The browser’s reload button exists to allow the user to get an updated version of the current page. In order to meet this goal, when you reload, browsers revalidate the page that you are currently on, even if that page hasn’t expired yet. However, they also go a step further and revalidate all sub-resources on the page — things like images and JavaScript files.
So even if you’ve set proper expires headers for resources, hitting that reload button (which people must do a ton at Facebook) still requires server round trips to revalidate assets (sometimes).
They worked with Chrome:
After fixing this, Chrome went from having 63% of its requests being conditional to 24% of them being conditional.
And Firefox:
Firefox implemented a proposal from one of our engineers to add a new cache-control header for some resources in order to tell the browser that this resource should never be revalidated.
So if you’re using URLs for assets that never change (if they change, they’ll be at a new URL) in Chrome you’ll benefit automatically, and in Firefox you should use their new header.
Top Games US ran “The Battle of Evony”, a Super Bowl commercial promoting the mobile game Evony: The King’s Return. George Washington (Aaron Eckhart), King Arthur (Jeffrey Dean Morgan) and Empress Wu Zetian (Fan Bingbing) are brought together from pivotal beginning points in Cornwall, Virginia and Shaanxi in an online two-minute cinematic film, their paths of alliance converging over time in an epic battlefield. The culminating battle was featured in a 30-second ad shown during the third quarter of the Super Bowl on Sunday, February 5th. Eleven additional ads will air later in the year, expanding the story line with forge and broken alliances.
“The Super Bowl is the ultimate test of today’s warriors, so it is a fitting place for us to showcase our free-to-play mobile game, Evony: The Kings Return” said Top Games CEO Lu Lu. “Having such spectacular talent literally leading the charge will help bring the game to life and drive interest.”
The campaign was directed by Henry Hobson of Furlined in stunning locations from New Zealand to Romania. “Being given the opportunity to pit historical figures against each other in a vast world is a hugely exhilarating and creatively rewarding experience,” says Hobson. “The world allowed me to shine a cinematic lens on both character and location, from battlefields to birthplaces, mountain tops to medieval villages. It brought all the areas I love to explore – character, performance, cinematic visuals, storytelling, tension, mood and intrigue – together.”
Battle of Evony King’s Return Credits
The Battle of Evony King’s Return campaign was developed at BSSP, San Francisco, by chief creative odficer John Butler, executive creative directors Keith Cartwright and Tom Coates, creative directors Mark Krajan, Chris Toffoli, associate creative directors Sinan Dagli and Luke Zehner, senior art director Lydia Dunay, senior copywriter Nick Zacher, director integrated production Vince Genovese, senior producer Lori Pisani, group account director Cristiano Alburitel, account supervisor Danielle Patipa, account executive Patrick Gregory, business affairs Nihad Peavler.
Filming was shot by director Henry Hobson via Furlined with president Diane Carter, executive producer Ben Davies, producer Aris McGarry and director of photography Alwin Kuchler, production designer Dominic Watkins, storyboard artist Mark Bristol, working with local production companies Goodoil Films and Icon Films.
Typography was by Me&theBootmaker.
Editor was Stewart Reeves at Work Editorial with assistant editor Josh Sasson, producer Lynne Mannino and executive producer Marlo Baird.
Visual effects were produced at Method Studios by VFX supervisor Ben Walsh, producer Mike Zavala, senior executive producer Stephanie Gilgar, CG supervisor Lee Carlton, compositing suprevisor Chris Bankoff, compositing lead Toma Bowen and VFX coordinator Kyle Leonard.
Top Games US ran “The Battle of Evony”, a Super Bowl commercial promoting the mobile game Evony: The King’s Return. George Washington (Aaron Eckhart), King Arthur (Jeffrey Dean Morgan) and Empress Wu Zetian (Fan Bingbing) are brought together from pivotal beginning points in Cornwall, Virginia and Shaanxi in an online two-minute cinematic film, their paths of alliance converging over time in an epic battlefield. The culminating battle was featured in a 30-second ad shown during the third quarter of the Super Bowl on Sunday, February 5th. Eleven additional ads will air later in the year, expanding the story line with forge and broken alliances.
“The Super Bowl is the ultimate test of today’s warriors, so it is a fitting place for us to showcase our free-to-play mobile game, Evony: The Kings Return” said Top Games CEO Lu Lu. “Having such spectacular talent literally leading the charge will help bring the game to life and drive interest.”
The campaign was directed by Henry Hobson of Furlined in stunning locations from New Zealand to Romania. “Being given the opportunity to pit historical figures against each other in a vast world is a hugely exhilarating and creatively rewarding experience,” says Hobson. “The world allowed me to shine a cinematic lens on both character and location, from battlefields to birthplaces, mountain tops to medieval villages. It brought all the areas I love to explore – character, performance, cinematic visuals, storytelling, tension, mood and intrigue – together.”
Battle of Evony King’s Return Credits
The Battle of Evony King’s Return campaign was developed at BSSP, San Francisco, by chief creative odficer John Butler, executive creative directors Keith Cartwright and Tom Coates, creative directors Mark Krajan, Chris Toffoli, associate creative directors Sinan Dagli and Luke Zehner, senior art director Lydia Dunay, senior copywriter Nick Zacher, director integrated production Vince Genovese, senior producer Lori Pisani, group account director Cristiano Alburitel, account supervisor Danielle Patipa, account executive Patrick Gregory, business affairs Nihad Peavler.
Filming was shot by director Henry Hobson via Furlined with president Diane Carter, executive producer Ben Davies, producer Aris McGarry and director of photography Alwin Kuchler, production designer Dominic Watkins, storyboard artist Mark Bristol, working with local production companies Goodoil Films and Icon Films.
Typography was by Me&theBootmaker.
Editor was Stewart Reeves at Work Editorial with assistant editor Josh Sasson, producer Lynne Mannino and executive producer Marlo Baird.
Visual effects were produced at Method Studios by VFX supervisor Ben Walsh, producer Mike Zavala, senior executive producer Stephanie Gilgar, CG supervisor Lee Carlton, compositing suprevisor Chris Bankoff, compositing lead Toma Bowen and VFX coordinator Kyle Leonard.
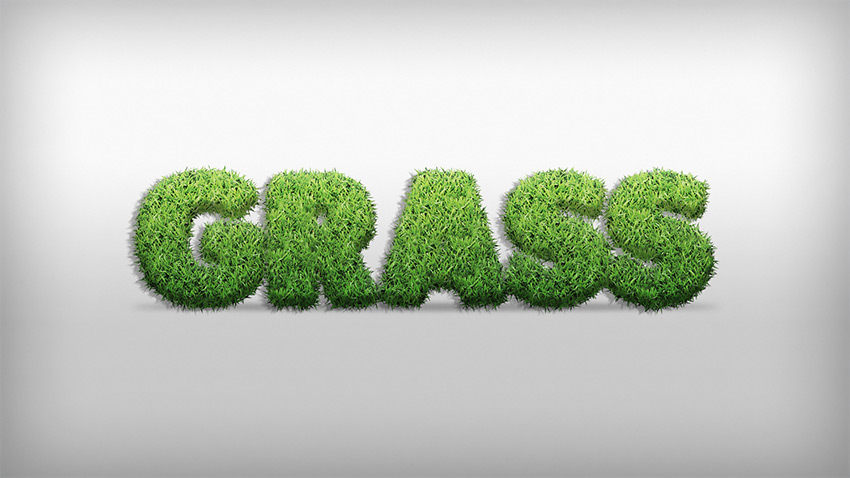
In this tutorial I will show you how to create a grass action in Adobe Photoshop using two brushes, and a layer style with a grass pattern. At the end of the tutorial you will have an action that lets you perform almost the entire process with a single click.
If you’d like to skip this tutorial but still wish to buy the action, you can head over to GraphicRiver and buy Grass Generator. The complete action has additional features, it works with 72 dpi and 300 dpi, and it also works with shapes.
Open Photoshop and create a new 350 x 460 px document.
Step 2
Press D on your keyboard to reset the ForegroundandBackground colors. Then pick the Ellipse Tool (U), and change its mode to shape.
Step 3
Start by drawing a long and thin oval shape.
Step 4
Now pick the Convert Point Tool and Control-Click on the center of the shape.
Step 5
Now click on the anchor point at the top to make it pointy. Do the same thing on the anchor point at the bottom.
Step 6
Control-Click on the thumbnail of the Ellipse 1 layer to create a selection around the shape. Then go to Edit > Define Brush Preset…, name it Base Brush and click OK.
Step 7
Pick the Brush Tool (B), and then Right-Click on the document and select the brush that we just created (Base Brush).
Step 8
Go to Window > Brush to open the Brush panel. Then set these settings in Brush Tip Shape:
Size: 27 px
Flip X: Unchecked
Flip Y: Unchecked
Angle: 0º
Roundness: 100%
Spacing: 130%
Step 9
Select Shape Dynamics with these settings:
Size Jitter: 32%
Control: Off
Minimum Diameter: 7%
Angle Jitter: 35%
Control: Off
Roundness Jitter: 26%
Control: Off
Minimum Roundness: 100%
Flip X Jitter: Unchecked
Flip Y Jitter: Unchecked
Brush Projection: Unchecked
Step 10
Select Scattering with these settings:
Scatter: 62%
Both Axes: Unchecked
Control: Off
Count: 5
Count Jitter: 100%
Control: Off
Step 11
Select Color Dynamics with these settings:
Apply Per Tip: Checked
Foreground/Background Jitter: 100%
Control: Off
Hue Jitter: 2%
Saturation Jitter: 13%
Brightness Jitter: 11%
Purity: -1%
Color Dynamics makes no difference to the final result of this tutorial, but it’s important if you want to use the brush with other things.
Step 12
Now click on the icon in the top right corner of the Brush panel and choose New Brush Preset. Then name it Grass Brush 1 and check the Capture Brush Size in Preset box. After that, click OK.
Step 13
Now let’s create a new preset. Go back to Brush Tip Shape in the Brush panel and make these changes:
Size: 18 px
Flip X: Unchecked
Flip Y: Unchecked
Angle: 0º
Roundness: 100%
Spacing: 339%
Step 14
Don’t change the Shape Dynamics settings; just leave it selected. Then select Scattering and make these changes:
Scatter: 50%
Both Axes: Unchecked
Control: Off
Count: 8
Count Jitter: 0%
Control: Off
Step 15
Leave Color Dynamics selected and save the preset as before, but this time name it Grass Brush 2.
2. How to Create the Text and Install the Pattern
Step 1
Go to File > Open…, and open the background that you downloaded (Background-Grass.jpg).
Step 2
Pick the Type Tool (T) and write „GRASS”. Choose the Plump font, and then set the Size to 300 pt.
Step 3
Go to Edit > Presets > Preset Manager. In the Preset Type, select Patterns, click load…, and choose Grass Pattern.pat. After that, click Done.
3. How to Create the Action
Step 1
Go to Window > Actions to open the Actions panel.
Step 2
Let’s create a new set of actions. To do so, click the Create New Set icon, name it Grass Set, and click OK.
Step 3
Click the Create New Action icon, name it Grass Text, and click Record.
From this point on, everything you do will be recorded, so keep an eye on the Actions panel. If you make a mistake, click the Stop Playing/Recording icon, and delete the unnecessary step from the action Grass Text. Then click the Begin Recording icon to continue.
Step 4
With the text layer selected, go to Layer > Rename Layer… and rename it 1.
Step 5
Create a new layer by clicking on the Create a New Layer icon, name it Grass 1, and click OK.
Step 6
Select the layer 1 and go to Type > Create Work Path.
Step 7
Now select the layer Grass 1. Then pick the Brush Tool (B) and select the Grass Brush 1 with these settings.
Mode: Normal
Opacity: 100%
Flow: 100%
Pen Related Options: Unchecked
Step 8
Go to Window > Paths to open the Paths panel. Then right-click the Work Path and choose Stroke Path. Choose Brush with Simulate Pressureunchecked, and then click OK.
Step 9
Select layer 1. Then create a new layer and name it Grass 2.
Step 10
Now pick the Brush Tool (B) with these settings:
Brush: Grass Brush 2
Mode: Normal
Opacity: 100%
Flow: 100%
Pen Related Options: Unchecked
Step 11
Go back to the Paths panel. Right-click the Work Path and choose Stroke Path. Just like before, choose Brush with Simulate Pressure unchecked, and then click OK. After that, delete the Work Path.
Step 12
Now select the layer 1 again. Then hold down the Shift key and click on the layer Grass 1 to select all layers (except the Background layer).
Step 13
Right-click on the layer Grass 1 and choose Convert to Smart Object.
Step 14
Now double-click on the layer Grass 1 to open the Layer Style window. Let’s start with Bevel & Emboss:
Style: Inner Bevel
Technique: Smooth
Depth: 100%
Direction: Up
Size: 26 px
Soften: 0%
Use Global Light: Unchecked
Angle: 90º
Altitude: 30º
Gloss Contour: Linear
Anti-Aliased: Unchecked
Highlight Mode: Screen
Highlight Mode Color:#ffffff
Highlight Mode Opacity: 16%
Shadow Mode: Multiply
Shadow Mode Color: #000000
Shadow Mode Opacity: 30%
Step 15
Add an Inner Shadow with these settings:
Blend Mode: Multiply
Color: #000000
Opacity: 22%
Use Global Light: Unchecked
Angle: -90º
Distance: 14 px
Choke: 16%
Size: 4 px
Contour: Linear
Anti-aliased: Unchecked
Noise: 0%
Step 16
Add a Gradient Overlay with these settings:
Blend Mode: Overlay
Dither: Unchecked
Opacity: 46%
Reverse: Unchecked
Style: Linear
Align with Layer: Checked
Angle: 90º
Scale: 89%
Click on the Gradient Bar and make a gradient with these settings:
First Stop Color: #000000
First Stop Position: 0%
Second Stop Color:#FFFB9C
Second Stop Position: 100%
Step 17
Add a Pattern Overlay with these settings:
Blend Mode: Normal
Opacity: 100%
Pattern: Choose the Grass Pattern that you installed at the beginning of the tutorial.
Scale: 25%
Link with Layer: Checked
Step 18
Add a Drop Shadow with these settings:
Blend Mode: Multiply
Color: #000000
Opacity: 31%
Use Global Light: Unchecked
Angle: 23º
Distance: 12 px
Spread: 0%
Size: 1 px
Contour: Linear
Anti-Aliased: Unchecked
Noise: 0%
Layer Knocks Out Drop Shadow: Checked
After that, click OK.
Step 19
Rename the layer Grass 1 to Grass Text. After that, click on the Stop Playing/Recording icon in the Actions panel.
And the result is:
Congratulations, You’re Now Done!
In this tutorial, you learned how to create a grass action in Adobe Photoshop.
We started out by creating our brushes, then we created the text, and while recording an action, we added a border to it using the brushes and a Path, then finally a Layer Style to make it look like grass.
Things to Remember Before Playing the Action:
Make sure that you have installed the Pattern.
Make sure that the Brush Opacity and Flow are set to 100%.
Make sure that you are playing the action with the text layer selected.
To play it, you need to select the action Grass Text and click Play on the Actions panel. I hope you have enjoyed this tutorial, and feel free to leave your comments below. This action we just created is part of Grass Generator.
There are some values available in CSS that allow shapes to be drawn. For example, there is a circle() function that is a valid value for a couple of CSS properties. „Drawn” might not be the right word, though. It’s not like in SVG where you can create a <circle> element and it will literally draw a circle.
These shapes in CSS are for other things. Namely: clip-path, which is for making clipping masks, and shape-outside, for flowing text around shapes.
There are some other CSS properties that use SVG-like shapes for doing what they do. For example, offset-path is part of animating elements along vector paths, using the path() function. Paths are awesome. They are the ultimate drawing element, as they can draw anything, and all the other shapes are essentially syntactic sugar for paths.
But let’s say you want to clip the avatar like this:
Well, you can’t. Not directly in CSS anyway. Those curves require a path, and clip-path don’t do path. Fortunatly, clip-path does take a url(), which will accept the ID of a <clipPath> element.
But what if you want to move the element in a circle? The basic shape version of a circle has a super easy syntax, like circle(50% at 50% 50%); But unfortunately, the basic shapes aren’t supported. The spec allows for them, but they don’t work. It kinda makes sense, because… how would you define which direction to travel?
You can still animate in a circle, because the all-powerful path can draw a circle, like:
.move-me {
  /* a circle */
  offset-path: path("M100,50a50,50,0,1,1-50-50A50,50,0,0,1,100,50Z");
  animation: move 3s linear infinite;
}
@keyframes move {
  100% { motion-offset: 100%;}
}
And those commands dictate a direction naturally. There are also other ways to animate in a circle.
shape-outside allows Basic Shapes (but not path())
Say you wanted to wrap some text around an egg shape, because I dunno, you were setting some text of Alice talking to Humpty Dumpty. The egg shape is a good excuse to use the ellipse() Basic Shape.
<div class="page-wrap">
  <div class="egg"></div>
  <p>"I don't know what you mean by 'glory,'" Alice said.</p>
  <p>Humpty Dumpty smiled contemptuously. "Of course you don't—till I tell you. I meant 'there's a nice knock-down argument for you!'"</p>

 ...
But what if you wanted to make some text wrap around a curved shape, like shown here in Illustrator:
Text Wrap in Adobe Illustrator
Unfortunately, shape-outside doesn’t take path(), so you can’t. But you kinda can. It does take url(), in which you can use to link to an image (doesn’t even have to be SVG, but SVG makes good sense). The image can have a nice curvy path, like we’re shooting for:
The url() can even be a data URL. Also note that any element using shape-outside must be floated, a limitation that might be resolved with CSS Exclusions.
<path> takes path()
Here’s one that starts out making logical sense. Say you have a path:
<svg>
 <path d=" ... " />
</svg>
You can change the shape of that path through CSS, say through a hover:
There isn’t a way, that I know of. Which seems weird as polygon is otherwise supported all over the place. I imagine part of problem is that the polygon() function is different from the points attribute. The polygon() function takes percentages and numbers with units in CSS, whereas the points attribute takes unitless numbers (like everything in SVG). They are different beasts, and that overlap is awkward.
It’s also not that SVG shapes that overlap with Basic Shapes can’t be altered. All of <circle>’s attributes, for example, can be altered with CSS:
If you’re into retro flower illustrations, this tutorial will definitely
catch your attention.
Today we’ll create a vintage frame by using basic
shapes, the Warp Tool, and a Scatter Brush. You will learn how to create pansies and the laced doily. In the end, you’ll get a
very romantic illustration!
Have you ever had a chance to visit GraphicRiver? I love their collection of pansies—they are adorable.
1. How to Create the Pansy Flower
Step 1
After creating a NewDocument850 x 850 px Width and Height, we will start by drawing the petals for our pansy.
First, we’ll draw an ellipse and then stretch it out as if you were stretching out a piece of pizza dough. Use
the Ellipse Tool (L) to make an ellipse. On the Tools panel (Window
> Tools), double-click on the Warp Tool (Shift-R).
In the new
dialogue window, enter the options presented below. The Width and Height on the Global Brush Dimensions can be different from the ones I used. It
depends on the petal size for the one you’re making. Then, click OK.
Once
you’ve entered the necessary options, grab the Warp Tool (Shift-R) and
pull the mouse in different directions, as shown by the arrows in the
image below.
Step 2
Add another darker ellipse on top of the shape you’ve created. Change the
options for the Warp Tool: double-click on the Warp Tool (Shift-R and
Enter), and in the section for Global Brush Dimension, decrease the Width and Height values. Then, hit OK. Now, by using the Warp Tool (Shift-R),
stretch this darker ellipse to create the shadow on the petal.
Step 3
Let’s continue. Create a violet ellipse and stretch it out again with
the Warp Tool (Shift-R). Don’t worry—it may look weird now, but once we
put everything together, it’ll be cute. Just you wait!
Step 4
Select all details of the petal and group them together
(right-click > Group). Make two more copies of the petal (Control-C,
Control-V) and arrange them as shown below.
Step 5
To create the fourth petal, make a copy of the first one, and then slightly
expand its size and rotate it to the right. Change the colors of this
petal as shown in the image below.
The fifth petal peeps shyly from behind, so we’ll place it behind and slightly tilted to the left. This one will have the darkest color.
Step 6
In the middle of the flower, create two yellow circles (Ellipse Tool
(L)) and stretch them with the Warp Tool (Shift-R) to make the pistil
and stamens for our pansy. Keep up the good work!
2. How to Create the Leaf
Step 1
This process will be very similar to the way we created the petals.
We’ll start with the Ellipse Tool (L) and draw two ellipses, and then
stretch out both ellipses in different directions by using the Warp Tool
(Shift-R).
When transforming the smaller, darker ellipse, change the Width and Height in the Warp Tool options (double-click on the Warp Tool and
set the necessary values). Using the changed Warp Options (Shift-R),
warp the smaller ellipse to create a leaf-like shape.
Step 2
In this step, we will add the veins of the leaf.
Using the Pencil Tool (N), draw a bunch of veins throughout the leaf.
Remember to remove the fill color and choose a dark green stroke color.
Before drawing, be sure to check the Round Cap button on the Stroke panel.
When you are done with the lines, expand them. Select
one vein and press Select > Same > Fill color. This will select
all the lines you just outlined. Now go to Object > Expand and hit
OK.
Keeping all veins selected, unite them by pressing the Unite button
on the Pathfinder panel (Window > Pathfinder). Still keeping them
selected, make a small touch with the Warp Tool (Shift-R). The veins
will now look more realistic.
Step 3
Make another copy of this leaf. You can make a mirror reflection of the
existing one. While keeping the leaf selected, right-click your mouse
and select Transform > Reflect.
Once you get a dialogue box, select Axis Vertical, Angle 90 degrees, and press Copy. Make this copy slightly
smaller. If you want more changes, you can stretch the new one with the Warp Tool (Shift-R) (optional).
3. How to Create the Background
Step 1
Let’s make a light cream square for our background. Using the Rectangle
Tool (M), click on the artboard and create a square 850 x 850 px with no
stroke and the fill color presented below.
Step 2
Draw a circle with the Ellipse Tool (L) while holding the Shift button.
Place this circle in the middle of the square. To do this, open the Align panel (Window > Align). Set the alignment to Artboard (open the
fly-out menu and go to Show Options if you don’t see the Align To section shown here), make sure that your shapes are selected, and click
the HorizontalAlign Center and Vertical Align Center buttons. In the
end, your circle should be in the middle of the square.
Using the same method, align the square.
Step 3
In this step, we’ll create a Scatter brush that we can use to make our
doily. Delete the fill color and set the stroke color of your choice.
Using
the Ellipse Tool (L), hold down the Shift key to make one circle with
relatively large stroke weight and no fill. On top of this circle, add a
smaller one with a thinner stroke weight.
To make a copy of the
smaller circle, select it, and then while holding the Shift and Alt keys,
drag it down. Select these two small circles and group them: right-click > Group.
While keeping them selected, press the Rotate
Tool (R) and the Enter key. In the pop-up window, enter 45 degrees and hit Copy. Press Control-D and you’ll get a copy of these circles rotated in 45-degree increments.
Continue pressing Control-D until you get the whole flower
made from small circles and one large circle in the middle. Expand this
image: select all circles and go to Object > Expand.
Step 4
After expanding the image, the stroke color will automatically change to
the fill color. Change this fill color to white and drag the entire set
of circles to the Brushes panel. Select the Scatter Brush and enter the options for Scatter Brush presented below.
Step 5
Now we will use this brush to design our doily. Select the white circle
in the middle of the artboard which you created before, and hit the
newly created brush. Tadaa—you just made a doily! You can also change
the stroke Weight on the Stroke panel if you’d like to adjust the size
of the side lace ornaments.
4. Place All the Elements Together
Step 1
Now return to your pansy. Make two more copies of it and arrange them together; feel free to change the size.
Step 2
Let’s not forget our leaves! Make as many copies of the leaves as you want
and place them behind the flowers, but over the background. Congratulations!
You’re done!
Awesome Work, You’re Done!
A round of applause for a job well done! I hope you enjoyed learning
some of the processes and shortcuts during the creation of this image in
the Adobe Illustrator. As always, feel free to share your project and
ask questions in the comments section below. Happy designing!
Using metal or similar materials for a graphic design project can really produce a stunning end result. I’ve compiled a collection of 21 designs forged by metal; ranging from bionic arms, to metal hearts, to iron typography, to a river of flowing metal.
BUT FIRST, here’s 10 mind blowing facts about metal:
The word ‘metal’ derives from the Greek word ‘metallon,’ which means to mine, excavate or extract from the ground.
75% of all the elements on the periodic table are metals.
At room temperature, all of the metals are solids except for mercury, which is a liquid.
The most common metal found in the Earth’s crust is aluminum.
Even though aluminum is abundant in the crust, the most abundant element in the entire Earth is iron, which makes up a large part of the Earth’s core.
Alkali metals, such as lithium, sodium, potassium, and rubidium, are so reactive they will ignite and even explode if placed in water.
Noble metals, such as silver, gold, and platinum, resist oxidation and corrosion in moist air.
Metals are elastic or tend to bend rather than break.
Gold was discovered in 6000 BC.
Copper even before that, being discovered in 9000 BC.
Post pobrano z: Design deals for the week Every week, we’ll give you an overview of the best deals for designers, make sure you don’t miss any by subscribing to our deals feed. You can also follow the recently launched website Type Deals if you are looking for free fonts or font deals. 4 Contemporary Font Families from Typesketchbook Make some room in your family because this […]
Agregator najlepszych postów o designie, webdesignie, cssie i Internecie