Post pobrano z: Design an innovative kitchen with different types of countertops
Kitchen cabinets and countertops add a glamourous look to any kitchen. So, if you are a new homeowner, you can easily utilize the options of cabinets as well as other innovative items to make your kitchen look modern and different from others. In order to design and decorate your kitchen well, you need to know […]
Archiwum miesiąca: luty 2017
All that we share on TV2 in Denmark
Post pobrano z: All that we share on TV2 in Denmark
TV2 in Denmark has launched “Alt Det Vi Deler” (All that we share), a commercial featuring 80 Danes from all walks of life, a challenge to growing attitudes of discrimination on the grounds of ethnicity in Denmark and across the world. The participants were given 40 questions to consider before filming. Throughout the shoot they were invited to cluster according to their responses. There was no requirement that they stick to their answers on the day of filming. The film was released on the same day that President Trump issued his executive order, “Protecting the Nation From Foreign Terrorist Entry Into The United States”. The commercial celebrates the concept of a tolerant and connected society in Denmark.

All that we share Transcript
It’s easy to put people in boxes. There’s us. And there’s them. The high earners. And those just getting by. Those we trust. And those we avoid. There’s the new Danes. And those who have always been here. The people from the countryside. And those who have never seen a cow. The religious. And the confident. There are those we share something with. And those we don’t share something with.
Welcome. I am going to ask you some questions today. Some might be a bit personal – but I hope you will answer them honestly. Who in this room was the class clown? Who are step parents? And then there’s suddenly us. We who believe in life after death. We who have seen a UFO. And all of us who love to dance. We who have been bullied. And we who have bullied others. And then there’s us who had sex this past week. We who are brokenhearted. We who are madly in love. We who feel lonely. We who are bisexual. And we who acknowledge the courage of others. We who have found the meaning of life. And those of us who have saved a life. And then there’s all of us who just love Denmark. So maybe there’s more that brings us together than we think. TV2Danmark All that we share.

All That We Share Credits
The TV2 All That We Share campaign was developed at &Co, Copenhagen.
Filming was shot by director Asger Leth via Moland Film.
Music, “Heartfelt Universe” by Michael Sajic, was licensed through Upright Music and Bibliotheque Music.
Art is Theft
Post pobrano z: Art is Theft

How to Create a Dragon Landscape Photo Manipulation With Adobe Photoshop
Post pobrano z: How to Create a Dragon Landscape Photo Manipulation With Adobe Photoshop

In this tutorial I’ll show you how to use Adobe Photoshop to create a mountainous landscape with flying dragons.
First we’ll build the misty background using three stock images. After that we’ll import the rocks and clone over them using the rock texture. Later we’ll add the towers and dragons and blend them together using adjustment layers, masking, dodge/burn, and brushes. We’ll also create a misty atmosphere using the sky image. Finally we’ll make several adjustment layers to complete the final effect.
Tutorial Assets
The following assets were used during the production of this tutorial:
1. How to Build the Misty Background
Step 1
Create a new 2000 x 798 px document in Adobe Photoshop with the given settings:

Step 2
Open the sky image. Drag this image into the white canvas using the Move Tool (V).

Step 3
Import the misty mountains image 1 and add it to the left of the canvas.

Click the second icon at the bottom of the Layers panel to add a mask to
this layer. Use a soft round brush with black color (soft black brush)
to remove the hard edges of the image.

Step 4
Duplicate
this layer and move it to the right edge of the canvas. Use a layer
mask with a soft black brush to blend it with the first layer.

Step 5
Select the mountain layers and press Control-G to make a group for them.
Change this group mode to Normal 100%. Go to Layer > New Adjustment
Layer > Curves and decrease the lightness.

Step 6
Use a Hue/Saturation adjustment layer and bring the Saturation value down to -82:

Step 7
Add the mountains 2 image and lower the Opacity to 30%:

Add a mask to this layer and use a soft black brush to remove the sky of this mountain image and make it blend more smoothly with the existing background.

Step 8
Create a Hue/Saturation adjustment layer and set it as Clipping Mask. Change the Saturation value to -85:

Step 9
Use
a Curves adjustment layer to darken the mountains a bit. These
mountains are nearer to the foreground so they should be hazier than the
ones farther away.

2. How to Add the Rocks
Step 1
Open the rocks 1 image and isolate the rocks from the background. Add two rocks to the left side and another to the middle. We’re aiming to create the light in the top middle, so arrange the rocks to fit this source.

Step 2
Create a new layer above the small rock on the left (behind the big
rock). Load the selection of the big rock on the left by clicking its
thumbnail layer while holding Control:

Press Control-C to copy the rock selection and then select the clipped
layer above the small rock one. Hit Control-V to paste the selection
into it. Now the small rock has similar textures to the big rock. Use a
layer mask with a lowered opacity brush to paint over the top so it appears slightly different from the original.

Step 3
Create a Color Fill layer for the small rock and pick the color #787a7a.
Lower the Opacity of this layer to 50%. We’re aiming to make this rock in the
mist area so it should be less visible.

Step 4
Create a new layer, change the mode to Overlay 100%, and fill it with 50% gray.

Select the Dodge and Burn Tool (O) with Midtones Range, Exposure about
15-20% to paint more details and enhance the light/shadow of the rock.
You can see how I did it with Normal mode and the result with Overlay
mode.

Step 5
Create a Curves adjustment layer above the middle rock to darken it,
especially the right. On this layer mask, use a soft black brush to
erase the left where it gets light from the sky.

Step 6
Make a group for all the rock layers. Create a Hue/Saturation adjustment layer and set the Saturation value to minimum (-100).

Step 7
Use a Color Balance adjustment layer and change the Midtones settings:

Step 8
Add a Curves adjustment layer and reduce the lightness. On this layer
mask, use a soft black brush to lower the effect of this adjustment
layer on the bright details of the rocks, especially the big rock and
the middle one.

Step 9
Open the rock 2 image. Select the bigger rock on the left and place it on the right side of our main canvas.

Step 10
Add the texture of the rock 1 to the rock 2 using the same techniques
as in step 2. Flip it horizontally by choosing Edit > Transform
> Flip Horizontal:

Step 11
Create a new layer and activate the Clone Tool (S) to fill the missing
areas of the rock 2 using the existing texture. Try to clone the
bright details over the front of the rock to fit the light source.

Step 12
Add a Hue/Saturation adjustment and bring the Saturation value down to -78:

Step 13
Use a Color Balance adjustment layer and change the Midtones values:

Step 14
Make a Curves adjustment layer to darken the rock. Paint on the bright details on the top of the rock to keep their lightness.

Step 15
Create a new layer, change the mode to Overlay 100% and fill with 50%
gray. Use the Dodge and Burn Tool to refine the light and shadow on the
rock.

3. How to Import the Towers
Step 1
Open the towers 1 image. Cut out the towers and place them above the big
rock on the left. You can duplicate and resize the towers and place them at different distances and positions.

Add a mask to each of these layers and use a soft black brush to blend their bottom with the top of the rock.

Step 2
Make a group for these towers and use a Hue/Saturation adjustment layer to desaturate them.

Step 3
Create a Color Balance adjustment layer and change the Midtones settings:

Step 4
Make a Curves adjustment layer to darken the hidden side of the towers (the left). Paint on the right to keep their lightness.

Step 5
Use another Curves adjustment layer to increase the light on the right
of the tower. The selected areas show where to paint on the layer mask.

Step 6
Place the tower 2 above the middle rock after isolating it from the
background and blend its bottom with the rock using a layer mask.

Step 7
Use a Hue/Saturation adjustment layer and reduce the Saturation value to -81:

Step 8
Make a Color Balance adjustment layer and alter the Midtones settings:

Step 9
Create a Curves adjustment layer and decrease the lightness. Paint on the left side, which is exposed under the light.

Step 10
Make a new layer, change the mode to Overlay 100% and fill with 50%
gray. Use the Dodge and Burn Tool to enhance the details, especially the
light/shadow of the tower.

Step 11
Use a Color Fill layer and pick the color #4b4c4c. Lower the Opacity of this layer to 40% to give it a hazy effect.

4. How to Add the Dragons
Step 1
Cut
out the dragons from the background and add the dragon 1 to the top
left and the second to the top of the right rock. Make the first much
bigger and the second much smaller.

Step 2
Select
the wing of the dragon 1 using the Lasso Tool (L) and place it in the
lower part of the space between the middle and the right rocks.

Step 3
To create some depth for the scene, on the dragon 1 layer, go to Filter > Blur > Gaussian Blur and set the Radius to 8 px:

Apply a Gaussian Blur of 12 px to the dragon’s wing as it’s nearer the foreground than the dragon 1.

Step 4
Create a new layer above the dragon 2 layer, change the mode to Overlay
100%, and fill with 50% gray. Use the Dodge and Burn Tool to refine the
details on this dragon.

Step 5
Make a group for the dragons and use a Hue/Saturation adjustment layer to desaturate the dragons’ color.

Step 6
Add a Color Balance adjustment layer and change the Midtones values:

Step 7
Create a Curves adjustment layer to darken the dragons. Paint on the outer details to keep them still bright.

Step 8
Use another Curves adjustment layer to increase the light on the outer details. Paint on the rest to keep them still in shade.

5. How to Create the Mist
Step 1
Duplicate the sky layer and move it on top of the layers. Use the Free
Transform Tool (Control-T) to reduce its size and place it between the
middle and the left rocks.

Use a layer mask to reduce the mist intensity and clear the hard edges.

Step 2
Duplicate the sky layer several times and move the copies around the space
between the rocks. Apply a layer mask to each of these layers. Don’t overdo it as it would look unnatural.

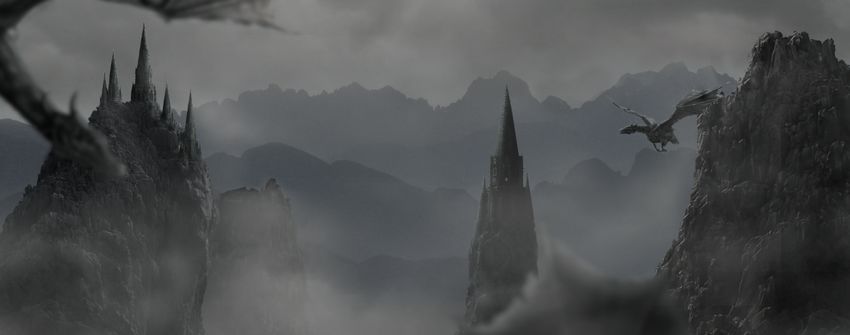
Step 3
Make a group for the sky layers and use a Curves adjustment layer to
decrease the visibility of the mist, making it appear more subtle.

6. How to Make the Final Adjustments
Step 1
Create a Photo Filter adjustment layer on top of the layers and pick the color #7da4fe.

Step 2
Make another Photo Filter adjustment layer and pick the color #00ecb7.

Step 3
Create a Curves adjustment layer and increase the lightness a bit. Paint
on the lower edges and sides to make the light visible only on the top
middle.

Step 4
Use another Curves adjustment layer to change the color and contrast of the whole scene.

Step 5
Make a Vibrance adjustment layer to enhance the final effect.

Congratulations, You’re Done!
I hope that you’ve enjoyed my tutorial and learned something new. Feel
free to share your ideas or comments in the box below—I’d love to see
them. Enjoy Photoshopping!


Pogo Rebrand
Post pobrano z: Pogo Rebrand

Intro to Vue.js: Vue-cli and Lifecycle Hooks
Post pobrano z: Intro to Vue.js: Vue-cli and Lifecycle Hooks
This is the third part in a five part series about the JavaScript framework, Vue.js. We’ll cover Vue-cli, and talk a little more about real-life development processes.
This is not intended to be a complete guide, but rather an overview of the basics to get you up and running so you can get to know Vue.js and understand what the framework has to offer.

Article Series:
- Rendering, Directives, and Events
- Components, Props, and Slots
- Vue-cli (You are here!)
- Vuex (Coming soon!)
- Animations (Coming soon!)
Vue-cli and build processes
If you haven’t yet read the last section on Vue.js components and props, I highly suggest you do so before reading this section, otherwise, some things we’ll cover will lack context.
Vue offers a really nice cli that gets you up and running with your choice of a few build tools, and really nice simple starter boilerplate. It’s a lovely tool. Before installing vue-cli, you might want to check that your versions of node, and npm or yarn are up-to-date. You’d first want to install vue-cli (the -g helps you install it globally)
$ npm install -g vue-cli
There are many builds available to you, but in our example, we’ll use webpack:
$ vue init webpack <project-name>
You can go through the commands that the output will give you, which will help you cd into the directory, install everything, set up your `package.json` file, and then finally serve up a local dev server at localhost:8080 with the command:
$ npm run dev
You’re up and running! I love that the setup is so clean. You’ll start off with an App file in your `/src/` directory with a `Hello.vue` file in the `/components/` directory. This is really nice because you can see already how you’d set up these files, and how imports and exports might work.
Let’s go over this new `.vue` file extension for a moment, because if you haven’t worked with vue, you won’t have come across it before.
In your `.vue` file, you can place everything you need for your component. We no longer have to wrap our templates in <script type="text/x-template">, now we’ll more semantically create files that follow this logic:
<template>
  <div>
     <!-- Write your HTML with Vue in here -->
  </div>
</template>

<script>
  export default {
     // Write your Vue component logic here
  }
</script>

<style scoped>
  /* Write your styles for the component in here */
</style>
I’ve made a repo of Vue snippets for Sublime Text to quickly spin up boilerplate like this for `.vue` files (this is what the snippet vbase would output). There’s also this one for atom, (though it specifies version 1+, and Vue is at v2), and this for vscode.
A few things to note here: just like in React, you have to return exactly one enclosing tag, here I’ve used a div. I’ve also used <g> elements in SVG. It can be anything, but the entire template must be wrapped in the one tag.
You’ll see that we’ll use export default here to write our scripts such as the data function or methods we used previously, but if we were to use components as children in this `.vue` document, we would also have to import them (more on this in a minute).
You can also see that we have a special scoped value on the style tag. This allows us to very easily scope the styles for this component to only this component. We could also use just <style> and it would create styles for the whole application. I typically like to create a base stylesheet for the whole application with common styles like fonts and line-heights, which I’ll @import into the <style> tag of the App.vue file with the help of vue-style-loader. I’ll then use the <style scoped> tag for very particular styles for the template when it calls for it, but really to each their own on this one! The nice thing is that Vue-cli lets you decide how to organize it, and you don’t have to add any other dependencies or modules to scope our styles this way. *heart eyes*.
We spoke briefly about slots before, when we use slots in Vue components with the scoped style tags, they apply to the component that has the slots. This is so helpful, because you can switch out components and change the appearance out very easily. *heartier eyes*
I have to say that in terms of development workflow, working within each particular `.vue` file for my HTML, styles, and JS has been extraordinarily helpful. I love that things are separated enough to see each piece clearly, yet close enough together that I’m not context-shifting. It speeds up my development, and I’ve noticed that markup stays pretty semantic.
You also might notice that your syntax highlighter doesn’t automatically recognize `.vue` files, so I’ve installed this for Sublime Text.
Here is the most basic way of importing/exporting components into a file (vimport:c in vue-sublime snippets)
import New from './components/New.vue';

export default {
  components: {
    appNew: New
  }
}
For more of a real-life example, let’s look at a sample of that last wine-label demo we used, with the components separated out into their own templates:
App.vue:
<template>
  <div class="container">

  <main>
      <component :is="selected">
        <svg class="winebottle" aria-labelledby="title" xmlns="http://www.w3.org/2000/svg" viewBox="0 155 140 300">
          ...
      </svg>
      </component>
    </main>

    <aside>
      <h4>Name your Wine</h4>
      <input v-model="label" maxlength="18">
      <div class="button-row">
        <h4>Color</h4>
        <button @click="selected ='appBlack', labelColor = '#000000'">Black Label</button>
        <button @click="selected ='appWhite', labelColor = '#ffffff'">White Label</button>
        <input type="color" v-model="labelColor" defaultValue="#ff0000">
      </div>
    </aside>

  </div>
</template>

<script>
  import Black from './components/Black.vue'
  import White from './components/White.vue'
  ...
  export default {
      data: function () {
        return {
          selected: 'appBlack',
          label: 'Label Name',
          ...
        };
      },
      components: {
          appBlack: Black,
          appWhite: White,
          ...
      }
  }
</script>

<style>
  @import "./assets/style.css";
</style>
Black Component:
<template>
  <div>
    <slot></slot>
  </div>
</template>

<style scoped>
  .label {
    fill: black;
  }
  .bottle, .wine-text {
    fill: white;
  }
  .flor {
    fill: #ccc;
  }
  .bkimg {
    filter:url(#inverse)
  }
</style>
Note that I’m using the component here to style each slot differently, that’s a really nice way of working, but it’s only one way. There are endless ways you can compose your application with components, slots, and props. The code here also only shows a piece of what’s happening. I’ve made a repo for you to explore, having used Vue-cli from the start to construct this. I highly recommend using Vue-cli in tandem with reading this and building out some components and passing state with props in a simple manner, just to get accustomed to the workflow. It’s very intuitive and quick once you get past the initial setup!
Lifecycle Hooks
Before we talk about lifecycle hooks, we need to backtrack a little and talk about the virtual DOM I mentioned in the first article. I noted that Vue.js has a virtual DOM, but not really what it does.
When you work with something like jQuery, in essence you’re listening to the DOM, and changing things based on those updates. We end up spending a lot of time checking what the DOM is up to, and storing state there. In contrast, a virtual DOM is an abstract representation of a DOM, sort of like a copy, but in this case it will be our master copy. When we work with state the way we have been with Vue in these articles, we’re creating the state ourselves, and then observing when the state changes.
When a Vue instance updates, Vue will check to see if it’s different from what we had previously. If it is indeed different, it will call some of these lifecycle methods, and patch the actual DOM with changes. This is for efficiency, this way the DOM is only updating what it absolutely needs to.
The lifecycle hooks provide you a method so that you might trigger something precisely at different junctures of a component’s lifecycle. Components are mounted when we instantiate them, and in turn unmounted, for instance when we toggle them in a v-if/v-else statement.
Some of the hooks available to you are: beforeCreate, created, beforeMount, mounted, beforeUpdate, updated, activated, deactivated, beforeDestroy, and destroyed. The API docs do a good job of describing each if you’d like to dig in further. Here’s a small demo to show how some of them work (check the console):
const Child = {
  template: '#childarea',
  beforeCreate() {
    console.log("beforeCreate!");
  },
 ...
};

new Vue({
  el: '#app',
  data() {
    return {
      isShowing: false
    }
  },
  methods: {
    toggleShow() {
      this.isShowing = !this.isShowing;
    }
  },
  components: {
    appChild: Child
  }
});
<div v-if="isShowing">
<app-child></app-child>
</div>See the Pen by Sarah Dransner.

Note that we use v-if here instead of v-show, as v-if will actually mount and unmount the component, while v-show will only toggle visibility (but it will remain mounted and stay in the DOM). Similarly, <keep-alive></keep-alive> will not be mounted or unmounted, but rather become activated and deactivated- as the component remains mounted, but is not in use.
Just as the methods available on the component bind this automatically, lifecycle hooks also auto-bind to the instance so that you can use the component’s state, and methods. Again, you don’t have to console.log to find out what this refers to! *heartiest eyes* For this reason though, you shouldn’t use an arrow function on a lifecycle method, as it will return the parent instead of giving you nice binding out of the box.
In the following I’m moving a ton of elements when each component is initially mounted, so I’ll use the mounted hook to trigger the corresponding animation for each component. You may have to hit the rerun button in the bottom left corner to see the starting animation.
See the Pen Vue Weather Notifier by Sarah Drasner (@sdras) on CodePen.
 mounted() {
    let audio = new Audio('https://s3-us-west-2.amazonaws.com/s.cdpn.io/28963/rain.mp3'),
        tl = new TimelineMax();

    audio.play();
    tl.add("drops");

    //drops in
    tl.staggerFromTo("#droplet-groups g path", 0.3, {
      drawSVG: "0% -10%"
    }, {
      drawSVG: "100% 110%",
      repeat: 3,
      repeatDelay: 1,
      ease: Sine.easeIn
    }, 0.5, "drops");
 …
}
There are also beautiful and sophisticated <transition> and <transition-group> components that Vue offers and we use elsewhere in this demo, and we’ll cover these, and why and when to use each in the last post of the series on Animation.
Article Series:
- Rendering, Directives, and Events
- Components, Props, and Slots
- Vue-cli (You are here!)
- Vuex (Coming soon!)
- Animations (Coming soon!)
Intro to Vue.js: Vue-cli and Lifecycle Hooks is a post from CSS-Tricks
ShopTalk 248: AMP
Post pobrano z: ShopTalk 248: AMP
AMP is wildly polarizing.
Huge tech companies evangelize for it. It has loads of tech partners and loads of publishers using it. Well-respected companies are building things for it.
There is also a ton of backlash. It’s too easy to break. It gives Google far too much control. It’s not entirely progressive enhancement friendly. Offline development is harder. The caching layer means clicking a link from Google search results shows the site without ever leaving google.com, which is concerning for any number of reasons, a small one being that it makes sharing the URL weird. That’s just a few. I’ve heard quite the laundry list of complaints.
On this episode of ShopTalk we discuss all things AMP with someone on the AMP team (and who’s own blog is entirely AMP) and an entrepreneur building a service around AMP. Do they wonder if AMP is helping or hurting the web? They do.
Direct Link to Article — Permalink
ShopTalk 248: AMP is a post from CSS-Tricks
10 artists who create amazing art with books
Post pobrano z: 10 artists who create amazing art with books
You don’t know whether you prefer books or art? You don’t need to choose anymore, you can have both with this art made with books. 1. Kenjio Kenjio is the artist name of Daniel Lai, a designer and artist based in Tennessee. He sells his work on his Etsy shop. 2. Akayo Sakanishi An intricate piece of art […]
10 Lodash Features You Can Replace with ES6
Post pobrano z: 10 Lodash Features You Can Replace with ES6
When learning to write JavaScript without jQuery, I found posts like this (also on SitePoint) quite helpful to reference. Now we’re going through that again, in a way, with ES6 replacing some of what we used libraries to help with.
Direct Link to Article — Permalink
10 Lodash Features You Can Replace with ES6 is a post from CSS-Tricks
Understanding the Critical Rendering Path
Post pobrano z: Understanding the Critical Rendering Path
Ire Aderinokun:
There are 6 stages to the CRP –
- Constructing the DOM Tree
- Constructing the CSSOM Tree
- Running JavaScript
- Creating the Render Tree
- Generating the Layout
- Painting
I imagine if you’re really getting into performance work, you’ll want a firm understanding of this. There are lots of ways to block/delay parts of this process. The job of a perf nerd is to understand when and why that’s happening, evaluate if it’s necessary or not, and tweak things to get to that painting step as soon as possible.
I’m curious if this is generic enough that 100% of all rendering engines work 100% the same way, or if there are significant differences.
Direct Link to Article — Permalink
Understanding the Critical Rendering Path is a post from CSS-Tricks