Welcome to our Design in 60 Seconds series, in which you can
learn a new design skill, feature, or technique in just a minute!
Design in 60 Seconds: Infographics
Infographics connect you to the world by allowing you to share interesting facts and information with beautiful visuals. Engage your readers and expand your reach across social media with exciting designs.
In this quick video, learn more about infographics and how to customize a simple template from Envato Market. Check out the infographics used in this video from GraphicRiver.
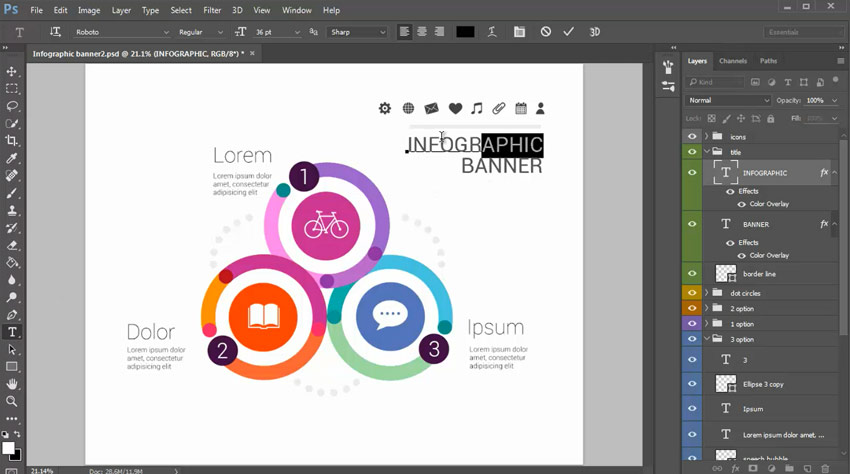
Depending on the template you download, you’ll need to use either Photoshop or Illustrator to edit the designs. Here we’ll be using Photoshop. Start by adjusting the titles, numbers, and all your important information with the Type Tool (T).
Move on to customizing the colors. Use the Selection Tool (A) to select one of the shapes and adjust the Color Fill.
Lastly, switch up the layout and organization by selecting each Layer Group to move the elements around with the Move Tool (V).
Want to see this in action? Check out the video above to see this lesson at work! Or enlist the help of a design professional from Envato Studio for all your infographic needs.
A Bit More Detail
Want to learn more about design and Adobe Photoshop’s vast tools and settings? Check out these tutorials below:
This is part of a series of quick video tutorials on
Envato Tuts+ in which we introduce a range of subjects, all in 60
seconds—just enough to whet your appetite. Let us know in the comments
what you thought of this video and what else you’d like to see explained
in 60 seconds!
Your logo should be as royal as your brand. Get inspired with this beautiful collection of 25 crest logos, and find the perfect match for your company.
25 Premium Crest Logos
Crest logos are rooted in deep symbolism. Often designed after the elaborate crests made in medieval Europe, their basic makeup usually involves a shield, scroll, or two mirrored animals. Designs may also vary, with elaborate curves or any swash details to accompany the main insignia.
And in this collection of incredible premium assets, we’re featuring 25 stunning crest logos curated from both GraphicRiver and Envato Elements.
Grab one of these great logos to kick-start your new brand, or enlist the help of a talented professional from Envato Studio for all your logo design needs.
Show the world you’re the king or queen of your industry with this exquisite crest logo. Designed with a perfect balance of angular and curvy details, this logo is sure to impress all future clients. Kick-start your next business with an awesome brand by downloading this package.
Exude an air of elegance and class with this divine Moscovita logo. A simple design for those who love circular logos, these unique elements can be open to almost any interpretation. Create a lovely backstory to match your new brand and download this vector logo today!
Create an elite brand with this classy bird logo. This design features a fierce eagle mascot soaring out of a crowned shield. A reflection of supreme elegance and sophistication, this logo is perfect for your real estate, fashion, or luxury business.
If the town of Alexandria needed a logo in The Walking Dead, then perhaps this would be their brand! Featuring a gorgeous minimalist design, this crest highlights the first letter of your company and surrounds it with fluid wreath details. It’s a great symbol of power and authority, so enjoy this high-resolution logo for your business.
Need an elegant logo for your business? Then check out this pretty crest logo featuring a fluid, curvy design. Use this identity in either horizontal or vertical orientation, and update the wording with your brand name for a print-ready logo design.
This super-fresh D vintage logo is a perfect mix of street and classic crest aesthetics. Use it as the trademark for your tattoo shop or creative business and customize it easily with the fully layered Illustrator file. Keep the bold yellow color or switch it up with a new one to make it your own.
Rule the kingdom with this powerful lion crest logo. Front and center is a ferocious lion with minimalist crest details to complement the overall design. Download this package to get access to alternative black and white versions, including an inverted white logo.
Show off your patriotism with this military-inspired crest logo. Designed with several red stars and a bold wingspan, this logo is perfect for any nonprofit or military-affiliated business. Enjoy three separate colored versions and completely resizable vector details.
Create a legendary brand with this awesome logo design. Great for creative companies and more, this logo features a subtle color palette with an alternative brown version. Celebrate your creative talents with a brand that matches your interests!
Dominate the local real estate industry with this super professional crest logo. Featuring fluid, curvy lines, this logo will add instant grandeur to all your marketing materials. Download this template to get a high-resolution file with fully resizable vector elements.
Crown your new business with an amazing brand identity. This stunning logo is the perfect mix of classic crest aesthetics paired with modern, fluid lines. Included in this package is a 100% free font that can be used for commercial use and alternative colored versions to make your brand stand out.
Launch your new boutique with a beautiful logo to match! This lovely crest features a simple centered letter, balanced out with circular details for the ultimate in elegance and style. Easily change the size, text, or colors to make the most out of this brand identity.
Whoever Hubbert is, he certainly has great taste in logos! This awesome logo design features a modern take on a traditional crest. With delicately designed lions and beautiful shield details, you’ll definitely want to have this logo to represent your brand. Ideal for any restaurant or real estate business.
Are you a huge sports fan? Then launch a fun sports club with this awesome soccer crest logo. It’s designed with a bright green shield, soccer ball, and simplistic typefaces, so you’ll definitely rule the area with this cool brand. Download this vector file to get access to an alternative black and white version.
Do you have an adventurous brand? Take your clients on a journey with this wickedly colorful crest logo. This brand identity features a unique design with three bold hot air balloons hovering over an evergreen landscape. Simply update the company name and add a clever brand slogan to make your company memorable!
Perfect for the luxury industry, this elegant logo template exudes great taste and style. It can be easily applied to many genres of business including restaurants, hotels, and luxury stores. Enjoy the clean, elegant design that can be easily customized with your favorite colors!
Need a logo with some bite? Then check out this awesome snake design. This design features a fierce serpent mascot surrounded by classic crest details. Included in this download are several Illustrator and EPS files with six color variations to choose from.
Create an awesome brand identity that the locals will love to rep! Introducing this wicked team logo, a package that includes a soccer-themed design with bold shield details and clean sans-serif fonts. Customize this logo easily to represent your local team.
Inspired by the strong gladiator helmets used in medieval Europe, this logo features a minimalist design with standard crest details. A crown, shield, banner, and pair of swords accompany this design for an overall logo that exudes power and status.
This wonderful logo series packs a punch, with ten incredible crest logos we’re sure you’ll love. Mix and match your favorite elements to create the logo of your dreams. And because it’s super easy to customize, you’ll be able to edit these vector files in no time at all!
Dominate any industry with this sublime logo design. This beautiful logo features a bold, gold color scheme that also looks great in black and white! Get access to additional font links and more in this quick download.
Get six amazing crest logos for the price of one! Featuring stunning minimalist designs, these logos highlight your company’s name and tagline with style. Enjoy clean vector details you can easily edit in an easy-to-use Adobe Illustrator file.
Who wouldn’t want a dragon in their logo? This awesome design features a powerful red dragon with simple shield and crown details. This print-ready file can be updated easily with any text, colors, or tagline you desire!
Or keep it simple with this minimalist Monroe crest logo. Switch out the center letter for the one that matches your brand, and enjoy this beautiful logo complete with two-toned colors and curvy swashes.
Become an industry leader with this bold Aramid logo. The perfect logo for any consultant, investment, or marketing business, this brand exudes strength and power. Enjoy the incredible metallic design with customizable elements in one easy-to-use Illustrator file.
Conclusion
This list features exciting resources for the avid designer
familiar with Adobe Illustrator. For additional help with all your logo needs, enlist the skills of a talented
professional by choosing one of the amazing designers from Envato Studio.
And with thousands of crest logos available at your fingertips, chances are we’ve missed a few to add to your personal collection. Be sure to browse GraphicRiver and Envato Elements for more resources, and let us know your favorites in the comments below!
In this tutorial I’ll show you how to create a fantasy, sci-fi portrait. You’ll learn how to blend a model portrait with a space background, make some special effects using light and nebula textures, manage blending modes, enhance color, paint light, and more.
Tutorial Assets
The following assets were used during the production of this tutorial:
Create a new 1500 x 900 px document in Photoshop with the given settings:
The background color should be #010e27.
Step 2
Go to Layer > New Adjustment Layer > Curves and reduce the
lightness. Select the layer mask and activate the Brush Tool (B). Use
a soft round brush with black color (soft black brush) to paint on both sides of the canvas. It’s to avoid both sides becoming black
and to show the details there later.
Step 3
Drag the space background onto the dark canvas and change the layer mode to Screen 100%:
Click the second icon at the bottom of the Layers panel to add a mask to
this layer. Use a soft black brush to clear some areas around the
middle and both sides.
Step 4
Create a Curves adjustment layer and set it as Clipping Mask. Decrease the lightness to make the effect appear more subtle.
2. How to Add the Model
Step 1
Isolate the model using the Polygonal Lasso Tool (L) and add her to the middle of the canvas using the Move Tool (V).
Use a layer mask and a soft black brush to erase the neck, shoulders, hair, and forehead.
Step 2
Make a new layer and set it as Clipping Mask. Select the Clone Tool (S) to remove the earring:
Step 3
Create a Curves adjustment layer to lower the lightness of the lower edge of the chin and the cheek. Use a soft black brush to paint on the other areas so they won’t be affected by this adjustment layer.
Step 4
Add a Hue/Saturation adjustment layer and bring the Saturation value down to -16:
Step 5
Use a Color Balance adjustment layer to match the color of the model’s face with the background. Change the Midtones settings:
Step 6
Use the Lasso Tool to select the mouth only, and then go to Layer > New Adjustment Layer > Curves. Increase the lightness to make this area brighter.
3. How to Do the Eye Makeup
Step 1
Open the ring light image and add it to the main document using the Move Tool. Change this layer mode to Screen 100%.
Step 2
Select Filter > Liquify and activate the Twirl Clockwise Tool
(C). Tweak the ring until it gets a similar result to the one shown below, or at
least until it has the eye-like part shown in the small screenshot. Use it to cover
the left eye.
Use a layer mask to erase the areas around this eye-like part.
Step 3
Duplicate this layer and flip it horizontally (Edit > Transform > Flip Horizontal). Move it to the other eye.
Step 4
Select the two eye layers and press Control-G to make a group for them.
Change this group’s mode to Screen 100% and add a Hue/Saturation
adjustment layer to alter the eyes’ color:
Step 5
Create a Color Balance adjustment layer and change the Midtones values:
4. How to Add the Nebula Effect
Step 1
Drag the nebula 1 image on top of the head and change its mode to Screen
100%. Use the Free Transform Tool (Control-T) with the Warp mode to
tweak the form of the nebula to fit the perspective of the head and
eyes.
Use a layer mask to remove the hard edges.
Step 2
Duplicate this layer several times and move them around the head and
face, especially trying to leave some visible effect on the cheeks. Use a
layer mask if needed to clear any unneccessary details and get your desired look.
Step 3
Make a group for these nebula layers and alter its mode to Screen 100%.
Add a Color Balance adjustment layer and change the Midtones and Highlights values:
Step 4
Use a Levels adjustment layer to hide all the remaining edges and make the effect more subtle.
Step 5
Place the nebula 2 image in the lower part of the canvas and use Control-T to
rotate it as shown below. Change the layer mode to Screen 100%.
Step 6
Create a Levels adjustment layer to remove the edges and make a subtle effect.
Step 7
Make a Color Balance adjustment layer and change the Midtones settings:
5. How to Add the Fantasy Light
Step 1
Drag the fantasy light image onto the top of the head and alter the mode to Screen 100%.
Use the Liquify Tool (the Forward Warp Tool) to tweak the light to get a similar result to the one shown below:
Step 2
Duplicate this layer twice and move them onto the face and to the right. Use a layer mask to erase any details you don’t want to see.
Step 3
Use the Lasso Tool to select a left area from the fantasy light image
and add it to the lower left of the model. Turn it into a curve using
the Forward Warp Tool.
Erase the hard edge of this result using a layer mask.
Step 4
Select another part from the light image and do the same technique. Add it to the other side of the model.
Step 5
Add more small details using a similar method.
Step 6
Make a group for these light layers and create a Color Balance adjustment layer within this group. Change the Midtones values:
Step 7
Use a Hue/Saturation adjustment layer and reduce the Blue saturation value to -81:
Step 8
Create a Levels adjustment layer to make the remaining edges completely disappear:
6. How to Do the Face Makeup
Step 1
Create
a new layer and use the Elliptical Marquee Tool (M) to grab a circle
and then activate the Gradient Tool (G). Use Radial Gradient with the
colors #f8b2f2 and #834115 to fill this circle.
Tweak this circle using the Forward Warp Tool and place it along the contour of the model’s face.
Step 2
Change this layer mode to Color Dodge 100% and use a layer mask to make the effect appear subtle along the lower part of the cheek.
Step 3
Duplicate this layer twice. Move one to a higher position on the
cheek, and flip the other horizontally and then place it on the other cheek.
7. How to Paint the Light
Step 1
Make a new layer on top of the layers and use a soft brush with the
color #746482 to paint around the model’s face. Change this layer mode
to Color Dodge 100%:
Step 2
Use a soft brush with the color #81a3ef to paint on the top of the head, cheek, and chin. Alter this layer mode to Overlay 100%.
Step 3
On a new layer, use a soft brush with the color #8c8dcb to paint on the
lower section of the canvas. Set this layer mode to Hard Light 30%.
Step 4
Change the brush color to #a797c1 and paint on the top left of the model. Keep this layer mode at Hard Light 30%.
8. How to Do the Final Adjustment
Step 1
Create a Gradient Map adjustment layer on top of the layers and pick the
colors #912d1d and #004460. Lower the Opacity of this layer to 20%.
Step 2
Add a Color Balance adjustment layer and change the Midtones and Highlights values:
Step 3
Use a Photo Filter adjustment layer and pick the color #ecde00.
Step 4
Make a Curves adjustment layer to add a warm tone and increase the contrast of the image.
Step 5
Create another Photo Filter adjustment layer and change the color to #dab9f4.
Step 6
Use a Vibrance adjustment layer to enhance the final effect.
Congratulations, You’re Done!
I hope that you’ve enjoyed my tutorial and learned something new. Feel
free to share your ideas or comments in the box below—I’d love to see
them. Enjoy Photoshopping!
In the past months, I’ve had several people coming up to me with ideas of products to sell online and ask me how to make a free website. They were usually discussing with me to understand what would be the best option for them to get started, especially for the design and technical parts.
Usually, I would recommend them Wix right away. Of course, they could install a WordPress website and use WooCommerce, but although it has gotten a lot simpler over the years, WordPress is still complicated for less technical people, and even more when using it for eCommerce.
Web design made easy
The main advantage of Wix is its ease-of-use. Anyone, even with very limited technical skills, can create a website. Design-wise, it’s not the same as hiring a web designer, but if you choose the right website template, you can create a pretty stunning website.
With a website builder, no complicated setup or installation, you are guided through every step with a beautiful interface. For the design part, everything is drag-and-drop, and add-ons are just a click away. It may seem obvious when all advantages are listed like that, but website builders are the easiest way to build a website nowadays.
Wix’s eCommerce features
With Wix, you’ll get the same advantages for building an online shop as you do for buildling a website. There are easy-to-use features that make it extremely simple to setup your shop.
The Wix stores have everything you’d expect: easy store management with order tracking and inventory management, cusomizable layouts for product pages, product collections creation, or the ability to create coupons and all kinds of special offers. All that without giving up on high-quality design.
On a more practical side of things, Wix stores offer a very customizable table of pricing for shipping rates and taxes. You can also produce professional invoices very quickly and track your expenses with great accounting tools. Furthermore, pop-up selling tools are super easy to implement along with other cool gimmicks like badges and this kind of things.
The last, but not least, technical issue that Wix handles beautifuly is the payment part. It’s easy to get money, and the platform doesn’t even take a commission, so all the money is yours. And yes, if you are feeling geeky, you can accept payments in Bitcoins. Also, and it’s worth mentionning, you can choose Wix to run your website, but if you’d rather use Etsy or Shopify, you can do so.
A platform to grow your business online
With all the stunning features listed above, it should already be enough to convince you to use Wix, but there is more. Actually, when you build an online store, the most important part is not to set it up, but to make it live and have the business grow. For that, you can’t beat Wix.
On the platform, you will get all the necessary tools to analyze your visitors and improve your SEO as you go. Wix even has some site boosting tools, and very convenient apps to automate part of the marketing work.
Saying that Wix is social media ready would be an understatement. Whether you are looking for publishing on multiple platforms or for quick integration, the website builder got you covered. No matter what social media sites you choose to integrate more, you should be able to do it much quicker than with any other website solution. To track results of all your campaigns, the social media management dashboard will prove very helpful.
Wix also aims at helping you to create a community around your website, for that purpose, community forums, coupons, and other features should be more than enough. For more direct support to your customers, you will be able to create and include forms very easily with Wix, even better, you can add a live chat to the website, which is pretty amazing for answering your clients.
Email marketing
A big part of online marketing happens by email, especially when run an online store. Email marketing has been back in marketers planning, as it proves to be one of the most efficient ways to sell online. Wix knows it, which is why they provide the best tools you could dream of for efficient emailing to your customers and prospects.
The most noticeable tool is probably WixShoutOut, a complete email marketing suit created by Wix to make its users life better and their shop more successful.
WixShoutOut is so cool that it’s hard to list all the advantages it offers. As usual with most Wix’s functionalities, email campaigns templates have totally customizable styles, they also integrate social media tools out of the box and make it easy to share your campaigns on your site.
Nevertheless, the most important for the average online shop owner will probably the more business oriented features. For that, WixShoutOut doesn’t disappoint either. The newsletter app comes with very useful stats tracking, as well as easy contact integration, basically the two most important things for email marketers.
Conclusion
As you can see, what came as a natural answer to me when asked about web design and eCommerce solutions is easily proved by facts, Wix is a very professional solution that will satisfy most users needs.



 Adobe PhotoshopThe A to Z of Adobe PhotoshopMary Winkler
 Design TheoryDesign in 60 Seconds: RGB and CMYK Color Modes ExplainedKirk Nelson
 Design TheoryDesign in 60 Seconds: How to Use LAB Color ModeKirk Nelson
 Business CardsPhotoshop in 60 Seconds: How to Customize a Business Card TemplateMelody Nieves