Post pobrano z: Covers

More covers:
Post pobrano z: How to Create an Engraved Stone Text Effect in Adobe InDesign

You can’t miss this Games of Thrones-style type effect. Perfect for posters and social media that need to command attention, this effect is also super quick and easy to create using Adobe InDesign.
To create this effect, you’ll need a simple stone background (try this texture from PhotoDune for a marble effect or this Pixabay background for a more grungy effect), and a chunky font (here I’ve used Charlevoix Pro ExtraBold).

Set up a new document in InDesign (File > New > Document) at A4 landscape size or a page size you prefer. Then create two layers, Background below and Type above. Lock Type to work on the Background layer.
Take the Rectangle Frame Tool (F) and drag to create an image frame that extends across the whole page. Go to File > Place, choose your stone background image, and click Open. Allow it to fill the whole frame. Select the frame and Edit > Copy.
With the frame selected, go to Object > Effects > Transparency, bringing the Opacity down to 50%. Click OK to exit the window.

Edit > Paste in Place a copy of the original stone image frame. Then head to Object > Effects > Gradient Feather. Set the Type to Radial, allowing the gradient to get lighter towards the center of the page.

Lock the Background layer and unlock the Type layer above. Create a large text frame in the center of the page using the Type Tool (T) and type in your text. Set the Font to Charlevoix Pro ExtraBold or your font of choice.

When you’re happy with the formatting of your text, head up to Type > Create Outlines to vectorize the text. Edit > Copy the vector to keep a copy to hand for a little later.
With the vector selected, go to File > Place, choose the same stone background image as before, and Open, allowing it to fill the whole text.

Go to Object > Effects > Transparency and choose Multiply from the Mode menu.

Click on Inner Shadow and bring the Opacity down to 30%. Increase the Choke to 45% and Noise to 30%, before clicking OK.

Edit > Paste in Place to drop a copy of the original vectorized text onto the page. From the Swatches panel, create a new CMYK swatch that mimics some of the tones in the darker parts of your stone image. Using the Eyedropper Tool (I) is a quick and simple way to find a suitable color. Here I’ve created a grey swatch, C=74 M=53 Y=39 K=29. Apply your new swatch to the Fill of the new vector.

Go to Object > Effects > Transparency and set the Mode of the vector to Multiply.

Click on Gradient Feather and create a -90 degree Linear gradient, creating a deep shadow effect inside the text.

Edit > Copy and Edit > Paste in Place the vector, and then go to Object > Effects > Gradient Feather. Switch the Angle to 90 degrees to flip the direction of the shadow effect.

Click OK, and your engraved stone effect is complete. Awesome job!
This sort of type effect brings a majestic, Games of Thrones-style touch to any design, but would look particularly striking on poster layouts or social media banners.
Looking for more display fonts for your next project? Check out the range of headline typefaces available on GraphicRiver and Envato Elements.

Post pobrano z: Swimming pool BBQ / Branchés sur la même idée?
 |
 |
| THE ORIGINAL? Reborn to be alive – 2014 Source : Coloribus Ag : Duval Guillaume (Belgium) |
LESS ORIGINAL Otter Phone Cases – 2017 Source : Cannes Lions OUTDOOR SHORTLIST Agency : Ogilvy & Mather (Singapore) |
Post pobrano z: Design deals for the week
Every week, we’ll give you an overview of the best deals for designers, make sure you don’t miss any by subscribing to our deals feed. You can also follow the recently launched website Type Deals if you are looking for free fonts or font deals.
a go-to collection for any designer or hobbyist to create gorgeous headers and graphics. Use the San Serif Typeface Collection for headlines, display graphics, labels, wedding invitations, vintage posters, and more. With three distinct products, each with their own character, and 5 total styles, you can always find the perfect pairing for your next project.What’s Included?
$16 – Get it now!
Now you can easily and quickly build up a variety of different mockups using the Fancy Items Scene Generator! Easy to use, just drag and drop more than 440 high-resolution items into a scene. Completely customizable, these high-res items and scenes are perfect for big retina screens as well as printed projects.
$15 instead of $38 – Get it now!

The Crafters Delight Bundle is here! This wonderful bundle is truly a crafters delight and comes with the following included: 16 fonts from 12 different font families, 350+ SVG’s, 650 + Different elements. Almost all the products come in SVG, DXF, EPS, PNG and JPEG file formats and are perfect for cutting and crafting.
$24 instead of $363 – Get it now!

It’s time to get down to business. Serious business. Your presentations have great information in them, but if they don’t look super professional, you may lose your audience. With a sharper focus on the overall look, you can really impress your clients and close that deal you’ve been working so hard on. This bundle features 50 Professional PowerPoint and Keynote Presentations, along with some creative bonus elements to get you presenting on a higher level.
$17 instead of $750 – Get it now!

Never worry about getting your point across again! With this collection of 850 Infographics Templates, you can easily put together a colorful story through pictures and charts. Simple to customize, you’ll reach your audience quicker than ever in an entertaining and informative manner.
$19 instead of $650 – Get it now!

Prototyping has never been this easy, nor this functional! Yes, the future of wireframes is here and its name is UX-App. This powerfully advanced web based tool lets you easily create fully functional prototypes, with no coding necessary. Simply stack various logic blocks to customize over 100 advanced components from working carousels to nested list views. There’s even a slew of mobile options.
$29 instead of $79 – Get it now!

Post pobrano z: Tips and Tricks for the Best Online Animation
It doesn’t seem so long ago that all it took to have a stand out web presence was some great content with the right keywords and a good logo. How times have changed. These days, if you can’t catch your audience in the first couple of seconds with some eye catching animation, you have lost them forever.
Of course, the principle of animation is as old as the hills, and despite constantly changing technology, some practices have stood the test of time and are as relevant today as they were years ago. Here are our top four tips and tricks to get the best out of online animation:
The first tip is one of those that has stood the test of time. If you want to check how effective your animation really looks, click the mute button and just watch it. There is nowhere to hide, and if something is not right, it will be far easier to spot it without the distraction of the soundtrack. In fact, it will stick out like a sore thumb.
If the first tip dates back 50 years or more, the second is cutting edge. In case you have not heard of it before, SVG stands for scalable vector graphics, and SVG animation is set to become the next big thing in online animation. SVGs are essentially similar to GIFs, but have the advantage of being far less heavy when it comes to file size. This means they load faster and run smoother. SVGator is a quick and easy way to animate SVG. It offers a user-friendly interface and automatically generated code.
Don’t try to create War and Peace. The best way to get better faster is to work on short animations and get them out the door. You will find your skill base grows, as well as your confidence. As Woody Allen almost said, if it takes longer than ten seconds, you’re doing it wrong.
One of the biggest challenges animators face is getting facial expressions right. When you really look properly, however, you will see that it is less about the poses and more about the motion. For example, eyes darting in confusion or lips trembling in sadness. Focus on the movement as much as the pose, and the desired effect will come far more naturally.

Post pobrano z: 5 Steps to Choosing an E-Commerce Theme Your Clients Will Love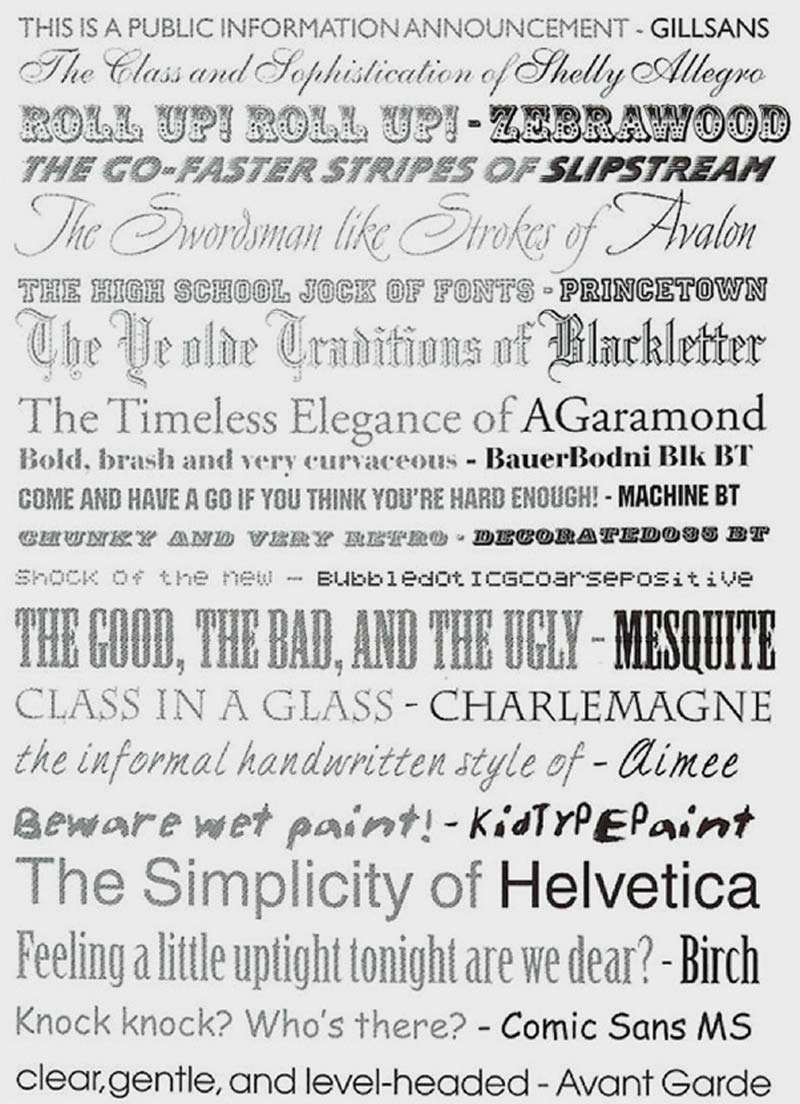
Your client doesn’t know what he wants in terms of design, so you have a blank screen to work on. The whole point of an e-commerce site is to sell, so all your design decisions must focus on what works for the final customer. You know what works, but you have to explain your choice to the client who is only interested in sales figures.
This is the one area where your client knows more than you. Listen and listen hard. Ask questions about the age, gender, education, and motivations of the target customer. Then go away and do your own research. This will include mobile use and color/font preferences. Look at other sites that are competing with your client’s and see what works for them.
The font you choose and layout also play a large part in any decision to stay or click the ‘back’ button. First impressions count, and you have only a fraction of a second to convince a website user that the site is reputable and aimed at them. A Stamford study showed that people’s decisions regarding a site’s trustworthiness depend on visual cues like the header, rather than logical ones such as a good privacy policy or generous returns conditions.
People read emotional meanings into fonts, and these are linked to the common usage types of each font. The image above from Graphic Design School by David Dabner illustrates this.
Expand the brief to include the client’s expectations and preferences regarding layout, color, number of products to a page, product categories and total number of items. Failure to set down in black and white what the client expects can lead to your design being rejected and you not being paid for your time.
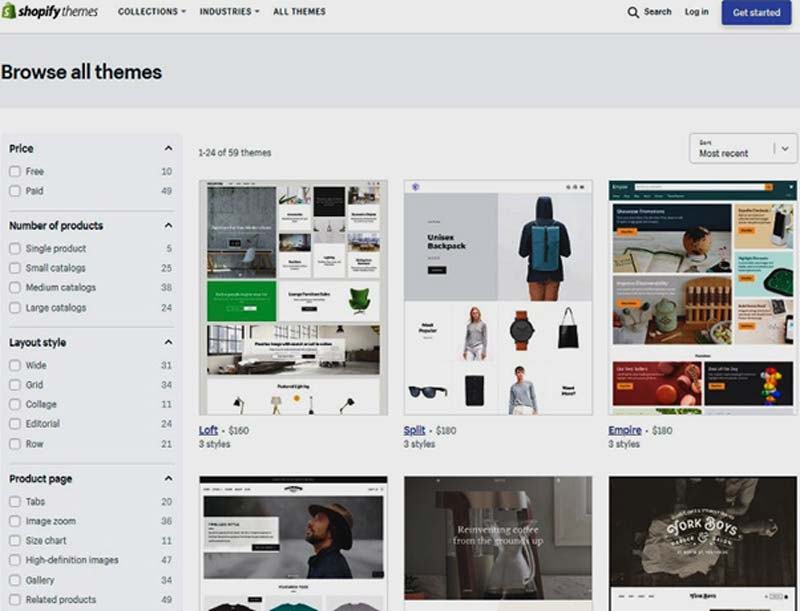
Just looking at Shopify themes, there are 59 themes to choose from. You can narrow your selection using the filters on the left of the screen, but you still have too many to choose from.
Start with this great guide on choosing an e-commerce store theme that will help you to narrow your choice down to one or two.
Most themes can be customized and come with two to four style options that allow you to change the layout. Use your brief to decide on the best option for the client’s customers, but be prepared to change the layout if the client demands you do so.
Most users will be on small phone screens, so your design needs to work for them. Buy Now, and Navigation links should use large buttons, rather than text links.
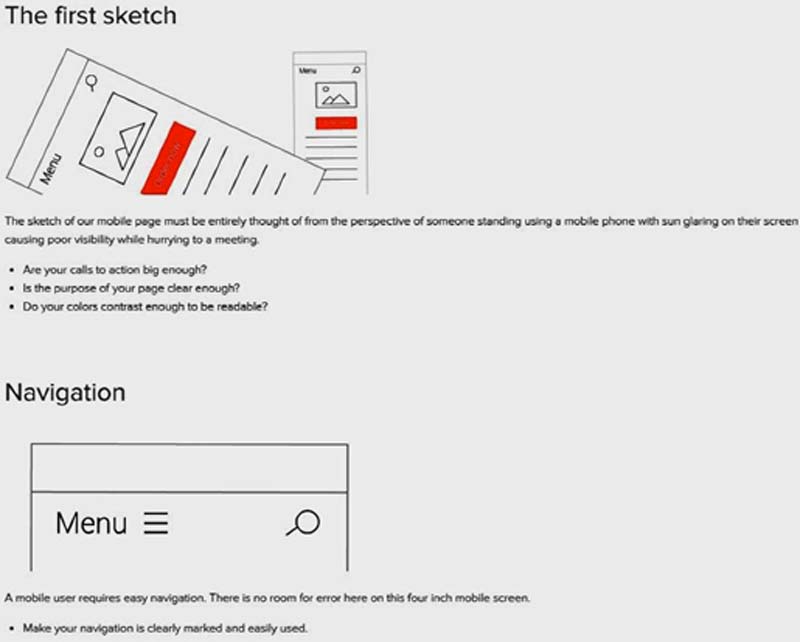
The screen shot above from Varvy illustrates a few mobile-first design principles, but the page itself is a prime example of how this design philosophy makes desktop users’ lives easier, too. There is lots of white space, fonts are large, and contrast is good, all of which benefit everyone, no matter what device they are using.
This Designer Daily article explains the psychology of color in detail.
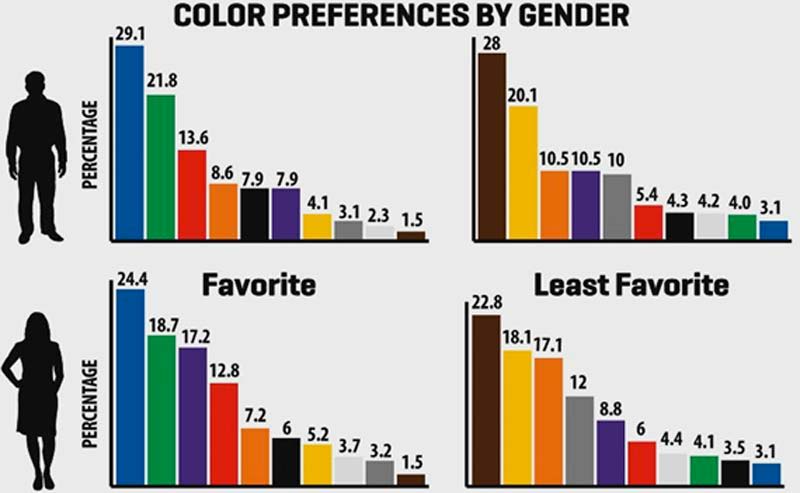
Color plays a large part in customers’ decisions to stay on a site, as this chart from HotDesign.com shows. It gives a clue as to why most websites use a blue design. Your color choices will be guided by the preferences of the target profile. Female users have a preference for more subtle shades as shown in the diagram below from Entrepreneur.com.
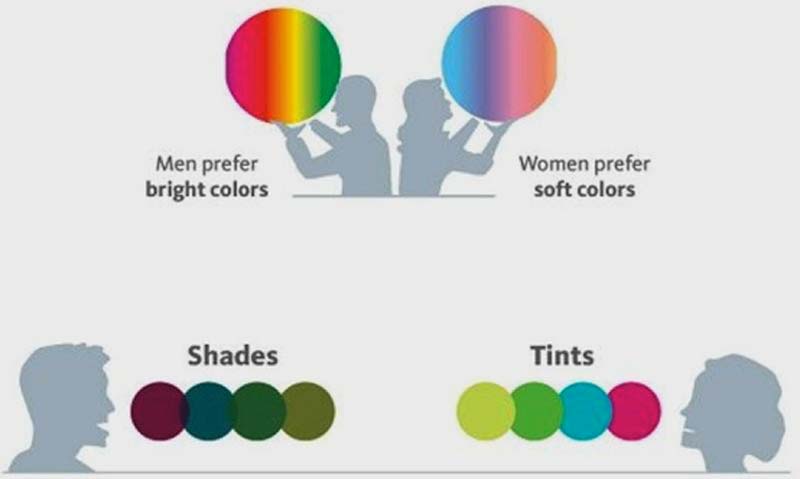
Build a unique color palette to suit your client’s customers using a tool such as the one from Paletton.com shown below.
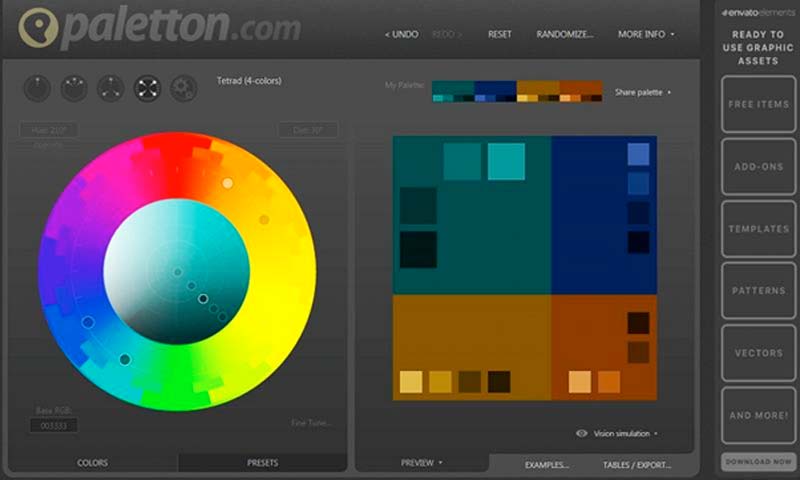
The Paletton tool allows you to choose different numbers and different color wheel relationships of colors.
Avoid giving the client more than two options in your presentation. It is for you as the designer to decide on colors, layouts, and fonts, and to explain your choices to your client so he is happy enough to pay you. You have to justify your design decisions and relate them to your brief. Your final theme design may well differ from what the client was expecting, and he or she must be happy with that before you are paid.
Ultimately, it is your client who pays you, so you might have to compromise between what you think is the best design and what your client wants.
Post pobrano z: JavaScript Scope and Closures
Scopes and closures are important in JavaScript. But, they were confusing for me when I first started. Here’s an explanation of scopes and closures to help you understand what they are.
Let’s start with scopes.
A scope in JavaScript defines what variables you have access to. There are two kinds of scope – global scope and local scope.
If a variable is declared outside all functions or curly braces ({}), it is said to be defined in the global scope.
This is true only with JavaScript in web browsers. You declare global variables in Node.js differently, but we won’t go into Node.js in this article.
const globalVariable = 'some value'Once you’ve declared a global variable, you can use that variable anywhere in your code, even in functions.
const hello = 'Hello CSS-Tricks Reader!'

function sayHello () {
  console.log(hello)
}

console.log(hello) // 'Hello CSS-Tricks Reader!'
sayHello() // 'Hello CSS-Tricks Reader!'
Although you can declare variables in the global scope, it is advised not to. This is because there is a chance of naming collisions, where two or more variables are named the same. If you declared your variables with const or let, you would receive an error whenever you a name collision happens. This is undesirable.
// Don't do this!
let thing = 'something'
let thing = 'something else' // Error, thing has already been declared
If you declare your variables with var, your second variable overwrites the first one after it is declared. This also undesirable as you make your code hard to debug.
// Don't do this!
var thing = 'something'
var thing = 'something else' // perhaps somewhere totally different in your code
console.log(thing) // 'something else'
So, you should always declare local variables, not global variables.
Variables that are usable only in a specific part of your code are considered to be in a local scope. These variables are also called local variables.
In JavaScript, there are two kinds of local scope: function scope and block scope.
Let’s talk about function scopes first.
When you declare a variable in a function, you can access this variable only within the function. You can’t get this variable once you get out of it.
In the example below, the variable hello is in the sayHello scope:
function sayHello () {
  const hello = 'Hello CSS-Tricks Reader!'
  console.log(hello)
}

sayHello() // 'Hello CSS-Tricks Reader!'
console.log(hello) // Error, hello is not definedWhen you declare a variable with const or let within a curly brace ({}), you can access this variable only within that curly brace.
In the example below, you can see that hello is scoped to the curly brace:
{
  const hello = 'Hello CSS-Tricks Reader!'
  console.log(hello) // 'Hello CSS-Tricks Reader!'
}

console.log(hello) // Error, hello is not defined
The block scope is a subset of a function scope since functions need to be declared with curly braces (unless you’re using arrow functions with an implicit return).
Functions, when declared with a function declaration, are always hoisted to the top of the current scope. So, these two are equivalent:
// This is the same as the one below
sayHello()
function sayHello () {
  console.log('Hello CSS-Tricks Reader!')
}

// This is the same as the code above
function sayHello () {
  console.log('Hello CSS-Tricks Reader!')
}
sayHello()
When declared with a function expression, functions are not hoisted to the top of the current scope.
sayHello() // Error, sayHello is not defined
const sayHello = function () {
  console.log(aFunction)
}
Because of these two variations, function hoisting can potentially be confusing, and should not be used. Always declare your functions before you use them.
Functions do not have access to each other’s scopes when you define them separately, even though one function may be used in another.
In this example below, second does not have access to firstFunctionVariable.
function first () {
  const firstFunctionVariable = `I'm part of first`
}

function second () {
  first()
  console.log(firstFunctionVariable) // Error, firstFunctionVariable is not defined
}When a function is defined in another function, the inner function has access to the outer function’s variables. This behavior is called lexical scoping.
However, the outer function does not have access to the inner function’s variables.
function outerFunction () {
  const outer = `I'm the outer function!`

  function innerFunction() {
    const inner = `I'm the inner function!`
    console.log(outer) // I'm the outer function!
  }

  console.log(inner) // Error, inner is not defined
}
To visualize how scopes work, you can imagine one-way glass. You can see the outside, but people from the outside cannot see you.

If you have scopes within scopes, visualize multiple layers of one-way glass.

After understanding everything about scopes so far, you’re well primed to figure out what closures are.
Whenever you create a function within another function, you have created a closure. The inner function is the closure. This closure is usually returned so you can use the outer function’s variables at a later time.
function outerFunction () {
  const outer = `I see the outer variable!`

  function innerFunction() {
    console.log(outer)
  }

  return innerFunction
}

outerFunction()() // I see the outer variable!
Since the inner function is returned, you can also shorten the code a little by writing a return statement while declaring the function.
function outerFunction () {
  const outer = `I see the outer variable!`

  return function innerFunction() {
    console.log(outer)
  }
}

outerFunction()() // I see the outer variable!
Since closures have access to the variables in the outer function, they are usually used for two things:
Side effects happen when you do something in aside from returning a value from a function. Many things can be side effects, like an Ajax request, a timeout or even a console.log statement:
function (x) {
  console.log('A console.log is a side effect!')
}
When you use closures to control side effects, you’re usually concerned with ones that can mess up your code flow like Ajax or timeouts.
Let’s go through this with an example to make things clearer.
Let’s say you want to make a cake for your friend’s birthday. This cake would take a second to make, so you wrote a function that logs made a cake after one second.
I’m using ES6 arrow functions here to make the example shorter, and easier to understand.
function makeCake() {
  setTimeout(_ => console.log(`Made a cake`, 1000)
  )
}
As you can see, this cake making function has a side effect: a timeout.
Let’s further say you want your friend to choose a flavor for the cake. To do so, you can write add a flavor to your makeCake function.
function makeCake(flavor) {
  setTimeout(_ => console.log(`Made a ${flavor} cake!`, 1000))
}
When you run the function, notice the cake gets made immediately after one second.
makeCake('banana')
// Made a banana cake!
The problem here is that you don’t want to make the cake immediately after knowing the flavor. You want to make it later when the time is right.
To solve this problem, you can write a prepareCake function that stores your flavor. Then, return the makeCake closure within prepareCake.
From this point on, you can call the returned function whenever you want to, and the cake will be made within a second.
function prepareCake (flavor) {
  return function () {
    setTimeout(_ => console.log(`Made a ${flavor} cake!`, 1000))
  }
}

const makeCakeLater = prepareCake('banana')

// And later in your code...
makeCakeLater()
// Made a banana cake!
That’s how closures are used to reduce side effects – you create a function that activates the inner closure at your whim.
As you know by now, variables created in a function cannot be accessed outside the function. Since they can’t be accessed, they are also called private variables.
However, sometimes you need to access such a private variable. You can do so with the help of closures.
function secret (secretCode) {
  return {
    saySecretCode () {
      console.log(secretCode)
    }
  }
}

const theSecret = secret('CSS Tricks is amazing')
theSecret.saySecretCode()
// 'CSS Tricks is amazing'
saySecretCode in this example above is the only function (a closure) that exposes the secretCode outside the original secret function. As such, it is also called a privileged function.
Chrome and Firefox’s DevTools make it simple for you to debug variables you can access in the current scope. There are two ways to use this functionality.
The first way is to add the debugger keyword in your code. This causes JavaScript execution in browsers to pause so you can debug.
Here’s an example with the prepareCake:
function prepareCake (flavor) {
  // Adding debugger
  debugger
  return function () {
    setTimeout(_ => console.log(`Made a ${flavor} cake!`, 1000))
  }
}

const makeCakeLater = prepareCake('banana')
If you open your DevTools and navigate to the Sources tab in Chrome (or Debugger tab in Firefox), you would see the variables available to you.

You can also shift the debugger keyword into the closure. Notice how the scope variables changes this time:
function prepareCake (flavor) {
  return function () {
    // Adding debugger
    debugger
    setTimeout(_ => console.log(`Made a ${flavor} cake!`, 1000))
  }
}

const makeCakeLater = prepareCake('banana')
The second way to use this debugging functionality is to add a breakpoint to your code directly in the sources (or debugger) tab by clicking on the line number.

Scopes and closures aren’t incredibly hard to understand. They’re pretty simple once you know how to see them through a one-way glass.
When you declare a variable in a function, you can only access it in the function. These variables are said to be scoped to the function.
If you define any inner function within another function, this inner function is called a closure. It retains access to the variables created in the outer function.
Feel free to pop by and ask any questions you have. I’ll get back to you as soon as I can.
If you liked this article, you may also like other front-end-related articles I write on my blog and my newsletter. I also have a brand new (and free!) email course: JavaScript Roadmap.
JavaScript Scope and Closures is a post from CSS-Tricks
Post pobrano z: Managing CSS & JS in an HTTP/2 World
Trevor Davis on how we’ll link up CSS when we go all-in on HTTP/2:
This is the opposite of what we have done as best practice for years now. But in order to take advantage of multiplexing, it’s best to break up your CSS into smaller files so that only the necessary CSS is loaded on each page. An example page markup would look something like this:
<link href="stylesheets/modules/text-block/index.css" rel="stylesheet">
<div class="text-block">
  ...
</div>

<link href="stylesheets/modules/two-column-block/index.css" rel="stylesheet">
<div class="two-column-block">
  ...
</div>
This idea shares some DNA with Critical CSS. Loading CSS with <link> is blocking, so load as little of it as you can right away and load the rest of it as you need it. There is no penalty for loading the stylesheets individually because of HTTP/2 multiplexing, and loading them right before the HTML that uses them actually takes advantage of the blocking by not allowing the rendering of the HTML before the CSS for it is gotten. Plus you’ll be able to break cache on these smaller bits of CSS as needed, just bear in mind it might not compress as well.
The thing is… for any browser that doesn’t support HTTP/2 (e.g. IE 10, Opera mobile/mini, UC browser), while this technique will still work, it will be pretty bad for performance. This will be an easier call to make on projects that don’t need to support those browsers for whatever reason.
Direct Link to Article — Permalink
Managing CSS & JS in an HTTP/2 World is a post from CSS-Tricks
Post pobrano z: Form Validation with Web Audio
I’ve been thinking about sound on websites for a while now.
When we talk about using sound on websites, most of us grimace and think of the old days, when blaring background music played when the website loaded.
Today this isn’t and needn’t be a thing. We can get clever with sound. We have the Web Audio API now and it gives us a great deal of control over how we design sound to be used within our web applications.
In this article, we’ll experiment with just one simple example: a form.
What if when you were filling out a form it gave you auditory feedback as well as visual feedback. I can see your grimacing faces! But give me a moment.
We already have a lot of auditory feedback within the digital products we use. The keyboard on a phone produces a tapping sound. Even if you have „message received” sounds turned off, you’re more than likely able to hear your phone vibrate. My MacBook makes a sound when I restart it and so do games consoles. Auditory feedback is everywhere and pretty well integrated, to the point that we don’t really think about it. When was the last time you grimaced at the microwave when it pinged? I bet you’re glad you didn’t have to watch it to know when it was done.
As I’m writing this article my computer just pinged. One of my open tabs sent me a useful notification. My point being sound can be helpful. We may not all need to know with our ears whether we’ve filled a form incorrectly, there may be plenty of people out there that do find it beneficial.
So I’m going to try it!
Why now? We have the capabilities at our finger tips now. I already mentioned the Web Audio API, we can use this to create/load and play sounds. Add this to HTML form validating capabilities and we should be all set to go.
Here’s a simple sign up form.
See the Pen Simple Form by Chris Coyier (@chriscoyier) on CodePen.
With everything we learned from Chris Ferdinandi’s guide to form validation, here’s a version of that form with validation:
See the Pen Simple Form with Validation by Chris Coyier (@chriscoyier) on CodePen.
We don’t want awful obtrusive sounds, but we do want those sounds to represent success and failure. One simple way to do this would be to have a higher, brighter sounds which go up for success and lower, more distorted sounds that go down for failure. This still gives us very broad options to choose from but is a general sound design pattern.
With the Web Audio API, we can create sounds right in the browser. Here are examples of little functions that play positive and negative sounds:
See the Pen Created Sounds by Chris Coyier (@chriscoyier) on CodePen.
Those are examples of creating sound with the oscillator, which is kinda cool because it doesn’t require any web requests. You’re literally coding the sounds. It’s a bit like the SVG of the sound world. It can be fun, but it can be a lot of work and a lot of code.
While I was playing around with this idea, FaceBook released their SoundKit, which is:
To help designers explore how sound can impact their designs, Facebook Design created a collection of interaction sounds for prototypes.

Here’s an example of selecting a few sounds from that and playing them:
See the Pen Playing Sound Files by Chris Coyier (@chriscoyier) on CodePen.
Another way would be to fetch the sound file and use the audioBufferSourceNode. As we’re using small files there isn’t much overhead here, but, the demo above does fetch the file over the network everytime it is played. If we put the sound in a buffer, we wouldn’t have to do that.
This experiment of adding sounds to a form brings up a lot of questions around the UX of using sound within an interface.
So far, we have two sounds, a positive/success sound and a negative/fail sound. It makes sense that we’d play these sounds to alert the user of these scenarios. But when exactly?
Here’s some food for thought:
blur?There aren’t any extremely established best practices for this stuff. The best we can do is make tasteful choices and do user research. Which is to say, the examples in this post are ideas, not gospel.
Here’s one!
And here’s a video, with sound, of it working:
Greg Genovese has an article all about form validation and screen readers. „Readers” being relevant here, as that’s all about audio! There is a lot to be done with aria roles and moving focus and such so that errors are clear and it’s clear how to fix them.
The Web Audio API could play a role here as well, or more likely, the Web Speech API. Audio feedback for form validation need not be limited to screen reader software. It certainly would be interesting to experiment with reading out actual error messages, perhaps in conjunction with other sounds like we’ve experimented with here.
All of this is what I call Sound Design in Web Design. It’s not merely just playing music and sounds, it’s giving the sound scape thought and undertaking some planning and designing like you would with any other aspect of what you design and build.
There is loads more to be said on this topic and absolutely more ways in which you can use sound in your designs. Let’s talk about it!
Form Validation with Web Audio is a post from CSS-Tricks

