Pandas are cute and very easy to draw, because of their plump body
and characteristic pattern. In this tutorial I will lead you step by
step to help you draw your own giant panda. It will be simple and fun!
What You Will Need
If you’re drawing digitally, you have all you need in your program. If you prefer traditional tools, I suggest:
Pencil
Black marker pen/felt-tip pen
1. How to Sketch a Panda’s Body
Step 1
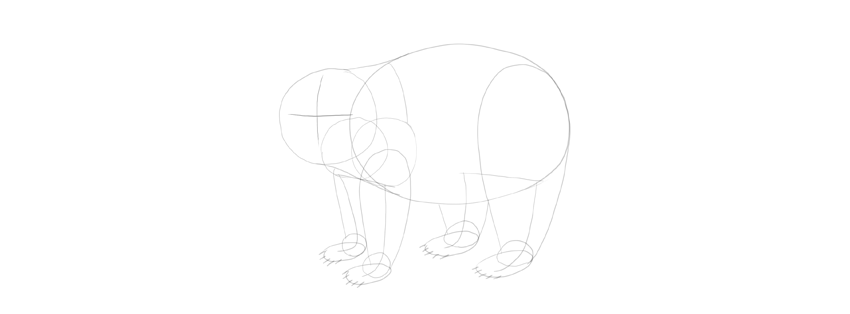
Sketch an oval for the main body.
Step 2
Add a circle for the head.
Step 3
Connect both parts with gentle lines.
Step 4
Draw two slanting lines to sketch the distance between the legs.
Step 5
Attach the legs to the ends of those lines. Make them slightly curved towards the ground.
2. How to Draw a Panda’s Legs
Step 1
Attach ovals to the legs to create a base for the feet.
Step 2
Draw ovals on them. This will make the joints look thicker.
Step 3
Outline the limbs. They should be big and fluffy.
Step 4
Add volume to the arms.
Step 5
Sketch the line of the shoulders.
Step 6
Sketch five claws on every foot.
3. How to Draw a Panda’s Face
Step 1
Draw a cross on the face to find its center. Keep in mind the head is spherical, not as flat as it seems.
Step 2
Draw a circle to create the muzzle.
Step 3
Draw circles on the sides of the muzzle, in the upper part.
Step 4
Draw smaller circles inside. These will be the actual eyes.
Step 5
Draw two bigger circles below. This will help us create the shape of the panda’s eye patch.
Step 6
Draw the nose.
Step 7
Draw the smile under the nose.
Step 8
Draw two big circles for the cheeks.
Step 9
Draw the place for the ears.
Step 10
Draw the rounded ears.
4. How to Finish the Drawing of a Panda
If you’re drawing digitally, do this part on a new layer. If you’re drawing traditionally, this is the time to take the darker, thicker tool.
Step 1
Outline the legs. Make them smooth on one side and fluffy on the other.
Step 2
Outline the fluffy ears and the face details.
Step 3
Outline the whole head.
Step 4
Outline the rest of the body.
Step 5
Outline the claws.
Step 6
Add some detail to the muzzle.
Step 7
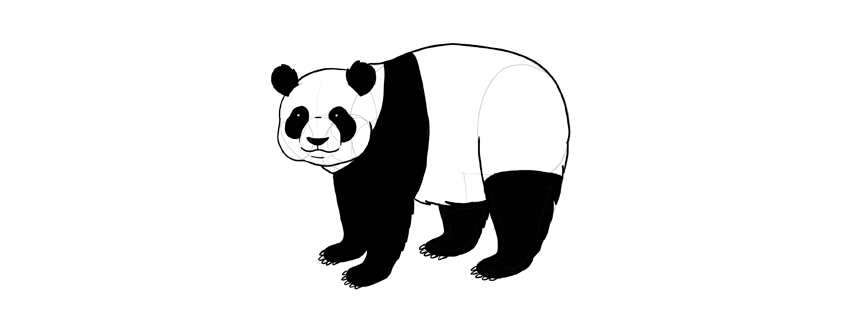
Draw the borders of the black-and-white pattern.
Step 8
Darken the patterns. If you want, you can leave white shine dots in the eyes.
So Cute!
That’s a beautiful panda! If you liked this tutorial, you may also enjoy these:
Led by the hashtag #GoodImpressionsLiveOn, the spot features a heart-warming boy-girl story of separation, and how they eventually reunited as a result of their circumstances, thus driving home the message of how it is the smallest of impressions that truly matter.
Passion for Life – that’s what GARDENA stands for. Therefor all of GARDENA’s products aim to inspire humans to go out and re-connect with nature and life.
Idea: Twitter is one of the most known and used Apps and a terminal, when it comes to fake news. But in fact its name refers to a thing, one can only experience offline, in “real” nature.
When the Original GARDENA System (OGS) came out in 1968 it changed watering forever.
Idea: The reliability and versatility of the OGS enables gardeners to bring any kind of rain – and therefor is the real cause, why rain became one of the most common issues in popular music in the last 50 years.
Combining 2D and 3D styles in different creative ways has been a part of multiple design trends over the years. This tutorial will show you how to use Photoshop’s 3D tools and settings to create an abstract 3D displaced text effect, with a touch of a Retro/Memphis Style feel. Let’s get started!
1. How to Create the Background and 3D Elements Layers
Step 1
Create a new 1000 x 1000 px document, click the Create new fill or adjustment layer icon at the bottom of the Layers panel, and choose Gradient.
Create the gradient fill using the Colors#d99c9c to the left, #b294c5 in the center, and #72a9be to the right, and change the Angle to -120.
Step 2
Create the text in All Caps, each word in a separate layer, using the font Bahn Pro. Set the Size to 200 and the Tracking value to 100.
Step 3
Create three new layers, fill them with any color you like, and name them from bottom to top: Sphere, Pyramid, and Cylinder.
2. How to Create 3D Layers
Step 1
For each text layer you have, select it and go to 3D > New 3D Extrusion from Selected Layer.
Then, select the Sphere layer and go to 3D > New Mesh from Layer > Mesh Preset > Sphere, select the Pyramid layer and go to 3D > New Mesh from Layer > Mesh Preset > Pyramid, and select the Cylinder layer and go to 3D > New Mesh from Layer > Mesh Preset > Cylinder.
Step 2
Select all the 3D layers, go to 3D > Merge 3D Layers, and rename the merged layer 3D Scene.
Step 3
To access the 3D mesh settings and properties, you’ll need to open two panels: the 3D panel and the Properties panel (both found under the Window menu).
The 3D panel has all the components of the 3D scene, and when you click the name of any of those, you’ll be able to access its settings in the Properties panel. So make sure to always select the tab of the element you want to modify in the 3D panel before you change its settings in the Properties panel.
Step 4
If you select the Move Tool, you’ll find a set of 3D Modes for it to the right of the Options bar. When you choose one of those, you can then click and drag to perform changes (on the selected element in the 3D panel).
Use those modes to change the Current View into an angle you like.
Step 5
Click the eye icon next to the Sphere, Pyramid, and Cylinder tabs to hide them.
3. How to Adjust the 3D Mesh Settings
Step 1
Select all the text mesh tabs in the 3D panel, and change their Extrusion Depth in the Properties panel to 0.
Step 2
Select each text mesh tab separately, click the 3D panel menu icon, and choose Move Object to Ground Plane.
Step 3
What we’re going to do next is assign values to the Z Position of each of the text meshes to set them apart from each other evenly.
So, for example, if you have three text meshes, you can change the one in the middle’s Z Position to 0, the one in the front’s to 300, and the one in the back’s to -300.
To assign the Z Position values, click the text mesh tab, and click the Coordinates icon at the top of the Properties panel to make the changes.
Step 4
You can use any values you think look best for your text and number of meshes, but just make sure to keep an equal distance between them.
4. How to Transform 3D Meshes
Step 1
Show the Sphere mesh and select its tab, pick the Move Tool, and use the 3D Axis to scale it up or down.
The arrows at the ends of the axis move the mesh, the part below them is used for rotation, and the cubes are used for scaling. The cube in the center is used to scale the object uniformly. All you need to do is click and drag the part you want to use.
Step 2
You can also use the Coordinates values for that, and if you click the Scale icon, you can check or uncheck the Uniform Scaling option depending on the result you want.
Step 3
Move the Sphere to the Ground Plane, and use the 3D Axis to move it to the final position.
Step 4
Repeat the same steps for the Pyramid and Cylinder meshes.
Notice how when scaling the Cylinder you might need to uncheck the Uniform Scaling box if you’re using the Coordinates values.
Make sure to always move the objects to the Ground Plane once you’re done transforming them.
5. How to Create Basic 3D Materials
Step 1
Select all the text Material tabs, and use these settings in the Properties panel (the color values used are in RGB):
Diffuse: 255, 255, 255
Specular: 183, 183, 183
Shine: 20%
Step 2
Select the Sphere_Material tab, click the Diffuse icon in the Properties panel, and choose Remove Texture.
Step 3
Keep in mind that you can use any other values for the material settings, but the ones used here are:
Diffuse: 163, 216, 236
Specular: 121, 114, 114
Shine: 30%
Reflection: 3%
Roughness: 30%
Step 4
Select all the Pyramid Material tabs, remove the Diffuse texture, and use these settings:
Diffuse: 241, 155, 93
Specular: 221, 199, 147
Shine: 30%
Reflection: 3%
Roughness: 30%
Step 5
Select the Cylinder’s Top_Material and Bottom_Material tabs, remove the Diffuse texture, and use these settings:
Diffuse: 17, 17, 17
Specular: 75, 72, 75
Shine: 50%
Reflection: 10%
Roughness: 30%
Step 6
Select the Cylinder_Material tab, remove the Diffuse texture, and use these settings:
Diffuse: 141, 128, 179
Specular: 190, 194, 220
Shine: 80%
Reflection: 30%
Roughness: 30%
6. How to Create a Simple Vertical Stripes Pattern
Step 1
Create a new 50 x 10pxWhite filled document, use the Rectangular Marquee Tool to select the left half, and fill it with Black.
Step 2
Press Command-D to deselect, go to Edit > Define Pattern, type Stripes Pattern in the Name field, and click OK.
7. How to Create a Bump Texture
Step 1
Select the Cylinder_Material tab, click its Bump icon in the Properties panel, and choose New Texture.
Step 2
Set both the Width and Height values to 500 and click OK.
Step 3
This will open the new file; if not, select the Bump texture icon and choose Edit Texture.
Create a new layer and fill it with White.
Step 4
Double-click the new layer to apply a Pattern Overlay effect using the Stripes Pattern.
Step 5
Save and close the file.
8. How to Edit the UV Properties
Step 1
Click the Bump texture icon and choose Edit UV Properties.
Step 2
Change the Tile’s V/Y value to 1 and the U/X value to whatever looks best on your Cylinder mesh, and click OK.
9. How to Add a Mesh Environment Texture
Step 1
With the Cylinder_Material tab still selected, click the Environment folder icon at the bottom of the Properties panel, and choose New Texture.
Step 2
Change both the Width and Height values to 1000 and click OK.
Step 3
Duplicate the Background layer, and double-click the copy to apply a Gradient Overlay effect using the Stainless Steel 166c gradient fill.
Step 4
Save and close the file when you’re done.
Step 5
You can try other gradient fills as well to get different lighting results.
10. How to Adjust Miscellaneous 3D Settings
Step 1
Select all text mesh tabs, and uncheck the Cast Shadows box in the Properties panel.
Step 2
Select the Scene tab, and under the Remove Hidden option in the Properties panel, check the Backfaces option.
Step 3
Click the Current View tab, and click the Orthographic icon in the Properties panel.
What this does is maintain parallel lines without convergence, which means displaying the meshes in accurate scale view without any perspective distortion.
Step 4
Now is a good time to choose a final camera angle, so that you can make any final changes to the scene.
Step 5
After you choose the final view, you can use the 3D Axis to move the meshes around, or scale them as needed.
11. How to Adjust a 3D Scene’s Lighting
Step 1
Select the Infinite Light 1 tab, and change its Intensity to 20% and its Shadow Softness to 50%.
Step 2
Move the light to an angle that best suits your final view, and you can use the Coordinates values if needed to do so.
Step 3
Select the Environment tab, click the IBL texture icon, and choose Edit Texture.
Step 4
Add a Solid Color fill layer, and use the Color fill (100, 100, 100). Save and close the file when done.
Step 5
Go to 3D > Render 3D Layer. The rendering might take a while, but you can stop it any time by pressing the Esc key.
Step 6
Once the rendering is done, right-click the 3D Scene layer and choose Convert to Smart Object to avoid making any accidental changes.
12. How to Create a Basic Paper Shape
Step 1
Use the Rectangle Tool to create a rectangle shape behind the 3D Scene.
Step 2
Pick the Direct Selection Tool, and use it to select and move the anchor points, to get a parallelogram-like shape.
Use the 3D Scene as a reference to make the shape look like a part of it.
Step 3
Use the Add Anchor Point Tool to add an anchor point on each of the two vertical sides.
Step 4
Use the Direct Selection Tool to nudge each of the added points to make the vertical sides a little bit curved in the same direction.
Step 5
Add two more points, one on each of the sides next to the top right corner’s anchor point. These will be used to create the corner fold, so keep that in mind when placing them.
13. How to Work With Anchor Points
Step 1
Rename the shape layer you have to Back, duplicate it, rename the copy to Front, and change its Fill Color to #ea6b9b.
Step 2
Select the Front layer, and use the Direct Selection Tool to click-drag the top right corner’s anchor point inwards to the center, creating a basic folded shape.
You can then adjust the shape by moving the surrounding anchor points and their handles.
Any adjustments should be very minimum and subtle, and should not affect the part of the shape that’s outside the two points around the corner.
Step 3
Pick the Delete Anchor Point Tool, select the Back layer, and click the top right corner’s anchor point to delete it.
This will create the outer curve of the fold, which you can subtly adjust if necessary as well.
Step 4
Change the Back layer’s Fill Color to #8b8b8b, and duplicate each of the Back and Front layers.
14. How to Create a Folded Shape
Step 1
Select both copy layers and move them on top of the 3D Scene layer.
Step 2
With both copy layers still selected, go to Layer > Combine Shapes > Subtract Front Shape. Rename the resulting layer to Fold, and change its Fill Color to #ee90b3.
Step 3
Pick the Direct Selection Tool, click the Path operations icon in the Options bar, and choose Merge Shape Components.
15. How to Add Gradient Overlays
Step 1
Double-click the Fold layer to apply a Gradient Overlay with these settings:
Check the Dither box
Blend Mode: Soft Light
Opacity: 35%
Angle: -157
Use the Black, White gradient fill
Step 2
While the Layer Style box is still open, you can click-drag the gradient inside the shape to adjust its Angle if you like.
Step 3
When you’re done, right-click the Fold layer, choose Copy Layer Style, right-click the Front layer, and choose Paste Layer Style.
16. How to Add Shadows
Step 1
Select the Back layer, and use the Direct Selection Tool to drag the bottom anchor points of the shape and create a shadow shape, which should follow the 3D Scene’s shadow direction.
Step 2
Right-click the Back layer, choose Convert to Smart Object, and change its layer’s Blend Mode to Multiply and its Opacity to 50%.
Step 3
Go to Filter > Blur > Gaussian Blur, and set the Radius to a value around 20.
Step 4
Command-click the Front layer’s thumbnail to create a selection.
Step 5
Create a new layer below the Fold layer, name it Shadow, change its Opacity to 35%, and pick the Brush Tool.
Set the Foreground Color to Black, and use a soft round tip to add some shadow underneath the fold.
You can change the brush tip’s Opacity value in the Options bar to get subtler results.
17. How to Create Zigzag Lines
Step 1
Create a new layer on top of all layers, name it Lines, and pick the Pen Tool.
Choose the Path option in the Options bar, and click once to add anchor points that create zigzag shapes around the text.
When you’re done creating a path, Command-click outside it to separate it from the next one.
Step 2
Pick the Brush Tool, choose a hard round 4 px tip, and hit the Return key to stroke the paths you have.
Pick the Direct Selection Tool and hit the Return key again to get rid of the work path.
Step 3
Double-click the Lines layer to apply a Gradient Overlay effect with these settings:
Check the Dither box
Angle: 157
Create the Gradient using the Colors#f5cd2c to the left and #f1e48b to the right.
18. How to Apply Global Adjustments
Step 1
Create a new layer on top of all layers, name it High Pass, and press the Command-Option-Shift-E keys to create a stamp.
Convert the layer into a Smart Object, and change its Blend Mode to Soft Light.
Step 2
Go to Filter > Other > High Pass, and change the Radius to 1.5.
Step 3
Add a Vibrance adjustment layer on top of all layers, and change the Vibrance value to 10.
Step 4
Add a Curves adjustment layer on top of all layers, and click-drag the center of the curve a little bit upwards to brighten up the image.
Step 5
Double-click the Curves layer to get its Blending Options.
We will use the Blend If’s Underlying Layer’s sliders to control how the Curves effect is applied.
So Option-click the Shadows slider to split it, and drag each of its ends to the right to exclude or protect the shadows from being affected by the Curves layer.
Splitting the slider will help create a gradual effect instead of a harsh one. So the right side will determine the amount of shadows protected, and the left side will fade the effect.
After adjusting the slider, change the Blend Mode to Soft Light, and the Opacity to 30%.
Step 6
Add another Curves adjustment layer, but this time, drag the curve’s center downwards to darken the image.
Step 7
Double-click the second Curves layer to repeat the same steps, only this time you’ll be excluding the Highlights, which means you’ll be adjusting the Highlights slider.
So make sure to split it and drag its sides until you get a result you like, and change the Blend Mode and Opacity values when done.
19. How to Add Noise
Step 1
Create a new layer on top of all layers, and name it Noise.
Step 2
Go to Edit > Fill, and change the Contents to 50% Gray.
Step 3
Convert the Noise layer into a Smart Object, and change its Blend Mode to Soft Light.
Step 4
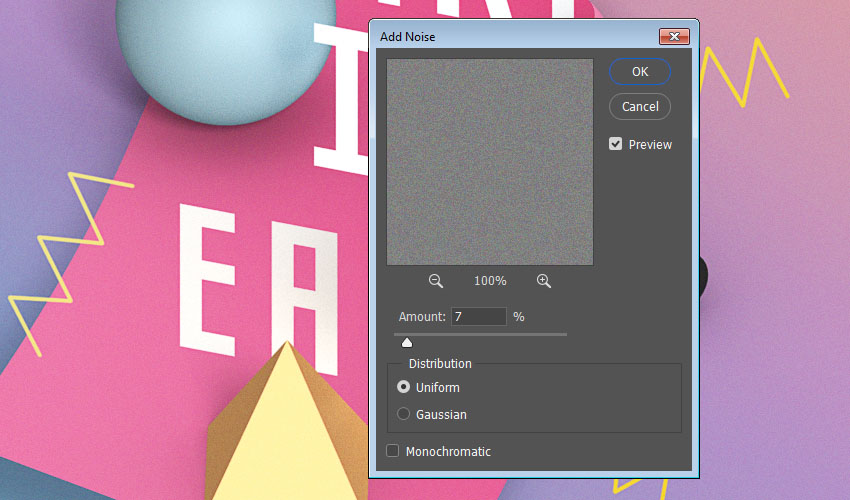
Go to Filter > Noise > Add Noise, and change the Amount to 7 and the Distribution to Uniform.
You can use any other values you prefer as well.
Awesome Work, You’re Done!
In this tutorial, we created a couple of text and shape layers, and converted them to 3D meshes. Then, we adjusted the meshes’ settings and created their materials, as well as adjusting the scene’s lighting to render it. After that, we used shape tools and options to create a folded paper shape and some zigzag lines. Finally, we added global adjustments to finish off the effect.
Please feel free to leave your comments, suggestions, and outcomes below.
You know those the little notification windows that pop up in the top right (Mac) or bottom right (Windows) corner when, for example, a new article on our favorite blog or a new video on YouTube was uploaded? Those are push notifications.
Part of the magic of these notifications is that they can appear even when we’re not currently on that website to give us that information (after you’ve approved it). On mobile devices, where supported, you can even close the browser and still get them.
Article Series:
Setting Up & Firebase (You are here!)
The Back End (Coming soon!)
Push notification on a Mac in Chrome
A notification consists of the browser logo so the user knows from which software it comes from, a title, the website URL it was sent from, a short description, and a custom icon.
We are going to explore how to implement push notifications. Since it relies on Service Workers, check out these starting points if you are not familiar with it or the general functionality of the Push API:
You are free to choose the back-end system which suits you best. I went with Firebase since it offers a special API which makes implementing a push notification service relatively easy.
In this part, we’ll only focus on the front end, including the Service Worker and manifest, but to use Firebase, you will also need to register and create a new project.
Implementing Subscription Logic
HTML
We have a button to subscribe which gets enabled if 'serviceWorker' in navigator. Below that, a simple form and a list of posts:
Now we can initialize Firebase using the credentials given under Project Settings → General. The sender ID can be found under Project Settings → Cloud Messaging. The settings are hidden behind the cog icon in the top left corner.
Firebase offers its own service worker setup by creating a file called `firebase-messaging-sw.js` which holds all the functionality to handle push notifications. But usually, you need your Service Worker to do more than just that. So with the useServiceWorker method we can tell Firebase to use our own `service-worker.js` file as well.
Now we can create a userToken and a isSubscribed variable which will be used later on.
Notice the function initializePush() after the Service Worker registration. It checks if the current user is already subscribed by looking up a token in localStorage. If there is a token, it changes the button text and saves the token in a variable.
Here we also handle the click event on the subscription button. We disable the button on click to avoid multiple triggers of it.
Update the Subscription Button
To reflect the current subscription state, we need to adjust the button’s text and style. We can also check if the user did not allow push notifications when prompted.
Let’s say the user visits us for the first time in a modern browser, so he is not yet subscribed. Plus, Service Workers and Push API are supported. When he clicks the button, the subscribeUser() function is fired.
Here we ask permission to send push notifications to the user by writing messaging.requestPermission().
The browser asking permission to send push notifications.
If the user blocks this request, the button is adjusted the way we implemented it in the updateBtn() function. If the user allows this request, a new token is generated, saved in a variable as well as in localStorage. The token is being saved in our database by updateSubscriptionOnServer().
Save Subscription in our Database
If the user was already subscribed, we target the right database reference where we saved the tokens (in this case device_ids), look for the token the user already has provided before, and remove it.
Otherwise, we want to save the token. With .once('value'), we receive the key values and can check if the token is already there. This serves as second protection to the lookup in localStorage in initializePush() since the token might get deleted from there due to various reasons. We don’t want the user to receive multiple notifications with the same content.
function updateSubscriptionOnServer(token) {

    if (isSubscribed) {
        return database.ref('device_ids')
                .equalTo(token)
                .on('child_added', snapshot => snapshot.ref.remove())
    }

    database.ref('device_ids').once('value')
        .then(snapshots => {
            let deviceExists = false

            snapshots.forEach(childSnapshot => {
                if (childSnapshot.val() === token) {
                    deviceExists = true
                    return console.log('Device already registered.');
                }

            })

            if (!deviceExists) {
                console.log('Device subscribed');
                return database.ref('device_ids').push(token)
            }
        })
}
Unsubscribe User
If the user clicks the button after subscribing again, their token gets deleted. We reset our userToken and isSubscribed variables as well as remove the token from localStorage and update our button again.
Below that we add all events around handling the notification window. In this example, we close the notification and open a website after clicking on it.
Another example would be synchronizing data in the background. Read Google’s article about that.
Show Messages when on Site
When we are subscribed to notifications of new posts but are already visiting the blog at the same moment a new post is published, we don’t receive a notification.
A way to solve this is by showing a different kind of message on the site itself like a little snackbar at the bottom.
To intercept the payload of the message, we call the onMessage method on Firebase Messaging.
The last step for this part of the series is adding the Google Cloud Messaging Sender ID to the `manifest.json` file. This ID makes sure Firebase is allowed to send messages to our app. If you don’t already have a manifest, create one and add the following. Do not change the value.
{
  "gcm_sender_id": "103953800507"
}
Now we are all set up on the front end. What’s left is creating our actual database and the functions to watch database changes in the next article.
Say you want to attach a click handler to a <button>. You almost surely are, as outside of a <form>, buttons don’t do anything without JavaScript. So you do that with something like this:
var button = document.querySelector("button");
button.addEventListener("click", function(e) {
  // button was clicked
});
But that doesn’t use event delegation at all.
Event delegation is where you bind the click handler not directly to the element itself, but to an element higher up the DOM tree. The idea being that you can rip out and plop in new DOM stuff inside of there and not worry about events being destroyed and needing to re-bind them.
This is where it gets tricky. In this example, even if the user clicks right on the button somewhere, depending on exactly where they click, e.target could be:
The button element
The svg element
The use element
So if you were hoping to be able to do something like this:
document.documentElement.addEventListener("click", function(e) {
  if (e.target.tagName === "BUTTON") {
    // may not work, because might be svg or use
  }
});
Unfortunately, it’s not going to be that easy. It doesn’t matter if you check for classname or ID or whatever else, the element itself that you are expecting might just be wrong.
There is a pretty decent CSS fix for this… If we make sure nothing within the button has pointer-events, clicks inside the button will always be for the button itself:
button > * {
  pointer-events: none;
}
This also prevents a situation where other JavaScript has prevented the event from bubbling up to the button itself (or higher).
document.querySelector("button > svg").addEventListener("click", function(e) {
  e.stopPropagation();
  e.preventDefault();
});

document.querySelector("button").addEventListener("click", function() {
  // If the user clicked right on the SVG,
  // this will never fire
});
Do you know about Oktoberfest in the Bavarian region of Germany? It’s a huge celebration from the middle of September until the beginning of October. The celebration started from the royal wedding of Prince Ludwig and Princess Therese. The wedding was in October, so that’s why the name of the celebration is Oktoberfest. It was in Munich, and all the citizens were invited to celebrate this ceremony in 1810.
I still remember the time I lived in Munich, those beautiful parades with traditionally dressed people, decorated horses pulling flowered wagons. And, of course, rivers of beer…
If you want to see Oktoberfest themed images and get more inspiration, please visit PhotoDune.
In this tutorial, you will learn how to create an illustration on an Oktoberfest theme. We will take basic shapes, warp here, distort there, and as a result we will get a Bavarian man with beer glasses and pretzels. You will learn how to create the pretzels from one of my previous tutorials.
1. How to Create the Head
Step 1
After creating a new document (850 x 850 px Width and Height), we will start by forming the shape of the head. Using the Rounded Rectangle Tool, create a beige rounded rectangle. To get a rounded rectangle with very rounded corners, create a small rounded rectangle first and then stretch it. Or you can go to View > Show Corner Widget and modify the corners by dragging them inside.
Now let’s modify the bottom part of this shape to create the chin. We’ll use the Fish effect: go to Effect > Warp > Fish and enter the options below. Finally, we need to expand this shape. Select it and go to Object > Expand Appearance.
Step 2
For the hair, make a copy of the new shape behind the original one (Control-C, Control-B) and rotate it upside down. Change its color to light brown.
Next using the Ellipse Tool (L), draw an oval with the same light brown color. Take the Direct Selection Tool (A) and move the handles of the anchor points of this oval to achieve the result you see below. To make a sharp edge like the one below, you need to keep the Alt button pressed while moving the handles. If you do not keep this button pressed, the opposite handle to the one you move will also symmetrically move.
Finally, create a slightly darker ellipse behind the shape with the sharp edge. To place it behind, right-click > Arrange > Send Backward, and move it a little to the left.
Step 3
For the eye, create an even circle. For this, use the Ellipse Tool (L) while holding down the Shift key. Now, using the Direct Selection Tool (A), move the left and right anchor points down. This will be the eyelid.
Next, make a copy of this shape in front of the original one, make it a little smaller, and change the color to white and slightly move it to the right.
Add a brown, even circle in front of the white shape, then a smaller darker circle inside.
For the highlight, create a tiny white circle on top.
Step 4
For your convenience, group the eye (right-click > Group).
Now, to create another one, hold the Shift and Alt keys, and move the first eye to the right. You will get another copy of it to complete the eyes.
Step 5
For the eyebrow, create a thin horizontal ellipse (the Ellipse Tool (L)). For further modification of this ellipse, go to Effect > Warp > Arc. Enter the options you see in the image below. Expand this shape (Object > Expand Appearance).
Step 6
Place the left eyebrow over the left eye. While keeping the left eyebrow selected, take the Reflect Tool (O) and while holding down the Alt key, click between the two eyes. In the new dialogue window, select Vertical, Angle 90 degrees and press Copy. Now we should have the two eyebrows.
Step 7
Let’s make the nose. Using the Eyedropper Tool (I), take the same fill color as the upper eyelid. To take the color you want, select the necessary object, take the Eyedropper Tool (I), and hit with this tool the color you want to take. Then create an ellipse. While keeping it selected, go to Effect > Warp > Inflate. Enter the options you see below in the first image.
Place a new horizontal ellipse covering the bottom part of the vertical one. Keep the new horizontal ellipse selected and again go to Effect > Warp > Inflate. Enter the options you see below in the second image.
Here are the options for the smaller horizontal ellipse:
Once the nose is done, group it (right-click > Group) and put it between the eyes.
Step 8
The mouth contains three half-ellipses. To create one, start with an ellipse, and set its color to white. I made the color a little bit darker so you can see it better. Cover the upper part of the ellipse with any color rectangle. Select both shapes and hit the Minus Front button in the Pathfinder panel. You will be left with a half-ellipse.
Create a copy of this half-ellipse behind (Control-C, Control-B), and make it bigger by stretching it downward. Change the fill color to the same as the face.
Create a third copy behind the previous one (Control-C, Control-B), make it bigger by stretching it downward, and change the fill color to the same as the nose.
Place the mouth where it should be.
Step 9
A good Bavarian man needs a mustache, so let’s give it to him. Make a left anchor point sharp on a newly created ellipse using the Convert Anchor Point Tool (Shift-C). Then take the Direct Selection Tool (A) and move the handles, forming the left piece of the mustache.
Step 10
Place this piece of the mustache over the mouth to cover its upper part. Create a vertical copy of the left part to have the right one.
Step 11
For the cheeks, first make an ellipse, and then move the handles of the anchor points to achieve the result shown below. Notice that the cheek has to be under the mustache. Then create a vertical copy of the left cheek to have the right one.
Step 12
Let’s make the chin. Be sure you have the same fill color as the nose. Make two ellipses. Keep both selected and press the Unite button on the Pathfinder panel. You’ll get one shape.
While keeping it selected, hold down the Alt key and move it up. You will notice that now you have two same shapes, as the Alt key gives you a copy of an object. Make the new copy slightly bigger.
Be sure the bigger shape stays over the smaller one. While keeping them selected, press Minus Front on the Pathfinder panel. Your result—it’s the chin of the Bavarian man.
Place the chin under the mouth.
Step 13
One of the last things we want to give our Bavarian man is an ear (keep the same fill color). Create two ellipses and make them overlap as in the image below. The lower one has to be on top. Press Minus Front on the Pathfinder panelwhile keeping both selected.
Add an ellipse behind, the same fill color as the face. And rotate the new ellipse a little to the left.
Step 14
Place the ear on the left side of the face. Notice that it should stay behind the face and in front of the hair. Make a vertical reflection of the left ear to get the right one, just as you did with the eyes and mustache.
Our handsome Bavarian man is almost done!
2. How to Create the Hat
Step 1
To create the hat, start with a green ellipse and then warp it: go to Effect > Warp > Arc. Enter the options you can see in the first image. After this, warp it again: go to Effect > Warp > Bulge. Enter the options you can see in the second image.
Here is the second image, where you can see the Bulge options.
Expand the result (Object > Expand Appearance). Then take the Delete Anchor Point Tool (-) and delete the anchor point marked in the image.
Step 2
Create a lighter copy behind this shape: first make a copy (Control-C, Control-B), shift it up, and change the fill color.
Add a tan rectangle as a hat ribbon. Warp the rectangle by entering the options from the image below.
Expand the rectangle and place it behind.
Step 3
Be sure to have the same green fill color as the hat. New ellipses need to be created. Using the Direct Selection Tool (A), move down the left and right anchor points.
Holding the Alt button, move it to the right. Now you have two shapes which you need to unite. So press the Unite button on the Pathfinder panel.
Select the top sharp anchor point marked in the image below and turn it into a smooth one by pressing the Convert selected anchor points to smooth button, which is located over your artboard.
It’s the upper part of the hat.
Place it behind the tan ribbon.
Step 4
For the feather, start with a rounded rectangle. Then go to Effect > Warp > Inflate. After warping, expand this shape.
Step 5
Add a very narrow vertical ellipse as a stem.
Now we want to cut off some parts to make this shape look more like a feather. As a cutter, we will take a triangle. You can make a triangle using the Polygon Tool, or even faster: create any fill color rectangle, take the Delete Anchor Point Tool (-), and delete one anchor point on it. Using the Direct Selection Tool (A), move the anchor points to make the triangle shape you want.
As you have a cutter now, make a few more copies of it. Place them over the main shape of the feather where you want to cut off. Select the feather and all the cutters together and press Minus Front in Pathfinder. It’s done!
Place the feather on the hat. Notice that the upper part of the hat is behind the feather, and the feather is behind the tan ribbon.
Group the whole hat for your convenience.
Step 6
Place the hat on the man’s head, behind it.
3. How to Create the Beer Glass
Step 1
Start with a long, vertical rounded rectangle. Cover its upper part with any color rectangle. While keeping the rectangles selected, press Minus Front in Pathfinder.
Now, make sure you don’t have anything selected, and press the Swap Fill and Stroke (Shift-X) button on the Tools panel. Then, on the Stroke panel, make a very thick stroke Weight and add one more rounded rectangle as a glass holder.
Step 2
Select the main beer glass shape and go to Object > Path > Offset Path… In the new dialogue window, enter Offset around -6 (it depends on your glass size), Joins Miter, Miter limit 4, and press OK. Change the fill color of the new shape.
While keeping the tan shape selected, go to Effect > Warp > Arc Lower. Enter the options you see below.
Step 3
Add a light yellow rounded rectangle for a highlight, and a few circles as bubbles.
Step 4
Then add beige circles to represent the foam, and rounded rectangles of the same fill color for the foam drip.
4. How to Create the Background
Step 1
Hit the Rectangle Tool (M) and click on your artboard. Enter Height and Width 850 px. Set its fill color.
Step 2
Add three darker and smaller rectangles.
Step 3
Using the Direct Selection Tool (A), move their anchor points to achieve a result similar to the image below.
Step 4
While keeping all three shapes selected, make three copies in front (Control-C, Control-F). Don’t take off the selection. Delete their fill color and set a white stroke color. Shift the new copies up.
Step 5
On the Stroke panel, check Dashed Line.
Step 6
Place the Bavarian man and beer on the background. Make one more copy of the beer.
Step 7
If you would like, you can add pretzels from my previous tutorial to this illustration.
Cheers!
What a great job you did! You have learned how to create not just a person, but a person with a specific nationality, as well as national features. And everything using just basic shapes! Thanks for being with me to the end. I hope to see you again in my next tutorial!




 DrawingHow to Draw a Sloth Step by StepMonika Zagrobelna
 AnimalsHow to Draw a Cute Bunny Step by StepMonika Zagrobelna
 AnimalsHow to Draw a Butterfly Step by StepMonika Zagrobelna