Five of My Favorite Features of Jetpack

Post pobrano z: Five of My Favorite Features of Jetpack

Jetpack is an official WordPress plugin directly from Automattic. It’s an interesting plugin in that it doesn’t just do *one thing* — it does a whole slew of things that enhance what your WordPress site can do. *Any* WordPress site, that is, and often with extremely little effort. Those easy win features Jesse Friedman calls light switch features, meaning you literally flip a switch in Jetpack’s settings and start benefitting. I love that.

There are dozens of features in Jetpack, and I personally make use of most of them and see the benefit in all of them. Allow me to share with you five of my favorites and how they are actively used right here on this site. It’s actually a bit hard to pick, so perhaps I’ll do this again sometime!

1) Related Posts

This seems like such a simple little feature, but it’s anything but. Something has to analyze all the content on your site and figure out what is most related to the current content. That kind of thing can be incredibly database intensive and bring even powerful hosting to its knees. WP Engine, by all accounts a powerful and WordPress-tuned host, bans many of them outright:

Almost all “Related Posts” plugins suffer from the same fundamental problems regarding MySQL, indexing, and search. These problems make the plugins themselves extremely database intensive.

Their top recommendation? Jetpack Related Posts.

Jetpack handles this by offloading the work off your servers and onto theirs. Your site has no additional load for this super useful feature. I find it does a great job.

In a recent post about dropdown menus, here are the related posts it displays.

2) Markdown

I wrote once: You Should Probably Blog in Markdown.

I’m quite serious about that. I’ve been involved with far too many sites where old content was mired with old crufty HTML or otherwise formatted in a way that held them back, and cleaning up that content was an impractically large job. You avoid that situation entirely if you create your content in Markdown (and stick to Markdown syntax).

Things like <span style="font-weight: bold; font-family: Georgia; color: red;"> around seemingly random sentences. <div class="content-wrap-wrap"> wrapping every single blog post because it was just “what you did”. Images force-floated to the right because that made sense three designs ago. Headers with class names on them that don’t even exist anymore. Tables of data spit into content with all the whitespace stripped out and weird alignment attributes you barely recognize. An about page that was pasted in from Microsoft Word.

Content like this will not and cannot last.

With Jetpack, you flip on Markdown support and you’re good!

Almost more importantly, it feels like the Markdown option you can trust. There are other plugins out there that add Markdown support, and that’s great, but they leave open questions. How long is the plugin going to be supported? What variety of Markdown did they pick? Is that variety going to continue to be supported? Does it work in comments? These kind of questions make me nervous.

Choosing Jetpack feels safe because it’s the official Markdown choice of WordPress, in a plugin we can be sure will be updated forever.

It’ll be interesting to see what Markdown + Gutenberg is like!

3) Social Sharing

This is a multi-pronged feature.

One, it can easily add sharing buttons to your posts. This isn’t a particularly difficult thing to do for any developer worth their salt, but having it abstracted away in a plugin is nice.

Two, it can share your posts directly to social sites like Twitter and Facebook. That’s a much harder thing to write from scratch. It’s a thing I used a paid third-party service for years. It was a pleasant surprise when I discovered Jetpack’s ability to do this.

The „official” buttons can be nice as they have the most integrated functionality with the services themselves, but I dig that the other options are like „Responsible Social Sharing Links” in that they have the least possible performance overhead.

It allows you to customize the mesasge, and does smart stuff like includes the Featured Image as image attached to the social post.

4) Comment Improvements

I’m a little uncomfortable using a third-party comment system on my sites. I like control. Comments are content and I like making sure those are in my own database. Yet, I think users have a little higher expectations of comment thread UX than they used to. Having to manually type in your name and email and all that feels kinda old school in a not-so-great way.

Fortunately, Jetpack can replace your comment form with a modernized version:

Jetpack has blocked about 8 million login attempts from CSS-Tricks and 2 million spam comments.

Now users can log in with their social accounts, making leaving a comment a much easier flow. Not to mention the fact that it’s all the less work you have to do styling the comment form.

Notice the „Notify me of new comments via email” checkbox there too. Guess what powers that? Jetpack. That’s a nice feature for people who are leaving question-style comments on your site. They very likely want to be notified of about the conversations happening in comments as it evolves.

5) Security

I’ve been deep into the world of web development for many years. The more I know, the more I can see that I don’t know. We all have to focus on certain things to get done what we need to on our own journeys. I fully admit I know very little about server-side web security. I’d rather leave that exertise to others, or ideally, software that I trust.

Here’s some fun statistics from here on CSS-Tricks:

It’s nice to know my site is being protected that way from malicious logins. Spam, an even more direct problem, is also taken care of by Akismet, the spam-blocking plugin that my Jetpack subscription covers.

Should anything happen to the site, I know it’s backed up off my server by VaultPress, which is also part of my Jetpack subscription.

See how much it does!?


Again, this is just a handful of the features of Jetpack. There are so many niceties tucked into it I consider it a no-brainer plugin. Probably the first and most important plugin you’ll install on any self-hosted WordPress site.

The post Five of My Favorite Features of Jetpack appeared first on CSS-Tricks.

Spectacular Link Building Techniques For Your Website

Post pobrano z: Spectacular Link Building Techniques For Your Website

There are numerous techniques you could use to build links, some of them white hat while others black hat. Google is very keen on sites that use black hat techniques and will place penalties on such sites, so while building links through ghost marketing, you should be careful to avoid falling in the hands of Google algorithms because this will literally take you back to zero. With that said, you still have white hat methods that are natural and safe that you could utilize.

Here are some guidelines you may use to generate high-quality links.

Content marketing

The first step you should take in building links is content marketing, which is basically producing high quality content that is sharable. By far, this is the most legitimate link building solution because you will naturally get links from different sources. Choose a relevant topic and conduct in-depth research to come up with an original article. Curate comprehensive advice and publish on your website and newsletter. You could also share on social media platforms like Twitter and Facebook. If your content is good, your target audience will share it and this will give you natural backlinks.

Broken link building

Broken link building includes identifying broken links on blogs and sites and giving the site owners an alternative resource. You need an SEO tool like Ahrefs to identify sites in your niche that have broken links for articles. Export data about the sites and reach out to as many as possible because most of them will definitely not agree to the offer. How this works is that after approval you create an article on the topic highlighted on the broken link, then ask the site to use your link instead of that which is not available.

Guest posting for SEO link building

Guest blogging is an effective technique and this works because you give valuable input to sites then they give you a link in return. Choose your targets wisely and build a diverse link profile including authoritative inbound link profile. Reach out to the sites you have identified and show them a sample of the article you intend to publish. After they have approved your request create a high-quality article and include one link to your site in a natural flow.

Link building with social shares

One of the options for getting links is encouraging social sharing. Although this does not impact ranking directly, social shares could impact the number of people who see the content and eventually link to it. This explains the reason posts that have many social shares usually rank high on search results.

Build links with reviews

Another way to build links is through reviews. There are many review platforms that you can join that will link back to your site. You could also talk to an online influencer to get them to review your content and this could get you some links. Sites like Trustpilot give you an opportunity to link back to your site and reviewers could also help to spread the good news about your business if your services or goods are perfect.

Link building is a diverse specialty and you can use different methods to earn links for your site. The rule of the thumb to good link building is to always avoid strategies that would be classified as spamming or black-hat because this will bring down the reputation of your site in the eyes of Google. Try the ideas mentioned here coupled with other white-hat methods and you will see results.

How to Create Custom Guides in Adobe Illustrator

Post pobrano z: How to Create Custom Guides in Adobe Illustrator

Final product image
What You’ll Be Creating

Welcome to our Illustrator in 60 Seconds series, in which you can learn an Illustrator skill, feature, or technique in just a minute!

Illustrator in 60 Seconds: How to Create Custom Guides in AI

Always wanted to create custom guides from more intricate shapes but never knew exactly how? Well, if that’s the case, you should watch this quick video, which will show you how easy the process is!

By default, Illustrator
comes with a basic Ruler system that you can turn on using the Control-R keyboard shortcut. You can use it to add both horizontal and vertical guidelines, to which your shapes can
snap, by simply clicking and dragging them out.

how to use the default ruler system

But what about those
situations when you need to build a set of custom guides based on more
intricate shapes? You’ll be happy to hear that the software allows you to do just that using any shape, as long as it’s a vector.

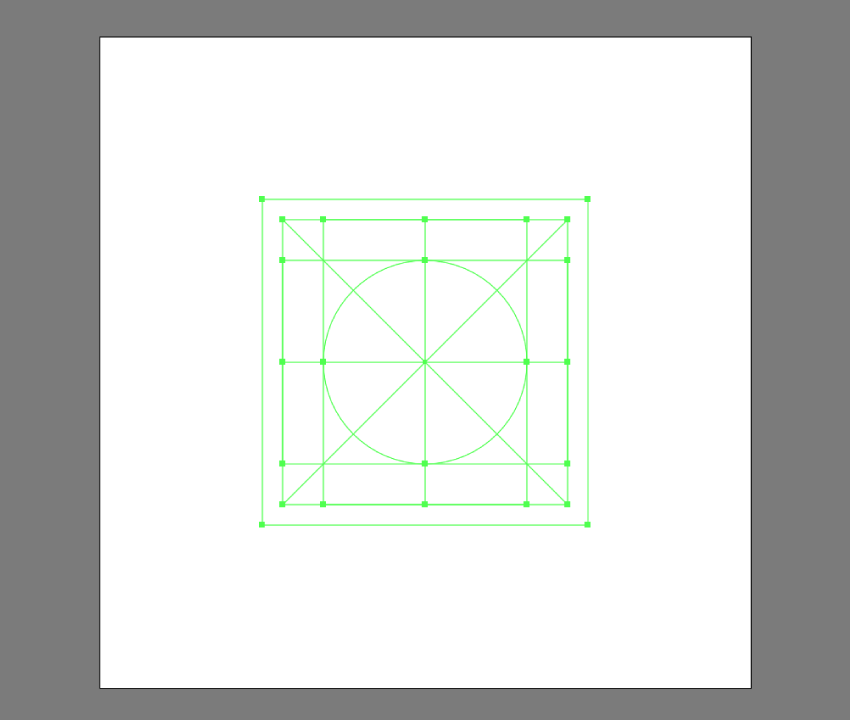
In my case, I’ve set up a simple
grid system that I’ll be using for some custom icons that I’ve built using a
couple of basic geometric shapes and strokes.

example of shapes to be converted into guides

To convert my shapes into guides, I first have to
select them and then go to View >
Guides > Make Guides
or use the faster right click > Make Guides option. This will turn them into a
custom reference grid that I can lock and use to build my assets on.

how to lock the guides

A Bit More Detail

Learn more about Adobe Illustrator on Envato Tuts+:

60 Seconds?!

This is part of a series of quick video tutorials on Envato Tuts+ in which we introduce a range of subjects, all in 60 seconds—just enough to whet your appetite. Let us know in the comments what you thought of this video and what else you’d like to see explained in 60 seconds!

How to Create a Set of Organic, Hand-Drawn, Retro Patterns in Adobe Illustrator

Post pobrano z: How to Create a Set of Organic, Hand-Drawn, Retro Patterns in Adobe Illustrator

Final product image
What You’ll Be Creating

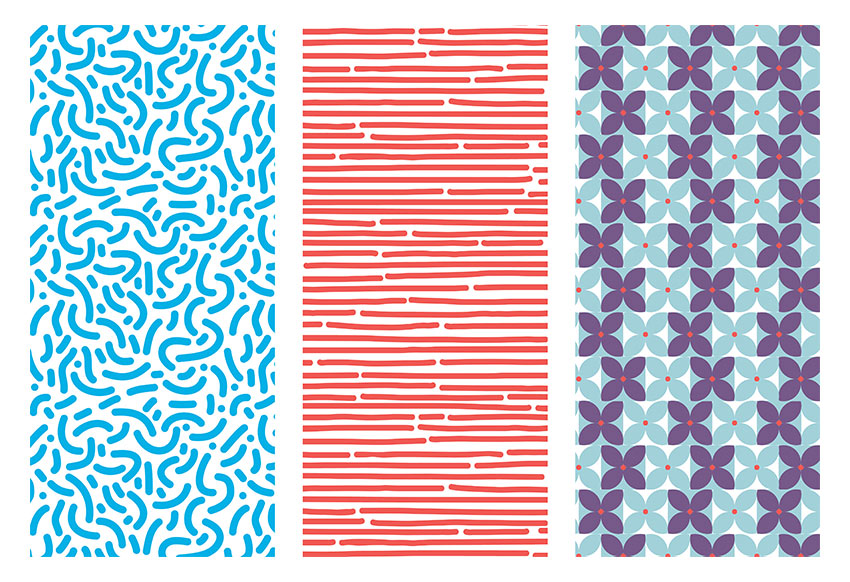
Have you always wondered how to make seamless patterns in Illustrator? Patterns that look effortless and are pleasant to the eye? In this tutorial, you will learn how to use the Pattern Option tool in Illustrator to create a set of fun patterns. 

If you’re looking for Adobe Illustrator addons and patterns, head on over to GraphicRiver.

1. How to Create a New Document in Adobe Illustrator

Step 1

Open Adobe Illustrator and head to File > New. Let’s name our file Patterns-v1, and let’s create a single square Artboard. Set the Width and Height to 1080 x 1080 px. Under Advanced, choose RGB for our Color Mode and 72 ppi for Raster Effects. If you are planning on printing it, use 300. Click OK.

Create a new document in Illustrator

Step 2

Let’s bring up our Pattern Options panel by going to Windows > Pattern Options. Let’s open the Swatches panel as well by going to Windows > Swatches. The new patterns we create will be added to the Swatches panel.

Bring up the Pattern Options and Swatches panel by going to Windows

2. How to Set Brush Options

Step 1

Let’s start by setting the brush for our first organic pattern. Select the Paintbrush Tool (B) from the Tools panel. For the Fill and Stroke color, double-click the stroke color and select a blue color with the following code: #00B0E6. Click on the fill color and select None (/).

Select a blue stroke color and none for fill color

Step 2

Head over to the Control bar. Click on Brush Definition and double-click on the round brush to open the Calligraphic Brush Options. On the new window, change the Size brush to 40 pt and change the Name to 40 pt. Round. Click OK.

Change the size of the brush on the Calligraphic Brush Options

Step 3

Go to the Tools panel and double-click on the Paintbrush Tool (B) to open the Paintbrush Tool Options panel. I am using the settings in the image below. This is to create a soft shape with curves and no hard edges, which will result in fewer points to edit.

Change the settings on the Paintbrush Tool Options

3. How to Create an Organic Pattern

Step 1

Using the Paintbrush Tool (B), create soft C shapes. I created the bigger shapes first and later filled them in with smaller dots and strokes. You can create anything—there’s no right or wrong in this! 

Try to focus on staying inside the page and making the shapes evenly spaced. We will fix the edges later on.

Create soft C shapes

Step 2

Add smaller details within the frame, like dots and short strokes. Remember not to worry too much about the edges as they will be fixed later on. Use the Direct Selection Tool (A) to select single points of the shapes and edit.

Fill in the gaps to avoid odd white spaces

4. How to Use the Pattern Tool

Step 1

Select the composition you just created, head over to the Pattern Options panel, and click on the dropdown menu on the top right side. Select Make Pattern, which will open up a window letting you know that the new pattern will be added to the Swatches panel. A second window will let you know that the strokes will now be extended into shapes. Click OK in both cases.

At this point you will enter Pattern Editing Mode, where you can edit the composition you just created as a whole pattern. You will notice you are in this mode when there is a bar over the document with a red stroke under it. Please note that the compositions around the main pattern are not clickable objects

Create a pattern with the composition we created

Step 2

Let’s start by setting up the basics to edit the pattern. Head over to the Pattern Options and name the pattern. I will name mine New Pattern 1. Set the Tile Type to Grid and the Width and Height to the same size as the artboard we created, 1080 x 1080 px. 

Under Copies I have 3×3 selected, which is the number of sets that appear around the main pattern. Make sure that Show Tile Edge is checked, which will add a blue margin to see the edge of the composition that we want to work on now. 

Change the settings on the Pattern Options panel

Step 3

Let’s edit the pattern. Use the Zoom Tool (Z) to get closer into the composition. Remember that only the composition within the blue stroke is editable. 

Use the Paintbrush Tool (B) to add elements. The new elements will be automatically drawn in the other compositions. This is a great tool for creating seamless patterns. Command-Z will be your friend for this stage as you will need to go back and forth to find the right balance.

Add more elements on the composition

Step 4

Let’s work on the edges. Continue using the Paintbrush Tool (B) and draw a line over the blue margin. The exceeding part will be drawn on the opposite side of the main composition; this is a great way to know how the elements are being connected. 

A seamless pattern works better when there’s no visible margin on the main composition. You can Zoom (Z) in and out to see what the pattern looks like and fix elements that seem too obvious to the eye.

Add elements over the margin of the composition

Step 5

To save the pattern, simply head over to the top of the document, above the red line, and click on Save a Copy. This will save a copy of the pattern. You can save as many copies as you like throughout the process so you can go back and forth. 

Another way of saving the pattern is by pressing Command-S to save the original pattern with its original name. This won’t create a whole new pattern, but will save the one you have been editing. A window will open letting you know that the strokes will be expanded. Click OK.

Save the pattern

5. How to Use and Edit the Pattern

Our pattern has been added to the Swatches panel, so now it’s time to use it! Click on the Rectangle Tool (M), draw a square, and select our newly created pattern in the Swatches panel as the Fill color.

If the pattern seems too big or small, you can resize it in the Pattern Options panel and lower the Width and Height to change the margin. Once you have resized the margin, proceed to resize the composition by selecting all of it, as if you were working normally outside Pattern Editing Mode

Now you are ready to use the pattern anywhere!

Create a square with the Rectangle Tool and click on the pattern under the Swatches panel as a Fill

6. How to Create a Hand-Drawn Pattern

Step 1

Let’s duplicate the artboard we created by hitting Shift-O, and you will get an outline around the artboard. Press Option-Shift and drag the artboard to duplicate and maintain the same XY level.

Duplicate the artboard we created at the beginning

Step 2

Using the Paintbrush Tool (B) from the Tools bar, create horizontal lines across the artboard. For this pattern, feel free to go outside the board and to change the point size of the brush. I am using a brush size of 40 pt, but remember we can change the size of our pattern later on. I am also using red color: #F05A54.

Using the Paintbrush Tool draw horizontal lines

Step 3

Open the Pattern Options panel by going to Window > Pattern Options. Select the shapes and, in the Pattern Options panel, click on the dropdown menu in the top right corner. Select Make Pattern. The pattern will be added to the Swatches panel. 

Select the lines and create a pattern through the Pattern Options

Step 4

Pattern Editing Mode will be activated. Let’s experiment with the options in the Pattern Options panel. Change the Tile Type to Hex by Column, which will make the pattern change from a square grid to a hexagonal grid margin in which the composition will overlap. Change the Height and Width to have a smaller size; I am activating the Maintain Width and Height Proportion option and changing the Width to 400 px. Resize the pattern to fit the margin.

On the Pattern Options change the Tile Type to Hex by Column

Step 5

Feel free to edit the pattern. When you are good with it, click Done on the top of the document, above the red stroke. This will take us out of Pattern Editing Mode, and our pattern will be edited in the Swatches panel. Our second pattern is ready to use!

Edit the pattern to fill in the gap save and it is ready to use

7. How to Create a Geometric Pattern

Step 1

Let’s create one last pattern inspired by the 70s. Using the Ellipse Tool (M), create two circles and make them overlap to create a leaf. Using the Pathfinder panel, Intersect the two shapes.

Using the Ellipse Tool create two overlapping circles Intersect using the Pathfinder panel to create a leaf

Step 2

Duplicate the leaf by pressing Command-Shift and clicking and dragging. We need four leaves to create a flower. Using the Rotate Tool (R), rotate each leaf while pressing Shift for an even rotation. Let’s add a red circle in the centre. I am using the following codes: blue #A3D1DA and red #F05956.

Duplicate the leaf to create a flower and add a red circle in the middle

Step 3

Duplicate the flower shape, and change the leaves’ color to purple with the color code #775988, and add a square as a background. Duplicate the two tiles by pressing Command-Shift and clicking and dragging horizontally. Do the same vertically until it looks like the image below:

Duplicate the flower and change the color to purple Duplicate the flowers to fill in the artboard

Step 4

Open the Pattern Options panel by going to Window > Pattern Options. Select the shapes and, in the Pattern Options panel, click on the dropdown menu in the top right corner. Select Make Pattern. The pattern will be added to the Swatches panel. For this pattern, let’s choose a Height and Width of 400 px and resize the composition so that the pattern is smaller.

Create a pattern of the flowers Feel free to resize the pattern to make the flower bigger or smaller

Step 5

I am choosing to select alternate horizontal lines of flowers and shifting them slightly to the left to add visual interest. As you can see, anything that appears outside of the left margin will reappear on the right side.

Edit the flower pattern

Step 6

Click on Done at the top of the document, above the red line. 

Save the flowers pattern

Step 7

Duplicate the square we created previously and apply the pattern. Now you have three patterns that you can use for anything! 

Duplicate a square and use the pattern under the Swatches panel

Awesome Work, You’re Done!

Congratulations! In this tutorial we’ve learned to:

  • Use the Pattern Option tool in Illustrator.
  • Set and change options for brushes.
  • Work in different grid settings to give a different look to our patterns.
End result

Mini People in the Jungle: beautiful grayscale illustrations by Dawid Planeta

Post pobrano z: Mini People in the Jungle: beautiful grayscale illustrations by Dawid Planeta

Dawid Planeta is a graphic design, illustrator, and artist from Poland. One of his most prominent work recently is his series of illustration titled “Mini People in the Jungle“. It features dark, colorless scenes with gigantic animals with glowing eyes. As one could have guessed, the artist’s inspiration comes from the dark side, from his own personal struggle with depression. The result is stunning and can be followed with recent artworks regularly added on his Tumblr.

Loyto L1: a modern take on the traditional analogue watch

Post pobrano z: Loyto L1: a modern take on the traditional analogue watch

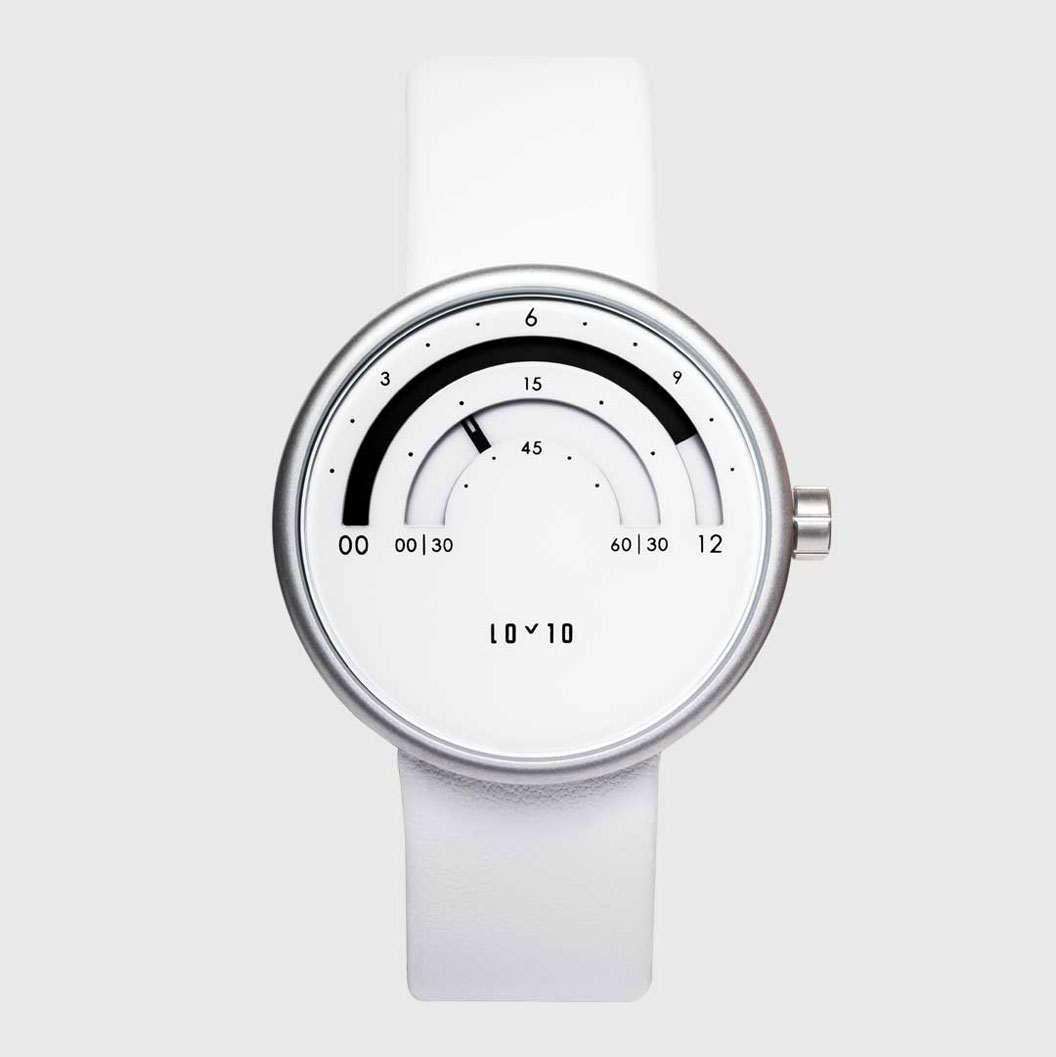
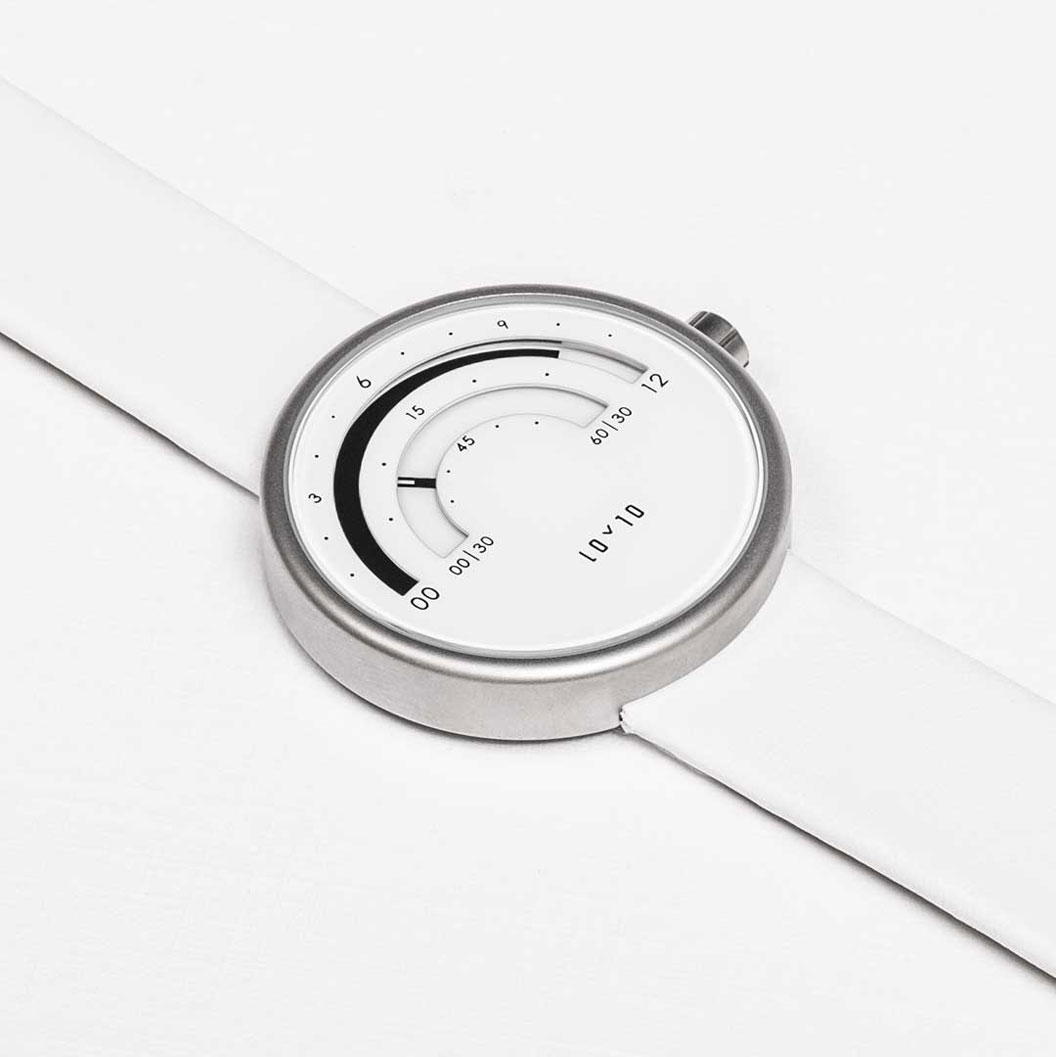
Many designers choose to design for smartwatches because the digital screens allow them to create modern interfaces and innovate. Innovating with a technology that has been around for hundreds of years is harder, especially when the technology behind is more restrictive.

With the Loyto L1, the designers found a way to give a new, modern graphic representation of “reading time”. You can find this beautiful watch on Loyto Watches.