How to Make a Photoshop Action to Create a Photo Art Effect

Post pobrano z: How to Make a Photoshop Action to Create a Photo Art Effect

Final product image
What You’ll Be Creating

In this tutorial, you will learn how to make Photoshop actions to create your own photo effects. I will show you how to transform any photo into art with Photoshop effects and how to keep these photo art effects editable using smart filters, which has the property of adding image effects to layers in a non-destructive way. So now it’s time to learn, and you’ll soon be able to create your first photo effect Photoshop actions.

The photo effect of this tutorial is part of Mezzopop Photoshop Action. The complete action has 27 premade gradient options and works with Photoshop CS5, CS6, and CC.

Mezzopop photoshop action promotion image
Mezzopop Photoshop Action

Tutorial Assets

The following asset was used during this tutorial:

1. Choosing and Preparing a Good Photo

Step 1

First, you need to find the right photo for the effect you want. Not every photo will look great with all photo effects. 

For this tutorial, you will need an image with good illumination and not much detail on the background. I’m going to use a photo of a beautiful woman with a white background. It will work perfectly with the photo effect we are going to create.

Stock image used for the photo to art effect

Step 2

Another thing you need to know is that some effects depend on the image size and dpi of the document. Using a different configuration will result in different results. Dpi is not going to be important for this tutorial, but if you choose an image much bigger or smaller than mine, your result will look slightly different.

To check the size and dpi of your image, open it with Photoshop and go to Image > Image Size. For this tutorial, you will need an image with about 1400 x 1400 px.

Image dimensions and resolution

2. Recording the Action

Step 1

We are going to create a new action set. Go to Window > Actions to open the Actions panel. Then click on the Create new set icon and name it My First Photo Effects.

Creating a new Action set

Step 2

Now click on the Create new action icon. Name it Mezzopop Effect and click on Record. After that, Photoshop will record almost every step you make. That is how a Photoshop action works—you play it, and Photoshop repeats the actions recorded.

Pay attention to the Actions panel. If you make a mistake, click on the step you want to delete and then click on the trash bin.

Creating a new action

Step 3

Go to the Layers panel, right-click on the photo layer, and choose Convert to Smart Object. That will keep the image editable. 

Converting the layer into a Smart Object

Step 4

Go to Filter > Blur > Gaussian Blur and set it to 0.5 px. That will make the image less detailed, which is good for the final result. You can disable it later if you don’t like the effect—all the effects will be on separate layers.

Adding a gaussian blur filter

Step 5

Now go to Filter > Sharpen > Smart Sharpen and use these settings:

  • Amount: 183%
  • Radius: 1.0 px
  • Reduce Noise: 66%
  • Remove: Lens Blur

This will make the image sharper but with less fine details, since we added a Gaussian blur first.

Smart sharpen settings

Step 6

Go to Filter > Noise > Add Noise and use these settings:

  • Amount: 9.16%
  • Distribution: Uniform
  • Monochromatic: On

This will give us some controlled noise, which will make the final result always look like we want.

Adding noise to the image

Step 7

Now go to Filter > Pixelate > Mezzotint and set it to Long Lines. This will add the main effect of this tutorial.

Adding the mezzotint effect

Step 8

Go to Window > Adjustments to open the Adjustments panel. Then click on the Gradient Map icon. After that, go to Window > Properties and click on the gradient bar to edit it with these settings:

  • Stop 1: Location: 0% Color: #003533
  • Stop 2: Location: 100% Color: #f6001d

Here we are creating a red gradient, but you can choose any color you want. The stop on the left side controls the shadows, and the one on the right controls the highlights. You can click below the gradient bar to create more stops and customize the gradient even more.

Adding a Gradient Map layer

Step 9

Go back to the Actions panel and click on Stop recording

In the next image, you can see all the steps of this action. 

Stopping the recording of the action

Here is the result of this photo art effect:

Final result of the photo art effect

Step 10

It is possible to edit the action. To understand that, we are going to add one more filter to it. This filter needs to be applied to the photo layer. If you look at the Actions panel, you will see that the last step that had the photo layer selected was the Mezzotint.

So select the Mezzotint step on the Actions panel and the photo layer on the Layers panel and click on Begin recording. Then go to Filter > Filter Gallery and add a Texturizer filter with these settings:

  • Texture: Canvas
  • Scaling: 100%
  • Relief: 2
  • Light: Bottom
  • Invert: Off

After that, click on Stop Recording.

Adding a texture to the photo art effect

Here you can see that the Texturizer filter was applied right after the Mezzotint.

Texturizer after the mezzotint filter

To play this action, select the photo layer on the Layers panel and the Mezzopop Effect on the Actions panel. Then click on Play and the photo effect will be applied.

Final result with the texturizer filter

Step 11

Now go back to the Layers panel—I want to show you something.

At the beginning of this tutorial, we converted the photo layer to a Smart Object. Because of that, all the filters we applied are now Smart Filters. So you can disable/enable or change them anytime you want, and the original photo will remain untouched. Not converting the photo to a Smart Object would result in an uneditable rasterized image.

To edit a Smart Filter, double-click it and the appropriate panel will open.

Smart Object and its Smart Filters

And We’re Done!

In this tutorial, you learned the basics of how Photoshop actions work. We created a beautiful Photoshop art effect using simple filters and a Gradient Map. Then you learned how to edit an action and add more filters to it. Then you also learned that Smart Objects allow us to apply filters as Smart Filters, keeping all the effects editable. 

I hope you learned something useful with this tutorial.

Don’t forget to check the original action:

Mezzopop photoshop action promotion image
Mezzopop Photoshop Action

If you want to keep learning, here are some tutorials I recommend:

How to Make a Photoshop Action to Create a Photo Art Effect

Post pobrano z: How to Make a Photoshop Action to Create a Photo Art Effect

Final product image
What You’ll Be Creating

In this tutorial, you will learn how to make Photoshop actions to create your own photo effects. I will show you how to transform any photo into art with Photoshop effects and how to keep these photo art effects editable using smart filters, which has the property of adding image effects to layers in a non-destructive way. So now it’s time to learn, and you’ll soon be able to create your first photo effect Photoshop actions.

The photo effect of this tutorial is part of Mezzopop Photoshop Action. The complete action has 27 premade gradient options and works with Photoshop CS5, CS6, and CC.

Mezzopop photoshop action promotion image
Mezzopop Photoshop Action

Tutorial Assets

The following asset was used during this tutorial:

1. Choosing and Preparing a Good Photo

Step 1

First, you need to find the right photo for the effect you want. Not every photo will look great with all photo effects. 

For this tutorial, you will need an image with good illumination and not much detail on the background. I’m going to use a photo of a beautiful woman with a white background. It will work perfectly with the photo effect we are going to create.

Stock image used for the photo to art effect

Step 2

Another thing you need to know is that some effects depend on the image size and dpi of the document. Using a different configuration will result in different results. Dpi is not going to be important for this tutorial, but if you choose an image much bigger or smaller than mine, your result will look slightly different.

To check the size and dpi of your image, open it with Photoshop and go to Image > Image Size. For this tutorial, you will need an image with about 1400 x 1400 px.

Image dimensions and resolution

2. Recording the Action

Step 1

We are going to create a new action set. Go to Window > Actions to open the Actions panel. Then click on the Create new set icon and name it My First Photo Effects.

Creating a new Action set

Step 2

Now click on the Create new action icon. Name it Mezzopop Effect and click on Record. After that, Photoshop will record almost every step you make. That is how a Photoshop action works—you play it, and Photoshop repeats the actions recorded.

Pay attention to the Actions panel. If you make a mistake, click on the step you want to delete and then click on the trash bin.

Creating a new action

Step 3

Go to the Layers panel, right-click on the photo layer, and choose Convert to Smart Object. That will keep the image editable. 

Converting the layer into a Smart Object

Step 4

Go to Filter > Blur > Gaussian Blur and set it to 0.5 px. That will make the image less detailed, which is good for the final result. You can disable it later if you don’t like the effect—all the effects will be on separate layers.

Adding a gaussian blur filter

Step 5

Now go to Filter > Sharpen > Smart Sharpen and use these settings:

  • Amount: 183%
  • Radius: 1.0 px
  • Reduce Noise: 66%
  • Remove: Lens Blur

This will make the image sharper but with less fine details, since we added a Gaussian blur first.

Smart sharpen settings

Step 6

Go to Filter > Noise > Add Noise and use these settings:

  • Amount: 9.16%
  • Distribution: Uniform
  • Monochromatic: On

This will give us some controlled noise, which will make the final result always look like we want.

Adding noise to the image

Step 7

Now go to Filter > Pixelate > Mezzotint and set it to Long Lines. This will add the main effect of this tutorial.

Adding the mezzotint effect

Step 8

Go to Window > Adjustments to open the Adjustments panel. Then click on the Gradient Map icon. After that, go to Window > Properties and click on the gradient bar to edit it with these settings:

  • Stop 1: Location: 0% Color: #003533
  • Stop 2: Location: 100% Color: #f6001d

Here we are creating a red gradient, but you can choose any color you want. The stop on the left side controls the shadows, and the one on the right controls the highlights. You can click below the gradient bar to create more stops and customize the gradient even more.

Adding a Gradient Map layer

Step 9

Go back to the Actions panel and click on Stop recording

In the next image, you can see all the steps of this action. 

Stopping the recording of the action

Here is the result of this photo art effect:

Final result of the photo art effect

Step 10

It is possible to edit the action. To understand that, we are going to add one more filter to it. This filter needs to be applied to the photo layer. If you look at the Actions panel, you will see that the last step that had the photo layer selected was the Mezzotint.

So select the Mezzotint step on the Actions panel and the photo layer on the Layers panel and click on Begin recording. Then go to Filter > Filter Gallery and add a Texturizer filter with these settings:

  • Texture: Canvas
  • Scaling: 100%
  • Relief: 2
  • Light: Bottom
  • Invert: Off

After that, click on Stop Recording.

Adding a texture to the photo art effect

Here you can see that the Texturizer filter was applied right after the Mezzotint.

Texturizer after the mezzotint filter

To play this action, select the photo layer on the Layers panel and the Mezzopop Effect on the Actions panel. Then click on Play and the photo effect will be applied.

Final result with the texturizer filter

Step 11

Now go back to the Layers panel—I want to show you something.

At the beginning of this tutorial, we converted the photo layer to a Smart Object. Because of that, all the filters we applied are now Smart Filters. So you can disable/enable or change them anytime you want, and the original photo will remain untouched. Not converting the photo to a Smart Object would result in an uneditable rasterized image.

To edit a Smart Filter, double-click it and the appropriate panel will open.

Smart Object and its Smart Filters

And We’re Done!

In this tutorial, you learned the basics of how Photoshop actions work. We created a beautiful Photoshop art effect using simple filters and a Gradient Map. Then you learned how to edit an action and add more filters to it. Then you also learned that Smart Objects allow us to apply filters as Smart Filters, keeping all the effects editable. 

I hope you learned something useful with this tutorial.

Don’t forget to check the original action:

Mezzopop photoshop action promotion image
Mezzopop Photoshop Action

If you want to keep learning, here are some tutorials I recommend:

How to Make a Photoshop Action to Create a Photo Art Effect

Post pobrano z: How to Make a Photoshop Action to Create a Photo Art Effect

Final product image
What You’ll Be Creating

In this tutorial, you will learn how to make Photoshop actions to create your own photo effects. I will show you how to transform any photo into art with Photoshop effects and how to keep these photo art effects editable using smart filters, which has the property of adding image effects to layers in a non-destructive way. So now it’s time to learn, and you’ll soon be able to create your first photo effect Photoshop actions.

The photo effect of this tutorial is part of Mezzopop Photoshop Action. The complete action has 27 premade gradient options and works with Photoshop CS5, CS6, and CC.

Mezzopop photoshop action promotion image
Mezzopop Photoshop Action

Tutorial Assets

The following asset was used during this tutorial:

1. Choosing and Preparing a Good Photo

Step 1

First, you need to find the right photo for the effect you want. Not every photo will look great with all photo effects. 

For this tutorial, you will need an image with good illumination and not much detail on the background. I’m going to use a photo of a beautiful woman with a white background. It will work perfectly with the photo effect we are going to create.

Stock image used for the photo to art effect

Step 2

Another thing you need to know is that some effects depend on the image size and dpi of the document. Using a different configuration will result in different results. Dpi is not going to be important for this tutorial, but if you choose an image much bigger or smaller than mine, your result will look slightly different.

To check the size and dpi of your image, open it with Photoshop and go to Image > Image Size. For this tutorial, you will need an image with about 1400 x 1400 px.

Image dimensions and resolution

2. Recording the Action

Step 1

We are going to create a new action set. Go to Window > Actions to open the Actions panel. Then click on the Create new set icon and name it My First Photo Effects.

Creating a new Action set

Step 2

Now click on the Create new action icon. Name it Mezzopop Effect and click on Record. After that, Photoshop will record almost every step you make. That is how a Photoshop action works—you play it, and Photoshop repeats the actions recorded.

Pay attention to the Actions panel. If you make a mistake, click on the step you want to delete and then click on the trash bin.

Creating a new action

Step 3

Go to the Layers panel, right-click on the photo layer, and choose Convert to Smart Object. That will keep the image editable. 

Converting the layer into a Smart Object

Step 4

Go to Filter > Blur > Gaussian Blur and set it to 0.5 px. That will make the image less detailed, which is good for the final result. You can disable it later if you don’t like the effect—all the effects will be on separate layers.

Adding a gaussian blur filter

Step 5

Now go to Filter > Sharpen > Smart Sharpen and use these settings:

  • Amount: 183%
  • Radius: 1.0 px
  • Reduce Noise: 66%
  • Remove: Lens Blur

This will make the image sharper but with less fine details, since we added a Gaussian blur first.

Smart sharpen settings

Step 6

Go to Filter > Noise > Add Noise and use these settings:

  • Amount: 9.16%
  • Distribution: Uniform
  • Monochromatic: On

This will give us some controlled noise, which will make the final result always look like we want.

Adding noise to the image

Step 7

Now go to Filter > Pixelate > Mezzotint and set it to Long Lines. This will add the main effect of this tutorial.

Adding the mezzotint effect

Step 8

Go to Window > Adjustments to open the Adjustments panel. Then click on the Gradient Map icon. After that, go to Window > Properties and click on the gradient bar to edit it with these settings:

  • Stop 1: Location: 0% Color: #003533
  • Stop 2: Location: 100% Color: #f6001d

Here we are creating a red gradient, but you can choose any color you want. The stop on the left side controls the shadows, and the one on the right controls the highlights. You can click below the gradient bar to create more stops and customize the gradient even more.

Adding a Gradient Map layer

Step 9

Go back to the Actions panel and click on Stop recording

In the next image, you can see all the steps of this action. 

Stopping the recording of the action

Here is the result of this photo art effect:

Final result of the photo art effect

Step 10

It is possible to edit the action. To understand that, we are going to add one more filter to it. This filter needs to be applied to the photo layer. If you look at the Actions panel, you will see that the last step that had the photo layer selected was the Mezzotint.

So select the Mezzotint step on the Actions panel and the photo layer on the Layers panel and click on Begin recording. Then go to Filter > Filter Gallery and add a Texturizer filter with these settings:

  • Texture: Canvas
  • Scaling: 100%
  • Relief: 2
  • Light: Bottom
  • Invert: Off

After that, click on Stop Recording.

Adding a texture to the photo art effect

Here you can see that the Texturizer filter was applied right after the Mezzotint.

Texturizer after the mezzotint filter

To play this action, select the photo layer on the Layers panel and the Mezzopop Effect on the Actions panel. Then click on Play and the photo effect will be applied.

Final result with the texturizer filter

Step 11

Now go back to the Layers panel—I want to show you something.

At the beginning of this tutorial, we converted the photo layer to a Smart Object. Because of that, all the filters we applied are now Smart Filters. So you can disable/enable or change them anytime you want, and the original photo will remain untouched. Not converting the photo to a Smart Object would result in an uneditable rasterized image.

To edit a Smart Filter, double-click it and the appropriate panel will open.

Smart Object and its Smart Filters

And We’re Done!

In this tutorial, you learned the basics of how Photoshop actions work. We created a beautiful Photoshop art effect using simple filters and a Gradient Map. Then you learned how to edit an action and add more filters to it. Then you also learned that Smart Objects allow us to apply filters as Smart Filters, keeping all the effects editable. 

I hope you learned something useful with this tutorial.

Don’t forget to check the original action:

Mezzopop photoshop action promotion image
Mezzopop Photoshop Action

If you want to keep learning, here are some tutorials I recommend:

How to Make a Photoshop Action to Create a Photo Art Effect

Post pobrano z: How to Make a Photoshop Action to Create a Photo Art Effect

Final product image
What You’ll Be Creating

In this tutorial, you will learn how to make Photoshop actions to create your own photo effects. I will show you how to transform any photo into art with Photoshop effects and how to keep these photo art effects editable using smart filters, which has the property of adding image effects to layers in a non-destructive way. So now it’s time to learn, and you’ll soon be able to create your first photo effect Photoshop actions.

The photo effect of this tutorial is part of Mezzopop Photoshop Action. The complete action has 27 premade gradient options and works with Photoshop CS5, CS6, and CC.

Mezzopop photoshop action promotion image
Mezzopop Photoshop Action

Tutorial Assets

The following asset was used during this tutorial:

1. Choosing and Preparing a Good Photo

Step 1

First, you need to find the right photo for the effect you want. Not every photo will look great with all photo effects. 

For this tutorial, you will need an image with good illumination and not much detail on the background. I’m going to use a photo of a beautiful woman with a white background. It will work perfectly with the photo effect we are going to create.

Stock image used for the photo to art effect

Step 2

Another thing you need to know is that some effects depend on the image size and dpi of the document. Using a different configuration will result in different results. Dpi is not going to be important for this tutorial, but if you choose an image much bigger or smaller than mine, your result will look slightly different.

To check the size and dpi of your image, open it with Photoshop and go to Image > Image Size. For this tutorial, you will need an image with about 1400 x 1400 px.

Image dimensions and resolution

2. Recording the Action

Step 1

We are going to create a new action set. Go to Window > Actions to open the Actions panel. Then click on the Create new set icon and name it My First Photo Effects.

Creating a new Action set

Step 2

Now click on the Create new action icon. Name it Mezzopop Effect and click on Record. After that, Photoshop will record almost every step you make. That is how a Photoshop action works—you play it, and Photoshop repeats the actions recorded.

Pay attention to the Actions panel. If you make a mistake, click on the step you want to delete and then click on the trash bin.

Creating a new action

Step 3

Go to the Layers panel, right-click on the photo layer, and choose Convert to Smart Object. That will keep the image editable. 

Converting the layer into a Smart Object

Step 4

Go to Filter > Blur > Gaussian Blur and set it to 0.5 px. That will make the image less detailed, which is good for the final result. You can disable it later if you don’t like the effect—all the effects will be on separate layers.

Adding a gaussian blur filter

Step 5

Now go to Filter > Sharpen > Smart Sharpen and use these settings:

  • Amount: 183%
  • Radius: 1.0 px
  • Reduce Noise: 66%
  • Remove: Lens Blur

This will make the image sharper but with less fine details, since we added a Gaussian blur first.

Smart sharpen settings

Step 6

Go to Filter > Noise > Add Noise and use these settings:

  • Amount: 9.16%
  • Distribution: Uniform
  • Monochromatic: On

This will give us some controlled noise, which will make the final result always look like we want.

Adding noise to the image

Step 7

Now go to Filter > Pixelate > Mezzotint and set it to Long Lines. This will add the main effect of this tutorial.

Adding the mezzotint effect

Step 8

Go to Window > Adjustments to open the Adjustments panel. Then click on the Gradient Map icon. After that, go to Window > Properties and click on the gradient bar to edit it with these settings:

  • Stop 1: Location: 0% Color: #003533
  • Stop 2: Location: 100% Color: #f6001d

Here we are creating a red gradient, but you can choose any color you want. The stop on the left side controls the shadows, and the one on the right controls the highlights. You can click below the gradient bar to create more stops and customize the gradient even more.

Adding a Gradient Map layer

Step 9

Go back to the Actions panel and click on Stop recording

In the next image, you can see all the steps of this action. 

Stopping the recording of the action

Here is the result of this photo art effect:

Final result of the photo art effect

Step 10

It is possible to edit the action. To understand that, we are going to add one more filter to it. This filter needs to be applied to the photo layer. If you look at the Actions panel, you will see that the last step that had the photo layer selected was the Mezzotint.

So select the Mezzotint step on the Actions panel and the photo layer on the Layers panel and click on Begin recording. Then go to Filter > Filter Gallery and add a Texturizer filter with these settings:

  • Texture: Canvas
  • Scaling: 100%
  • Relief: 2
  • Light: Bottom
  • Invert: Off

After that, click on Stop Recording.

Adding a texture to the photo art effect

Here you can see that the Texturizer filter was applied right after the Mezzotint.

Texturizer after the mezzotint filter

To play this action, select the photo layer on the Layers panel and the Mezzopop Effect on the Actions panel. Then click on Play and the photo effect will be applied.

Final result with the texturizer filter

Step 11

Now go back to the Layers panel—I want to show you something.

At the beginning of this tutorial, we converted the photo layer to a Smart Object. Because of that, all the filters we applied are now Smart Filters. So you can disable/enable or change them anytime you want, and the original photo will remain untouched. Not converting the photo to a Smart Object would result in an uneditable rasterized image.

To edit a Smart Filter, double-click it and the appropriate panel will open.

Smart Object and its Smart Filters

And We’re Done!

In this tutorial, you learned the basics of how Photoshop actions work. We created a beautiful Photoshop art effect using simple filters and a Gradient Map. Then you learned how to edit an action and add more filters to it. Then you also learned that Smart Objects allow us to apply filters as Smart Filters, keeping all the effects editable. 

I hope you learned something useful with this tutorial.

Don’t forget to check the original action:

Mezzopop photoshop action promotion image
Mezzopop Photoshop Action

If you want to keep learning, here are some tutorials I recommend:

10 Art Shopify Themes For A Remarkable Store Website

Post pobrano z: 10 Art Shopify Themes For A Remarkable Store Website

In the context of business development and sales increase, any store must have an online version of its trading platform, regardless of the goods sold. The most important aspects are safety and speed of work, which is not so easy to achieve. However, the Shopify platform and Shopify themes will help with this.

Table of Content:

  1. Introduction
  2. Multifly
  3. Artrite
  4. Jimmy Moo
  5. Home Decor
  6. Floorix
  7. Nails Art
  8. PhotoLoro
  9. Shopence
  10. Stuff
  11. Walden
  12. Final Word

Introduction

Regardless of the path you choose – to create your own e-commerce solution or buy a proven all-in-one solution – all your worries will be about getting everything you need for an online store immediately and together.

You need an easy way to add and remove products, you need the ability to customize the look of your store, and you definitely need reliable and simple analytics to keep track of everything. So, Shopify has everything you need to run an amazing online store! In addition, there are no restrictions on the field of activities. Here you will find everything ranging from Shopify t shirt theme or jewelry Shopify themes to Shopify themes for travels and sports.

Moreover, for marketing campaigns, Shopify allows you to quickly and easily create landing pages, which is the key factor that distinguishes this online solution from other platforms. Besides that, from a SEO point of view, Shopify creates a 100% recognizable, clean code. It is possible to use custom header tags and meta descriptions, even for collections, in addition to important tools such as sitemap and content duplication prevention.

As you can see, thanks to this platform you can make the design of your site more unique and convenient in all senses. After purchasing the Shopify theme, you get a complete design solution for the future site. In the review, I collected the best ready-made site themes and assets from MasterBundles that will help you create your own business website for your requirements. And now I want to share with you 10 best Shopify themes which have a unique sense of style and will suit any art filed.

Multifly

Details |  Demo

Multifly is an excellent example of versatility and high-quality design for the sale of fashion goods, electronics stores, cosmetics, building materials, fishing, and wholesale stores. The theme is universal and works great on any device. The code is written very high quality and correct. All this is complemented by a high degree of SEO-optimization, thanks to which your store will be able to get the highest positions in the search results. Other features:

  • Commenting System;
  • Crossbrowser Compatibility;
  • Dropdown Menu;
  • Favicon;
  • Google Map;
  • Google Web Fonts;
  • Social Options;
  • Tooltips;
  • Bootstrap;
  • Contact Form;
  • Login Form;
  • Newsletter Subscription;
  • User Registration.

The Persepctive Website Mockup

Details

Artrite

Details |  Demo

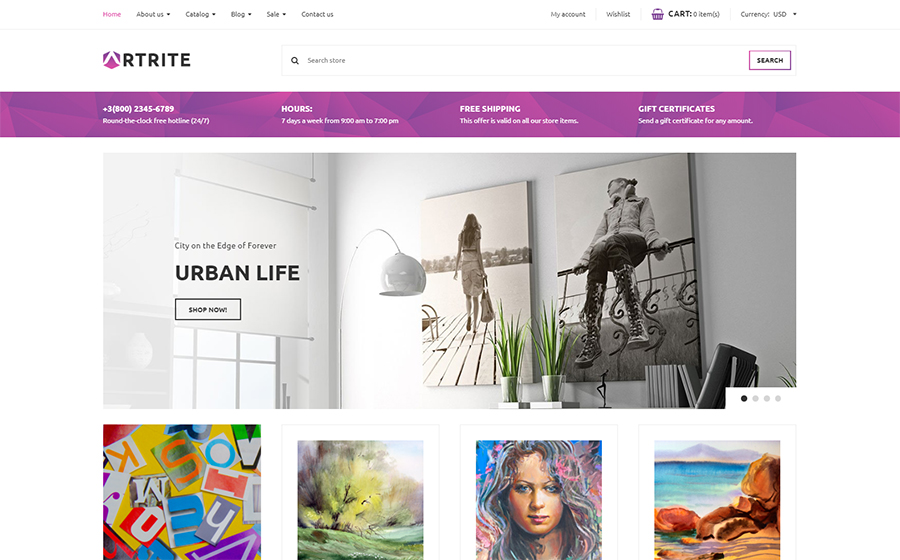
Artrite will help in the promotion of art and paintings online stores. With the help of sectioning, help users not to poke around the site, but to search purposefully for what they want. Take advantage of pre-made sections such as catalog, blog, about us, product carousel or slideshow. Set up and manage your online store quickly and without hassle. There are a large number of icons, Google fonts, alternative module layouts, sample content, and contact form. All this is guaranteed to increase your position in the search results. Additional features:

  • Commenting System;
  • Crossbrowser Compatibility;
  • Dropdown Menu;
  • Valid Coding;
  • Admin Panel;
  • Bootstrap;
  • Retina Ready;
  • Booking Form;
  • Newsletter Subscription;
  • Well Documented.

Italian Food Stock Photography Bundle

Jimmy Moo

Details |  Demo

The Jimmy Moo theme, like many other Shopify themes in this review, has an incredibly clean and responsive design, making your online store look very cool and confident on any screens. Especially well this theme is suitable for the store of perfumes, accessories, and cosmetics. You can make the menu in your store as convenient as possible by adding the necessary categories and subcategories of goods. Besides, modern CSS and correct XHTML will make the design of your site not only elegant but also powerful. Main features:

  • Theme Color Switcher;
  • Shopify Visual Builder;
  • Commenting System;
  • Crossbrowser Compatibility;
  • Bootstrap;
  • Retina Ready;
  • Newsletter Subscription;
  • User Registration;
  • Search Form.

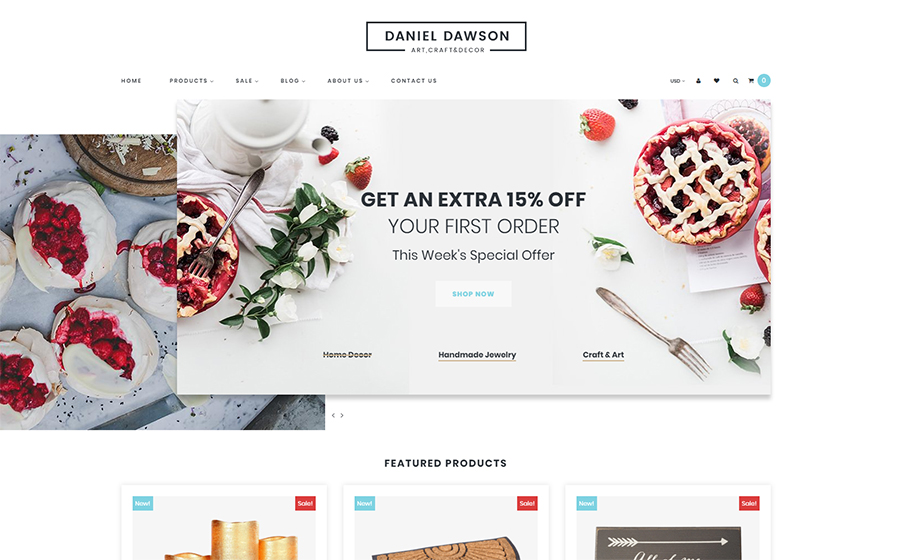
Home Decor

Details |  Demo

This theme is characterized by a combination of classic design and the capabilities of modern technologies. Suitable for home decor online store. You can install it in minutes and later customize to fit your needs. This theme will allow you to reach a completely new level of business. In many ways, this can be achieved through full support for working with mobile devices, SEO-optimization, and code with a good structure. More features:

  • Commenting System;
  • Crossbrowser Compatibility;
  • Custom Page Templates;
  • Dropdown Menu;
  • Favicon;
  • Google Map;
  • Google Web Fonts;
  • Social Options;
  • Grid System;
  • Contact Form;
  • Newsletter Subscription;
  • Well Documented.

Watch a short review on ssential Resources for Shopify Developers and End-Users.

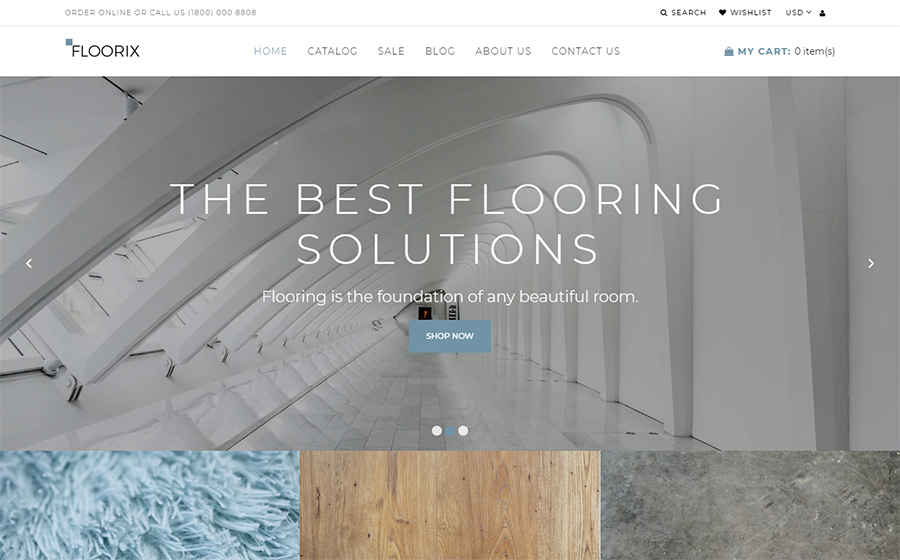
Floorix

Details |  Demo

Here we have Floorix – a flooring solutions Shopify theme. If besides laconic design, creativity is important to you, then Floorix is what you need to create a professional website. A collection of stylish layouts of ready-made pages, Shopify Visual Builder, and different customizable sections are included in the kit. The developers did not forget about the promotion and made the theme mobile-adapted and SEO-optimized. You can see other features of the theme down below:

  • Advanced Theme Options;
  • Commenting System;
  • Crossbrowser Compatibility;
  • Dropdown Menu;
  • Favicon;
  • Google Map;
  • Google Web Fonts;
  • Tooltips;
  • Semantic Code;
  • Bootstrap;
  • Retina Ready;
  • Contact Form;
  • Newsletter Subscription;
  • 24/7 Support.

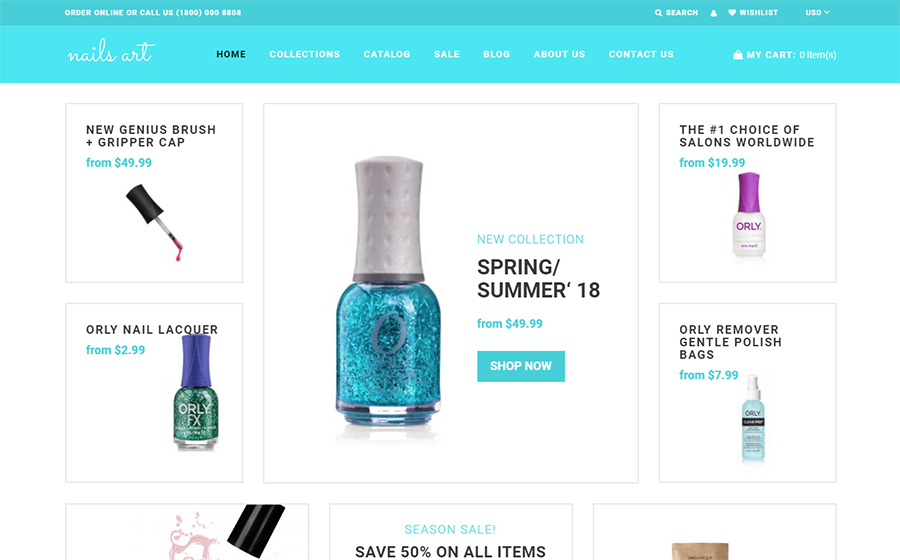
Nails Art

Details |  Demo

This theme suits best for the sphere of goods for those who like to take care of themselves. The name itself says that the theme can be used for a nail shop website. The theme supports almost all the standard features of a typical store, as well as sorting options and the ability to add products to wish list. The design is responsive and SEO-optimized. All this will positively affect your popularity and your success in business. Other features:

  • Commenting System;
  • Instagram Feed;
  • Slideshow;
  • Crossbrowser Compatibility;
  • Product Countdown;
  • Favicon;
  • Blog Articles;
  • Google Web Fonts;
  • Contact Form;
  • Newsletter Subscription;
  • Well Documented.

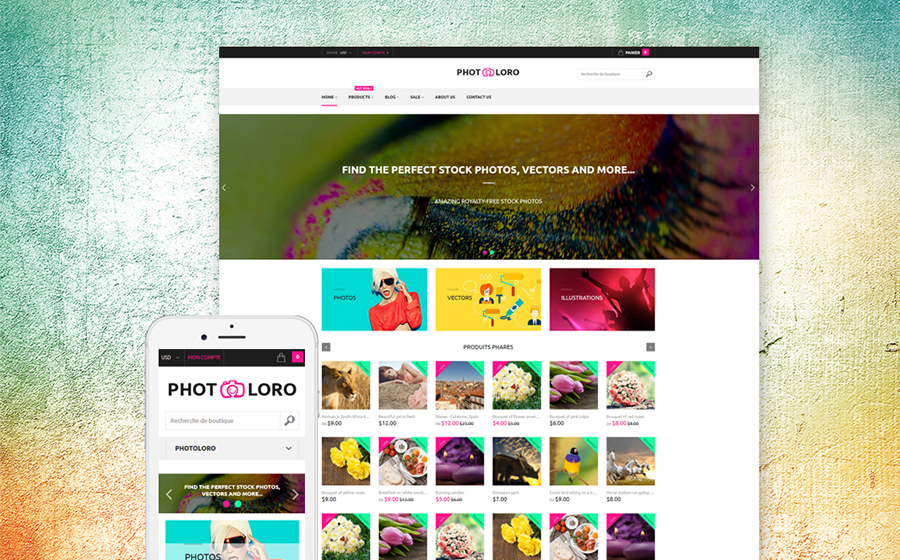
PhotoLoro

Details |  Demo

Photographers perform very important work – they show the world around us at a certain point in time. And in order for them to do it even better, this theme will help create a website that will tell people about their activities. PhotoLoro is a great Shopify theme for stock photo sites. With it, any photo can be presented very beautifully and effectively. In addition, the theme has a very clean and high-quality HTML ode and SEO-optimized design. Additional features:

  • Alternative Module Layouts;
  • Commenting System;
  • Crossbrowser Compatibility;
  • Facebook Like Box;
  • Dropdown Menu;
  • Social Options;
  • Customized Modules;
  • Semantic Code;
  • Login Form;
  • Multicurrency Support.

Watch short Shopify Tutorials videos

Shopence

Details |  Demo

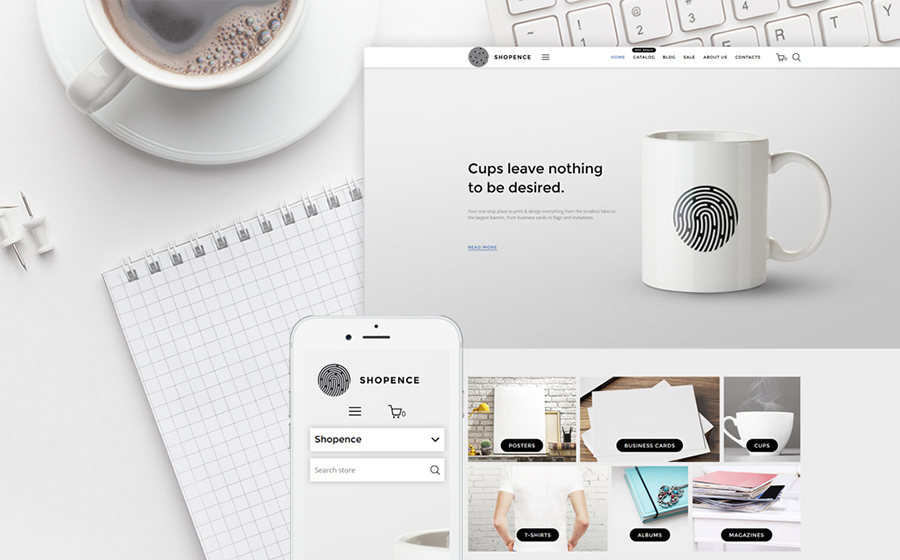
A good theme with a creative design that allows you to create high-quality printing shop & printing company sites. Shopence is rather universal, so it is perfect for business printing. Among the key features are Favicon, Bootstrap, parallax effect, and different web forms. The code itself is clean, which will allow your site to load faster and promote more effectively. Shopence will help you create a successful printing site that will bring real results in short and long terms. More features:

  • Commenting System;
  • Crossbrowser Compatibility;
  • Custom Page Templates;
  • Google Map;
  • Valid Coding;
  • Admin Panel;
  • Tech Support.

Stuff

Details |  Demo

Are you looking for a furniture theme? Stuff is great for use as the basis for a furniture store site or furniture production. This theme provides visitors with the comfort and convenience of being on the site. Shopify online store for selling furniture based on this theme will be very beautiful and popular. And this is not only due to the responsive design but also due to the presence of useful and beautiful web components available in this theme. Main features:

  • Drag and Drop Page Builder;
  • Mega Menu;
  • Google Analytics;
  • Ajax Cart;
  • Multiple Currency;
  • Quick View Product;
  • Social Media Integration;
  • Shortcodes.

Walden

Details |  Demo

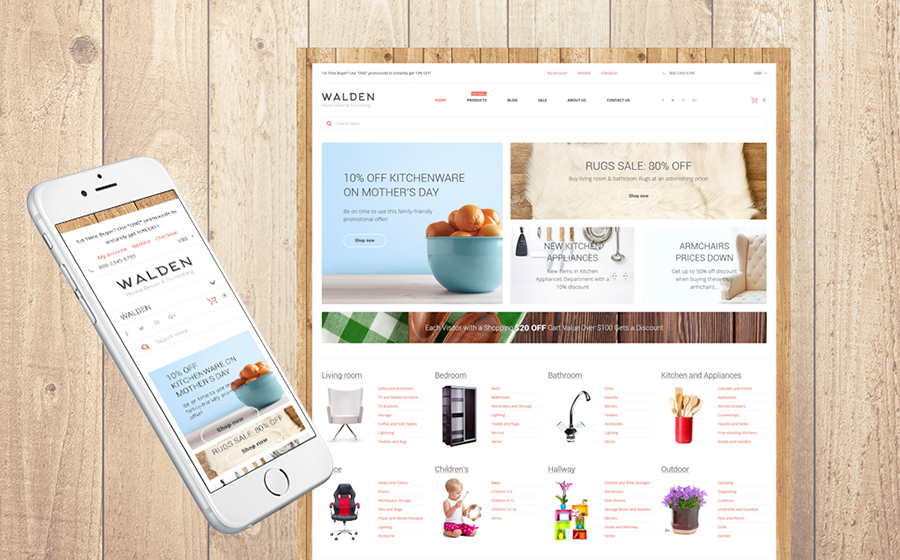
This is an excellent theme with a minimalist design that is ideal for selling products for interior, decor or lighting. Walden has a responsive design that allows you to immediately cover a huge audience of potential buyers. Also, this theme has everything you need for effective sales: a convenient menu, banners to draw attention to certain categories of products, product labels, multicurrency and multilingual support, and many other premium features. Other features:

  • Theme Color Switcher;
  • Alternative Module Layouts;
  • Crossbrowser Compatibility;
  • Bootstrap;
  • Google Map;
  • Google Web Fonts;
  • Social Options;
  • Valid Coding;
  • Contact Form;
  • Newsletter Subscription.

Final Word

These were the best Shopify themes, each of which is suitable for any kind of art store, although some of them are specially created and adapted for specific options. Choose one of the themes provided by Shopify, and you will never regret your decision. You will receive a fully functional, reliable online store with a great individual design. Do not waste your precious time and purchase Shopify premium theme right now. The site with any of them is created even easier – just a couple of clicks and you’re done!

10 Art Shopify Themes For A Remarkable Store Website

Post pobrano z: 10 Art Shopify Themes For A Remarkable Store Website

In the context of business development and sales increase, any store must have an online version of its trading platform, regardless of the goods sold. The most important aspects are safety and speed of work, which is not so easy to achieve. However, the Shopify platform and Shopify themes will help with this.

Table of Content:

  1. Introduction
  2. Multifly
  3. Artrite
  4. Jimmy Moo
  5. Home Decor
  6. Floorix
  7. Nails Art
  8. PhotoLoro
  9. Shopence
  10. Stuff
  11. Walden
  12. Final Word

Introduction

Regardless of the path you choose – to create your own e-commerce solution or buy a proven all-in-one solution – all your worries will be about getting everything you need for an online store immediately and together.

You need an easy way to add and remove products, you need the ability to customize the look of your store, and you definitely need reliable and simple analytics to keep track of everything. So, Shopify has everything you need to run an amazing online store! In addition, there are no restrictions on the field of activities. Here you will find everything ranging from Shopify t shirt theme or jewelry Shopify themes to Shopify themes for travels and sports.

Moreover, for marketing campaigns, Shopify allows you to quickly and easily create landing pages, which is the key factor that distinguishes this online solution from other platforms. Besides that, from a SEO point of view, Shopify creates a 100% recognizable, clean code. It is possible to use custom header tags and meta descriptions, even for collections, in addition to important tools such as sitemap and content duplication prevention.

As you can see, thanks to this platform you can make the design of your site more unique and convenient in all senses. After purchasing the Shopify theme, you get a complete design solution for the future site. In the review, I collected the best ready-made site themes and assets from MasterBundles that will help you create your own business website for your requirements. And now I want to share with you 10 best Shopify themes which have a unique sense of style and will suit any art filed.

Multifly

Details |  Demo

Multifly is an excellent example of versatility and high-quality design for the sale of fashion goods, electronics stores, cosmetics, building materials, fishing, and wholesale stores. The theme is universal and works great on any device. The code is written very high quality and correct. All this is complemented by a high degree of SEO-optimization, thanks to which your store will be able to get the highest positions in the search results. Other features:

  • Commenting System;
  • Crossbrowser Compatibility;
  • Dropdown Menu;
  • Favicon;
  • Google Map;
  • Google Web Fonts;
  • Social Options;
  • Tooltips;
  • Bootstrap;
  • Contact Form;
  • Login Form;
  • Newsletter Subscription;
  • User Registration.

The Persepctive Website Mockup

Details

Artrite

Details |  Demo

Artrite will help in the promotion of art and paintings online stores. With the help of sectioning, help users not to poke around the site, but to search purposefully for what they want. Take advantage of pre-made sections such as catalog, blog, about us, product carousel or slideshow. Set up and manage your online store quickly and without hassle. There are a large number of icons, Google fonts, alternative module layouts, sample content, and contact form. All this is guaranteed to increase your position in the search results. Additional features:

  • Commenting System;
  • Crossbrowser Compatibility;
  • Dropdown Menu;
  • Valid Coding;
  • Admin Panel;
  • Bootstrap;
  • Retina Ready;
  • Booking Form;
  • Newsletter Subscription;
  • Well Documented.

Italian Food Stock Photography Bundle

Jimmy Moo

Details |  Demo

The Jimmy Moo theme, like many other Shopify themes in this review, has an incredibly clean and responsive design, making your online store look very cool and confident on any screens. Especially well this theme is suitable for the store of perfumes, accessories, and cosmetics. You can make the menu in your store as convenient as possible by adding the necessary categories and subcategories of goods. Besides, modern CSS and correct XHTML will make the design of your site not only elegant but also powerful. Main features:

  • Theme Color Switcher;
  • Shopify Visual Builder;
  • Commenting System;
  • Crossbrowser Compatibility;
  • Bootstrap;
  • Retina Ready;
  • Newsletter Subscription;
  • User Registration;
  • Search Form.

Home Decor

Details |  Demo

This theme is characterized by a combination of classic design and the capabilities of modern technologies. Suitable for home decor online store. You can install it in minutes and later customize to fit your needs. This theme will allow you to reach a completely new level of business. In many ways, this can be achieved through full support for working with mobile devices, SEO-optimization, and code with a good structure. More features:

  • Commenting System;
  • Crossbrowser Compatibility;
  • Custom Page Templates;
  • Dropdown Menu;
  • Favicon;
  • Google Map;
  • Google Web Fonts;
  • Social Options;
  • Grid System;
  • Contact Form;
  • Newsletter Subscription;
  • Well Documented.

Watch a short review on ssential Resources for Shopify Developers and End-Users.

Floorix

Details |  Demo

Here we have Floorix – a flooring solutions Shopify theme. If besides laconic design, creativity is important to you, then Floorix is what you need to create a professional website. A collection of stylish layouts of ready-made pages, Shopify Visual Builder, and different customizable sections are included in the kit. The developers did not forget about the promotion and made the theme mobile-adapted and SEO-optimized. You can see other features of the theme down below:

  • Advanced Theme Options;
  • Commenting System;
  • Crossbrowser Compatibility;
  • Dropdown Menu;
  • Favicon;
  • Google Map;
  • Google Web Fonts;
  • Tooltips;
  • Semantic Code;
  • Bootstrap;
  • Retina Ready;
  • Contact Form;
  • Newsletter Subscription;
  • 24/7 Support.

Nails Art

Details |  Demo

This theme suits best for the sphere of goods for those who like to take care of themselves. The name itself says that the theme can be used for a nail shop website. The theme supports almost all the standard features of a typical store, as well as sorting options and the ability to add products to wish list. The design is responsive and SEO-optimized. All this will positively affect your popularity and your success in business. Other features:

  • Commenting System;
  • Instagram Feed;
  • Slideshow;
  • Crossbrowser Compatibility;
  • Product Countdown;
  • Favicon;
  • Blog Articles;
  • Google Web Fonts;
  • Contact Form;
  • Newsletter Subscription;
  • Well Documented.

PhotoLoro

Details |  Demo

Photographers perform very important work – they show the world around us at a certain point in time. And in order for them to do it even better, this theme will help create a website that will tell people about their activities. PhotoLoro is a great Shopify theme for stock photo sites. With it, any photo can be presented very beautifully and effectively. In addition, the theme has a very clean and high-quality HTML ode and SEO-optimized design. Additional features:

  • Alternative Module Layouts;
  • Commenting System;
  • Crossbrowser Compatibility;
  • Facebook Like Box;
  • Dropdown Menu;
  • Social Options;
  • Customized Modules;
  • Semantic Code;
  • Login Form;
  • Multicurrency Support.

Watch short Shopify Tutorials videos

Shopence

Details |  Demo

A good theme with a creative design that allows you to create high-quality printing shop & printing company sites. Shopence is rather universal, so it is perfect for business printing. Among the key features are Favicon, Bootstrap, parallax effect, and different web forms. The code itself is clean, which will allow your site to load faster and promote more effectively. Shopence will help you create a successful printing site that will bring real results in short and long terms. More features:

  • Commenting System;
  • Crossbrowser Compatibility;
  • Custom Page Templates;
  • Google Map;
  • Valid Coding;
  • Admin Panel;
  • Tech Support.

Stuff

Details |  Demo

Are you looking for a furniture theme? Stuff is great for use as the basis for a furniture store site or furniture production. This theme provides visitors with the comfort and convenience of being on the site. Shopify online store for selling furniture based on this theme will be very beautiful and popular. And this is not only due to the responsive design but also due to the presence of useful and beautiful web components available in this theme. Main features:

  • Drag and Drop Page Builder;
  • Mega Menu;
  • Google Analytics;
  • Ajax Cart;
  • Multiple Currency;
  • Quick View Product;
  • Social Media Integration;
  • Shortcodes.

Walden

Details |  Demo

This is an excellent theme with a minimalist design that is ideal for selling products for interior, decor or lighting. Walden has a responsive design that allows you to immediately cover a huge audience of potential buyers. Also, this theme has everything you need for effective sales: a convenient menu, banners to draw attention to certain categories of products, product labels, multicurrency and multilingual support, and many other premium features. Other features:

  • Theme Color Switcher;
  • Alternative Module Layouts;
  • Crossbrowser Compatibility;
  • Bootstrap;
  • Google Map;
  • Google Web Fonts;
  • Social Options;
  • Valid Coding;
  • Contact Form;
  • Newsletter Subscription.

Final Word

These were the best Shopify themes, each of which is suitable for any kind of art store, although some of them are specially created and adapted for specific options. Choose one of the themes provided by Shopify, and you will never regret your decision. You will receive a fully functional, reliable online store with a great individual design. Do not waste your precious time and purchase Shopify premium theme right now. The site with any of them is created even easier – just a couple of clicks and you’re done!