28 New Tasty Restaurant & Cafe Menu Templates for 2019

Post pobrano z: 28 New Tasty Restaurant & Cafe Menu Templates for 2019

Become the next hottest spot to grab a bite! Check out these amazing menu templates below!

28 New Restaurant and Cafe Menus for 2019

The restaurant of your dreams is missing just one special element: the perfect menu. So entice your customers with mouth-watering items and tasty aesthetics.

Today we bring you another amazing set of premium templates from Envato Market and Envato Elements. Featuring incredible designs from professional designers, these templates will give you high-quality results in less time!

Not sure where to begin? Try a minimalist vibe with clean colors and simplistic elements. Or for the more traditional route, download trendy menu designs any customer is sure to love!

Get more help! For custom professional designs, ask our experts at Envato Studio.

Learn More About Menu Design

New to menu design? Follow along with our instructors with these helpful lessons:

Restaurant Menu

Many restaurants incorporate certain colors into their menus that are as vibrant as their meals. Take this spectacular design, for example. With clean, professional elements and plenty of room for your menu items, this design is highly effective. Use it today for a noticeable difference!

Restaurant Menu

Cafe Restaurant Menu

Modern cafe menus effortlessly blend a mixture of elegance and style. So does that sound like your restaurant? Celebrate your delectable treats with a lovely design like this one. It features a standard A4 sized template that is completely customizable, so you’ll be able to update this design in minutes! Enjoy!

Cafe Restaurant Menu

Cafe Menu

Your menu is the biggest selling point for every customer. Make sure you win them over with stunning modern visuals like fresh, premium ingredients. This gorgeous template features a seafood-inspired design with plenty of premium extras for drink menus and more.

Cafe Menu

Vegan Food Menu

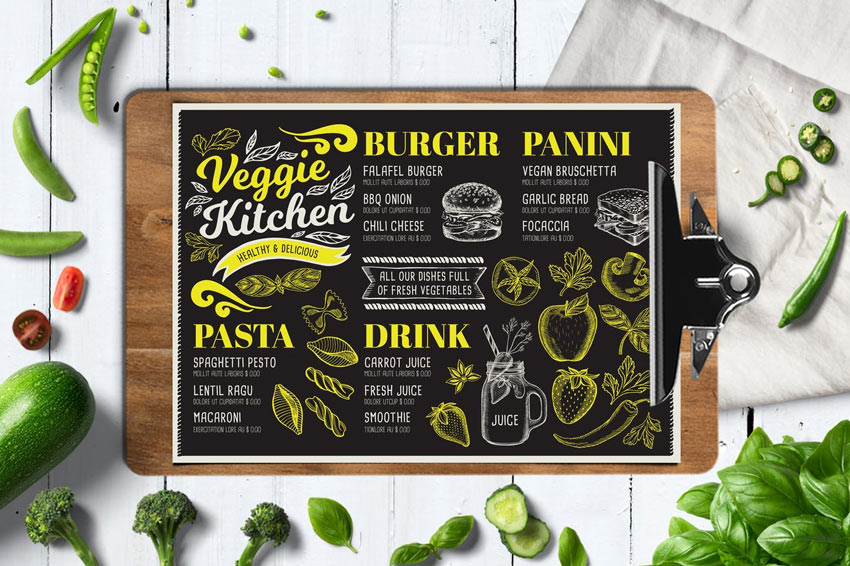
Invite your customers to enjoy a delicious healthy meal with this vegan food menu. Inspired by a classic chalkboard style, this template features an A4 sized design that has been pieced together with bold, editable details. The best part? Only free fonts were used!
Vegan Food Menu

Rustic Restaurant Menu

Could this be the template for your next
award-winning meals? We hope so! Created with stylish rustic elements in
mind, this menu template is a beauty! Enjoy six Photoshop files with
alternative styles for the main menu and drinks page.

Rustic Menu

Restaurant Menu

For just under $10, you can enjoy stunning luxury restaurant menus. This menu template features five alternate versions where you can mix and match your favorite elements for the photos, colors and graphics. Update it fast with Adobe Photoshop.

Restaurant Menu

Cafe Menu

Large menus are overwhelming. So keep it simple with an elegant cafe menu like this casual style below. It offers two unique color schemes with beautiful arrangements, so you’ll love the way your items appear on this menu! All the images you see are included, and you’ll get access to free fonts!

Cafe Menu

Coffee Shop Template

Refresh your coffee shop menu with a contemporary flyer template! Although the sample graphics are not included in this one, you can easily drag and drop your favorite photos into the editable placeholders for more customization. Try it out for a fresh new look!

Coffee Shop Template

Bi-Fold Food Menu Template

The best meals in town should have the best menu too! This mouth-watering design features a classic flip out style with room for food items and pictures. Just switch out the images for some of your own or utilize your subscription to download these great finds!

Bi-Fold Food Menu Template

Fakous Restaurant Menu Flyer

Got a burger joint with the best fresh patties around?
Check out this delicious-looking Fakous menu with incredible colors and
details. This design features a clean and modern layout with adjustable
smart objects. And it’s ready to print for a super quick turnaround!

Fakous Restaurant Menu Flyer

Simple Restaurant Menu

This simple and elegant design might be just what you need for a restaurant menu. The perfect style for steak house or fast food restaurants, this design features six pages and more. Get access to this print-ready template for an easy menu alternative.

Simple Restaurant Menu

Clean & Simple Menu

Or
highlight your exquisite palette with this clean and simple menu
template. A ready-to-print design created in standard A4 size, this
template is ideal for any cafe or restaurant looking to stay away from
busy visuals. Enjoy a minimalist style with text elements you can easily
update today!

Clean  Simple Menu

Vintage Restaurant Menu

Add that old school charm to your cafe or restaurant with this vintage menu. Inspired by classic designs from the 50s and 60s, this restaurant menu can be used with both Illustrator and Photoshop. It’s 100% vector and fully editable. Check it out!

Vintage Restaurant Menu

Colorful Tropical Menu

Create
a happy atmosphere in your establishment with this delightful tropical
menu. Inspired by the vibrant colors seen in many exotic locations, this
menu can be customized to any tropical cuisine. Perfect for beginners,
this template requires at least Photoshop CS3 to access the files.
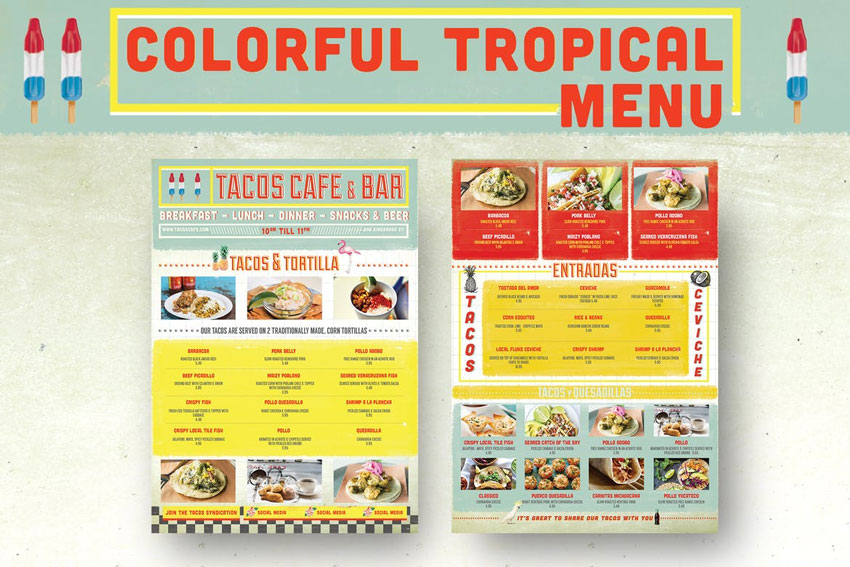
Colorful Tropical Menu

Retro Diner Food Menu

Show off your love for nostalgic diner design with this vibrant food menu. Inspired by the retro aesthetics of 1950s drive-in diners, this menu comes in Photoshop and Illustrator formats. Included are well-organized layers with vector elements you can modify.

Retro Diner Food Menu

Restaurant Menu

How will you present your menu to customers? Consider this next lovely restaurant menu template available in two design formats. Perfect for small restaurants or cafes, this template features white and turquoise versions for a standout menu.
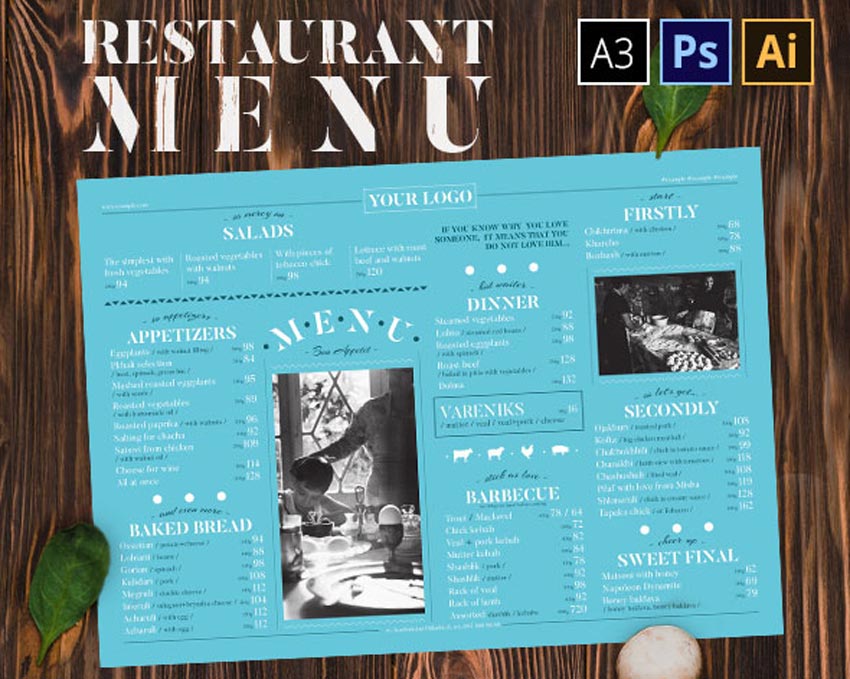
Restaurant Menu

Restaurant Menu

Looking for a table mat menu instead? Try this incredible restaurant menu specifically designed for beach themed bars and grills. Display your favorite bar drinks and hot appetizers on one sunny menu. Save it to your design arsenal today!

Restaurant Menu

Rectangle Restaurant Menu

Ready to open the best seafood restaurant in your area? Kick things off with this elegant rectangular restaurant menu. This menu template features four Photoshop files along with four alternative Illustrator formats. Modern and classy, this one is a winner!

Rectangle Restaurant Menu

Restaurant Menu

A stunning design with golden geometric details, this menu is an elegant choice for any restaurateur. Included in this package is a duo restaurant and beverage menu set with ten total files available. Simply edit them with the help of Adobe Photoshop for easy customization.

Restaurant Menu

Elegant Food Menu

Would you prefer tri-fold templates for your restaurant menu? Then check out this awesome design suitable for pizza restaurants and many small businesses. This download features several unique folds along with everything you need to get started. Check it out!

Elegant Food Menu

Sketch Trifold Food Menu

Chalkboard menus are currently popular for their clean designs and retro charm. Check out this sketch trifold menu, for instance. It comes with A4 and US letter sizes perfect for an easy transition to a new menu. You’ll love the realistic chalkboard design!

Sketch Trifold Food Menu

Coffee Shop Trifold Brochure

Brew heartwarming cups of delicious coffee accompanied by this delightful menu! An affordable design for any cafe owner on a budget, this trifold makes it easy to update the pictures and coffee names fast. Experience no quality loss with fully editable smart objects!

Coffee Shop Trifold Brochure

Cafe Menu

Make your cafe stand out with delectable items presented on this vintage-inspired chalkboard menu. It’s created with realistic chalkboard details like handmade typography and more, so you’ll be able to update it quickly and easily. Just drag and drop your specials into the super convenient placeholders. Get started today!

Cafe Menu

Restaurant Menu

Ready to become the hottest restaurant in town? Show off your appetizers, entrees and desserts with this fantastic restaurant menu. This template features an exquisite black and white design with plenty of room for your delicious photos. Add it to your collection!

Restaurant Menu

Cocktail Drinks Menu

Everyone loves happy hour! So make sure your best weekly deals shine with a fun cocktail drinks menu. This design features a cool, modern style with realistic bar elements for the perfect mixer! Get access to one fully editable Photoshop file with built-in bleed lines and more!

Cocktail Drinks Menu

Restaurant Menu

Your bakery menu should stand out with all the delectable treats you have. So make your graphics count with this easily editable menu template. This template features print-ready Illustrator files along with helpful instructions for easier customization. Add it today!

Restaurant Menu

Cafe Restaurant Menu

Set your restaurant apart from the others in town. This cafe menu template features a sleek and elegant style you’ll definitely love. Enjoy eight Photoshop files you can customize at any time at all. Add new icons, prices, or text for a brand new look.

Cafe Restaurant Menu

Restaurant Menu

Sometimes, less is more. Succeed with a professional menu template that is easy to read and manage. Easily update this ready-to-use template with new items when they’re available! Included are four Photoshop files with clear instructions.

Restaurant Menu

Conclusion

This list features exciting
resources for the avid designer
familiar with Adobe Photoshop, Illustrator, and InDesign. For
additional help with your menu needs, enlist the skills of a talented
professional by choosing one of the amazing designers from Envato Studio.

And
with loads of menu templates available at your fingertips, chances are we’ve
missed a few to add to your personal collection. Be sure to browse Envato Market and Envato Elements for more resources, and let us know your favorites in the comments below!

28 New Tasty Restaurant & Cafe Menu Templates for 2019

Post pobrano z: 28 New Tasty Restaurant & Cafe Menu Templates for 2019

Become the next hottest spot to grab a bite! Check out these amazing menu templates below!

28 New Restaurant and Cafe Menus for 2019

The restaurant of your dreams is missing just one special element: the perfect menu. So entice your customers with mouth-watering items and tasty aesthetics.

Today we bring you another amazing set of premium templates from Envato Market and Envato Elements. Featuring incredible designs from professional designers, these templates will give you high-quality results in less time!

Not sure where to begin? Try a minimalist vibe with clean colors and simplistic elements. Or for the more traditional route, download trendy menu designs any customer is sure to love!

Get more help! For custom professional designs, ask our experts at Envato Studio.

Learn More About Menu Design

New to menu design? Follow along with our instructors with these helpful lessons:

Restaurant Menu

Many restaurants incorporate certain colors into their menus that are as vibrant as their meals. Take this spectacular design, for example. With clean, professional elements and plenty of room for your menu items, this design is highly effective. Use it today for a noticeable difference!

Restaurant Menu

Cafe Restaurant Menu

Modern cafe menus effortlessly blend a mixture of elegance and style. So does that sound like your restaurant? Celebrate your delectable treats with a lovely design like this one. It features a standard A4 sized template that is completely customizable, so you’ll be able to update this design in minutes! Enjoy!

Cafe Restaurant Menu

Cafe Menu

Your menu is the biggest selling point for every customer. Make sure you win them over with stunning modern visuals like fresh, premium ingredients. This gorgeous template features a seafood-inspired design with plenty of premium extras for drink menus and more.

Cafe Menu

Vegan Food Menu

Invite your customers to enjoy a delicious healthy meal with this vegan food menu. Inspired by a classic chalkboard style, this template features an A4 sized design that has been pieced together with bold, editable details. The best part? Only free fonts were used!

Vegan Food Menu

Rustic Restaurant Menu

Could this be the template for your next
award-winning meals? We hope so! Created with stylish rustic elements in
mind, this menu template is a beauty! Enjoy six Photoshop files with
alternative styles for the main menu and drinks page.

Rustic Menu

Restaurant Menu

For just under $10, you can enjoy stunning luxury restaurant menus. This menu template features five alternate versions where you can mix and match your favorite elements for the photos, colors and graphics. Update it fast with Adobe Photoshop.

Restaurant Menu

Cafe Menu

Large menus are overwhelming. So keep it simple with an elegant cafe menu like this casual style below. It offers two unique color schemes with beautiful arrangements, so you’ll love the way your items appear on this menu! All the images you see are included, and you’ll get access to free fonts!

Cafe Menu

Coffee Shop Template

Refresh your coffee shop menu with a contemporary flyer template! Although the sample graphics are not included in this one, you can easily drag and drop your favorite photos into the editable placeholders for more customization. Try it out for a fresh new look!

Coffee Shop Template

Bi-Fold Food Menu Template

The best meals in town should have the best menu too! This mouth-watering design features a classic flip out style with room for food items and pictures. Just switch out the images for some of your own or utilize your subscription to download these great finds!

Bi-Fold Food Menu Template

Fakous Restaurant Menu Flyer

Got a burger joint with the best fresh patties around?
Check out this delicious-looking Fakous menu with incredible colors and
details. This design features a clean and modern layout with adjustable
smart objects. And it’s ready to print for a super quick turnaround!

Fakous Restaurant Menu Flyer

Simple Restaurant Menu

This simple and elegant design might be just what you need for a restaurant menu. The perfect style for steak house or fast food restaurants, this design features six pages and more. Get access to this print-ready template for an easy menu alternative.

Simple Restaurant Menu

Clean & Simple Menu

Or
highlight your exquisite palette with this clean and simple menu
template. A ready-to-print design created in standard A4 size, this
template is ideal for any cafe or restaurant looking to stay away from
busy visuals. Enjoy a minimalist style with text elements you can easily
update today!

Clean  Simple Menu

Vintage Restaurant Menu

Add that old school charm to your cafe or restaurant with this vintage menu. Inspired by classic designs from the 50s and 60s, this restaurant menu can be used with both Illustrator and Photoshop. It’s 100% vector and fully editable. Check it out!

Vintage Restaurant Menu

Colorful Tropical Menu

Create
a happy atmosphere in your establishment with this delightful tropical
menu. Inspired by the vibrant colors seen in many exotic locations, this
menu can be customized to any tropical cuisine. Perfect for beginners,
this template requires at least Photoshop CS3 to access the files.

Colorful Tropical Menu

Retro Diner Food Menu

Show off your love for nostalgic diner design with this vibrant food menu. Inspired by the retro aesthetics of 1950s drive-in diners, this menu comes in Photoshop and Illustrator formats. Included are well-organized layers with vector elements you can modify.

Retro Diner Food Menu

Restaurant Menu

How will you present your menu to customers? Consider this next lovely restaurant menu template available in two design formats. Perfect for small restaurants or cafes, this template features white and turquoise versions for a standout menu.

Restaurant Menu

Restaurant Menu

Looking for a table mat menu instead? Try this incredible restaurant menu specifically designed for beach themed bars and grills. Display your favorite bar drinks and hot appetizers on one sunny menu. Save it to your design arsenal today!

Restaurant Menu

Rectangle Restaurant Menu

Ready to open the best seafood restaurant in your area? Kick things off with this elegant rectangular restaurant menu. This menu template features four Photoshop files along with four alternative Illustrator formats. Modern and classy, this one is a winner!

Rectangle Restaurant Menu

Restaurant Menu

A stunning design with golden geometric details, this menu is an elegant choice for any restaurateur. Included in this package is a duo restaurant and beverage menu set with ten total files available. Simply edit them with the help of Adobe Photoshop for easy customization.

Restaurant Menu

Elegant Food Menu

Would you prefer tri-fold templates for your restaurant menu? Then check out this awesome design suitable for pizza restaurants and many small businesses. This download features several unique folds along with everything you need to get started. Check it out!

Elegant Food Menu

Sketch Trifold Food Menu

Chalkboard menus are currently popular for their clean designs and retro charm. Check out this sketch trifold menu, for instance. It comes with A4 and US letter sizes perfect for an easy transition to a new menu. You’ll love the realistic chalkboard design!

Sketch Trifold Food Menu

Coffee Shop Trifold Brochure

Brew heartwarming cups of delicious coffee accompanied by this delightful menu! An affordable design for any cafe owner on a budget, this trifold makes it easy to update the pictures and coffee names fast. Experience no quality loss with fully editable smart objects!

Coffee Shop Trifold Brochure

Cafe Menu

Make your cafe stand out with delectable items presented on this vintage-inspired chalkboard menu. It’s created with realistic chalkboard details like handmade typography and more, so you’ll be able to update it quickly and easily. Just drag and drop your specials into the super convenient placeholders. Get started today!

Cafe Menu

Restaurant Menu

Ready to become the hottest restaurant in town? Show off your appetizers, entrees and desserts with this fantastic restaurant menu. This template features an exquisite black and white design with plenty of room for your delicious photos. Add it to your collection!

Restaurant Menu

Cocktail Drinks Menu

Everyone loves happy hour! So make sure your best weekly deals shine with a fun cocktail drinks menu. This design features a cool, modern style with realistic bar elements for the perfect mixer! Get access to one fully editable Photoshop file with built-in bleed lines and more!

Cocktail Drinks Menu

Restaurant Menu

Your bakery menu should stand out with all the delectable treats you have. So make your graphics count with this easily editable menu template. This template features print-ready Illustrator files along with helpful instructions for easier customization. Add it today!

Restaurant Menu

Cafe Restaurant Menu

Set your restaurant apart from the others in town. This cafe menu template features a sleek and elegant style you’ll definitely love. Enjoy eight Photoshop files you can customize at any time at all. Add new icons, prices, or text for a brand new look.

Cafe Restaurant Menu

Restaurant Menu

Sometimes, less is more. Succeed with a professional menu template that is easy to read and manage. Easily update this ready-to-use template with new items when they’re available! Included are four Photoshop files with clear instructions.

Restaurant Menu

Conclusion

This list features exciting
resources for the avid designer
familiar with Adobe Photoshop, Illustrator, and InDesign. For
additional help with your menu needs, enlist the skills of a talented
professional by choosing one of the amazing designers from Envato Studio.

And
with loads of menu templates available at your fingertips, chances are we’ve
missed a few to add to your personal collection. Be sure to browse Envato Market and Envato Elements for more resources, and let us know your favorites in the comments below!

How to Make an Effective Web Banner

Post pobrano z: How to Make an Effective Web Banner

Final product image
What You’ll Be Creating

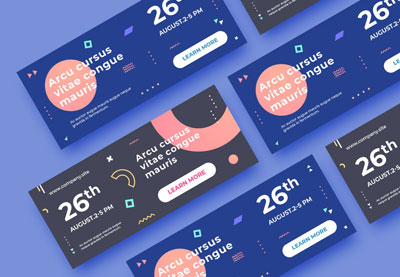
Website banners: we see them every day, and they are a great addition to your marketing campaign. In this tutorial, I’ll show you how to make a banner. Banner designs and banner templates are composed of a couple of key elements: an offer and a call to action. You can add your logo if you’d like, and an image to enhance the message. 

The offer needs to be concise and to the point. You have to let your readers know what you are promoting. The call to action is a text/button that will invite your consumer to your website. Short phrases like “Shop Now” or “Subscribe” are great anchors.  

In this tutorial, we’ll design a half-page vertical banner that includes all the essential elements. We’ll apply this design to a pop-up banner size, which is a great example for you to see if you are planning on designing banner templates in the future. 

Not ready to make a banner in Photoshop? Placeit is a great online ad maker that’s easy to use and quick to customize. With hundreds of options to choose from, you are sure to find a banner template that suits your needs. Envato Elements also offers amazing and effective web banner templates and stock photos that can help you create a stunning campaign. Go check them out! 

What You Will Need

You’ll need access to Adobe Photoshop. If you don’t have the software, you can download a trial from the Adobe website. You’ll also need these assets:

Download the assets and make sure the font is installed on your system before starting. When you are ready, we’ll get started on creating your website banner! 

1. Setting Up a Web Banner Design File

Step 1

In Photoshop, go to File > New. Name the document Web Banner. Set the file to the following dimensions:

  • Width to 300 px
  • Height to 600 px
  • Orientation to Portrait
  • Resolution to 72 px
  • Color Mode to RGB

Click Create.

create a new photoshop file

Step 2

Create margins around the document by going to View > New Guide. In the New Guide option window, select Horizontal and set the Position to 20 px. Click OK. 

Go to View > New Guide, this time setting the Position to 580 px.

create margin guides

To create vertical lines, go to View > New Guide. In the option window, select Vertical and set the Position to 20 px. Click OK. 

Go to View > New Guide, this time setting the Position to 280 px.

margin guides around the document

2. Designing Your Web Banner

Step 1

Drop the Blonde retro style image onto the document. The width of the image should match the width of the banner. If you need to resize, press Command-T to Transform. 

add image

Step 2

Press I to select the Eyedropper tool. Sample the yellow color on the image. 

Head over to the Layers panel, and go to Create a New Fill or Adjustment Layer > Solid Color. The foreground swatch should automatically be set. If not, use the following code: #fcf1d3. Click OK. 

Move the solid color layer under the image layer.

create a solid color layer

Step 3

Create a new layer on the Layers panel by pressing Shift-Command-N

Using the Brush Tool (B) and the #fcf1d3 as foreground, brush over the top right corner of the image. This will create a seamless look.

add a new layer and create a seamless look with the brush tool

Step 4

Select all the layers by holding down Shift and selecting the very first and the very last layers. Click on the Create a New Group button. Double-click on the folder and rename it Background.

combine layers into a folder

Step 5

Select the Text Tool (T) from the toolbar. Add the offer or what you are advertising. In this case, I will add ‘Spring’ in a different font than the rest of the banner to emphasize the season.  

Head over to the Character panel (Type > Panels > Character Panel). Set the Font to Awosem and the Size to 175 pt. Click on the Color swatch and set it to black. 

Use the guides to place the text in the center of the banner. 

add a text layer

Step 6

Using the Text Tool (T), add the rest of your copy. In this case, add the rest of the offer: ‘Sale, up to 50% off selected items. Online only.’ You can do this on a single layer or multiple layers. 

Head over to the Character panel and use the following settings: 

  • SALE: Font Morton Bold, Size 110 pt. Set the Color swatch and set it to #d82a2e.
  • UP TO 50%: Font Morton Bold, Size 110 pt, Leading 40 pt. Set the Color swatch to black.
  • OFF SELECTED ITEMS: Font Morton Bold, Size 25 pt, Leading 25 pt.
  • ONLINE ONLY: Font Morton Bold, Size 40 pt, Leading 35 pt.

Place this layer under the Spring layer. Select both layers and create a new folder named Copy.

add the rest of the offer

Step 7

Now it’s time to create the call to action button. In this case, we will call it ‘Shop Now >.’

Using the Text Tool (T), add the call to action and use the following settings: Font Morton Bold, Size 110 pt, Tracking 100 pt. Set the Color swatch to black.

Using the Rectangle Tool (U), create a rectangle. Head over to the Control bar and set the color to white, the Width to 145 px, and the Height to 35 px.

add a call to action button

Step 8

To make the call to action stand out, we’ll add a shadow. On the Layers panel, right-click on the Rectangle layer and select Blending Options. 

In the Layer Style option window, check and select the Drop Shadow option. In the Drop Shadow settings, set the Opacity to 35%, Angle to 130, Distance to 10 px, and Size to 20px. Click OK. 

Select the text and rectangle layers and combine them into one folder called ‘Call to action.’

add a drop shadow to the button

3. Applying Your Web Banner Design to Other Sizes

There’s no right or wrong way to apply your web banner design to other sizes. Below, I’ll show you an example of easily applying a half-page banner to a pop-up size. Use this as an inspiration and try to add your own spin. Then show us your design in the comments section below! 
Step 1

In Photoshop, go to File > New. Name the document Web Banner 2. Set the file to the following dimensions:

  • Width to 500 px
  • Height to 350 px
  • Orientation to Portrait
  • Resolution to 72 px
  • Color Mode to RGB

Click Create.

create a new file

Step 2

Create margins around the document. Go to View > New Guide. In the New Guide option window, select Horizontal and set the Position to 20 px. Click OK. 

Go to View > New Guide, this time setting the Position to 580 px.

To create vertical lines, go to View > New Guide. In the option window, select Vertical and set the Position to 20 px. Click OK. 

Go to View > New Guide, this time setting the Position to 280 px.

add margin guides

Step 3

Drop the Blonde retro style image and press Command-T to Transform. Head over to the Control bar and set the Width and Height to 75%.

Place the image to the left of the banner. A good guide is to have the elbow of the subject touching the margin. 

add the image

Step 4

Head over to the Layers panel, and go to Create a New Fill or Adjustment Layer > Solid Color. Set the solid color to the following code: #ff634b. Click OK.

create a solid color layer

Step 5

Create a new layer on the Layers panel by pressing Shift-Command-N

Using the Brush Tool (B) and #ff634b as the foreground color, brush over the edge of the image and the solid color to create a seamless look.

using the brush tool create a seamless look

Step 6

Select all the layers by holding down Shift and selecting the very first and the very last layers. Click on the Create a New Group button. Double-click on the folder and rename it Background.

combine the layers into a folder

Step 7

Head back to the Web Banner 1 file. Go to the Layers panel, and select the call to action and Copy folders. Right-click and select Duplicate Layers. 

In the Duplicate Layers option window, set the Document to Web Banner 2. Click OK. 

duplicate the offer and call to action folders

Step 8

Head back to the Web Banner 2 file. 

Select the Copy folder and press Command-T to Transform, moving the text towards the top left corner.

Open the folder and change the color of the ‘Sale’ text to #fceece

move the text on the banner and change the color of the Sale word

Step 9

Place the call to action button above the bottom margin.

move the call to action button

4. How to Export Your Banner Design for Web

Head over to File > Save and save the file as you would normally.

To save a JPEG for web file, head over to File > Save for Web or Shift-Option-Command-S. Select the file type you want to save the document in—I am choosing JPEG—and set 100 for Quality. Under Image size, you can change the pixel size of the image if you have any size constraints.

On the bottom left-hand side, you can see a preview of the size of the file. This is useful when there are size constraints on a website and you need to lower the quality or the size of the image.

Click on Save… to choose the location in the new window, and click on Save again.

export your design

Great Job! You’ve Finished Your Web Banner Template!

In this tutorial, we learned how to make a banner design. We covered tools that will help you design web banners for your next marketing campaign. Today, we learned to:

  • set up a website banner file
  • use Layer Masks
  • organize layers into folders
  • export a web-ready JPEG file

If you are new to Photoshop and need a banner template or promotional marketing templates right away, head over to Envato Elements and GraphicRiver. If you are in a hurry, don’t forget to check out Placeit. We’ve got many options for you to explore! 

If you liked this tutorial, you might like these:

How to Make an Effective Web Banner

Post pobrano z: How to Make an Effective Web Banner

Final product image
What You’ll Be Creating

Website banners: we see them every day, and they are a great addition to your marketing campaign. In this tutorial, I’ll show you how to make a banner. Banner designs and banner templates are composed of a couple of key elements: an offer and a call to action. You can add your logo if you’d like, and an image to enhance the message. 

The offer needs to be concise and to the point. You have to let your readers know what you are promoting. The call to action is a text/button that will invite your consumer to your website. Short phrases like “Shop Now” or “Subscribe” are great anchors.  

In this tutorial, we’ll design a half-page vertical banner that includes all the essential elements. We’ll apply this design to a pop-up banner size, which is a great example for you to see if you are planning on designing banner templates in the future. 

Not ready to make a banner in Photoshop? Placeit is a great online ad maker that’s easy to use and quick to customize. With hundreds of options to choose from, you are sure to find a banner template that suits your needs. Envato Elements also offers amazing and effective web banner templates and stock photos that can help you create a stunning campaign. Go check them out! 

What You Will Need

You’ll need access to Adobe Photoshop. If you don’t have the software, you can download a trial from the Adobe website. You’ll also need these assets:

Download the assets and make sure the font is installed on your system before starting. When you are ready, we’ll get started on creating your website banner! 

1. Setting Up a Web Banner Design File

Step 1

In Photoshop, go to File > New. Name the document Web Banner. Set the file to the following dimensions:

  • Width to 300 px
  • Height to 600 px
  • Orientation to Portrait
  • Resolution to 72 px
  • Color Mode to RGB

Click Create.

create a new photoshop file

Step 2

Create margins around the document by going to View > New Guide. In the New Guide option window, select Horizontal and set the Position to 20 px. Click OK. 

Go to View > New Guide, this time setting the Position to 580 px.

create margin guides

To create vertical lines, go to View > New Guide. In the option window, select Vertical and set the Position to 20 px. Click OK. 

Go to View > New Guide, this time setting the Position to 280 px.

margin guides around the document

2. Designing Your Web Banner

Step 1

Drop the Blonde retro style image onto the document. The width of the image should match the width of the banner. If you need to resize, press Command-T to Transform. 

add image

Step 2

Press I to select the Eyedropper tool. Sample the yellow color on the image. 

Head over to the Layers panel, and go to Create a New Fill or Adjustment Layer > Solid Color. The foreground swatch should automatically be set. If not, use the following code: #fcf1d3. Click OK. 

Move the solid color layer under the image layer.

create a solid color layer

Step 3

Create a new layer on the Layers panel by pressing Shift-Command-N

Using the Brush Tool (B) and the #fcf1d3 as foreground, brush over the top right corner of the image. This will create a seamless look.

add a new layer and create a seamless look with the brush tool

Step 4

Select all the layers by holding down Shift and selecting the very first and the very last layers. Click on the Create a New Group button. Double-click on the folder and rename it Background.

combine layers into a folder

Step 5

Select the Text Tool (T) from the toolbar. Add the offer or what you are advertising. In this case, I will add ‘Spring’ in a different font than the rest of the banner to emphasize the season.  

Head over to the Character panel (Type > Panels > Character Panel). Set the Font to Awosem and the Size to 175 pt. Click on the Color swatch and set it to black. 

Use the guides to place the text in the center of the banner. 

add a text layer

Step 6

Using the Text Tool (T), add the rest of your copy. In this case, add the rest of the offer: ‘Sale, up to 50% off selected items. Online only.’ You can do this on a single layer or multiple layers. 

Head over to the Character panel and use the following settings: 

  • SALE: Font Morton Bold, Size 110 pt. Set the Color swatch and set it to #d82a2e.
  • UP TO 50%: Font Morton Bold, Size 110 pt, Leading 40 pt. Set the Color swatch to black.
  • OFF SELECTED ITEMS: Font Morton Bold, Size 25 pt, Leading 25 pt.
  • ONLINE ONLY: Font Morton Bold, Size 40 pt, Leading 35 pt.

Place this layer under the Spring layer. Select both layers and create a new folder named Copy.

add the rest of the offer

Step 7

Now it’s time to create the call to action button. In this case, we will call it ‘Shop Now >.’

Using the Text Tool (T), add the call to action and use the following settings: Font Morton Bold, Size 110 pt, Tracking 100 pt. Set the Color swatch to black.

Using the Rectangle Tool (U), create a rectangle. Head over to the Control bar and set the color to white, the Width to 145 px, and the Height to 35 px.

add a call to action button

Step 8

To make the call to action stand out, we’ll add a shadow. On the Layers panel, right-click on the Rectangle layer and select Blending Options. 

In the Layer Style option window, check and select the Drop Shadow option. In the Drop Shadow settings, set the Opacity to 35%, Angle to 130, Distance to 10 px, and Size to 20px. Click OK. 

Select the text and rectangle layers and combine them into one folder called ‘Call to action.’

add a drop shadow to the button

3. Applying Your Web Banner Design to Other Sizes

There’s no right or wrong way to apply your web banner design to other sizes. Below, I’ll show you an example of easily applying a half-page banner to a pop-up size. Use this as an inspiration and try to add your own spin. Then show us your design in the comments section below! 
Step 1

In Photoshop, go to File > New. Name the document Web Banner 2. Set the file to the following dimensions:

  • Width to 500 px
  • Height to 350 px
  • Orientation to Portrait
  • Resolution to 72 px
  • Color Mode to RGB

Click Create.

create a new file

Step 2

Create margins around the document. Go to View > New Guide. In the New Guide option window, select Horizontal and set the Position to 20 px. Click OK. 

Go to View > New Guide, this time setting the Position to 580 px.

To create vertical lines, go to View > New Guide. In the option window, select Vertical and set the Position to 20 px. Click OK. 

Go to View > New Guide, this time setting the Position to 280 px.

add margin guides

Step 3

Drop the Blonde retro style image and press Command-T to Transform. Head over to the Control bar and set the Width and Height to 75%.

Place the image to the left of the banner. A good guide is to have the elbow of the subject touching the margin. 

add the image

Step 4

Head over to the Layers panel, and go to Create a New Fill or Adjustment Layer > Solid Color. Set the solid color to the following code: #ff634b. Click OK.

create a solid color layer

Step 5

Create a new layer on the Layers panel by pressing Shift-Command-N

Using the Brush Tool (B) and #ff634b as the foreground color, brush over the edge of the image and the solid color to create a seamless look.

using the brush tool create a seamless look

Step 6

Select all the layers by holding down Shift and selecting the very first and the very last layers. Click on the Create a New Group button. Double-click on the folder and rename it Background.

combine the layers into a folder

Step 7

Head back to the Web Banner 1 file. Go to the Layers panel, and select the call to action and Copy folders. Right-click and select Duplicate Layers. 

In the Duplicate Layers option window, set the Document to Web Banner 2. Click OK. 

duplicate the offer and call to action folders

Step 8

Head back to the Web Banner 2 file. 

Select the Copy folder and press Command-T to Transform, moving the text towards the top left corner.

Open the folder and change the color of the ‘Sale’ text to #fceece

move the text on the banner and change the color of the Sale word

Step 9

Place the call to action button above the bottom margin.

move the call to action button

4. How to Export Your Banner Design for Web

Head over to File > Save and save the file as you would normally.

To save a JPEG for web file, head over to File > Save for Web or Shift-Option-Command-S. Select the file type you want to save the document in—I am choosing JPEG—and set 100 for Quality. Under Image size, you can change the pixel size of the image if you have any size constraints.

On the bottom left-hand side, you can see a preview of the size of the file. This is useful when there are size constraints on a website and you need to lower the quality or the size of the image.

Click on Save… to choose the location in the new window, and click on Save again.

export your design

Great Job! You’ve Finished Your Web Banner Template!

In this tutorial, we learned how to make a banner design. We covered tools that will help you design web banners for your next marketing campaign. Today, we learned to:

  • set up a website banner file
  • use Layer Masks
  • organize layers into folders
  • export a web-ready JPEG file

If you are new to Photoshop and need a banner template or promotional marketing templates right away, head over to Envato Elements and GraphicRiver. If you are in a hurry, don’t forget to check out Placeit. We’ve got many options for you to explore! 

If you liked this tutorial, you might like these:

How to Make an Effective Web Banner

Post pobrano z: How to Make an Effective Web Banner

Final product image
What You’ll Be Creating

Website banners: we see them every day, and they are a great addition to your marketing campaign. In this tutorial, I’ll show you how to make a banner. Banner designs and banner templates are composed of a couple of key elements: an offer and a call to action. You can add your logo if you’d like, and an image to enhance the message. 

The offer needs to be concise and to the point. You have to let your readers know what you are promoting. The call to action is a text/button that will invite your consumer to your website. Short phrases like “Shop Now” or “Subscribe” are great anchors.  

In this tutorial, we’ll design a half-page vertical banner that includes all the essential elements. We’ll apply this design to a pop-up banner size, which is a great example for you to see if you are planning on designing banner templates in the future. 

Not ready to make a banner in Photoshop? Placeit is a great online ad maker that’s easy to use and quick to customize. With hundreds of options to choose from, you are sure to find a banner template that suits your needs. Envato Elements also offers amazing and effective web banner templates and stock photos that can help you create a stunning campaign. Go check them out! 

What You Will Need

You’ll need access to Adobe Photoshop. If you don’t have the software, you can download a trial from the Adobe website. You’ll also need these assets:

Download the assets and make sure the font is installed on your system before starting. When you are ready, we’ll get started on creating your website banner! 

1. Setting Up a Web Banner Design File

Step 1

In Photoshop, go to File > New. Name the document Web Banner. Set the file to the following dimensions:

  • Width to 300 px
  • Height to 600 px
  • Orientation to Portrait
  • Resolution to 72 px
  • Color Mode to RGB

Click Create.

create a new photoshop file

Step 2

Create margins around the document by going to View > New Guide. In the New Guide option window, select Horizontal and set the Position to 20 px. Click OK. 

Go to View > New Guide, this time setting the Position to 580 px.

create margin guides

To create vertical lines, go to View > New Guide. In the option window, select Vertical and set the Position to 20 px. Click OK. 

Go to View > New Guide, this time setting the Position to 280 px.

margin guides around the document

2. Designing Your Web Banner

Step 1

Drop the Blonde retro style image onto the document. The width of the image should match the width of the banner. If you need to resize, press Command-T to Transform. 

add image

Step 2

Press I to select the Eyedropper tool. Sample the yellow color on the image. 

Head over to the Layers panel, and go to Create a New Fill or Adjustment Layer > Solid Color. The foreground swatch should automatically be set. If not, use the following code: #fcf1d3. Click OK. 

Move the solid color layer under the image layer.

create a solid color layer

Step 3

Create a new layer on the Layers panel by pressing Shift-Command-N

Using the Brush Tool (B) and the #fcf1d3 as foreground, brush over the top right corner of the image. This will create a seamless look.

add a new layer and create a seamless look with the brush tool

Step 4

Select all the layers by holding down Shift and selecting the very first and the very last layers. Click on the Create a New Group button. Double-click on the folder and rename it Background.

combine layers into a folder

Step 5

Select the Text Tool (T) from the toolbar. Add the offer or what you are advertising. In this case, I will add ‘Spring’ in a different font than the rest of the banner to emphasize the season.  

Head over to the Character panel (Type > Panels > Character Panel). Set the Font to Awosem and the Size to 175 pt. Click on the Color swatch and set it to black. 

Use the guides to place the text in the center of the banner. 

add a text layer

Step 6

Using the Text Tool (T), add the rest of your copy. In this case, add the rest of the offer: ‘Sale, up to 50% off selected items. Online only.’ You can do this on a single layer or multiple layers. 

Head over to the Character panel and use the following settings: 

  • SALE: Font Morton Bold, Size 110 pt. Set the Color swatch and set it to #d82a2e.
  • UP TO 50%: Font Morton Bold, Size 110 pt, Leading 40 pt. Set the Color swatch to black.
  • OFF SELECTED ITEMS: Font Morton Bold, Size 25 pt, Leading 25 pt.
  • ONLINE ONLY: Font Morton Bold, Size 40 pt, Leading 35 pt.

Place this layer under the Spring layer. Select both layers and create a new folder named Copy.

add the rest of the offer

Step 7

Now it’s time to create the call to action button. In this case, we will call it ‘Shop Now >.’

Using the Text Tool (T), add the call to action and use the following settings: Font Morton Bold, Size 110 pt, Tracking 100 pt. Set the Color swatch to black.

Using the Rectangle Tool (U), create a rectangle. Head over to the Control bar and set the color to white, the Width to 145 px, and the Height to 35 px.

add a call to action button

Step 8

To make the call to action stand out, we’ll add a shadow. On the Layers panel, right-click on the Rectangle layer and select Blending Options. 

In the Layer Style option window, check and select the Drop Shadow option. In the Drop Shadow settings, set the Opacity to 35%, Angle to 130, Distance to 10 px, and Size to 20px. Click OK. 

Select the text and rectangle layers and combine them into one folder called ‘Call to action.’

add a drop shadow to the button

3. Applying Your Web Banner Design to Other Sizes

There’s no right or wrong way to apply your web banner design to other sizes. Below, I’ll show you an example of easily applying a half-page banner to a pop-up size. Use this as an inspiration and try to add your own spin. Then show us your design in the comments section below! 

Step 1

In Photoshop, go to File > New. Name the document Web Banner 2. Set the file to the following dimensions:

  • Width to 500 px
  • Height to 350 px
  • Orientation to Portrait
  • Resolution to 72 px
  • Color Mode to RGB

Click Create.

create a new file

Step 2

Create margins around the document. Go to View > New Guide. In the New Guide option window, select Horizontal and set the Position to 20 px. Click OK. 

Go to View > New Guide, this time setting the Position to 580 px.

To create vertical lines, go to View > New Guide. In the option window, select Vertical and set the Position to 20 px. Click OK. 

Go to View > New Guide, this time setting the Position to 280 px.

add margin guides

Step 3

Drop the Blonde retro style image and press Command-T to Transform. Head over to the Control bar and set the Width and Height to 75%.

Place the image to the left of the banner. A good guide is to have the elbow of the subject touching the margin. 

add the image

Step 4

Head over to the Layers panel, and go to Create a New Fill or Adjustment Layer > Solid Color. Set the solid color to the following code: #ff634b. Click OK.

create a solid color layer

Step 5

Create a new layer on the Layers panel by pressing Shift-Command-N

Using the Brush Tool (B) and #ff634b as the foreground color, brush over the edge of the image and the solid color to create a seamless look.

using the brush tool create a seamless look

Step 6

Select all the layers by holding down Shift and selecting the very first and the very last layers. Click on the Create a New Group button. Double-click on the folder and rename it Background.

combine the layers into a folder

Step 7

Head back to the Web Banner 1 file. Go to the Layers panel, and select the call to action and Copy folders. Right-click and select Duplicate Layers. 

In the Duplicate Layers option window, set the Document to Web Banner 2. Click OK. 

duplicate the offer and call to action folders

Step 8

Head back to the Web Banner 2 file. 

Select the Copy folder and press Command-T to Transform, moving the text towards the top left corner.

Open the folder and change the color of the ‘Sale’ text to #fceece

move the text on the banner and change the color of the Sale word

Step 9

Place the call to action button above the bottom margin.

move the call to action button

4. How to Export Your Banner Design for Web

Head over to File > Save and save the file as you would normally.

To save a JPEG for web file, head over to File > Save for Web or Shift-Option-Command-S. Select the file type you want to save the document in—I am choosing JPEG—and set 100 for Quality. Under Image size, you can change the pixel size of the image if you have any size constraints.

On the bottom left-hand side, you can see a preview of the size of the file. This is useful when there are size constraints on a website and you need to lower the quality or the size of the image.

Click on Save… to choose the location in the new window, and click on Save again.

export your design

Great Job! You’ve Finished Your Web Banner Template!

In this tutorial, we learned how to make a banner design. We covered tools that will help you design web banners for your next marketing campaign. Today, we learned to:

  • set up a website banner file
  • use Layer Masks
  • organize layers into folders
  • export a web-ready JPEG file

If you are new to Photoshop and need a banner template or promotional marketing templates right away, head over to Envato Elements and GraphicRiver. If you are in a hurry, don’t forget to check out Placeit. We’ve got many options for you to explore! 

If you liked this tutorial, you might like these:

How to Make an Effective Web Banner

Post pobrano z: How to Make an Effective Web Banner

Final product image
What You’ll Be Creating

Website banners: we see them every day, and they are a great addition to your marketing campaign. In this tutorial, I’ll show you how to make a banner. Banner designs and banner templates are composed of a couple of key elements: an offer and a call to action. You can add your logo if you’d like, and an image to enhance the message. 

The offer needs to be concise and to the point. You have to let your readers know what you are promoting. The call to action is a text/button that will invite your consumer to your website. Short phrases like “Shop Now” or “Subscribe” are great anchors.  

In this tutorial, we’ll design a half-page vertical banner that includes all the essential elements. We’ll apply this design to a pop-up banner size, which is a great example for you to see if you are planning on designing banner templates in the future. 

Not ready to make a banner in Photoshop? Placeit is a great online ad maker that’s easy to use and quick to customize. With hundreds of options to choose from, you are sure to find a banner template that suits your needs. Envato Elements also offers amazing and effective web banner templates and stock photos that can help you create a stunning campaign. Go check them out! 

What You Will Need

You’ll need access to Adobe Photoshop. If you don’t have the software, you can download a trial from the Adobe website. You’ll also need these assets:

Download the assets and make sure the font is installed on your system before starting. When you are ready, we’ll get started on creating your website banner! 

1. Setting Up a Web Banner Design File

Step 1

In Photoshop, go to File > New. Name the document Web Banner. Set the file to the following dimensions:

  • Width to 300 px
  • Height to 600 px
  • Orientation to Portrait
  • Resolution to 72 px
  • Color Mode to RGB

Click Create.

create a new photoshop file

Step 2

Create margins around the document by going to View > New Guide. In the New Guide option window, select Horizontal and set the Position to 20 px. Click OK. 

Go to View > New Guide, this time setting the Position to 580 px.

create margin guides

To create vertical lines, go to View > New Guide. In the option window, select Vertical and set the Position to 20 px. Click OK. 

Go to View > New Guide, this time setting the Position to 280 px.

margin guides around the document

2. Designing Your Web Banner

Step 1

Drop the Blonde retro style image onto the document. The width of the image should match the width of the banner. If you need to resize, press Command-T to Transform. 

add image

Step 2

Press I to select the Eyedropper tool. Sample the yellow color on the image. 

Head over to the Layers panel, and go to Create a New Fill or Adjustment Layer > Solid Color. The foreground swatch should automatically be set. If not, use the following code: #fcf1d3. Click OK. 

Move the solid color layer under the image layer.

create a solid color layer

Step 3

Create a new layer on the Layers panel by pressing Shift-Command-N

Using the Brush Tool (B) and the #fcf1d3 as foreground, brush over the top right corner of the image. This will create a seamless look.

add a new layer and create a seamless look with the brush tool

Step 4

Select all the layers by holding down Shift and selecting the very first and the very last layers. Click on the Create a New Group button. Double-click on the folder and rename it Background.

combine layers into a folder

Step 5

Select the Text Tool (T) from the toolbar. Add the offer or what you are advertising. In this case, I will add ‘Spring’ in a different font than the rest of the banner to emphasize the season.  

Head over to the Character panel (Type > Panels > Character Panel). Set the Font to Awosem and the Size to 175 pt. Click on the Color swatch and set it to black. 

Use the guides to place the text in the center of the banner. 

add a text layer

Step 6

Using the Text Tool (T), add the rest of your copy. In this case, add the rest of the offer: ‘Sale, up to 50% off selected items. Online only.’ You can do this on a single layer or multiple layers. 

Head over to the Character panel and use the following settings: 

  • SALE: Font Morton Bold, Size 110 pt. Set the Color swatch and set it to #d82a2e.
  • UP TO 50%: Font Morton Bold, Size 110 pt, Leading 40 pt. Set the Color swatch to black.
  • OFF SELECTED ITEMS: Font Morton Bold, Size 25 pt, Leading 25 pt.
  • ONLINE ONLY: Font Morton Bold, Size 40 pt, Leading 35 pt.

Place this layer under the Spring layer. Select both layers and create a new folder named Copy.

add the rest of the offer

Step 7

Now it’s time to create the call to action button. In this case, we will call it ‘Shop Now >.’

Using the Text Tool (T), add the call to action and use the following settings: Font Morton Bold, Size 110 pt, Tracking 100 pt. Set the Color swatch to black.

Using the Rectangle Tool (U), create a rectangle. Head over to the Control bar and set the color to white, the Width to 145 px, and the Height to 35 px.

add a call to action button

Step 8

To make the call to action stand out, we’ll add a shadow. On the Layers panel, right-click on the Rectangle layer and select Blending Options. 

In the Layer Style option window, check and select the Drop Shadow option. In the Drop Shadow settings, set the Opacity to 35%, Angle to 130, Distance to 10 px, and Size to 20px. Click OK. 

Select the text and rectangle layers and combine them into one folder called ‘Call to action.’

add a drop shadow to the button

3. Applying Your Web Banner Design to Other Sizes

There’s no right or wrong way to apply your web banner design to other sizes. Below, I’ll show you an example of easily applying a half-page banner to a pop-up size. Use this as an inspiration and try to add your own spin. Then show us your design in the comments section below! 

Step 1

In Photoshop, go to File > New. Name the document Web Banner 2. Set the file to the following dimensions:

  • Width to 500 px
  • Height to 350 px
  • Orientation to Portrait
  • Resolution to 72 px
  • Color Mode to RGB

Click Create.

create a new file

Step 2

Create margins around the document. Go to View > New Guide. In the New Guide option window, select Horizontal and set the Position to 20 px. Click OK. 

Go to View > New Guide, this time setting the Position to 580 px.

To create vertical lines, go to View > New Guide. In the option window, select Vertical and set the Position to 20 px. Click OK. 

Go to View > New Guide, this time setting the Position to 280 px.

add margin guides

Step 3

Drop the Blonde retro style image and press Command-T to Transform. Head over to the Control bar and set the Width and Height to 75%.

Place the image to the left of the banner. A good guide is to have the elbow of the subject touching the margin. 

add the image

Step 4

Head over to the Layers panel, and go to Create a New Fill or Adjustment Layer > Solid Color. Set the solid color to the following code: #ff634b. Click OK.

create a solid color layer

Step 5

Create a new layer on the Layers panel by pressing Shift-Command-N

Using the Brush Tool (B) and #ff634b as the foreground color, brush over the edge of the image and the solid color to create a seamless look.

using the brush tool create a seamless look

Step 6

Select all the layers by holding down Shift and selecting the very first and the very last layers. Click on the Create a New Group button. Double-click on the folder and rename it Background.

combine the layers into a folder

Step 7

Head back to the Web Banner 1 file. Go to the Layers panel, and select the call to action and Copy folders. Right-click and select Duplicate Layers. 

In the Duplicate Layers option window, set the Document to Web Banner 2. Click OK. 

duplicate the offer and call to action folders

Step 8

Head back to the Web Banner 2 file. 

Select the Copy folder and press Command-T to Transform, moving the text towards the top left corner.

Open the folder and change the color of the ‘Sale’ text to #fceece

move the text on the banner and change the color of the Sale word

Step 9

Place the call to action button above the bottom margin.

move the call to action button

4. How to Export Your Banner Design for Web

Head over to File > Save and save the file as you would normally.

To save a JPEG for web file, head over to File > Save for Web or Shift-Option-Command-S. Select the file type you want to save the document in—I am choosing JPEG—and set 100 for Quality. Under Image size, you can change the pixel size of the image if you have any size constraints.

On the bottom left-hand side, you can see a preview of the size of the file. This is useful when there are size constraints on a website and you need to lower the quality or the size of the image.

Click on Save… to choose the location in the new window, and click on Save again.

export your design

Great Job! You’ve Finished Your Web Banner Template!

In this tutorial, we learned how to make a banner design. We covered tools that will help you design web banners for your next marketing campaign. Today, we learned to:

  • set up a website banner file
  • use Layer Masks
  • organize layers into folders
  • export a web-ready JPEG file

If you are new to Photoshop and need a banner template or promotional marketing templates right away, head over to Envato Elements and GraphicRiver. If you are in a hurry, don’t forget to check out Placeit. We’ve got many options for you to explore! 

If you liked this tutorial, you might like these: