How to Make a Book Cover

Post pobrano z: How to Make a Book Cover

In this article, you’ll learn how to make a book cover. Here, you’ll pick up tips on how to make a book in InDesign and create your own InDesign book template, from using InDesign templates to putting together your cover artwork. 

If you’re looking to self-publish your own books and sell them online, or you are making your first steps into professional cover design for clients, this guide will introduce you to the essentials of creating book cover templates. 

Looking for a quick start? InDesign templates are great value and easy to adapt. You can find a huge range of customizable InDesign book cover templates and book layout templates on Envato Elements and GraphicRiver.

book cover mockup
Book cover mockup template

Read on to discover eight key steps for helping you create a book cover design that’s guaranteed to draw in readers. 

1. Pick Your Software Wisely

If you’re dipping a toe into the publishing design world, it can be tricky to know which software you should use to create your book cover. 

You can use almost any design software to create a cover, but some programs are more specialised for creating professional-quality covers. 

Adobe Photoshop isn’t suited for creating inside layouts, but it works perfectly well for creating covers, which are drafted as one page (with the back cover, spine and front cover as one image).

Professional cover designers tend to opt for publishing software as standard, as these tend to give you more control over print specs and typography. Adobe InDesign is the most popular choice, with QuarkXPress a good, if more simplified, alternative. 

With Affinity Publisher’s full launch just around the corner as well, this is likely to be a good-value alternative for cover designers in the future. 

2. Make a Confident Start With a Book Cover Template

If you don’t know how to make a book in InDesign, starting with a downloadable InDesign template can be a sensible and reassuring place to begin designing your cover. Ready-made InDesign book templates can be downloaded from sites like GraphicRiver and can be updated with your own content.

By adapting an existing template, you can learn more about cover design by observing the work a designer has put into a template. Look at how the document has been set up in InDesign to pick up tips for designing your own covers in the future. 

Go to File > Document Setup to view the page size and bleed specs, and Layout > Margins and Columns will show you more details about how the cover has been structured. Has the designer included a flexible spine? Noting these key details will help you understand how professional cover designers work and give you pointers for your own custom book covers. 

Maker apps like Placeit can also provide a helpful solution for new cover designers wanting to build confidence. In these apps, you can choose an existing cover design and adapt it quickly, tailoring the size for multiple print formats or adapting it as an eBook cover.

This Simple Graphic and Text cover template can be adapted quickly using a range of fonts, graphics, and photos.

placeit
Simple Graphic and Text Template on Placeit

Ready to take the next step and create a cover in InDesign? Check out these book cover templates which are quick and easy to customize with your own text and images:

book cover template
book template
Book cover and book layout template
book cover
Book cover template

3. Discover Creative Inspiration

Book cover design is one of the most creative areas of print design. Why? Compared to more commercial print media, like flyers and business cards, book covers are intrinsically linked to art—the connection between a book and a potential reader is emotionally charged. 

Although we are told not to judge a book by its cover, we can’t help doing just that when we browse a bookshelf. By making your cover as creative and striking as possible, you can hope to win the hearts and minds of your readership and convert browsing to sales. 

Professional cover designers know the power of treating a cover like an art canvas. So look to inspirational sources like the fantastic Book Cover Archive and Pinterest to really get your creative juices flowing.

book cover archive
Book Cover Archive
pinterest
By clicking on cover designs which catch your eye on Pinterest, you can browse hundreds of related images, which might spark your next cover idea.

It’s also important to not allow your creativity to outpace your judgement about making the cover genre- and audience-appropriate. 

So crime thrillers have a certain design language (large sans serif fonts in punchy colors like red and blue), as do historical romance novels (which tend towards script fonts and pastel colors). 

If you’re self-publishing an eBook, it pays to be aware of the sorts of design styles which are trending on eBook stores, like the Kindle Store and Google Play

kindle store
Do your research by browsing trending cover designs on the Kindle Store.

Check out these tutorials and courses which show you how to design covers tailored to specific audiences, from young adults to thriller fans:

4. Get the Essentials Right

When you start to design your book cover, you should take a bit of time to carefully prepare your artwork before you begin designing. 

working on a cover in indesign
Carefully consider page size, bleed and guides before you put together your cover artwork in InDesign.

Consider the format and size of the cover—will you print the book as a paperback (softcover) or hardback, or create a digital eBook? Do you have a standard size in mind such as Pocket Book, Demy, or Royal? Look up industry-recommended book sizes, and don’t be tempted to stray from the norm. 

Top tip: If you want to adjust the size of your cover artwork without starting over in a new document, you can use the Free Transform Tool (E) in InDesign to scale the artwork.

You’ll also need to add a bleed to your cover artwork, which allows background elements and color to extend past the page (trim) edge, making for a more seamless printed result. In InDesign, go to File > Document Setup to add a bleed width to your artwork. 

Consider also the expected spine width of your cover, which will have a knock-on effect on the overall width of the cover artwork (which includes the back cover, spine and front cover, from left to right). You can work out the width of the spine once you know the final page count of your book and the paper stock the inside pages will be printed on (which will affect how bulky the book is, and therefore how wide the spine is). 

Use an online spine width calculator to find the final width, or ask for a width spec from your printer. 

Looking for a more in-depth walk-through on how to create a book cover? This book cover design course shows you how to comprehensively design a cover for a paperback book, from setting up the artwork all the way through to exporting the design for professional printing. 

5. For the Front Cover, Focus on Balance, Impact, and Legibility

When designing your front cover, it’s a good tip to let yourself be creative and experiment with different layouts, styles, and themes. The more eye-catching and imaginative you can make your book cover, the better!

long shadow
Book cover mockup template

However, you do tend to find that covers still follow some rules of layout. After all, you will always need to include some essential information, including the book title and author name. The publisher might also want to include a review or short blurb on the front of the book. 

Some cover designers choose to make a feature of the title, creating covers which prioritise typographic design. Alternatively, a single strong photo or graphic can be the dominant feature, with type taking a secondary role. 

Above all, you want to foster balance on your cover, and because covers tend to be relatively small it usually looks best if either type or graphic are highlighted more than the other. This also contributes to the improved legibility of the cover, which is also incredibly important when a cover is viewed from a distance away.

This tutorial shows you how to create a cover design which balances an absorbing image with legible text:

6. Use the Back Cover to Seal the Deal

While the front cover should be designed to advertise the book and provoke an immediate reaction from a reader, the back cover should be used to ‘seal the deal’, providing more enticing information about the book.

Here is the place to include a blurb (a short, interesting summary of the narrative), and possibly reviews (it goes without saying to only include positive ones!).

You will also need to place a barcode (use a barcode generator once you have an ISBN to hand) and optional pricing information on the back cover too. The publisher may also want to include their logo and website, which is usually placed at the bottom of the back cover. 

book cover
Book cover template

7. Don’t Neglect the Spine

Readers won’t always come into contact with your book through looking at the front cover. The sheer volume of books in stores can mean retailers can choose to stack your book alongside thousands of other competing titles, with only the spine visible. So this small area of spine can spell the difference between someone picking up your book or dismissing it in an instant. 

Take the time to consider the design of your spine. You can lift elements from the front cover, such as the title and author name, but you can also add extra quirky details. 

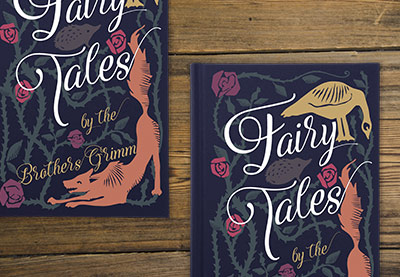
In this example, I designed a vintage-inspired cover for a book of fairy tales. The artwork on the front cover is intricate and fantastical, and I wanted to translate this mood to the spine of the book.

vintage cover

The spine has trailing vines and a rose detail, which frame the script type and make the spine just as romantic and ethereal as the front cover. 

spine design

8. Export Your Cover for Printing

When you’ve finished the artwork for your cover, you’ll need to export your design as a press-ready PDF file to be printed. 

To do this, head up to File > Export in InDesign, and choose Adobe PDF (Print) from the Format menu. Choose Press Quality from the Preset options to ensure your artwork is exported at very high quality. 

Top tip: The cover should be exported as one whole image (including back cover, front cover, and spine).

book cover

Find out more about the essentials of preparing your book artwork for print with this must-read tutorial:

Take Your Publishing Design Skills to the Next Level…

Still unsure about how to start creating your own book templates? A downloadable InDesign template is a sensible place to get started, and can be great for boosting your confidence when you’re dipping a toe into book design.

You can find a wide range of customizable InDesign book templates for book covers and book layouts on Envato Elements and GraphicRiver.

Discover our pick of the best book design tutorials for beginners below:

How to Make a Book Cover

Post pobrano z: How to Make a Book Cover

In this article, you’ll learn how to make a book cover. Here, you’ll pick up tips on how to make a book in InDesign and create your own InDesign book template, from using InDesign templates to putting together your cover artwork. 

If you’re looking to self-publish your own books and sell them online, or you are making your first steps into professional cover design for clients, this guide will introduce you to the essentials of creating book cover templates. 

Looking for a quick start? InDesign templates are great value and easy to adapt. You can find a huge range of customizable InDesign book cover templates and book layout templates on Envato Elements and GraphicRiver.

book cover mockup
Book cover mockup template

Read on to discover eight key steps for helping you create a book cover design that’s guaranteed to draw in readers. 

1. Pick Your Software Wisely

If you’re dipping a toe into the publishing design world, it can be tricky to know which software you should use to create your book cover. 

You can use almost any design software to create a cover, but some programs are more specialised for creating professional-quality covers. 

Adobe Photoshop isn’t suited for creating inside layouts, but it works perfectly well for creating covers, which are drafted as one page (with the back cover, spine and front cover as one image).

Professional cover designers tend to opt for publishing software as standard, as these tend to give you more control over print specs and typography. Adobe InDesign is the most popular choice, with QuarkXPress a good, if more simplified, alternative. 

With Affinity Publisher’s full launch just around the corner as well, this is likely to be a good-value alternative for cover designers in the future. 

2. Make a Confident Start With a Book Cover Template

If you don’t know how to make a book in InDesign, starting with a downloadable InDesign template can be a sensible and reassuring place to begin designing your cover. Ready-made InDesign book templates can be downloaded from sites like GraphicRiver and can be updated with your own content.

By adapting an existing template, you can learn more about cover design by observing the work a designer has put into a template. Look at how the document has been set up in InDesign to pick up tips for designing your own covers in the future. 

Go to File > Document Setup to view the page size and bleed specs, and Layout > Margins and Columns will show you more details about how the cover has been structured. Has the designer included a flexible spine? Noting these key details will help you understand how professional cover designers work and give you pointers for your own custom book covers. 

Maker apps like Placeit can also provide a helpful solution for new cover designers wanting to build confidence. In these apps, you can choose an existing cover design and adapt it quickly, tailoring the size for multiple print formats or adapting it as an eBook cover.

This Simple Graphic and Text cover template can be adapted quickly using a range of fonts, graphics, and photos.

placeit
Simple Graphic and Text Template on Placeit

Ready to take the next step and create a cover in InDesign? Check out these book cover templates which are quick and easy to customize with your own text and images:

book cover template
book template
Book cover and book layout template
book cover
Book cover template

3. Discover Creative Inspiration

Book cover design is one of the most creative areas of print design. Why? Compared to more commercial print media, like flyers and business cards, book covers are intrinsically linked to art—the connection between a book and a potential reader is emotionally charged. 

Although we are told not to judge a book by its cover, we can’t help doing just that when we browse a bookshelf. By making your cover as creative and striking as possible, you can hope to win the hearts and minds of your readership and convert browsing to sales. 

Professional cover designers know the power of treating a cover like an art canvas. So look to inspirational sources like the fantastic Book Cover Archive and Pinterest to really get your creative juices flowing.

book cover archive
Book Cover Archive
pinterest
By clicking on cover designs which catch your eye on Pinterest, you can browse hundreds of related images, which might spark your next cover idea.

It’s also important to not allow your creativity to outpace your judgement about making the cover genre- and audience-appropriate. 

So crime thrillers have a certain design language (large sans serif fonts in punchy colors like red and blue), as do historical romance novels (which tend towards script fonts and pastel colors). 

If you’re self-publishing an eBook, it pays to be aware of the sorts of design styles which are trending on eBook stores, like the Kindle Store and Google Play

kindle store
Do your research by browsing trending cover designs on the Kindle Store.

Check out these tutorials and courses which show you how to design covers tailored to specific audiences, from young adults to thriller fans:

4. Get the Essentials Right

When you start to design your book cover, you should take a bit of time to carefully prepare your artwork before you begin designing. 

working on a cover in indesign
Carefully consider page size, bleed and guides before you put together your cover artwork in InDesign.

Consider the format and size of the cover—will you print the book as a paperback (softcover) or hardback, or create a digital eBook? Do you have a standard size in mind such as Pocket Book, Demy, or Royal? Look up industry-recommended book sizes, and don’t be tempted to stray from the norm. 

Top tip: If you want to adjust the size of your cover artwork without starting over in a new document, you can use the Free Transform Tool (E) in InDesign to scale the artwork.

You’ll also need to add a bleed to your cover artwork, which allows background elements and color to extend past the page (trim) edge, making for a more seamless printed result. In InDesign, go to File > Document Setup to add a bleed width to your artwork. 

Consider also the expected spine width of your cover, which will have a knock-on effect on the overall width of the cover artwork (which includes the back cover, spine and front cover, from left to right). You can work out the width of the spine once you know the final page count of your book and the paper stock the inside pages will be printed on (which will affect how bulky the book is, and therefore how wide the spine is). 

Use an online spine width calculator to find the final width, or ask for a width spec from your printer. 

Looking for a more in-depth walk-through on how to create a book cover? This book cover design course shows you how to comprehensively design a cover for a paperback book, from setting up the artwork all the way through to exporting the design for professional printing. 

5. For the Front Cover, Focus on Balance, Impact, and Legibility

When designing your front cover, it’s a good tip to let yourself be creative and experiment with different layouts, styles, and themes. The more eye-catching and imaginative you can make your book cover, the better!

long shadow
Book cover mockup template

However, you do tend to find that covers still follow some rules of layout. After all, you will always need to include some essential information, including the book title and author name. The publisher might also want to include a review or short blurb on the front of the book. 

Some cover designers choose to make a feature of the title, creating covers which prioritise typographic design. Alternatively, a single strong photo or graphic can be the dominant feature, with type taking a secondary role. 

Above all, you want to foster balance on your cover, and because covers tend to be relatively small it usually looks best if either type or graphic are highlighted more than the other. This also contributes to the improved legibility of the cover, which is also incredibly important when a cover is viewed from a distance away.

This tutorial shows you how to create a cover design which balances an absorbing image with legible text:

6. Use the Back Cover to Seal the Deal

While the front cover should be designed to advertise the book and provoke an immediate reaction from a reader, the back cover should be used to ‘seal the deal’, providing more enticing information about the book.

Here is the place to include a blurb (a short, interesting summary of the narrative), and possibly reviews (it goes without saying to only include positive ones!).

You will also need to place a barcode (use a barcode generator once you have an ISBN to hand) and optional pricing information on the back cover too. The publisher may also want to include their logo and website, which is usually placed at the bottom of the back cover. 

book cover
Book cover template

7. Don’t Neglect the Spine

Readers won’t always come into contact with your book through looking at the front cover. The sheer volume of books in stores can mean retailers can choose to stack your book alongside thousands of other competing titles, with only the spine visible. So this small area of spine can spell the difference between someone picking up your book or dismissing it in an instant. 

Take the time to consider the design of your spine. You can lift elements from the front cover, such as the title and author name, but you can also add extra quirky details. 

In this example, I designed a vintage-inspired cover for a book of fairy tales. The artwork on the front cover is intricate and fantastical, and I wanted to translate this mood to the spine of the book.

vintage cover

The spine has trailing vines and a rose detail, which frame the script type and make the spine just as romantic and ethereal as the front cover. 

spine design

8. Export Your Cover for Printing

When you’ve finished the artwork for your cover, you’ll need to export your design as a press-ready PDF file to be printed. 

To do this, head up to File > Export in InDesign, and choose Adobe PDF (Print) from the Format menu. Choose Press Quality from the Preset options to ensure your artwork is exported at very high quality. 

Top tip: The cover should be exported as one whole image (including back cover, front cover, and spine).

book cover

Find out more about the essentials of preparing your book artwork for print with this must-read tutorial:

Take Your Publishing Design Skills to the Next Level…

Still unsure about how to start creating your own book templates? A downloadable InDesign template is a sensible place to get started, and can be great for boosting your confidence when you’re dipping a toe into book design.

You can find a wide range of customizable InDesign book templates for book covers and book layouts on Envato Elements and GraphicRiver.

Discover our pick of the best book design tutorials for beginners below:

The Magic of React-Based Multi-Step Forms

Post pobrano z: The Magic of React-Based Multi-Step Forms

One way to deal with long, complex forms is to break them up into multiple steps. You know, answer one set of questions, move on to another, then maybe another, and so on and so forth. We often refer to these as multi-step forms (for obvious reasons), but others also take to calling it a “wizard” form.

Multi-step forms can be a great idea! By only showing a few inputs on a screen at a time, the form may feel more digestible and prevent users from feeling overwhelmed by a sea of form fields. Although I haven’t looked it up, I’m willing to say no one enjoys completing a ginormous form — that’s where multiple steps can come in handy.

The problem is that multi-step forms — while reducing perceived complexity on the front end — can feel complex and overwhelming to develop. But, I’m here to tell you that it’s not only achievable, but relatively straightforward using React as the base. So, that’s what we’re going to build together today!

Here’s the final product:

See the Pen
React Simple Wizard Form
by Nathan Sebhastian (@nathansebhastian)
on CodePen.

Let’s build it!

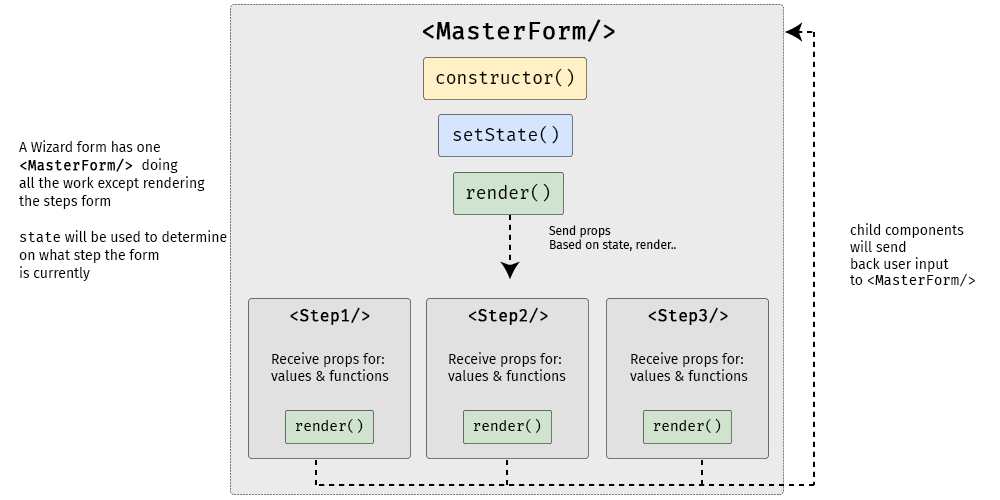
The easiest way to create a multi-step form is to create a container form element that contains all the steps inside of it as components. Here’s a visual showing that container (<MasterForm/>), the components inside of it (<Step1/>, <Step2/>, <Step3/>) and the way states and props are passed between them.

A diagram showing the master form component above three rectangles representing the three steps of the form, from left to right. Between the master form and the steps is a constructor, setState, and render.
<MasterForm/> serves as the container while three child components inside of it act as each step of the form.

Although it seems to be more complex than a regular form, a multi-step form still uses the same principles as a React form:

  • State is used for storing data and user inputs.
  • Component is used for writing methods and the interface.
  • Props are used for passing data and function into elements.

Instead of having one form component, we will have one parent component and three child components. In the diagram above, <MasterForm/> will send data and functions to the child components via props, and in turn, the child components will trigger a handleChange() function to set values in the state of <MasterForm/>. It’s one big happy family over here!

We’ll need a function to move the form from one step to another as well, and we’ll get to that a little later.

The step child (get it?) components will receive props from the <MasterForm/> parent component for value and onChange props.

  • <Step1/> component will render an email address input
  • <Step2/> will render a username input
  • <Step3/> will render a password input and a submit button

<MasterForm/> will supply both data and function into child components, and child components will pass user inputs back to the parent using its props.

Creating the step (child) components

First, we’ll create the form’s child components. We’re keeping things pretty barebones for this example by only using one input per step, but each step could really be as complex as we’d like. Since the child components look almost similar between one another, I’m just gonna show one of them here. But be sure to take a look at the demo for the full code.

class Step1 extends React.Component {
  render() {
    if (this.props.currentStep !== 1) { // Prop: The current step
      return null
    }
    // The markup for the Step 1 UI
    return(
      <div className="form-group">
        <label htmlFor="email">Email address</label>
        <input
          className="form-control"
          id="email"
          name="email"
          type="text"
          placeholder="Enter email"
          value={this.props.email} // Prop: The email input data
          onChange={this.props.handleChange} // Prop: Puts data into state
        />
      </div>
    )
  }
}

Now we can put this child component into the form’s render() function and pass in the necessary props. Just like in React’s form documentation, we can still use handleChange() to put the user’s submitted data into state with setState(). A handleSubmit() function will run on form submit.

Next up, the parent component

Let’s make the parent component — which we’re all aware by now, we’re calling <MasterForm/> — and initialize its state and methods.

We’re using a currentStep state that will be initialized with a default value of 1, indicating the first step (<Step1/>) of the form. We’ll update the state as the form progresses to indicate the current step.

class MasterForm extends Component {
  constructor(props) {
    super(props)
    // Set the initial input values
    this.state = {
      currentStep: 1, // Default is Step 1
      email: '',
      username: '',
      password: '', 
    }
    // Bind the submission to handleChange() 
    this.handleChange = this.handleChange.bind(this)
  }

  // Use the submitted data to set the state
  handleChange(event) {
    const {name, value} = event.target
    this.setState({
      [name]: value
    })    
  }
  
  // Trigger an alert on form submission
  handleSubmit = (event) => {
    event.preventDefault()
    const { email, username, password } = this.state
    alert(`Your registration detail: \n 
      Email: ${email} \n 
      Username: ${username} \n
      Password: ${password}`)
  }
  
  // Render UI will go here...
}

OK, that’s the baseline functionality we’re looking for. Next, we want to create the shell UI for the actual form add call the child components in it, including the required state props that will be passed from <MasterForm/> via handleChange().

render() {    
return (
  <React.Fragment>
  <h1>A Wizard Form!</h1>
  <p>Step {this.state.currentStep} </p> 
    
  <form onSubmit={this.handleSubmit}>
  
    // Render the form steps and pass in the required props
    <Step1 
      currentStep={this.state.currentStep} 
      handleChange={this.handleChange}
      email={this.state.email}
    />
    <Step2 
      currentStep={this.state.currentStep} 
      handleChange={this.handleChange}
      username={this.state.username}
    />
    <Step3 
      currentStep={this.state.currentStep} 
      handleChange={this.handleChange}
      password={this.state.password}
    />       

  </form>
  </React.Fragment>
)
}

One step at a time

So far, we’ve allowed users to fill the form fields, but we’ve provided no actual way to proceed to the next step or head back to the previous one. That calls for next and previous functions that check if the current step has a previous or next step; and if it does, push the currentStep prop up or down accordingly.

class MasterForm extends Component {
  constructor(props) {
    super(props)
    // Bind new functions for next and previous
    this._next = this._next.bind(this)
    this._prev = this._prev.bind(this)
  }

  // Test current step with ternary
  // _next and _previous functions will be called on button click
  _next() {
    let currentStep = this.state.currentStep
    // If the current step is 1 or 2, then add one on "next" button click
    currentStep = currentStep >= 2? 3: currentStep + 1
    this.setState({
      currentStep: currentStep
    })
  }
    
  _prev() {
    let currentStep = this.state.currentStep
    // If the current step is 2 or 3, then subtract one on "previous" button click
    currentStep = currentStep <= 1? 1: currentStep - 1
    this.setState({
      currentStep: currentStep
    })
  }
}

We’ll use a get function that will check whether the current step is 1 or 3. This is because we have three-step form. Of course, we can change these checks as more steps are added to the form. We also want to display the next and previous buttons only if there actually are next and previous steps to navigate to, respectively.

// The "next" and "previous" button functions
get previousButton(){
  let currentStep = this.state.currentStep;
  // If the current step is not 1, then render the "previous" button
  if(currentStep !==1){
    return (
      <button 
        className="btn btn-secondary" 
        type="button" onClick={this._prev}>
      Previous
      </button>
    )
  }
  // ...else return nothing
  return null;
}

get nextButton(){
  let currentStep = this.state.currentStep;
  // If the current step is not 3, then render the "next" button
  if(currentStep <3){
    return (
      <button 
        className="btn btn-primary float-right" 
        type="button" onClick={this._next}>
      Next
      </button>        
    )
  }
  // ...else render nothing
  return null;
}

All that’s left is to render those buttons:

// Render "next" and "previous" buttons
render(){
  return(
    <form onSubmit={this.handleSubmit}>
      {/* 
        ... other codes
      */}
      
      {this.previousButton}
      {this.nextButton}
      
    </form>
  )
}

Congrats, you’re a form wizard! 🧙

That was the last step in this multi-step tutorial on multi-step forms. Whoa, how meta! While we didn’t go deep into styling, hopefully this gives you a solid overview of how to go about making complex forms less… complex!

Here’s that final demo again so you can see all the code in it’s full and glorious context:

See the Pen
React Simple Wizard Form
by Nathan Sebhastian (@nathansebhastian)
on CodePen.

React was made for this sort of thing considering it makes use of states, property changes, reusable components and such. I know that React may seem like a high barrier to entry for some folks, but I’ve written a book that makes it a much lower hurdle. I hope you check it out!

The post The Magic of React-Based Multi-Step Forms appeared first on CSS-Tricks.

The #StateOfCSS 2019 Survey

Post pobrano z: The #StateOfCSS 2019 Survey

You know about the State of JavaScript survey, where thousands upon thousands of developers were surveyed about all-things-JS, from frameworks to testing and many other things in between? Well, Sacha Greif has launched one focused entirely on CSS.

This is super timely given a lot of the content we and other sites have been posting lately centered around learning, complexity, changing roles, and more. Sacha captures it nicely:

This is especially interesting since it comes at a time where many are talking about a “Great Divide” between the “front” of the front-end (HTML, CSS) and the “back” of the front-end (JavaScript and its many frameworks and libraries). […] [T]he survey will be a great chance to take a snapshot of the community as it currently exists, and see how this evolves over the next couple years.

Sounds like a good goal. Let’s help by putting some responses in there!

Take Survey

Direct Link to ArticlePermalink

The post The #StateOfCSS 2019 Survey appeared first on CSS-Tricks.

Unicef: Toy Soldiers

Post pobrano z: Unicef: Toy Soldiers
Print
Unicef

Children in countries like Congo, Nigeria, Myanmar, Philippines and Syria are being recruited forcefully whether to governmental army or non-stated armed gangs. Numbers of child-soldiers around the world has increased rapidly and one out of twelve kids lives a distorted childhood. Subsequently the normal state of a kid is to play with toys, today they are just a mean to carry weapons, thereby at LEAP STUDIOS, we decided to spread awareness and shed the light on this issue by crafting this campaign from the idea all the way to sketching, modeling, texturing, lighting, rendering and creative retouching. *This is an initiative and not a real advertising campaign

Advertising Agency:LEAP Studios, Cairo, Egypt
Creative Director:Kerollos Magdy
Art Director:Kerollos Magdy, Tamer Samy
Copywriter:Amr El Massri, Kerollos Magdy
Illustrator:Mohamed Hamid
3D artists:Shadi Xeiian, Ibrahim Satour, Mohammed Nasr
Retouchers:Kerollos Magdy, Mohammed Nasr

Unicef: Toy Soldiers

Post pobrano z: Unicef: Toy Soldiers
Print
Unicef

Children in countries like Congo, Nigeria, Myanmar, Philippines and Syria are being recruited forcefully whether to governmental army or non-stated armed gangs. Numbers of child-soldiers around the world has increased rapidly and one out of twelve kids lives a distorted childhood. Subsequently the normal state of a kid is to play with toys, today they are just a mean to carry weapons, thereby at LEAP STUDIOS, we decided to spread awareness and shed the light on this issue by crafting this campaign from the idea all the way to sketching, modeling, texturing, lighting, rendering and creative retouching. *This is an initiative and not a real advertising campaign

Advertising Agency:LEAP Studios, Cairo, Egypt
Creative Director:Kerollos Magdy
Art Director:Kerollos Magdy, Tamer Samy
Copywriter:Amr El Massri, Kerollos Magdy
Illustrator:Mohamed Hamid
3D artists:Shadi Xeiian, Ibrahim Satour, Mohammed Nasr
Retouchers:Kerollos Magdy, Mohammed Nasr

Unicef: Toy Soldiers

Post pobrano z: Unicef: Toy Soldiers
Print
Unicef

Children in countries like Congo, Nigeria, Myanmar, Philippines and Syria are being recruited forcefully whether to governmental army or non-stated armed gangs. Numbers of child-soldiers around the world has increased rapidly and one out of twelve kids lives a distorted childhood. Subsequently the normal state of a kid is to play with toys, today they are just a mean to carry weapons, thereby at LEAP STUDIOS, we decided to spread awareness and shed the light on this issue by crafting this campaign from the idea all the way to sketching, modeling, texturing, lighting, rendering and creative retouching. *This is an initiative and not a real advertising campaign

Advertising Agency:LEAP Studios, Cairo, Egypt
Creative Director:Kerollos Magdy
Art Director:Kerollos Magdy, Tamer Samy
Copywriter:Amr El Massri, Kerollos Magdy
Illustrator:Mohamed Hamid
3D artists:Shadi Xeiian, Ibrahim Satour, Mohammed Nasr
Retouchers:Kerollos Magdy, Mohammed Nasr