Photo effects are a great way to practice and harness your Photoshop skills. In this lesson, learn how to create a fun photo glitch effect usingMarquee Tools, the Wave Filter, and more!
In order to get the best result possible when achieving effects based on real-life scenarios, it helps to do your research. So let’s get to know what a glitch is.
The kind of glitch we’ll be tackling is common to television or video games. These glitches are software errors or bugs that are often caused by a corrupted signal. The end result leaves your screen incredibly distorted and hard to make out.
For this tutorial, we’ll need to keep in mind some key visual characteristics to achieve this look. These are:
Jagged lines or waves
Frozen or static looking visuals
Inverted colors
Do a couple of Google searches to keep some inspiration and references on deck. Refer to them often to experiment with this style for yourself, or enlist the help of a design professional from Envato Studio.
Alternate version. Gather references to help achieve this look! Stock from Freepik.
If you’re having trouble achieving this look, don’t forget that you can always bypass this process by downloading one of our incredible Glitch Photo Effects from GraphicRiver and Envato Elements.
1. How to Set Up the Glitch Photo Effect
Step 1
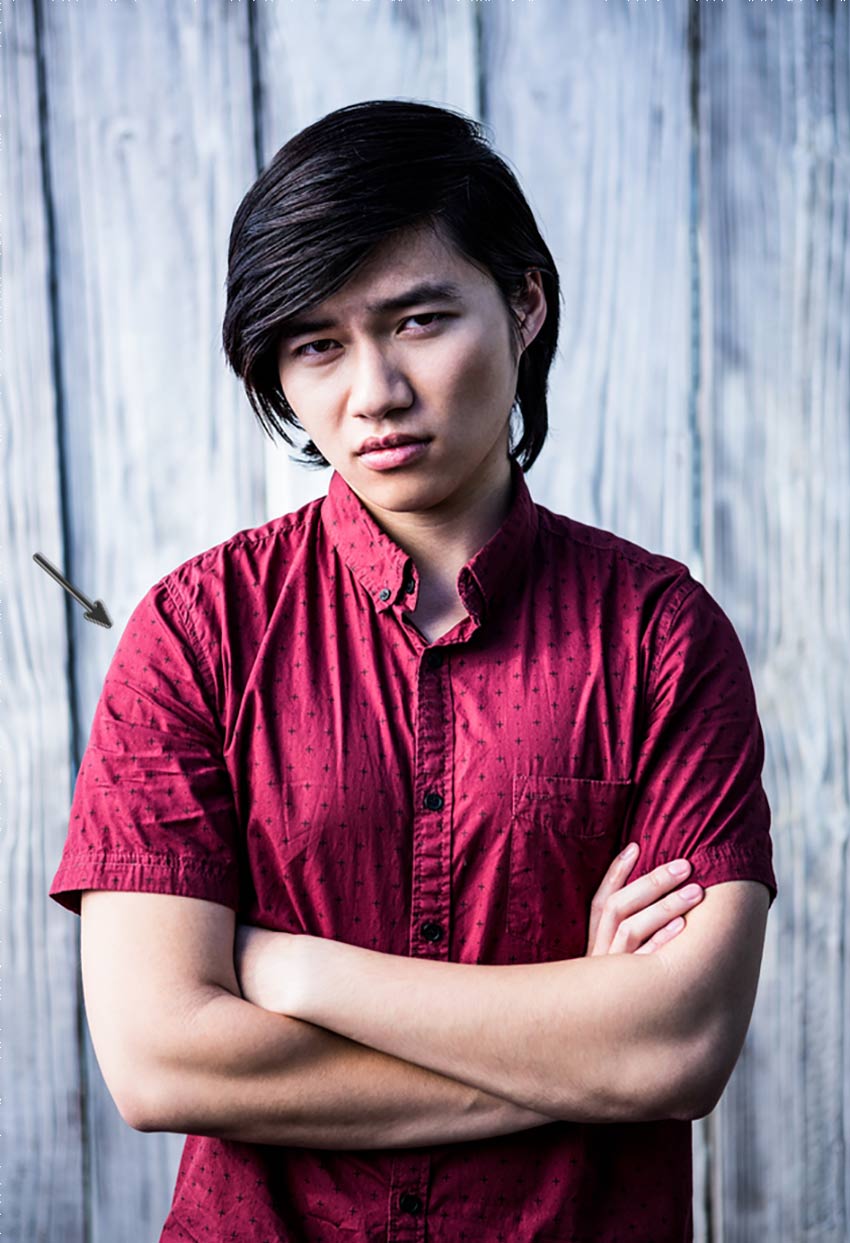
Let’s begin! I’ll be using this Hipster Stock from PhotoDune for this tutorial. For this particular look, it helps if you choose a stock where the model has edges that you can see clearly because we’ll need to extract it from its background. It’s also an added bonus if the background is a solid color or not too distracting like these wooden panels.
Notice how you can clearly see all the edges of this model. Make sure you choose a stock with a model you can easily extract.
Double-click the Background layer to make it a New Layer. Create a New Layer (Control-Shift-N) positioned underneath your reference. Set the Foreground Color to white, and Fill the layer with white using the Paint Bucket Tool (G).
Step 2
Select the Magnetic Lasso Tool (L). This will help us extract the reference by easily snapping to the sides of your model. Use the Magnetic Lasso Tool (L) to create a complete selection around the model. When you’re finished, Right-click and select Layer via Copy to create a quick duplicate.
Make sure you keep the original stock. The end result is what the stock would look like on its own layer.
Step 3
Select the original stock. Use the Free Transform Tool (Control-T) to bring in the sides of the background to expose some of the white to the left and right.
Alternatively, if your stock doesn’t have a background, you can just add a rectangle using the Rectangle Tool (U) like this example below.
Alternatively, if your stock doesn’t have a background, add a quick rectangle. Stock from Freepik.
2. How to Desaturate a Photo
Step 1
Moving along, let’s Desaturate this photo for a more monochromatic color palette. Select the layer for the model’s cutout and go to Image > Adjustments > Hue & Saturation.Lower the Saturation to -95 to remove the majority of the photo’s color.
Step 2
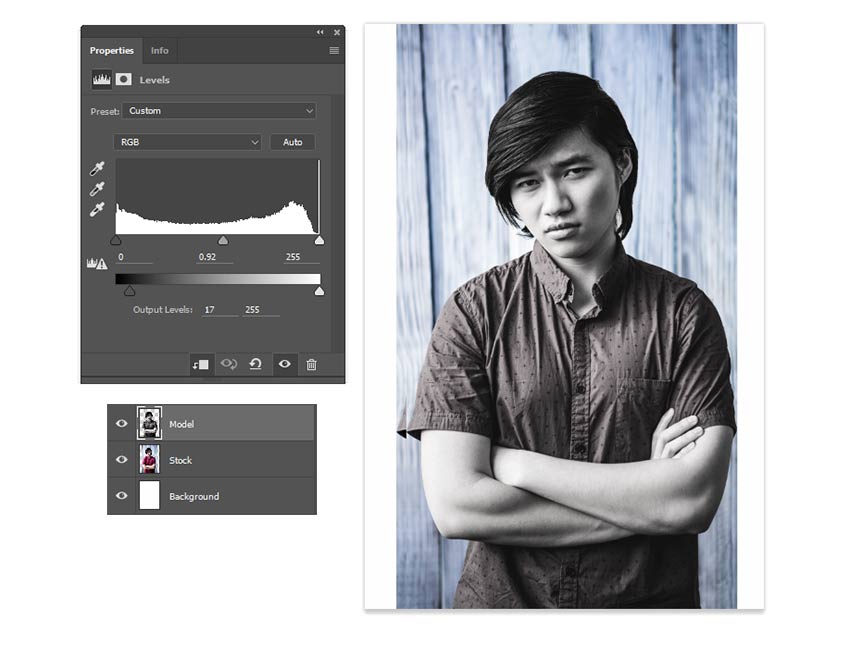
You can adjust the main photo even further by using Levels. Select the extracted model’s layer again, and go to Image > Adjustments > Levels. Adjust the Levels for the RGB Channel with the following settings:
Shadow Input Level: 0
Midtone Input Level: 0.92
Highlight Input Level: 255
Output Levels: 17, 255
The end result is subtle, and it lightens the model slightly.
3. How to Create a Linear Glitch Distortion
Step 1
The next part of this effect is to recreate the jagged photo distortion that makes it look as if the visuals are out of place. To do this, first select the stock and model layers and Merge them together.
Step 2
Now select the Rectangular Marquee Tool (M). Create two skinny selections on the photo layer. First create one at the bottom, and then hold the Shift keyto add another selection at the top.
Press the V key on your keyboard to switch over to the Move Tool. Use the Left Arrow key to move the selections to the left. You may have to hit it several times or hold it down for a while to get the desired result.
Step 3
You can continue this process on a single layer, but eventually there might be open white spaces that don’t look quite so good. So to avoid this, Duplicate the Model Layer and use the copy to create the distortion.
Again, use the Rectangular Marquee Tool (M) to create more selections, moving them in different directions with the Left Arrow and Right Arrow keys. Here I created two more and moved them to the right slightly.
Notice that because there’s a copy of the photo behind this layer, the resulting look shows the layer behind it instead of the white background.
Step 4
Let’s speed this up a bit! Create even more Rectangular Selections, using the Move Tool (V) to move the different sections out of place. Vary the size between skinny selections and thicker ones to make the effect more natural.
It’s even a good idea to have a game plan before you tackle this part. Since I like the man’s serious expression, I want to make sure the glitches create focus towards the center of the photo.
As you get closer to the face, try not to distort it too much. Do each glitch individually to see what will work. This part is all about experimentation, so if you need to go back a step or two, just hit Control-Z to Undo.
When you’re finished with all your linear glitches, the effect should look something like this:
4. How to Create a Wavy Glitch Distortion
Step 1
The next part of this distortion effect is to create that wavy glitch. You may have seen these before if you’ve ventured off into the naughty channels as a kid, but these glitches make the image appear as though it’s moving in liquid.
To do this we’ll need the Wave Filter. First, Merge the original stock layer together with copy that has all the glitches. Then Control-J to create a duplicate to create the wavy distortion on.
Step 2
With the copy selected, create several more large selections with the Rectangular Marquee Tool (M) just like before. Keep in mind that I’m trying to frame the face of the subject, so don’t select any parts directly in the center.
Now go to Filter > Distort > Wave, adjusting the settings as follows to create a wavy effect on only the selections.
Step 3
With this particular effect, the settings above may or may not work for your photo. So it’s important to experiment and adjust the settings on your own to achieve the look you desire.
Continue this process of making selections first before applying the Wave Filter. You’ll need to change the settings each time to vary the effect on the photo.
Here is some more progress after a little experimentation.
Step 4
Finish this effect by concentrating on the top and bottom parts of the photo. First, select the bottom of the image with the Rectangular Marquee Tool (M) and apply the Wave Filter with the following settings.
Now for the top portion. Repeat the process, this time changing the settings to the following ones below.
Here is the image complete with all the linear and wavy glitches. Let’s move on to the finishing touches!
5. How to Create a Simple 3D Effect
Step 1
Now for the 3D color effects! Just like before, start by Merging the glitch layers together, leaving the white background out so that there are only two layers left. Then hit Control-J to create two more Duplicates of the merged photo layer.
Step 2
Hide the Visibility of the top two layers. Then Right-click the first photo layer, „Merged,” and go to Blending Options. Uncheck the G, or Green Channel located under Advanced Blending.
Now Unhide the Visibility of the top layers and repeat the process. This time Uncheck the Red Channel for „Merged Copy,” and both the Red and Green Channels for „Merged Copy 2.”
Step 3
Now we can begin to move each layer to create the insane 3D effect. Select the Move Tool (V) and then select the layer, „Merged Copy,” using the Left Arrow key to move the layer to the left. Next, select the top layer, „Merged Copy 2,” using the Left Arrow key to move the layer to the left as well.
Here is what the process will look like.
Step 4
Almost done! To add the appearance of screen lines to this effect, select the top layer, „Merged Copy 2,” and Right-click to go to Blending Options. Add a quick PatternOverlay using the default Horizontal Line Pattern, and set the rest of the settings as follows:
Because the layer is blue and the Blend Mode is set to Soft Light, this will also give your image a nice blue tint.
Step 5
To complete this cool glitch effect, we just need to carry out one last step. Add a New Layer and set the Layer Blend Mode to Dissolve. In this step, we’ll use the Brush Tool (B) to paint red #5e220a towards the bottom of the image in order to create tiny particles as a part of the final glitch effect. Adjust the Opacity of the layer if you need to; here I brought mine down to 8%.
That’s it! Check out the final result below. You could also modify this to create a glitch effect Photoshop Action.
Conclusion
Photo effects are a smart way to practice unique and exciting techniques in Adobe Photoshop. You can have lots of fun achieving real-life scenarios like photo glitches and so much more.
If you liked this article and want to try more Photoshop photo effect tutorials, check out this epic list:
I hope you enjoyed this tutorial. Feel free to let me know if you have any questions in the comments below. And be sure to browse our wide range of Glitch Photo Effect Actions available on GraphicRiver and Envato Elements.
Glitch Effect Photoshop Actions
Looking for some recommended glitch effect actions for Photoshop? Check out these items from GraphicRiver.
Photo effects are a great way to practice and harness your Photoshop skills. In this lesson, learn how to create a fun photo glitch effect usingMarquee Tools, the Wave Filter, and more!
In order to get the best result possible when achieving effects based on real-life scenarios, it helps to do your research. So let’s get to know what a glitch is.
The kind of glitch we’ll be tackling is common to television or video games. These glitches are software errors or bugs that are often caused by a corrupted signal. The end result leaves your screen incredibly distorted and hard to make out.
For this tutorial, we’ll need to keep in mind some key visual characteristics to achieve this look. These are:
Jagged lines or waves
Frozen or static looking visuals
Inverted colors
Do a couple of Google searches to keep some inspiration and references on deck. Refer to them often to experiment with this style for yourself, or enlist the help of a design professional from Envato Studio.
Alternate version. Gather references to help achieve this look! Stock from Freepik.
If you’re having trouble achieving this look, don’t forget that you can always bypass this process by downloading one of our incredible Glitch Photo Effects from GraphicRiver and Envato Elements.
1. How to Set Up the Glitch Photo Effect
Step 1
Let’s begin! I’ll be using this Hipster Stock from PhotoDune for this tutorial. For this particular look, it helps if you choose a stock where the model has edges that you can see clearly because we’ll need to extract it from its background. It’s also an added bonus if the background is a solid color or not too distracting like these wooden panels.
Notice how you can clearly see all the edges of this model. Make sure you choose a stock with a model you can easily extract.
Double-click the Background layer to make it a New Layer. Create a New Layer (Control-Shift-N) positioned underneath your reference. Set the Foreground Color to white, and Fill the layer with white using the Paint Bucket Tool (G).
Step 2
Select the Magnetic Lasso Tool (L). This will help us extract the reference by easily snapping to the sides of your model. Use the Magnetic Lasso Tool (L) to create a complete selection around the model. When you’re finished, Right-click and select Layer via Copy to create a quick duplicate.
Make sure you keep the original stock. The end result is what the stock would look like on its own layer.
Step 3
Select the original stock. Use the Free Transform Tool (Control-T) to bring in the sides of the background to expose some of the white to the left and right.
Alternatively, if your stock doesn’t have a background, you can just add a rectangle using the Rectangle Tool (U) like this example below.
Alternatively, if your stock doesn’t have a background, add a quick rectangle. Stock from Freepik.
2. How to Desaturate a Photo
Step 1
Moving along, let’s Desaturate this photo for a more monochromatic color palette. Select the layer for the model’s cutout and go to Image > Adjustments > Hue & Saturation.Lower the Saturation to -95 to remove the majority of the photo’s color.
Step 2
You can adjust the main photo even further by using Levels. Select the extracted model’s layer again, and go to Image > Adjustments > Levels. Adjust the Levels for the RGB Channel with the following settings:
Shadow Input Level: 0
Midtone Input Level: 0.92
Highlight Input Level: 255
Output Levels: 17, 255
The end result is subtle, and it lightens the model slightly.
3. How to Create a Linear Glitch Distortion
Step 1
The next part of this effect is to recreate the jagged photo distortion that makes it look as if the visuals are out of place. To do this, first select the stock and model layers and Merge them together.
Step 2
Now select the Rectangular Marquee Tool (M). Create two skinny selections on the photo layer. First create one at the bottom, and then hold the Shift keyto add another selection at the top.
Press the V key on your keyboard to switch over to the Move Tool. Use the Left Arrow key to move the selections to the left. You may have to hit it several times or hold it down for a while to get the desired result.
Step 3
You can continue this process on a single layer, but eventually there might be open white spaces that don’t look quite so good. So to avoid this, Duplicate the Model Layer and use the copy to create the distortion.
Again, use the Rectangular Marquee Tool (M) to create more selections, moving them in different directions with the Left Arrow and Right Arrow keys. Here I created two more and moved them to the right slightly.
Notice that because there’s a copy of the photo behind this layer, the resulting look shows the layer behind it instead of the white background.
Step 4
Let’s speed this up a bit! Create even more Rectangular Selections, using the Move Tool (V) to move the different sections out of place. Vary the size between skinny selections and thicker ones to make the effect more natural.
It’s even a good idea to have a game plan before you tackle this part. Since I like the man’s serious expression, I want to make sure the glitches create focus towards the center of the photo.
As you get closer to the face, try not to distort it too much. Do each glitch individually to see what will work. This part is all about experimentation, so if you need to go back a step or two, just hit Control-Z to Undo.
When you’re finished with all your linear glitches, the effect should look something like this:
4. How to Create a Wavy Glitch Distortion
Step 1
The next part of this distortion effect is to create that wavy glitch. You may have seen these before if you’ve ventured off into the naughty channels as a kid, but these glitches make the image appear as though it’s moving in liquid.
To do this we’ll need the Wave Filter. First, Merge the original stock layer together with copy that has all the glitches. Then Control-J to create a duplicate to create the wavy distortion on.
Step 2
With the copy selected, create several more large selections with the Rectangular Marquee Tool (M) just like before. Keep in mind that I’m trying to frame the face of the subject, so don’t select any parts directly in the center.
Now go to Filter > Distort > Wave, adjusting the settings as follows to create a wavy effect on only the selections.
Step 3
With this particular effect, the settings above may or may not work for your photo. So it’s important to experiment and adjust the settings on your own to achieve the look you desire.
Continue this process of making selections first before applying the Wave Filter. You’ll need to change the settings each time to vary the effect on the photo.
Here is some more progress after a little experimentation.
Step 4
Finish this effect by concentrating on the top and bottom parts of the photo. First, select the bottom of the image with the Rectangular Marquee Tool (M) and apply the Wave Filter with the following settings.
Now for the top portion. Repeat the process, this time changing the settings to the following ones below.
Here is the image complete with all the linear and wavy glitches. Let’s move on to the finishing touches!
5. How to Create a Simple 3D Effect
Step 1
Now for the 3D color effects! Just like before, start by Merging the glitch layers together, leaving the white background out so that there are only two layers left. Then hit Control-J to create two more Duplicates of the merged photo layer.
Step 2
Hide the Visibility of the top two layers. Then Right-click the first photo layer, „Merged,” and go to Blending Options. Uncheck the G, or Green Channel located under Advanced Blending.
Now Unhide the Visibility of the top layers and repeat the process. This time Uncheck the Red Channel for „Merged Copy,” and both the Red and Green Channels for „Merged Copy 2.”
Step 3
Now we can begin to move each layer to create the insane 3D effect. Select the Move Tool (V) and then select the layer, „Merged Copy,” using the Left Arrow key to move the layer to the left. Next, select the top layer, „Merged Copy 2,” using the Left Arrow key to move the layer to the left as well.
Here is what the process will look like.
Step 4
Almost done! To add the appearance of screen lines to this effect, select the top layer, „Merged Copy 2,” and Right-click to go to Blending Options. Add a quick PatternOverlay using the default Horizontal Line Pattern, and set the rest of the settings as follows:
Because the layer is blue and the Blend Mode is set to Soft Light, this will also give your image a nice blue tint.
Step 5
To complete this cool glitch effect, we just need to carry out one last step. Add a New Layer and set the Layer Blend Mode to Dissolve. In this step, we’ll use the Brush Tool (B) to paint red #5e220a towards the bottom of the image in order to create tiny particles as a part of the final glitch effect. Adjust the Opacity of the layer if you need to; here I brought mine down to 8%.
That’s it! Check out the final result below. You could also modify this to create a glitch effect Photoshop Action.
Conclusion
Photo effects are a smart way to practice unique and exciting techniques in Adobe Photoshop. You can have lots of fun achieving real-life scenarios like photo glitches and so much more.
If you liked this article and want to try more Photoshop photo effect tutorials, check out this epic list:
I hope you enjoyed this tutorial. Feel free to let me know if you have any questions in the comments below. And be sure to browse our wide range of Glitch Photo Effect Actions available on GraphicRiver and Envato Elements.
Glitch Effect Photoshop Actions
Looking for some recommended glitch effect actions for Photoshop? Check out these items from GraphicRiver.
Photo effects are a great way to practice and harness your Photoshop skills. In this lesson, learn how to create a fun photo glitch effect usingMarquee Tools, the Wave Filter, and more!
In order to get the best result possible when achieving effects based on real-life scenarios, it helps to do your research. So let’s get to know what a glitch is.
The kind of glitch we’ll be tackling is common to television or video games. These glitches are software errors or bugs that are often caused by a corrupted signal. The end result leaves your screen incredibly distorted and hard to make out.
For this tutorial, we’ll need to keep in mind some key visual characteristics to achieve this look. These are:
Jagged lines or waves
Frozen or static looking visuals
Inverted colors
Do a couple of Google searches to keep some inspiration and references on deck. Refer to them often to experiment with this style for yourself, or enlist the help of a design professional from Envato Studio.
Alternate version. Gather references to help achieve this look! Stock from Freepik.
If you’re having trouble achieving this look, don’t forget that you can always bypass this process by downloading one of our incredible Glitch Photo Effects from GraphicRiver and Envato Elements.
1. How to Set Up the Glitch Photo Effect
Step 1
Let’s begin! I’ll be using this Hipster Stock from PhotoDune for this tutorial. For this particular look, it helps if you choose a stock where the model has edges that you can see clearly because we’ll need to extract it from its background. It’s also an added bonus if the background is a solid color or not too distracting like these wooden panels.
Notice how you can clearly see all the edges of this model. Make sure you choose a stock with a model you can easily extract.
Double-click the Background layer to make it a New Layer. Create a New Layer (Control-Shift-N) positioned underneath your reference. Set the Foreground Color to white, and Fill the layer with white using the Paint Bucket Tool (G).
Step 2
Select the Magnetic Lasso Tool (L). This will help us extract the reference by easily snapping to the sides of your model. Use the Magnetic Lasso Tool (L) to create a complete selection around the model. When you’re finished, Right-click and select Layer via Copy to create a quick duplicate.
Make sure you keep the original stock. The end result is what the stock would look like on its own layer.
Step 3
Select the original stock. Use the Free Transform Tool (Control-T) to bring in the sides of the background to expose some of the white to the left and right.
Alternatively, if your stock doesn’t have a background, you can just add a rectangle using the Rectangle Tool (U) like this example below.
Alternatively, if your stock doesn’t have a background, add a quick rectangle. Stock from Freepik.
2. How to Desaturate a Photo
Step 1
Moving along, let’s Desaturate this photo for a more monochromatic color palette. Select the layer for the model’s cutout and go to Image > Adjustments > Hue & Saturation.Lower the Saturation to -95 to remove the majority of the photo’s color.
Step 2
You can adjust the main photo even further by using Levels. Select the extracted model’s layer again, and go to Image > Adjustments > Levels. Adjust the Levels for the RGB Channel with the following settings:
Shadow Input Level: 0
Midtone Input Level: 0.92
Highlight Input Level: 255
Output Levels: 17, 255
The end result is subtle, and it lightens the model slightly.
3. How to Create a Linear Glitch Distortion
Step 1
The next part of this effect is to recreate the jagged photo distortion that makes it look as if the visuals are out of place. To do this, first select the stock and model layers and Merge them together.
Step 2
Now select the Rectangular Marquee Tool (M). Create two skinny selections on the photo layer. First create one at the bottom, and then hold the Shift keyto add another selection at the top.
Press the V key on your keyboard to switch over to the Move Tool. Use the Left Arrow key to move the selections to the left. You may have to hit it several times or hold it down for a while to get the desired result.
Step 3
You can continue this process on a single layer, but eventually there might be open white spaces that don’t look quite so good. So to avoid this, Duplicate the Model Layer and use the copy to create the distortion.
Again, use the Rectangular Marquee Tool (M) to create more selections, moving them in different directions with the Left Arrow and Right Arrow keys. Here I created two more and moved them to the right slightly.
Notice that because there’s a copy of the photo behind this layer, the resulting look shows the layer behind it instead of the white background.
Step 4
Let’s speed this up a bit! Create even more Rectangular Selections, using the Move Tool (V) to move the different sections out of place. Vary the size between skinny selections and thicker ones to make the effect more natural.
It’s even a good idea to have a game plan before you tackle this part. Since I like the man’s serious expression, I want to make sure the glitches create focus towards the center of the photo.
As you get closer to the face, try not to distort it too much. Do each glitch individually to see what will work. This part is all about experimentation, so if you need to go back a step or two, just hit Control-Z to Undo.
When you’re finished with all your linear glitches, the effect should look something like this:
4. How to Create a Wavy Glitch Distortion
Step 1
The next part of this distortion effect is to create that wavy glitch. You may have seen these before if you’ve ventured off into the naughty channels as a kid, but these glitches make the image appear as though it’s moving in liquid.
To do this we’ll need the Wave Filter. First, Merge the original stock layer together with copy that has all the glitches. Then Control-J to create a duplicate to create the wavy distortion on.
Step 2
With the copy selected, create several more large selections with the Rectangular Marquee Tool (M) just like before. Keep in mind that I’m trying to frame the face of the subject, so don’t select any parts directly in the center.
Now go to Filter > Distort > Wave, adjusting the settings as follows to create a wavy effect on only the selections.
Step 3
With this particular effect, the settings above may or may not work for your photo. So it’s important to experiment and adjust the settings on your own to achieve the look you desire.
Continue this process of making selections first before applying the Wave Filter. You’ll need to change the settings each time to vary the effect on the photo.
Here is some more progress after a little experimentation.
Step 4
Finish this effect by concentrating on the top and bottom parts of the photo. First, select the bottom of the image with the Rectangular Marquee Tool (M) and apply the Wave Filter with the following settings.
Now for the top portion. Repeat the process, this time changing the settings to the following ones below.
Here is the image complete with all the linear and wavy glitches. Let’s move on to the finishing touches!
5. How to Create a Simple 3D Effect
Step 1
Now for the 3D color effects! Just like before, start by Merging the glitch layers together, leaving the white background out so that there are only two layers left. Then hit Control-J to create two more Duplicates of the merged photo layer.
Step 2
Hide the Visibility of the top two layers. Then Right-click the first photo layer, „Merged,” and go to Blending Options. Uncheck the G, or Green Channel located under Advanced Blending.
Now Unhide the Visibility of the top layers and repeat the process. This time Uncheck the Red Channel for „Merged Copy,” and both the Red and Green Channels for „Merged Copy 2.”
Step 3
Now we can begin to move each layer to create the insane 3D effect. Select the Move Tool (V) and then select the layer, „Merged Copy,” using the Left Arrow key to move the layer to the left. Next, select the top layer, „Merged Copy 2,” using the Left Arrow key to move the layer to the left as well.
Here is what the process will look like.
Step 4
Almost done! To add the appearance of screen lines to this effect, select the top layer, „Merged Copy 2,” and Right-click to go to Blending Options. Add a quick PatternOverlay using the default Horizontal Line Pattern, and set the rest of the settings as follows:
Because the layer is blue and the Blend Mode is set to Soft Light, this will also give your image a nice blue tint.
Step 5
To complete this cool glitch effect, we just need to carry out one last step. Add a New Layer and set the Layer Blend Mode to Dissolve. In this step, we’ll use the Brush Tool (B) to paint red #5e220a towards the bottom of the image in order to create tiny particles as a part of the final glitch effect. Adjust the Opacity of the layer if you need to; here I brought mine down to 8%.
That’s it! Check out the final result below. You could also modify this to create a glitch effect Photoshop Action.
Conclusion
Photo effects are a smart way to practice unique and exciting techniques in Adobe Photoshop. You can have lots of fun achieving real-life scenarios like photo glitches and so much more.
If you liked this article and want to try more Photoshop photo effect tutorials, check out this epic list:
I hope you enjoyed this tutorial. Feel free to let me know if you have any questions in the comments below. And be sure to browse our wide range of Glitch Photo Effect Actions available on GraphicRiver and Envato Elements.
Glitch Effect Photoshop Actions
Looking for some recommended glitch effect actions for Photoshop? Check out these items from GraphicRiver.
Photo effects are a great way to practice and harness your Photoshop skills. In this lesson, learn how to create a fun photo glitch effect usingMarquee Tools, the Wave Filter, and more!
In order to get the best result possible when achieving effects based on real-life scenarios, it helps to do your research. So let’s get to know what a glitch is.
The kind of glitch we’ll be tackling is common to television or video games. These glitches are software errors or bugs that are often caused by a corrupted signal. The end result leaves your screen incredibly distorted and hard to make out.
For this tutorial, we’ll need to keep in mind some key visual characteristics to achieve this look. These are:
Jagged lines or waves
Frozen or static looking visuals
Inverted colors
Do a couple of Google searches to keep some inspiration and references on deck. Refer to them often to experiment with this style for yourself, or enlist the help of a design professional from Envato Studio.
Alternate version. Gather references to help achieve this look! Stock from Freepik.
If you’re having trouble achieving this look, don’t forget that you can always bypass this process by downloading one of our incredible Glitch Photo Effects from GraphicRiver and Envato Elements.
1. How to Set Up the Glitch Photo Effect
Step 1
Let’s begin! I’ll be using this Hipster Stock from PhotoDune for this tutorial. For this particular look, it helps if you choose a stock where the model has edges that you can see clearly because we’ll need to extract it from its background. It’s also an added bonus if the background is a solid color or not too distracting like these wooden panels.
Notice how you can clearly see all the edges of this model. Make sure you choose a stock with a model you can easily extract.
Double-click the Background layer to make it a New Layer. Create a New Layer (Control-Shift-N) positioned underneath your reference. Set the Foreground Color to white, and Fill the layer with white using the Paint Bucket Tool (G).
Step 2
Select the Magnetic Lasso Tool (L). This will help us extract the reference by easily snapping to the sides of your model. Use the Magnetic Lasso Tool (L) to create a complete selection around the model. When you’re finished, Right-click and select Layer via Copy to create a quick duplicate.
Make sure you keep the original stock. The end result is what the stock would look like on its own layer.
Step 3
Select the original stock. Use the Free Transform Tool (Control-T) to bring in the sides of the background to expose some of the white to the left and right.
Alternatively, if your stock doesn’t have a background, you can just add a rectangle using the Rectangle Tool (U) like this example below.
Alternatively, if your stock doesn’t have a background, add a quick rectangle. Stock from Freepik.
2. How to Desaturate a Photo
Step 1
Moving along, let’s Desaturate this photo for a more monochromatic color palette. Select the layer for the model’s cutout and go to Image > Adjustments > Hue & Saturation.Lower the Saturation to -95 to remove the majority of the photo’s color.
Step 2
You can adjust the main photo even further by using Levels. Select the extracted model’s layer again, and go to Image > Adjustments > Levels. Adjust the Levels for the RGB Channel with the following settings:
Shadow Input Level: 0
Midtone Input Level: 0.92
Highlight Input Level: 255
Output Levels: 17, 255
The end result is subtle, and it lightens the model slightly.
3. How to Create a Linear Glitch Distortion
Step 1
The next part of this effect is to recreate the jagged photo distortion that makes it look as if the visuals are out of place. To do this, first select the stock and model layers and Merge them together.
Step 2
Now select the Rectangular Marquee Tool (M). Create two skinny selections on the photo layer. First create one at the bottom, and then hold the Shift keyto add another selection at the top.
Press the V key on your keyboard to switch over to the Move Tool. Use the Left Arrow key to move the selections to the left. You may have to hit it several times or hold it down for a while to get the desired result.
Step 3
You can continue this process on a single layer, but eventually there might be open white spaces that don’t look quite so good. So to avoid this, Duplicate the Model Layer and use the copy to create the distortion.
Again, use the Rectangular Marquee Tool (M) to create more selections, moving them in different directions with the Left Arrow and Right Arrow keys. Here I created two more and moved them to the right slightly.
Notice that because there’s a copy of the photo behind this layer, the resulting look shows the layer behind it instead of the white background.
Step 4
Let’s speed this up a bit! Create even more Rectangular Selections, using the Move Tool (V) to move the different sections out of place. Vary the size between skinny selections and thicker ones to make the effect more natural.
It’s even a good idea to have a game plan before you tackle this part. Since I like the man’s serious expression, I want to make sure the glitches create focus towards the center of the photo.
As you get closer to the face, try not to distort it too much. Do each glitch individually to see what will work. This part is all about experimentation, so if you need to go back a step or two, just hit Control-Z to Undo.
When you’re finished with all your linear glitches, the effect should look something like this:
4. How to Create a Wavy Glitch Distortion
Step 1
The next part of this distortion effect is to create that wavy glitch. You may have seen these before if you’ve ventured off into the naughty channels as a kid, but these glitches make the image appear as though it’s moving in liquid.
To do this we’ll need the Wave Filter. First, Merge the original stock layer together with copy that has all the glitches. Then Control-J to create a duplicate to create the wavy distortion on.
Step 2
With the copy selected, create several more large selections with the Rectangular Marquee Tool (M) just like before. Keep in mind that I’m trying to frame the face of the subject, so don’t select any parts directly in the center.
Now go to Filter > Distort > Wave, adjusting the settings as follows to create a wavy effect on only the selections.
Step 3
With this particular effect, the settings above may or may not work for your photo. So it’s important to experiment and adjust the settings on your own to achieve the look you desire.
Continue this process of making selections first before applying the Wave Filter. You’ll need to change the settings each time to vary the effect on the photo.
Here is some more progress after a little experimentation.
Step 4
Finish this effect by concentrating on the top and bottom parts of the photo. First, select the bottom of the image with the Rectangular Marquee Tool (M) and apply the Wave Filter with the following settings.
Now for the top portion. Repeat the process, this time changing the settings to the following ones below.
Here is the image complete with all the linear and wavy glitches. Let’s move on to the finishing touches!
5. How to Create a Simple 3D Effect
Step 1
Now for the 3D color effects! Just like before, start by Merging the glitch layers together, leaving the white background out so that there are only two layers left. Then hit Control-J to create two more Duplicates of the merged photo layer.
Step 2
Hide the Visibility of the top two layers. Then Right-click the first photo layer, „Merged,” and go to Blending Options. Uncheck the G, or Green Channel located under Advanced Blending.
Now Unhide the Visibility of the top layers and repeat the process. This time Uncheck the Red Channel for „Merged Copy,” and both the Red and Green Channels for „Merged Copy 2.”
Step 3
Now we can begin to move each layer to create the insane 3D effect. Select the Move Tool (V) and then select the layer, „Merged Copy,” using the Left Arrow key to move the layer to the left. Next, select the top layer, „Merged Copy 2,” using the Left Arrow key to move the layer to the left as well.
Here is what the process will look like.
Step 4
Almost done! To add the appearance of screen lines to this effect, select the top layer, „Merged Copy 2,” and Right-click to go to Blending Options. Add a quick PatternOverlay using the default Horizontal Line Pattern, and set the rest of the settings as follows:
Because the layer is blue and the Blend Mode is set to Soft Light, this will also give your image a nice blue tint.
Step 5
To complete this cool glitch effect, we just need to carry out one last step. Add a New Layer and set the Layer Blend Mode to Dissolve. In this step, we’ll use the Brush Tool (B) to paint red #5e220a towards the bottom of the image in order to create tiny particles as a part of the final glitch effect. Adjust the Opacity of the layer if you need to; here I brought mine down to 8%.
That’s it! Check out the final result below. You could also modify this to create a glitch effect Photoshop Action.
Conclusion
Photo effects are a smart way to practice unique and exciting techniques in Adobe Photoshop. You can have lots of fun achieving real-life scenarios like photo glitches and so much more.
If you liked this article and want to try more Photoshop photo effect tutorials, check out this epic list:
I hope you enjoyed this tutorial. Feel free to let me know if you have any questions in the comments below. And be sure to browse our wide range of Glitch Photo Effect Actions available on GraphicRiver and Envato Elements.
Glitch Effect Photoshop Actions
Looking for some recommended glitch effect actions for Photoshop? Check out these items from GraphicRiver.
Photo effects are a great way to practice and harness your Photoshop skills. In this lesson, learn how to create a fun photo glitch effect usingMarquee Tools, the Wave Filter, and more!
In order to get the best result possible when achieving effects based on real-life scenarios, it helps to do your research. So let’s get to know what a glitch is.
The kind of glitch we’ll be tackling is common to television or video games. These glitches are software errors or bugs that are often caused by a corrupted signal. The end result leaves your screen incredibly distorted and hard to make out.
For this tutorial, we’ll need to keep in mind some key visual characteristics to achieve this look. These are:
Jagged lines or waves
Frozen or static looking visuals
Inverted colors
Do a couple of Google searches to keep some inspiration and references on deck. Refer to them often to experiment with this style for yourself, or enlist the help of a design professional from Envato Studio.
Alternate version. Gather references to help achieve this look! Stock from Freepik.
If you’re having trouble achieving this look, don’t forget that you can always bypass this process by downloading one of our incredible Glitch Photo Effects from GraphicRiver and Envato Elements.
1. How to Set Up the Glitch Photo Effect
Step 1
Let’s begin! I’ll be using this Hipster Stock from PhotoDune for this tutorial. For this particular look, it helps if you choose a stock where the model has edges that you can see clearly because we’ll need to extract it from its background. It’s also an added bonus if the background is a solid color or not too distracting like these wooden panels.
Notice how you can clearly see all the edges of this model. Make sure you choose a stock with a model you can easily extract.
Double-click the Background layer to make it a New Layer. Create a New Layer (Control-Shift-N) positioned underneath your reference. Set the Foreground Color to white, and Fill the layer with white using the Paint Bucket Tool (G).
Step 2
Select the Magnetic Lasso Tool (L). This will help us extract the reference by easily snapping to the sides of your model. Use the Magnetic Lasso Tool (L) to create a complete selection around the model. When you’re finished, Right-click and select Layer via Copy to create a quick duplicate.
Make sure you keep the original stock. The end result is what the stock would look like on its own layer.
Step 3
Select the original stock. Use the Free Transform Tool (Control-T) to bring in the sides of the background to expose some of the white to the left and right.
Alternatively, if your stock doesn’t have a background, you can just add a rectangle using the Rectangle Tool (U) like this example below.
Alternatively, if your stock doesn’t have a background, add a quick rectangle. Stock from Freepik.
2. How to Desaturate a Photo
Step 1
Moving along, let’s Desaturate this photo for a more monochromatic color palette. Select the layer for the model’s cutout and go to Image > Adjustments > Hue & Saturation.Lower the Saturation to -95 to remove the majority of the photo’s color.
Step 2
You can adjust the main photo even further by using Levels. Select the extracted model’s layer again, and go to Image > Adjustments > Levels. Adjust the Levels for the RGB Channel with the following settings:
Shadow Input Level: 0
Midtone Input Level: 0.92
Highlight Input Level: 255
Output Levels: 17, 255
The end result is subtle, and it lightens the model slightly.
3. How to Create a Linear Glitch Distortion
Step 1
The next part of this effect is to recreate the jagged photo distortion that makes it look as if the visuals are out of place. To do this, first select the stock and model layers and Merge them together.
Step 2
Now select the Rectangular Marquee Tool (M). Create two skinny selections on the photo layer. First create one at the bottom, and then hold the Shift keyto add another selection at the top.
Press the V key on your keyboard to switch over to the Move Tool. Use the Left Arrow key to move the selections to the left. You may have to hit it several times or hold it down for a while to get the desired result.
Step 3
You can continue this process on a single layer, but eventually there might be open white spaces that don’t look quite so good. So to avoid this, Duplicate the Model Layer and use the copy to create the distortion.
Again, use the Rectangular Marquee Tool (M) to create more selections, moving them in different directions with the Left Arrow and Right Arrow keys. Here I created two more and moved them to the right slightly.
Notice that because there’s a copy of the photo behind this layer, the resulting look shows the layer behind it instead of the white background.
Step 4
Let’s speed this up a bit! Create even more Rectangular Selections, using the Move Tool (V) to move the different sections out of place. Vary the size between skinny selections and thicker ones to make the effect more natural.
It’s even a good idea to have a game plan before you tackle this part. Since I like the man’s serious expression, I want to make sure the glitches create focus towards the center of the photo.
As you get closer to the face, try not to distort it too much. Do each glitch individually to see what will work. This part is all about experimentation, so if you need to go back a step or two, just hit Control-Z to Undo.
When you’re finished with all your linear glitches, the effect should look something like this:
4. How to Create a Wavy Glitch Distortion
Step 1
The next part of this distortion effect is to create that wavy glitch. You may have seen these before if you’ve ventured off into the naughty channels as a kid, but these glitches make the image appear as though it’s moving in liquid.
To do this we’ll need the Wave Filter. First, Merge the original stock layer together with copy that has all the glitches. Then Control-J to create a duplicate to create the wavy distortion on.
Step 2
With the copy selected, create several more large selections with the Rectangular Marquee Tool (M) just like before. Keep in mind that I’m trying to frame the face of the subject, so don’t select any parts directly in the center.
Now go to Filter > Distort > Wave, adjusting the settings as follows to create a wavy effect on only the selections.
Step 3
With this particular effect, the settings above may or may not work for your photo. So it’s important to experiment and adjust the settings on your own to achieve the look you desire.
Continue this process of making selections first before applying the Wave Filter. You’ll need to change the settings each time to vary the effect on the photo.
Here is some more progress after a little experimentation.
Step 4
Finish this effect by concentrating on the top and bottom parts of the photo. First, select the bottom of the image with the Rectangular Marquee Tool (M) and apply the Wave Filter with the following settings.
Now for the top portion. Repeat the process, this time changing the settings to the following ones below.
Here is the image complete with all the linear and wavy glitches. Let’s move on to the finishing touches!
5. How to Create a Simple 3D Effect
Step 1
Now for the 3D color effects! Just like before, start by Merging the glitch layers together, leaving the white background out so that there are only two layers left. Then hit Control-J to create two more Duplicates of the merged photo layer.
Step 2
Hide the Visibility of the top two layers. Then Right-click the first photo layer, „Merged,” and go to Blending Options. Uncheck the G, or Green Channel located under Advanced Blending.
Now Unhide the Visibility of the top layers and repeat the process. This time Uncheck the Red Channel for „Merged Copy,” and both the Red and Green Channels for „Merged Copy 2.”
Step 3
Now we can begin to move each layer to create the insane 3D effect. Select the Move Tool (V) and then select the layer, „Merged Copy,” using the Left Arrow key to move the layer to the left. Next, select the top layer, „Merged Copy 2,” using the Left Arrow key to move the layer to the left as well.
Here is what the process will look like.
Step 4
Almost done! To add the appearance of screen lines to this effect, select the top layer, „Merged Copy 2,” and Right-click to go to Blending Options. Add a quick PatternOverlay using the default Horizontal Line Pattern, and set the rest of the settings as follows:
Because the layer is blue and the Blend Mode is set to Soft Light, this will also give your image a nice blue tint.
Step 5
To complete this cool glitch effect, we just need to carry out one last step. Add a New Layer and set the Layer Blend Mode to Dissolve. In this step, we’ll use the Brush Tool (B) to paint red #5e220a towards the bottom of the image in order to create tiny particles as a part of the final glitch effect. Adjust the Opacity of the layer if you need to; here I brought mine down to 8%.
That’s it! Check out the final result below. You could also modify this to create a glitch effect Photoshop Action.
Conclusion
Photo effects are a smart way to practice unique and exciting techniques in Adobe Photoshop. You can have lots of fun achieving real-life scenarios like photo glitches and so much more.
If you liked this article and want to try more Photoshop photo effect tutorials, check out this epic list:
I hope you enjoyed this tutorial. Feel free to let me know if you have any questions in the comments below. And be sure to browse our wide range of Glitch Photo Effect Actions available on GraphicRiver and Envato Elements.
Glitch Effect Photoshop Actions
Looking for some recommended glitch effect actions for Photoshop? Check out these items from GraphicRiver.
In this week’s roundup: fighting shifty layouts, some videos might be a bit stalled, and a new way to take screenshots in Firefox.
Let’s get into the news!
Identifying the causes of layout shifts during page load
You can now use WebPageTest to capture any layout shifts that occur on your website during page load, and identify what caused them.
Step 1: Paste a snippet
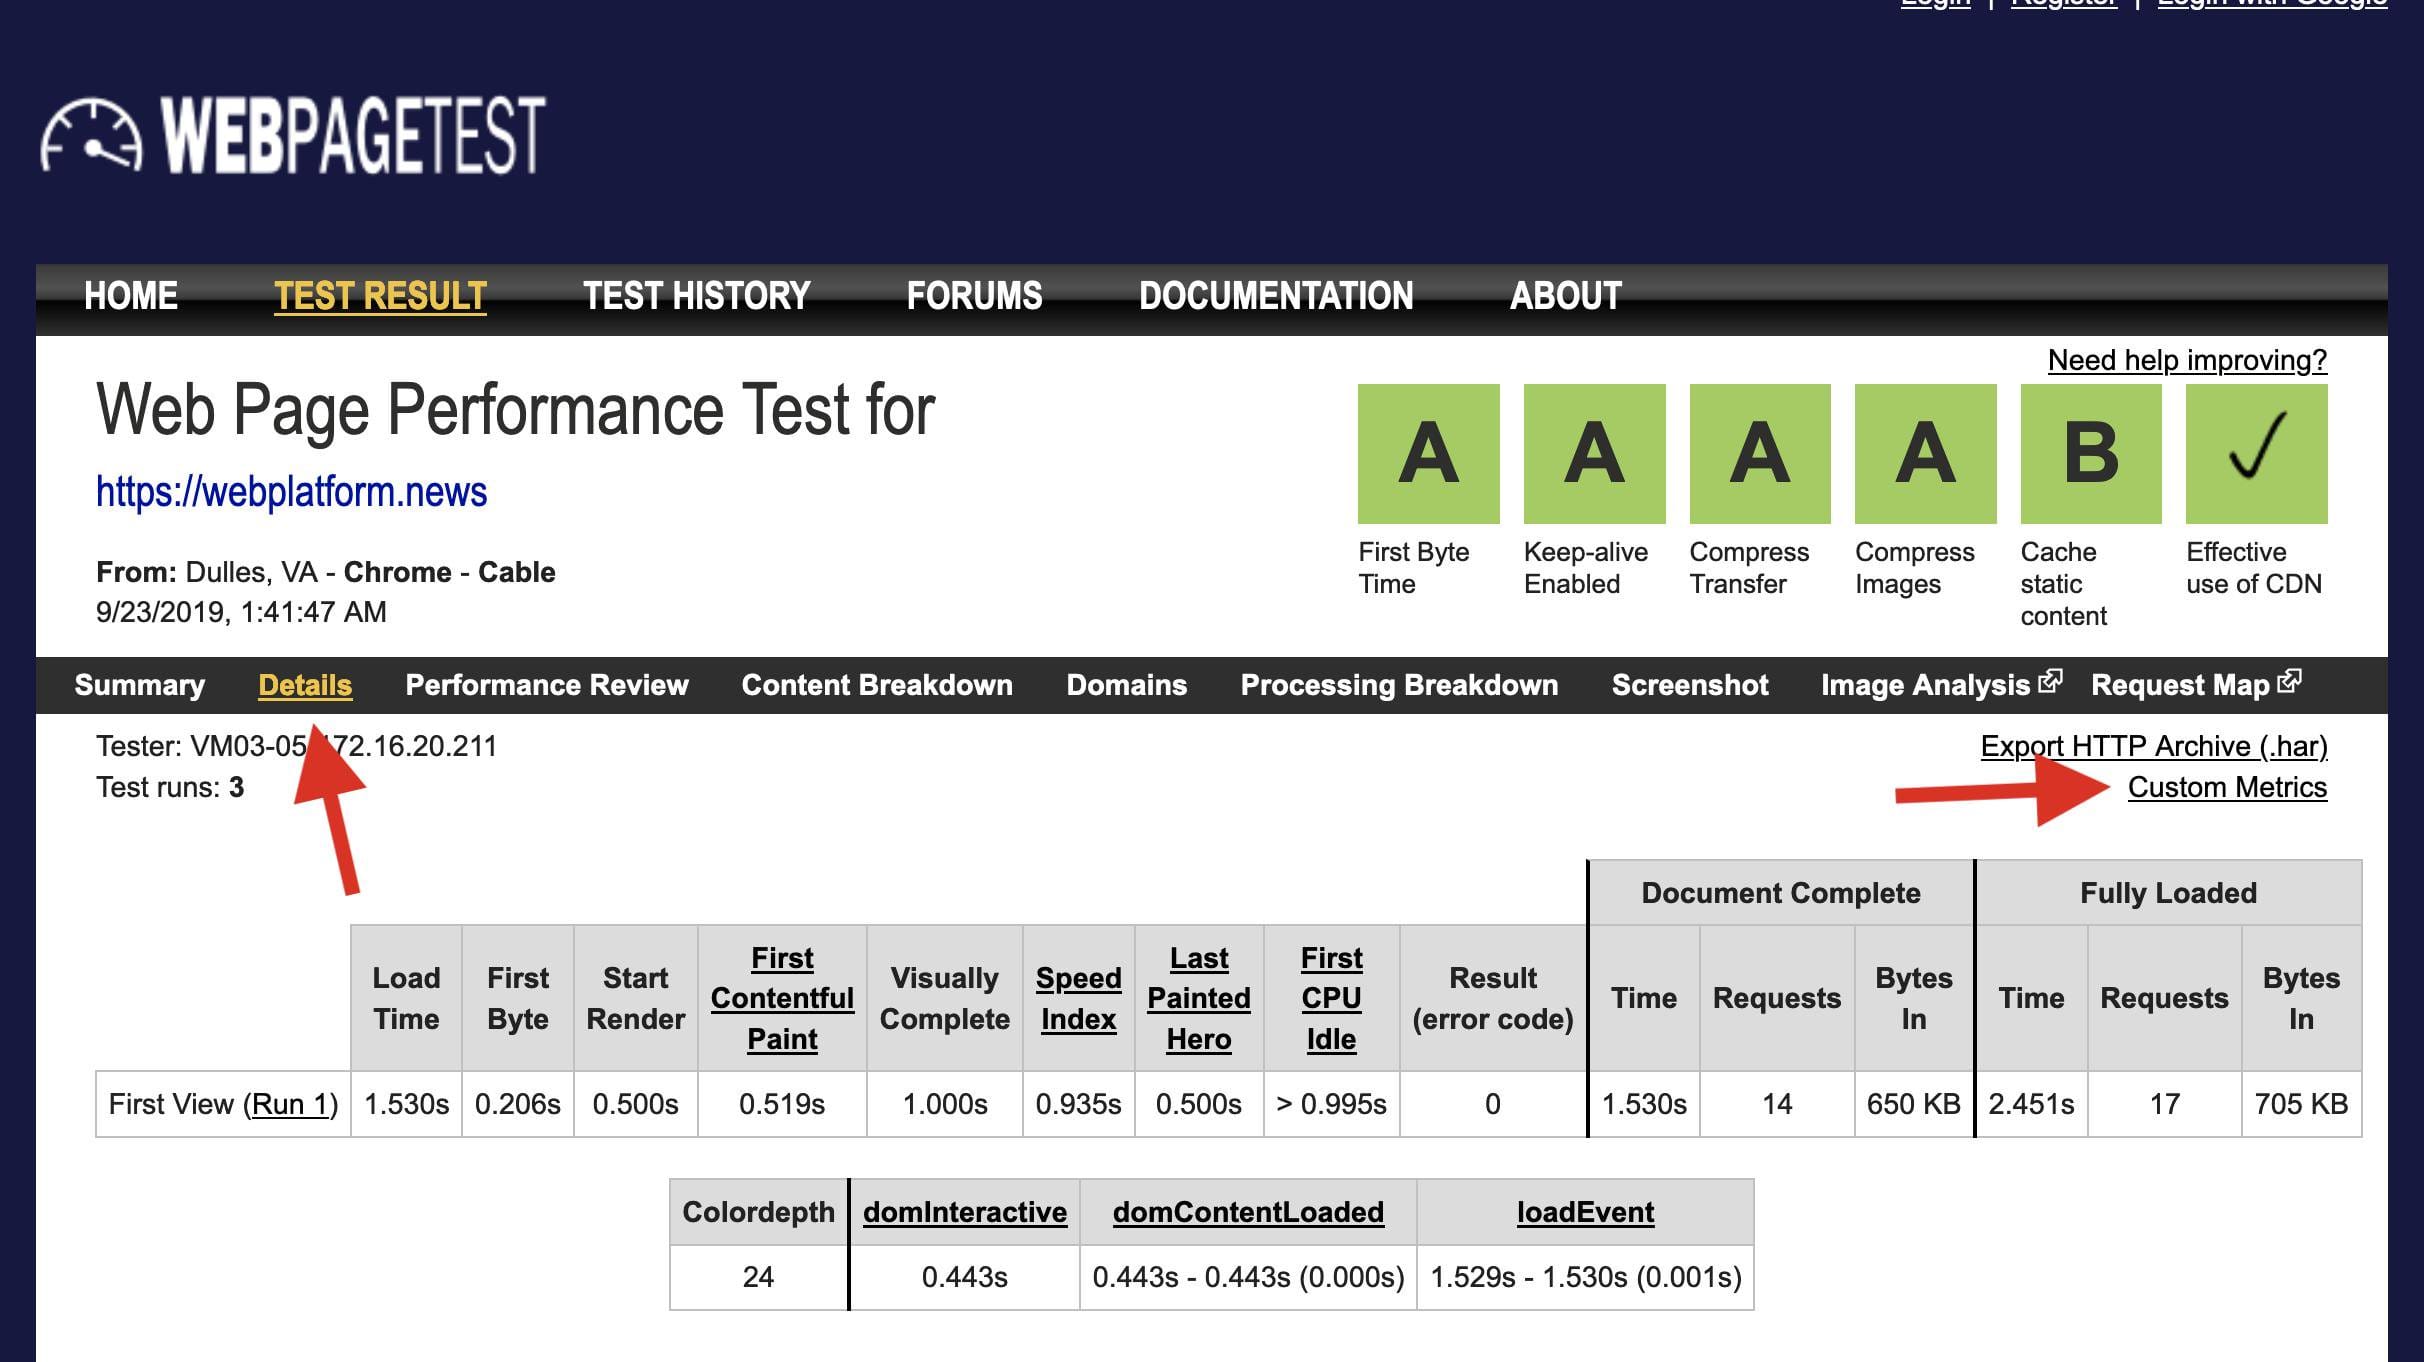
Paste the following snippet into the “Custom Metrics” on webpagetest.org in field in the Custom tab (under Advanced Settings) and make sure that a Chrome browser is selected.
[LayoutShifts]
return new Promise(resolve => {
  new PerformanceObserver(list => {
    resolve(JSON.stringify(list.getEntries().filter(entry => !entry.hadRecentInput)));
  }).observe({type: "layout-shift", buffered: true});
});
Step 2: Inspect entries
After completing the test, inspect the captured LayoutShifts entries on the Custom Metrics page, which is linked from the Details section.
Step 3: Check the filmstrip
Based on the "startTime" and "value" numbers in the data, use WebPageTest’s filmstrip view to pinpoint the individual layout shifts and identify their causes.
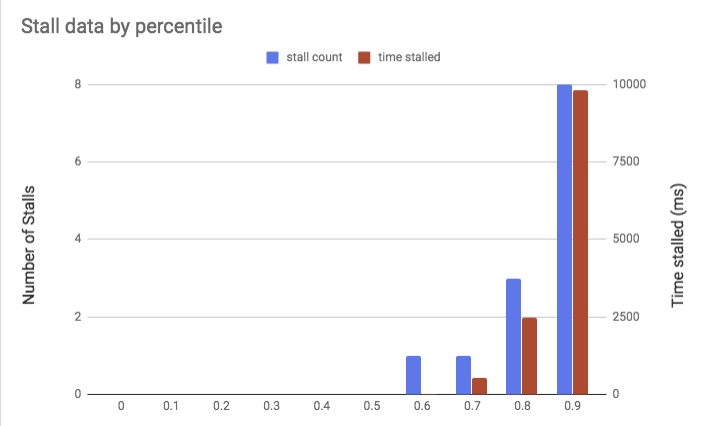
If you serve videos for your website from your own web server, keep an eye on the video bitrate (the author suggests FFmpeg and streamclarity.com). If your video has a bitrate of over 1.5 Mbps, playback may stall one or more times for people on 3G connections, depending on the video’s length.
50% of videos in this study have a bitrate that is greater than the downlink speed of a 3G connection — meaning that video playback will be delayed and contain stalls.
Firefox’s DevTools console includes a powerful command for capturing screenshots of the current web page. Like in Chrome DevTools, you can capture a screenshot of an individual element, the current viewport, or the full page, but Firefox’s :screenshot command also provides advanced options for adjusting the device pixel ratio and setting a delay.
// capture a full-page screenshot at a device pixel ratio of 2
:screenshot --fullpage --dpr 2

// capture a screenshot of the viewport with a 5-second delay
:screenshot --delay 5
Whether you’re looking to get a tattoo for the first time or you’re a total tattoo snob, choosing the right font for your designs takes patience. So today we present you with 49 insanely epic tattoo fonts we’re sure you’ll love.
49 Insanely Epic Tattoo Fonts
With a selection of fonts curated from GraphicRiver and Envato Elements, this collection features 49 awesome tattoo fonts you’ll definitely want to incorporate into your next ink.
Want that extra personalized touch? Enlist the help of the professional designers at Envato Studio to create a custom tattoo design just for you!
Old English Fonts
Do you love tattoo design? We sure do! From wild decorative fonts to stunning handwritten scripts, we’ve got a font to cover all of your tattoo needs.
Enjoy this eclectic collection below and let us know your favorites in the comments!
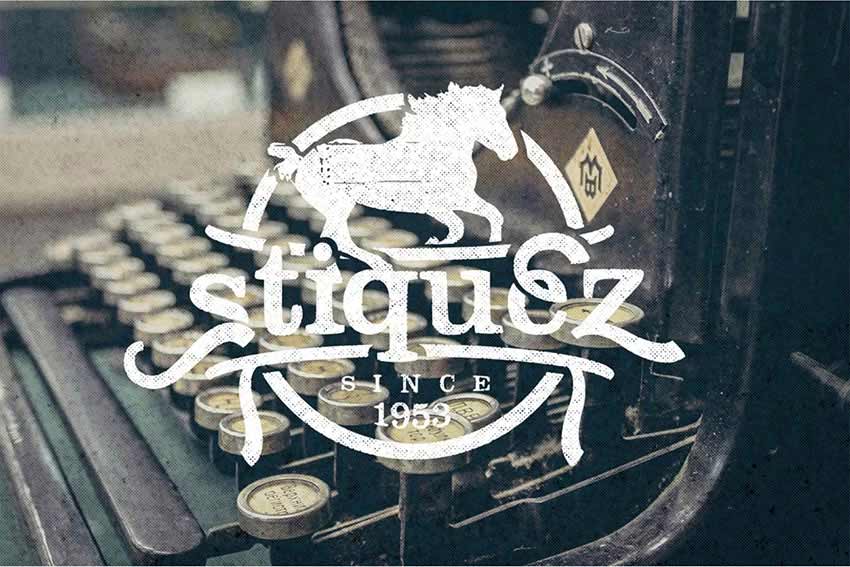
This razor blade font is a design inspired by elegant handwriting. This Old English calligraphy font captures the unique style of the past while adding a new modern twist. Enjoy uppercase and lowercase styles you can use in any design program.
Tattoo
lovers, beware. This font will turn you into a badass in no time.
Inspired by the west coast style of tattoos, this font type features an
aggressive, gothic design. Included in this set is a complete package of
letters, numbers, and punctuation.
This new blackletter font was made with creative designers in mind. Use it as the official typeface for your next book, or to kick off a new brand. Included in this download is a full suite of letters and numbers as well as punctuation.
Wield your words like an ancient sword. This next magnificent font is sharp and alluring. It combines several vintage typographic styles together and includes unique details and additions to each letter. Just visit the link to try it out!
Do
you have a vision of black for your next tattoo? Well, try this Black
Vision font on for style. This set includes an elegant vintage feel, and
features a full set of letters, numbers, and punctuation to complete
your designs.
Evolve with the right typeface. The Sirunian font is bold and strong. It captures the look of vintage architecture and works great for headlines, websites and more. Grab it today for just $15. Try it out!
Enjoy a wonderful victory with next brilliant font. Victory is an ornamental typeface inspired by vintage Victorian writing. It comes with standard upper and lowercase letters as well as additional numbers and symbols. Add it to your collection!
What better way to start off this collection than with an amazing tattoo font? This awesome script font was inspired by the swirls of traditional tattoos and a unique hand lettering style. Find packaged into this typeface a complete set of uppercase and lowercase letters, numbers, and even a bonus set of borders for your convenience.
If you’re looking for a unique font with that traditional vintage flair, then try the Aseina typeface for your designs. This font features a beautiful elegant feel, with the perfect mix of letters, numbers, and glyphs for that one-of-a-kind vintage style.
Inspired by tattoo lettering, this all caps font features a bold style that is sure to stand out. Download this set to get access to a complete collection of uppercase letters, numbers, and punctuation.
Gothic Fonts
Love Gothic fonts? This next selection includes amazing Gothic fonts that are perfectly suited for posters, print design and typographical projects. Check out our favorites.
If
you’re looking for a bold design, considering using this Zenzero Sans
font for your tattoo art. An industrial-based font created with regular
and round styles, this unique font type gives you endless possibilities.
Explore
the rustic Neo-Gothic elements of this Haext font for impressive tattoo
designs. Part rune craft, part sacred goddess, this font is sure to put
a spell on you with its spellbinding features.
If
you’re feeling a little crazy, throw this Sadis font into the tattoo
mix. A black letter font inspired by that epic Gothic look, this font
features a complete set of letters, numbers, and punctuation we’re sure
you’ll love.
Enjoy
the sacred geometric shapes of this unique and inspiring font type.
Inspired by sacred symbols, this font features letters, numbers, and
basic punctuation. Incorporate it into your tattoo designs for that
sacred personalized touch.
Named after the famous Captain James Cook who stumbled across
the wonders of tattooed people in the South Pacific, this font features a
cool decorative style perfect for a sailor or pirate. Its recommended
size is at 36 pt or higher for a great design ideal for your next tattoo
project.
Want
a tattoo that is unique yet simple? Give this awesome Typewriter font a
try. Inspired by the cool mechanical look of classic typewriter
lettering, this font features 187 unique glyphs and all the letters and
numbers you need for your next project.
Delicate
with organic curly serifs, this Petit Jardin font is divinely lovable.
Designed for that sweet, dainty look, this font package includes
letters, symbols, numbers, and more! Use it for your tattoo designs for
that gorgeous Art Nouveau look.
Inspired by old western design, this typeface features a modern twist for creative tattoo lovers. Included in this set are several font files with a helpful video for using the alternative glyph characters.
A
classic Victorian serif font that is simple and easy to use,
Victoriandeco is a font you’ll definitely want to incorporate into an
awesome tattoo design. Inspired by the Victorian era of British history,
this font features all your essential characters with bonus ornamental
elements for additional decoration.
Designed with a traditional Victorian aesthetic in mind, this typeface incorporates that clean vintage look with unique swirls and glyphs. Included in this package is a full set of letters, multi-language support, and access to 350 glyphs.
With
three unique styles—clean, inline, and inline-shadow—this energetic
typeface features an ornamental design that is sure to make you stand
out. Be the envy of all your tattooed friends with this awesome vintage
style.
Black
Heat is a modern typeface inspired by the Victorian era of design.
Download this package to gain access to a full set of numbers, letters,
and additional support for international symbols.
If you’re a fan of horror, metal, or gothic design, you’ll
definitely love this Bekelakar typeface. Available in regular and an
all-caps style, this font features a full set of letters, numbers, and
basic punctuation.
Create drama with this insane Dramaga typeface.
Inspired by the design behind the Posthardcore Band, this font features
an intense Gothic vibe with unique angular accents. Download this font
to feature this awesome style for your next tattoo.
Although
this typeface is perfect for logos, you can also mix it into an awesome
tattoo design. This unique serif typeface features a cool retro design
that works perfectly in a variety of programs for further customization.
This
cool vintage font is perfect for your next ink design. Featuring a
grungy design with interesting loops and curves, this package comes
complete with four font files and so much more!
Get
crafty with this unique Food Craft font. Designed with an unusual
ribbon aesthetic in mind, this font would be the perfect addition to a
standalone tattoo design. Included in this package is a full range of
letters and more to fulfill your tattoo needs.
Stay
alive with this edgy font type. Inspired by the Victorian era and the
posters of the 1800s, this font type features a full set of characters,
numbers, and basic symbols. Use it for print work or that special ink
you’ve been dying to get!
Script Fonts
Our final selection is a collection of modern script fonts that are inspired by creative vintage trends. See our favorites below!
A
decorative copperplate script with a modern twist, this Bodega Script
font is a stunning typeface with an elegant style. It’s perfect for
print work, tattoos, and so much more, so highlight your favorite
passages with this unique typeface.
Sail
across the seas with this November Script font. Hand-crafted and then
digitized for a beautiful calligraphic design, this font features a full
set of letters, numbers, and some nice ligatures for tricky letter
combinations.
Suitable for print designs and creative tattoo art, this
typeface features a modern script design that was handcrafted for that
handwritten look. Included in this package is a full set of letters,
numbers, and even multi-language support.
Inspired by handwritten letters and the cool side of street life, this modern typeface features a wild curvy design with all the characters you could ask for. This font is perfect for graffiti lovers, and you can incorporate it into your next ink for a cool, edgy style.
March into an awesome tattoo design with this gorgeous script typeface. Marchy was designed to illustrate a unique calligraphic style with stunning loops and clean lines. Featured in this download is access to a full range of letters and numbers with over 430 glyphs to incorporate into your designs.
Bring out your inner genius with this awesome Einstein font. A sophisticated script with a playful baseline, this font features a full set of letters, numbers, and basic punctuation. Download this package to gain access to a bonus swash set!
Twenty Nine is a playful marker typeface featuring a simple curvy style. With a bouncy baseline and a few sweet bonuses included, you’ll be happy you downloaded this set. An additional set of handcrafted ornaments is also included for that extra awesome touch!
Script fonts are super popular in tattoo designs nowadays. And this Jimmy font family includes a handcrafted script font designed to reflect the modern vintage trend sweeping the nation. Incorporate it into your next ink designs for that magical retro look.
A modern typeface handcrafted with brushes, the SokaQola font features an elegant design suitable for print work, tattoo art, and so much more. Included in this set is a full range of characters with additional stylistic ligatures for more design options.
Get dainty with this sweet Amorie Modella font family. Featuring a skinny, hand-drawn style, this font would work perfectly for a simple quote or even a unique name. Mix it up with flowers for an additional pretty element or keep it simple for a classic handmade design.
Get rude with this delicious typeface. A hand-drawn font designed with unique character, this file includes two serif fonts along with two script fonts. These fonts are created to work perfectly together, so you can mix them for interesting tattoo designs.
You’ll be saying „Hello Lary” with this lovely handmade font type. A modern typeface created with brushes, this font features a full set of letters, numbers, and basic punctuation for all your tattoo needs.
Get reckless with this awesome font trio. Reckless is a handwritten brush font made with elegant curves and a unique style. Download this set to gain access to three handwritten fonts with all the characters you need for the ultimate design of elegance.
Balham to Brooklyn is a modern monoline script font that emulates hand-drawn letterforms. It’s inspired by American pop culture and features a stunning cursive design that works perfectly for simple tattoo designs and so much more.
Start singing the blues with this handmade Roadhouse Blues font. Inspired by an early American style, its decorative swashes give it a friendly retro vibe. Download this package for a full set of letters, numbers, and basic punctuation.
Get glamorous with this gorgeous font. A freestyle handmade signature type, this Glamour font is perfect for that awesome handwritten element. Included in this package are all the characters you need as well as 100 total freebies for more design experimentation.
Enjoy the adorable qualities of this stunning, elegant font. A modern script with a looping calligraphic style, this font is perfect for a meaningful personal quote or a name-based tattoo design.
Enjoy the beauty of this classically designed typeface. Combining elements of copperplate and contemporary design, this font is perfect for a stunning yet simple tattoo. Included in this set are 300 glyphs and 118 alternate characters to complement your work.
A mono-weight script font, this type is heavily based on the modern era of traditional logo design. Make your tattoos stand out with this impressive font complete with letters, numbers, and so much more!
Enjoy the fancy yet flirty elements of this delicious Honeycomb font. Designed with fat-to-thin brush strokes and an imperfect baseline, this font would work gorgeously for a simple tattoo design. Download this package to gain access to a complete set of characters and stunning bonus extras.
To finish this collection of amazing tattoo fonts, I present you with this beautiful Mochafloat typeface. Created to emulate a modern calligraphic style, this package features 300 glyphs and 200 alternative characters.
10 Amazing Tattoo Tutorials from Envato Tuts+
Inspired by this wonderful collection? Put your skills to the test with these awesome tattoo-based tutorials from Envato Tuts+.
This list is jam-packed with exciting resources for the avid designer
familiar with OpenType and more. If you need additional
help creating a personal tattoo design, enlist the skills of a talented
professional by choosing one of the amazing designers from Envato Studio.
And with hundreds of glorious handwritten and script fonts to choose from, chances are we’ve missed a few to add to your personal collection. Be sure to browse Envato Market and Envato Elements for more resources, and let us know your favorites in the comments below!
Whether you’re looking to get a tattoo for the first time or you’re a total tattoo snob, choosing the right font for your designs takes patience. So today we present you with 49 insanely epic tattoo fonts we’re sure you’ll love.
49 Insanely Epic Tattoo Fonts
With a selection of fonts curated from GraphicRiver and Envato Elements, this collection features 49 awesome tattoo fonts you’ll definitely want to incorporate into your next ink.
Want that extra personalized touch? Enlist the help of the professional designers at Envato Studio to create a custom tattoo design just for you!
Old English Fonts
Do you love tattoo design? We sure do! From wild decorative fonts to stunning handwritten scripts, we’ve got a font to cover all of your tattoo needs.
Enjoy this eclectic collection below and let us know your favorites in the comments!
This razor blade font is a design inspired by elegant handwriting. This Old English calligraphy font captures the unique style of the past while adding a new modern twist. Enjoy uppercase and lowercase styles you can use in any design program.
Tattoo
lovers, beware. This font will turn you into a badass in no time.
Inspired by the west coast style of tattoos, this font type features an
aggressive, gothic design. Included in this set is a complete package of
letters, numbers, and punctuation.
This new blackletter font was made with creative designers in mind. Use it as the official typeface for your next book, or to kick off a new brand. Included in this download is a full suite of letters and numbers as well as punctuation.
Wield your words like an ancient sword. This next magnificent font is sharp and alluring. It combines several vintage typographic styles together and includes unique details and additions to each letter. Just visit the link to try it out!
Do
you have a vision of black for your next tattoo? Well, try this Black
Vision font on for style. This set includes an elegant vintage feel, and
features a full set of letters, numbers, and punctuation to complete
your designs.
Evolve with the right typeface. The Sirunian font is bold and strong. It captures the look of vintage architecture and works great for headlines, websites and more. Grab it today for just $15. Try it out!
Enjoy a wonderful victory with next brilliant font. Victory is an ornamental typeface inspired by vintage Victorian writing. It comes with standard upper and lowercase letters as well as additional numbers and symbols. Add it to your collection!
What better way to start off this collection than with an amazing tattoo font? This awesome script font was inspired by the swirls of traditional tattoos and a unique hand lettering style. Find packaged into this typeface a complete set of uppercase and lowercase letters, numbers, and even a bonus set of borders for your convenience.
If you’re looking for a unique font with that traditional vintage flair, then try the Aseina typeface for your designs. This font features a beautiful elegant feel, with the perfect mix of letters, numbers, and glyphs for that one-of-a-kind vintage style.
Inspired by tattoo lettering, this all caps font features a bold style that is sure to stand out. Download this set to get access to a complete collection of uppercase letters, numbers, and punctuation.
Gothic Fonts
Love Gothic fonts? This next selection includes amazing Gothic fonts that are perfectly suited for posters, print design and typographical projects. Check out our favorites.
If
you’re looking for a bold design, considering using this Zenzero Sans
font for your tattoo art. An industrial-based font created with regular
and round styles, this unique font type gives you endless possibilities.
Explore
the rustic Neo-Gothic elements of this Haext font for impressive tattoo
designs. Part rune craft, part sacred goddess, this font is sure to put
a spell on you with its spellbinding features.
If
you’re feeling a little crazy, throw this Sadis font into the tattoo
mix. A black letter font inspired by that epic Gothic look, this font
features a complete set of letters, numbers, and punctuation we’re sure
you’ll love.
Enjoy
the sacred geometric shapes of this unique and inspiring font type.
Inspired by sacred symbols, this font features letters, numbers, and
basic punctuation. Incorporate it into your tattoo designs for that
sacred personalized touch.
Named after the famous Captain James Cook who stumbled across
the wonders of tattooed people in the South Pacific, this font features a
cool decorative style perfect for a sailor or pirate. Its recommended
size is at 36 pt or higher for a great design ideal for your next tattoo
project.
Want
a tattoo that is unique yet simple? Give this awesome Typewriter font a
try. Inspired by the cool mechanical look of classic typewriter
lettering, this font features 187 unique glyphs and all the letters and
numbers you need for your next project.
Delicate
with organic curly serifs, this Petit Jardin font is divinely lovable.
Designed for that sweet, dainty look, this font package includes
letters, symbols, numbers, and more! Use it for your tattoo designs for
that gorgeous Art Nouveau look.
Inspired by old western design, this typeface features a modern twist for creative tattoo lovers. Included in this set are several font files with a helpful video for using the alternative glyph characters.
A
classic Victorian serif font that is simple and easy to use,
Victoriandeco is a font you’ll definitely want to incorporate into an
awesome tattoo design. Inspired by the Victorian era of British history,
this font features all your essential characters with bonus ornamental
elements for additional decoration.
Designed with a traditional Victorian aesthetic in mind, this typeface incorporates that clean vintage look with unique swirls and glyphs. Included in this package is a full set of letters, multi-language support, and access to 350 glyphs.
With
three unique styles—clean, inline, and inline-shadow—this energetic
typeface features an ornamental design that is sure to make you stand
out. Be the envy of all your tattooed friends with this awesome vintage
style.
Black
Heat is a modern typeface inspired by the Victorian era of design.
Download this package to gain access to a full set of numbers, letters,
and additional support for international symbols.
If you’re a fan of horror, metal, or gothic design, you’ll
definitely love this Bekelakar typeface. Available in regular and an
all-caps style, this font features a full set of letters, numbers, and
basic punctuation.
Create drama with this insane Dramaga typeface.
Inspired by the design behind the Posthardcore Band, this font features
an intense Gothic vibe with unique angular accents. Download this font
to feature this awesome style for your next tattoo.
Although
this typeface is perfect for logos, you can also mix it into an awesome
tattoo design. This unique serif typeface features a cool retro design
that works perfectly in a variety of programs for further customization.
This
cool vintage font is perfect for your next ink design. Featuring a
grungy design with interesting loops and curves, this package comes
complete with four font files and so much more!
Get
crafty with this unique Food Craft font. Designed with an unusual
ribbon aesthetic in mind, this font would be the perfect addition to a
standalone tattoo design. Included in this package is a full range of
letters and more to fulfill your tattoo needs.
Stay
alive with this edgy font type. Inspired by the Victorian era and the
posters of the 1800s, this font type features a full set of characters,
numbers, and basic symbols. Use it for print work or that special ink
you’ve been dying to get!
Script Fonts
Our final selection is a collection of modern script fonts that are inspired by creative vintage trends. See our favorites below!
A
decorative copperplate script with a modern twist, this Bodega Script
font is a stunning typeface with an elegant style. It’s perfect for
print work, tattoos, and so much more, so highlight your favorite
passages with this unique typeface.
Sail
across the seas with this November Script font. Hand-crafted and then
digitized for a beautiful calligraphic design, this font features a full
set of letters, numbers, and some nice ligatures for tricky letter
combinations.
Suitable for print designs and creative tattoo art, this
typeface features a modern script design that was handcrafted for that
handwritten look. Included in this package is a full set of letters,
numbers, and even multi-language support.
Inspired by handwritten letters and the cool side of street life, this modern typeface features a wild curvy design with all the characters you could ask for. This font is perfect for graffiti lovers, and you can incorporate it into your next ink for a cool, edgy style.
March into an awesome tattoo design with this gorgeous script typeface. Marchy was designed to illustrate a unique calligraphic style with stunning loops and clean lines. Featured in this download is access to a full range of letters and numbers with over 430 glyphs to incorporate into your designs.
Bring out your inner genius with this awesome Einstein font. A sophisticated script with a playful baseline, this font features a full set of letters, numbers, and basic punctuation. Download this package to gain access to a bonus swash set!
Twenty Nine is a playful marker typeface featuring a simple curvy style. With a bouncy baseline and a few sweet bonuses included, you’ll be happy you downloaded this set. An additional set of handcrafted ornaments is also included for that extra awesome touch!
Script fonts are super popular in tattoo designs nowadays. And this Jimmy font family includes a handcrafted script font designed to reflect the modern vintage trend sweeping the nation. Incorporate it into your next ink designs for that magical retro look.
A modern typeface handcrafted with brushes, the SokaQola font features an elegant design suitable for print work, tattoo art, and so much more. Included in this set is a full range of characters with additional stylistic ligatures for more design options.
Get dainty with this sweet Amorie Modella font family. Featuring a skinny, hand-drawn style, this font would work perfectly for a simple quote or even a unique name. Mix it up with flowers for an additional pretty element or keep it simple for a classic handmade design.
Get rude with this delicious typeface. A hand-drawn font designed with unique character, this file includes two serif fonts along with two script fonts. These fonts are created to work perfectly together, so you can mix them for interesting tattoo designs.
You’ll be saying „Hello Lary” with this lovely handmade font type. A modern typeface created with brushes, this font features a full set of letters, numbers, and basic punctuation for all your tattoo needs.
Get reckless with this awesome font trio. Reckless is a handwritten brush font made with elegant curves and a unique style. Download this set to gain access to three handwritten fonts with all the characters you need for the ultimate design of elegance.
Balham to Brooklyn is a modern monoline script font that emulates hand-drawn letterforms. It’s inspired by American pop culture and features a stunning cursive design that works perfectly for simple tattoo designs and so much more.
Start singing the blues with this handmade Roadhouse Blues font. Inspired by an early American style, its decorative swashes give it a friendly retro vibe. Download this package for a full set of letters, numbers, and basic punctuation.
Get glamorous with this gorgeous font. A freestyle handmade signature type, this Glamour font is perfect for that awesome handwritten element. Included in this package are all the characters you need as well as 100 total freebies for more design experimentation.
Enjoy the adorable qualities of this stunning, elegant font. A modern script with a looping calligraphic style, this font is perfect for a meaningful personal quote or a name-based tattoo design.
Enjoy the beauty of this classically designed typeface. Combining elements of copperplate and contemporary design, this font is perfect for a stunning yet simple tattoo. Included in this set are 300 glyphs and 118 alternate characters to complement your work.
A mono-weight script font, this type is heavily based on the modern era of traditional logo design. Make your tattoos stand out with this impressive font complete with letters, numbers, and so much more!
Enjoy the fancy yet flirty elements of this delicious Honeycomb font. Designed with fat-to-thin brush strokes and an imperfect baseline, this font would work gorgeously for a simple tattoo design. Download this package to gain access to a complete set of characters and stunning bonus extras.
To finish this collection of amazing tattoo fonts, I present you with this beautiful Mochafloat typeface. Created to emulate a modern calligraphic style, this package features 300 glyphs and 200 alternative characters.
10 Amazing Tattoo Tutorials from Envato Tuts+
Inspired by this wonderful collection? Put your skills to the test with these awesome tattoo-based tutorials from Envato Tuts+.
This list is jam-packed with exciting resources for the avid designer
familiar with OpenType and more. If you need additional
help creating a personal tattoo design, enlist the skills of a talented
professional by choosing one of the amazing designers from Envato Studio.
And with hundreds of glorious handwritten and script fonts to choose from, chances are we’ve missed a few to add to your personal collection. Be sure to browse Envato Market and Envato Elements for more resources, and let us know your favorites in the comments below!
Whether you’re looking to get a tattoo for the first time or you’re a total tattoo snob, choosing the right font for your designs takes patience. So today we present you with 49 insanely epic tattoo fonts we’re sure you’ll love.
49 Insanely Epic Tattoo Fonts
With a selection of fonts curated from GraphicRiver and Envato Elements, this collection features 49 awesome tattoo fonts you’ll definitely want to incorporate into your next ink.
Want that extra personalized touch? Enlist the help of the professional designers at Envato Studio to create a custom tattoo design just for you!
Old English Fonts
Do you love tattoo design? We sure do! From wild decorative fonts to stunning handwritten scripts, we’ve got a font to cover all of your tattoo needs.
Enjoy this eclectic collection below and let us know your favorites in the comments!
This razor blade font is a design inspired by elegant handwriting. This Old English calligraphy font captures the unique style of the past while adding a new modern twist. Enjoy uppercase and lowercase styles you can use in any design program.
Tattoo
lovers, beware. This font will turn you into a badass in no time.
Inspired by the west coast style of tattoos, this font type features an
aggressive, gothic design. Included in this set is a complete package of
letters, numbers, and punctuation.
This new blackletter font was made with creative designers in mind. Use it as the official typeface for your next book, or to kick off a new brand. Included in this download is a full suite of letters and numbers as well as punctuation.
Wield your words like an ancient sword. This next magnificent font is sharp and alluring. It combines several vintage typographic styles together and includes unique details and additions to each letter. Just visit the link to try it out!
Do
you have a vision of black for your next tattoo? Well, try this Black
Vision font on for style. This set includes an elegant vintage feel, and
features a full set of letters, numbers, and punctuation to complete
your designs.
Evolve with the right typeface. The Sirunian font is bold and strong. It captures the look of vintage architecture and works great for headlines, websites and more. Grab it today for just $15. Try it out!
Enjoy a wonderful victory with next brilliant font. Victory is an ornamental typeface inspired by vintage Victorian writing. It comes with standard upper and lowercase letters as well as additional numbers and symbols. Add it to your collection!
What better way to start off this collection than with an amazing tattoo font? This awesome script font was inspired by the swirls of traditional tattoos and a unique hand lettering style. Find packaged into this typeface a complete set of uppercase and lowercase letters, numbers, and even a bonus set of borders for your convenience.
If you’re looking for a unique font with that traditional vintage flair, then try the Aseina typeface for your designs. This font features a beautiful elegant feel, with the perfect mix of letters, numbers, and glyphs for that one-of-a-kind vintage style.
Inspired by tattoo lettering, this all caps font features a bold style that is sure to stand out. Download this set to get access to a complete collection of uppercase letters, numbers, and punctuation.
Gothic Fonts
Love Gothic fonts? This next selection includes amazing Gothic fonts that are perfectly suited for posters, print design and typographical projects. Check out our favorites.
If
you’re looking for a bold design, considering using this Zenzero Sans
font for your tattoo art. An industrial-based font created with regular
and round styles, this unique font type gives you endless possibilities.
Explore
the rustic Neo-Gothic elements of this Haext font for impressive tattoo
designs. Part rune craft, part sacred goddess, this font is sure to put
a spell on you with its spellbinding features.
If
you’re feeling a little crazy, throw this Sadis font into the tattoo
mix. A black letter font inspired by that epic Gothic look, this font
features a complete set of letters, numbers, and punctuation we’re sure
you’ll love.
Enjoy
the sacred geometric shapes of this unique and inspiring font type.
Inspired by sacred symbols, this font features letters, numbers, and
basic punctuation. Incorporate it into your tattoo designs for that
sacred personalized touch.
Named after the famous Captain James Cook who stumbled across
the wonders of tattooed people in the South Pacific, this font features a
cool decorative style perfect for a sailor or pirate. Its recommended
size is at 36 pt or higher for a great design ideal for your next tattoo
project.
Want
a tattoo that is unique yet simple? Give this awesome Typewriter font a
try. Inspired by the cool mechanical look of classic typewriter
lettering, this font features 187 unique glyphs and all the letters and
numbers you need for your next project.
Delicate
with organic curly serifs, this Petit Jardin font is divinely lovable.
Designed for that sweet, dainty look, this font package includes
letters, symbols, numbers, and more! Use it for your tattoo designs for
that gorgeous Art Nouveau look.
Inspired by old western design, this typeface features a modern twist for creative tattoo lovers. Included in this set are several font files with a helpful video for using the alternative glyph characters.
A
classic Victorian serif font that is simple and easy to use,
Victoriandeco is a font you’ll definitely want to incorporate into an
awesome tattoo design. Inspired by the Victorian era of British history,
this font features all your essential characters with bonus ornamental
elements for additional decoration.
Designed with a traditional Victorian aesthetic in mind, this typeface incorporates that clean vintage look with unique swirls and glyphs. Included in this package is a full set of letters, multi-language support, and access to 350 glyphs.
With
three unique styles—clean, inline, and inline-shadow—this energetic
typeface features an ornamental design that is sure to make you stand
out. Be the envy of all your tattooed friends with this awesome vintage
style.
Black
Heat is a modern typeface inspired by the Victorian era of design.
Download this package to gain access to a full set of numbers, letters,
and additional support for international symbols.
If you’re a fan of horror, metal, or gothic design, you’ll
definitely love this Bekelakar typeface. Available in regular and an
all-caps style, this font features a full set of letters, numbers, and
basic punctuation.
Create drama with this insane Dramaga typeface.
Inspired by the design behind the Posthardcore Band, this font features
an intense Gothic vibe with unique angular accents. Download this font
to feature this awesome style for your next tattoo.
Although
this typeface is perfect for logos, you can also mix it into an awesome
tattoo design. This unique serif typeface features a cool retro design
that works perfectly in a variety of programs for further customization.
This
cool vintage font is perfect for your next ink design. Featuring a
grungy design with interesting loops and curves, this package comes
complete with four font files and so much more!
Get
crafty with this unique Food Craft font. Designed with an unusual
ribbon aesthetic in mind, this font would be the perfect addition to a
standalone tattoo design. Included in this package is a full range of
letters and more to fulfill your tattoo needs.
Stay
alive with this edgy font type. Inspired by the Victorian era and the
posters of the 1800s, this font type features a full set of characters,
numbers, and basic symbols. Use it for print work or that special ink
you’ve been dying to get!
Script Fonts
Our final selection is a collection of modern script fonts that are inspired by creative vintage trends. See our favorites below!
A
decorative copperplate script with a modern twist, this Bodega Script
font is a stunning typeface with an elegant style. It’s perfect for
print work, tattoos, and so much more, so highlight your favorite
passages with this unique typeface.
Sail
across the seas with this November Script font. Hand-crafted and then
digitized for a beautiful calligraphic design, this font features a full
set of letters, numbers, and some nice ligatures for tricky letter
combinations.
Suitable for print designs and creative tattoo art, this
typeface features a modern script design that was handcrafted for that
handwritten look. Included in this package is a full set of letters,
numbers, and even multi-language support.
Inspired by handwritten letters and the cool side of street life, this modern typeface features a wild curvy design with all the characters you could ask for. This font is perfect for graffiti lovers, and you can incorporate it into your next ink for a cool, edgy style.
March into an awesome tattoo design with this gorgeous script typeface. Marchy was designed to illustrate a unique calligraphic style with stunning loops and clean lines. Featured in this download is access to a full range of letters and numbers with over 430 glyphs to incorporate into your designs.
Bring out your inner genius with this awesome Einstein font. A sophisticated script with a playful baseline, this font features a full set of letters, numbers, and basic punctuation. Download this package to gain access to a bonus swash set!
Twenty Nine is a playful marker typeface featuring a simple curvy style. With a bouncy baseline and a few sweet bonuses included, you’ll be happy you downloaded this set. An additional set of handcrafted ornaments is also included for that extra awesome touch!
Script fonts are super popular in tattoo designs nowadays. And this Jimmy font family includes a handcrafted script font designed to reflect the modern vintage trend sweeping the nation. Incorporate it into your next ink designs for that magical retro look.
A modern typeface handcrafted with brushes, the SokaQola font features an elegant design suitable for print work, tattoo art, and so much more. Included in this set is a full range of characters with additional stylistic ligatures for more design options.
Get dainty with this sweet Amorie Modella font family. Featuring a skinny, hand-drawn style, this font would work perfectly for a simple quote or even a unique name. Mix it up with flowers for an additional pretty element or keep it simple for a classic handmade design.
Get rude with this delicious typeface. A hand-drawn font designed with unique character, this file includes two serif fonts along with two script fonts. These fonts are created to work perfectly together, so you can mix them for interesting tattoo designs.
You’ll be saying „Hello Lary” with this lovely handmade font type. A modern typeface created with brushes, this font features a full set of letters, numbers, and basic punctuation for all your tattoo needs.
Get reckless with this awesome font trio. Reckless is a handwritten brush font made with elegant curves and a unique style. Download this set to gain access to three handwritten fonts with all the characters you need for the ultimate design of elegance.
Balham to Brooklyn is a modern monoline script font that emulates hand-drawn letterforms. It’s inspired by American pop culture and features a stunning cursive design that works perfectly for simple tattoo designs and so much more.
Start singing the blues with this handmade Roadhouse Blues font. Inspired by an early American style, its decorative swashes give it a friendly retro vibe. Download this package for a full set of letters, numbers, and basic punctuation.
Get glamorous with this gorgeous font. A freestyle handmade signature type, this Glamour font is perfect for that awesome handwritten element. Included in this package are all the characters you need as well as 100 total freebies for more design experimentation.
Enjoy the adorable qualities of this stunning, elegant font. A modern script with a looping calligraphic style, this font is perfect for a meaningful personal quote or a name-based tattoo design.
Enjoy the beauty of this classically designed typeface. Combining elements of copperplate and contemporary design, this font is perfect for a stunning yet simple tattoo. Included in this set are 300 glyphs and 118 alternate characters to complement your work.
A mono-weight script font, this type is heavily based on the modern era of traditional logo design. Make your tattoos stand out with this impressive font complete with letters, numbers, and so much more!
Enjoy the fancy yet flirty elements of this delicious Honeycomb font. Designed with fat-to-thin brush strokes and an imperfect baseline, this font would work gorgeously for a simple tattoo design. Download this package to gain access to a complete set of characters and stunning bonus extras.
To finish this collection of amazing tattoo fonts, I present you with this beautiful Mochafloat typeface. Created to emulate a modern calligraphic style, this package features 300 glyphs and 200 alternative characters.
10 Amazing Tattoo Tutorials from Envato Tuts+
Inspired by this wonderful collection? Put your skills to the test with these awesome tattoo-based tutorials from Envato Tuts+.
This list is jam-packed with exciting resources for the avid designer
familiar with OpenType and more. If you need additional
help creating a personal tattoo design, enlist the skills of a talented
professional by choosing one of the amazing designers from Envato Studio.
And with hundreds of glorious handwritten and script fonts to choose from, chances are we’ve missed a few to add to your personal collection. Be sure to browse Envato Market and Envato Elements for more resources, and let us know your favorites in the comments below!
Whether you’re looking to get a tattoo for the first time or you’re a total tattoo snob, choosing the right font for your designs takes patience. So today we present you with 49 insanely epic tattoo fonts we’re sure you’ll love.
49 Insanely Epic Tattoo Fonts
With a selection of fonts curated from GraphicRiver and Envato Elements, this collection features 49 awesome tattoo fonts you’ll definitely want to incorporate into your next ink.
Want that extra personalized touch? Enlist the help of the professional designers at Envato Studio to create a custom tattoo design just for you!
Old English Fonts
Do you love tattoo design? We sure do! From wild decorative fonts to stunning handwritten scripts, we’ve got a font to cover all of your tattoo needs.
Enjoy this eclectic collection below and let us know your favorites in the comments!
This razor blade font is a design inspired by elegant handwriting. This Old English calligraphy font captures the unique style of the past while adding a new modern twist. Enjoy uppercase and lowercase styles you can use in any design program.
Tattoo
lovers, beware. This font will turn you into a badass in no time.
Inspired by the west coast style of tattoos, this font type features an
aggressive, gothic design. Included in this set is a complete package of
letters, numbers, and punctuation.
This new blackletter font was made with creative designers in mind. Use it as the official typeface for your next book, or to kick off a new brand. Included in this download is a full suite of letters and numbers as well as punctuation.
Wield your words like an ancient sword. This next magnificent font is sharp and alluring. It combines several vintage typographic styles together and includes unique details and additions to each letter. Just visit the link to try it out!
Do
you have a vision of black for your next tattoo? Well, try this Black
Vision font on for style. This set includes an elegant vintage feel, and
features a full set of letters, numbers, and punctuation to complete
your designs.
Evolve with the right typeface. The Sirunian font is bold and strong. It captures the look of vintage architecture and works great for headlines, websites and more. Grab it today for just $15. Try it out!
Enjoy a wonderful victory with next brilliant font. Victory is an ornamental typeface inspired by vintage Victorian writing. It comes with standard upper and lowercase letters as well as additional numbers and symbols. Add it to your collection!
What better way to start off this collection than with an amazing tattoo font? This awesome script font was inspired by the swirls of traditional tattoos and a unique hand lettering style. Find packaged into this typeface a complete set of uppercase and lowercase letters, numbers, and even a bonus set of borders for your convenience.
If you’re looking for a unique font with that traditional vintage flair, then try the Aseina typeface for your designs. This font features a beautiful elegant feel, with the perfect mix of letters, numbers, and glyphs for that one-of-a-kind vintage style.
Inspired by tattoo lettering, this all caps font features a bold style that is sure to stand out. Download this set to get access to a complete collection of uppercase letters, numbers, and punctuation.
Gothic Fonts
Love Gothic fonts? This next selection includes amazing Gothic fonts that are perfectly suited for posters, print design and typographical projects. Check out our favorites.
If
you’re looking for a bold design, considering using this Zenzero Sans
font for your tattoo art. An industrial-based font created with regular
and round styles, this unique font type gives you endless possibilities.
Explore
the rustic Neo-Gothic elements of this Haext font for impressive tattoo
designs. Part rune craft, part sacred goddess, this font is sure to put
a spell on you with its spellbinding features.
If
you’re feeling a little crazy, throw this Sadis font into the tattoo
mix. A black letter font inspired by that epic Gothic look, this font
features a complete set of letters, numbers, and punctuation we’re sure
you’ll love.
Enjoy
the sacred geometric shapes of this unique and inspiring font type.
Inspired by sacred symbols, this font features letters, numbers, and
basic punctuation. Incorporate it into your tattoo designs for that
sacred personalized touch.
Named after the famous Captain James Cook who stumbled across
the wonders of tattooed people in the South Pacific, this font features a
cool decorative style perfect for a sailor or pirate. Its recommended
size is at 36 pt or higher for a great design ideal for your next tattoo
project.
Want
a tattoo that is unique yet simple? Give this awesome Typewriter font a
try. Inspired by the cool mechanical look of classic typewriter
lettering, this font features 187 unique glyphs and all the letters and
numbers you need for your next project.
Delicate
with organic curly serifs, this Petit Jardin font is divinely lovable.
Designed for that sweet, dainty look, this font package includes
letters, symbols, numbers, and more! Use it for your tattoo designs for
that gorgeous Art Nouveau look.
Inspired by old western design, this typeface features a modern twist for creative tattoo lovers. Included in this set are several font files with a helpful video for using the alternative glyph characters.
A
classic Victorian serif font that is simple and easy to use,
Victoriandeco is a font you’ll definitely want to incorporate into an
awesome tattoo design. Inspired by the Victorian era of British history,
this font features all your essential characters with bonus ornamental
elements for additional decoration.
Designed with a traditional Victorian aesthetic in mind, this typeface incorporates that clean vintage look with unique swirls and glyphs. Included in this package is a full set of letters, multi-language support, and access to 350 glyphs.
With
three unique styles—clean, inline, and inline-shadow—this energetic
typeface features an ornamental design that is sure to make you stand
out. Be the envy of all your tattooed friends with this awesome vintage
style.
Black
Heat is a modern typeface inspired by the Victorian era of design.
Download this package to gain access to a full set of numbers, letters,
and additional support for international symbols.
If you’re a fan of horror, metal, or gothic design, you’ll
definitely love this Bekelakar typeface. Available in regular and an
all-caps style, this font features a full set of letters, numbers, and
basic punctuation.
Create drama with this insane Dramaga typeface.
Inspired by the design behind the Posthardcore Band, this font features
an intense Gothic vibe with unique angular accents. Download this font
to feature this awesome style for your next tattoo.
Although
this typeface is perfect for logos, you can also mix it into an awesome
tattoo design. This unique serif typeface features a cool retro design
that works perfectly in a variety of programs for further customization.
This
cool vintage font is perfect for your next ink design. Featuring a
grungy design with interesting loops and curves, this package comes
complete with four font files and so much more!
Get
crafty with this unique Food Craft font. Designed with an unusual
ribbon aesthetic in mind, this font would be the perfect addition to a
standalone tattoo design. Included in this package is a full range of
letters and more to fulfill your tattoo needs.
Stay
alive with this edgy font type. Inspired by the Victorian era and the
posters of the 1800s, this font type features a full set of characters,
numbers, and basic symbols. Use it for print work or that special ink
you’ve been dying to get!
Script Fonts
Our final selection is a collection of modern script fonts that are inspired by creative vintage trends. See our favorites below!
A
decorative copperplate script with a modern twist, this Bodega Script
font is a stunning typeface with an elegant style. It’s perfect for
print work, tattoos, and so much more, so highlight your favorite
passages with this unique typeface.
Sail
across the seas with this November Script font. Hand-crafted and then
digitized for a beautiful calligraphic design, this font features a full
set of letters, numbers, and some nice ligatures for tricky letter
combinations.
Suitable for print designs and creative tattoo art, this
typeface features a modern script design that was handcrafted for that
handwritten look. Included in this package is a full set of letters,
numbers, and even multi-language support.
Inspired by handwritten letters and the cool side of street life, this modern typeface features a wild curvy design with all the characters you could ask for. This font is perfect for graffiti lovers, and you can incorporate it into your next ink for a cool, edgy style.
March into an awesome tattoo design with this gorgeous script typeface. Marchy was designed to illustrate a unique calligraphic style with stunning loops and clean lines. Featured in this download is access to a full range of letters and numbers with over 430 glyphs to incorporate into your designs.
Bring out your inner genius with this awesome Einstein font. A sophisticated script with a playful baseline, this font features a full set of letters, numbers, and basic punctuation. Download this package to gain access to a bonus swash set!
Twenty Nine is a playful marker typeface featuring a simple curvy style. With a bouncy baseline and a few sweet bonuses included, you’ll be happy you downloaded this set. An additional set of handcrafted ornaments is also included for that extra awesome touch!
Script fonts are super popular in tattoo designs nowadays. And this Jimmy font family includes a handcrafted script font designed to reflect the modern vintage trend sweeping the nation. Incorporate it into your next ink designs for that magical retro look.
A modern typeface handcrafted with brushes, the SokaQola font features an elegant design suitable for print work, tattoo art, and so much more. Included in this set is a full range of characters with additional stylistic ligatures for more design options.
Get dainty with this sweet Amorie Modella font family. Featuring a skinny, hand-drawn style, this font would work perfectly for a simple quote or even a unique name. Mix it up with flowers for an additional pretty element or keep it simple for a classic handmade design.
Get rude with this delicious typeface. A hand-drawn font designed with unique character, this file includes two serif fonts along with two script fonts. These fonts are created to work perfectly together, so you can mix them for interesting tattoo designs.
You’ll be saying „Hello Lary” with this lovely handmade font type. A modern typeface created with brushes, this font features a full set of letters, numbers, and basic punctuation for all your tattoo needs.
Get reckless with this awesome font trio. Reckless is a handwritten brush font made with elegant curves and a unique style. Download this set to gain access to three handwritten fonts with all the characters you need for the ultimate design of elegance.
Balham to Brooklyn is a modern monoline script font that emulates hand-drawn letterforms. It’s inspired by American pop culture and features a stunning cursive design that works perfectly for simple tattoo designs and so much more.
Start singing the blues with this handmade Roadhouse Blues font. Inspired by an early American style, its decorative swashes give it a friendly retro vibe. Download this package for a full set of letters, numbers, and basic punctuation.
Get glamorous with this gorgeous font. A freestyle handmade signature type, this Glamour font is perfect for that awesome handwritten element. Included in this package are all the characters you need as well as 100 total freebies for more design experimentation.
Enjoy the adorable qualities of this stunning, elegant font. A modern script with a looping calligraphic style, this font is perfect for a meaningful personal quote or a name-based tattoo design.
Enjoy the beauty of this classically designed typeface. Combining elements of copperplate and contemporary design, this font is perfect for a stunning yet simple tattoo. Included in this set are 300 glyphs and 118 alternate characters to complement your work.
A mono-weight script font, this type is heavily based on the modern era of traditional logo design. Make your tattoos stand out with this impressive font complete with letters, numbers, and so much more!
Enjoy the fancy yet flirty elements of this delicious Honeycomb font. Designed with fat-to-thin brush strokes and an imperfect baseline, this font would work gorgeously for a simple tattoo design. Download this package to gain access to a complete set of characters and stunning bonus extras.
To finish this collection of amazing tattoo fonts, I present you with this beautiful Mochafloat typeface. Created to emulate a modern calligraphic style, this package features 300 glyphs and 200 alternative characters.
10 Amazing Tattoo Tutorials from Envato Tuts+
Inspired by this wonderful collection? Put your skills to the test with these awesome tattoo-based tutorials from Envato Tuts+.
This list is jam-packed with exciting resources for the avid designer
familiar with OpenType and more. If you need additional
help creating a personal tattoo design, enlist the skills of a talented
professional by choosing one of the amazing designers from Envato Studio.
And with hundreds of glorious handwritten and script fonts to choose from, chances are we’ve missed a few to add to your personal collection. Be sure to browse Envato Market and Envato Elements for more resources, and let us know your favorites in the comments below!
Agregator najlepszych postów o designie, webdesignie, cssie i Internecie

 Photo Effects20 Funny Photo Effects for Photoshop (Fun and Entertaining Actions)Melody Nieves
 Adobe Photoshop24 Best New Photoshop Actions & Photo Effects for 2019Melody Nieves