ALDI: Christmas Spectacular

Post pobrano z: ALDI: Christmas Spectacular

Film
Aldi

Advertising Agency:McCann, London, United Kingdom
Executive Creative Director:Dave Price
Creative Director:Neil Lancaster
Creative Team:Clive Davis, Andy Fenton
Planning Director:Jamie Peate
Senior Account Director:Laura McKinlay
Account Director:Jane Colbeck
Senior account managers:Josie Campbell, Kim Cleaver
Production Company:Stink
Directors:Todd Mueller, Kylie Matulick, Psyop
Editor:John Mayes, Marshall Street
Postproduction:Psyop
Audio:Wave, Parv Thind
Music:SixtyFour Music

Walmark GinkoPrim: Never Forget

Post pobrano z: Walmark GinkoPrim: Never Forget
Promo, Print
Walmark

According to studies, 30 years is the age when our memory starts to fade away. 2019 is the year when the Czech Republic celebrates 30 years since the Velvet Revolution, which ended the rule of one of the most repressive communist regimes in Europe, bringing democracy to Czechoslovakia. GinkoPrim, a supplement from Walmark that improves memory, wants to remind everyone how important it is to take good care with not forgetting the things that matter.

Advertising Agency:VCCP, Prague, Czech Republic
Creative Director:Dejan Stajnberger
Art Director:Rade Saptovic
Copywriter:Markéta Kolodžejová
Account:Rosťa Novák
Production:Ruben Aram Ter-Akopow

Walmark GinkoPrim: Never Forget

Post pobrano z: Walmark GinkoPrim: Never Forget
Promo, Print
Walmark

According to studies, 30 years is the age when our memory starts to fade away. 2019 is the year when the Czech Republic celebrates 30 years since the Velvet Revolution, which ended the rule of one of the most repressive communist regimes in Europe, bringing democracy to Czechoslovakia. GinkoPrim, a supplement from Walmark that improves memory, wants to remind everyone how important it is to take good care with not forgetting the things that matter.

Advertising Agency:VCCP, Prague, Czech Republic
Creative Director:Dejan Stajnberger
Art Director:Rade Saptovic
Copywriter:Markéta Kolodžejová
Account:Rosťa Novák
Production:Ruben Aram Ter-Akopow

Hover: Great Domain Names for your Ideas

Post pobrano z: Hover: Great Domain Names for your Ideas

Whether you are in marketing, branding, web design, or graphic design, you already know how important it is to pick a good domain name for your projects. If you have tried a few domain name sellers, you already know how important it is to work with the right reseller.

There are also good chances that you have already heard about less traditional domain names, such as .club, .gallery, or .florist. As a designer, these examples will probably not be the most appealing, the .design domain names are more likely what you are looking for.

Get over 300 Top Level Domains at Hover

Talking of a reliable TLD domains provider, Hover is one of the greatest companies to work with. Whether you are an individual starting a side project or a business in need of its brand as a domain name, you cannot go wrong with Hover.

On top of the domain services, Hover also offers cheap mailbox plans. This is very useful, as domains are often purchased for both websites and email addresses. Here is a more complete list of the key features and benefits that Hover provides with their products:

Domains:

  • Free Whois privacy protection on all eligible domains
  • Tiered pricing on bulk domain name purchases
  • Over 300+ domain name extensions (called Top-Level Domains/TLDs)
  • Monthly sales and promotions on select TLDs
  • Intuitive UX/UI for managing your domain names and DNS

Mailboxes:

  • Mail forwarding option for those who want to use their usual email account
  • Inexpensive plans for mailboxes of many storage options and services
  • Recently updated webmail interface
  • Easily pairs with your Hover domain name

Hover is a domain name registrar based out of Toronto, Canada since 2008. They are the retail brand of the second largest domain registrar in the world, Tucows. Hover has built a company on the belief that buying a domain name should be a quick, intuitive, and honest process – a simple step in getting your website live. Hover believes your privacy is a right, not an upsell, and that you should be able to grab your domain name without a bunch of add-ons clogging your cart. Get your domain name and go. Make a name for yourself with Hover.

Designers: get your .design domain with Hover!

Hover want you to focus on what matters the most to you: getting your brand online fast. To make this process quick and easy, they have build an intuitive UI to manage your domains in a simple and efficient way. If you are using a website builder, you will also love their Connect feature, which lets you connect your domain name very easily with countless website building services.

As designers, you will certainly be interested in .DESIGN domains, as they are a clear indicator that you are in the design business. It is perfect for the freelance designer, whether it’s in UX, fashion, architecture, interior design, or graphic design, but also for the larger design studios or agencies.

For bigger brands, getting a .DESIGN domain is a nice addition to explain a rebranding or to share a design system. So… what are you waiting for? Get your own .DESIGN domain now!

Thanks for being a subscriber, here is your FREE house vector icons set.

Hover: Great Domain Names for your Ideas

Post pobrano z: Hover: Great Domain Names for your Ideas

Whether you are in marketing, branding, web design, or graphic design, you already know how important it is to pick a good domain name for your projects. If you have tried a few domain name sellers, you already know how important it is to work with the right reseller.

There are also good chances that you have already heard about less traditional domain names, such as .club, .gallery, or .florist. As a designer, these examples will probably not be the most appealing, the .design domain names are more likely what you are looking for.

Get over 300 Top Level Domains at Hover

Talking of a reliable TLD domains provider, Hover is one of the greatest companies to work with. Whether you are an individual starting a side project or a business in need of its brand as a domain name, you cannot go wrong with Hover.

On top of the domain services, Hover also offers cheap mailbox plans. This is very useful, as domains are often purchased for both websites and email addresses. Here is a more complete list of the key features and benefits that Hover provides with their products:

Domains:

  • Free Whois privacy protection on all eligible domains
  • Tiered pricing on bulk domain name purchases
  • Over 300+ domain name extensions (called Top-Level Domains/TLDs)
  • Monthly sales and promotions on select TLDs
  • Intuitive UX/UI for managing your domain names and DNS

Mailboxes:

  • Mail forwarding option for those who want to use their usual email account
  • Inexpensive plans for mailboxes of many storage options and services
  • Recently updated webmail interface
  • Easily pairs with your Hover domain name

Hover is a domain name registrar based out of Toronto, Canada since 2008. They are the retail brand of the second largest domain registrar in the world, Tucows. Hover has built a company on the belief that buying a domain name should be a quick, intuitive, and honest process – a simple step in getting your website live. Hover believes your privacy is a right, not an upsell, and that you should be able to grab your domain name without a bunch of add-ons clogging your cart. Get your domain name and go. Make a name for yourself with Hover.

Designers: get your .design domain with Hover!

Hover want you to focus on what matters the most to you: getting your brand online fast. To make this process quick and easy, they have build an intuitive UI to manage your domains in a simple and efficient way. If you are using a website builder, you will also love their Connect feature, which lets you connect your domain name very easily with countless website building services.

As designers, you will certainly be interested in .DESIGN domains, as they are a clear indicator that you are in the design business. It is perfect for the freelance designer, whether it’s in UX, fashion, architecture, interior design, or graphic design, but also for the larger design studios or agencies.

For bigger brands, getting a .DESIGN domain is a nice addition to explain a rebranding or to share a design system. So… what are you waiting for? Get your own .DESIGN domain now!

Thanks for being a subscriber, here is your FREE house vector icons set.

Two-Value Display Syntax (and Sometimes Three)

Post pobrano z: Two-Value Display Syntax (and Sometimes Three)

You know the single-value syntax: .thing { display: block; }. The value „block” being a single value. There are lots of single values for display. For example, inline-flex, which is like flex in that it becomse a flex container, but behaves like an inline-level element rather than a block-level element. Somewhat intuitive, but much better served by a two-value system that can apply that same concept more broadly and just as intuitively.

For a deep look, you should read Rachel Andrew’s blog post The two-value syntax of the CSS Display property. The spec is also a decent read, as is this video from Miriam:

This is how it maps in my brain

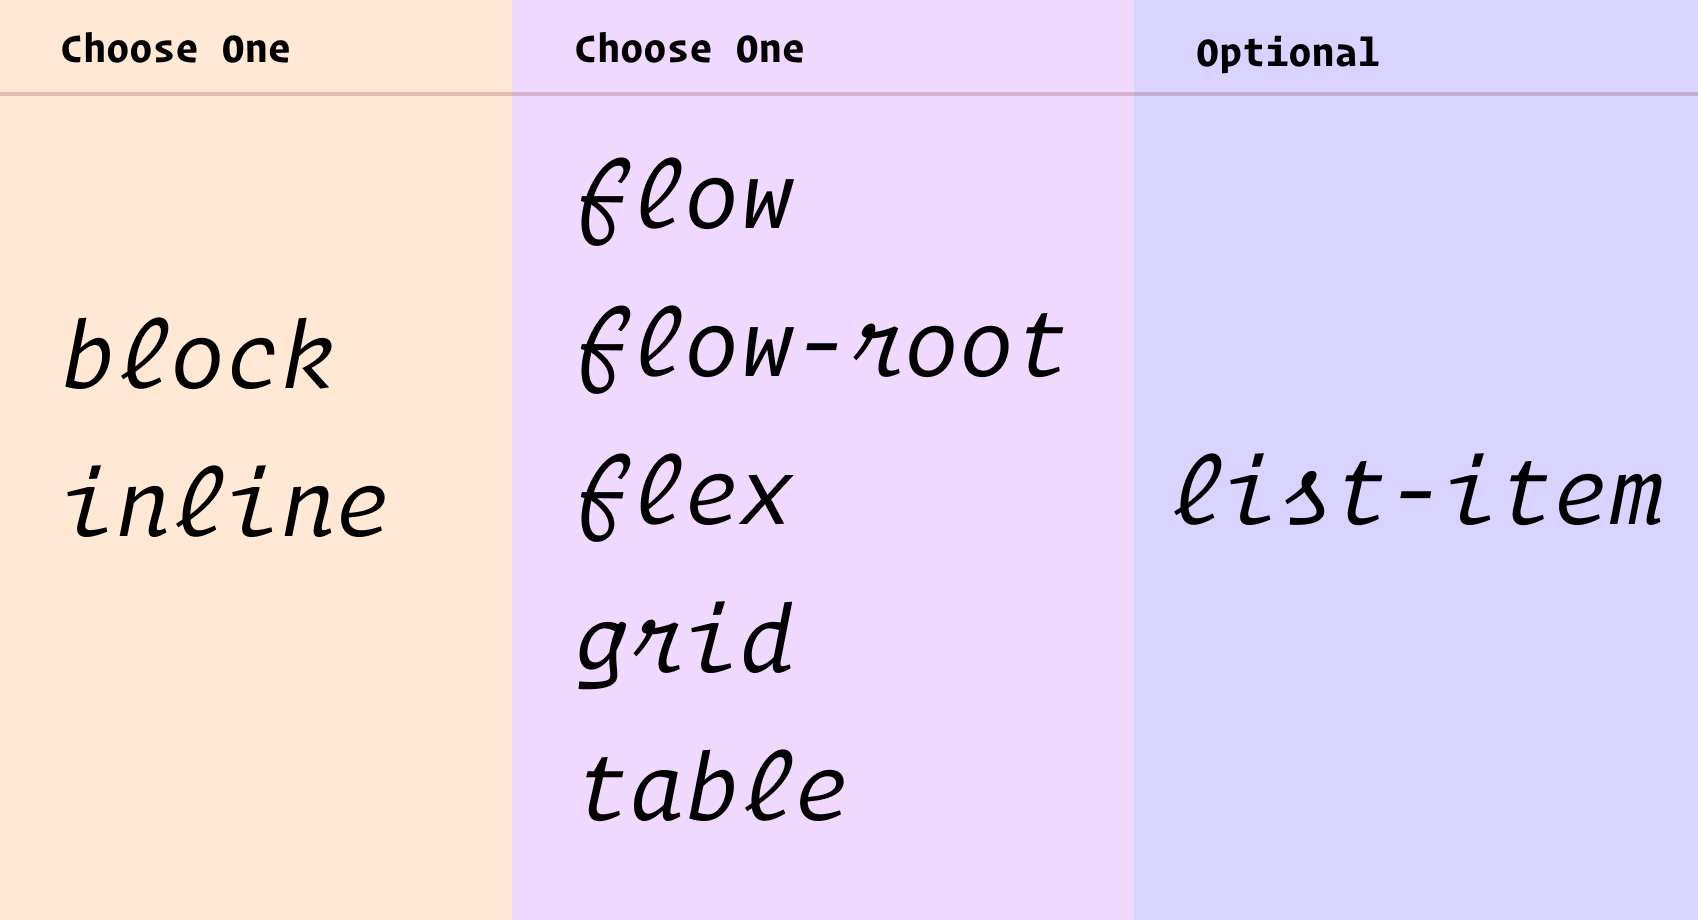
Choose block or inline, then choose flow, flow-root, flex, grid, or table. If it’s a list-item that’s a third thing.

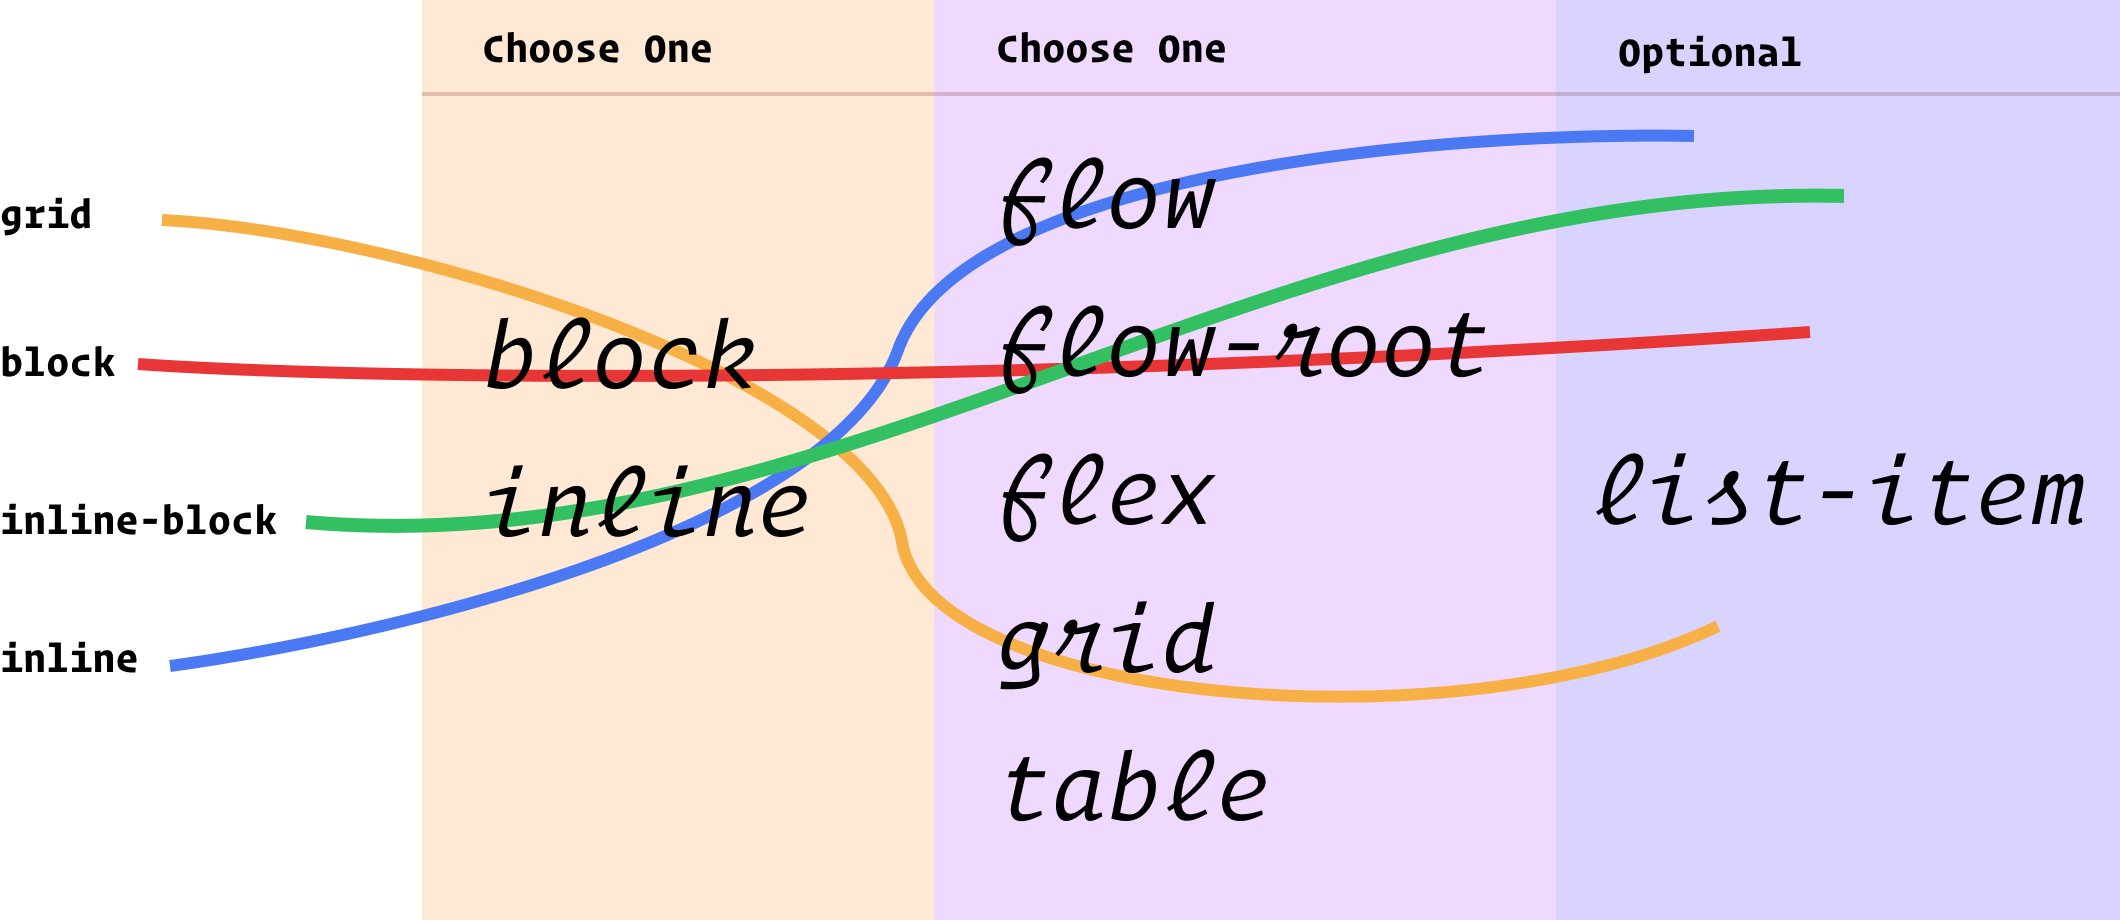
You essentially pick one from each column to describe the layout you want. So the existing values we use all the time map out something like this:

Another way to think about those two columns I have there is „outside” and „inside” display values. Outside, as in, how it flows with other elements around it. Inside, as in, how layout happens inside those elements.

Can you actually use it?

Not really. Firefox 70 is first out of the gate with it, and there are no other signals for support from Chrome-land or Safari-land that I know about. It’s a great evolution of CSS, but as far as day-to-day usage, it’ll be years out. Something as vital as layout isn’t something you wanna let fail just for this somewhat minor descriptive benefit. Nor is it probably worth the trouble to progressively enhance with @supports and such.

Weirdnesses

  • You can’t block flow because that doesn’t really make sense. It’ll be reset to block flow-root.
  • There is implied shorthand. Like if you inline list-item, that’s really inline flow list-item whereas list-item is block flow list-item. Looks all fairly intuitive.
  • You still use stuff like table-row and table-header-group. Those are single-value deals, as is contents and none.
  • Column one technically includes run-in too, but as far as I know, no browser has ever supported run-in display.
  • Column two technically includes ruby, but I have never understood what that even is.

How we talk about CSS

I like how Rachel ties this change to a more rational mental and teaching model:

… They properly explain the interaction of boxes with other boxes, in terms of whether they are block or inline, plus the behavior of the children. For understanding what display is and does, I think they make for a very useful clarification. As a result, I’ve started to teach display using these two values to help explain what is going on when you change formatting contexts.

It is always exciting to see new features being implemented, I hope that other browsers will also implement these two-value versions soon. And then, in the not too distant future we’ll be able to write CSS in the same way as we now explain it, clearly demonstrating the relationship between boxes and the behavior of their children.

The post Two-Value Display Syntax (and Sometimes Three) appeared first on CSS-Tricks.

Diana Smith’s Pure CSS Artwork “Lace”

Post pobrano z: Diana Smith’s Pure CSS Artwork “Lace”

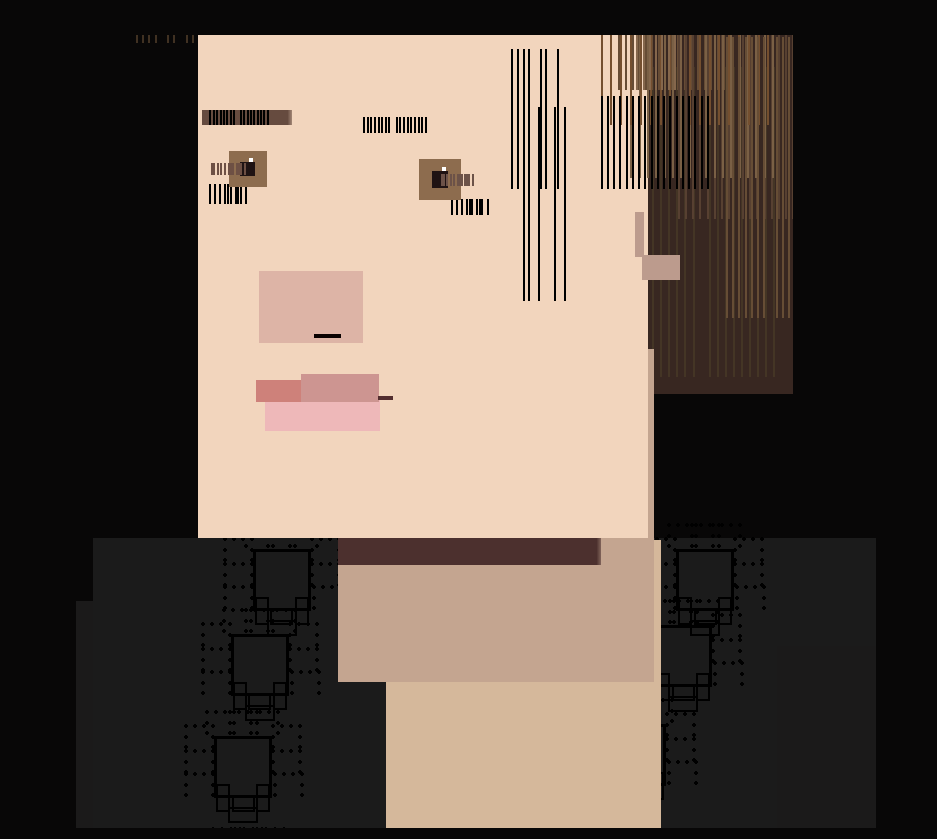
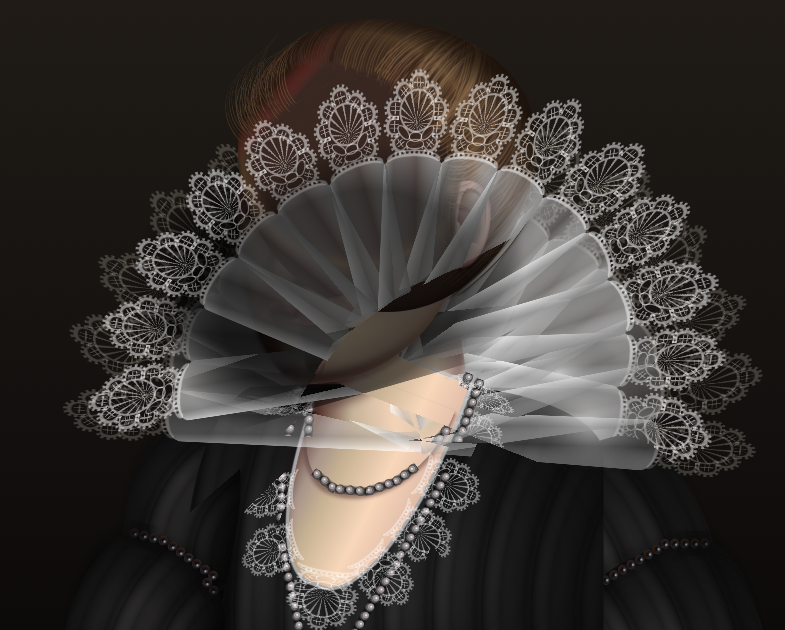
Diana is at it again with her absolutely unbelievable CSS paintings. This latest one is called Lace. Past paintings are Francine, Vignes, and Zigario.

She wrote for us last year if you’d like a little insight into her thinking.

Andy Baio looked at the painting in a variety of older and incompatible browsers, and the results are hilarious and amazing.

IE 8
Safari 13

Direct Link to ArticlePermalink

The post Diana Smith’s Pure CSS Artwork “Lace” appeared first on CSS-Tricks.

Working with Fusebox and React

Post pobrano z: Working with Fusebox and React

If you are searching for an alternative bundler to webpack, you might want to take a look at FuseBox. It builds on what webpack offers — code-splitting, hot module reloading, dynamic imports, etc. — but code-splitting in FuseBox requires zero configuration by default (although webpack will offer the same as of version 4.0).

Instead, FuseBox is built for simplicity (in the form of less complicated configuration) and performance (by including aggressive caching methods). Plus, it can be extended to use tons of plugins that can handle anything you need above and beyond the defaults.

Oh yeah, and if you are a fan of TypeScript, you might be interested in knowing that FuseBox makes it a first-class citizen. That means you can write an application in Typescript — with no configuration! — and it will use the Typescript transpiler to compile scripts by default. Don’t plan on using Typescript? No worries, the transpiler will handle any JavaScript. Yet another bonus!

To illustrate just how fast it is to to get up and running, let’s build the bones of a sample application that’s usually scaffolded with create-react-app. Everything we’re doing will be on GitHub if you want to follow along.

FuseBox is not the only alternative to webpack, of course. There are plenty and, in fact, Maks Akymenko has a great write-up on Parcel which is another great alternative worth looking into.

The basic setup

Start by creating a new project directory and initializing it with npm:

## Create the directory
mkdir csstricks-fusebox-react && $_
## Initialize with npm default options
npm init -y

Now we can install some dependencies. We’re going to build the app in React, so we’ll need that as well as react-dom.

npm install --save react react-dom

Next, we’ll install FuseBox and Typescript as dependencies. We’ll toss Uglify in there as well for help minifying our scripts and add support for writing styles in Sass.

npm install --save-dev fuse-box typescript uglify-js node-sass

Alright, now let’s create a src folder in the root of the project directory (which can be done manually). Add the following files (`app.js and index.js) in there, including the contents:

// App.js

import * as React from "react";
import * as logo from "./logo.svg";

const App = () => {
  return (
    <div className="App">
      <header className="App-header">
        <img src={logo} className="App-logo" alt="logo" />
        <h1 className="App-title">Welcome to React</h1>
      </header>
      <p className="App-intro">
        To get started, edit `src/App.js` and save to reload.
      </p>
    </div>
  )
};

export default App;

You may have noticed that we’re importing an SVG file. You can download it directly from the GitHub repo.

// index.js

import * as React from "react";
import * as ReactDOM from "react-dom";
import App from "./App"

ReactDOM.render(
  <App />, document.getElementById('root')
);

You can see that the way we handle importing files is a little different than a typical React app. That’s because FuseBox does not polyfill imports by default.

So, instead of doing this:

import React from "react";

…we’re doing this:

import * as React from "react";
<!-- ./src/index.html -->

<!DOCTYPE html>
<html lang="en">
  <head>
    <title>CSSTricks Fusebox React</title>
    $css
  </head>

  <body>
    <noscript>
      You need to enable JavaScript to run this app.
    </noscript>
    <div id="root"></div>
    $bundles
  </body>
</html>

Styling isn’t really the point of this post, but let’s drop some in there to dress things up a bit. We’ll have two stylesheets. The first is for the App component and saved as App.css.

/* App.css */

.App {
  text-align: center;
}

.App-logo {
  animation: App-logo-spin infinite 20s linear;
  height: 80px;
}

.App-header {
  background-color: #222;
  height: 150px;
  padding: 20px;
  color: white;
}

.App-intro {
  font-size: large;
}

@keyframes App-logo-spin {
  from {
    transform: rotate(0deg);
  }
  to {
    transform:
        rotate(360deg);
  }
}

The second stylesheet is for index.js and should be saved as index.css:

/* index.css */
body {
  margin: 0;
  padding: 0;
  font-family: sans-serif;
}

OK, we’re all done with the initial housekeeping. On to extending FuseBox with some goodies!

Plugins and configuration

We said earlier that configuring FuseBox is designed to be way less complex than the likes of webpack — and that’s true! Create a file called fuse.js in the root directory of the application.

We start with importing the plugins we’ll be making use of, all the plugins come from the FuseBox package we installed.

const { FuseBox, CSSPlugin, SVGPlugin, WebIndexPlugin } = require("fuse-box");

Next, we’ll initialize a FuseBox instance and tell it what we’re using as the home directory and where to put compiled assets:

const fuse = FuseBox.init({
  homeDir: "src",
  output: "dist/$name.js"
});

We’ll let FuseBox know that we intend to use the TypeScript compiler:

const fuse = FuseBox.init({
  homeDir: "src",
  output: "dist/$name.js",
  useTypescriptCompiler: true,
});

We identified plugins in the first line of the configuration file, but now we’ve got to call them. We’re using the plugins pretty much as-is, but definitely check out what the CSSPlugin, SVGPlugin and WebIndexPlugin have to offer if you want more fine-grained control over the options.

const fuse = FuseBox.init({
  homeDir: "src",
  output: "dist/$name.js",
  useTypescriptCompiler: true,
  plugins: [ // HIGHLIGHT
    CSSPlugin(),
    SVGPlugin(),
    WebIndexPlugin({
      template: "src/index.html"
    })
  ]
});

const { FuseBox, CSSPlugin, SVGPlugin, WebIndexPlugin } = require("fuse-box");

const fuse = FuseBox.init({
  homeDir: "src",
  output: "dist/$name.js",
  useTypescriptCompiler: true,
  plugins: [
    CSSPlugin(),
    SVGPlugin(),
    WebIndexPlugin({
      template: "src/index.html"
    })
  ]
});
fuse.dev();
fuse
  .bundle("app")
  .instructions(`>index.js`)
  .hmr()
  .watch()

fuse.run();

FuseBox lets us configure a development server. We can define ports, SSL certificates, and even open the application in a browser on build.

We’ll simply use the default environment for this example:

fuse.dev();

It is important to define the development environment *before* the bundle instructions that come next:

fuse
  .bundle("app")
  .instructions(`>index.js`)
  .hmr()
  .watch().

What the heck is this? When we initialized the FuseBox instance, we specified an output using dist/$name.js. The value for $name is provided by the bundle() method. In our case, we set the value as app. That means that when the application is bundled, the output destination will be dist/app.js.

The instructions() method defines how FuseBox should deal with the code. In our case, we’re telling it to start with index.js and to execute it after it’s loaded.

The hmr() method is used for cases where we want to update the user when a file changes, this usually involves updating the browser when a file changes. Meanwhile, watch() re-bundles the bundled code after every saved change.

With that, we’ll cap it off by launching the build process with fuse.run() at the end of the configuration file. Here’s everything we just covered put together:

const { FuseBox, CSSPlugin, SVGPlugin, WebIndexPlugin } = require("fuse-box");

const fuse = FuseBox.init({
  homeDir: "src",
  output: "dist/$name.js",
  useTypescriptCompiler: true,
  plugins: [
    CSSPlugin(),
    SVGPlugin(),
    WebIndexPlugin({
      template: "src/index.html"
    })
  ]
});
fuse.dev();
fuse
  .bundle("app")
  .instructions(`>index.js`)
  .hmr()
  .watch()

fuse.run();

Now we can run the application from the terminal by running node fuse. This will start the build process which creates the dist folder that contains the bundled code and the template we specified in the configuration. After the build process is done, we can point the browser to http://localhost:4444/ to see our app.

Running tasks with Sparky

FuseBox includes a task runner that can be used to automate a build process. It’s called Sparky and you can think of it as sorta like Grunt and Gulp, the difference being that it is built on top of FuseBox with built-in access to FuseBox plugins and the FuseBox API.

We don’t have to use it, but task runners make development a lot easier by automating things we’d otherwise have to do manually and it makes sense to use what’s specifically designed for FuseBox.

To use it, we’ll update the configuration we have in fuse.js, starting with some imports that go at the top of the file:

const { src, task, context } = require("fuse-box/sparky");

Next, we’ll define a context, which will look similar to what we already have. We’re basically wrapping what we did in a context and setConfig(), then initializing FuseBox in the return:

context({
  setConfig() {
    return FuseBox.init({
      homeDir: "src",
      output: "dist/$name.js",
      useTypescriptCompiler: true,
      plugins: [
        CSSPlugin(),
        SVGPlugin(),
        WebIndexPlugin({
          template: "src/index.html"
        })
      ]
    });
  },
  createBundle(fuse) {
    return fuse
      .bundle("app")
      .instructions(`> index.js`)
      .hmr();
  }
});

It’s possible to pass a class, function or plain object to a context. In the above scenario, we’re passing functions, specifically setConfig() and createBundle(). setConfig() initializes FuseBox and sets up the plugins. createBundle() does what you might expect by the name, which is bundling the code. Again, the difference from what we did before is that we’re embedding both functionalities into different functions which are contained in the context object.

We want our task runner to run tasks, right? Here are a few examples we can define:

task("clean", () => src("dist").clean("dist").exec());
task("default", ["clean"], async (context) => {
  const fuse = context.setConfig();
  fuse.dev();
  context.createBundle(fuse);
  await fuse.run()
});

The first task will be responsible for cleaning the dist directory. The first argument is the name of the task, while the second is the function that gets called when the task runs.
To call the first task, we can do node fuse clean from the terminal.

When a task is named default (which is the first argument as in the second task), that task will be the one that gets called by default when running node fuse — in this case, that’s the second task in our configuration. Other tasks need to be will need to be called explicitly in terminal, like node fuse <task_name>.

So, our second task is the default and three arguments are passed into it. The first is the name of the task (`default`), the second (["clean"]) is an array of dependencies that should be called before the task itself is executed, and the third is a function (fuse.dev()) that gets the initialized FuseBox instance and begins the bundling and build process.

Now we can run things with node fuse in the terminal. You have the option to add these to your package.json file if that’s more comfortable and familiar to you. The script section would look like this:

"scripts": {
  "start": "node fuse",
  "clean": "node fuse clean"
},

That’s a wrap!

All in all, FuseBox is an interesting alternative to webpack for all your application bundling needs. As we saw, it offers the same sort of power that we all tend to like about webpack, but with a way less complicated configuration process that makes it much easier to get up and running, thanks to built-in Typescript support, performance considerations, and a task runner that’s designed to take advantage of the FuseBox API.

What we look at was a pretty simple example. In practice, you’re likely going to be working with more complex applications, but the concepts and principles are the same. It’s nice to know that FuseBox is capable of handling more than what’s baked into it, but that the initial setup is still super streamlined.

If you’re looking for more information about FuseBox, it’s site and documentation are obviously great starting point. the following links are also super helpful to get more perspective on how others are setting it up and using it on projects.

The post Working with Fusebox and React appeared first on CSS-Tricks.

How to Create a Dripping Paint Photoshop Effect Action

Post pobrano z: How to Create a Dripping Paint Photoshop Effect Action

Final product image
What You’ll Be Creating

In this tutorial you will learn how to create an amazing, artistic paint drip effect Photoshop action. I will try to explain everything in so much detail that everyone can create it, even those who have just opened Photoshop for the first time.

The effect shown above is the one I will show you how to create in this tutorial. If you would like to create the even more
advanced effect shown below, a sketch with a dripping paint and 3D pop-out effect, using just a single click, then check out my Wet Paint Photoshop Action.

Wet Paint Photoshop Action

Follow along with us over on our Envato Tuts+ YouTube channel:

What You’ll Need

To recreate the design above, you will need the following photo:

1. Let’s Get Started

Step 1

First, open the photo that you want to work with. To open your photo, go to File > Open, choose your photo, and click Open. Now, before we get started, just check a couple of things:

  1. Your photo should be in RGB Color mode, 8 Bits/Channel. To check this, go to Image > Mode.
  2. For best results, your photo size should be 1500–4000 px wide/high. To check this, go to Image > Image Size.
  3. Your photo should be the Background layer. If it is not, go to Layer > New > Background from Layer.
Checking the image size and mode

Step 2

If you are using a different stock photo from mine, you should firstly follow the Unfinished Coloured Pencil Sketch Effect
tutorial to get a sketch effect that is the base for this effect. Then I
suggest that you merge all sketch layers into one layer named Sketch Effect so that it’s easier for you to follow this tutorial. 

If you are using the same stock photo as I do, go to File > Place Embedded, select the Sketch Effect file attached, click Place, and place it so it fits the canvas as shown below:

Placing Sketch Effect

2. How to Create Brushes

Step 1

In this section, we are going to create brushes that we will need for this effect. Go to File > New to create a new file, name it Dripping Brushes, and use the settings below:

Creating a new file

Step 2

Go to Layer > New > Layer to create a new layer and name it Brush_1. Then, while this layer is selected, choose the Pen Tool (P), select the Shape tool mode, set the Fill color to #000000, and draw a dripping shape. If you prefer some other tools for drawing, feel free to use them.

Drawing dripping shape

Step 3

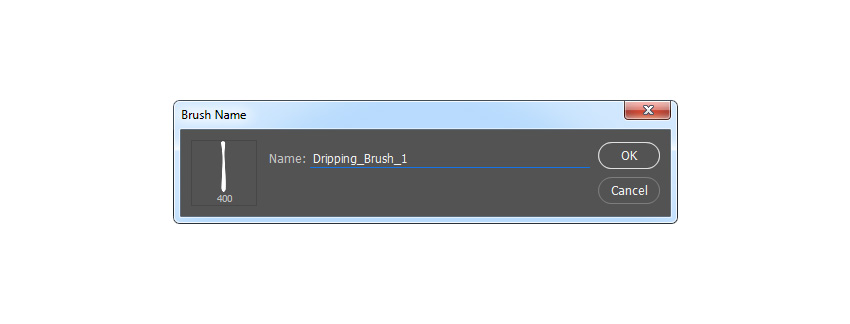
Now go to Edit > Define Brush Preset to define this shape as a brush and name it Dripping_Brush_1.

Defining dripping brush

Step 4

Go to Layer > New > Layer to create a new layer and name it Brush_2. Then, while this layer is selected, draw another dripping shape in the same way and hide the Brush 1 layer.

Drawing dripping shape

Step 5

Now go to Edit > Define Brush Preset to define this shape as a brush and name it Dripping_Brush_2.

Defining dripping brush

Step 6

Go to Layer > New > Layer to create a new layer and name it Brush_3. Then, while this layer is selected, draw another dripping shape in the same way and hide the Brush 2 layer.

Drawing dripping shape

Step 7

Now go to Edit > Define Brush Preset to define this shape as a brush and name it Dripping_Brush_3.

Defining dripping brush

Step 8

Go to Layer > New > Layer to create a new layer and name it Brush_4. Then, while this layer is selected, draw a drop shape in the same way and hide the Brush 3 layer.

Drawing dripping shape

Step 9

Now go to Edit > Define Brush Preset to define this shape as a brush and name it Dripping_Brush_4.

Defining dripping brush

Step 10

Go to Layer > New > Layer to create a new layer and name it Brush_5. Then, while this layer is selected, draw a drop shape in the same way and hide the Brush 4 layer.

Drawing dripping shape

Step 11

Now go to Edit > Define Brush Preset to define this shape as a brush and name it Dripping_Brush_5. After that, you can close the Dripping Brushes file window.

Defining dripping brush

3. How to Create a Painting Effect

Step 1

In this section, we are going to create a painting effect from a specific area of the photo. Go to Layer > New > Layer to create a new layer and name it Painting.

Creating a new layer

Step 2

Now hide the Sketch Effect layer, and while the Painting layer is selected, choose the Brush Tool (B), pick a soft brush, and brush over the areas that you want to turn into a painting.

Brushing over photo

Step 3

Control-click on this layer thumbnail to make a selection of this layer. Then hide this layer, select the Background layer, and press Control-J on your keyboard to create a new layer using a selection. Show the Sketch Effect layer and drag this new layer just above it in the Layers panel.

Creating a new layer using selection

Step 4

Now name this layer Subject, go to Image > Adjustments > Shadows/Highlights, and set the Shadows to 20% and the Highlights to 5% as shown below:

Adjusting shadows and highlights

Step 5

Press Control-J on your keyboard to duplicate this layer, go to Filter > Sharpen > Sharpen, and then go to Filter > Other > High Pass and set the Radius to 2 px as shown below:

Adding high pass filter

Step 6

Go to Filter > Sharpen > Sharpen again and then press Control-Shift-U on your keyboard to desaturate this layer. After that, change this layer blending mode to Soft Light, Control-click on the Subject layer to select both layers at the same time, and press Control-E on your keyboard to merge these two layers into one layer.

Sharpening desaturating and merging-layers

Step 7

Now go to Filter > Sharpen > Unsharp Mask and set the Amount to 100%, Radius to 2.5 px and Threshold to 1 level as shown below:

Adding unsharp mask filter

Step 8

Go to Filter > Stylize > Diffuse and choose Anisotropic Mode as shown below. Then go to Edit > Transform > Rotate 90° clockwise to rotate this layer 90° clockwise.

Adding diffuse filter

Step 9

Now repeat the previous filter again, so go to Filter > Stylize > Diffuse and choose Anisotropic Mode. Then go to Edit > Transform > Rotate 90° clockwise to rotate this layer 90° clockwise once more. After that, go to Filter > Stylize > Diffuse and choose Anisotropic Mode for a last time, and go to Edit > Transform > Rotate 180° to rotate this layer 180° and return it to the original position.

Adding diffuse filter

Step 10

Name this layer Subject, and then go to Filter > Noise > Reduce Noise and use the settings below:

Adding reduce noise filter

Step 11

Now we are going to add a contrast to the Subject layer. Press D on your keyboard to reset the swatches, and then go to Layer > New Adjustment Layer > Gradient Map to create a new gradient map adjustment layer and name it Subject_Contrast.

Creating a gradient map adjustment layer

Step 12

Press Control-Alt-G on your keyboard to create a clipping mask, and then change this layer blending mode to Soft Light and set the Opacity to 35%.

Changing blending mode and opacity

Step 13

Go to Layer > New Adjustment Layer > Hue/Saturation to create a new hue/saturation adjustment layer and name it Subject_Saturation.

Creating huesaturation adjustment layer

Step 14

Press Control-Alt-G on your keyboard to create a clipping mask, and then Double-click on this layer thumbnail, and in the Properties panel enter the settings below:

Adjusting saturation

Step 15

Now go to Layer > New Adjustment Layer > Levels to create a new levels adjustment layer and name it Overall Brightness.

Creating levels adjustment layer

Step 16

Press Control-Alt-G on your keyboard to create a clipping mask, and then Double-click on this layer thumbnail, and in the Properties panel enter the settings below:

Adjusting brightness

Step 17

Now select the Subject layer, and then hold the Alt button on your keyboard and drag this layer just above the Subject_Brightness layer to duplicate this layer and place it on top of the visible layers in the Layers panel. Then go to Filter > Other > High Pass and set the Radius to 5 px as shown below:

Adding high pass filter

Step 18

Press Control-Alt-G on your keyboard to create a clipping mask and then press Control-Shift-U to desaturate this layer. After that, change this layer blending mode to Hard Light and name it Subject_Sharpening.

Creating clipping mask and changing blending mode

4. How to Create the Paint Drops

Step 1

In this section, we are going to create the paint drops using the brushes that we made in the beginning of the tutorial. Go to Layer > New > Layer to create a new layer and name it Paint Drops.

Creating a new layer

Step 2

Now you need to decide where you are going to place the first dripping brush. After that,
using the Eyedropper Tool (I), click on the area of your subject where the drop will start to drip from to set that color as your foreground color, choose the Brush Tool (B), pick some of the dripping brushes, and position them where you want.

Creating paint drop

Step 3

Repeat
the same process to create more paint drops. Keep changing the brushes and brush size to get a diverse effect. Here is my
result:

Creating more paint drops

Step 4

Now go to Layer > Layer Mask > Reveal All to create a blank layer mask. Then press D on your keyboard to reset the swatches and then X to invert them. After that, choose the Brush Tool (B), pick a soft brush, and brush over the top area of paint drops where needed to make them better blend with the subject.

Brushing into layer mask

5. How to Create a Vignette

Step 1

In this section, we are going to create a vignette effect. Go to Layer > New > Layer to create a new layer and name it Vignette.

Creating a new layer

Step 2

Press D on your keyboard to reset the swatches, go to Edit > Fill, and set Contents to Foreground Color, Mode to Normal and Opacity to 100% as shown below:

Filling layer with foreground color

Step 3

Now press Control-A on your keyboard to make a selection of the canvas and go to Layer > Layer Mask > Hide Selection to create a layer mask that hides the selected area of the layer. Then click on the link icon between the layer mask and layer thumbnail to unlink them.

Adding layer mask

Step 4

While the layer mask is selected, press Control-T on your keyboard to transform it, and set Width and Height to 85% as shown below:

Transforming layer mask

Step 5

Now go to Filter > Blur > Gaussian Blur and set Radius to 100 px as shown below:

Adding gaussian blur filter

Step 6

Set the Opacity of this layer to 20%.

Changing opacity of the layer

6. How to Create a Color Look

Step 1

In this section, we are going create a color look. Go to Layer > New Adjustment Layer > Curves to create a new curves adjustment layer and name it Color Look.

Creating curves adjustment layer

Step 2

Now Double-click on this layer thumbnail, and in the Properties panel make the settings below:

Adjusting color look

You Made It!

Congratulations, you have succeeded! Here is our final result:

Final Result

If you would like to create the even more advanced effect as shown below, a sketch with a
dripping paint and 3D pop-out effect, using just a single click, then
check out my Wet Paint Photoshop Action.

Action final result

How to Create a Dripping Paint Photoshop Effect Action

Post pobrano z: How to Create a Dripping Paint Photoshop Effect Action

Final product image
What You’ll Be Creating

In this tutorial you will learn how to create an amazing, artistic paint drip effect Photoshop action. I will try to explain everything in so much detail that everyone can create it, even those who have just opened Photoshop for the first time.

The effect shown above is the one I will show you how to create in this tutorial. If you would like to create the even more
advanced effect shown below, a sketch with a dripping paint and 3D pop-out effect, using just a single click, then check out my Wet Paint Photoshop Action.

Wet Paint Photoshop Action

Follow along with us over on our Envato Tuts+ YouTube channel:

What You’ll Need

To recreate the design above, you will need the following photo:

1. Let’s Get Started

Step 1

First, open the photo that you want to work with. To open your photo, go to File > Open, choose your photo, and click Open. Now, before we get started, just check a couple of things:

  1. Your photo should be in RGB Color mode, 8 Bits/Channel. To check this, go to Image > Mode.
  2. For best results, your photo size should be 1500–4000 px wide/high. To check this, go to Image > Image Size.
  3. Your photo should be the Background layer. If it is not, go to Layer > New > Background from Layer.
Checking the image size and mode

Step 2

If you are using a different stock photo from mine, you should firstly follow the Unfinished Coloured Pencil Sketch Effect
tutorial to get a sketch effect that is the base for this effect. Then I
suggest that you merge all sketch layers into one layer named Sketch Effect so that it’s easier for you to follow this tutorial. 

If you are using the same stock photo as I do, go to File > Place Embedded, select the Sketch Effect file attached, click Place, and place it so it fits the canvas as shown below:

Placing Sketch Effect

2. How to Create Brushes

Step 1

In this section, we are going to create brushes that we will need for this effect. Go to File > New to create a new file, name it Dripping Brushes, and use the settings below:

Creating a new file

Step 2

Go to Layer > New > Layer to create a new layer and name it Brush_1. Then, while this layer is selected, choose the Pen Tool (P), select the Shape tool mode, set the Fill color to #000000, and draw a dripping shape. If you prefer some other tools for drawing, feel free to use them.

Drawing dripping shape

Step 3

Now go to Edit > Define Brush Preset to define this shape as a brush and name it Dripping_Brush_1.

Defining dripping brush

Step 4

Go to Layer > New > Layer to create a new layer and name it Brush_2. Then, while this layer is selected, draw another dripping shape in the same way and hide the Brush 1 layer.

Drawing dripping shape

Step 5

Now go to Edit > Define Brush Preset to define this shape as a brush and name it Dripping_Brush_2.

Defining dripping brush

Step 6

Go to Layer > New > Layer to create a new layer and name it Brush_3. Then, while this layer is selected, draw another dripping shape in the same way and hide the Brush 2 layer.

Drawing dripping shape

Step 7

Now go to Edit > Define Brush Preset to define this shape as a brush and name it Dripping_Brush_3.

Defining dripping brush

Step 8

Go to Layer > New > Layer to create a new layer and name it Brush_4. Then, while this layer is selected, draw a drop shape in the same way and hide the Brush 3 layer.

Drawing dripping shape

Step 9

Now go to Edit > Define Brush Preset to define this shape as a brush and name it Dripping_Brush_4.

Defining dripping brush

Step 10

Go to Layer > New > Layer to create a new layer and name it Brush_5. Then, while this layer is selected, draw a drop shape in the same way and hide the Brush 4 layer.

Drawing dripping shape

Step 11

Now go to Edit > Define Brush Preset to define this shape as a brush and name it Dripping_Brush_5. After that, you can close the Dripping Brushes file window.

Defining dripping brush

3. How to Create a Painting Effect

Step 1

In this section, we are going to create a painting effect from a specific area of the photo. Go to Layer > New > Layer to create a new layer and name it Painting.

Creating a new layer

Step 2

Now hide the Sketch Effect layer, and while the Painting layer is selected, choose the Brush Tool (B), pick a soft brush, and brush over the areas that you want to turn into a painting.

Brushing over photo

Step 3

Control-click on this layer thumbnail to make a selection of this layer. Then hide this layer, select the Background layer, and press Control-J on your keyboard to create a new layer using a selection. Show the Sketch Effect layer and drag this new layer just above it in the Layers panel.

Creating a new layer using selection

Step 4

Now name this layer Subject, go to Image > Adjustments > Shadows/Highlights, and set the Shadows to 20% and the Highlights to 5% as shown below:

Adjusting shadows and highlights

Step 5

Press Control-J on your keyboard to duplicate this layer, go to Filter > Sharpen > Sharpen, and then go to Filter > Other > High Pass and set the Radius to 2 px as shown below:

Adding high pass filter

Step 6

Go to Filter > Sharpen > Sharpen again and then press Control-Shift-U on your keyboard to desaturate this layer. After that, change this layer blending mode to Soft Light, Control-click on the Subject layer to select both layers at the same time, and press Control-E on your keyboard to merge these two layers into one layer.

Sharpening desaturating and merging-layers

Step 7

Now go to Filter > Sharpen > Unsharp Mask and set the Amount to 100%, Radius to 2.5 px and Threshold to 1 level as shown below:

Adding unsharp mask filter

Step 8

Go to Filter > Stylize > Diffuse and choose Anisotropic Mode as shown below. Then go to Edit > Transform > Rotate 90° clockwise to rotate this layer 90° clockwise.

Adding diffuse filter

Step 9

Now repeat the previous filter again, so go to Filter > Stylize > Diffuse and choose Anisotropic Mode. Then go to Edit > Transform > Rotate 90° clockwise to rotate this layer 90° clockwise once more. After that, go to Filter > Stylize > Diffuse and choose Anisotropic Mode for a last time, and go to Edit > Transform > Rotate 180° to rotate this layer 180° and return it to the original position.

Adding diffuse filter

Step 10

Name this layer Subject, and then go to Filter > Noise > Reduce Noise and use the settings below:

Adding reduce noise filter

Step 11

Now we are going to add a contrast to the Subject layer. Press D on your keyboard to reset the swatches, and then go to Layer > New Adjustment Layer > Gradient Map to create a new gradient map adjustment layer and name it Subject_Contrast.

Creating a gradient map adjustment layer

Step 12

Press Control-Alt-G on your keyboard to create a clipping mask, and then change this layer blending mode to Soft Light and set the Opacity to 35%.

Changing blending mode and opacity

Step 13

Go to Layer > New Adjustment Layer > Hue/Saturation to create a new hue/saturation adjustment layer and name it Subject_Saturation.

Creating huesaturation adjustment layer

Step 14

Press Control-Alt-G on your keyboard to create a clipping mask, and then Double-click on this layer thumbnail, and in the Properties panel enter the settings below:

Adjusting saturation

Step 15

Now go to Layer > New Adjustment Layer > Levels to create a new levels adjustment layer and name it Overall Brightness.

Creating levels adjustment layer

Step 16

Press Control-Alt-G on your keyboard to create a clipping mask, and then Double-click on this layer thumbnail, and in the Properties panel enter the settings below:

Adjusting brightness

Step 17

Now select the Subject layer, and then hold the Alt button on your keyboard and drag this layer just above the Subject_Brightness layer to duplicate this layer and place it on top of the visible layers in the Layers panel. Then go to Filter > Other > High Pass and set the Radius to 5 px as shown below:

Adding high pass filter

Step 18

Press Control-Alt-G on your keyboard to create a clipping mask and then press Control-Shift-U to desaturate this layer. After that, change this layer blending mode to Hard Light and name it Subject_Sharpening.

Creating clipping mask and changing blending mode

4. How to Create the Paint Drops

Step 1

In this section, we are going to create the paint drops using the brushes that we made in the beginning of the tutorial. Go to Layer > New > Layer to create a new layer and name it Paint Drops.

Creating a new layer

Step 2

Now you need to decide where you are going to place the first dripping brush. After that,
using the Eyedropper Tool (I), click on the area of your subject where the drop will start to drip from to set that color as your foreground color, choose the Brush Tool (B), pick some of the dripping brushes, and position them where you want.

Creating paint drop

Step 3

Repeat
the same process to create more paint drops. Keep changing the brushes and brush size to get a diverse effect. Here is my
result:

Creating more paint drops

Step 4

Now go to Layer > Layer Mask > Reveal All to create a blank layer mask. Then press D on your keyboard to reset the swatches and then X to invert them. After that, choose the Brush Tool (B), pick a soft brush, and brush over the top area of paint drops where needed to make them better blend with the subject.

Brushing into layer mask

5. How to Create a Vignette

Step 1

In this section, we are going to create a vignette effect. Go to Layer > New > Layer to create a new layer and name it Vignette.

Creating a new layer

Step 2

Press D on your keyboard to reset the swatches, go to Edit > Fill, and set Contents to Foreground Color, Mode to Normal and Opacity to 100% as shown below:

Filling layer with foreground color

Step 3

Now press Control-A on your keyboard to make a selection of the canvas and go to Layer > Layer Mask > Hide Selection to create a layer mask that hides the selected area of the layer. Then click on the link icon between the layer mask and layer thumbnail to unlink them.

Adding layer mask

Step 4

While the layer mask is selected, press Control-T on your keyboard to transform it, and set Width and Height to 85% as shown below:

Transforming layer mask

Step 5

Now go to Filter > Blur > Gaussian Blur and set Radius to 100 px as shown below:

Adding gaussian blur filter

Step 6

Set the Opacity of this layer to 20%.

Changing opacity of the layer

6. How to Create a Color Look

Step 1

In this section, we are going create a color look. Go to Layer > New Adjustment Layer > Curves to create a new curves adjustment layer and name it Color Look.

Creating curves adjustment layer

Step 2

Now Double-click on this layer thumbnail, and in the Properties panel make the settings below:

Adjusting color look

You Made It!

Congratulations, you have succeeded! Here is our final result:

Final Result

If you would like to create the even more advanced effect as shown below, a sketch with a
dripping paint and 3D pop-out effect, using just a single click, then
check out my Wet Paint Photoshop Action.

Action final result