When done right, increasing a website’s functionality can enhance visitor interest. It can improve its usability, and even increase its conversion rate. If you can use a plugin to make this happen the effort required to implement the added functionality is often minimal.
Put another way, pick the right plugin for the problem you need to solve and the results, the time saved, and the ROI can be off the charts.
There’s certainly no shortage of WordPress plugins on the market. There are so many in fact that it can be difficult to find one that could address your needs. It is even more difficult to find a super-useful one that not only does the job but does it well.
To help you along we’ve assembled this list of 2020’s top WordPress plugins.
Booking an appointment generally takes little time and can usually be easily handled manually. It’s a different story when a constant stream of bookings has to be managed. Manually taking and managing multiple bookings can take hours of time, plus manual methods can be prone to errors.
Amelia is a WordPress booking plugin that provides a reliable error free solution to your booking needs
health and fitness clubs, spas, gyms, beauty parlors, and even consulting firms can make bookings 24/7.
Amelia manages employee scheduling as well, matching employees to clients and scheduling hours worked, special days, and days off.
Amelia can manage bookings and appointments for a single or multiple business locations, for virtual sessions you can use Zoom integration.
Amelia replaces sticky notes with up-to-date graphic depictions of the business’s key performance indicators (KPIs)
Amelia is easy to use. It’s GDPR compliant and currently in use by 12,000+ businesses.
With wpDataTables messy, ugly tables, navigation and load speed issues, and time wasted associated with attempting to manage large amounts of data can be completely avoided.
Attractive, responsive, and editable tables and charts can be created in minutes rather than hours, and the frustration that sometimes accompany attempting to create an informative table or chart can be avoided as well.
With this premium plugin you can –
Take advantage of conditional formatting, where data of particular interest can be color-coded
Apply multi-criteria filtering of data to easily access needed information
Manage data from multiple separate Database connections
Create tables and charts based on CSV and Excel files, SQL queries, and Google spreadsheets
Create tables and charts based on JSON and XML feeds and PHP arrays
wpDataTables allows you to build tables and charts using a single plugin rather than several and lets you organize your data the way you want to.
On the average, WordPress users spend just under 6 minutes searching for what they need after they log in. Power users generally find what they want almost immediately and can complete a task in 3 or 4 minutes that can take many users 15 to 20.
The Go Dash plugin significantly speeds up your dashboard activity. Instead of feeling a bit envious when you see a power user doing his or her thing, you might consider investing in Go Dash.
With Go Dash you can:
Power Search all your pages, posts & products – Even admin pages!
Create favorites & groups for fast access
Open multiple pages with a single click
Access recently viewed pages and posts
Become a full-fledged WordPress power user with Go Dash!
The AdSanity plugin supports Image and Text ads, Ad Networks, and HTML5 ads. It functions seamlessly with WordPress Custom Post Types and is easy to use,
AdSanity’s dashboard features a high-level custom reporting capability
Ads can be inserted into your content automatically rather than manually
12 Add-ons significantly extend AdSanity’s functionality to match your specific use
Ad templates can be customized to help users size and format ads
Logic Hop puts the power of content personalization at your fingertips. By leveraging on-site activity and real-time data, it allows you to show the right content to the right people at the right time.
Fully integrated with WordPress, Logic Hop is a truly professional level tool
Logic Hop’s free addons are 100% compatible with WooCommerce, Beaver Builder, Divi, & others
Logic Hop is the only plugin that allows unlimited personalization with geolocation
Click on the banner to learn more about Logic Hop.
Slider Revolution 6 offers much more than its name implies. This premium plugin is a powerhouse website content builder. It’s also a potential game changer if your websites are beginning to look more and more alike.
Slider Revolution can create exciting, dynamic solutions to your everyday design problems and issues.
It enables you to create everything from sliders, carousels, content modules to full websites.
2000+ royalty-free media assets are included
Click on the banner to learn more about Slider Revolution 6.
*****
A conversation about which plugins and solutions are best for WordPress users can often turn into a spirited debate. That’s not unusual since there’s a host of fantastic WordPress plugins on the market that different people use in different ways.
The 8 top WordPress plugins featured here are, in our opinion, MUST-HAVE web design tools. We have crowdsourced them from some of the leading online entrepreneurs and bloggers we’ve become acquainted with.
When done right, increasing a website’s functionality can enhance visitor interest. It can improve its usability, and even increase its conversion rate. If you can use a plugin to make this happen the effort required to implement the added functionality is often minimal.
Put another way, pick the right plugin for the problem you need to solve and the results, the time saved, and the ROI can be off the charts.
There’s certainly no shortage of WordPress plugins on the market. There are so many in fact that it can be difficult to find one that could address your needs. It is even more difficult to find a super-useful one that not only does the job but does it well.
To help you along we’ve assembled this list of 2020’s top WordPress plugins.
Booking an appointment generally takes little time and can usually be easily handled manually. It’s a different story when a constant stream of bookings has to be managed. Manually taking and managing multiple bookings can take hours of time, plus manual methods can be prone to errors.
Amelia is a WordPress booking plugin that provides a reliable error free solution to your booking needs
health and fitness clubs, spas, gyms, beauty parlors, and even consulting firms can make bookings 24/7.
Amelia manages employee scheduling as well, matching employees to clients and scheduling hours worked, special days, and days off.
Amelia can manage bookings and appointments for a single or multiple business locations, for virtual sessions you can use Zoom integration.
Amelia replaces sticky notes with up-to-date graphic depictions of the business’s key performance indicators (KPIs)
Amelia is easy to use. It’s GDPR compliant and currently in use by 12,000+ businesses.
With wpDataTables messy, ugly tables, navigation and load speed issues, and time wasted associated with attempting to manage large amounts of data can be completely avoided.
Attractive, responsive, and editable tables and charts can be created in minutes rather than hours, and the frustration that sometimes accompany attempting to create an informative table or chart can be avoided as well.
With this premium plugin you can –
Take advantage of conditional formatting, where data of particular interest can be color-coded
Apply multi-criteria filtering of data to easily access needed information
Manage data from multiple separate Database connections
Create tables and charts based on CSV and Excel files, SQL queries, and Google spreadsheets
Create tables and charts based on JSON and XML feeds and PHP arrays
wpDataTables allows you to build tables and charts using a single plugin rather than several and lets you organize your data the way you want to.
On the average, WordPress users spend just under 6 minutes searching for what they need after they log in. Power users generally find what they want almost immediately and can complete a task in 3 or 4 minutes that can take many users 15 to 20.
The Go Dash plugin significantly speeds up your dashboard activity. Instead of feeling a bit envious when you see a power user doing his or her thing, you might consider investing in Go Dash.
With Go Dash you can:
Power Search all your pages, posts & products – Even admin pages!
Create favorites & groups for fast access
Open multiple pages with a single click
Access recently viewed pages and posts
Become a full-fledged WordPress power user with Go Dash!
The AdSanity plugin supports Image and Text ads, Ad Networks, and HTML5 ads. It functions seamlessly with WordPress Custom Post Types and is easy to use,
AdSanity’s dashboard features a high-level custom reporting capability
Ads can be inserted into your content automatically rather than manually
12 Add-ons significantly extend AdSanity’s functionality to match your specific use
Ad templates can be customized to help users size and format ads
Logic Hop puts the power of content personalization at your fingertips. By leveraging on-site activity and real-time data, it allows you to show the right content to the right people at the right time.
Fully integrated with WordPress, Logic Hop is a truly professional level tool
Logic Hop’s free addons are 100% compatible with WooCommerce, Beaver Builder, Divi, & others
Logic Hop is the only plugin that allows unlimited personalization with geolocation
Click on the banner to learn more about Logic Hop.
Slider Revolution 6 offers much more than its name implies. This premium plugin is a powerhouse website content builder. It’s also a potential game changer if your websites are beginning to look more and more alike.
Slider Revolution can create exciting, dynamic solutions to your everyday design problems and issues.
It enables you to create everything from sliders, carousels, content modules to full websites.
2000+ royalty-free media assets are included
Click on the banner to learn more about Slider Revolution 6.
*****
A conversation about which plugins and solutions are best for WordPress users can often turn into a spirited debate. That’s not unusual since there’s a host of fantastic WordPress plugins on the market that different people use in different ways.
The 8 top WordPress plugins featured here are, in our opinion, MUST-HAVE web design tools. We have crowdsourced them from some of the leading online entrepreneurs and bloggers we’ve become acquainted with.
When done right, increasing a website’s functionality can enhance visitor interest. It can improve its usability, and even increase its conversion rate. If you can use a plugin to make this happen the effort required to implement the added functionality is often minimal.
Put another way, pick the right plugin for the problem you need to solve and the results, the time saved, and the ROI can be off the charts.
There’s certainly no shortage of WordPress plugins on the market. There are so many in fact that it can be difficult to find one that could address your needs. It is even more difficult to find a super-useful one that not only does the job but does it well.
To help you along we’ve assembled this list of 2020’s top WordPress plugins.
Booking an appointment generally takes little time and can usually be easily handled manually. It’s a different story when a constant stream of bookings has to be managed. Manually taking and managing multiple bookings can take hours of time, plus manual methods can be prone to errors.
Amelia is a WordPress booking plugin that provides a reliable error free solution to your booking needs
health and fitness clubs, spas, gyms, beauty parlors, and even consulting firms can make bookings 24/7.
Amelia manages employee scheduling as well, matching employees to clients and scheduling hours worked, special days, and days off.
Amelia can manage bookings and appointments for a single or multiple business locations, for virtual sessions you can use Zoom integration.
Amelia replaces sticky notes with up-to-date graphic depictions of the business’s key performance indicators (KPIs)
Amelia is easy to use. It’s GDPR compliant and currently in use by 12,000+ businesses.
With wpDataTables messy, ugly tables, navigation and load speed issues, and time wasted associated with attempting to manage large amounts of data can be completely avoided.
Attractive, responsive, and editable tables and charts can be created in minutes rather than hours, and the frustration that sometimes accompany attempting to create an informative table or chart can be avoided as well.
With this premium plugin you can –
Take advantage of conditional formatting, where data of particular interest can be color-coded
Apply multi-criteria filtering of data to easily access needed information
Manage data from multiple separate Database connections
Create tables and charts based on CSV and Excel files, SQL queries, and Google spreadsheets
Create tables and charts based on JSON and XML feeds and PHP arrays
wpDataTables allows you to build tables and charts using a single plugin rather than several and lets you organize your data the way you want to.
On the average, WordPress users spend just under 6 minutes searching for what they need after they log in. Power users generally find what they want almost immediately and can complete a task in 3 or 4 minutes that can take many users 15 to 20.
The Go Dash plugin significantly speeds up your dashboard activity. Instead of feeling a bit envious when you see a power user doing his or her thing, you might consider investing in Go Dash.
With Go Dash you can:
Power Search all your pages, posts & products – Even admin pages!
Create favorites & groups for fast access
Open multiple pages with a single click
Access recently viewed pages and posts
Become a full-fledged WordPress power user with Go Dash!
The AdSanity plugin supports Image and Text ads, Ad Networks, and HTML5 ads. It functions seamlessly with WordPress Custom Post Types and is easy to use,
AdSanity’s dashboard features a high-level custom reporting capability
Ads can be inserted into your content automatically rather than manually
12 Add-ons significantly extend AdSanity’s functionality to match your specific use
Ad templates can be customized to help users size and format ads
Logic Hop puts the power of content personalization at your fingertips. By leveraging on-site activity and real-time data, it allows you to show the right content to the right people at the right time.
Fully integrated with WordPress, Logic Hop is a truly professional level tool
Logic Hop’s free addons are 100% compatible with WooCommerce, Beaver Builder, Divi, & others
Logic Hop is the only plugin that allows unlimited personalization with geolocation
Click on the banner to learn more about Logic Hop.
Slider Revolution 6 offers much more than its name implies. This premium plugin is a powerhouse website content builder. It’s also a potential game changer if your websites are beginning to look more and more alike.
Slider Revolution can create exciting, dynamic solutions to your everyday design problems and issues.
It enables you to create everything from sliders, carousels, content modules to full websites.
2000+ royalty-free media assets are included
Click on the banner to learn more about Slider Revolution 6.
*****
A conversation about which plugins and solutions are best for WordPress users can often turn into a spirited debate. That’s not unusual since there’s a host of fantastic WordPress plugins on the market that different people use in different ways.
The 8 top WordPress plugins featured here are, in our opinion, MUST-HAVE web design tools. We have crowdsourced them from some of the leading online entrepreneurs and bloggers we’ve become acquainted with.
As an Internet user, you are probably using a web browser most of your day, whether it’s for work or for personal use. Just as for other software, we quickly adopt some habits when it comes to using a browser. On top of that, we also install extensions that make switching browser even more bothering.
While most of us may use several web browser for different uses, we tend to stick to one browser as our main browser. According to W3Counter stats, in March 2020, the most used web browser was Google Chrome with 59.3% of all Internet users using it.
I was one of these Google Chrome users for a while, after being a faithful Firefox user for years. Main reason for switching at the time? Speed, and some other reasons like the browser plugins. Last week, I switched to the Brave browser, partly for the same reasons, but let’s take a look at the main reasons.
1. It’s Super-Fast! (Faster Than Google Chrome)
While it may not be the fastest browser of all, Brave is really much faster than its most popular counterparts (looking at you, Chrome!). On top of that, Brave doesn’t eat up all your CPU as Google Chrome does. So if speed is a concern for you, Brave should be just right for you.
2. It Cares About Your Privacy
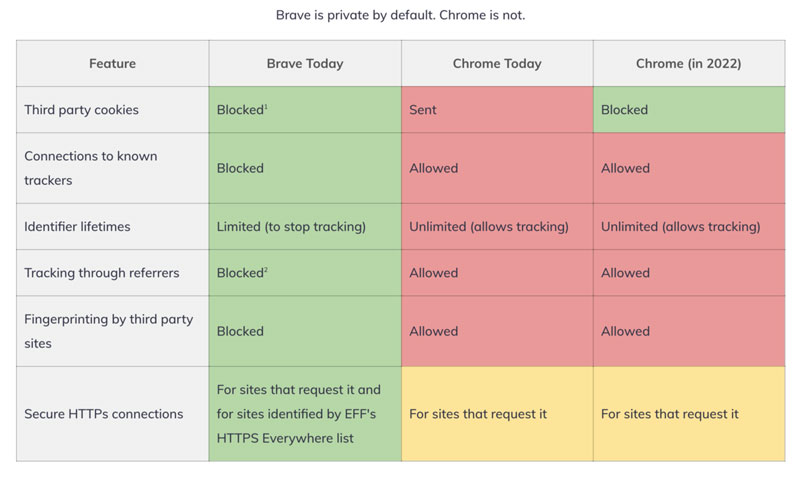
This may be the most convincing point for anyone who cares about not being tracked online. Most other browsers require you to install an ad blocker to start blocking ads, but Brave takes it much further by not only blocking ads, but also making sure that other means of tracking can’t be used either. See the following chart that compares it to Google Chrome and the future, more private, Google Chrome of 2022.
3. It Uses Innovative Advertising
Out of the box, Brave blocks all ads on every website. You can turn ads on specific websites if you want to support them, but the browser encourages using its ground-breaking advertising system. Brave comes with a cryptocurrency (BAT) that is used to pay the browser’s users for accepting being served native ads. The BAT earned this way can be used to reward content creators by tipping them once or regularly.
4. It Is Crypto-friendly
For those of you interested in crypto-currencies, or in blockchain projects at large, you will enjoy the Brave browser. On top of using BAT coins to reward users and content creators, it also comes with a crypto-wallet out of the box, so you can store your Bitcoin and other crypto-currencies on it. If you want to use your earned BAT for trading, you can do so by using the integrated Binance widget.
5. Browser extensions
Last for this article, but not least, Brave comes with tons of browser extensions. In fact, you can use any Google Chrome extension in Brave, so if you are a Chrome user, you will not lose any of your current extensions.
As an Internet user, you are probably using a web browser most of your day, whether it’s for work or for personal use. Just as for other software, we quickly adopt some habits when it comes to using a browser. On top of that, we also install extensions that make switching browser even more bothering.
While most of us may use several web browser for different uses, we tend to stick to one browser as our main browser. According to W3Counter stats, in March 2020, the most used web browser was Google Chrome with 59.3% of all Internet users using it.
I was one of these Google Chrome users for a while, after being a faithful Firefox user for years. Main reason for switching at the time? Speed, and some other reasons like the browser plugins. Last week, I switched to the Brave browser, partly for the same reasons, but let’s take a look at the main reasons.
1. It’s Super-Fast! (Faster Than Google Chrome)
While it may not be the fastest browser of all, Brave is really much faster than its most popular counterparts (looking at you, Chrome!). On top of that, Brave doesn’t eat up all your CPU as Google Chrome does. So if speed is a concern for you, Brave should be just right for you.
2. It Cares About Your Privacy
This may be the most convincing point for anyone who cares about not being tracked online. Most other browsers require you to install an ad blocker to start blocking ads, but Brave takes it much further by not only blocking ads, but also making sure that other means of tracking can’t be used either. See the following chart that compares it to Google Chrome and the future, more private, Google Chrome of 2022.
3. It Uses Innovative Advertising
Out of the box, Brave blocks all ads on every website. You can turn ads on specific websites if you want to support them, but the browser encourages using its ground-breaking advertising system. Brave comes with a cryptocurrency (BAT) that is used to pay the browser’s users for accepting being served native ads. The BAT earned this way can be used to reward content creators by tipping them once or regularly.
4. It Is Crypto-friendly
For those of you interested in crypto-currencies, or in blockchain projects at large, you will enjoy the Brave browser. On top of using BAT coins to reward users and content creators, it also comes with a crypto-wallet out of the box, so you can store your Bitcoin and other crypto-currencies on it. If you want to use your earned BAT for trading, you can do so by using the integrated Binance widget.
5. Browser extensions
Last for this article, but not least, Brave comes with tons of browser extensions. In fact, you can use any Google Chrome extension in Brave, so if you are a Chrome user, you will not lose any of your current extensions.
As an Internet user, you are probably using a web browser most of your day, whether it’s for work or for personal use. Just as for other software, we quickly adopt some habits when it comes to using a browser. On top of that, we also install extensions that make switching browser even more bothering.
While most of us may use several web browser for different uses, we tend to stick to one browser as our main browser. According to W3Counter stats, in March 2020, the most used web browser was Google Chrome with 59.3% of all Internet users using it.
I was one of these Google Chrome users for a while, after being a faithful Firefox user for years. Main reason for switching at the time? Speed, and some other reasons like the browser plugins. Last week, I switched to the Brave browser, partly for the same reasons, but let’s take a look at the main reasons.
1. It’s Super-Fast! (Faster Than Google Chrome)
While it may not be the fastest browser of all, Brave is really much faster than its most popular counterparts (looking at you, Chrome!). On top of that, Brave doesn’t eat up all your CPU as Google Chrome does. So if speed is a concern for you, Brave should be just right for you.
2. It Cares About Your Privacy
This may be the most convincing point for anyone who cares about not being tracked online. Most other browsers require you to install an ad blocker to start blocking ads, but Brave takes it much further by not only blocking ads, but also making sure that other means of tracking can’t be used either. See the following chart that compares it to Google Chrome and the future, more private, Google Chrome of 2022.
3. It Uses Innovative Advertising
Out of the box, Brave blocks all ads on every website. You can turn ads on specific websites if you want to support them, but the browser encourages using its ground-breaking advertising system. Brave comes with a cryptocurrency (BAT) that is used to pay the browser’s users for accepting being served native ads. The BAT earned this way can be used to reward content creators by tipping them once or regularly.
4. It Is Crypto-friendly
For those of you interested in crypto-currencies, or in blockchain projects at large, you will enjoy the Brave browser. On top of using BAT coins to reward users and content creators, it also comes with a crypto-wallet out of the box, so you can store your Bitcoin and other crypto-currencies on it. If you want to use your earned BAT for trading, you can do so by using the integrated Binance widget.
5. Browser extensions
Last for this article, but not least, Brave comes with tons of browser extensions. In fact, you can use any Google Chrome extension in Brave, so if you are a Chrome user, you will not lose any of your current extensions.
Many developers are at least marginally familiar with AWS Lambda functions. They’re reasonably straightforward to set up, but the vast AWS landscape can make it hard to see the big picture. With so many different pieces it can be daunting, and frustratingly hard to see how they fit seamlessly into a normal web application.
The Serverless framework is a huge help here. It streamlines the creation, deployment, and most significantly, the integration of Lambda functions into a web app. To be clear, it does much, much more than that, but these are the pieces I’ll be focusing on. Hopefully, this post strikes your interest and encourages you to check out the many other things Serverless supports. If you’re completely new to Lambda you might first want to check out this AWS intro.
There’s no way I can cover the initial installation and setup better than the quick start guide, so start there to get up and running. Assuming you already have an AWS account, you might be up and running in 5–10 minutes; and if you don’t, the guide covers that as well.
Your first Serverless service
Before we get to cool things like file uploads and S3 buckets, let’s create a basic Lambda function, connect it to an HTTP endpoint, and call it from an existing web app. The Lambda won’t do anything useful or interesting, but this will give us a nice opportunity to see how pleasant it is to work with Serverless.
First, let’s create our service. Open any new, or existing web app you might have (create-react-app is a great way to quickly spin up a new one) and find a place to create our services. For me, it’s my lambda folder. Whatever directory you choose, cd into it from terminal and run the following command:
sls create -t aws-nodejs --path hello-world
That creates a new directory called hello-world. Let’s crack it open and see what’s in there.
If you look in handler.js, you should see an async function that returns a message. We could hit sls deploy in our terminal right now, and deploy that Lambda function, which could then be invoked. But before we do that, let’s make it callable over the web.
Working with AWS manually, we’d normally need to go into the AWS API Gateway, create an endpoint, then create a stage, and tell it to proxy to our Lambda. With serverless, all we need is a little bit of config.
Still in the hello-world directory? Open the serverless.yaml file that was created in there.
The config file actually comes with boilerplate for the most common setups. Let’s uncomment the http entries, and add a more sensible path. Something like this:
functions:
  hello:
    handler: handler.hello
#   The following are a few example events you can configure
#   NOTE: Please make sure to change your handler code to work with those events
#   Check the event documentation for details
    events:
      - http:
        path: msg
        method: get
That’s it. Serverless does all the grunt work described above.
CORS configuration
Ideally, we want to call this from front-end JavaScript code with the Fetch API, but that unfortunately means we need CORS to be configured. This section will walk you through that.
Below the configuration above, add cors: true, like this
That’s the section! CORS is now configured on our API endpoint, allowing cross-origin communication.
CORS Lambda tweak
While our HTTP endpoint is configured for CORS, it’s up to our Lambda to return the right headers. That’s just how CORS works. Let’s automate that by heading back into handler.js, and adding this function:
Before returning from the Lambda, we’ll send the return value through that function. Here’s the entirety of handler.js with everything we’ve done up to this point:
Let’s run it. Type sls deploy into your terminal from the hello-world folder.
When that runs, we’ll have deployed our Lambda function to an HTTP endpoint that we can call via Fetch. But… where is it? We could crack open our AWS console, find the gateway API that serverless created for us, then find the Invoke URL. It would look something like this.
Fortunately, there is an easier way, which is to type sls info into our terminal:
Just like that, we can see that our Lambda function is available at the following path:
Now that we’ve gotten our feet wet, let’s repeat this process. This time, though, let’s make a more interesting, useful service. Specifically, let’s make the canonical “resize an image” Lambda, but instead of being triggered by a new S3 bucket upload, let’s let the user upload an image directly to our Lambda. That’ll remove the need to bundle any kind of aws-sdk resources in our client-side bundle.
Building a useful Lambda
OK, from the start! This particular Lambda will take an image, resize it, then upload it to an S3 bucket. First, let’s create a new service. I’m calling it cover-art but it could certainly be anything else.
sls create -t aws-nodejs --path cover-art
As before, we’ll add a path to our HTTP endpoint (which in this case will be a POST, instead of GET, since we’re sending the file instead of receiving it) and enable CORS:
// Same as before
  events:
    - http:
      path: upload
      method: post
      cors: true
Next, let’s grant our Lambda access to whatever S3 buckets we’re going to use for the upload. Look in your YAML file — there should be a iamRoleStatements section that contains boilerplate code that’s been commented out. We can leverage some of that by uncommenting it. Here’s the config we’ll use to enable the S3 buckets we want:
Note the /* on the end. We don’t list specific bucket names in isolation, but rather paths to resources; in this case, that’s any resources that happen to exist inside your-bucket-name.
Since we want to upload files directly to our Lambda, we need to make one more tweak. Specifically, we need to configure the API endpoint to accept multipart/form-data as a binary media type. Locate the provider section in the YAML file:
For good measure, let’s give our function an intelligent name. Replace handler: handler.hello with handler: handler.upload, then change module.exports.hello to module.exports.upload in handler.js.
Now we get to write some code
First, let’s grab some helpers.
npm i jimp uuid lambda-multipart-parser
Wait, what’s Jimp? It’s the library I’m using to resize uploaded images. uuid will be for creating new, unique file names of the sized resources, before uploading to S3. Oh, and lambda-multipart-parser? That’s for parsing the file info inside our Lambda.
Next, let’s make a convenience helper for S3 uploading:
Lastly, we’ll plug in some code that reads the upload files, resizes them with Jimp (if needed) and uploads the result to S3. The final result is below.
I’m sorry to dump so much code on you but — this being a post about Amazon Lambda and serverless — I’d rather not belabor the grunt work within the serverless function. Of course, yours might look completely different if you’re using an image library other than Jimp.
Let’s run it by uploading a file from our client. I’m using the react-dropzone library, so my JSX looks like this:
<Dropzone
  onDrop={files => onDrop(files)}
  multiple={false}
>
  <div>Click or drag to upload a new cover</div>
</Dropzone>
The onDrop function looks like this:
const onDrop = files => {
  let request = new FormData();
  request.append("fileUploaded", files[0]);


  fetch("https://yb1ihnzpy8.execute-api.us-east-1.amazonaws.com/dev/upload", {
    method: "POST",
    mode: "cors",
    body: request
    })
  .then(resp => resp.json())
  .then(res => {
    if (res.error) {
      // handle errors
    } else {
      // success - woo hoo - update state as needed
    }
  });
};
And just like that, we can upload a file and see it appear in our S3 bucket!
An optional detour: bundling
There’s one optional enhancement we could make to our setup. Right now, when we deploy our service, Serverless is zipping up the entire services folder and sending all of it to our Lambda. The content currently weighs in at 10MB, since all of our node_modules are getting dragged along for the ride. We can use a bundler to drastically reduce that size. Not only that, but a bundler will cut deploy time, data usage, cold start performance, etc. In other words, it’s a nice thing to have.
Fortunately for us, there’s a plugin that easily integrates webpack into the serverless build process. Let’s install it with:
npm i serverless-webpack --save-dev
…and add it via our YAML config file. We can drop this in at the very end:
// Same as before
plugins:
  - serverless-webpack
Naturally, we need a webpack.config.js file, so let’s add that to the mix:
Notice that we’re setting target: node so Node-specific assets are treated properly. Also note that you may need to set the output filename to handler.js. I’m also adding aws-sdk to the externals array so webpack doesn’t bundle it at all; instead, it’ll leave the call to const AWS = require("aws-sdk"); alone, allowing it to be handled by our Lamdba, at runtime. This is OK since Lambdas already have the aws-sdk available implicitly, meaning there’s no need for us to send it over the wire. Finally, the mainFields: ["main"] is to tell webpack to ignore any ESM module fields. This is necessary to fix some issues with the Jimp library.
Now let’s re-deploy, and hopefully we’ll see webpack running.
Now our code is bundled nicely into a single file that’s 935K, which zips down further to a mere 337K. That’s a lot of savings!
Odds and ends
If you’re wondering how you’d send other data to the Lambda, you’d add what you want to the request object, of type FormData, from before. For example:
request.append("xyz", "Hi there");
…and then read formPayload.xyz in the Lambda. This can be useful if you need to send a security token, or other file info.
If you’re wondering how you might configure env variables for your Lambda, you might have guessed by now that it’s as simple as adding some fields to your serverless.yaml file. It even supports reading the values from an external file (presumably not committed to git). This blog post by Philipp Müns covers it well.
Wrapping up
Serverless is an incredible framework. I promise, we’ve barely scratched the surface. Hopefully this post has shown you its potential, and motivated you to check it out even further.
If you’re interested in learning more, I’d recommend the learning materials from David Wells, an engineer at Netlify, and former member of the serverless team, as well as the Serverless Handbook by Swizec Teller
Many developers are at least marginally familiar with AWS Lambda functions. They’re reasonably straightforward to set up, but the vast AWS landscape can make it hard to see the big picture. With so many different pieces it can be daunting, and frustratingly hard to see how they fit seamlessly into a normal web application.
The Serverless framework is a huge help here. It streamlines the creation, deployment, and most significantly, the integration of Lambda functions into a web app. To be clear, it does much, much more than that, but these are the pieces I’ll be focusing on. Hopefully, this post strikes your interest and encourages you to check out the many other things Serverless supports. If you’re completely new to Lambda you might first want to check out this AWS intro.
There’s no way I can cover the initial installation and setup better than the quick start guide, so start there to get up and running. Assuming you already have an AWS account, you might be up and running in 5–10 minutes; and if you don’t, the guide covers that as well.
Your first Serverless service
Before we get to cool things like file uploads and S3 buckets, let’s create a basic Lambda function, connect it to an HTTP endpoint, and call it from an existing web app. The Lambda won’t do anything useful or interesting, but this will give us a nice opportunity to see how pleasant it is to work with Serverless.
First, let’s create our service. Open any new, or existing web app you might have (create-react-app is a great way to quickly spin up a new one) and find a place to create our services. For me, it’s my lambda folder. Whatever directory you choose, cd into it from terminal and run the following command:
sls create -t aws-nodejs --path hello-world
That creates a new directory called hello-world. Let’s crack it open and see what’s in there.
If you look in handler.js, you should see an async function that returns a message. We could hit sls deploy in our terminal right now, and deploy that Lambda function, which could then be invoked. But before we do that, let’s make it callable over the web.
Working with AWS manually, we’d normally need to go into the AWS API Gateway, create an endpoint, then create a stage, and tell it to proxy to our Lambda. With serverless, all we need is a little bit of config.
Still in the hello-world directory? Open the serverless.yaml file that was created in there.
The config file actually comes with boilerplate for the most common setups. Let’s uncomment the http entries, and add a more sensible path. Something like this:
functions:
  hello:
    handler: handler.hello
#   The following are a few example events you can configure
#   NOTE: Please make sure to change your handler code to work with those events
#   Check the event documentation for details
    events:
      - http:
        path: msg
        method: get
That’s it. Serverless does all the grunt work described above.
CORS configuration
Ideally, we want to call this from front-end JavaScript code with the Fetch API, but that unfortunately means we need CORS to be configured. This section will walk you through that.
Below the configuration above, add cors: true, like this
That’s the section! CORS is now configured on our API endpoint, allowing cross-origin communication.
CORS Lambda tweak
While our HTTP endpoint is configured for CORS, it’s up to our Lambda to return the right headers. That’s just how CORS works. Let’s automate that by heading back into handler.js, and adding this function:
Before returning from the Lambda, we’ll send the return value through that function. Here’s the entirety of handler.js with everything we’ve done up to this point:
Let’s run it. Type sls deploy into your terminal from the hello-world folder.
When that runs, we’ll have deployed our Lambda function to an HTTP endpoint that we can call via Fetch. But… where is it? We could crack open our AWS console, find the gateway API that serverless created for us, then find the Invoke URL. It would look something like this.
Fortunately, there is an easier way, which is to type sls info into our terminal:
Just like that, we can see that our Lambda function is available at the following path:
Now that we’ve gotten our feet wet, let’s repeat this process. This time, though, let’s make a more interesting, useful service. Specifically, let’s make the canonical “resize an image” Lambda, but instead of being triggered by a new S3 bucket upload, let’s let the user upload an image directly to our Lambda. That’ll remove the need to bundle any kind of aws-sdk resources in our client-side bundle.
Building a useful Lambda
OK, from the start! This particular Lambda will take an image, resize it, then upload it to an S3 bucket. First, let’s create a new service. I’m calling it cover-art but it could certainly be anything else.
sls create -t aws-nodejs --path cover-art
As before, we’ll add a path to our HTTP endpoint (which in this case will be a POST, instead of GET, since we’re sending the file instead of receiving it) and enable CORS:
// Same as before
  events:
    - http:
      path: upload
      method: post
      cors: true
Next, let’s grant our Lambda access to whatever S3 buckets we’re going to use for the upload. Look in your YAML file — there should be a iamRoleStatements section that contains boilerplate code that’s been commented out. We can leverage some of that by uncommenting it. Here’s the config we’ll use to enable the S3 buckets we want:
Note the /* on the end. We don’t list specific bucket names in isolation, but rather paths to resources; in this case, that’s any resources that happen to exist inside your-bucket-name.
Since we want to upload files directly to our Lambda, we need to make one more tweak. Specifically, we need to configure the API endpoint to accept multipart/form-data as a binary media type. Locate the provider section in the YAML file:
For good measure, let’s give our function an intelligent name. Replace handler: handler.hello with handler: handler.upload, then change module.exports.hello to module.exports.upload in handler.js.
Now we get to write some code
First, let’s grab some helpers.
npm i jimp uuid lambda-multipart-parser
Wait, what’s Jimp? It’s the library I’m using to resize uploaded images. uuid will be for creating new, unique file names of the sized resources, before uploading to S3. Oh, and lambda-multipart-parser? That’s for parsing the file info inside our Lambda.
Next, let’s make a convenience helper for S3 uploading:
Lastly, we’ll plug in some code that reads the upload files, resizes them with Jimp (if needed) and uploads the result to S3. The final result is below.
I’m sorry to dump so much code on you but — this being a post about Amazon Lambda and serverless — I’d rather not belabor the grunt work within the serverless function. Of course, yours might look completely different if you’re using an image library other than Jimp.
Let’s run it by uploading a file from our client. I’m using the react-dropzone library, so my JSX looks like this:
<Dropzone
  onDrop={files => onDrop(files)}
  multiple={false}
>
  <div>Click or drag to upload a new cover</div>
</Dropzone>
The onDrop function looks like this:
const onDrop = files => {
  let request = new FormData();
  request.append("fileUploaded", files[0]);


  fetch("https://yb1ihnzpy8.execute-api.us-east-1.amazonaws.com/dev/upload", {
    method: "POST",
    mode: "cors",
    body: request
    })
  .then(resp => resp.json())
  .then(res => {
    if (res.error) {
      // handle errors
    } else {
      // success - woo hoo - update state as needed
    }
  });
};
And just like that, we can upload a file and see it appear in our S3 bucket!
An optional detour: bundling
There’s one optional enhancement we could make to our setup. Right now, when we deploy our service, Serverless is zipping up the entire services folder and sending all of it to our Lambda. The content currently weighs in at 10MB, since all of our node_modules are getting dragged along for the ride. We can use a bundler to drastically reduce that size. Not only that, but a bundler will cut deploy time, data usage, cold start performance, etc. In other words, it’s a nice thing to have.
Fortunately for us, there’s a plugin that easily integrates webpack into the serverless build process. Let’s install it with:
npm i serverless-webpack --save-dev
…and add it via our YAML config file. We can drop this in at the very end:
// Same as before
plugins:
  - serverless-webpack
Naturally, we need a webpack.config.js file, so let’s add that to the mix:
Notice that we’re setting target: node so Node-specific assets are treated properly. Also note that you may need to set the output filename to handler.js. I’m also adding aws-sdk to the externals array so webpack doesn’t bundle it at all; instead, it’ll leave the call to const AWS = require("aws-sdk"); alone, allowing it to be handled by our Lamdba, at runtime. This is OK since Lambdas already have the aws-sdk available implicitly, meaning there’s no need for us to send it over the wire. Finally, the mainFields: ["main"] is to tell webpack to ignore any ESM module fields. This is necessary to fix some issues with the Jimp library.
Now let’s re-deploy, and hopefully we’ll see webpack running.
Now our code is bundled nicely into a single file that’s 935K, which zips down further to a mere 337K. That’s a lot of savings!
Odds and ends
If you’re wondering how you’d send other data to the Lambda, you’d add what you want to the request object, of type FormData, from before. For example:
request.append("xyz", "Hi there");
…and then read formPayload.xyz in the Lambda. This can be useful if you need to send a security token, or other file info.
If you’re wondering how you might configure env variables for your Lambda, you might have guessed by now that it’s as simple as adding some fields to your serverless.yaml file. It even supports reading the values from an external file (presumably not committed to git). This blog post by Philipp Müns covers it well.
Wrapping up
Serverless is an incredible framework. I promise, we’ve barely scratched the surface. Hopefully this post has shown you its potential, and motivated you to check it out even further.
If you’re interested in learning more, I’d recommend the learning materials from David Wells, an engineer at Netlify, and former member of the serverless team, as well as the Serverless Handbook by Swizec Teller
I totally forgot that the Jamstack Conf was this week but thankfully they’ve already published the talks on the Jamstack YouTube channel. I’m really looking forward to sitting down with these over a coffee while I also check out Netlify’s other big release today: Build Plugins.
These are plugins that run whenever your site is building. One example is the A11y plugin that will fail a build if accessibility failures are detected. Another minifies HTML and there’s even one that inlines critical CSS. What’s exciting is that these build plugins are kinda making complex Gulp/Grunt environments the stuff of legend. Instead of going through the hassle of config stuff, build plugins let Netlify figure it all out for you. And that’s pretty neat.
Also, our very own Sarah Drasner wrote just about how to create your first Netlify Build Plugin. So, if you have an idea for something that you could share with the community, then that may be the best place to start.
Learn how to make photo drawing effects using Photoshop actions! Check out this awesome resource list below.
How do you draw a person? A building? Or the sky? These simple questions open the floodgates to different design and art theories, but often people get intimidated by them.
That’s why you should always take advantage of different mediums to explore your creative thoughts. Photoshop line drawing actions can deliver promising, expert-level results by transforming any photo into a realistic pencil drawing.
Explore varying textures and more, with exciting actions perfect for any art enthusiast. Enjoy this selection of amazing hand-picked sketch art Photoshop actions from Envato Elements and fantastic PS drawing effects from GraphicRiver, and see how easily you can convert a photo to a sketch.
Envato Elements: Get the Best Photoshop Effects (With Unlimited Use)
To get you started on the art of converting your photos to hand-drawn sketches, Envato Elements has a great, all-inclusive offer you can’t ignore.
Sign up for Envato Elements and get access to thousands of creative graphics and templates (with unlimited use), from stunning Photoshop actions to professional resume designs and more. All for one low monthly fee.
Envato Elements has the best pencil sketches and photo effects for you
Envato Elements saves you both the time and energy needed when you’re designing from scratch. That’s a key benefit you can’t miss from our offer.
15 Best Photoshop Sketch Filters to Download From Envato Elements
To show you what I’m talking about, I’ve gathered 15 of the best drawing filters and actions for sketches from Envato Elements. You’ll be able to convert a picture to a drawing in just a few clicks!
For a little texture, this is a great photo to sketch converter. I went with this pretty Sketch Art action for Adobe Photoshop. Easily make your photos into gifts, packages, or souvenirs with this quick and effective action.
This sketch effect action for Photoshop will convert any picture to a drawing in seconds. Use this PS drawing action for any kind of engineering or architectural design and save yourself hours of work!
This is a great Photoshop sketch filter to download from Envato Elements. Try this PS drawing action to convert a picture to a drawing in a matter of clicks, and get a very realistic result.
This is one of our best pencil sketch effects. This drawing filter will give you artworks in the style of the great Renaissance painter, Leonardo da Vinci. The photo to hand drawing converter works best with portraits and inanimate objects and other photos.
Ever wanted to convert any photo to a sketch? You can do it quickly with this photo to sketch converter and give your portraits a unique vintage look. Get this Photoshop sketch filter and download it from Envato Elements to impress your friends.
This is a fantastic Photoshop line drawing action for any logo. You can convert any photo to a pencil sketch in Photoshop very easily. Apply this photo filter as many times as you wish, and get a different result every time. Don’t miss out on this action sketch and turn any photo into a pen and ink drawing.
Dedicate a special portrait to your furry friend with this amazing photo filter. This features a Photoshop line drawing action, with accompanying brush textures to complete the look! It’s been tested on Photoshop CS3 and above, so make sure to try it out with recent versions!
Charcoal is another great medium many artists enjoy. And now you can convert a photo to a pencil sketch with Photoshop. Explore these dramatic tones with this fun action sketch. Included in this pack is one main Photoshop action with access to ten colorful presets for more options. Check it out!
Design the tech you’ve always wanted with this brilliant Photoshop action to help you convert photos to drawings. Try it out on amazing car concepts and more for fantastic tech-inspired drawings. Save countless hours with this simple Photoshop line drawing action packed with well-organized layers.
No matter your subject, Photoshop effects create jaw-dropping images that will wow your audience. And this pencil sketch action is no different. Create a realistic pencil sketch with Photoshop actions that you can easily apply color effects to. Keep it monochromatic for a traditional look, or just add color.
Need a new way to display your product photos? Try this wicked sketch Photoshop action. Featuring a fantastic, realistic look, this photo effect creates drawings that look as if they just left your drafting table. Simply pick the photo you want, and then play the action for great effects to convert a picture to a drawing!
A sequel to the original Architectum action, this is a photo to hand drawing converter you don’t want to miss! Add varying straight and diagonal lines for more dynamic energy in your work. Apply this realistic pencil sketch Photoshop action to objects, places, or transportation. Check it out!
Architects are known for bringing their work to life with traditional pencil sketches. Now you can get the same look with your favorite architectural imagery and convert a photo to a drawing. Perfect for exteriors, interiors, and other types of building design, this sketch art Photoshop action is highly effective and easy to use.
Get clean crosshatching lines with this realistic pencil sketch Photoshop action. Optimized specifically for Photoshop CS3 and above, this Photoshop effect helps you enjoy a phenomenal pen sketch look without all the fuss. Use this ink sketch Photoshop action on posters, collages, and more for different effects.
Highlight your family photos with this charming sketch effect action for Photoshop. The ModernArt action comes with one Photoshop action to quickly convert your work. Save the original background or upload your own textures for more variety. Try this photo to illustration converter!
GraphicRiver: Best Source for Photoshop Effects (Get One at a Time)
Are you looking for great action sketches for single purchase? GraphicRiver is the best digital market to buy single-use graphics and creative assets. It’s part of the Envato Market suite of online marketplaces that cater to many creative digital asset needs.
The best photo sketch effects for single purchase are on GraphicRiver
While Envato Elements is a fantastic option, if you prefer to buy just one drawing filter (instead of getting unlimited access to hundreds of digital assets), check out the selection from our Envato Market below.
10 Best Sketch Photoshop Actions From GraphicRiver
Now, get ready to check out some of the best photo sketches for single purchase we have on GraphicRiver. Now it’s very easy to convert a photo to a pencil sketch in Photoshop and save a lot of time with these incredible photo effects.
Let’s start with this fantastic photo to illustration converter. This ink sketch Photoshop action will turn your images into engraved works of art. Use this pics to sketch converter to give your photos a sophisticated, eye-catching look.
It’s one of our best pencil sketches, and it works better with portraits, but you can try it on any other kind of picture.
Here’s a pics to sketch converter that will turn your images into a fine drawing with a couple of clicks. It’s especially good in the architectural and design fields, but you can use this Photoshop effect on any other type of project. Don’t hesitate to check this ink sketch Photoshop action!
Use a photo to pen and ink drawing photo filter like this to help update your space! This ink sketch Photoshop action combines ink and pencil textures for an abstract, modern painting. This photo to illustration converter has been tested on dozens of photos with quality results and creates stunning images you’ll want to hang up. Try it out!
Discover the beauty of hatching and crosshatching pencil marks with this sketch Photoshop action. Convert a photo to a drawing with a two-step process. First, create a new layer dedicated to the pencil details, and then brush over your image. Press the action and presto! You’ve got a stunning result. This is one of the best photo sketch actions we have to offer!
Some artists are so talented that they can create epic drawings with pens! Now you can too with this incredible photo to pen and ink drawing effect. Dedicate a new layer to the areas where you want the most details, and then play the action. Within a matter of moments, you’ll get a cool drawing like the one above with this sketch art Photoshop action.
Easily change your landscapes into dramatic pencil sketches with this realistic pencil sketch Photoshop action. This photo effect simulates a person holding a torn drawing over a real-life scene. Inspired by the photo artist Ben Heine, this action creates a high-quality image we’re sure you’ll love. This is one of the best pencil sketches out there.
Make your photography even more beautiful with this photo to illustration converter. A photo to pen and ink drawing effect designed to combine two traditional textures into one, this action is highly effective. Play around with different looks by jumping into the folders section and experimenting with texture. Check this drawing filter out!
Design epic prints with traditional pencil textures and convert any photo to a pencil sketch with Photoshop. This new photo filter brings you phenomenal results with simple instructions. As with most actions, you’ll need to follow the initial steps of preparing your photo before playing the photo to sketch converter. Pair this design with posters, prints, and more.
Construct a clean and dynamic composition with this helpful PS drawing action. Specifically made for design images and architecture-friendly content, this photo filter is super simple to master. Try out the colored pencil effect by itself or add more color to match your brand and convert a photo to pencil sketch with Photoshop.
Mix and match vintage styles and textures with beautiful color presets with this sketch effect action for Photoshop. This amazing photo effect is inspired by vintage drawings and even places your photo on weathered paper. Customize your result by playing with different brushes to make your work unique with this photo to hand drawing converter.
Learn More About Sketch Effect Actions
Learning how to convert photos to drawings and how to create your own sketch effect actions in Photoshop can be a little challenging at first. But don’t worry. We’ve got you covered. Check this tutorial we’ve made for you on this topic.
Also, don’t forget to follow along with us over on our Envato Tuts+ YouTube channel! We’ve got many more interesting and useful videos for you.
Show Us Your Sketch Effects!
Tried any of these pics to sketch converters? Let us know! Tell us your favorite Photoshop sketch effects in the comments below.
Or make your own! Convert any photo to a sketch using the following tutorials:
This has been a collection of premium resources perfect for the avid designer and photographer. For more cool Photoshop sketch actions and great PS drawing effects, check out Envato Elements and GraphicRiver, or enlist the help of our talented professionals at Envato Studio. Happy designing!
Agregator najlepszych postów o designie, webdesignie, cssie i Internecie