We’ll be showing you how to create this style of design. We’ll start with basic image editing techniques in Adobe Photoshop to get our guide layers setup, and then we’ll jump into Adobe Illustrator. You don’t need any fancy equipment to do this. I used an older mouse that still has the rubber ball.
Note: This tutorial has been recently updated, however the stock image and pattern are no longer available for download. Please find the appropriate items to replace them to complete the exact end result. Envato Tuts+ does not endorse any political party in the publishing of this tutorial. Rather, this tutorial is focused on demonstrating a workflow for recreating this iconic poster.
For this effect it is best to have a portrait style picture, preferably of a subject that appears to be thinking, or looking off into the distance.
Step 2
Once you have your image, you need to Open it in Photoshop and Crop it appropriately. The top of the image should be cropped to the top of your subject’s head, and the bottom should be a bit higher than chest height. The crop should have about a 2:1 ratio.
Step 3
Now we need to Posterize the image. Go to Image > Adjustments > Posterize. An appropriate posterization level for the look we are going for is 5.
Step 4
Now we’re going to create our guide layers for use in Illustrator. Start by duplicating your posterized layer, and name this new layer „Pattern Guide.” Then go to Image > Adjustments > Threshold. We’re going to slide our Point until we get something similar to below. We want it fairly dark, but still with a small amount of detail. Also, when using Threshold, it is best to use the Peaks that you see.
Step 5
Save this newly created layer as „patternguide.psd,” or something similar, as you’ll need it for Illustrator.
Step 6
We need to repeat Step 4 and Step 5 three more times. Each time apply a lower threshold, and save each new layer. Below are the settings I used, again notice the peaks.
2. Setup Your Document and Palettes
Step 1
Before we start to outline our layers, we need to create the horizontal blue line pattern. To do this create a new Illustrator document. Give it a Height and Width of 4px. Then create a rectangle filled with our light blue color (#4F919F), and cover the top half of the canvas.
Step 2
Cover the bottom half with a rectangle filled with beige. Then Select All (Control + A), and drag this over to our Swatches panel. Congratulations you’ve made a pattern!
Step 3
Now we have to save this Swatch set so we can use it in our poster we’re about to make. In the bottom left corner of our Swatches panel we’ll select Save Swatches from the Swatches Library Menu. Name it anything you want, I used „pattern.” You can now close this document, as we won’t need it anymore.
Step 4
Here is the color palette we’ll be using for this tutorial. There are four colors and a pattern. We’ll be using a mix of beige and light blue colors.
3. Create Your Portrait
Step 1
Now that we have our reference images and pattern created, it is time to create a New document in Illustrator. I used a canvas size of 700 x 850px.
Step 2
We’re going to start with our darkest guide layer, this will be our pattern layer. We’re going to outline the layer using the Pen Tool (P). So to start we’re going to go to File > Place and select our first reference layer into Illustrator. If you’ve been following verbatim, this file to place is called „patternguide.psd”.
Step 3
Let’s stop for a moment and discuss the proper use of the Pen Tool (P) in Illustrator. This is one area where Illustrator handedly trumps Photoshop, but only if you use it correctly.
For any curve you basically have three clicks; two are anchor points, and the other is your curve point. You place your curve point at the highest point of your curve. You place the anchors at where the curve starts and ends.
One click is all that is needed when you are creating a curve. You can then change the curve points to curves after you have done the entire shape. To convert them use the Direct Selection Tool (A) and click on the Convert Selected Anchor Points to Smooth icon.
Step 4
Before we can outline our first layer, we need to load our pattern into the Swatches Library. To do this select Other Library from the Swatches Library menu in the Swatches panel.
Step 5
Okay, so back to outlining our first layer. Create New Layer below the file you just placed into Illustrator. This layer will hold our outline. We place it below because it is easier to see what we’re outlining that way.
Now we grab our Pen Tool (P), give it a stroke of null, and a fill of our pattern. Then start outlining all the black areas with the Pen Tool (P). The key is to average it out, don’t follow too closely to the guide layer. Just roughly outline, and don’t worry about our curves, as we’ll fix that after we create our outline.
Note: This is the most tedious part of the process.
Step 6
You might have noticed that there are portions in the middle that are lighter that we just went right over with outlines. Well we’re going to fix that by outlining those using the same process. Fill those with our beige color, as shown below. We’ll do this on a new layer just above the pattern layer. After you’ve done that, you should have something similar to the following.
Step 7
Now we smooth out the shapes we just created. We want most of our points to be smooth, but I find it looks better if you leave a few the way they are. View the effect below from smoothing both the pattern and beige layer.
Note: I made this image out of order and the pattern was wrong, don’t worry about the color difference.
Step 8
Now we just do this same thing for each layer. Roughly outlining it, then outlining the highlights with the color immediately below it, and then smoothing out our outlines. The next layer should have solid light blue, followed by red, and then finally our dark blue.
Step 9
Okay, you should have something like the following. The tedious part is over. Now to make it look like a poster. First we’ll put a beige filled rectangle below all these layers, this will serve as our background.
Step 10
Now we’ll need to put our red and light blue halves in. We’re going to do this just above the beige rectangle layer. Use the Rectangle Tool (M) to place the two rectangles.
Step 11
Our poster is looking pretty good. Let’s create the space needed to add the inspiring text at the bottom. You’ll probably have to enlarge your canvas area. To do this go to File > Document Setup. I added 300px onto mine.
Step 12
Now extend you beige rectangle so that it covers the new length of your canvas. Then create a new rectangle filled with our dark blue color. It should be a quarter the size of main subject.
Step 13
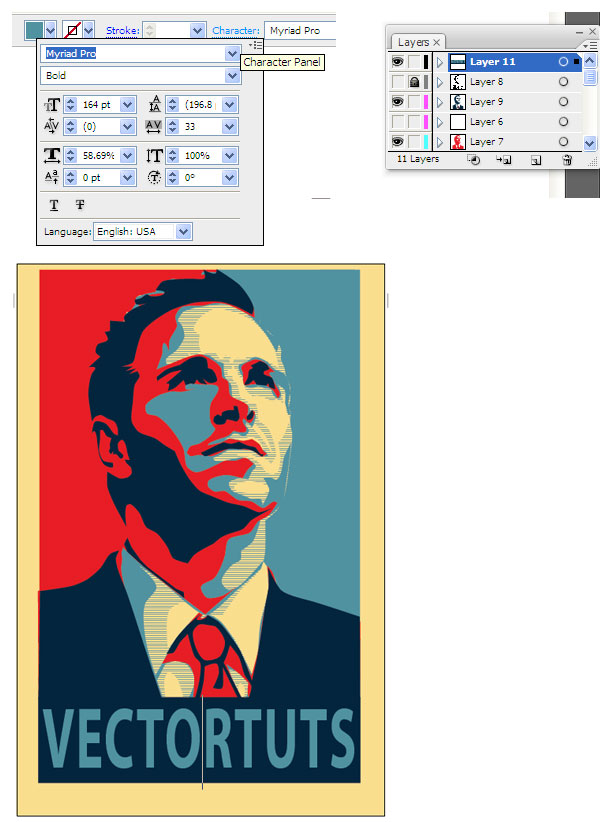
Time to add our inspiring word. We’ll use light blue for the font color, and we want to change the text settings so that the word fills most of the dark blue rectangle. To change the spacing between the characters, use the Character panel. This is available to us when we are using the Text Tool (T). I used the font „Myriad Pro”.
Step 14
Almost finished, we need to clean up our borders a little bit. First, select every layer, but your beige layer. Then create a Group (Control + G). Then Vertically and Horizontally Align them to the artboard.
Step 15
Now we’re going to clean up the edges of our poster. Cover the layers that we grouped in a rectangle of any color. Then use the Pathfinder panel, and select Subtract Shape From Area.
Awesome Work! You’re Now Finished!
Way to go, we’re done! We managed to create a really awesome effect without needing a whole lot of artistic ability. We also learned how to efficiently use the Pen Tool, and a nice way to use Photoshop and Illustrator in tandem. This is my first tutorial, so I’m sure there will be questions. Feel free to ask in the comments, and I’ll try and answer as quickly as I can. Thanks!
Want to Learn More?
Check out the following great poster design tutorials to learn more:
We’ve all heard them before. The 101 reasons why art will never be a sustainable career. But it’s time to throw away all that negativity and pick up some real hope, because the digital age is changing the game for artists.
In today’s world, there are more opportunities than ever which allow artists to do what they love while creating a sustainable income. And if you’re willing to put in the time and work, you too can reap the incredible rewards of this new age in being a creative.
Today we’ll dive into one avenue that artists turn to when they want to figure out how illustrators make money online. We’ll take a look at what Patreon is, how to use Patreon as an artist, how to set up an account, look at sites like Patreon, and consider the alternatives to building these types of businesses online.
Creator Jack Conte was looking for a way to support himself and his YouTube channel when he decided to found Patreon. Patreon is a crowdfunding platform that allows creators to fund their projects by fans, or patrons, who donate money on a recurring basis.
How Illustrators Make Money on Patreon
Similar to crowdfunding sites like Kickstarter, Patreon allows users to create their own profiles where fans can support their work, either through pledges of monthly Patreon donations or donations per project.
You can help your favorite Patreon artists hit their goals and be one step closer to supporting their dreams of making a living doing what they love.
Patreon is reinventing the way artists are supported by their community. Pledges are separated into several different tiers, with amazing rewards at each level. And with fans able to pledge as little as $1 per cycle, there’s a real sense that you’re able to support artists without needing to break the bank.
Paid to Do „Nothing?”
So how do you convince people to give you Patreon donations? And are they really okay with it?
Don’t be fooled by the naysayers who don’t understand what it takes to build a business online. The number one misconception you’ll run into is people thinking that you’re getting paid to do nothing.
But let’s be real. Patreon artists by no means are accepting handouts.
And it’s not just a platform for visual artists. Writers, musicians, podcasters, photographers, and creatives of all different shapes and sizes use Patreon to fund their projects. Each of these projects takes from dozens to hundreds of hours to complete, on top of the years of experience put into mastering their craft.
So think of all those years you spent creating for others without ever receiving a single penny. Allow Patreon to buy back those years by supplying you with a way to support yourself reliably.
How Do I Start a Patreon?
Learning how to start a Patreon takes a few simple steps. Let’s walk through them together.
1. Head to the Patreon Website
The first step in learning how to start a Patreon is to head to their website. In the upper right-hand corner, click the red button that says Create on Patreon.
2. Choose a Sign-Up Option
You’ll find three sign-up options: Sign up with Google, Sign up with Facebook, and the choice to create an account without linking.
What’s the difference? Choosing either of the first two sign-up options will link your Patreon account to Google or Facebook, meaning you won’t need to make new login information. However, that does mean that if you lose your Google or Facebook account, you lose your Patreon account too.
3. Complete the Account Creation Steps
Once you’ve signed up, you’ll be greeted with five steps to get your account ready.
Choose Content Categories
On Patreon, you can promote anime, podcasts, films, and other creative arts. You can choose up to two categories from the list to describe the content you’ll show on your Patreon.
18+ Age Filter
This is an important step for Patreon artists. Patrons on Patreon come from many different age groups. If you have content that’s appropriate for older audiences and not for younger ones, this will add an 18+ pop up to visitors of your page.
Currency Options
Patreon offers three payout currency options to creators: US Dollars, Euro, or British Pounds.
Don’t worry. Even if you don’t see your local currency, you can still create on Patreon! This article from the Patreon Help Center addresses how you can receive payouts if you’re not based in the United States, United Kingdom, or Europe.
Offer Exclusive Merch
Part of the appeal of making Patreon art is connecting with patrons, and you can build that relationship with merch. If you choose this option, you design the merch and Patreon will handle production and shipping for an added fee to your membership plan.
Pro tip: tying merch to different tiers is a great incentive for patrons. Learn about the relationship between tier pricing and merch from the Patreon Help Center.
Merch through Patreon isn’t mandatory. There are plenty of other Patreon reward ideas for artists that you can find to show your patrons love.
Reserve Custom URL
If you want to set up a custom URL for your Patreon page, you can do so here. You’ll need to connect at least one social media account on this page to be able to use this option.
Take this opportunity to connect all your social accounts to your Patreon. This is how to use Patreon as an artist with an interconnected presence.
4. Set Up Account Details and Launch
We’re almost done learning how to start a Patreon! Your last and most important step will be filling out the important account details. This is where you share information about you and what you create, customize tiers, choose merch, edit payment information, and other account information. Note: you won’t be able to launch your Patreon until you finish the required items in the checklist (shown below).
Once you’re finished with this step, click Launch in the upper right-hand corner.
And you’re done! If you’ve been wondering „how do I start a Patreon”, now you know how quick the process is.
How to Be Successful With Patreon
Want a look at a day in the life of a creator? Illustrator Andreas Rocha shares the reality of what it takes to become one of the successful Patreon artists. Their insights are useful if you need some Patreon help.
„Posting my work on Patreon is different from posting paintings on my online portfolio. There is not so much freedom as I have to prepare the files and paint following certain guidelines so people can more or less follow what is going on when they watch the videos. I also have to try and find themes that people appreciate and find interesting.
It’s challenging, because ultimately you have to keep motivated to post but that can only work if people support you. If you set pledge levels too high people won’t support you, but if the income is too low it ends up not being rewarding. You must have patience as the number of followers rises, very slowly. My goal with Patreon is to share my workflow with people interested in knowing how I work and, of course, to provide another source of income.”
I asked even more artists about their insight into what it takes to be successful on Patreon. Let’s take a look at what they all have to say.
Set Realistic Goals
As with any project, goals help not only with motivation but establishing what your end game is. And for Patreon donations, goals also allow your fans to help you by understanding what your needs are. Need new equipment? Say it. Looking to make this your full-time job? Be honest. Don’t be afraid to post your real goals while asking for pledges. It’s how illustrators make money from Patreon.
Digital artist DanteWontDie knows all about goal-setting on Patreon. Here is what he had to say:
„I
think Patreon is a place that you need to prove yourself. You have to let people
willingly pledge to see your art. My
page was set up at the beginning of 2015 and I think I’m pretty satisfied with
my monthly income on that, but I’m still far from my ultimate goal ($2000
per month).
I know there’s still a lot of space for me
to improve and I really appreciate those who have already pledged on my page now. Accumulating
Patreon pledges is like setting up your own business. Do you want to be a full-time artist, or just do it for fun? The good thing is you
have almost zero costs, so you can manage your time accordingly.”
This is one of the most important pieces of Patreon help you’ll get. If you showed up to your work only a few times a week, you wouldn’t have the greatest reputation. So just like any other profession, make sure you’re able to post regularly in order to keep your patrons interested and Patreon donations coming in.
Icarus, artist and creator of the analog scifi comic Inhuman, offer his advice on the best way to approach posting regularly:
„Engage,
engage, engage! Build your brand before launching as much as possible, and then
encourage people to check out your Patreon whenever possible.
Rewards are a
must, if that’s WIPs or access to zips of unreleased art or whatever. People
just like to get „something” for their money besides just the knowledge they’re
helping you. Patreon
is half of our household income, so it helps a lot. More than anything, being friendly in whatever you do also pays!”
Though it’s not uncommon that people will support you just for the heck of it, one of the best ways you can keep your patrons happy while garnering new ones is to offer them valuable rewards. This could be Patreon anime commissions, shoutouts, or other rewards.
Freelance Digital Artist Didi Esmeralda offers tutorials and commissions for her patrons depending on the reward tier they select. She reminds us why it’s important to have Patreon reward ideas for artists and to keep in communication with your fans for support:
„Each
artist must divulge their own work on social networks to be appreciated by
followers and fans, and then communicate to their followers that they can
support the work in patreon, and get exclusive content that can be found there.”
But remember, Patreon is not your only option here. While there are other sites like Patreon, taking advantage of social media and online business goes way beyond just crowdfunding sites. Here are just a few other areas that are some great alternatives to sites like Patreon:
Though artist Racheal Scotland is new to building her presence on Patreon, she’s a talented artist with years in the industry. Take it from her on what other sites like Patreon and alternatives you can look to:
If
you’re looking to live off your art, you can open shops on DeviantArt, INPRNT, and Etsy. If
you’re confident in your work, open commissions. There’s always
someone who’s bound to help support your work.
As long as you make sure people know where to find your work, market all
your avenues. Create a portfolio. And use all the platforms available to you.
Graphic Designer Roberto Blake is not a Patreon artist but definitely knows the online grind. From his popular YouTube channel to his offline speaking engagements, he’s found a way to not only build a community but one that supports his creative endeavors. Here’s his advice:
„A service based business
is not sustainable long term. My variations of diversifying income (advertising/affiliate marketing/public speaking/paid
writing/consulting/webinars) may not be a fit for everyone.
However, creating a product that can generate a combination
of passive and active income can make you more secure.
Envato, for instance,
is a great marketplace and I buy assets to modify to save my time pretty
regularly. Align
your passions to a purpose and the work in between is figuring out a practical
application of it. Making
your moves with intention and clarity makes all the difference in where you end
up.”
Thank you to all the artists who gave their wonderful advice. If you want to learn more about them, feel free to follow their work on social media and support their pages below:
Whether you make Patreon anime or abstract illustrations, there’s an audience out there. If you point them in the right direction, your fans will support you more than you could ever imagine. So take a risk and put yourself out there to build an incredible community that will back your dreams.
Who knows, maybe with the help of Patreon or other online avenues, you’ll be able to make a living doing what you love. Now that you know how to use Patreon as an artist, it’s time to get started. So how will you put yourself out there today?
If you’re an artist starting out online, you can find more helpful articles and social media graphics from Envato Tuts+ below. Have any experience with Patreon? Let us know how you like it in the comments below.
Sometimes, when you’re looking for a quick answer, it’s really useful to have an FAQ system in place, rather than waiting for someone to respond to a question. Wouldn’t it be great if Slack could just answer these FAQs for us? In this tutorial, we’re going to be making just that: a slash command for Slack that will answer user FAQs. We’ll be storing our answers in FaunaDB, using FQL to search the database, and utilising a Netlify function to provide a serverless endpoint to connect Slack and FaunaDB.
Prerequisites
This tutorial assumes you have the following requirements:
Github account, used to log in to Netlify and Fauna, as well as storing our code
Slack workspace with permission to create and install new apps
Node.js v12
Create npm package
To get started, create a new folder and initialise a npm package by using your package manager of choice and run npm init -y from inside the folder. After the package has been created, we have a few npm packages to install.
Run this to install all the packages we will need for this tutorial:
These packages are explained below, but if you are already familiar with them, feel free to skip ahead.
Encoding has been installed due to a plugin error occurring in @netlify/plugin-functions-core at the time of writing and may not be needed when you follow this tutorial.
Packages
Express is a web application framework that will allow us to simplify writing multiple endpoints for our function. Netlify functions require handlers for each endpoint, but express combined with serverless-http will allow us to write the endpoints all in one place.
Body-parser is an express middleware which will take care of the application/x-www-form-urlencoded data Slack will be sending to our function.
Faunadb is an npm module that allows us to interact with the database through the FaunaDB Javascript driver. It allows us to pass queries from our function to the database, in order to get the answers
Serverless-http is a module that wraps Express applications to the format expected by Netlify functions, meaning we won’t have to rewrite our code when we shift from local development to Netlify.
Netlify-lambda is a tool which will allow us to build and serve our functions locally, in the same way they will be built and deployed on Netlify. This means we can develop locally before pushing our code to Netlify, increasing the speed of our workflow.
Create a function
With our npm packages installed, it’s time to begin work on the function. We’ll be using serverless to wrap an express app, which will allow us to deploy it to Netlify later. To get started, create a file called netlify.toml, and add the following into it:
[build]
  functions = "functions"
We will use a .gitignore file, to prevent our node_modules and functions folders from being added to git later. Create a file called .gitignore, and add the following:
functions/
node_modules/
We will also need a folder called src, and a file inside it called server.js. Your final file structure should look like:
With this in place, create a basic express app by inserting the code below into server.js:
Check out the final line; it looks a little different to a regular express app. Rather than listening on a port, we’re passing our app into serverless and using this as our handler, so that Netlify can invoke our function.
Let’s set up our body parser to use application/x-www-form-urlencoded data, as well as putting a router in place. Add the following to server.js after defining app:
Notice that the router is using /.netlify/functions/server as an endpoint. This is so that Netlify will be able to correctly deploy the function later in the tutorial. This means we will need to add this to any base URLs, in order to invoke the function.
Create a test route
With a basic app in place, let’s create a test route to check everything is working. Insert the following code to create a simple GET route, that returns a simple json object:
With this route in place, let’s spin up our function on localhost, and check that we get a response. We’ll be using netlify-lambda to serve our app, so that we can imitate a Netlify function locally on port 9000. In our package.json, add the following lines into the scripts section:
With this in place, after saving the file, we can run npm start to begin netlify-lambda on port 9000.
The build command will be used when we deploy to Netlify later.
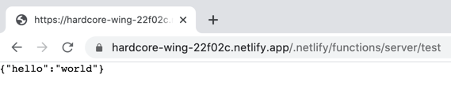
Once it is up and running, we can visit http://localhost:9000/.netlify/functions/server/test to check our function is working as expected.
The great thing about netlify-lambda is it will listen for changes to our code, and automatically recompile whenever we update something, so we can leave it running for the duration of this tutorial.
Start ngrok URL
Now we have a test route working on our local machine, let’s make it available online. To do this, we’ll be using ngrok, a npm package that provides a public URL for our function. If you don’t have ngrok installed already, first run npm install -g ngrok to globally install it on your machine. Then run ngrok http 9000 which will automatically direct traffic to our function running on port 9000.
After starting ngrok, you should see a forwarding URL in the terminal, which we can visit to confirm our server is available online. Copy this base URL to your browser, and follow it with /.netlify/functions/server/test. You should see the same result as when we made our calls on localhost, which means we can now use this URL as an endpoint for Slack!
Each time you restart ngrok, it creates a new URL, so if you need to stop it at any point, you will need to update your URL endpoint in Slack.
Setting up Slack
Now that we have a function in place, it’s time to move to Slack to create the app and slash command. We will have to deploy this app to our workspace, as well as making a few updates to our code to connect our function. For a more in depth set of instructions on how to create a new slash command, you can follow the official Slack documentation. For a streamlined set of instructions, follow along below:
Create a new Slack app
First off, let’s create our new Slack app for these FAQs. Visit https://api.slack.com/apps and select Create New App to begin. Give your app a name (I used Fauna FAQ), and select a development workspace for the app.
Create a slash command
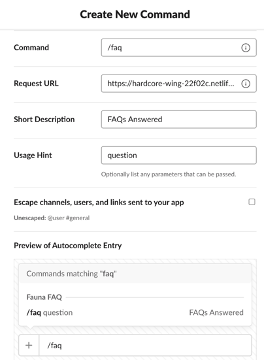
After creating the app, we need to add a slash command to it, so that we can interact with the app. Select slash commands from the menu after the app has been created, then create a new command. Fill in the following form with the name of your command (I used /faq) as well as providing the URL from ngrok. Don’t forget to add /.netlify/functions/server/ to the end!
Install app to workspace
Once you have created your slash command, click on basic information in the sidebar on the left to return to the app’s main page. From here, select the dropdown “Install app to your workspace” and click the button to install it.
Once you have allowed access, the app will be installed, and you’ll be able to start using the slash command in your workspace.
Update the function
With our new app in place, we’ll need to create a new endpoint for Slack to send the requests to. For this, we’ll use the root endpoint for simplicity. The endpoint will need to be able to take a post request with application/x-www-form-urlencoded data, then return a 200 status response with a message. To do this, let’s create a new post route at the root by adding the following code to server.js:
router.post("/", async (req, res) => {

});
Now that we have our endpoint, we can also extract and view the text that has been sent by slack by adding the following line before we set the status:
const text = req.body.text;
console.log(`Input text: ${text}`);
For now, we’ll just pass this text into the response and send it back instantly, to ensure the slack app and function are communicating.
res.status(200);
res.send(text);
Now, when you type /faq <somequestion> on a slack channel, you should get back the same message from the slack slash command.
Formatting the response
Rather than just sending back plaintext, we can make use of Slack’s Block Kit to use specialised UI elements to improve the look of our answers. If you want to create a more complex layout, Slack provides a Block Kit builder to visually design your layout.
For now, we’re going to keep things simple, and just provide a response where each answer is separated by a divider. Add the following function to your server.js file after the post route:
const format = (answers) => {
 if (answers.length == 0) {
   answers = ["No answers found"];
 }

 let formatted = {
   blocks: [],
 };

 for (answer of answers) {
   formatted["blocks"].push({
     type: "divider",
   });
   formatted["blocks"].push({
     type: "section",
     text: {
       type: "mrkdwn",
       text: answer,
     },
   });
 }

 return formatted;
};
With this in place, we now need to pass our answers into this function, to format the answers before returning them to Slack. Update the following in the root post route:
let answers = text;
const formattedAnswers = format(answers);
Now when we enter the same command to the slash app, we should get back the same message, but this time in a formatted version!
Setting up Fauna
With our slack app in place, and a function to connect to it, we now need to start working on the database to store our answers. If you’ve never set up a database with FaunaDB before, there is some great documentation on how to quickly get started. A brief step-by-step overview for the database and collection is included below:
Create database
First, we’ll need to create a new database. After logging into the Fauna dashboard online, click New Database. Give your new database a name you’ll remember (I used “slack-faq”) and save the database.
Create collection
With this database in place, we now need a collection. Click the “New Collection” button that should appear on your dashboard, and give your collection a name (I used “faq”). The history days and TTL values can be left as their defaults, but you should ensure you don’t add a value to the TTL field, as we don’t want our documents to be removed automatically after a certain time.
Add question / answer documents
Now we have a database and collection in place, we can start adding some documents to it. Each document should follow the structure:
The qToken values should be key terms in the question, as we will use them for a tokenized search when we can’t match a question exactly. You can add as many qTokens as you like for each question. The more relevant the tokens are, the more accurate results will be. For example, if our question is “where are the bathrooms”, we should include the qTokens “bathroom”, “bathrooms”, “toilet”, “toilets” and any other terms you may think people will search for when trying to find information about a bathroom.
The questions I used to develop a proof of concept are as follows:
{
  question: "where is the lobby",
  answer: "On the third floor",
  qTokens: ["lobby", "reception"],
},
{
  question: "when is payday",
  answer: "On the first Monday of each month",
  qTokens: ["payday", "pay", "paid"],
},
{
  question: "when is lunch",
  answer: "Lunch break is *12 - 1pm*",
  qTokens: ["lunch", "break", "eat"],
},
{
  question: "where are the bathrooms",
  answer: "Next to the elevators on each floor",
  qTokens: ["toilet", "bathroom", "toilets", "bathrooms"],
},
{
  question: "when are my breaks",
  answer: "You can take a break whenever you want",
  qTokens: ["break", "breaks"],
}
Feel free to take this time to add as many documents as you like, and as many qTokens as you think each question needs, then we’ll move on to the next step.
Creating Indexes
With these questions in place, we will create two indexes to allow us to search the database. First, create an index called “answers_by_question”, selecting question as the term and answer as the value. This will allow us to search all answers by their associated question.
Then, create an index called “answers_by_qTokens”, selecting qTokens as the term and answer as the value. We will use this index to allow us to search through the qTokens of all items in the database.
Searching the database
To run a search in our database, we will do two things. First, we’ll run a search for an exact match to the question, so we can provide a single answer to the user. Second, if this search doesn’t find a result, we’ll do a search on the qTokens each answer has, returning any results that provide a match. We’ll use Fauna’s online shell to demonstrate and explain these queries, before using them in our function.
Exact Match
Before searching the tokens, we’ll test whether we can match the input question exactly, as this will allow for the best answer to what the user has asked. To search our questions, we will match against the “answers_by_question” index, then paginate our answers. Copy the following code into the online Fauna shell to see this in action:
q.Paginate(q.Match(q.Index("answers_by_question"), "where is the lobby"))
If you have a question matching the “where is the lobby” example above, you should see the expected answer of “On the third floor” as a result.
Searching the tokens
For cases where there is no exact match on the database, we will have to use our qTokens to find any relevant answers. For this, we will match against the “answers_by_qTokens” index we created and again paginate our answers. Copy the following into the online shell to see how this works:
If you have any questions with the qToken “break” from the example questions, you should see all answers returned as a result.
Connect function to Fauna
We have our searches figured out, but currently we can only run them from the online shell. To use these in our function, there is some configuration required, as well as an update to our function’s code.
Function configuration
To connect to Fauna from our function, we will need to create a server key. From your database’s dashboard, select security in the left hand sidebar, and create a new key. Give your new key a name you will recognise, and ensure that the dropdown has Server selected, not Admin. Finally, once the key has been created, add the following code to server.js before the test route, replacing the <secretKey> value with the secret provided by Fauna.
It would be preferred to store this key in an environment variable in Netlify, rather than directly in the code, but that is beyond the scope of this tutorial. If you would like to use environment variables, this Netlify post explains how to do so.
Update function code
To include our new search queries in the function, copy the following code into server.js after the post route:
These functions replicate the same functionality as the queries we previously ran in the online Fauna shell, but now we can utilise them from our function.
Deploy to Netlify
Now the function is searching the database, the only thing left to do is put it on the cloud, rather than a local machine. To do this, we’ll be making use of a Netlify function deployed from a GitHub repository.
First things first, add a new repo on Github, and push your code to it. Once the code is there, go to Netlify and either sign up or log in using your Github profile. From the home page of Netlify, select “New site from git” to deploy a new site, using the repo you’ve just created in Github.
If you have never deployed a site in Netlify before, this post explains the process to deploy from git.
Ensure while you are creating the new site, that your build command is set to npm run build, to have Netlify build the function before deployment. The publish directory can be left blank, as we are only deploying a function, rather than any pages.
Netlify will now build and deploy your repo, generating a unique URL for the site deployment. We can use this base URL to access the test endpoint of our function from earlier, to ensure things are working.
The last thing to do is update the Slack endpoint to our new URL! Navigate to your app, then select ‘slash commands’ in the left sidebar. Click on the pencil icon to edit the slash command and paste in the new URL for the function. Finally, you can use your new slash command in any authorised Slack channels!
Conclusion
There you have it, an entirely serverless, functional slack slash command. We have used FaunaDB to store our answers and connected to it through a Netlify function. Also, by using Express, we have the flexibility to add further endpoints to the function for adding new questions, or anything else you can think up to further extend this project! Hopefully now, instead of waiting around for someone to answer your questions, you can just use /faq and get the answer instantly!
Matthew Williams is a software engineer from Melbourne, Australia who believes the future of technology is serverless. If you’re interested in more from him, check out his Medium articles, or his GitHub repos.
US Elections and these in particular, are more than a candidate vs another, is a show of strength between Republicans and Democrats and all they represent, two completely different views against each other in world’s biggest political game.
Coupons are a great way to reward loyal customers and clients, so they should look as attractive as the discounts they’re offering.
Placeit has many gorgeous Coupon Templates for you to choose from
If you are a small business looking for a cost-effective way to create a professional quality coupon, then you have to check out Placeit. Not only does Placeit offer hundreds of gorgeous coupon templates, but it also provides an easy to use coupon maker so you can make your own coupon quickly and easily in a few simple steps.
Let me show you how.
How to Make Coupons With a Digital Coupon Creator
Step 1
Go to Placeit.net and enter ’Sales Coupons’ in the search bar.
Browse the coupon design ideas available.
Select a coupon maker template you like.
Click on it to open up the coupon creator.
Step 2
Now you will create your custom coupon template, starting with the controls on the right.
Select a background image for your coupon template. If you want to upload your own photo, this is where you can do so by clicking on Upload Image.
Alternatively, you can elect not to use a photo by selecting No Image and choosing a beautiful colour for your background instead.
If your business has an icon that you wish to use, you can upload it next or choose an icon you like from those on offer.
Now select a top and bottom banner colour for your coupon.
Step 3
When you are done, go to the left of the template.
Here you will enter the text for your coupon and change the font style and colour if you like.
You can also add additional text fields if you need them.
Step 4
You can move and resize your text or top and bottom banners if you like, and use the Reset Layout button to return to the default setting if you don’t like what you’ve done.
Step 5
When you’re happy with your design, hit the Download button.
This will take you to the download page, where you have two options for purchasing your custom coupon design.
You can either pay a small fee for your single design or sign up for a monthly or yearly subscription that offers you unlimited downloads of all of Placeit’s designs, mockups, logos, videos, and gaming templates.
Now that you know how to design a coupon, let’s look at some of the best coupon design ideas available at Placeit.
Who can resist a 2 for 1 offer, especially when it’s paired with a mouth-watering image like this one? Of course, you can easily use your own image and change the text to advertise a completely different kind of offer too.
Why not learn how to design a coupon by playing with a template like this one? Switch out the background image, change the text, and see how easy it is to make your own coupon.
Boom! The offer is hard to miss here, with super-sized text and that bright red background. If it’s too much, you can easily pull back a little by tweaking the template online.
Learning how to make coupons can be time-consuming and tedious, but a coupon maker template like this one means you can get it done in no time and get back to focusing on the more important aspects of your business.
Did someone say „smoothie bowls”? That one looks particularly delicious, but of course you’ll have your own enticing image to use to promote your offer.
This business coupon template is so flexible. The example is for a photography studio, but you can easily change the text and use it to promote pretty much any type of company.
With this bakery or restaurant coupon template, you can give most of the space to your imagery, but there’s still enough space to give people a nice discount in the bottom half.
You know the drill by now. This is billed as a gym coupon template, but by changing the image and text using the digital coupon creator, you can promote any business you want!
Try a touch of mystery with this coupon, which gives viewers a glimpse of the clothes on the left but leaves the rest of them partially hidden behind the text and colour overlay.
Why not tie your offer in with a particular holiday to make this an Easter coupon template or other holiday coupon template? The sky’s the limit with Placeit’s digital coupon creator.
Out of coupon design ideas? No problem. You can use a template like this one as inspiration to make your own coupon. You’ll never run out of ideas again!
Creative typography can be surprisingly persuasive. This coupon makes great use of different typefaces to communicate its message. Offering free coffee always helps too!
Here’s a simple gift coupon template that you can use to help spread the word. The elegant design and abstract graphics make it easy to use it for a range of different businesses with minimal changes required.
Anyone who can do that pose definitely deserves their 50% off! The rest of us, though, can still use the template to make a coupon that’s visually appealing and that customers will want to keep and use.
Some of the templates here are generic, but others cater to a specific niche. This car wash coupon template is definitely in the „niche” category. If you happen to run a car wash and need to make a coupon, it’s your lucky day!
You don’t need to be a designer or even know how to make coupons. All you need to do is use a referral coupon template like this one and edit it right in your browser. So simple!
Whether you’re vegan or carnivore, you can get your customers salivating by uploading your best imagery to this restaurant coupon template (and by giving your best discount, of course).
Check out the elegant simplicity of this referral coupon template. The white text on a black background has a wonderful minimalism, and the percentage line extending to slice through the number is a lovely touch.
Need some fresh coupon design ideas? Check out an online coupon maker template like this one, which includes some cool design elements while keeping the attention focused on your all-important discount offer.
When you’re learning how to design coupons, one popular principle is the dotted line at the edge to encourage people to „clip” them. Another is to make your offer super clear. This business coupon template makes great use of both those principles.
You’ve got to admire the optimism of someone who would create a coupon template with a $1,000 discount offer. If you’re not feeling so generous, no problem—you can change the amount, as well as all the other details, with the online coupon maker.
Sometimes, bigger is better. If you want to grab your customers’ attention by screaming „SALE” in big, bold letters against a bright red background, this is the business coupon template for you.
Want to offer a special discount to students? Use this student coupon template to get the job done. Of course, you could also use the same template to offer a range of different discounts.
Offer your customers a great deal on the holiday of their dreams! This holiday coupon template gives plenty of space for an enticing image to inspire wanderlust, as well as text to specify the details of the deal.
Let your customers print off a coupon giving them a discount on a meal. This restaurant coupon template is the perfect solution for making people’s mouths water and getting them to come back to your restaurant. Try offering an extra discount to boost reservations on slow nights of the week.
Here’s a printable gift coupon template that’s suitable for a variety of different businesses. Give it out to reward your loyal customers, or let people buy the certificates to give to their friends.
Coupons can be either physical or digital these days, and this digital coupon creator is perfect for creating a web-based coupon. If the background graphic is not for you, don’t worry—there are plenty more to choose from.
Want to generate more referrals for your business? A coupon is a great tactic to use. With this simple referral coupon template, you can drum up business for your spa, salon, or other type of company.
Let your customers give a gift that also spreads the word about your business! With this gift coupon template, you can make a stylish gift certificate that people will want to give away.
This last one won’t be to everyone’s taste, but if you like bright colours, bold text, and trippy designs, you’ll love it. If not, you can always use the online coupon maker to tone things down a bit.
Make Your Own Coupon Today
Placeit is an excellent source for premium coupon designs. You can create your own with the online coupon maker in minutes and download it for a small fee.
Alternatively, if you regularly need mockups, logos, banners, and other design resources, Placeit offers unlimited downloads for one low monthly fee.
Check out the following articles to see what other terrific resources are available from Placeit.
If you are searching for a theme to install on a new WordPress website, then one provider you will certainly come across is Elegant Themes. Founded by Nick Roach in his college apartment, Elegant Themes is one of the most popular WordPress theme stores around. What started as a repository of 80+ themes and a […]
If you are searching for a theme to install on a new WordPress website, then one provider you will certainly come across is Elegant Themes. Founded by Nick Roach in his college apartment, Elegant Themes is one of the most popular WordPress theme stores around. What started as a repository of 80+ themes and a […]
THE ORIGINAL? L’assurance Maladie / Health Insurance – 2001 “You eat fruits and vegetables at every meal,
you strongly protect your health”
Source : French Art Directors Club Agency : Young & Rubicam (France)
LESS ORIGINAL Indian River Select fruit juice – 2020
“Get ready to fight”
(Click image to enlarge)
Source : Adsoftheworld
Agency : El Autobus, Miami (USA)
THE ORIGINAL? L’assurance Maladie / Health Insurance – 2001 “You eat fruits and vegetables at every meal,
you strongly protect your health”
Source : French Art Directors Club Agency : Young & Rubicam (France)
LESS ORIGINAL Indian River Select fruit juice – 2020
“Get ready to fight”
(Click image to enlarge)
Source : Adsoftheworld
Agency : El Autobus, Miami (USA)
Agregator najlepszych postów o designie, webdesignie, cssie i Internecie





 Poster DesignHow to Create a Suffragette-Inspired Poster in Adobe InDesign #100YearsGrace Fussell
 RetroHow to Create a Vintage Soviet Space Travel Poster in Adobe InDesignGrace Fussell
 SummerHow to Create an Ice-Cream Script Poster in Adobe InDesignGrace Fussell
 InDesign TemplatesHow to Create a Memphis Style Club Poster in Adobe InDesignGrace Fussell
 Poster DesignHow to Create a Chalkboard BBQ Poster in Adobe InDesignGrace Fussell
 Poster DesignMovie Poster Design 101: The Anatomy of a Movie PosterGrace Fussell
 Poster DesignHow to Create a Wanted PosterMonika Zagrobelna