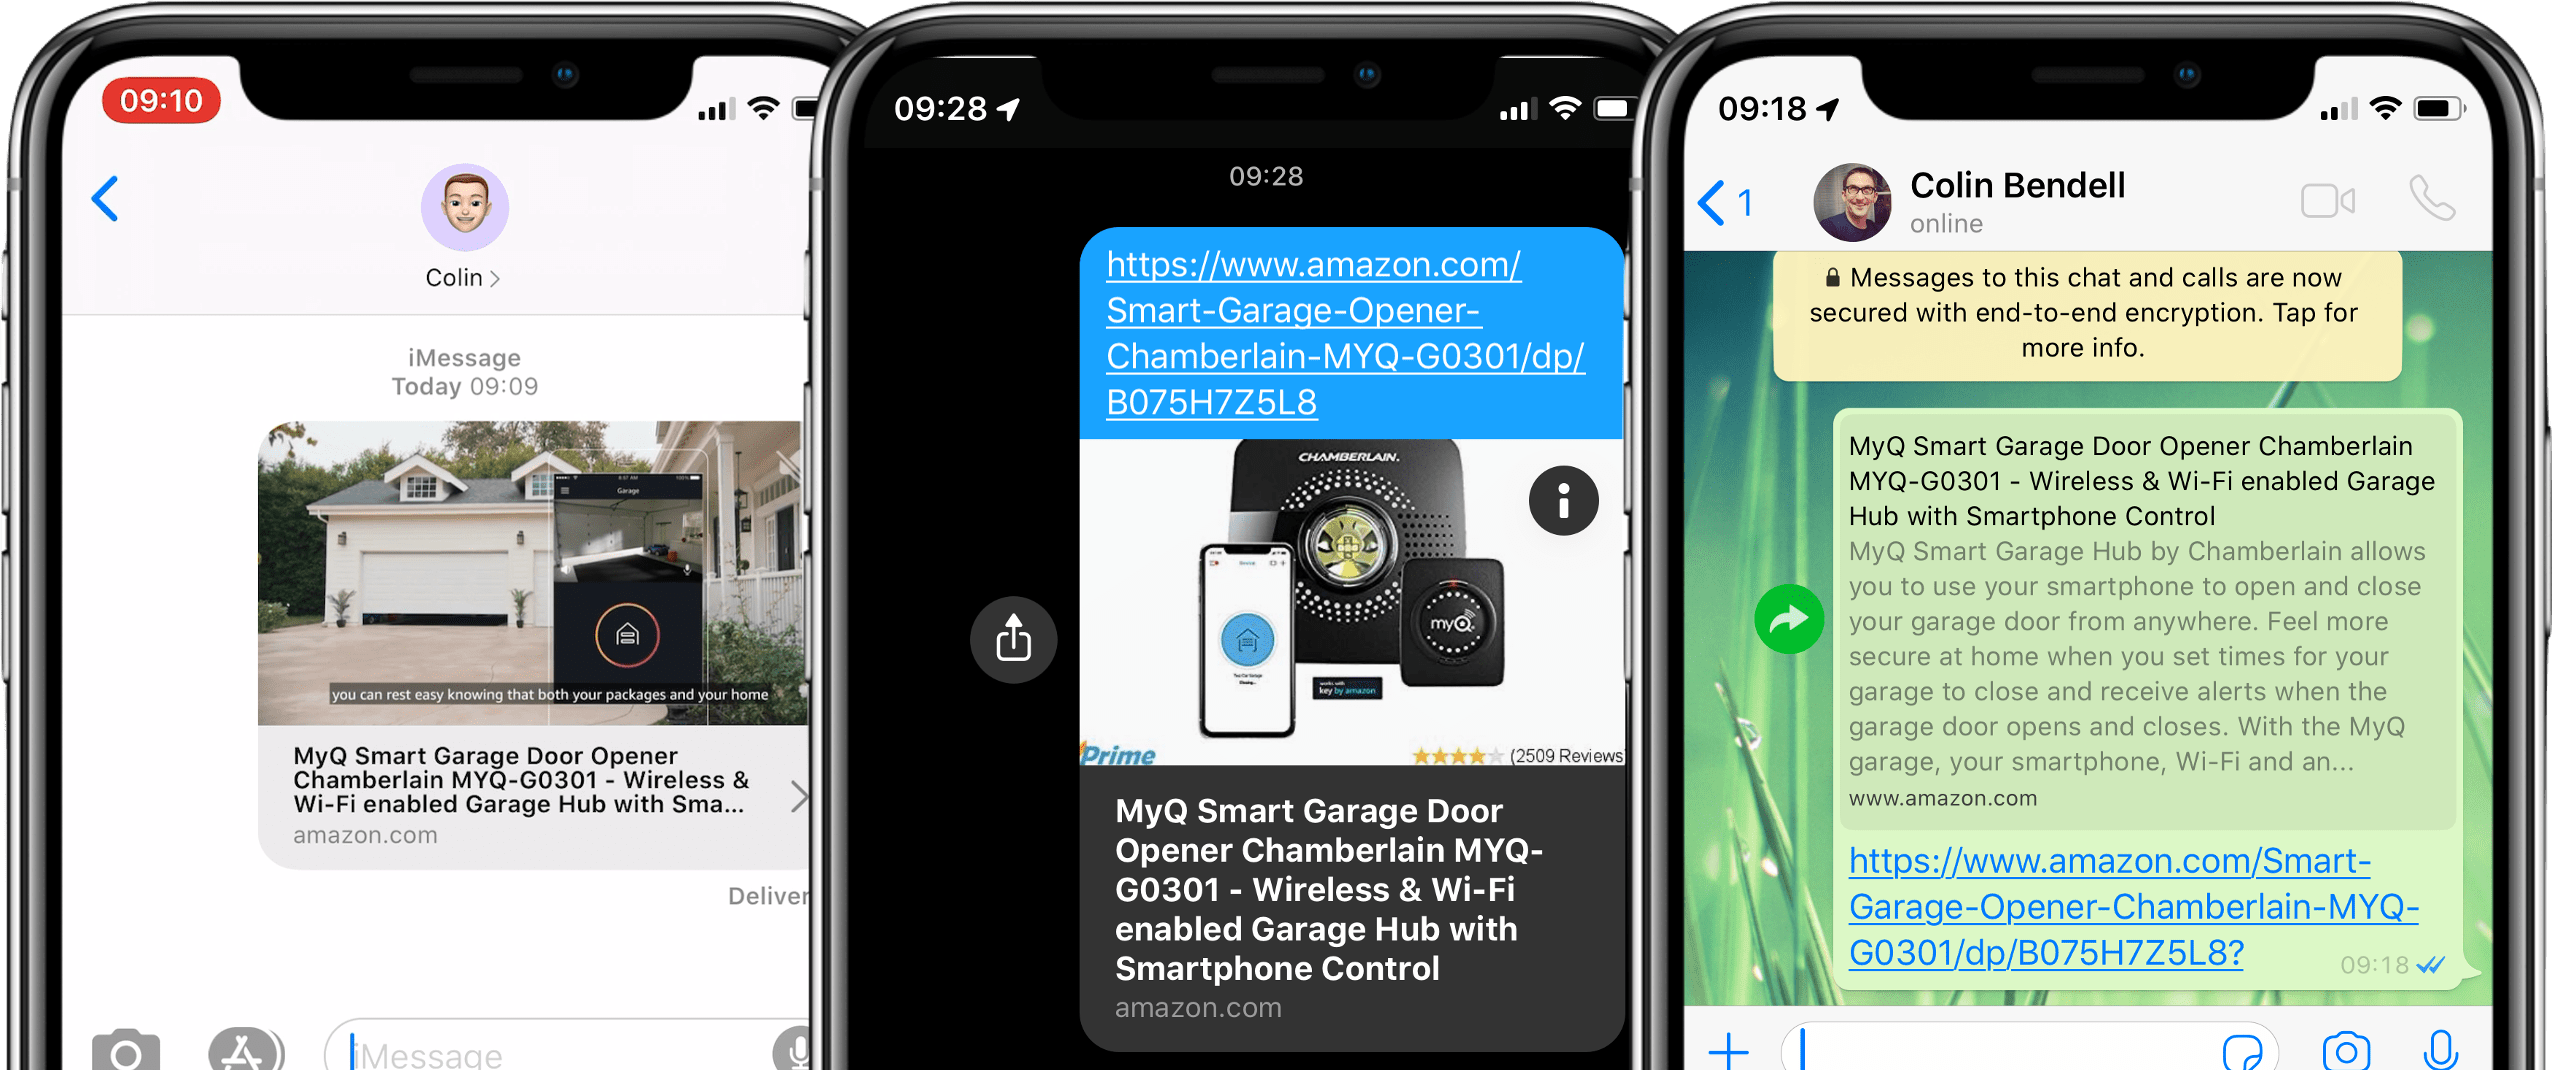
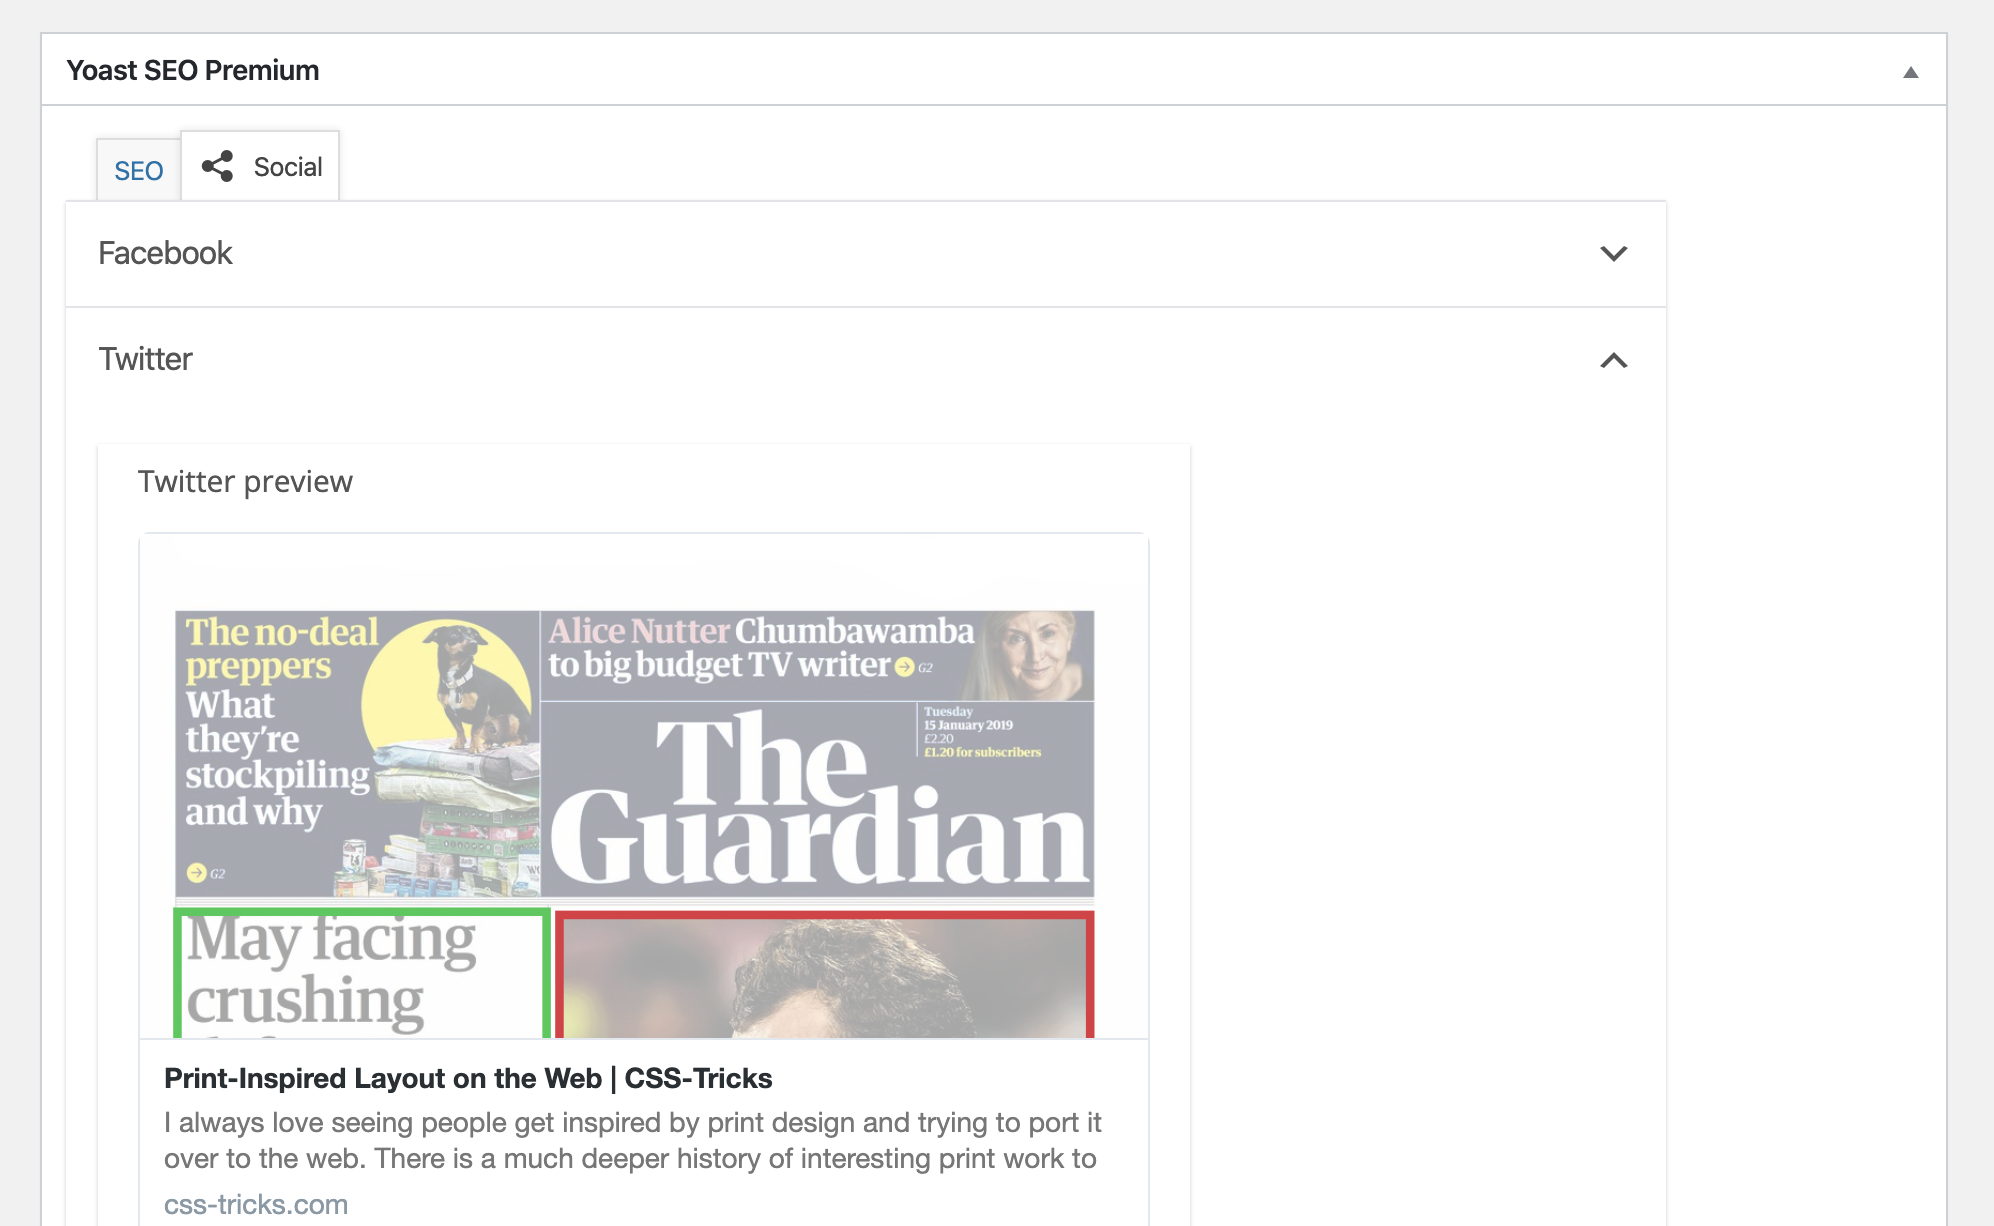
The word „microbrowser” clearly got my attention. Never heard that before. Colin Bendell defines them as the little parts of other software that do HTTP requests to a URL to generate a preview. Like the little URL preview in iOS messages, WhatsApp, or Slack.
I’m a tiny bit skeptical of the name, because what’s happening is the software making that HTTP request and parsing out a little data to use however it will. I’m not sure I’d call that a browser of any kind, but I take the point.
I agree that these things are mega important.
[…] the real gold for marketers is from word-of-mouth discussions. Those conversations with your friends when you recommend a TV show, a brand of clothing, or share a news report. This is the most valuable kind of marketing.
Falling snowflakes are a great way to make your winter photography much more interesting. Sometimes the weather doesn’t cooperate, however, and you have to…
Digitally created snow can often be quite difficult to generate in Photoshop, in a realistic-looking way. We recently published a tutorial showing how to add…
In this quick video from our Photoshop in 60 seconds series, learn how to install and load custom brushes to use for your designs and digital paintings.
Tutorial Assets
The following assets were used in the production of this tutorial:
Press Control-N to create a new document and use the following settings: 1000 x 1000 px; 300 dpi.
Step 2
Click U and select the Rounded Rectangle Tool. Create a shape with the following settings: Width: 30 px; Height: 720 px.
Step 3
After that, we need to create a duplicate of the shape using Right Click > Duplicate.
Step 4
Hit Control-T and change the Height to 20%.
Step 5
Rotate the shape by 45° while holding Shift.
Step 6
While holding Shift, move the layer 305 px up and 40 px to the right.
Step 7
Create a duplicate of the layer, and then go to Edit > Transform > Flip Horizontal.
Step 8
Move the duplicate of the shape 80 px to the left.
Step 9
Select the small shapes while holding Shift and then Right Click > Merge.
Step 10
Create two duplicates of this new layer, and move each new shape 70px down.
Step 11
Merge all the shape layers and create a duplicate of your new layer. Then rotate it 180° while holding Shift.
Step 12
Merge the shapes again, and create two duplicates of the layer. Rotate these duplicates by 60° and -60°, and then merge these shapes into a snowflake.
2. How to Create a Snowflake Brush Using the Shape Layers
Step 1
Now we can start to create our brush. Make the background layer Invisible, and then go to Edit > Define Brush Preset, select any name you want to use, and hit the OK button.
Step 2
Now we need to change the brush’s settings to create a complex brush texture. Select the Brush Instrument and hit the Brush Settings icon.
Step 3
Go to the Shape Dynamics panel and set the Size Jitter to 100% and Angle Jitter to 100%.
Step 4
Go to the Scattering panel, set the Scatter to 1000%, and put a tick on Both Axes. Our snowflake brush Photoshop settings are almost ready now—we just need to add some dynamics to the opacity of the snow brush Photoshop preset.
Step 5
Go to the Transfer panel and set the Opacity Jitter to 100%.
Step 6
Click on New Brush Preset to save the settings for the brush.
3. How to Create an Overlay Using a Custom Snowflake Photoshop Brush
Step 1
Open the image you want to use for overlaying, and then create two layers using Shift-Control-N.
Step 2
Select the brush, change the size to 250 px, and draw with this brush on the first empty layer to create an overlaying brush texture.
Step 3
Draw some more snowflakes on the second layer, and finally, to add some motion to the image, go to Filter > Blur > Motion Blur and use the following settings:
Angle: 90°
Distance: 25 px
Awesome Work, You’re Now Done!
Congratulations! You have created snowflake brushes and snow overlays for an image using Photoshop shapes and brush instruments. Here is our final result:
Looking for some more snowflake or sparkle brush Photoshop items? Check these products from GraphicRiver:
This pack contains 60 hi-res snowflakes brushes with different brush textures. It could be extremely useful for creating Christmas and winter pictures.
If you want something more realistic, check this 17 snow brush Photoshop pack. This item will work well for adding snow to your images. These brushes could be also useful if you need to create sparkle brush Photoshop presets, as it gives you realistic-looking particles.
This „30 snow decoration brushes” item contains a complex snowflake brush Photoshop pack with different complex shapes, great for creating elements of your Christmas background.
This brushes pack contains six Photoshop snowflake brushes with crystal effect brush textures. A great choice for creating winter and Christmas decoration elements or backgrounds.
Want to learn snowflake brush Photoshop techniques, or maybe how to create illustrator vector snowflake shapes? Check these awesome tutorials:
Falling snowflakes are a great way to make your winter photography much more interesting. Sometimes the weather doesn’t cooperate, however, and you have to…
Digitally created snow can often be quite difficult to generate in Photoshop, in a realistic-looking way. We recently published a tutorial showing how to add…
In this quick video from our Photoshop in 60 seconds series, learn how to install and load custom brushes to use for your designs and digital paintings.
Tutorial Assets
The following assets were used in the production of this tutorial:
Press Control-N to create a new document and use the following settings: 1000 x 1000 px; 300 dpi.
Step 2
Click U and select the Rounded Rectangle Tool. Create a shape with the following settings: Width: 30 px; Height: 720 px.
Step 3
After that, we need to create a duplicate of the shape using Right Click > Duplicate.
Step 4
Hit Control-T and change the Height to 20%.
Step 5
Rotate the shape by 45° while holding Shift.
Step 6
While holding Shift, move the layer 305 px up and 40 px to the right.
Step 7
Create a duplicate of the layer, and then go to Edit > Transform > Flip Horizontal.
Step 8
Move the duplicate of the shape 80 px to the left.
Step 9
Select the small shapes while holding Shift and then Right Click > Merge.
Step 10
Create two duplicates of this new layer, and move each new shape 70px down.
Step 11
Merge all the shape layers and create a duplicate of your new layer. Then rotate it 180° while holding Shift.
Step 12
Merge the shapes again, and create two duplicates of the layer. Rotate these duplicates by 60° and -60°, and then merge these shapes into a snowflake.
2. How to Create a Snowflake Brush Using the Shape Layers
Step 1
Now we can start to create our brush. Make the background layer Invisible, and then go to Edit > Define Brush Preset, select any name you want to use, and hit the OK button.
Step 2
Now we need to change the brush’s settings to create a complex brush texture. Select the Brush Instrument and hit the Brush Settings icon.
Step 3
Go to the Shape Dynamics panel and set the Size Jitter to 100% and Angle Jitter to 100%.
Step 4
Go to the Scattering panel, set the Scatter to 1000%, and put a tick on Both Axes. Our snowflake brush Photoshop settings are almost ready now—we just need to add some dynamics to the opacity of the snow brush Photoshop preset.
Step 5
Go to the Transfer panel and set the Opacity Jitter to 100%.
Step 6
Click on New Brush Preset to save the settings for the brush.
3. How to Create an Overlay Using a Custom Snowflake Photoshop Brush
Step 1
Open the image you want to use for overlaying, and then create two layers using Shift-Control-N.
Step 2
Select the brush, change the size to 250 px, and draw with this brush on the first empty layer to create an overlaying brush texture.
Step 3
Draw some more snowflakes on the second layer, and finally, to add some motion to the image, go to Filter > Blur > Motion Blur and use the following settings:
Angle: 90°
Distance: 25 px
Awesome Work, You’re Now Done!
Congratulations! You have created snowflake brushes and snow overlays for an image using Photoshop shapes and brush instruments. Here is our final result:
Looking for some more snowflake or sparkle brush Photoshop items? Check these products from GraphicRiver:
This pack contains 60 hi-res snowflakes brushes with different brush textures. It could be extremely useful for creating Christmas and winter pictures.
If you want something more realistic, check this 17 snow brush Photoshop pack. This item will work well for adding snow to your images. These brushes could be also useful if you need to create sparkle brush Photoshop presets, as it gives you realistic-looking particles.
This „30 snow decoration brushes” item contains a complex snowflake brush Photoshop pack with different complex shapes, great for creating elements of your Christmas background.
This brushes pack contains six Photoshop snowflake brushes with crystal effect brush textures. A great choice for creating winter and Christmas decoration elements or backgrounds.
Want to learn snowflake brush Photoshop techniques, or maybe how to create illustrator vector snowflake shapes? Check these awesome tutorials:
Falling snowflakes are a great way to make your winter photography much more interesting. Sometimes the weather doesn’t cooperate, however, and you have to…
Digitally created snow can often be quite difficult to generate in Photoshop, in a realistic-looking way. We recently published a tutorial showing how to add…
In this quick video from our Photoshop in 60 seconds series, learn how to install and load custom brushes to use for your designs and digital paintings.
Tutorial Assets
The following assets were used in the production of this tutorial:
Press Control-N to create a new document and use the following settings: 1000 x 1000 px; 300 dpi.
Step 2
Click U and select the Rounded Rectangle Tool. Create a shape with the following settings: Width: 30 px; Height: 720 px.
Step 3
After that, we need to create a duplicate of the shape using Right Click > Duplicate.
Step 4
Hit Control-T and change the Height to 20%.
Step 5
Rotate the shape by 45° while holding Shift.
Step 6
While holding Shift, move the layer 305 px up and 40 px to the right.
Step 7
Create a duplicate of the layer, and then go to Edit > Transform > Flip Horizontal.
Step 8
Move the duplicate of the shape 80 px to the left.
Step 9
Select the small shapes while holding Shift and then Right Click > Merge.
Step 10
Create two duplicates of this new layer, and move each new shape 70px down.
Step 11
Merge all the shape layers and create a duplicate of your new layer. Then rotate it 180° while holding Shift.
Step 12
Merge the shapes again, and create two duplicates of the layer. Rotate these duplicates by 60° and -60°, and then merge these shapes into a snowflake.
2. How to Create a Snowflake Brush Using the Shape Layers
Step 1
Now we can start to create our brush. Make the background layer Invisible, and then go to Edit > Define Brush Preset, select any name you want to use, and hit the OK button.
Step 2
Now we need to change the brush’s settings to create a complex brush texture. Select the Brush Instrument and hit the Brush Settings icon.
Step 3
Go to the Shape Dynamics panel and set the Size Jitter to 100% and Angle Jitter to 100%.
Step 4
Go to the Scattering panel, set the Scatter to 1000%, and put a tick on Both Axes. Our snowflake brush Photoshop settings are almost ready now—we just need to add some dynamics to the opacity of the snow brush Photoshop preset.
Step 5
Go to the Transfer panel and set the Opacity Jitter to 100%.
Step 6
Click on New Brush Preset to save the settings for the brush.
3. How to Create an Overlay Using a Custom Snowflake Photoshop Brush
Step 1
Open the image you want to use for overlaying, and then create two layers using Shift-Control-N.
Step 2
Select the brush, change the size to 250 px, and draw with this brush on the first empty layer to create an overlaying brush texture.
Step 3
Draw some more snowflakes on the second layer, and finally, to add some motion to the image, go to Filter > Blur > Motion Blur and use the following settings:
Angle: 90°
Distance: 25 px
Awesome Work, You’re Now Done!
Congratulations! You have created snowflake brushes and snow overlays for an image using Photoshop shapes and brush instruments. Here is our final result:
Looking for some more snowflake or sparkle brush Photoshop items? Check these products from GraphicRiver:
This pack contains 60 hi-res snowflakes brushes with different brush textures. It could be extremely useful for creating Christmas and winter pictures.
If you want something more realistic, check this 17 snow brush Photoshop pack. This item will work well for adding snow to your images. These brushes could be also useful if you need to create sparkle brush Photoshop presets, as it gives you realistic-looking particles.
This „30 snow decoration brushes” item contains a complex snowflake brush Photoshop pack with different complex shapes, great for creating elements of your Christmas background.
This brushes pack contains six Photoshop snowflake brushes with crystal effect brush textures. A great choice for creating winter and Christmas decoration elements or backgrounds.
Want to learn snowflake brush Photoshop techniques, or maybe how to create illustrator vector snowflake shapes? Check these awesome tutorials:
Falling snowflakes are a great way to make your winter photography much more interesting. Sometimes the weather doesn’t cooperate, however, and you have to…
Digitally created snow can often be quite difficult to generate in Photoshop, in a realistic-looking way. We recently published a tutorial showing how to add…
In this quick video from our Photoshop in 60 seconds series, learn how to install and load custom brushes to use for your designs and digital paintings.
Tutorial Assets
The following assets were used in the production of this tutorial:
Press Control-N to create a new document and use the following settings: 1000 x 1000 px; 300 dpi.
Step 2
Click U and select the Rounded Rectangle Tool. Create a shape with the following settings: Width: 30 px; Height: 720 px.
Step 3
After that, we need to create a duplicate of the shape using Right Click > Duplicate.
Step 4
Hit Control-T and change the Height to 20%.
Step 5
Rotate the shape by 45° while holding Shift.
Step 6
While holding Shift, move the layer 305 px up and 40 px to the right.
Step 7
Create a duplicate of the layer, and then go to Edit > Transform > Flip Horizontal.
Step 8
Move the duplicate of the shape 80 px to the left.
Step 9
Select the small shapes while holding Shift and then Right Click > Merge.
Step 10
Create two duplicates of this new layer, and move each new shape 70px down.
Step 11
Merge all the shape layers and create a duplicate of your new layer. Then rotate it 180° while holding Shift.
Step 12
Merge the shapes again, and create two duplicates of the layer. Rotate these duplicates by 60° and -60°, and then merge these shapes into a snowflake.
2. How to Create a Snowflake Brush Using the Shape Layers
Step 1
Now we can start to create our brush. Make the background layer Invisible, and then go to Edit > Define Brush Preset, select any name you want to use, and hit the OK button.
Step 2
Now we need to change the brush’s settings to create a complex brush texture. Select the Brush Instrument and hit the Brush Settings icon.
Step 3
Go to the Shape Dynamics panel and set the Size Jitter to 100% and Angle Jitter to 100%.
Step 4
Go to the Scattering panel, set the Scatter to 1000%, and put a tick on Both Axes. Our snowflake brush Photoshop settings are almost ready now—we just need to add some dynamics to the opacity of the snow brush Photoshop preset.
Step 5
Go to the Transfer panel and set the Opacity Jitter to 100%.
Step 6
Click on New Brush Preset to save the settings for the brush.
3. How to Create an Overlay Using a Custom Snowflake Photoshop Brush
Step 1
Open the image you want to use for overlaying, and then create two layers using Shift-Control-N.
Step 2
Select the brush, change the size to 250 px, and draw with this brush on the first empty layer to create an overlaying brush texture.
Step 3
Draw some more snowflakes on the second layer, and finally, to add some motion to the image, go to Filter > Blur > Motion Blur and use the following settings:
Angle: 90°
Distance: 25 px
Awesome Work, You’re Now Done!
Congratulations! You have created snowflake brushes and snow overlays for an image using Photoshop shapes and brush instruments. Here is our final result:
Looking for some more snowflake or sparkle brush Photoshop items? Check these products from GraphicRiver:
This pack contains 60 hi-res snowflakes brushes with different brush textures. It could be extremely useful for creating Christmas and winter pictures.
If you want something more realistic, check this 17 snow brush Photoshop pack. This item will work well for adding snow to your images. These brushes could be also useful if you need to create sparkle brush Photoshop presets, as it gives you realistic-looking particles.
This „30 snow decoration brushes” item contains a complex snowflake brush Photoshop pack with different complex shapes, great for creating elements of your Christmas background.
This brushes pack contains six Photoshop snowflake brushes with crystal effect brush textures. A great choice for creating winter and Christmas decoration elements or backgrounds.
Want to learn snowflake brush Photoshop techniques, or maybe how to create illustrator vector snowflake shapes? Check these awesome tutorials:
Falling snowflakes are a great way to make your winter photography much more interesting. Sometimes the weather doesn’t cooperate, however, and you have to…
Digitally created snow can often be quite difficult to generate in Photoshop, in a realistic-looking way. We recently published a tutorial showing how to add…
In this quick video from our Photoshop in 60 seconds series, learn how to install and load custom brushes to use for your designs and digital paintings.
Tutorial Assets
The following assets were used in the production of this tutorial:
Press Control-N to create a new document and use the following settings: 1000 x 1000 px; 300 dpi.
Step 2
Click U and select the Rounded Rectangle Tool. Create a shape with the following settings: Width: 30 px; Height: 720 px.
Step 3
After that, we need to create a duplicate of the shape using Right Click > Duplicate.
Step 4
Hit Control-T and change the Height to 20%.
Step 5
Rotate the shape by 45° while holding Shift.
Step 6
While holding Shift, move the layer 305 px up and 40 px to the right.
Step 7
Create a duplicate of the layer, and then go to Edit > Transform > Flip Horizontal.
Step 8
Move the duplicate of the shape 80 px to the left.
Step 9
Select the small shapes while holding Shift and then Right Click > Merge.
Step 10
Create two duplicates of this new layer, and move each new shape 70px down.
Step 11
Merge all the shape layers and create a duplicate of your new layer. Then rotate it 180° while holding Shift.
Step 12
Merge the shapes again, and create two duplicates of the layer. Rotate these duplicates by 60° and -60°, and then merge these shapes into a snowflake.
2. How to Create a Snowflake Brush Using the Shape Layers
Step 1
Now we can start to create our brush. Make the background layer Invisible, and then go to Edit > Define Brush Preset, select any name you want to use, and hit the OK button.
Step 2
Now we need to change the brush’s settings to create a complex brush texture. Select the Brush Instrument and hit the Brush Settings icon.
Step 3
Go to the Shape Dynamics panel and set the Size Jitter to 100% and Angle Jitter to 100%.
Step 4
Go to the Scattering panel, set the Scatter to 1000%, and put a tick on Both Axes. Our snowflake brush Photoshop settings are almost ready now—we just need to add some dynamics to the opacity of the snow brush Photoshop preset.
Step 5
Go to the Transfer panel and set the Opacity Jitter to 100%.
Step 6
Click on New Brush Preset to save the settings for the brush.
3. How to Create an Overlay Using a Custom Snowflake Photoshop Brush
Step 1
Open the image you want to use for overlaying, and then create two layers using Shift-Control-N.
Step 2
Select the brush, change the size to 250 px, and draw with this brush on the first empty layer to create an overlaying brush texture.
Step 3
Draw some more snowflakes on the second layer, and finally, to add some motion to the image, go to Filter > Blur > Motion Blur and use the following settings:
Angle: 90°
Distance: 25 px
Awesome Work, You’re Now Done!
Congratulations! You have created snowflake brushes and snow overlays for an image using Photoshop shapes and brush instruments. Here is our final result:
Looking for some more snowflake or sparkle brush Photoshop items? Check these products from GraphicRiver:
This pack contains 60 hi-res snowflakes brushes with different brush textures. It could be extremely useful for creating Christmas and winter pictures.
If you want something more realistic, check this 17 snow brush Photoshop pack. This item will work well for adding snow to your images. These brushes could be also useful if you need to create sparkle brush Photoshop presets, as it gives you realistic-looking particles.
This „30 snow decoration brushes” item contains a complex snowflake brush Photoshop pack with different complex shapes, great for creating elements of your Christmas background.
This brushes pack contains six Photoshop snowflake brushes with crystal effect brush textures. A great choice for creating winter and Christmas decoration elements or backgrounds.
Want to learn snowflake brush Photoshop techniques, or maybe how to create illustrator vector snowflake shapes? Check these awesome tutorials:
If you’ve created an app that works on different devices, it’s good to let your potential users know about it by showing the app on a responsive mockup. You can do it easily with the online responsive mockup generator at Placeit.
How to Make a Responsive Mockup for the iPhone Without Photoshop
Step 1
Go to Placeit.net. Navigate to Mockups and find the Responsive Devices tab.
Step 2
Here you can see a whole library of potential mockups for your app. There are many devices available, but if you’re particularly interested in one, you can narrow down the search using the filters on the left.
Step 3
Even after applying the filter, you’ve got over 100 propositions to choose from. You can show your app on many screens at the same time, either in a neutral setting or inside a photographed scene. Place your cursor over the mockup to see an example of it being used. After you find the one you like, just click it to start editing. I used this mockup template.
Step 4
Believe it or not, you’ve done most of the work already! Once you’ve chosen your mockup, you just need to upload the screenshots of your app to it. Depending on the mockup, you’ll find a couple of Upload Image buttons on the left. Click the first one—here it will be the iPhone screen.
Step 5
Select your iPhone screenshot and crop it to the size of the screen. Click Crop when you’re done.
Step 6
Give it a second to upload. After it appears on the mockup iPhone screen, you’re ready to add another screenshot. Click the other button and repeat the process, this time selecting your iPad screenshot.
Step 7
After you upload your screenshots, you can remove them or crop them again. You can also add some text or a graphic.
Step 8
Once you’re done, just scroll up and click Download. You can purchase this one design, or download it for free as part of your unlimited subscription.
Responsive Mockup Templates
See how easy it is? Now let me show you a couple of mockups that you can use to present your app to potential customers.
If you’re going to sell your app in the Google Play store, you need something eye-catching! This mockup template offers you dozens of modern-looking backgrounds, along with different fonts for the text.
Create a neat screenshot for App Store in seconds with this mockup template. Play with different colors, fonts, and graphics to create a perfect presentation for your app.
If you need something more dynamic, you’ll like this one! Here the screen is angled, which gives an organic feel to the presentation. Combine it with a cool background and a clean font for the best look!
That’s All!
Now you know how to make a responsive mockup for the iPhone without Photoshop.
If you want to learn more about using Placeit for your designs, try these tutorials as well:
If you’ve created an app that works on different devices, it’s good to let your potential users know about it by showing the app on a responsive mockup. You can do it easily with the online responsive mockup generator at Placeit.
How to Make a Responsive Mockup for the iPhone Without Photoshop
Step 1
Go to Placeit.net. Navigate to Mockups and find the Responsive Devices tab.
Step 2
Here you can see a whole library of potential mockups for your app. There are many devices available, but if you’re particularly interested in one, you can narrow down the search using the filters on the left.
Step 3
Even after applying the filter, you’ve got over 100 propositions to choose from. You can show your app on many screens at the same time, either in a neutral setting or inside a photographed scene. Place your cursor over the mockup to see an example of it being used. After you find the one you like, just click it to start editing. I used this mockup template.
Step 4
Believe it or not, you’ve done most of the work already! Once you’ve chosen your mockup, you just need to upload the screenshots of your app to it. Depending on the mockup, you’ll find a couple of Upload Image buttons on the left. Click the first one—here it will be the iPhone screen.
Step 5
Select your iPhone screenshot and crop it to the size of the screen. Click Crop when you’re done.
Step 6
Give it a second to upload. After it appears on the mockup iPhone screen, you’re ready to add another screenshot. Click the other button and repeat the process, this time selecting your iPad screenshot.
Step 7
After you upload your screenshots, you can remove them or crop them again. You can also add some text or a graphic.
Step 8
Once you’re done, just scroll up and click Download. You can purchase this one design, or download it for free as part of your unlimited subscription.
Responsive Mockup Templates
See how easy it is? Now let me show you a couple of mockups that you can use to present your app to potential customers.
If you’re going to sell your app in the Google Play store, you need something eye-catching! This mockup template offers you dozens of modern-looking backgrounds, along with different fonts for the text.
Create a neat screenshot for App Store in seconds with this mockup template. Play with different colors, fonts, and graphics to create a perfect presentation for your app.
If you need something more dynamic, you’ll like this one! Here the screen is angled, which gives an organic feel to the presentation. Combine it with a cool background and a clean font for the best look!
That’s All!
Now you know how to make a responsive mockup for the iPhone without Photoshop.
If you want to learn more about using Placeit for your designs, try these tutorials as well:
If you’ve created an app that works on different devices, it’s good to let your potential users know about it by showing the app on a responsive mockup. You can do it easily with the online responsive mockup generator at Placeit.
How to Make a Responsive Mockup for the iPhone Without Photoshop
Step 1
Go to Placeit.net. Navigate to Mockups and find the Responsive Devices tab.
Step 2
Here you can see a whole library of potential mockups for your app. There are many devices available, but if you’re particularly interested in one, you can narrow down the search using the filters on the left.
Step 3
Even after applying the filter, you’ve got over 100 propositions to choose from. You can show your app on many screens at the same time, either in a neutral setting or inside a photographed scene. Place your cursor over the mockup to see an example of it being used. After you find the one you like, just click it to start editing. I used this mockup template.
Step 4
Believe it or not, you’ve done most of the work already! Once you’ve chosen your mockup, you just need to upload the screenshots of your app to it. Depending on the mockup, you’ll find a couple of Upload Image buttons on the left. Click the first one—here it will be the iPhone screen.
Step 5
Select your iPhone screenshot and crop it to the size of the screen. Click Crop when you’re done.
Step 6
Give it a second to upload. After it appears on the mockup iPhone screen, you’re ready to add another screenshot. Click the other button and repeat the process, this time selecting your iPad screenshot.
Step 7
After you upload your screenshots, you can remove them or crop them again. You can also add some text or a graphic.
Step 8
Once you’re done, just scroll up and click Download. You can purchase this one design, or download it for free as part of your unlimited subscription.
Responsive Mockup Templates
See how easy it is? Now let me show you a couple of mockups that you can use to present your app to potential customers.
If you’re going to sell your app in the Google Play store, you need something eye-catching! This mockup template offers you dozens of modern-looking backgrounds, along with different fonts for the text.
Create a neat screenshot for App Store in seconds with this mockup template. Play with different colors, fonts, and graphics to create a perfect presentation for your app.
If you need something more dynamic, you’ll like this one! Here the screen is angled, which gives an organic feel to the presentation. Combine it with a cool background and a clean font for the best look!
That’s All!
Now you know how to make a responsive mockup for the iPhone without Photoshop.
If you want to learn more about using Placeit for your designs, try these tutorials as well:
If you’ve created an app that works on different devices, it’s good to let your potential users know about it by showing the app on a responsive mockup. You can do it easily with the online responsive mockup generator at Placeit.
How to Make a Responsive Mockup for the iPhone Without Photoshop
Step 1
Go to Placeit.net. Navigate to Mockups and find the Responsive Devices tab.
Step 2
Here you can see a whole library of potential mockups for your app. There are many devices available, but if you’re particularly interested in one, you can narrow down the search using the filters on the left.
Step 3
Even after applying the filter, you’ve got over 100 propositions to choose from. You can show your app on many screens at the same time, either in a neutral setting or inside a photographed scene. Place your cursor over the mockup to see an example of it being used. After you find the one you like, just click it to start editing. I used this mockup template.
Step 4
Believe it or not, you’ve done most of the work already! Once you’ve chosen your mockup, you just need to upload the screenshots of your app to it. Depending on the mockup, you’ll find a couple of Upload Image buttons on the left. Click the first one—here it will be the iPhone screen.
Step 5
Select your iPhone screenshot and crop it to the size of the screen. Click Crop when you’re done.
Step 6
Give it a second to upload. After it appears on the mockup iPhone screen, you’re ready to add another screenshot. Click the other button and repeat the process, this time selecting your iPad screenshot.
Step 7
After you upload your screenshots, you can remove them or crop them again. You can also add some text or a graphic.
Step 8
Once you’re done, just scroll up and click Download. You can purchase this one design, or download it for free as part of your unlimited subscription.
Responsive Mockup Templates
See how easy it is? Now let me show you a couple of mockups that you can use to present your app to potential customers.
If you’re going to sell your app in the Google Play store, you need something eye-catching! This mockup template offers you dozens of modern-looking backgrounds, along with different fonts for the text.
Create a neat screenshot for App Store in seconds with this mockup template. Play with different colors, fonts, and graphics to create a perfect presentation for your app.
If you need something more dynamic, you’ll like this one! Here the screen is angled, which gives an organic feel to the presentation. Combine it with a cool background and a clean font for the best look!
That’s All!
Now you know how to make a responsive mockup for the iPhone without Photoshop.
If you want to learn more about using Placeit for your designs, try these tutorials as well: