The Earth is a remarkable planet brimming with life, and its vibrant ecosystems owe their existence to one celestial entity: the sun. As the heart of our solar system, the sun illuminates the cosmos and serves as the primary wellspring of energy for our planet.
While various energy sources sustain our modern lifestyles, from fossil fuels to renewables, they all trace their origins back to the sun’s immense power. This article delves into the profound influence of the sun’s energy on Earth and explores its pivotal role in shaping our world.
The Sun’s Energy
At the core of our solar system resides a colossal sphere of superheated plasma—the sun. This astronomical giant powers its surroundings through a process known as nuclear fusion, where hydrogen atoms fuse to form helium, releasing an enormous amount of energy in the form of light and heat.
This energy journey begins with the sun’s radiance penetrating Earth’s atmosphere. Some of this energy is absorbed by the planet’s oceans, landmasses, and atmosphere, while the remainder is reflected back into space.
Earth’s atmospheric and oceanic absorption of solar energy fuels an intricate dance—the climate system. The sun’s heat drives winds and ocean currents, shaping weather patterns and influencing climate variations.
Additionally, this energy fuels the water cycle, where the sun’s heat evaporates water from Earth’s surface, forms clouds, and eventually leads to precipitation, perpetuating a vital cycle that sustains life.
Fossil Fuels
While the sun’s energy plays a direct role in driving natural processes, its impact on energy sources like fossil fuels is equally profound. Fossil fuels, including coal, oil, and natural gas, are the remnants of ancient plants and animals that existed millions of years ago.
These organisms captured the sun’s energy through photosynthesis, storing it in their remains. Over eons, these remnants transformed into fossil fuels.
However, burning fossil fuels releases this stored energy back into the atmosphere, albeit in a different form. The combustion of fossil fuels generates heat and carbon dioxide—a greenhouse gas responsible for global warming.
As society increasingly relies on these energy sources, the consequences are evident through climate change, emphasizing the necessity for a transition towards cleaner alternatives.
Biomass
The intricate relationship between the sun and energy extends to biomass—a renewable energy source derived from living organisms or recently deceased ones. Biomass encompasses an array of materials, including wood, crop residues, and animal waste.
When these materials are burned, they release the sun’s energy, which the organisms had harnessed during their lifetimes through photosynthesis.
Biomass offers a versatile energy solution. It can be employed to produce electricity, heat residential and commercial spaces, and even fuel vehicles.
This sustainable energy source mitigates the carbon footprint associated with fossil fuels, making it a stepping stone towards a greener energy landscape.
Renewable Energy
As society recognizes the environmental toll of conventional energy sources, renewable energy emerges as a beacon of hope—a constellation of solutions sourced directly from the sun’s bounty.
Renewable energy derives from naturally replenished sources, including solar radiation, wind, water, and geothermal heat. These sources harness the sun’s energy in various ways to generate power.
Solar energy harnesses sunlight through photovoltaic cells, converting it into electricity. Wind energy utilizes the sun’s heat to create air currents, driving wind turbines that generate power.
Hydroelectric power harnesses water’s gravitational potential energy, driven by the sun’s role in the water cycle. Geothermal energy taps into the heat within Earth’s crust, which originates from the planet’s formation and ongoing radioactive decay.
Conclusion
The sun’s energy is the lifeblood of Earth’s systems, igniting the climate, propelling the water cycle, and fostering the growth of plants. Its influence permeates every facet of our existence, from the food on our tables to the technologies powering our lives.
Yet, as we confront the environmental challenges posed by conventional energy sources, the need for a transition to cleaner, more sustainable alternatives is evident.
Renewable energy stands as a testament to humanity’s capacity to innovate and harmonize with nature. By embracing solar, wind, hydroelectric, and geothermal energy, we can curtail the ecological impact of energy production, reduce greenhouse gas emissions, and pave the way for a brighter, cleaner future.
As we move forward, our journey into the sun-powered era will illuminate the path towards a sustainable and harmonious coexistence with the energy sources that shape our world.
Solar powered lights are a popular and environmentally friendly lighting solution that harnesses the power of the sun to illuminate outdoor spaces. These lights rely on solar panels to convert sunlight into electricity, which is stored in rechargeable batteries. As the sun sets, the lights automatically turn on and use the stored energy to provide illumination throughout the night.
Explanation of solar powered lights and how they work
Solar powered lights work by utilizing photovoltaic (PV) technology, which converts sunlight into electricity. The solar panels, typically located on top of the lights, capture the sunlight and convert it into direct current (DC) electricity. This electricity is then fed into the batteries for storage.
When evening arrives and the sun goes down, a built-in sensor within the solar powered lights detects the decrease in natural light. This triggers the lights to turn on, and they begin to use the stored energy from the batteries to power the LED (light-emitting diode) bulbs.
Solar powered lights are equipped with efficient LEDs that consume minimal energy, allowing them to provide bright illumination while maximizing battery life. The lights will stay on throughout the night and automatically turn off when the sun rises, as the solar panels begin to recharge the batteries for the next night.
One of the major benefits of solar powered lights is their energy efficiency and sustainability. By harnessing the power of the sun, these lights do not rely on electricity from the grid, reducing energy consumption and carbon emissions. Additionally, they require minimal maintenance and can be easily installed in various outdoor areas, such as gardens, pathways, and driveways, without the need for complex wiring.
Environmental Benefits of Solar Powered Lights
Reduced carbon footprint and greenhouse gas emissions
One of the key environmental benefits of solar-powered lights is the significant reduction in carbon footprint and greenhouse gas emissions. Traditional lighting options such as fluorescent or incandescent lights rely on electricity generated from fossil fuels, which release harmful emissions into the atmosphere.
Solar-powered lights, on the other hand, harness energy from the sun to generate electricity. This renewable energy source produces zero emissions during operation, helping to mitigate the effects of climate change and reduce air pollution. By switching to solar-powered lights, you can directly contribute to the reduction of greenhouse gases and help combat global warming.
Additionally, solar-powered lights do not require the use of batteries or electricity from the grid, further reducing the demand for fossil fuels and decreasing the overall carbon footprint associated with lighting.
Investing in solar-powered lights can make a significant impact on the environment by promoting clean energy and sustainable practices. By choosing this eco-friendly lighting solution, you are not only saving money on electricity bills but also actively participating in the fight against climate change.
So, if you’re looking for a lighting option that not only brightens up your space but also contributes to a cleaner and greener planet, solar-powered lights are the way to go. Embrace sustainability and make a positive impact on the environment with this environmentally friendly lighting solution.
Cost Savings with Solar Powered Lights
Lower electricity bills and long-term savings
One of the key benefits of using solar powered lights is the significant cost savings they offer. Traditional lighting options rely on electricity from the grid, resulting in high energy bills. However, solar powered lights use the sun’s energy to generate power, eliminating the need for electricity and reducing your monthly expenses.
With solar powered lights, you can experience long-term savings as well. Once installed, these lights require minimal maintenance and have a lifespan of up to 20 years. This means you won’t have to worry about frequent replacements, saving you money on replacement costs over time.
Additionally, solar powered lights offer a great return on investment. While the initial installation cost may be higher than traditional lighting options, the savings you accumulate over the years make it a worthwhile investment. As energy costs continue to rise, the benefits of solar powered lights become even more evident.
Not only do solar powered lights help you save money, but they also contribute to a greener environment. By using renewable energy, you reduce your carbon footprint and contribute to the fight against climate change.
So, if you’re looking for an eco-friendly and cost-effective lighting solution, solar powered lights are an excellent choice. Not only do they provide cost savings, but they also promote sustainability and help create a cleaner, greener future for all.
Easy Installation and Maintenance of Solar Powered Lights
Simple setup process and minimal upkeep
One of the biggest advantages of solar powered lights is their easy installation and low maintenance requirements. Unlike traditional lighting systems that require extensive wiring and electrical connections, solar lights can be set up with just a few simple steps. All you need to do is find a suitable location that receives direct sunlight, secure the solar panel in place, and attach the light fixture to the desired area. No need for complicated wiring or professional installation services.
Once installed, solar powered lights require minimal upkeep. The solar panels automatically charge the built-in batteries during the day, and the lights turn on automatically at dusk. There is no need for manual operation or regular bulb replacement. The LED bulbs used in solar lights have a long lifespan, typically ranging from 50,000 to 100,000 hours. This means you can enjoy consistent, reliable lighting without the hassle of frequent maintenance.
Additionally, solar powered lights are designed to withstand various weather conditions. They are made from durable materials that are resistant to corrosion, rust, and UV damage. This makes them perfect for outdoor use, whether it’s to illuminate your garden, pathway, or patio.
In conclusion, the easy installation process and minimal maintenance requirements are key benefits of solar powered lights. Not only do they save you time and effort, but they also provide reliable and environmentally friendly lighting solutions for your outdoor spaces.
Versatility and Functionality of Solar Powered Lights
Solar-powered lights offer a plethora of benefits, making them an excellent choice for outdoor lighting solutions. Here, we will discuss one of the key advantages of solar-powered lights: their versatility and functionality.
Suitable for various outdoor lighting applications
One of the major benefits of solar-powered lights is their suitability for a wide range of outdoor lighting applications. Whether you need lighting for your garden, patio, pathway, or driveway, solar-powered lights can meet your needs. They come in various types, such as solar floodlights, solar string lights, and solar garden lights, providing you with plenty of options to choose from.
Solar-powered lights are also portable, allowing you to move them around as needed. This flexibility makes them perfect for events, camping trips, or any situation where you require temporary lighting outdoors.
Additionally, solar-powered lights are easy to install. Since they don’t require any electrical wirings or access to a power source, you can effortlessly set them up anywhere you desire. This convenience saves you time, effort, and money that would otherwise be spent on hiring an electrician or extending power lines.
Investing in solar-powered lights not only reduces your environmental impact but also provides you with versatile and functional lighting options for all your outdoor needs. Take advantage of their versatility and enjoy the convenience and efficiency they offer.
Increased Safety and Security with Solar Powered Lights
When it comes to outdoor lighting, solar powered lights offer numerous benefits. Not only do they provide illumination without the need for electrical wiring, but they also enhance safety and security around your property. Here’s how:
Enhanced visibility and deterrent for potential intruders
One of the main advantages of solar powered lights is their ability to provide bright and consistent illumination throughout the night. This increased visibility can act as a deterrent for potential intruders, as it makes it more difficult for them to approach your property unnoticed. Criminals are less likely to target well-lit areas, as they prefer to operate in the dark.
Furthermore, solar powered lights are not dependent on the power grid, meaning they continue to function even during power outages. This ensures that your property remains well-lit and secure at all times, regardless of any disruptions in the electrical supply.
By installing solar powered lights in strategic locations around your property, you create a safer and more secure environment. Whether it’s illuminating walkways, driveways, or entrances, these lights provide peace of mind by reducing the risk of accidents and deterring potential intruders. Plus, they do all of this while being energy efficient and environmentally friendly.
Investing in solar powered lights is a smart choice for both homeowners and business owners who prioritize safety and security. Not only do they enhance visibility, but they also provide a sustainable lighting solution that saves on energy costs in the long run. By making this investment, you can enjoy a safer environment while reducing your carbon footprint.
Independence from the Grid with Solar Powered Lights
In recent years, solar-powered lights have been gaining popularity as an alternative lighting solution. The benefits of utilizing solar power for lighting go beyond just cost savings and environmental sustainability. Let’s explore some of the key advantages of using solar powered lights.
No reliance on traditional power sources
One of the most significant benefits of solar-powered lights is their independence from the traditional power grid. These lights are equipped with solar panels that convert sunlight into energy, which is then stored in rechargeable batteries. This means that even in remote locations or during power outages, you can still have reliable lighting. Whether it’s for outdoor lighting, security lighting, or even indoor lighting in off-grid locations, solar-powered lights provide a hassle-free solution.
Moreover, solar-powered lights do not require any wiring or electrical connections. This makes installation quick and easy, with no need for extensive electrical work or ongoing maintenance costs. Additionally, since the energy used for solar-powered lights comes from the sun, it is a renewable and clean source of power, reducing your carbon footprint.
By embracing solar-powered lights, you can enjoy the freedom and peace of mind that comes with not being reliant on the grid. Whether it’s for residential, commercial, or outdoor use, these lights provide a sustainable and efficient lighting solution for various applications.
Long Lifespan and Durability of Solar Powered Lights
When it comes to outdoor lighting solutions, solar-powered lights provide numerous benefits. One of the key advantages of these lights is their long lifespan and durability.
High-quality materials and resistance to harsh weather conditions
Solar powered lights are designed to withstand various weather conditions, making them highly durable. They are made with high-quality materials that can resist extreme temperatures, rain, snow, and even strong winds. This means that you can rely on solar-powered lights to continue functioning properly and providing illumination regardless of the weather conditions.
Compared to traditional lighting options, such as fluorescent or incandescent lights, solar-powered lights have a longer lifespan. This is because they do not rely on disposable batteries or electricity, but rather on renewable energy from the sun. With proper maintenance and care, solar-powered lights can last for several years, making them a cost-effective and sustainable lighting solution for outdoor spaces.
In addition to their durability and long lifespan, solar-powered lights are also energy-efficient and environmentally friendly. They harness solar energy during the day and use it to generate light at night, reducing electricity consumption and carbon emissions. This not only helps to save on energy costs but also contributes to a greener and more sustainable environment.
Overall, the long lifespan and durability of solar-powered lights make them a reliable and efficient lighting solution for outdoor areas. Whether you need to light up your garden, pathway, or patio, solar-powered lights offer a practical and eco-friendly option that will stand the test of time.
Conclusion
In conclusion, solar powered lights offer numerous benefits that make them a smart choice for both residential and commercial use. They are not only environmentally friendly and cost-effective, but also provide a reliable and independent source of lighting. By harnessing the power of the sun, you can enjoy bright and efficient lighting without the need for traditional electricity.
Overall advantages and considerations for using solar powered lights
Advantages
Considerations
Eco-friendly
Dependent on sunlight availability
Reduce electricity bills
Initial cost can be higher
Easy installation
May require regular maintenance
Low maintenance
May not be suitable for areas with limited sunlight
Automatic operation
Solar panels can deteriorate over time
By carefully considering these advantages and considerations, you can make an informed decision about whether solar powered lights are the right choice for your lighting needs. Don’t forget to evaluate the specific requirements of your location and calculate the potential energy savings to determine the long-term benefits. Embracing solar power not only reduces your environmental impact, but also provides a sustainable and efficient solution for your lighting requirements.
Solar power is the conversion of sunlight into electricity using photovoltaic cells or through the use of concentrated solar power. It is a renewable source of energy that has gained significant attention in recent years due to its numerous advantages and importance in addressing climate change and reducing reliance on fossil fuels.
One of the primary advantages of solar power is its ability to generate electricity without any direct carbon emissions. Unlike traditional energy sources like coal or natural gas, solar power does not produce greenhouse gases that contribute to global warming. This makes it a clean and sustainable alternative that helps to reduce carbon emissions and mitigate the impact of climate change.
Solar power is also a renewable energy source, as sunlight is abundant and available almost everywhere on the Earth. Unlike fossil fuels, which are finite and will eventually run out, solar energy will be available for as long as the sun exists. This means that investing in solar power systems can provide a long-term and sustainable source of electricity.
Furthermore, solar power systems can be installed at various scales, from small residential rooftop systems to large-scale utility power plants. This versatility allows for solar energy to be harnessed in both urban and rural areas, providing electricity to communities that may not have access to traditional power grids.
In addition to its environmental benefits, solar power can also provide economic advantages. The cost of solar panels has significantly decreased over the years, making it a more affordable option for both residential and commercial use. Moreover, generating electricity from solar power can reduce or eliminate electricity bills, providing long-term savings for consumers.
However, solar power is not without its disadvantages. The main disadvantage is its intermittent nature, as solar energy can only be generated during daylight hours and is dependent on weather conditions. This means that solar power may not be a constant and reliable source of electricity, especially during cloudy days or when there is limited sunlight.
Furthermore, the initial cost of setting up a solar power system can be high, although this is offset by the long-term savings on electricity bills. Additionally, the production and disposal of solar panels can have environmental impacts, as certain materials used in their manufacturing can be harmful if not managed properly.
Overall, the advantages of solar power, such as its cleanliness, renewability, and economic benefits, outweigh its drawbacks. With continued research and advancements in solar technology, the efficiency and reliability of solar power systems are improving, making it an increasingly viable and important source of energy.
Advantages of Solar Power
Solar power offers several advantages that make it a popular choice for renewable energy. Let’s discuss some of its key benefits.
Cost Savings and Financial Benefits of Solar Energy
One of the major advantages of solar power is the potential for significant cost savings. Once installed, solar panels can generate electricity for free, reducing or even eliminating your monthly electricity bill. This can result in substantial long-term savings, especially in areas with high electricity rates. Additionally, some countries and states offer financial incentives, such as tax credits or rebates, to encourage the adoption of solar energy. These incentives can further offset the initial investment and make solar power more affordable for homeowners and businesses.
Environmental Advantages of Solar Power
Solar power is a clean and renewable source of energy. Unlike fossil fuels, solar energy does not produce harmful emissions or contribute to air pollution. By reducing reliance on non-renewable energy sources, solar power helps to reduce greenhouse gas emissions, which are a major contributor to climate change. Furthermore, solar panels have a long lifespan and require minimal maintenance, which helps to minimize their environmental impact.
Energy Independence and Security
Solar power provides energy independence and security. By generating your own electricity from the sun, you become less dependent on the grid and the fluctuating prices of fossil fuels. This can protect you from rising energy costs and instability in the energy market. Additionally, in remote areas where access to the grid is limited or unreliable, solar power can provide a reliable source of electricity.
Overall, solar power offers numerous advantages. It can save you money, reduce your environmental footprint, and provide a reliable and independent source of energy. However, it’s important to consider the initial installation costs, availability of sunlight, and the space required for solar panels before deciding to invest in solar power.
Disadvantages of Solar Power
Initial Installation Costs and Payback Period
One of the primary disadvantages of solar power is the initial installation costs and the time it takes to recoup those costs. Solar panels and the associated equipment can be quite expensive, making it difficult for some individuals or businesses to afford the upfront investment. Additionally, the payback period, which is the time it takes for the savings generated from solar power to equal the initial investment, can take several years. This can deter some people from adopting solar power as a renewable energy source.
Intermittency and Dependence on Sunlight
Another disadvantage of solar power is its dependence on sunlight. Solar panels are only able to generate electricity when sunlight is available, which means they are not operational during cloudy days or at night. This intermittency can be a significant drawback, especially in areas with limited sunlight or a high number of overcast days. To counteract this limitation, solar power systems often require the installation of battery storage or connection to the electrical grid as a backup source of power. However, these additional components can increase the overall costs of the system.
Resource Intensive Manufacturing Process
The manufacturing process of solar panels and associated equipment can be resource-intensive. Producing solar panels requires various raw materials, such as silicon, glass, and metals, which need to be extracted and processed. This extraction process can have environmental impacts, such as habitat destruction and water pollution. Additionally, the energy-intensive manufacturing process itself can contribute to greenhouse gas emissions, offsetting some of the environmental benefits of solar power. However, it is worth noting that advancements in technology and manufacturing processes are continuously being made to minimize these drawbacks and improve the sustainability of solar power.
Net Metering and Solar Incentives
Explanation of Net Metering and its Benefits
Net metering is a billing arrangement that allows owners of solar energy systems to receive credit for the excess electricity they generate and send back to the grid. When the solar panels produce more electricity than is being used, the excess power is fed into the grid and the meter runs backwards. This is beneficial because it allows homeowners and businesses to offset their energy costs by selling back the excess power they generate.
One of the main benefits of net metering is the financial savings it offers. By receiving credit for the excess electricity produced, consumers can significantly reduce their electricity bills. This is particularly advantageous during times when the solar panels generate more electricity than is being used, such as during the daylight hours when the sun is shining bright.
Net metering also encourages the use of renewable energy sources like solar power. It provides an incentive for individuals to invest in solar energy systems by making it more economically viable. This not only benefits individual consumers by reducing their reliance on traditional energy sources but also helps in reducing greenhouse gas emissions and promoting environmental sustainability.
Government and Local Incentives for Solar Power
In addition to net metering, there are various government and local incentives available to promote the use of solar power. These incentives come in the form of tax credits, grants, rebates, and other financial incentives.
Some of the common government incentives include federal tax credits that can help offset the cost of installing a solar system. States and local governments also offer their own incentives, such as cash rebates or property tax exemptions for solar panel installations. These incentives can greatly reduce the upfront costs of installing solar power systems, making them more affordable for homeowners and businesses.
These incentives not only make solar power more affordable but also contribute to the growth of the solar industry, creating job opportunities and stimulating the economy. Additionally, they help increase energy independence and reduce the dependence on fossil fuels.
However, it is important to note that the availability and extent of these incentives can vary depending on the location and government policies. Therefore, it is essential for individuals to research and understand the specific incentives available in their area before investing in solar power.
Overall, net metering and government incentives make solar power an attractive and financially viable option for both individual consumers and businesses. They provide economic benefits, encourage renewable energy adoption, and contribute to a more sustainable future.
Solar Power Storage Solutions
Importance of Energy Storage in Solar Power Systems
Energy storage plays a crucial role in the effective utilization of solar power. As solar power generation is intermittent, storing the excess energy for use during periods of low or no sunlight is essential for a reliable and continuous power supply. This has led to the development of various solar power storage solutions that help overcome the challenges of intermittency.
One of the most common solar power storage solutions is the use of batteries. Batteries store the excess energy produced during the day and discharge it when needed, providing a consistent power supply even when the sun is not shining. These batteries can be installed in residential homes, commercial buildings, and even in large-scale solar power plants. Advances in battery technology have made them more efficient, durable, and cost-effective over the years.
Another solar power storage solution is the use of pumped hydro storage. This method involves using excess solar energy to pump water to a higher elevation, which is then released to generate electricity during times of low solar power production. Pumped hydro storage systems have been widely used in large-scale solar power plants and have proven to be reliable and efficient.
Additionally, thermal energy storage can be utilized in solar power systems. This involves capturing and storing the heat generated by solar panels in a medium such as molten salt, which can then be used to generate electricity even when sunlight is not available. Thermal energy storage is particularly suited for applications that require a continuous supply of heat or steam, such as industrial processes and heating systems.
While solar power storage solutions offer significant advantages in ensuring a consistent power supply, there are also some drawbacks to consider. The main disadvantage is the high upfront cost of implementing these storage systems, which can be a barrier for some individuals or organizations. Additionally, the lifespan of storage systems, such as batteries, may require periodic replacements, further adding to the overall cost.
In conclusion, solar power storage solutions are crucial for overcoming the intermittent nature of solar energy and ensuring a reliable and continuous power supply. Although there are some challenges and costs associated with these storage systems, the benefits they provide in terms of sustainability and independence from the grid are worth considering. Continued advancements in technology and decreasing costs are expected to further enhance the feasibility and adoption of solar power storage solutions in the future.
Conclusion
In conclusion, solar power has both advantages and disadvantages. It is a renewable source of energy that helps reduce greenhouse gas emissions and dependency on fossil fuels. Solar power is also becoming more affordable and accessible, making it a viable option for both residential and commercial use. However, there are also some limitations and challenges associated with solar power.
Summary of Advantages and Disadvantages of Solar Power
Advantages of Solar Power:
Renewable and abundant source of energy
Reduces greenhouse gas emissions
Low maintenance costs
Can be installed in remote areas
Long lifespan of solar panels
Disadvantages of Solar Power:
High initial installation costs
Requires a large amount of space for installation
Intermittency and weather dependency
The need for backup energy sources
The production of solar panels can have environmental impacts
Importance of Considering Individual Factors and Circumstances
When considering whether to adopt solar power, it is important to take individual factors and circumstances into account. Factors such as location, available space, energy requirements, and budget will vary from person to person. It is essential to assess these factors and consult with professionals to determine if solar power is a suitable option.
FAQ (Frequently Asked Questions)
Is solar power expensive? The initial installation costs can be high, but over the long term, solar power can save money on electricity bills.
How much space is needed for solar panels? The amount of space needed depends on the energy requirements and the efficiency of the solar panels. On average, around 100 square feet of space is required per kilowatt of solar panels.
Are solar panels durable?Solar panels are designed to withstand various weather conditions and have a long lifespan. Most solar panels come with warranties ranging from 20 to 30 years.
Can solar power be used during cloudy days?Solar panels can still generate electricity on cloudy days, although at a lower efficiency compared to sunny days. However, a backup energy source may be required during extended periods of cloudiness.
What are the environmental impacts of solar power?While solar power itself is environmentally friendly, the production of solar panels can have environmental impacts, mainly due to the use of certain materials and the energy-intensive manufacturing process. However, advancements are being made to address these issues.
As a technology enthusiast and an advocate for sustainable energy, I am always on the lookout for innovative ways to harness the power of the sun. While most of us are familiar with solar panels and their direct use of solar energy, there are also indirect forms of solar energy that are capturing my attention. These indirect forms involve using solar energy to produce other types of renewable energy, such as wind or hydropower. In this blog section, we will explore some of these fascinating technologies and their potential impact on our energy future.
Understanding the Different Types of Solar Energy
Let’s take a closer look at two popular indirect forms of solar energy: solar-wind hybrid systems and solar-hydro hybrid systems.
Solar-wind hybrid systems: These systems combine the power of solar panels with wind turbines to maximize energy production. By harnessing both solar and wind energy, these systems can generate electricity even when one source is not available or producing at its maximum capacity. The combination of these two renewable energy sources allows for a more reliable and consistent power supply.
Solar-hydro hybrid systems: These systems integrate solar panels with hydroelectric power generation. The sunlight is used to generate electricity, while the excess energy is used to pump water to a higher elevation. When additional power is needed, the water is released and flows through turbines, generating electricity. This method enhances the overall efficiency of the hydroelectric power plant and allows it to operate even during periods of low water flow.
By combining the strengths of different renewable energy sources, these indirect forms of solar energy offer a more diverse and reliable energy generation system. They can provide clean energy solutions that are not solely dependent on sunlight or favorable weather conditions. As we continue to advance in our understanding of solar energy technologies, these indirect forms show great promise in meeting our growing energy needs in a sustainable and environmentally friendly manner.
If you’re interested in learning more about solar energy and its various applications, check out the Wikipedia page on solar energy. It’s a great resource to dive deeper into this fascinating field.
Solar Thermal Energy: A Fascinating Indirect Form of Solar Energy
As an environmentally conscious individual, I have always been intrigued by the various ways we can harness the power of the sun. While solar panels are the most common and direct form of solar energy, there are other fascinating indirect forms that are worth exploring. One such form is Solar Thermal Energy, which utilizes the sun’s heat to generate power and provide heating solutions. Let’s take a closer look at this amazing technology.
Overview of Solar Thermal Energy
Solar Thermal Energy, also known as Concentrated Solar Power (CSP), is a renewable energy technology that utilizes mirrors or lenses to concentrate sunlight onto a receiver. The concentrated sunlight heats a fluid or a material, such as molten salt or oil, which is then used to generate steam. This steam drives a turbine connected to a generator, producing electricity. Additionally, the heat energy can be stored for later use, allowing for continuous power generation even when the sun is not shining.
Applications of Solar Thermal Energy
Solar Thermal Energy has a wide range of applications, making it a versatile and sustainable solution. Some notable applications include:
1. Power Generation: Solar thermal power plants can generate clean and eco-friendly electricity on a large scale, making them ideal for powering cities and industries.
2. Water Desalination: Solar thermal energy can be used to desalinate and purify water, providing a sustainable solution to the growing global water scarcity problem.
3. Industrial Heating: Industries can utilize solar thermal energy for heating processes, reducing their reliance on fossil fuels and minimizing their carbon footprint.
4. Space Heating and Cooling: Solar thermal systems can provide efficient heating and cooling solutions for residential and commercial buildings.
5. Solar Cooking: Solar cookers harness solar thermal energy to cook food, offering a clean and sustainable alternative to traditional cooking methods.
Here’s a table to help you compare Solar Thermal Energy to other forms of solar energy:
Form of Solar Energy
Direct/Indirect
Use of Sunlight
Applications
Solar Panels
Direct
Photovoltaic (PV)
Residential, Commercial, and Utility-scale Power
Solar Thermal Energy
Indirect
Concentrated Solar Power (CSP)
Power Generation, Water Desalination, Industrial Heating, Space Heating and Cooling, Solar Cooking
It’s truly fascinating how solar energy can be harnessed in so many different ways. While solar panels dominate the renewable energy market, exploring and utilizing the potential of indirect forms like Solar Thermal Energy is crucial for a sustainable and greener future. So, let’s continue to support and invest in these innovative technologies to make a positive impact on the planet.
Photovoltaic Systems
As a {person} who is passionate about sustainable energy, I am always on the lookout for innovative ways to harness the power of the sun. When it comes to indirect forms of solar energy, one technology that stands out is Photovoltaic (PV) systems. These systems convert sunlight into electricity using semiconductors, such as silicon. In this blog section, we will explore the fascinating world of Photovoltaic systems and their various uses.
Exploring Photovoltaic Systems
Photovoltaic systems: are designed to capture solar energy and convert it into usable electricity. They consist of solar panels that contain PV cells, which generate direct current (DC) electricity when exposed to sunlight. This electricity is then converted into alternating current (AC) by an inverter, making it suitable for powering homes, businesses, and even entire communities.
Uses of Photovoltaic Systems
Photovoltaic systems have a wide range of applications and are being utilized in various sectors. Here are some of the key uses of PV systems:
Residential Solar Power: Many homeowners are opting for PV systems to generate their electricity, reducing their dependence on the traditional power grid and saving on energy bills.
Commercial and Industrial Applications: PV systems are also being installed in commercial buildings and industrial facilities to power operations, reducing their carbon footprint and operating costs.
Remote Locations and Off-Grid Solutions: PV systems are ideal for remote locations where access to traditional electricity infrastructure is limited. They can provide clean and reliable power to off-grid communities, telecommunications towers, and research stations.
Utility-Scale Solar Farms: Large-scale solar farms generate vast amounts of electricity through PV systems. These solar farms feed the generated power into the grid, contributing to the overall energy mix and reducing greenhouse gas emissions.
Here’s a table comparing some key features of residential PV systems:
Specification
On-Grid System
Off-Grid System
Grid Connection
Yes
No
Battery Backup
Optional
Essential
Energy Storage
None
Batteries
Cost
Lower
Higher
Energy Independence
Partial
Full
In conclusion, Photovoltaic systems offer an exciting means of harnessing indirect solar energy. Whether it be for residential, commercial, or utility-scale use, these systems provide a clean and sustainable source of electricity. By investing in PV systems, we can contribute to a greener future and reduce our reliance on fossil fuels. So let’s embrace the power of the sun and make a positive impact on our planet.
Wind Power
As someone who has always been interested in renewable energy, I recently discovered the fascinating world of indirect forms of solar energy. One such form is wind power, which harnesses the power of wind to generate electricity. In this blog post, I’ll explore the relationship between wind power and solar energy and discuss the advantages and applications of wind power.
The Relationship Between Wind Power and Solar Energy
Wind power: is a form of indirect solar energy because the sun’s radiation heats the Earth’s surface, causing temperature and pressure differences. These differences create wind patterns, which can be harnessed by wind turbines to generate electricity. Wind power and solar energy often work hand in hand, as they are both clean, renewable sources of energy. Many wind farms are located in areas with ample sunlight, allowing them to benefit from the interconnectedness of solar and wind power.
Advantages and Applications of Wind Power
Wind power offers several advantages, including its environmental sustainability and its potential for energy independence. Unlike fossil fuels, wind power does not produce harmful emissions or contribute to climate change. Additionally, wind power can help reduce dependence on fossil fuels, making countries less vulnerable to price fluctuations and disruptions in the global oil market.
Here’s a list of some key advantages and applications of wind power:
Renewable and sustainable energy source.
Low operating costs once the infrastructure is in place.
Can be utilized for both small-scale and large-scale energy production.
Supports rural development and job creation.
Reduces greenhouse gas emissions and mitigates climate change.
In conclusion, indirect forms of solar energy, such as wind power, offer promising solutions for a sustainable future. By utilizing the power of wind, we can reduce our reliance on fossil fuels and make significant strides towards a cleaner, greener world. So, let’s continue to explore and embrace these innovative sources of energy for a brighter tomorrow.
As a {tone} {person}, I’m always fascinated by the different ways we can harness energy from the sun. While solar panels are the most commonly known form of direct solar energy, there are also indirect forms that utilize natural processes to generate power. One such form is hydropower, which harnesses the energy of moving water to generate electricity.
Hydropower as an Indirect Form of Solar Energy
Hydropower is a renewable energy source that derives its power from the water cycle, which is driven by the sun’s heat. The sun’s energy causes water to evaporate from bodies of water, forming clouds. When these clouds condense, precipitation occurs, and water returns to the ground. This cycle creates the potential for hydropower generation.
Utilizing Hydropower for Electricity Generation
Hydropower plants utilize the force of moving water to turn turbines, which then generate electricity. This process is highly efficient and produces clean, emission-free energy. Many countries around the world rely on hydropower for a significant portion of their electricity needs.
Here’s a table comparing the pros and cons of hydropower:
Pros
Cons
Renewable and clean
Environmental impact from dam construction
Highly efficient
Disruption of aquatic ecosystems
Provides reliable electricity
Limited availability of suitable locations
In conclusion, while solar panels are the most well-known form of direct solar energy, it’s also important to recognize the indirect forms, such as hydropower. It’s a fascinating way to harness nature’s power and generate clean and renewable electricity. So, next time you see a flowing river or visit a hydropower plant, take a moment to appreciate the role of the sun in this indirect form of energy generation.
Biomass Energy
As a nature enthusiast, I am always on the lookout for innovative ways to harness the power of the sun. Solar energy is undoubtedly one of the most popular and direct forms of utilizing sunlight, but did you know that there are also indirect forms of solar energy? One such form is biomass energy, which has gained significant attention in recent years.
How Biomass Energy Relates to Solar Energy: Biomass energy is derived from organic matter, such as plants and plant-based materials, which have utilized the sun’s energy through photosynthesis. When these organic materials are burned or converted into biogas, heat and electricity are generated. This means that the energy stored within biomass originally came from the sun, making it an indirect form of solar energy.
To better understand the concept, here is a list of the features and details of biomass energy:
Biomass energy is considered renewable because it relies on constantly regrowing plants and plant-based materials.
It is a versatile energy source that can be used for heating, electricity generation, and even fuel in transportation.
Biomass energy releases carbon dioxide when burned, but the carbon emitted is roughly equal to the amount absorbed by the plants during their growth, making it a carbon-neutral option.
Biomass resources can vary from wood pellets and agricultural waste to dedicated energy crops like switchgrass.
This form of energy helps reduce dependence on fossil fuels and contributes to a greener future.
By utilizing biomass energy, we can tap into the sun’s energy stored in organic matter and reduce our carbon footprint. While it may not be as widely recognized as solar panels on rooftops, biomass energy has enormous potential as an indirect form of solar energy. So, let’s continue exploring innovative ways to harness the power of the sun and create a sustainable future.
Being passionate about renewable energy sources, I have always been fascinated by the ways we can harness the power of the sun. While we often think of solar energy in terms of solar panels and direct sunlight, there are actually other indirect forms of solar energy that have tremendous potential. One such form is geothermal energy, which explores the geological connection to solar energy.
Exploring the Geological Connection to Solar Energy
Geothermal energy utilizes the heat generated by the sun, stored within the Earth’s crust. This heat is a direct result of the sun’s energy, making it an indirect form of solar energy. It is harnessed by tapping into natural reservoirs of hot water or steam beneath the Earth’s surface. This heat can then be converted into usable energy through various geothermal power sources such as geothermal power plants.
Geothermal Energy Applications and Benefits
Geothermal energy has various applications and offers several benefits. Here are some key features and details:
Heating and cooling systems: Geothermal energy can be used for residential and commercial heating and cooling systems, providing a consistent and efficient source of energy for temperature control.
Electricity generation: Geothermal power plants generate electricity by using the heat from geothermal reservoirs, making it a sustainable and renewable energy source.
Environmental benefits: Geothermal energy is a clean and renewable energy source, producing minimal greenhouse gas emissions and having a relatively low environmental impact compared to fossil fuel alternatives.
Cost-effectiveness: In regions with suitable geothermal resources, geothermal energy can be a cost-effective solution for energy production and heating, offering long-term savings.
Here’s a table to help you understand the comparisons:
Application
Geothermal Energy
Solar Energy
Source
Earth’s heat
Sun’s radiation
Utilization
Heating, cooling, electricity generation
Electricity generation, heating, lighting
Storage capacity
Continuous
Dependent on battery systems
In conclusion, geothermal energy is an indirect form of solar energy that harnesses the Earth’s heat, making it a unique and valuable renewable energy source. With its applications and numerous benefits, geothermal energy plays a significant role in reducing greenhouse gas emissions and offering sustainable alternatives to traditional energy sources. So, let’s continue exploring the potential of geothermal energy and its contribution to a greener future.
Key Considerations
As someone who is interested in renewable energy and wants to make a positive impact on the environment, I have been exploring different ways to harness solar power. While direct solar energy, such as solar panels, is a popular choice, there are also indirect forms of solar energy that are worth considering. These options utilize the sun’s energy in different ways to generate power. Here are some key factors to consider when evaluating indirect solar energy options:
Factors to Consider When Evaluating Indirect Solar Energy Options
1. Solar Thermal Power: Solar thermal power plants use mirrors to concentrate sunlight and generate steam, which drives a turbine to produce electricity. This technology is particularly effective in areas with high solar radiation. 2. Concentrated Solar Power (CSP): CSP systems employ mirrors or lenses to focus sunlight onto a receiver, which transfers the heat to a working fluid. This thermal energy can then be used to generate electricity. 3. Solar Water Heating: Solar water heating systems use the sun’s energy to heat water for various purposes, such as domestic use or swimming pools. These systems can significantly decrease energy consumption and reduce utility bills.4. Solar Air Heating: Solar air heating systems absorb the sun’s energy to heat air, which can then be used for space heating or other applications.5. Solar Cookers: Solar cookers harness sunlight to cook food or heat water, eliminating the need for traditional fuel sources.
These indirect forms of solar energy have their own advantages and considerations. It’s important to assess factors such as location, available resources, and energy needs when evaluating which option is the best fit. Whether you choose direct or indirect solar energy, both options contribute to reducing dependence on fossil fuels and mitigating climate change. So, let’s make the most of our abundant solar resource and embrace the power of the sun!
The impact of emerging technologies on the world of 3D art cannot be overstated. Besides the aid of a good render farm and good optimization practices, a true tech renaissance in the field is empowering artists to work faster, smarter, and more creatively. Both AI-based and more traditional technologies are making huge strides.On the AI front, we are seeing extremely sophisticated neural networks that can analyze photos or text prompts and generate 3D models, textures, animations and other assets with increasing realism. This is massively amplifying the productivity of 3D artists.In parallel, more traditional tools in areas like VR/AR, motion capture, real-time rendering and material libraries are also evolving rapidly. Together, these AI and non-AI toolsets are transforming what is possible in 3D art.Any 3D artist looking to level up their skills needs to be leveraging these new technologies. In this post, we will explore some of the most important tools and developments that 3D creatives should have on their radar for 2023-2024.
Online Render Farm Services
Render farm services have become (and still are) an indispensable tool for 3D artists.. Rendering high-resolution frames for animation and visual effects is a resource-intensive process, requiring massive CPU and GPU power that is beyond the capabilities of a single workstation. Render farm services address this problem by providing on-demand access to a large network of servers and GPU cards, delivering the massive parallel processing power needed to render scenes quickly. 3D artists simply upload their projects to a render farm service and have the frames distributed across hundreds or thousands of servers simultaneously. This results in a massive speed up, allowing animators and VFX artists to cut rendering times from days or weeks down to hours, granting them the flexibility and turnaround needed to meet aggressive deadlines.
Automating the Future of 3D Modeling with AI
Credit: Lumalabs.ai
One of the biggest impacts we are seeing from AI is in the automation of 3D modeling. Powerful neural networks are now capable of extrapolating 3D forms from reference photos or even generating models based on text descriptions. This is supercharging model creation.
Tools like LumaAI are using deep learning to analyze videos of objects and generatively grow 3D models that match the references. With some cleanup work, artists can have basic model shapes in minutes. For character models, Reallusion’s Headshot 2 for Character Creator enables a workflow that can generate an AI portrait and turn it into a full 3d character matching the subject. This raw model can still be procedurally altered or stylized, but it provides an amazing head start, if you’ll forgive the pun. Even more advanced AI model generation tools leverage NLP or natural language processing to interpret text prompts and translate them into 3D model output. GET3D is one example using NLP to analyze text descriptions of objects and generate matching 3D models. NVIDIA’s upcoming Magic3D tool allows generating a wide range of organic and inorganic 3D mesh models simply by providing the AI with text prompts. Over time, these AI model generators will become incredibly sophisticated.
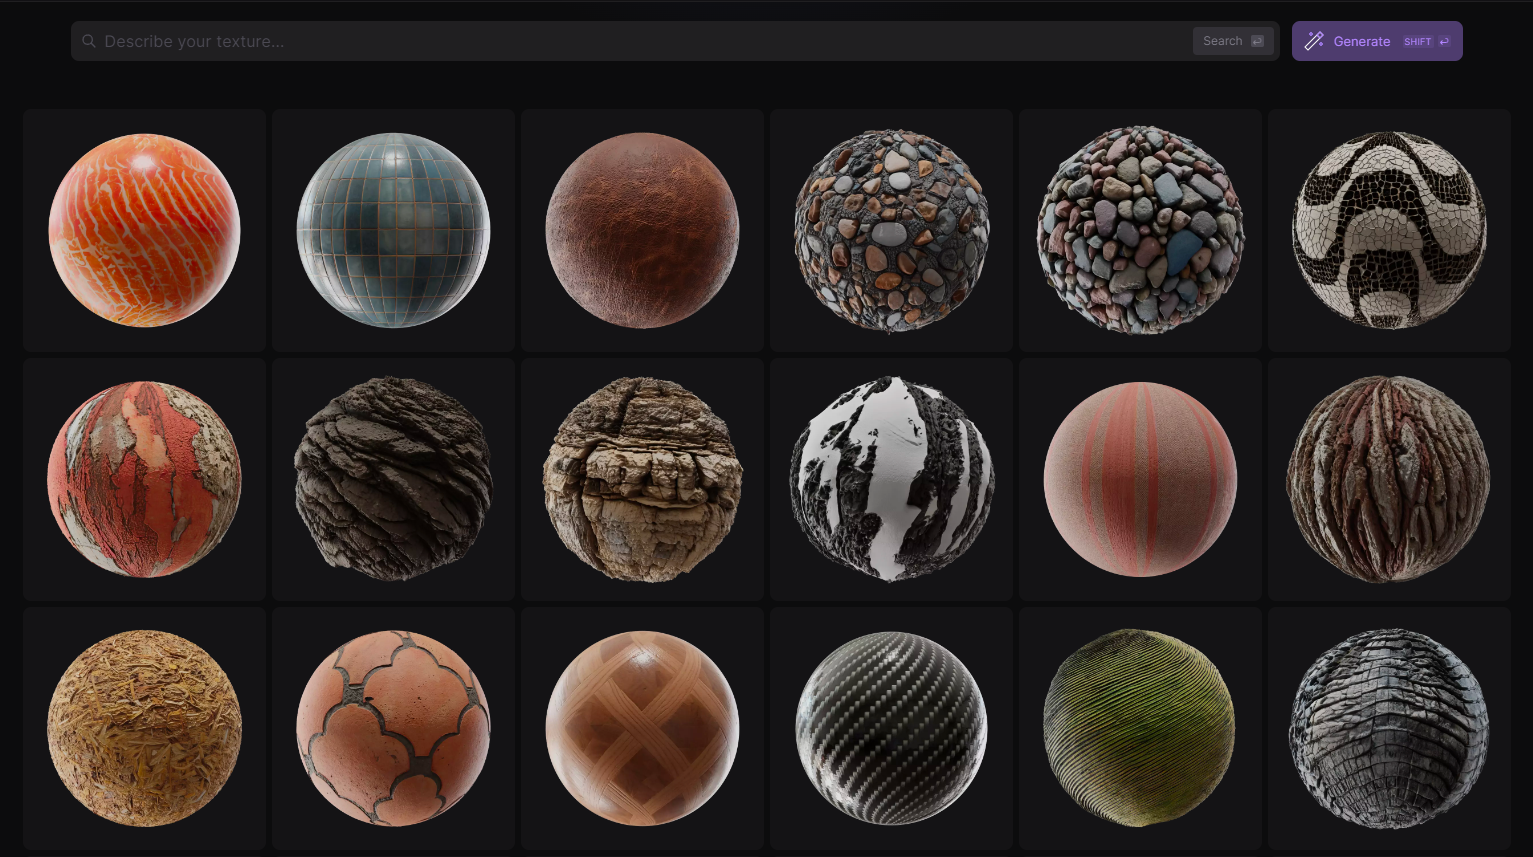
Revolutionizing Textures with AI
Credit: withpoly.com
Beyond 3D geometry, AI is also making huge strides in automating texture creation. Tools like Poly can generate a vast array of smart textures for surfaces, materials and environments. Users can specify texture types like fabric, wood, granite, metal, liquids and more.Taking it a step further, Poly Infinity, the Premium version of Poly, can even create production-ready 8K resolution textures rivalling hand-painted quality. The textures have incredible fine detail and variation.
The Dawn of AI assisted Animation
Credit: Cascadeur.com
Generating models and textures is just the beginning. We are also seeing AI drive automation in animation.
Cascadeur leverages physics simulations and deep learning techniques to automate parts of the animation process that currently require a lot of manual effort. Their vision is that by handling the mechanical and repetitive aspects through technology, animators will be able to concentrate on the creative side of animation and produce work of higher quality and efficiency. Ultimately, Cascadeur hopes to shift animators’ work from routine tasks to the artistic and expressive facets of creating animation.AI animation assistants will only get smarter over time, allowing rapid iteration of motion studies.
Stepping aside from AI, we are also seeing many key developments in more traditional technologies that are transforming workflows.
VR and AR tools for 3D modeling and sculpting continue to evolve. Working in virtual reality enables a more intuitive creative process with spatial immersion. Mixed reality headsets like the Hololens 2 or Vision Pro allow previewing digital objects in real-world contexts.
Sophisticated full body motion capture systems outfitted with machine learning are providing exponentially better data for animating realistic human motions, facial expressions and more. This benefits areas like digital humans, metaverse development and film VFX.
Unreal Engine 5 allows artists to interact and iterate in their scenes in real-time with ray-traced effects. This enables much faster turnarounds, and entire scenes can be ported to a DCC via Pixar’s Universal Scene Description (USD) file format for a final render on an artist’s preferred offline renderer.
Ever-growing material and objects libraries are also emerging. Resources like Quixel Megascans or Adobe’s Substance 3D now provide easy access to hundreds of thousands of high fidelity materials and assets to populate scenes.
Looking Ahead
The pace of advancement across both AI and more traditional technologies signals an extremely bright future for 3D artists. To stay ahead of the curve, 3D creatives need to continually assess and incorporate these emerging tools into their pipelines.
With these ever-evolving AI and non-AI tools, 3D artists have an incredible opportunity to elevate their workflows and focus more on the creative aspects. We are entering a new golden age of 3D art empowered by technology. Artists who embrace these tools will be able shape astonishing virtual worlds.
Interested in learning how to draw the Guardians of the Galaxy logo? Follow this tutorial and learn how to make it from scratch while learning many new techniques. You will definitely get inspired to create other unique logos and text effects in future projects.
If you don’t have the time to learn how to draw the Guardians of the Galaxy logo, you can always try Envato Elements, where you will find a large selection of fonts, text effects, and logos that are ready to be used in your project.
What You’ll Learn in This Guardians of the Galaxy Logo Tutorial
How to make the Guardians of the Galaxy font
How to make the Guardians of the Galaxy text effect
How to make the Guardians of the Galaxy logo background
How to make a neon light effect in Adobe Illustrator
Tutorial Assets
You’ll need the following resources in order to complete this project:
1. How to Make a New Document in Adobe Illustrator
Launch Illustrator and go to File > New to open the New Document window. There, type the name of the document and set up the dimensions as shown. Keep the Units to Pixels and the Color Mode to RGB. Once you’re done, hit Create Document.
In the image below, you can see the other settings that I prefer to use while working in Illustrator. You can access them by going to Edit > Preferences.
2. How to Make the Guardians of the Galaxy Font
Step 1
Let’s start by taking the Type Tool (T) and writing the word „GUARDIANS”in capitals on your artboard. Use the Sezectra Regular font with a size of 212 pt. The color is not important at the moment.
While the text stays selected, go to the Character panel and change the following settings in order to distort the font (1):
Set the tracking for the selected characters: -10
Horizontal Scale: 115%
Vertical Scale: 88%
Next, type „GALAXY”on your artboard using the Sezectra Regular font with a size of 212 pt, and apply the following settings in the Character panel (2):
Set the tracking for the selected characters: 25
Horizontal Scale: 115%
Vertical Scale: 85%
Step 2
Still using the Type Tool (T), write „OF”on your artboard using the same font (1). Apply these settings:
Set the font size: 80 pt
Set the tracking for the selected characters: 0
Horizontal Scale: 125%
Vertical Scale: 100%
The next piece of text is „THE”. Use the following settings and then arrange it under the word „OF”(2).
Set the font size: 80 pt
Set the tracking for the selected characters: -25
Horizontal Scale: 125%
Vertical Scale: 100%
Before you continue, make sure that the words „THE” and „GALAXY” are aligned at the bottom and that the words „OF” and „GALAXY”are aligned at the top. Once that’s done, select everything on your artboard and go to Type > Create Outlines followed by Object > Ungroup (Shift-Control-G).
Step 3
In order to make the font more similar to the original Guardians of the Galaxy vol 3 logo, we need to distort the letters. We can achieve this by using the Direct Selection Tool (A) and moving some of the points where we want them to be. I recommend activating the Smart Guides by going to View > Smart Guides to help you align the points easily. Let’s start with the letter „G”.
First, while the letter is selected, go to Object > Compound Path > Release to obtain the three separate shapes that make up the letter G. Now, select only the points highlighted in green using the Direct Selection Tool (A) and move them downwards until you cover the empty space in the upper left side of the letter. Also elongate this top shape by dragging the two end points a little to the right.
Next, select only the point highlighted in red using the Direct Selection Tool (A), and move it downwards so it is aligned with the rest of the points at the bottom of the letter.
Continue to select only the points highlighted in blue, and move them upwards by pressing the Up Arrow key on your keyboard about 15 times, which means 15 px. Next, select the two end points and move them to the right to cover the empty space. Finally, select the two points highlighted in orange and move them to the right as shown. Also, elongate the top of this shape by dragging a selection over the three points, and move them upwards by pressing the Up Arrow key on your keyboard a few times.
Once you are done with the distorting (1), select all three shapes and press Unite in the Pathfinder panel to merge them into one shape. This will be the new letter G (2).
Step 4
For the letter „U”, first go to Object > Compound Path > Release to obtain the two separate shapes that make up the letter. Now, select only the two points highlighted in green using the Direct Selection Tool (A), and move them upwards by pressing the Up Arrow key on your keyboard about 15 times (15 px) until the empty space is covered. Once that’s done, select both shapes and press Unite in the Pathfinder panel to merge them into the new letter U (1).
Following the simple distortion techniques explained above, you can modify the rest of the letters in the word „GUARDIANS”(2).
Step 5
Continue with the letters in the word „GALAXY”next. Some of the letters are repeated, so there’s no need to make them again. The ones that need to be modified are L, X, and Y, as shown in the image below (1).
Repeat the same techniques for the words „OF”(2) and „THE”(3).
3. How to Make the Guardians of the Galaxy Text Effect
Step 1
Now that you have the Guardians of the Galaxy logo text ready and arranged on your artboard, you can go ahead and create the text effect, which consists of multiple appearances.
First, create a group out of all the letters in the word „GUARDIANS”and then another group out of the letters in the word „GALAXY”by going to Object > Group (Control-G). Select the GUARDIANS and GALAXY groups and, in the Appearance panel, click on the Add New Fill icon at the bottom. This will add the first Fill attribute above the Contents line. Use the burgundy linear gradient shown, and set the Angle to 100 degrees.
While the two words stay selected, click on Add New Fill again to add a second Fill attribute under the first one. Use the gold linear gradient shown, and set the Angle to 109 degrees. While this Fill attribute is selected in the Appearance panel, go to Effect > Path > Offset Path and apply an Offset of 2 px.
The gradient color stops are:
Color: 916D3C, Location: 0%
Color: 553E1B, Location: 7.5%
Color: 7A5E38, Location: 8.5%
Color: DBB555, Location: 10%
Color: FFFD9D, Location: 15%
Color: DCB456, Location: 27.5%
Color: 785C37, Location: 35%
Color: E3BD5E, Location: 45%
Color: BF9246, Location: 55%
Color: 6E5029, Location: 65%
Color: 4D3717, Location: 70%
Color: BE9146, Location: 80%
Color: D3A74F, Location: 92.5%
Color: 4E391C, Location: 100%
Step 2
Add a third Fill attribute under the previous two, and use a linear gradient from black to pale yellow at a 90-degree Angle. Keep this Fill attribute selected in the Appearance panel, go to Effect > Path > Offset Path, and apply an Offset of 5 px. Set the Blending mode to Screen (1).
Add the fourth Fill attribute at the bottom of the Appearance panel and use the linear gradient shown, set at a 110-degree Angle. Next, apply a 4 px Offset; then go to Effect > Stylize > Drop Shadow and apply the settings shown (2).
The gradient color stops are:
Color: D3A74F, Location: 0%
Color: 71501F, Location: 9.5%
Color: 4D3717, Location: 40%
Color: 6E5029, Location: 45%
Color: BF9246, Location: 55%
Color: F6C668, Location: 63%
Color: 693A05, Location: 73%
Color: DCB456, Location: 82%
Color: FFFFDB, Location: 95%
Color: 916D3C, Location: 100%
Step 3
Still with the GUARDIANS and GALAXY groups selected, use a white to black to white linear gradient at a 90-degree Angle to stroke the letters. Increase the Stroke Weight to 2 pt. Next, go to Effect > Distort & Transform > Transform and apply a 98% Vertical Scale along with a -2 px Horizontal Move. Hit OK.
While the Stroke attribute is still selected in the Appearance panel, go to Effect > Blur > Gaussian Blur and apply a Radius of 1 px. This is a small adjustment just to blur out the stroke a bit and turn it into a soft inner glow. Set the Blending mode to Screen (black becomes transparent).
Step 4
We are almost done with this text effect; only the shadow is missing. Click on the Add New Fill icon again to add a new Fill attribute under all the others. Use dark brown as the fill color, and then apply an Offset of 5 px. Next, go to Effect > Distort & Transform > Transform and apply a 99.8% Horizontal and Vertical Scale. In the Copies box, choose 6 and hit OK. Finally, go to Effect > Stylize > Drop Shadow and apply the settings shown below.
Step 5
The groups OF and THE have a different text effect applied to them, so we will create it in the following steps.
Click on the Add New Fill icon at the bottom of the Appearance panel to add the first Fill attribute above the Contents line. Use the brown linear gradient shown and set the Angle to 109 degrees (1).
Add the second Fill attribute above the first, and use the golden brown linear gradient shown. Apply an Offset of -2 px; then go to Effect > Stylize and apply the Inner Glow effect (2).
Step 6
Add the third Fill attribute under the previous two, and use a pale yellow to black linear gradient at a 90-degree Angle. Apply an Offset of 1.5 px; then set the Blending mode to Screen and reduce the Opacity to 75% (1).
Add the fourth Fill attribute at the bottom and use the linear gradient shown at a 110-degree Angle. Apply an Offset of 1.5 px; then go to Effect > Stylize and apply the Drop Shadow effect (2).
The gradient color stops are:
Color: D3A74F, Location: 0%
Color: 71501F, Location: 9.5%
Color: 4D3717, Location: 40%
Color: 6E5029, Location: 45%
Color: BF9246, Location: 55%
Color: 693A05, Location: 73%
Color: DCB456, Location: 82%
Color: 916D3C, Location: 100%
Step 7
For the last Fill attribute, use dark brown and apply an Offset of 2.3 px. Next, go to Effect > Distort & Transform > Transform and apply a 99.8% Horizontal and Vertical Scale. In the Copies box, choose 6 and hit OK. Finally, go to Effect > Stylize > Drop Shadow and apply the settings shown below.
4. How to Make the Guardians of the Galaxy Logo Background
Step 1
Use the Pen Tool (P) to draw a shape around the entire text, as shown in the image below. Give it a 20 pt Stroke using a light brown color. In the Stroke panel, click on the Round Join and Align Stroke to Outside options.
While the shape stays selected, go to Effect > 3D and Materials > 3D (Classic) > Extrude & Bevel (Classic) and apply the settings shown. Hit OK. This will turn the shape into a 3D edge.
Step 2
Copy and Paste in Front (Control-F) the 3D edge shape; then reduce the Stroke Weight to 19 pt and remove the 3D Extrude & Bevel (Classic) effect. Now, go to Effect > 3D and Materials > Extrude & Bevel. As you can see, this effect is different from the classic one and has much more settings and options to choose from.
Under the Object tab, make sure that Extrude is active and use the following settings:
Depth: 1447 pt
Preset: Front
Perspective: 3 degrees
Under the Materials tab, find and click on Cork Natural to apply it. Next, open the Main Parameters settings and change some of them as shown on the right side of the image.
Step 3
Copy and Paste in Back (Control-B) the 3D edge and open the 3D and Materials window to change some of the settings. In the Materials tab, find and click on Natural Terrazzo Inserts to apply it and replace the Cork Natural material. Next, change the settings under Main Parameters and Inserts,as shown on the right side of the image. Once done, you will get the background behind the Guardians of the Galaxy text effect.
Step 4
Select the 3D edge with the 3D Extrude & Bevel (Classic) effect applied, and then Copy and Paste in Place (Shift-Control-V) to make a copy of it in front of everything. Go to Object > Expand Appearance to turn the 3D path into a group of shapes (1). Use the Direct Selection Tool (A) to select only the outer border and delete it. You only need the inner shapes (2).
Double-click on the group of shapes to enter Isolation Mode. Zoom in on a section as much as needed, and select all the small shapes that make up that section as shown in the close-up. Click on Unite in the Pathfinder panel to merge them into one shape (3).
Repeat the same thing for all the other sections, and you will get all the colored shapes shown in the image below (4).
Step 5
Fill all the colored shapes obtained in the previous step with yellow, and set the Blending mode to Overlay. Keep the Opacity at 100% for some of the shapes, and reduce it to 50% for others, depending on the location of each shape (1). You can adjust this after you create the neon light effect, if needed.
To increase the light even more in some of the sections, Copy and Paste in Front (Control-F) the shapes shown below. Keep the same yellow fill color, but set them to Blending mode Overlay and 40% Opacity (2).
5. How to Make the Neon Light Effect
Step 1
Copy and Paste in Place (Shift-Control-V) the 3D edge again, and remove the 3D Extrude & Bevel (Classic) effect. You only need the path. Give it a 6 pt Stroke using any color for the moment. While the path is selected with the Selection Tool (V), drag the bounding box inwards to make the shape smaller (1).
After that, take the Scissors Tool (C) and click on the points highlighted in red to cut the path. Delete the segment between them (2) and then modify the path using the Pen Tool (P) as shown in the image below (3). Before you continue, click on the Round Cap and Round Join icons in the Stroke panel.
Step 2
We will use the path obtained in the previous step to create the neon light effect that goes around the Guardians of the Galaxy text effect. This neon effect consists of multiple appearances and blur effects, as most neon effects usually are.
While the path stays selected, first go to Object > Expand in order to turn the 6 pt Stroke into a filled shape. Follow up with Object > Ungroup (Shift-Control-G). Set the fill color to white; then go to Effect > Blur > Gaussian Blur and apply a Radius of 4 px. Hit OK (1).
With the path still selected, click on the Add New Fill icon at the bottom of the Appearance panel to add a second Fill attribute under the first one. Set the fill color to ivory, and then apply a 4 px Gaussian Blur again (2).
Step 3
Add a third Fill attribute under the previous two, and set the fill color to orange. Keep it selected, go to Effect > Distort & Transform > Transform, and apply the settings shown. Once that’s done, go to Effect > Blur > Gaussian Blur and apply a Radius of 5 px. Set the Blending mode of this Fill attribute to Overlay (1).
Add the fourth Fill attribute at the bottom of the Appearance panel, and use yellow as the fill color. Apply a 5 px Gaussian Blur and set the Blending mode to Overlay (2).
Step 4
Add another Fill attribute under the others, and set the color to yellow. Apply the Transform effect using the settings shown, and also a 10 px Gaussian Blur. Set the Blending mode to Overlay (1).
Add a new Fill attribute at the bottom, and set the color to orange. Apply the Transform effect again using the settings shown, and then a 13 px Gaussian Blur. Set the Blending mode to Hard Light this time (2).
Step 5
For the last Fill attribute, use orange again; then go to Effect > Blur > Radial Blur and set the Amount to 22. Make sure that the Blur Method is Zoom and the Quality is Good. Hit OK. Reduce the Opacity to 60%.
Step 6
At this point, the neon light effect is done. One final thing that you can do to improve the final look of the Guardians of the Galaxy Vol 3 logo is to select the GALAXY text effect and, in the Appearance panel, select the black to pale yellow gradient fill and change the Angle to -90 degrees. This will move the highlight to the bottom of the text, which is closer to the neon (1).
Also, select the text „THE”, head over to the Appearance panel, and change the Angle of the black to pale yellow gradient fill to 120 degrees. This will move the highlight to the top left side of the text, which is closer to the neon (2). That’s it!
Congratulations! You’re Done
You have successfully learned how to draw the Guardians of the Galaxy logo. Now that you know how to make it, feel free to apply the same techniques to create other unique logos and text effects. You should definitely be inspired!
Make sure to check out Envato Elements, where you’ll find plenty of resources that will help you in your projects, from logos to text effects, fonts, actions, and so much more. Download as many as you need with a subscription.
Popular Resources From Envato Elements
Envato Elements is an excellent resource for fonts, text effects, logos, actions, and so much more. Here’s a short list of some of the most popular resources that you can find. Grab them and take your designs to the next level.
This font is another great option that you can include in your designs to get that unique, futuristic look. It’s also similar to the font we used here. Be creative with it!
If you’re looking for a text effect that’s ready to be used, here is the perfect choice. All you have to do is to change the text in one click. It will definitely make your designs pop.
Here is a gorgeous, detailed logo template that you can easily edit and make your own. Add your personal touch by changing the colors or the text, and it will fit perfectly in your next project.
Looking for something more eye-catching and bold? This guardian logo definitely looks fierce and will get all the attention. It is vector and editable, so you can try any other colors you want.
Want to edit photos instead? Turn any photo that you have into a cool design by using this Galaxy action. It’s easy to use, and you can customize the effect even further. Give it a try!
Want to Learn More Illustrator Skills?
We have loads of tutorials on Envato Tuts+ that teach many other useful techniques. Here’s a list of tutorials specially made for you. Take a look!
In this tutorial, you’ll discover how to add a drop shadow in Illustrator and learn everything you need to know about the Illustrator drop shadow effect.
Would you like to watch this Illustrator drop shadow effect tutorial in action? You can follow this tutorial in this cool video from the Envato Tuts+ YouTube channel. Don’t forget to visit and subscribe if you’d like to watch more content like this!
How to Add a Drop Shadow in Illustrator
Step 1
To add a drop shadow in Illustrator, select your shape(s) and just go to Effect > Stylize > Drop Shadow. This will open the Drop Shadow window, where you can select the settings of your drop shadow in Illustrator.
Make sure that you have the Preview box checked to get a live preview with the applied effect and to notice any changes that you choose to make.
Step 2
Using the Mode dropdown menu, you can select the blend mode of your drop shadow in Illustrator. For this example, we’ll use Overlay, but feel free to try out the other blend modes. You can use the up/down arrow buttons from your keyboard to easily toggle between blend modes.
Step 3
The Opacity value sets the transparency of your drop shadow in Illustrator.
Hover the cursor over the existing value and roll the mouse wheel to adjust it easily. You can also use the arrow buttons or simply enter the desired value in the input field. Holding down the Shift key when you click one of those arrow buttons will increase/decrease the value by 10%. For this example, we’ll keep it at 50%.
Step 4
The X and Y Offset settings control the location of your drop shadow in Illustrator.
The X Offset moves your shadow horizontally, while the Y Offset moves your shadow vertically. Set a negative value whenever you wish to move your shadow up or to the left. For these examples, we’ll set both values to 15 px.
Step 5
The Blur setting controls the blurriness of your shadow.
You can set this to 0 px to add a sharp drop shadow or increase it to make your shadow bigger. For this example, we’ll set it to 20 px.
Step 6
With Color, you can set the color of your drop shadow in Illustrator.
Just click the color wheel and select the color that fits your need. For this example, we’ll keep the default black.
Step 7
With Darkness, the color of your drop shadow is influenced by the fill color of your shape.
Set this value to 0% to use the same color for your shadow that’s used to fill the shape. Just increase the Darkness whenever you wish to use a darker shade of the fill color for your drop shadow in Illustrator. Once you’re done, you can click OK, and that’s how you create a drop shadow in Illustrator.
Congratulations! You’re Done!
Now that you know how to add a shadow in Illustrator and where the drop shadow is in Illustrator, you can apply these techniques in your future projects.
You can find some great sources of inspiration at Envato Elements, with interesting solutions on how to do a drop shadow in Illustrator in more creative ways.
Popular Assets From Envato Elements
Envato Elements is an excellent resource for Illustrator assets and add-ons. Here’s a great Illustrator add-on that can help you quickly recreate the Illustrator drop shadow effect without needing to learn how to add a shadow in Illustrator.
Now you know how to add a drop shadow in Illustrator, but you’re still looking to add a different type of shadow effect? This pack of actions gives you 40 alternatives to choose from. Just click play and you’ll get your shadow.
Want to Learn More?
We have loads of tutorials on Envato Tuts+, from beginner to intermediate level. Take a look!
Swiss-style sans serifs are the go-to fonts for both digital and print projects. Today, we take a look at the best of these classic modernist fonts from Envato Elements. Elements is a subscription-based marketplace that offers tons ofgraphic templates, fonts, logos,add-ons, and more—all for one low monthly fee.
Simple and elegant, the Alexio Swiss typefaces come in four weights. This download also offers free updates and feature additions, so it’s an excellent choice for long-term projects.
Geometric-style fonts are easy to read and visually pleasing. Ageo contains eight weights from thin to heavy, with matching italics. You’ll get OpenType features like standard ligatures.
You can’t go wrong with the Jacques Swiss typeface. With eight weights, it’s versatile enough to stand out at larger and smaller sizes. It’s one of the popular modern fonts on Elements.
If you’re looking for classic font styles, check out Pulse Modernist Fonts. Find five weights with their corresponding italics. It includes numbers, punctuation, and uppercase characters.
Looking for a headline Swiss font? Spacia is a font with a classic look. It offers five weights, from light to extra bold. This makes it an excellent choice for branding, logos, banners, posters, etc.
Pacco Modernist Fonts is a display Swiss font that won’t let you down when you need it for either personal or business projects. The download is available in three file formats.
Looking for a modern Swiss font? Check out Zubayr Sans Serif. This font contains uppercase characters only, as well as numbers, punctuation, and foreign language characters.
Sans serif classic font styles like Univa Nova are all about clean lines and simplicity. Univa Nova offers a total of 16 modernist fonts: eight weights from thin to heavy, and their italics.
Crops Swiss Font is a simple sans serif that comes in light, regular, and bold styles. This uppercase font with a classic look includes numerals, punctuation, and multilingual support.
With a total of 329 glyphs, the Luxora Swiss Typefaces are versatile. This download offers 14 font styles consisting of seven weights and seven italic versions for each.
Inspired by Swiss font aesthetics, the Argon modernist fonts come in two weights: regular and oblique. These can be used at larger and smaller sizes without compromising legibility.
The Axon Swiss type font is a minimalist sans serif typeface that offers four different weights. It’s an excellent choice for a wide range of projects, from titles to banners.
Why not try Gayaku sans serif Swiss fonts for your next design project? This thin font contains upper and lowercase characters and is a perfect choice for greeting cards and headers.
What’s so great about the Luciano modernist font isn’t just its simplicity but also the fact that it offers six weights. From light to bold, Luciano can be used in a variety of applications at any given size.
The irresistible Modric Modernist Font is one you should have in your library. Use it whenever you need an elegant font with a classic look for business or personal use.
Download the Aginoe popular modern fonts for your next branding project. You’ll get upper and lowercase characters, numbers, and punctuation. Aginoe comes in two weights and their italics.
You won’t be able to resist the Enwicken modernist font. This Swiss typeface offers seven fonts with lower and uppercase characters, numerals, and extended punctuation.
Karolina Swiss Typography is a sans serif font with a classic look. You’ll get lowercase characters, numbers, punctuation, and support. Karolina is perfect for both body text and headers.
The Monerd modernist font is a sans serif offered in four styles: solid, bold, outline, and outline bold. It’s a great choice for logos, magazine titles, and so much more!
Looking for classic font styles to create a brand? Take a look at the Influencer modern Swiss fonts. This sans serif offers upper and lowercase characters, numbers, punctuation, and support.
Naia is a pack of six modernist fonts with a classic look. They come in three weights and three italics. You’ll also get all Latin characters, numbers, special characters, and punctuation.
Unlike Adobe Illustrator, Photoshop doesn’t have a dedicated perspective grid tool. So if you want to create a perspective grid in Photoshop, you need to use a special brush or set up the Shape tool in a very specific way.
In this tutorial, I’ll show you how to create a perspective grid in Photoshop that you can turn into a brush or a custom shape for future use!
Prefer video tutorials? Then don’t miss this new video by Abbey Esparza from the Envato Tuts+ YouTube channel. Learn everything you need to know about drawing perspective grids in Photoshop:
What You’ll Learn in This Photoshop Perspective Grid Tutorial
How to draw a perspective grid in Photoshop
How to create a perspective grid Photoshop brush
How to create a vector perspective grid
How to draw a one-point perspective grid in Photoshop
How to draw a 2-point perspective grid in Photoshop
How to use a vanishing point in Photoshop
1. How to Create a Perspective Grid in Photoshop
Step 1
Let’s start this Photoshop perspective grid tutorial. Open the software and create a New File. Use the 5000 x 5000 px for the dimensions, and keep the background white.
Step 2
Open the Shape Tool menu in the toolbar, and select the Polygon Tool.
Step 3
Set the Mode to Shape, Fill and Stroke to black, and make the Stroke 1 px thick.
Step 4
Now click anywhere in the canvas—a new window should appear. Adjust the settings the following way:
Set Width and Height to 5000 px
Set Number of Sides to 100
Set Star Ratio to 1%
Check From Center
Step 5
A nice one-point perspective grid in Photoshop should appear! Select both layers now with the Shift key, take the Move Tool (V) and Align Horizontal and Vertical Center to properly position the grid.
2. How to Create a Perspective Grid Photoshop Brush
Step 1
You could create the grid this way every time you need it, but it’s easier to turn it into a perspective grid Photoshop brush, or simply a custom shape. To turn it into a brush, simply go to Edit > Define Brush Preset and give it a name.
Step 2
Then you can create your perspective grid just by clicking on the canvas. However, this grid can’t be resized on the fly to a size bigger than 5000 px. You can resize it after drawing it, but it’s raster, so it will come with a loss of quality.
Step 3
The second method of drawing perspective grids is to turn the grid into a custom shape. To do this, select the layer with the grid and choose the Polygon Tool (U). Then go to Edit > Define Custom Shape and give it a name.
Step 4
Your perspective grid is now available on the Custom Shape tool’s list of shapes.
Step 5
In the Path Options, check From Center—it will make it easier to place the vanishing point where you want it to be. Check Defined Proportions as well, to keep the grid symmetrical.
Step 6
Now you can just draw the grid by clicking and dragging.
This perspective grid is vector and can be resized without any loss of quality.
3. Drawing Perspective in Photoshop
Step 1
Once you have your grid tools, all you need to do is decide the location of the horizon and the vanishing points in Photoshop. You can draw the horizon using the Line Tool (U) from the Shape Tool menu. Use the same settings as before, and set the Weight to 1 px.
You can also use a Guide for the horizon
Step 2
Now we’ll see how to use a vanishing point in Photoshop. To create a one-point perspective grid in Photoshop, place your vanishing point right in the center. You don’t have to be precise—after drawing the grid, you can take the Move Tool (V) and use the arrow keys to nudge the grid into the right place.
Use the Shift key to draw straight lines
Step 3
To create a 2-point perspective grid, place two vanishing points on your horizon. It’s good to keep them far away from each other.
Good Job!
Now you know how to create a perspective grid in Photoshop, both in the 1-point and 2-point versions, and how to use a vanishing point in Photoshop!
Top Recommended Photoshop Brushes From Envato Elements
Are you looking for Photoshop brush sets designed to look like traditional tools? Give these a try!
A pencil is the simplest drawing tool, but its textured strokes are a perfect base for any type of artwork—from technical sketches to detailed portraits. This set is simply a must-have for any digital artist!
If you’re interested in technical drawing, a digital brush imitating the strokes of a ballpoint pen can make your sketches clean, while also keeping that natural effect of traditional drawing. This set contains 60 of them!
Sometimes you may need thicker strokes for your artwork, and although it’s possible to make pencil or pen strokes bigger, it makes the natural effect go away. If you need thicker strokes, use a thicker tool—and this set gives you exactly this!
If you want to make your strokes look extra convincing, you can add a „drying ink” effect to them with this set. It contains 70 marker brushes with realistic textures.
If you need something for shading, you can use any brush—but nothing will give you a unique style like a set of stipple brushes. This set contains 62 brushes—32 for Photoshop and 30 for Illustrator.
Discover More Photoshop Tutorials and Resources
If you want to learn more about drawing in perspective, try these tutorials: