Wszystkie wpisy, których autorem jest admin

How to Make a Spotlight Effect Photoshop Action

Post pobrano z: How to Make a Spotlight Effect Photoshop Action

Final product image
What You’ll Be Creating

In this tutorial, you will learn how to create a spotlight effect Photoshop action to add amazing special effects to your images. I will explain everything in so much detail that everyone can create it, even those who have just opened Photoshop for the first time.

The photo effect shown above is the one I will show you how to create in this tutorial. If you would like to create the even more advanced spotlight effect Photoshop action shown below, using just a single click and in only a few minutes, then check out my Dust Storm Photoshop Action.

action final results

What You’ll Need

To recreate the design above, you will need the following resources:

1. How to Start Creating an Action

Step 1

First, open the photo that you want to work with. To open your photo, go to File > Open, choose your photo, and click Open. Now, before we get started, just check a couple of things:

  1. Your photo should be in RGB Color mode, 8 Bits/Channel. To check this, go to Image > Mode.
  2. For best results, your photo size should be 2000–4500 px wide/high. To check this, go to Image > Image Size.
  3. Your photo should be the Background layer. If it is not, go to Layer > New > Background from Layer.
checking image mode and size

Step 2

Now we need to expand the canvas on the top and bottom so we have more space around the subject on these sides. Go to Image > Canvas Size and use the settings below:

expanding canvas

Step 3

Go to Window > Actions, and in the Actions panel, click on the menu icon in the top right-hand corner, choose New Set to create a new set, and name it Spotlight. Then, click on the same menu icon again, choose New Action to create a new action, and name it Spotlight.

creating new action

2. How to Select the Subject

Step 1

In this section, we are going to make a selection of our subject and then copy the subject to a separate layer. Choose the Quick Selection Tool (W) and select the background of the photo. Use the Shift-Alt buttons on your keyboard to add or subtract areas from the selection. After you’ve made a perfect selection, press Control-Shift-I on your keyboard to invert the selection.

making selection

Step 2

Now go to Select > Modify > Smooth and set the Sample Radius to 5 px. Next, go to Select > Modify > Contract and set Contract By to 2 px. Finally, go to Select > Modify > Feather and set Feather Radius to 2 px.

modifying selection

Step 3

Press Control-J on your keyboard to create a new layer using a selection, and name this new layer Subject.

creating new layer using selection

3. How to Create the Background

In this section, we are going to create the background. Select the Background layer, go to Layer > New Fill Layer > Solid Color to create a new solid color fill layer, name it Background Color, and choose the color #000000.

creating new solid color fill layer

4. How to Create the Light Source

Step 1

In this section, we are going to create the light source. Go to Layer > New Fill Layer > Gradient Fill to create a new gradient fill layer, name it Light Source, and use the settings below:

creating new gradient fill layer

Step 2

Now Double-click on this layer thumbnail and, using the Move Tool (V), click and drag anywhere inside the canvas to position the gradient fill as shown below.

positioning layer

Step 3

Select the Subject layer and press Control-J on your keyboard to duplicate it. Then, go to Filter > Blur > Motion Blur and set the Angle to and Distance to 1000 px.

adding motion blur filter

Step 4

Now press Control-Alt-F on your keyboard to apply the previous filter again. Then, press Control-J on your keyboard to duplicate this layer. After that, using the Move tool (V), click and drag anywhere inside the canvas to position the layer as shown below:

duplicating layer

Step 5

Press Control-J on your keyboard to duplicate this layer and, using the Move tool (V), click and drag anywhere inside the canvas to position the layer as shown below:

duplicating layer

Step 6

Now Shift-click on the Subject copy layer to select all layers between. Then, press Control-E on your keyboard to merge these layers into one layer. After that, press Control-J to duplicate this new layer.

merging layers

Step 7

Control-click on the Subject copy 3 layer to select both layers at the same time. Then, press Control-E on your keyboard to merge these layers into one layer. After that, using the Move Tool (V), click and drag anywhere inside the canvas to position the layer as shown below:

merging layers

Step 8

Now Control-click on this layer thumbnail to make a selection of this layer. Then, press D on your keyboard to reset the swatches and select the layer mask of the Light Source layer. After that, go to Edit > Fill, and set Contents to Foreground Color, Mode to Normal, and Opacity to 100% as shown below:

filling selection with foreground color

Step 9

Press Control-D on your keyboard to deselect the selection. Then, Right-click on the Subject copy 4 layer and choose Delete Layer to delete this layer.

deleting layer

Step 10

Now press D on your keyboard to reset the swatches and select the layer mask of the Light Source layer. Then, choose the Brush Tool (B), pick a soft brush, set the Opacity of the brush to 50%, and brush as shown below:

brushing onto layer mask

Step 11

Press X on your keyboard to exchange the swatches and Control-click on the Subject layer thumbnail to make a selection of this layer. Then, press Control-Shift-I to inverse the selection. After that, choose the Brush Tool (B), pick a soft brush, set the Opacity of the brush to 100%, and brush as shown below:

brushing onto layer mask

Step 12

Now press Control-D on your keyboard to deselect the selection. Then, in the Properties panel, set the Density of the layer mask to 95%.

adjusting layer mask density

5. How to Blend the Subject

Step 1

In this section we are going to blend the subject with the background. Now Right-click on this layer, choose Blending Options, check Gradient Overlay, and use the settings below:

adding layer style

Step 2

Now go to Layer > Layer Mask > Reveal All to add a layer mask that reveals the whole layer. Then, go to Image > Apply Image and use the settings below:

applying image

Step 3

Right-click on this layer, choose Blending Options, select Gradient Overlay, and change the Blend Mode to Multiply.

adjusting layer style

Step 4

Now change the Blending Mode of this layer to Soft Light.

changing blending mode

Step 5

Control-click on this layer thumbnail to make a selection of this layer. Then, select the Background layer and press Control-J on your keyboard to create a new layer using the selection. After that, drag this new layer to the top of the layers in the Layers panel.

creating new layer using selection

Step 6

Now Control-click on this layer thumbnail to make a selection of this layer. Then, go to Select > Modify > Contract and set Contract By to 40 px. After that, go to Select > Modify > Feather and set the Feather Radius to 50 px.modifying selection

Step 7

Go to Layer > Layer Mask > Reveal Selection to add a layer mask that reveals the selected area of the layer.

adding layer mask

Step 8

Now select the thumbnail of this layer and press Control-Shift-U on your keyboard to desaturate it. Then, change the Blending Mode of this layer to Soft Light and name it Subject Contrast.

changing blending mode

Step 9

Control-click on the Subject layer thumbnail to make a selection of this layer. Then, go to Select > Modify > Contract, set Contract By to 2 px, and press Control-Shift-I to invert the selection. After that, select the Subject layer, press Delete to delete the selected area of the layer, and press Control-D to deselect the selection.

refining layer

6. How to Create the Texture

Step 1

In this section we are going to create the texture. Select the Subject Contrast layer, go to Layer > New > Layer to create a new layer, and name it Texture.

creating new layer

Step 2

Now press D on your keyboard to reset the swatches. Then, go to Filter > Render > Clouds. After that, press Control-T on your keyboard to transform this layer and set the Width and Height of the layer to 150%.

transforming layer

Step 3

Change the Blending Mode of this layer to Overlay and set the Opacity to 25%.

changing blending mode and opacity

7. How to Make the Final Adjustments.

Step 1

In this section we are going to make some final adjustments to the design. Right-click on the Light Source layer and choose Rasterize Layer. Then, click on the link icon between the layer and layer mask to unlink them. After that, go to Filter > Blur > Gaussian Blur and set the Radius to 50 px.

adding gaussian blur filter

Step 2

Now press D on your keyboard to reset the swatches and X to exchange them. Then, select the layer mask of this layer, choose the Brush Tool (B), pick a soft brush, and brush as shown below:

brushing onto layer mask

Step 3

Now go to Filter > Blur > Gaussian Blur and set the Radius to 7 px.

adding gaussian blur filter

Step 4

Select the Texture layer, go to Layer > New Adjustment Layer > Curves to create a new curves adjustment layer, and name it Color Look.

creating new curves adjustment layer

Step 5

Now Double-click on this layer thumbnail and in the Properties panel enter the settings below:

adjusting curves

Step 6

Control-click on the Subject layer thumbnail to make a selection of this layer. Then, select the Background layer and press Control-J on your keyboard to create a new layer using the selection. After that, drag this layer just above the Subject Contrast layer in the Layers panel.

creating new layer using selection

Step 7

Now press D on your keyboard to reset the swatches. Then, go to Layer > Layer Mask > Reveal All to add a layer mask that reveals the whole layer. After that, choose the Brush Tool (B), pick a soft brush, and brush as shown below:

brushing onto layer mask

Step 8

Select this layer thumbnail and press Control-Shift-U on your keyboard to desaturate it. Then, change the Opacity of this layer to 10% and name it Subject Details.

changing opacity

Step 9

Now press D on your keyboard to reset the swatches. Then, go to Layer > New Adjustment Layer > Gradient Map to create a new gradient map adjustment layer and name it S_D_Contrast.

creating new gradient map adjustment layer

Step 10

Press Control-Alt-G on your keyboard to create a clipping mask. Then, change the Blending Mode of this layer to Soft Light.

changing blending mode

You Made It!

Congratulations, you have succeeded! You have now learned how to create a glow effect Photoshop action to add amazing Photoshop effects to your photos by using various Photoshop filters along with other techniques. Here is our final result:

final result

If you would like to create the even more advanced spotlight effect
Photoshop action shown below, using just a single click
and in only a few minutes, then check out my Dust Storm Photoshop Action.

With this action, you can create amazing spotlight Photoshop effects
from your photos with no work at all! Simply fill in your subject with a
color and play the action. It’s really that simple! The action
will do all the work for you, giving you fully layered and customizable results that you can further modify.

You can choose from eight different lighting directions, and the action also creates 40 preset color looks that you can choose from. A snowstorm action is also included!

The action comes with a detailed video tutorial that demonstrates how to use the action and customize the results to get the most out of the effect.

action final results

Do you like Photoshop actions and effects? Then you may also like:

How to Make a Spotlight Effect Photoshop Action

Post pobrano z: How to Make a Spotlight Effect Photoshop Action

Final product image
What You’ll Be Creating

In this tutorial, you will learn how to create a spotlight effect Photoshop action to add amazing special effects to your images. I will explain everything in so much detail that everyone can create it, even those who have just opened Photoshop for the first time.

The photo effect shown above is the one I will show you how to create in this tutorial. If you would like to create the even more advanced spotlight effect Photoshop action shown below, using just a single click and in only a few minutes, then check out my Dust Storm Photoshop Action.

action final results

What You’ll Need

To recreate the design above, you will need the following resources:

1. How to Start Creating an Action

Step 1

First, open the photo that you want to work with. To open your photo, go to File > Open, choose your photo, and click Open. Now, before we get started, just check a couple of things:

  1. Your photo should be in RGB Color mode, 8 Bits/Channel. To check this, go to Image > Mode.
  2. For best results, your photo size should be 2000–4500 px wide/high. To check this, go to Image > Image Size.
  3. Your photo should be the Background layer. If it is not, go to Layer > New > Background from Layer.
checking image mode and size

Step 2

Now we need to expand the canvas on the top and bottom so we have more space around the subject on these sides. Go to Image > Canvas Size and use the settings below:

expanding canvas

Step 3

Go to Window > Actions, and in the Actions panel, click on the menu icon in the top right-hand corner, choose New Set to create a new set, and name it Spotlight. Then, click on the same menu icon again, choose New Action to create a new action, and name it Spotlight.

creating new action

2. How to Select the Subject

Step 1

In this section, we are going to make a selection of our subject and then copy the subject to a separate layer. Choose the Quick Selection Tool (W) and select the background of the photo. Use the Shift-Alt buttons on your keyboard to add or subtract areas from the selection. After you’ve made a perfect selection, press Control-Shift-I on your keyboard to invert the selection.

making selection

Step 2

Now go to Select > Modify > Smooth and set the Sample Radius to 5 px. Next, go to Select > Modify > Contract and set Contract By to 2 px. Finally, go to Select > Modify > Feather and set Feather Radius to 2 px.

modifying selection

Step 3

Press Control-J on your keyboard to create a new layer using a selection, and name this new layer Subject.

creating new layer using selection

3. How to Create the Background

In this section, we are going to create the background. Select the Background layer, go to Layer > New Fill Layer > Solid Color to create a new solid color fill layer, name it Background Color, and choose the color #000000.

creating new solid color fill layer

4. How to Create the Light Source

Step 1

In this section, we are going to create the light source. Go to Layer > New Fill Layer > Gradient Fill to create a new gradient fill layer, name it Light Source, and use the settings below:

creating new gradient fill layer

Step 2

Now Double-click on this layer thumbnail and, using the Move Tool (V), click and drag anywhere inside the canvas to position the gradient fill as shown below.

positioning layer

Step 3

Select the Subject layer and press Control-J on your keyboard to duplicate it. Then, go to Filter > Blur > Motion Blur and set the Angle to and Distance to 1000 px.

adding motion blur filter

Step 4

Now press Control-Alt-F on your keyboard to apply the previous filter again. Then, press Control-J on your keyboard to duplicate this layer. After that, using the Move tool (V), click and drag anywhere inside the canvas to position the layer as shown below:

duplicating layer

Step 5

Press Control-J on your keyboard to duplicate this layer and, using the Move tool (V), click and drag anywhere inside the canvas to position the layer as shown below:

duplicating layer

Step 6

Now Shift-click on the Subject copy layer to select all layers between. Then, press Control-E on your keyboard to merge these layers into one layer. After that, press Control-J to duplicate this new layer.

merging layers

Step 7

Control-click on the Subject copy 3 layer to select both layers at the same time. Then, press Control-E on your keyboard to merge these layers into one layer. After that, using the Move Tool (V), click and drag anywhere inside the canvas to position the layer as shown below:

merging layers

Step 8

Now Control-click on this layer thumbnail to make a selection of this layer. Then, press D on your keyboard to reset the swatches and select the layer mask of the Light Source layer. After that, go to Edit > Fill, and set Contents to Foreground Color, Mode to Normal, and Opacity to 100% as shown below:

filling selection with foreground color

Step 9

Press Control-D on your keyboard to deselect the selection. Then, Right-click on the Subject copy 4 layer and choose Delete Layer to delete this layer.

deleting layer

Step 10

Now press D on your keyboard to reset the swatches and select the layer mask of the Light Source layer. Then, choose the Brush Tool (B), pick a soft brush, set the Opacity of the brush to 50%, and brush as shown below:

brushing onto layer mask

Step 11

Press X on your keyboard to exchange the swatches and Control-click on the Subject layer thumbnail to make a selection of this layer. Then, press Control-Shift-I to inverse the selection. After that, choose the Brush Tool (B), pick a soft brush, set the Opacity of the brush to 100%, and brush as shown below:

brushing onto layer mask

Step 12

Now press Control-D on your keyboard to deselect the selection. Then, in the Properties panel, set the Density of the layer mask to 95%.

adjusting layer mask density

5. How to Blend the Subject

Step 1

In this section we are going to blend the subject with the background. Now Right-click on this layer, choose Blending Options, check Gradient Overlay, and use the settings below:

adding layer style

Step 2

Now go to Layer > Layer Mask > Reveal All to add a layer mask that reveals the whole layer. Then, go to Image > Apply Image and use the settings below:

applying image

Step 3

Right-click on this layer, choose Blending Options, select Gradient Overlay, and change the Blend Mode to Multiply.

adjusting layer style

Step 4

Now change the Blending Mode of this layer to Soft Light.

changing blending mode

Step 5

Control-click on this layer thumbnail to make a selection of this layer. Then, select the Background layer and press Control-J on your keyboard to create a new layer using the selection. After that, drag this new layer to the top of the layers in the Layers panel.

creating new layer using selection

Step 6

Now Control-click on this layer thumbnail to make a selection of this layer. Then, go to Select > Modify > Contract and set Contract By to 40 px. After that, go to Select > Modify > Feather and set the Feather Radius to 50 px.modifying selection

Step 7

Go to Layer > Layer Mask > Reveal Selection to add a layer mask that reveals the selected area of the layer.

adding layer mask

Step 8

Now select the thumbnail of this layer and press Control-Shift-U on your keyboard to desaturate it. Then, change the Blending Mode of this layer to Soft Light and name it Subject Contrast.

changing blending mode

Step 9

Control-click on the Subject layer thumbnail to make a selection of this layer. Then, go to Select > Modify > Contract, set Contract By to 2 px, and press Control-Shift-I to invert the selection. After that, select the Subject layer, press Delete to delete the selected area of the layer, and press Control-D to deselect the selection.

refining layer

6. How to Create the Texture

Step 1

In this section we are going to create the texture. Select the Subject Contrast layer, go to Layer > New > Layer to create a new layer, and name it Texture.

creating new layer

Step 2

Now press D on your keyboard to reset the swatches. Then, go to Filter > Render > Clouds. After that, press Control-T on your keyboard to transform this layer and set the Width and Height of the layer to 150%.

transforming layer

Step 3

Change the Blending Mode of this layer to Overlay and set the Opacity to 25%.

changing blending mode and opacity

7. How to Make the Final Adjustments.

Step 1

In this section we are going to make some final adjustments to the design. Right-click on the Light Source layer and choose Rasterize Layer. Then, click on the link icon between the layer and layer mask to unlink them. After that, go to Filter > Blur > Gaussian Blur and set the Radius to 50 px.

adding gaussian blur filter

Step 2

Now press D on your keyboard to reset the swatches and X to exchange them. Then, select the layer mask of this layer, choose the Brush Tool (B), pick a soft brush, and brush as shown below:

brushing onto layer mask

Step 3

Now go to Filter > Blur > Gaussian Blur and set the Radius to 7 px.

adding gaussian blur filter

Step 4

Select the Texture layer, go to Layer > New Adjustment Layer > Curves to create a new curves adjustment layer, and name it Color Look.

creating new curves adjustment layer

Step 5

Now Double-click on this layer thumbnail and in the Properties panel enter the settings below:

adjusting curves

Step 6

Control-click on the Subject layer thumbnail to make a selection of this layer. Then, select the Background layer and press Control-J on your keyboard to create a new layer using the selection. After that, drag this layer just above the Subject Contrast layer in the Layers panel.

creating new layer using selection

Step 7

Now press D on your keyboard to reset the swatches. Then, go to Layer > Layer Mask > Reveal All to add a layer mask that reveals the whole layer. After that, choose the Brush Tool (B), pick a soft brush, and brush as shown below:

brushing onto layer mask

Step 8

Select this layer thumbnail and press Control-Shift-U on your keyboard to desaturate it. Then, change the Opacity of this layer to 10% and name it Subject Details.

changing opacity

Step 9

Now press D on your keyboard to reset the swatches. Then, go to Layer > New Adjustment Layer > Gradient Map to create a new gradient map adjustment layer and name it S_D_Contrast.

creating new gradient map adjustment layer

Step 10

Press Control-Alt-G on your keyboard to create a clipping mask. Then, change the Blending Mode of this layer to Soft Light.

changing blending mode

You Made It!

Congratulations, you have succeeded! You have now learned how to create a glow effect Photoshop action to add amazing Photoshop effects to your photos by using various Photoshop filters along with other techniques. Here is our final result:

final result

If you would like to create the even more advanced spotlight effect
Photoshop action shown below, using just a single click
and in only a few minutes, then check out my Dust Storm Photoshop Action.

With this action, you can create amazing spotlight Photoshop effects
from your photos with no work at all! Simply fill in your subject with a
color and play the action. It’s really that simple! The action
will do all the work for you, giving you fully layered and customizable results that you can further modify.

You can choose from eight different lighting directions, and the action also creates 40 preset color looks that you can choose from. A snowstorm action is also included!

The action comes with a detailed video tutorial that demonstrates how to use the action and customize the results to get the most out of the effect.

action final results

Do you like Photoshop actions and effects? Then you may also like:

How to Make a Spotlight Effect Photoshop Action

Post pobrano z: How to Make a Spotlight Effect Photoshop Action

Final product image
What You’ll Be Creating

In this tutorial, you will learn how to create a spotlight effect Photoshop action to add amazing special effects to your images. I will explain everything in so much detail that everyone can create it, even those who have just opened Photoshop for the first time.

The photo effect shown above is the one I will show you how to create in this tutorial. If you would like to create the even more advanced spotlight effect Photoshop action shown below, using just a single click and in only a few minutes, then check out my Dust Storm Photoshop Action.

action final results

What You’ll Need

To recreate the design above, you will need the following resources:

1. How to Start Creating an Action

Step 1

First, open the photo that you want to work with. To open your photo, go to File > Open, choose your photo, and click Open. Now, before we get started, just check a couple of things:

  1. Your photo should be in RGB Color mode, 8 Bits/Channel. To check this, go to Image > Mode.
  2. For best results, your photo size should be 2000–4500 px wide/high. To check this, go to Image > Image Size.
  3. Your photo should be the Background layer. If it is not, go to Layer > New > Background from Layer.
checking image mode and size

Step 2

Now we need to expand the canvas on the top and bottom so we have more space around the subject on these sides. Go to Image > Canvas Size and use the settings below:

expanding canvas

Step 3

Go to Window > Actions, and in the Actions panel, click on the menu icon in the top right-hand corner, choose New Set to create a new set, and name it Spotlight. Then, click on the same menu icon again, choose New Action to create a new action, and name it Spotlight.

creating new action

2. How to Select the Subject

Step 1

In this section, we are going to make a selection of our subject and then copy the subject to a separate layer. Choose the Quick Selection Tool (W) and select the background of the photo. Use the Shift-Alt buttons on your keyboard to add or subtract areas from the selection. After you’ve made a perfect selection, press Control-Shift-I on your keyboard to invert the selection.

making selection

Step 2

Now go to Select > Modify > Smooth and set the Sample Radius to 5 px. Next, go to Select > Modify > Contract and set Contract By to 2 px. Finally, go to Select > Modify > Feather and set Feather Radius to 2 px.

modifying selection

Step 3

Press Control-J on your keyboard to create a new layer using a selection, and name this new layer Subject.

creating new layer using selection

3. How to Create the Background

In this section, we are going to create the background. Select the Background layer, go to Layer > New Fill Layer > Solid Color to create a new solid color fill layer, name it Background Color, and choose the color #000000.

creating new solid color fill layer

4. How to Create the Light Source

Step 1

In this section, we are going to create the light source. Go to Layer > New Fill Layer > Gradient Fill to create a new gradient fill layer, name it Light Source, and use the settings below:

creating new gradient fill layer

Step 2

Now Double-click on this layer thumbnail and, using the Move Tool (V), click and drag anywhere inside the canvas to position the gradient fill as shown below.

positioning layer

Step 3

Select the Subject layer and press Control-J on your keyboard to duplicate it. Then, go to Filter > Blur > Motion Blur and set the Angle to and Distance to 1000 px.

adding motion blur filter

Step 4

Now press Control-Alt-F on your keyboard to apply the previous filter again. Then, press Control-J on your keyboard to duplicate this layer. After that, using the Move tool (V), click and drag anywhere inside the canvas to position the layer as shown below:

duplicating layer

Step 5

Press Control-J on your keyboard to duplicate this layer and, using the Move tool (V), click and drag anywhere inside the canvas to position the layer as shown below:

duplicating layer

Step 6

Now Shift-click on the Subject copy layer to select all layers between. Then, press Control-E on your keyboard to merge these layers into one layer. After that, press Control-J to duplicate this new layer.

merging layers

Step 7

Control-click on the Subject copy 3 layer to select both layers at the same time. Then, press Control-E on your keyboard to merge these layers into one layer. After that, using the Move Tool (V), click and drag anywhere inside the canvas to position the layer as shown below:

merging layers

Step 8

Now Control-click on this layer thumbnail to make a selection of this layer. Then, press D on your keyboard to reset the swatches and select the layer mask of the Light Source layer. After that, go to Edit > Fill, and set Contents to Foreground Color, Mode to Normal, and Opacity to 100% as shown below:

filling selection with foreground color

Step 9

Press Control-D on your keyboard to deselect the selection. Then, Right-click on the Subject copy 4 layer and choose Delete Layer to delete this layer.

deleting layer

Step 10

Now press D on your keyboard to reset the swatches and select the layer mask of the Light Source layer. Then, choose the Brush Tool (B), pick a soft brush, set the Opacity of the brush to 50%, and brush as shown below:

brushing onto layer mask

Step 11

Press X on your keyboard to exchange the swatches and Control-click on the Subject layer thumbnail to make a selection of this layer. Then, press Control-Shift-I to inverse the selection. After that, choose the Brush Tool (B), pick a soft brush, set the Opacity of the brush to 100%, and brush as shown below:

brushing onto layer mask

Step 12

Now press Control-D on your keyboard to deselect the selection. Then, in the Properties panel, set the Density of the layer mask to 95%.

adjusting layer mask density

5. How to Blend the Subject

Step 1

In this section we are going to blend the subject with the background. Now Right-click on this layer, choose Blending Options, check Gradient Overlay, and use the settings below:

adding layer style

Step 2

Now go to Layer > Layer Mask > Reveal All to add a layer mask that reveals the whole layer. Then, go to Image > Apply Image and use the settings below:

applying image

Step 3

Right-click on this layer, choose Blending Options, select Gradient Overlay, and change the Blend Mode to Multiply.

adjusting layer style

Step 4

Now change the Blending Mode of this layer to Soft Light.

changing blending mode

Step 5

Control-click on this layer thumbnail to make a selection of this layer. Then, select the Background layer and press Control-J on your keyboard to create a new layer using the selection. After that, drag this new layer to the top of the layers in the Layers panel.

creating new layer using selection

Step 6

Now Control-click on this layer thumbnail to make a selection of this layer. Then, go to Select > Modify > Contract and set Contract By to 40 px. After that, go to Select > Modify > Feather and set the Feather Radius to 50 px.modifying selection

Step 7

Go to Layer > Layer Mask > Reveal Selection to add a layer mask that reveals the selected area of the layer.

adding layer mask

Step 8

Now select the thumbnail of this layer and press Control-Shift-U on your keyboard to desaturate it. Then, change the Blending Mode of this layer to Soft Light and name it Subject Contrast.

changing blending mode

Step 9

Control-click on the Subject layer thumbnail to make a selection of this layer. Then, go to Select > Modify > Contract, set Contract By to 2 px, and press Control-Shift-I to invert the selection. After that, select the Subject layer, press Delete to delete the selected area of the layer, and press Control-D to deselect the selection.

refining layer

6. How to Create the Texture

Step 1

In this section we are going to create the texture. Select the Subject Contrast layer, go to Layer > New > Layer to create a new layer, and name it Texture.

creating new layer

Step 2

Now press D on your keyboard to reset the swatches. Then, go to Filter > Render > Clouds. After that, press Control-T on your keyboard to transform this layer and set the Width and Height of the layer to 150%.

transforming layer

Step 3

Change the Blending Mode of this layer to Overlay and set the Opacity to 25%.

changing blending mode and opacity

7. How to Make the Final Adjustments.

Step 1

In this section we are going to make some final adjustments to the design. Right-click on the Light Source layer and choose Rasterize Layer. Then, click on the link icon between the layer and layer mask to unlink them. After that, go to Filter > Blur > Gaussian Blur and set the Radius to 50 px.

adding gaussian blur filter

Step 2

Now press D on your keyboard to reset the swatches and X to exchange them. Then, select the layer mask of this layer, choose the Brush Tool (B), pick a soft brush, and brush as shown below:

brushing onto layer mask

Step 3

Now go to Filter > Blur > Gaussian Blur and set the Radius to 7 px.

adding gaussian blur filter

Step 4

Select the Texture layer, go to Layer > New Adjustment Layer > Curves to create a new curves adjustment layer, and name it Color Look.

creating new curves adjustment layer

Step 5

Now Double-click on this layer thumbnail and in the Properties panel enter the settings below:

adjusting curves

Step 6

Control-click on the Subject layer thumbnail to make a selection of this layer. Then, select the Background layer and press Control-J on your keyboard to create a new layer using the selection. After that, drag this layer just above the Subject Contrast layer in the Layers panel.

creating new layer using selection

Step 7

Now press D on your keyboard to reset the swatches. Then, go to Layer > Layer Mask > Reveal All to add a layer mask that reveals the whole layer. After that, choose the Brush Tool (B), pick a soft brush, and brush as shown below:

brushing onto layer mask

Step 8

Select this layer thumbnail and press Control-Shift-U on your keyboard to desaturate it. Then, change the Opacity of this layer to 10% and name it Subject Details.

changing opacity

Step 9

Now press D on your keyboard to reset the swatches. Then, go to Layer > New Adjustment Layer > Gradient Map to create a new gradient map adjustment layer and name it S_D_Contrast.

creating new gradient map adjustment layer

Step 10

Press Control-Alt-G on your keyboard to create a clipping mask. Then, change the Blending Mode of this layer to Soft Light.

changing blending mode

You Made It!

Congratulations, you have succeeded! You have now learned how to create a glow effect Photoshop action to add amazing Photoshop effects to your photos by using various Photoshop filters along with other techniques. Here is our final result:

final result

If you would like to create the even more advanced spotlight effect
Photoshop action shown below, using just a single click
and in only a few minutes, then check out my Dust Storm Photoshop Action.

With this action, you can create amazing spotlight Photoshop effects
from your photos with no work at all! Simply fill in your subject with a
color and play the action. It’s really that simple! The action
will do all the work for you, giving you fully layered and customizable results that you can further modify.

You can choose from eight different lighting directions, and the action also creates 40 preset color looks that you can choose from. A snowstorm action is also included!

The action comes with a detailed video tutorial that demonstrates how to use the action and customize the results to get the most out of the effect.

action final results

Do you like Photoshop actions and effects? Then you may also like:

How to Make a Spotlight Effect Photoshop Action

Post pobrano z: How to Make a Spotlight Effect Photoshop Action

Final product image
What You’ll Be Creating

In this tutorial, you will learn how to create a spotlight effect Photoshop action to add amazing special effects to your images. I will explain everything in so much detail that everyone can create it, even those who have just opened Photoshop for the first time.

The photo effect shown above is the one I will show you how to create in this tutorial. If you would like to create the even more advanced spotlight effect Photoshop action shown below, using just a single click and in only a few minutes, then check out my Dust Storm Photoshop Action.

action final results

What You’ll Need

To recreate the design above, you will need the following resources:

1. How to Start Creating an Action

Step 1

First, open the photo that you want to work with. To open your photo, go to File > Open, choose your photo, and click Open. Now, before we get started, just check a couple of things:

  1. Your photo should be in RGB Color mode, 8 Bits/Channel. To check this, go to Image > Mode.
  2. For best results, your photo size should be 2000–4500 px wide/high. To check this, go to Image > Image Size.
  3. Your photo should be the Background layer. If it is not, go to Layer > New > Background from Layer.
checking image mode and size

Step 2

Now we need to expand the canvas on the top and bottom so we have more space around the subject on these sides. Go to Image > Canvas Size and use the settings below:

expanding canvas

Step 3

Go to Window > Actions, and in the Actions panel, click on the menu icon in the top right-hand corner, choose New Set to create a new set, and name it Spotlight. Then, click on the same menu icon again, choose New Action to create a new action, and name it Spotlight.

creating new action

2. How to Select the Subject

Step 1

In this section, we are going to make a selection of our subject and then copy the subject to a separate layer. Choose the Quick Selection Tool (W) and select the background of the photo. Use the Shift-Alt buttons on your keyboard to add or subtract areas from the selection. After you’ve made a perfect selection, press Control-Shift-I on your keyboard to invert the selection.

making selection

Step 2

Now go to Select > Modify > Smooth and set the Sample Radius to 5 px. Next, go to Select > Modify > Contract and set Contract By to 2 px. Finally, go to Select > Modify > Feather and set Feather Radius to 2 px.

modifying selection

Step 3

Press Control-J on your keyboard to create a new layer using a selection, and name this new layer Subject.

creating new layer using selection

3. How to Create the Background

In this section, we are going to create the background. Select the Background layer, go to Layer > New Fill Layer > Solid Color to create a new solid color fill layer, name it Background Color, and choose the color #000000.

creating new solid color fill layer

4. How to Create the Light Source

Step 1

In this section, we are going to create the light source. Go to Layer > New Fill Layer > Gradient Fill to create a new gradient fill layer, name it Light Source, and use the settings below:

creating new gradient fill layer

Step 2

Now Double-click on this layer thumbnail and, using the Move Tool (V), click and drag anywhere inside the canvas to position the gradient fill as shown below.

positioning layer

Step 3

Select the Subject layer and press Control-J on your keyboard to duplicate it. Then, go to Filter > Blur > Motion Blur and set the Angle to and Distance to 1000 px.

adding motion blur filter

Step 4

Now press Control-Alt-F on your keyboard to apply the previous filter again. Then, press Control-J on your keyboard to duplicate this layer. After that, using the Move tool (V), click and drag anywhere inside the canvas to position the layer as shown below:

duplicating layer

Step 5

Press Control-J on your keyboard to duplicate this layer and, using the Move tool (V), click and drag anywhere inside the canvas to position the layer as shown below:

duplicating layer

Step 6

Now Shift-click on the Subject copy layer to select all layers between. Then, press Control-E on your keyboard to merge these layers into one layer. After that, press Control-J to duplicate this new layer.

merging layers

Step 7

Control-click on the Subject copy 3 layer to select both layers at the same time. Then, press Control-E on your keyboard to merge these layers into one layer. After that, using the Move Tool (V), click and drag anywhere inside the canvas to position the layer as shown below:

merging layers

Step 8

Now Control-click on this layer thumbnail to make a selection of this layer. Then, press D on your keyboard to reset the swatches and select the layer mask of the Light Source layer. After that, go to Edit > Fill, and set Contents to Foreground Color, Mode to Normal, and Opacity to 100% as shown below:

filling selection with foreground color

Step 9

Press Control-D on your keyboard to deselect the selection. Then, Right-click on the Subject copy 4 layer and choose Delete Layer to delete this layer.

deleting layer

Step 10

Now press D on your keyboard to reset the swatches and select the layer mask of the Light Source layer. Then, choose the Brush Tool (B), pick a soft brush, set the Opacity of the brush to 50%, and brush as shown below:

brushing onto layer mask

Step 11

Press X on your keyboard to exchange the swatches and Control-click on the Subject layer thumbnail to make a selection of this layer. Then, press Control-Shift-I to inverse the selection. After that, choose the Brush Tool (B), pick a soft brush, set the Opacity of the brush to 100%, and brush as shown below:

brushing onto layer mask

Step 12

Now press Control-D on your keyboard to deselect the selection. Then, in the Properties panel, set the Density of the layer mask to 95%.

adjusting layer mask density

5. How to Blend the Subject

Step 1

In this section we are going to blend the subject with the background. Now Right-click on this layer, choose Blending Options, check Gradient Overlay, and use the settings below:

adding layer style

Step 2

Now go to Layer > Layer Mask > Reveal All to add a layer mask that reveals the whole layer. Then, go to Image > Apply Image and use the settings below:

applying image

Step 3

Right-click on this layer, choose Blending Options, select Gradient Overlay, and change the Blend Mode to Multiply.

adjusting layer style

Step 4

Now change the Blending Mode of this layer to Soft Light.

changing blending mode

Step 5

Control-click on this layer thumbnail to make a selection of this layer. Then, select the Background layer and press Control-J on your keyboard to create a new layer using the selection. After that, drag this new layer to the top of the layers in the Layers panel.

creating new layer using selection

Step 6

Now Control-click on this layer thumbnail to make a selection of this layer. Then, go to Select > Modify > Contract and set Contract By to 40 px. After that, go to Select > Modify > Feather and set the Feather Radius to 50 px.modifying selection

Step 7

Go to Layer > Layer Mask > Reveal Selection to add a layer mask that reveals the selected area of the layer.

adding layer mask

Step 8

Now select the thumbnail of this layer and press Control-Shift-U on your keyboard to desaturate it. Then, change the Blending Mode of this layer to Soft Light and name it Subject Contrast.

changing blending mode

Step 9

Control-click on the Subject layer thumbnail to make a selection of this layer. Then, go to Select > Modify > Contract, set Contract By to 2 px, and press Control-Shift-I to invert the selection. After that, select the Subject layer, press Delete to delete the selected area of the layer, and press Control-D to deselect the selection.

refining layer

6. How to Create the Texture

Step 1

In this section we are going to create the texture. Select the Subject Contrast layer, go to Layer > New > Layer to create a new layer, and name it Texture.

creating new layer

Step 2

Now press D on your keyboard to reset the swatches. Then, go to Filter > Render > Clouds. After that, press Control-T on your keyboard to transform this layer and set the Width and Height of the layer to 150%.

transforming layer

Step 3

Change the Blending Mode of this layer to Overlay and set the Opacity to 25%.

changing blending mode and opacity

7. How to Make the Final Adjustments.

Step 1

In this section we are going to make some final adjustments to the design. Right-click on the Light Source layer and choose Rasterize Layer. Then, click on the link icon between the layer and layer mask to unlink them. After that, go to Filter > Blur > Gaussian Blur and set the Radius to 50 px.

adding gaussian blur filter

Step 2

Now press D on your keyboard to reset the swatches and X to exchange them. Then, select the layer mask of this layer, choose the Brush Tool (B), pick a soft brush, and brush as shown below:

brushing onto layer mask

Step 3

Now go to Filter > Blur > Gaussian Blur and set the Radius to 7 px.

adding gaussian blur filter

Step 4

Select the Texture layer, go to Layer > New Adjustment Layer > Curves to create a new curves adjustment layer, and name it Color Look.

creating new curves adjustment layer

Step 5

Now Double-click on this layer thumbnail and in the Properties panel enter the settings below:

adjusting curves

Step 6

Control-click on the Subject layer thumbnail to make a selection of this layer. Then, select the Background layer and press Control-J on your keyboard to create a new layer using the selection. After that, drag this layer just above the Subject Contrast layer in the Layers panel.

creating new layer using selection

Step 7

Now press D on your keyboard to reset the swatches. Then, go to Layer > Layer Mask > Reveal All to add a layer mask that reveals the whole layer. After that, choose the Brush Tool (B), pick a soft brush, and brush as shown below:

brushing onto layer mask

Step 8

Select this layer thumbnail and press Control-Shift-U on your keyboard to desaturate it. Then, change the Opacity of this layer to 10% and name it Subject Details.

changing opacity

Step 9

Now press D on your keyboard to reset the swatches. Then, go to Layer > New Adjustment Layer > Gradient Map to create a new gradient map adjustment layer and name it S_D_Contrast.

creating new gradient map adjustment layer

Step 10

Press Control-Alt-G on your keyboard to create a clipping mask. Then, change the Blending Mode of this layer to Soft Light.

changing blending mode

You Made It!

Congratulations, you have succeeded! You have now learned how to create a glow effect Photoshop action to add amazing Photoshop effects to your photos by using various Photoshop filters along with other techniques. Here is our final result:

final result

If you would like to create the even more advanced spotlight effect
Photoshop action shown below, using just a single click
and in only a few minutes, then check out my Dust Storm Photoshop Action.

With this action, you can create amazing spotlight Photoshop effects
from your photos with no work at all! Simply fill in your subject with a
color and play the action. It’s really that simple! The action
will do all the work for you, giving you fully layered and customizable results that you can further modify.

You can choose from eight different lighting directions, and the action also creates 40 preset color looks that you can choose from. A snowstorm action is also included!

The action comes with a detailed video tutorial that demonstrates how to use the action and customize the results to get the most out of the effect.

action final results

Do you like Photoshop actions and effects? Then you may also like:

How to Make a Spotlight Effect Photoshop Action

Post pobrano z: How to Make a Spotlight Effect Photoshop Action

Final product image
What You’ll Be Creating

In this tutorial, you will learn how to create a spotlight effect Photoshop action to add amazing special effects to your images. I will explain everything in so much detail that everyone can create it, even those who have just opened Photoshop for the first time.

The photo effect shown above is the one I will show you how to create in this tutorial. If you would like to create the even more advanced spotlight effect Photoshop action shown below, using just a single click and in only a few minutes, then check out my Dust Storm Photoshop Action.

action final results

What You’ll Need

To recreate the design above, you will need the following resources:

1. How to Start Creating an Action

Step 1

First, open the photo that you want to work with. To open your photo, go to File > Open, choose your photo, and click Open. Now, before we get started, just check a couple of things:

  1. Your photo should be in RGB Color mode, 8 Bits/Channel. To check this, go to Image > Mode.
  2. For best results, your photo size should be 2000–4500 px wide/high. To check this, go to Image > Image Size.
  3. Your photo should be the Background layer. If it is not, go to Layer > New > Background from Layer.
checking image mode and size

Step 2

Now we need to expand the canvas on the top and bottom so we have more space around the subject on these sides. Go to Image > Canvas Size and use the settings below:

expanding canvas

Step 3

Go to Window > Actions, and in the Actions panel, click on the menu icon in the top right-hand corner, choose New Set to create a new set, and name it Spotlight. Then, click on the same menu icon again, choose New Action to create a new action, and name it Spotlight.

creating new action

2. How to Select the Subject

Step 1

In this section, we are going to make a selection of our subject and then copy the subject to a separate layer. Choose the Quick Selection Tool (W) and select the background of the photo. Use the Shift-Alt buttons on your keyboard to add or subtract areas from the selection. After you’ve made a perfect selection, press Control-Shift-I on your keyboard to invert the selection.

making selection

Step 2

Now go to Select > Modify > Smooth and set the Sample Radius to 5 px. Next, go to Select > Modify > Contract and set Contract By to 2 px. Finally, go to Select > Modify > Feather and set Feather Radius to 2 px.

modifying selection

Step 3

Press Control-J on your keyboard to create a new layer using a selection, and name this new layer Subject.

creating new layer using selection

3. How to Create the Background

In this section, we are going to create the background. Select the Background layer, go to Layer > New Fill Layer > Solid Color to create a new solid color fill layer, name it Background Color, and choose the color #000000.

creating new solid color fill layer

4. How to Create the Light Source

Step 1

In this section, we are going to create the light source. Go to Layer > New Fill Layer > Gradient Fill to create a new gradient fill layer, name it Light Source, and use the settings below:

creating new gradient fill layer

Step 2

Now Double-click on this layer thumbnail and, using the Move Tool (V), click and drag anywhere inside the canvas to position the gradient fill as shown below.

positioning layer

Step 3

Select the Subject layer and press Control-J on your keyboard to duplicate it. Then, go to Filter > Blur > Motion Blur and set the Angle to and Distance to 1000 px.

adding motion blur filter

Step 4

Now press Control-Alt-F on your keyboard to apply the previous filter again. Then, press Control-J on your keyboard to duplicate this layer. After that, using the Move tool (V), click and drag anywhere inside the canvas to position the layer as shown below:

duplicating layer

Step 5

Press Control-J on your keyboard to duplicate this layer and, using the Move tool (V), click and drag anywhere inside the canvas to position the layer as shown below:

duplicating layer

Step 6

Now Shift-click on the Subject copy layer to select all layers between. Then, press Control-E on your keyboard to merge these layers into one layer. After that, press Control-J to duplicate this new layer.

merging layers

Step 7

Control-click on the Subject copy 3 layer to select both layers at the same time. Then, press Control-E on your keyboard to merge these layers into one layer. After that, using the Move Tool (V), click and drag anywhere inside the canvas to position the layer as shown below:

merging layers

Step 8

Now Control-click on this layer thumbnail to make a selection of this layer. Then, press D on your keyboard to reset the swatches and select the layer mask of the Light Source layer. After that, go to Edit > Fill, and set Contents to Foreground Color, Mode to Normal, and Opacity to 100% as shown below:

filling selection with foreground color

Step 9

Press Control-D on your keyboard to deselect the selection. Then, Right-click on the Subject copy 4 layer and choose Delete Layer to delete this layer.

deleting layer

Step 10

Now press D on your keyboard to reset the swatches and select the layer mask of the Light Source layer. Then, choose the Brush Tool (B), pick a soft brush, set the Opacity of the brush to 50%, and brush as shown below:

brushing onto layer mask

Step 11

Press X on your keyboard to exchange the swatches and Control-click on the Subject layer thumbnail to make a selection of this layer. Then, press Control-Shift-I to inverse the selection. After that, choose the Brush Tool (B), pick a soft brush, set the Opacity of the brush to 100%, and brush as shown below:

brushing onto layer mask

Step 12

Now press Control-D on your keyboard to deselect the selection. Then, in the Properties panel, set the Density of the layer mask to 95%.

adjusting layer mask density

5. How to Blend the Subject

Step 1

In this section we are going to blend the subject with the background. Now Right-click on this layer, choose Blending Options, check Gradient Overlay, and use the settings below:

adding layer style

Step 2

Now go to Layer > Layer Mask > Reveal All to add a layer mask that reveals the whole layer. Then, go to Image > Apply Image and use the settings below:

applying image

Step 3

Right-click on this layer, choose Blending Options, select Gradient Overlay, and change the Blend Mode to Multiply.

adjusting layer style

Step 4

Now change the Blending Mode of this layer to Soft Light.

changing blending mode

Step 5

Control-click on this layer thumbnail to make a selection of this layer. Then, select the Background layer and press Control-J on your keyboard to create a new layer using the selection. After that, drag this new layer to the top of the layers in the Layers panel.

creating new layer using selection

Step 6

Now Control-click on this layer thumbnail to make a selection of this layer. Then, go to Select > Modify > Contract and set Contract By to 40 px. After that, go to Select > Modify > Feather and set the Feather Radius to 50 px.modifying selection

Step 7

Go to Layer > Layer Mask > Reveal Selection to add a layer mask that reveals the selected area of the layer.

adding layer mask

Step 8

Now select the thumbnail of this layer and press Control-Shift-U on your keyboard to desaturate it. Then, change the Blending Mode of this layer to Soft Light and name it Subject Contrast.

changing blending mode

Step 9

Control-click on the Subject layer thumbnail to make a selection of this layer. Then, go to Select > Modify > Contract, set Contract By to 2 px, and press Control-Shift-I to invert the selection. After that, select the Subject layer, press Delete to delete the selected area of the layer, and press Control-D to deselect the selection.

refining layer

6. How to Create the Texture

Step 1

In this section we are going to create the texture. Select the Subject Contrast layer, go to Layer > New > Layer to create a new layer, and name it Texture.

creating new layer

Step 2

Now press D on your keyboard to reset the swatches. Then, go to Filter > Render > Clouds. After that, press Control-T on your keyboard to transform this layer and set the Width and Height of the layer to 150%.

transforming layer

Step 3

Change the Blending Mode of this layer to Overlay and set the Opacity to 25%.

changing blending mode and opacity

7. How to Make the Final Adjustments.

Step 1

In this section we are going to make some final adjustments to the design. Right-click on the Light Source layer and choose Rasterize Layer. Then, click on the link icon between the layer and layer mask to unlink them. After that, go to Filter > Blur > Gaussian Blur and set the Radius to 50 px.

adding gaussian blur filter

Step 2

Now press D on your keyboard to reset the swatches and X to exchange them. Then, select the layer mask of this layer, choose the Brush Tool (B), pick a soft brush, and brush as shown below:

brushing onto layer mask

Step 3

Now go to Filter > Blur > Gaussian Blur and set the Radius to 7 px.

adding gaussian blur filter

Step 4

Select the Texture layer, go to Layer > New Adjustment Layer > Curves to create a new curves adjustment layer, and name it Color Look.

creating new curves adjustment layer

Step 5

Now Double-click on this layer thumbnail and in the Properties panel enter the settings below:

adjusting curves

Step 6

Control-click on the Subject layer thumbnail to make a selection of this layer. Then, select the Background layer and press Control-J on your keyboard to create a new layer using the selection. After that, drag this layer just above the Subject Contrast layer in the Layers panel.

creating new layer using selection

Step 7

Now press D on your keyboard to reset the swatches. Then, go to Layer > Layer Mask > Reveal All to add a layer mask that reveals the whole layer. After that, choose the Brush Tool (B), pick a soft brush, and brush as shown below:

brushing onto layer mask

Step 8

Select this layer thumbnail and press Control-Shift-U on your keyboard to desaturate it. Then, change the Opacity of this layer to 10% and name it Subject Details.

changing opacity

Step 9

Now press D on your keyboard to reset the swatches. Then, go to Layer > New Adjustment Layer > Gradient Map to create a new gradient map adjustment layer and name it S_D_Contrast.

creating new gradient map adjustment layer

Step 10

Press Control-Alt-G on your keyboard to create a clipping mask. Then, change the Blending Mode of this layer to Soft Light.

changing blending mode

You Made It!

Congratulations, you have succeeded! You have now learned how to create a glow effect Photoshop action to add amazing Photoshop effects to your photos by using various Photoshop filters along with other techniques. Here is our final result:

final result

If you would like to create the even more advanced spotlight effect
Photoshop action shown below, using just a single click
and in only a few minutes, then check out my Dust Storm Photoshop Action.

With this action, you can create amazing spotlight Photoshop effects
from your photos with no work at all! Simply fill in your subject with a
color and play the action. It’s really that simple! The action
will do all the work for you, giving you fully layered and customizable results that you can further modify.

You can choose from eight different lighting directions, and the action also creates 40 preset color looks that you can choose from. A snowstorm action is also included!

The action comes with a detailed video tutorial that demonstrates how to use the action and customize the results to get the most out of the effect.

action final results

Do you like Photoshop actions and effects? Then you may also like:

How to Create a Cool Glitch Photo Effect in Adobe Photoshop

Post pobrano z: How to Create a Cool Glitch Photo Effect in Adobe Photoshop

Final product image
What You’ll Be Creating

Photo effects are a great way to practice and harness your Photoshop skills. In this lesson, learn how to create a fun photo glitch effect using Marquee Tools, the Wave Filter, and more!

Prefer to follow along via video? Check out our lesson over on the Envato Tuts+ YouTube channel:

Want to create more fun photo effects, without needing any in-depth Photoshop skills? Try these:

Tutorial Assets

The following assets were used in the production of this tutorial.

Photo Glitch Basics: What You Need to Know

In order to get the best result possible when achieving effects based on real-life scenarios, it helps to do your research. So let’s get to know what a glitch is.

The kind of glitch we’ll be tackling is common to television or video games. These glitches are software errors or bugs that are often caused by a corrupted signal. The end result leaves your screen incredibly distorted and hard to make out.

For this tutorial, we’ll need to keep in mind some key visual characteristics to achieve this look. These are:

  • Jagged lines or waves
  • Frozen or static looking visuals
  • Inverted colors

Do a couple of Google searches to keep some inspiration and references on deck. Refer to them often to experiment with this style for yourself, or enlist the help of a design professional from Envato Studio.

Glitch Photo Effect Alternative Version by Melody Nieves
Alternate version. Gather references to help achieve this look! Stock from Freepik.

If you’re having trouble achieving this look, don’t forget that you can always bypass this process by downloading one of our incredible Glitch Photo Effects from GraphicRiver and Envato Elements.

1. How to Set Up the Glitch Photo Effect

Step 1

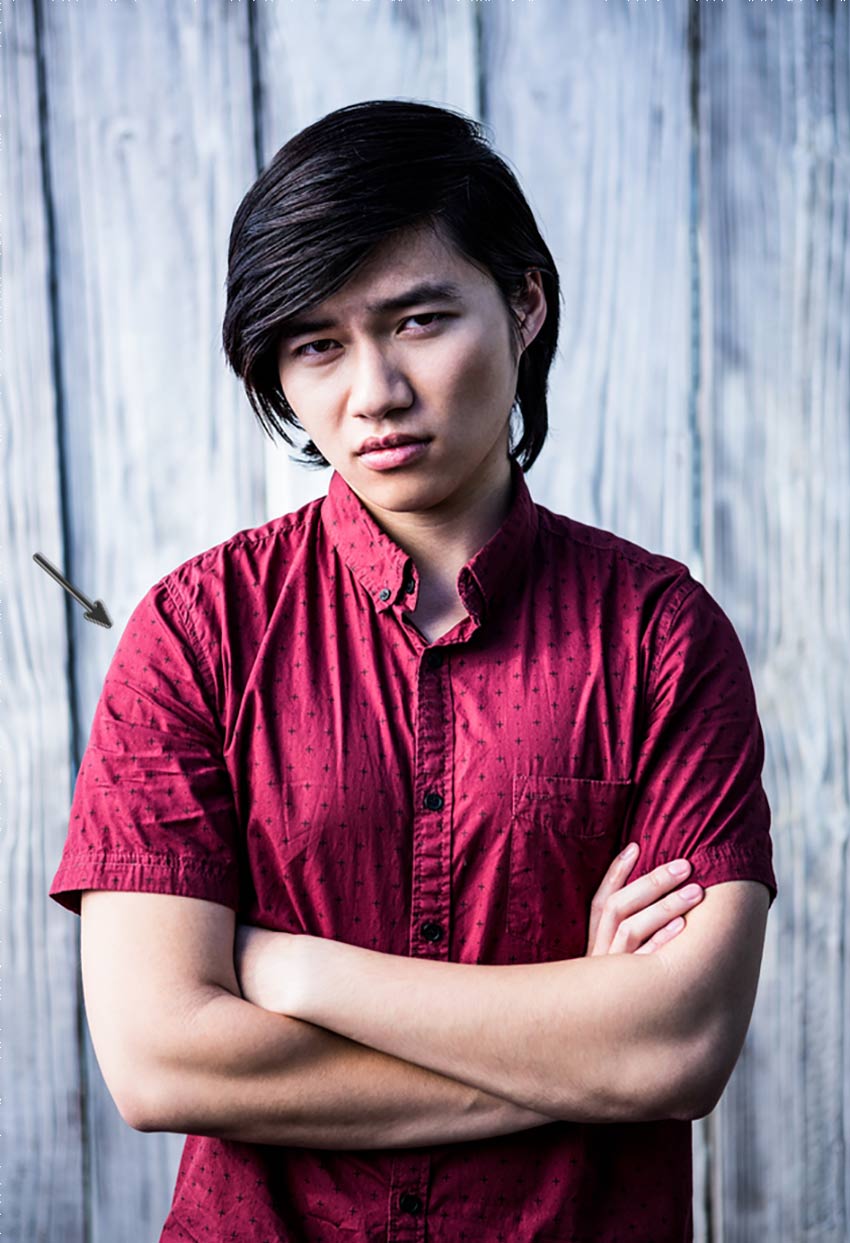
Let’s begin! I’ll be using this Hipster Stock from PhotoDune for this tutorial. For this particular look, it helps if you choose a stock where the model has edges that you can see clearly because we’ll need to extract it from its background. It’s also an added bonus if the background is a solid color or not too distracting like these wooden panels.

Hipster Man Stock from PhotoDune
Notice how you can clearly see all the edges of this model. Make sure you choose a stock with a model you can easily extract.

Double-click the Background layer to make it a New Layer. Create a New Layer (Control-Shift-N) positioned underneath your reference. Set the Foreground Color to white, and Fill the layer with white using the Paint Bucket Tool (G).

Setup the Layers for a Glitch Photo Effect

Step 2

Select the Magnetic Lasso Tool (L). This will help us extract the reference by easily snapping to the sides of your model. Use the Magnetic Lasso Tool (L) to create a complete selection around the model. When you’re finished, Right-click and select Layer via Copy to create a quick duplicate.

Use the Magnetic Lasso Tool to Extract the Subject
Make sure you keep the original stock. The end result is what the stock would look like on its own layer.

Step 3

Select the original stock. Use the Free Transform Tool (Control-T) to bring in the sides of the background to expose some of the white to the left and right.

Squeeze the Sides with the Free Transform Tool

Alternatively, if your stock doesn’t have a background, you can just add a rectangle using the Rectangle Tool (U) like this example below.

Alternative Glitch Version with Rectangle Background
Alternatively, if your stock doesn’t have a background, add a quick rectangle. Stock from Freepik.

2. How to Desaturate a Photo

Step 1

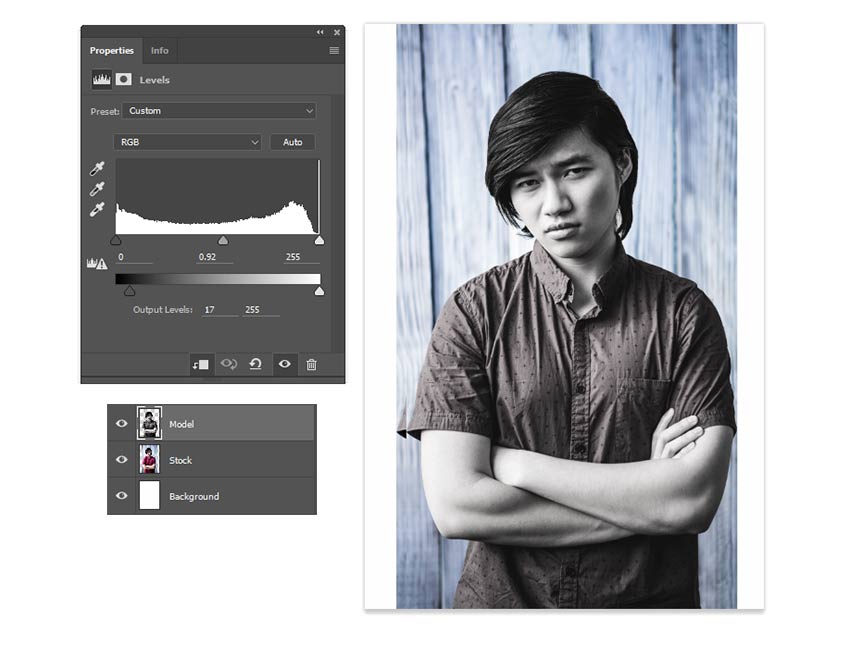
Moving along, let’s Desaturate this photo for a more monochromatic color palette. Select the layer for the model’s cutout and go to Image > Adjustments > Hue & Saturation. Lower the Saturation to -95 to remove the majority of the photo’s color.

Desaturate with Hue and Saturation

Step 2

You can adjust the main photo even further by using Levels. Select the extracted model’s layer again, and go to Image > Adjustments > Levels. Adjust the Levels for the RGB Channel with the following settings:

  • Shadow Input Level: 0
  • Midtone Input Level: 0.92
  • Highlight Input Level: 255
  • Output Levels: 17, 255

The end result is subtle, and it lightens the model slightly.

Use Levels to Adjust the Desaturated Photo

3. How to Create a Linear Glitch Distortion

Step 1

The next part of this effect is to recreate the jagged photo distortion that makes it look as if the visuals are out of place. To do this, first select the stock and model layers and Merge them together.

Merge the layers together

Step 2

Now select the Rectangular Marquee Tool (M). Create two skinny selections on the photo layer. First create one at the bottom, and then hold the Shift key to add another selection at the top.

Use the Rectangular Marquee Tool to create selection

Press the V key on your keyboard to switch over to the Move Tool. Use the Left Arrow key to move the selections to the left. You may have to hit it several times or hold it down for a while to get the desired result. 

Move the selection to the left for the glitch

Step 3

You can continue this process on a single layer, but eventually there might be open white spaces that don’t look quite so good. So to avoid this, Duplicate the Model Layer and use the copy to create the distortion.

Again, use the Rectangular Marquee Tool (M) to create more selections, moving them in different directions with the Left Arrow and Right Arrow keys. Here I created two more and moved them to the right slightly.

Create more selections for more glitches

Notice that because there’s a copy of the photo behind this layer, the resulting look shows the layer behind it instead of the white background.

Step 4

Let’s speed this up a bit! Create even more Rectangular Selections, using the Move Tool (V) to move the different sections out of place. Vary the size between skinny selections and thicker ones to make the effect more natural.

It’s even a good idea to have a game plan before you tackle this part. Since I like the man’s serious expression, I want to make sure the glitches create focus towards the center of the photo.

Continue creating the glitch effect with selections

As you get closer to the face, try not to distort it too much. Do each glitch individually to see what will work. This part is all about experimentation, so if you need to go back a step or two, just hit Control-Z to Undo.

Creating Photo Glitches Around the Face

When you’re finished with all your linear glitches, the effect should look something like this:

Final Linear Glitch Effect

4. How to Create a Wavy Glitch Distortion

Step 1

The next part of this distortion effect is to create that wavy glitch. You may have seen these before if you’ve ventured off into the naughty channels as a kid, but these glitches make the image appear as though it’s moving in liquid.

To do this we’ll need the Wave Filter. First, Merge the original stock layer together with copy that has all the glitches. Then Control-J to create a duplicate to create the wavy distortion on. 

Merging Layers and Creating Duplicates for the Wavy Distortion

Step 2

With the copy selected, create several more large selections with the Rectangular Marquee Tool (M) just like before. Keep in mind that I’m trying to frame the face of the subject, so don’t select any parts directly in the center.

Create Selections for the Wavy Glitch

Now go to Filter > Distort > Wave, adjusting the settings as follows to create a wavy effect on only the selections.

Creating a Wavy Glitch with Filter Distort Wave

Step 3

With this particular effect, the settings above may or may not work for your photo. So it’s important to experiment and adjust the settings on your own to achieve the look you desire.

Continue this process of making selections first before applying the Wave Filter. You’ll need to change the settings each time to vary the effect on the photo.

Continue the Wavy Glitch Process

Here is some more progress after a little experimentation.

Wavy Glitch Photo Effect Progress

Step 4

Finish this effect by concentrating on the top and bottom parts of the photo. First, select the bottom of the image with the Rectangular Marquee Tool (M) and apply the Wave Filter with the following settings.

Add the Glitch to the Bottom with the Wave Filter

Now for the top portion. Repeat the process, this time changing the settings to the following ones below.

Top Portion Wavy Glitch Effect

Here is the image complete with all the linear and wavy glitches. Let’s move on to the finishing touches!

Final Wavy Glitch Effect

5. How to Create a Simple 3D Effect

Step 1

Now for the 3D color effects! Just like before, start by Merging the glitch layers together, leaving the white background out so that there are only two layers left. Then hit Control-J to create two more Duplicates of the merged photo layer.

Duplicate Layers for the Final Effect

Step 2

Hide the Visibility of the top two layers. Then Right-click the first photo layer, „Merged,” and go to Blending Options. Uncheck the G, or Green Channel located under Advanced Blending.

Uncheck the Green Channel for 3D Effect

Now Unhide the Visibility of the top layers and repeat the process. This time Uncheck the Red Channel for „Merged Copy,” and both the Red and Green Channels for „Merged Copy 2.”

Uncheck the Red and Blue Channels for 3D Effect

Step 3

Now we can begin to move each layer to create the insane 3D effect. Select the Move Tool (V) and then select the layer, „Merged Copy,” using the Left Arrow key to move the layer to the left. Next, select the top layer, „Merged Copy 2,” using the Left Arrow key to move the layer to the left as well.

Here is what the process will look like.

Creating the 3D effect on a glitched photo

Step 4

Almost done! To add the appearance of screen lines to this effect, select the top layer, „Merged Copy 2,” and Right-click to go to Blending Options. Add a quick Pattern Overlay using the default Horizontal Line Pattern, and set the rest of the settings as follows:

Creating the Horizontal Pattern with an Overlay

Because the layer is blue and the Blend Mode is set to Soft Light, this will also give your image a nice blue tint.

Result of the Pattern Overlay

Step 5

To complete this cool glitch effect, we just need to carry out one last step. Add a New Layer and set the Layer Blend Mode to Dissolve. In this step, we’ll use the Brush Tool (B) to paint red #5e220a towards the bottom of the image in order to create tiny particles as a part of the final glitch effect. Adjust the Opacity of the layer if you need to; here I brought mine down to 8%.

Creating Glitch Particles with Dissolve

That’s it! Check out the final result below. You could also modify this to create a glitch effect Photoshop Action.

Conclusion

Photo effects are a smart way to practice unique and exciting techniques in Adobe Photoshop. You can have lots of fun achieving real-life scenarios like photo glitches and so much more.

If you liked this article and want to try more Photoshop photo effect tutorials, check out this epic list:

I hope you enjoyed this tutorial. Feel free to let me know if you have any questions in the comments below. And be sure to browse our wide range of Glitch Photo Effect Actions available on GraphicRiver and Envato Elements.

Glitch Photo Effect Photoshop Tutorial by Melody Nieves

Glitch Effect Photoshop Actions

Looking for some recommended glitch effect actions for Photoshop? Check out these items from GraphicRiver.

Animated Glitch – Photoshop Action

Turn a photo into an animated glitch effect with this action. One of the biggest sellers in the glitch effect category.

Animated Glitch

Glitch Photoshop Photo Template

Why not try this RGB glitch PSD photo effect template for a variety of options in creating a static glitch effect in Photoshop.

Glitch Photoshop Photo Template

Random Glitch Square Photoshop Action

Or try a unique approach to the glitch effect with this pack of six glitch square Photoshop actions and 30 color effects.

Random Glitch Square Photoshop Action

How to Create a Cool Glitch Photo Effect in Adobe Photoshop

Post pobrano z: How to Create a Cool Glitch Photo Effect in Adobe Photoshop

Final product image
What You’ll Be Creating

Photo effects are a great way to practice and harness your Photoshop skills. In this lesson, learn how to create a fun photo glitch effect using Marquee Tools, the Wave Filter, and more!

Prefer to follow along via video? Check out our lesson over on the Envato Tuts+ YouTube channel:

Want to create more fun photo effects, without needing any in-depth Photoshop skills? Try these:

Tutorial Assets

The following assets were used in the production of this tutorial.

Photo Glitch Basics: What You Need to Know

In order to get the best result possible when achieving effects based on real-life scenarios, it helps to do your research. So let’s get to know what a glitch is.

The kind of glitch we’ll be tackling is common to television or video games. These glitches are software errors or bugs that are often caused by a corrupted signal. The end result leaves your screen incredibly distorted and hard to make out.

For this tutorial, we’ll need to keep in mind some key visual characteristics to achieve this look. These are:

  • Jagged lines or waves
  • Frozen or static looking visuals
  • Inverted colors

Do a couple of Google searches to keep some inspiration and references on deck. Refer to them often to experiment with this style for yourself, or enlist the help of a design professional from Envato Studio.

Glitch Photo Effect Alternative Version by Melody Nieves
Alternate version. Gather references to help achieve this look! Stock from Freepik.

If you’re having trouble achieving this look, don’t forget that you can always bypass this process by downloading one of our incredible Glitch Photo Effects from GraphicRiver and Envato Elements.

1. How to Set Up the Glitch Photo Effect

Step 1

Let’s begin! I’ll be using this Hipster Stock from PhotoDune for this tutorial. For this particular look, it helps if you choose a stock where the model has edges that you can see clearly because we’ll need to extract it from its background. It’s also an added bonus if the background is a solid color or not too distracting like these wooden panels.

Hipster Man Stock from PhotoDune
Notice how you can clearly see all the edges of this model. Make sure you choose a stock with a model you can easily extract.

Double-click the Background layer to make it a New Layer. Create a New Layer (Control-Shift-N) positioned underneath your reference. Set the Foreground Color to white, and Fill the layer with white using the Paint Bucket Tool (G).

Setup the Layers for a Glitch Photo Effect

Step 2

Select the Magnetic Lasso Tool (L). This will help us extract the reference by easily snapping to the sides of your model. Use the Magnetic Lasso Tool (L) to create a complete selection around the model. When you’re finished, Right-click and select Layer via Copy to create a quick duplicate.

Use the Magnetic Lasso Tool to Extract the Subject
Make sure you keep the original stock. The end result is what the stock would look like on its own layer.

Step 3

Select the original stock. Use the Free Transform Tool (Control-T) to bring in the sides of the background to expose some of the white to the left and right.

Squeeze the Sides with the Free Transform Tool

Alternatively, if your stock doesn’t have a background, you can just add a rectangle using the Rectangle Tool (U) like this example below.

Alternative Glitch Version with Rectangle Background
Alternatively, if your stock doesn’t have a background, add a quick rectangle. Stock from Freepik.

2. How to Desaturate a Photo

Step 1

Moving along, let’s Desaturate this photo for a more monochromatic color palette. Select the layer for the model’s cutout and go to Image > Adjustments > Hue & Saturation. Lower the Saturation to -95 to remove the majority of the photo’s color.

Desaturate with Hue and Saturation

Step 2

You can adjust the main photo even further by using Levels. Select the extracted model’s layer again, and go to Image > Adjustments > Levels. Adjust the Levels for the RGB Channel with the following settings:

  • Shadow Input Level: 0
  • Midtone Input Level: 0.92
  • Highlight Input Level: 255
  • Output Levels: 17, 255

The end result is subtle, and it lightens the model slightly.

Use Levels to Adjust the Desaturated Photo

3. How to Create a Linear Glitch Distortion

Step 1

The next part of this effect is to recreate the jagged photo distortion that makes it look as if the visuals are out of place. To do this, first select the stock and model layers and Merge them together.

Merge the layers together

Step 2

Now select the Rectangular Marquee Tool (M). Create two skinny selections on the photo layer. First create one at the bottom, and then hold the Shift key to add another selection at the top.

Use the Rectangular Marquee Tool to create selection

Press the V key on your keyboard to switch over to the Move Tool. Use the Left Arrow key to move the selections to the left. You may have to hit it several times or hold it down for a while to get the desired result. 

Move the selection to the left for the glitch

Step 3

You can continue this process on a single layer, but eventually there might be open white spaces that don’t look quite so good. So to avoid this, Duplicate the Model Layer and use the copy to create the distortion.

Again, use the Rectangular Marquee Tool (M) to create more selections, moving them in different directions with the Left Arrow and Right Arrow keys. Here I created two more and moved them to the right slightly.

Create more selections for more glitches

Notice that because there’s a copy of the photo behind this layer, the resulting look shows the layer behind it instead of the white background.

Step 4

Let’s speed this up a bit! Create even more Rectangular Selections, using the Move Tool (V) to move the different sections out of place. Vary the size between skinny selections and thicker ones to make the effect more natural.

It’s even a good idea to have a game plan before you tackle this part. Since I like the man’s serious expression, I want to make sure the glitches create focus towards the center of the photo.

Continue creating the glitch effect with selections

As you get closer to the face, try not to distort it too much. Do each glitch individually to see what will work. This part is all about experimentation, so if you need to go back a step or two, just hit Control-Z to Undo.

Creating Photo Glitches Around the Face

When you’re finished with all your linear glitches, the effect should look something like this:

Final Linear Glitch Effect

4. How to Create a Wavy Glitch Distortion

Step 1

The next part of this distortion effect is to create that wavy glitch. You may have seen these before if you’ve ventured off into the naughty channels as a kid, but these glitches make the image appear as though it’s moving in liquid.

To do this we’ll need the Wave Filter. First, Merge the original stock layer together with copy that has all the glitches. Then Control-J to create a duplicate to create the wavy distortion on. 

Merging Layers and Creating Duplicates for the Wavy Distortion

Step 2

With the copy selected, create several more large selections with the Rectangular Marquee Tool (M) just like before. Keep in mind that I’m trying to frame the face of the subject, so don’t select any parts directly in the center.

Create Selections for the Wavy Glitch

Now go to Filter > Distort > Wave, adjusting the settings as follows to create a wavy effect on only the selections.

Creating a Wavy Glitch with Filter Distort Wave

Step 3

With this particular effect, the settings above may or may not work for your photo. So it’s important to experiment and adjust the settings on your own to achieve the look you desire.

Continue this process of making selections first before applying the Wave Filter. You’ll need to change the settings each time to vary the effect on the photo.

Continue the Wavy Glitch Process

Here is some more progress after a little experimentation.

Wavy Glitch Photo Effect Progress

Step 4

Finish this effect by concentrating on the top and bottom parts of the photo. First, select the bottom of the image with the Rectangular Marquee Tool (M) and apply the Wave Filter with the following settings.

Add the Glitch to the Bottom with the Wave Filter

Now for the top portion. Repeat the process, this time changing the settings to the following ones below.

Top Portion Wavy Glitch Effect

Here is the image complete with all the linear and wavy glitches. Let’s move on to the finishing touches!

Final Wavy Glitch Effect

5. How to Create a Simple 3D Effect

Step 1

Now for the 3D color effects! Just like before, start by Merging the glitch layers together, leaving the white background out so that there are only two layers left. Then hit Control-J to create two more Duplicates of the merged photo layer.

Duplicate Layers for the Final Effect

Step 2

Hide the Visibility of the top two layers. Then Right-click the first photo layer, „Merged,” and go to Blending Options. Uncheck the G, or Green Channel located under Advanced Blending.

Uncheck the Green Channel for 3D Effect

Now Unhide the Visibility of the top layers and repeat the process. This time Uncheck the Red Channel for „Merged Copy,” and both the Red and Green Channels for „Merged Copy 2.”

Uncheck the Red and Blue Channels for 3D Effect

Step 3

Now we can begin to move each layer to create the insane 3D effect. Select the Move Tool (V) and then select the layer, „Merged Copy,” using the Left Arrow key to move the layer to the left. Next, select the top layer, „Merged Copy 2,” using the Left Arrow key to move the layer to the left as well.

Here is what the process will look like.

Creating the 3D effect on a glitched photo

Step 4

Almost done! To add the appearance of screen lines to this effect, select the top layer, „Merged Copy 2,” and Right-click to go to Blending Options. Add a quick Pattern Overlay using the default Horizontal Line Pattern, and set the rest of the settings as follows:

Creating the Horizontal Pattern with an Overlay

Because the layer is blue and the Blend Mode is set to Soft Light, this will also give your image a nice blue tint.

Result of the Pattern Overlay

Step 5

To complete this cool glitch effect, we just need to carry out one last step. Add a New Layer and set the Layer Blend Mode to Dissolve. In this step, we’ll use the Brush Tool (B) to paint red #5e220a towards the bottom of the image in order to create tiny particles as a part of the final glitch effect. Adjust the Opacity of the layer if you need to; here I brought mine down to 8%.

Creating Glitch Particles with Dissolve

That’s it! Check out the final result below. You could also modify this to create a glitch effect Photoshop Action.

Conclusion

Photo effects are a smart way to practice unique and exciting techniques in Adobe Photoshop. You can have lots of fun achieving real-life scenarios like photo glitches and so much more.

If you liked this article and want to try more Photoshop photo effect tutorials, check out this epic list:

I hope you enjoyed this tutorial. Feel free to let me know if you have any questions in the comments below. And be sure to browse our wide range of Glitch Photo Effect Actions available on GraphicRiver and Envato Elements.

Glitch Photo Effect Photoshop Tutorial by Melody Nieves

Glitch Effect Photoshop Actions

Looking for some recommended glitch effect actions for Photoshop? Check out these items from GraphicRiver.

Animated Glitch – Photoshop Action

Turn a photo into an animated glitch effect with this action. One of the biggest sellers in the glitch effect category.

Animated Glitch

Glitch Photoshop Photo Template

Why not try this RGB glitch PSD photo effect template for a variety of options in creating a static glitch effect in Photoshop.

Glitch Photoshop Photo Template

Random Glitch Square Photoshop Action

Or try a unique approach to the glitch effect with this pack of six glitch square Photoshop actions and 30 color effects.

Random Glitch Square Photoshop Action

How to Create a Cool Glitch Photo Effect in Adobe Photoshop

Post pobrano z: How to Create a Cool Glitch Photo Effect in Adobe Photoshop

Final product image
What You’ll Be Creating

Photo effects are a great way to practice and harness your Photoshop skills. In this lesson, learn how to create a fun photo glitch effect using Marquee Tools, the Wave Filter, and more!

Prefer to follow along via video? Check out our lesson over on the Envato Tuts+ YouTube channel:

Want to create more fun photo effects, without needing any in-depth Photoshop skills? Try these:

Tutorial Assets

The following assets were used in the production of this tutorial.

Photo Glitch Basics: What You Need to Know

In order to get the best result possible when achieving effects based on real-life scenarios, it helps to do your research. So let’s get to know what a glitch is.

The kind of glitch we’ll be tackling is common to television or video games. These glitches are software errors or bugs that are often caused by a corrupted signal. The end result leaves your screen incredibly distorted and hard to make out.

For this tutorial, we’ll need to keep in mind some key visual characteristics to achieve this look. These are:

  • Jagged lines or waves
  • Frozen or static looking visuals
  • Inverted colors

Do a couple of Google searches to keep some inspiration and references on deck. Refer to them often to experiment with this style for yourself, or enlist the help of a design professional from Envato Studio.

Glitch Photo Effect Alternative Version by Melody Nieves
Alternate version. Gather references to help achieve this look! Stock from Freepik.

If you’re having trouble achieving this look, don’t forget that you can always bypass this process by downloading one of our incredible Glitch Photo Effects from GraphicRiver and Envato Elements.

1. How to Set Up the Glitch Photo Effect

Step 1

Let’s begin! I’ll be using this Hipster Stock from PhotoDune for this tutorial. For this particular look, it helps if you choose a stock where the model has edges that you can see clearly because we’ll need to extract it from its background. It’s also an added bonus if the background is a solid color or not too distracting like these wooden panels.

Hipster Man Stock from PhotoDune
Notice how you can clearly see all the edges of this model. Make sure you choose a stock with a model you can easily extract.

Double-click the Background layer to make it a New Layer. Create a New Layer (Control-Shift-N) positioned underneath your reference. Set the Foreground Color to white, and Fill the layer with white using the Paint Bucket Tool (G).

Setup the Layers for a Glitch Photo Effect

Step 2

Select the Magnetic Lasso Tool (L). This will help us extract the reference by easily snapping to the sides of your model. Use the Magnetic Lasso Tool (L) to create a complete selection around the model. When you’re finished, Right-click and select Layer via Copy to create a quick duplicate.

Use the Magnetic Lasso Tool to Extract the Subject
Make sure you keep the original stock. The end result is what the stock would look like on its own layer.

Step 3

Select the original stock. Use the Free Transform Tool (Control-T) to bring in the sides of the background to expose some of the white to the left and right.

Squeeze the Sides with the Free Transform Tool

Alternatively, if your stock doesn’t have a background, you can just add a rectangle using the Rectangle Tool (U) like this example below.

Alternative Glitch Version with Rectangle Background
Alternatively, if your stock doesn’t have a background, add a quick rectangle. Stock from Freepik.

2. How to Desaturate a Photo

Step 1

Moving along, let’s Desaturate this photo for a more monochromatic color palette. Select the layer for the model’s cutout and go to Image > Adjustments > Hue & Saturation. Lower the Saturation to -95 to remove the majority of the photo’s color.

Desaturate with Hue and Saturation

Step 2

You can adjust the main photo even further by using Levels. Select the extracted model’s layer again, and go to Image > Adjustments > Levels. Adjust the Levels for the RGB Channel with the following settings:

  • Shadow Input Level: 0
  • Midtone Input Level: 0.92
  • Highlight Input Level: 255
  • Output Levels: 17, 255

The end result is subtle, and it lightens the model slightly.

Use Levels to Adjust the Desaturated Photo

3. How to Create a Linear Glitch Distortion

Step 1

The next part of this effect is to recreate the jagged photo distortion that makes it look as if the visuals are out of place. To do this, first select the stock and model layers and Merge them together.

Merge the layers together

Step 2

Now select the Rectangular Marquee Tool (M). Create two skinny selections on the photo layer. First create one at the bottom, and then hold the Shift key to add another selection at the top.

Use the Rectangular Marquee Tool to create selection

Press the V key on your keyboard to switch over to the Move Tool. Use the Left Arrow key to move the selections to the left. You may have to hit it several times or hold it down for a while to get the desired result. 

Move the selection to the left for the glitch

Step 3

You can continue this process on a single layer, but eventually there might be open white spaces that don’t look quite so good. So to avoid this, Duplicate the Model Layer and use the copy to create the distortion.

Again, use the Rectangular Marquee Tool (M) to create more selections, moving them in different directions with the Left Arrow and Right Arrow keys. Here I created two more and moved them to the right slightly.

Create more selections for more glitches

Notice that because there’s a copy of the photo behind this layer, the resulting look shows the layer behind it instead of the white background.

Step 4

Let’s speed this up a bit! Create even more Rectangular Selections, using the Move Tool (V) to move the different sections out of place. Vary the size between skinny selections and thicker ones to make the effect more natural.

It’s even a good idea to have a game plan before you tackle this part. Since I like the man’s serious expression, I want to make sure the glitches create focus towards the center of the photo.

Continue creating the glitch effect with selections

As you get closer to the face, try not to distort it too much. Do each glitch individually to see what will work. This part is all about experimentation, so if you need to go back a step or two, just hit Control-Z to Undo.

Creating Photo Glitches Around the Face

When you’re finished with all your linear glitches, the effect should look something like this:

Final Linear Glitch Effect

4. How to Create a Wavy Glitch Distortion

Step 1

The next part of this distortion effect is to create that wavy glitch. You may have seen these before if you’ve ventured off into the naughty channels as a kid, but these glitches make the image appear as though it’s moving in liquid.

To do this we’ll need the Wave Filter. First, Merge the original stock layer together with copy that has all the glitches. Then Control-J to create a duplicate to create the wavy distortion on. 

Merging Layers and Creating Duplicates for the Wavy Distortion

Step 2

With the copy selected, create several more large selections with the Rectangular Marquee Tool (M) just like before. Keep in mind that I’m trying to frame the face of the subject, so don’t select any parts directly in the center.

Create Selections for the Wavy Glitch

Now go to Filter > Distort > Wave, adjusting the settings as follows to create a wavy effect on only the selections.

Creating a Wavy Glitch with Filter Distort Wave

Step 3

With this particular effect, the settings above may or may not work for your photo. So it’s important to experiment and adjust the settings on your own to achieve the look you desire.

Continue this process of making selections first before applying the Wave Filter. You’ll need to change the settings each time to vary the effect on the photo.

Continue the Wavy Glitch Process

Here is some more progress after a little experimentation.

Wavy Glitch Photo Effect Progress

Step 4

Finish this effect by concentrating on the top and bottom parts of the photo. First, select the bottom of the image with the Rectangular Marquee Tool (M) and apply the Wave Filter with the following settings.

Add the Glitch to the Bottom with the Wave Filter

Now for the top portion. Repeat the process, this time changing the settings to the following ones below.

Top Portion Wavy Glitch Effect

Here is the image complete with all the linear and wavy glitches. Let’s move on to the finishing touches!

Final Wavy Glitch Effect

5. How to Create a Simple 3D Effect

Step 1

Now for the 3D color effects! Just like before, start by Merging the glitch layers together, leaving the white background out so that there are only two layers left. Then hit Control-J to create two more Duplicates of the merged photo layer.

Duplicate Layers for the Final Effect

Step 2

Hide the Visibility of the top two layers. Then Right-click the first photo layer, „Merged,” and go to Blending Options. Uncheck the G, or Green Channel located under Advanced Blending.

Uncheck the Green Channel for 3D Effect

Now Unhide the Visibility of the top layers and repeat the process. This time Uncheck the Red Channel for „Merged Copy,” and both the Red and Green Channels for „Merged Copy 2.”

Uncheck the Red and Blue Channels for 3D Effect

Step 3

Now we can begin to move each layer to create the insane 3D effect. Select the Move Tool (V) and then select the layer, „Merged Copy,” using the Left Arrow key to move the layer to the left. Next, select the top layer, „Merged Copy 2,” using the Left Arrow key to move the layer to the left as well.

Here is what the process will look like.

Creating the 3D effect on a glitched photo

Step 4

Almost done! To add the appearance of screen lines to this effect, select the top layer, „Merged Copy 2,” and Right-click to go to Blending Options. Add a quick Pattern Overlay using the default Horizontal Line Pattern, and set the rest of the settings as follows:

Creating the Horizontal Pattern with an Overlay

Because the layer is blue and the Blend Mode is set to Soft Light, this will also give your image a nice blue tint.

Result of the Pattern Overlay

Step 5

To complete this cool glitch effect, we just need to carry out one last step. Add a New Layer and set the Layer Blend Mode to Dissolve. In this step, we’ll use the Brush Tool (B) to paint red #5e220a towards the bottom of the image in order to create tiny particles as a part of the final glitch effect. Adjust the Opacity of the layer if you need to; here I brought mine down to 8%.

Creating Glitch Particles with Dissolve

That’s it! Check out the final result below. You could also modify this to create a glitch effect Photoshop Action.

Conclusion

Photo effects are a smart way to practice unique and exciting techniques in Adobe Photoshop. You can have lots of fun achieving real-life scenarios like photo glitches and so much more.

If you liked this article and want to try more Photoshop photo effect tutorials, check out this epic list:

I hope you enjoyed this tutorial. Feel free to let me know if you have any questions in the comments below. And be sure to browse our wide range of Glitch Photo Effect Actions available on GraphicRiver and Envato Elements.

Glitch Photo Effect Photoshop Tutorial by Melody Nieves

Glitch Effect Photoshop Actions

Looking for some recommended glitch effect actions for Photoshop? Check out these items from GraphicRiver.

Animated Glitch – Photoshop Action

Turn a photo into an animated glitch effect with this action. One of the biggest sellers in the glitch effect category.

Animated Glitch

Glitch Photoshop Photo Template

Why not try this RGB glitch PSD photo effect template for a variety of options in creating a static glitch effect in Photoshop.

Glitch Photoshop Photo Template

Random Glitch Square Photoshop Action

Or try a unique approach to the glitch effect with this pack of six glitch square Photoshop actions and 30 color effects.

Random Glitch Square Photoshop Action

How to Create a Cool Glitch Photo Effect in Adobe Photoshop

Post pobrano z: How to Create a Cool Glitch Photo Effect in Adobe Photoshop

Final product image
What You’ll Be Creating

Photo effects are a great way to practice and harness your Photoshop skills. In this lesson, learn how to create a fun photo glitch effect using Marquee Tools, the Wave Filter, and more!

Prefer to follow along via video? Check out our lesson over on the Envato Tuts+ YouTube channel:

Want to create more fun photo effects, without needing any in-depth Photoshop skills? Try these:

Tutorial Assets

The following assets were used in the production of this tutorial.

Photo Glitch Basics: What You Need to Know

In order to get the best result possible when achieving effects based on real-life scenarios, it helps to do your research. So let’s get to know what a glitch is.

The kind of glitch we’ll be tackling is common to television or video games. These glitches are software errors or bugs that are often caused by a corrupted signal. The end result leaves your screen incredibly distorted and hard to make out.

For this tutorial, we’ll need to keep in mind some key visual characteristics to achieve this look. These are:

  • Jagged lines or waves
  • Frozen or static looking visuals
  • Inverted colors

Do a couple of Google searches to keep some inspiration and references on deck. Refer to them often to experiment with this style for yourself, or enlist the help of a design professional from Envato Studio.

Glitch Photo Effect Alternative Version by Melody Nieves
Alternate version. Gather references to help achieve this look! Stock from Freepik.

If you’re having trouble achieving this look, don’t forget that you can always bypass this process by downloading one of our incredible Glitch Photo Effects from GraphicRiver and Envato Elements.

1. How to Set Up the Glitch Photo Effect

Step 1

Let’s begin! I’ll be using this Hipster Stock from PhotoDune for this tutorial. For this particular look, it helps if you choose a stock where the model has edges that you can see clearly because we’ll need to extract it from its background. It’s also an added bonus if the background is a solid color or not too distracting like these wooden panels.

Hipster Man Stock from PhotoDune
Notice how you can clearly see all the edges of this model. Make sure you choose a stock with a model you can easily extract.

Double-click the Background layer to make it a New Layer. Create a New Layer (Control-Shift-N) positioned underneath your reference. Set the Foreground Color to white, and Fill the layer with white using the Paint Bucket Tool (G).

Setup the Layers for a Glitch Photo Effect

Step 2

Select the Magnetic Lasso Tool (L). This will help us extract the reference by easily snapping to the sides of your model. Use the Magnetic Lasso Tool (L) to create a complete selection around the model. When you’re finished, Right-click and select Layer via Copy to create a quick duplicate.

Use the Magnetic Lasso Tool to Extract the Subject
Make sure you keep the original stock. The end result is what the stock would look like on its own layer.

Step 3

Select the original stock. Use the Free Transform Tool (Control-T) to bring in the sides of the background to expose some of the white to the left and right.

Squeeze the Sides with the Free Transform Tool

Alternatively, if your stock doesn’t have a background, you can just add a rectangle using the Rectangle Tool (U) like this example below.

Alternative Glitch Version with Rectangle Background
Alternatively, if your stock doesn’t have a background, add a quick rectangle. Stock from Freepik.

2. How to Desaturate a Photo

Step 1

Moving along, let’s Desaturate this photo for a more monochromatic color palette. Select the layer for the model’s cutout and go to Image > Adjustments > Hue & Saturation. Lower the Saturation to -95 to remove the majority of the photo’s color.

Desaturate with Hue and Saturation

Step 2

You can adjust the main photo even further by using Levels. Select the extracted model’s layer again, and go to Image > Adjustments > Levels. Adjust the Levels for the RGB Channel with the following settings:

  • Shadow Input Level: 0
  • Midtone Input Level: 0.92
  • Highlight Input Level: 255
  • Output Levels: 17, 255

The end result is subtle, and it lightens the model slightly.

Use Levels to Adjust the Desaturated Photo

3. How to Create a Linear Glitch Distortion

Step 1

The next part of this effect is to recreate the jagged photo distortion that makes it look as if the visuals are out of place. To do this, first select the stock and model layers and Merge them together.

Merge the layers together

Step 2

Now select the Rectangular Marquee Tool (M). Create two skinny selections on the photo layer. First create one at the bottom, and then hold the Shift key to add another selection at the top.

Use the Rectangular Marquee Tool to create selection

Press the V key on your keyboard to switch over to the Move Tool. Use the Left Arrow key to move the selections to the left. You may have to hit it several times or hold it down for a while to get the desired result. 

Move the selection to the left for the glitch

Step 3

You can continue this process on a single layer, but eventually there might be open white spaces that don’t look quite so good. So to avoid this, Duplicate the Model Layer and use the copy to create the distortion.

Again, use the Rectangular Marquee Tool (M) to create more selections, moving them in different directions with the Left Arrow and Right Arrow keys. Here I created two more and moved them to the right slightly.

Create more selections for more glitches

Notice that because there’s a copy of the photo behind this layer, the resulting look shows the layer behind it instead of the white background.

Step 4

Let’s speed this up a bit! Create even more Rectangular Selections, using the Move Tool (V) to move the different sections out of place. Vary the size between skinny selections and thicker ones to make the effect more natural.

It’s even a good idea to have a game plan before you tackle this part. Since I like the man’s serious expression, I want to make sure the glitches create focus towards the center of the photo.

Continue creating the glitch effect with selections

As you get closer to the face, try not to distort it too much. Do each glitch individually to see what will work. This part is all about experimentation, so if you need to go back a step or two, just hit Control-Z to Undo.

Creating Photo Glitches Around the Face

When you’re finished with all your linear glitches, the effect should look something like this:

Final Linear Glitch Effect

4. How to Create a Wavy Glitch Distortion

Step 1

The next part of this distortion effect is to create that wavy glitch. You may have seen these before if you’ve ventured off into the naughty channels as a kid, but these glitches make the image appear as though it’s moving in liquid.

To do this we’ll need the Wave Filter. First, Merge the original stock layer together with copy that has all the glitches. Then Control-J to create a duplicate to create the wavy distortion on. 

Merging Layers and Creating Duplicates for the Wavy Distortion

Step 2

With the copy selected, create several more large selections with the Rectangular Marquee Tool (M) just like before. Keep in mind that I’m trying to frame the face of the subject, so don’t select any parts directly in the center.

Create Selections for the Wavy Glitch

Now go to Filter > Distort > Wave, adjusting the settings as follows to create a wavy effect on only the selections.

Creating a Wavy Glitch with Filter Distort Wave

Step 3

With this particular effect, the settings above may or may not work for your photo. So it’s important to experiment and adjust the settings on your own to achieve the look you desire.

Continue this process of making selections first before applying the Wave Filter. You’ll need to change the settings each time to vary the effect on the photo.

Continue the Wavy Glitch Process

Here is some more progress after a little experimentation.

Wavy Glitch Photo Effect Progress

Step 4

Finish this effect by concentrating on the top and bottom parts of the photo. First, select the bottom of the image with the Rectangular Marquee Tool (M) and apply the Wave Filter with the following settings.

Add the Glitch to the Bottom with the Wave Filter

Now for the top portion. Repeat the process, this time changing the settings to the following ones below.

Top Portion Wavy Glitch Effect

Here is the image complete with all the linear and wavy glitches. Let’s move on to the finishing touches!

Final Wavy Glitch Effect

5. How to Create a Simple 3D Effect

Step 1

Now for the 3D color effects! Just like before, start by Merging the glitch layers together, leaving the white background out so that there are only two layers left. Then hit Control-J to create two more Duplicates of the merged photo layer.

Duplicate Layers for the Final Effect

Step 2

Hide the Visibility of the top two layers. Then Right-click the first photo layer, „Merged,” and go to Blending Options. Uncheck the G, or Green Channel located under Advanced Blending.

Uncheck the Green Channel for 3D Effect

Now Unhide the Visibility of the top layers and repeat the process. This time Uncheck the Red Channel for „Merged Copy,” and both the Red and Green Channels for „Merged Copy 2.”

Uncheck the Red and Blue Channels for 3D Effect

Step 3

Now we can begin to move each layer to create the insane 3D effect. Select the Move Tool (V) and then select the layer, „Merged Copy,” using the Left Arrow key to move the layer to the left. Next, select the top layer, „Merged Copy 2,” using the Left Arrow key to move the layer to the left as well.

Here is what the process will look like.

Creating the 3D effect on a glitched photo

Step 4

Almost done! To add the appearance of screen lines to this effect, select the top layer, „Merged Copy 2,” and Right-click to go to Blending Options. Add a quick Pattern Overlay using the default Horizontal Line Pattern, and set the rest of the settings as follows:

Creating the Horizontal Pattern with an Overlay

Because the layer is blue and the Blend Mode is set to Soft Light, this will also give your image a nice blue tint.

Result of the Pattern Overlay

Step 5

To complete this cool glitch effect, we just need to carry out one last step. Add a New Layer and set the Layer Blend Mode to Dissolve. In this step, we’ll use the Brush Tool (B) to paint red #5e220a towards the bottom of the image in order to create tiny particles as a part of the final glitch effect. Adjust the Opacity of the layer if you need to; here I brought mine down to 8%.

Creating Glitch Particles with Dissolve

That’s it! Check out the final result below. You could also modify this to create a glitch effect Photoshop Action.

Conclusion

Photo effects are a smart way to practice unique and exciting techniques in Adobe Photoshop. You can have lots of fun achieving real-life scenarios like photo glitches and so much more.

If you liked this article and want to try more Photoshop photo effect tutorials, check out this epic list:

I hope you enjoyed this tutorial. Feel free to let me know if you have any questions in the comments below. And be sure to browse our wide range of Glitch Photo Effect Actions available on GraphicRiver and Envato Elements.

Glitch Photo Effect Photoshop Tutorial by Melody Nieves

Glitch Effect Photoshop Actions

Looking for some recommended glitch effect actions for Photoshop? Check out these items from GraphicRiver.

Animated Glitch – Photoshop Action

Turn a photo into an animated glitch effect with this action. One of the biggest sellers in the glitch effect category.

Animated Glitch

Glitch Photoshop Photo Template

Why not try this RGB glitch PSD photo effect template for a variety of options in creating a static glitch effect in Photoshop.

Glitch Photoshop Photo Template

Random Glitch Square Photoshop Action

Or try a unique approach to the glitch effect with this pack of six glitch square Photoshop actions and 30 color effects.

Random Glitch Square Photoshop Action

How to Create a Cool Glitch Photo Effect in Adobe Photoshop

Post pobrano z: How to Create a Cool Glitch Photo Effect in Adobe Photoshop

Final product image
What You’ll Be Creating

Photo effects are a great way to practice and harness your Photoshop skills. In this lesson, learn how to create a fun photo glitch effect using Marquee Tools, the Wave Filter, and more!

Prefer to follow along via video? Check out our lesson over on the Envato Tuts+ YouTube channel:

Want to create more fun photo effects, without needing any in-depth Photoshop skills? Try these:

Tutorial Assets

The following assets were used in the production of this tutorial.

Photo Glitch Basics: What You Need to Know

In order to get the best result possible when achieving effects based on real-life scenarios, it helps to do your research. So let’s get to know what a glitch is.

The kind of glitch we’ll be tackling is common to television or video games. These glitches are software errors or bugs that are often caused by a corrupted signal. The end result leaves your screen incredibly distorted and hard to make out.

For this tutorial, we’ll need to keep in mind some key visual characteristics to achieve this look. These are:

  • Jagged lines or waves
  • Frozen or static looking visuals
  • Inverted colors

Do a couple of Google searches to keep some inspiration and references on deck. Refer to them often to experiment with this style for yourself, or enlist the help of a design professional from Envato Studio.

Glitch Photo Effect Alternative Version by Melody Nieves
Alternate version. Gather references to help achieve this look! Stock from Freepik.

If you’re having trouble achieving this look, don’t forget that you can always bypass this process by downloading one of our incredible Glitch Photo Effects from GraphicRiver and Envato Elements.

1. How to Set Up the Glitch Photo Effect

Step 1

Let’s begin! I’ll be using this Hipster Stock from PhotoDune for this tutorial. For this particular look, it helps if you choose a stock where the model has edges that you can see clearly because we’ll need to extract it from its background. It’s also an added bonus if the background is a solid color or not too distracting like these wooden panels.

Hipster Man Stock from PhotoDune
Notice how you can clearly see all the edges of this model. Make sure you choose a stock with a model you can easily extract.

Double-click the Background layer to make it a New Layer. Create a New Layer (Control-Shift-N) positioned underneath your reference. Set the Foreground Color to white, and Fill the layer with white using the Paint Bucket Tool (G).

Setup the Layers for a Glitch Photo Effect

Step 2

Select the Magnetic Lasso Tool (L). This will help us extract the reference by easily snapping to the sides of your model. Use the Magnetic Lasso Tool (L) to create a complete selection around the model. When you’re finished, Right-click and select Layer via Copy to create a quick duplicate.

Use the Magnetic Lasso Tool to Extract the Subject
Make sure you keep the original stock. The end result is what the stock would look like on its own layer.

Step 3

Select the original stock. Use the Free Transform Tool (Control-T) to bring in the sides of the background to expose some of the white to the left and right.

Squeeze the Sides with the Free Transform Tool

Alternatively, if your stock doesn’t have a background, you can just add a rectangle using the Rectangle Tool (U) like this example below.

Alternative Glitch Version with Rectangle Background
Alternatively, if your stock doesn’t have a background, add a quick rectangle. Stock from Freepik.

2. How to Desaturate a Photo

Step 1

Moving along, let’s Desaturate this photo for a more monochromatic color palette. Select the layer for the model’s cutout and go to Image > Adjustments > Hue & Saturation. Lower the Saturation to -95 to remove the majority of the photo’s color.

Desaturate with Hue and Saturation

Step 2

You can adjust the main photo even further by using Levels. Select the extracted model’s layer again, and go to Image > Adjustments > Levels. Adjust the Levels for the RGB Channel with the following settings:

  • Shadow Input Level: 0
  • Midtone Input Level: 0.92
  • Highlight Input Level: 255
  • Output Levels: 17, 255

The end result is subtle, and it lightens the model slightly.

Use Levels to Adjust the Desaturated Photo

3. How to Create a Linear Glitch Distortion

Step 1

The next part of this effect is to recreate the jagged photo distortion that makes it look as if the visuals are out of place. To do this, first select the stock and model layers and Merge them together.

Merge the layers together

Step 2

Now select the Rectangular Marquee Tool (M). Create two skinny selections on the photo layer. First create one at the bottom, and then hold the Shift key to add another selection at the top.

Use the Rectangular Marquee Tool to create selection

Press the V key on your keyboard to switch over to the Move Tool. Use the Left Arrow key to move the selections to the left. You may have to hit it several times or hold it down for a while to get the desired result. 

Move the selection to the left for the glitch

Step 3

You can continue this process on a single layer, but eventually there might be open white spaces that don’t look quite so good. So to avoid this, Duplicate the Model Layer and use the copy to create the distortion.

Again, use the Rectangular Marquee Tool (M) to create more selections, moving them in different directions with the Left Arrow and Right Arrow keys. Here I created two more and moved them to the right slightly.

Create more selections for more glitches

Notice that because there’s a copy of the photo behind this layer, the resulting look shows the layer behind it instead of the white background.

Step 4

Let’s speed this up a bit! Create even more Rectangular Selections, using the Move Tool (V) to move the different sections out of place. Vary the size between skinny selections and thicker ones to make the effect more natural.

It’s even a good idea to have a game plan before you tackle this part. Since I like the man’s serious expression, I want to make sure the glitches create focus towards the center of the photo.

Continue creating the glitch effect with selections

As you get closer to the face, try not to distort it too much. Do each glitch individually to see what will work. This part is all about experimentation, so if you need to go back a step or two, just hit Control-Z to Undo.

Creating Photo Glitches Around the Face

When you’re finished with all your linear glitches, the effect should look something like this:

Final Linear Glitch Effect

4. How to Create a Wavy Glitch Distortion

Step 1

The next part of this distortion effect is to create that wavy glitch. You may have seen these before if you’ve ventured off into the naughty channels as a kid, but these glitches make the image appear as though it’s moving in liquid.

To do this we’ll need the Wave Filter. First, Merge the original stock layer together with copy that has all the glitches. Then Control-J to create a duplicate to create the wavy distortion on. 

Merging Layers and Creating Duplicates for the Wavy Distortion

Step 2

With the copy selected, create several more large selections with the Rectangular Marquee Tool (M) just like before. Keep in mind that I’m trying to frame the face of the subject, so don’t select any parts directly in the center.

Create Selections for the Wavy Glitch

Now go to Filter > Distort > Wave, adjusting the settings as follows to create a wavy effect on only the selections.

Creating a Wavy Glitch with Filter Distort Wave

Step 3

With this particular effect, the settings above may or may not work for your photo. So it’s important to experiment and adjust the settings on your own to achieve the look you desire.

Continue this process of making selections first before applying the Wave Filter. You’ll need to change the settings each time to vary the effect on the photo.

Continue the Wavy Glitch Process

Here is some more progress after a little experimentation.

Wavy Glitch Photo Effect Progress

Step 4

Finish this effect by concentrating on the top and bottom parts of the photo. First, select the bottom of the image with the Rectangular Marquee Tool (M) and apply the Wave Filter with the following settings.

Add the Glitch to the Bottom with the Wave Filter

Now for the top portion. Repeat the process, this time changing the settings to the following ones below.

Top Portion Wavy Glitch Effect

Here is the image complete with all the linear and wavy glitches. Let’s move on to the finishing touches!

Final Wavy Glitch Effect

5. How to Create a Simple 3D Effect

Step 1

Now for the 3D color effects! Just like before, start by Merging the glitch layers together, leaving the white background out so that there are only two layers left. Then hit Control-J to create two more Duplicates of the merged photo layer.

Duplicate Layers for the Final Effect

Step 2

Hide the Visibility of the top two layers. Then Right-click the first photo layer, „Merged,” and go to Blending Options. Uncheck the G, or Green Channel located under Advanced Blending.

Uncheck the Green Channel for 3D Effect

Now Unhide the Visibility of the top layers and repeat the process. This time Uncheck the Red Channel for „Merged Copy,” and both the Red and Green Channels for „Merged Copy 2.”

Uncheck the Red and Blue Channels for 3D Effect

Step 3

Now we can begin to move each layer to create the insane 3D effect. Select the Move Tool (V) and then select the layer, „Merged Copy,” using the Left Arrow key to move the layer to the left. Next, select the top layer, „Merged Copy 2,” using the Left Arrow key to move the layer to the left as well.

Here is what the process will look like.

Creating the 3D effect on a glitched photo

Step 4

Almost done! To add the appearance of screen lines to this effect, select the top layer, „Merged Copy 2,” and Right-click to go to Blending Options. Add a quick Pattern Overlay using the default Horizontal Line Pattern, and set the rest of the settings as follows:

Creating the Horizontal Pattern with an Overlay

Because the layer is blue and the Blend Mode is set to Soft Light, this will also give your image a nice blue tint.

Result of the Pattern Overlay

Step 5

To complete this cool glitch effect, we just need to carry out one last step. Add a New Layer and set the Layer Blend Mode to Dissolve. In this step, we’ll use the Brush Tool (B) to paint red #5e220a towards the bottom of the image in order to create tiny particles as a part of the final glitch effect. Adjust the Opacity of the layer if you need to; here I brought mine down to 8%.

Creating Glitch Particles with Dissolve

That’s it! Check out the final result below. You could also modify this to create a glitch effect Photoshop Action.

Conclusion

Photo effects are a smart way to practice unique and exciting techniques in Adobe Photoshop. You can have lots of fun achieving real-life scenarios like photo glitches and so much more.

If you liked this article and want to try more Photoshop photo effect tutorials, check out this epic list:

I hope you enjoyed this tutorial. Feel free to let me know if you have any questions in the comments below. And be sure to browse our wide range of Glitch Photo Effect Actions available on GraphicRiver and Envato Elements.

Glitch Photo Effect Photoshop Tutorial by Melody Nieves

Glitch Effect Photoshop Actions

Looking for some recommended glitch effect actions for Photoshop? Check out these items from GraphicRiver.

Animated Glitch – Photoshop Action

Turn a photo into an animated glitch effect with this action. One of the biggest sellers in the glitch effect category.

Animated Glitch

Glitch Photoshop Photo Template

Why not try this RGB glitch PSD photo effect template for a variety of options in creating a static glitch effect in Photoshop.

Glitch Photoshop Photo Template

Random Glitch Square Photoshop Action

Or try a unique approach to the glitch effect with this pack of six glitch square Photoshop actions and 30 color effects.

Random Glitch Square Photoshop Action