
Wszystkie wpisy, których autorem jest admin

Royal Beer


How to Make, Use, and Manipulate a Calligraphic Brush in Adobe Illustrator
Post pobrano z: How to Make, Use, and Manipulate a Calligraphic Brush in Adobe Illustrator

The Calligraphic brush in Adobe Illustrator mimics the look and feel of a calligraphy pen nib. Let’s take its options for a spin to get everything you can from this brush type.
1. How to Make a Calligraphic Brush
Step 1
To start, create a New Document, select the Paintbrush Tool (B) and open the Brushes panel in Illustrator. Select options and hit New Brush to do just that: create a new brush.

Step 2
Select Calligraphic Brush (chances are it’s already selected) and hit OK.

Step 3
Let’s start with a very simple default-style brush. Name it whatever you want. Set the Angle to 0°, Roundness to 100%, and the Size to whatever you feel like using (in this case 5 pt). Keep the drop-down boxes of each option at Fixed for now. Hit OK and check out your very simple round brush with the Paintbrush Tool (B).

Step 4
Hit Enter with the Paintbrush Tool (B) selected and you can check out the options of the tool that have some effect on the brush you’ve created as well. In this case, I’ve kept the Fidelity to Smooth so my paths are as fluid and clean as possible.

2. How to Use the Round Brush Options
Step 1
Now that we’ve done the super simple task of making a new brush, let’s play with the options within it. In the event that you’d like for every path drawn to change in size, select Random from the drop-down menu next to Size and move the Variation up to 12 pt. Each line will be a different size from 1 pt to 12 pt.

Step 2
Much of the options are only useful if you’re using a pressure-sensitive graphics tablet. If you switch from Random to Tilt, you’ll find that the angle at which you hold your tablet’s stylus effects the size of the brush’s line. This variation, unlike Random, changes throughout a single path, rather than each new one.

Step 3
If you change the drop-down menu to Pressure, the size will vary according to how much pressure you apply to your stylus’s nib when drawing. Again, the variation exists within a single path rather than with each new path. Using the pressure option for your Calligraphic Brush is perfect for creating clean line art with thick and thin line work that remains scalable (unlike making it in Adobe Photoshop).

3. How to Create Flat Brushes
Step 1
To create a flat brush reduce the Roundness when creating or editing the brush you’re using. In the example below, I’ve set the Roundness to 20%. the initial doodle below keeps all options as Fixed.

The second example is with Pressure enabled for size variance. I find that although you can play with variations for the roundness too, a flat brush style is most useful when size of the nib is the only variable of the work. This does depend on what you’re creating, however, so take that opinion with a grain of salt.

Step 2
As means of an example, lower the opacity of your brush either in the Transparency panel or at the top of Illustrator’s window when you have the Paintbrush Tool selected. The flat brush is a wonderful tool for sketching and painting with vectors. And as you can see from the Outline view below, it’s done with a series of editable paths.

3. How to Create Angled Flat Brushes
Step 1
The last brush style we’ll go over is an Angled Flat Brush. You can change the angle to whatever you want your brush to be. In the case below, I’ve set it to 45°. I also changed the Roundness to 11%, am keeping both Angle and Roundness Fixed, and have Size set to 11 pt, Pressure, and with an 11 pt Variation. As you can see below, I find this Calligraphic Brush to be excellent for mimicking real-life calligraphy, perfect for hand-lettering, fancy party invitations, or all of your elegantly written needs.

Step 2
I find creating calligraphic lettering in vector form allows for easy manipulation to the letters and flourishes as well as being ready to print any time at any size without loss to the quality of the image. You’re also able to change the stroke size itself when you resize the letter without expanding the stroke (Object > Expand) by selecting a larger stroke weight in the Strokes panel.

Step 3
Finally, let’s take a look at selecting Pressure for all three options for the Angled Flat Brush. In the example below I have the Angle set to 45° and the Variation at 180°, the Roundness set at 11% and the Variation at 11%, and Size at 31 pt and the Variation all the way up to 31 pt. Below the options, the first line shows the angled brush clicked with a mouse versus pressing down in one place with a tablet’s stylus. The second and third line show all three options at work with two paths and various levels of pressure.

Conclusion
The Calligraphic Brush is the most basic and often quite useful of the five brush options within Adobe Illustrator. Playing with its options and creating a library of brushes not only allows for more customization within your work, but it also emphasizes the use of Illustrator as a drawing program versus being a tool for pure design.
Don’t forget that you can always expand your brush library by heading over to Envato Elements, where you’ll find a great selection of vector brushes such as these ones.
Marker Illustrator Brushes
This professional Illustrator brush pack contains 25 high-quality digital marker brushes intended for professional designers, illustrators, and artists.

Pastels Brush Pack
In this set you will get 43 realistic pastel brushes and 25 pastel colors in 5 swatch groups for authentic pastel colors. You will love to use these brushes in Illustrator on any kind of project, from illustrations for kids to grunge-style illustrations, comics, and realistic projects.

Stipple Brushes Pack
Inside you’ll find a huge collection of brushes to suit your every need—for example, create vintage logos, illustrations, or backgrounds!

Vintage Brush Pack
Using these brushes is simple—just lay down the strokes and select a suitable brush from the brushes panel. Save time by using multi-lined brushes to create your vintage shading and textures to give it that old-school engraving look!

Japan Brush Pack
This professional Illustrator brush pack contains 39 high-quality Asian calligraphy brushes intended for professional designers, illustrators, and artists.

1950s Artist Brush Pack
Inspired by 1950s illustration, these brushes were made by using ink, old brushes, and the artist’s fingers. You can use these brushes for vector paintings and line art too. Scanned in high resolution, cleaned, and turned to vector.

Or you can use some of these free Illustrator brushes:

Further Develop Your Creative Skills
Just finished going through this little article, and feel like learning more? Well, if that’s the case, you’re in luck, since I took the time to put together this list that should keep you going for the following days!
-

How to Make a Watercolor Brush in Adobe Illustrator
Always wondered how to make a watercolor brush in Illustrator, but never knew exactly where to start? Today you’ll learn how easy it is to create a vector… -

How to Make a Brush in Illustrator
Learn to create a custom paint brush, a scatter brush and a texture brush in Adobe Illustrator, using nothing more than some basic geometric shapes and effects. -

How to Make a Texture Brush in Illustrator
Have you always liked to draw using texture or grunge brushes? Why not create your own vector Illustrator brush? What if I’ll tell you that it’s easy and… -

How to Use Brushes in Adobe Illustrator to Create a Colorful Flamingo
Learn how to create an illustration of a flamingo and tropical plants using Adobe Illustrator brushes. -

How to Vector Hair With Brushes in Adobe Illustrator
In this tutorial I’m going to show you how to create one set of brushes (four individual brushes) and then how to create a free flowing, detailed hair style… -

Illustrator in 60 Seconds: How to Install and Use a Custom Brush Set
Custom Brushes are one of Illustrator’s most attractive features, but sometimes the process of adding them can prove to be a difficult task, especially if… -

Illustrator in 60 Seconds: How to Create a Custom Stipple Brush
Always wanted to create your very own Stipple brush, but never knew exactly how?
Well, if that’s the case you should watch this video since it will show you…

How to Make, Use, and Manipulate a Calligraphic Brush in Adobe Illustrator
Post pobrano z: How to Make, Use, and Manipulate a Calligraphic Brush in Adobe Illustrator
The Calligraphic brush in Adobe Illustrator mimics the look and feel of a calligraphy pen nib. Let’s take its options for a spin to get everything you can from this brush type.
1. How to Make a Calligraphic Brush
Step 1
To start, create a New Document, select the Paintbrush Tool (B) and open the Brushes panel in Illustrator. Select options and hit New Brush to do just that: create a new brush.
Step 2
Select Calligraphic Brush (chances are it’s already selected) and hit OK.
Step 3
Let’s start with a very simple default-style brush. Name it whatever you want. Set the Angle to 0°, Roundness to 100%, and the Size to whatever you feel like using (in this case 5 pt). Keep the drop-down boxes of each option at Fixed for now. Hit OK and check out your very simple round brush with the Paintbrush Tool (B).
Step 4
Hit Enter with the Paintbrush Tool (B) selected and you can check out the options of the tool that have some effect on the brush you’ve created as well. In this case, I’ve kept the Fidelity to Smooth so my paths are as fluid and clean as possible.
2. How to Use the Round Brush Options
Step 1
Now that we’ve done the super simple task of making a new brush, let’s play with the options within it. In the event that you’d like for every path drawn to change in size, select Random from the drop-down menu next to Size and move the Variation up to 12 pt. Each line will be a different size from 1 pt to 12 pt.
Step 2
Much of the options are only useful if you’re using a pressure-sensitive graphics tablet. If you switch from Random to Tilt, you’ll find that the angle at which you hold your tablet’s stylus effects the size of the brush’s line. This variation, unlike Random, changes throughout a single path, rather than each new one.
Step 3
If you change the drop-down menu to Pressure, the size will vary according to how much pressure you apply to your stylus’s nib when drawing. Again, the variation exists within a single path rather than with each new path. Using the pressure option for your Calligraphic Brush is perfect for creating clean line art with thick and thin line work that remains scalable (unlike making it in Adobe Photoshop).
3. How to Create Flat Brushes
Step 1
To create a flat brush reduce the Roundness when creating or editing the brush you’re using. In the example below, I’ve set the Roundness to 20%. the initial doodle below keeps all options as Fixed.
The second example is with Pressure enabled for size variance. I find that although you can play with variations for the roundness too, a flat brush style is most useful when size of the nib is the only variable of the work. This does depend on what you’re creating, however, so take that opinion with a grain of salt.
Step 2
As means of an example, lower the opacity of your brush either in the Transparency panel or at the top of Illustrator’s window when you have the Paintbrush Tool selected. The flat brush is a wonderful tool for sketching and painting with vectors. And as you can see from the Outline view below, it’s done with a series of editable paths.
3. How to Create Angled Flat Brushes
Step 1
The last brush style we’ll go over is an Angled Flat Brush. You can change the angle to whatever you want your brush to be. In the case below, I’ve set it to 45°. I also changed the Roundness to 11%, am keeping both Angle and Roundness Fixed, and have Size set to 11 pt, Pressure, and with an 11 pt Variation. As you can see below, I find this Calligraphic Brush to be excellent for mimicking real-life calligraphy, perfect for hand-lettering, fancy party invitations, or all of your elegantly written needs.
Step 2
I find creating calligraphic lettering in vector form allows for easy manipulation to the letters and flourishes as well as being ready to print any time at any size without loss to the quality of the image. You’re also able to change the stroke size itself when you resize the letter without expanding the stroke (Object > Expand) by selecting a larger stroke weight in the Strokes panel.
Step 3
Finally, let’s take a look at selecting Pressure for all three options for the Angled Flat Brush. In the example below I have the Angle set to 45° and the Variation at 180°, the Roundness set at 11% and the Variation at 11%, and Size at 31 pt and the Variation all the way up to 31 pt. Below the options, the first line shows the angled brush clicked with a mouse versus pressing down in one place with a tablet’s stylus. The second and third line show all three options at work with two paths and various levels of pressure.
Conclusion
The Calligraphic Brush is the most basic and often quite useful of the five brush options within Adobe Illustrator. Playing with its options and creating a library of brushes not only allows for more customization within your work, but it also emphasizes the use of Illustrator as a drawing program versus being a tool for pure design.
Don’t forget that you can always expand your brush library by heading over to Envato Elements, where you’ll find a great selection of vector brushes such as these ones.
Marker Illustrator Brushes
This professional Illustrator brush pack contains 25 high-quality digital marker brushes intended for professional designers, illustrators, and artists.
Pastels Brush Pack
In this set you will get 43 realistic pastel brushes and 25 pastel colors in 5 swatch groups for authentic pastel colors. You will love to use these brushes in Illustrator on any kind of project, from illustrations for kids to grunge-style illustrations, comics, and realistic projects.
Stipple Brushes Pack
Inside you’ll find a huge collection of brushes to suit your every need—for example, create vintage logos, illustrations, or backgrounds!
Vintage Brush Pack
Using these brushes is simple—just lay down the strokes and select a suitable brush from the brushes panel. Save time by using multi-lined brushes to create your vintage shading and textures to give it that old-school engraving look!
Japan Brush Pack
This professional Illustrator brush pack contains 39 high-quality Asian calligraphy brushes intended for professional designers, illustrators, and artists.
1950s Artist Brush Pack
Inspired by 1950s illustration, these brushes were made by using ink, old brushes, and the artist’s fingers. You can use these brushes for vector paintings and line art too. Scanned in high resolution, cleaned, and turned to vector.
Or you can use some of these free Illustrator brushes:
Further Develop Your Creative Skills
Just finished going through this little article, and feel like learning more? Well, if that’s the case, you’re in luck, since I took the time to put together this list that should keep you going for the following days!
-
How to Make a Watercolor Brush in Adobe Illustrator
Always wondered how to make a watercolor brush in Illustrator, but never knew exactly where to start? Today you’ll learn how easy it is to create a vector… -
How to Make a Brush in Illustrator
Learn to create a custom paint brush, a scatter brush and a texture brush in Adobe Illustrator, using nothing more than some basic geometric shapes and effects. -
How to Make a Texture Brush in Illustrator
Have you always liked to draw using texture or grunge brushes? Why not create your own vector Illustrator brush? What if I’ll tell you that it’s easy and… -
How to Use Brushes in Adobe Illustrator to Create a Colorful Flamingo
Learn how to create an illustration of a flamingo and tropical plants using Adobe Illustrator brushes. -
How to Vector Hair With Brushes in Adobe Illustrator
In this tutorial I’m going to show you how to create one set of brushes (four individual brushes) and then how to create a free flowing, detailed hair style… -
Illustrator in 60 Seconds: How to Install and Use a Custom Brush Set
Custom Brushes are one of Illustrator’s most attractive features, but sometimes the process of adding them can prove to be a difficult task, especially if… -
Illustrator in 60 Seconds: How to Create a Custom Stipple Brush
Always wanted to create your very own Stipple brush, but never knew exactly how?
Well, if that’s the case you should watch this video since it will show you…
How to Make, Use, and Manipulate a Calligraphic Brush in Adobe Illustrator
Post pobrano z: How to Make, Use, and Manipulate a Calligraphic Brush in Adobe Illustrator
The Calligraphic brush in Adobe Illustrator mimics the look and feel of a calligraphy pen nib. Let’s take its options for a spin to get everything you can from this brush type.
1. How to Make a Calligraphic Brush
Step 1
To start, create a New Document, select the Paintbrush Tool (B) and open the Brushes panel in Illustrator. Select options and hit New Brush to do just that: create a new brush.
Step 2
Select Calligraphic Brush (chances are it’s already selected) and hit OK.
Step 3
Let’s start with a very simple default-style brush. Name it whatever you want. Set the Angle to 0°, Roundness to 100%, and the Size to whatever you feel like using (in this case 5 pt). Keep the drop-down boxes of each option at Fixed for now. Hit OK and check out your very simple round brush with the Paintbrush Tool (B).
Step 4
Hit Enter with the Paintbrush Tool (B) selected and you can check out the options of the tool that have some effect on the brush you’ve created as well. In this case, I’ve kept the Fidelity to Smooth so my paths are as fluid and clean as possible.
2. How to Use the Round Brush Options
Step 1
Now that we’ve done the super simple task of making a new brush, let’s play with the options within it. In the event that you’d like for every path drawn to change in size, select Random from the drop-down menu next to Size and move the Variation up to 12 pt. Each line will be a different size from 1 pt to 12 pt.
Step 2
Much of the options are only useful if you’re using a pressure-sensitive graphics tablet. If you switch from Random to Tilt, you’ll find that the angle at which you hold your tablet’s stylus effects the size of the brush’s line. This variation, unlike Random, changes throughout a single path, rather than each new one.
Step 3
If you change the drop-down menu to Pressure, the size will vary according to how much pressure you apply to your stylus’s nib when drawing. Again, the variation exists within a single path rather than with each new path. Using the pressure option for your Calligraphic Brush is perfect for creating clean line art with thick and thin line work that remains scalable (unlike making it in Adobe Photoshop).
3. How to Create Flat Brushes
Step 1
To create a flat brush reduce the Roundness when creating or editing the brush you’re using. In the example below, I’ve set the Roundness to 20%. the initial doodle below keeps all options as Fixed.
The second example is with Pressure enabled for size variance. I find that although you can play with variations for the roundness too, a flat brush style is most useful when size of the nib is the only variable of the work. This does depend on what you’re creating, however, so take that opinion with a grain of salt.
Step 2
As means of an example, lower the opacity of your brush either in the Transparency panel or at the top of Illustrator’s window when you have the Paintbrush Tool selected. The flat brush is a wonderful tool for sketching and painting with vectors. And as you can see from the Outline view below, it’s done with a series of editable paths.
3. How to Create Angled Flat Brushes
Step 1
The last brush style we’ll go over is an Angled Flat Brush. You can change the angle to whatever you want your brush to be. In the case below, I’ve set it to 45°. I also changed the Roundness to 11%, am keeping both Angle and Roundness Fixed, and have Size set to 11 pt, Pressure, and with an 11 pt Variation. As you can see below, I find this Calligraphic Brush to be excellent for mimicking real-life calligraphy, perfect for hand-lettering, fancy party invitations, or all of your elegantly written needs.
Step 2
I find creating calligraphic lettering in vector form allows for easy manipulation to the letters and flourishes as well as being ready to print any time at any size without loss to the quality of the image. You’re also able to change the stroke size itself when you resize the letter without expanding the stroke (Object > Expand) by selecting a larger stroke weight in the Strokes panel.
Step 3
Finally, let’s take a look at selecting Pressure for all three options for the Angled Flat Brush. In the example below I have the Angle set to 45° and the Variation at 180°, the Roundness set at 11% and the Variation at 11%, and Size at 31 pt and the Variation all the way up to 31 pt. Below the options, the first line shows the angled brush clicked with a mouse versus pressing down in one place with a tablet’s stylus. The second and third line show all three options at work with two paths and various levels of pressure.
Conclusion
The Calligraphic Brush is the most basic and often quite useful of the five brush options within Adobe Illustrator. Playing with its options and creating a library of brushes not only allows for more customization within your work, but it also emphasizes the use of Illustrator as a drawing program versus being a tool for pure design.
Don’t forget that you can always expand your brush library by heading over to Envato Elements, where you’ll find a great selection of vector brushes such as these ones.
Marker Illustrator Brushes
This professional Illustrator brush pack contains 25 high-quality digital marker brushes intended for professional designers, illustrators, and artists.
Pastels Brush Pack
In this set you will get 43 realistic pastel brushes and 25 pastel colors in 5 swatch groups for authentic pastel colors. You will love to use these brushes in Illustrator on any kind of project, from illustrations for kids to grunge-style illustrations, comics, and realistic projects.
Stipple Brushes Pack
Inside you’ll find a huge collection of brushes to suit your every need—for example, create vintage logos, illustrations, or backgrounds!
Vintage Brush Pack
Using these brushes is simple—just lay down the strokes and select a suitable brush from the brushes panel. Save time by using multi-lined brushes to create your vintage shading and textures to give it that old-school engraving look!
Japan Brush Pack
This professional Illustrator brush pack contains 39 high-quality Asian calligraphy brushes intended for professional designers, illustrators, and artists.
1950s Artist Brush Pack
Inspired by 1950s illustration, these brushes were made by using ink, old brushes, and the artist’s fingers. You can use these brushes for vector paintings and line art too. Scanned in high resolution, cleaned, and turned to vector.
Or you can use some of these free Illustrator brushes:
Further Develop Your Creative Skills
Just finished going through this little article, and feel like learning more? Well, if that’s the case, you’re in luck, since I took the time to put together this list that should keep you going for the following days!
-
How to Make a Watercolor Brush in Adobe Illustrator
Always wondered how to make a watercolor brush in Illustrator, but never knew exactly where to start? Today you’ll learn how easy it is to create a vector… -
How to Make a Brush in Illustrator
Learn to create a custom paint brush, a scatter brush and a texture brush in Adobe Illustrator, using nothing more than some basic geometric shapes and effects. -
How to Make a Texture Brush in Illustrator
Have you always liked to draw using texture or grunge brushes? Why not create your own vector Illustrator brush? What if I’ll tell you that it’s easy and… -
How to Use Brushes in Adobe Illustrator to Create a Colorful Flamingo
Learn how to create an illustration of a flamingo and tropical plants using Adobe Illustrator brushes. -
How to Vector Hair With Brushes in Adobe Illustrator
In this tutorial I’m going to show you how to create one set of brushes (four individual brushes) and then how to create a free flowing, detailed hair style… -
Illustrator in 60 Seconds: How to Install and Use a Custom Brush Set
Custom Brushes are one of Illustrator’s most attractive features, but sometimes the process of adding them can prove to be a difficult task, especially if… -
Illustrator in 60 Seconds: How to Create a Custom Stipple Brush
Always wanted to create your very own Stipple brush, but never knew exactly how?
Well, if that’s the case you should watch this video since it will show you…
How to Make, Use, and Manipulate a Calligraphic Brush in Adobe Illustrator
Post pobrano z: How to Make, Use, and Manipulate a Calligraphic Brush in Adobe Illustrator
The Calligraphic brush in Adobe Illustrator mimics the look and feel of a calligraphy pen nib. Let’s take its options for a spin to get everything you can from this brush type.
1. How to Make a Calligraphic Brush
Step 1
To start, create a New Document, select the Paintbrush Tool (B) and open the Brushes panel in Illustrator. Select options and hit New Brush to do just that: create a new brush.
Step 2
Select Calligraphic Brush (chances are it’s already selected) and hit OK.
Step 3
Let’s start with a very simple default-style brush. Name it whatever you want. Set the Angle to 0°, Roundness to 100%, and the Size to whatever you feel like using (in this case 5 pt). Keep the drop-down boxes of each option at Fixed for now. Hit OK and check out your very simple round brush with the Paintbrush Tool (B).
Step 4
Hit Enter with the Paintbrush Tool (B) selected and you can check out the options of the tool that have some effect on the brush you’ve created as well. In this case, I’ve kept the Fidelity to Smooth so my paths are as fluid and clean as possible.
2. How to Use the Round Brush Options
Step 1
Now that we’ve done the super simple task of making a new brush, let’s play with the options within it. In the event that you’d like for every path drawn to change in size, select Random from the drop-down menu next to Size and move the Variation up to 12 pt. Each line will be a different size from 1 pt to 12 pt.
Step 2
Much of the options are only useful if you’re using a pressure-sensitive graphics tablet. If you switch from Random to Tilt, you’ll find that the angle at which you hold your tablet’s stylus effects the size of the brush’s line. This variation, unlike Random, changes throughout a single path, rather than each new one.
Step 3
If you change the drop-down menu to Pressure, the size will vary according to how much pressure you apply to your stylus’s nib when drawing. Again, the variation exists within a single path rather than with each new path. Using the pressure option for your Calligraphic Brush is perfect for creating clean line art with thick and thin line work that remains scalable (unlike making it in Adobe Photoshop).
3. How to Create Flat Brushes
Step 1
To create a flat brush reduce the Roundness when creating or editing the brush you’re using. In the example below, I’ve set the Roundness to 20%. the initial doodle below keeps all options as Fixed.
The second example is with Pressure enabled for size variance. I find that although you can play with variations for the roundness too, a flat brush style is most useful when size of the nib is the only variable of the work. This does depend on what you’re creating, however, so take that opinion with a grain of salt.
Step 2
As means of an example, lower the opacity of your brush either in the Transparency panel or at the top of Illustrator’s window when you have the Paintbrush Tool selected. The flat brush is a wonderful tool for sketching and painting with vectors. And as you can see from the Outline view below, it’s done with a series of editable paths.
3. How to Create Angled Flat Brushes
Step 1
The last brush style we’ll go over is an Angled Flat Brush. You can change the angle to whatever you want your brush to be. In the case below, I’ve set it to 45°. I also changed the Roundness to 11%, am keeping both Angle and Roundness Fixed, and have Size set to 11 pt, Pressure, and with an 11 pt Variation. As you can see below, I find this Calligraphic Brush to be excellent for mimicking real-life calligraphy, perfect for hand-lettering, fancy party invitations, or all of your elegantly written needs.
Step 2
I find creating calligraphic lettering in vector form allows for easy manipulation to the letters and flourishes as well as being ready to print any time at any size without loss to the quality of the image. You’re also able to change the stroke size itself when you resize the letter without expanding the stroke (Object > Expand) by selecting a larger stroke weight in the Strokes panel.
Step 3
Finally, let’s take a look at selecting Pressure for all three options for the Angled Flat Brush. In the example below I have the Angle set to 45° and the Variation at 180°, the Roundness set at 11% and the Variation at 11%, and Size at 31 pt and the Variation all the way up to 31 pt. Below the options, the first line shows the angled brush clicked with a mouse versus pressing down in one place with a tablet’s stylus. The second and third line show all three options at work with two paths and various levels of pressure.
Conclusion
The Calligraphic Brush is the most basic and often quite useful of the five brush options within Adobe Illustrator. Playing with its options and creating a library of brushes not only allows for more customization within your work, but it also emphasizes the use of Illustrator as a drawing program versus being a tool for pure design.
Don’t forget that you can always expand your brush library by heading over to Envato Elements, where you’ll find a great selection of vector brushes such as these ones.
Marker Illustrator Brushes
This professional Illustrator brush pack contains 25 high-quality digital marker brushes intended for professional designers, illustrators, and artists.
Pastels Brush Pack
In this set you will get 43 realistic pastel brushes and 25 pastel colors in 5 swatch groups for authentic pastel colors. You will love to use these brushes in Illustrator on any kind of project, from illustrations for kids to grunge-style illustrations, comics, and realistic projects.
Stipple Brushes Pack
Inside you’ll find a huge collection of brushes to suit your every need—for example, create vintage logos, illustrations, or backgrounds!
Vintage Brush Pack
Using these brushes is simple—just lay down the strokes and select a suitable brush from the brushes panel. Save time by using multi-lined brushes to create your vintage shading and textures to give it that old-school engraving look!
Japan Brush Pack
This professional Illustrator brush pack contains 39 high-quality Asian calligraphy brushes intended for professional designers, illustrators, and artists.
1950s Artist Brush Pack
Inspired by 1950s illustration, these brushes were made by using ink, old brushes, and the artist’s fingers. You can use these brushes for vector paintings and line art too. Scanned in high resolution, cleaned, and turned to vector.
Or you can use some of these free Illustrator brushes:
Further Develop Your Creative Skills
Just finished going through this little article, and feel like learning more? Well, if that’s the case, you’re in luck, since I took the time to put together this list that should keep you going for the following days!
-
How to Make a Watercolor Brush in Adobe Illustrator
Always wondered how to make a watercolor brush in Illustrator, but never knew exactly where to start? Today you’ll learn how easy it is to create a vector… -
How to Make a Brush in Illustrator
Learn to create a custom paint brush, a scatter brush and a texture brush in Adobe Illustrator, using nothing more than some basic geometric shapes and effects. -
How to Make a Texture Brush in Illustrator
Have you always liked to draw using texture or grunge brushes? Why not create your own vector Illustrator brush? What if I’ll tell you that it’s easy and… -
How to Use Brushes in Adobe Illustrator to Create a Colorful Flamingo
Learn how to create an illustration of a flamingo and tropical plants using Adobe Illustrator brushes. -
How to Vector Hair With Brushes in Adobe Illustrator
In this tutorial I’m going to show you how to create one set of brushes (four individual brushes) and then how to create a free flowing, detailed hair style… -
Illustrator in 60 Seconds: How to Install and Use a Custom Brush Set
Custom Brushes are one of Illustrator’s most attractive features, but sometimes the process of adding them can prove to be a difficult task, especially if… -
Illustrator in 60 Seconds: How to Create a Custom Stipple Brush
Always wanted to create your very own Stipple brush, but never knew exactly how?
Well, if that’s the case you should watch this video since it will show you…
How to Make, Use, and Manipulate a Calligraphic Brush in Adobe Illustrator
Post pobrano z: How to Make, Use, and Manipulate a Calligraphic Brush in Adobe Illustrator
The Calligraphic brush in Adobe Illustrator mimics the look and feel of a calligraphy pen nib. Let’s take its options for a spin to get everything you can from this brush type.
1. How to Make a Calligraphic Brush
Step 1
To start, create a New Document, select the Paintbrush Tool (B) and open the Brushes panel in Illustrator. Select options and hit New Brush to do just that: create a new brush.
Step 2
Select Calligraphic Brush (chances are it’s already selected) and hit OK.
Step 3
Let’s start with a very simple default-style brush. Name it whatever you want. Set the Angle to 0°, Roundness to 100%, and the Size to whatever you feel like using (in this case 5 pt). Keep the drop-down boxes of each option at Fixed for now. Hit OK and check out your very simple round brush with the Paintbrush Tool (B).
Step 4
Hit Enter with the Paintbrush Tool (B) selected and you can check out the options of the tool that have some effect on the brush you’ve created as well. In this case, I’ve kept the Fidelity to Smooth so my paths are as fluid and clean as possible.
2. How to Use the Round Brush Options
Step 1
Now that we’ve done the super simple task of making a new brush, let’s play with the options within it. In the event that you’d like for every path drawn to change in size, select Random from the drop-down menu next to Size and move the Variation up to 12 pt. Each line will be a different size from 1 pt to 12 pt.
Step 2
Much of the options are only useful if you’re using a pressure-sensitive graphics tablet. If you switch from Random to Tilt, you’ll find that the angle at which you hold your tablet’s stylus effects the size of the brush’s line. This variation, unlike Random, changes throughout a single path, rather than each new one.
Step 3
If you change the drop-down menu to Pressure, the size will vary according to how much pressure you apply to your stylus’s nib when drawing. Again, the variation exists within a single path rather than with each new path. Using the pressure option for your Calligraphic Brush is perfect for creating clean line art with thick and thin line work that remains scalable (unlike making it in Adobe Photoshop).
3. How to Create Flat Brushes
Step 1
To create a flat brush reduce the Roundness when creating or editing the brush you’re using. In the example below, I’ve set the Roundness to 20%. the initial doodle below keeps all options as Fixed.
The second example is with Pressure enabled for size variance. I find that although you can play with variations for the roundness too, a flat brush style is most useful when size of the nib is the only variable of the work. This does depend on what you’re creating, however, so take that opinion with a grain of salt.
Step 2
As means of an example, lower the opacity of your brush either in the Transparency panel or at the top of Illustrator’s window when you have the Paintbrush Tool selected. The flat brush is a wonderful tool for sketching and painting with vectors. And as you can see from the Outline view below, it’s done with a series of editable paths.
3. How to Create Angled Flat Brushes
Step 1
The last brush style we’ll go over is an Angled Flat Brush. You can change the angle to whatever you want your brush to be. In the case below, I’ve set it to 45°. I also changed the Roundness to 11%, am keeping both Angle and Roundness Fixed, and have Size set to 11 pt, Pressure, and with an 11 pt Variation. As you can see below, I find this Calligraphic Brush to be excellent for mimicking real-life calligraphy, perfect for hand-lettering, fancy party invitations, or all of your elegantly written needs.
Step 2
I find creating calligraphic lettering in vector form allows for easy manipulation to the letters and flourishes as well as being ready to print any time at any size without loss to the quality of the image. You’re also able to change the stroke size itself when you resize the letter without expanding the stroke (Object > Expand) by selecting a larger stroke weight in the Strokes panel.
Step 3
Finally, let’s take a look at selecting Pressure for all three options for the Angled Flat Brush. In the example below I have the Angle set to 45° and the Variation at 180°, the Roundness set at 11% and the Variation at 11%, and Size at 31 pt and the Variation all the way up to 31 pt. Below the options, the first line shows the angled brush clicked with a mouse versus pressing down in one place with a tablet’s stylus. The second and third line show all three options at work with two paths and various levels of pressure.
Conclusion
The Calligraphic Brush is the most basic and often quite useful of the five brush options within Adobe Illustrator. Playing with its options and creating a library of brushes not only allows for more customization within your work, but it also emphasizes the use of Illustrator as a drawing program versus being a tool for pure design.
Don’t forget that you can always expand your brush library by heading over to Envato Elements, where you’ll find a great selection of vector brushes such as these ones.
Marker Illustrator Brushes
This professional Illustrator brush pack contains 25 high-quality digital marker brushes intended for professional designers, illustrators, and artists.
Pastels Brush Pack
In this set you will get 43 realistic pastel brushes and 25 pastel colors in 5 swatch groups for authentic pastel colors. You will love to use these brushes in Illustrator on any kind of project, from illustrations for kids to grunge-style illustrations, comics, and realistic projects.
Stipple Brushes Pack
Inside you’ll find a huge collection of brushes to suit your every need—for example, create vintage logos, illustrations, or backgrounds!
Vintage Brush Pack
Using these brushes is simple—just lay down the strokes and select a suitable brush from the brushes panel. Save time by using multi-lined brushes to create your vintage shading and textures to give it that old-school engraving look!
Japan Brush Pack
This professional Illustrator brush pack contains 39 high-quality Asian calligraphy brushes intended for professional designers, illustrators, and artists.
1950s Artist Brush Pack
Inspired by 1950s illustration, these brushes were made by using ink, old brushes, and the artist’s fingers. You can use these brushes for vector paintings and line art too. Scanned in high resolution, cleaned, and turned to vector.
Or you can use some of these free Illustrator brushes:
Further Develop Your Creative Skills
Just finished going through this little article, and feel like learning more? Well, if that’s the case, you’re in luck, since I took the time to put together this list that should keep you going for the following days!
-
How to Make a Watercolor Brush in Adobe Illustrator
Always wondered how to make a watercolor brush in Illustrator, but never knew exactly where to start? Today you’ll learn how easy it is to create a vector… -
How to Make a Brush in Illustrator
Learn to create a custom paint brush, a scatter brush and a texture brush in Adobe Illustrator, using nothing more than some basic geometric shapes and effects. -
How to Make a Texture Brush in Illustrator
Have you always liked to draw using texture or grunge brushes? Why not create your own vector Illustrator brush? What if I’ll tell you that it’s easy and… -
How to Use Brushes in Adobe Illustrator to Create a Colorful Flamingo
Learn how to create an illustration of a flamingo and tropical plants using Adobe Illustrator brushes. -
How to Vector Hair With Brushes in Adobe Illustrator
In this tutorial I’m going to show you how to create one set of brushes (four individual brushes) and then how to create a free flowing, detailed hair style… -
Illustrator in 60 Seconds: How to Install and Use a Custom Brush Set
Custom Brushes are one of Illustrator’s most attractive features, but sometimes the process of adding them can prove to be a difficult task, especially if… -
Illustrator in 60 Seconds: How to Create a Custom Stipple Brush
Always wanted to create your very own Stipple brush, but never knew exactly how?
Well, if that’s the case you should watch this video since it will show you…
How to Make, Use, and Manipulate a Calligraphic Brush in Adobe Illustrator
Post pobrano z: How to Make, Use, and Manipulate a Calligraphic Brush in Adobe Illustrator
The Calligraphic brush in Adobe Illustrator mimics the look and feel of a calligraphy pen nib. Let’s take its options for a spin to get everything you can from this brush type.
1. How to Make a Calligraphic Brush
Step 1
To start, create a New Document, select the Paintbrush Tool (B) and open the Brushes panel in Illustrator. Select options and hit New Brush to do just that: create a new brush.
Step 2
Select Calligraphic Brush (chances are it’s already selected) and hit OK.
Step 3
Let’s start with a very simple default-style brush. Name it whatever you want. Set the Angle to 0°, Roundness to 100%, and the Size to whatever you feel like using (in this case 5 pt). Keep the drop-down boxes of each option at Fixed for now. Hit OK and check out your very simple round brush with the Paintbrush Tool (B).
Step 4
Hit Enter with the Paintbrush Tool (B) selected and you can check out the options of the tool that have some effect on the brush you’ve created as well. In this case, I’ve kept the Fidelity to Smooth so my paths are as fluid and clean as possible.
2. How to Use the Round Brush Options
Step 1
Now that we’ve done the super simple task of making a new brush, let’s play with the options within it. In the event that you’d like for every path drawn to change in size, select Random from the drop-down menu next to Size and move the Variation up to 12 pt. Each line will be a different size from 1 pt to 12 pt.
Step 2
Much of the options are only useful if you’re using a pressure-sensitive graphics tablet. If you switch from Random to Tilt, you’ll find that the angle at which you hold your tablet’s stylus effects the size of the brush’s line. This variation, unlike Random, changes throughout a single path, rather than each new one.
Step 3
If you change the drop-down menu to Pressure, the size will vary according to how much pressure you apply to your stylus’s nib when drawing. Again, the variation exists within a single path rather than with each new path. Using the pressure option for your Calligraphic Brush is perfect for creating clean line art with thick and thin line work that remains scalable (unlike making it in Adobe Photoshop).
3. How to Create Flat Brushes
Step 1
To create a flat brush reduce the Roundness when creating or editing the brush you’re using. In the example below, I’ve set the Roundness to 20%. the initial doodle below keeps all options as Fixed.
The second example is with Pressure enabled for size variance. I find that although you can play with variations for the roundness too, a flat brush style is most useful when size of the nib is the only variable of the work. This does depend on what you’re creating, however, so take that opinion with a grain of salt.
Step 2
As means of an example, lower the opacity of your brush either in the Transparency panel or at the top of Illustrator’s window when you have the Paintbrush Tool selected. The flat brush is a wonderful tool for sketching and painting with vectors. And as you can see from the Outline view below, it’s done with a series of editable paths.
3. How to Create Angled Flat Brushes
Step 1
The last brush style we’ll go over is an Angled Flat Brush. You can change the angle to whatever you want your brush to be. In the case below, I’ve set it to 45°. I also changed the Roundness to 11%, am keeping both Angle and Roundness Fixed, and have Size set to 11 pt, Pressure, and with an 11 pt Variation. As you can see below, I find this Calligraphic Brush to be excellent for mimicking real-life calligraphy, perfect for hand-lettering, fancy party invitations, or all of your elegantly written needs.
Step 2
I find creating calligraphic lettering in vector form allows for easy manipulation to the letters and flourishes as well as being ready to print any time at any size without loss to the quality of the image. You’re also able to change the stroke size itself when you resize the letter without expanding the stroke (Object > Expand) by selecting a larger stroke weight in the Strokes panel.
Step 3
Finally, let’s take a look at selecting Pressure for all three options for the Angled Flat Brush. In the example below I have the Angle set to 45° and the Variation at 180°, the Roundness set at 11% and the Variation at 11%, and Size at 31 pt and the Variation all the way up to 31 pt. Below the options, the first line shows the angled brush clicked with a mouse versus pressing down in one place with a tablet’s stylus. The second and third line show all three options at work with two paths and various levels of pressure.
Conclusion
The Calligraphic Brush is the most basic and often quite useful of the five brush options within Adobe Illustrator. Playing with its options and creating a library of brushes not only allows for more customization within your work, but it also emphasizes the use of Illustrator as a drawing program versus being a tool for pure design.
Don’t forget that you can always expand your brush library by heading over to Envato Elements, where you’ll find a great selection of vector brushes such as these ones.
Marker Illustrator Brushes
This professional Illustrator brush pack contains 25 high-quality digital marker brushes intended for professional designers, illustrators, and artists.
Pastels Brush Pack
In this set you will get 43 realistic pastel brushes and 25 pastel colors in 5 swatch groups for authentic pastel colors. You will love to use these brushes in Illustrator on any kind of project, from illustrations for kids to grunge-style illustrations, comics, and realistic projects.
Stipple Brushes Pack
Inside you’ll find a huge collection of brushes to suit your every need—for example, create vintage logos, illustrations, or backgrounds!
Vintage Brush Pack
Using these brushes is simple—just lay down the strokes and select a suitable brush from the brushes panel. Save time by using multi-lined brushes to create your vintage shading and textures to give it that old-school engraving look!
Japan Brush Pack
This professional Illustrator brush pack contains 39 high-quality Asian calligraphy brushes intended for professional designers, illustrators, and artists.
1950s Artist Brush Pack
Inspired by 1950s illustration, these brushes were made by using ink, old brushes, and the artist’s fingers. You can use these brushes for vector paintings and line art too. Scanned in high resolution, cleaned, and turned to vector.
Or you can use some of these free Illustrator brushes:
Further Develop Your Creative Skills
Just finished going through this little article, and feel like learning more? Well, if that’s the case, you’re in luck, since I took the time to put together this list that should keep you going for the following days!
-
How to Make a Watercolor Brush in Adobe Illustrator
Always wondered how to make a watercolor brush in Illustrator, but never knew exactly where to start? Today you’ll learn how easy it is to create a vector… -
How to Make a Brush in Illustrator
Learn to create a custom paint brush, a scatter brush and a texture brush in Adobe Illustrator, using nothing more than some basic geometric shapes and effects. -
How to Make a Texture Brush in Illustrator
Have you always liked to draw using texture or grunge brushes? Why not create your own vector Illustrator brush? What if I’ll tell you that it’s easy and… -
How to Use Brushes in Adobe Illustrator to Create a Colorful Flamingo
Learn how to create an illustration of a flamingo and tropical plants using Adobe Illustrator brushes. -
How to Vector Hair With Brushes in Adobe Illustrator
In this tutorial I’m going to show you how to create one set of brushes (four individual brushes) and then how to create a free flowing, detailed hair style… -
Illustrator in 60 Seconds: How to Install and Use a Custom Brush Set
Custom Brushes are one of Illustrator’s most attractive features, but sometimes the process of adding them can prove to be a difficult task, especially if… -
Illustrator in 60 Seconds: How to Create a Custom Stipple Brush
Always wanted to create your very own Stipple brush, but never knew exactly how?
Well, if that’s the case you should watch this video since it will show you…
25 Professional Modern Letterhead Templates
Post pobrano z: 25 Professional Modern Letterhead Templates
Introduce your business to new clients with a professional letterhead. Check out this awesome collection of corporate letterhead templates.
25 Modern Letterhead Templates
So what is a letterhead and why is it important? A letterhead is the heading at the top of a sheet of paper used to identify a business. It usually contains a company’s name and contact information as well as the official logo.
Leave a great impression while enforcing a strong brand presence with an official letterhead template. Want to learn more about letterhead design? Check out these killer tips from Grace Fussell.
 Branding11 Tips for Creating Professional LetterheadGrace Fussell
 Branding10 Business Letterhead Design Tips (With Killer Brand Identity Examples)Grace Fussell
Then dive into our amazing collection of inspiring Letterhead Templates below. Find more extraordinary examples on Envato Market and Envato Elements.
Prefer a custom design instead? Enlist the help of a talented designer from Envato Studio for all your stationery needs.
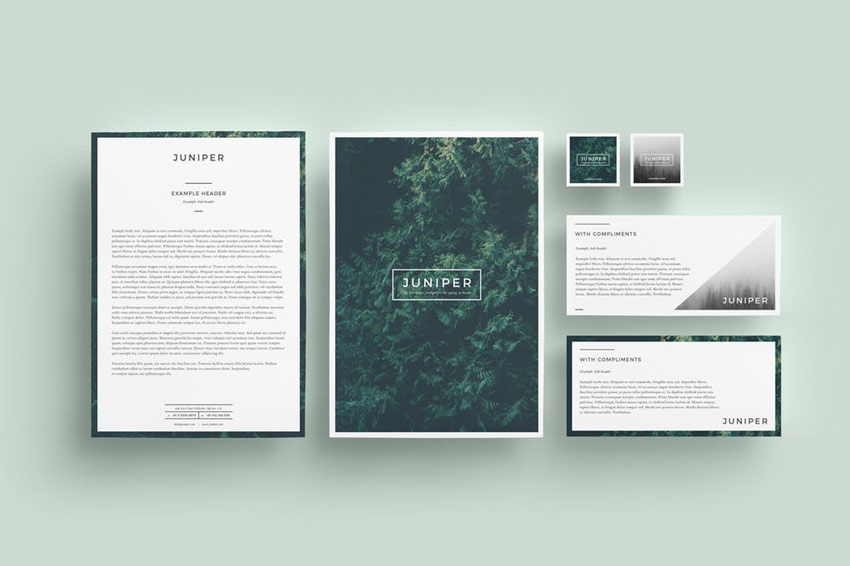
Juniper Letterhead & With Comps
Let’s kick off this collection with this gorgeous nature-inspired design. This template features a complete letterhead kit with bonus box stickers and more. Easily modify these well-organized files which are compatible with both Photoshop and InDesign.
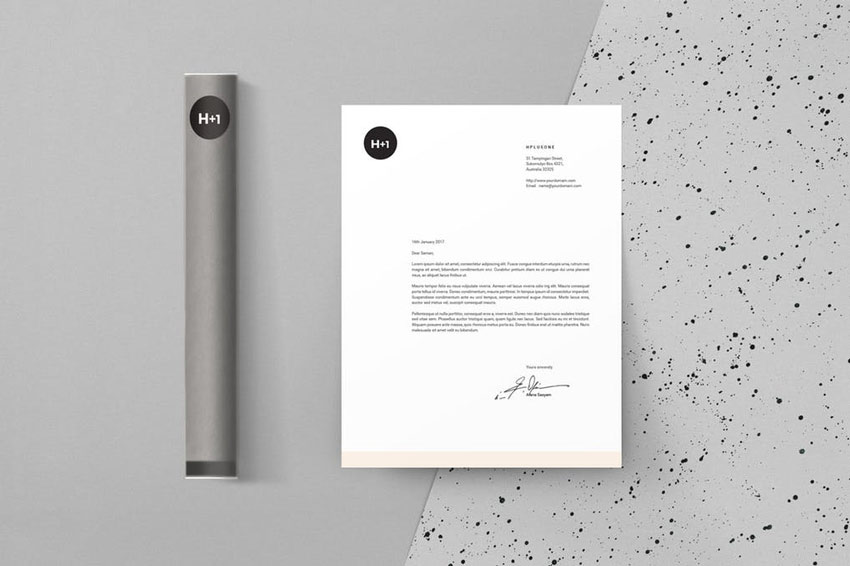
Gray Letterhead Template
Or feast your eyes on this splendidly chic design! Customize this modern template with strong typography to help your brand stand out. Easily replace the text and images for a quick letterhead design in under an hour!
Clean Letterhead
Every company should have an official letterhead. So why not try out this polished version? This template features a clean, minimalist design available in three different colors. Each file is fully editable, no matter the software you choose.

Flow Shape Branding Print Pack
Identity packs provide all your essential branding files in one brilliant download! This pack features a fully editable logo, business card, and letterhead template. It also includes free fonts like Bebas Neue and PT Serif for an overall modern design.

7 Letterhead Templates
Get seven amazing templates for the price of one! This pack features clean, professional letterhead templates suitable for any project. Get access to several industry standard formats including a convenient Microsoft Word file.

Corporate Letterhead
Sometimes less is more. Enjoy a professional
corporate letterhead without all the extra fuss! This brilliant template
includes four color versions available in several industry formats.
Also included is a bonus pack of free icons inside!

Clean Letterhead Pad With MS Word Doc
Stay on top of your brand guidelines with a clean letterhead template. This template features high-resolution files that are easy to edit in Microsoft Word or Adobe Photoshop. Customize this design with your contact details in only a matter of minutes!

Clean Letterhead
Rebrand your company with a refreshing, clean design. This letterhead template features three stunning color variations available in yellow, blue, and red. It’s great for any corporate business and even includes a handy Microsoft Word version.

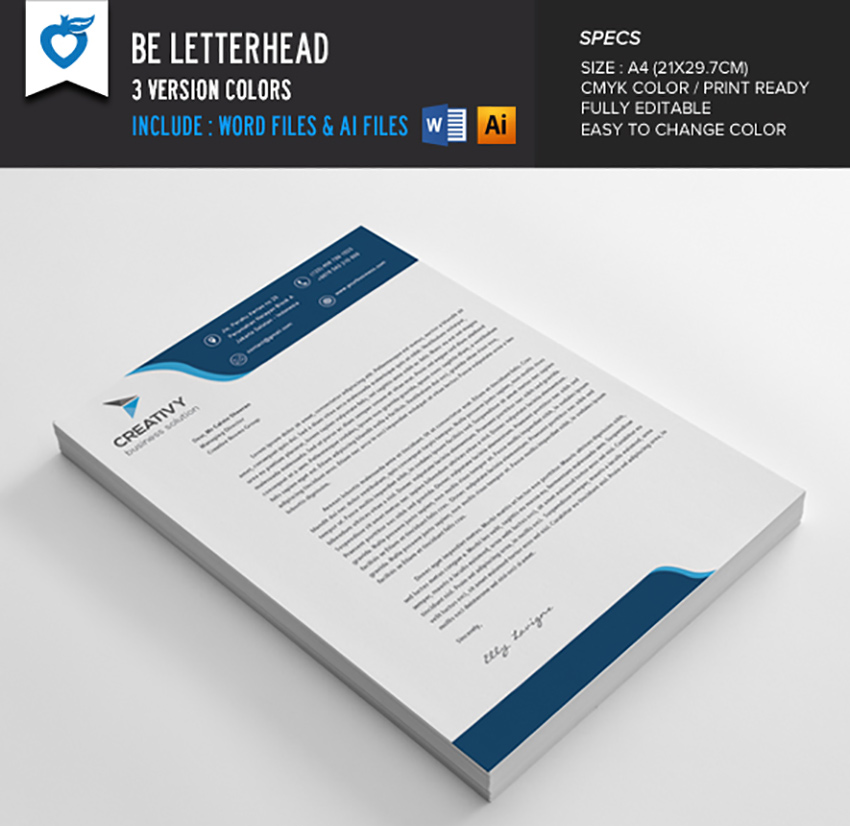
Be Letterhead Template
Letterheads are often the first form of contact for your customers, so make a lasting impression with this stylish template. This template includes red, blue, and brown color options, all available in A4 size. And with print-ready files, you’ll be able to use this template right away!
Modern Corporate Letterhead
Or choose a modern letterhead that fits the style of your business. This template features a clean design with three standard color options. Simply replace the logo and insert your information onto the left side panel to enjoy this template today!

Letterhead Pad
This massive letterhead bundle includes 40 print-ready files! It features a minimalist design with eight unique color schemes to choose from. Also included are several free fonts and a helpful PDF for further instruction.

The Letterhead
Add a punch of color to your letterheads to make them stand out! This awesome template features a simple angular design with plenty of room for your logo and contact details. Simply insert your information using the well-organized text layers.

Slim Letterhead Pad With MS Word Doc
Not everyone has access to professional design software. That’s why it’s important to take advantage of template bundles that feature several formats. This sleek design features five Photoshop files with a bonus Word document for easy editing.

Colourful Business Letterheads
If you’re a fan of colorful design then you’ll definitely love this letterhead bundle. Great for real estate companies, home agencies, and more, this simple design features six beautiful colors. It’s originally designed with Adobe Illustrator so each element is fully editable.
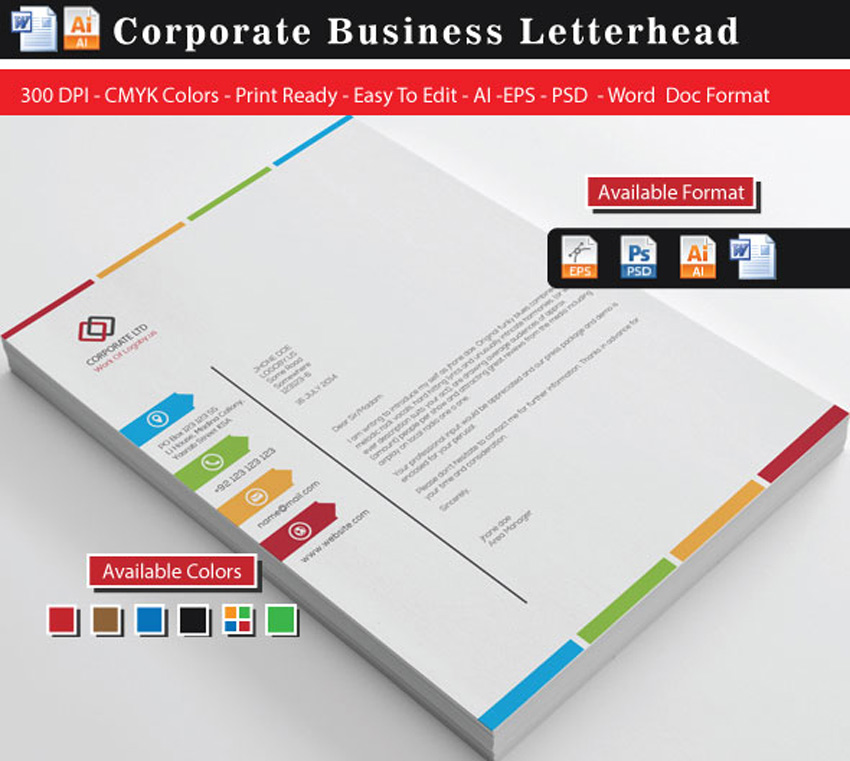
Corporate Letterhead With Ms-Word 01
If you’re not familiar with programs like Adobe Illustrator or Photoshop, then choose a letterhead template with a convenient Microsoft Word format instead. This template, for instance, includes four industry formats suitable for beginners. Enjoy a minimalist design with three color variations available.

Corporate Letterhead
This sleek and sophisticated design is simple yet stylish enough to make a great impact. Download this file to get access to high-resolution files at 300 dpi and so much more. Easily change the design using Adobe Illustrator or just update the main info in Word.

5 Corporate Letterheads
Get the most bang for your buck by downloading one of our corporate letterhead bundles. This bundle includes five letterhead templates available in two paper sizes. Get access to five different designs in seven different formats for a total of 73 files! Don’t miss out!

A4 Letterhead Mock-Up
Sometimes
extra elements in a design can be a bit distracting. That’s why
simplistic layouts outperform all the rest! Take this standard
letterhead, for example. It features five well-organized Photoshop files
with editable text layers.

Conclusion
This list features exciting
resources for the avid designer
familiar with Adobe Illustrator, Photoshop, and InDesign. For
additional help with all your stationery needs, enlist the skills of a
talented
professional by choosing one of the amazing designers from Envato Studio.
And with loads of letterhead templates available at your fingertips, chances are we’ve missed a few to add to your personal collection. Be sure to browse Envato Market and Envato Elements for more resources, and let us know your favorites in the comments below!

25 Professional Modern Letterhead Templates
Post pobrano z: 25 Professional Modern Letterhead Templates
Introduce your business to new clients with a professional letterhead. Check out this awesome collection of corporate letterhead templates.
25 Modern Letterhead Templates
So what is a letterhead and why is it important? A letterhead is the heading at the top of a sheet of paper used to identify a business. It usually contains a company’s name and contact information as well as the official logo.
Leave a great impression while enforcing a strong brand presence with an official letterhead template. Want to learn more about letterhead design? Check out these killer tips from Grace Fussell.
-
Branding11 Tips for Creating Professional LetterheadGrace Fussell
-
Branding10 Business Letterhead Design Tips (With Killer Brand Identity Examples)Grace Fussell
Then dive into our amazing collection of inspiring Letterhead Templates below. Find more extraordinary examples on Envato Market and Envato Elements.
Prefer a custom design instead? Enlist the help of a talented designer from Envato Studio for all your stationery needs.
Juniper Letterhead & With Comps
Let’s kick off this collection with this gorgeous nature-inspired design. This template features a complete letterhead kit with bonus box stickers and more. Easily modify these well-organized files which are compatible with both Photoshop and InDesign.
Gray Letterhead Template
Or feast your eyes on this splendidly chic design! Customize this modern template with strong typography to help your brand stand out. Easily replace the text and images for a quick letterhead design in under an hour!
Clean Letterhead
Every company should have an official letterhead. So why not try out this polished version? This template features a clean, minimalist design available in three different colors. Each file is fully editable, no matter the software you choose.
Flow Shape Branding Print Pack
Identity packs provide all your essential branding files in one brilliant download! This pack features a fully editable logo, business card, and letterhead template. It also includes free fonts like Bebas Neue and PT Serif for an overall modern design.
7 Letterhead Templates
Get seven amazing templates for the price of one! This pack features clean, professional letterhead templates suitable for any project. Get access to several industry standard formats including a convenient Microsoft Word file.
Corporate Letterhead
Sometimes less is more. Enjoy a professional
corporate letterhead without all the extra fuss! This brilliant template
includes four color versions available in several industry formats.
Also included is a bonus pack of free icons inside!
Clean Letterhead Pad With MS Word Doc
Stay on top of your brand guidelines with a clean letterhead template. This template features high-resolution files that are easy to edit in Microsoft Word or Adobe Photoshop. Customize this design with your contact details in only a matter of minutes!
Clean Letterhead
Rebrand your company with a refreshing, clean design. This letterhead template features three stunning color variations available in yellow, blue, and red. It’s great for any corporate business and even includes a handy Microsoft Word version.
Be Letterhead Template
Letterheads are often the first form of contact for your customers, so make a lasting impression with this stylish template. This template includes red, blue, and brown color options, all available in A4 size. And with print-ready files, you’ll be able to use this template right away!
Modern Corporate Letterhead
Or choose a modern letterhead that fits the style of your business. This template features a clean design with three standard color options. Simply replace the logo and insert your information onto the left side panel to enjoy this template today!
Letterhead Pad
This massive letterhead bundle includes 40 print-ready files! It features a minimalist design with eight unique color schemes to choose from. Also included are several free fonts and a helpful PDF for further instruction.
The Letterhead
Add a punch of color to your letterheads to make them stand out! This awesome template features a simple angular design with plenty of room for your logo and contact details. Simply insert your information using the well-organized text layers.
Slim Letterhead Pad With MS Word Doc
Not everyone has access to professional design software. That’s why it’s important to take advantage of template bundles that feature several formats. This sleek design features five Photoshop files with a bonus Word document for easy editing.
Colourful Business Letterheads
If you’re a fan of colorful design then you’ll definitely love this letterhead bundle. Great for real estate companies, home agencies, and more, this simple design features six beautiful colors. It’s originally designed with Adobe Illustrator so each element is fully editable.
Corporate Letterhead With Ms-Word 01
If you’re not familiar with programs like Adobe Illustrator or Photoshop, then choose a letterhead template with a convenient Microsoft Word format instead. This template, for instance, includes four industry formats suitable for beginners. Enjoy a minimalist design with three color variations available.
Corporate Letterhead
This sleek and sophisticated design is simple yet stylish enough to make a great impact. Download this file to get access to high-resolution files at 300 dpi and so much more. Easily change the design using Adobe Illustrator or just update the main info in Word.
5 Corporate Letterheads
Get the most bang for your buck by downloading one of our corporate letterhead bundles. This bundle includes five letterhead templates available in two paper sizes. Get access to five different designs in seven different formats for a total of 73 files! Don’t miss out!
A4 Letterhead Mock-Up
Sometimes
extra elements in a design can be a bit distracting. That’s why
simplistic layouts outperform all the rest! Take this standard
letterhead, for example. It features five well-organized Photoshop files
with editable text layers.
Conclusion
This list features exciting
resources for the avid designer
familiar with Adobe Illustrator, Photoshop, and InDesign. For
additional help with all your stationery needs, enlist the skills of a
talented
professional by choosing one of the amazing designers from Envato Studio.
And with loads of letterhead templates available at your fingertips, chances are we’ve missed a few to add to your personal collection. Be sure to browse Envato Market and Envato Elements for more resources, and let us know your favorites in the comments below!