Wszystkie wpisy, których autorem jest admin

How to Create a Realistic Embroidery Text Effect in Adobe Photoshop

Post pobrano z: How to Create a Realistic Embroidery Text Effect in Adobe Photoshop
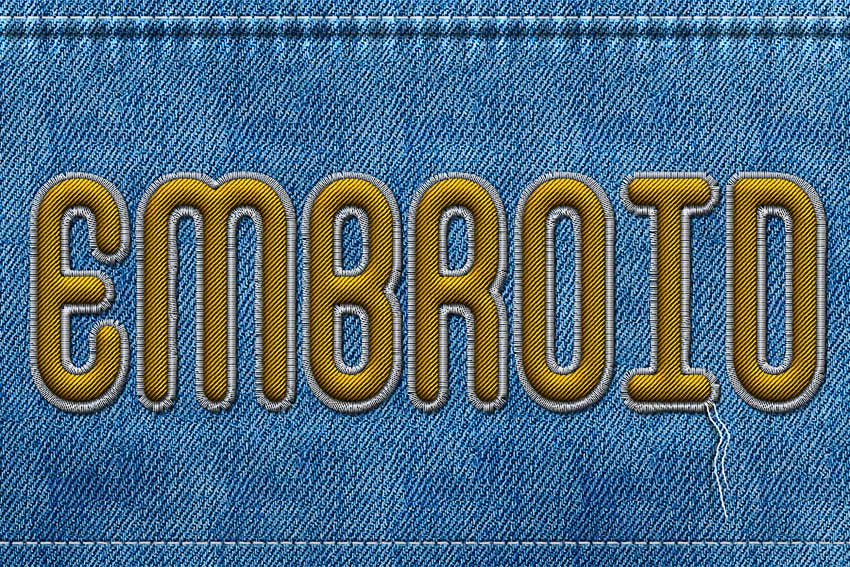
Final product image
What You’ll Be Creating

In this tutorial, I will show you how to create a realistic embroidery text effect in Photoshop using stitch brushes and layer styles. The end result will be a font that looks like embroidery! 

This is part of my embroidery effect Photoshop action, which is part of the Embroidery and Stitching Photoshop Creation Kit from my portfolio on Envato Market

Embroidery and Stitching Photoshop Actions embroidery effect photoshop
Embroidery and Stitching Photoshop Actions

Tutorial Assets

The following assets were used during the production of this tutorial:

1. Create the Jeans Background

Step 1

Create a new 1100 x 600 px document, and create a new layer called Jeans Background. Copy and Paste the Jeans Texture on this layer. Make sure you use the large texture (2000 x 1500 px). 

Create Jeans Background

Step 2

Create a new layer called Textured and Fill it with white. Make sure you have the Foreground Color set to white and the Background Color set to black. Go to Filter > Render > Clouds.

Add Clouds Filter

Step 3

Go to Filter > Brush Strokes > Crosshatch. Set the Stroke Length to 15, Sharpness to 16, and Strength to 2. You can, of course, change the settings to your liking. 

Add Crosshatch Filter

Step 4

Set the blend mode of the Textured layer to Soft Light and around 50% Opacity. If you want, you can change the color of the jeans; add a Color Overlay style to the Textured layer with blend mode Color and simply pick a color that you like. 

Change Jeans Color

2. Create the Stitch Brushes

Step 1

In order to finish the jeans background and to start creating the stitched embroidery effect, we need some stitch brushes that we are going to make from scratch.

Create a new PSD file, size 27 x 5 px. Fill the canvas with color black. Go to Edit > Define Brush Preset. Set the brush name to „stitch” and click OK

Define Brush Preset

You can now close the new PSD file without saving and return to the initial PSD file (the one with the jeans background). 

Step 2

Now we are going to modify the brush that we just made, to create a custom brush. Choose the Brush Tool and select the „stitch” brush from the Brush Preset Picker. Toggle the Brush Panel and make the following settings: Angle 90, Roundness 50%, Spacing 87%, and set the Angle Jitter to Direction.

Create Custom Brush

Step 3

Click on the top right corner of the Brush Panel and choose New Brush Preset. Name the new brush „stitch1”

Create Stitch Brush

Step 4

Now we’ll create the second brush. Again choose the Brush Tool and select the „stitch” brush from the Brush Preset Picker. Toggle the Brush Panel and make the following settings: Spacing 750% and set the Angle Jitter to Direction.

Create Dashed Brush

Step 5

Click on the top right corner of the Brush Panel and choose New Brush Preset. Name the new brush „stitch2”

Create Dashed Line Brush

3. Add Sewing Details

Step 1

Use the Rectangle Tool and draw a shape as shown in the preview image. Make sure it exceeds the canvas on the top and left/right edges. Name this layer Jeans Border.

Draw Rectangle

Step 2

Go to Filter > Distort > Wave and set the Wavelength, Amplitude and Scale to create a wavy border. Also go to Filter > Blur > Gaussian Blur and set the Radius to 0.7 pixels.

Filter Distort Wave

Step 3

Add this layer style to the Jeans Border layer: Drop Shadow (color #131e26), Inner Shadow (color #131e26), Inner Glow (color #ffffff), Bevel and Emboss (colors: #ffffff and #131e26).

Drop Shadow
Inner Shadow
Inner Glow
Bevel and Emboss

Step 4

Create a new layer and call it Stitch. Pick the Brush Tool and choose the „stitch2” brush. Set the size to around 13 px and the color to #ffffff. Keep the Shift key pressed to draw a straight line. Add another line on the bottom of the jeans background in the same way.

Add Stitch

Step 5

Add this layer style to the Stitch layer: Drop Shadow, Inner Glow, Bevel and Emboss, Stroke.

Drop Shadow
Inner Glow
Bevel and Emboss
Stroke

Step 6

Go to Filter > Distort > Ripple and set the Amount 30% and Size Small. Your result should now look like this.

Filter Distort Ripple

Step 7

Create a new layer and call it Ripple Edge. Take the Brush Tool and pick the Soft Round Brush which is a default Adobe Photoshop brush that you should have in your list. Toggle the Brush panel to customize the brush and make these settings: Size 50 px, Angle 90, Roundness 45%, Spacing 150%

Create Custom Brush

Step 8

Draw two lines using this custom brush and color white. Set the blend mode of the Ripple Edge layer to Overlay, 40% opacity level. Also add a Drop Shadow layer style (color #0f1114).

Add Line Border

4. How to Create an Embroidery Effect in Photoshop

Step 1

Create a new text layer and call it Embroidered Text. Type your text using the False Positive font. Click on the Toggle the Character and Paragraph Panels button and set the Font Size to around 230 px, Vertically/Horizontally Scale, etc., as shown in the preview.

False Positive Font

You can of course use any font type you want or even combine text and vector shapes. In this last case you will have to convert the layers into a smart object.

Step 2

Add a Stroke layer style to the Embroidered Text layer. I am doing that to make the text a little thinner. Right click on the layer and Convert to Smart Object.

Add Stroke

Step 3

Again, add this layer style to the Embroidered Text smart object: Drop Shadow (color #000000), Inner Shadow (color #000000), Bevel and Emboss (colors #ffffff and #000000Bevel and Emboss – Texture (Pattern „pixel-pattern-diagonal”), Color Overlay (color #686565)

Drop Shadow
Inner Shadow
Bevel and Emboss
Bevel and Emboss Texture
Color Overlay

Step 4

Convert the layer into a smart object one more time to be able to add another layer style without rasterizing the effects. Press Control-T to transform the smart object and scale it to 130% on both the horizontal and vertical scales.

Convert to Smart Object

Step 5

Duplicate the Embroidered Text smart object and call it Shadow. Move this layer below the Embroidered Text smart object. 

Step 6

Now we’ll add layer styles for each of these two layers. Let’s start with the Embroidered Text smart object. Add an Inner Shadow (color #000000), Bevel and Emboss (colors #ffffff and #000000), Color Overlay (color #ffc000) and Gradient Overlay (colors #ffffff and #ffffff). You can choose any Color Overlay you like, but just make sure to also adjust the Gradient Overlay opacity if you want a darker or lighter color tone.

Inner Shadow
Bevel and Emboss
Color Overlay
Gradient Overlay

Step 7

To make the effect more realistic, let’s add a Filter > Distort > Ripple and a Filter > Distort > Noise effect. These two effects are added as Smart Filters so you can edit them at any time by double clicking on the Filter name

Filter Distort Ripple and Noise

Step 8

Go to the Shadow Layer and set the Fill to 0%. Next, add a Bevel and Emboss (colors #ffffff and #000000) layer style. The embroidered text should now look like this.

Embroidered Text

Step 9

Create a new layer just below the Shadow layer and name it Stitched Border. Keep the Control key pressed and click on the Embroidered Text layer thumbnail to make a selection. Go to Select > Modify > Expand and expand by 5 pixels. 

Expand Selection

Step 10

Go to the Paths tab and choose Make Work Path.

Make Work Path

Step 11

Select the Brush Tool, color #ffffff, and pick the „stitch1” brush. Again from the Paths tab, choose Stroke Path. Press Delete to remove the work path. 

Stroke Path

Step 12

Add a Drop Shadow (color #000000) layer style to the Stitched Border layer. Convert this layer to a smart object. 

Drop Shadow

Step 13

Finally, let’s add a layer style to the Stitched Border smart object: Drop Shadow (color #161616), Inner Shadow (color #161616), Bevel and Emboss (color #ffffff and #161616), Color Overlay (color #f5f5f5—you can choose any color you want for the stitch)

Drop Shadow
Inner Shadow
Bevel and Emboss
Color Overlay

Congratulations! You’re Done!

In this tutorial you learned how to create an embroidered text effect in Adobe Photoshop. I hope you’ve enjoyed this tutorial. 

The Embroidered text effect is a part of Embroidery and Stitching Photoshop Creation Kit from my portfolio on Envato Market.

Embroidered Text in Photoshop embroidery effect Photoshop action

How to Create a Realistic Embroidery Text Effect in Adobe Photoshop

Post pobrano z: How to Create a Realistic Embroidery Text Effect in Adobe Photoshop

Final product image
What You’ll Be Creating

In this tutorial, I will show you how to create a realistic embroidery text effect in Photoshop using stitch brushes and layer styles. The end result will be a font that looks like embroidery! 

This is part of my embroidery effect Photoshop action, which is part of the Embroidery and Stitching Photoshop Creation Kit from my portfolio on Envato Market

Embroidery and Stitching Photoshop Actions embroidery effect photoshop
Embroidery and Stitching Photoshop Actions

Tutorial Assets

The following assets were used during the production of this tutorial:

1. Create the Jeans Background

Step 1

Create a new 1100 x 600 px document, and create a new layer called Jeans Background. Copy and Paste the Jeans Texture on this layer. Make sure you use the large texture (2000 x 1500 px). 

Create Jeans Background

Step 2

Create a new layer called Textured and Fill it with white. Make sure you have the Foreground Color set to white and the Background Color set to black. Go to Filter > Render > Clouds.

Add Clouds Filter

Step 3

Go to Filter > Brush Strokes > Crosshatch. Set the Stroke Length to 15, Sharpness to 16, and Strength to 2. You can, of course, change the settings to your liking. 

Add Crosshatch Filter

Step 4

Set the blend mode of the Textured layer to Soft Light and around 50% Opacity. If you want, you can change the color of the jeans; add a Color Overlay style to the Textured layer with blend mode Color and simply pick a color that you like. 

Change Jeans Color

2. Create the Stitch Brushes

Step 1

In order to finish the jeans background and to start creating the stitched embroidery effect, we need some stitch brushes that we are going to make from scratch.

Create a new PSD file, size 27 x 5 px. Fill the canvas with color black. Go to Edit > Define Brush Preset. Set the brush name to „stitch” and click OK

Define Brush Preset

You can now close the new PSD file without saving and return to the initial PSD file (the one with the jeans background). 

Step 2

Now we are going to modify the brush that we just made, to create a custom brush. Choose the Brush Tool and select the „stitch” brush from the Brush Preset Picker. Toggle the Brush Panel and make the following settings: Angle 90, Roundness 50%, Spacing 87%, and set the Angle Jitter to Direction.

Create Custom Brush

Step 3

Click on the top right corner of the Brush Panel and choose New Brush Preset. Name the new brush „stitch1”

Create Stitch Brush

Step 4

Now we’ll create the second brush. Again choose the Brush Tool and select the „stitch” brush from the Brush Preset Picker. Toggle the Brush Panel and make the following settings: Spacing 750% and set the Angle Jitter to Direction.

Create Dashed Brush

Step 5

Click on the top right corner of the Brush Panel and choose New Brush Preset. Name the new brush „stitch2”

Create Dashed Line Brush

3. Add Sewing Details

Step 1

Use the Rectangle Tool and draw a shape as shown in the preview image. Make sure it exceeds the canvas on the top and left/right edges. Name this layer Jeans Border.

Draw Rectangle

Step 2

Go to Filter > Distort > Wave and set the Wavelength, Amplitude and Scale to create a wavy border. Also go to Filter > Blur > Gaussian Blur and set the Radius to 0.7 pixels.

Filter Distort Wave

Step 3

Add this layer style to the Jeans Border layer: Drop Shadow (color #131e26), Inner Shadow (color #131e26), Inner Glow (color #ffffff), Bevel and Emboss (colors: #ffffff and #131e26).

Drop Shadow
Inner Shadow
Inner Glow
Bevel and Emboss

Step 4

Create a new layer and call it Stitch. Pick the Brush Tool and choose the „stitch2” brush. Set the size to around 13 px and the color to #ffffff. Keep the Shift key pressed to draw a straight line. Add another line on the bottom of the jeans background in the same way.

Add Stitch

Step 5

Add this layer style to the Stitch layer: Drop Shadow, Inner Glow, Bevel and Emboss, Stroke.

Drop Shadow
Inner Glow
Bevel and Emboss
Stroke

Step 6

Go to Filter > Distort > Ripple and set the Amount 30% and Size Small. Your result should now look like this.

Filter Distort Ripple

Step 7

Create a new layer and call it Ripple Edge. Take the Brush Tool and pick the Soft Round Brush which is a default Adobe Photoshop brush that you should have in your list. Toggle the Brush panel to customize the brush and make these settings: Size 50 px, Angle 90, Roundness 45%, Spacing 150%

Create Custom Brush

Step 8

Draw two lines using this custom brush and color white. Set the blend mode of the Ripple Edge layer to Overlay, 40% opacity level. Also add a Drop Shadow layer style (color #0f1114).

Add Line Border

4. How to Create an Embroidery Effect in Photoshop

Step 1

Create a new text layer and call it Embroidered Text. Type your text using the False Positive font. Click on the Toggle the Character and Paragraph Panels button and set the Font Size to around 230 px, Vertically/Horizontally Scale, etc., as shown in the preview.

False Positive Font

You can of course use any font type you want or even combine text and vector shapes. In this last case you will have to convert the layers into a smart object.

Step 2

Add a Stroke layer style to the Embroidered Text layer. I am doing that to make the text a little thinner. Right click on the layer and Convert to Smart Object.

Add Stroke

Step 3

Again, add this layer style to the Embroidered Text smart object: Drop Shadow (color #000000), Inner Shadow (color #000000), Bevel and Emboss (colors #ffffff and #000000Bevel and Emboss – Texture (Pattern „pixel-pattern-diagonal”), Color Overlay (color #686565)

Drop Shadow
Inner Shadow
Bevel and Emboss
Bevel and Emboss Texture
Color Overlay

Step 4

Convert the layer into a smart object one more time to be able to add another layer style without rasterizing the effects. Press Control-T to transform the smart object and scale it to 130% on both the horizontal and vertical scales.

Convert to Smart Object

Step 5

Duplicate the Embroidered Text smart object and call it Shadow. Move this layer below the Embroidered Text smart object. 

Step 6

Now we’ll add layer styles for each of these two layers. Let’s start with the Embroidered Text smart object. Add an Inner Shadow (color #000000), Bevel and Emboss (colors #ffffff and #000000), Color Overlay (color #ffc000) and Gradient Overlay (colors #ffffff and #ffffff). You can choose any Color Overlay you like, but just make sure to also adjust the Gradient Overlay opacity if you want a darker or lighter color tone.

Inner Shadow
Bevel and Emboss
Color Overlay
Gradient Overlay

Step 7

To make the effect more realistic, let’s add a Filter > Distort > Ripple and a Filter > Distort > Noise effect. These two effects are added as Smart Filters so you can edit them at any time by double clicking on the Filter name

Filter Distort Ripple and Noise

Step 8

Go to the Shadow Layer and set the Fill to 0%. Next, add a Bevel and Emboss (colors #ffffff and #000000) layer style. The embroidered text should now look like this.

Embroidered Text

Step 9

Create a new layer just below the Shadow layer and name it Stitched Border. Keep the Control key pressed and click on the Embroidered Text layer thumbnail to make a selection. Go to Select > Modify > Expand and expand by 5 pixels. 

Expand Selection

Step 10

Go to the Paths tab and choose Make Work Path.

Make Work Path

Step 11

Select the Brush Tool, color #ffffff, and pick the „stitch1” brush. Again from the Paths tab, choose Stroke Path. Press Delete to remove the work path. 

Stroke Path

Step 12

Add a Drop Shadow (color #000000) layer style to the Stitched Border layer. Convert this layer to a smart object. 

Drop Shadow

Step 13

Finally, let’s add a layer style to the Stitched Border smart object: Drop Shadow (color #161616), Inner Shadow (color #161616), Bevel and Emboss (color #ffffff and #161616), Color Overlay (color #f5f5f5—you can choose any color you want for the stitch)

Drop Shadow
Inner Shadow
Bevel and Emboss
Color Overlay

Congratulations! You’re Done!

In this tutorial you learned how to create an embroidered text effect in Adobe Photoshop. I hope you’ve enjoyed this tutorial. 

The Embroidered text effect is a part of Embroidery and Stitching Photoshop Creation Kit from my portfolio on Envato Market.

Embroidered Text in Photoshop embroidery effect Photoshop action

How to Create a Realistic Embroidery Text Effect in Adobe Photoshop

Post pobrano z: How to Create a Realistic Embroidery Text Effect in Adobe Photoshop

Final product image
What You’ll Be Creating

In this tutorial, I will show you how to create a realistic embroidery text effect in Photoshop using stitch brushes and layer styles. The end result will be a font that looks like embroidery! 

This is part of my embroidery effect Photoshop action, which is part of the Embroidery and Stitching Photoshop Creation Kit from my portfolio on Envato Market

Embroidery and Stitching Photoshop Actions embroidery effect photoshop
Embroidery and Stitching Photoshop Actions

Tutorial Assets

The following assets were used during the production of this tutorial:

1. Create the Jeans Background

Step 1

Create a new 1100 x 600 px document, and create a new layer called Jeans Background. Copy and Paste the Jeans Texture on this layer. Make sure you use the large texture (2000 x 1500 px). 

Create Jeans Background

Step 2

Create a new layer called Textured and Fill it with white. Make sure you have the Foreground Color set to white and the Background Color set to black. Go to Filter > Render > Clouds.

Add Clouds Filter

Step 3

Go to Filter > Brush Strokes > Crosshatch. Set the Stroke Length to 15, Sharpness to 16, and Strength to 2. You can, of course, change the settings to your liking. 

Add Crosshatch Filter

Step 4

Set the blend mode of the Textured layer to Soft Light and around 50% Opacity. If you want, you can change the color of the jeans; add a Color Overlay style to the Textured layer with blend mode Color and simply pick a color that you like. 

Change Jeans Color

2. Create the Stitch Brushes

Step 1

In order to finish the jeans background and to start creating the stitched embroidery effect, we need some stitch brushes that we are going to make from scratch.

Create a new PSD file, size 27 x 5 px. Fill the canvas with color black. Go to Edit > Define Brush Preset. Set the brush name to „stitch” and click OK

Define Brush Preset

You can now close the new PSD file without saving and return to the initial PSD file (the one with the jeans background). 

Step 2

Now we are going to modify the brush that we just made, to create a custom brush. Choose the Brush Tool and select the „stitch” brush from the Brush Preset Picker. Toggle the Brush Panel and make the following settings: Angle 90, Roundness 50%, Spacing 87%, and set the Angle Jitter to Direction.

Create Custom Brush

Step 3

Click on the top right corner of the Brush Panel and choose New Brush Preset. Name the new brush „stitch1”

Create Stitch Brush

Step 4

Now we’ll create the second brush. Again choose the Brush Tool and select the „stitch” brush from the Brush Preset Picker. Toggle the Brush Panel and make the following settings: Spacing 750% and set the Angle Jitter to Direction.

Create Dashed Brush

Step 5

Click on the top right corner of the Brush Panel and choose New Brush Preset. Name the new brush „stitch2”

Create Dashed Line Brush

3. Add Sewing Details

Step 1

Use the Rectangle Tool and draw a shape as shown in the preview image. Make sure it exceeds the canvas on the top and left/right edges. Name this layer Jeans Border.

Draw Rectangle

Step 2

Go to Filter > Distort > Wave and set the Wavelength, Amplitude and Scale to create a wavy border. Also go to Filter > Blur > Gaussian Blur and set the Radius to 0.7 pixels.

Filter Distort Wave

Step 3

Add this layer style to the Jeans Border layer: Drop Shadow (color #131e26), Inner Shadow (color #131e26), Inner Glow (color #ffffff), Bevel and Emboss (colors: #ffffff and #131e26).

Drop Shadow
Inner Shadow
Inner Glow
Bevel and Emboss

Step 4

Create a new layer and call it Stitch. Pick the Brush Tool and choose the „stitch2” brush. Set the size to around 13 px and the color to #ffffff. Keep the Shift key pressed to draw a straight line. Add another line on the bottom of the jeans background in the same way.

Add Stitch

Step 5

Add this layer style to the Stitch layer: Drop Shadow, Inner Glow, Bevel and Emboss, Stroke.

Drop Shadow
Inner Glow
Bevel and Emboss
Stroke

Step 6

Go to Filter > Distort > Ripple and set the Amount 30% and Size Small. Your result should now look like this.

Filter Distort Ripple

Step 7

Create a new layer and call it Ripple Edge. Take the Brush Tool and pick the Soft Round Brush which is a default Adobe Photoshop brush that you should have in your list. Toggle the Brush panel to customize the brush and make these settings: Size 50 px, Angle 90, Roundness 45%, Spacing 150%

Create Custom Brush

Step 8

Draw two lines using this custom brush and color white. Set the blend mode of the Ripple Edge layer to Overlay, 40% opacity level. Also add a Drop Shadow layer style (color #0f1114).

Add Line Border

4. How to Create an Embroidery Effect in Photoshop

Step 1

Create a new text layer and call it Embroidered Text. Type your text using the False Positive font. Click on the Toggle the Character and Paragraph Panels button and set the Font Size to around 230 px, Vertically/Horizontally Scale, etc., as shown in the preview.

False Positive Font

You can of course use any font type you want or even combine text and vector shapes. In this last case you will have to convert the layers into a smart object.

Step 2

Add a Stroke layer style to the Embroidered Text layer. I am doing that to make the text a little thinner. Right click on the layer and Convert to Smart Object.

Add Stroke

Step 3

Again, add this layer style to the Embroidered Text smart object: Drop Shadow (color #000000), Inner Shadow (color #000000), Bevel and Emboss (colors #ffffff and #000000Bevel and Emboss – Texture (Pattern „pixel-pattern-diagonal”), Color Overlay (color #686565)

Drop Shadow
Inner Shadow
Bevel and Emboss
Bevel and Emboss Texture
Color Overlay

Step 4

Convert the layer into a smart object one more time to be able to add another layer style without rasterizing the effects. Press Control-T to transform the smart object and scale it to 130% on both the horizontal and vertical scales.

Convert to Smart Object

Step 5

Duplicate the Embroidered Text smart object and call it Shadow. Move this layer below the Embroidered Text smart object. 

Step 6

Now we’ll add layer styles for each of these two layers. Let’s start with the Embroidered Text smart object. Add an Inner Shadow (color #000000), Bevel and Emboss (colors #ffffff and #000000), Color Overlay (color #ffc000) and Gradient Overlay (colors #ffffff and #ffffff). You can choose any Color Overlay you like, but just make sure to also adjust the Gradient Overlay opacity if you want a darker or lighter color tone.

Inner Shadow
Bevel and Emboss
Color Overlay
Gradient Overlay

Step 7

To make the effect more realistic, let’s add a Filter > Distort > Ripple and a Filter > Distort > Noise effect. These two effects are added as Smart Filters so you can edit them at any time by double clicking on the Filter name

Filter Distort Ripple and Noise

Step 8

Go to the Shadow Layer and set the Fill to 0%. Next, add a Bevel and Emboss (colors #ffffff and #000000) layer style. The embroidered text should now look like this.

Embroidered Text

Step 9

Create a new layer just below the Shadow layer and name it Stitched Border. Keep the Control key pressed and click on the Embroidered Text layer thumbnail to make a selection. Go to Select > Modify > Expand and expand by 5 pixels. 

Expand Selection

Step 10

Go to the Paths tab and choose Make Work Path.

Make Work Path

Step 11

Select the Brush Tool, color #ffffff, and pick the „stitch1” brush. Again from the Paths tab, choose Stroke Path. Press Delete to remove the work path. 

Stroke Path

Step 12

Add a Drop Shadow (color #000000) layer style to the Stitched Border layer. Convert this layer to a smart object. 

Drop Shadow

Step 13

Finally, let’s add a layer style to the Stitched Border smart object: Drop Shadow (color #161616), Inner Shadow (color #161616), Bevel and Emboss (color #ffffff and #161616), Color Overlay (color #f5f5f5—you can choose any color you want for the stitch)

Drop Shadow
Inner Shadow
Bevel and Emboss
Color Overlay

Congratulations! You’re Done!

In this tutorial you learned how to create an embroidered text effect in Adobe Photoshop. I hope you’ve enjoyed this tutorial. 

The Embroidered text effect is a part of Embroidery and Stitching Photoshop Creation Kit from my portfolio on Envato Market.

Embroidered Text in Photoshop embroidery effect Photoshop action

How to Create a Realistic Embroidery Text Effect in Adobe Photoshop

Post pobrano z: How to Create a Realistic Embroidery Text Effect in Adobe Photoshop

Final product image
What You’ll Be Creating

In this tutorial, I will show you how to create a realistic embroidery text effect in Photoshop using stitch brushes and layer styles. The end result will be a font that looks like embroidery! 

This is part of my embroidery effect Photoshop action, which is part of the Embroidery and Stitching Photoshop Creation Kit from my portfolio on Envato Market

Embroidery and Stitching Photoshop Actions embroidery effect photoshop
Embroidery and Stitching Photoshop Actions

Tutorial Assets

The following assets were used during the production of this tutorial:

1. Create the Jeans Background

Step 1

Create a new 1100 x 600 px document, and create a new layer called Jeans Background. Copy and Paste the Jeans Texture on this layer. Make sure you use the large texture (2000 x 1500 px). 

Create Jeans Background

Step 2

Create a new layer called Textured and Fill it with white. Make sure you have the Foreground Color set to white and the Background Color set to black. Go to Filter > Render > Clouds.

Add Clouds Filter

Step 3

Go to Filter > Brush Strokes > Crosshatch. Set the Stroke Length to 15, Sharpness to 16, and Strength to 2. You can, of course, change the settings to your liking. 

Add Crosshatch Filter

Step 4

Set the blend mode of the Textured layer to Soft Light and around 50% Opacity. If you want, you can change the color of the jeans; add a Color Overlay style to the Textured layer with blend mode Color and simply pick a color that you like. 

Change Jeans Color

2. Create the Stitch Brushes

Step 1

In order to finish the jeans background and to start creating the stitched embroidery effect, we need some stitch brushes that we are going to make from scratch.

Create a new PSD file, size 27 x 5 px. Fill the canvas with color black. Go to Edit > Define Brush Preset. Set the brush name to „stitch” and click OK

Define Brush Preset

You can now close the new PSD file without saving and return to the initial PSD file (the one with the jeans background). 

Step 2

Now we are going to modify the brush that we just made, to create a custom brush. Choose the Brush Tool and select the „stitch” brush from the Brush Preset Picker. Toggle the Brush Panel and make the following settings: Angle 90, Roundness 50%, Spacing 87%, and set the Angle Jitter to Direction.

Create Custom Brush

Step 3

Click on the top right corner of the Brush Panel and choose New Brush Preset. Name the new brush „stitch1”

Create Stitch Brush

Step 4

Now we’ll create the second brush. Again choose the Brush Tool and select the „stitch” brush from the Brush Preset Picker. Toggle the Brush Panel and make the following settings: Spacing 750% and set the Angle Jitter to Direction.

Create Dashed Brush

Step 5

Click on the top right corner of the Brush Panel and choose New Brush Preset. Name the new brush „stitch2”

Create Dashed Line Brush

3. Add Sewing Details

Step 1

Use the Rectangle Tool and draw a shape as shown in the preview image. Make sure it exceeds the canvas on the top and left/right edges. Name this layer Jeans Border.

Draw Rectangle

Step 2

Go to Filter > Distort > Wave and set the Wavelength, Amplitude and Scale to create a wavy border. Also go to Filter > Blur > Gaussian Blur and set the Radius to 0.7 pixels.

Filter Distort Wave

Step 3

Add this layer style to the Jeans Border layer: Drop Shadow (color #131e26), Inner Shadow (color #131e26), Inner Glow (color #ffffff), Bevel and Emboss (colors: #ffffff and #131e26).

Drop Shadow
Inner Shadow
Inner Glow
Bevel and Emboss

Step 4

Create a new layer and call it Stitch. Pick the Brush Tool and choose the „stitch2” brush. Set the size to around 13 px and the color to #ffffff. Keep the Shift key pressed to draw a straight line. Add another line on the bottom of the jeans background in the same way.

Add Stitch

Step 5

Add this layer style to the Stitch layer: Drop Shadow, Inner Glow, Bevel and Emboss, Stroke.

Drop Shadow
Inner Glow
Bevel and Emboss
Stroke

Step 6

Go to Filter > Distort > Ripple and set the Amount 30% and Size Small. Your result should now look like this.

Filter Distort Ripple

Step 7

Create a new layer and call it Ripple Edge. Take the Brush Tool and pick the Soft Round Brush which is a default Adobe Photoshop brush that you should have in your list. Toggle the Brush panel to customize the brush and make these settings: Size 50 px, Angle 90, Roundness 45%, Spacing 150%

Create Custom Brush

Step 8

Draw two lines using this custom brush and color white. Set the blend mode of the Ripple Edge layer to Overlay, 40% opacity level. Also add a Drop Shadow layer style (color #0f1114).

Add Line Border

4. How to Create an Embroidery Effect in Photoshop

Step 1

Create a new text layer and call it Embroidered Text. Type your text using the False Positive font. Click on the Toggle the Character and Paragraph Panels button and set the Font Size to around 230 px, Vertically/Horizontally Scale, etc., as shown in the preview.

False Positive Font

You can of course use any font type you want or even combine text and vector shapes. In this last case you will have to convert the layers into a smart object.

Step 2

Add a Stroke layer style to the Embroidered Text layer. I am doing that to make the text a little thinner. Right click on the layer and Convert to Smart Object.

Add Stroke

Step 3

Again, add this layer style to the Embroidered Text smart object: Drop Shadow (color #000000), Inner Shadow (color #000000), Bevel and Emboss (colors #ffffff and #000000Bevel and Emboss – Texture (Pattern „pixel-pattern-diagonal”), Color Overlay (color #686565)

Drop Shadow
Inner Shadow
Bevel and Emboss
Bevel and Emboss Texture
Color Overlay

Step 4

Convert the layer into a smart object one more time to be able to add another layer style without rasterizing the effects. Press Control-T to transform the smart object and scale it to 130% on both the horizontal and vertical scales.

Convert to Smart Object

Step 5

Duplicate the Embroidered Text smart object and call it Shadow. Move this layer below the Embroidered Text smart object. 

Step 6

Now we’ll add layer styles for each of these two layers. Let’s start with the Embroidered Text smart object. Add an Inner Shadow (color #000000), Bevel and Emboss (colors #ffffff and #000000), Color Overlay (color #ffc000) and Gradient Overlay (colors #ffffff and #ffffff). You can choose any Color Overlay you like, but just make sure to also adjust the Gradient Overlay opacity if you want a darker or lighter color tone.

Inner Shadow
Bevel and Emboss
Color Overlay
Gradient Overlay

Step 7

To make the effect more realistic, let’s add a Filter > Distort > Ripple and a Filter > Distort > Noise effect. These two effects are added as Smart Filters so you can edit them at any time by double clicking on the Filter name

Filter Distort Ripple and Noise

Step 8

Go to the Shadow Layer and set the Fill to 0%. Next, add a Bevel and Emboss (colors #ffffff and #000000) layer style. The embroidered text should now look like this.

Embroidered Text

Step 9

Create a new layer just below the Shadow layer and name it Stitched Border. Keep the Control key pressed and click on the Embroidered Text layer thumbnail to make a selection. Go to Select > Modify > Expand and expand by 5 pixels. 

Expand Selection

Step 10

Go to the Paths tab and choose Make Work Path.

Make Work Path

Step 11

Select the Brush Tool, color #ffffff, and pick the „stitch1” brush. Again from the Paths tab, choose Stroke Path. Press Delete to remove the work path. 

Stroke Path

Step 12

Add a Drop Shadow (color #000000) layer style to the Stitched Border layer. Convert this layer to a smart object. 

Drop Shadow

Step 13

Finally, let’s add a layer style to the Stitched Border smart object: Drop Shadow (color #161616), Inner Shadow (color #161616), Bevel and Emboss (color #ffffff and #161616), Color Overlay (color #f5f5f5—you can choose any color you want for the stitch)

Drop Shadow
Inner Shadow
Bevel and Emboss
Color Overlay

Congratulations! You’re Done!

In this tutorial you learned how to create an embroidered text effect in Adobe Photoshop. I hope you’ve enjoyed this tutorial. 

The Embroidered text effect is a part of Embroidery and Stitching Photoshop Creation Kit from my portfolio on Envato Market.

Embroidered Text in Photoshop embroidery effect Photoshop action

The Open Source Alternatives to the Most Popular Design Software

Post pobrano z: The Open Source Alternatives to the Most Popular Design Software

Whether you are a professional graphic designer with formal education in the field or you are an advanced amateur, you are probably always on the lookout for the best tools.

The first recommendation you will surely receive is to go with the Adobe Suite. It comprises a series of very professional tools, so you couldn’t be wrong by choosing to work with it.

However, not everyone appreciates Adobe’s hegemony in the world of design software. Open Source advocates already proved with web publishing tools or server software that the free and open alternatives can be as good, if not better, than their paid counterparts. Also, many designers tend to find Adobe’s products too expensive. Making a living with these tools, I don’t think that the Adobe Creative Suite is too expensive, but if you design as a hobby, it surely is.

In this post, you will find some alternatives to Adobe’s most popular tools. It is not a comprehensive list, but it will give you some good alternatives to the most used design software.

Alternatives to Photoshop: Gimp or Krita

GIMP (aka GNU Image Manipulation Program) is the oldest free and open-source alternative to Photoshop, and it’s probably also the most well-known. It allows you to do pretty much everything Photoshop does, although there are some recent features that may not have been adopted.

The most common complaint about GIMP is its interface design, which is not as pleasant as Photoshop’s UI. This can be fixed by using a fork of GIMP: Gimpshop. This fork happened to build a version of GIMP that has a UI more similar to Photoshop in order to facilitate the transition. GIMP and its fork are available for all operating systems.

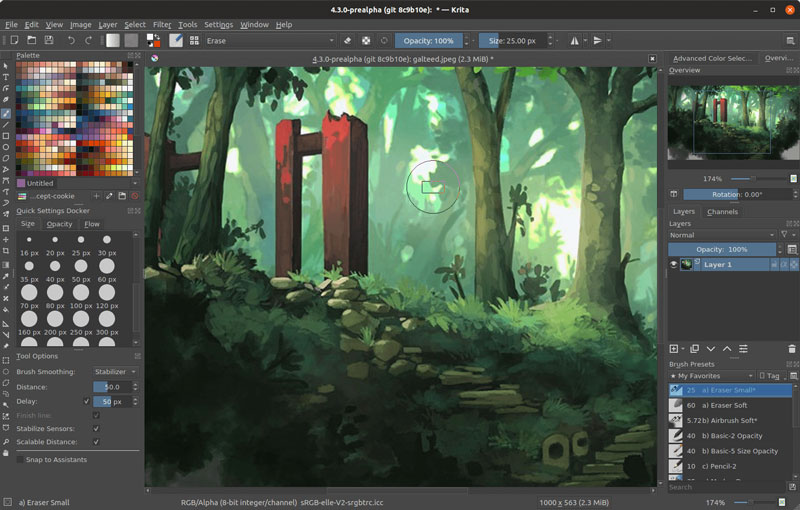
Krita is lesser-known, but it’s my favorite alternative to Photoshop. It may not have as many features as GIMP has, but it does one thing very well: digital art. Krita was built to be the go-to digital artists’ software of choice.

It comes with tons of great features: a great UI, tons of brushes for digital art, vector art editing capabilities, and even tools to create 2D animations.

Alternative to Illustrator: Inkscape

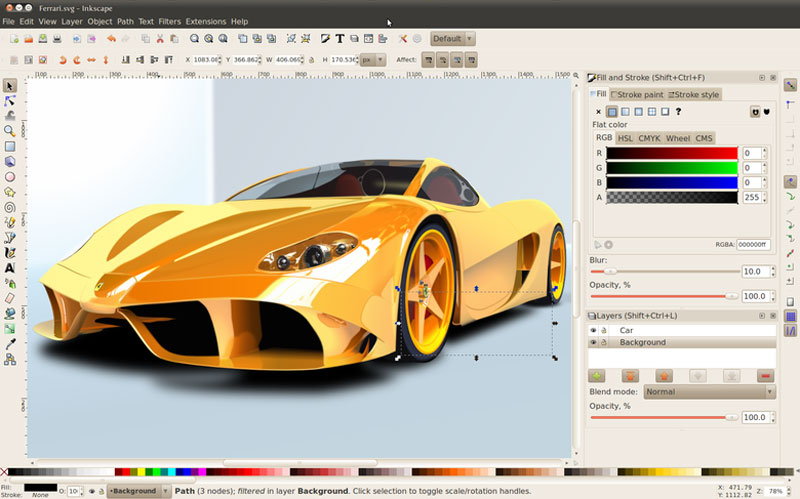
Inkscape is a very complete and professional alternative to Adobe Illustrator. It comes with flexible drawing tools, compatibility for most necessary file formats, great text, and Bezier curve tools, among other things.

If you are too used to working with Illustrator, there will be a learning curve to work with Inkscape, as there would for any other software. However, once the transition is made, you can safely work with Inkscape for any professional project as it’s a very powerful solution.

Alternative to InDesign: Scribus

For a long time, the hardest part of making the transition from Adobe’s Suite to open-source alternatives was the lack of decent alternatives to InDesign, Adobe’s powerful desktop publishing tool.

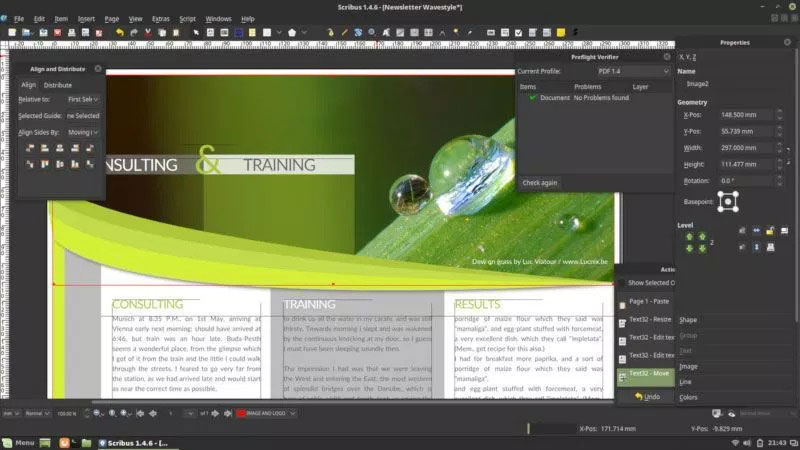
This is not longer the case, as Scribus has matured into a very professional tool that can be used to create anything that needs a layout.

The publishing features that you can now find in Scribus are: support for various color types management (CMYK, spot colors, ICC), PDF creation, vector drawing tools, powerful import/export filters, and an XML-based format that makes it much easier to recover damaged documents.

Alternative to Premiere: OpenShot

For designers who also like to work with moving things, video editing software is a must-have. If you are doing design professionally, it is also an area where finding work is getting easier, thanks to the fast growth of Youtube and online video in general.

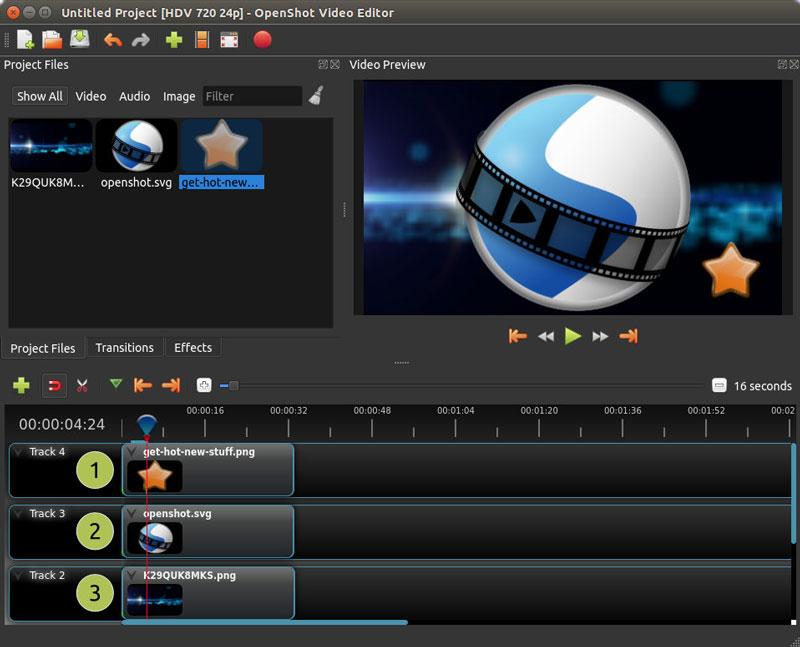
Although there are other alternatives that you could choose from, OpenShot is a safe bet if you are looking to make a quick transition. The user interface is extremely easy to get used to, especially if you have ever worked with video editing software.

Openshot is also filled with features that even go beyond simple video editing. It allows you to animate objects, use video effects, add as many layers as you need, edit text and titles, render 3D animations, or add some time effects.

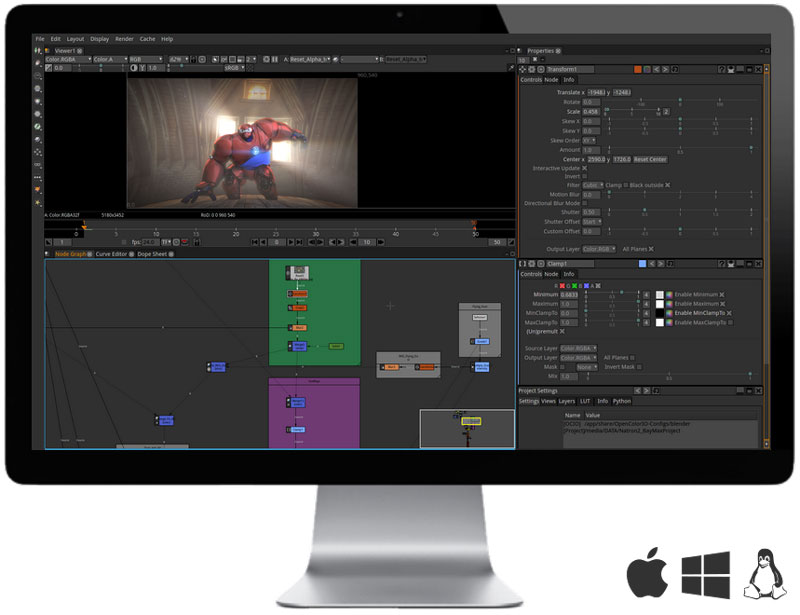
Alternative to After Effects: Natron

Another tool that people into video editing use regularly is After Effects. Known for freezing computer due to high GPU usage, this software makes anything possible in your video, thanks to amazing video effect tools.

Natron is the only alternative to After Effects that I could find. It’s a powerful Digital Compositor for 2D and a little more (they call it 2.5D). You can create plenty of visual effects in your videos, tack and key elements, do rotoscoping, and more.

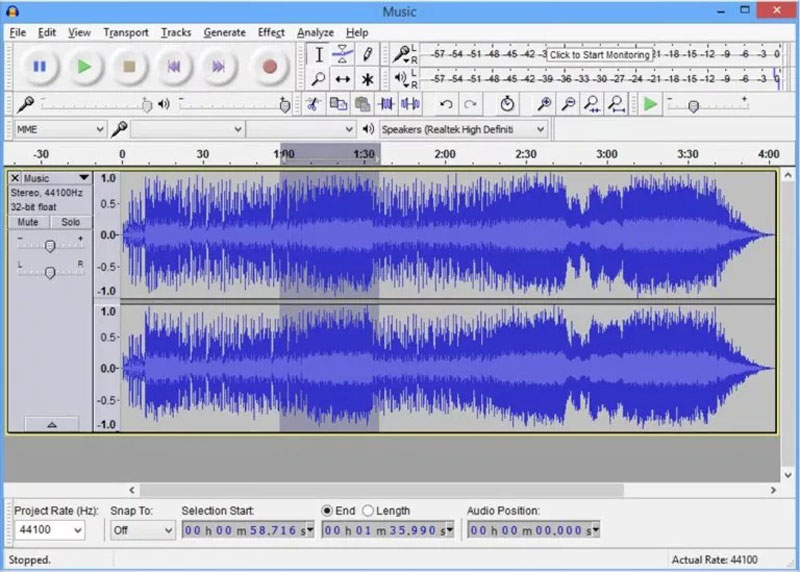
Alternative to Audition: Audacity

If you are creating videos, they would be very boring without sound. With Adobe’s Creative Suite, you would have used Audition to work on sound cutting and effects. There is a well-established open-source alternative: Audacity.

Audacity has been around for a long time now and its community of users has proved that it can be used professionally. It is a multi-track audio editor and recorder that allows you to fine-tune the sounds you want to publish.

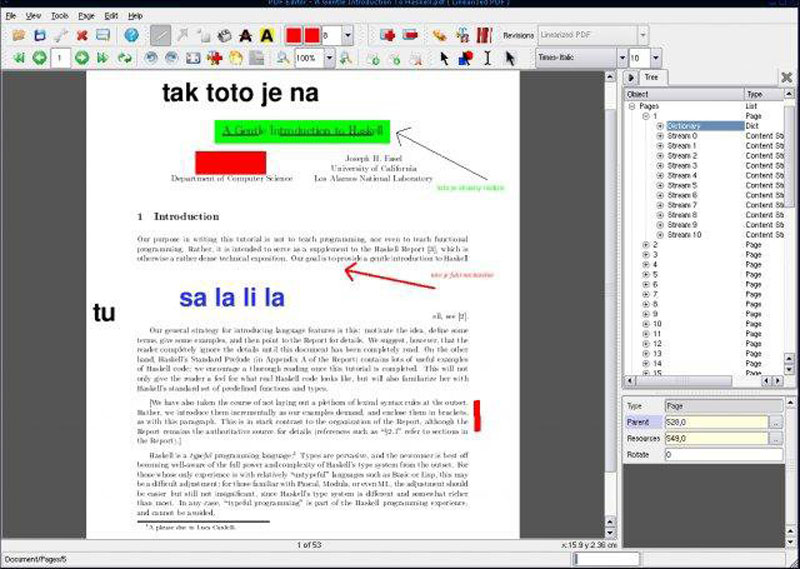
Alternative to Adobe Acrobat: PDFedit

Adobe Acrobat may be less used by designers in their day-to-day work, but it comes very handily when you need to edit some text in a PDF or extract some images.

There is a free alternative to Acrobat Pro, it’s named PDFedit and it allows you to edit anything in a PDF and even change some raw PDF objects. If you are geeky enough, you can even extend its features using ECMAScript.

Thanks for being a subscriber, here is your FREE house vector icons set.

The Open Source Alternatives to the Most Popular Design Software

Post pobrano z: The Open Source Alternatives to the Most Popular Design Software

Whether you are a professional graphic designer with formal education in the field or you are an advanced amateur, you are probably always on the lookout for the best tools.

The first recommendation you will surely receive is to go with the Adobe Suite. It comprises a series of very professional tools, so you couldn’t be wrong by choosing to work with it.

However, not everyone appreciates Adobe’s hegemony in the world of design software. Open Source advocates already proved with web publishing tools or server software that the free and open alternatives can be as good, if not better, than their paid counterparts. Also, many designers tend to find Adobe’s products too expensive. Making a living with these tools, I don’t think that the Adobe Creative Suite is too expensive, but if you design as a hobby, it surely is.

In this post, you will find some alternatives to Adobe’s most popular tools. It is not a comprehensive list, but it will give you some good alternatives to the most used design software.

Alternatives to Photoshop: Gimp or Krita

GIMP (aka GNU Image Manipulation Program) is the oldest free and open-source alternative to Photoshop, and it’s probably also the most well-known. It allows you to do pretty much everything Photoshop does, although there are some recent features that may not have been adopted.

The most common complaint about GIMP is its interface design, which is not as pleasant as Photoshop’s UI. This can be fixed by using a fork of GIMP: Gimpshop. This fork happened to build a version of GIMP that has a UI more similar to Photoshop in order to facilitate the transition. GIMP and its fork are available for all operating systems.

Krita is lesser-known, but it’s my favorite alternative to Photoshop. It may not have as many features as GIMP has, but it does one thing very well: digital art. Krita was built to be the go-to digital artists’ software of choice.

It comes with tons of great features: a great UI, tons of brushes for digital art, vector art editing capabilities, and even tools to create 2D animations.

Alternative to Illustrator: Inkscape

Inkscape is a very complete and professional alternative to Adobe Illustrator. It comes with flexible drawing tools, compatibility for most necessary file formats, great text, and Bezier curve tools, among other things.

If you are too used to working with Illustrator, there will be a learning curve to work with Inkscape, as there would for any other software. However, once the transition is made, you can safely work with Inkscape for any professional project as it’s a very powerful solution.

Alternative to InDesign: Scribus

For a long time, the hardest part of making the transition from Adobe’s Suite to open-source alternatives was the lack of decent alternatives to InDesign, Adobe’s powerful desktop publishing tool.

This is not longer the case, as Scribus has matured into a very professional tool that can be used to create anything that needs a layout.

The publishing features that you can now find in Scribus are: support for various color types management (CMYK, spot colors, ICC), PDF creation, vector drawing tools, powerful import/export filters, and an XML-based format that makes it much easier to recover damaged documents.

Alternative to Premiere: OpenShot

For designers who also like to work with moving things, video editing software is a must-have. If you are doing design professionally, it is also an area where finding work is getting easier, thanks to the fast growth of Youtube and online video in general.

Although there are other alternatives that you could choose from, OpenShot is a safe bet if you are looking to make a quick transition. The user interface is extremely easy to get used to, especially if you have ever worked with video editing software.

Openshot is also filled with features that even go beyond simple video editing. It allows you to animate objects, use video effects, add as many layers as you need, edit text and titles, render 3D animations, or add some time effects.

Alternative to After Effects: Natron

Another tool that people into video editing use regularly is After Effects. Known for freezing computer due to high GPU usage, this software makes anything possible in your video, thanks to amazing video effect tools.

Natron is the only alternative to After Effects that I could find. It’s a powerful Digital Compositor for 2D and a little more (they call it 2.5D). You can create plenty of visual effects in your videos, tack and key elements, do rotoscoping, and more.

Alternative to Audition: Audacity

If you are creating videos, they would be very boring without sound. With Adobe’s Creative Suite, you would have used Audition to work on sound cutting and effects. There is a well-established open-source alternative: Audacity.

Audacity has been around for a long time now and its community of users has proved that it can be used professionally. It is a multi-track audio editor and recorder that allows you to fine-tune the sounds you want to publish.

Alternative to Adobe Acrobat: PDFedit

Adobe Acrobat may be less used by designers in their day-to-day work, but it comes very handily when you need to edit some text in a PDF or extract some images.

There is a free alternative to Acrobat Pro, it’s named PDFedit and it allows you to edit anything in a PDF and even change some raw PDF objects. If you are geeky enough, you can even extend its features using ECMAScript.

Thanks for being a subscriber, here is your FREE house vector icons set.

The Open Source Alternatives to the Most Popular Design Software

Post pobrano z: The Open Source Alternatives to the Most Popular Design Software

Whether you are a professional graphic designer with formal education in the field or you are an advanced amateur, you are probably always on the lookout for the best tools.

The first recommendation you will surely receive is to go with the Adobe Suite. It comprises a series of very professional tools, so you couldn’t be wrong by choosing to work with it.

However, not everyone appreciates Adobe’s hegemony in the world of design software. Open Source advocates already proved with web publishing tools or server software that the free and open alternatives can be as good, if not better, than their paid counterparts. Also, many designers tend to find Adobe’s products too expensive. Making a living with these tools, I don’t think that the Adobe Creative Suite is too expensive, but if you design as a hobby, it surely is.

In this post, you will find some alternatives to Adobe’s most popular tools. It is not a comprehensive list, but it will give you some good alternatives to the most used design software.

Alternatives to Photoshop: Gimp or Krita

GIMP (aka GNU Image Manipulation Program) is the oldest free and open-source alternative to Photoshop, and it’s probably also the most well-known. It allows you to do pretty much everything Photoshop does, although there are some recent features that may not have been adopted.

The most common complaint about GIMP is its interface design, which is not as pleasant as Photoshop’s UI. This can be fixed by using a fork of GIMP: Gimpshop. This fork happened to build a version of GIMP that has a UI more similar to Photoshop in order to facilitate the transition. GIMP and its fork are available for all operating systems.

Krita is lesser-known, but it’s my favorite alternative to Photoshop. It may not have as many features as GIMP has, but it does one thing very well: digital art. Krita was built to be the go-to digital artists’ software of choice.

It comes with tons of great features: a great UI, tons of brushes for digital art, vector art editing capabilities, and even tools to create 2D animations.

Alternative to Illustrator: Inkscape

Inkscape is a very complete and professional alternative to Adobe Illustrator. It comes with flexible drawing tools, compatibility for most necessary file formats, great text, and Bezier curve tools, among other things.

If you are too used to working with Illustrator, there will be a learning curve to work with Inkscape, as there would for any other software. However, once the transition is made, you can safely work with Inkscape for any professional project as it’s a very powerful solution.

Alternative to InDesign: Scribus

For a long time, the hardest part of making the transition from Adobe’s Suite to open-source alternatives was the lack of decent alternatives to InDesign, Adobe’s powerful desktop publishing tool.

This is not longer the case, as Scribus has matured into a very professional tool that can be used to create anything that needs a layout.

The publishing features that you can now find in Scribus are: support for various color types management (CMYK, spot colors, ICC), PDF creation, vector drawing tools, powerful import/export filters, and an XML-based format that makes it much easier to recover damaged documents.

Alternative to Premiere: OpenShot

For designers who also like to work with moving things, video editing software is a must-have. If you are doing design professionally, it is also an area where finding work is getting easier, thanks to the fast growth of Youtube and online video in general.

Although there are other alternatives that you could choose from, OpenShot is a safe bet if you are looking to make a quick transition. The user interface is extremely easy to get used to, especially if you have ever worked with video editing software.

Openshot is also filled with features that even go beyond simple video editing. It allows you to animate objects, use video effects, add as many layers as you need, edit text and titles, render 3D animations, or add some time effects.

Alternative to After Effects: Natron

Another tool that people into video editing use regularly is After Effects. Known for freezing computer due to high GPU usage, this software makes anything possible in your video, thanks to amazing video effect tools.

Natron is the only alternative to After Effects that I could find. It’s a powerful Digital Compositor for 2D and a little more (they call it 2.5D). You can create plenty of visual effects in your videos, tack and key elements, do rotoscoping, and more.

Alternative to Audition: Audacity

If you are creating videos, they would be very boring without sound. With Adobe’s Creative Suite, you would have used Audition to work on sound cutting and effects. There is a well-established open-source alternative: Audacity.

Audacity has been around for a long time now and its community of users has proved that it can be used professionally. It is a multi-track audio editor and recorder that allows you to fine-tune the sounds you want to publish.

Alternative to Adobe Acrobat: PDFedit

Adobe Acrobat may be less used by designers in their day-to-day work, but it comes very handily when you need to edit some text in a PDF or extract some images.

There is a free alternative to Acrobat Pro, it’s named PDFedit and it allows you to edit anything in a PDF and even change some raw PDF objects. If you are geeky enough, you can even extend its features using ECMAScript.

Thanks for being a subscriber, here is your FREE house vector icons set.

The Open Source Alternatives to the Most Popular Design Software

Post pobrano z: The Open Source Alternatives to the Most Popular Design Software

Whether you are a professional graphic designer with formal education in the field or you are an advanced amateur, you are probably always on the lookout for the best tools.

The first recommendation you will surely receive is to go with the Adobe Suite. It comprises a series of very professional tools, so you couldn’t be wrong by choosing to work with it.

However, not everyone appreciates Adobe’s hegemony in the world of design software. Open Source advocates already proved with web publishing tools or server software that the free and open alternatives can be as good, if not better, than their paid counterparts. Also, many designers tend to find Adobe’s products too expensive. Making a living with these tools, I don’t think that the Adobe Creative Suite is too expensive, but if you design as a hobby, it surely is.

In this post, you will find some alternatives to Adobe’s most popular tools. It is not a comprehensive list, but it will give you some good alternatives to the most used design software.

Alternatives to Photoshop: Gimp or Krita

GIMP (aka GNU Image Manipulation Program) is the oldest free and open-source alternative to Photoshop, and it’s probably also the most well-known. It allows you to do pretty much everything Photoshop does, although there are some recent features that may not have been adopted.

The most common complaint about GIMP is its interface design, which is not as pleasant as Photoshop’s UI. This can be fixed by using a fork of GIMP: Gimpshop. This fork happened to build a version of GIMP that has a UI more similar to Photoshop in order to facilitate the transition. GIMP and its fork are available for all operating systems.

Krita is lesser-known, but it’s my favorite alternative to Photoshop. It may not have as many features as GIMP has, but it does one thing very well: digital art. Krita was built to be the go-to digital artists’ software of choice.

It comes with tons of great features: a great UI, tons of brushes for digital art, vector art editing capabilities, and even tools to create 2D animations.

Alternative to Illustrator: Inkscape

Inkscape is a very complete and professional alternative to Adobe Illustrator. It comes with flexible drawing tools, compatibility for most necessary file formats, great text, and Bezier curve tools, among other things.

If you are too used to working with Illustrator, there will be a learning curve to work with Inkscape, as there would for any other software. However, once the transition is made, you can safely work with Inkscape for any professional project as it’s a very powerful solution.

Alternative to InDesign: Scribus

For a long time, the hardest part of making the transition from Adobe’s Suite to open-source alternatives was the lack of decent alternatives to InDesign, Adobe’s powerful desktop publishing tool.

This is not longer the case, as Scribus has matured into a very professional tool that can be used to create anything that needs a layout.

The publishing features that you can now find in Scribus are: support for various color types management (CMYK, spot colors, ICC), PDF creation, vector drawing tools, powerful import/export filters, and an XML-based format that makes it much easier to recover damaged documents.

Alternative to Premiere: OpenShot

For designers who also like to work with moving things, video editing software is a must-have. If you are doing design professionally, it is also an area where finding work is getting easier, thanks to the fast growth of Youtube and online video in general.

Although there are other alternatives that you could choose from, OpenShot is a safe bet if you are looking to make a quick transition. The user interface is extremely easy to get used to, especially if you have ever worked with video editing software.

Openshot is also filled with features that even go beyond simple video editing. It allows you to animate objects, use video effects, add as many layers as you need, edit text and titles, render 3D animations, or add some time effects.

Alternative to After Effects: Natron

Another tool that people into video editing use regularly is After Effects. Known for freezing computer due to high GPU usage, this software makes anything possible in your video, thanks to amazing video effect tools.

Natron is the only alternative to After Effects that I could find. It’s a powerful Digital Compositor for 2D and a little more (they call it 2.5D). You can create plenty of visual effects in your videos, tack and key elements, do rotoscoping, and more.

Alternative to Audition: Audacity

If you are creating videos, they would be very boring without sound. With Adobe’s Creative Suite, you would have used Audition to work on sound cutting and effects. There is a well-established open-source alternative: Audacity.

Audacity has been around for a long time now and its community of users has proved that it can be used professionally. It is a multi-track audio editor and recorder that allows you to fine-tune the sounds you want to publish.

Alternative to Adobe Acrobat: PDFedit

Adobe Acrobat may be less used by designers in their day-to-day work, but it comes very handily when you need to edit some text in a PDF or extract some images.

There is a free alternative to Acrobat Pro, it’s named PDFedit and it allows you to edit anything in a PDF and even change some raw PDF objects. If you are geeky enough, you can even extend its features using ECMAScript.

Thanks for being a subscriber, here is your FREE house vector icons set.

The Best (GraphQL) API is One You Write

Post pobrano z: The Best (GraphQL) API is One You Write

Listen, I am no GraphQL expert but I do enjoy working with it. The way it exposes data to me as a front-end developer is pretty cool. It’s like a menu of available data and I can ask for whatever I want. That’s a massive improvement over REST and highly empowering for me as a front-end developer who desires to craft components with whatever data I think is best for a UI without having to make slew of calls for data or ask a back-end developer to help make me a new bespoke API for my new needs.

But… who builds that menu of data? Somebody does.

If that somebody is a person or team at your own company because you’ve built out your own GraphQL API for your own needs, that’s great. Now you’ve got control over what goes in there (and when and how).

But sometimes GraphQL APIs are just handed to you. Perhaps that is how your CMS delivers its data. Still cool and useful, but that control is at the mercy of the CMS. You still have a menu of options, but the menu just is what it is. No substitutes, to continue the metaphor. If the menu doesn’t have what you need, you can’t go back into the kitchen and add extra sauerkraut to that reuben or have the steak fries come with fried mushrooms.

This came up in a discussion with Simen Skogsrud and Knut Melvær on an episode of ShopTalk. Their product, Sanity, is like cloud storage for JSON data, and a CMS if you need it. A modern product like this, you’d think a GraphQL API would be a no-brainer, and indeed, they have a beta for it.

But instead of GraphQL being the main first-class citizen way of querying for and mutating data, they have their own special language: GROQ. At first glance, I’m like: eeeeeesh, there’s a way to shoot yourself in the foot. Invent some special language that people have to learn that’s unique to your product instead of the emerging industry standard.

But Simen and Knut made a good point about some of the limitations of GraphQL in the context of a third-party handing you an API: you get what you get. Say a GraphQL API offers a way to retrieve authors. A generic API for that is probably designed something like this:

{
  allAuthors {
    author {
      name
      username
      avatar
    }
  }
}

But what I actually want is just how many authors we have on the site. Perhaps I wish I could do this:

{
  allAuthors {
    count
  }
}

But that’s not in the API I was given. Well, too bad. I guess I’ll have to request all the authors and count them myself. I might not control the API.

This means that something like a CMS that offers a GraphQL endpoint needs to make a choice. They are either very strict and you just get-what-you-get. Or, they offer not only a GraphQL API but a way to control and augment what goes into that API.

In Santiy’s case, rather than offer the later, they offer GROQ, which is a query language that is powerful enough you can get whatever you want out of the (JSON) data. And rather than making it this proprietary Sanity-only thing, they’ve open sourced it.

With GROQ, I don’t need any permission or alterations to the API to ask how many authors there are. I’d do something like…

{ "totalAuthors": count(*[* in authors]) }

(I actually have no idea if the above code is accurate, and of course, it depends on the JSON it is querying, but it’s just conceptual anyway.)

By giving someone a query language that is capable of selecting any possible data in the data store, it has a big benefit:

  • You can query for literally anything
  • You don’t need a middle layer of configuration

But it comes at a cost:

  • Complexity of syntax
  • No middle layer means less opportunity for connecting multiple APIs, exposing only certain data based on permissions, etc.

The post The Best (GraphQL) API is One You Write appeared first on CSS-Tricks.

Volkswagen Official Services: Ecosystems

Post pobrano z: Volkswagen Official Services: Ecosystems
Print
Volkswagen

The campaign entails three executions that show with real data, the disaster that can occur when an animal is introduced to a foreign habitat. The ads reflect on the issues that can appear when customers opt to not get Volkwagens official services and how this decision can affect how your truck will work. COPYS: PERCH OF THE NILE. Native species of Ethiopia, introduced in Tanzania. Lates Niloticusesis a fish that has caused the extinction of more than 200 native species of Lake Victoria, with another 150 still in danger. Your truck is also an ecosystem. Don’t let anything endanger it. Volkswagen official services. BROWN TREESNAKE. Native species of Australia, introduced in the island of Guam, USA. The Boiga Irregularis caused the extinction of a large part of the native birds and represents a latent threat to the biodiversity of other islands. Your truck is also an ecosystem. Don’t let anything endanger it. Volkswagen official services. THE MONK PARAKEET. Native species of Argentina, introduced in Spain. The Myiopsitta Monachusis a pest that’s greatly reducing the sparrow’s population and represents a great threat to other species. Your truck is also an ecosystem. Don’t let anything endanger it. Volkswagen official services.

Advertising Agency:Geometry Global, Buenos Aires, Argentina