Wszystkie wpisy, których autorem jest admin

How to Create a Melting Portrait Photo Effect Manipulation in Photoshop

Post pobrano z: How to Create a Melting Portrait Photo Effect Manipulation in Photoshop

Final product image
What You’ll Be Creating

In this tutorial, I’ll show you how to create a portrait photo effect of a man melting. First, we’ll add a curtain background and retouch the model. After that, we’ll build a melting candle on top of the model’s head and some wax around his body. We’ll refine several details, paint the light effect, and use an adjustment layer to enhance the final effect.

Tutorial Assets

The following assets were used during the production of this tutorial:

1. How to Make the Base Background

Step 1

Create a new 2000 x 2000 px document in Photoshop with the following settings:

photo effect - new file

Step 2

Open the curtain background image and drag this image into the white canvas using the Move Tool (V). Place the upper half of the curtain onto the canvas and hide the floor.

photo effect - add curtain

Step 3

On the curtain layer, go to Filter > Blur > Gaussian Blur and set the Radius to 21 px. You can change these settings depending on the dimension of your document or when you feel it’s soft and blurry enough. This step is to separate the background from the main subject and make some depth for the whole scene.

photo effect - curtain gaussian blur

Step 4

Go to Layer > New Adjustment Layer > Curves and decrease the lightness until it’s almost invisible. On this layer mask, activate the Brush Tool (B) and select a soft round one with black color. Lower the brush’s Opacity to about 10-15% to paint on the middle of the background to reveal some light on the wrinkles of the curtain in a subtle way.

photo effect - curtain curves
photo effect - curtain curves masking

Step 5

Create a Hue/Saturation adjustment layer to desaturate the blue of the curtain. Reduce the Saturation to –90.

photo effect - curtain hue saturation

2. How to Retouch the Model

Step 1

Cut out the model from the background and place him in the lower half of the dark canvas. Click the second icon at the bottom of the Layers panel to add a mask to this layer. Use a soft black brush to remove the top part of the head.

photo effect - add model
photo effect - model masking

Step 2

Make a Hue/Saturation adjustment layer and change the Reds and Blues settings. This step is to adjust the tone of the model’s face and his shirt to match the background.

photo effect - model hue saturation 1 reds
photo effect - model hue saturation 1 blues

Step 3

Add a Color Balance adjustment layer and alter the Midtones and Highlights values. The aim is to give the model some golden light reflection as we’ll be adding the flame effect above his head in the next stages. On this layer mask, use a soft black brush to reduce the light effect on his skin and on the lower part of his shirt where it’s less affected by the light than the rest.

photo effect - model color balance highlights
photo effect - model color balance midtones
photo effect - model color balance masking

Step 4

Make a Curves adjustment layer and decrease the lightness. On the layer mask, paint on the front of the model to reveal the lightness there.

photo effect - model curves 1

Step 5

Use another Curves adjustment layer to increase the contrast of the model. Paint on the front of the mouth, chin and shoulders and any details you feel are too dark or contrasting.

photo effect - model curves 2

Step 6

Add another Hue/Saturation adjustment layer to reduce the golden light after increasing the contrast. Bring the Saturation values down to -32:

photo effect - model hue saturation 2

Step 7

Create a new layer and use a medium-soft brush with the color #0d0907 to paint more shadow below the model’s lips and nose. We’ve added more light and contrast, so the shadow should be more visible and a bit larger.

photo effect - model face shadow

3. How to Build the Candle

Step 1

Cut out the candle 1 image and use the Lasso Tool (L) to select the top of this candle. Drag this part onto the front of the model using the Move Tool.

photo effect - add candle 1

Add a mask to this layer and use a soft black brush to remove the bottom of the candle and the wick, and blend the top with his face. Lower the brush’s opacity when blending on the intersection between the face and the candle.

photo effect - candle 1 masking

Step 2

Use the Lasso Tool to select another part from the original candle image and add it to the face of the model. Add a mask to this layer and use a soft black brush to remove the hard edges and blend this part with the face.

photo effect - add  another part of candle 1
photo effect - candle part 1 masking

Step 3

Select a long, thin part from the side of the candle to add to the right of the model’s face (from the viewer). Add a mask to this layer and take a hard black brush to trim this part into several lines flowing from the top of the head. Lower the brush’s size to get a more natural result.

photo effect - add more part of candle 1
photo effect - candle part 2 masking

Step 4

Select all of the candle layers and hit Control-G to make a group for them. Change this group’s mode to Normal 100% and create a new layer within the group. Activate the Clone Tool (S) to reduce the light on the part above the nose.

photo effect - candle 1 cloning

Step 5

Make a Hue/Saturation adjustment layer and set it as a Clipping Mask. Adjust the
Saturation values to desaturate and change the color of the candle.

photo effect - candle 1 hue saturation

Step 6

Create a Curves adjustment layer to decrease the lightness. On this layer mask, paint on the middle area to reveal the lightness there, leaving the shadow visible on both sides and the space between the candle wax lines.

photo effect - candle 1 curves

Step 7

Move the candle 2 image into the main document and place the candle’s flame on top of the middle of the existing candle. Add a mask to this layer and use a medium-soft black brush to erase most of the candle, leaving the candle’s flame and its glow visible.

photo effect - add candle 2
photo effect - candle 2 masking

Step 8

Create a Hue/Saturation adjustment layer above this candle layer and set it as a Clipping Mask. Change the Hue values a bit to +8:

photo effect - candle 2 hue saturation

Step 9

Make a new layer below the candle 2 layer. Use a soft brush with the color #e2b588 to paint around the candle’s flame. Change this layer mode to Color Dodge 80% and use a layer mask to erase the light around the head.

photo effect - paint candle glow 1
photo effect - candle glow 1 result

Step 10

Create another layer and use a soft brush with the color #9b6837 to paint above the candle’s flame to make a light reflection there. Alter this layer mode to Hard Light 40%.

photo effect - paint background light reflection normal mode
photo effect - background light hard light mode

4. How to Add the Candle Wax

Step 1

Open the candle wax 1 image. Use the Polygonal Lasso Tool to select a part on the right to place on the left of the model’s face. Flip it horizontally (Edit > Transform > Flip Horizontal) and add a mask to this layer. Use a soft black brush to blend this part with the existing candle’s surface.

photo effect - add wax 1 part 1
photo effect - wax 1 part 1 masking

Step 2

Select other parts from the candle’s wax to add around the shoulders and the left ear. Use Control-T to rotate these parts to different angles and sizes. Add a mask to several wax layers to blend them with the existing candle and shirt and remove the hard shadow of the wax on the left shoulder.

photo effect - add more parts of wax 1
photo effect - wax 1 parts masking

Step 3

Create a group for these wax layers and make a Hue/Saturation adjustment layer to change the color of the wax.

photo effect - wax 1 hue saturation

Step 4

Add a Curves adjustment layer to bring more light to this wax. On this layer mask, paint on the shadow areas of any details you feel are too bright.

photo effect - wax 1 curves

Step 5

Open the candle wax 2 image. Use the Quick Selection Tool (W) to select different parts of wax to add to the head, face, and shirt. Add a mask to each of these layers, use a soft black brush to blend the top of the wax with the existing candle, and use a hard black brush to trim these pieces of wax in different lines flowing along the face.

photo effect - add wax 2
photo effect - wax 2 masking

Step 6

Make a group for these wax layers and make a Channel Mixer adjustment layer to alter the color of the wax.

photo effect - wax 2 channel mixer red
photo effect - wax 2 channel mixer blue

Step 7

Create a Hue/Saturation adjustment layer to desaturate the color of the wax lines a bit to make them match the rest of the candle.

photo effect - wax 2 hue saturation

Step 8

Make a Curves adjustment layer to increase the contrast of the wax. Paint on any details you feel are too dark or contrasting.

photo effect - wax 2 curves

Step 9

Create a new layer below the candle wax groups. Use a soft brush with the color #1c1b1b and Opacity about 30% to paint shadow below the wax on the shirt.

photo effect - waxes shadow

5. How to Make the Final Adjustments

Step 1

Make a new layer on top of the other layers and use a brush with the color #753c23 to paint on the lower lip, avoiding its highlight. Change this layer mode to Multiply 40% to reduce the light on this part.

photo effect - reduce lips highlights

Step 2

Create another layer and use a soft brush with the color #2a1503 to paint on the candle’s flame. Change this layer mode to Color Dodge 100%.

photo effect - candle glow 2

Step 3

Use another brush with the color #d5af5a to paint more glowing light on the bottom of the flame. Alter this layer mode to Hard Light 100%.

photo effect - candle glow 3

Step 4

Make a new layer and change the brush’s color to #0d0907. Use a medium-soft brush to paint the shadow of the head, including the top of the candle, on the shoulders and neck. Lower the Opacity of this layer to 80%.

photo effect - paint head shadow

Step 5

Create a new layer, change the mode to Overlay 100%, and fill with 50% gray.

photo effect - DB new layer

Activate the Dodge and Burn Tool (O) with Midtones Range and Exposure about 15-25% to refine the light and shadow of the details of the candle, face, shoulders, and face, especially the space between the wax lines. You can see how I did it with Normal mode and the result with Overlay mode.

photo effect - DB normal mode
photo effect - DB overlay mode

Step 6

Create a Color Balance adjustment layer to increase the light, color, contrast and vibrance of the whole scene.

photo effect - whole scene color balance midtones
photo effect - whole scene color balance shadows
photo effect - whole scene color balance highlights

Congratulations, You’re Done!

I hope that you’ve enjoyed the process of creating an interesting portrait photo effect and learned something new for
your own projects. Feel free to share your results or leave comments in
the box below. Enjoy Photoshopping!

Here are some more interesting portrait photo effects:

photo effect - final result

How to Create a Melting Portrait Photo Effect Manipulation in Photoshop

Post pobrano z: How to Create a Melting Portrait Photo Effect Manipulation in Photoshop

Final product image
What You’ll Be Creating

In this tutorial, I’ll show you how to create a portrait photo effect of a man melting. First, we’ll add a curtain background and retouch the model. After that, we’ll build a melting candle on top of the model’s head and some wax around his body. We’ll refine several details, paint the light effect, and use an adjustment layer to enhance the final effect.

Tutorial Assets

The following assets were used during the production of this tutorial:

1. How to Make the Base Background

Step 1

Create a new 2000 x 2000 px document in Photoshop with the following settings:

photo effect - new file

Step 2

Open the curtain background image and drag this image into the white canvas using the Move Tool (V). Place the upper half of the curtain onto the canvas and hide the floor.

photo effect - add curtain

Step 3

On the curtain layer, go to Filter > Blur > Gaussian Blur and set the Radius to 21 px. You can change these settings depending on the dimension of your document or when you feel it’s soft and blurry enough. This step is to separate the background from the main subject and make some depth for the whole scene.

photo effect - curtain gaussian blur

Step 4

Go to Layer > New Adjustment Layer > Curves and decrease the lightness until it’s almost invisible. On this layer mask, activate the Brush Tool (B) and select a soft round one with black color. Lower the brush’s Opacity to about 10-15% to paint on the middle of the background to reveal some light on the wrinkles of the curtain in a subtle way.

photo effect - curtain curves
photo effect - curtain curves masking

Step 5

Create a Hue/Saturation adjustment layer to desaturate the blue of the curtain. Reduce the Saturation to –90.

photo effect - curtain hue saturation

2. How to Retouch the Model

Step 1

Cut out the model from the background and place him in the lower half of the dark canvas. Click the second icon at the bottom of the Layers panel to add a mask to this layer. Use a soft black brush to remove the top part of the head.

photo effect - add model
photo effect - model masking

Step 2

Make a Hue/Saturation adjustment layer and change the Reds and Blues settings. This step is to adjust the tone of the model’s face and his shirt to match the background.

photo effect - model hue saturation 1 reds
photo effect - model hue saturation 1 blues

Step 3

Add a Color Balance adjustment layer and alter the Midtones and Highlights values. The aim is to give the model some golden light reflection as we’ll be adding the flame effect above his head in the next stages. On this layer mask, use a soft black brush to reduce the light effect on his skin and on the lower part of his shirt where it’s less affected by the light than the rest.

photo effect - model color balance highlights
photo effect - model color balance midtones
photo effect - model color balance masking

Step 4

Make a Curves adjustment layer and decrease the lightness. On the layer mask, paint on the front of the model to reveal the lightness there.

photo effect - model curves 1

Step 5

Use another Curves adjustment layer to increase the contrast of the model. Paint on the front of the mouth, chin and shoulders and any details you feel are too dark or contrasting.

photo effect - model curves 2

Step 6

Add another Hue/Saturation adjustment layer to reduce the golden light after increasing the contrast. Bring the Saturation values down to -32:

photo effect - model hue saturation 2

Step 7

Create a new layer and use a medium-soft brush with the color #0d0907 to paint more shadow below the model’s lips and nose. We’ve added more light and contrast, so the shadow should be more visible and a bit larger.

photo effect - model face shadow

3. How to Build the Candle

Step 1

Cut out the candle 1 image and use the Lasso Tool (L) to select the top of this candle. Drag this part onto the front of the model using the Move Tool.

photo effect - add candle 1

Add a mask to this layer and use a soft black brush to remove the bottom of the candle and the wick, and blend the top with his face. Lower the brush’s opacity when blending on the intersection between the face and the candle.

photo effect - candle 1 masking

Step 2

Use the Lasso Tool to select another part from the original candle image and add it to the face of the model. Add a mask to this layer and use a soft black brush to remove the hard edges and blend this part with the face.

photo effect - add  another part of candle 1
photo effect - candle part 1 masking

Step 3

Select a long, thin part from the side of the candle to add to the right of the model’s face (from the viewer). Add a mask to this layer and take a hard black brush to trim this part into several lines flowing from the top of the head. Lower the brush’s size to get a more natural result.

photo effect - add more part of candle 1
photo effect - candle part 2 masking

Step 4

Select all of the candle layers and hit Control-G to make a group for them. Change this group’s mode to Normal 100% and create a new layer within the group. Activate the Clone Tool (S) to reduce the light on the part above the nose.

photo effect - candle 1 cloning

Step 5

Make a Hue/Saturation adjustment layer and set it as a Clipping Mask. Adjust the
Saturation values to desaturate and change the color of the candle.

photo effect - candle 1 hue saturation

Step 6

Create a Curves adjustment layer to decrease the lightness. On this layer mask, paint on the middle area to reveal the lightness there, leaving the shadow visible on both sides and the space between the candle wax lines.

photo effect - candle 1 curves

Step 7

Move the candle 2 image into the main document and place the candle’s flame on top of the middle of the existing candle. Add a mask to this layer and use a medium-soft black brush to erase most of the candle, leaving the candle’s flame and its glow visible.

photo effect - add candle 2
photo effect - candle 2 masking

Step 8

Create a Hue/Saturation adjustment layer above this candle layer and set it as a Clipping Mask. Change the Hue values a bit to +8:

photo effect - candle 2 hue saturation

Step 9

Make a new layer below the candle 2 layer. Use a soft brush with the color #e2b588 to paint around the candle’s flame. Change this layer mode to Color Dodge 80% and use a layer mask to erase the light around the head.

photo effect - paint candle glow 1
photo effect - candle glow 1 result

Step 10

Create another layer and use a soft brush with the color #9b6837 to paint above the candle’s flame to make a light reflection there. Alter this layer mode to Hard Light 40%.

photo effect - paint background light reflection normal mode
photo effect - background light hard light mode

4. How to Add the Candle Wax

Step 1

Open the candle wax 1 image. Use the Polygonal Lasso Tool to select a part on the right to place on the left of the model’s face. Flip it horizontally (Edit > Transform > Flip Horizontal) and add a mask to this layer. Use a soft black brush to blend this part with the existing candle’s surface.

photo effect - add wax 1 part 1
photo effect - wax 1 part 1 masking

Step 2

Select other parts from the candle’s wax to add around the shoulders and the left ear. Use Control-T to rotate these parts to different angles and sizes. Add a mask to several wax layers to blend them with the existing candle and shirt and remove the hard shadow of the wax on the left shoulder.

photo effect - add more parts of wax 1
photo effect - wax 1 parts masking

Step 3

Create a group for these wax layers and make a Hue/Saturation adjustment layer to change the color of the wax.

photo effect - wax 1 hue saturation

Step 4

Add a Curves adjustment layer to bring more light to this wax. On this layer mask, paint on the shadow areas of any details you feel are too bright.

photo effect - wax 1 curves

Step 5

Open the candle wax 2 image. Use the Quick Selection Tool (W) to select different parts of wax to add to the head, face, and shirt. Add a mask to each of these layers, use a soft black brush to blend the top of the wax with the existing candle, and use a hard black brush to trim these pieces of wax in different lines flowing along the face.

photo effect - add wax 2
photo effect - wax 2 masking

Step 6

Make a group for these wax layers and make a Channel Mixer adjustment layer to alter the color of the wax.

photo effect - wax 2 channel mixer red
photo effect - wax 2 channel mixer blue

Step 7

Create a Hue/Saturation adjustment layer to desaturate the color of the wax lines a bit to make them match the rest of the candle.

photo effect - wax 2 hue saturation

Step 8

Make a Curves adjustment layer to increase the contrast of the wax. Paint on any details you feel are too dark or contrasting.

photo effect - wax 2 curves

Step 9

Create a new layer below the candle wax groups. Use a soft brush with the color #1c1b1b and Opacity about 30% to paint shadow below the wax on the shirt.

photo effect - waxes shadow

5. How to Make the Final Adjustments

Step 1

Make a new layer on top of the other layers and use a brush with the color #753c23 to paint on the lower lip, avoiding its highlight. Change this layer mode to Multiply 40% to reduce the light on this part.

photo effect - reduce lips highlights

Step 2

Create another layer and use a soft brush with the color #2a1503 to paint on the candle’s flame. Change this layer mode to Color Dodge 100%.

photo effect - candle glow 2

Step 3

Use another brush with the color #d5af5a to paint more glowing light on the bottom of the flame. Alter this layer mode to Hard Light 100%.

photo effect - candle glow 3

Step 4

Make a new layer and change the brush’s color to #0d0907. Use a medium-soft brush to paint the shadow of the head, including the top of the candle, on the shoulders and neck. Lower the Opacity of this layer to 80%.

photo effect - paint head shadow

Step 5

Create a new layer, change the mode to Overlay 100%, and fill with 50% gray.

photo effect - DB new layer

Activate the Dodge and Burn Tool (O) with Midtones Range and Exposure about 15-25% to refine the light and shadow of the details of the candle, face, shoulders, and face, especially the space between the wax lines. You can see how I did it with Normal mode and the result with Overlay mode.

photo effect - DB normal mode
photo effect - DB overlay mode

Step 6

Create a Color Balance adjustment layer to increase the light, color, contrast and vibrance of the whole scene.

photo effect - whole scene color balance midtones
photo effect - whole scene color balance shadows
photo effect - whole scene color balance highlights

Congratulations, You’re Done!

I hope that you’ve enjoyed the process of creating an interesting portrait photo effect and learned something new for
your own projects. Feel free to share your results or leave comments in
the box below. Enjoy Photoshopping!

Here are some more interesting portrait photo effects:

photo effect - final result

How to Create a Melting Portrait Photo Effect Manipulation in Photoshop

Post pobrano z: How to Create a Melting Portrait Photo Effect Manipulation in Photoshop

Final product image
What You’ll Be Creating

In this tutorial, I’ll show you how to create a portrait photo effect of a man melting. First, we’ll add a curtain background and retouch the model. After that, we’ll build a melting candle on top of the model’s head and some wax around his body. We’ll refine several details, paint the light effect, and use an adjustment layer to enhance the final effect.

Tutorial Assets

The following assets were used during the production of this tutorial:

1. How to Make the Base Background

Step 1

Create a new 2000 x 2000 px document in Photoshop with the following settings:

photo effect - new file

Step 2

Open the curtain background image and drag this image into the white canvas using the Move Tool (V). Place the upper half of the curtain onto the canvas and hide the floor.

photo effect - add curtain

Step 3

On the curtain layer, go to Filter > Blur > Gaussian Blur and set the Radius to 21 px. You can change these settings depending on the dimension of your document or when you feel it’s soft and blurry enough. This step is to separate the background from the main subject and make some depth for the whole scene.

photo effect - curtain gaussian blur

Step 4

Go to Layer > New Adjustment Layer > Curves and decrease the lightness until it’s almost invisible. On this layer mask, activate the Brush Tool (B) and select a soft round one with black color. Lower the brush’s Opacity to about 10-15% to paint on the middle of the background to reveal some light on the wrinkles of the curtain in a subtle way.

photo effect - curtain curves
photo effect - curtain curves masking

Step 5

Create a Hue/Saturation adjustment layer to desaturate the blue of the curtain. Reduce the Saturation to –90.

photo effect - curtain hue saturation

2. How to Retouch the Model

Step 1

Cut out the model from the background and place him in the lower half of the dark canvas. Click the second icon at the bottom of the Layers panel to add a mask to this layer. Use a soft black brush to remove the top part of the head.

photo effect - add model
photo effect - model masking

Step 2

Make a Hue/Saturation adjustment layer and change the Reds and Blues settings. This step is to adjust the tone of the model’s face and his shirt to match the background.

photo effect - model hue saturation 1 reds
photo effect - model hue saturation 1 blues

Step 3

Add a Color Balance adjustment layer and alter the Midtones and Highlights values. The aim is to give the model some golden light reflection as we’ll be adding the flame effect above his head in the next stages. On this layer mask, use a soft black brush to reduce the light effect on his skin and on the lower part of his shirt where it’s less affected by the light than the rest.

photo effect - model color balance highlights
photo effect - model color balance midtones
photo effect - model color balance masking

Step 4

Make a Curves adjustment layer and decrease the lightness. On the layer mask, paint on the front of the model to reveal the lightness there.

photo effect - model curves 1

Step 5

Use another Curves adjustment layer to increase the contrast of the model. Paint on the front of the mouth, chin and shoulders and any details you feel are too dark or contrasting.

photo effect - model curves 2

Step 6

Add another Hue/Saturation adjustment layer to reduce the golden light after increasing the contrast. Bring the Saturation values down to -32:

photo effect - model hue saturation 2

Step 7

Create a new layer and use a medium-soft brush with the color #0d0907 to paint more shadow below the model’s lips and nose. We’ve added more light and contrast, so the shadow should be more visible and a bit larger.

photo effect - model face shadow

3. How to Build the Candle

Step 1

Cut out the candle 1 image and use the Lasso Tool (L) to select the top of this candle. Drag this part onto the front of the model using the Move Tool.

photo effect - add candle 1

Add a mask to this layer and use a soft black brush to remove the bottom of the candle and the wick, and blend the top with his face. Lower the brush’s opacity when blending on the intersection between the face and the candle.

photo effect - candle 1 masking

Step 2

Use the Lasso Tool to select another part from the original candle image and add it to the face of the model. Add a mask to this layer and use a soft black brush to remove the hard edges and blend this part with the face.

photo effect - add  another part of candle 1
photo effect - candle part 1 masking

Step 3

Select a long, thin part from the side of the candle to add to the right of the model’s face (from the viewer). Add a mask to this layer and take a hard black brush to trim this part into several lines flowing from the top of the head. Lower the brush’s size to get a more natural result.

photo effect - add more part of candle 1
photo effect - candle part 2 masking

Step 4

Select all of the candle layers and hit Control-G to make a group for them. Change this group’s mode to Normal 100% and create a new layer within the group. Activate the Clone Tool (S) to reduce the light on the part above the nose.

photo effect - candle 1 cloning

Step 5

Make a Hue/Saturation adjustment layer and set it as a Clipping Mask. Adjust the
Saturation values to desaturate and change the color of the candle.

photo effect - candle 1 hue saturation

Step 6

Create a Curves adjustment layer to decrease the lightness. On this layer mask, paint on the middle area to reveal the lightness there, leaving the shadow visible on both sides and the space between the candle wax lines.

photo effect - candle 1 curves

Step 7

Move the candle 2 image into the main document and place the candle’s flame on top of the middle of the existing candle. Add a mask to this layer and use a medium-soft black brush to erase most of the candle, leaving the candle’s flame and its glow visible.

photo effect - add candle 2
photo effect - candle 2 masking

Step 8

Create a Hue/Saturation adjustment layer above this candle layer and set it as a Clipping Mask. Change the Hue values a bit to +8:

photo effect - candle 2 hue saturation

Step 9

Make a new layer below the candle 2 layer. Use a soft brush with the color #e2b588 to paint around the candle’s flame. Change this layer mode to Color Dodge 80% and use a layer mask to erase the light around the head.

photo effect - paint candle glow 1
photo effect - candle glow 1 result

Step 10

Create another layer and use a soft brush with the color #9b6837 to paint above the candle’s flame to make a light reflection there. Alter this layer mode to Hard Light 40%.

photo effect - paint background light reflection normal mode
photo effect - background light hard light mode

4. How to Add the Candle Wax

Step 1

Open the candle wax 1 image. Use the Polygonal Lasso Tool to select a part on the right to place on the left of the model’s face. Flip it horizontally (Edit > Transform > Flip Horizontal) and add a mask to this layer. Use a soft black brush to blend this part with the existing candle’s surface.

photo effect - add wax 1 part 1
photo effect - wax 1 part 1 masking

Step 2

Select other parts from the candle’s wax to add around the shoulders and the left ear. Use Control-T to rotate these parts to different angles and sizes. Add a mask to several wax layers to blend them with the existing candle and shirt and remove the hard shadow of the wax on the left shoulder.

photo effect - add more parts of wax 1
photo effect - wax 1 parts masking

Step 3

Create a group for these wax layers and make a Hue/Saturation adjustment layer to change the color of the wax.

photo effect - wax 1 hue saturation

Step 4

Add a Curves adjustment layer to bring more light to this wax. On this layer mask, paint on the shadow areas of any details you feel are too bright.

photo effect - wax 1 curves

Step 5

Open the candle wax 2 image. Use the Quick Selection Tool (W) to select different parts of wax to add to the head, face, and shirt. Add a mask to each of these layers, use a soft black brush to blend the top of the wax with the existing candle, and use a hard black brush to trim these pieces of wax in different lines flowing along the face.

photo effect - add wax 2
photo effect - wax 2 masking

Step 6

Make a group for these wax layers and make a Channel Mixer adjustment layer to alter the color of the wax.

photo effect - wax 2 channel mixer red
photo effect - wax 2 channel mixer blue

Step 7

Create a Hue/Saturation adjustment layer to desaturate the color of the wax lines a bit to make them match the rest of the candle.

photo effect - wax 2 hue saturation

Step 8

Make a Curves adjustment layer to increase the contrast of the wax. Paint on any details you feel are too dark or contrasting.

photo effect - wax 2 curves

Step 9

Create a new layer below the candle wax groups. Use a soft brush with the color #1c1b1b and Opacity about 30% to paint shadow below the wax on the shirt.

photo effect - waxes shadow

5. How to Make the Final Adjustments

Step 1

Make a new layer on top of the other layers and use a brush with the color #753c23 to paint on the lower lip, avoiding its highlight. Change this layer mode to Multiply 40% to reduce the light on this part.

photo effect - reduce lips highlights

Step 2

Create another layer and use a soft brush with the color #2a1503 to paint on the candle’s flame. Change this layer mode to Color Dodge 100%.

photo effect - candle glow 2

Step 3

Use another brush with the color #d5af5a to paint more glowing light on the bottom of the flame. Alter this layer mode to Hard Light 100%.

photo effect - candle glow 3

Step 4

Make a new layer and change the brush’s color to #0d0907. Use a medium-soft brush to paint the shadow of the head, including the top of the candle, on the shoulders and neck. Lower the Opacity of this layer to 80%.

photo effect - paint head shadow

Step 5

Create a new layer, change the mode to Overlay 100%, and fill with 50% gray.

photo effect - DB new layer

Activate the Dodge and Burn Tool (O) with Midtones Range and Exposure about 15-25% to refine the light and shadow of the details of the candle, face, shoulders, and face, especially the space between the wax lines. You can see how I did it with Normal mode and the result with Overlay mode.

photo effect - DB normal mode
photo effect - DB overlay mode

Step 6

Create a Color Balance adjustment layer to increase the light, color, contrast and vibrance of the whole scene.

photo effect - whole scene color balance midtones
photo effect - whole scene color balance shadows
photo effect - whole scene color balance highlights

Congratulations, You’re Done!

I hope that you’ve enjoyed the process of creating an interesting portrait photo effect and learned something new for
your own projects. Feel free to share your results or leave comments in
the box below. Enjoy Photoshopping!

Here are some more interesting portrait photo effects:

photo effect - final result

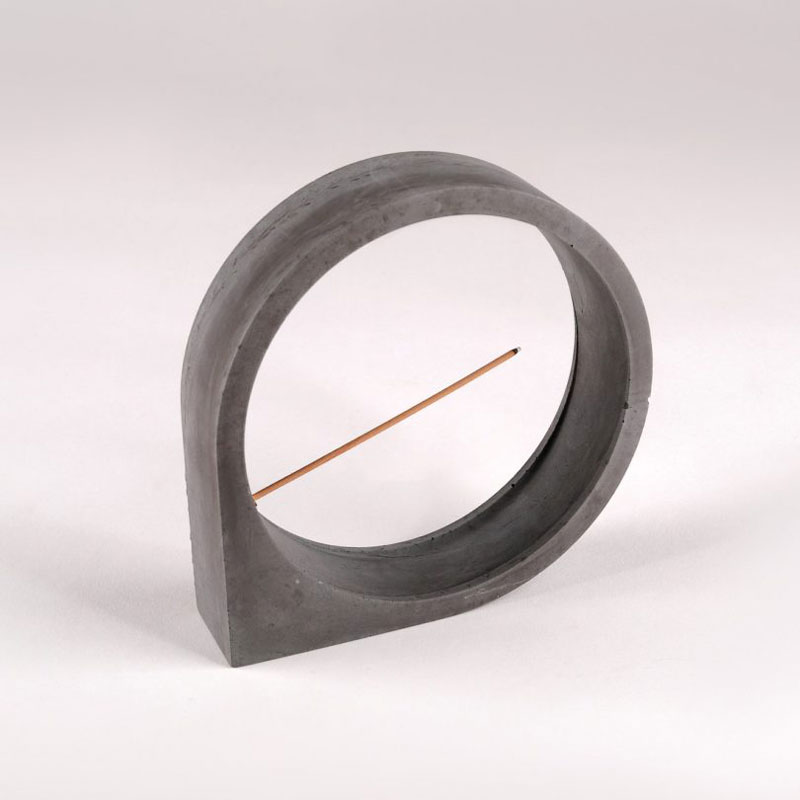
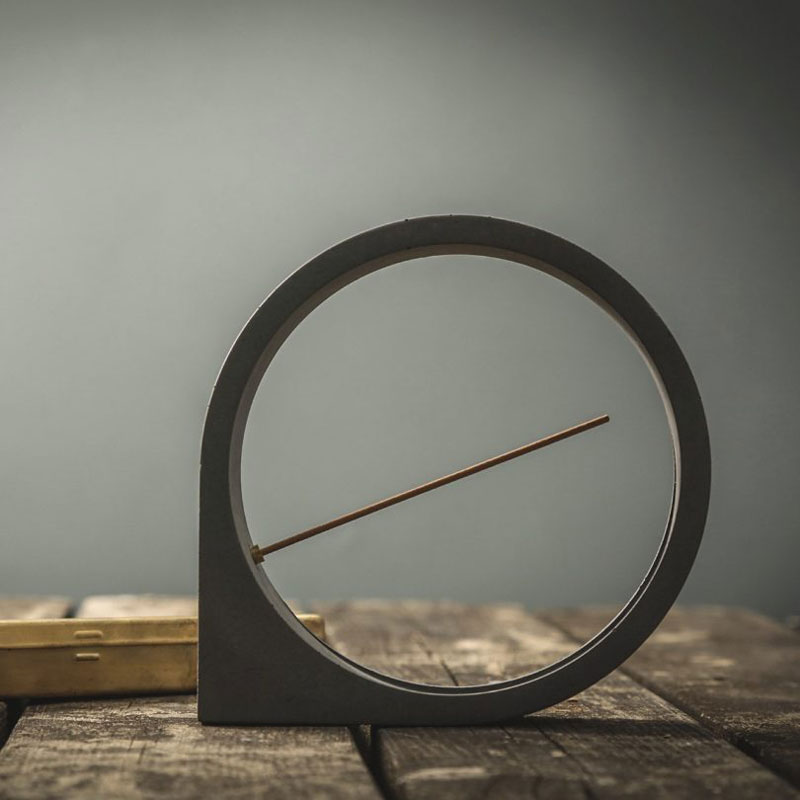
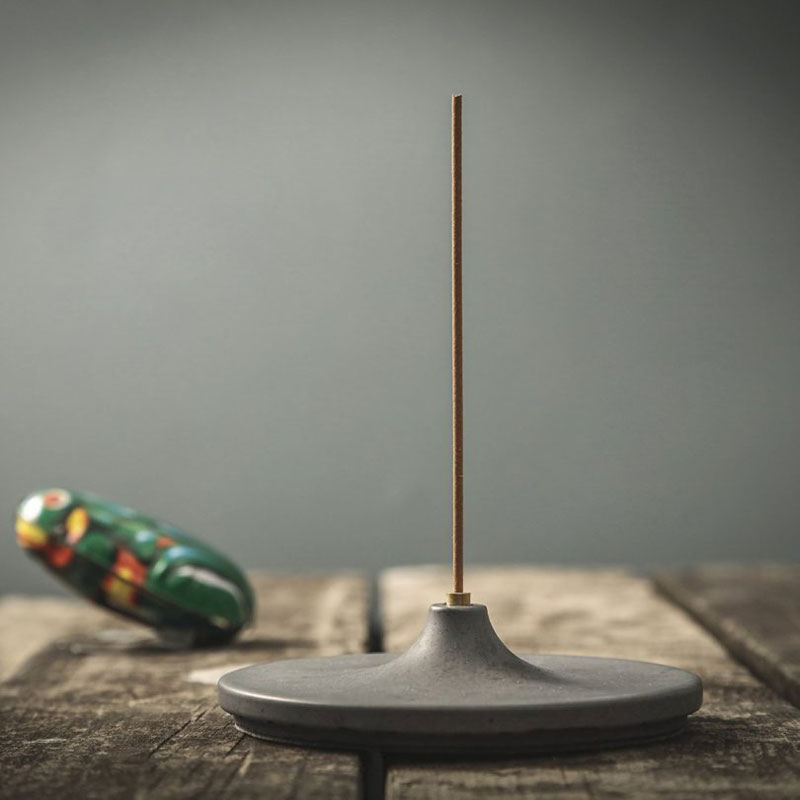
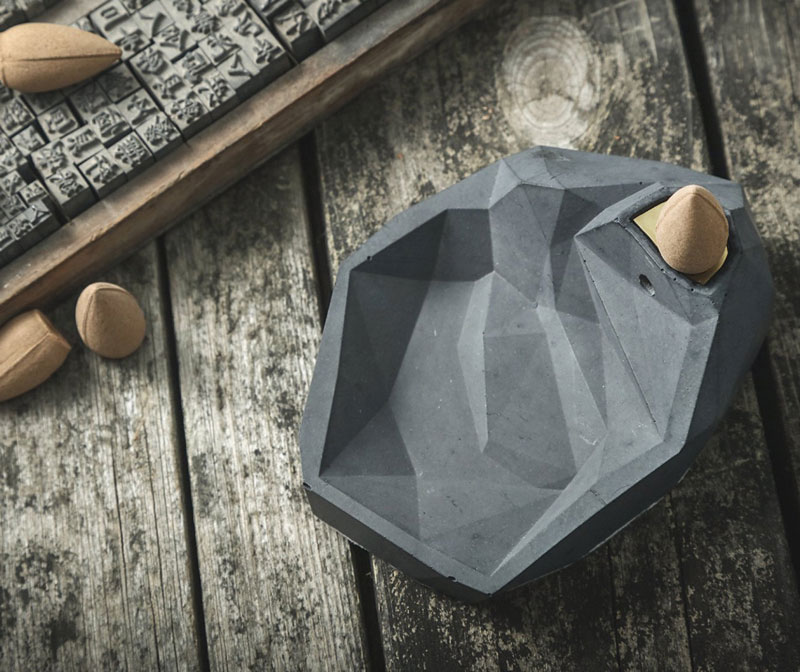
The Brutalist Incense Holders of Kin Objects

Post pobrano z: The Brutalist Incense Holders of Kin Objects

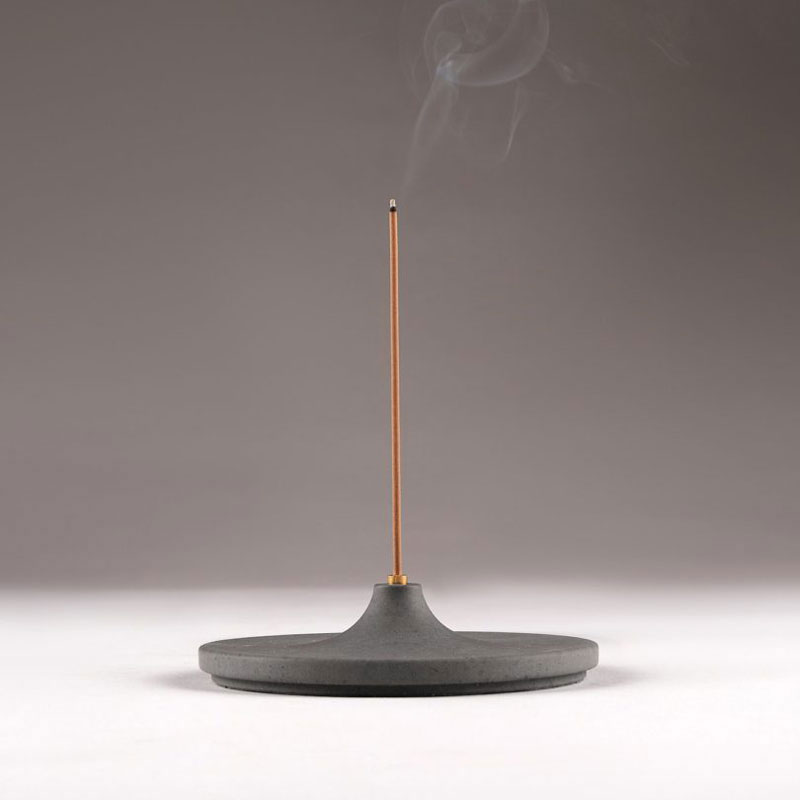
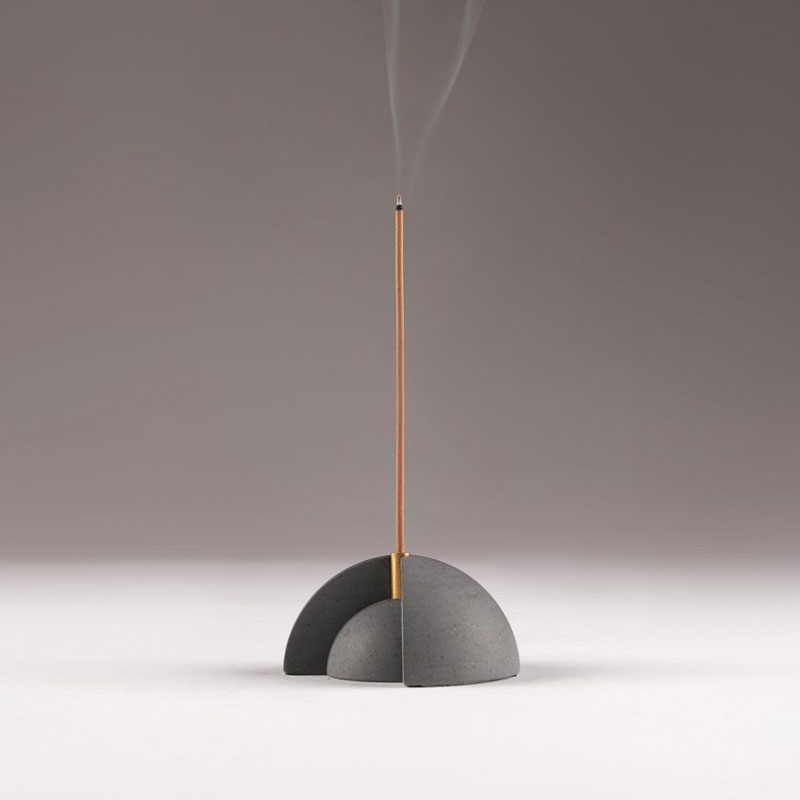
When you think of exciting design, incense burners are not the first product that comes to mind. With these designs inspired by the brutalist movement, the designers at Kin Objects demonstrate once more that we should look for inspiration in unusual places.

The designs come from a couple of first-generation immigrants who landed to USA and Australia and decided to go back to their roots. With these incense burners, they blend their mixed origins to create unique designs.

The Brutalist Incense Holders of Kin Objects

Post pobrano z: The Brutalist Incense Holders of Kin Objects

When you think of exciting design, incense burners are not the first product that comes to mind. With these designs inspired by the brutalist movement, the designers at Kin Objects demonstrate once more that we should look for inspiration in unusual places.

The designs come from a couple of first-generation immigrants who landed to USA and Australia and decided to go back to their roots. With these incense burners, they blend their mixed origins to create unique designs.

5 Things You Should Never Forget in a Web Design Contract

Post pobrano z: 5 Things You Should Never Forget in a Web Design Contract

It is great fun to design a website. When your client is about to enter into a new project, all they do is put their complete faith on you to bring their ideas into life. Seeing a big smile on your happy client’s face is the most satisfying thing that any designer can ever ask for. But, even the best of the relationship with your client can go wrong if a proper web design contract is not in place.

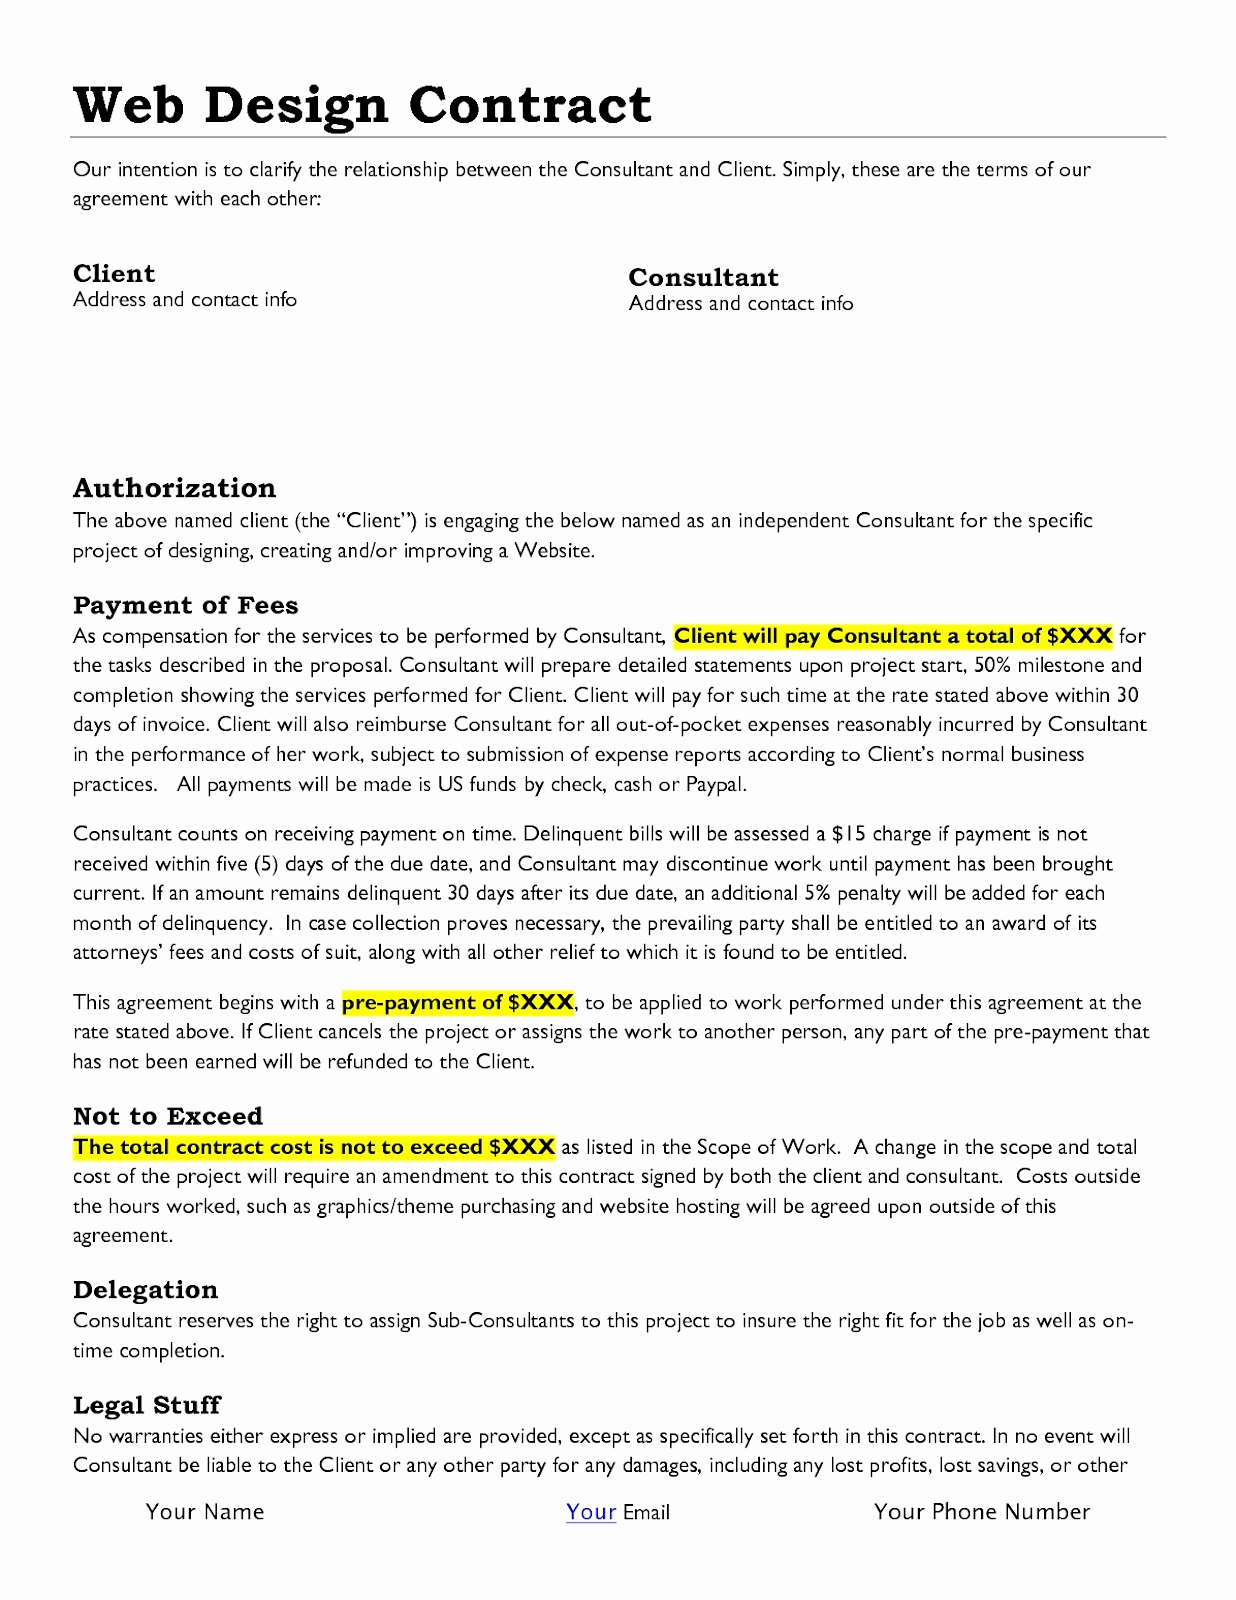
A complete and solid contract can avert the concerns that you fear and try to avoid. A web design contract can be complicated or simple according to the project’s complexity and size but, there are certain elements that one should never miss even in the smallest of the contract. You and your client can save yourself a lot of trouble and time by simply having a proper web design contract with some of the key points mentioned in it. Here are the 5 things you should never forget in a web design contract.

Things, Your Client and You Own

Web design contract

There are various components when you design a website. When a contract is worked in print, it’s usually believed that the client pays 100% for your services and takes complete ownership of the work produced. But, it doesn’t remain that simple when you actually start developing the website and offering your services. So, it is very important to mention what you are offering and what you are not in the web design contract.

For instance, what should be done if your client wishes to change web hosting in the future, the layout, etc.? Other things that you may include in the web design contract are – theme or web layout ownership, the web design, site development coding, site’s CMS System, any intellectual property owned by the client or you, web copy, and more. To avoid any sticky legal mess, it is important to state each of the points in the web design contract clearly.

Client and Your Layout Responsibilities

When a website is designed, it is a two-way process. Firstly, your responsibility is to ensure 100% perfection in what you deliver and also maintain your repute in the industry. And secondly, your client’s responsibilities to provide all the information you need to complete the project and also offer on-time feedback to help you with the on-going development.

Often clients fail to understand it, so always better to put down in writing like client need to provide the product info, photos, complete plan of the site, key information such as FTP or WordPress detail. One of the most vital things is who is going to upload the content, the client or the designer, which creates a lot of tension. So, it is always better to be clear from the beginning by including these points in the web design contract.

Mention Upfront or Part Payment

Create a few milestone for a big project

It might be a tricky situation when it comes to the payment part but it is the most vital one too. In order to ensure that you receive the full payment, never feel shy to get your payment upfront. Completing work and then getting paid is what you would never look forward to, as there are chances of the client ignoring or delaying your payment. If you cannot ask for the payment upfront, ensure to get part payments as you keep completing the work.

Mention each of the milestones whatever is discussed with your client regarding payment in the contract to avoid any confusion at a later date. For instance, if you have a $6000 project, you may divide and detail your milestone into 50% and 25%-25% ratio. Like 50% as deposit, 25% at the completion of the design phase and another 25%at the final site delivery phase. Never start the work without getting any upfront fees.

Charge for Any Kind of Additional Work or Time

It is important to note that if you do good work, clients will automatically come to you for your web design/development services. You don’t need to do any work other than the work mentioned in the contract or revisions free of cost to please your client. If you are given any additional work by the client, you might feel it is just a matter of 30 seconds so let’s fix but never do so without charging the money.

Any kind of additional work must always be billed hourly. Even if you are visiting a client, ensure to charge for it, whether effort or your time, it is your money. Apart from web design, if you also offer hosting services, mention the same in the web design contract. Keep the detail handy about how often and how much your client needs to pay you.

Contract Termination or Change of Terms

If you don’t wish to work with a client for whatever reason it might be or if you want to change any clause, your contract must have the point that you are allowed to do so to avoid any problem in the future. It definitely has to be fair for the client as well, for example, giving a notice period before leaving or coming to a decision from both parties before changing a clause.

In case of termination of the contract, the web design contract must have the details like within how many days the client properties like discs, images, etc. have to be returned, etc.

You must think of every situation and then draft the web design contract.  Do you have any other important points to share that must be included in a web design contract? Feel free to share.

10 Examples of Business Cards that are the Perfect Conversation Starters

Post pobrano z: 10 Examples of Business Cards that are the Perfect Conversation Starters

In the age of online branding, some would think that business cards are a thing of the past. It’s far from true!

Printed business cards are still a very simple and practical way to give out your information to anyone, in any situation. In some cases, handing out a business card can be the best conversation starter, especially if you have been creative with your design.

How to create an impact with your business card and start a conversation

To create an impact, your business card has to be different from others in one way or another. It can be with a creative idea, special folding, or a provocative text on it, but it can be more simple. If your business card is well-crafted and printed, it will often be enough to have people asking questions.

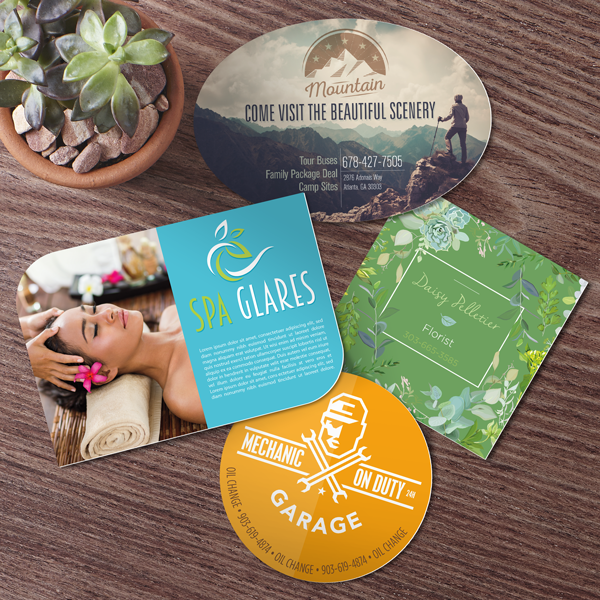
1. Go with different shapes

Not all business cards should be rectangular. Modern cutting techniques make it very affordable to shape your cards differently. Pull out an oval-shaped business card and you will see some surprise in the eyes of your interlocutor.

Image source

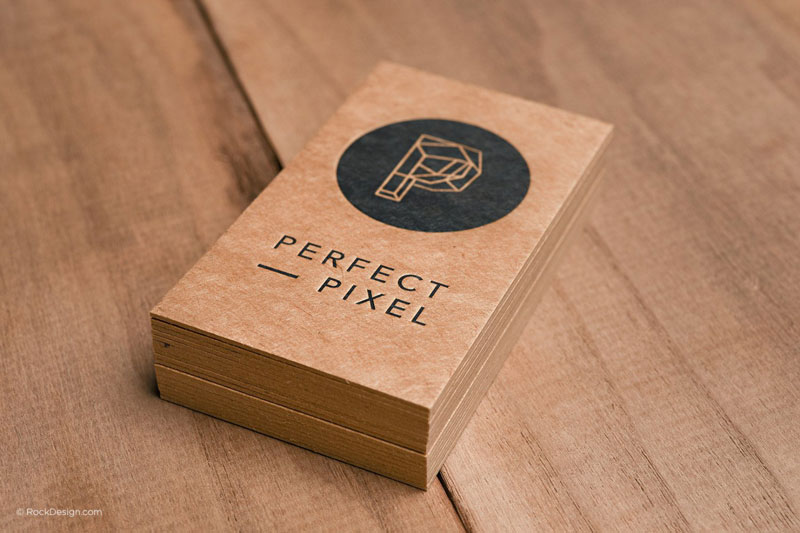
2. Be creative with your paper choices

The people who are handed your business cards will not only be able to see it, but they will also feel it even if they are not looking at it. The right choice of paper can say a lot about your business and it can be a great conversation starter.

3. Add a quote on your business card

There is a reason people like to share quotes on social media, the quotes are an easy way to let someone famous say something deep better than you would have said it yourself.

Add a quote that reflects your business values on your card, and people will surely start talking about it when they are handed the card.

4. Don’t put a phone number

Or don’t put another information that people are expecting to see on your business card. People will notice it and ask about it, which can be the beginning of a conversation. You can for example answer that you are generally too busy to take phone call, but that you are willing to give them your phone information, this will make them feel more unique.

5. Choose a creative job title

If you are in a large corporation, you may not have your word to say on this, but if you are a freelancer or a small business owner, it’s up to you to choose the job title you want, and, let’s face it, CEO or General Manager sound a bit weird when you are a sole proprietorship.

Why not try something a bit different and go for “Chief Visionary Officer” or “Master of All That Is”, it will surely get you more reactions than a dull title.

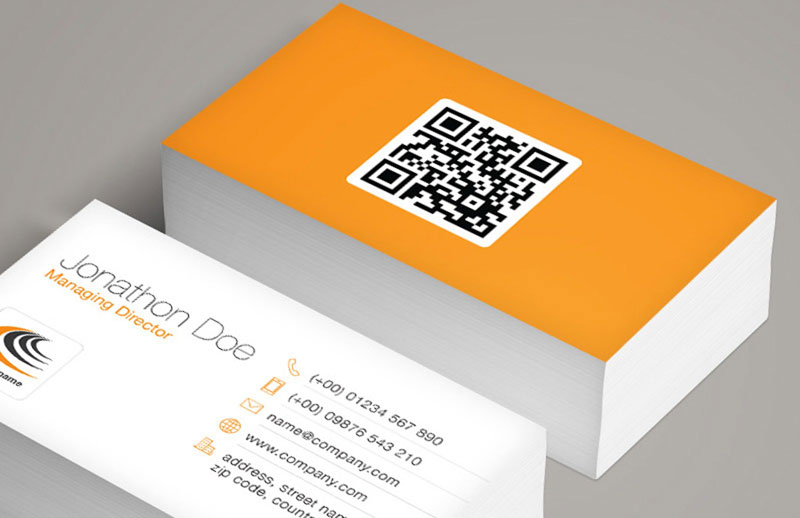
6. Use a QR code

Nowadays, QR codes are popular enough to be used safely and know that people will know how to use them. The nice part about QR code is that they let you expand the reach of your business card. You can use them to send people to your website, of course, but you can also use them to let people add you on LinkedIn or any other creative thing that you can think of.

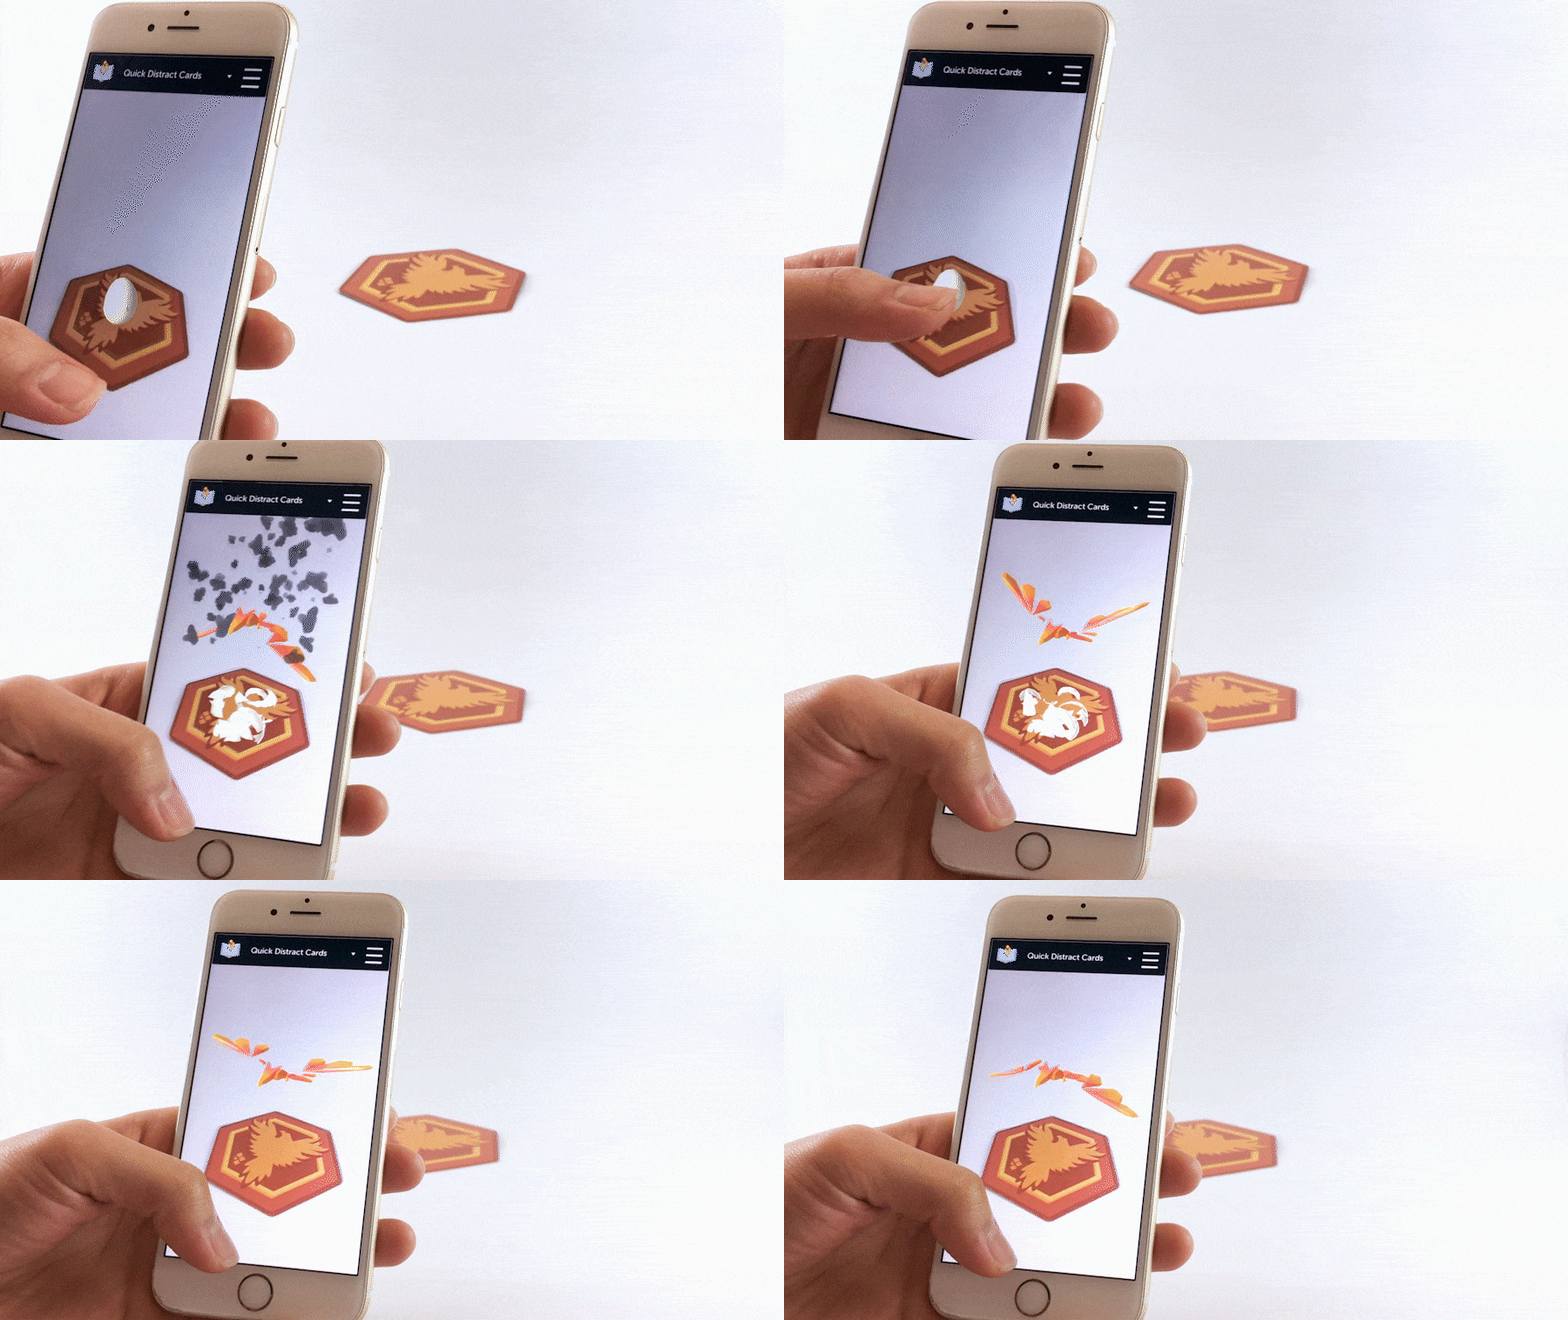
7. Use AR on the card

Augmented Reality is the amazing new technology that allows you to add all kinds of content to a visual when filming it with your cell phone. Using AR, you can, for example, add some video introduction to your business card.

8. Use photography

A picture is worth a thousand words. Everyone knows that, or at least everyone should know it. Using powerful photo imagery is a great way to have people more interested in your business card.

9. Use a coupon on your business cards

A business card is not only a medium to share some printed contact information, it also acts as a proof that you have met a certain person. To reward the people you have met in person, add a coupon code for your services or products, this way you will be sure that they will not forget you.

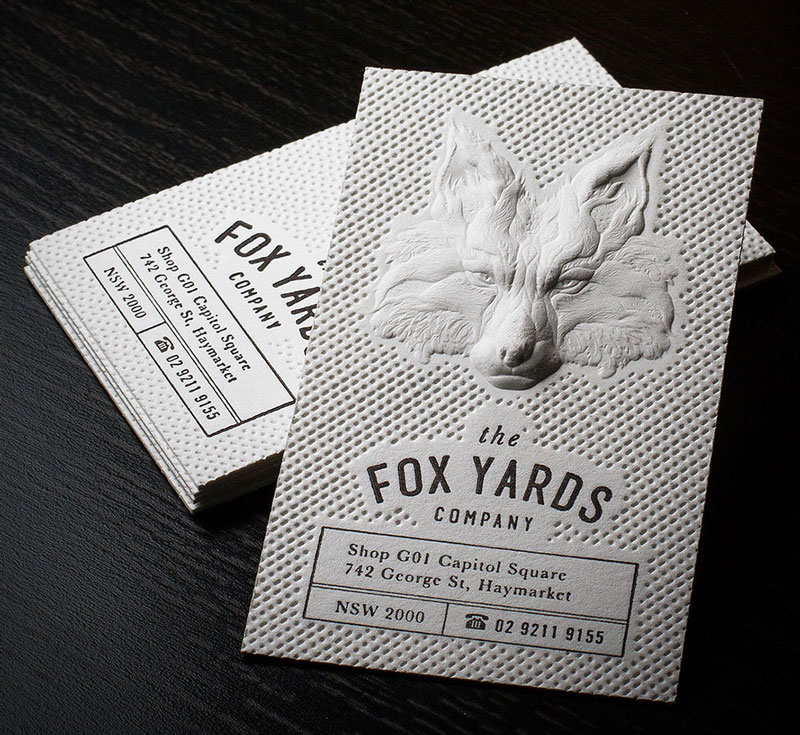
10. Use 3D on your business cards

3D or embossing will bring your business cards to a whole new world. It allows you to be more creative and add special effect, but also to ensure that people will be able to feel your business cards, not only to read them.

Decaying Sites

Post pobrano z: Decaying Sites

Websites have a tendency to decay all by themselves. Link rot, they call it. Unpaid domain name registrations. Companies that have gone out of business. Site owners that have lost interest. What’s sadder than a 404? Landing on a holding page of a URL that used to exist, but now has fallen into the hands of some domain hoarder after it expired, hoping someone will pay a premium to get it back.

That stuff is no fun. But what about sites that are totally still around, just old? What kind of fun things could we do to indicate oldness that’s, like, on purpose?

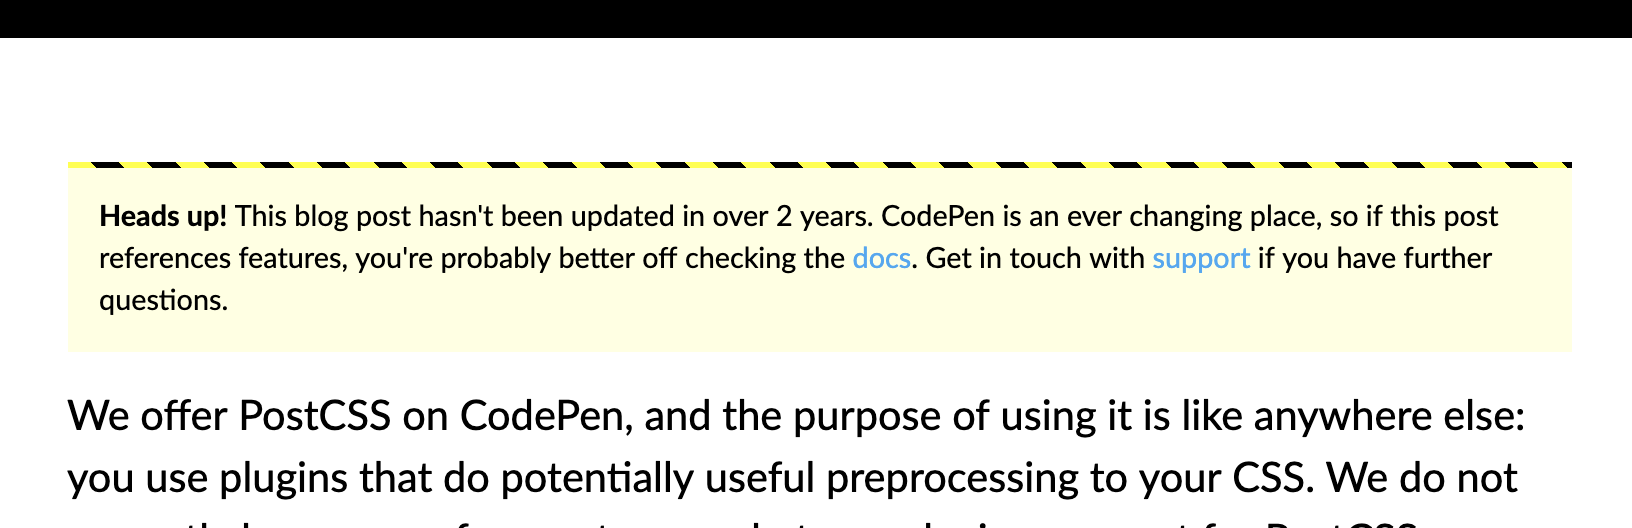
On the CodePen blog, we call out blog posts that haven’t been updated in at least a couple of years. We update documentation, sure, but we tend to leave blog posts alone as a historical record. So, we’re pretty clear about that:

<?php if (get_the_modified_date("Y") < 2017) { ?>
  <p class="callout"><strong>Heads up!</strong> This blog post hasn't been updated in over 2 years. CodePen is an ever changing place, so if this post references features, you're probably better off checking the <a href="/documentation/">docs</a>. Get in touch with <a href="https://codepen.io/support/">support</a> if you have further questions.</p>
<?php } ?>

We style it up like a little warning:

But what if it was less obvious? What if the text just kinda started going all to crap? Words falling off their lines and going out of focus? The older the content, the more decay:

See the Pen
Decayed Text
by Chris Coyier (@chriscoyier)
on CodePen.

What if you let a site decaye on purpose? Say, perhaps, you’re holding oto client work and the client hasn’t paid their bill. Dragoi Ciprian has a little idea (repo) for that. You set the due date and deadline:

var due_date = new Date('2017-02-27');
var days_deadline = 60;

Here’s a demo of that. As I write, I’m 30 days into a 90-day deadline. If the demo looks blank to you, well, I guess I should have paid my bill so this code could have been removed 😉

See the Pen
not-paid Demo
by Chris Coyier (@chriscoyier)
on CodePen.

Or maybe the screen could kinda flash red, like you’re getting hit in a video game.

Dave once mentioned this would be a cool browser extension, like the browser window could flash red when certain bad things are happening, like layout jank.

Or you could get all glitchy! (This demo is click-to-load, fast colors and motion warning.)

See the Pen
Glitchy loader
by Nathaniel Inman (@NathanielInman)
on CodePen.

See the Pen
CSS Glitched Text
by Lucas Bebber (@lbebber)
on CodePen.

Perhaps rather than basing things off a payment due date or the age of the content, these effects come into play based on how long it’s been since the site’s dependencies have been updated. Or at least had some kind of deployment push.


This is only sorta tangentially related, but it reminds me of the very, very scary game Lose/Lose:

Lose/Lose is a video-game with real life consequences. Each alien in the game is created based on a random file on the players [sic] computer. If the player kills the alien, the file it is based on is deleted. If the players [sic] ship is destroyed, the application itself is deleted.

Although touching aliens will cause the player to lose the game, and killing aliens awards points, the aliens will never actually fire at the player. This calls into question the player’s mission, which is never explicitly stated, only hinted at through classic game mechanics. Is the player supposed to be an aggressor? Or merely an observer, traversing through a dangerous land?

The post Decaying Sites appeared first on CSS-Tricks.

A Couple of New Wufoo Tips

Post pobrano z: A Couple of New Wufoo Tips

(This is a sponsored post.)

High fives to Wufoo, our long-time sponsor here on CSS-Tricks. It’s powered the vast majority of forms I’ve built over the past decade. If you’ve never used it or heard of it: it’s a form builder. It makes the arduous task of implementing forms trivially easy. Building a form on Wufoo means you’ll get a form that does everything right UX-wise, gives you full design control, integrates with anything, and that you can put anywhere.

The feature list is too long to cover in the confines of a single post, so I always like to cover little bits that I’ve used recently and liked.

  1. They just released a much quicker way to rename a form both in the Form Manager and inside the form itself.
  2. Don’t forget they have a robust API. I used the API to submit form entries on a form just the other day. I wanted to do some special things on a form, like be able to react to the DOM event of submitting the form. That’s not really possible when the form is in an <iframe>, but just fine when you host the form yourself and submit via API. Worked great.

Direct Link to ArticlePermalink

The post A Couple of New Wufoo Tips appeared first on CSS-Tricks.