Wszystkie wpisy, których autorem jest admin

How to Make an InDesign Report Template

Post pobrano z: How to Make an InDesign Report Template

Final product image
What You’ll Be Creating

Looking for a stylish InDesign report template for your business? This InDesign business report template has a clean and modern design which can be customized with your own text and images. 

This eight-page template, including a front and back cover, can be adapted as an annual report, business brochure, or pitch document, and the InDesign template is also quick and easy to put together for beginners.

Internal of report
Internal of report

Ready to create your InDesign report template? Awesome, let’s get started.

Looking for more easy-to-edit InDesign templates? These InDesign business report templates and brochure templates on GraphicRiver and Envato Elements come in a huge range of customizable styles.

What You’ll Need 

As well as access to Adobe InDesign, you’ll also need to download and install the following font family from Envato Elements to use in your report layouts:

You can choose to use the photos used in the template as pictured or replace these with your own choice of images. The photo used in the template, as pictured here, is:

Infographic elements are a great way to explain statistics or facts in a more compelling way. This pack of infographic vector graphics contains a wide range of graphs, charts and tables in a stylish flat style:

Once you’ve installed the font files on your computer and have your image(s) to hand, you’re ready to start creating your report template.

1. How to Set Up the Report Template in InDesign

Step 1

Open InDesign and go to File > New > Document. 

Select Print from the Intent options at the top of the window, and choose Letter for the page size. 

Increase the number of Pages to 8 and make sure Facing Pages is checked. 

Add a Margin width of 17 mm to all edges of the page except the Outside edge, which you should set to a shorter 15 mm

Add a Bleed of 5 mm to all edges except the Inside edge, which you can keep to 0 mm. Then click Create

new document

Step 2

Go to the Layers panel (Window > Layers) and double-click on Layer 1, renaming it Images

Create two more new layers—Color and Type

layer options

Step 3

Expand the Swatches panel (Window > Color > Swatches) and choose New Color Swatch from the panel’s drop-down menu. 

Set the levels to C=93 M=79 Y=38 K=37, and click Add and Done.

Create three more new CMYK swatches:

  • C=8 M=92 Y=81 K=1
  • C=19 M=100 Y=83 K=11
  • C=8 M=6 Y=5 K=0
swatches panel

Step 4

Expand the Pages panel (Window > Pages) and click on the Page 3 icon to highlight it. 

Choose Numbering & Section Options from the panel’s main menu. 

numbering and section

Check Start Page Numbering at: 1, and make sure ‘1, 2, 3, 4…’ is selected from the Style menu. 

numbering and section

Click OK. A warning message will flag up about repeated page numbers, but we’ll rectify this in the next step, so go ahead and click OK

warning message

Step 5

Select the first Page 1 icon of the document (the original page 1), and choose Numbering & Section Options again. 

numbering and section

Check Start Page Numbering at: 1, as before, but this time choose ‘i, ii, iii, iv…’ from the Style menu. Then click OK

numbering and section

This splits the report into two sections—a front cover and contents page which won’t be numbered, with the first page beginning on the ‘Introduction’ page of the report. 

pages panel

Step 6

Click on the A-Master icon at the top of the Pages panel, bringing up the master on screen.

Lock the Images and Color layers, keeping the top Type layer unlocked and active. 

Use the Type Tool (T) to create a text frame across the bottom of the right-hand page.

text frame

Step 7

With your type cursor set inside the frame, go to Type > Insert Special Character > Markers > Current Page Number. 

Highlight the page number and, from either the top Controls panel or the Character and Paragraph panels (Window > Type & Tables > Character / Paragraph), set the Font to Adriatic Bold, Size 12 pt, Align Right, and the Font Color to C=8 M=6 Y=5 K=0.

Make sure the A-Master is only applied to Pages 1-6 of your document. You can remove it from Pages i-ii by dragging down the [None] icon at the very top of the Pages panel and dropping it onto these pages. 

page number

2. How to Add Gradient Color Bars to Your Report Template

Step 1

Click on Page i in the Pages panel to bring up the page on screen. 

Use the Rectangle Tool (M) to create a shape across the bottom seventh of the page, setting the Fill to your dark blue swatch.

blue bar

Step 2

Create a second shape, roughly a seventh of the page in height (40 mm). Set the Fill of this to your dark red swatch, C=19 M=100 Y=83 K=11.

dark red bar

Select this shape and Edit > Copy, Edit > Paste it, moving it directly above. Switch the Fill to the paler red swatch, C=8 M=92 Y=81 K=1.

red bar

Step 3

Paste the shape again, moving it above, and adjusting the Tint of the Fill to 95%. 

tint of swatch

Paste the shape repeatedly, creating a sequence of shapes across the top of the page, each with a slightly lower Tint, with the final shape having a 70% Tint.

tint color

Step 4

Select all the shapes on Page i (which is going to be the front cover of your report), and Edit > Copy them. 

copied bars

Scroll down to Page 6, which will be the back cover, and Edit > Paste them into the same position. 

back cover

Step 5

Scroll up to the first spread of your document, Pages ii and 1, and Paste the shapes again onto this spread. 

On the shapes, Right-Click > Transform > Rotate 90 Degrees CW. 

rotate bars

Move the shapes over to the left side of the spread, and extend the width of all the shapes together until the two bars on the far right of the group are both sitting on the right-hand page. 

gradient bars extended

Step 6

Select three of the red bars from the group, and Edit > Copy them. 

Scroll down to the next spread, Pages 2 and 3, and Paste them. Ensure the right page has a completely solid red shape across the whole page, with two narrower bars sitting next to the spine on the left-hand page. 

pasted bars

Step 7

Repeat a similar process for the next spread down, Pages 4 and 5. This time, adjust the Fill of the shapes to blue, and add an extra bar on the right-hand page, splitting the page roughly in half. 

blue rectangles

3. How to Add Typography to Your Cover and Contents Page

Step 1

Lock the Color layer and unlock the Type layer. 

Use the Type Tool (T) to create a large text frame on the front cover, typing in the title of your report and setting this to Adriatic Bold, Size 65 pt, All Caps, and the Font Color to C=8 M=6 Y=5 K=0. 

report title

Step 2

Add any other details, such as the year and a subtitle or the name of the business, to the cover, setting the Font to Adriatic Bold.

business logo

Step 3

Scroll down to the next spread, which will be the Contents and Introduction pages. 

Create a text frame for the ‘Contents’ title, setting the Font to Adriatic Bold, Size 65 pt, and the Font Color to C=8 M=6 Y=5 K=0.

On the text frame, Right-Click > Transform > Rotate 90 Degrees CCW. 

rotate frame

Position the text frame at the bottom of the blue bar on the left-hand page.

contents title

Copy and Paste the text frame, and Right-Click > Transform > Rotate 180 Degrees. Position it at the top-right of the right-hand page and switch the Font Color to blue. 

title text

Step 4

Create a text frame at the top of the first red bar on the left-hand page, typing in ‘1’.

Set the Font to Adriatic Bold, Size 100 pt, and the Font Color to C=8 M=6 Y=5 K=0.

number text

Add a title text frame, set in Adriatic Bold, Size 40 pt, and rotate this 90 Degrees CW, positioning it directly below the number. 

title text

You can also add subtitle text below in the same arrangement, with a smaller 17 pt Font Size. 

subtitle text

Step 5

You can use these first three text frames as a foundation for populating the rest of the colored bars on the contents page. 

Copy and Paste the group, varying the Font Color and Tint of them to contrast with the different-colored bars. 

pasted frames
color tint
completed contents

Step 6

On the white section, you can add introductory text for the report. 

Create a subtitle text frame set in Adriatic Bold, Size 18 pt, and a blue Font Color.

subtitle text

Add body text below set in Adriatic Medium and an 11 pt Font Size.

body text

4. How to Add Images and Content to Your Report

Step 1

Scroll down to the next spread in your document. Lock the Type layer and unlock the bottom layer, Images.

Use the Rectangle Frame Tool (F) to create an image frame across the whole of Page 2.

image frame

Go to File > Place, choose an image (such as this one) and Open it, allowing it to fill up the whole frame. 

Unlock the Color layer, select the two colored bars overlapping the image frame and head up to Object > Effects > Transparency. Set the Mode to Multiply and click OK

multiply

Step 2

Unlock the Type layer.

Copy the ‘Introduction’ header from Page 1, scroll back down to Page 3, and Edit > Paste in Place, adjusting the Font Color to your off-white swatch. 

title text

You can also use the subtitle and body text frames from the ‘Introduction’ page to populate Page 3. Copy and Paste the text frames, adjusting the Font Color. 

pasted frames

Thread any long sections of text into a second column. To do this, click on the small square symbol at the bottom-right of the first text frame, and click anywhere to create a second linked text frame. 

threaded text

Add pull-out quotes to the spread, set in Adriatic Bold, Size 27 pt.

quote text

Step 3

Add a number text frame to the bottom-left of Page 2, set in Adriatic Bold, Size 100 pt.

number

Step 4

You can now use this spread as a model for creating further spreads in your report. 

Begin by unlocking the Images and Type layers, selecting all the elements sitting on the spread and copying them. 

On the next spread down (Pages 4-5), Edit > Paste in Place.

Switch up the image, and adjust the position of the text frames. 

adjusted spread

If you want to add infographic details to your pages, simply open the infographic elements file in Illustrator or another vector program, select and Copy individual graphics, and Paste these onto the Type layer in your InDesign document. 

infographics

You can adjust the color of these vector graphics directly in InDesign, to match your gradient color scheme.

swatches panel

5. How to Export Your Report for Printing

Step 1

Go to File > Export and choose Adobe PDF (Print) from the Format menu at the bottom of the window. Name your file and click Save.

In the Export Adobe PDF window that opens, choose Press Quality from the Preset menu at the top.

press quality

Step 2

Click on Marks and Bleeds in the left-hand menu, and check both All Printer’s Marks and Use Document Bleed Settings.

Click Export to create your PDF.

marks and bleed

Great job! You can send this PDF straight off to be printed. 

Conclusion: Your Finished Report

This modern and stylish report template can be used in its original style or as a versatile template for creating your own unique report design. 

cover and contents
final spread one
final spread two

Why not try mixing up the fonts and color swatches for a fresh look?

Looking for more stylish report templates? These InDesign templates on GraphicRiver and Envato Elements come in a huge range of modern and customizable styles.

Don’t miss these brochure design tutorials for InDesign and Photoshop:

How to Make an InDesign Report Template

Post pobrano z: How to Make an InDesign Report Template

Final product image
What You’ll Be Creating

Looking for a stylish InDesign report template for your business? This InDesign business report template has a clean and modern design which can be customized with your own text and images. 

This eight-page template, including a front and back cover, can be adapted as an annual report, business brochure, or pitch document, and the InDesign template is also quick and easy to put together for beginners.

Internal of report
Internal of report

Ready to create your InDesign report template? Awesome, let’s get started.

Looking for more easy-to-edit InDesign templates? These InDesign business report templates and brochure templates on GraphicRiver and Envato Elements come in a huge range of customizable styles.

What You’ll Need 

As well as access to Adobe InDesign, you’ll also need to download and install the following font family from Envato Elements to use in your report layouts:

You can choose to use the photos used in the template as pictured or replace these with your own choice of images. The photo used in the template, as pictured here, is:

Infographic elements are a great way to explain statistics or facts in a more compelling way. This pack of infographic vector graphics contains a wide range of graphs, charts and tables in a stylish flat style:

Once you’ve installed the font files on your computer and have your image(s) to hand, you’re ready to start creating your report template.

1. How to Set Up the Report Template in InDesign

Step 1

Open InDesign and go to File > New > Document. 

Select Print from the Intent options at the top of the window, and choose Letter for the page size. 

Increase the number of Pages to 8 and make sure Facing Pages is checked. 

Add a Margin width of 17 mm to all edges of the page except the Outside edge, which you should set to a shorter 15 mm

Add a Bleed of 5 mm to all edges except the Inside edge, which you can keep to 0 mm. Then click Create

new document

Step 2

Go to the Layers panel (Window > Layers) and double-click on Layer 1, renaming it Images

Create two more new layers—Color and Type

layer options

Step 3

Expand the Swatches panel (Window > Color > Swatches) and choose New Color Swatch from the panel’s drop-down menu. 

Set the levels to C=93 M=79 Y=38 K=37, and click Add and Done.

Create three more new CMYK swatches:

  • C=8 M=92 Y=81 K=1
  • C=19 M=100 Y=83 K=11
  • C=8 M=6 Y=5 K=0
swatches panel

Step 4

Expand the Pages panel (Window > Pages) and click on the Page 3 icon to highlight it. 

Choose Numbering & Section Options from the panel’s main menu. 

numbering and section

Check Start Page Numbering at: 1, and make sure ‘1, 2, 3, 4…’ is selected from the Style menu. 

numbering and section

Click OK. A warning message will flag up about repeated page numbers, but we’ll rectify this in the next step, so go ahead and click OK

warning message

Step 5

Select the first Page 1 icon of the document (the original page 1), and choose Numbering & Section Options again. 

numbering and section

Check Start Page Numbering at: 1, as before, but this time choose ‘i, ii, iii, iv…’ from the Style menu. Then click OK

numbering and section

This splits the report into two sections—a front cover and contents page which won’t be numbered, with the first page beginning on the ‘Introduction’ page of the report. 

pages panel

Step 6

Click on the A-Master icon at the top of the Pages panel, bringing up the master on screen.

Lock the Images and Color layers, keeping the top Type layer unlocked and active. 

Use the Type Tool (T) to create a text frame across the bottom of the right-hand page.

text frame

Step 7

With your type cursor set inside the frame, go to Type > Insert Special Character > Markers > Current Page Number. 

Highlight the page number and, from either the top Controls panel or the Character and Paragraph panels (Window > Type & Tables > Character / Paragraph), set the Font to Adriatic Bold, Size 12 pt, Align Right, and the Font Color to C=8 M=6 Y=5 K=0.

Make sure the A-Master is only applied to Pages 1-6 of your document. You can remove it from Pages i-ii by dragging down the [None] icon at the very top of the Pages panel and dropping it onto these pages. 

page number

2. How to Add Gradient Color Bars to Your Report Template

Step 1

Click on Page i in the Pages panel to bring up the page on screen. 

Use the Rectangle Tool (M) to create a shape across the bottom seventh of the page, setting the Fill to your dark blue swatch.

blue bar

Step 2

Create a second shape, roughly a seventh of the page in height (40 mm). Set the Fill of this to your dark red swatch, C=19 M=100 Y=83 K=11.

dark red bar

Select this shape and Edit > Copy, Edit > Paste it, moving it directly above. Switch the Fill to the paler red swatch, C=8 M=92 Y=81 K=1.

red bar

Step 3

Paste the shape again, moving it above, and adjusting the Tint of the Fill to 95%. 

tint of swatch

Paste the shape repeatedly, creating a sequence of shapes across the top of the page, each with a slightly lower Tint, with the final shape having a 70% Tint.

tint color

Step 4

Select all the shapes on Page i (which is going to be the front cover of your report), and Edit > Copy them. 

copied bars

Scroll down to Page 6, which will be the back cover, and Edit > Paste them into the same position. 

back cover

Step 5

Scroll up to the first spread of your document, Pages ii and 1, and Paste the shapes again onto this spread. 

On the shapes, Right-Click > Transform > Rotate 90 Degrees CW. 

rotate bars

Move the shapes over to the left side of the spread, and extend the width of all the shapes together until the two bars on the far right of the group are both sitting on the right-hand page. 

gradient bars extended

Step 6

Select three of the red bars from the group, and Edit > Copy them. 

Scroll down to the next spread, Pages 2 and 3, and Paste them. Ensure the right page has a completely solid red shape across the whole page, with two narrower bars sitting next to the spine on the left-hand page. 

pasted bars

Step 7

Repeat a similar process for the next spread down, Pages 4 and 5. This time, adjust the Fill of the shapes to blue, and add an extra bar on the right-hand page, splitting the page roughly in half. 

blue rectangles

3. How to Add Typography to Your Cover and Contents Page

Step 1

Lock the Color layer and unlock the Type layer. 

Use the Type Tool (T) to create a large text frame on the front cover, typing in the title of your report and setting this to Adriatic Bold, Size 65 pt, All Caps, and the Font Color to C=8 M=6 Y=5 K=0. 

report title

Step 2

Add any other details, such as the year and a subtitle or the name of the business, to the cover, setting the Font to Adriatic Bold.

business logo

Step 3

Scroll down to the next spread, which will be the Contents and Introduction pages. 

Create a text frame for the ‘Contents’ title, setting the Font to Adriatic Bold, Size 65 pt, and the Font Color to C=8 M=6 Y=5 K=0.

On the text frame, Right-Click > Transform > Rotate 90 Degrees CCW. 

rotate frame

Position the text frame at the bottom of the blue bar on the left-hand page.

contents title

Copy and Paste the text frame, and Right-Click > Transform > Rotate 180 Degrees. Position it at the top-right of the right-hand page and switch the Font Color to blue. 

title text

Step 4

Create a text frame at the top of the first red bar on the left-hand page, typing in ‘1’.

Set the Font to Adriatic Bold, Size 100 pt, and the Font Color to C=8 M=6 Y=5 K=0.

number text

Add a title text frame, set in Adriatic Bold, Size 40 pt, and rotate this 90 Degrees CW, positioning it directly below the number. 

title text

You can also add subtitle text below in the same arrangement, with a smaller 17 pt Font Size. 

subtitle text

Step 5

You can use these first three text frames as a foundation for populating the rest of the colored bars on the contents page. 

Copy and Paste the group, varying the Font Color and Tint of them to contrast with the different-colored bars. 

pasted frames
color tint
completed contents

Step 6

On the white section, you can add introductory text for the report. 

Create a subtitle text frame set in Adriatic Bold, Size 18 pt, and a blue Font Color.

subtitle text

Add body text below set in Adriatic Medium and an 11 pt Font Size.

body text

4. How to Add Images and Content to Your Report

Step 1

Scroll down to the next spread in your document. Lock the Type layer and unlock the bottom layer, Images.

Use the Rectangle Frame Tool (F) to create an image frame across the whole of Page 2.

image frame

Go to File > Place, choose an image (such as this one) and Open it, allowing it to fill up the whole frame. 

Unlock the Color layer, select the two colored bars overlapping the image frame and head up to Object > Effects > Transparency. Set the Mode to Multiply and click OK

multiply

Step 2

Unlock the Type layer.

Copy the ‘Introduction’ header from Page 1, scroll back down to Page 3, and Edit > Paste in Place, adjusting the Font Color to your off-white swatch. 

title text

You can also use the subtitle and body text frames from the ‘Introduction’ page to populate Page 3. Copy and Paste the text frames, adjusting the Font Color. 

pasted frames

Thread any long sections of text into a second column. To do this, click on the small square symbol at the bottom-right of the first text frame, and click anywhere to create a second linked text frame. 

threaded text

Add pull-out quotes to the spread, set in Adriatic Bold, Size 27 pt.

quote text

Step 3

Add a number text frame to the bottom-left of Page 2, set in Adriatic Bold, Size 100 pt.

number

Step 4

You can now use this spread as a model for creating further spreads in your report. 

Begin by unlocking the Images and Type layers, selecting all the elements sitting on the spread and copying them. 

On the next spread down (Pages 4-5), Edit > Paste in Place.

Switch up the image, and adjust the position of the text frames. 

adjusted spread

If you want to add infographic details to your pages, simply open the infographic elements file in Illustrator or another vector program, select and Copy individual graphics, and Paste these onto the Type layer in your InDesign document. 

infographics

You can adjust the color of these vector graphics directly in InDesign, to match your gradient color scheme.

swatches panel

5. How to Export Your Report for Printing

Step 1

Go to File > Export and choose Adobe PDF (Print) from the Format menu at the bottom of the window. Name your file and click Save.

In the Export Adobe PDF window that opens, choose Press Quality from the Preset menu at the top.

press quality

Step 2

Click on Marks and Bleeds in the left-hand menu, and check both All Printer’s Marks and Use Document Bleed Settings.

Click Export to create your PDF.

marks and bleed

Great job! You can send this PDF straight off to be printed. 

Conclusion: Your Finished Report

This modern and stylish report template can be used in its original style or as a versatile template for creating your own unique report design. 

cover and contents
final spread one
final spread two

Why not try mixing up the fonts and color swatches for a fresh look?

Looking for more stylish report templates? These InDesign templates on GraphicRiver and Envato Elements come in a huge range of modern and customizable styles.

Don’t miss these brochure design tutorials for InDesign and Photoshop:

How to Make an InDesign Report Template

Post pobrano z: How to Make an InDesign Report Template

Final product image
What You’ll Be Creating

Looking for a stylish InDesign report template for your business? This InDesign business report template has a clean and modern design which can be customized with your own text and images. 

This eight-page template, including a front and back cover, can be adapted as an annual report, business brochure, or pitch document, and the InDesign template is also quick and easy to put together for beginners.

Internal of report
Internal of report

Ready to create your InDesign report template? Awesome, let’s get started.

Looking for more easy-to-edit InDesign templates? These InDesign business report templates and brochure templates on GraphicRiver and Envato Elements come in a huge range of customizable styles.

What You’ll Need 

As well as access to Adobe InDesign, you’ll also need to download and install the following font family from Envato Elements to use in your report layouts:

You can choose to use the photos used in the template as pictured or replace these with your own choice of images. The photo used in the template, as pictured here, is:

Infographic elements are a great way to explain statistics or facts in a more compelling way. This pack of infographic vector graphics contains a wide range of graphs, charts and tables in a stylish flat style:

Once you’ve installed the font files on your computer and have your image(s) to hand, you’re ready to start creating your report template.

1. How to Set Up the Report Template in InDesign

Step 1

Open InDesign and go to File > New > Document. 

Select Print from the Intent options at the top of the window, and choose Letter for the page size. 

Increase the number of Pages to 8 and make sure Facing Pages is checked. 

Add a Margin width of 17 mm to all edges of the page except the Outside edge, which you should set to a shorter 15 mm

Add a Bleed of 5 mm to all edges except the Inside edge, which you can keep to 0 mm. Then click Create

new document

Step 2

Go to the Layers panel (Window > Layers) and double-click on Layer 1, renaming it Images

Create two more new layers—Color and Type

layer options

Step 3

Expand the Swatches panel (Window > Color > Swatches) and choose New Color Swatch from the panel’s drop-down menu. 

Set the levels to C=93 M=79 Y=38 K=37, and click Add and Done.

Create three more new CMYK swatches:

  • C=8 M=92 Y=81 K=1
  • C=19 M=100 Y=83 K=11
  • C=8 M=6 Y=5 K=0
swatches panel

Step 4

Expand the Pages panel (Window > Pages) and click on the Page 3 icon to highlight it. 

Choose Numbering & Section Options from the panel’s main menu. 

numbering and section

Check Start Page Numbering at: 1, and make sure ‘1, 2, 3, 4…’ is selected from the Style menu. 

numbering and section

Click OK. A warning message will flag up about repeated page numbers, but we’ll rectify this in the next step, so go ahead and click OK

warning message

Step 5

Select the first Page 1 icon of the document (the original page 1), and choose Numbering & Section Options again. 

numbering and section

Check Start Page Numbering at: 1, as before, but this time choose ‘i, ii, iii, iv…’ from the Style menu. Then click OK

numbering and section

This splits the report into two sections—a front cover and contents page which won’t be numbered, with the first page beginning on the ‘Introduction’ page of the report. 

pages panel

Step 6

Click on the A-Master icon at the top of the Pages panel, bringing up the master on screen.

Lock the Images and Color layers, keeping the top Type layer unlocked and active. 

Use the Type Tool (T) to create a text frame across the bottom of the right-hand page.

text frame

Step 7

With your type cursor set inside the frame, go to Type > Insert Special Character > Markers > Current Page Number. 

Highlight the page number and, from either the top Controls panel or the Character and Paragraph panels (Window > Type & Tables > Character / Paragraph), set the Font to Adriatic Bold, Size 12 pt, Align Right, and the Font Color to C=8 M=6 Y=5 K=0.

Make sure the A-Master is only applied to Pages 1-6 of your document. You can remove it from Pages i-ii by dragging down the [None] icon at the very top of the Pages panel and dropping it onto these pages. 

page number

2. How to Add Gradient Color Bars to Your Report Template

Step 1

Click on Page i in the Pages panel to bring up the page on screen. 

Use the Rectangle Tool (M) to create a shape across the bottom seventh of the page, setting the Fill to your dark blue swatch.

blue bar

Step 2

Create a second shape, roughly a seventh of the page in height (40 mm). Set the Fill of this to your dark red swatch, C=19 M=100 Y=83 K=11.

dark red bar

Select this shape and Edit > Copy, Edit > Paste it, moving it directly above. Switch the Fill to the paler red swatch, C=8 M=92 Y=81 K=1.

red bar

Step 3

Paste the shape again, moving it above, and adjusting the Tint of the Fill to 95%. 

tint of swatch

Paste the shape repeatedly, creating a sequence of shapes across the top of the page, each with a slightly lower Tint, with the final shape having a 70% Tint.

tint color

Step 4

Select all the shapes on Page i (which is going to be the front cover of your report), and Edit > Copy them. 

copied bars

Scroll down to Page 6, which will be the back cover, and Edit > Paste them into the same position. 

back cover

Step 5

Scroll up to the first spread of your document, Pages ii and 1, and Paste the shapes again onto this spread. 

On the shapes, Right-Click > Transform > Rotate 90 Degrees CW. 

rotate bars

Move the shapes over to the left side of the spread, and extend the width of all the shapes together until the two bars on the far right of the group are both sitting on the right-hand page. 

gradient bars extended

Step 6

Select three of the red bars from the group, and Edit > Copy them. 

Scroll down to the next spread, Pages 2 and 3, and Paste them. Ensure the right page has a completely solid red shape across the whole page, with two narrower bars sitting next to the spine on the left-hand page. 

pasted bars

Step 7

Repeat a similar process for the next spread down, Pages 4 and 5. This time, adjust the Fill of the shapes to blue, and add an extra bar on the right-hand page, splitting the page roughly in half. 

blue rectangles

3. How to Add Typography to Your Cover and Contents Page

Step 1

Lock the Color layer and unlock the Type layer. 

Use the Type Tool (T) to create a large text frame on the front cover, typing in the title of your report and setting this to Adriatic Bold, Size 65 pt, All Caps, and the Font Color to C=8 M=6 Y=5 K=0. 

report title

Step 2

Add any other details, such as the year and a subtitle or the name of the business, to the cover, setting the Font to Adriatic Bold.

business logo

Step 3

Scroll down to the next spread, which will be the Contents and Introduction pages. 

Create a text frame for the ‘Contents’ title, setting the Font to Adriatic Bold, Size 65 pt, and the Font Color to C=8 M=6 Y=5 K=0.

On the text frame, Right-Click > Transform > Rotate 90 Degrees CCW. 

rotate frame

Position the text frame at the bottom of the blue bar on the left-hand page.

contents title

Copy and Paste the text frame, and Right-Click > Transform > Rotate 180 Degrees. Position it at the top-right of the right-hand page and switch the Font Color to blue. 

title text

Step 4

Create a text frame at the top of the first red bar on the left-hand page, typing in ‘1’.

Set the Font to Adriatic Bold, Size 100 pt, and the Font Color to C=8 M=6 Y=5 K=0.

number text

Add a title text frame, set in Adriatic Bold, Size 40 pt, and rotate this 90 Degrees CW, positioning it directly below the number. 

title text

You can also add subtitle text below in the same arrangement, with a smaller 17 pt Font Size. 

subtitle text

Step 5

You can use these first three text frames as a foundation for populating the rest of the colored bars on the contents page. 

Copy and Paste the group, varying the Font Color and Tint of them to contrast with the different-colored bars. 

pasted frames
color tint
completed contents

Step 6

On the white section, you can add introductory text for the report. 

Create a subtitle text frame set in Adriatic Bold, Size 18 pt, and a blue Font Color.

subtitle text

Add body text below set in Adriatic Medium and an 11 pt Font Size.

body text

4. How to Add Images and Content to Your Report

Step 1

Scroll down to the next spread in your document. Lock the Type layer and unlock the bottom layer, Images.

Use the Rectangle Frame Tool (F) to create an image frame across the whole of Page 2.

image frame

Go to File > Place, choose an image (such as this one) and Open it, allowing it to fill up the whole frame. 

Unlock the Color layer, select the two colored bars overlapping the image frame and head up to Object > Effects > Transparency. Set the Mode to Multiply and click OK

multiply

Step 2

Unlock the Type layer.

Copy the ‘Introduction’ header from Page 1, scroll back down to Page 3, and Edit > Paste in Place, adjusting the Font Color to your off-white swatch. 

title text

You can also use the subtitle and body text frames from the ‘Introduction’ page to populate Page 3. Copy and Paste the text frames, adjusting the Font Color. 

pasted frames

Thread any long sections of text into a second column. To do this, click on the small square symbol at the bottom-right of the first text frame, and click anywhere to create a second linked text frame. 

threaded text

Add pull-out quotes to the spread, set in Adriatic Bold, Size 27 pt.

quote text

Step 3

Add a number text frame to the bottom-left of Page 2, set in Adriatic Bold, Size 100 pt.

number

Step 4

You can now use this spread as a model for creating further spreads in your report. 

Begin by unlocking the Images and Type layers, selecting all the elements sitting on the spread and copying them. 

On the next spread down (Pages 4-5), Edit > Paste in Place.

Switch up the image, and adjust the position of the text frames. 

adjusted spread

If you want to add infographic details to your pages, simply open the infographic elements file in Illustrator or another vector program, select and Copy individual graphics, and Paste these onto the Type layer in your InDesign document. 

infographics

You can adjust the color of these vector graphics directly in InDesign, to match your gradient color scheme.

swatches panel

5. How to Export Your Report for Printing

Step 1

Go to File > Export and choose Adobe PDF (Print) from the Format menu at the bottom of the window. Name your file and click Save.

In the Export Adobe PDF window that opens, choose Press Quality from the Preset menu at the top.

press quality

Step 2

Click on Marks and Bleeds in the left-hand menu, and check both All Printer’s Marks and Use Document Bleed Settings.

Click Export to create your PDF.

marks and bleed

Great job! You can send this PDF straight off to be printed. 

Conclusion: Your Finished Report

This modern and stylish report template can be used in its original style or as a versatile template for creating your own unique report design. 

cover and contents
final spread one
final spread two

Why not try mixing up the fonts and color swatches for a fresh look?

Looking for more stylish report templates? These InDesign templates on GraphicRiver and Envato Elements come in a huge range of modern and customizable styles.

Don’t miss these brochure design tutorials for InDesign and Photoshop:

Sécurité Routière: Wife, Children, Family

Post pobrano z: Sécurité Routière: Wife, Children, Family
Print
Securite Routiere

On the Road, a Telephone Can Kill.

Advertising Agency:La Chose, Paris, France
Chief Creative Officer:Pascal Grégoire
Creative Director:Nathalie Foratier, Ibrahim Seck
Copywriter:Antoine Defaye
Art Director:Mathieu Viollet Bosson, Guillaume Ganty
Head Of Production:Nicolas Buisset
Producer:Melina audoux
Account Executives:Marina Flammier, Rodolphe Pedrono
Strategic Planner:Justine Cavanié
Director Of Communication:Barka Zérouali

Sécurité Routière: Wife, Children, Family

Post pobrano z: Sécurité Routière: Wife, Children, Family
Print
Securite Routiere

On the Road, a Telephone Can Kill.

Advertising Agency:La Chose, Paris, France
Chief Creative Officer:Pascal Grégoire
Creative Director:Nathalie Foratier, Ibrahim Seck
Copywriter:Antoine Defaye
Art Director:Mathieu Viollet Bosson, Guillaume Ganty
Head Of Production:Nicolas Buisset
Producer:Melina audoux
Account Executives:Marina Flammier, Rodolphe Pedrono
Strategic Planner:Justine Cavanié
Director Of Communication:Barka Zérouali

How to Create a YouTube Banner in Adobe Photoshop

Post pobrano z: How to Create a YouTube Banner in Adobe Photoshop

Final product image
What You’ll Be Creating

In this tutorial, we’re going to create a simple banner for a YouTube channel using stock images and basic tools in Adobe Photoshop.

Need more inspiration? Check out the amazing YouTube Banners available on GraphicRiver or our recommended banner selection in this article:

Tutorial Assets

The following assets were used during the production of this tutorial:

How to Create the Banner

Step 1

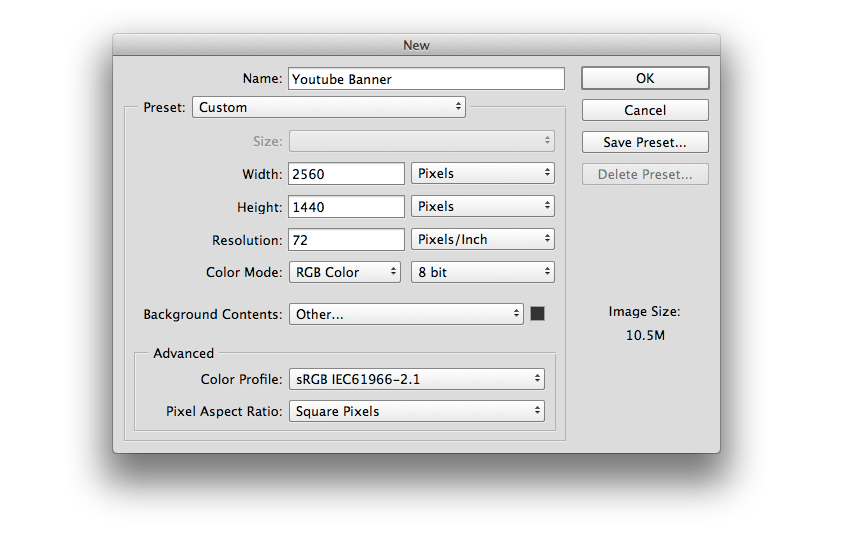
Start by creating a 2560 x 1440 px document in Photoshop with the following configuration. Set the Background Fill Color to #333333.

Setting a New Document

Step 2

Add the background and adjust its size. Then Rasterize the layer (right click > Rasterize layer) and subsequently desaturate the image (Shift-Command-U).

Placing the background in the canvas

Step 3

Now add a Layer Mask from the Layers panel and apply a Radial Gradient with the Gradient Tool (G) using the front black color. Then set the layer Opacity to 80%.

Applying a mask with gradient fill

Step 4

Let’s create the boxes to place the stock images. Draw a rectangle with the Rectangle Tool (U) and set the Stroke thickness to 20 px; any fill color will do.

Creating the first portrait with a rectangle

Step 5

Apply a Drop Shadow to the rectangle using the Blending options, using the following values:

Setting the layer style of the rectangle

Step 6

Import the first stock image and place it over the rectangle. Rasterize the image (Layer > Rasterize > Layer) and then desaturate the layer (Shift-command-U).

Placing the first image stock in the portrait

Step 7

Now create a Clipping Mask with the rectangle below (right click > Create Clipping Mask) to enter in the box.

Creating a clipping mask

Step 8

Draw another rectangle around the frame with a 1 px Stroke thickness (#FFFFFF) and no fill color. Then Group the rectangle, the image and the frame (Command-G).

Adding final details in the portrait

Step 9

Make six copies of the portrait (Command-J) and place the rest of the stock images in each of the portraits. Then Rotate and place them as shown in the image below.

Be sure to frame the images well in the box and to desaturate them.

Duplicating portraits in the banner

Step 10

Create a text title called “TRAVELCITY” with the Horizontal Type Tool (T) and apply Bold to the word „CITY„.

Adding a text title

Step 11

Take the Pen Tool (P) and draw a 5 px thick frame around the text title, leaving the upper right corner open. Then draw a cross with a Stroke thickness of 10 px.

Drawing a frame around of the text title

Step 12

Now we are going to create a vignette. To do so, create a Gradient layer from the Layers panel using the black color as front, and apply the following settings.

Adding a vignette

Congratulations! You’re Finished!

And that’s it! We have created a banner for your YouTube Channel, simply and quickly. I hope you find it useful and use what you learnt here for your future banners. I hope to see your results!

YouTube Banner Photoshop Tutorial

Want more YouTube banners? Check out the following articles:

How to Create a YouTube Banner in Adobe Photoshop

Post pobrano z: How to Create a YouTube Banner in Adobe Photoshop

Final product image
What You’ll Be Creating

In this tutorial, we’re going to create a simple banner for a YouTube channel using stock images and basic tools in Adobe Photoshop.

Need more inspiration? Check out the amazing YouTube Banners available on GraphicRiver or our recommended banner selection in this article:

Tutorial Assets

The following assets were used during the production of this tutorial:

How to Create the Banner

Step 1

Start by creating a 2560 x 1440 px document in Photoshop with the following configuration. Set the Background Fill Color to #333333.

Setting a New Document

Step 2

Add the background and adjust its size. Then Rasterize the layer (right click > Rasterize layer) and subsequently desaturate the image (Shift-Command-U).

Placing the background in the canvas

Step 3

Now add a Layer Mask from the Layers panel and apply a Radial Gradient with the Gradient Tool (G) using the front black color. Then set the layer Opacity to 80%.

Applying a mask with gradient fill

Step 4

Let’s create the boxes to place the stock images. Draw a rectangle with the Rectangle Tool (U) and set the Stroke thickness to 20 px; any fill color will do.

Creating the first portrait with a rectangle

Step 5

Apply a Drop Shadow to the rectangle using the Blending options, using the following values:

Setting the layer style of the rectangle

Step 6

Import the first stock image and place it over the rectangle. Rasterize the image (Layer > Rasterize > Layer) and then desaturate the layer (Shift-command-U).

Placing the first image stock in the portrait

Step 7

Now create a Clipping Mask with the rectangle below (right click > Create Clipping Mask) to enter in the box.

Creating a clipping mask

Step 8

Draw another rectangle around the frame with a 1 px Stroke thickness (#FFFFFF) and no fill color. Then Group the rectangle, the image and the frame (Command-G).

Adding final details in the portrait

Step 9

Make six copies of the portrait (Command-J) and place the rest of the stock images in each of the portraits. Then Rotate and place them as shown in the image below.

Be sure to frame the images well in the box and to desaturate them.

Duplicating portraits in the banner

Step 10

Create a text title called “TRAVELCITY” with the Horizontal Type Tool (T) and apply Bold to the word „CITY„.

Adding a text title

Step 11

Take the Pen Tool (P) and draw a 5 px thick frame around the text title, leaving the upper right corner open. Then draw a cross with a Stroke thickness of 10 px.

Drawing a frame around of the text title

Step 12

Now we are going to create a vignette. To do so, create a Gradient layer from the Layers panel using the black color as front, and apply the following settings.

Adding a vignette

Congratulations! You’re Finished!

And that’s it! We have created a banner for your YouTube Channel, simply and quickly. I hope you find it useful and use what you learnt here for your future banners. I hope to see your results!

YouTube Banner Photoshop Tutorial

Want more YouTube banners? Check out the following articles:

How to Create a YouTube Banner in Adobe Photoshop

Post pobrano z: How to Create a YouTube Banner in Adobe Photoshop

Final product image
What You’ll Be Creating

In this tutorial, we’re going to create a simple banner for a YouTube channel using stock images and basic tools in Adobe Photoshop.

Need more inspiration? Check out the amazing YouTube Banners available on GraphicRiver or our recommended banner selection in this article:

Tutorial Assets

The following assets were used during the production of this tutorial:

How to Create the Banner

Step 1

Start by creating a 2560 x 1440 px document in Photoshop with the following configuration. Set the Background Fill Color to #333333.

Setting a New Document

Step 2

Add the background and adjust its size. Then Rasterize the layer (right click > Rasterize layer) and subsequently desaturate the image (Shift-Command-U).

Placing the background in the canvas

Step 3

Now add a Layer Mask from the Layers panel and apply a Radial Gradient with the Gradient Tool (G) using the front black color. Then set the layer Opacity to 80%.

Applying a mask with gradient fill

Step 4

Let’s create the boxes to place the stock images. Draw a rectangle with the Rectangle Tool (U) and set the Stroke thickness to 20 px; any fill color will do.

Creating the first portrait with a rectangle

Step 5

Apply a Drop Shadow to the rectangle using the Blending options, using the following values:

Setting the layer style of the rectangle

Step 6

Import the first stock image and place it over the rectangle. Rasterize the image (Layer > Rasterize > Layer) and then desaturate the layer (Shift-command-U).

Placing the first image stock in the portrait

Step 7

Now create a Clipping Mask with the rectangle below (right click > Create Clipping Mask) to enter in the box.

Creating a clipping mask

Step 8

Draw another rectangle around the frame with a 1 px Stroke thickness (#FFFFFF) and no fill color. Then Group the rectangle, the image and the frame (Command-G).

Adding final details in the portrait

Step 9

Make six copies of the portrait (Command-J) and place the rest of the stock images in each of the portraits. Then Rotate and place them as shown in the image below.

Be sure to frame the images well in the box and to desaturate them.

Duplicating portraits in the banner

Step 10

Create a text title called “TRAVELCITY” with the Horizontal Type Tool (T) and apply Bold to the word „CITY„.

Adding a text title

Step 11

Take the Pen Tool (P) and draw a 5 px thick frame around the text title, leaving the upper right corner open. Then draw a cross with a Stroke thickness of 10 px.

Drawing a frame around of the text title

Step 12

Now we are going to create a vignette. To do so, create a Gradient layer from the Layers panel using the black color as front, and apply the following settings.

Adding a vignette

Congratulations! You’re Finished!

And that’s it! We have created a banner for your YouTube Channel, simply and quickly. I hope you find it useful and use what you learnt here for your future banners. I hope to see your results!

YouTube Banner Photoshop Tutorial

Want more YouTube banners? Check out the following articles: