Wszystkie wpisy, których autorem jest admin

How to Draw a Camel

Post pobrano z: How to Draw a Camel

Final product image
What You’ll Be Creating

Camels have an
unmistakable silhouette, with their humped back, short tail, long, slim legs,
and a neck that dips downward and rises to a small, narrow head. The English
word ‘camel’ is thought to derive from the Arabic word ‘jamāl’, which means
‘handsome’ or ‘beauty’. What an apt name for this admirable animal!

Camels efficiently
adapted to the harsh conditions of their
habitat; for this reason, they are called “the ships of the desert”.

In this tutorial,
we’ll learn what distinctive features allow camels to be capable, strong, and
endurable. And, of course, we’ll create a couple of beautiful drawings!

You may also be
interested in these drawing tutorials:

What You Will Need

In order to
complete this project, you’ll need the following equipment:

  • an HB graphite
    pencil
  • a 3B graphite
    pencil
  • an eraser
  • drawing paper
The art supplies for this project

1. How
to Draw the Dromedary Camel

Step 1

The dromedary,
also known as the Arabian camel, inhabits the Middle East and the Horn of
Africa.

Dromedaries have
only one hump, but they do employ it to great effect; their humps store up to
80 pounds of fat, which a camel can break down into water and energy when
sustenance is scarce. Humps give camels their legendary ability to travel up to
100 desert miles without water.

We’ll depict the dromedary camel in a side view. With the HB graphite pencil, I outline a rough
shape of the head; it resembles a triangle with smoothed angles.

Outlining the shape of the head

I also add the
shapes of the ear and the eye.

Drawing the shapes of the ear and eye

Step 2

I draw a curved
line for the camel’s neck, marking its general direction. Please be sure to
leave enough space for the rest of the body on the sheet of paper.

Adding the line of the neck

Then I add an oblong
shape for the camel’s body.

Drawing the body shape

Step 3

Let’s draw the
framework of the long legs, adding one segment at a time. First, I outline the
upper parts of the limbs; they are divided into portions to make the task
easier.

Constructing the legs by parts

I present the
joints as circles—the simpler, the better.

Adding the circles for joints

I add the lower
parts of the limbs; they are more slender compared to the upper ones.

Adding the next parts of the limbs

I complete the
framework with the rough shapes of the feet.

Adding the shapes of feet

Step 4

I refine the neck,
giving it some thickness with a contour.

Drawing the neck

Step 5

I add a sketchy shape
of the hump to the camel’s back.

Drawing the hump

Step 6

Now I draw the
line of its tail; camels have relatively short tails.

Adding the line of the tail

Step 7

Let’s work on the
facial features of our camel—and explore why they are perfectly suited to the
desert environment.

Although camels
have relatively small heads, their eyes are large and prominent. They enable
the animal to see for long distances.

A protruding ridge
of bone and bushy eyebrows protect the eyes from the hot sun. There are also two
sets of long eyelashes in addition to a third thin 'eyelid’; together, they serve
as a defense from the sand.

I draw the eye,
making it as contrasting and expressive as possible (don’t forget about the
highlight), and the ear. The ears are quite small, almost indiscernible from a
distance.

Drawing the eye and refining the ear

Camels have
nostrils lined with hairs that stop any sand from entering the nose. What’s
more, they can shut their nostrils at will!

Their lips are
thick and protruding;
the upper lip is split into
two sections that move independently. It’s another form of adaptation—thick,
rubbery lips allow them to eat prickly desert plants without feeling pain. In fact,
most of the water that camels take in comes from grazing on the thorny bushes that grow in a desert.

Refining the snout

Step 8

I refine the
contour of the camel’s back, erasing the unnecessary lines. I add some new
features of the tail, too—now it is tufted near the end.

Also, I mark some
skinfolds on the neck to make the sketch more credible.

Changing the contour line in the upper part of the body

Step 9

I refine the upper
parts of the limbs. The dromedary has callosities (thick, hardened skin) on the joints of the legs and
on the chest, upon which it rests in a kneeling position. They enable the
animal to withstand the heat of the desert sand.

Working on the legs

Now I refine the
lower parts of the limbs, accenting the elbows and knees. Each foot has broad,
flat, leathery pads with two toes. When a camel places its foot on the ground,
the pads spread so that the foot does not sink in the sand.

Refining the feet

Step 10

The outline is
complete, but we can make our drawing more realistic. With the HB pencil, I
apply some hatching, accenting the darker areas, such as the core shadows on
the legs and the abdomen.

The hair is
concentrated on the throat, the shoulders, and the hump; I create an illusion of
this texture with longer or curvy hatches.

As a finishing
touch, I add a hint at a drop shadow under the animal; it’s also possible to
blend it with a special blending stump, a cotton bud, or just a clean, dry
fingertip.

Applying graphite hatching

Step 11

With the 3B
pencil, I accentuate the darker areas on the camel’s body and increase the
contrast in general. The drawing of the dromedary camel is complete!

Completing the drawing

2. How to Draw the
Bactrian Camel

Step 1

In contrast to the
single-humped dromedary camel, the Bactrian camel has two humps on its back.
Its population inhabits Central Asia, including the historical region of
Bactria.

The Bactrian camel
is also the largest mammal in its native range and is the largest living camel.
Actually, the Arabian and the Bactrian camels share many features, so we can speed
up the drawing process.

I mark the camel’s
head, and then add the shape of the body nearby.  

Drawing the head and body shapes

Step 2

I join the head
and body with a line.

In fact, the silhouette
of the Bactrian camel’s neck is usually slightly different—the curve is more
accentuated, compared to the neck of the dromedary.

I also mark the
eye and the ear of the camel.

Adding the line of the neck

Step 3

I add the contour
lines of the neck and the rough shapes of two humps on the back, and mark the tail
line.

Refining the neck and adding the humps

Step 4

I add the
framework of the limbs, just in the same manner as we were drawing the
dromedary camel.

Drawing the framework of limbs

Step 5

I refine the
contour of the camel’s body, erasing the subsidiary graphite lines.

The facial
features need some attention, too—let’s draw a happy camel with a hint at a
smile!

Refining the head and body of the camel

Step 6

The Bactrian camel
has long, slender legs, but its body forms a stouter, heavier impression than
the body of the dromedary.

The feet are very
tough—it’s another adaptive feature; these camels are migratory, and their habitat
ranges from rocky mountain massifs to flat desert, stony plains, and sand
dunes. The Bactrians are designed for extreme environments!

The feet have undivided
soles and two broad toes on each foot.

Working on the feet

Step 7

I enhance the
sketch with the HB graphite hatching, darkening the sides of the humps and the
underside of the body. The Bactrians have long hair on the neck and throat (a
‘mane’ and ‘beard’).

The long, wooly
coat protects the Bactrians from extreme cold (as low as −40 °C in winter) and
is shed in warmer months. By the way, the most satisfactory camel fiber is
gathered particularly from the Bactrian camels.

Applying graphite hatching to the drawing

Step 8

With the 3B
pencil, I increase the contrast in the drawing. I also make subtle changes to the
contour line of the camel’s body, making it more ‘hairy’ to imitate the shorter, slimmer undercoat.

Completing the drawing

Your Drawing Are
Complete

Congratulations!
You’ve created two beautiful drawings and, hopefully, learned a lot about
camels.

May your further
creative journey be full of joy and inspiration! If you enjoyed this tutorial, you may also be interested in these:

The result of our work

How to Draw a Camel

Post pobrano z: How to Draw a Camel

Final product image
What You’ll Be Creating

Camels have an
unmistakable silhouette, with their humped back, short tail, long, slim legs,
and a neck that dips downward and rises to a small, narrow head. The English
word ‘camel’ is thought to derive from the Arabic word ‘jamāl’, which means
‘handsome’ or ‘beauty’. What an apt name for this admirable animal!

Camels efficiently
adapted to the harsh conditions of their
habitat; for this reason, they are called “the ships of the desert”.

In this tutorial,
we’ll learn what distinctive features allow camels to be capable, strong, and
endurable. And, of course, we’ll create a couple of beautiful drawings!

You may also be
interested in these drawing tutorials:

What You Will Need

In order to
complete this project, you’ll need the following equipment:

  • an HB graphite
    pencil
  • a 3B graphite
    pencil
  • an eraser
  • drawing paper
The art supplies for this project

1. How
to Draw the Dromedary Camel

Step 1

The dromedary,
also known as the Arabian camel, inhabits the Middle East and the Horn of
Africa.

Dromedaries have
only one hump, but they do employ it to great effect; their humps store up to
80 pounds of fat, which a camel can break down into water and energy when
sustenance is scarce. Humps give camels their legendary ability to travel up to
100 desert miles without water.

We’ll depict the dromedary camel in a side view. With the HB graphite pencil, I outline a rough
shape of the head; it resembles a triangle with smoothed angles.

Outlining the shape of the head

I also add the
shapes of the ear and the eye.

Drawing the shapes of the ear and eye

Step 2

I draw a curved
line for the camel’s neck, marking its general direction. Please be sure to
leave enough space for the rest of the body on the sheet of paper.

Adding the line of the neck

Then I add an oblong
shape for the camel’s body.

Drawing the body shape

Step 3

Let’s draw the
framework of the long legs, adding one segment at a time. First, I outline the
upper parts of the limbs; they are divided into portions to make the task
easier.

Constructing the legs by parts

I present the
joints as circles—the simpler, the better.

Adding the circles for joints

I add the lower
parts of the limbs; they are more slender compared to the upper ones.

Adding the next parts of the limbs

I complete the
framework with the rough shapes of the feet.

Adding the shapes of feet

Step 4

I refine the neck,
giving it some thickness with a contour.

Drawing the neck

Step 5

I add a sketchy shape
of the hump to the camel’s back.

Drawing the hump

Step 6

Now I draw the
line of its tail; camels have relatively short tails.

Adding the line of the tail

Step 7

Let’s work on the
facial features of our camel—and explore why they are perfectly suited to the
desert environment.

Although camels
have relatively small heads, their eyes are large and prominent. They enable
the animal to see for long distances.

A protruding ridge
of bone and bushy eyebrows protect the eyes from the hot sun. There are also two
sets of long eyelashes in addition to a third thin 'eyelid’; together, they serve
as a defense from the sand.

I draw the eye,
making it as contrasting and expressive as possible (don’t forget about the
highlight), and the ear. The ears are quite small, almost indiscernible from a
distance.

Drawing the eye and refining the ear

Camels have
nostrils lined with hairs that stop any sand from entering the nose. What’s
more, they can shut their nostrils at will!

Their lips are
thick and protruding;
the upper lip is split into
two sections that move independently. It’s another form of adaptation—thick,
rubbery lips allow them to eat prickly desert plants without feeling pain. In fact,
most of the water that camels take in comes from grazing on the thorny bushes that grow in a desert.

Refining the snout

Step 8

I refine the
contour of the camel’s back, erasing the unnecessary lines. I add some new
features of the tail, too—now it is tufted near the end.

Also, I mark some
skinfolds on the neck to make the sketch more credible.

Changing the contour line in the upper part of the body

Step 9

I refine the upper
parts of the limbs. The dromedary has callosities (thick, hardened skin) on the joints of the legs and
on the chest, upon which it rests in a kneeling position. They enable the
animal to withstand the heat of the desert sand.

Working on the legs

Now I refine the
lower parts of the limbs, accenting the elbows and knees. Each foot has broad,
flat, leathery pads with two toes. When a camel places its foot on the ground,
the pads spread so that the foot does not sink in the sand.

Refining the feet

Step 10

The outline is
complete, but we can make our drawing more realistic. With the HB pencil, I
apply some hatching, accenting the darker areas, such as the core shadows on
the legs and the abdomen.

The hair is
concentrated on the throat, the shoulders, and the hump; I create an illusion of
this texture with longer or curvy hatches.

As a finishing
touch, I add a hint at a drop shadow under the animal; it’s also possible to
blend it with a special blending stump, a cotton bud, or just a clean, dry
fingertip.

Applying graphite hatching

Step 11

With the 3B
pencil, I accentuate the darker areas on the camel’s body and increase the
contrast in general. The drawing of the dromedary camel is complete!

Completing the drawing

2. How to Draw the
Bactrian Camel

Step 1

In contrast to the
single-humped dromedary camel, the Bactrian camel has two humps on its back.
Its population inhabits Central Asia, including the historical region of
Bactria.

The Bactrian camel
is also the largest mammal in its native range and is the largest living camel.
Actually, the Arabian and the Bactrian camels share many features, so we can speed
up the drawing process.

I mark the camel’s
head, and then add the shape of the body nearby.  

Drawing the head and body shapes

Step 2

I join the head
and body with a line.

In fact, the silhouette
of the Bactrian camel’s neck is usually slightly different—the curve is more
accentuated, compared to the neck of the dromedary.

I also mark the
eye and the ear of the camel.

Adding the line of the neck

Step 3

I add the contour
lines of the neck and the rough shapes of two humps on the back, and mark the tail
line.

Refining the neck and adding the humps

Step 4

I add the
framework of the limbs, just in the same manner as we were drawing the
dromedary camel.

Drawing the framework of limbs

Step 5

I refine the
contour of the camel’s body, erasing the subsidiary graphite lines.

The facial
features need some attention, too—let’s draw a happy camel with a hint at a
smile!

Refining the head and body of the camel

Step 6

The Bactrian camel
has long, slender legs, but its body forms a stouter, heavier impression than
the body of the dromedary.

The feet are very
tough—it’s another adaptive feature; these camels are migratory, and their habitat
ranges from rocky mountain massifs to flat desert, stony plains, and sand
dunes. The Bactrians are designed for extreme environments!

The feet have undivided
soles and two broad toes on each foot.

Working on the feet

Step 7

I enhance the
sketch with the HB graphite hatching, darkening the sides of the humps and the
underside of the body. The Bactrians have long hair on the neck and throat (a
‘mane’ and ‘beard’).

The long, wooly
coat protects the Bactrians from extreme cold (as low as −40 °C in winter) and
is shed in warmer months. By the way, the most satisfactory camel fiber is
gathered particularly from the Bactrian camels.

Applying graphite hatching to the drawing

Step 8

With the 3B
pencil, I increase the contrast in the drawing. I also make subtle changes to the
contour line of the camel’s body, making it more ‘hairy’ to imitate the shorter, slimmer undercoat.

Completing the drawing

Your Drawing Are
Complete

Congratulations!
You’ve created two beautiful drawings and, hopefully, learned a lot about
camels.

May your further
creative journey be full of joy and inspiration! If you enjoyed this tutorial, you may also be interested in these:

The result of our work

How to Draw a Camel

Post pobrano z: How to Draw a Camel

Final product image
What You’ll Be Creating

Camels have an
unmistakable silhouette, with their humped back, short tail, long, slim legs,
and a neck that dips downward and rises to a small, narrow head. The English
word ‘camel’ is thought to derive from the Arabic word ‘jamāl’, which means
‘handsome’ or ‘beauty’. What an apt name for this admirable animal!

Camels efficiently
adapted to the harsh conditions of their
habitat; for this reason, they are called “the ships of the desert”.

In this tutorial,
we’ll learn what distinctive features allow camels to be capable, strong, and
endurable. And, of course, we’ll create a couple of beautiful drawings!

You may also be
interested in these drawing tutorials:

What You Will Need

In order to
complete this project, you’ll need the following equipment:

  • an HB graphite
    pencil
  • a 3B graphite
    pencil
  • an eraser
  • drawing paper
The art supplies for this project

1. How
to Draw the Dromedary Camel

Step 1

The dromedary,
also known as the Arabian camel, inhabits the Middle East and the Horn of
Africa.

Dromedaries have
only one hump, but they do employ it to great effect; their humps store up to
80 pounds of fat, which a camel can break down into water and energy when
sustenance is scarce. Humps give camels their legendary ability to travel up to
100 desert miles without water.

We’ll depict the dromedary camel in a side view. With the HB graphite pencil, I outline a rough
shape of the head; it resembles a triangle with smoothed angles.

Outlining the shape of the head

I also add the
shapes of the ear and the eye.

Drawing the shapes of the ear and eye

Step 2

I draw a curved
line for the camel’s neck, marking its general direction. Please be sure to
leave enough space for the rest of the body on the sheet of paper.

Adding the line of the neck

Then I add an oblong
shape for the camel’s body.

Drawing the body shape

Step 3

Let’s draw the
framework of the long legs, adding one segment at a time. First, I outline the
upper parts of the limbs; they are divided into portions to make the task
easier.

Constructing the legs by parts

I present the
joints as circles—the simpler, the better.

Adding the circles for joints

I add the lower
parts of the limbs; they are more slender compared to the upper ones.

Adding the next parts of the limbs

I complete the
framework with the rough shapes of the feet.

Adding the shapes of feet

Step 4

I refine the neck,
giving it some thickness with a contour.

Drawing the neck

Step 5

I add a sketchy shape
of the hump to the camel’s back.

Drawing the hump

Step 6

Now I draw the
line of its tail; camels have relatively short tails.

Adding the line of the tail

Step 7

Let’s work on the
facial features of our camel—and explore why they are perfectly suited to the
desert environment.

Although camels
have relatively small heads, their eyes are large and prominent. They enable
the animal to see for long distances.

A protruding ridge
of bone and bushy eyebrows protect the eyes from the hot sun. There are also two
sets of long eyelashes in addition to a third thin 'eyelid’; together, they serve
as a defense from the sand.

I draw the eye,
making it as contrasting and expressive as possible (don’t forget about the
highlight), and the ear. The ears are quite small, almost indiscernible from a
distance.

Drawing the eye and refining the ear

Camels have
nostrils lined with hairs that stop any sand from entering the nose. What’s
more, they can shut their nostrils at will!

Their lips are
thick and protruding;
the upper lip is split into
two sections that move independently. It’s another form of adaptation—thick,
rubbery lips allow them to eat prickly desert plants without feeling pain. In fact,
most of the water that camels take in comes from grazing on the thorny bushes that grow in a desert.

Refining the snout

Step 8

I refine the
contour of the camel’s back, erasing the unnecessary lines. I add some new
features of the tail, too—now it is tufted near the end.

Also, I mark some
skinfolds on the neck to make the sketch more credible.

Changing the contour line in the upper part of the body

Step 9

I refine the upper
parts of the limbs. The dromedary has callosities (thick, hardened skin) on the joints of the legs and
on the chest, upon which it rests in a kneeling position. They enable the
animal to withstand the heat of the desert sand.

Working on the legs

Now I refine the
lower parts of the limbs, accenting the elbows and knees. Each foot has broad,
flat, leathery pads with two toes. When a camel places its foot on the ground,
the pads spread so that the foot does not sink in the sand.

Refining the feet

Step 10

The outline is
complete, but we can make our drawing more realistic. With the HB pencil, I
apply some hatching, accenting the darker areas, such as the core shadows on
the legs and the abdomen.

The hair is
concentrated on the throat, the shoulders, and the hump; I create an illusion of
this texture with longer or curvy hatches.

As a finishing
touch, I add a hint at a drop shadow under the animal; it’s also possible to
blend it with a special blending stump, a cotton bud, or just a clean, dry
fingertip.

Applying graphite hatching

Step 11

With the 3B
pencil, I accentuate the darker areas on the camel’s body and increase the
contrast in general. The drawing of the dromedary camel is complete!

Completing the drawing

2. How to Draw the
Bactrian Camel

Step 1

In contrast to the
single-humped dromedary camel, the Bactrian camel has two humps on its back.
Its population inhabits Central Asia, including the historical region of
Bactria.

The Bactrian camel
is also the largest mammal in its native range and is the largest living camel.
Actually, the Arabian and the Bactrian camels share many features, so we can speed
up the drawing process.

I mark the camel’s
head, and then add the shape of the body nearby.  

Drawing the head and body shapes

Step 2

I join the head
and body with a line.

In fact, the silhouette
of the Bactrian camel’s neck is usually slightly different—the curve is more
accentuated, compared to the neck of the dromedary.

I also mark the
eye and the ear of the camel.

Adding the line of the neck

Step 3

I add the contour
lines of the neck and the rough shapes of two humps on the back, and mark the tail
line.

Refining the neck and adding the humps

Step 4

I add the
framework of the limbs, just in the same manner as we were drawing the
dromedary camel.

Drawing the framework of limbs

Step 5

I refine the
contour of the camel’s body, erasing the subsidiary graphite lines.

The facial
features need some attention, too—let’s draw a happy camel with a hint at a
smile!

Refining the head and body of the camel

Step 6

The Bactrian camel
has long, slender legs, but its body forms a stouter, heavier impression than
the body of the dromedary.

The feet are very
tough—it’s another adaptive feature; these camels are migratory, and their habitat
ranges from rocky mountain massifs to flat desert, stony plains, and sand
dunes. The Bactrians are designed for extreme environments!

The feet have undivided
soles and two broad toes on each foot.

Working on the feet

Step 7

I enhance the
sketch with the HB graphite hatching, darkening the sides of the humps and the
underside of the body. The Bactrians have long hair on the neck and throat (a
‘mane’ and ‘beard’).

The long, wooly
coat protects the Bactrians from extreme cold (as low as −40 °C in winter) and
is shed in warmer months. By the way, the most satisfactory camel fiber is
gathered particularly from the Bactrian camels.

Applying graphite hatching to the drawing

Step 8

With the 3B
pencil, I increase the contrast in the drawing. I also make subtle changes to the
contour line of the camel’s body, making it more ‘hairy’ to imitate the shorter, slimmer undercoat.

Completing the drawing

Your Drawing Are
Complete

Congratulations!
You’ve created two beautiful drawings and, hopefully, learned a lot about
camels.

May your further
creative journey be full of joy and inspiration! If you enjoyed this tutorial, you may also be interested in these:

The result of our work

8 Pieces of Technology Every Designer Should Have

Post pobrano z: 8 Pieces of Technology Every Designer Should Have

Great designers tend to be extremely talented and also work
hard to hone their skills. However, it’s equally important to own and master
the tools of the trade. Having access to the latest technologies might help you
work more efficiently and become highly successful in your industry.

As the majority of the work is done digitally, designers
should have a powerful computer to work flawlessly with big files. It’s also
essential to have a big external hard drive to store them and have a backup in
case something goes wrong. And don’t forget about a comfortable chair, because
working with excruciating back pain can badly affect your productivity.
Discover these eight pieces of technology every designer should have.

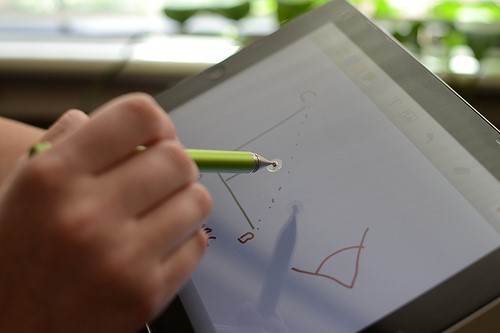
A Tablet and Stylus Pen

Image via Flickr by Teal Jeep

Although it’s totally fine to create your drafts using
artist’s pencils and high-quality sketchbooks, you’ll still need to work on
them digitally. The best course of action is to scan or photograph your drafts,
and then finish the work using tools such as the Wacom Intuos, a Huion
1060PLUS, or even an iPad Pro.

A Powerful Laptop or Desktop PC

If you tend to always carry your work with you and spend
time in coffee shops or co-working spaces, a laptop is probably the best
choice. Otherwise, a powerful desktop PC back home should do the job. Pay
special attention to the screen resolution, the RAM memory, and the processor —
since you’ll be working with heavy graphics all the time.

An Incredible Monitor With a
Calibrator

It goes without saying that having a high-definition
monitor is of the utmost importance for a designer. You need to be able to see
the colors perfectly as it would be a disaster if they were different from the
final product. Monitor calibrators can help set up the ideal brightness, gray
balancing, and other settings. Plus, they have room light monitoring. It’s
definitely a must-have!

A Big External Hard Drive

Depending on the type of work you’re doing, you’ll be
dealing with massive files. They usually tend to eat up most of the local
storage, so an external hard drive is essential if you need more space. They’re
also perfect to sync your backups as no one wants to lose a day’s work because
of a power cut.

The Latest Software

It would be great if you could create amazing content with
the pre-installed software that comes with your laptop, but that’s rarely the
case. Most designers tend to use Adobe Creative Cloud, which comes with InDesign,
Photoshop, and Illustrator. They may also use tools such as Corel Painter and
Affinity Designer. They’re not cheap, but it’s an investment that’s worth
making.

A Top-of-the-Line Smartphone

Everybody seems to need a smartphone nowadays, but
designers are a special case — they require a powerful device with a capable
network. A great option would be T-Mobile’s iPhone 6s Plus with its 12MP camera and
retina HD display. When you take into consideration that T-Mobile is the
fastest network, you won’t have problems checking those big files on the go.

Quality Speakers or Headphones

Did you know that listening to music while working can drastically improve your productivity? Studies show that depending
on the type of work (problem-solving, data entry, etc.), you might want to
listen to classical music, pop songs, or even dance music! With that in mind,
it’s probably a good idea to have top-notch speakers or headphones so you can
get more accomplished while listening to the right tunes.

A Comfortable Chair

If you’ve ever tried to work with never-ending back pain,
then you know how important a comfortable chair is. As you struggle to focus on
your projects, your productivity decreases and consequently your earnings. The
right ergonomic chair can help with your back, but also with repetitive strain
injury and even with blood flow.

Being a designer is no easy feat. Apart from constantly
trying to come up with interesting ideas for your projects, you also need
incredible artistic skills. But if you don’t have the right tools to work with,
all that talent could be wasted. When you invest in high-quality technology,
you’re also investing in your career.