Buick’s 2017 Super Bowl advertising campaign “Not So Pee Wee Football”, features NFL most valued player Cam Newton and supermodel Miranda Kerr alongside two teams of Pee Wee football players and their supporters. The Buick Not So Pee Wee Football spot takes place at a Pee Wee football game where two dads are in the stands watching their kids play. As a Buick Sport Red Cascada ST pulls into the parking lot, one of the men says, “Check out that Buick!” with delight. The other dad says, “If that’s a Buick, then my kid is Cam Newton.” The football game, of course, picks up with a new injection of muscle and experience. A Buick Encore SUV arrives toward the end of the commercial, with the coach of the “Sharks” saying, “If that’s a Buick, then I’m a supermodel.” He then turns into Kerr. The campaign, online at buick.com/biggame, is designed to reset expectations about Buick’s modern vehicles, particularly the Encore SUV and Cascada convertible and provokes viewers with its “That’s a Buick?” theme.
“Buick is experiencing unprecedented sales success and consumer awareness backed by remarkable third-party quality and reliability validation,” said Duncan Aldred, vice president of Global Buick Sales, Service and Marketing. “Our latest vehicles like the Encore and Cascada belong in the spotlight on a global stage only the Super Bowl can offer.”
“Every time I take the field, I aim to shatter traditional expectations of the quarterback position,” said Newton. “Buick’s doing the same thing with this ad, and I think everyone watching will love it. It was so fun going back to the Pee Wee field with such great kids.”.
Buick Not So Pee Wee Football Credits
The Buick Not So Pee Wee Football campaign was developed at Engage M-1 / Leo Burnett Detroit, by creative directors Steve Glinski, Tim Thomas, Christopher Handyside, associate creative director/art director Stephen Kerry, associate creative director/copywriter Matt Perry, group account directors Brian McCallum and Yanlin Sun, director if integrated production Brian Dooley, executive producer Tom Hillebrand.
Editor was Paul Martinez at Arcade Edit with executive producer Crissy DeSimone, managing partner Damian Stevens, head of production Kirsten Thon-Webb, senior producer Rebecca Jameson and assistant editor Pete D’Andrea.
Visual effects were produced at Timber by creative directors Jonah Hall and Kevin Lau, executive producer Sabrina Elizondo, senior producer Megan Kennedy, lead Flame artist Christopher DeCristo, Flame artist Mark Loso, Flame assistant Austin Lewis, nuke artists Nick Hiegel, Eric Almeras, Robert Williams, Eduardo Anton. CG tracking was done at Match the Motion LLC by Matthew Merkovich. Rotoscoping was done at Rotomaker LLC. Colour was produced at Shed.
Sound was produced at Eleven Sound by sound designer and mixer Jeff Payne, executive producer Melissa Elston, assistant mixers Jordan Meltzer and AJ Murrillo.
Buick’s 2017 Super Bowl advertising campaign “Not So Pee Wee Football”, features NFL most valued player Cam Newton and supermodel Miranda Kerr alongside two teams of Pee Wee football players and their supporters. The Buick Not So Pee Wee Football spot takes place at a Pee Wee football game where two dads are in the stands watching their kids play. As a Buick Sport Red Cascada ST pulls into the parking lot, one of the men says, “Check out that Buick!” with delight. The other dad says, “If that’s a Buick, then my kid is Cam Newton.” The football game, of course, picks up with a new injection of muscle and experience. A Buick Encore SUV arrives toward the end of the commercial, with the coach of the “Sharks” saying, “If that’s a Buick, then I’m a supermodel.” He then turns into Kerr. The campaign, online at buick.com/biggame, is designed to reset expectations about Buick’s modern vehicles, particularly the Encore SUV and Cascada convertible and provokes viewers with its “That’s a Buick?” theme.
“Buick is experiencing unprecedented sales success and consumer awareness backed by remarkable third-party quality and reliability validation,” said Duncan Aldred, vice president of Global Buick Sales, Service and Marketing. “Our latest vehicles like the Encore and Cascada belong in the spotlight on a global stage only the Super Bowl can offer.”
“Every time I take the field, I aim to shatter traditional expectations of the quarterback position,” said Newton. “Buick’s doing the same thing with this ad, and I think everyone watching will love it. It was so fun going back to the Pee Wee field with such great kids.”.
Buick Not So Pee Wee Football Credits
The Buick Not So Pee Wee Football campaign was developed at Engage M-1 / Leo Burnett Detroit, by creative directors Steve Glinski, Tim Thomas, Christopher Handyside, associate creative director/art director Stephen Kerry, associate creative director/copywriter Matt Perry, group account directors Brian McCallum and Yanlin Sun, director if integrated production Brian Dooley, executive producer Tom Hillebrand.
Editor was Paul Martinez at Arcade Edit with executive producer Crissy DeSimone, managing partner Damian Stevens, head of production Kirsten Thon-Webb, senior producer Rebecca Jameson and assistant editor Pete D’Andrea.
Visual effects were produced at Timber by creative directors Jonah Hall and Kevin Lau, executive producer Sabrina Elizondo, senior producer Megan Kennedy, lead Flame artist Christopher DeCristo, Flame artist Mark Loso, Flame assistant Austin Lewis, nuke artists Nick Hiegel, Eric Almeras, Robert Williams, Eduardo Anton. CG tracking was done at Match the Motion LLC by Matthew Merkovich. Rotoscoping was done at Rotomaker LLC. Colour was produced at Shed.
Sound was produced at Eleven Sound by sound designer and mixer Jeff Payne, executive producer Melissa Elston, assistant mixers Jordan Meltzer and AJ Murrillo.
84 Lumber, a building materials supply company based in Pennsylvania, is using the Super Bowl to run a controversial television commercial featuring Mexican immigrants. A young girl travels with her mother on foot as they head towards the Mexico USA border. As they travel the girl collects red white and blue pieces of fabric. 84 Lumber’s Super Bowl spot is the launch of a national recruiting campaign for the company’s management training program. The 84 Lumber Journey campaign, online at journey84.com, is targeting males’ ages 20 to 29 that want to take control of their careers and embody the entrepreneurial spirit that runs rampant at 84 Lumber.
Chief Creative Officer Rob Schapiro talks about the commercial.
Director Cole Webley speaks about the controversial 84 Lumber Super Bowl commercial.
“For 60 years, this has been a company defined by its people, entrepreneurs who see opportunity where others don’t,” said Maggie Hardy Magerko, 84 Lumber owner and president. “Our next 60 years will be no different. That’s why we’re casting a wider net; we want the world to know 84 Lumber is the place for people who don’t always fit nicely into a box.”
“Our industry is going through a period of extreme disruption,” Hardy Magerko continues. “And I’ve always preferred to be the one doing the disrupting, rather than the one being disrupted. But to do that, we need to hire and train people differently. We don’t need more people interested in doing the same thing that’s always been done. We need more people interested in creating their own path for themselves and for 84 Lumber.”
84 Lumber Journey Credits
The 84 Lumber Journey campaign was developed at Brunner, Pittsburgh, by creative director Dave Vissat, chief creative officer Rob Schapiro, associate creative directors Derek Julin, Kevin Corfield, chief client officer Jeff Maggs, account director Lauren Tedesco, senior account manager Dana Lucas, associate broadcast director Kathy Baldauf, with Fixer Partners executive producers John Noble and Brad Powell.
Filming was shot by director Cole Webley via Sanctuary with director of photography Justin Brown, creative director Matt Wilson, line producer Christopher Cho, executive producer Preston Lee, heads of production Adam Litt, Leopoldo Luisetti, and production designer Christopher Lagunes.
Editor was Jeff Buchanan at Final Cut with executive producer Sarah Roebuck, producer Penny Ensley, head of production Jen Sienkwicz, assistant editor Geoff Hastings and cutting assistant Andre Castiglioni.
Visual effects were produced at Method Studios by executive producer Stuart Robinson, CG supervisor Boaz Livny, VFX supervisor Eliza Pelham Randall, Flame artists Stephen Morris and Jared Pollack, senior VFX producer Bennett Lieber.
Color was graded at Company 3 by colourist Tom Poole.
Sound was produced at Heard City by sound mixer Phil Loeb.
Music was produced Future Perfect by composer Victor Magro and producer Max Gosling.
84 Lumber, a building materials supply company based in Pennsylvania, is using the Super Bowl to run a controversial television commercial featuring Mexican immigrants. A young girl travels with her mother on foot as they head towards the Mexico USA border. As they travel the girl collects red white and blue pieces of fabric. 84 Lumber’s Super Bowl spot is the launch of a national recruiting campaign for the company’s management training program. The 84 Lumber Journey campaign, online at journey84.com, is targeting males’ ages 20 to 29 that want to take control of their careers and embody the entrepreneurial spirit that runs rampant at 84 Lumber.
Chief Creative Officer Rob Schapiro talks about the commercial.
Director Cole Webley speaks about the controversial 84 Lumber Super Bowl commercial.
“For 60 years, this has been a company defined by its people, entrepreneurs who see opportunity where others don’t,” said Maggie Hardy Magerko, 84 Lumber owner and president. “Our next 60 years will be no different. That’s why we’re casting a wider net; we want the world to know 84 Lumber is the place for people who don’t always fit nicely into a box.”
“Our industry is going through a period of extreme disruption,” Hardy Magerko continues. “And I’ve always preferred to be the one doing the disrupting, rather than the one being disrupted. But to do that, we need to hire and train people differently. We don’t need more people interested in doing the same thing that’s always been done. We need more people interested in creating their own path for themselves and for 84 Lumber.”
84 Lumber Journey Credits
The 84 Lumber Journey campaign was developed at Brunner, Pittsburgh, by creative director Dave Vissat, chief creative officer Rob Schapiro, associate creative directors Derek Julin, Kevin Corfield, chief client officer Jeff Maggs, account director Lauren Tedesco, senior account manager Dana Lucas, associate broadcast director Kathy Baldauf, with Fixer Partners executive producers John Noble and Brad Powell.
Filming was shot by director Cole Webley via Sanctuary with director of photography Justin Brown, creative director Matt Wilson, line producer Christopher Cho, executive producer Preston Lee, heads of production Adam Litt, Leopoldo Luisetti, and production designer Christopher Lagunes.
Editor was Jeff Buchanan at Final Cut with executive producer Sarah Roebuck, producer Penny Ensley, head of production Jen Sienkwicz, assistant editor Geoff Hastings and cutting assistant Andre Castiglioni.
Visual effects were produced at Method Studios by executive producer Stuart Robinson, CG supervisor Boaz Livny, VFX supervisor Eliza Pelham Randall, Flame artists Stephen Morris and Jared Pollack, senior VFX producer Bennett Lieber.
Color was graded at Company 3 by colourist Tom Poole.
Sound was produced at Heard City by sound mixer Phil Loeb.
Music was produced Future Perfect by composer Victor Magro and producer Max Gosling.
I love headphones, and this tutorial is inspired by the Audiotechnica M50X. As you’ll see, we’ll be creating this with basic shapes in Adobe Illustrator. So if you’re a lover of headphones and good music, this tutorial is for you!
Press Control-N to make a New Document. Set the Units to Pixels, and enter 800 x 600 for the width and height of the document. Then in the Advanced options, select RGB, Screen (72 ppi), and make sure to activate the Align New Objects to Pixel Grid box before clicking OK.
Activate the Grid (View > Show Grid) and Snap to Grid (View > Snap to Grid). You’ll need a grid every 10 px, so simply press Control-K to go to Preferences, and in Guides & Grid set Gridline every to 10 and Subdivisions to 4. Don’t worry—the grid will help you work in an easy way, and it can also be enabled or disabled by pressing the keyboard shortcut Control-„.
You can activate the Info panel (Window > Info) in order to have a preview of the size and position of your shapes. Remember to set the measuring unit to Pixels from Edit > Preferences > Units. This will greatly increase the speed of your work.
2. How to Create the Headphones
First things first—let’s start with one earpad so we can
duplicate it and then create the headband for our headphones. Make sure to turn on the Grid so that you can work with greater precision and ease.
Step 1
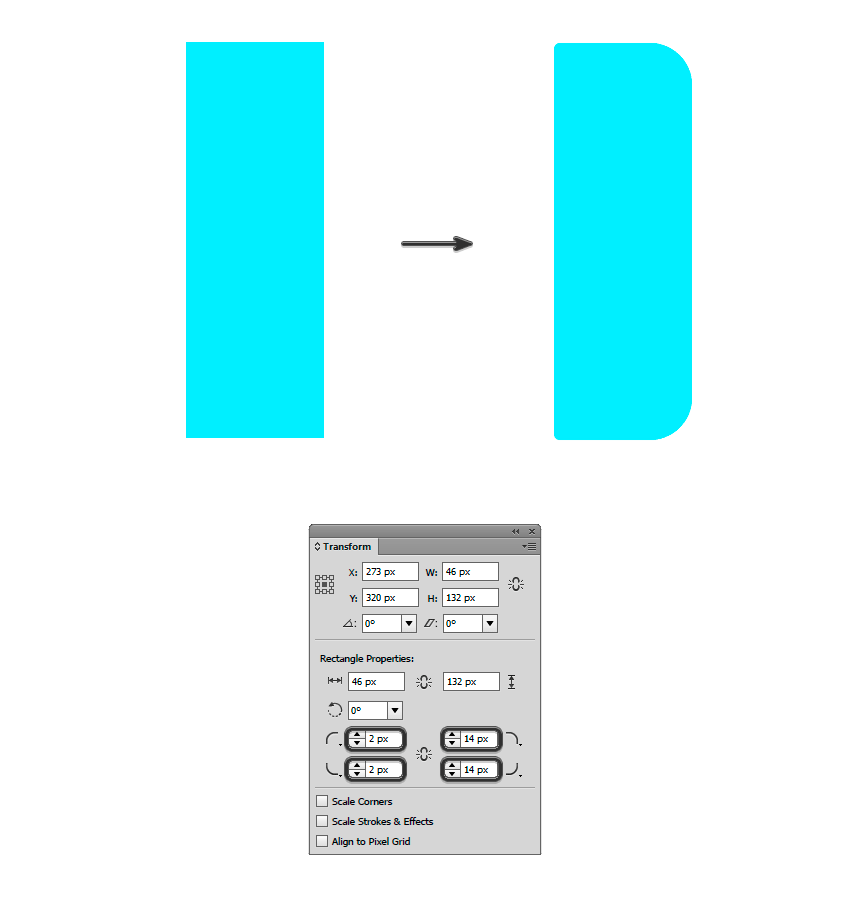
Start by creating the earpad with a 46 x 132 px rectangle using the Rectangle Tool (M). Select #84EDFF as the fill color and no color for the stroke fill.
In the Transform panel, enter 14 px as the right-side corner
radius and 2 px as the left-side corner radius.
Step 2
Duplicate the rectangle (Control-C > Control-F)
and change its Width to 36 px with the Selection Tool (V). Select #40BDD1 as the fill color and change the right-side corner radius to 10 px.
Step 3
Duplicate the last rectangle (Control-C > Control-F) and change its Width to 24 px. Select #47D2E9 as the fill color and change the left-side corner radius to 6 px.
Step 4
Next to the earpad, create the speaker base
using a 4 x 128 px rectangle, and use #5B5B5F as the fill color; then set the right-side corner radius to 2 px.
Step 5
Now create the housing using a 24 x 80 px rectangle. Select #363434 as the fill color and change
the left-side corner radius to 2 px.
Step 6
Add some depth to the housing duplicating
(Control-C > Control-F) the previous rectangle and changing its Height to 58 px.
Change the fill color to #3B3939.
Step 7
Repeat the previous step and change the
rectangle’s Height to 50 px. Change the fill color to #444242.
Step 8
Now create the support for the speaker’s hinge
using a 20 x 16 px rectangle. Select #4D4A4A as the fill color and change the left side radius to 8 px.
Duplicate the rectangle (Control-C > Control-F)
and move 2 px downwards using the arrow of your keyboard. Change the fill color
to #3B3B3B and send it backwards
(Object > Arrange > Send Backward).
Step 9
Create a 8 x 42 px rectangle for the small headband on the speaker/housing.
Set the lower corner radius to 4 px and select #5B5B5F as the fill color.
Duplicate it (Control-C > Control-F) and change
the fill color to #3B3B3B. Move the rectangle
downwards 2 px, and send it backwards (Object > Arrange > Send Backward).
Step 10
Continue with the small headband using a 8 x 10
px rectangle. Select #444242 as the fill color and place
the rectangle as shown in the image below.
Step 11
Now create a hinge using a 16 x 16 px ellipse
with the Ellipse Tool (L). Select #5B5B5F as the fill color and place the ellipse as shown in the image below.
Duplicate the ellipse and change its size to 12 x 12 px from the Transform panel. Change the fill color to #444242.
Step 12
Continue drawing the headband’s support using
a 16 x 18 px rectangle. Change the fill color to #444242. Select chamfer corners for the lower corners and set the
radius to 4 px. Send the rectangle to the back (Object > Arrange > Send
to Back).
Step 13
Create a new 12 x 20 px rectangle, and select #5B5B5F as the fill color. Set the lower corner’s radius to 6 px.
Duplicate (Control-C > Control-F) the rectangle
and change the fill color to #3B3B3B. Send it backwards
(Object > Arrange > Send to Back) and move it downwards 2 px.
Step 14
Create two rectangles, one of 4 x 26 px (#D8D9DD) for
the headband strap, and another one of 12 x 20 px (#5B5B5F) as the strap support.
Duplicate the first rectangle (Control-C > Control-F) and change its Height to 2 px. Change the fill color to #AEADB3.
Select everything and group it together
(Control-G).
Step 15
Now, we’ll draw our headphones headband. Let’s begin by creating a 252 x 252 px ellipse and selecting 20 px as the stroke width.
Select #84EDFF as the stroke color and delete the ellipse’s lower anchor point with
the Direct Selection Tool (A).
Expand the stroke (Object > Expand…) and
then slightly round the headband’s lower edges with the Direct Selection Tool
(A).
Step 16
Duplicate the headband (Control-C > Control-F).
Set the scale to 93% (Object > Transform > Scale..). Use #47D2E9 as the fill color.
Move the duplicated headband 6 px downwards, and then select both headbands and remove the lower remaining part with the Shape
Builder Tool (Shift-M).
Step 17
We are about to finish the headphones!
Now select the left speaker, duplicate it
(Control-C > Control-F) and reflect it vertically (Object > Transform >
Reflect…). Put it just on the right side of the headband.
3. How to Create a Plug Cord
Now that we have finished the headphones, it’s time to draw the plug cord.
Moving on!
Step 1
Let’s start with the cable entry in the right
speaker. Draw it using a 14 x 20 px rectangle, and select #2B2A2A as the fill color.
Add another 8 x 16 px rectangle for the cable connector. Use #545252 as the fill color.
Step 2
Now, draw the cable with the Pen Tool (P), using 4 px as the stroke thickness. Use #47D2E9 as the stroke color.
Round all corners with the Direct Selection
Tool (A). Then expand the stroke shape (Object > Expand…) and press OK.
Turn off Snap to Grid for a moment
(Shift-Control-„) to align the cable with the connector.
Step 3
Let’s draw the jack using a 8 x 22 px rectangle
and #545252 as the fill color. Add another 2 x 8 px rectangle (#8A8686).
Add a third rectangle, this one of (#B4B5B8) 4 x 20
px, and set 2 px chamfers in the upper corners from the Transform panel.
Finally, add two 4 x2 px rectangles (#8A8686) and
place them over the jack.
4. How to Create a Background
And we are done with the plug cord, so now let’s
finish the design by creating a nice background for our headphones.
Step 1
Let’s start by creating a musical note. To do
this, use a 22 x 12 px rectangle, a 4 x 40 px rectangle and finally a 20 x 20 px
ellipse. Use #003E57 as the fill color.
Link all forms and merge them together using the Unite button from the Pathfinder panel. Slightly round all corners with the Direct Selection Tool (A).
Step 2
Duplicate (Control-C > Control-F) the
musical note four times, and rotate the copies and change their scales using the Selection Tool (V).
Place them as shown in the picture below.
Then group them together and flip them
vertically (Object > Transform > Reflect…) to place them on the right side of the headphone.
Step 3
Finally, create an 800 x 600 px rectangle, the same
size as the canvas. Apply a radial gradient from the Gradient panel, using the
following fill colors:
Color A:#1F3B54
Color B:#182D40
Remember to send the rectangle to the back of
the canvas (right click > Arrange > Send to Back).
Awesome Work, You’re Finished!
Yaaaay! We’re done! You have finished this
amazing headphones illustration! It’s an incredible result, another example
that you can achieve fun illustrations without much difficulty by using basic forms.
I hope you enjoyed this tutorial as much as I
did; hopefully, it was full of new knowledge for you. I’d like to see your
design—I’ll be waiting!
We only have one home, protecting it should be of utmost priority! Plenty of companies, NPO’s, and government bodies have set exactly this as their goal and mission. If you’re not convinced, hopefully this will sway you.
27,000 trees are cut down each day and used for Toilet Paper.
Rainforests are cut down at a rate of 100 acres per minute.
Roughly 14 billion pounds of garbage is dumped into the ocean each year.
Approximately 46% of the lakes in America are extremely polluted making them risky for swimming, fishing and aquatic life.
Every year around one trillion gallons of untreated sewage and industrial waste is dumped in the U.S water.
Almost 80% of urban waste in India is dumped in the river Ganges.
A single car generates half a ton of CO2 and a NASA space shuttle releases 28 tons of C02.
It takes only 5 days for a jet stream in China to carry the air pollution to the United States.
Pollution in China can change the weather in United States.
There are more around 73 various kinds of pesticides in the groundwater, which is used as drinking water.
In hindsight, we all should be playing our part, but cheers to those who are acting to make a difference.
I’ve put together a collection of 26 clean and green environmental related logos for your inspiration. Enjoy!
Credit to respective artists.
credit:Alfrey Davilla | vaneltia
credit:Matt Yow
credit:Liv Elinor
credit:Cody Petts
credit:Isaac Grant
credit:Breno Bitencourt
credit:Dimitrije Mikovic
credit:trinitiff
credit:Nick Signet
credit:trinitiff
credit:Stephen MacEachern
credit:Matt Cameron
credit:Nikhil Singh
credit:Charles Aroutiounian
credit:Matt Cameron
credit:Paul J. Bartlett
credit:Diana Arizmendi
credit:Becca Dalke
credit:Tom Frew
credit:ASK Dziner
credit:Mohiuddin Parekh
credit:Jordan Frank
credit:Carlos Sosa
credit:Freddy Tejeda
credit:Sarah Croughwell
credit:Laura Santos
Conclusion
The thought that our earth is our only option (unless Elon Musk figures our Mars) should be motivation enough to really commit to keeping our home clean. If everyone does their part, we should see a dramatic difference within the near future.
I hope that this collection of environmental related logos has inspired you! Thanks for stopping by!
Post pobrano z: A’ Design Awards & Competition – Call for Entries For its 2017 edition, A’ Design Award is calling for all talented designers entries. If you think you have design work that may be worthy of an award, you should enter your design here. For years now, this international competition has been rewarding excellency in design and giving exposure to designers from all around the […]
Agregator najlepszych postów o designie, webdesignie, cssie i Internecie