Wszystkie wpisy, których autorem jest admin

10 Design Tips for Creating Amazing Wedding Invitations

Post pobrano z: 10 Design Tips for Creating Amazing Wedding Invitations
Final product image
What You’ll Be Creating

Designing wedding invitations can be scary—which style to choose? Which font to use? Go for pared-back elegance or flashy decadence? Vintage florals or modern minimalism? And above all, how to make it personal and special for the couple in question?

In this article, I’ll give you 10 top tips for designing wedding invitations, using some gorgeous templates as examples. Read on, and get inspired to create your own!

1. Choose a Style

Every invitation design will fall into a style category, or perhaps borrow from a couple of styles. Staying true to a particular style, especially if the couple are having a themed wedding, or love a particular period or genre, can be a great way of giving your invitation project a strong focus. 

These are just a few of the design styles that work well for wedding invitations, and the qualities that each style brings to the design…

  • Traditional and Elegant: This style is classic, timeless and appropriate for both formal and informal weddings. You won’t risk offending any older members of the wedding party with this beautiful, tasteful style choice. Achieve the look of a traditional wedding invitation with script fonts, floral borders and dainty colors.
Traditional and elegant wedding invite
Traditional and Elegant Wedding Invitation
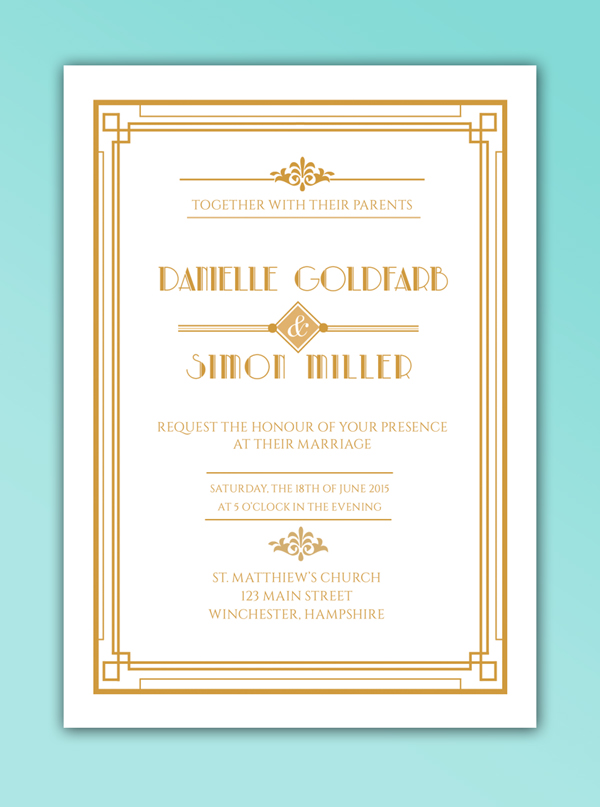
  • Art Deco: Another old-school style, but one that gives off a stronger vintage vibe, which can feel hip and on-trend. An Art Deco invitation style brings a lovely, symmetrical quality to your designs, like in the invitation example below, and adds a distinctly glamorous edge with lavish geometric designs and luxe colors, like gold, silver and jet black. You might want to allow for metallic foiling if you go with an Art Deco look.
art deco invite
Art Deco Wedding Invitation
  • Mid-Century Retro: This style borrows from 1950s design, but gives it a hip twist, making it look very relevant and ‘now’. Pastel colors, Americana-inspired typefaces and vintage-inspired graphics, like ribbons and badges, bring a fun, informal twist to this wedding invitation.
retro invite
Retro Wedding Invitation

Choosing a style is a great place to get started with your designs. Even if you start out traditional, and add a twist of Art Deco with a 1920s-inspired font, mixing some of the main style genres will give your invitations an instantly recognisable and distinctive character.

2. Go for Timeless Typefaces

A font can make or break an invitation design. Step away from novelty, ‘out-there’ type styles, and choose typefaces that have lasting longevity. 

Formal classics like Fournier and Caslon will prove to be timeless when the couple pulls out their wedding invitations decades later, and elegant scripts like Allura or Manglayang Script will always look occasion-appropriate. 

manglayang script
Manglayang Script

Unless it’s a themed wedding, this might not be the time to experiment with a novelty font. Stay well away from grunge, marker-pen, and distressed fonts that might look cool, but will make your designs look too informal and flyer-like.

Look for typefaces that have a variety of weights too—you might fall in love with a particular font in a regular weight, but make sure there are italic and bold weights available too. Pulling out names and venues in different weights can divide up bulky text, and make the design appear more balanced. This Vakia font, for instance, is an elegant script with a timeless design.

Vakia Typeface
Vakia Typeface

3. Think About the Practicalities!

Before you dive into designing your invitation, you need to consider a couple of practical issues. Yawn, I know, but nonetheless absolutely essential!

Firstly, what will the dimensions of your invitation be, and will it be oriented portrait or landscape? 

Most invitations are designed to fit inside a standard envelope. If you’re sending your design to a professional printer, they may use their own standard-size envelopes for invitations, so your first task should be to get in touch with your printer and seek their advice on sizing. If you’re planning to save money and source the envelopes yourself, you should do this first, and size your invitation to fit your chosen envelope size. This wedding invitation stationery set features several card sizes that are sure to fit standard envelopes.

Wedding Initation Stationery
Wedding Invitation Stationery

One more tip—don’t match the size of the invitation to the size of the envelope, as it will be too large to fit inside! Allow a few millimetres extra at least around the edge of the envelope.

Once you are happy with the dimensions of the invitation, you can decide whether to give the design a portrait or landscape orientation. Both can look lovely, but if you’re dealing with a lot of text (e.g. lengthy names or venue address) a portrait design might be more sensible. You won’t risk cramming text as easily as you might on a landscape design (Note: Save the Date and RSVP cards look especially lovely in landscape format).

RSVP card in landscape format
Art Deco Wedding Invitation and RSVP

Secondly, you need to consider how and where your invitation is going to be printed. 

Dreaming of a letterpress finish? You’ll need to track down a letterpress specialist who is happy to produce the designs to the time restriction, quantity and price that you’re looking for. 

Special printing effects like foiling and gloss printing can also stretch the purse strings, so make sure to not get too carried away (remember, often simple is best!) and shop around for the best deal if you do want something out of the ordinary.

4. News Alert! Florals Can Look Modern

Floral designs have a bad rep, and are often associated with old-fashioned, fusty styles. 

I assure you, florals can look modern, and, when done well, strike that perfect (and sometimes elusive) balance of romance and modernity.

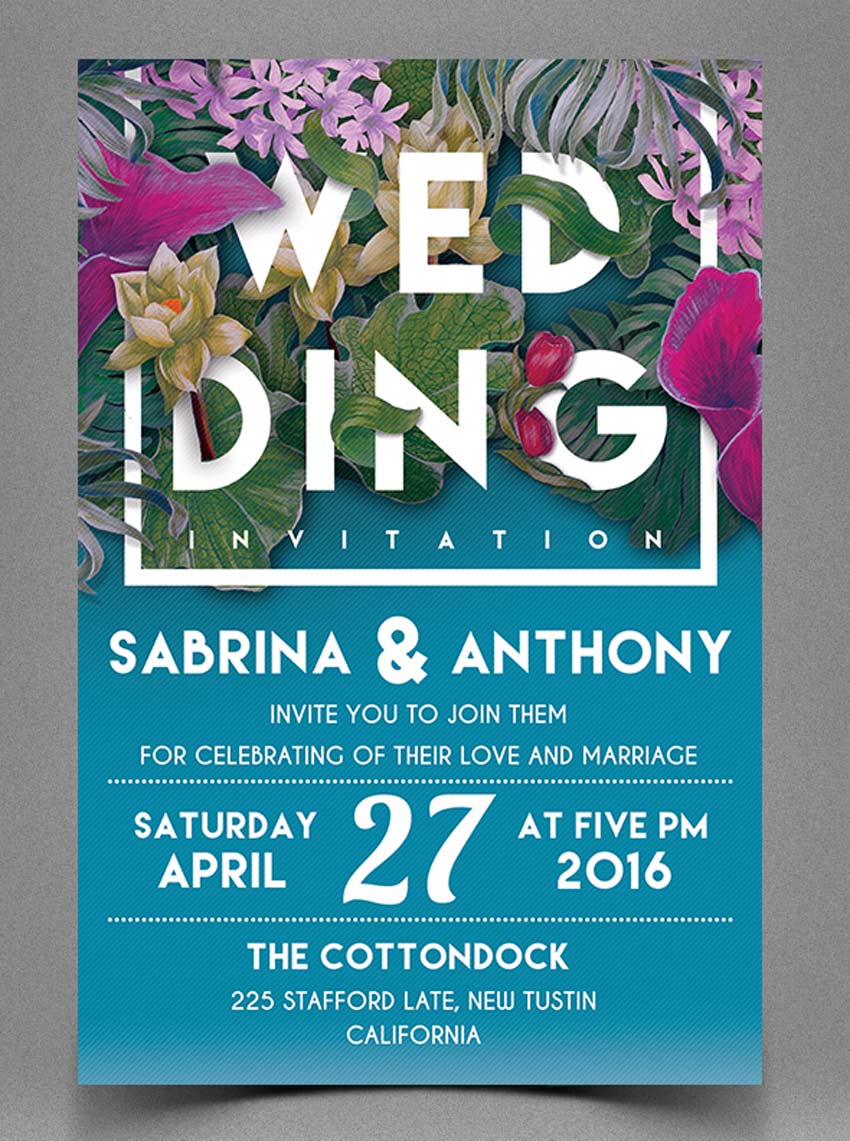
This floral wedding invitation unites modern typography with beautiful, watercolor-like flowers. And the blue background becomes a perfect contrast against the remaining subtle colors.
Floral Wedding Invitation

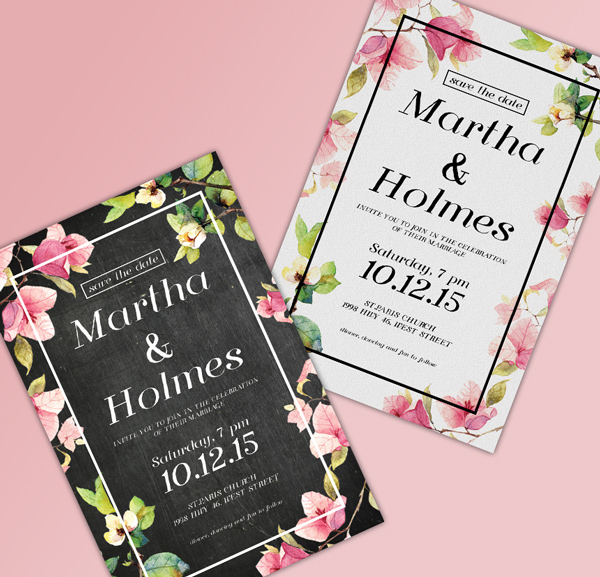
And this stylish wedding invitation is a perfect example of florals executed with a modern twist. The black background provides a stylish contrast to watercolor-style flowers in soft pinks and greens. The feature that makes it modern, not stuffy? Note the minimal white frame around the border of the design. 

floral invite in black
Flower Chalkboard Invitation

Even when the color scheme is reversed, the simple frame, now in black, keeps the design grounded and looking ultra-contemporary. 

floral invite in white
Flower Chalkboard Invitation

5. Consider Using Photography

Photography is very under-used on wedding invitations. Designs tend to have a typographic or illustrative focus instead.

To give your wedding invitation a unique look, consider introducing photos onto the layout. This can also make your invitations look modern and fresh—ideal if you’d rather not go down the vintage route. You can even incorporate photos of the bride and groom to be, for an alternative photo-based wedding invitation.

Photo Wedding Invitation
Photo Wedding Invitation Card

To keep your design looking contemporary, set the photo as a background or border, like in this simple wedding invitation design below. This also allows you to make the invite customizable and unique—why not drop in different photos across a batch of invites, so guests receive their own unique invitation design?

Photographic Wedding Invitation

6. Align Your Type Centrally

When it comes to typesetting the text for your invitation, it’s best to follow a traditional, tried-and-tested formula. Even if your invites have a modern, unconventional design, you should still align your text centrally like this nautical-inspired wedding invitation.

Nautical Wedding Invitation

Why? Aligning text centrally makes text appear instantly more formal and important, and distinguishes the invitation as something important and notable. Smaller chunks of text (e.g. names and dates) also look more organized and more elegant when aligned centrally. Flushing the text off-center can make headers look a little messy. 

So when you come to arrange the text on your design, make sure to drag a vertical guide out to the dead-center of the page, whichever software you choose to use, and ensure that all text frames are aligned absolutely centrally.

You can also impose a hierarchy on the text by applying a variety of weights and font sizes to different sections. Try setting the names of the couple in a large size italic, the date and time of the event in bold (you don’t want anyone to forget this!) and extra items like dress code in a smaller size and a light or regular weight.

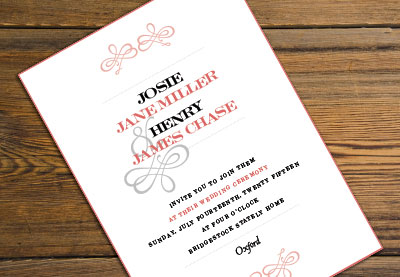
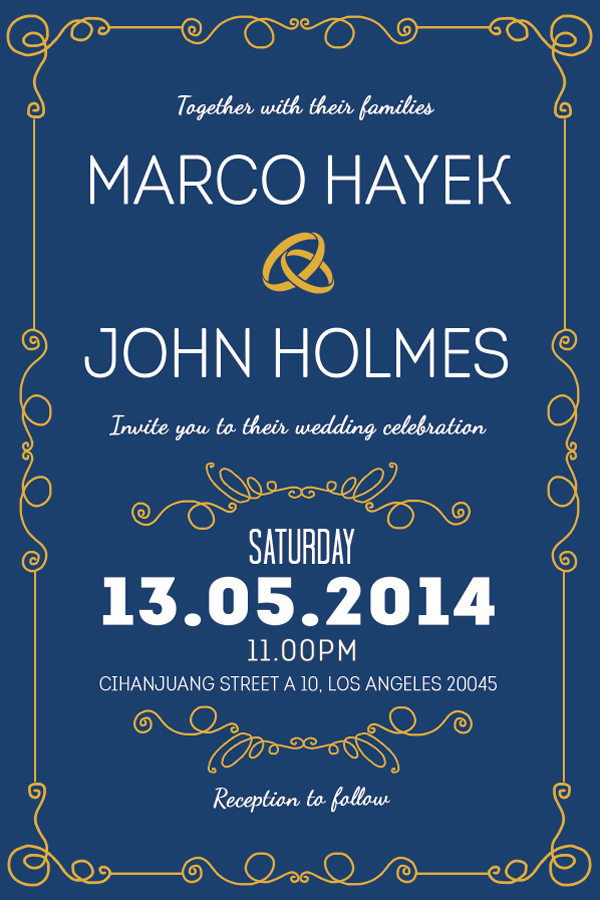
Consider separating different sections of the text using dividers (try ribbon banners for vintage styles, or elegant scripted flourishes for a traditional design, like in the elegant wedding invitation shown below) to make the information more digestible too.
Simple Wedding Invitation

7. It’s ‘&’, Not ‘And’

The humble ampersand, the squiggly ‘&’ used to indicate ‘and’, is your new best friend when it comes to designing wedding invitations.

Particularly when sandwiched between the names of the couple, an ampersand looks elegant, dramatic and interesting, without distracting from the text around it. Replace a useless and sorry-looking ’and’ with a decorative substitute instead! This Risthi Script provides a gorgeous ampersand perfect for wedding designs like the one below.

Risthi Script
Risthi Script

A good ampersand takes a bit of hunting. But here are some typefaces with beautiful ampersands to get you started:

caslon ampersand
cinzel ampersand
mutlu ampersand

8. Use Color to Transform…

You’d be amazed at how simple changes to color on your design can transform the whole look and feel of the invitation. I’m a big believer in the effectiveness of simple, minimal designs, and color is a great way of adding personality and theme to an otherwise classic, functional layout.

Take this winter-worthy example of a wedding invitation. The moody, deep blue background and crisp white text is a world away from the traditional white/cream background with dark text. 

winter invite
Winter Wedding Invitation

The invitation’s dramatic colors are perfectly suited for a winter wedding, but the design could easily be switched up to lighter pastel shades to create an entirely different look.

Don’t underestimate the high-contrast impact of monochrome designs too. A black and white palette can look glamorous, classic and fashionable all at the same time. Drop in a touch of gold or silver foiling for an extra-special color combination.

Once you’re happy with the basic layout of your invitation, including text, graphics and borders, experiment with different color combinations, and consider showing these options to the couple to help them feel involved in the process. This colorful wedding invitation shows that this unique style is successful with many different color combinations.

Colorful Wedding Invitation

Color is an easy thing to change, but the core elements of the design might be more tricky to rethink; choosing color is an easy gateway into the design process if you’re designing for a client or friend.

9. If in Doubt, Keep It Classic

Classic invitation designs will always be in style, and suit a broad range of events and personal tastes. Unless the wedding has a strong theme, a traditional design will work really well, and, if designed beautifully, be treasured forever by the couple and their guests. This classy wedding invitation features gorgeous script fonts with floral elements that work perfectly for any wedding.
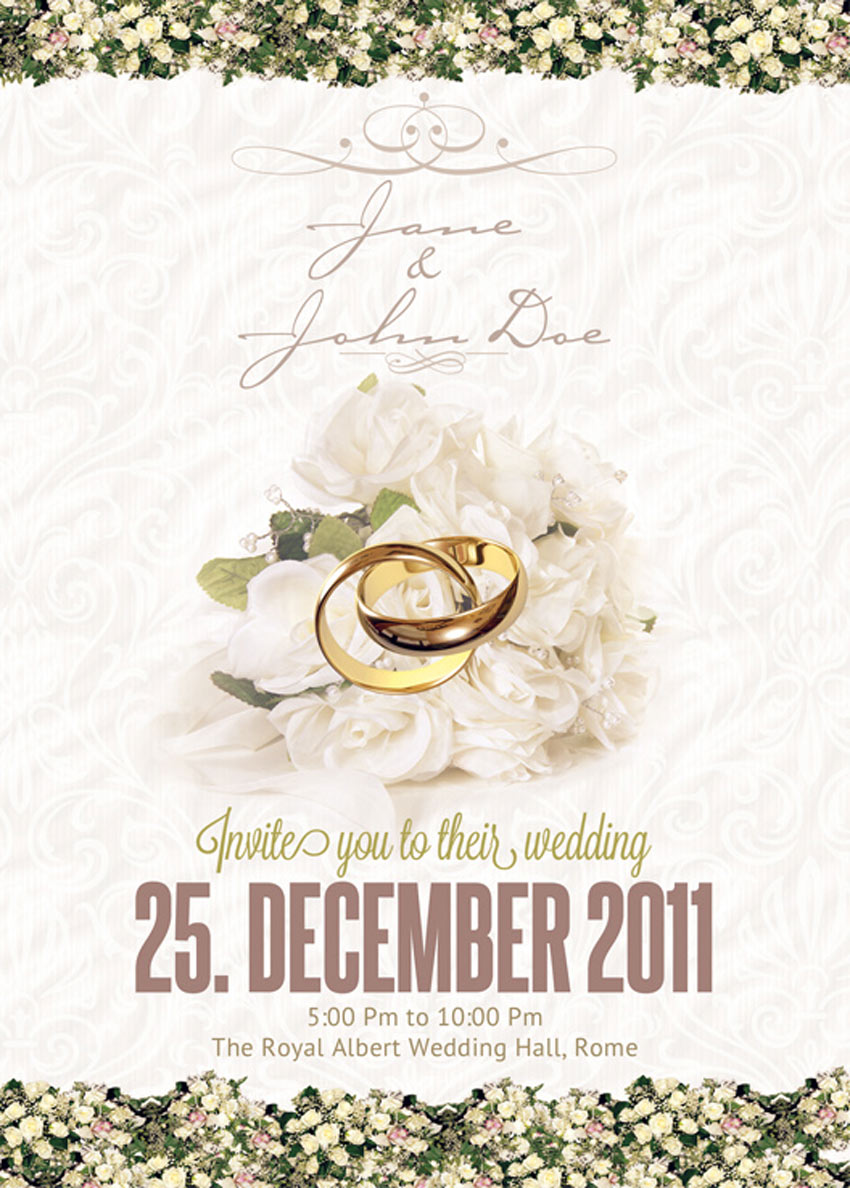
Classy Wedding Invitation

To keep your classic design looking modern, not stuffy, try to balance the design’s feminine and masculine elements. Straight, fuss-free line dividers and a geometric border give this design a masculine edge, while the scripted italics bring a feminine touch. 

Why not introduce just one unconventional element to an otherwise classic design? In this example of a classic wedding invite, the typeface has a distinctly vintage vibe, and the dark background keeps it looking glamorous, not staid. 
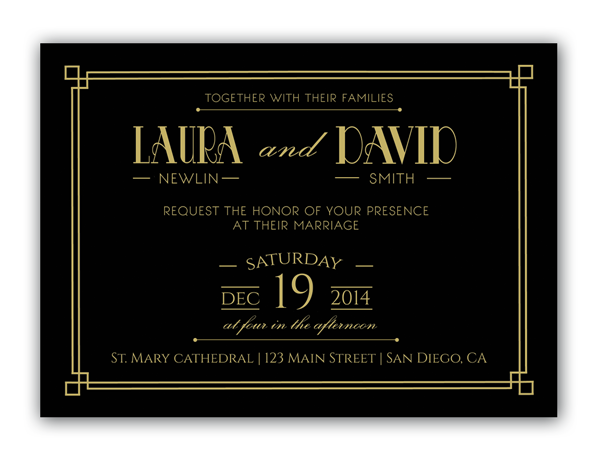
classic invite
Classic Wedding Invitation

10. Above All… Make It Personal!

Whatever style of invitation you choose for your design, try to keep in mind who the couple are, and what their personal tastes are like. 

If you’re designing an invitation for your own wedding, this is unlikely to be a problem. But if you’re designing for a relative, a friend, or a client, try not to get carried away. People commission designers as they want expertise and advice, but wedding invitations are particularly personal, and couples can be deeply disappointed if they wanted a folksy floral design and received a flashy Art Deco creation in its place! 

One certain way to avoid this clash of tastes is to have the couple give you a set brief from the very beginning. Ask them what styles they like (e.g. vintage, elegant, contemporary), and show them some examples to fire their interest and give you a better idea of what they’re looking for. A couple that loves vintage-inspired fashion and furniture might also love something like this fun retro wedding invitation design.

retro invite
Retro Wedding Invitation

You’ll never know a person’s individual preferences unless you ask! It’s also really useful to ask the couple what they definitely don’t like too. There’s no point spending ages perfecting a floral border if flowers just aren’t their thing.

Another important practical issue to consider is the couple’s budget, and take this into account when you put together the design—gold foil can look lovely, but it can also be expensive for bargain-hunting couples. Try a simple pattern design instead, like this retro wedding invitation that features unique pattern elements.

Retro Wedding Invitation

Your Invitation Checklist

To conclude, I’ve covered a number of helpful tips and tricks to get you started with creating your own wedding invitation designs. To get started with designing your own invitations, you can:

  1. Choose a Style: Pick a well-known design style, such as Art Deco or Traditional, to help steer your ideas and give the design focus
  2. Go for Timeless Typefaces: Classic fonts that have stood the test of time will always look great on invitations, and will ensure your design never goes out of style.
  3. Think About the Practicalities: Consider important issues like sizing, orientation and print finish before getting stuck into designing. You won’t regret it later!
  4. Keep Floral Designs Modern: Floral designs are a romantic, traditional choice for wedding invitations, but they don’t need to look stuffy. Try out abstract illustrations, and contrast against dramatic background color for a design that looks thoroughly contemporary.
  5. Consider Using Photography: If you’re looking for a unique design that looks fresh and modern, introducing photography into a background or border might be the way to go.
  6. Align Your Type Centrally: Sure, you can flush your type left or right if you want to, but 99% of the time, aligning your text centrally is going to make your typography look way better.
  7. Embrace the Ampersand: Replace clumsy ands with decorative ampersands (&) for elegance and added interest.
  8. Use Color to Transform Your Designs: Avoid reinventing the wheel all the time by switching up the colors of your design instead of changing the main elements of the layout.
  9. If in Doubt, Keep It Classic: Personal tastes can differ, and design trends may come and go, but classic designs will always have an appeal in wedding invitation design. Add a modern twist to traditional designs to inject a bit of personality.
  10. Above All… Always Make It Personal: Get to know the couple’s tastes and the vision they have for their wedding day. Can you bring those two factors together into one unified design? Keep the couple involved in the design process without compromising your creative ideas, by allowing them to choose a color scheme for the invitations from a selection you prepare for them.
floral design
Flower Chalkboard Invitation

If you use these ten tips as a starting point for your invitation design, you are well on your way to creating an invitation that’s going to be super-special. 

If you’re still feeling a bit lost and in the dark (it happens to us all!), take a look again at some of the great templates featured in the article above, and see if one of those will fit the bill. You can also browse a wider selection of wedding invitation templates to find the perfect style for your event.

Wedding Invitation Tutorials From Envato Tuts+

Need more inspiration? Check out these amazing wedding invitation tutorials below, featuring incredible print designs for elegant, modern weddings. Try them out for fun, or incorporate these designs into your special day!

How to Create a "Share the Love" Icon Pack in Adobe Illustrator

Post pobrano z: How to Create a "Share the Love" Icon Pack in Adobe Illustrator

Final product image
What You’ll Be Creating

Since this week is all about love, we’re going to continue the theme and create a „Share the Love” icon pack to explore the different ways in which you can express
your feelings in the digital era. 

We’re going to be creating
all three icons using basic geometric shapes combined with some of the primary
tools that you probably already work with on a daily basis.

So, without wasting any more time, grab a
cup of that sweet coffee and let’s get started!

Oh, and before I forget, you can always
expand the project by checking out GraphicRiver, where you can find tons of love-themed icons.

1. How to Set Up a New Document

Since I’m pretty sure you already have
Illustrator up and running in the background, bring it up and let’s set up a New Document (File > New or Control-N)
using the following settings:

  • Number
    of Artboards:
    1
  • Width:
    800
    px
  • Height:
    600
    px
  • Units:
    Pixels

And from the Advanced tab:

  • Color
    Mode:
    RGB
  • Raster
    Effects:
    Screen (72ppi)
  • Preview Mode: Default
setting up a new document

Quick
tip:
some of you might have noticed that the Align New Objects to Pixel Grid option
is missing. That’s because I’m running the new CC 2017 version of the
software, where great changes have been made to the way Illustrator handles the way shapes snap to the underlying pixel grid.

2. How to Set Up a Custom Grid

Since we’re going to be creating the icons
using a pixel-perfect workflow, we’ll want to set up a nice little grid so that we can have full control
over our shapes—that is if we’re running the older version of the software.

Step 1

Go to the Edit > Preferences > Guides &
Grid
submenu, and adjust the following settings:

  • Gridline
    every:
    1 px
  • Subdivisions: 1
setting up a custom grid

Quick
tip:
you can learn more about grids by reading this
in-depth piece on how Illustrator’s Grid System works.

Step 2

Once we’ve set up our
custom grid, all we need to do in order to make sure our shapes look crisp is
enable the Snap to Grid option found
under the View menu, which will
transform into Snap to Pixel each
time you enter Pixel Preview mode.

Now, if you’re new to the whole
“pixel-perfect workflow”, I strongly recommend you go through my how to create
pixel-perfect artwork
tutorial, which will help you widen your technical skills
in no time.

3. How to Set Up the Layers

With the New Document created, it would be
a good idea to structure our project using a couple of layers, since this way
we can maintain a steady workflow by focusing on one icon at a time.

That being said, bring up the Layers panel, and create a total of
four layers, which we will rename as follows:

  • layer 1: reference grids
  • layer 2: phone sharing
  • layer 3: email sharing
  • layer 4: im
    sharing
setting up the layers

4. How to Create the Reference Grids

The
reference grids (or base grids)
are a set of precisely delimited reference surfaces, which allow us to build
our icons by focusing on size and consistency.

Usually, the size of the grids determines
the size of the actual icons, and they should always be the first decision you
make on you start a new project, since you’ll always want to start from the
smallest possible size and build on that.

Now, in our case,
we’re going to be creating the icon pack using just one size, more exactly 128 x 128 px, which is a fairly large
one.

Step 1

Start by locking all
but the reference grid layer, and then grab the Rectangle Tool (M) and create a 128 x 128 px orange (#F15A24) square, which will help define the
overall size of our icons.

creating the main shape for the reference grid

Step 2

Add another smaller 120 x 120 px one (#FFFFFF) which will
act as our active drawing area, thus giving us an all-around 4 px padding.

creating the main shape for the active drawing area

Step 3

Group the two squares composing the
reference grid using the Control-G keyboard
shortcut, and then create two copies at a distance of 40 px from one another, making sure to align them to the center of
the Artboard.

Once you’re done, lock
the current layer and move on to the next one, where we’ll start working on our
first icon.

creating and positioning the reference grids

5. How to Create the Phone Sharing Icon

With the document all set up, let’s kick
off the project by making sure that we’re on the right layer (that would be the
second one) and then zooming in on the first reference grid so that we can have
a better view of our icon’s shapes.

Step 1

Start working on the
left phone by creating its body using a 56
x 94 px
rounded rectangle with an 8
px Corner Radius
, which we will color using #C4CEE8 and then position in the underlying active drawing area’s bottom-left corner, making sure to leave a
4 px gap for its outline.

creating and positioning the main shape for the phone sharing icons left phone

Step 2

Give the shape
that we’ve
just created an outline, by creating a copy of it (Control-C) which we will paste in front (Control-F) and then adjust by changing its color to #2B3249, and
then setting its Weight to 8 px.

Once you’re done,
select and group both shapes together using the Control-G keyboard shortcut.

adding the outline to the phone sharing icons left phone

Step 3

Start working on the
phone’s display by creating a 32 x 58
px
rectangle, which we will color using #8195C1 and then horizontally center
align to the two shapes that we’ve just grouped, at a distance of 12 px from the top edge of the fill
shape’s visible surface.

creating and positioning the main shape for the left phones display

Step 4

Give the display an 8 px thick outline (#2B3249) using the Stroke method, selecting and grouping (Control-G) both shapes together
afterwards.

adding the outline to the left phones display

Step 5

Create the phone’s
bottom circular button, using an 8 x 8
px
circle which we will color using #2B3249 and then center align.

creating and positioning the main shape for the left phones circular bottom button

Step 6

Turn on Pixel Preview mode, and using the Pen Tool (P) draw in the front-facing
speaker unit, using a 12 px wide, 4 px thick Stroke with a Round Cap,
which we will color using #2B3249 and then center align to the visible surface
of the phone’s upper section.

creating and positioning the left phones front facing speaker unit

Step 7

Create the phone’s
power button using a 12 x 4 px rectangle,
which we will color using #2B3249 and then position onto the larger outline, at
a distance of 12 px from the active
drawing area’s left edge.

creating and positioning the main shape for the left phones power button

Step 8

Adjust the shape that
we’ve just created by setting the Radius
of its top corners to 2 px from
within the Transform panel’s Rectangle Properties, selecting and
grouping (Control-G) all of the phone’s
composing shapes together afterwards.

adjusting the shape of the left phones power button

Step 9

Create the second
phone using a copy (Control-C >
Control-F
) of the one that we’ve just finished working on, which we will
reflect both horizontally and vertically (right
click > Transform > Reflect > Horizontal / Vertical
), and then
position onto the right side of the active drawing area, aligning it to its top
edge.

creating and positioning the phone sharing icons second phone

Step 10

Start working on the
little heart by creating a 20 x 20 px circle,
which we will color using #ED664C and then position onto the left phone’s display, at a distance
of 9 px from its top edge and 6 px from its left edge.

creating and positioning the left section of the little heart

Step 11

Continue working on the
heart by creating two more 20 x 20 px circles
(#ED664C), positioning one on the right side so that it ends up overlapping the surface of the first one by 4 px,
and the last one at the bottom, so that it overlaps the surface of the other two by 8 px.

creating and positioning the hearts main shapes

Step 12

Once you have all three
circles in place, select and then unite them into a single larger shape using Pathfinder’s Unite Shape Mode.

uniting the three circles into a single larger shape

Step 13

Adjust the resulting shape
by removing the center anchor points created during the uniting process, by
simply clicking on them using the Delete
Anchor Point Tool (-)
.

adjusting the hearts shape by removing its center anchor points

Step 14

Continue adjusting the
new shape by selecting its anchor’s handles and dragging them so that you get a
nice curvature on each of its sides. Once you’re done, give the resulting shape
an 8 px thick outline (#2B3249) with
a Round Join, selecting and grouping
both shapes together afterwards.

adding the outline to the little hearts body

Step 15

Since we’ll want the
heart to remain within the visible surface of the phone’s display, we’ll have
to mask it using a 24 x 50 px rectangle
(highlighted with yellow), which we will center align to the display. Then,
simply select both the heart and the rectangle, right-click and select Make
Clipping Mask
, making sure to group it and the left phone together using the
Control-G keyboard shortcut.

masking the hearts right half

Step 16

Finish off the icon by creating a copy of
the masked heart and then center aligning it to the right phone’s display,
making sure to flip it vertically (right
click > Transform > Reflect > Vertical
).

Once you have it in
place, group (Control-G) it along
with the phone, doing the same for all of the icon’s composing sections
afterwards.

positioning the hearts right half onto the second phones display

6. How to Create the Email Sharing Icon

Assuming you’ve
already moved on up to the next layer (that would be the third one), zoom in on
the second reference grid and let’s get started.

Step 1

Create the envelope’s
main body using a 96 x 64 px rectangle,
which we will color using #ED664C and then center align to the underlying
active drawing area, at a distance of 4
px
from its bottom edge.

creating and positioning the main shape for the email sharing icons envelope

Step 2

Adjust the shape that
we’ve just created by setting the Radius
of its bottom corners to 8 px from
within the Transform panel’s Rectangle Properties.

adjusting the corner radius of the envelopes main body

Step 3

Give the resulting shape
an 8 px thick outline (#2B3249)
using the Stroke method, only this
time set its Corner to Round Join, making sure to select and
group (Control-G) both shapes
together afterwards.

adding the outline to the envelopes main body

Step 4

Create the envelope’s
upper section using a 96 x 64 px rectangle,
which we will color using #BF402E and then center align to its bottom section,
positioning it so that its lower half overlaps it.

creating and positioning the main shape for the envelopes upper section

Step 5

Turn the shape that
we’ve just created into a diamond by adding a new anchor point to the center of
each of its edges using the Add Anchor
Point Tool (+)
, and then removing its corner ones (highlighted in the
reference image) using the Delete Anchor
Point Tool (-)
.

adjusting the shape of the envelopes upper section

Step 6

Give the resulting
shape an 8 px thick outline (#2B3249)
making sure to set the Stroke’s Corner to Round Join, selecting and grouping (Control-G) the two shapes together afterwards.

adding the outline to the envelopes upper section

Step 7

Select the Pen Tool (P) and draw in the envelope’s two diagonal detail lines using an 8 px thick Stroke
(#2B3249) with a Round Cap.

drawing in the envelopes two diagonal detail lines using the pen tool

Step 8

Create the letter’s
main body using a 64 x 80 px rounded
rectangle with an 8 px Corner Radius,
which we will color using #F4E9E9 and then center align to the underlying
active drawing area, at a distance of 4
px
from its top edge.

creating and positioning the main shape for the envelopes letter

Step 9

Give the shape that
we’ve just created an 8 px thick
outline (#2B3249), selecting and grouping both shapes afterwards using
the Control-G keyboard shortcut.

adding the outline to the envelopes letter

Step 10

Quickly unlock
the previous layer, and create a copy (Control-C)
of the heart that we’ve masked and paste it back (Control-F) onto the current layer,
center aligning it to the envelope’s letter, positioning it at a distance of 8 px from the fill shape’s visible
surface.

Then, once you’re
done, select and group them both using the Control-G keyboard shortcut.

adding the little heart to the envelopes letter

Step 11

Mask the two shapes that
we’ve just grouped by creating a copy (Control-C)
of the envelope’s upper section, which we will paste in front (Control-F) and then adjust by removing
its top anchor point. Then close up the path so that it follows the width
of the envelope itself.

masking the contents of the envelopes upper section

Step 12

Now, as you can probably already see, we’ll
need to isolate the mask by double-clicking on it, and then add a copy of the
pocket outline’s downward-facing section in order to correctly mask the surface of
the letter.

Once you’re done, you
can then select the masked shapes and the envelope’s upper section and group (Control-G) them so that they
won’t get separated by accident.

adjusting the bottom section of the letters mask

Step 13

Select the Pen Tool (P) and, using a 4
px
thick Stroke (#2B3249), draw
the front section of the arrow, making sure to set the Cap and Corner of the
head section to Round.

Take your time, and
once you’re done, select and group the two paths using the Control-G keyboard shortcut.

drawing the front section of the envelope icons arrow

Step 14

Draw in the back
section of the arrow using a 28 px wide
4 px thick Stroke (#2B3249) which we will position between the active
drawing area’s left edge and the letter’s outline.

drawing the back section of the envelopes arrow

Step 15

Create the little fletches using a 12 x 12 px square, which we
will color using #EAA74E and then center align to the arrow’s back section, at a
distance of 2 px from the active
drawing area’s left edge.

creating and positioning the main shape for the envelope icons arrow fletches

Step 16

Adjust the shape that we’ve
just created by adding a new anchor point to the center of each of its side
edges using the Add Anchor Point Tool
(A)
, and then selecting and
pushing them to the right by a distance of 6
px
using the Move tool (right click > Transform > Move >
Horizontal > 6 px
).

adjusting the shape of the arrows fletches

Step 17

Finish off the
icon by giving the resulting shape a 4
px
thick outline (#2B3249) with a Round
Join
, grouping (Control-G) and
then sending them both to the back of the arrow’s back section (right click > Transform > Arrange
> Send to Back
).

Once you’re done, don’t
forget to select and group all of the icon’s composing sections using
the Control-G keyboard shortcut.

adding the outline to the arrows fletches

7. How to Create the IM Sharing Icon

We’re now down to our third and last icon,
so assuming you’ve already moved on up to the last layer, zoom in on its
reference grid and let’s finish this.

Step 1

Create the left text
box’s main body using an 88 x 68 px rectangle,
which we will color using #C2A6DD and then position in the top-left corner of
the underlying active drawing area, leaving a 4 px gap around it for its outline.

creating and positioning the main shape for the im sharing icons left text box

Step 2

Adjust the shape that
we’ve just created by setting the Radius
of its top and bottom-right corners to 8
px
from within the Transform panel’s
Rectangle Properties.

adjusting the radius of the left text boxs corners

Step 3

Switch over to Pixel Preview Mode (Alt-Control-Y) and then using the Add Anchor Point Tool (+) add a new
anchor point to the text box’s bottom edge, positioning it at a distance of 20 px from its left side.

adding a new anchor point to the left text boxs bottom edge

Step 4

Continue adjusting the
shape by selecting its bottom-left anchor point using the Direct Selection Tool (A), and then pushing it to the bottom by 16 px using the Move tool (right click > Transform >
Move > Vertical > 16 px
).

repositioning the left text boxs bottom left corner

Step 5

Give the resulting
shape an 8 px thick outline (#2B3249)
with a Round Join, and then select
and group both of them together using the Control-G
keyboard shortcut.

adding the outline to the left text boxs body

Step 6

Create a copy (Control-C) of the little heart from one
of the previous icons, and then paste (Control-F)
it onto the current layer, center aligning it to the text box’s body.

adding the little heart to the center of the left text boxs body

Step 7

Create the
little dots using three 6 x 6 px circles at a distance of 2 px from one another,
which we will color using #2B3249, group (Control-G), and then position onto the bottom-right corner of the text box, leaving a 4 px gap around them.

Once you’re done, select and
group all the shapes that we’ve created so far using the Control-G keyboard shortcut.

creating and positioning the three little dots onto the left text boxs body

Step 8

Create a copy (Control-C > Control-F) of the left
text box’s fill and outline, and align them to the underlying active drawing
area’s bottom-right corner, making sure to horizontally flip them afterwards (right click > Transform > Reflect
> Horizontal
), changing the fill shape’s color to #9F88BA.

creating and positioning the main shapes for the im sharing icons right text box

Step 9

Turn on Pixel Preview mode (Alt-Control-Y) and draw the little
text lines using an 18 px wide, 4 px thick Stroke line (#2B3249) followed by another 34 px wide, 4 px thick
line at a distance of 4 px from it.
Group (Control-G) the two shapes and
then position them at a distance of 8 px
from the text box’s left and bottom edges.

adding the text lines to the im sharing icons right text box

Step 10

Finish off the icon by selecting and
grouping (Control-G) all of the
right text box’s composing shapes together, sending them to the back afterwards
(right click > Arrange > Send to
Back
).

Oh, and don’t forget to group
all of the icon’s composing sections as well since you don’t want them flying
around.

finishing off the im sharing icon

It’s a Wrap!

There you have it—a nice little icon pack that you can use to share your love
with that special someone. I hope you’ve managed to follow each and every step
and had as much fun as I did during the process.

finished project preview

HOP! Air France: Run to Mum

Post pobrano z: HOP! Air France: Run to Mum

Online
Air France

To promote HOP! Air France young person’s card, Les Gaulois agency is launching RUN TO MUM, in collaboration with adidas and Citadium, a well-known and trendy store in France.

The end-of-year celebrations are over. The magical family moments spent by the fire, where parents cuddle their beloved children are finished. These young people have left to live their adults lives in different cities of France. However, Les Gaulois and HOP! Air France will bring the children home, and running!

The concept : To offer your lovely child, new recently launched 2017 adidas EQT Support ADV sneakers. This is the perfect gift for any young adult. Except that only one of the two trainers will be sent to the individual. The other is kept safe by the parents. In the box the young adult receives, there is a HOP! Air France young person’s card in place of the missing shoe. A card that will incite them to jump on the first plane to get their shoe back, and give their parents a big hug at the same time.

To follow this promotional operation and share on social media : #RunToMum

Website: Runtomum.com

Advertising Agency:Les Gaulois, Puteaux, France
Chief Creative Officer:Xavier Beauregard
Creative Directors:Hadi Hassan-Helou – Jérôme Gonfond
Art Director:Paul Garnier
Copy Writer:Julie Moreno
Tv Prod:Sarah Bouadjera
Production:ALLSO
Director:Julian Nodolwsky
Producer:Franck Annese
Sound:HRCLS

Audi Piloted Driving: Selfie, Make-Up, Text

Post pobrano z: Audi Piloted Driving: Selfie, Make-Up, Text
Print
Audi

Made possible with Audi Piloted Driving.

„Audi stands for innovation. And piloted driving by Audi marks a logical, evolutionary step in the carmaker’s line of technical product ideas. As naturally self-evident as it is for Audi to develop such products, so too should its communications look and feel just as natural.The campaign is designed to bring the benefits of piloted driving to life.””We showcase the possibilities of modern-day motoring that innovations from Audi have opened up. In a very simple way – by using the four rings of the logo to quickly and simply highlight all the newfound options offered by this technology.Audi is a facilitator, not an inhibitor.Text and drive, not don’t text and drive.”

Advertising Agency:thjnk, Hamburg, Germany
CCO:Armin Jochum
Executive Creative Director:Gerrit Zinke, Francisca Maass
Art Director:Matthijs Mejan
Copywriter:Moritz Franke
Art Buyer:Marc Huth
Final Artwork:Hilko Wiegmann, Christian Schemath
Group Account Director:Anke Peters
Account Director:Katharina Form
Account Manager:Karolin Kegeler