This tutorial will show you a really quick and easy way to create a stylized chalk text effect, using some filters and drop shadow effects. Let’s get started!
Looking for a chalk effect in Photoshop? Head on over to Envato Elements and download this amazing chalk effect Photoshop Layer Styles set with 15 chalk and 15 charcoal style presets.
1. Create the Background
Step 1
Open the Black Board image, and then go to Image > Image Size, and set the Width to 1000 px.
Step 2
Click the Create new fill or adjustment layer icon at the bottom of the Layers panel and choose Levels.
Step 3
Set the Gamma value to 0.95. This will darken the texture a little bit.
2. Create the Text and Chalk Layers
Step 1
Create the text using the font Magnolia Script. Set the Size to 200 pt, and if you’re using multiple lines of text, set the Leading to a value around 185 pt.
Step 2
Set the Foreground and Background colors to Black and White.
Create a new layer below the text layer, call it Chalk, and fill it with Black.
Step 3
Go to Filter > Convert for Smart Filters, to convert the layer into a smart object.
3. Apply the Filters
Step 1
Go to Filter > Noise > Add Noise.
Change the Amount to 150 and the Distribution to Gaussian, and check the Monochromatic box.
Step 2
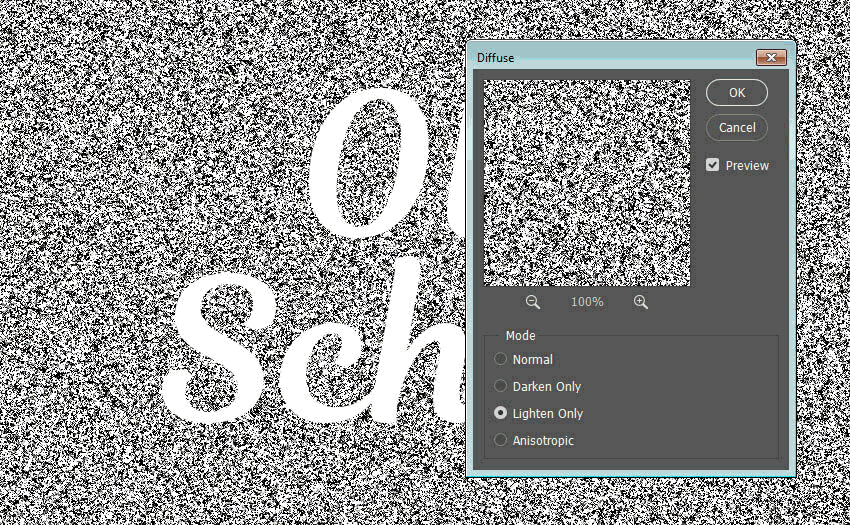
Go to Filter > Stylize > Diffuse, and choose the Lighten Only Mode.
4. Mask the Chalk Texture
Step 1
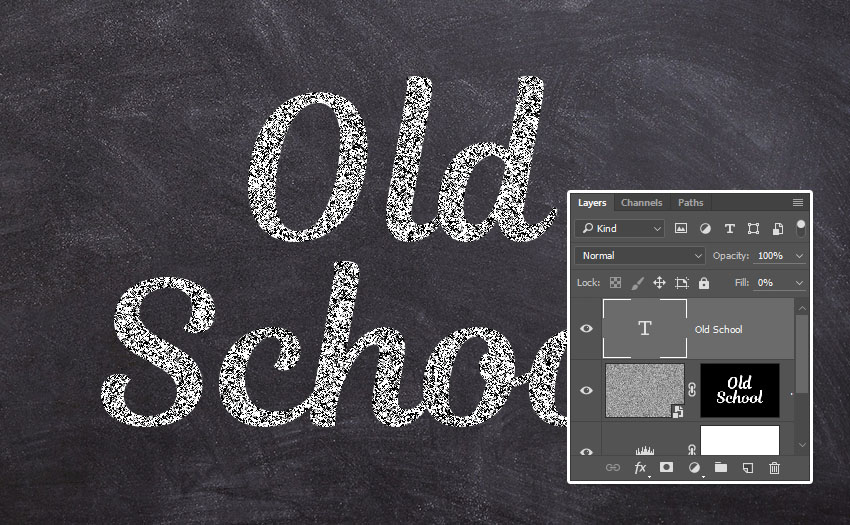
Command-click the text layer’s thumbnail to create a selection.
Step 2
Click the Add layer mask icon at the bottom of the Layers panel.
Step 3
Select the text layer, and change its Fill value to 0.
5. Style the Text Layer
Double-click the text layer to apply the following layer style:
Step 1
Add a Drop Shadow with these settings:
Color: #1e1c1e
Opacity: 100%
Distance: 6
Spread: 35
Size: 1
Noise: 100%
Step 2
Click the + icon to the right of the Drop Shadow tab to add another instance with these settings:
Color: #b57b88
Opacity: 100%
Distance: 7
Spread: 60
Size: 5
Noise: 50%
Step 3
Add another Drop Shadow instance with these settings:
Color: #000000
Opacity: 25%
Distance: 15
Spread: 0
Size: 15
Noise: 30%
This will create the colored chalk outline and finish off the text effect.
Text Effect Actions
If you need Photoshop actions that will do most of the work for you, check out our propositions:
This item comes with 14 extra actions to make your main
shape/text/raster have a chalk writing look. You can play with many
ready-made icons to give your chalkboard a unique look.
Ever tried to write text or make a logo or graphic using flour
or powder? It’s really hard.
With this set of Photoshop actions, you can achieve amazing results with
few clicks. Simply install the action, create your text or logo, and click play. Job
done!
Make your text or logo written in the sand! You can achieve a realistic effect of writing on the sand in just a couple of seconds.
Use this summer style for your projects!
Transform your text or logo into a realistic Salt and Sugar effect in few clicks. All the layers are well organized and packed in a Smart Object, so the starting layer is untouched.
Congratulations, You’re Done!
In this tutorial, we created a simple background using a blackboard texture, and then created text and a smart object layer to work on the effect.
After that, we applied some filters to create the main chalk effect and masked it to the text we created.
Finally, we styled the text using a couple of drop shadow effects with different settings to create the colored outline.
Please feel free to leave your comments, suggestions, and outcomes below.
This tutorial will show you a really quick and easy way to create a stylized chalk text effect, using some filters and drop shadow effects. Let’s get started!
Looking for a chalk effect in Photoshop? Head on over to Envato Elements and download this amazing chalk effect Photoshop Layer Styles set with 15 chalk and 15 charcoal style presets.
1. Create the Background
Step 1
Open the Black Board image, and then go to Image > Image Size, and set the Width to 1000 px.
Step 2
Click the Create new fill or adjustment layer icon at the bottom of the Layers panel and choose Levels.
Step 3
Set the Gamma value to 0.95. This will darken the texture a little bit.
2. Create the Text and Chalk Layers
Step 1
Create the text using the font Magnolia Script. Set the Size to 200 pt, and if you’re using multiple lines of text, set the Leading to a value around 185 pt.
Step 2
Set the Foreground and Background colors to Black and White.
Create a new layer below the text layer, call it Chalk, and fill it with Black.
Step 3
Go to Filter > Convert for Smart Filters, to convert the layer into a smart object.
3. Apply the Filters
Step 1
Go to Filter > Noise > Add Noise.
Change the Amount to 150 and the Distribution to Gaussian, and check the Monochromatic box.
Step 2
Go to Filter > Stylize > Diffuse, and choose the Lighten Only Mode.
4. Mask the Chalk Texture
Step 1
Command-click the text layer’s thumbnail to create a selection.
Step 2
Click the Add layer mask icon at the bottom of the Layers panel.
Step 3
Select the text layer, and change its Fill value to 0.
5. Style the Text Layer
Double-click the text layer to apply the following layer style:
Step 1
Add a Drop Shadow with these settings:
Color: #1e1c1e
Opacity: 100%
Distance: 6
Spread: 35
Size: 1
Noise: 100%
Step 2
Click the + icon to the right of the Drop Shadow tab to add another instance with these settings:
Color: #b57b88
Opacity: 100%
Distance: 7
Spread: 60
Size: 5
Noise: 50%
Step 3
Add another Drop Shadow instance with these settings:
Color: #000000
Opacity: 25%
Distance: 15
Spread: 0
Size: 15
Noise: 30%
This will create the colored chalk outline and finish off the text effect.
Text Effect Actions
If you need Photoshop actions that will do most of the work for you, check out our propositions:
This item comes with 14 extra actions to make your main
shape/text/raster have a chalk writing look. You can play with many
ready-made icons to give your chalkboard a unique look.
Ever tried to write text or make a logo or graphic using flour
or powder? It’s really hard.
With this set of Photoshop actions, you can achieve amazing results with
few clicks. Simply install the action, create your text or logo, and click play. Job
done!
Make your text or logo written in the sand! You can achieve a realistic effect of writing on the sand in just a couple of seconds.
Use this summer style for your projects!
Transform your text or logo into a realistic Salt and Sugar effect in few clicks. All the layers are well organized and packed in a Smart Object, so the starting layer is untouched.
Congratulations, You’re Done!
In this tutorial, we created a simple background using a blackboard texture, and then created text and a smart object layer to work on the effect.
After that, we applied some filters to create the main chalk effect and masked it to the text we created.
Finally, we styled the text using a couple of drop shadow effects with different settings to create the colored outline.
Please feel free to leave your comments, suggestions, and outcomes below.
This tutorial will show you a really quick and easy way to create a stylized chalk text effect, using some filters and drop shadow effects. Let’s get started!
Looking for a chalk effect in Photoshop? Head on over to Envato Elements and download this amazing chalk effect Photoshop Layer Styles set with 15 chalk and 15 charcoal style presets.
1. Create the Background
Step 1
Open the Black Board image, and then go to Image > Image Size, and set the Width to 1000 px.
Step 2
Click the Create new fill or adjustment layer icon at the bottom of the Layers panel and choose Levels.
Step 3
Set the Gamma value to 0.95. This will darken the texture a little bit.
2. Create the Text and Chalk Layers
Step 1
Create the text using the font Magnolia Script. Set the Size to 200 pt, and if you’re using multiple lines of text, set the Leading to a value around 185 pt.
Step 2
Set the Foreground and Background colors to Black and White.
Create a new layer below the text layer, call it Chalk, and fill it with Black.
Step 3
Go to Filter > Convert for Smart Filters, to convert the layer into a smart object.
3. Apply the Filters
Step 1
Go to Filter > Noise > Add Noise.
Change the Amount to 150 and the Distribution to Gaussian, and check the Monochromatic box.
Step 2
Go to Filter > Stylize > Diffuse, and choose the Lighten Only Mode.
4. Mask the Chalk Texture
Step 1
Command-click the text layer’s thumbnail to create a selection.
Step 2
Click the Add layer mask icon at the bottom of the Layers panel.
Step 3
Select the text layer, and change its Fill value to 0.
5. Style the Text Layer
Double-click the text layer to apply the following layer style:
Step 1
Add a Drop Shadow with these settings:
Color: #1e1c1e
Opacity: 100%
Distance: 6
Spread: 35
Size: 1
Noise: 100%
Step 2
Click the + icon to the right of the Drop Shadow tab to add another instance with these settings:
Color: #b57b88
Opacity: 100%
Distance: 7
Spread: 60
Size: 5
Noise: 50%
Step 3
Add another Drop Shadow instance with these settings:
Color: #000000
Opacity: 25%
Distance: 15
Spread: 0
Size: 15
Noise: 30%
This will create the colored chalk outline and finish off the text effect.
Text Effect Actions
If you need Photoshop actions that will do most of the work for you, check out our propositions:
This item comes with 14 extra actions to make your main
shape/text/raster have a chalk writing look. You can play with many
ready-made icons to give your chalkboard a unique look.
Ever tried to write text or make a logo or graphic using flour
or powder? It’s really hard.
With this set of Photoshop actions, you can achieve amazing results with
few clicks. Simply install the action, create your text or logo, and click play. Job
done!
Make your text or logo written in the sand! You can achieve a realistic effect of writing on the sand in just a couple of seconds.
Use this summer style for your projects!
Transform your text or logo into a realistic Salt and Sugar effect in few clicks. All the layers are well organized and packed in a Smart Object, so the starting layer is untouched.
Congratulations, You’re Done!
In this tutorial, we created a simple background using a blackboard texture, and then created text and a smart object layer to work on the effect.
After that, we applied some filters to create the main chalk effect and masked it to the text we created.
Finally, we styled the text using a couple of drop shadow effects with different settings to create the colored outline.
Please feel free to leave your comments, suggestions, and outcomes below.
This tutorial will show you a really quick and easy way to create a stylized chalk text effect, using some filters and drop shadow effects. Let’s get started!
Looking for a chalk effect in Photoshop? Head on over to Envato Elements and download this amazing chalk effect Photoshop Layer Styles set with 15 chalk and 15 charcoal style presets.
1. Create the Background
Step 1
Open the Black Board image, and then go to Image > Image Size, and set the Width to 1000 px.
Step 2
Click the Create new fill or adjustment layer icon at the bottom of the Layers panel and choose Levels.
Step 3
Set the Gamma value to 0.95. This will darken the texture a little bit.
2. Create the Text and Chalk Layers
Step 1
Create the text using the font Magnolia Script. Set the Size to 200 pt, and if you’re using multiple lines of text, set the Leading to a value around 185 pt.
Step 2
Set the Foreground and Background colors to Black and White.
Create a new layer below the text layer, call it Chalk, and fill it with Black.
Step 3
Go to Filter > Convert for Smart Filters, to convert the layer into a smart object.
3. Apply the Filters
Step 1
Go to Filter > Noise > Add Noise.
Change the Amount to 150 and the Distribution to Gaussian, and check the Monochromatic box.
Step 2
Go to Filter > Stylize > Diffuse, and choose the Lighten Only Mode.
4. Mask the Chalk Texture
Step 1
Command-click the text layer’s thumbnail to create a selection.
Step 2
Click the Add layer mask icon at the bottom of the Layers panel.
Step 3
Select the text layer, and change its Fill value to 0.
5. Style the Text Layer
Double-click the text layer to apply the following layer style:
Step 1
Add a Drop Shadow with these settings:
Color: #1e1c1e
Opacity: 100%
Distance: 6
Spread: 35
Size: 1
Noise: 100%
Step 2
Click the + icon to the right of the Drop Shadow tab to add another instance with these settings:
Color: #b57b88
Opacity: 100%
Distance: 7
Spread: 60
Size: 5
Noise: 50%
Step 3
Add another Drop Shadow instance with these settings:
Color: #000000
Opacity: 25%
Distance: 15
Spread: 0
Size: 15
Noise: 30%
This will create the colored chalk outline and finish off the text effect.
Text Effect Actions
If you need Photoshop actions that will do most of the work for you, check out our propositions:
This item comes with 14 extra actions to make your main
shape/text/raster have a chalk writing look. You can play with many
ready-made icons to give your chalkboard a unique look.
Ever tried to write text or make a logo or graphic using flour
or powder? It’s really hard.
With this set of Photoshop actions, you can achieve amazing results with
few clicks. Simply install the action, create your text or logo, and click play. Job
done!
Make your text or logo written in the sand! You can achieve a realistic effect of writing on the sand in just a couple of seconds.
Use this summer style for your projects!
Transform your text or logo into a realistic Salt and Sugar effect in few clicks. All the layers are well organized and packed in a Smart Object, so the starting layer is untouched.
Congratulations, You’re Done!
In this tutorial, we created a simple background using a blackboard texture, and then created text and a smart object layer to work on the effect.
After that, we applied some filters to create the main chalk effect and masked it to the text we created.
Finally, we styled the text using a couple of drop shadow effects with different settings to create the colored outline.
Please feel free to leave your comments, suggestions, and outcomes below.
This tutorial will show you a really quick and easy way to create a stylized chalk text effect, using some filters and drop shadow effects. Let’s get started!
Looking for a chalk effect in Photoshop? Head on over to Envato Elements and download this amazing chalk effect Photoshop Layer Styles set with 15 chalk and 15 charcoal style presets.
1. Create the Background
Step 1
Open the Black Board image, and then go to Image > Image Size, and set the Width to 1000 px.
Step 2
Click the Create new fill or adjustment layer icon at the bottom of the Layers panel and choose Levels.
Step 3
Set the Gamma value to 0.95. This will darken the texture a little bit.
2. Create the Text and Chalk Layers
Step 1
Create the text using the font Magnolia Script. Set the Size to 200 pt, and if you’re using multiple lines of text, set the Leading to a value around 185 pt.
Step 2
Set the Foreground and Background colors to Black and White.
Create a new layer below the text layer, call it Chalk, and fill it with Black.
Step 3
Go to Filter > Convert for Smart Filters, to convert the layer into a smart object.
3. Apply the Filters
Step 1
Go to Filter > Noise > Add Noise.
Change the Amount to 150 and the Distribution to Gaussian, and check the Monochromatic box.
Step 2
Go to Filter > Stylize > Diffuse, and choose the Lighten Only Mode.
4. Mask the Chalk Texture
Step 1
Command-click the text layer’s thumbnail to create a selection.
Step 2
Click the Add layer mask icon at the bottom of the Layers panel.
Step 3
Select the text layer, and change its Fill value to 0.
5. Style the Text Layer
Double-click the text layer to apply the following layer style:
Step 1
Add a Drop Shadow with these settings:
Color: #1e1c1e
Opacity: 100%
Distance: 6
Spread: 35
Size: 1
Noise: 100%
Step 2
Click the + icon to the right of the Drop Shadow tab to add another instance with these settings:
Color: #b57b88
Opacity: 100%
Distance: 7
Spread: 60
Size: 5
Noise: 50%
Step 3
Add another Drop Shadow instance with these settings:
Color: #000000
Opacity: 25%
Distance: 15
Spread: 0
Size: 15
Noise: 30%
This will create the colored chalk outline and finish off the text effect.
Text Effect Actions
If you need Photoshop actions that will do most of the work for you, check out our propositions:
This item comes with 14 extra actions to make your main
shape/text/raster have a chalk writing look. You can play with many
ready-made icons to give your chalkboard a unique look.
Ever tried to write text or make a logo or graphic using flour
or powder? It’s really hard.
With this set of Photoshop actions, you can achieve amazing results with
few clicks. Simply install the action, create your text or logo, and click play. Job
done!
Make your text or logo written in the sand! You can achieve a realistic effect of writing on the sand in just a couple of seconds.
Use this summer style for your projects!
Transform your text or logo into a realistic Salt and Sugar effect in few clicks. All the layers are well organized and packed in a Smart Object, so the starting layer is untouched.
Congratulations, You’re Done!
In this tutorial, we created a simple background using a blackboard texture, and then created text and a smart object layer to work on the effect.
After that, we applied some filters to create the main chalk effect and masked it to the text we created.
Finally, we styled the text using a couple of drop shadow effects with different settings to create the colored outline.
Please feel free to leave your comments, suggestions, and outcomes below.
This tutorial will show you a really quick and easy way to create a stylized chalk text effect, using some filters and drop shadow effects. Let’s get started!
Looking for a chalk effect in Photoshop? Head on over to Envato Elements and download this amazing chalk effect Photoshop Layer Styles set with 15 chalk and 15 charcoal style presets.
1. Create the Background
Step 1
Open the Black Board image, and then go to Image > Image Size, and set the Width to 1000 px.
Step 2
Click the Create new fill or adjustment layer icon at the bottom of the Layers panel and choose Levels.
Step 3
Set the Gamma value to 0.95. This will darken the texture a little bit.
2. Create the Text and Chalk Layers
Step 1
Create the text using the font Magnolia Script. Set the Size to 200 pt, and if you’re using multiple lines of text, set the Leading to a value around 185 pt.
Step 2
Set the Foreground and Background colors to Black and White.
Create a new layer below the text layer, call it Chalk, and fill it with Black.
Step 3
Go to Filter > Convert for Smart Filters, to convert the layer into a smart object.
3. Apply the Filters
Step 1
Go to Filter > Noise > Add Noise.
Change the Amount to 150 and the Distribution to Gaussian, and check the Monochromatic box.
Step 2
Go to Filter > Stylize > Diffuse, and choose the Lighten Only Mode.
4. Mask the Chalk Texture
Step 1
Command-click the text layer’s thumbnail to create a selection.
Step 2
Click the Add layer mask icon at the bottom of the Layers panel.
Step 3
Select the text layer, and change its Fill value to 0.
5. Style the Text Layer
Double-click the text layer to apply the following layer style:
Step 1
Add a Drop Shadow with these settings:
Color: #1e1c1e
Opacity: 100%
Distance: 6
Spread: 35
Size: 1
Noise: 100%
Step 2
Click the + icon to the right of the Drop Shadow tab to add another instance with these settings:
Color: #b57b88
Opacity: 100%
Distance: 7
Spread: 60
Size: 5
Noise: 50%
Step 3
Add another Drop Shadow instance with these settings:
Color: #000000
Opacity: 25%
Distance: 15
Spread: 0
Size: 15
Noise: 30%
This will create the colored chalk outline and finish off the text effect.
Text Effect Actions
If you need Photoshop actions that will do most of the work for you, check out our propositions:
This item comes with 14 extra actions to make your main
shape/text/raster have a chalk writing look. You can play with many
ready-made icons to give your chalkboard a unique look.
Ever tried to write text or make a logo or graphic using flour
or powder? It’s really hard.
With this set of Photoshop actions, you can achieve amazing results with
few clicks. Simply install the action, create your text or logo, and click play. Job
done!
Make your text or logo written in the sand! You can achieve a realistic effect of writing on the sand in just a couple of seconds.
Use this summer style for your projects!
Transform your text or logo into a realistic Salt and Sugar effect in few clicks. All the layers are well organized and packed in a Smart Object, so the starting layer is untouched.
Congratulations, You’re Done!
In this tutorial, we created a simple background using a blackboard texture, and then created text and a smart object layer to work on the effect.
After that, we applied some filters to create the main chalk effect and masked it to the text we created.
Finally, we styled the text using a couple of drop shadow effects with different settings to create the colored outline.
Please feel free to leave your comments, suggestions, and outcomes below.
Covid-19 is an equal opportunity global killer. It makes no difference between race or social standing. To keep virus from spreading, we all need to literally spread out and stay at least 2 meters away from anyone, but the best way to stifle the spread is to stay home.
Stay 2 meters away from everyone even better, please #StayHome.