Archiwum kategorii: CSS

Technical Debt is Like Tetris

Post pobrano z: Technical Debt is Like Tetris

Here’s a wonderful post by Eric Higgins all about refactoring and technical debt. He compares giant refactoring projects to being similar to Tetris:

Similar to running a business, Tetris gets harder the longer you play. Pieces move faster and it becomes harder to keep up.

Similar to running a business, you can never win Tetris. There is no true finish line. You only control how quickly you lose.

Similar to running a business, allowing too many gaps to build up in Tetris will cause you to lose.

I love this comparison, despite my mediocre Tetris skills. It does feel like even „easy” development becomes harder as technical debt grows on a project, much the same way Tetris pieces gain speed and provide little time to react as the stack grows. However, I do think perhaps I have a more optimistic view of technical debt overall. If you work slowly and carefully then you can build up a culture of refactoring and gather momentum over time.

Direct Link to ArticlePermalink

The post Technical Debt is Like Tetris appeared first on CSS-Tricks.

People Digging into Grid Sizing and Layout Possibilities

Post pobrano z: People Digging into Grid Sizing and Layout Possibilities

Jen Simmons has been coining the term intrinsic design, referring to a new era in web layout where the sizing of content has gone beyond fluid columns and media query breakpoints and into, I dunno, something a bit more exotic. For example, columns that are sized more by content and guidelines than percentages. And not always columns, but more like appropriate placement, however that needs to be done.

One thing is for sure, people are playing with the possibilities a lot right now. In the span of 10 days I’ve gathered these links:

The post People Digging into Grid Sizing and Layout Possibilities appeared first on CSS-Tricks.

Design Systems and Portfolios

Post pobrano z: Design Systems and Portfolios

In my experience working with design systems, I’ve found that I have to sacrifice my portfolio to do it well. Unlike a lot of other design work where it’s relatively easy to present Dribbble-worthy interfaces and designs, I fear that systems are quite a bit trickier than that.

You could make things beautiful, but the best work that happens on a design systems team often isn’t beautiful. In fact, a lot of the best work isn’t even visible.

For example, most days I’m pairing up with folks on my team to help them understand how our system works; from the CSS architecture, to the font stack, to the UI Kit to how a component can be manipulated to solve a specific problem, to many things in between. I’m trying as best as I can to help other designers understand what would be hard to build and what would be easy, as well as when to change their designs based on technical or other design constraints.

Further, there’s a lot of hard and diligent work that goes into projects that have no visible impact on the system at all. Last week, I noticed a weird thing with our checkboxes. Our Checkbox React component would output HTML like this:

<div class="checkbox">
  <label for="ch-1">
    <input id="ch-1" type="checkbox" class="checkbox" />
  </label>
</div>

We needed to wrap the checkbox with a <div> for styling purposes and, from a quick glance, there’s nothing wrong with this markup. However, the <div> and the <input> both have a class of .checkbox and there were confusing styles in the CSS file that styled the <div> first and then un-did those styles to fix the <input> itself.

The fix for this is a pretty simple one: all we need to do is make sure that the class names are specific so that we can safely refactor any confusing CSS:

<div class="checkbox-wrapper">
  <label for="ch-1">
    <input id="ch-1" type="checkbox" class="checkbox" />
  </label>
</div>

The thing is that this work took more than a week to ship because we had to refactor a ton of checkboxes in our app to behave in the same way and make sure that they were all using the same component. These checkboxes are one of those things that are now significantly better and less confusing, but it’s difficult to make it look sexy in a portfolio. I can’t simply drop them into a big iPhone mockup and rotate it as part of a fancy portfolio post if I wanted to write about my work or show it to someone else.

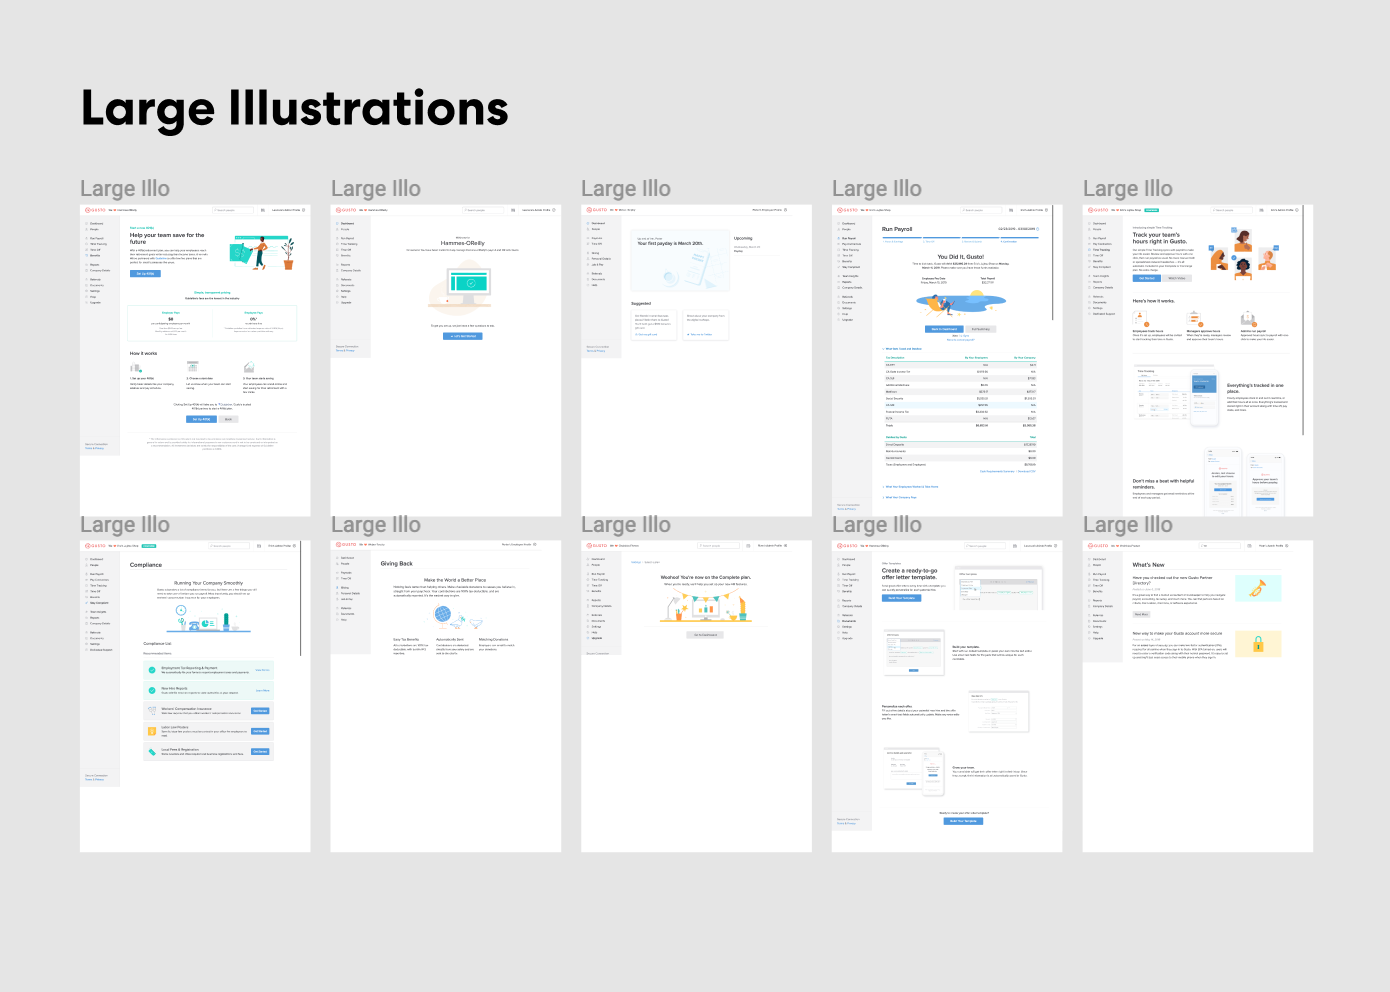
Take another example: I spent an entire day making an audit of our illustrations to help our team get an understanding of how we use them in our application. I opened up Figma and took dozens of screenshots:

It’s sort of hard to take credit for this work because the heavy lifting is really moderating a discussion and helping the team plan. It’s important work! But I feel like it’s hard to show that this work is valuable and to show the effects of it in a large org. “Things are now less confusing,” isn’t exactly a great accomplishment – but it really should be. These boring, methodical changes are vital for the health of a good design system.

Also… it’s kind of weird to putm “I wrote documentation” in a portfolio as much as it is to say, “I paired with designers and engineers for three years.” It’s certainly less satisfying than a big, glossy JPEG of a cool interface you designed. And I’m not sure if this is the same everywhere, but only about 10% of the work I do is visual and worthy of showing off.

My point is that building new components like this RadioCard I designed a while back is extraordinarily rare and accounts for a tiny amount of the useful work that I do:

See the Pen
Gusto App – RadioCard Prototype
by Robin Rendle (@robinrendle)
on CodePen.

I’d love to see how you’re dealing with this problem though. How do you show off your front-end and design systems work? How do you make it visible and valuable in your organization? Let me know in the comments!

The post Design Systems and Portfolios appeared first on CSS-Tricks.

See No Evil: Hidden Content and Accessibility

Post pobrano z: See No Evil: Hidden Content and Accessibility

There is no one true way to hide something on the web. Nor should there be, because hiding is too vague. Are you hiding visually or temporarily (like a user menu), but the content should still be accessible? Are you hiding it from assistive tech on purpose? Are you showing it to assistive tech only? Are you hiding it at certain screen sizes or other scenarios? Or are you just plain hiding it from everyone all the time?

Paul Hebert digs into these scenarios. We’ve done a video on this subject as well.

Feels like many CSS properties play some role in hiding or revealing content: display, position, overflow, opacity, visibility, clip-path

Direct Link to ArticlePermalink

The post See No Evil: Hidden Content and Accessibility appeared first on CSS-Tricks.

Web Standards Meet User-Land: Using CSS-in-JS to Style Custom Elements

Post pobrano z: Web Standards Meet User-Land: Using CSS-in-JS to Style Custom Elements

The popularity of CSS-in-JS has mostly come from the React community, and indeed many CSS-in-JS libraries are React-specific. However, Emotion, the most popular library in terms of npm downloads, is framework agnostic.

Using the shadow DOM is common when creating custom elements, but there’s no requirement to do so. Not all use cases require that level of encapsulation. While it’s also possible to style custom elements with CSS in a regular stylesheet, we’re going to look at using Emotion.

We start with an install:

npm i emotion

Emotion offers the css function:

import {css} from 'emotion';

css is a tagged template literal. It accepts standard CSS syntax but adds support for Sass-style nesting.

const buttonStyles = css`
  color: white;
  font-size: 16px;
  background-color: blue;

  &:hover {
    background-color: purple;
  }
`

Once some styles have been defined, they need to be applied. Working with custom elements can be somewhat cumbersome. Libraries — like Stencil and LitElement — compile to web components, but offer a friendlier API than what we’d get right out of the box.

So, we’re going to define styles with Emotion and take advantage of both Stencil and LitElement to make working with web components a little easier.

Applying styles for Stencil

Stencil makes use of the bleeding-edge JavaScript decorators feature. An @Component decorator is used to provide metadata about the component. By default, Stencil won’t use shadow DOM, but I like to be explicit by setting shadow: false inside the @Component decorator:

@Component({
  tag: 'fancy-button',
  shadow: false
})

Stencil uses JSX, so the styles are applied with a curly bracket ({}) syntax:

export class Button {
  render() {
    return <div><button class={buttonStyles}><slot/></button></div>
  }
}

Here’s how a simple example component would look in Stencil:

import { css, injectGlobal } from 'emotion';
import {Component} from '@stencil/core';

const buttonStyles = css`
  color: white;
  font-size: 16px;
  background-color: blue;
  &:hover {
    background-color: purple;
  }
`
@Component({
  tag: 'fancy-button',
  shadow: false
})
export class Button {
  render() {
    return <div><button class={buttonStyles}><slot/></button></div>
  }
}

Applying styles for LitElement

LitElement, on the other hand, <em<does use shadow DOM by default. When creating a custom element with LitElement, the LitElement class is extended. LitElement has a createRenderRoot() method, which creates and opens a shadow DOM:

createRenderRoot()  {
  return this.attachShadow({mode: 'open'});
}

Don’t want to make use of shadow DOM? That requires re-implementing this method inside the component class:

class Button extends LitElement {
  createRenderRoot() {
      return this;
  }
}

Inside the render function, we can reference the styles we defined using a template literal:

render() {
  return html`<button class=${buttonStyles}>hello world!</button>`
}

It’s worth noting that when using LitElement, we can only use a slot element when also using shadow DOM (Stencil does not have this problem).

Put together, we end up with:

import {LitElement, html} from 'lit-element';
import {css, injectGlobal} from 'emotion';
const buttonStyles = css`
  color: white;
  font-size: 16px;
  background-color: blue;
  &:hover {
    background-color: purple;
  }
`

class Button extends LitElement {
  createRenderRoot() {
    return this;
  }
  render() {
    return html`<button class=${buttonStyles}>hello world!</button>`
  }
}

customElements.define('fancy-button', Button);

Understanding Emotion

We don’t have to stress over naming our button — a random class name will be generated by Emotion.

We could make use of CSS nesting and attach a class only to a parent element. Alternatively, we can define styles as separate tagged template literals:

const styles = {
  heading: css`
    font-size: 24px;
  `,
  para: css`
    color: pink;
  `
} 

And then apply them separately to different HTML elements (this example uses JSX):

render() {
  return <div>
    <h2 class={styles.heading}>lorem ipsum</h2>
    <p class={styles.para}>lorem ipsum</p>
  </div>
}

Styling the container

So far, we’ve styled the inner contents of the custom element. To style the container itself, we need another import from Emotion.

import {css, injectGlobal} from 'emotion';

injectGlobal injects styles into the “global scope” (like writing regular CSS in a traditional stylesheet — rather than generating a random class name). Custom elements are display: inline by default (a somewhat odd decision from spec authors). In almost all cases, I change this default with a style applied to all instances of the component. Below are the buttonStyles which is how we can change that up, making use of injectGlobal:

injectGlobal`
fancy-button {
  display: block;
}
`

Why not just use shadow DOM?

If a component could end up in any codebase, then shadow DOM may well be a good option. It’s ideal for third party widgets — any CSS that’s applied to the page simply won’t break the the component, thanks to the isolated nature of shadow DOM. That’s why it’s used by Twitter embeds, to take one example. However, the vast majority of us make components for for a particular site or app and nowhere else. In that situation, shadow DOM can arguably add complexity with limited benefit.

The post Web Standards Meet User-Land: Using CSS-in-JS to Style Custom Elements appeared first on CSS-Tricks.

Styling Based on Scroll Position

Post pobrano z: Styling Based on Scroll Position

Rik Schennink documents a system for being able to write CSS selectors that style a page when it has scrolled to a certain point. If you’re like me, you’re already on the lookout for document.addEventListener('scroll' ... and being terrified about performance. Rik gets to that right away by both debouncing the function as well as marking the event as passive.

The end result is a data-scroll attribute on the <html> element that can be used in the CSS. Meaning if you’re scrolled to 640px down the page, you have <html data-scroll="640"> and could write a selector like:

html:not([data-scroll='0']) {
  body {
    padding-top: 3em;
  }
  header {
    position: fixed;
  }
}

See the Pen
Writing Dumb JS 🧟‍♂️ and Smart CSS 👩‍🔬
by Rik Schennink (@rikschennink)
on CodePen.

Unfortunately, we don’t have greater than (>) less than (<) selectors in CSS for things like numbered attributes, so the CSS styling potential is fairly limited here. You might ultimately need to update the JavaScript function such that it applies other classes or data attributes based on your math. But you’ll already be set up for good performance here.

„Apply styles when the user has scrolled away from the top” is a legit use case. It makes me think of a once function (like we have in jQuery) where any scroll event would only be triggered once and then not again. They scrolled! So, by definition, they aren’t at the top anymore! But that doesn’t deal with when they scroll back to the top.

I find it generally more useful to use IntersectionObserver for styling things based on scroll position. With it, you can do things like, „has this element been scrolled into view or beyond,” which is generically useful and can be used for scrolled-away-from-top stuff too.

Here’s an example that adds or removes a class if a user has scrolled past a hidden pixel positioned at 500px down the page.

See the Pen
Fixed Header with IntersectionObserver
by Chris Coyier (@chriscoyier)
on CodePen.

That’s performant as well, avoiding any scroll event handlers at all.

And speaking of IntersectionObserver, check out „Trust is Good, Observation is Better—Intersection Observer v2”.

The post Styling Based on Scroll Position appeared first on CSS-Tricks.

8 Little Videos About the Firefox Shape Path Editor

Post pobrano z: 8 Little Videos About the Firefox Shape Path Editor

It sometimes takes a quick 35 seconds for a concept to really sink in. Mikael Ainalem delivers that here, in the case that you haven’t quite grokked the concepts behind path-based CSS properties like clip-path and shape-outside.

Here are two of my favorites. The first demonstrates animating text into view using a polygon as a clip.

The second shows how the editor can help morph one shape into another.

Direct Link to ArticlePermalink

The post 8 Little Videos About the Firefox Shape Path Editor appeared first on CSS-Tricks.

Level up your JavaScript error monitoring

Post pobrano z: Level up your JavaScript error monitoring

(This is a sponsored post.)

Automatically detect and diagnose JavaScript errors impacting your users with Bugsnag. Get comprehensive diagnostic reports, know immediately which errors are worth fixing, and debug in a fraction of the time.

Bugsnag detects every single error and prioritizes errors with the greatest impact on your users. Get support for 50+ platforms and integrate with the development and productivity tools your team already uses.

Bugsnag is used by the world’s top engineering teams including Airbnb, Slack, Pinterest, Lyft, Square, Yelp, Shopify, Docker, and Cisco. Start your free trial today.

Direct Link to ArticlePermalink

The post Level up your JavaScript error monitoring appeared first on CSS-Tricks.

HMTL, CSS and JS in an ADD, OCD, Bi-Polar, Dyslexic and Autistic World

Post pobrano z: HMTL, CSS and JS in an ADD, OCD, Bi-Polar, Dyslexic and Autistic World

Hey CSS-Tricksters! A lot of folks tweeted, emailed, commented and even courier pigeoned (OK, maybe not that) stories about their personal journeys learning web development after we published „The Great Divide” essay. One of those stories was from Tim Smith and, it was so interesting, that we invited him to share it with the broader community. So, please help us welcome him as he elaborates on his unique personal experience and how it feels to be in his shoes as a front-ender.

Hi folks, my name is Tim Smith

I have ADD, OCD, Bi-Polar, Dyslexia… and not to mention that I am on the Autism spectrum. This combination (apart from causing me to feel a lot of personal shame) makes coding very hard — especially learning how to code, which I am trying to do. Things get mixed up in my head and appear backwards to the point that I find it nearly impossible to focus any longer than 15-20 minutes at a time. Perhaps I will expand on this in another post. Even now as I write this, I feel pulled to rate each song on YouTube Music and attempt to correct every mistake I make. And since I keep switching “write” with “right,” this becomes infuriating and discouraging, to say the least.

I do not read well, so learning from books is the least effective way for me to learn (sorry O’Reilly). Online tutorials are OK, but I tend to sell myself short by being lazy with copy and paste for the code examples. If I force myself to hand-type the examples, I get the benefit of muscle memory but drown in the words of the tutorial and eventually lose interest altogether.

Video tutorials are my ideal learning method. There’s no reading involved and no way for me to copy and paste my way out of things. Having to stop and start the videos in order to type the code is maddening, but well worth it. YouTube is a great place for video tutorials if you have the patience to wade through them… which I don’t.

I found Chris Coyier in the early 2000s. The treasure trove of articles, guides, and videos contained here on CSS-Tricks has been a major benefit for me and actually progressed my ability to learn code. Later, I found Wes Bos. He, too, has been a leading contributor to my web learning. Wes unlocked many of the things I struggled with, namely React and the new features of ES6.

Together, I’d say Chris and Wes are responsible for at least 80% of my collective front-end knowledge. (Personal aside: Chris and Wes, you two are my heroes and secret mentors.) Both Chris and Wes have a way of giving me the information that’s relevant to what I’m learning in a way that is fun and entertaining as well as straightforward and precise. They don’t just present the code; they explain the why and history behind each topic. Wes is a little better at this, but the sheer number of videos Chris has created has kept me busy for years and will continue to into the future.

Simply writing code is another effective way for me to learn. I like to geek-out and setup development servers for various web languages and libraries and play around. I have learned a lot about MacOS and Linux (mostly Ubuntu) while also learning the basics of many web languages and libraries: PHP (for WordPress themes), Python, React, Vue and many others. I learned to embrace the command line and avoid GUIs when possible. Nothing against GUIs; I simply find the command line more precise (and just between you and me, way cooler to brag about to non-coders).

I still do use the command line — or at least I would if I still had a laptop or desktop to work on. I am actually writing this on an iPad Mini 2. However, I have found another great way to write and share code without the need to set up servers and complicated environments: CodePen. I joined an early beta way back when and it was love at first sight. I can now write code, share it and get feedback all in one place (here’s my profile). Every time I get a fun idea or find a fun kata, I fire up Codepen and just start coding. No tricky dev setup. There are other apps that do this but CodePen is unique because of the social aspect and the ability to easily embed code samples on forums.

So, that’s a little about me. What I want to get into is how I learn HTML and CSS because it’s probably somewhat similar to yours, but different than how you might have gone about it.

Breaking into HTML

A black and white tree illustration.

I learned HTML in a few different ways. At first, I would look at the source code of popular web sites. In the early nineties, when I started to learn HTML many, if not most, web browsers had the ability to show the source code of a website. I saw all of the tags, how they were used and the basic structure of the sites. I was able to reverse-engineer them. I had not learned CSS at the time, so my first websites were single column and very boring.

Quick aside: Without CSS, all websites are perfectly responsive and look great on any device or screen size. We break them with CSS, then need to fix them… ponder that a bit.

Thanks to source code, I began reading articles on the web and studied constantly. I found the DreamInCode forum which serves as a forum for all code disciplines and languages — similar to StackOverflow because, like StackOverflow, the people were arrogant and rude to newbies, at least in my experience. Still, I was able to see how people approached various HTML concepts and problems and this was the springboard upon which I launched my learning adventure. I received blunt, often harsh feedback on my code examples. As hard as it is to hear hard criticism, it benefitted me as it taught me the right and — even more importantly, the wrong — way to approach and write HTML.

Like most things, writing and mastering HTML is all about trial and error. I had to create hundreds of horrible websites (if you could call them that) before it “clicked” for me. But that’s better than nothing, as we’ve all heard it said before:

Just build websites!
— Chris Coyier

It was not long after that I was introduced to CSS, and then the real journey began…

Along came CSS

Tree illustration with green background

The easiest way for me to describe CSS is this: It’s the code that makes your HTML look nice.” I had to adopt a KISS attitude as I learned CSS because I found that I was overthinking it. CSS is simple if you let it be. Let’s have a look:

See the Pen
Thing
by Tim Smith (@WebRuin)
on CodePen.

This is about as simple as CSS is. Name your block in HTML (e.g. <div class="Tim">...</div>), then target that name in a CSS file with properties to describe the block, like colors, borders, font treatments among much, much more.

At first, I would spend all my time trying to memorize as many CSS properties as I could. I would “Alta Vista” (remember that?!) around for what sort of things others were doing with CSS and how they were doing it. This was fun and informative but only served to confuse me to no end. Trying to reverse-engineer CSS as I did with HTML only got me so far. My memory for stuff like this is poor, at best. I had to step back, take a deep breath (literally and figuratively) and find a new approach.

My thought process typically goes something like this:

  1. Do I want the words to be black? If so, do nothing
  2. What about the background color? The default white is boring so… give it a background color.
  3. How big do I want the element to be? Don’t overthink this as far as measurement units go, because pixels are fine and, well, height and width seem pretty logical to me.

And so on. Simple questions with simple property names. My point is you can do some amazing things with simple CSS. It was that simplicity that made me want to learn and apply everything I found. But, at the same time, I was so overwhelmed that I almost quit web development for good. It’s an awkward conflict: the simplicity and elegance are welcoming and fun but the myriad possibilities are dizzying and impossible to retain.

What worked for me was taking an incremental approach to learn CSS. By starting small and slowly adding more as I truly learned and understood the properties. I found I could have fun and be creative at a comfortable pace without putting too much pressure on myself.

I won’t lie. I am not a designer. Given a blank canvas, I will freeze or come up with a mediocre design that’s derivative of a mish-mash of other designs I like. That said, I am great at coding a design that someone with actual design skills can put together (like this).

I fell in love with CSS for one reason: it is the perfect balance of logic and design. A lot of coding is like this. Code can be beautiful, but CSS is the bee’s knees for me!

JavaScript is hard! But I’m trying.

Full color tree illustration

HTML and CSS came relatively easily to me. I stumbled a bit on CSS Grid and some of the more advanced stuff, but it just clicked for me. As I alluded to earlier, I am a visual learner. Both HTML and CSS are inherently visual languages, and they give me the instant gratification my ADD needs. Both are straightforward and commonsensical to me.

In contrast, Javascript is something I find to be very, very difficult. It is a logic-based language which would ordinarily be my cup of tea; nevertheless, I have found it challenging to “click” with. Despite a few epiphanies while learning it, JavaScript seems to elude me beyond the basics. I have completed Wes Bos’ JavaScript30 course along with many other tutorials. They make sense in the moment it’s being explained to me, but even still, when presented with a “blank canvas” so to speak, I forget most of the concepts and either write the same ol’ stuff over and over or simply give up.

Surprisingly, React came much more naturally to me. I think it has to do with its modularity and my love for blocks, LEGOs, and puzzles. I have learned it well enough that I have been able to be creative with it and have started writing an app with it: a crowd-sourced urban bathroom locator. I have written and rewritten the start of the app with various Flux libraries and backend data libraries. I invariably give up only to start again, like the famous definition of insanity. I just keep thinking I will figure it out and/or find someone to do the hard parts for me.

My roadblock with React is JavaScript, of course. That may not make sense, but remember my stance on blocks. I know React is JavaScript. To me, though, it is quite different than vanilla JavaScript. Closures, pure functions, arrow functions, let vs. const vs. var, the enormous set of built-in methods, not to mention imported libraries, classes, and of course, my nemesis, Big O (how I loath Big-O)… my head is spinning even as I write this.

I want so badly to be, at the very least, decent at Javascript so I keep trying. Hundreds of tutorials, code schools like freeCodeCamp.org, Treehouse, Khan Academy, and yes, even muscling through many books (I love JavaScript: The Good Parts).

I have no trouble learning the syntax. The hangup, I think, lays in a lack of computer science knowledge and this inability to think mathematically. Algorithms make sense in concept, but their practical application simply blows my mind.

For mental health reasons, it was necessary for me to step away from my web development career in 2005. I was able to get back into it around 2010 when I worked for a few startups, but I never truly got back in. Javascript is my Achilles heel. I was lucky to find a few jobs that were truly light on JavaScript so I could focus on HTML and CSS — the things I thought added up to front-end development — but inevitably, I was expected to write JavaScript beyond basic interface enhancements and the jobs fell apart. So I either quit or was fired.

The ongoing search for work

Animated version of all tree images from start to finish.

Looking for work in recent times has been a nightmare! We now live in a world dominated by JavaScript and it seems no one wants a front-end developer whose strengths lie in HTML, CSS with an intermediate knowledge of Javascript — especially those without a degree in Computer Science. I can’t even find a job posting for this on any major job site.

I have had the honor of interviewing with recruiters at Facebook, Google, and Apple but I could not get past the first round of phone screening. I was asked questions that I felt have little-to-nothing to do with what I understand front-end development to be. There were no questions about CSS best practices and even nothing about semantic HTML or the proper use of ARIA attributes. All they seemed to care about was Big O and efficient loops. Even interviews with smaller companies were like this. Have services like Wix and the like taken all the core front-end jobs away?

Despite all the challenges I have faced, I feel I have mastered HTML and CSS and have a baseline grasp on JavaScript. I am very proud of that. While I dream of getting a job at a large company like Facebook, Google, or Apple, I really just hope to find a role where my HTML and CSS skills will shine and I can gain real-world experience with JavaScript as a junior developer with the benefit of mentoring somewhere, like the San Francisco Bay Area where I currently live.

We all have different learning styles and paces, so don’t give up before you have tried every possible way to learn what you are trying to do. And, if you come up with a new way, please share so we can all broaden our individual and collective knowledge.

I hope this article has reached at least one other developer like me! Thank you to all my predecessors. Happy coding!

The post HMTL, CSS and JS in an ADD, OCD, Bi-Polar, Dyslexic and Autistic World appeared first on CSS-Tricks.

Should I Use Source Maps in Production?

Post pobrano z: Should I Use Source Maps in Production?

It’s a valid question. A „source map” is a special file that connects a minified/uglified version of an asset (CSS or JavaScript) to the original authored version. Say you’ve got a filed called _header.scss that gets imported into global.scss which is compiled to global.css. That final CSS file is what gets loaded in the browser, so for example, when you inspect an element in DevTools, it might tell you that the <nav> is display: flex; because it says so on line 387 in global.css.

On line 528 of page.css</, we can find out that <code>.meta has position: relative;

But because that final CSS file is probably minified (all whitespace removed), DevTools is likely to tell us that we’ll find the declaration we’re looking for on line 1! Unfortunate, and not helpful for development.

That’s where source maps come in. Like I said up top, source maps are special files that connect that final output file the browser is actually using with the authored files that you actually work with and write code in on your file system.

Typically, source maps are a configuration option from the preprocessor. Here’s Babel’s options. I believe that with Sass, you don’t even have to pass a flag for it in the command or anything because it produces source maps by default.

So, these source maps are for developers. They are particularly useful for you and your team because they help tremendously for debugging issues as well as day-to-day work. I’m sure I make use of them just about every day. I’d say in general, they are used for local development. You might even .gitignore them or skip them in a deployment process in order to serve and store fewer assets to production. But there’s been some recent chatter about making sure they go to production as well.

David Heinemeier Hansson:

But source maps have long been seen merely as a local development tool. Not something you ship to production, although people have also been doing that, such that live debugging would be easier. That in itself is a great reason to ship source maps. […]

Additional, Rails 6 just committed to shipping source maps by default in production, also thanks to Webpack. You’ll be able to turn that feature off, but I hope you won’t. The web is a better place when we allow others to learn from our work.

Check out that issue thread for more interesting conversation about shipping source maps to production. The benefits boil down to these two things:

  1. It might help you track down bugs in production more easily
  2. It helps other people learn from your website more easily

Both are cool. Personally, I’d be opposed to shipping performance-optimized code for learning purposes alone. I wrote about that last year:

I don’t want my source to be human-readable, not for protective reasons, but because I care about web performance more. I want my website to arrive at light speed on a tiny spec of magical network packet dust and blossom into a complete website. Or do whatever computer science deems is the absolute fastest way to send website data between computers. I’m much more worried about the state of web performance than I am about web education. But even if I was very worried about web education, I don’t think it’s the network’s job to deliver teachability.

Shipping source maps to production is a nice middle ground. There’s no hit on performance (source maps don’t get loaded unless you have DevTools open, which is, IMO, irrelevant to a real performance discussion) with the benefit of delivering debugging and learning benefits.

The downsides brought up in recent discussion boil down to:

  1. Sourcemaps require compilation time
  2. It allows people to, I dunno, steal your code or something

I don’t care about #2 (sorry), and #1 seems generally negligible for a small or what we think of as the average site, though I’m afraid I can’t speak for mega sites.

One thing I should add though is that source maps can even be generated for CSS-in-JS tooling, so for those that literally inject styles into the DOM for you, those source maps are injected as well. I’ve seen major slowdowns in those situations, so I would say definitely do not ship source maps to production if you can’t split them out of your main bundles. Otherwise, I’d vote strongly that you do.

The post Should I Use Source Maps in Production? appeared first on CSS-Tricks.