Archiwum kategorii: Web Tools

How to Create a Fun Felt Photoshop Text Effect

Post pobrano z: How to Create a Fun Felt Photoshop Text Effect

Final product image
What You’ll Be Creating

Learn how to create a stitched felt Photoshop text effect in just a few easy steps. This effect is great for the winter holidays.

This felt text effect is a part of the Felt Effect Photoshop Actions from my portfolio on Envato Market.

Felt Photoshop Action
Felt Effect Photoshop Action

The stitched felt effect action is also included in my new Christmas Photoshop Actions Bundle. The bundle contains 10 useful actions for the winter holidays.

Tutorial Assets

To create this Photoshop text effect, I will use the following assets:

1. How to Create the Felt Background

Step 1

Create a new document in Photoshop. The size of the canvas is 850 x 600px, resolution 72 dpi. If you use another canvas size, you have to adjust the layer styles.

Create new Photoshop document

Step 2

Add a new layer and call it Felt Background. Fill the layer with any color you like.

Fill Layer with Color

Step 3 

Add a Pattern Overlay layer style. Click on the arrow to Load Patterns and choose the felt-pattern.pat file. 

How to Load Patterns in Photoshop

Step 4

Add a Color Overlay (color #428fc7) to the Felt Background layer. 

Add Color Overlay in Photoshop

2. How to Create the Felt Photoshop Text Effect

Step 1

I will create the text in a new document. So make a new file and add your text. Set the size to 320 pt.

Add Text Layer in Photoshop

Step 2

Toggle the Character and Paragraph panels and set the tracking for the selected characters to around 200.  

Character and Paragraph Panels in Photoshop

Step 3

Press Control-J to make two copies of the text layer. 

Duplicate layers in Photoshop

Step 4

Add a Stroke layer style of 15 px to the Felt Text 1 layer. The color of the border is not important, so you can choose any color you want. 

Stroke Layer Style

Step 5

Add a Stroke layer style of 10 px to the Felt Text 2 layer. The color of the border is not important, so you can choose any color you want. 

Stroke Layer Style

Step 6

Set the Fill of the Felt Text 3 layer to 0%.

Add a Bevel and Emboss layer style (color #ffffff and #000000) to the Felt Text 3 layer.

Bevel and Emboss Layer Style

Step 7

Go to the Felt Text 1 layer, right-click and choose Convert to Smart Object. Do the same for the Felt Text 2 and Felt Text 3 layers.

Convert to Smart Object in Photoshop

Step 8

I will hide the Felt Text 2 and Felt Text 3 layers for now. 

Go to the Felt Text 1 smart object and add these layer styles:

  • Drop Shadow (color #000000)
  • Color Overlay (color #328f1f)
  • Pattern Overlay (felt-pattern)
  • Bevel and Emboss (color #ffffff and #000000)
Drop Shadow Layer Style
Color Overlay Layer Style
Pattern Overlay Layer Style
Bevel and Emboss Layer Style

Step 9

To expand the text, go to Filter > Other > Minimum and set the Radius to 10 px

Minimum Filter in Photoshop

Step 10

Go to the Felt Text 2 smart object and add these layer styles:

  • Drop Shadow (color #000000)
  • Color Overlay (color #c11a1a)
  • Pattern Overlay (felt-pattern)
  • Bevel and Emboss (color #ffffff and #000000)
Drop Shadow Layer Style
Color Overlay Layer Style
Pattern Overlay Layer Style
Bevel and Emboss Layer Style

Step 11

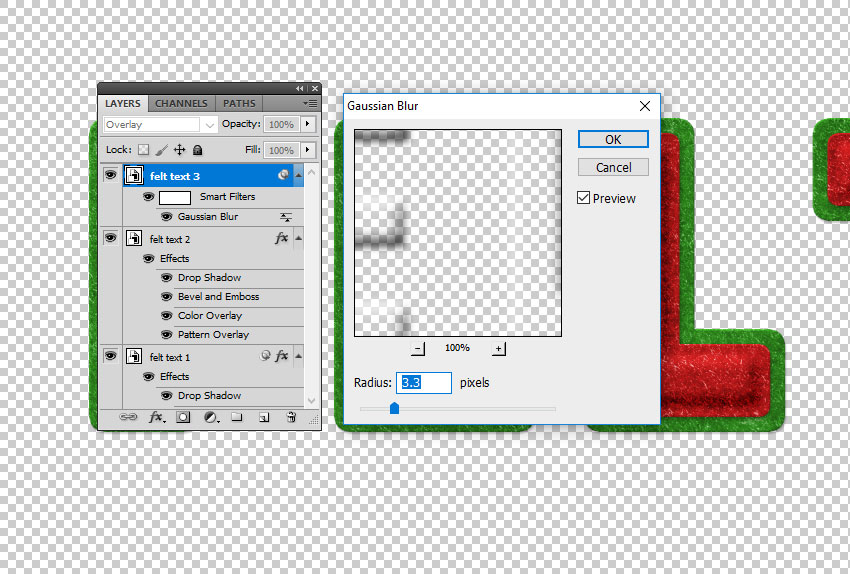
Go to the Felt Text 3 smart object and set the blend mode to Overlay

Blend Mode Overlay

Step 12

Go to Filter > Blur > Gaussian Blur and set the Radius to around 3.3 px

Gaussian Blur Photoshop Filter

Step 13

The felt text effect should now look like this. You can, of course, choose any colors you like for the felt pattern. 

Felt Text Effect in Photoshop

3. Create a Stitch Brush in Photoshop

Step 1

Let’s create a stitch brush for the felt Photoshop text effect.

Create a new PSD file, size 27 x 5 pxFill the canvas with color black. Go to Edit > Define Brush Preset. Set the brush name to „stitch” and click OK

Define Brush Preset in Photoshop

Step 2

Choose the Brush Tool and select the „stitch” brush from the Brush Preset Picker. Toggle the Brush panel and make the following settings: Spacing 750% and set the Angle Jitter to Direction.

Create Dashed Brush in Photoshop

Step 3

Click on the top right corner of the Brush panel and choose New Brush Preset. Name the new brush „stitch2”

Create Stitch Brush in Photoshop

You can now close the file in which you created the brush.

4. Add a Stitch Effect in Photoshop

Step 1

Press Shift-Control-N to create a new layer called Stitch Effect

Keep the Control key pressed and click on the thumbnail of the Felt Text 2 smart object to make a selection.

Make a Selection in Photoshop

Step 2

Go to Select > Modify > Contract and contract by 12 pixels.

Contract Selection in Photoshop

Step 3

Go to the Path tab and choose Make Work Path from the selection. 

Make Work Path in Photoshop

Step 4

Create a new layer above the Felt Text 3 layer and call it Stitch Effect

Pick the Brush Tool and select the stitch brush. 

Pick the Brush Tool

Step 5

Go to the Path tab and choose Stroke Work Path

Stroke Work Path
Stroke Work Path

Step 6

Press Delete to remove the work path.

Stitch Effect in Photoshop

Step 7

Add these layer styles to the Stitch Effect layer:

  • Drop Shadow (color #000000)
  • Color Overlay (color #e3dbc2)
  • Bevel and Emboss (color #ffffff and #000000)
Drop Shadow
Color Overlay
Bevel and Emboss

5. Create the Felt Letters

Step 1

Select all the layers and right-click to Convert to Smart Object

Select Layers and Convert to Smart Object

Step 2

Right-click on the Felt Text smart object and choose Duplicate Layer. For the Destination, choose the initial document, the one with the felt background.

Duplicate layer in Another Document

Step 3

Make a copy of the Felt Text smart object and hide it. That way, you have the original text intact.

Rasterize the Felt Text smart object. 

Rasterize a Smart Object in Photoshop

Step 4

Use the Rectangular Marquee Tool to select the letter F. Press Control-X and Control-V to cut and paste the letter F onto another layer.

Cut and Paste in Photoshop

Step 5

Do the same for all the letters. Now you have the felt text letters on separate layers.

Text to Letters in Photoshop

Step 6

Press Control-T to Rotate and Move the letters as you like.

Rotate Layers in Photoshop

6. How to Make a Shadow in Photoshop

Step 1

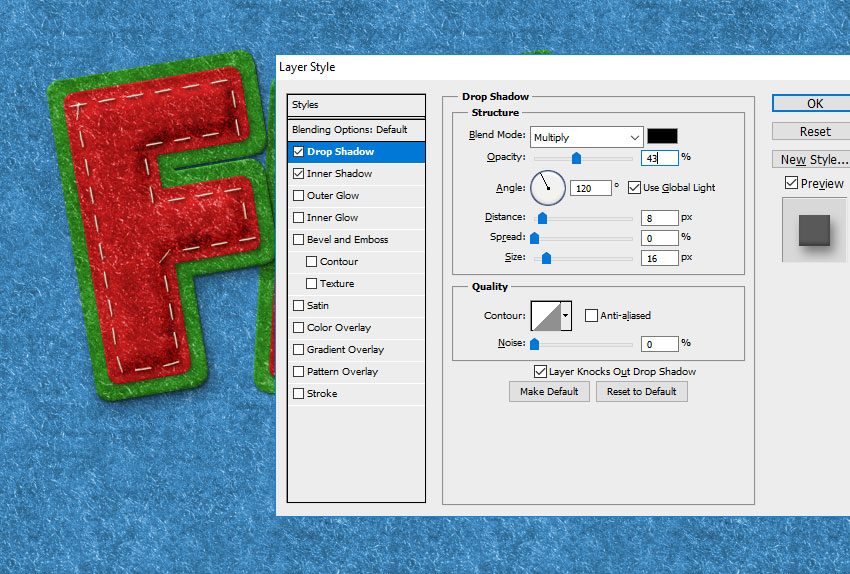
As you can see, the letters look a little flat and have the same shadow. So to make them look more realistic, add different Drop Shadow layer styles to each letter.

Start with the F layer. 
Drop Shadow Layer Style in Photoshop

Step 2

Add a Drop Shadow layer style to the E layer. 

Drop Shadow Layer Style in Photoshop

Step 3

Add a Drop Shadow layer style to the L layer. 

Drop Shadow Layer Style in Photoshop

Step 4

Add a Drop Shadow layer style to the T layer. 

Drop Shadow Layer Style in Photoshop

You can also add an Inner Shadow layer style to each layer. 

Inner Shadow Layer Style

7. Change the Color of the Felt Photoshop Text Effect

If you want to change the color of the felt letters, add a Hue/Saturation adjustment layer for the letter that you want to modify. If you want to change the red color, choose the Reds channel. 

Click the Clip to Layer button to add the adjustment only for that layer. 

HueSaturation Adjustment Layer

In the same way, you can change any letter you want.

Felt Photoshop Text Effect

8. Add Felt Ornaments

Step 1

Use the Pen Tool to add shapes like trees and clouds. 

Create Shapes Using the Pen Tool

Step 2

Click on the Add to Shape Area if you want to create multiple shapes on the same layer. 

I made two separate layers with tree shapes and one separate layer with cloud shapes. I did that because I want to add different colors to the shapes.

Step 3

For each layer, add these layer styles:

  • Drop Shadow (color #000000)
  • Color Overlay (choose the color that you like)
  • Pattern Overlay (felt-pattern)
  • Bevel and Emboss (color #ffffff and #000000)
Drop Shadow
Color Overlay
Pattern Overlay
Bevel and Emboss

Step 4

You can also create a new layer and use the Brush Tool to add some stitch effects using the stitch brush.

Photoshop Felt Text with Stitch Effects

9. Create Clothes Buttons in Photoshop

Step 1

To create the clothes button, I use the Ellipse Tool. Keep the Shift key pressed and draw to create a circle. 

Create a Circle in Photoshop

Step 2

Click on the Subtract from Shape Area button and add a circle inside the first circle to make a hole. Do this three more times.

Create a Circle in Photoshop

Step 3

Add these layer styles to the Clothes Button layer: 

  • Drop Shadow (color #000000)
  • Color Overlay (color #c8350d or choose the color that you like)
  • Bevel and Emboss (color #ffffff and #000000)
Drop Shadow
Bevel and Emboss
Color Overlay

Step 4

Create a new circle shape layer. Click on the Subtract from Shape Area button and add a large circle inside the first circle to make a hole. 

Subtract from Shape Area

Step 5

Go to the Clothes Button 1 layer, right-click and choose Copy Layer Style. Go to the Clothes Button 2 layer, right-click and choose Paste Layer Style.

Copy Layer Style in Photoshop

You can modify the layer style as you wish to create endless results. Change the Color Overlay, the Bevel and Emboss settings, etc.

Step 6

Create a new layer and call it Thread. Use the Brush Tool to create a thread.

Brush Tool

Create another layer and call it Thread. Use the Brush Tool to create another thread.

Brush Tool

Step 7

Add these layer styles to the Thread layers: 

  • Drop Shadow (color #000000)
  • Color Overlay (color #b9b9b9)
  • Inner Shadow (color #000000)
  • Bevel and Emboss (color #ffffff and #000000)
Drop Shadow
Color Overlay
Inner Shadow
Bevel and Emboss

Step 8

In the same way, you can create more buttons with different colors and sizes.  

Congratulations! You’re Done!

In this tutorial, you’ve learned how to create a felt text effect in Photoshop from scratch using brushes and patterns. Photoshop text effects are really useful, so I hope you’ve enjoyed this tutorial.  

Create a Felt Text Effect in Photoshop

This Photoshop text effect is a part of the Felt Photoshop Actions pack from my portfolio on Envato Market

The new Christmas Photoshop Actions Bundle contains 10 actions that you can use for the winter festive holidays. The stitched felt effect action is also included in the bundle.

Christmas Photoshop Actions Bundle

How to Create a Fun Felt Photoshop Text Effect

Post pobrano z: How to Create a Fun Felt Photoshop Text Effect

Final product image
What You’ll Be Creating

Learn how to create a stitched felt Photoshop text effect in just a few easy steps. This effect is great for the winter holidays.

This felt text effect is a part of the Felt Effect Photoshop Actions from my portfolio on Envato Market.

Felt Photoshop Action
Felt Effect Photoshop Action

The stitched felt effect action is also included in my new Christmas Photoshop Actions Bundle. The bundle contains 10 useful actions for the winter holidays.

Tutorial Assets

To create this Photoshop text effect, I will use the following assets:

1. How to Create the Felt Background

Step 1

Create a new document in Photoshop. The size of the canvas is 850 x 600px, resolution 72 dpi. If you use another canvas size, you have to adjust the layer styles.

Create new Photoshop document

Step 2

Add a new layer and call it Felt Background. Fill the layer with any color you like.

Fill Layer with Color

Step 3 

Add a Pattern Overlay layer style. Click on the arrow to Load Patterns and choose the felt-pattern.pat file. 

How to Load Patterns in Photoshop

Step 4

Add a Color Overlay (color #428fc7) to the Felt Background layer. 

Add Color Overlay in Photoshop

2. How to Create the Felt Photoshop Text Effect

Step 1

I will create the text in a new document. So make a new file and add your text. Set the size to 320 pt.

Add Text Layer in Photoshop

Step 2

Toggle the Character and Paragraph panels and set the tracking for the selected characters to around 200.  

Character and Paragraph Panels in Photoshop

Step 3

Press Control-J to make two copies of the text layer. 

Duplicate layers in Photoshop

Step 4

Add a Stroke layer style of 15 px to the Felt Text 1 layer. The color of the border is not important, so you can choose any color you want. 

Stroke Layer Style

Step 5

Add a Stroke layer style of 10 px to the Felt Text 2 layer. The color of the border is not important, so you can choose any color you want. 

Stroke Layer Style

Step 6

Set the Fill of the Felt Text 3 layer to 0%.

Add a Bevel and Emboss layer style (color #ffffff and #000000) to the Felt Text 3 layer.

Bevel and Emboss Layer Style

Step 7

Go to the Felt Text 1 layer, right-click and choose Convert to Smart Object. Do the same for the Felt Text 2 and Felt Text 3 layers.

Convert to Smart Object in Photoshop

Step 8

I will hide the Felt Text 2 and Felt Text 3 layers for now. 

Go to the Felt Text 1 smart object and add these layer styles:

  • Drop Shadow (color #000000)
  • Color Overlay (color #328f1f)
  • Pattern Overlay (felt-pattern)
  • Bevel and Emboss (color #ffffff and #000000)
Drop Shadow Layer Style
Color Overlay Layer Style
Pattern Overlay Layer Style
Bevel and Emboss Layer Style

Step 9

To expand the text, go to Filter > Other > Minimum and set the Radius to 10 px

Minimum Filter in Photoshop

Step 10

Go to the Felt Text 2 smart object and add these layer styles:

  • Drop Shadow (color #000000)
  • Color Overlay (color #c11a1a)
  • Pattern Overlay (felt-pattern)
  • Bevel and Emboss (color #ffffff and #000000)
Drop Shadow Layer Style
Color Overlay Layer Style
Pattern Overlay Layer Style
Bevel and Emboss Layer Style

Step 11

Go to the Felt Text 3 smart object and set the blend mode to Overlay

Blend Mode Overlay

Step 12

Go to Filter > Blur > Gaussian Blur and set the Radius to around 3.3 px

Gaussian Blur Photoshop Filter

Step 13

The felt text effect should now look like this. You can, of course, choose any colors you like for the felt pattern. 

Felt Text Effect in Photoshop

3. Create a Stitch Brush in Photoshop

Step 1

Let’s create a stitch brush for the felt Photoshop text effect.

Create a new PSD file, size 27 x 5 pxFill the canvas with color black. Go to Edit > Define Brush Preset. Set the brush name to „stitch” and click OK

Define Brush Preset in Photoshop

Step 2

Choose the Brush Tool and select the „stitch” brush from the Brush Preset Picker. Toggle the Brush panel and make the following settings: Spacing 750% and set the Angle Jitter to Direction.

Create Dashed Brush in Photoshop

Step 3

Click on the top right corner of the Brush panel and choose New Brush Preset. Name the new brush „stitch2”

Create Stitch Brush in Photoshop

You can now close the file in which you created the brush.

4. Add a Stitch Effect in Photoshop

Step 1

Press Shift-Control-N to create a new layer called Stitch Effect

Keep the Control key pressed and click on the thumbnail of the Felt Text 2 smart object to make a selection.

Make a Selection in Photoshop

Step 2

Go to Select > Modify > Contract and contract by 12 pixels.

Contract Selection in Photoshop

Step 3

Go to the Path tab and choose Make Work Path from the selection. 

Make Work Path in Photoshop

Step 4

Create a new layer above the Felt Text 3 layer and call it Stitch Effect

Pick the Brush Tool and select the stitch brush. 

Pick the Brush Tool

Step 5

Go to the Path tab and choose Stroke Work Path

Stroke Work Path
Stroke Work Path

Step 6

Press Delete to remove the work path.

Stitch Effect in Photoshop

Step 7

Add these layer styles to the Stitch Effect layer:

  • Drop Shadow (color #000000)
  • Color Overlay (color #e3dbc2)
  • Bevel and Emboss (color #ffffff and #000000)
Drop Shadow
Color Overlay
Bevel and Emboss

5. Create the Felt Letters

Step 1

Select all the layers and right-click to Convert to Smart Object

Select Layers and Convert to Smart Object

Step 2

Right-click on the Felt Text smart object and choose Duplicate Layer. For the Destination, choose the initial document, the one with the felt background.

Duplicate layer in Another Document

Step 3

Make a copy of the Felt Text smart object and hide it. That way, you have the original text intact.

Rasterize the Felt Text smart object. 

Rasterize a Smart Object in Photoshop

Step 4

Use the Rectangular Marquee Tool to select the letter F. Press Control-X and Control-V to cut and paste the letter F onto another layer.

Cut and Paste in Photoshop

Step 5

Do the same for all the letters. Now you have the felt text letters on separate layers.

Text to Letters in Photoshop

Step 6

Press Control-T to Rotate and Move the letters as you like.

Rotate Layers in Photoshop

6. How to Make a Shadow in Photoshop

Step 1

As you can see, the letters look a little flat and have the same shadow. So to make them look more realistic, add different Drop Shadow layer styles to each letter.

Start with the F layer. 

Drop Shadow Layer Style in Photoshop

Step 2

Add a Drop Shadow layer style to the E layer. 

Drop Shadow Layer Style in Photoshop

Step 3

Add a Drop Shadow layer style to the L layer. 

Drop Shadow Layer Style in Photoshop

Step 4

Add a Drop Shadow layer style to the T layer. 

Drop Shadow Layer Style in Photoshop

You can also add an Inner Shadow layer style to each layer. 

Inner Shadow Layer Style

7. Change the Color of the Felt Photoshop Text Effect

If you want to change the color of the felt letters, add a Hue/Saturation adjustment layer for the letter that you want to modify. If you want to change the red color, choose the Reds channel. 

Click the Clip to Layer button to add the adjustment only for that layer. 

HueSaturation Adjustment Layer

In the same way, you can change any letter you want.

Felt Photoshop Text Effect

8. Add Felt Ornaments

Step 1

Use the Pen Tool to add shapes like trees and clouds. 

Create Shapes Using the Pen Tool

Step 2

Click on the Add to Shape Area if you want to create multiple shapes on the same layer. 

I made two separate layers with tree shapes and one separate layer with cloud shapes. I did that because I want to add different colors to the shapes.

Step 3

For each layer, add these layer styles:

  • Drop Shadow (color #000000)
  • Color Overlay (choose the color that you like)
  • Pattern Overlay (felt-pattern)
  • Bevel and Emboss (color #ffffff and #000000)
Drop Shadow
Color Overlay
Pattern Overlay
Bevel and Emboss

Step 4

You can also create a new layer and use the Brush Tool to add some stitch effects using the stitch brush.

Photoshop Felt Text with Stitch Effects

9. Create Clothes Buttons in Photoshop

Step 1

To create the clothes button, I use the Ellipse Tool. Keep the Shift key pressed and draw to create a circle. 

Create a Circle in Photoshop

Step 2

Click on the Subtract from Shape Area button and add a circle inside the first circle to make a hole. Do this three more times.

Create a Circle in Photoshop

Step 3

Add these layer styles to the Clothes Button layer: 

  • Drop Shadow (color #000000)
  • Color Overlay (color #c8350d or choose the color that you like)
  • Bevel and Emboss (color #ffffff and #000000)
Drop Shadow
Bevel and Emboss
Color Overlay

Step 4

Create a new circle shape layer. Click on the Subtract from Shape Area button and add a large circle inside the first circle to make a hole. 

Subtract from Shape Area

Step 5

Go to the Clothes Button 1 layer, right-click and choose Copy Layer Style. Go to the Clothes Button 2 layer, right-click and choose Paste Layer Style.

Copy Layer Style in Photoshop

You can modify the layer style as you wish to create endless results. Change the Color Overlay, the Bevel and Emboss settings, etc.

Step 6

Create a new layer and call it Thread. Use the Brush Tool to create a thread.

Brush Tool

Create another layer and call it Thread. Use the Brush Tool to create another thread.

Brush Tool

Step 7

Add these layer styles to the Thread layers: 

  • Drop Shadow (color #000000)
  • Color Overlay (color #b9b9b9)
  • Inner Shadow (color #000000)
  • Bevel and Emboss (color #ffffff and #000000)
Drop Shadow
Color Overlay
Inner Shadow
Bevel and Emboss

Step 8

In the same way, you can create more buttons with different colors and sizes.  

Congratulations! You’re Done!

In this tutorial, you’ve learned how to create a felt text effect in Photoshop from scratch using brushes and patterns. Photoshop text effects are really useful, so I hope you’ve enjoyed this tutorial.  

Create a Felt Text Effect in Photoshop

This Photoshop text effect is a part of the Felt Photoshop Actions pack from my portfolio on Envato Market

The new Christmas Photoshop Actions Bundle contains 10 actions that you can use for the winter festive holidays. The stitched felt effect action is also included in the bundle.

Christmas Photoshop Actions Bundle

How to Create a Fun Felt Photoshop Text Effect

Post pobrano z: How to Create a Fun Felt Photoshop Text Effect

Final product image
What You’ll Be Creating

Learn how to create a stitched felt Photoshop text effect in just a few easy steps. This effect is great for the winter holidays.

This felt text effect is a part of the Felt Effect Photoshop Actions from my portfolio on Envato Market.

Felt Photoshop Action
Felt Effect Photoshop Action

The stitched felt effect action is also included in my new Christmas Photoshop Actions Bundle. The bundle contains 10 useful actions for the winter holidays.

Tutorial Assets

To create this Photoshop text effect, I will use the following assets:

1. How to Create the Felt Background

Step 1

Create a new document in Photoshop. The size of the canvas is 850 x 600px, resolution 72 dpi. If you use another canvas size, you have to adjust the layer styles.

Create new Photoshop document

Step 2

Add a new layer and call it Felt Background. Fill the layer with any color you like.

Fill Layer with Color

Step 3 

Add a Pattern Overlay layer style. Click on the arrow to Load Patterns and choose the felt-pattern.pat file. 

How to Load Patterns in Photoshop

Step 4

Add a Color Overlay (color #428fc7) to the Felt Background layer. 

Add Color Overlay in Photoshop

2. How to Create the Felt Photoshop Text Effect

Step 1

I will create the text in a new document. So make a new file and add your text. Set the size to 320 pt.

Add Text Layer in Photoshop

Step 2

Toggle the Character and Paragraph panels and set the tracking for the selected characters to around 200.  

Character and Paragraph Panels in Photoshop

Step 3

Press Control-J to make two copies of the text layer. 

Duplicate layers in Photoshop

Step 4

Add a Stroke layer style of 15 px to the Felt Text 1 layer. The color of the border is not important, so you can choose any color you want. 

Stroke Layer Style

Step 5

Add a Stroke layer style of 10 px to the Felt Text 2 layer. The color of the border is not important, so you can choose any color you want. 

Stroke Layer Style

Step 6

Set the Fill of the Felt Text 3 layer to 0%.

Add a Bevel and Emboss layer style (color #ffffff and #000000) to the Felt Text 3 layer.

Bevel and Emboss Layer Style

Step 7

Go to the Felt Text 1 layer, right-click and choose Convert to Smart Object. Do the same for the Felt Text 2 and Felt Text 3 layers.

Convert to Smart Object in Photoshop

Step 8

I will hide the Felt Text 2 and Felt Text 3 layers for now. 

Go to the Felt Text 1 smart object and add these layer styles:

  • Drop Shadow (color #000000)
  • Color Overlay (color #328f1f)
  • Pattern Overlay (felt-pattern)
  • Bevel and Emboss (color #ffffff and #000000)
Drop Shadow Layer Style
Color Overlay Layer Style
Pattern Overlay Layer Style
Bevel and Emboss Layer Style

Step 9

To expand the text, go to Filter > Other > Minimum and set the Radius to 10 px

Minimum Filter in Photoshop

Step 10

Go to the Felt Text 2 smart object and add these layer styles:

  • Drop Shadow (color #000000)
  • Color Overlay (color #c11a1a)
  • Pattern Overlay (felt-pattern)
  • Bevel and Emboss (color #ffffff and #000000)
Drop Shadow Layer Style
Color Overlay Layer Style
Pattern Overlay Layer Style
Bevel and Emboss Layer Style

Step 11

Go to the Felt Text 3 smart object and set the blend mode to Overlay

Blend Mode Overlay

Step 12

Go to Filter > Blur > Gaussian Blur and set the Radius to around 3.3 px

Gaussian Blur Photoshop Filter

Step 13

The felt text effect should now look like this. You can, of course, choose any colors you like for the felt pattern. 

Felt Text Effect in Photoshop

3. Create a Stitch Brush in Photoshop

Step 1

Let’s create a stitch brush for the felt Photoshop text effect.

Create a new PSD file, size 27 x 5 pxFill the canvas with color black. Go to Edit > Define Brush Preset. Set the brush name to „stitch” and click OK

Define Brush Preset in Photoshop

Step 2

Choose the Brush Tool and select the „stitch” brush from the Brush Preset Picker. Toggle the Brush panel and make the following settings: Spacing 750% and set the Angle Jitter to Direction.

Create Dashed Brush in Photoshop

Step 3

Click on the top right corner of the Brush panel and choose New Brush Preset. Name the new brush „stitch2”

Create Stitch Brush in Photoshop

You can now close the file in which you created the brush.

4. Add a Stitch Effect in Photoshop

Step 1

Press Shift-Control-N to create a new layer called Stitch Effect

Keep the Control key pressed and click on the thumbnail of the Felt Text 2 smart object to make a selection.

Make a Selection in Photoshop

Step 2

Go to Select > Modify > Contract and contract by 12 pixels.

Contract Selection in Photoshop

Step 3

Go to the Path tab and choose Make Work Path from the selection. 

Make Work Path in Photoshop

Step 4

Create a new layer above the Felt Text 3 layer and call it Stitch Effect

Pick the Brush Tool and select the stitch brush. 

Pick the Brush Tool

Step 5

Go to the Path tab and choose Stroke Work Path

Stroke Work Path
Stroke Work Path

Step 6

Press Delete to remove the work path.

Stitch Effect in Photoshop

Step 7

Add these layer styles to the Stitch Effect layer:

  • Drop Shadow (color #000000)
  • Color Overlay (color #e3dbc2)
  • Bevel and Emboss (color #ffffff and #000000)
Drop Shadow
Color Overlay
Bevel and Emboss

5. Create the Felt Letters

Step 1

Select all the layers and right-click to Convert to Smart Object

Select Layers and Convert to Smart Object

Step 2

Right-click on the Felt Text smart object and choose Duplicate Layer. For the Destination, choose the initial document, the one with the felt background.

Duplicate layer in Another Document

Step 3

Make a copy of the Felt Text smart object and hide it. That way, you have the original text intact.

Rasterize the Felt Text smart object. 

Rasterize a Smart Object in Photoshop

Step 4

Use the Rectangular Marquee Tool to select the letter F. Press Control-X and Control-V to cut and paste the letter F onto another layer.

Cut and Paste in Photoshop

Step 5

Do the same for all the letters. Now you have the felt text letters on separate layers.

Text to Letters in Photoshop

Step 6

Press Control-T to Rotate and Move the letters as you like.

Rotate Layers in Photoshop

6. How to Make a Shadow in Photoshop

Step 1

As you can see, the letters look a little flat and have the same shadow. So to make them look more realistic, add different Drop Shadow layer styles to each letter.

Start with the F layer. 

Drop Shadow Layer Style in Photoshop

Step 2

Add a Drop Shadow layer style to the E layer. 

Drop Shadow Layer Style in Photoshop

Step 3

Add a Drop Shadow layer style to the L layer. 

Drop Shadow Layer Style in Photoshop

Step 4

Add a Drop Shadow layer style to the T layer. 

Drop Shadow Layer Style in Photoshop

You can also add an Inner Shadow layer style to each layer. 

Inner Shadow Layer Style

7. Change the Color of the Felt Photoshop Text Effect

If you want to change the color of the felt letters, add a Hue/Saturation adjustment layer for the letter that you want to modify. If you want to change the red color, choose the Reds channel. 

Click the Clip to Layer button to add the adjustment only for that layer. 

HueSaturation Adjustment Layer

In the same way, you can change any letter you want.

Felt Photoshop Text Effect

8. Add Felt Ornaments

Step 1

Use the Pen Tool to add shapes like trees and clouds. 

Create Shapes Using the Pen Tool

Step 2

Click on the Add to Shape Area if you want to create multiple shapes on the same layer. 

I made two separate layers with tree shapes and one separate layer with cloud shapes. I did that because I want to add different colors to the shapes.

Step 3

For each layer, add these layer styles:

  • Drop Shadow (color #000000)
  • Color Overlay (choose the color that you like)
  • Pattern Overlay (felt-pattern)
  • Bevel and Emboss (color #ffffff and #000000)
Drop Shadow
Color Overlay
Pattern Overlay
Bevel and Emboss

Step 4

You can also create a new layer and use the Brush Tool to add some stitch effects using the stitch brush.

Photoshop Felt Text with Stitch Effects

9. Create Clothes Buttons in Photoshop

Step 1

To create the clothes button, I use the Ellipse Tool. Keep the Shift key pressed and draw to create a circle. 

Create a Circle in Photoshop

Step 2

Click on the Subtract from Shape Area button and add a circle inside the first circle to make a hole. Do this three more times.

Create a Circle in Photoshop

Step 3

Add these layer styles to the Clothes Button layer: 

  • Drop Shadow (color #000000)
  • Color Overlay (color #c8350d or choose the color that you like)
  • Bevel and Emboss (color #ffffff and #000000)
Drop Shadow
Bevel and Emboss
Color Overlay

Step 4

Create a new circle shape layer. Click on the Subtract from Shape Area button and add a large circle inside the first circle to make a hole. 

Subtract from Shape Area

Step 5

Go to the Clothes Button 1 layer, right-click and choose Copy Layer Style. Go to the Clothes Button 2 layer, right-click and choose Paste Layer Style.

Copy Layer Style in Photoshop

You can modify the layer style as you wish to create endless results. Change the Color Overlay, the Bevel and Emboss settings, etc.

Step 6

Create a new layer and call it Thread. Use the Brush Tool to create a thread.

Brush Tool

Create another layer and call it Thread. Use the Brush Tool to create another thread.

Brush Tool

Step 7

Add these layer styles to the Thread layers: 

  • Drop Shadow (color #000000)
  • Color Overlay (color #b9b9b9)
  • Inner Shadow (color #000000)
  • Bevel and Emboss (color #ffffff and #000000)
Drop Shadow
Color Overlay
Inner Shadow
Bevel and Emboss

Step 8

In the same way, you can create more buttons with different colors and sizes.  

Congratulations! You’re Done!

In this tutorial, you’ve learned how to create a felt text effect in Photoshop from scratch using brushes and patterns. Photoshop text effects are really useful, so I hope you’ve enjoyed this tutorial.  

Create a Felt Text Effect in Photoshop

This Photoshop text effect is a part of the Felt Photoshop Actions pack from my portfolio on Envato Market

The new Christmas Photoshop Actions Bundle contains 10 actions that you can use for the winter festive holidays. The stitched felt effect action is also included in the bundle.

Christmas Photoshop Actions Bundle

How to Create a Fun Felt Photoshop Text Effect

Post pobrano z: How to Create a Fun Felt Photoshop Text Effect

Final product image
What You’ll Be Creating

Learn how to create a stitched felt Photoshop text effect in just a few easy steps. This effect is great for the winter holidays.

This felt text effect is a part of the Felt Effect Photoshop Actions from my portfolio on Envato Market.

Felt Photoshop Action
Felt Effect Photoshop Action

The stitched felt effect action is also included in my new Christmas Photoshop Actions Bundle. The bundle contains 10 useful actions for the winter holidays.

Tutorial Assets

To create this Photoshop text effect, I will use the following assets:

1. How to Create the Felt Background

Step 1

Create a new document in Photoshop. The size of the canvas is 850 x 600px, resolution 72 dpi. If you use another canvas size, you have to adjust the layer styles.

Create new Photoshop document

Step 2

Add a new layer and call it Felt Background. Fill the layer with any color you like.

Fill Layer with Color

Step 3 

Add a Pattern Overlay layer style. Click on the arrow to Load Patterns and choose the felt-pattern.pat file. 

How to Load Patterns in Photoshop

Step 4

Add a Color Overlay (color #428fc7) to the Felt Background layer. 

Add Color Overlay in Photoshop

2. How to Create the Felt Photoshop Text Effect

Step 1

I will create the text in a new document. So make a new file and add your text. Set the size to 320 pt.

Add Text Layer in Photoshop

Step 2

Toggle the Character and Paragraph panels and set the tracking for the selected characters to around 200.  

Character and Paragraph Panels in Photoshop

Step 3

Press Control-J to make two copies of the text layer. 

Duplicate layers in Photoshop

Step 4

Add a Stroke layer style of 15 px to the Felt Text 1 layer. The color of the border is not important, so you can choose any color you want. 

Stroke Layer Style

Step 5

Add a Stroke layer style of 10 px to the Felt Text 2 layer. The color of the border is not important, so you can choose any color you want. 

Stroke Layer Style

Step 6

Set the Fill of the Felt Text 3 layer to 0%.

Add a Bevel and Emboss layer style (color #ffffff and #000000) to the Felt Text 3 layer.

Bevel and Emboss Layer Style

Step 7

Go to the Felt Text 1 layer, right-click and choose Convert to Smart Object. Do the same for the Felt Text 2 and Felt Text 3 layers.

Convert to Smart Object in Photoshop

Step 8

I will hide the Felt Text 2 and Felt Text 3 layers for now. 

Go to the Felt Text 1 smart object and add these layer styles:

  • Drop Shadow (color #000000)
  • Color Overlay (color #328f1f)
  • Pattern Overlay (felt-pattern)
  • Bevel and Emboss (color #ffffff and #000000)
Drop Shadow Layer Style
Color Overlay Layer Style
Pattern Overlay Layer Style
Bevel and Emboss Layer Style

Step 9

To expand the text, go to Filter > Other > Minimum and set the Radius to 10 px

Minimum Filter in Photoshop

Step 10

Go to the Felt Text 2 smart object and add these layer styles:

  • Drop Shadow (color #000000)
  • Color Overlay (color #c11a1a)
  • Pattern Overlay (felt-pattern)
  • Bevel and Emboss (color #ffffff and #000000)
Drop Shadow Layer Style
Color Overlay Layer Style
Pattern Overlay Layer Style
Bevel and Emboss Layer Style

Step 11

Go to the Felt Text 3 smart object and set the blend mode to Overlay

Blend Mode Overlay

Step 12

Go to Filter > Blur > Gaussian Blur and set the Radius to around 3.3 px

Gaussian Blur Photoshop Filter

Step 13

The felt text effect should now look like this. You can, of course, choose any colors you like for the felt pattern. 

Felt Text Effect in Photoshop

3. Create a Stitch Brush in Photoshop

Step 1

Let’s create a stitch brush for the felt Photoshop text effect.

Create a new PSD file, size 27 x 5 pxFill the canvas with color black. Go to Edit > Define Brush Preset. Set the brush name to „stitch” and click OK

Define Brush Preset in Photoshop

Step 2

Choose the Brush Tool and select the „stitch” brush from the Brush Preset Picker. Toggle the Brush panel and make the following settings: Spacing 750% and set the Angle Jitter to Direction.

Create Dashed Brush in Photoshop

Step 3

Click on the top right corner of the Brush panel and choose New Brush Preset. Name the new brush „stitch2”

Create Stitch Brush in Photoshop

You can now close the file in which you created the brush.

4. Add a Stitch Effect in Photoshop

Step 1

Press Shift-Control-N to create a new layer called Stitch Effect

Keep the Control key pressed and click on the thumbnail of the Felt Text 2 smart object to make a selection.

Make a Selection in Photoshop

Step 2

Go to Select > Modify > Contract and contract by 12 pixels.

Contract Selection in Photoshop

Step 3

Go to the Path tab and choose Make Work Path from the selection. 

Make Work Path in Photoshop

Step 4

Create a new layer above the Felt Text 3 layer and call it Stitch Effect

Pick the Brush Tool and select the stitch brush. 

Pick the Brush Tool

Step 5

Go to the Path tab and choose Stroke Work Path

Stroke Work Path
Stroke Work Path

Step 6

Press Delete to remove the work path.

Stitch Effect in Photoshop

Step 7

Add these layer styles to the Stitch Effect layer:

  • Drop Shadow (color #000000)
  • Color Overlay (color #e3dbc2)
  • Bevel and Emboss (color #ffffff and #000000)
Drop Shadow
Color Overlay
Bevel and Emboss

5. Create the Felt Letters

Step 1

Select all the layers and right-click to Convert to Smart Object

Select Layers and Convert to Smart Object

Step 2

Right-click on the Felt Text smart object and choose Duplicate Layer. For the Destination, choose the initial document, the one with the felt background.

Duplicate layer in Another Document

Step 3

Make a copy of the Felt Text smart object and hide it. That way, you have the original text intact.

Rasterize the Felt Text smart object. 

Rasterize a Smart Object in Photoshop

Step 4

Use the Rectangular Marquee Tool to select the letter F. Press Control-X and Control-V to cut and paste the letter F onto another layer.

Cut and Paste in Photoshop

Step 5

Do the same for all the letters. Now you have the felt text letters on separate layers.

Text to Letters in Photoshop

Step 6

Press Control-T to Rotate and Move the letters as you like.

Rotate Layers in Photoshop

6. How to Make a Shadow in Photoshop

Step 1

As you can see, the letters look a little flat and have the same shadow. So to make them look more realistic, add different Drop Shadow layer styles to each letter.

Start with the F layer. 

Drop Shadow Layer Style in Photoshop

Step 2

Add a Drop Shadow layer style to the E layer. 

Drop Shadow Layer Style in Photoshop

Step 3

Add a Drop Shadow layer style to the L layer. 

Drop Shadow Layer Style in Photoshop

Step 4

Add a Drop Shadow layer style to the T layer. 

Drop Shadow Layer Style in Photoshop

You can also add an Inner Shadow layer style to each layer. 

Inner Shadow Layer Style

7. Change the Color of the Felt Photoshop Text Effect

If you want to change the color of the felt letters, add a Hue/Saturation adjustment layer for the letter that you want to modify. If you want to change the red color, choose the Reds channel. 

Click the Clip to Layer button to add the adjustment only for that layer. 

HueSaturation Adjustment Layer

In the same way, you can change any letter you want.

Felt Photoshop Text Effect

8. Add Felt Ornaments

Step 1

Use the Pen Tool to add shapes like trees and clouds. 

Create Shapes Using the Pen Tool

Step 2

Click on the Add to Shape Area if you want to create multiple shapes on the same layer. 

I made two separate layers with tree shapes and one separate layer with cloud shapes. I did that because I want to add different colors to the shapes.

Step 3

For each layer, add these layer styles:

  • Drop Shadow (color #000000)
  • Color Overlay (choose the color that you like)
  • Pattern Overlay (felt-pattern)
  • Bevel and Emboss (color #ffffff and #000000)
Drop Shadow
Color Overlay
Pattern Overlay
Bevel and Emboss

Step 4

You can also create a new layer and use the Brush Tool to add some stitch effects using the stitch brush.

Photoshop Felt Text with Stitch Effects

9. Create Clothes Buttons in Photoshop

Step 1

To create the clothes button, I use the Ellipse Tool. Keep the Shift key pressed and draw to create a circle. 

Create a Circle in Photoshop

Step 2

Click on the Subtract from Shape Area button and add a circle inside the first circle to make a hole. Do this three more times.

Create a Circle in Photoshop

Step 3

Add these layer styles to the Clothes Button layer: 

  • Drop Shadow (color #000000)
  • Color Overlay (color #c8350d or choose the color that you like)
  • Bevel and Emboss (color #ffffff and #000000)
Drop Shadow
Bevel and Emboss
Color Overlay

Step 4

Create a new circle shape layer. Click on the Subtract from Shape Area button and add a large circle inside the first circle to make a hole. 

Subtract from Shape Area

Step 5

Go to the Clothes Button 1 layer, right-click and choose Copy Layer Style. Go to the Clothes Button 2 layer, right-click and choose Paste Layer Style.

Copy Layer Style in Photoshop

You can modify the layer style as you wish to create endless results. Change the Color Overlay, the Bevel and Emboss settings, etc.

Step 6

Create a new layer and call it Thread. Use the Brush Tool to create a thread.

Brush Tool

Create another layer and call it Thread. Use the Brush Tool to create another thread.

Brush Tool

Step 7

Add these layer styles to the Thread layers: 

  • Drop Shadow (color #000000)
  • Color Overlay (color #b9b9b9)
  • Inner Shadow (color #000000)
  • Bevel and Emboss (color #ffffff and #000000)
Drop Shadow
Color Overlay
Inner Shadow
Bevel and Emboss

Step 8

In the same way, you can create more buttons with different colors and sizes.  

Congratulations! You’re Done!

In this tutorial, you’ve learned how to create a felt text effect in Photoshop from scratch using brushes and patterns. Photoshop text effects are really useful, so I hope you’ve enjoyed this tutorial.  

Create a Felt Text Effect in Photoshop

This Photoshop text effect is a part of the Felt Photoshop Actions pack from my portfolio on Envato Market

The new Christmas Photoshop Actions Bundle contains 10 actions that you can use for the winter festive holidays. The stitched felt effect action is also included in the bundle.

Christmas Photoshop Actions Bundle

How to Create a Fun Felt Photoshop Text Effect

Post pobrano z: How to Create a Fun Felt Photoshop Text Effect

Final product image
What You’ll Be Creating

Learn how to create a stitched felt Photoshop text effect in just a few easy steps. This effect is great for the winter holidays.

This felt text effect is a part of the Felt Effect Photoshop Actions from my portfolio on Envato Market.

Felt Photoshop Action
Felt Effect Photoshop Action

The stitched felt effect action is also included in my new Christmas Photoshop Actions Bundle. The bundle contains 10 useful actions for the winter holidays.

Tutorial Assets

To create this Photoshop text effect, I will use the following assets:

1. How to Create the Felt Background

Step 1

Create a new document in Photoshop. The size of the canvas is 850 x 600px, resolution 72 dpi. If you use another canvas size, you have to adjust the layer styles.

Create new Photoshop document

Step 2

Add a new layer and call it Felt Background. Fill the layer with any color you like.

Fill Layer with Color

Step 3 

Add a Pattern Overlay layer style. Click on the arrow to Load Patterns and choose the felt-pattern.pat file. 

How to Load Patterns in Photoshop

Step 4

Add a Color Overlay (color #428fc7) to the Felt Background layer. 

Add Color Overlay in Photoshop

2. How to Create the Felt Photoshop Text Effect

Step 1

I will create the text in a new document. So make a new file and add your text. Set the size to 320 pt.

Add Text Layer in Photoshop

Step 2

Toggle the Character and Paragraph panels and set the tracking for the selected characters to around 200.  

Character and Paragraph Panels in Photoshop

Step 3

Press Control-J to make two copies of the text layer. 

Duplicate layers in Photoshop

Step 4

Add a Stroke layer style of 15 px to the Felt Text 1 layer. The color of the border is not important, so you can choose any color you want. 

Stroke Layer Style

Step 5

Add a Stroke layer style of 10 px to the Felt Text 2 layer. The color of the border is not important, so you can choose any color you want. 

Stroke Layer Style

Step 6

Set the Fill of the Felt Text 3 layer to 0%.

Add a Bevel and Emboss layer style (color #ffffff and #000000) to the Felt Text 3 layer.

Bevel and Emboss Layer Style

Step 7

Go to the Felt Text 1 layer, right-click and choose Convert to Smart Object. Do the same for the Felt Text 2 and Felt Text 3 layers.

Convert to Smart Object in Photoshop

Step 8

I will hide the Felt Text 2 and Felt Text 3 layers for now. 

Go to the Felt Text 1 smart object and add these layer styles:

  • Drop Shadow (color #000000)
  • Color Overlay (color #328f1f)
  • Pattern Overlay (felt-pattern)
  • Bevel and Emboss (color #ffffff and #000000)
Drop Shadow Layer Style
Color Overlay Layer Style
Pattern Overlay Layer Style
Bevel and Emboss Layer Style

Step 9

To expand the text, go to Filter > Other > Minimum and set the Radius to 10 px

Minimum Filter in Photoshop

Step 10

Go to the Felt Text 2 smart object and add these layer styles:

  • Drop Shadow (color #000000)
  • Color Overlay (color #c11a1a)
  • Pattern Overlay (felt-pattern)
  • Bevel and Emboss (color #ffffff and #000000)
Drop Shadow Layer Style
Color Overlay Layer Style
Pattern Overlay Layer Style
Bevel and Emboss Layer Style

Step 11

Go to the Felt Text 3 smart object and set the blend mode to Overlay

Blend Mode Overlay

Step 12

Go to Filter > Blur > Gaussian Blur and set the Radius to around 3.3 px

Gaussian Blur Photoshop Filter

Step 13

The felt text effect should now look like this. You can, of course, choose any colors you like for the felt pattern. 

Felt Text Effect in Photoshop

3. Create a Stitch Brush in Photoshop

Step 1

Let’s create a stitch brush for the felt Photoshop text effect.

Create a new PSD file, size 27 x 5 pxFill the canvas with color black. Go to Edit > Define Brush Preset. Set the brush name to „stitch” and click OK

Define Brush Preset in Photoshop

Step 2

Choose the Brush Tool and select the „stitch” brush from the Brush Preset Picker. Toggle the Brush panel and make the following settings: Spacing 750% and set the Angle Jitter to Direction.

Create Dashed Brush in Photoshop

Step 3

Click on the top right corner of the Brush panel and choose New Brush Preset. Name the new brush „stitch2”

Create Stitch Brush in Photoshop

You can now close the file in which you created the brush.

4. Add a Stitch Effect in Photoshop

Step 1

Press Shift-Control-N to create a new layer called Stitch Effect

Keep the Control key pressed and click on the thumbnail of the Felt Text 2 smart object to make a selection.

Make a Selection in Photoshop

Step 2

Go to Select > Modify > Contract and contract by 12 pixels.

Contract Selection in Photoshop

Step 3

Go to the Path tab and choose Make Work Path from the selection. 

Make Work Path in Photoshop

Step 4

Create a new layer above the Felt Text 3 layer and call it Stitch Effect

Pick the Brush Tool and select the stitch brush. 

Pick the Brush Tool

Step 5

Go to the Path tab and choose Stroke Work Path

Stroke Work Path
Stroke Work Path

Step 6

Press Delete to remove the work path.

Stitch Effect in Photoshop

Step 7

Add these layer styles to the Stitch Effect layer:

  • Drop Shadow (color #000000)
  • Color Overlay (color #e3dbc2)
  • Bevel and Emboss (color #ffffff and #000000)
Drop Shadow
Color Overlay
Bevel and Emboss

5. Create the Felt Letters

Step 1

Select all the layers and right-click to Convert to Smart Object

Select Layers and Convert to Smart Object

Step 2

Right-click on the Felt Text smart object and choose Duplicate Layer. For the Destination, choose the initial document, the one with the felt background.

Duplicate layer in Another Document

Step 3

Make a copy of the Felt Text smart object and hide it. That way, you have the original text intact.

Rasterize the Felt Text smart object. 

Rasterize a Smart Object in Photoshop

Step 4

Use the Rectangular Marquee Tool to select the letter F. Press Control-X and Control-V to cut and paste the letter F onto another layer.

Cut and Paste in Photoshop

Step 5

Do the same for all the letters. Now you have the felt text letters on separate layers.

Text to Letters in Photoshop

Step 6

Press Control-T to Rotate and Move the letters as you like.

Rotate Layers in Photoshop

6. How to Make a Shadow in Photoshop

Step 1

As you can see, the letters look a little flat and have the same shadow. So to make them look more realistic, add different Drop Shadow layer styles to each letter.

Start with the F layer. 

Drop Shadow Layer Style in Photoshop

Step 2

Add a Drop Shadow layer style to the E layer. 

Drop Shadow Layer Style in Photoshop

Step 3

Add a Drop Shadow layer style to the L layer. 

Drop Shadow Layer Style in Photoshop

Step 4

Add a Drop Shadow layer style to the T layer. 

Drop Shadow Layer Style in Photoshop

You can also add an Inner Shadow layer style to each layer. 

Inner Shadow Layer Style

7. Change the Color of the Felt Photoshop Text Effect

If you want to change the color of the felt letters, add a Hue/Saturation adjustment layer for the letter that you want to modify. If you want to change the red color, choose the Reds channel. 

Click the Clip to Layer button to add the adjustment only for that layer. 

HueSaturation Adjustment Layer

In the same way, you can change any letter you want.

Felt Photoshop Text Effect

8. Add Felt Ornaments

Step 1

Use the Pen Tool to add shapes like trees and clouds. 

Create Shapes Using the Pen Tool

Step 2

Click on the Add to Shape Area if you want to create multiple shapes on the same layer. 

I made two separate layers with tree shapes and one separate layer with cloud shapes. I did that because I want to add different colors to the shapes.

Step 3

For each layer, add these layer styles:

  • Drop Shadow (color #000000)
  • Color Overlay (choose the color that you like)
  • Pattern Overlay (felt-pattern)
  • Bevel and Emboss (color #ffffff and #000000)
Drop Shadow
Color Overlay
Pattern Overlay
Bevel and Emboss

Step 4

You can also create a new layer and use the Brush Tool to add some stitch effects using the stitch brush.

Photoshop Felt Text with Stitch Effects

9. Create Clothes Buttons in Photoshop

Step 1

To create the clothes button, I use the Ellipse Tool. Keep the Shift key pressed and draw to create a circle. 

Create a Circle in Photoshop

Step 2

Click on the Subtract from Shape Area button and add a circle inside the first circle to make a hole. Do this three more times.

Create a Circle in Photoshop

Step 3

Add these layer styles to the Clothes Button layer: 

  • Drop Shadow (color #000000)
  • Color Overlay (color #c8350d or choose the color that you like)
  • Bevel and Emboss (color #ffffff and #000000)
Drop Shadow
Bevel and Emboss
Color Overlay

Step 4

Create a new circle shape layer. Click on the Subtract from Shape Area button and add a large circle inside the first circle to make a hole. 

Subtract from Shape Area

Step 5

Go to the Clothes Button 1 layer, right-click and choose Copy Layer Style. Go to the Clothes Button 2 layer, right-click and choose Paste Layer Style.

Copy Layer Style in Photoshop

You can modify the layer style as you wish to create endless results. Change the Color Overlay, the Bevel and Emboss settings, etc.

Step 6

Create a new layer and call it Thread. Use the Brush Tool to create a thread.

Brush Tool

Create another layer and call it Thread. Use the Brush Tool to create another thread.

Brush Tool

Step 7

Add these layer styles to the Thread layers: 

  • Drop Shadow (color #000000)
  • Color Overlay (color #b9b9b9)
  • Inner Shadow (color #000000)
  • Bevel and Emboss (color #ffffff and #000000)
Drop Shadow
Color Overlay
Inner Shadow
Bevel and Emboss

Step 8

In the same way, you can create more buttons with different colors and sizes.  

Congratulations! You’re Done!

In this tutorial, you’ve learned how to create a felt text effect in Photoshop from scratch using brushes and patterns. Photoshop text effects are really useful, so I hope you’ve enjoyed this tutorial.  

Create a Felt Text Effect in Photoshop

This Photoshop text effect is a part of the Felt Photoshop Actions pack from my portfolio on Envato Market

The new Christmas Photoshop Actions Bundle contains 10 actions that you can use for the winter festive holidays. The stitched felt effect action is also included in the bundle.

Christmas Photoshop Actions Bundle

How to Create a Fun Felt Photoshop Text Effect

Post pobrano z: How to Create a Fun Felt Photoshop Text Effect

Final product image
What You’ll Be Creating

Learn how to create a stitched felt Photoshop text effect in just a few easy steps. This effect is great for the winter holidays.

This felt text effect is a part of the Felt Effect Photoshop Actions from my portfolio on Envato Market.

Felt Photoshop Action
Felt Effect Photoshop Action

The stitched felt effect action is also included in my new Christmas Photoshop Actions Bundle. The bundle contains 10 useful actions for the winter holidays.

Tutorial Assets

To create this Photoshop text effect, I will use the following assets:

1. How to Create the Felt Background

Step 1

Create a new document in Photoshop. The size of the canvas is 850 x 600px, resolution 72 dpi. If you use another canvas size, you have to adjust the layer styles.

Create new Photoshop document

Step 2

Add a new layer and call it Felt Background. Fill the layer with any color you like.

Fill Layer with Color

Step 3 

Add a Pattern Overlay layer style. Click on the arrow to Load Patterns and choose the felt-pattern.pat file. 

How to Load Patterns in Photoshop

Step 4

Add a Color Overlay (color #428fc7) to the Felt Background layer. 

Add Color Overlay in Photoshop

2. How to Create the Felt Photoshop Text Effect

Step 1

I will create the text in a new document. So make a new file and add your text. Set the size to 320 pt.

Add Text Layer in Photoshop

Step 2

Toggle the Character and Paragraph panels and set the tracking for the selected characters to around 200.  

Character and Paragraph Panels in Photoshop

Step 3

Press Control-J to make two copies of the text layer. 

Duplicate layers in Photoshop

Step 4

Add a Stroke layer style of 15 px to the Felt Text 1 layer. The color of the border is not important, so you can choose any color you want. 

Stroke Layer Style

Step 5

Add a Stroke layer style of 10 px to the Felt Text 2 layer. The color of the border is not important, so you can choose any color you want. 

Stroke Layer Style

Step 6

Set the Fill of the Felt Text 3 layer to 0%.

Add a Bevel and Emboss layer style (color #ffffff and #000000) to the Felt Text 3 layer.

Bevel and Emboss Layer Style

Step 7

Go to the Felt Text 1 layer, right-click and choose Convert to Smart Object. Do the same for the Felt Text 2 and Felt Text 3 layers.

Convert to Smart Object in Photoshop

Step 8

I will hide the Felt Text 2 and Felt Text 3 layers for now. 

Go to the Felt Text 1 smart object and add these layer styles:

  • Drop Shadow (color #000000)
  • Color Overlay (color #328f1f)
  • Pattern Overlay (felt-pattern)
  • Bevel and Emboss (color #ffffff and #000000)
Drop Shadow Layer Style
Color Overlay Layer Style
Pattern Overlay Layer Style
Bevel and Emboss Layer Style

Step 9

To expand the text, go to Filter > Other > Minimum and set the Radius to 10 px

Minimum Filter in Photoshop

Step 10

Go to the Felt Text 2 smart object and add these layer styles:

  • Drop Shadow (color #000000)
  • Color Overlay (color #c11a1a)
  • Pattern Overlay (felt-pattern)
  • Bevel and Emboss (color #ffffff and #000000)
Drop Shadow Layer Style
Color Overlay Layer Style
Pattern Overlay Layer Style
Bevel and Emboss Layer Style

Step 11

Go to the Felt Text 3 smart object and set the blend mode to Overlay

Blend Mode Overlay

Step 12

Go to Filter > Blur > Gaussian Blur and set the Radius to around 3.3 px

Gaussian Blur Photoshop Filter

Step 13

The felt text effect should now look like this. You can, of course, choose any colors you like for the felt pattern. 

Felt Text Effect in Photoshop

3. Create a Stitch Brush in Photoshop

Step 1

Let’s create a stitch brush for the felt Photoshop text effect.

Create a new PSD file, size 27 x 5 pxFill the canvas with color black. Go to Edit > Define Brush Preset. Set the brush name to „stitch” and click OK

Define Brush Preset in Photoshop

Step 2

Choose the Brush Tool and select the „stitch” brush from the Brush Preset Picker. Toggle the Brush panel and make the following settings: Spacing 750% and set the Angle Jitter to Direction.

Create Dashed Brush in Photoshop

Step 3

Click on the top right corner of the Brush panel and choose New Brush Preset. Name the new brush „stitch2”

Create Stitch Brush in Photoshop

You can now close the file in which you created the brush.

4. Add a Stitch Effect in Photoshop

Step 1

Press Shift-Control-N to create a new layer called Stitch Effect

Keep the Control key pressed and click on the thumbnail of the Felt Text 2 smart object to make a selection.

Make a Selection in Photoshop

Step 2

Go to Select > Modify > Contract and contract by 12 pixels.

Contract Selection in Photoshop

Step 3

Go to the Path tab and choose Make Work Path from the selection. 

Make Work Path in Photoshop

Step 4

Create a new layer above the Felt Text 3 layer and call it Stitch Effect

Pick the Brush Tool and select the stitch brush. 

Pick the Brush Tool

Step 5

Go to the Path tab and choose Stroke Work Path

Stroke Work Path
Stroke Work Path

Step 6

Press Delete to remove the work path.

Stitch Effect in Photoshop

Step 7

Add these layer styles to the Stitch Effect layer:

  • Drop Shadow (color #000000)
  • Color Overlay (color #e3dbc2)
  • Bevel and Emboss (color #ffffff and #000000)
Drop Shadow
Color Overlay
Bevel and Emboss

5. Create the Felt Letters

Step 1

Select all the layers and right-click to Convert to Smart Object

Select Layers and Convert to Smart Object

Step 2

Right-click on the Felt Text smart object and choose Duplicate Layer. For the Destination, choose the initial document, the one with the felt background.

Duplicate layer in Another Document

Step 3

Make a copy of the Felt Text smart object and hide it. That way, you have the original text intact.

Rasterize the Felt Text smart object. 

Rasterize a Smart Object in Photoshop

Step 4

Use the Rectangular Marquee Tool to select the letter F. Press Control-X and Control-V to cut and paste the letter F onto another layer.

Cut and Paste in Photoshop

Step 5

Do the same for all the letters. Now you have the felt text letters on separate layers.

Text to Letters in Photoshop

Step 6

Press Control-T to Rotate and Move the letters as you like.

Rotate Layers in Photoshop

6. How to Make a Shadow in Photoshop

Step 1

As you can see, the letters look a little flat and have the same shadow. So to make them look more realistic, add different Drop Shadow layer styles to each letter.

Start with the F layer. 

Drop Shadow Layer Style in Photoshop

Step 2

Add a Drop Shadow layer style to the E layer. 

Drop Shadow Layer Style in Photoshop

Step 3

Add a Drop Shadow layer style to the L layer. 

Drop Shadow Layer Style in Photoshop

Step 4

Add a Drop Shadow layer style to the T layer. 

Drop Shadow Layer Style in Photoshop

You can also add an Inner Shadow layer style to each layer. 

Inner Shadow Layer Style

7. Change the Color of the Felt Photoshop Text Effect

If you want to change the color of the felt letters, add a Hue/Saturation adjustment layer for the letter that you want to modify. If you want to change the red color, choose the Reds channel. 

Click the Clip to Layer button to add the adjustment only for that layer. 

HueSaturation Adjustment Layer

In the same way, you can change any letter you want.

Felt Photoshop Text Effect

8. Add Felt Ornaments

Step 1

Use the Pen Tool to add shapes like trees and clouds. 

Create Shapes Using the Pen Tool

Step 2

Click on the Add to Shape Area if you want to create multiple shapes on the same layer. 

I made two separate layers with tree shapes and one separate layer with cloud shapes. I did that because I want to add different colors to the shapes.

Step 3

For each layer, add these layer styles:

  • Drop Shadow (color #000000)
  • Color Overlay (choose the color that you like)
  • Pattern Overlay (felt-pattern)
  • Bevel and Emboss (color #ffffff and #000000)
Drop Shadow
Color Overlay
Pattern Overlay
Bevel and Emboss

Step 4

You can also create a new layer and use the Brush Tool to add some stitch effects using the stitch brush.

Photoshop Felt Text with Stitch Effects

9. Create Clothes Buttons in Photoshop

Step 1

To create the clothes button, I use the Ellipse Tool. Keep the Shift key pressed and draw to create a circle. 

Create a Circle in Photoshop

Step 2

Click on the Subtract from Shape Area button and add a circle inside the first circle to make a hole. Do this three more times.

Create a Circle in Photoshop

Step 3

Add these layer styles to the Clothes Button layer: 

  • Drop Shadow (color #000000)
  • Color Overlay (color #c8350d or choose the color that you like)
  • Bevel and Emboss (color #ffffff and #000000)
Drop Shadow
Bevel and Emboss
Color Overlay

Step 4

Create a new circle shape layer. Click on the Subtract from Shape Area button and add a large circle inside the first circle to make a hole. 

Subtract from Shape Area

Step 5

Go to the Clothes Button 1 layer, right-click and choose Copy Layer Style. Go to the Clothes Button 2 layer, right-click and choose Paste Layer Style.

Copy Layer Style in Photoshop

You can modify the layer style as you wish to create endless results. Change the Color Overlay, the Bevel and Emboss settings, etc.

Step 6

Create a new layer and call it Thread. Use the Brush Tool to create a thread.

Brush Tool

Create another layer and call it Thread. Use the Brush Tool to create another thread.

Brush Tool

Step 7

Add these layer styles to the Thread layers: 

  • Drop Shadow (color #000000)
  • Color Overlay (color #b9b9b9)
  • Inner Shadow (color #000000)
  • Bevel and Emboss (color #ffffff and #000000)
Drop Shadow
Color Overlay
Inner Shadow
Bevel and Emboss

Step 8

In the same way, you can create more buttons with different colors and sizes.  

Congratulations! You’re Done!

In this tutorial, you’ve learned how to create a felt text effect in Photoshop from scratch using brushes and patterns. Photoshop text effects are really useful, so I hope you’ve enjoyed this tutorial.  

Create a Felt Text Effect in Photoshop

This Photoshop text effect is a part of the Felt Photoshop Actions pack from my portfolio on Envato Market

The new Christmas Photoshop Actions Bundle contains 10 actions that you can use for the winter festive holidays. The stitched felt effect action is also included in the bundle.

Christmas Photoshop Actions Bundle

How to Create a Handout Template

Post pobrano z: How to Create a Handout Template

Final product image
What You’ll Be Creating

Creating a template with consisting branding doesn’t need to be difficult. In this tutorial, we’ll create a professional informational flyer. It is eye-catching and has a professional look, perfect for your business!

Business flyers help you inform readers/customers about your company. This form of advertisement is meant for wide distribution and is perfect to send through the mail or use in your marketing campaign. This versatile flyer design can be customized for a variety of cases and branding guidelines.

There are some key components that you want consistently present in a handout flyer. These are the logo, contact information, and tagline. The content and image should be editable because these are things that need updating. Today, we will focus on creating a flyer that matches the logo we are working with. 

What You Will Need

You’ll need access to Adobe InDesign and Adobe Illustrator. If you don’t have the software, you can download a trial from the Adobe website. You’ll also need the following assets:

Download the assets and make sure the font is installed on your system before starting. When you are ready, we can dive in! 

Looking for amazing business flyer templates? Head on over to Envato Elements or GraphicRiver.

1. Setting Up a New Adobe InDesign File

Step 1

For this tutorial, we will be using an A4 size. This is the most popular size for a handout template. 

In InDesign, go to File > New. Name the document Handout templateIf you are using a document preset, select A4. If not, change the Units to Centimetres. Set the Width to 21 cm and Height to 29.7 cm. Set the Orientation to Portrait.

Set the Margins to 1 cm. Set the Bleeds to 0.3 cm. If you are using a professional printer, ask them what kind of bleed they would like you to use. Click Create.

Create a new A4 file

Step 2

Before we start the project, let’s create a grid so it is easier for you to follow. Head over to Layout > Create Guides. In the Create Guides option window, set the Rows Number to 8 and the Gutter to 0. Set the Columns Number to 3 and the Gutter to 0.5 cm. Under Options, set the Fit Guides to: Margins and click OK. 

Show/Hide the guides and margins by pressing Command-;. Alternatively, you can use W to enter and exit Preview mode. 

Create guides

Step 3

Before we start with the design, let’s add some color swatches. Head over to Window > Color > Swatches to expand the Swatches panel. Choose the New Color Swatch button from the main menu. 

Set the values to C=65 M=100 Y=0 K=0. Click Add and OK.

We need to add a darker shade for contrast. Repeat the process with these values: C=80 M=100 Y=30 K=40.

Add color swatches

2. How to Place Images in Adobe InDesign

Flyer templates need to have a relevant image front and center to attract readers. For this project, we will place this on the top/middle section of the template. 

Step 1

On the Toolbar, select the Frame Tool (F). Click on the document, and in the Rectangle window option, set the Width to 21.6 cm and the Height to 11.3 cm. Click OK.

Using the Selection Tool, move the frame to start on the second row of guides. 

Create a frame using the frame tool

Step 2

While selecting the frame, press Command-D to Place an image. Look for the Looking for inspiration image on your computer. Click Open. 

Using the Direct Selection Tool (A), select the image inside the element. Head over to the Control bar. If you don’t have it activated, head over to Window > Control. Activate Constrain Proportions for the Width and Height button. This is so the image resizes proportionally. Set the Percentage to 60%. 

Place the subject of the image on the right side of the poster, like the image below:

Place an image

Step 3

On the Toolbar, select the Rectangle Tool (M). Click on the document, and in the Rectangle window option, set the Width to 10.6 cm and the Height to 11.3 cm. Click OK.

Using the Direct Selection Tool (A), select the two points on the right of the rectangle. Click on one point, hold down Shift, and click on the other point. I’ve highlighted the two points you need to select in the image below.

Right-click and select Transform > Shear. Set the Shear Angle to 26° and the Axis to Horizontal. Click OK.

Create a rectangle and shear the right side of it

Step 4

Using the Selection Tool (V), select the object. Head over to the Swatches panel and select the darker shade of purple.

Head over to Window > Effects to open the Effects panel. While selecting the object, set the Opacity to Multiply. 

Change the opacity to multiply and the color to purple

Step 5

Let’s add a logo to the handout template. Press Command-D to place a file. Find the Forecastr logo we downloaded, we will be using forecastr-06.eps. Click Open. 

Click on the document to place the file.

Place the logo

Step 6

Select the logo image we placed. Head over to the Control bar, and make sure Constrain proportions is activated. Set the Percentage to 30%.

The logo is smaller, but the frame around it is still too big. Hold down Option and drag one of the corners in. This key will allow you to resize the frame on all four sides and towards the center of the object. 

Place the logo on the top left corner of the flyer. 

Resize the logo and place it on the top left corner of the flyer

Step 7

Bring up the Layers panel by going to Window > Layers. Double-click on Layer 1 to rename it to Back. Click OK. 

Create a New Layer and name it Front. Click OK.

Create a new layer

3. How to Format Type in Adobe InDesign

Step 1

We will add a heading and subheading on the purple object. For this, we need to duplicate the object on the Front layer and keep the layers organized. We can’t create a text box with the original object because we are using Multiply as the Opacity. 

Duplicate the purple object by pressing Command-C. Lock the Back layer and copy the object on the Front layer. Press Shift-Option-Command-V to Paste in Place. 

While selecting the object, change the color in the Swatches panel to [None]. Change the Opacity to Normal on the Effects panel. 

Add a headline and subheadline

Step 2

On the Toolbar, select the Text Tool (T). Click on the duplicated object and add a heading and subheading. Bring up the Characters panel by pressing Command-T. 

To create contrast and depth, split the heading onto two lines. Set one line to RNS Sanz Normal and the next one to RNS Sanz Extra Bold. Set the Size to 30 pt. 

Set the subhead to the same font and the Size to 14 pt.

Press Command-B to bring up the Text Frame Options. Check the Preview box to see the changes live. Under Inset Spacing, set the Inset to 1.25 cm. Click OK. 

Using the text frame options add an inset

Step 3

Using the Text Tool (T), create a single-column text box. Place this at the top right of the template. Here, we will add contact information. On the Characters panel, set the font to RNS Sanz Normal and the Size to 8 pt. 

Add contact information

Step 4

It’s time to create the body copy text boxes. Using the Text Tool (T), create one text box to fit two-thirds of the columns. Create a second text box to fit a single column. Place these two side by side. 

Add a subhead and body copy to both text boxes. Using the Characters panel, set the subhead’s font to RNS Sanz Extra Bold and Size to 14 pt. Using the Swatches panel, set the color to the lighter purple.

For the body copy, use the Normal family and Size 11 pt. Using the Swatches panel, set the color to the darker purple. 

Create two text boxes

Step 5

On the right text box, you will notice I added bullet points. 

A great tip when working with bullet points is to use hanging punctuation. This means that the lines after the first line are indented and aligned to the first line. Avoiding having text under the bullet point makes for a sharper design. 

To do this, we can add an Indent to Here special character by pressing Command-\. To see if this is activated, head over to Type > Show Hidden Characters. The Indent to Here should be shown as a dagger. 

Add hanging punctuations on the bullet points

4. How to Add Vector Icons

Step 1

Head over to the Layers panel, and unlock the Back layer. 

On the Toolbar, select the Rectangle Tool (M). Click on the document and set the Width to 21.6 cm and the Height to 5 cm. Place the rectangle under the text box we created in the step before. Set the Color on the Swatches panel to [Black]. Change the Tint to 10%.

Lock the Back layer and work on the Front layer. This is useful so that the Text Tool doesn’t create a text box within the rectangle. 

Create a rectangle using the rectangle tool

Step 2

Let’s work on the Front layer now. Using the Text Tool (T), create a text box within the grey object.

While selecting the text box, press Command-B to open the Text Frame Options. Under Columns, set the Number to 3 and the Gutter to 0.5 cm. Click OK.

Add a text box to fit the rectangle

Step 3

Here, we can add copy concentrating on what the business offers. Set the subhead to RNS Sanz Extra Bold and Size to 11 pt. Set the copy to the same size but this time in the Normal family.

Format the text box to have a subheadline and body copy

Step 4

For a professional look, we can add icons to this section. Open the Business doodles vector file in Adobe Illustrator

Select the graph, light bulb and airplane icons by pressing Shift and clicking on each icon. Press Command-C to Copy

Open the vector icons in Adobe Illustrator

Step 5

Head back to the InDesign file. Press Command-V to Paste. On the Swatches panel, set the Color swatch to the lighter purple color. 

The icons will be grouped; to ungroup them, press Shift-Command-G.

To resize the icons, select each icon and head over to the Control bar. Activate the Constrain Proportions button as we will only set the Height. The Width will change automatically. Set the Height to 1.5 cm. 

Place an icon on top of each of the text boxes we created. 

Past the icons Change the color to purple and resize

Step 6

We will add strokes between the three columns to separate them visually. Go to the Toolbar and select the Line Tool (\).

Create 4 cm lines, using the Control bar to adjust the size. Use the column guides to center each line.

Head over to Window > Stroke to bring up the Stroke panel. Set the Weight to 2 pt and under Type select Dotted. 

Change the color to the light purple on the Swatches panel.

Add strokes in between the columns

Step 7

To finalize the design, we will add a text line at the bottom of the template. This will give the design a nice finishing touch. Here, we can add a single sentence or words related to the business.

Using the Type Tool (T), create a small text box on the bottom margin of the flyer. Add some text and set the Size to 14 pt and the color to the lighter purple. 

Bring up the Paragraph panel by going to Window > Type & Tables > Paragraph or by pressing Option-Command-T. Set the alignment to Center.

Add a text line at the bottom of the flyer Align to the center

5. How to Export a File for Printing and Online Sharing

Before exporting a file for printing, it’s useful to take a look around all the edges of the flyer. This is to make sure all the images and vectors bleeding out are touching the bleeds. Press W to go between Preview mode and Normal mode. Feel free to adjust some spaces to even out the design.

Step 1

To export the file, go to File > Export. Name the file Fundraiser brochure, and choose Adobe PDF (Print) from the Format dropdown menu. Click Save. 

Export the file for printing

Step 2

In the Export Adobe PDF window, set the Adobe PDF Preset to Press Quality.

Select press quality as a PDF preset

On the left side of the panel, select Marks and Bleeds. Check All Printer’s Marks and Use Document Bleed Settings. Click Export. You will have a ready-to-print PDF file. 

Check all printers parks and use document bleed settings

Step 3

If you would like to save the file for online sharing, export the file as a JPEG. 

Export as a JPEG for online sharing

Great Job! You’ve Finished This Tutorial!

In this tutorial, we learned how to set up a ready-to-print handout template. It is easy to edit to match your brand guidelines and ready for a marketing campaign.

Today, we’ve learned to:

  • Set up a ready-to-print file in Adobe InDesign.
  • Design a professional informational handout template.
  • Work with columns and create a different-shaped text box.
  • Format small details in typography for a professional look.
  • Use different InDesign panels to format shapes, images, colors, and typography.
  • Export a ready-to-print PDF file.

If you would like to explore more flyer and handout ideas, you can find many customizable business flyer templates over at Envato Elements and Graphic River. Check it out!

If you liked this tutorial, you might like these:

How to Create a Handout Template

Post pobrano z: How to Create a Handout Template

Final product image
What You’ll Be Creating

Creating a template with consisting branding doesn’t need to be difficult. In this tutorial, we’ll create a professional informational flyer. It is eye-catching and has a professional look, perfect for your business!

Business flyers help you inform readers/customers about your company. This form of advertisement is meant for wide distribution and is perfect to send through the mail or use in your marketing campaign. This versatile flyer design can be customized for a variety of cases and branding guidelines.

There are some key components that you want consistently present in a handout flyer. These are the logo, contact information, and tagline. The content and image should be editable because these are things that need updating. Today, we will focus on creating a flyer that matches the logo we are working with. 

What You Will Need

You’ll need access to Adobe InDesign and Adobe Illustrator. If you don’t have the software, you can download a trial from the Adobe website. You’ll also need the following assets:

Download the assets and make sure the font is installed on your system before starting. When you are ready, we can dive in! 

Looking for amazing business flyer templates? Head on over to Envato Elements or GraphicRiver.

1. Setting Up a New Adobe InDesign File

Step 1

For this tutorial, we will be using an A4 size. This is the most popular size for a handout template. 

In InDesign, go to File > New. Name the document Handout templateIf you are using a document preset, select A4. If not, change the Units to Centimetres. Set the Width to 21 cm and Height to 29.7 cm. Set the Orientation to Portrait.

Set the Margins to 1 cm. Set the Bleeds to 0.3 cm. If you are using a professional printer, ask them what kind of bleed they would like you to use. Click Create.

Create a new A4 file

Step 2

Before we start the project, let’s create a grid so it is easier for you to follow. Head over to Layout > Create Guides. In the Create Guides option window, set the Rows Number to 8 and the Gutter to 0. Set the Columns Number to 3 and the Gutter to 0.5 cm. Under Options, set the Fit Guides to: Margins and click OK. 

Show/Hide the guides and margins by pressing Command-;. Alternatively, you can use W to enter and exit Preview mode. 

Create guides

Step 3

Before we start with the design, let’s add some color swatches. Head over to Window > Color > Swatches to expand the Swatches panel. Choose the New Color Swatch button from the main menu. 

Set the values to C=65 M=100 Y=0 K=0. Click Add and OK.

We need to add a darker shade for contrast. Repeat the process with these values: C=80 M=100 Y=30 K=40.

Add color swatches

2. How to Place Images in Adobe InDesign

Flyer templates need to have a relevant image front and center to attract readers. For this project, we will place this on the top/middle section of the template. 

Step 1

On the Toolbar, select the Frame Tool (F). Click on the document, and in the Rectangle window option, set the Width to 21.6 cm and the Height to 11.3 cm. Click OK.

Using the Selection Tool, move the frame to start on the second row of guides. 

Create a frame using the frame tool

Step 2

While selecting the frame, press Command-D to Place an image. Look for the Looking for inspiration image on your computer. Click Open. 

Using the Direct Selection Tool (A), select the image inside the element. Head over to the Control bar. If you don’t have it activated, head over to Window > Control. Activate Constrain Proportions for the Width and Height button. This is so the image resizes proportionally. Set the Percentage to 60%. 

Place the subject of the image on the right side of the poster, like the image below:

Place an image

Step 3

On the Toolbar, select the Rectangle Tool (M). Click on the document, and in the Rectangle window option, set the Width to 10.6 cm and the Height to 11.3 cm. Click OK.

Using the Direct Selection Tool (A), select the two points on the right of the rectangle. Click on one point, hold down Shift, and click on the other point. I’ve highlighted the two points you need to select in the image below.

Right-click and select Transform > Shear. Set the Shear Angle to 26° and the Axis to Horizontal. Click OK.

Create a rectangle and shear the right side of it

Step 4

Using the Selection Tool (V), select the object. Head over to the Swatches panel and select the darker shade of purple.

Head over to Window > Effects to open the Effects panel. While selecting the object, set the Opacity to Multiply. 

Change the opacity to multiply and the color to purple

Step 5

Let’s add a logo to the handout template. Press Command-D to place a file. Find the Forecastr logo we downloaded, we will be using forecastr-06.eps. Click Open. 

Click on the document to place the file.

Place the logo

Step 6

Select the logo image we placed. Head over to the Control bar, and make sure Constrain proportions is activated. Set the Percentage to 30%.

The logo is smaller, but the frame around it is still too big. Hold down Option and drag one of the corners in. This key will allow you to resize the frame on all four sides and towards the center of the object. 

Place the logo on the top left corner of the flyer. 

Resize the logo and place it on the top left corner of the flyer

Step 7

Bring up the Layers panel by going to Window > Layers. Double-click on Layer 1 to rename it to Back. Click OK. 

Create a New Layer and name it Front. Click OK.

Create a new layer

3. How to Format Type in Adobe InDesign

Step 1

We will add a heading and subheading on the purple object. For this, we need to duplicate the object on the Front layer and keep the layers organized. We can’t create a text box with the original object because we are using Multiply as the Opacity. 

Duplicate the purple object by pressing Command-C. Lock the Back layer and copy the object on the Front layer. Press Shift-Option-Command-V to Paste in Place. 

While selecting the object, change the color in the Swatches panel to [None]. Change the Opacity to Normal on the Effects panel. 

Add a headline and subheadline

Step 2

On the Toolbar, select the Text Tool (T). Click on the duplicated object and add a heading and subheading. Bring up the Characters panel by pressing Command-T. 

To create contrast and depth, split the heading onto two lines. Set one line to RNS Sanz Normal and the next one to RNS Sanz Extra Bold. Set the Size to 30 pt. 

Set the subhead to the same font and the Size to 14 pt.

Press Command-B to bring up the Text Frame Options. Check the Preview box to see the changes live. Under Inset Spacing, set the Inset to 1.25 cm. Click OK. 

Using the text frame options add an inset

Step 3

Using the Text Tool (T), create a single-column text box. Place this at the top right of the template. Here, we will add contact information. On the Characters panel, set the font to RNS Sanz Normal and the Size to 8 pt. 

Add contact information

Step 4

It’s time to create the body copy text boxes. Using the Text Tool (T), create one text box to fit two-thirds of the columns. Create a second text box to fit a single column. Place these two side by side. 

Add a subhead and body copy to both text boxes. Using the Characters panel, set the subhead’s font to RNS Sanz Extra Bold and Size to 14 pt. Using the Swatches panel, set the color to the lighter purple.

For the body copy, use the Normal family and Size 11 pt. Using the Swatches panel, set the color to the darker purple. 

Create two text boxes

Step 5

On the right text box, you will notice I added bullet points. 

A great tip when working with bullet points is to use hanging punctuation. This means that the lines after the first line are indented and aligned to the first line. Avoiding having text under the bullet point makes for a sharper design. 

To do this, we can add an Indent to Here special character by pressing Command-\. To see if this is activated, head over to Type > Show Hidden Characters. The Indent to Here should be shown as a dagger. 

Add hanging punctuations on the bullet points

4. How to Add Vector Icons

Step 1

Head over to the Layers panel, and unlock the Back layer. 

On the Toolbar, select the Rectangle Tool (M). Click on the document and set the Width to 21.6 cm and the Height to 5 cm. Place the rectangle under the text box we created in the step before. Set the Color on the Swatches panel to [Black]. Change the Tint to 10%.

Lock the Back layer and work on the Front layer. This is useful so that the Text Tool doesn’t create a text box within the rectangle. 

Create a rectangle using the rectangle tool

Step 2

Let’s work on the Front layer now. Using the Text Tool (T), create a text box within the grey object.

While selecting the text box, press Command-B to open the Text Frame Options. Under Columns, set the Number to 3 and the Gutter to 0.5 cm. Click OK.

Add a text box to fit the rectangle

Step 3

Here, we can add copy concentrating on what the business offers. Set the subhead to RNS Sanz Extra Bold and Size to 11 pt. Set the copy to the same size but this time in the Normal family.

Format the text box to have a subheadline and body copy

Step 4

For a professional look, we can add icons to this section. Open the Business doodles vector file in Adobe Illustrator

Select the graph, light bulb and airplane icons by pressing Shift and clicking on each icon. Press Command-C to Copy

Open the vector icons in Adobe Illustrator

Step 5

Head back to the InDesign file. Press Command-V to Paste. On the Swatches panel, set the Color swatch to the lighter purple color. 

The icons will be grouped; to ungroup them, press Shift-Command-G.

To resize the icons, select each icon and head over to the Control bar. Activate the Constrain Proportions button as we will only set the Height. The Width will change automatically. Set the Height to 1.5 cm. 

Place an icon on top of each of the text boxes we created. 

Past the icons Change the color to purple and resize

Step 6

We will add strokes between the three columns to separate them visually. Go to the Toolbar and select the Line Tool (\).

Create 4 cm lines, using the Control bar to adjust the size. Use the column guides to center each line.

Head over to Window > Stroke to bring up the Stroke panel. Set the Weight to 2 pt and under Type select Dotted. 

Change the color to the light purple on the Swatches panel.

Add strokes in between the columns

Step 7

To finalize the design, we will add a text line at the bottom of the template. This will give the design a nice finishing touch. Here, we can add a single sentence or words related to the business.

Using the Type Tool (T), create a small text box on the bottom margin of the flyer. Add some text and set the Size to 14 pt and the color to the lighter purple. 

Bring up the Paragraph panel by going to Window > Type & Tables > Paragraph or by pressing Option-Command-T. Set the alignment to Center.

Add a text line at the bottom of the flyer Align to the center

5. How to Export a File for Printing and Online Sharing

Before exporting a file for printing, it’s useful to take a look around all the edges of the flyer. This is to make sure all the images and vectors bleeding out are touching the bleeds. Press W to go between Preview mode and Normal mode. Feel free to adjust some spaces to even out the design.

Step 1

To export the file, go to File > Export. Name the file Fundraiser brochure, and choose Adobe PDF (Print) from the Format dropdown menu. Click Save. 

Export the file for printing

Step 2

In the Export Adobe PDF window, set the Adobe PDF Preset to Press Quality.

Select press quality as a PDF preset

On the left side of the panel, select Marks and Bleeds. Check All Printer’s Marks and Use Document Bleed Settings. Click Export. You will have a ready-to-print PDF file. 

Check all printers parks and use document bleed settings

Step 3

If you would like to save the file for online sharing, export the file as a JPEG. 

Export as a JPEG for online sharing

Great Job! You’ve Finished This Tutorial!

In this tutorial, we learned how to set up a ready-to-print handout template. It is easy to edit to match your brand guidelines and ready for a marketing campaign.

Today, we’ve learned to:

  • Set up a ready-to-print file in Adobe InDesign.
  • Design a professional informational handout template.
  • Work with columns and create a different-shaped text box.
  • Format small details in typography for a professional look.
  • Use different InDesign panels to format shapes, images, colors, and typography.
  • Export a ready-to-print PDF file.

If you would like to explore more flyer and handout ideas, you can find many customizable business flyer templates over at Envato Elements and Graphic River. Check it out!

If you liked this tutorial, you might like these:

How to Create a Handout Template

Post pobrano z: How to Create a Handout Template

Final product image
What You’ll Be Creating

Creating a template with consisting branding doesn’t need to be difficult. In this tutorial, we’ll create a professional informational flyer. It is eye-catching and has a professional look, perfect for your business!

Business flyers help you inform readers/customers about your company. This form of advertisement is meant for wide distribution and is perfect to send through the mail or use in your marketing campaign. This versatile flyer design can be customized for a variety of cases and branding guidelines.

There are some key components that you want consistently present in a handout flyer. These are the logo, contact information, and tagline. The content and image should be editable because these are things that need updating. Today, we will focus on creating a flyer that matches the logo we are working with. 

What You Will Need

You’ll need access to Adobe InDesign and Adobe Illustrator. If you don’t have the software, you can download a trial from the Adobe website. You’ll also need the following assets:

Download the assets and make sure the font is installed on your system before starting. When you are ready, we can dive in! 

Looking for amazing business flyer templates? Head on over to Envato Elements or GraphicRiver.

1. Setting Up a New Adobe InDesign File

Step 1

For this tutorial, we will be using an A4 size. This is the most popular size for a handout template. 

In InDesign, go to File > New. Name the document Handout templateIf you are using a document preset, select A4. If not, change the Units to Centimetres. Set the Width to 21 cm and Height to 29.7 cm. Set the Orientation to Portrait.

Set the Margins to 1 cm. Set the Bleeds to 0.3 cm. If you are using a professional printer, ask them what kind of bleed they would like you to use. Click Create.

Create a new A4 file

Step 2

Before we start the project, let’s create a grid so it is easier for you to follow. Head over to Layout > Create Guides. In the Create Guides option window, set the Rows Number to 8 and the Gutter to 0. Set the Columns Number to 3 and the Gutter to 0.5 cm. Under Options, set the Fit Guides to: Margins and click OK. 

Show/Hide the guides and margins by pressing Command-;. Alternatively, you can use W to enter and exit Preview mode. 

Create guides

Step 3

Before we start with the design, let’s add some color swatches. Head over to Window > Color > Swatches to expand the Swatches panel. Choose the New Color Swatch button from the main menu. 

Set the values to C=65 M=100 Y=0 K=0. Click Add and OK.

We need to add a darker shade for contrast. Repeat the process with these values: C=80 M=100 Y=30 K=40.

Add color swatches

2. How to Place Images in Adobe InDesign

Flyer templates need to have a relevant image front and center to attract readers. For this project, we will place this on the top/middle section of the template. 

Step 1

On the Toolbar, select the Frame Tool (F). Click on the document, and in the Rectangle window option, set the Width to 21.6 cm and the Height to 11.3 cm. Click OK.

Using the Selection Tool, move the frame to start on the second row of guides. 

Create a frame using the frame tool

Step 2

While selecting the frame, press Command-D to Place an image. Look for the Looking for inspiration image on your computer. Click Open. 

Using the Direct Selection Tool (A), select the image inside the element. Head over to the Control bar. If you don’t have it activated, head over to Window > Control. Activate Constrain Proportions for the Width and Height button. This is so the image resizes proportionally. Set the Percentage to 60%. 

Place the subject of the image on the right side of the poster, like the image below:

Place an image

Step 3

On the Toolbar, select the Rectangle Tool (M). Click on the document, and in the Rectangle window option, set the Width to 10.6 cm and the Height to 11.3 cm. Click OK.

Using the Direct Selection Tool (A), select the two points on the right of the rectangle. Click on one point, hold down Shift, and click on the other point. I’ve highlighted the two points you need to select in the image below.

Right-click and select Transform > Shear. Set the Shear Angle to 26° and the Axis to Horizontal. Click OK.

Create a rectangle and shear the right side of it

Step 4

Using the Selection Tool (V), select the object. Head over to the Swatches panel and select the darker shade of purple.

Head over to Window > Effects to open the Effects panel. While selecting the object, set the Opacity to Multiply. 

Change the opacity to multiply and the color to purple

Step 5

Let’s add a logo to the handout template. Press Command-D to place a file. Find the Forecastr logo we downloaded, we will be using forecastr-06.eps. Click Open. 

Click on the document to place the file.

Place the logo

Step 6

Select the logo image we placed. Head over to the Control bar, and make sure Constrain proportions is activated. Set the Percentage to 30%.

The logo is smaller, but the frame around it is still too big. Hold down Option and drag one of the corners in. This key will allow you to resize the frame on all four sides and towards the center of the object. 

Place the logo on the top left corner of the flyer. 

Resize the logo and place it on the top left corner of the flyer

Step 7

Bring up the Layers panel by going to Window > Layers. Double-click on Layer 1 to rename it to Back. Click OK. 

Create a New Layer and name it Front. Click OK.

Create a new layer

3. How to Format Type in Adobe InDesign

Step 1

We will add a heading and subheading on the purple object. For this, we need to duplicate the object on the Front layer and keep the layers organized. We can’t create a text box with the original object because we are using Multiply as the Opacity. 

Duplicate the purple object by pressing Command-C. Lock the Back layer and copy the object on the Front layer. Press Shift-Option-Command-V to Paste in Place. 

While selecting the object, change the color in the Swatches panel to [None]. Change the Opacity to Normal on the Effects panel. 

Add a headline and subheadline

Step 2

On the Toolbar, select the Text Tool (T). Click on the duplicated object and add a heading and subheading. Bring up the Characters panel by pressing Command-T. 

To create contrast and depth, split the heading onto two lines. Set one line to RNS Sanz Normal and the next one to RNS Sanz Extra Bold. Set the Size to 30 pt. 

Set the subhead to the same font and the Size to 14 pt.

Press Command-B to bring up the Text Frame Options. Check the Preview box to see the changes live. Under Inset Spacing, set the Inset to 1.25 cm. Click OK. 

Using the text frame options add an inset

Step 3

Using the Text Tool (T), create a single-column text box. Place this at the top right of the template. Here, we will add contact information. On the Characters panel, set the font to RNS Sanz Normal and the Size to 8 pt. 

Add contact information

Step 4

It’s time to create the body copy text boxes. Using the Text Tool (T), create one text box to fit two-thirds of the columns. Create a second text box to fit a single column. Place these two side by side. 

Add a subhead and body copy to both text boxes. Using the Characters panel, set the subhead’s font to RNS Sanz Extra Bold and Size to 14 pt. Using the Swatches panel, set the color to the lighter purple.

For the body copy, use the Normal family and Size 11 pt. Using the Swatches panel, set the color to the darker purple. 

Create two text boxes

Step 5

On the right text box, you will notice I added bullet points. 

A great tip when working with bullet points is to use hanging punctuation. This means that the lines after the first line are indented and aligned to the first line. Avoiding having text under the bullet point makes for a sharper design. 

To do this, we can add an Indent to Here special character by pressing Command-\. To see if this is activated, head over to Type > Show Hidden Characters. The Indent to Here should be shown as a dagger. 

Add hanging punctuations on the bullet points

4. How to Add Vector Icons

Step 1

Head over to the Layers panel, and unlock the Back layer. 

On the Toolbar, select the Rectangle Tool (M). Click on the document and set the Width to 21.6 cm and the Height to 5 cm. Place the rectangle under the text box we created in the step before. Set the Color on the Swatches panel to [Black]. Change the Tint to 10%.

Lock the Back layer and work on the Front layer. This is useful so that the Text Tool doesn’t create a text box within the rectangle. 

Create a rectangle using the rectangle tool

Step 2

Let’s work on the Front layer now. Using the Text Tool (T), create a text box within the grey object.

While selecting the text box, press Command-B to open the Text Frame Options. Under Columns, set the Number to 3 and the Gutter to 0.5 cm. Click OK.

Add a text box to fit the rectangle

Step 3

Here, we can add copy concentrating on what the business offers. Set the subhead to RNS Sanz Extra Bold and Size to 11 pt. Set the copy to the same size but this time in the Normal family.

Format the text box to have a subheadline and body copy

Step 4

For a professional look, we can add icons to this section. Open the Business doodles vector file in Adobe Illustrator

Select the graph, light bulb and airplane icons by pressing Shift and clicking on each icon. Press Command-C to Copy

Open the vector icons in Adobe Illustrator

Step 5

Head back to the InDesign file. Press Command-V to Paste. On the Swatches panel, set the Color swatch to the lighter purple color. 

The icons will be grouped; to ungroup them, press Shift-Command-G.

To resize the icons, select each icon and head over to the Control bar. Activate the Constrain Proportions button as we will only set the Height. The Width will change automatically. Set the Height to 1.5 cm. 

Place an icon on top of each of the text boxes we created. 

Past the icons Change the color to purple and resize

Step 6

We will add strokes between the three columns to separate them visually. Go to the Toolbar and select the Line Tool (\).

Create 4 cm lines, using the Control bar to adjust the size. Use the column guides to center each line.

Head over to Window > Stroke to bring up the Stroke panel. Set the Weight to 2 pt and under Type select Dotted. 

Change the color to the light purple on the Swatches panel.

Add strokes in between the columns

Step 7

To finalize the design, we will add a text line at the bottom of the template. This will give the design a nice finishing touch. Here, we can add a single sentence or words related to the business.

Using the Type Tool (T), create a small text box on the bottom margin of the flyer. Add some text and set the Size to 14 pt and the color to the lighter purple. 

Bring up the Paragraph panel by going to Window > Type & Tables > Paragraph or by pressing Option-Command-T. Set the alignment to Center.

Add a text line at the bottom of the flyer Align to the center

5. How to Export a File for Printing and Online Sharing

Before exporting a file for printing, it’s useful to take a look around all the edges of the flyer. This is to make sure all the images and vectors bleeding out are touching the bleeds. Press W to go between Preview mode and Normal mode. Feel free to adjust some spaces to even out the design.

Step 1

To export the file, go to File > Export. Name the file Fundraiser brochure, and choose Adobe PDF (Print) from the Format dropdown menu. Click Save. 

Export the file for printing

Step 2

In the Export Adobe PDF window, set the Adobe PDF Preset to Press Quality.

Select press quality as a PDF preset

On the left side of the panel, select Marks and Bleeds. Check All Printer’s Marks and Use Document Bleed Settings. Click Export. You will have a ready-to-print PDF file. 

Check all printers parks and use document bleed settings

Step 3

If you would like to save the file for online sharing, export the file as a JPEG. 

Export as a JPEG for online sharing

Great Job! You’ve Finished This Tutorial!

In this tutorial, we learned how to set up a ready-to-print handout template. It is easy to edit to match your brand guidelines and ready for a marketing campaign.

Today, we’ve learned to:

  • Set up a ready-to-print file in Adobe InDesign.
  • Design a professional informational handout template.
  • Work with columns and create a different-shaped text box.
  • Format small details in typography for a professional look.
  • Use different InDesign panels to format shapes, images, colors, and typography.
  • Export a ready-to-print PDF file.

If you would like to explore more flyer and handout ideas, you can find many customizable business flyer templates over at Envato Elements and Graphic River. Check it out!

If you liked this tutorial, you might like these:

How to Create a Handout Template

Post pobrano z: How to Create a Handout Template

Final product image
What You’ll Be Creating

Creating a template with consisting branding doesn’t need to be difficult. In this tutorial, we’ll create a professional informational flyer. It is eye-catching and has a professional look, perfect for your business!

Business flyers help you inform readers/customers about your company. This form of advertisement is meant for wide distribution and is perfect to send through the mail or use in your marketing campaign. This versatile flyer design can be customized for a variety of cases and branding guidelines.

There are some key components that you want consistently present in a handout flyer. These are the logo, contact information, and tagline. The content and image should be editable because these are things that need updating. Today, we will focus on creating a flyer that matches the logo we are working with. 

What You Will Need

You’ll need access to Adobe InDesign and Adobe Illustrator. If you don’t have the software, you can download a trial from the Adobe website. You’ll also need the following assets:

Download the assets and make sure the font is installed on your system before starting. When you are ready, we can dive in! 

Looking for amazing business flyer templates? Head on over to Envato Elements or GraphicRiver.

1. Setting Up a New Adobe InDesign File

Step 1

For this tutorial, we will be using an A4 size. This is the most popular size for a handout template. 

In InDesign, go to File > New. Name the document Handout templateIf you are using a document preset, select A4. If not, change the Units to Centimetres. Set the Width to 21 cm and Height to 29.7 cm. Set the Orientation to Portrait.

Set the Margins to 1 cm. Set the Bleeds to 0.3 cm. If you are using a professional printer, ask them what kind of bleed they would like you to use. Click Create.

Create a new A4 file

Step 2

Before we start the project, let’s create a grid so it is easier for you to follow. Head over to Layout > Create Guides. In the Create Guides option window, set the Rows Number to 8 and the Gutter to 0. Set the Columns Number to 3 and the Gutter to 0.5 cm. Under Options, set the Fit Guides to: Margins and click OK. 

Show/Hide the guides and margins by pressing Command-;. Alternatively, you can use W to enter and exit Preview mode. 

Create guides

Step 3

Before we start with the design, let’s add some color swatches. Head over to Window > Color > Swatches to expand the Swatches panel. Choose the New Color Swatch button from the main menu. 

Set the values to C=65 M=100 Y=0 K=0. Click Add and OK.

We need to add a darker shade for contrast. Repeat the process with these values: C=80 M=100 Y=30 K=40.

Add color swatches

2. How to Place Images in Adobe InDesign

Flyer templates need to have a relevant image front and center to attract readers. For this project, we will place this on the top/middle section of the template. 

Step 1

On the Toolbar, select the Frame Tool (F). Click on the document, and in the Rectangle window option, set the Width to 21.6 cm and the Height to 11.3 cm. Click OK.

Using the Selection Tool, move the frame to start on the second row of guides. 

Create a frame using the frame tool

Step 2

While selecting the frame, press Command-D to Place an image. Look for the Looking for inspiration image on your computer. Click Open. 

Using the Direct Selection Tool (A), select the image inside the element. Head over to the Control bar. If you don’t have it activated, head over to Window > Control. Activate Constrain Proportions for the Width and Height button. This is so the image resizes proportionally. Set the Percentage to 60%. 

Place the subject of the image on the right side of the poster, like the image below:

Place an image

Step 3

On the Toolbar, select the Rectangle Tool (M). Click on the document, and in the Rectangle window option, set the Width to 10.6 cm and the Height to 11.3 cm. Click OK.

Using the Direct Selection Tool (A), select the two points on the right of the rectangle. Click on one point, hold down Shift, and click on the other point. I’ve highlighted the two points you need to select in the image below.

Right-click and select Transform > Shear. Set the Shear Angle to 26° and the Axis to Horizontal. Click OK.

Create a rectangle and shear the right side of it

Step 4

Using the Selection Tool (V), select the object. Head over to the Swatches panel and select the darker shade of purple.

Head over to Window > Effects to open the Effects panel. While selecting the object, set the Opacity to Multiply. 

Change the opacity to multiply and the color to purple

Step 5

Let’s add a logo to the handout template. Press Command-D to place a file. Find the Forecastr logo we downloaded, we will be using forecastr-06.eps. Click Open. 

Click on the document to place the file.

Place the logo

Step 6

Select the logo image we placed. Head over to the Control bar, and make sure Constrain proportions is activated. Set the Percentage to 30%.

The logo is smaller, but the frame around it is still too big. Hold down Option and drag one of the corners in. This key will allow you to resize the frame on all four sides and towards the center of the object. 

Place the logo on the top left corner of the flyer. 

Resize the logo and place it on the top left corner of the flyer

Step 7

Bring up the Layers panel by going to Window > Layers. Double-click on Layer 1 to rename it to Back. Click OK. 

Create a New Layer and name it Front. Click OK.

Create a new layer

3. How to Format Type in Adobe InDesign

Step 1

We will add a heading and subheading on the purple object. For this, we need to duplicate the object on the Front layer and keep the layers organized. We can’t create a text box with the original object because we are using Multiply as the Opacity. 

Duplicate the purple object by pressing Command-C. Lock the Back layer and copy the object on the Front layer. Press Shift-Option-Command-V to Paste in Place. 

While selecting the object, change the color in the Swatches panel to [None]. Change the Opacity to Normal on the Effects panel. 

Add a headline and subheadline

Step 2

On the Toolbar, select the Text Tool (T). Click on the duplicated object and add a heading and subheading. Bring up the Characters panel by pressing Command-T. 

To create contrast and depth, split the heading onto two lines. Set one line to RNS Sanz Normal and the next one to RNS Sanz Extra Bold. Set the Size to 30 pt. 

Set the subhead to the same font and the Size to 14 pt.

Press Command-B to bring up the Text Frame Options. Check the Preview box to see the changes live. Under Inset Spacing, set the Inset to 1.25 cm. Click OK. 

Using the text frame options add an inset

Step 3

Using the Text Tool (T), create a single-column text box. Place this at the top right of the template. Here, we will add contact information. On the Characters panel, set the font to RNS Sanz Normal and the Size to 8 pt. 

Add contact information

Step 4

It’s time to create the body copy text boxes. Using the Text Tool (T), create one text box to fit two-thirds of the columns. Create a second text box to fit a single column. Place these two side by side. 

Add a subhead and body copy to both text boxes. Using the Characters panel, set the subhead’s font to RNS Sanz Extra Bold and Size to 14 pt. Using the Swatches panel, set the color to the lighter purple.

For the body copy, use the Normal family and Size 11 pt. Using the Swatches panel, set the color to the darker purple. 

Create two text boxes

Step 5

On the right text box, you will notice I added bullet points. 

A great tip when working with bullet points is to use hanging punctuation. This means that the lines after the first line are indented and aligned to the first line. Avoiding having text under the bullet point makes for a sharper design. 

To do this, we can add an Indent to Here special character by pressing Command-\. To see if this is activated, head over to Type > Show Hidden Characters. The Indent to Here should be shown as a dagger. 

Add hanging punctuations on the bullet points

4. How to Add Vector Icons

Step 1

Head over to the Layers panel, and unlock the Back layer. 

On the Toolbar, select the Rectangle Tool (M). Click on the document and set the Width to 21.6 cm and the Height to 5 cm. Place the rectangle under the text box we created in the step before. Set the Color on the Swatches panel to [Black]. Change the Tint to 10%.

Lock the Back layer and work on the Front layer. This is useful so that the Text Tool doesn’t create a text box within the rectangle. 

Create a rectangle using the rectangle tool

Step 2

Let’s work on the Front layer now. Using the Text Tool (T), create a text box within the grey object.

While selecting the text box, press Command-B to open the Text Frame Options. Under Columns, set the Number to 3 and the Gutter to 0.5 cm. Click OK.

Add a text box to fit the rectangle

Step 3

Here, we can add copy concentrating on what the business offers. Set the subhead to RNS Sanz Extra Bold and Size to 11 pt. Set the copy to the same size but this time in the Normal family.

Format the text box to have a subheadline and body copy

Step 4

For a professional look, we can add icons to this section. Open the Business doodles vector file in Adobe Illustrator

Select the graph, light bulb and airplane icons by pressing Shift and clicking on each icon. Press Command-C to Copy

Open the vector icons in Adobe Illustrator

Step 5

Head back to the InDesign file. Press Command-V to Paste. On the Swatches panel, set the Color swatch to the lighter purple color. 

The icons will be grouped; to ungroup them, press Shift-Command-G.

To resize the icons, select each icon and head over to the Control bar. Activate the Constrain Proportions button as we will only set the Height. The Width will change automatically. Set the Height to 1.5 cm. 

Place an icon on top of each of the text boxes we created. 

Past the icons Change the color to purple and resize

Step 6

We will add strokes between the three columns to separate them visually. Go to the Toolbar and select the Line Tool (\).

Create 4 cm lines, using the Control bar to adjust the size. Use the column guides to center each line.

Head over to Window > Stroke to bring up the Stroke panel. Set the Weight to 2 pt and under Type select Dotted. 

Change the color to the light purple on the Swatches panel.

Add strokes in between the columns

Step 7

To finalize the design, we will add a text line at the bottom of the template. This will give the design a nice finishing touch. Here, we can add a single sentence or words related to the business.

Using the Type Tool (T), create a small text box on the bottom margin of the flyer. Add some text and set the Size to 14 pt and the color to the lighter purple. 

Bring up the Paragraph panel by going to Window > Type & Tables > Paragraph or by pressing Option-Command-T. Set the alignment to Center.

Add a text line at the bottom of the flyer Align to the center

5. How to Export a File for Printing and Online Sharing

Before exporting a file for printing, it’s useful to take a look around all the edges of the flyer. This is to make sure all the images and vectors bleeding out are touching the bleeds. Press W to go between Preview mode and Normal mode. Feel free to adjust some spaces to even out the design.

Step 1

To export the file, go to File > Export. Name the file Fundraiser brochure, and choose Adobe PDF (Print) from the Format dropdown menu. Click Save. 

Export the file for printing

Step 2

In the Export Adobe PDF window, set the Adobe PDF Preset to Press Quality.

Select press quality as a PDF preset

On the left side of the panel, select Marks and Bleeds. Check All Printer’s Marks and Use Document Bleed Settings. Click Export. You will have a ready-to-print PDF file. 

Check all printers parks and use document bleed settings

Step 3

If you would like to save the file for online sharing, export the file as a JPEG. 

Export as a JPEG for online sharing

Great Job! You’ve Finished This Tutorial!

In this tutorial, we learned how to set up a ready-to-print handout template. It is easy to edit to match your brand guidelines and ready for a marketing campaign.

Today, we’ve learned to:

  • Set up a ready-to-print file in Adobe InDesign.
  • Design a professional informational handout template.
  • Work with columns and create a different-shaped text box.
  • Format small details in typography for a professional look.
  • Use different InDesign panels to format shapes, images, colors, and typography.
  • Export a ready-to-print PDF file.

If you would like to explore more flyer and handout ideas, you can find many customizable business flyer templates over at Envato Elements and Graphic River. Check it out!

If you liked this tutorial, you might like these: