If you want to make a flyer, you don’t need any super expensive software. You can easily make your own flyer online, using the Placeit flyer creator. It offers you many flyer templates that you can customize to your needs, so that you can design straight in your browser. Here I’ll show you how to create a flyer in Placeit in a few easy steps.
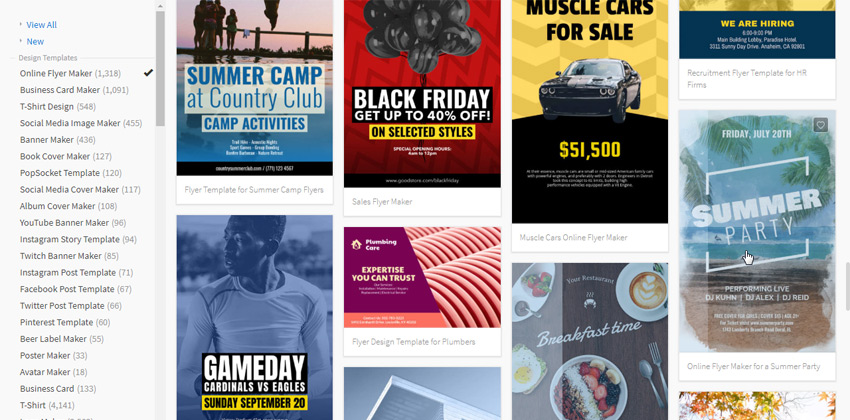
Go to Placeit.net. The site welcomes you with hundreds of templates for logos and mockups, but today we’re interested in making a flyer. So just go to Designs and find the Flyer Maker.
Step 2
If you have a specific theme in mind, you can type it here to narrow down your search. You can also just scroll through thousands of templates to see if something inspires you. I decided to give the Summer Party template a try—it looks very nice to me, and I can already see some potential for an interesting customization. Just click the template to open the editor.
Step 3
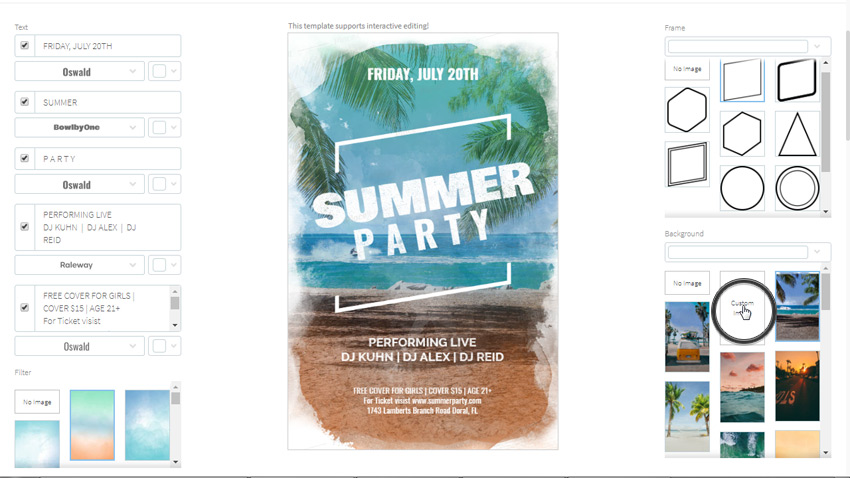
Each template has certain sections that you can edit and customize. This one allows you to change the text, add a colorful filter, add a frame to the main text, and add an image for the background. Let’s start our creation by changing the background image. This template offers a lot of beautiful images, but if you want a fully personalized effect, you can always add your own custom image.
Click Custom Image and pick your own image. Make sure it has a high enough resolution.
Give it a moment to load. After the image is processed, you can crop it to fit the format of the flyer.
Step 5
You can also move the image to create a more interesting frame. When you’re done, just click Crop and let the editor do the magic for you.
Step 6
As you can see, all the filters have been added to your image automatically. If you want, you can customize the effect by changing the available filters. Just click them to see which effect looks the best on your design. I decided to choose the last one, to add sunset colors to my flyer.
Step 7
The overall design looks good, so now it’s time to add the information. All the text areas can be found on the left. You can change the text and adjust its font and color here.
Changing the text and font can affect the layout of the elements, so feel free to adjust it manually as you see fit. This template allows you to grab and resize most of its elements in a very straightforward way.
Step 8
Use this method to add all the relevant information to your flyer and to give it the intended look. There are many fonts to choose from, so test some of them to see which one works best for each element.
Step 9
On this template, there’s a frame around the main text that you can adjust. I decided to remove it because the sun in the background already looks like a nice frame.
Step 10
Finally, you can change the colors of the text separately for each element. You can pick one of the sample colors, or click More to choose from all the shades you can imagine.
Step 11
Our flyer looks amazing now! If you’re happy with the results, go to the top of the page and click Download.
Here you can see the resolution and the price of your design. Click Purchase to finalize the process.
Step 12
Additionally, you can use one of the many flyer mockup templates that Placeit offers. It will help you see how your design works in practice, and your client will appreciate this form of presentation, too!
Good Job!
Now you know how to make your own flyer using a flyer creator! If you’re interested in flyer design, you may also like our other tutorials on this topic:
If you want to make a flyer, you don’t need any super expensive software. You can easily make your own flyer online, using the Placeit flyer creator. It offers you many flyer templates that you can customize to your needs, so that you can design straight in your browser. Here I’ll show you how to create a flyer in Placeit in a few easy steps.
Go to Placeit.net. The site welcomes you with hundreds of templates for logos and mockups, but today we’re interested in making a flyer. So just go to Designs and find the Flyer Maker.
Step 2
If you have a specific theme in mind, you can type it here to narrow down your search. You can also just scroll through thousands of templates to see if something inspires you. I decided to give the Summer Party template a try—it looks very nice to me, and I can already see some potential for an interesting customization. Just click the template to open the editor.
Step 3
Each template has certain sections that you can edit and customize. This one allows you to change the text, add a colorful filter, add a frame to the main text, and add an image for the background. Let’s start our creation by changing the background image. This template offers a lot of beautiful images, but if you want a fully personalized effect, you can always add your own custom image.
Click Custom Image and pick your own image. Make sure it has a high enough resolution.
Give it a moment to load. After the image is processed, you can crop it to fit the format of the flyer.
Step 5
You can also move the image to create a more interesting frame. When you’re done, just click Crop and let the editor do the magic for you.
Step 6
As you can see, all the filters have been added to your image automatically. If you want, you can customize the effect by changing the available filters. Just click them to see which effect looks the best on your design. I decided to choose the last one, to add sunset colors to my flyer.
Step 7
The overall design looks good, so now it’s time to add the information. All the text areas can be found on the left. You can change the text and adjust its font and color here.
Changing the text and font can affect the layout of the elements, so feel free to adjust it manually as you see fit. This template allows you to grab and resize most of its elements in a very straightforward way.
Step 8
Use this method to add all the relevant information to your flyer and to give it the intended look. There are many fonts to choose from, so test some of them to see which one works best for each element.
Step 9
On this template, there’s a frame around the main text that you can adjust. I decided to remove it because the sun in the background already looks like a nice frame.
Step 10
Finally, you can change the colors of the text separately for each element. You can pick one of the sample colors, or click More to choose from all the shades you can imagine.
Step 11
Our flyer looks amazing now! If you’re happy with the results, go to the top of the page and click Download.
Here you can see the resolution and the price of your design. Click Purchase to finalize the process.
Step 12
Additionally, you can use one of the many flyer mockup templates that Placeit offers. It will help you see how your design works in practice, and your client will appreciate this form of presentation, too!
Good Job!
Now you know how to make your own flyer using a flyer creator! If you’re interested in flyer design, you may also like our other tutorials on this topic:
If you want to make a flyer, you don’t need any super expensive software. You can easily make your own flyer online, using the Placeit flyer creator. It offers you many flyer templates that you can customize to your needs, so that you can design straight in your browser. Here I’ll show you how to create a flyer in Placeit in a few easy steps.
Go to Placeit.net. The site welcomes you with hundreds of templates for logos and mockups, but today we’re interested in making a flyer. So just go to Designs and find the Flyer Maker.
Step 2
If you have a specific theme in mind, you can type it here to narrow down your search. You can also just scroll through thousands of templates to see if something inspires you. I decided to give the Summer Party template a try—it looks very nice to me, and I can already see some potential for an interesting customization. Just click the template to open the editor.
Step 3
Each template has certain sections that you can edit and customize. This one allows you to change the text, add a colorful filter, add a frame to the main text, and add an image for the background. Let’s start our creation by changing the background image. This template offers a lot of beautiful images, but if you want a fully personalized effect, you can always add your own custom image.
Click Custom Image and pick your own image. Make sure it has a high enough resolution.
Give it a moment to load. After the image is processed, you can crop it to fit the format of the flyer.
Step 5
You can also move the image to create a more interesting frame. When you’re done, just click Crop and let the editor do the magic for you.
Step 6
As you can see, all the filters have been added to your image automatically. If you want, you can customize the effect by changing the available filters. Just click them to see which effect looks the best on your design. I decided to choose the last one, to add sunset colors to my flyer.
Step 7
The overall design looks good, so now it’s time to add the information. All the text areas can be found on the left. You can change the text and adjust its font and color here.
Changing the text and font can affect the layout of the elements, so feel free to adjust it manually as you see fit. This template allows you to grab and resize most of its elements in a very straightforward way.
Step 8
Use this method to add all the relevant information to your flyer and to give it the intended look. There are many fonts to choose from, so test some of them to see which one works best for each element.
Step 9
On this template, there’s a frame around the main text that you can adjust. I decided to remove it because the sun in the background already looks like a nice frame.
Step 10
Finally, you can change the colors of the text separately for each element. You can pick one of the sample colors, or click More to choose from all the shades you can imagine.
Step 11
Our flyer looks amazing now! If you’re happy with the results, go to the top of the page and click Download.
Here you can see the resolution and the price of your design. Click Purchase to finalize the process.
Step 12
Additionally, you can use one of the many flyer mockup templates that Placeit offers. It will help you see how your design works in practice, and your client will appreciate this form of presentation, too!
Good Job!
Now you know how to make your own flyer using a flyer creator! If you’re interested in flyer design, you may also like our other tutorials on this topic:
If you want to make a flyer, you don’t need any super expensive software. You can easily make your own flyer online, using the Placeit flyer creator. It offers you many flyer templates that you can customize to your needs, so that you can design straight in your browser. Here I’ll show you how to create a flyer in Placeit in a few easy steps.
Go to Placeit.net. The site welcomes you with hundreds of templates for logos and mockups, but today we’re interested in making a flyer. So just go to Designs and find the Flyer Maker.
Step 2
If you have a specific theme in mind, you can type it here to narrow down your search. You can also just scroll through thousands of templates to see if something inspires you. I decided to give the Summer Party template a try—it looks very nice to me, and I can already see some potential for an interesting customization. Just click the template to open the editor.
Step 3
Each template has certain sections that you can edit and customize. This one allows you to change the text, add a colorful filter, add a frame to the main text, and add an image for the background. Let’s start our creation by changing the background image. This template offers a lot of beautiful images, but if you want a fully personalized effect, you can always add your own custom image.
Click Custom Image and pick your own image. Make sure it has a high enough resolution.
Give it a moment to load. After the image is processed, you can crop it to fit the format of the flyer.
Step 5
You can also move the image to create a more interesting frame. When you’re done, just click Crop and let the editor do the magic for you.
Step 6
As you can see, all the filters have been added to your image automatically. If you want, you can customize the effect by changing the available filters. Just click them to see which effect looks the best on your design. I decided to choose the last one, to add sunset colors to my flyer.
Step 7
The overall design looks good, so now it’s time to add the information. All the text areas can be found on the left. You can change the text and adjust its font and color here.
Changing the text and font can affect the layout of the elements, so feel free to adjust it manually as you see fit. This template allows you to grab and resize most of its elements in a very straightforward way.
Step 8
Use this method to add all the relevant information to your flyer and to give it the intended look. There are many fonts to choose from, so test some of them to see which one works best for each element.
Step 9
On this template, there’s a frame around the main text that you can adjust. I decided to remove it because the sun in the background already looks like a nice frame.
Step 10
Finally, you can change the colors of the text separately for each element. You can pick one of the sample colors, or click More to choose from all the shades you can imagine.
Step 11
Our flyer looks amazing now! If you’re happy with the results, go to the top of the page and click Download.
Here you can see the resolution and the price of your design. Click Purchase to finalize the process.
Step 12
Additionally, you can use one of the many flyer mockup templates that Placeit offers. It will help you see how your design works in practice, and your client will appreciate this form of presentation, too!
Good Job!
Now you know how to make your own flyer using a flyer creator! If you’re interested in flyer design, you may also like our other tutorials on this topic:
In this tutorial, I will show you how to draw a peacock with an open tail and how to draw a peacock feather.
Many birds sport fabulous plumage, but one species takes it to an extreme level—the peacock. Their tails are huge and can be displayed in the shape of a fan. It’s a beautiful sight, very inspiring for an artist, but not easy to draw at all.
In this tutorial, I will show you how to draw a peacock with a beautiful, open tail. I will also show you how to draw a peacock feather step by step, not only in a tail, but as an individual one.
1. How to Draw a Peacock
Step 1
Draw an oval. This will be the torso of our peacock.
Step 2
Draw a long, S-shaped neck with an oval head at one end.
Step 3
Sketch the legs below the ankles („reversed knees”). Drawing them this way can help you establish the pose without getting caught up in the details.
Step 4
Draw the upper part of the legs. These will be hidden under the feathers, but it helps to know where they are.
Step 5
Sketch the curve of the beak. Peacocks are related to chickens, so you can use a chicken beak as a reference.
Step 6
Sketch the curve of the wings. Peacocks tend to keep them low when they fan their tail. The wings are covered by the tail mostly, but some parts may stay visible, so we need to know where they are.
Step 7
Draw all the toes. Again, these are just like chicken feet!
Step 8
Outline the neck, starting thin right by the head and then getting wider as you get closer to the torso.
Step 9
Finish the beak.
Step 10
Draw an oval eye.
Step 11
Add a nose hole.
Step 12
Draw the „crown” on the head.
Step 13
Add details to the legs and feet.
Step 14
Finish the wings.
2. How to Draw a Peacock’s Tail
Step 1
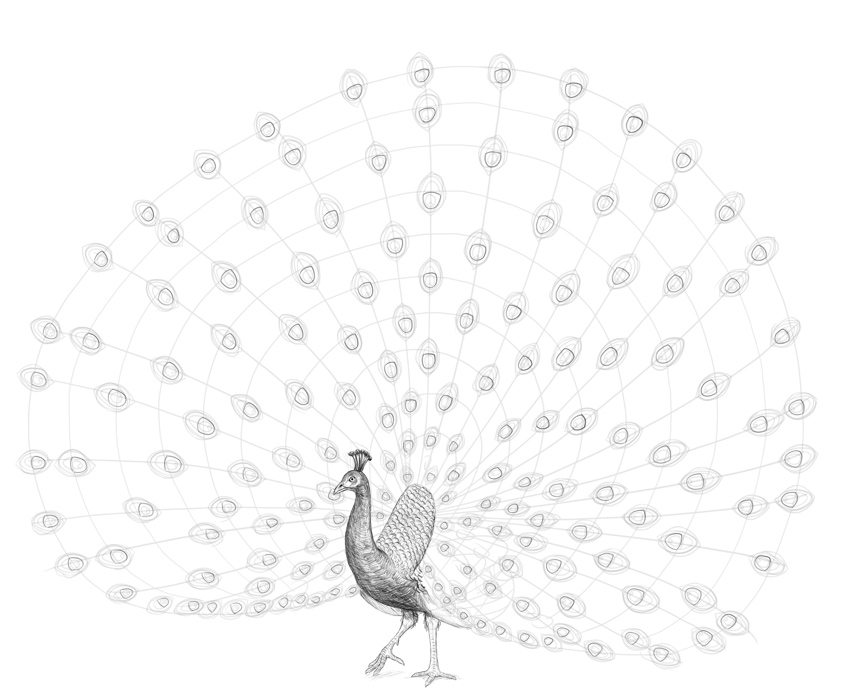
The body is done, so now it’s time to draw a fabulous peacock tail! Its base is like a stiff cape that the peacock raises above its back.
Step 2
Sketch the axes of the tail. Younger birds have smaller tails, so if you want to make this drawing less challenging, you can draw the axes shorter.
Step 3
Draw the rays of feathers.
Step 4
Outline the whole tail to make sure the shape made by the feathers looks regular.
Step 5
Divide the whole shape of the tail into many regular sections. This will help you place the feathers regularly.
Step 6
Draw the „eyespots” around the tail’s edge…
… and within the shape, but this time leaving regular spaces in between.
Step 7
The base of the tail is covered with little scale-like feathers. So you can use the method I use for drawing scales:
3. How to Draw a Peacock Feather
Step 1
All the guide lines are in place, so let’s take a look now at the details of how to draw a single peacock feather.
Every feather must start with a straight line. Peacock feathers can be very long, but only the top has a visible vane.
Step 2
Draw an egg shape. It will be the basis for the whole eyespot.
Step 3
Draw the same shape inside, leaving a little space in between.
Step 4
Cross the smaller oval with a gentle curve. This will create a shape of the „iris”.
Step 5
Draw a smaller oval inside the „iris”—the „pupil”.
Step 6
Draw a reversed „V” inside this small shape.
Step 7
Outline the whole shape, creating a triangular base for the eyespot and a thick outline on its sides.
Step 8
This outline is copied on top, but here it starts to turn into individual barbs.
Step 9
The whole tail must be drawn with a slightly different approach, so let’s focus on a single feather for now. The „pupil” is dark, but there’s a subtle gradient inside.
Step 10
The top of the feather is the densest, and it follows the shape of the eyespot:
Step 11
The lower part is sparser:
Step 12
If you want to draw a detailed peacock feather, make the barbs fluffy and gently shade the eyespot.
Step 13
We’re focusing on black and white drawing here, but if you want to draw a peacock feather in color, there are three colors that are the most important: green, blue, and brown.
4. How to Finish a Drawing of a Peacock
Step 1
All right, we’re almost done! Let’s draw the final lines now. Draw the details of the head. Because the head looks so insignificant in comparison to the impressive tail, you don’t have to make it too detailed—these details will not be that visible anyway.
Step 2
Outline the body and the legs.
Step 3
Outline the scaly feathers at the base of the tail.
Step 4
Add some scales to the legs.
Step 5
Cross each „scale” on the base of the tail with a vertical line.
Step 6
Now shade the peacock. It must look dark in comparison to the tail.
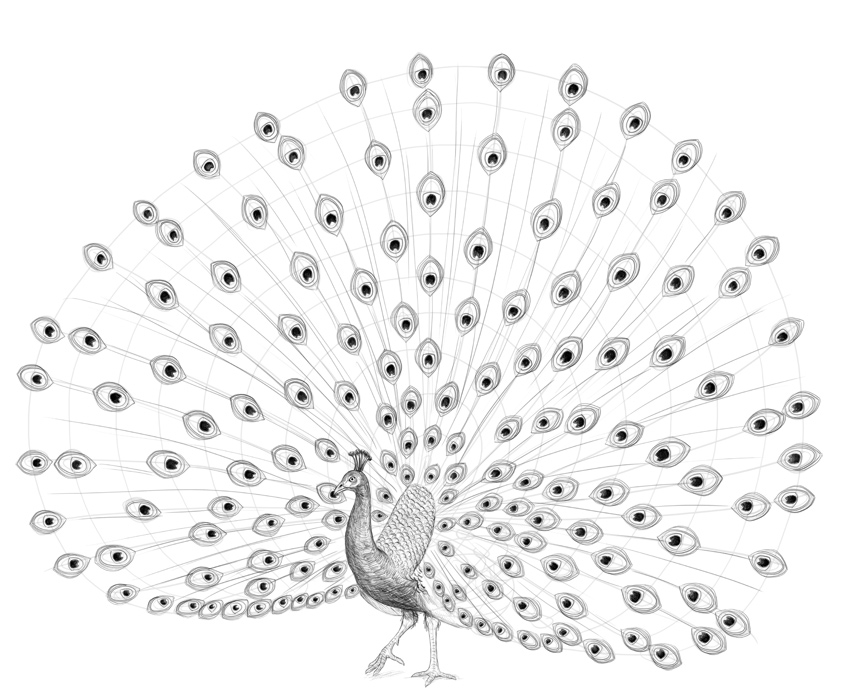
Step 7
Let’s go back to the tail now. Draw the spots as explained earlier, except looser here—because there are so many of the spots and they’re so little, each individual one matters less.
Step 8
Draw the shafts of the feathers. Because the feathers are mostly thin, they look almost translucent in contrast to the thick and solid shafts. Add shafts to all the eyespots, but also in between, to fill the empty spaces.
Step 9
The lower part of the tail has a lot of eyespots concentrated in one place. It makes this area look thick and fluffy.
Step 10
Now draw all the feathers. It may take a while, but remember that you don’t need to be very strict here—just draw a lot of lines in the same rhythm along each shaft.
Step 11
There’s also one more type of peacock feather, mainly visible at the edge of the tail. They look like open V’s.
Step 12
Accentuate the shafts some more to make them more visible.
Step 13
Since we’re drawing in black and white, it’s hard to create the contrast between colorful eyespots and dull feathers. However, we can use value for this—make it even denser to make the areas between the eyespots darker. However, keep in mind that the closer you are to the edge of the tail, the sparser the feathers.
Step 14
Take a final look at your drawing and see what else you can fix. I accentuated the shading some more to increase the contrast.
Beautiful!
Now you know how to draw a beautiful peacock with an open tail from scratch! If you’ve followed my steps and you like your end result, feel free to share it in the comments—I’d love to see it!
You may also be interested in one of our many bird-related tutorials:
In this tutorial, I will show you how to draw a peacock with an open tail and how to draw a peacock feather.
Many birds sport fabulous plumage, but one species takes it to an extreme level—the peacock. Their tails are huge and can be displayed in the shape of a fan. It’s a beautiful sight, very inspiring for an artist, but not easy to draw at all.
In this tutorial, I will show you how to draw a peacock with a beautiful, open tail. I will also show you how to draw a peacock feather step by step, not only in a tail, but as an individual one.
1. How to Draw a Peacock
Step 1
Draw an oval. This will be the torso of our peacock.
Step 2
Draw a long, S-shaped neck with an oval head at one end.
Step 3
Sketch the legs below the ankles („reversed knees”). Drawing them this way can help you establish the pose without getting caught up in the details.
Step 4
Draw the upper part of the legs. These will be hidden under the feathers, but it helps to know where they are.
Step 5
Sketch the curve of the beak. Peacocks are related to chickens, so you can use a chicken beak as a reference.
Step 6
Sketch the curve of the wings. Peacocks tend to keep them low when they fan their tail. The wings are covered by the tail mostly, but some parts may stay visible, so we need to know where they are.
Step 7
Draw all the toes. Again, these are just like chicken feet!
Step 8
Outline the neck, starting thin right by the head and then getting wider as you get closer to the torso.
Step 9
Finish the beak.
Step 10
Draw an oval eye.
Step 11
Add a nose hole.
Step 12
Draw the „crown” on the head.
Step 13
Add details to the legs and feet.
Step 14
Finish the wings.
2. How to Draw a Peacock’s Tail
Step 1
The body is done, so now it’s time to draw a fabulous peacock tail! Its base is like a stiff cape that the peacock raises above its back.
Step 2
Sketch the axes of the tail. Younger birds have smaller tails, so if you want to make this drawing less challenging, you can draw the axes shorter.
Step 3
Draw the rays of feathers.
Step 4
Outline the whole tail to make sure the shape made by the feathers looks regular.
Step 5
Divide the whole shape of the tail into many regular sections. This will help you place the feathers regularly.
Step 6
Draw the „eyespots” around the tail’s edge…
… and within the shape, but this time leaving regular spaces in between.
Step 7
The base of the tail is covered with little scale-like feathers. So you can use the method I use for drawing scales:
3. How to Draw a Peacock Feather
Step 1
All the guide lines are in place, so let’s take a look now at the details of how to draw a single peacock feather.
Every feather must start with a straight line. Peacock feathers can be very long, but only the top has a visible vane.
Step 2
Draw an egg shape. It will be the basis for the whole eyespot.
Step 3
Draw the same shape inside, leaving a little space in between.
Step 4
Cross the smaller oval with a gentle curve. This will create a shape of the „iris”.
Step 5
Draw a smaller oval inside the „iris”—the „pupil”.
Step 6
Draw a reversed „V” inside this small shape.
Step 7
Outline the whole shape, creating a triangular base for the eyespot and a thick outline on its sides.
Step 8
This outline is copied on top, but here it starts to turn into individual barbs.
Step 9
The whole tail must be drawn with a slightly different approach, so let’s focus on a single feather for now. The „pupil” is dark, but there’s a subtle gradient inside.
Step 10
The top of the feather is the densest, and it follows the shape of the eyespot:
Step 11
The lower part is sparser:
Step 12
If you want to draw a detailed peacock feather, make the barbs fluffy and gently shade the eyespot.
Step 13
We’re focusing on black and white drawing here, but if you want to draw a peacock feather in color, there are three colors that are the most important: green, blue, and brown.
4. How to Finish a Drawing of a Peacock
Step 1
All right, we’re almost done! Let’s draw the final lines now. Draw the details of the head. Because the head looks so insignificant in comparison to the impressive tail, you don’t have to make it too detailed—these details will not be that visible anyway.
Step 2
Outline the body and the legs.
Step 3
Outline the scaly feathers at the base of the tail.
Step 4
Add some scales to the legs.
Step 5
Cross each „scale” on the base of the tail with a vertical line.
Step 6
Now shade the peacock. It must look dark in comparison to the tail.
Step 7
Let’s go back to the tail now. Draw the spots as explained earlier, except looser here—because there are so many of the spots and they’re so little, each individual one matters less.
Step 8
Draw the shafts of the feathers. Because the feathers are mostly thin, they look almost translucent in contrast to the thick and solid shafts. Add shafts to all the eyespots, but also in between, to fill the empty spaces.
Step 9
The lower part of the tail has a lot of eyespots concentrated in one place. It makes this area look thick and fluffy.
Step 10
Now draw all the feathers. It may take a while, but remember that you don’t need to be very strict here—just draw a lot of lines in the same rhythm along each shaft.
Step 11
There’s also one more type of peacock feather, mainly visible at the edge of the tail. They look like open V’s.
Step 12
Accentuate the shafts some more to make them more visible.
Step 13
Since we’re drawing in black and white, it’s hard to create the contrast between colorful eyespots and dull feathers. However, we can use value for this—make it even denser to make the areas between the eyespots darker. However, keep in mind that the closer you are to the edge of the tail, the sparser the feathers.
Step 14
Take a final look at your drawing and see what else you can fix. I accentuated the shading some more to increase the contrast.
Beautiful!
Now you know how to draw a beautiful peacock with an open tail from scratch! If you’ve followed my steps and you like your end result, feel free to share it in the comments—I’d love to see it!
You may also be interested in one of our many bird-related tutorials:
In this tutorial, I will show you how to draw a peacock with an open tail and how to draw a peacock feather.
Many birds sport fabulous plumage, but one species takes it to an extreme level—the peacock. Their tails are huge and can be displayed in the shape of a fan. It’s a beautiful sight, very inspiring for an artist, but not easy to draw at all.
In this tutorial, I will show you how to draw a peacock with a beautiful, open tail. I will also show you how to draw a peacock feather step by step, not only in a tail, but as an individual one.
1. How to Draw a Peacock
Step 1
Draw an oval. This will be the torso of our peacock.
Step 2
Draw a long, S-shaped neck with an oval head at one end.
Step 3
Sketch the legs below the ankles („reversed knees”). Drawing them this way can help you establish the pose without getting caught up in the details.
Step 4
Draw the upper part of the legs. These will be hidden under the feathers, but it helps to know where they are.
Step 5
Sketch the curve of the beak. Peacocks are related to chickens, so you can use a chicken beak as a reference.
Step 6
Sketch the curve of the wings. Peacocks tend to keep them low when they fan their tail. The wings are covered by the tail mostly, but some parts may stay visible, so we need to know where they are.
Step 7
Draw all the toes. Again, these are just like chicken feet!
Step 8
Outline the neck, starting thin right by the head and then getting wider as you get closer to the torso.
Step 9
Finish the beak.
Step 10
Draw an oval eye.
Step 11
Add a nose hole.
Step 12
Draw the „crown” on the head.
Step 13
Add details to the legs and feet.
Step 14
Finish the wings.
2. How to Draw a Peacock’s Tail
Step 1
The body is done, so now it’s time to draw a fabulous peacock tail! Its base is like a stiff cape that the peacock raises above its back.
Step 2
Sketch the axes of the tail. Younger birds have smaller tails, so if you want to make this drawing less challenging, you can draw the axes shorter.
Step 3
Draw the rays of feathers.
Step 4
Outline the whole tail to make sure the shape made by the feathers looks regular.
Step 5
Divide the whole shape of the tail into many regular sections. This will help you place the feathers regularly.
Step 6
Draw the „eyespots” around the tail’s edge…
… and within the shape, but this time leaving regular spaces in between.
Step 7
The base of the tail is covered with little scale-like feathers. So you can use the method I use for drawing scales:
3. How to Draw a Peacock Feather
Step 1
All the guide lines are in place, so let’s take a look now at the details of how to draw a single peacock feather.
Every feather must start with a straight line. Peacock feathers can be very long, but only the top has a visible vane.
Step 2
Draw an egg shape. It will be the basis for the whole eyespot.
Step 3
Draw the same shape inside, leaving a little space in between.
Step 4
Cross the smaller oval with a gentle curve. This will create a shape of the „iris”.
Step 5
Draw a smaller oval inside the „iris”—the „pupil”.
Step 6
Draw a reversed „V” inside this small shape.
Step 7
Outline the whole shape, creating a triangular base for the eyespot and a thick outline on its sides.
Step 8
This outline is copied on top, but here it starts to turn into individual barbs.
Step 9
The whole tail must be drawn with a slightly different approach, so let’s focus on a single feather for now. The „pupil” is dark, but there’s a subtle gradient inside.
Step 10
The top of the feather is the densest, and it follows the shape of the eyespot:
Step 11
The lower part is sparser:
Step 12
If you want to draw a detailed peacock feather, make the barbs fluffy and gently shade the eyespot.
Step 13
We’re focusing on black and white drawing here, but if you want to draw a peacock feather in color, there are three colors that are the most important: green, blue, and brown.
4. How to Finish a Drawing of a Peacock
Step 1
All right, we’re almost done! Let’s draw the final lines now. Draw the details of the head. Because the head looks so insignificant in comparison to the impressive tail, you don’t have to make it too detailed—these details will not be that visible anyway.
Step 2
Outline the body and the legs.
Step 3
Outline the scaly feathers at the base of the tail.
Step 4
Add some scales to the legs.
Step 5
Cross each „scale” on the base of the tail with a vertical line.
Step 6
Now shade the peacock. It must look dark in comparison to the tail.
Step 7
Let’s go back to the tail now. Draw the spots as explained earlier, except looser here—because there are so many of the spots and they’re so little, each individual one matters less.
Step 8
Draw the shafts of the feathers. Because the feathers are mostly thin, they look almost translucent in contrast to the thick and solid shafts. Add shafts to all the eyespots, but also in between, to fill the empty spaces.
Step 9
The lower part of the tail has a lot of eyespots concentrated in one place. It makes this area look thick and fluffy.
Step 10
Now draw all the feathers. It may take a while, but remember that you don’t need to be very strict here—just draw a lot of lines in the same rhythm along each shaft.
Step 11
There’s also one more type of peacock feather, mainly visible at the edge of the tail. They look like open V’s.
Step 12
Accentuate the shafts some more to make them more visible.
Step 13
Since we’re drawing in black and white, it’s hard to create the contrast between colorful eyespots and dull feathers. However, we can use value for this—make it even denser to make the areas between the eyespots darker. However, keep in mind that the closer you are to the edge of the tail, the sparser the feathers.
Step 14
Take a final look at your drawing and see what else you can fix. I accentuated the shading some more to increase the contrast.
Beautiful!
Now you know how to draw a beautiful peacock with an open tail from scratch! If you’ve followed my steps and you like your end result, feel free to share it in the comments—I’d love to see it!
You may also be interested in one of our many bird-related tutorials:
In this tutorial, I will show you how to draw a peacock with an open tail and how to draw a peacock feather.
Many birds sport fabulous plumage, but one species takes it to an extreme level—the peacock. Their tails are huge and can be displayed in the shape of a fan. It’s a beautiful sight, very inspiring for an artist, but not easy to draw at all.
In this tutorial, I will show you how to draw a peacock with a beautiful, open tail. I will also show you how to draw a peacock feather step by step, not only in a tail, but as an individual one.
1. How to Draw a Peacock
Step 1
Draw an oval. This will be the torso of our peacock.
Step 2
Draw a long, S-shaped neck with an oval head at one end.
Step 3
Sketch the legs below the ankles („reversed knees”). Drawing them this way can help you establish the pose without getting caught up in the details.
Step 4
Draw the upper part of the legs. These will be hidden under the feathers, but it helps to know where they are.
Step 5
Sketch the curve of the beak. Peacocks are related to chickens, so you can use a chicken beak as a reference.
Step 6
Sketch the curve of the wings. Peacocks tend to keep them low when they fan their tail. The wings are covered by the tail mostly, but some parts may stay visible, so we need to know where they are.
Step 7
Draw all the toes. Again, these are just like chicken feet!
Step 8
Outline the neck, starting thin right by the head and then getting wider as you get closer to the torso.
Step 9
Finish the beak.
Step 10
Draw an oval eye.
Step 11
Add a nose hole.
Step 12
Draw the „crown” on the head.
Step 13
Add details to the legs and feet.
Step 14
Finish the wings.
2. How to Draw a Peacock’s Tail
Step 1
The body is done, so now it’s time to draw a fabulous peacock tail! Its base is like a stiff cape that the peacock raises above its back.
Step 2
Sketch the axes of the tail. Younger birds have smaller tails, so if you want to make this drawing less challenging, you can draw the axes shorter.
Step 3
Draw the rays of feathers.
Step 4
Outline the whole tail to make sure the shape made by the feathers looks regular.
Step 5
Divide the whole shape of the tail into many regular sections. This will help you place the feathers regularly.
Step 6
Draw the „eyespots” around the tail’s edge…
… and within the shape, but this time leaving regular spaces in between.
Step 7
The base of the tail is covered with little scale-like feathers. So you can use the method I use for drawing scales:
3. How to Draw a Peacock Feather
Step 1
All the guide lines are in place, so let’s take a look now at the details of how to draw a single peacock feather.
Every feather must start with a straight line. Peacock feathers can be very long, but only the top has a visible vane.
Step 2
Draw an egg shape. It will be the basis for the whole eyespot.
Step 3
Draw the same shape inside, leaving a little space in between.
Step 4
Cross the smaller oval with a gentle curve. This will create a shape of the „iris”.
Step 5
Draw a smaller oval inside the „iris”—the „pupil”.
Step 6
Draw a reversed „V” inside this small shape.
Step 7
Outline the whole shape, creating a triangular base for the eyespot and a thick outline on its sides.
Step 8
This outline is copied on top, but here it starts to turn into individual barbs.
Step 9
The whole tail must be drawn with a slightly different approach, so let’s focus on a single feather for now. The „pupil” is dark, but there’s a subtle gradient inside.
Step 10
The top of the feather is the densest, and it follows the shape of the eyespot:
Step 11
The lower part is sparser:
Step 12
If you want to draw a detailed peacock feather, make the barbs fluffy and gently shade the eyespot.
Step 13
We’re focusing on black and white drawing here, but if you want to draw a peacock feather in color, there are three colors that are the most important: green, blue, and brown.
4. How to Finish a Drawing of a Peacock
Step 1
All right, we’re almost done! Let’s draw the final lines now. Draw the details of the head. Because the head looks so insignificant in comparison to the impressive tail, you don’t have to make it too detailed—these details will not be that visible anyway.
Step 2
Outline the body and the legs.
Step 3
Outline the scaly feathers at the base of the tail.
Step 4
Add some scales to the legs.
Step 5
Cross each „scale” on the base of the tail with a vertical line.
Step 6
Now shade the peacock. It must look dark in comparison to the tail.
Step 7
Let’s go back to the tail now. Draw the spots as explained earlier, except looser here—because there are so many of the spots and they’re so little, each individual one matters less.
Step 8
Draw the shafts of the feathers. Because the feathers are mostly thin, they look almost translucent in contrast to the thick and solid shafts. Add shafts to all the eyespots, but also in between, to fill the empty spaces.
Step 9
The lower part of the tail has a lot of eyespots concentrated in one place. It makes this area look thick and fluffy.
Step 10
Now draw all the feathers. It may take a while, but remember that you don’t need to be very strict here—just draw a lot of lines in the same rhythm along each shaft.
Step 11
There’s also one more type of peacock feather, mainly visible at the edge of the tail. They look like open V’s.
Step 12
Accentuate the shafts some more to make them more visible.
Step 13
Since we’re drawing in black and white, it’s hard to create the contrast between colorful eyespots and dull feathers. However, we can use value for this—make it even denser to make the areas between the eyespots darker. However, keep in mind that the closer you are to the edge of the tail, the sparser the feathers.
Step 14
Take a final look at your drawing and see what else you can fix. I accentuated the shading some more to increase the contrast.
Beautiful!
Now you know how to draw a beautiful peacock with an open tail from scratch! If you’ve followed my steps and you like your end result, feel free to share it in the comments—I’d love to see it!
You may also be interested in one of our many bird-related tutorials:
In this tutorial, I will show you how to draw a peacock with an open tail and how to draw a peacock feather.
Many birds sport fabulous plumage, but one species takes it to an extreme level—the peacock. Their tails are huge and can be displayed in the shape of a fan. It’s a beautiful sight, very inspiring for an artist, but not easy to draw at all.
In this tutorial, I will show you how to draw a peacock with a beautiful, open tail. I will also show you how to draw a peacock feather step by step, not only in a tail, but as an individual one.
1. How to Draw a Peacock
Step 1
Draw an oval. This will be the torso of our peacock.
Step 2
Draw a long, S-shaped neck with an oval head at one end.
Step 3
Sketch the legs below the ankles („reversed knees”). Drawing them this way can help you establish the pose without getting caught up in the details.
Step 4
Draw the upper part of the legs. These will be hidden under the feathers, but it helps to know where they are.
Step 5
Sketch the curve of the beak. Peacocks are related to chickens, so you can use a chicken beak as a reference.
Step 6
Sketch the curve of the wings. Peacocks tend to keep them low when they fan their tail. The wings are covered by the tail mostly, but some parts may stay visible, so we need to know where they are.
Step 7
Draw all the toes. Again, these are just like chicken feet!
Step 8
Outline the neck, starting thin right by the head and then getting wider as you get closer to the torso.
Step 9
Finish the beak.
Step 10
Draw an oval eye.
Step 11
Add a nose hole.
Step 12
Draw the „crown” on the head.
Step 13
Add details to the legs and feet.
Step 14
Finish the wings.
2. How to Draw a Peacock’s Tail
Step 1
The body is done, so now it’s time to draw a fabulous peacock tail! Its base is like a stiff cape that the peacock raises above its back.
Step 2
Sketch the axes of the tail. Younger birds have smaller tails, so if you want to make this drawing less challenging, you can draw the axes shorter.
Step 3
Draw the rays of feathers.
Step 4
Outline the whole tail to make sure the shape made by the feathers looks regular.
Step 5
Divide the whole shape of the tail into many regular sections. This will help you place the feathers regularly.
Step 6
Draw the „eyespots” around the tail’s edge…
… and within the shape, but this time leaving regular spaces in between.
Step 7
The base of the tail is covered with little scale-like feathers. So you can use the method I use for drawing scales:
3. How to Draw a Peacock Feather
Step 1
All the guide lines are in place, so let’s take a look now at the details of how to draw a single peacock feather.
Every feather must start with a straight line. Peacock feathers can be very long, but only the top has a visible vane.
Step 2
Draw an egg shape. It will be the basis for the whole eyespot.
Step 3
Draw the same shape inside, leaving a little space in between.
Step 4
Cross the smaller oval with a gentle curve. This will create a shape of the „iris”.
Step 5
Draw a smaller oval inside the „iris”—the „pupil”.
Step 6
Draw a reversed „V” inside this small shape.
Step 7
Outline the whole shape, creating a triangular base for the eyespot and a thick outline on its sides.
Step 8
This outline is copied on top, but here it starts to turn into individual barbs.
Step 9
The whole tail must be drawn with a slightly different approach, so let’s focus on a single feather for now. The „pupil” is dark, but there’s a subtle gradient inside.
Step 10
The top of the feather is the densest, and it follows the shape of the eyespot:
Step 11
The lower part is sparser:
Step 12
If you want to draw a detailed peacock feather, make the barbs fluffy and gently shade the eyespot.
Step 13
We’re focusing on black and white drawing here, but if you want to draw a peacock feather in color, there are three colors that are the most important: green, blue, and brown.
4. How to Finish a Drawing of a Peacock
Step 1
All right, we’re almost done! Let’s draw the final lines now. Draw the details of the head. Because the head looks so insignificant in comparison to the impressive tail, you don’t have to make it too detailed—these details will not be that visible anyway.
Step 2
Outline the body and the legs.
Step 3
Outline the scaly feathers at the base of the tail.
Step 4
Add some scales to the legs.
Step 5
Cross each „scale” on the base of the tail with a vertical line.
Step 6
Now shade the peacock. It must look dark in comparison to the tail.
Step 7
Let’s go back to the tail now. Draw the spots as explained earlier, except looser here—because there are so many of the spots and they’re so little, each individual one matters less.
Step 8
Draw the shafts of the feathers. Because the feathers are mostly thin, they look almost translucent in contrast to the thick and solid shafts. Add shafts to all the eyespots, but also in between, to fill the empty spaces.
Step 9
The lower part of the tail has a lot of eyespots concentrated in one place. It makes this area look thick and fluffy.
Step 10
Now draw all the feathers. It may take a while, but remember that you don’t need to be very strict here—just draw a lot of lines in the same rhythm along each shaft.
Step 11
There’s also one more type of peacock feather, mainly visible at the edge of the tail. They look like open V’s.
Step 12
Accentuate the shafts some more to make them more visible.
Step 13
Since we’re drawing in black and white, it’s hard to create the contrast between colorful eyespots and dull feathers. However, we can use value for this—make it even denser to make the areas between the eyespots darker. However, keep in mind that the closer you are to the edge of the tail, the sparser the feathers.
Step 14
Take a final look at your drawing and see what else you can fix. I accentuated the shading some more to increase the contrast.
Beautiful!
Now you know how to draw a beautiful peacock with an open tail from scratch! If you’ve followed my steps and you like your end result, feel free to share it in the comments—I’d love to see it!
You may also be interested in one of our many bird-related tutorials:
In today’s article, we’re going to tackle a more technical subject, which should be part of your knowledge bag, no matter if you’re a creative tinkerer or a simple computer user.
From file type to file format, we’re going to explore the meaning of these notions and learn the most common image types and formats that are in use at the moment.
So, if I managed to grab your attention, quickly grab a fresh cup of coffee and let’s jump straight into it!
1. The “File” Concept
Whether you’re a designer,
a gamer, or a casual computer user, you’ve probably had your fair share of
interactions with those digital creatures that we like to call “files”. But
have you ever wondered what they actually are, or where the concept behind
them originated from?
“a collection of data stored in one unit, identified by a filename”.
The computers that
we work with (be it a Mac or a PC) or any other modern device operate with data
(information, settings, commands, etc.) that is kept on a physical storage
device (usually an HDD) using virtual containers that we universally call “files”.
These virtual
objects are self-contained strings of bytes that once encoded are made
available to the OS (operating system) and any program capable of opening and
reading them, thus allowing the user to interact with their content.
The idea of the “file” as a means of portraying data was rooted back in 1981, when computer scientist David Canfield Smith and designer Norman Lloyd
Cox used the “office metaphor” to develop the first modern user interface for the Xerox Star 8010, by
creating and integrating a set of document-based icons, meant to ease the
interaction between users and machines.
Before we go any
further, I want to take a couple moments and briefly talk about four
distinct file–related notions which, even though they carry different meanings, are often treated as if
they were the same thing.
I’m talking about
“file type”, “file format”, “file name”, and “file extension”, which should
become an intrinsic part of our day-to-day creative lingo.
2.1. File Type
Depending on the nature of its content, a file can be considered as being of a specific „type”, thus allowing us to label it according to the application or standard to which it belongs.
For example, Windows describes a text file written in Word as being a „Microsoft Word Document” since the file is an application-specific document that can only be opened using that piece of software. At the same time, the document can be viewed as a text file since the data contained within it is mostly rich text.
If we create an illustration and then save it using the PNG compression algorithm, Windows will see that image as being a „PNG File”, which is an open standard that doesn’t require a specific piece of software to be able to view it. That same „PNG File” is also an image file since the data encoded within it describes the color and position of its composing pixels.
As you would expect, the list of existing file types
is quite a big one, since it ranges from simple text documents all the way to developer
code:
Text Files contain textual data such as logs, entire documents, or simple notes.
Data Files are installed by applications or created by the user and contain libraries,
project files, and saved documents.
Audio Files contain waveform data that can be played with audio playback software.
Image Files contain image-related information blocks.
Video Files contain a wide range of encoded video data.
eBook Files contain books designed to be viewed on eReaders.
Database Files store data in a structured format, organized into tables and fields.
Executable Files contain code that is run when the file is opened.
Game Files contain saved video-game files and files referenced by video games.
CAD Files contain
2D or 3D designs (usually models or architectural plans) generated by CAD
software.
GIS Files contain data related to GPS devices and mapping software.
Web Files contain website and web server-related data.
Font Files contain one or more fonts that can be accessed by the operating system and
applications.
System Files contain system libraries, icons, themes, device drivers, etc.
Settings Files contain settings for the operating system and applications.
Compressed Files use compression algorithms to compress and store any other type of files.
Disk Image Files contain entire copies of a hard drive partition or other type of media.
Developer Files contain data related to software development such as source code, code
libraries, etc.
Backup Files contain backups of files.
A more comprehensive list can be found over at FileInfo.com, where you
can go through the different categories/types, in order to see exactly what they are
used for.
“a standard way that information is encoded for
storage in a computer file. It specifies how bits are used to encode information
in a digital storage medium. File formats may be either proprietary or free and
may be either unpublished or open”.
To put it simply, the format describes the way the information is being stored within the file, which varies from software to software and from standard to standard.
For example, a Microsoft Word file uses the .docx format which is composed out of an XML file (Content Types) and three folders (_rels, docProps, word), which are hidden within its structure, unless you unzip the file, as Stepan Yakovenko demonstrates in this informal introduction to DocX.
An image file saved using PNG compression will appear using the .png file format,which is composed out of a file header that starts with an 8-byte signature, which is then followed by a series of chunks which convey certain information about the image itself (Wikipedia).
2.3. File Name
A „file name” is a unique identifier which, depending on the nature of the file dependency (whether it’s part of a system/software or a standalone one) comes already set or is entered by the user during the creation process.
For example, if we create a new Word file, the software will ask us to give it a custom name, so that we can later on find it within the system.
Other files such as executable files come with an already predefined name, which if changed in some cases might prevent that specific application to launch or function properly.
2.4. File Extension
Last but not least, we have „file extension” which is the suffix found at the end of a file name. This suffix not only tells you what type of file we are dealing with, but also determines which program should be used to open it, as well as what icon should be displayed (TechTerms.com).
To continue on that Microsoft Word example, the file extension used by the software is .docx, which shouldn’t be confused with its format, since they’re quite different notions as we now know. The extension lets us know we’re dealing with a Word document, but also helps the operating system decide which software should be used to open it.
Now that we have a clearer idea regarding these notions, we can move on and talk about the most common image file types and formats that you’ll interact with in this line of work.
3. Image File Types
As we saw a few moments ago, there are a plethora of existing file types that you, I and everyone else using a computer interacts with on a daily basis, but out of all of them, one particular category is really important when it comes to our line of work.
As a creative tinkerer, whether you’re an illustrator, a photo editor, or a print designer, you constantly have to work
on image-based projects, which can easily become an overwhelming job.
This is especially true for those cases when you’re just starting out but haven’t quite managed to fully grasp
the differences between the existing image file types and their
specific use cases.
Now, before we continue down the path of exploring
this category of file types, let’s take a couple of moments and see what an image actually
is.
3.1. What Is an Image?
From an etymological standpoint, the noun is thought to derive from the
Latin word “imaginem” (nominative imago,
c. 1200), and was originally used to describe a “piece of statuary artificial
representation that looks like a person or a thing”, meant to copy or imitate a
real-life object.
Today, the meaning
of the word has been slightly updated due to the technological advances in the
fields of computer science and photography.
According to the
online version of the Merriam Webster dictionary, an “image” (ɪmɪdʒ) is now defined as being a:
“visual representation of
something: such as (1): a likeness of an object produced on a photographic
material (2): a picture produced on an electronic display (such as a television
or computer screen)”.
From a digital standpoint, an image can be perceived as any type of
two-dimensional visual representation, created using dedicated software or captured using a digital camera, meant to be
displayed on a pixel-based output device such as a computer monitor, or to be printed onto a physical medium.
Of course, any digital image can be turned into a physical one through the process of printing, but the file itself will remain saved within the computer’s storage unit.
Whether or not you’re a designer yourself, you should be aware of the fact that there are two very different types of images that can be used in this line of work, and those are raster images and vector images.
3.1.1. Raster-Based Image Files
According to the Merriam Webster online
dictionary, a “raster” is defined as:
“a pattern of closely spaced rows of
dots that form an image (as on the cathode-ray tube of a television or a
computer display)”.
A raster image, or
bitmap, is a grid-based data structure composed of a fixed number of square-shaped pixels, each of which carries a specific color value, forming an identifiable composition when displayed on the surface of a
digital screen, be it a computer, smartphone, or any other pixel-based output
device.
Due to its pixel-based nature, a raster
image is resolution dependent, which
means that it has a specific Width
and Height pixel count that
directly affects the quality of that image when it’s subjected to the process
of resizing or resampling.
Quick tip: while at first the two terms might seem synonymous,
they are quite different methods of adjusting the size of an image. The first one maintains the same pixel
count while stretching or shrinking their surface, while the second method physically
changes the number of pixels found within an image using interpolation
algorithms by adding to or removing from the original count.
For example, if we
were to take an 800 x 600 px image
and scale it down, the composing pixels would shrink, thus maintaining the
overall quality. On the other hand, if we were to scale it up, then the resizing process
would expand the surface of each composing pixel, thus degrading its quality, resulting
in what we usually call “pixelation”.
While people tend to associate raster images with digital photography,
almost all of the images displayed by a computer screen are raster-based ones
due to the nature of the current display technology, which is pixel based.
The most common raster-based image files are JPEG, GIF, PNG, TIFF, and PSD.
Depending on the compression method used by its format, a raster image can be lossy or lossless.
JPEGfiles are based on lossy compression since they approximate what the original image would look like and then reduce the number of colors within the file in order to remove any unnecessary data while trying to maintain a high quality.
GIF,PNG, TIFF, and PSD are all lossless images since they manage to capture all of the data of your original file, thus giving you the highest possible quality.
Most raster files come as the final version of an image, which means that once they are created they can’t be edited later on. I say most since TIFF and PSD files maintain their editability.
„a quantity having direction as well as magnitude, especially as determining the position of one point in space relative to another”.
In computing, it „denotes a type of graphical representation using lines to construct the outlines of objects”.
Compared to raster images, a vector image is
composed of a series of open and/or closed paths that are mathematically
described by a series of pointscalledanchors or nodes. These points help define the
different composing shapes using lines and/or curves (TechTerms.com).
The main reason why vectors are usually the de
facto choice when it comes to graphic design is due to their pixel-independent
nature, which means that you can basically take any vector-based image and
scale it up or down to any degree without any loss of quality.
The most common vector-based image files are AI, EPS, PDF, and SVG.
Compared to raster-based image files, vector ones give you the ability to edit their content at any time, as long as you have the right piece of software capable of opening them.
4. Image File Formats
So up to this point we’ve talked about the different existing image file types. Now let’s spend a couple of moments and go through the most common file formats and see when and why we should use them.
As you would expect, there are two main types of File Formats, which are determined by the nature of the composing data.
4.1. Raster-Based File Formats
A raster-based file format is, as the name suggests, based on the use of pixels as the main way to create an image. It is usually the last part of the creative process, where the designer chooses how to output the artwork.
4.1.1. JPEG
This is probably the most commonly known file format when it comes to saving images, but have you ever wondered what the letters stand for?
JPEG (pronounced jay-peg) is an acronym for „Joint Photographic Experts Group” and is a raster format based on lossy compression used for digital images, particularly those produced by digital photography, that was made publicly available in the year 1992.
The reason why JPEG became so popular was the ability to achieve high compression rates without any noticeable quality degradation.
While the format is raster based, it can be used to export any vector-based image, being one of the predefined available file formats in most modern pieces of vector software.
Advantages
You have full control over the compression/quality ratio.
The small file size makes the JPEG format ideal for web-related content, where images need to be loaded fast without stressing the server or the local machine.
Compatibility across all operating systems and web browsers.
Disadvantages
The JPEG format doesn’t support alpha channels (transparency).
Once the image is saved using this format, any quality loss is permanent as long as the original source file has been discarded.
The process of resizing or scaling will result in quality degradation.
Recommended Use Case
The small file size makes the JPEG format suitable for most use cases, such as websites, visual presentations, or quick project previews that don’t require extremely high-res images.
While the format is not the highest in terms of quality, it can confidently be used in non-high-resolution printing, such as text documents that are accompanied by images.
Due to its intended nature, the JPEG format is best associated with digital photos, but it can also be used to export vector-based images such as illustrations, icons, etc. However, it will come at a higher file size compared to a PNG file.
4.1.2. GIF
GIF (pronounced jif) stands for „Graphics Interchange Format”, and is a lossless raster image format created back in 1987 that quickly became widely used on the web due to its small file size determined by the available color limitation (only 256 colors), and the ability to support transparency and animations.
Advantages
The GIF format comes with a very small file size.
It lets you embed animations within a single file.
It gives you the ability to use a transparent background.
Disadvantages
Compared to JPEG, the image quality is far lower.
Once edited and exported, any changes to the contents of an image are permanent.
Due to its lower quality, the format isn’t a viable solution for printing.
The process of resizing or scaling will result in quality degradation.
Recommended Use Case
Due to its small file size, the GIF format is a perfect fit for any web-related content that doesn’t focus on image quality.
4.1.3. PNG
PNG (pronounced ping) is a popular raster image file format that stands for „Portable Network Graphics” and was designed as a lossless replacement for GIF.
Today, the format has become the web standard for graphics-based images, due to its small file size and sharp details.
Advantages
The PNG file format is a great solution for presenting artwork within the digital medium, especially for the web, due to its higher color range and sharp details.
It has a small footprint compared to JPEG files.
It gives you the ability to use a transparent background.
Disadvantages
When used with photos, the PNG format can end up increasing the overall file size of the final project.
Since the format was intended to be used for the web, printing any PNG file will always result in an unexpected or less desirable result.
The process of resizing or scaling will result in quality degradation.
Recommended Use Case
The PNG file format is best used within web-based projects due to its small footprint and the ability to add background transparency.
It can be used within mobile apps or desktop applications that require the use of a transparent background.
4.1.4. TIFF
TIFF (pronounced tif) is a lossless raster format developed by the Aldus Corporation in 1986, that was intended to be used for high-resolution prints.
Compared to JPEG, TIFF files come uncompressed, which means that they can carry a lot more data since they allow the use of layers and effects, which in turn results in a heavier file size, thus preventing them from being used on the web.
Advantages
The TIFF file format offers the highest level of quality when it comes to photo-based projects that are meant to be printed out.
It gives you the ability to edit an image later on, as long as its layers aren’t merged.
It’s a universal format supported by most raster/vector software.
Disadvantages
The TIFF format isn’t suited for web use due to its large file size.
It can quickly increase the file size of a project.
Recommended Use Case
Due to its high-res nature, the TIFF format is best suited for print projects, where you need as much color data as possible.
4.1.5. PSD
PSD stands for „Photoshop Document” and is an Adobe proprietary raster format that allows users to add layers and effects to an image, giving them the ability to edit the file later on at any time.
Advantages
The PSD file format is a great way of creating and sharing a photo/art-based project while maintaining a high level of editability.
It can contain both raster and vector images/elements.
It maintains a high level of quality as long as the raster images used are of higher resolution.
Disadvantages
It’s an Adobe proprietary format, which means that the file can only be opened and edited using Adobe’s own Photoshop software, or other software that supports it such as GIMP or CorelDraw.
It isn’t a file format that can be viewed on browsers.
Recommended Use Case
The PSD file format is a great solution for those projects where you need to retouch photos or artwork.
4.2. Vector-Based File Formats
Vector-based file formats rely on the use of mathematical equations to create the composing shapes of an image, and they are usually used in the initial part of the creative process, where the designer works on the composition.
4.2.1. AI
AI stands for „Adobe Illustrator” and is a proprietary lossless image format created by Adobe, containing primarily vector-based graphics along with embedded or linked raster images.
Advantages
The AI file format is great for creating and sharing vector-based images.
It’s a vector-based format that allows the user to edit it at any point in time.
It gives you the ability to scale any vector-based image to almost any degree without any loss of quality.
It has a small file size.
Disadvantages
It’s an Adobe proprietary file format, which means that which means that it can only be opened and edited using its own Illustrator software, or other software that supports it.
The file can’t be previewed using simple image viewing software.
Recommended Use Case
The AI file format is great for creating, editing, and sharing vector-based projects.
4.2.2. EPS
EPS is another vector-based image format developed by Adobe back in 1992, EPS stands for „Encapsulated Postscript”, and the format was intended to work across different OS platforms and applications, which is something that it has successfully managed to accomplish.
Advantages
The EPS file format is perfect for sharing vector-based projects across different software users due to its universal acceptance and integration.
It has a small file size.
Disadvantages
To be honest, I really can’t think of any, except for the fact that it isn’t supported by web browsers.
4.2.3. PDF
PDF stands for „Portable Document Format” and is yet another image format developed by Adobe in the 1990s, capable of including both text and images. PDFs are accessible from any application, computer, or OS.
Advantages
By now, the PDF file format is an established standard, making it universally accessible from any operating system and computing device.
It can be a great way of sharing a larger project.
It can display both raster and vector images.
PDFs are a good way of ensuring that what you create is what gets printed out.
Disadvantages
They can’t be edited using non-raster/vector software.
Recommended Use Case
The PDF file format is great for sharing and printing a project or design.
4.2.4. SVG
SVG stands for „Scalable Vector Graphics” and is one of the more interesting available open file formats that was developed by the World Wide Web Consortium (W3C) back in 1999. It has proved to become a strong alternative to traditional web images, due to the small size footprint and the ease of editability.
Advantages
The SVG file format allows images to be created and edited using any text editor.
SVG images can be searched, indexed, scripted, and compressed.
They are scalable without any quality loss.
Images can be zoomed without image pixelation.
It is an open standard.
Disadvantages
When using the SVG file format, the file size can quickly grow if your design has a lot of smaller details.
If you need to edit the file using a text editor, it might take a while until you identify the shape that you want to adjust.
Recommended Use Case
The SVG file format is clearly intended to be used for the web, in situations where you need pixel-crisp graphics that have a smaller footprint compared to the more classical PNG format.
It’s a Wrap!
As always, I hope you found the read useful and worthy of your time, and if you have any questions or feedback suggestions, please feel free to post them within the comments section and I’ll get back to you as soon as I can!
Expand Your Designer Skills!
Just finished reading the article, and feel like absorbing more knowledge?! Well, you’re in luck, since I took the liberty of putting together this little list of tutorials and articles that should keep you busy for the following days!
In this article, we’re going to talk about the top ten most useful tools in Adobe Illustrator. Whether you’re into icon design, illustrations or any other…
Welcome back to another Affinity Designer article, in which we’re going to take a close look at six tools that you should be adding to your arsenal right now.




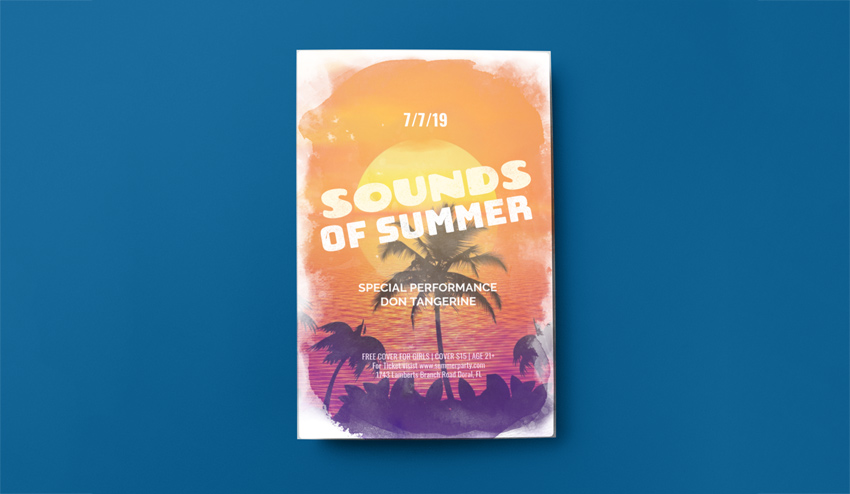
 FlyersHow to Create a Summer Club Flyer in Adobe InDesignGrace Fussell
 Print DesignLearn How to Make a Flyer in Our New Photoshop CourseAndrew Blackman
 FlyersHow to Create a 90s Style Event Flyer in Adobe InDesignGrace Fussell
 Print DesignHow to Create a Vintage Botanical Flyer in Adobe InDesignGrace Fussell
 FlyersHow to Create a Winter Sale Flyer in Adobe InDesignGrace Fussell