Archiwum kategorii: Web Tools

25+ Best Free Hand-Lettering Style Fonts (Designs for 2020)

Post pobrano z: 25+ Best Free Hand-Lettering Style Fonts (Designs for 2020)

Need a hand-lettering font for your next project? Check out the list of stunning resources below!

26 Best Free Hand-Lettering Fonts 

Hand lettering is a beautiful art for anyone interested in calligraphic letterforms. Artists painstakingly create each letter by hand while breaking down the characters using creative techniques.

Beckman Demons Signature Sign Lettering Font

Now you can incorporate wonderful hand-lettering designs into your work with the help of amazing fonts! Today, we’re bringing you an awesome selection of hand-picked goodies in the form of free hand-lettering fonts from around the web.

Use lettering fonts to design a beautiful handwritten letter for a friend. Or set the tone for your wedding stationery with a lovely handmade script. Add these incredible font packs to your design arsenal!

Premium Handwritten Fonts

But first, discover a few new favorites with this premium collection of hand-lettering styles from Envato Elements, our library of creative digital assets that let you design without limits. 

With a monthly subscription to Envato Elements, you get unlimited access and downloads to everything the site has to offer. That means unlimited downloads of hand-lettering fonts, WordPress templates, stock videos, and more—without paying for each item. It’s an unbeatable offer for artists, entrepreneurs, and creatives.

Design Without Limits Unlimited Digital Assets Envato Elements
Access graphics, lettering fonts, photos, and everything in between with your Envato Elements subscription.

Premium lettering fonts from Envato Elements give you peace of mind as well. You won’t have to worry about the quality of your chosen font or whether it’s cleared for commercial use. The easy-to-understand licenses of all of the hand-lettering fonts make taking advantage of unlimited downloads a snap.

Let’s take a look at some of the best lettering fonts Envato Elements has to offer!

Hard Stones Family (OTF, TTF)

Rock the creative world with a modern take on a retro style. The Hard Stones family of hand-lettering fonts includes a set of sans serifs, display, and script. Whether you’re a graphic designer or just a creative with great taste, you’ll love this brilliant modern style. Get it today!

Hard Stones Family Lettering Fonts

Pathout Script (OTF, TTF)

Everyone has their own unique signature, and you can showcase yours with the Pathout Script. This connected hand-lettered font has many varied characters that you can get creative with. It’s a great alternative to free fonts. Use it as your official signature or try it out on packaging and logos!

Pathout Script Lettering Design

Bold Ink Simple Font (TTF, EOT)

Hand-painting letters is a brilliant art form that will never die out. And the Bold Ink Simple font is a perfect example of this gorgeous art. This sign lettering font has characters that effortlessly flow into each other, while maintaining their bold lettering design. Try it out!

Bold Ink Hand Lettered Font

Whimsy Lettering Design (OTF, TTF)

If you like hand-lettering styles that keep things light, you could use a touch of Whimsy. This fantastical hand-lettered font makes a mark on displays, T-shirts, posters, and much more. Play around with different colors and combinations to make it truly yours. 

Whimsy Lettering Design

Paladise Font & Extras (OTF, TTF)

The Paladise font has a natural, stylish flow that’s minimal and effortless. Take advantage of the bonus vectors for alternate lettering styles. This font can also be used for logos, titles, and invites. If you like fun lettering fonts, design with Paladise.

Paladise Sign Lettering Font

Yahiko Playful Handwritten Font (OTF, TTF, WOFF)

Yahiko is one of the great lettering fonts available online today. The lettering design of this stunning handmade font pays homage to Japanese design. It’s a great look for social media, restaurant advertisements, invitations, and more!

Yahiko Playful Handwritten Font

Salada – Funny Style Font (OTF, TTF)

Be as quirky or grungy as you’d like with the Salada lettering fonts. A handwritten typeface that stands on its own, this font features eight different lettering styles so that you can get the most out of your creativity.

Salada Hand Lettering Styles

Beckman Demons – Signature Font (OTF, TTF, WOFF)

Beckman Demons is a devilishly good hand-lettered font. It takes its inspiration from the world of photography. Enjoy a full set of characters that complement high-quality photos well. If you’re a photographer making business cards or a creative working with images, Beckman Demons is one of the best lettering fonts for you!

Beckman Demons Signature Sign Lettering Font

Amithen Brush Font (OTF, TTF, EOT, WOFF, WOFF2)

Embody a contemporary look with the Amithen Brush Font, one of the top hand-lettering styles on Envato Elements. A great font for social media graphics and more, Amithen has a special look that feels both modern and rustic. Try it out on your favorite quote today!

Amithen Brush Sign Lettering Font

Leah Gaviota Hand Lettered Font (OTF, TTF, WOFF)

Add a casual look to your brand with the fun Leah Gaviota font. This hand-lettered typeface features a mixture of script, bold, and sans-serif types for a complete artisan set. Also included is a bonus pack of 100 cute illustrations to use in your designs!

Leah Gaviota Hand Lettered Font

Buffalo Handwritten Font (OTF)

Our next font is a handwritten typeface that’s sleek and multipurpose. Buffalo is one of the minimal hand-lettering styles in our asset library. Add it to your social media packages for stand-out images, or save it to your collection for a rainy day. Use it in a variety of design software, from Photoshop to Illustrator and more.

Buffalo Handwritten Font

Gineva Script Font (OTF, TTF, AI, EPS)

Calligraphy-styled fonts usually incorporate bold, thick letters that are achieved with dynamic pens. The Gineva script is one of our favorite lettering fonts for design. It’s the perfect addition to any headline, logotype, or poster project. Enjoy a full set of letters, punctuation, and symbols in this premium download!

Gineva Script Font

Amstenia Typeface (OTF, TTF)

One of the best features of hand-lettered fonts is the casual brush style often used. The Amstenia typeface masters that look with hand-drawn characters created at a slight angle. Update your store sign with this handwritten type or feature it on your blog for a new look!

Amstenia Typeface

Knuckle Sandwich Handwritten Font (TTF, WOFF, WOFF2)

Next up is this hard-hitting brush font named Knuckle Sandwich. It features a rough, quick dry style that will perfectly pair with any grunge or vintage-related project. It’d be hard to say it’s not one of the best lettering fonts with edgy and unique design. You’ll definitely want to feature it as a title or logo. Give it a try!

Knuckle Sandwich Handwritten Font

Free Hand-Lettering Fonts

Now for the freebies! It can be hard to find quality fonts for free, but we’ve done the hard work for you. Enjoy this marvelous collection of authentic, handwritten fonts from all over the web. Which of these free lettering fonts do you love?

Sophia – Free Handlettered Brush Script Font

Many free hand-drawn fonts come with cool bonuses to add more style to your work. Check out the stunning Sophia brush script, for instance. It features a sweet hand-lettered font which allows you to create your own decorated word with fun ornaments. Customize your typography for posters, invites, and more.

Sophia Free Hand Lettering Fonts

Passengers Script Font

The next of the free lettering fonts is the gorgeous Passengers Script, originally from Pathero Studio. Amaze your clients and friends with a lovely, hand-lettered font featuring extra cool bonuses. Get access to additional swashes and decorations to beautify your next project!

 Passengers Font Free Lettering

Luna Font

You’ll make any design pop with Luna, one of the great fonts for free. A handwritten style that’s simple yet classy, Luna is perfect for logos, stationery, or website headers. Try it out for your brand identity package for an incredible result! It’s a great option for users of free hand-drawn fonts.

Luna Best Free Fonts

Cattalonia Signature Font

Next up on our free fonts list is Cattalonia, a gorgeous signature font with over 100 stunning ligatures. Made with a balance of flirty letters and exquisite script details, this font is free for personal and commercial use. Instantly beautify stationery and logos with the Cattalonia Signature font.
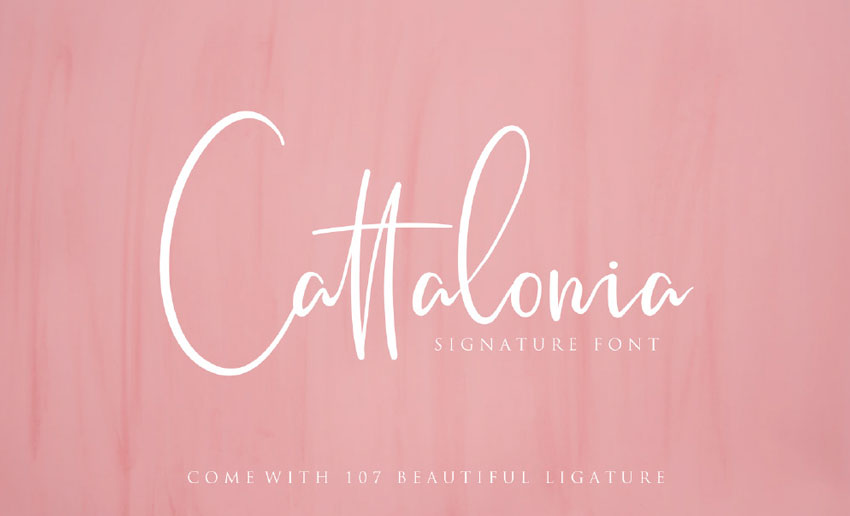
Cattalonia Signature Font

Pink Script Font

Beautiful handwritten scripts can drastically improve your work. Take this pretty Pink Script font, for instance. It’s one of the best free fonts you can download. Pink Script is one of many lettering fonts with design that looks as natural as possible. This font is both elegant and charming. It comes with over 100 ligatures as well as a full set of lowercase alternates.

Pink Script Font

Madelyn Font

Not happy with your own handwriting? Then try the wonderful Madelyn handwritten script. Written with a calligraphy pen, this casual script is flirty yet soft, making it an amazing signature script to add to your collection. Test it out on products or blog projects! You can’t go wrong with Madelyn if you like fonts for free.

Madelyn Font

Marigold Font

Want a modern calligraphy font that’s easy to use? Then feast your eyes
on the stunning Marigold font with fluid script details and an elegant
flow. Created to resemble the handwriting of the designer who created
it, this font features an authentic hand-lettered script that’s pretty
and charming. Marigold is one of the great hand-lettering fonts that are free.

Marigold Font

Tuesday Night Font

Planning a new graphic design project soon? Then be sure to add the free lettering of this lovely Tuesday Night font to your collection. This signature font features rough script details with fascinating letters and numbers. Use it for headlines, logos, and covers. Fonts for free don’t come much better.

Tuesday Night Font

Odachi Brush Font

Odachi is a custom, rough brush font perfect for illustrations and posters. It’s one of the free fonts we’ve found for personal and commercial use. This download includes a full set of letters and numbers, as well as stylistic alternates to make your work pop. Try it out with different colors and effects!

Odachi Brush Font

Macbeth Font

Get authentic handwritten details in each letter with the brilliant Macbeth font. It features a full set of letters and numbers with aggressively written details to give your work powerful energy. Add the free lettering of Macbeth to your project. Works well on posters, albums, and more.

Macbeth Free Font

Cabana Font

Want a handwritten typeface with clean letters? Then check out this modern free font, Cabana. Made by designer Adrien Coquet, this free font download features everything you need to take your work to new levels. And it’s great for all designers and creatives alike!

Cabana Free Font

Tahu Script Font

Pair your master photography with a phenomenal font like the Tahu Script. A modern typeface developed by Khurasan, this free font download instantly adds a clean, stylish feel to any project. Also included in this pack are multilingual characters for additional support. Tahu is great if you’re looking for hand-lettering fonts for free.

Tahu Script Font

Cheesy Enchilada Font

Cheesy Enchilada is right up your alley if you like free hand-lettering fonts with a side of fun. It’s easy to use and includes the full alphabet character set. Add a fun title to your next poster with Cheesy Enchilada!

Cheesy Enchilada Free Font

Westfalia Font

Push your design boundaries with this next font, Westfalia. A bold, hand-lettered font created by Rambler Creative, this free font download features authentic hand-drawn characters with varying thickness. Apply it to apparel and more for a rustic look!

Westfalia Font

Marker Mark Handwritten Font

Design your life around extraordinary projects with this next handwritten typeface. This Marker Mark font features realistic handwritten letters created with a standard marker. It’s another one of the hand-lettering fonts for free that’s licensed for personal and commercial use. Marker Mark comes ready to go with clean, professional details.

Marker Mark Handwritten Font

Smoothie Shoppe Font

Looking for a head start to your smoothie business? Then try out the Smoothie Shoppe font from Emily Spadoni. Smoothie Shoppe is another of the free fonts that use fun lettering styles. Created with large loopy characters and lovely brush details, this font has that creative chalkboard look! Great for menus and more!

Smoothie Shoppe Font

Sprite Graffiti Font

Graffiti will always be the calligraphy of the streets. Now you can incorporate that cool street style into your work with the epic Sprite Graffiti font. This free lettering features a unique urban look that pairs well with almost any color scheme. Try it out on T-shirts, banners, and more! It’s one of the best lettering fonts that embraces the graffiti style.

Sprite Graffiti Font

Mazak Font

Need inspiration ASAP? Then try out this compelling brush font, Mazak. A free font download created by designer Ewelina Gąska, this font features thick letters on a flat baseline. Use it on apparel and packaging for an updated look!

Mazak Font

3Dumb Font

Remember the days of doodling in your notebook? Well, the 3Dumb font from Tension Type is just what you need for a solid hand-lettered font. This free font download comes with two impressive styles for subtle and 3D effects. What will you try it on?
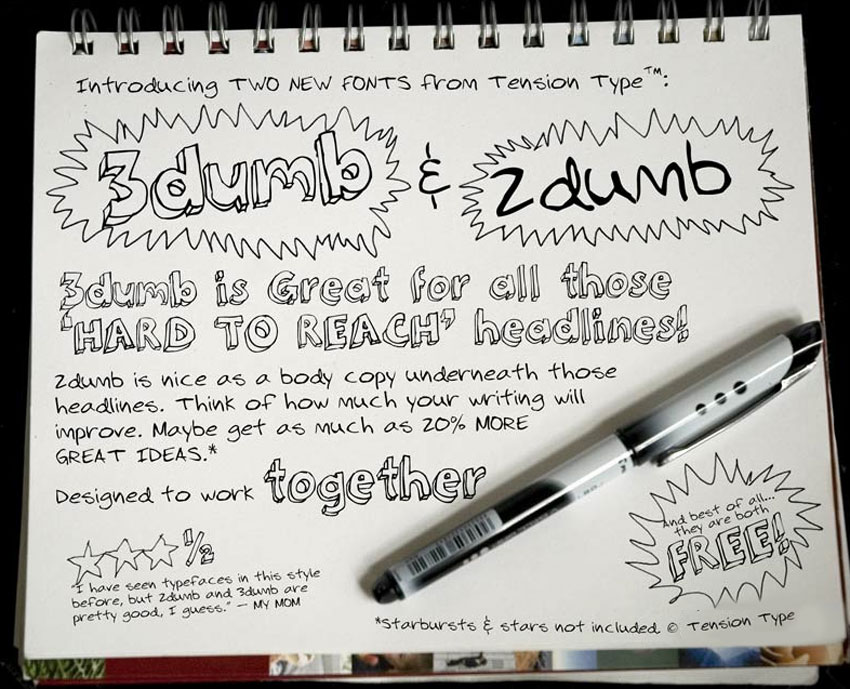
3Dumb Fonts For Free

Cabron Font

Get a little messy with your next typography project with one of the great free hand-drawn fonts. This cool Cabron Font will help you do just the trick with its awesome messy letters and imperfect characters. Download it today to take advantage of the full set of letters, numbers, and punctuation included in this pack.

Cabron Font

October Twilight Font

The autumn season is the perfect time to try out your creative talents. So check out the October Twilight font. It’s one of the best free fonts for making awesome Halloween party posters and more. Try this awesome script style with a bouncy baseline for more fun. Enjoy a full set of letters, numbers, and symbols in this pack!

October Twilight Font

Ocean Six Brush Font

Inspired by traditional media? This next brush font features realistic brush textures inspired by acrylic painting. Ocean Six is one of the inspiring free lettering fonts available. Recreate your favorite vintage postcards and themes with authentic textural details inspired by different eras. Give it a try today and let us know how you like it!

Ocean Six Brush Font

Rockstar Brush Font Set

Love typographic illustrations? Get inspired by your favorite artists to create something new with the cool Rockstar brush font. This set includes a handmade brush font along with helpful extras for Photoshop. Enjoy a pack of watercolor illustrations and Photoshop brushes also included in this set. Rockstar is one of the more creative hand-lettering fonts for free.

Rockstar Brush Font Set

Europa Brush Font

Textured fonts can add mystery, horror, suspense, or drama to your work. Take this fascinating Europa brush font, for instance. It features chunky, bold letters with messy edges similar to paint strokes. It’s a cool style not found in many other free hand-drawn fonts. Create compelling quotes and more with this fun font.

Europa Brush Font

UStroke Typeface

What would you make with the epic UStroke typeface from designer Tikhon Reztcov? A free hand-lettering font perfect for grunge effects and more, this font is simple to use and download. Included in this pack is everything you need to make dope graphics fast.

UStroke Typeface Free Lettering Fonts

Besom – Free Brush Font

Our last hand-lettered font comes from the amazing designers at RIT Creative. Made specifically to upgrade your personal projects with a little handwritten flair, Besom is one of the best free fonts and a must-have download. Use it on posters, T-shirts, or packaging for a cool look!

Besom - Free Brush Font

Conclusion

I hope this collection has inspired you to dive into your next creative project! Whether you choose one of the premium or free fonts listed, you can still have fun with your creations. Try these hand-lettering fonts for logotypes, stationery and more, and let us know your favorites in the comments below!

Want more fonts? Check out these amazing collections:

This has been a selection of resources perfect for the avid designer. Check out more amazing hand-lettering fonts on Envato Elements.

How to Make a Tear-Off Flyer Template in Affinity Publisher (Free Flyer File to Download)

Post pobrano z: How to Make a Tear-Off Flyer Template in Affinity Publisher (Free Flyer File to Download)

Final product image
What You’ll Be Creating

In this Affinity Publisher tutorial, you’ll learn how to create a tear-off flyer template. This flyer is quick and easy to create, and you can easily adapt it with your own choice of images and fonts. You’ll learn how to create a cool flyer with tear-off tabs—a bonus free tear-off flyer template is also included.

This flyer template is for a US Letter-sized flyer with tear-off tabs, perfect for advertising business services or local events in your neighborhood. You’ll pick up tips on how to create a catchy flyer, using impactful colours, graphics, and photos to create a compelling tear-off flyer. 

final tear off flyer

This tear-off flyer tutorial comes complete with a downloadable free tear-off flyer template for both Adobe InDesign and Affinity Publisher, allowing you to quickly create your own flyer with tear-off tabs. 

Follow the steps below to get to grips with Affinity Publisher, pick up key print design skills, and learn how to make a good flyer from scratch. 

Follow along with this Affinity Publisher tutorial over on our Envato Tuts+ YouTube channel:

What You’ll Learn in This Affinity Publisher Flyer Tutorial

  • How to make a blank tear-off flyer template and good flyer design, complete with stylish typography and colours.
  • How to create layers and colour swatches and then format text for your tear-off flyer in Affinity Publisher.
  • How to create a flyer template with tear-off tabs, set up to a standard US Letter format.
  • How to make a flyer template with an adaptable layout that can be customised with your own images and fonts.

Looking for more Affinity Publisher templates and blank tear-off flyer templates? Don’t miss the wide selection of flyer templates on Envato Elements

What You’ll Need to Create Your Tear-Off Flyer Template

Let’s get started with how to make a tear-off flyer in Affinity Publisher. In this tutorial, we’ll be using Affinity Publisher to create our tear-off flyer template, and we’ll dip into Affinity Photo to edit the photo to place into the Affinity Publisher template. If you’re an InDesign user, you can download the InDesign flyer template

As well as access to Publisher, you’ll also need to download the following fonts and images from Envato Elements to recreate the tear-off flyer design pictured here:

1. How to Set Up Your Blank Tear-Off Flyer Template in Affinity Publisher

Step 1

Open Publisher, and go to File > New. 

Select Print from the options along the top of the window. Set the Page width to 11 in and Page height to 8.5 in. Deselect Facing Pages under the Pages section.

new document

Step 2

From the Margins options, set a margin width of 0.5 in for all sides of the page except the Bottom, which you can set to 2.75 in. Add a Bleed width of 0.25 in. 

Then click Create

bleed and margins

Step 3

Double-click on Page 1 in the Pages panel to go to the main page of your document.

Go to the Layers panel (View > Studio > Layers), click on the Add Layer button at the bottom-right of the panel, and rename Layer 1 as Background

Click on the Add Layer button again. Name this second layer Text Behind. Repeat to create two more layers: Images and Text in Front. 

Select all the layers except Background and lock them by clicking the padlock icon at top-right. 

background layer

Step 4

Go to the Swatches panel (View > Studio > Swatches) and choose Add Global Colour from the drop-down menu at top-right. 

global colour

Name the swatch Off-White and set the levels below to C=3 M=1 Y=4 K=0. Then click Add

off white colour

Repeat to create five more swatches:

  • Dark Yellow: C=4 M=44 Y=90 K=0
  • Medium Yellow: C=0 M=35 Y=81 K=0
  • Pale Yellow: C=0 M=28 Y=72 K=0
  • Purple: C=76 M=78 Y=0 K=0
  • Dark Purple: C=92 M=100 Y=7 K=2
global colour

2. How to Add Colour and Text to Your Tear-Off Flyer Template

Step 1

Working on the Background layer, select the Rectangle Tool (M) from the Tools panel and drag across the whole of the page, extending the edges up to the bleed. 

From the Swatches panel, set the Fill Colour to Medium Yellow. 

medium yellow swatch

Step 2

Lock the Background layer and unlock the layer above, Text Behind. 

Select the Frame Text Tool (T) and drag across the left side of the page to create a small text frame.

Type in the description text (e.g. „Ellie’s Friendly / Dog Walking / Service”), and from the Character and Paragraph panels (View > Studio > Character), set the Font to Lumber, All Caps, and Align Center. 

Set the Font Colour to Off-White and Dark Purple. 

font colour purple

You can add more text below the heading (such as „30% Off / Your First Walk / With the Code Below”), set in Lumber, All Caps, Align Center, and an Off-White Font Colour. 

lumber text

Step 3

Switch to the Pen Tool (P) and, holding Shift, click twice to create a straight vertical line below the bottom text frame. 

From the Swatches panel, set the Stroke Colour to Off-White.

From the Stroke panel (View > Studio > Stroke), set the Width of the line to 2.5 pt. From the End drop-down menu, choose Simple to apply an arrowhead to the stroke. 

pen tool

To the right of the End arrow option, increase the percentage to 225% to enlarge the arrowhead. 

arrow head

Step 4

Open up the set of EPS animal icons in a vector program, such as Affinity Designer or Adobe Illustrator, and identify the paw icon. You can either use this as an outlined icon, or fill the paw with solid colour, as I’ve done here. In the vector program, Edit > Copy the paw icon. 

Back in Publisher, and still working on the Text Behind layer, Edit > Paste the icon onto the page. Adjust the colour to Pale Yellow, and position it towards the top right of the layout. 

large paw icon

Paste more paw icons, grouping them across the page to create a trail effect, setting the colour of some to Pale Yellow and others to Dark Yellow, to contrast against the background. 

paw icons
paws pasted

Step 5

Switch to the Pen Tool (P) and use this to draw a loose, wavy line across the top-left corner of the page. To create curves, hold the mouse down while you click. You can tidy up the curve afterwards by using the Node Tool (A) to select individual anchor points.

Make sure the line has no colour, from the Swatches panel. 

pen tool

Choose the Artistic Text Tool (T) from the Tools panel. Hover over the far left edge of the line and click to transform the line into a text path. 

Type in introductory text (e.g. „did someone say…”). Highlight the text and set the Font to Southern, with an Off-White Font Colour. 

off white swatch

Step 6

Select the Frame Text Tool (T) and create a larger text frame below the curved line, for a main title (e.g. „Walkies”). Rotate the frame slightly anti-clockwise. 

frame text tool

Set the Font to Southern and the Font Colour to Dark Purple. You can make the text appear jauntier by highlighting individual letters and adjusting the Baseline value from the Positioning and Transform options in the Character panel. 

baseline shift

For this design, I’ve also added a question mark in a separate text frame. 

text frame

3. How to Remove the Background From a Photo in Affinity Photo

Step 1

Before we can use the photo we’ve chosen for our tear-off flyer design, we’ll need to remove the background. 

Open the photo in Affinity Photo, before duplicating and switching off the visibility of the Background layer. 

Go to Select > Select Sampled Colour, and click on the white background.

select sampled colour

In the Select Sampled Colour window, adjust the Tolerance slider until all of the background colour is selected. Then click Apply

tolerance slider

Step 2

Delete the selection to remove the background, before saving the file as an afphoto file. 

save as file

Step 3

Back in Affinity Publisher, use the Picture Frame Rectangle Tool (F) to create an image frame on the Images layer, towards the right side of the page, above the bottom margin. 

image frame

File > Place, choosing the edited photo and opening it. Double-click inside the frame to select the image and scale it if needed. 

placed image

4. How to Add a Tear-Off Section to Your Flyer Template

Step 1

Working on the Images layer, use the Rectangle Tool (M) to create a shape across the bottom margin area. 

Set the Fill Colour to Dark Purple. 

dark purple

Step 2

Use guides pulled out from the left-hand ruler (View > Show Rulers) to divide the page into sections. You can divide the width of the page (8.5 in) into as many sections as you want—these will form the tear-off parts of your flyer. 

purple rectangle

Step 3

Use the Pen Tool (P) to create a vertical line over the first guide, setting the Stroke Colour to Medium Yellow. 

medium yellow

From the Stroke panel, set the Style to Dash Line Style and the Width to 2.5 pt, and adjust the Dash options at the bottom of the panel to adjust the look of the dashed line. 

dash line style

Copy and Paste the line, moving each over a guide, to create a row of tear-off tabs. 

pasted lines

Step 4

Use the Frame Text Tool (T) to create a text frame for the details on the tear-off tab, such as contact details. 

Set the Font to Lumber, and vary the Font Colour between Off-White and Pale Yellow. 

font lumber

On the text frame, Right-Click > Transform > Rotate Left, and position the text frame centrally on the first tab. 

rotate left
rotated text

Copy and Paste the text frame, positioning each pasted frame in its own tab. 

tear off tabs

5. How to Export Your Tear-Off Flyer for Print

Step 1

When you’ve finished working on your flyer, it’s time to export your artwork as a PDF, ready for sending to print. 

completed artwork

Make sure to File > Save your work, before going to File > Export. 

In the window that opens, choose PDF from the icon options at the top, and select PDF (press ready) from the Preset menu. 

Make sure the Raster DPI is set to 300 and that the Include Bleed box is checked.

Then click Export

export pdf

Step 2

Name your file, select a folder to save it into, and then hit Save

save file

You can now send the exported PDF straight off to the printers!

Conclusion: Your Finished Tear-Off Flyer Template

Your tear-off flyer template with tear-off tabs is finished—great job! 

finl tear off flyer

In this tutorial, you’ve picked up a wide range of skills and techniques for how to make a good flyer and how to create a tear-off flyer in Affinity Publisher, from setting up a blank tear-off flyer template to creating colour swatches, placing images, and formatting typography to create a stylish and contemporary tear-off flyer design. 

If you want to compare your tear-off flyer design with my own, make sure to download the completed Affinity Publisher template. The same tear-off flyer design is also available as an InDesign flyer template.

It’s quick and easy to customise your tear-off flyer design further by swapping in different colour swatches, fonts, and images, to create a completely unique tear-off flyer of your own. 

Looking for more Affinity Publisher templates and InDesign flyer templates? Discover more flyer templates for tri-fold brochures, tear-off flyers and more over on Envato Elements

Eager to develop your flyer design skills further? Don’t miss these Affinity Publisher and Affinity Photo flyer and print design tutorials:

How to Make a Tear-Off Flyer Template in Affinity Publisher (Free Flyer File to Download)

Post pobrano z: How to Make a Tear-Off Flyer Template in Affinity Publisher (Free Flyer File to Download)

Final product image
What You’ll Be Creating

In this Affinity Publisher tutorial, you’ll learn how to create a tear-off flyer template. This flyer is quick and easy to create, and you can easily adapt it with your own choice of images and fonts. You’ll learn how to create a cool flyer with tear-off tabs—a bonus free tear-off flyer template is also included.

This flyer template is for a US Letter-sized flyer with tear-off tabs, perfect for advertising business services or local events in your neighborhood. You’ll pick up tips on how to create a catchy flyer, using impactful colours, graphics, and photos to create a compelling tear-off flyer. 

final tear off flyer

This tear-off flyer tutorial comes complete with a downloadable free tear-off flyer template for both Adobe InDesign and Affinity Publisher, allowing you to quickly create your own flyer with tear-off tabs. 

Follow the steps below to get to grips with Affinity Publisher, pick up key print design skills, and learn how to make a good flyer from scratch. 

Follow along with this Affinity Publisher tutorial over on our Envato Tuts+ YouTube channel:

What You’ll Learn in This Affinity Publisher Flyer Tutorial

  • How to make a blank tear-off flyer template and good flyer design, complete with stylish typography and colours.
  • How to create layers and colour swatches and then format text for your tear-off flyer in Affinity Publisher.
  • How to create a flyer template with tear-off tabs, set up to a standard US Letter format.
  • How to make a flyer template with an adaptable layout that can be customised with your own images and fonts.

Looking for more Affinity Publisher templates and blank tear-off flyer templates? Don’t miss the wide selection of flyer templates on Envato Elements

What You’ll Need to Create Your Tear-Off Flyer Template

Let’s get started with how to make a tear-off flyer in Affinity Publisher. In this tutorial, we’ll be using Affinity Publisher to create our tear-off flyer template, and we’ll dip into Affinity Photo to edit the photo to place into the Affinity Publisher template. If you’re an InDesign user, you can download the InDesign flyer template

As well as access to Publisher, you’ll also need to download the following fonts and images from Envato Elements to recreate the tear-off flyer design pictured here:

1. How to Set Up Your Blank Tear-Off Flyer Template in Affinity Publisher

Step 1

Open Publisher, and go to File > New. 

Select Print from the options along the top of the window. Set the Page width to 11 in and Page height to 8.5 in. Deselect Facing Pages under the Pages section.

new document

Step 2

From the Margins options, set a margin width of 0.5 in for all sides of the page except the Bottom, which you can set to 2.75 in. Add a Bleed width of 0.25 in. 

Then click Create

bleed and margins

Step 3

Double-click on Page 1 in the Pages panel to go to the main page of your document.

Go to the Layers panel (View > Studio > Layers), click on the Add Layer button at the bottom-right of the panel, and rename Layer 1 as Background

Click on the Add Layer button again. Name this second layer Text Behind. Repeat to create two more layers: Images and Text in Front. 

Select all the layers except Background and lock them by clicking the padlock icon at top-right. 

background layer

Step 4

Go to the Swatches panel (View > Studio > Swatches) and choose Add Global Colour from the drop-down menu at top-right. 

global colour

Name the swatch Off-White and set the levels below to C=3 M=1 Y=4 K=0. Then click Add

off white colour

Repeat to create five more swatches:

  • Dark Yellow: C=4 M=44 Y=90 K=0
  • Medium Yellow: C=0 M=35 Y=81 K=0
  • Pale Yellow: C=0 M=28 Y=72 K=0
  • Purple: C=76 M=78 Y=0 K=0
  • Dark Purple: C=92 M=100 Y=7 K=2
global colour

2. How to Add Colour and Text to Your Tear-Off Flyer Template

Step 1

Working on the Background layer, select the Rectangle Tool (M) from the Tools panel and drag across the whole of the page, extending the edges up to the bleed. 

From the Swatches panel, set the Fill Colour to Medium Yellow. 

medium yellow swatch

Step 2

Lock the Background layer and unlock the layer above, Text Behind. 

Select the Frame Text Tool (T) and drag across the left side of the page to create a small text frame.

Type in the description text (e.g. „Ellie’s Friendly / Dog Walking / Service”), and from the Character and Paragraph panels (View > Studio > Character), set the Font to Lumber, All Caps, and Align Center. 

Set the Font Colour to Off-White and Dark Purple. 

font colour purple

You can add more text below the heading (such as „30% Off / Your First Walk / With the Code Below”), set in Lumber, All Caps, Align Center, and an Off-White Font Colour. 

lumber text

Step 3

Switch to the Pen Tool (P) and, holding Shift, click twice to create a straight vertical line below the bottom text frame. 

From the Swatches panel, set the Stroke Colour to Off-White.

From the Stroke panel (View > Studio > Stroke), set the Width of the line to 2.5 pt. From the End drop-down menu, choose Simple to apply an arrowhead to the stroke. 

pen tool

To the right of the End arrow option, increase the percentage to 225% to enlarge the arrowhead. 

arrow head

Step 4

Open up the set of EPS animal icons in a vector program, such as Affinity Designer or Adobe Illustrator, and identify the paw icon. You can either use this as an outlined icon, or fill the paw with solid colour, as I’ve done here. In the vector program, Edit > Copy the paw icon. 

Back in Publisher, and still working on the Text Behind layer, Edit > Paste the icon onto the page. Adjust the colour to Pale Yellow, and position it towards the top right of the layout. 

large paw icon

Paste more paw icons, grouping them across the page to create a trail effect, setting the colour of some to Pale Yellow and others to Dark Yellow, to contrast against the background. 

paw icons
paws pasted

Step 5

Switch to the Pen Tool (P) and use this to draw a loose, wavy line across the top-left corner of the page. To create curves, hold the mouse down while you click. You can tidy up the curve afterwards by using the Node Tool (A) to select individual anchor points.

Make sure the line has no colour, from the Swatches panel. 

pen tool

Choose the Artistic Text Tool (T) from the Tools panel. Hover over the far left edge of the line and click to transform the line into a text path. 

Type in introductory text (e.g. „did someone say…”). Highlight the text and set the Font to Southern, with an Off-White Font Colour. 

off white swatch

Step 6

Select the Frame Text Tool (T) and create a larger text frame below the curved line, for a main title (e.g. „Walkies”). Rotate the frame slightly anti-clockwise. 

frame text tool

Set the Font to Southern and the Font Colour to Dark Purple. You can make the text appear jauntier by highlighting individual letters and adjusting the Baseline value from the Positioning and Transform options in the Character panel. 

baseline shift

For this design, I’ve also added a question mark in a separate text frame. 

text frame

3. How to Remove the Background From a Photo in Affinity Photo

Step 1

Before we can use the photo we’ve chosen for our tear-off flyer design, we’ll need to remove the background. 

Open the photo in Affinity Photo, before duplicating and switching off the visibility of the Background layer. 

Go to Select > Select Sampled Colour, and click on the white background.

select sampled colour

In the Select Sampled Colour window, adjust the Tolerance slider until all of the background colour is selected. Then click Apply

tolerance slider

Step 2

Delete the selection to remove the background, before saving the file as an afphoto file. 

save as file

Step 3

Back in Affinity Publisher, use the Picture Frame Rectangle Tool (F) to create an image frame on the Images layer, towards the right side of the page, above the bottom margin. 

image frame

File > Place, choosing the edited photo and opening it. Double-click inside the frame to select the image and scale it if needed. 

placed image

4. How to Add a Tear-Off Section to Your Flyer Template

Step 1

Working on the Images layer, use the Rectangle Tool (M) to create a shape across the bottom margin area. 

Set the Fill Colour to Dark Purple. 

dark purple

Step 2

Use guides pulled out from the left-hand ruler (View > Show Rulers) to divide the page into sections. You can divide the width of the page (8.5 in) into as many sections as you want—these will form the tear-off parts of your flyer. 

purple rectangle

Step 3

Use the Pen Tool (P) to create a vertical line over the first guide, setting the Stroke Colour to Medium Yellow. 

medium yellow

From the Stroke panel, set the Style to Dash Line Style and the Width to 2.5 pt, and adjust the Dash options at the bottom of the panel to adjust the look of the dashed line. 

dash line style

Copy and Paste the line, moving each over a guide, to create a row of tear-off tabs. 

pasted lines

Step 4

Use the Frame Text Tool (T) to create a text frame for the details on the tear-off tab, such as contact details. 

Set the Font to Lumber, and vary the Font Colour between Off-White and Pale Yellow. 

font lumber

On the text frame, Right-Click > Transform > Rotate Left, and position the text frame centrally on the first tab. 

rotate left
rotated text

Copy and Paste the text frame, positioning each pasted frame in its own tab. 

tear off tabs

5. How to Export Your Tear-Off Flyer for Print

Step 1

When you’ve finished working on your flyer, it’s time to export your artwork as a PDF, ready for sending to print. 

completed artwork

Make sure to File > Save your work, before going to File > Export. 

In the window that opens, choose PDF from the icon options at the top, and select PDF (press ready) from the Preset menu. 

Make sure the Raster DPI is set to 300 and that the Include Bleed box is checked.

Then click Export

export pdf

Step 2

Name your file, select a folder to save it into, and then hit Save

save file

You can now send the exported PDF straight off to the printers!

Conclusion: Your Finished Tear-Off Flyer Template

Your tear-off flyer template with tear-off tabs is finished—great job! 

finl tear off flyer

In this tutorial, you’ve picked up a wide range of skills and techniques for how to make a good flyer and how to create a tear-off flyer in Affinity Publisher, from setting up a blank tear-off flyer template to creating colour swatches, placing images, and formatting typography to create a stylish and contemporary tear-off flyer design. 

If you want to compare your tear-off flyer design with my own, make sure to download the completed Affinity Publisher template. The same tear-off flyer design is also available as an InDesign flyer template.

It’s quick and easy to customise your tear-off flyer design further by swapping in different colour swatches, fonts, and images, to create a completely unique tear-off flyer of your own. 

Looking for more Affinity Publisher templates and InDesign flyer templates? Discover more flyer templates for tri-fold brochures, tear-off flyers and more over on Envato Elements

Eager to develop your flyer design skills further? Don’t miss these Affinity Publisher and Affinity Photo flyer and print design tutorials:

How to Make a Tear-Off Flyer Template in Affinity Publisher (Free Flyer File to Download)

Post pobrano z: How to Make a Tear-Off Flyer Template in Affinity Publisher (Free Flyer File to Download)

Final product image
What You’ll Be Creating

In this Affinity Publisher tutorial, you’ll learn how to create a tear-off flyer template. This flyer is quick and easy to create, and you can easily adapt it with your own choice of images and fonts. You’ll learn how to create a cool flyer with tear-off tabs—a bonus free tear-off flyer template is also included.

This flyer template is for a US Letter-sized flyer with tear-off tabs, perfect for advertising business services or local events in your neighborhood. You’ll pick up tips on how to create a catchy flyer, using impactful colours, graphics, and photos to create a compelling tear-off flyer. 

final tear off flyer

This tear-off flyer tutorial comes complete with a downloadable free tear-off flyer template for both Adobe InDesign and Affinity Publisher, allowing you to quickly create your own flyer with tear-off tabs. 

Follow the steps below to get to grips with Affinity Publisher, pick up key print design skills, and learn how to make a good flyer from scratch. 

Follow along with this Affinity Publisher tutorial over on our Envato Tuts+ YouTube channel:

What You’ll Learn in This Affinity Publisher Flyer Tutorial

  • How to make a blank tear-off flyer template and good flyer design, complete with stylish typography and colours.
  • How to create layers and colour swatches and then format text for your tear-off flyer in Affinity Publisher.
  • How to create a flyer template with tear-off tabs, set up to a standard US Letter format.
  • How to make a flyer template with an adaptable layout that can be customised with your own images and fonts.

Looking for more Affinity Publisher templates and blank tear-off flyer templates? Don’t miss the wide selection of flyer templates on Envato Elements

What You’ll Need to Create Your Tear-Off Flyer Template

Let’s get started with how to make a tear-off flyer in Affinity Publisher. In this tutorial, we’ll be using Affinity Publisher to create our tear-off flyer template, and we’ll dip into Affinity Photo to edit the photo to place into the Affinity Publisher template. If you’re an InDesign user, you can download the InDesign flyer template

As well as access to Publisher, you’ll also need to download the following fonts and images from Envato Elements to recreate the tear-off flyer design pictured here:

1. How to Set Up Your Blank Tear-Off Flyer Template in Affinity Publisher

Step 1

Open Publisher, and go to File > New. 

Select Print from the options along the top of the window. Set the Page width to 11 in and Page height to 8.5 in. Deselect Facing Pages under the Pages section.

new document

Step 2

From the Margins options, set a margin width of 0.5 in for all sides of the page except the Bottom, which you can set to 2.75 in. Add a Bleed width of 0.25 in. 

Then click Create

bleed and margins

Step 3

Double-click on Page 1 in the Pages panel to go to the main page of your document.

Go to the Layers panel (View > Studio > Layers), click on the Add Layer button at the bottom-right of the panel, and rename Layer 1 as Background

Click on the Add Layer button again. Name this second layer Text Behind. Repeat to create two more layers: Images and Text in Front. 

Select all the layers except Background and lock them by clicking the padlock icon at top-right. 

background layer

Step 4

Go to the Swatches panel (View > Studio > Swatches) and choose Add Global Colour from the drop-down menu at top-right. 

global colour

Name the swatch Off-White and set the levels below to C=3 M=1 Y=4 K=0. Then click Add

off white colour

Repeat to create five more swatches:

  • Dark Yellow: C=4 M=44 Y=90 K=0
  • Medium Yellow: C=0 M=35 Y=81 K=0
  • Pale Yellow: C=0 M=28 Y=72 K=0
  • Purple: C=76 M=78 Y=0 K=0
  • Dark Purple: C=92 M=100 Y=7 K=2
global colour

2. How to Add Colour and Text to Your Tear-Off Flyer Template

Step 1

Working on the Background layer, select the Rectangle Tool (M) from the Tools panel and drag across the whole of the page, extending the edges up to the bleed. 

From the Swatches panel, set the Fill Colour to Medium Yellow. 

medium yellow swatch

Step 2

Lock the Background layer and unlock the layer above, Text Behind. 

Select the Frame Text Tool (T) and drag across the left side of the page to create a small text frame.

Type in the description text (e.g. „Ellie’s Friendly / Dog Walking / Service”), and from the Character and Paragraph panels (View > Studio > Character), set the Font to Lumber, All Caps, and Align Center. 

Set the Font Colour to Off-White and Dark Purple. 

font colour purple

You can add more text below the heading (such as „30% Off / Your First Walk / With the Code Below”), set in Lumber, All Caps, Align Center, and an Off-White Font Colour. 

lumber text

Step 3

Switch to the Pen Tool (P) and, holding Shift, click twice to create a straight vertical line below the bottom text frame. 

From the Swatches panel, set the Stroke Colour to Off-White.

From the Stroke panel (View > Studio > Stroke), set the Width of the line to 2.5 pt. From the End drop-down menu, choose Simple to apply an arrowhead to the stroke. 

pen tool

To the right of the End arrow option, increase the percentage to 225% to enlarge the arrowhead. 

arrow head

Step 4

Open up the set of EPS animal icons in a vector program, such as Affinity Designer or Adobe Illustrator, and identify the paw icon. You can either use this as an outlined icon, or fill the paw with solid colour, as I’ve done here. In the vector program, Edit > Copy the paw icon. 

Back in Publisher, and still working on the Text Behind layer, Edit > Paste the icon onto the page. Adjust the colour to Pale Yellow, and position it towards the top right of the layout. 

large paw icon

Paste more paw icons, grouping them across the page to create a trail effect, setting the colour of some to Pale Yellow and others to Dark Yellow, to contrast against the background. 

paw icons
paws pasted

Step 5

Switch to the Pen Tool (P) and use this to draw a loose, wavy line across the top-left corner of the page. To create curves, hold the mouse down while you click. You can tidy up the curve afterwards by using the Node Tool (A) to select individual anchor points.

Make sure the line has no colour, from the Swatches panel. 

pen tool

Choose the Artistic Text Tool (T) from the Tools panel. Hover over the far left edge of the line and click to transform the line into a text path. 

Type in introductory text (e.g. „did someone say…”). Highlight the text and set the Font to Southern, with an Off-White Font Colour. 

off white swatch

Step 6

Select the Frame Text Tool (T) and create a larger text frame below the curved line, for a main title (e.g. „Walkies”). Rotate the frame slightly anti-clockwise. 

frame text tool

Set the Font to Southern and the Font Colour to Dark Purple. You can make the text appear jauntier by highlighting individual letters and adjusting the Baseline value from the Positioning and Transform options in the Character panel. 

baseline shift

For this design, I’ve also added a question mark in a separate text frame. 

text frame

3. How to Remove the Background From a Photo in Affinity Photo

Step 1

Before we can use the photo we’ve chosen for our tear-off flyer design, we’ll need to remove the background. 

Open the photo in Affinity Photo, before duplicating and switching off the visibility of the Background layer. 

Go to Select > Select Sampled Colour, and click on the white background.

select sampled colour

In the Select Sampled Colour window, adjust the Tolerance slider until all of the background colour is selected. Then click Apply

tolerance slider

Step 2

Delete the selection to remove the background, before saving the file as an afphoto file. 

save as file

Step 3

Back in Affinity Publisher, use the Picture Frame Rectangle Tool (F) to create an image frame on the Images layer, towards the right side of the page, above the bottom margin. 

image frame

File > Place, choosing the edited photo and opening it. Double-click inside the frame to select the image and scale it if needed. 

placed image

4. How to Add a Tear-Off Section to Your Flyer Template

Step 1

Working on the Images layer, use the Rectangle Tool (M) to create a shape across the bottom margin area. 

Set the Fill Colour to Dark Purple. 

dark purple

Step 2

Use guides pulled out from the left-hand ruler (View > Show Rulers) to divide the page into sections. You can divide the width of the page (8.5 in) into as many sections as you want—these will form the tear-off parts of your flyer. 

purple rectangle

Step 3

Use the Pen Tool (P) to create a vertical line over the first guide, setting the Stroke Colour to Medium Yellow. 

medium yellow

From the Stroke panel, set the Style to Dash Line Style and the Width to 2.5 pt, and adjust the Dash options at the bottom of the panel to adjust the look of the dashed line. 

dash line style

Copy and Paste the line, moving each over a guide, to create a row of tear-off tabs. 

pasted lines

Step 4

Use the Frame Text Tool (T) to create a text frame for the details on the tear-off tab, such as contact details. 

Set the Font to Lumber, and vary the Font Colour between Off-White and Pale Yellow. 

font lumber

On the text frame, Right-Click > Transform > Rotate Left, and position the text frame centrally on the first tab. 

rotate left
rotated text

Copy and Paste the text frame, positioning each pasted frame in its own tab. 

tear off tabs

5. How to Export Your Tear-Off Flyer for Print

Step 1

When you’ve finished working on your flyer, it’s time to export your artwork as a PDF, ready for sending to print. 

completed artwork

Make sure to File > Save your work, before going to File > Export. 

In the window that opens, choose PDF from the icon options at the top, and select PDF (press ready) from the Preset menu. 

Make sure the Raster DPI is set to 300 and that the Include Bleed box is checked.

Then click Export

export pdf

Step 2

Name your file, select a folder to save it into, and then hit Save

save file

You can now send the exported PDF straight off to the printers!

Conclusion: Your Finished Tear-Off Flyer Template

Your tear-off flyer template with tear-off tabs is finished—great job! 

finl tear off flyer

In this tutorial, you’ve picked up a wide range of skills and techniques for how to make a good flyer and how to create a tear-off flyer in Affinity Publisher, from setting up a blank tear-off flyer template to creating colour swatches, placing images, and formatting typography to create a stylish and contemporary tear-off flyer design. 

If you want to compare your tear-off flyer design with my own, make sure to download the completed Affinity Publisher template. The same tear-off flyer design is also available as an InDesign flyer template.

It’s quick and easy to customise your tear-off flyer design further by swapping in different colour swatches, fonts, and images, to create a completely unique tear-off flyer of your own. 

Looking for more Affinity Publisher templates and InDesign flyer templates? Discover more flyer templates for tri-fold brochures, tear-off flyers and more over on Envato Elements

Eager to develop your flyer design skills further? Don’t miss these Affinity Publisher and Affinity Photo flyer and print design tutorials:

How to Make a Tear-Off Flyer Template in Affinity Publisher (Free Flyer File to Download)

Post pobrano z: How to Make a Tear-Off Flyer Template in Affinity Publisher (Free Flyer File to Download)

Final product image
What You’ll Be Creating

In this Affinity Publisher tutorial, you’ll learn how to create a tear-off flyer template. This flyer is quick and easy to create, and you can easily adapt it with your own choice of images and fonts. You’ll learn how to create a cool flyer with tear-off tabs—a bonus free tear-off flyer template is also included.

This flyer template is for a US Letter-sized flyer with tear-off tabs, perfect for advertising business services or local events in your neighborhood. You’ll pick up tips on how to create a catchy flyer, using impactful colours, graphics, and photos to create a compelling tear-off flyer. 

final tear off flyer

This tear-off flyer tutorial comes complete with a downloadable free tear-off flyer template for both Adobe InDesign and Affinity Publisher, allowing you to quickly create your own flyer with tear-off tabs. 

Follow the steps below to get to grips with Affinity Publisher, pick up key print design skills, and learn how to make a good flyer from scratch. 

Follow along with this Affinity Publisher tutorial over on our Envato Tuts+ YouTube channel:

What You’ll Learn in This Affinity Publisher Flyer Tutorial

  • How to make a blank tear-off flyer template and good flyer design, complete with stylish typography and colours.
  • How to create layers and colour swatches and then format text for your tear-off flyer in Affinity Publisher.
  • How to create a flyer template with tear-off tabs, set up to a standard US Letter format.
  • How to make a flyer template with an adaptable layout that can be customised with your own images and fonts.

Looking for more Affinity Publisher templates and blank tear-off flyer templates? Don’t miss the wide selection of flyer templates on Envato Elements

What You’ll Need to Create Your Tear-Off Flyer Template

Let’s get started with how to make a tear-off flyer in Affinity Publisher. In this tutorial, we’ll be using Affinity Publisher to create our tear-off flyer template, and we’ll dip into Affinity Photo to edit the photo to place into the Affinity Publisher template. If you’re an InDesign user, you can download the InDesign flyer template

As well as access to Publisher, you’ll also need to download the following fonts and images from Envato Elements to recreate the tear-off flyer design pictured here:

1. How to Set Up Your Blank Tear-Off Flyer Template in Affinity Publisher

Step 1

Open Publisher, and go to File > New. 

Select Print from the options along the top of the window. Set the Page width to 11 in and Page height to 8.5 in. Deselect Facing Pages under the Pages section.

new document

Step 2

From the Margins options, set a margin width of 0.5 in for all sides of the page except the Bottom, which you can set to 2.75 in. Add a Bleed width of 0.25 in. 

Then click Create

bleed and margins

Step 3

Double-click on Page 1 in the Pages panel to go to the main page of your document.

Go to the Layers panel (View > Studio > Layers), click on the Add Layer button at the bottom-right of the panel, and rename Layer 1 as Background

Click on the Add Layer button again. Name this second layer Text Behind. Repeat to create two more layers: Images and Text in Front. 

Select all the layers except Background and lock them by clicking the padlock icon at top-right. 

background layer

Step 4

Go to the Swatches panel (View > Studio > Swatches) and choose Add Global Colour from the drop-down menu at top-right. 

global colour

Name the swatch Off-White and set the levels below to C=3 M=1 Y=4 K=0. Then click Add

off white colour

Repeat to create five more swatches:

  • Dark Yellow: C=4 M=44 Y=90 K=0
  • Medium Yellow: C=0 M=35 Y=81 K=0
  • Pale Yellow: C=0 M=28 Y=72 K=0
  • Purple: C=76 M=78 Y=0 K=0
  • Dark Purple: C=92 M=100 Y=7 K=2
global colour

2. How to Add Colour and Text to Your Tear-Off Flyer Template

Step 1

Working on the Background layer, select the Rectangle Tool (M) from the Tools panel and drag across the whole of the page, extending the edges up to the bleed. 

From the Swatches panel, set the Fill Colour to Medium Yellow. 

medium yellow swatch

Step 2

Lock the Background layer and unlock the layer above, Text Behind. 

Select the Frame Text Tool (T) and drag across the left side of the page to create a small text frame.

Type in the description text (e.g. „Ellie’s Friendly / Dog Walking / Service”), and from the Character and Paragraph panels (View > Studio > Character), set the Font to Lumber, All Caps, and Align Center. 

Set the Font Colour to Off-White and Dark Purple. 

font colour purple

You can add more text below the heading (such as „30% Off / Your First Walk / With the Code Below”), set in Lumber, All Caps, Align Center, and an Off-White Font Colour. 

lumber text

Step 3

Switch to the Pen Tool (P) and, holding Shift, click twice to create a straight vertical line below the bottom text frame. 

From the Swatches panel, set the Stroke Colour to Off-White.

From the Stroke panel (View > Studio > Stroke), set the Width of the line to 2.5 pt. From the End drop-down menu, choose Simple to apply an arrowhead to the stroke. 

pen tool

To the right of the End arrow option, increase the percentage to 225% to enlarge the arrowhead. 

arrow head

Step 4

Open up the set of EPS animal icons in a vector program, such as Affinity Designer or Adobe Illustrator, and identify the paw icon. You can either use this as an outlined icon, or fill the paw with solid colour, as I’ve done here. In the vector program, Edit > Copy the paw icon. 

Back in Publisher, and still working on the Text Behind layer, Edit > Paste the icon onto the page. Adjust the colour to Pale Yellow, and position it towards the top right of the layout. 

large paw icon

Paste more paw icons, grouping them across the page to create a trail effect, setting the colour of some to Pale Yellow and others to Dark Yellow, to contrast against the background. 

paw icons
paws pasted

Step 5

Switch to the Pen Tool (P) and use this to draw a loose, wavy line across the top-left corner of the page. To create curves, hold the mouse down while you click. You can tidy up the curve afterwards by using the Node Tool (A) to select individual anchor points.

Make sure the line has no colour, from the Swatches panel. 

pen tool

Choose the Artistic Text Tool (T) from the Tools panel. Hover over the far left edge of the line and click to transform the line into a text path. 

Type in introductory text (e.g. „did someone say…”). Highlight the text and set the Font to Southern, with an Off-White Font Colour. 

off white swatch

Step 6

Select the Frame Text Tool (T) and create a larger text frame below the curved line, for a main title (e.g. „Walkies”). Rotate the frame slightly anti-clockwise. 

frame text tool

Set the Font to Southern and the Font Colour to Dark Purple. You can make the text appear jauntier by highlighting individual letters and adjusting the Baseline value from the Positioning and Transform options in the Character panel. 

baseline shift

For this design, I’ve also added a question mark in a separate text frame. 

text frame

3. How to Remove the Background From a Photo in Affinity Photo

Step 1

Before we can use the photo we’ve chosen for our tear-off flyer design, we’ll need to remove the background. 

Open the photo in Affinity Photo, before duplicating and switching off the visibility of the Background layer. 

Go to Select > Select Sampled Colour, and click on the white background.

select sampled colour

In the Select Sampled Colour window, adjust the Tolerance slider until all of the background colour is selected. Then click Apply

tolerance slider

Step 2

Delete the selection to remove the background, before saving the file as an afphoto file. 

save as file

Step 3

Back in Affinity Publisher, use the Picture Frame Rectangle Tool (F) to create an image frame on the Images layer, towards the right side of the page, above the bottom margin. 

image frame

File > Place, choosing the edited photo and opening it. Double-click inside the frame to select the image and scale it if needed. 

placed image

4. How to Add a Tear-Off Section to Your Flyer Template

Step 1

Working on the Images layer, use the Rectangle Tool (M) to create a shape across the bottom margin area. 

Set the Fill Colour to Dark Purple. 

dark purple

Step 2

Use guides pulled out from the left-hand ruler (View > Show Rulers) to divide the page into sections. You can divide the width of the page (8.5 in) into as many sections as you want—these will form the tear-off parts of your flyer. 

purple rectangle

Step 3

Use the Pen Tool (P) to create a vertical line over the first guide, setting the Stroke Colour to Medium Yellow. 

medium yellow

From the Stroke panel, set the Style to Dash Line Style and the Width to 2.5 pt, and adjust the Dash options at the bottom of the panel to adjust the look of the dashed line. 

dash line style

Copy and Paste the line, moving each over a guide, to create a row of tear-off tabs. 

pasted lines

Step 4

Use the Frame Text Tool (T) to create a text frame for the details on the tear-off tab, such as contact details. 

Set the Font to Lumber, and vary the Font Colour between Off-White and Pale Yellow. 

font lumber

On the text frame, Right-Click > Transform > Rotate Left, and position the text frame centrally on the first tab. 

rotate left
rotated text

Copy and Paste the text frame, positioning each pasted frame in its own tab. 

tear off tabs

5. How to Export Your Tear-Off Flyer for Print

Step 1

When you’ve finished working on your flyer, it’s time to export your artwork as a PDF, ready for sending to print. 

completed artwork

Make sure to File > Save your work, before going to File > Export. 

In the window that opens, choose PDF from the icon options at the top, and select PDF (press ready) from the Preset menu. 

Make sure the Raster DPI is set to 300 and that the Include Bleed box is checked.

Then click Export

export pdf

Step 2

Name your file, select a folder to save it into, and then hit Save

save file

You can now send the exported PDF straight off to the printers!

Conclusion: Your Finished Tear-Off Flyer Template

Your tear-off flyer template with tear-off tabs is finished—great job! 

finl tear off flyer

In this tutorial, you’ve picked up a wide range of skills and techniques for how to make a good flyer and how to create a tear-off flyer in Affinity Publisher, from setting up a blank tear-off flyer template to creating colour swatches, placing images, and formatting typography to create a stylish and contemporary tear-off flyer design. 

If you want to compare your tear-off flyer design with my own, make sure to download the completed Affinity Publisher template. The same tear-off flyer design is also available as an InDesign flyer template.

It’s quick and easy to customise your tear-off flyer design further by swapping in different colour swatches, fonts, and images, to create a completely unique tear-off flyer of your own. 

Looking for more Affinity Publisher templates and InDesign flyer templates? Discover more flyer templates for tri-fold brochures, tear-off flyers and more over on Envato Elements

Eager to develop your flyer design skills further? Don’t miss these Affinity Publisher and Affinity Photo flyer and print design tutorials:

How to Make a Tear-Off Flyer Template in Affinity Publisher (Free Flyer File to Download)

Post pobrano z: How to Make a Tear-Off Flyer Template in Affinity Publisher (Free Flyer File to Download)

Final product image
What You’ll Be Creating

In this Affinity Publisher tutorial, you’ll learn how to create a tear-off flyer template. This flyer is quick and easy to create, and you can easily adapt it with your own choice of images and fonts. You’ll learn how to create a cool flyer with tear-off tabs—a bonus free tear-off flyer template is also included.

This flyer template is for a US Letter-sized flyer with tear-off tabs, perfect for advertising business services or local events in your neighborhood. You’ll pick up tips on how to create a catchy flyer, using impactful colours, graphics, and photos to create a compelling tear-off flyer. 

final tear off flyer

This tear-off flyer tutorial comes complete with a downloadable free tear-off flyer template for both Adobe InDesign and Affinity Publisher, allowing you to quickly create your own flyer with tear-off tabs. 

Follow the steps below to get to grips with Affinity Publisher, pick up key print design skills, and learn how to make a good flyer from scratch. 

Follow along with this Affinity Publisher tutorial over on our Envato Tuts+ YouTube channel:

What You’ll Learn in This Affinity Publisher Flyer Tutorial

  • How to make a blank tear-off flyer template and good flyer design, complete with stylish typography and colours.
  • How to create layers and colour swatches and then format text for your tear-off flyer in Affinity Publisher.
  • How to create a flyer template with tear-off tabs, set up to a standard US Letter format.
  • How to make a flyer template with an adaptable layout that can be customised with your own images and fonts.

Looking for more Affinity Publisher templates and blank tear-off flyer templates? Don’t miss the wide selection of flyer templates on Envato Elements

What You’ll Need to Create Your Tear-Off Flyer Template

Let’s get started with how to make a tear-off flyer in Affinity Publisher. In this tutorial, we’ll be using Affinity Publisher to create our tear-off flyer template, and we’ll dip into Affinity Photo to edit the photo to place into the Affinity Publisher template. If you’re an InDesign user, you can download the InDesign flyer template

As well as access to Publisher, you’ll also need to download the following fonts and images from Envato Elements to recreate the tear-off flyer design pictured here:

1. How to Set Up Your Blank Tear-Off Flyer Template in Affinity Publisher

Step 1

Open Publisher, and go to File > New. 

Select Print from the options along the top of the window. Set the Page width to 11 in and Page height to 8.5 in. Deselect Facing Pages under the Pages section.

new document

Step 2

From the Margins options, set a margin width of 0.5 in for all sides of the page except the Bottom, which you can set to 2.75 in. Add a Bleed width of 0.25 in. 

Then click Create

bleed and margins

Step 3

Double-click on Page 1 in the Pages panel to go to the main page of your document.

Go to the Layers panel (View > Studio > Layers), click on the Add Layer button at the bottom-right of the panel, and rename Layer 1 as Background

Click on the Add Layer button again. Name this second layer Text Behind. Repeat to create two more layers: Images and Text in Front. 

Select all the layers except Background and lock them by clicking the padlock icon at top-right. 

background layer

Step 4

Go to the Swatches panel (View > Studio > Swatches) and choose Add Global Colour from the drop-down menu at top-right. 

global colour

Name the swatch Off-White and set the levels below to C=3 M=1 Y=4 K=0. Then click Add

off white colour

Repeat to create five more swatches:

  • Dark Yellow: C=4 M=44 Y=90 K=0
  • Medium Yellow: C=0 M=35 Y=81 K=0
  • Pale Yellow: C=0 M=28 Y=72 K=0
  • Purple: C=76 M=78 Y=0 K=0
  • Dark Purple: C=92 M=100 Y=7 K=2
global colour

2. How to Add Colour and Text to Your Tear-Off Flyer Template

Step 1

Working on the Background layer, select the Rectangle Tool (M) from the Tools panel and drag across the whole of the page, extending the edges up to the bleed. 

From the Swatches panel, set the Fill Colour to Medium Yellow. 

medium yellow swatch

Step 2

Lock the Background layer and unlock the layer above, Text Behind. 

Select the Frame Text Tool (T) and drag across the left side of the page to create a small text frame.

Type in the description text (e.g. „Ellie’s Friendly / Dog Walking / Service”), and from the Character and Paragraph panels (View > Studio > Character), set the Font to Lumber, All Caps, and Align Center. 

Set the Font Colour to Off-White and Dark Purple. 

font colour purple

You can add more text below the heading (such as „30% Off / Your First Walk / With the Code Below”), set in Lumber, All Caps, Align Center, and an Off-White Font Colour. 

lumber text

Step 3

Switch to the Pen Tool (P) and, holding Shift, click twice to create a straight vertical line below the bottom text frame. 

From the Swatches panel, set the Stroke Colour to Off-White.

From the Stroke panel (View > Studio > Stroke), set the Width of the line to 2.5 pt. From the End drop-down menu, choose Simple to apply an arrowhead to the stroke. 

pen tool

To the right of the End arrow option, increase the percentage to 225% to enlarge the arrowhead. 

arrow head

Step 4

Open up the set of EPS animal icons in a vector program, such as Affinity Designer or Adobe Illustrator, and identify the paw icon. You can either use this as an outlined icon, or fill the paw with solid colour, as I’ve done here. In the vector program, Edit > Copy the paw icon. 

Back in Publisher, and still working on the Text Behind layer, Edit > Paste the icon onto the page. Adjust the colour to Pale Yellow, and position it towards the top right of the layout. 

large paw icon

Paste more paw icons, grouping them across the page to create a trail effect, setting the colour of some to Pale Yellow and others to Dark Yellow, to contrast against the background. 

paw icons
paws pasted

Step 5

Switch to the Pen Tool (P) and use this to draw a loose, wavy line across the top-left corner of the page. To create curves, hold the mouse down while you click. You can tidy up the curve afterwards by using the Node Tool (A) to select individual anchor points.

Make sure the line has no colour, from the Swatches panel. 

pen tool

Choose the Artistic Text Tool (T) from the Tools panel. Hover over the far left edge of the line and click to transform the line into a text path. 

Type in introductory text (e.g. „did someone say…”). Highlight the text and set the Font to Southern, with an Off-White Font Colour. 

off white swatch

Step 6

Select the Frame Text Tool (T) and create a larger text frame below the curved line, for a main title (e.g. „Walkies”). Rotate the frame slightly anti-clockwise. 

frame text tool

Set the Font to Southern and the Font Colour to Dark Purple. You can make the text appear jauntier by highlighting individual letters and adjusting the Baseline value from the Positioning and Transform options in the Character panel. 

baseline shift

For this design, I’ve also added a question mark in a separate text frame. 

text frame

3. How to Remove the Background From a Photo in Affinity Photo

Step 1

Before we can use the photo we’ve chosen for our tear-off flyer design, we’ll need to remove the background. 

Open the photo in Affinity Photo, before duplicating and switching off the visibility of the Background layer. 

Go to Select > Select Sampled Colour, and click on the white background.

select sampled colour

In the Select Sampled Colour window, adjust the Tolerance slider until all of the background colour is selected. Then click Apply

tolerance slider

Step 2

Delete the selection to remove the background, before saving the file as an afphoto file. 

save as file

Step 3

Back in Affinity Publisher, use the Picture Frame Rectangle Tool (F) to create an image frame on the Images layer, towards the right side of the page, above the bottom margin. 

image frame

File > Place, choosing the edited photo and opening it. Double-click inside the frame to select the image and scale it if needed. 

placed image

4. How to Add a Tear-Off Section to Your Flyer Template

Step 1

Working on the Images layer, use the Rectangle Tool (M) to create a shape across the bottom margin area. 

Set the Fill Colour to Dark Purple. 

dark purple

Step 2

Use guides pulled out from the left-hand ruler (View > Show Rulers) to divide the page into sections. You can divide the width of the page (8.5 in) into as many sections as you want—these will form the tear-off parts of your flyer. 

purple rectangle

Step 3

Use the Pen Tool (P) to create a vertical line over the first guide, setting the Stroke Colour to Medium Yellow. 

medium yellow

From the Stroke panel, set the Style to Dash Line Style and the Width to 2.5 pt, and adjust the Dash options at the bottom of the panel to adjust the look of the dashed line. 

dash line style

Copy and Paste the line, moving each over a guide, to create a row of tear-off tabs. 

pasted lines

Step 4

Use the Frame Text Tool (T) to create a text frame for the details on the tear-off tab, such as contact details. 

Set the Font to Lumber, and vary the Font Colour between Off-White and Pale Yellow. 

font lumber

On the text frame, Right-Click > Transform > Rotate Left, and position the text frame centrally on the first tab. 

rotate left
rotated text

Copy and Paste the text frame, positioning each pasted frame in its own tab. 

tear off tabs

5. How to Export Your Tear-Off Flyer for Print

Step 1

When you’ve finished working on your flyer, it’s time to export your artwork as a PDF, ready for sending to print. 

completed artwork

Make sure to File > Save your work, before going to File > Export. 

In the window that opens, choose PDF from the icon options at the top, and select PDF (press ready) from the Preset menu. 

Make sure the Raster DPI is set to 300 and that the Include Bleed box is checked.

Then click Export

export pdf

Step 2

Name your file, select a folder to save it into, and then hit Save

save file

You can now send the exported PDF straight off to the printers!

Conclusion: Your Finished Tear-Off Flyer Template

Your tear-off flyer template with tear-off tabs is finished—great job! 

finl tear off flyer

In this tutorial, you’ve picked up a wide range of skills and techniques for how to make a good flyer and how to create a tear-off flyer in Affinity Publisher, from setting up a blank tear-off flyer template to creating colour swatches, placing images, and formatting typography to create a stylish and contemporary tear-off flyer design. 

If you want to compare your tear-off flyer design with my own, make sure to download the completed Affinity Publisher template. The same tear-off flyer design is also available as an InDesign flyer template.

It’s quick and easy to customise your tear-off flyer design further by swapping in different colour swatches, fonts, and images, to create a completely unique tear-off flyer of your own. 

Looking for more Affinity Publisher templates and InDesign flyer templates? Discover more flyer templates for tri-fold brochures, tear-off flyers and more over on Envato Elements

Eager to develop your flyer design skills further? Don’t miss these Affinity Publisher and Affinity Photo flyer and print design tutorials:

How to Make a Tear-Off Flyer Template in Affinity Publisher (Free Flyer File to Download)

Post pobrano z: How to Make a Tear-Off Flyer Template in Affinity Publisher (Free Flyer File to Download)

Final product image
What You’ll Be Creating

In this Affinity Publisher tutorial, you’ll learn how to create a tear-off flyer template. This flyer is quick and easy to create, and you can easily adapt it with your own choice of images and fonts. You’ll learn how to create a cool flyer with tear-off tabs—a bonus free tear-off flyer template is also included.

This flyer template is for a US Letter-sized flyer with tear-off tabs, perfect for advertising business services or local events in your neighborhood. You’ll pick up tips on how to create a catchy flyer, using impactful colours, graphics, and photos to create a compelling tear-off flyer. 

final tear off flyer

This tear-off flyer tutorial comes complete with a downloadable free tear-off flyer template for both Adobe InDesign and Affinity Publisher, allowing you to quickly create your own flyer with tear-off tabs. 

Follow the steps below to get to grips with Affinity Publisher, pick up key print design skills, and learn how to make a good flyer from scratch. 

Follow along with this Affinity Publisher tutorial over on our Envato Tuts+ YouTube channel:

What You’ll Learn in This Affinity Publisher Flyer Tutorial

  • How to make a blank tear-off flyer template and good flyer design, complete with stylish typography and colours.
  • How to create layers and colour swatches and then format text for your tear-off flyer in Affinity Publisher.
  • How to create a flyer template with tear-off tabs, set up to a standard US Letter format.
  • How to make a flyer template with an adaptable layout that can be customised with your own images and fonts.

Looking for more Affinity Publisher templates and blank tear-off flyer templates? Don’t miss the wide selection of flyer templates on Envato Elements

What You’ll Need to Create Your Tear-Off Flyer Template

Let’s get started with how to make a tear-off flyer in Affinity Publisher. In this tutorial, we’ll be using Affinity Publisher to create our tear-off flyer template, and we’ll dip into Affinity Photo to edit the photo to place into the Affinity Publisher template. If you’re an InDesign user, you can download the InDesign flyer template

As well as access to Publisher, you’ll also need to download the following fonts and images from Envato Elements to recreate the tear-off flyer design pictured here:

1. How to Set Up Your Blank Tear-Off Flyer Template in Affinity Publisher

Step 1

Open Publisher, and go to File > New. 

Select Print from the options along the top of the window. Set the Page width to 11 in and Page height to 8.5 in. Deselect Facing Pages under the Pages section.

new document

Step 2

From the Margins options, set a margin width of 0.5 in for all sides of the page except the Bottom, which you can set to 2.75 in. Add a Bleed width of 0.25 in. 

Then click Create

bleed and margins

Step 3

Double-click on Page 1 in the Pages panel to go to the main page of your document.

Go to the Layers panel (View > Studio > Layers), click on the Add Layer button at the bottom-right of the panel, and rename Layer 1 as Background

Click on the Add Layer button again. Name this second layer Text Behind. Repeat to create two more layers: Images and Text in Front. 

Select all the layers except Background and lock them by clicking the padlock icon at top-right. 

background layer

Step 4

Go to the Swatches panel (View > Studio > Swatches) and choose Add Global Colour from the drop-down menu at top-right. 

global colour

Name the swatch Off-White and set the levels below to C=3 M=1 Y=4 K=0. Then click Add

off white colour

Repeat to create five more swatches:

  • Dark Yellow: C=4 M=44 Y=90 K=0
  • Medium Yellow: C=0 M=35 Y=81 K=0
  • Pale Yellow: C=0 M=28 Y=72 K=0
  • Purple: C=76 M=78 Y=0 K=0
  • Dark Purple: C=92 M=100 Y=7 K=2
global colour

2. How to Add Colour and Text to Your Tear-Off Flyer Template

Step 1

Working on the Background layer, select the Rectangle Tool (M) from the Tools panel and drag across the whole of the page, extending the edges up to the bleed. 

From the Swatches panel, set the Fill Colour to Medium Yellow. 

medium yellow swatch

Step 2

Lock the Background layer and unlock the layer above, Text Behind. 

Select the Frame Text Tool (T) and drag across the left side of the page to create a small text frame.

Type in the description text (e.g. „Ellie’s Friendly / Dog Walking / Service”), and from the Character and Paragraph panels (View > Studio > Character), set the Font to Lumber, All Caps, and Align Center. 

Set the Font Colour to Off-White and Dark Purple. 

font colour purple

You can add more text below the heading (such as „30% Off / Your First Walk / With the Code Below”), set in Lumber, All Caps, Align Center, and an Off-White Font Colour. 

lumber text

Step 3

Switch to the Pen Tool (P) and, holding Shift, click twice to create a straight vertical line below the bottom text frame. 

From the Swatches panel, set the Stroke Colour to Off-White.

From the Stroke panel (View > Studio > Stroke), set the Width of the line to 2.5 pt. From the End drop-down menu, choose Simple to apply an arrowhead to the stroke. 

pen tool

To the right of the End arrow option, increase the percentage to 225% to enlarge the arrowhead. 

arrow head

Step 4

Open up the set of EPS animal icons in a vector program, such as Affinity Designer or Adobe Illustrator, and identify the paw icon. You can either use this as an outlined icon, or fill the paw with solid colour, as I’ve done here. In the vector program, Edit > Copy the paw icon. 

Back in Publisher, and still working on the Text Behind layer, Edit > Paste the icon onto the page. Adjust the colour to Pale Yellow, and position it towards the top right of the layout. 

large paw icon

Paste more paw icons, grouping them across the page to create a trail effect, setting the colour of some to Pale Yellow and others to Dark Yellow, to contrast against the background. 

paw icons
paws pasted

Step 5

Switch to the Pen Tool (P) and use this to draw a loose, wavy line across the top-left corner of the page. To create curves, hold the mouse down while you click. You can tidy up the curve afterwards by using the Node Tool (A) to select individual anchor points.

Make sure the line has no colour, from the Swatches panel. 

pen tool

Choose the Artistic Text Tool (T) from the Tools panel. Hover over the far left edge of the line and click to transform the line into a text path. 

Type in introductory text (e.g. „did someone say…”). Highlight the text and set the Font to Southern, with an Off-White Font Colour. 

off white swatch

Step 6

Select the Frame Text Tool (T) and create a larger text frame below the curved line, for a main title (e.g. „Walkies”). Rotate the frame slightly anti-clockwise. 

frame text tool

Set the Font to Southern and the Font Colour to Dark Purple. You can make the text appear jauntier by highlighting individual letters and adjusting the Baseline value from the Positioning and Transform options in the Character panel. 

baseline shift

For this design, I’ve also added a question mark in a separate text frame. 

text frame

3. How to Remove the Background From a Photo in Affinity Photo

Step 1

Before we can use the photo we’ve chosen for our tear-off flyer design, we’ll need to remove the background. 

Open the photo in Affinity Photo, before duplicating and switching off the visibility of the Background layer. 

Go to Select > Select Sampled Colour, and click on the white background.

select sampled colour

In the Select Sampled Colour window, adjust the Tolerance slider until all of the background colour is selected. Then click Apply

tolerance slider

Step 2

Delete the selection to remove the background, before saving the file as an afphoto file. 

save as file

Step 3

Back in Affinity Publisher, use the Picture Frame Rectangle Tool (F) to create an image frame on the Images layer, towards the right side of the page, above the bottom margin. 

image frame

File > Place, choosing the edited photo and opening it. Double-click inside the frame to select the image and scale it if needed. 

placed image

4. How to Add a Tear-Off Section to Your Flyer Template

Step 1

Working on the Images layer, use the Rectangle Tool (M) to create a shape across the bottom margin area. 

Set the Fill Colour to Dark Purple. 

dark purple

Step 2

Use guides pulled out from the left-hand ruler (View > Show Rulers) to divide the page into sections. You can divide the width of the page (8.5 in) into as many sections as you want—these will form the tear-off parts of your flyer. 

purple rectangle

Step 3

Use the Pen Tool (P) to create a vertical line over the first guide, setting the Stroke Colour to Medium Yellow. 

medium yellow

From the Stroke panel, set the Style to Dash Line Style and the Width to 2.5 pt, and adjust the Dash options at the bottom of the panel to adjust the look of the dashed line. 

dash line style

Copy and Paste the line, moving each over a guide, to create a row of tear-off tabs. 

pasted lines

Step 4

Use the Frame Text Tool (T) to create a text frame for the details on the tear-off tab, such as contact details. 

Set the Font to Lumber, and vary the Font Colour between Off-White and Pale Yellow. 

font lumber

On the text frame, Right-Click > Transform > Rotate Left, and position the text frame centrally on the first tab. 

rotate left
rotated text

Copy and Paste the text frame, positioning each pasted frame in its own tab. 

tear off tabs

5. How to Export Your Tear-Off Flyer for Print

Step 1

When you’ve finished working on your flyer, it’s time to export your artwork as a PDF, ready for sending to print. 

completed artwork

Make sure to File > Save your work, before going to File > Export. 

In the window that opens, choose PDF from the icon options at the top, and select PDF (press ready) from the Preset menu. 

Make sure the Raster DPI is set to 300 and that the Include Bleed box is checked.

Then click Export

export pdf

Step 2

Name your file, select a folder to save it into, and then hit Save

save file

You can now send the exported PDF straight off to the printers!

Conclusion: Your Finished Tear-Off Flyer Template

Your tear-off flyer template with tear-off tabs is finished—great job! 

finl tear off flyer

In this tutorial, you’ve picked up a wide range of skills and techniques for how to make a good flyer and how to create a tear-off flyer in Affinity Publisher, from setting up a blank tear-off flyer template to creating colour swatches, placing images, and formatting typography to create a stylish and contemporary tear-off flyer design. 

If you want to compare your tear-off flyer design with my own, make sure to download the completed Affinity Publisher template. The same tear-off flyer design is also available as an InDesign flyer template.

It’s quick and easy to customise your tear-off flyer design further by swapping in different colour swatches, fonts, and images, to create a completely unique tear-off flyer of your own. 

Looking for more Affinity Publisher templates and InDesign flyer templates? Discover more flyer templates for tri-fold brochures, tear-off flyers and more over on Envato Elements

Eager to develop your flyer design skills further? Don’t miss these Affinity Publisher and Affinity Photo flyer and print design tutorials:

How to Make a Tear-Off Flyer Template in Affinity Publisher (Free Flyer File to Download)

Post pobrano z: How to Make a Tear-Off Flyer Template in Affinity Publisher (Free Flyer File to Download)

Final product image
What You’ll Be Creating

In this Affinity Publisher tutorial, you’ll learn how to create a tear-off flyer template. This flyer is quick and easy to create, and you can easily adapt it with your own choice of images and fonts. You’ll learn how to create a cool flyer with tear-off tabs—a bonus free tear-off flyer template is also included.

This flyer template is for a US Letter-sized flyer with tear-off tabs, perfect for advertising business services or local events in your neighborhood. You’ll pick up tips on how to create a catchy flyer, using impactful colours, graphics, and photos to create a compelling tear-off flyer. 

final tear off flyer

This tear-off flyer tutorial comes complete with a downloadable free tear-off flyer template for both Adobe InDesign and Affinity Publisher, allowing you to quickly create your own flyer with tear-off tabs. 

Follow the steps below to get to grips with Affinity Publisher, pick up key print design skills, and learn how to make a good flyer from scratch. 

Follow along with this Affinity Publisher tutorial over on our Envato Tuts+ YouTube channel:

What You’ll Learn in This Affinity Publisher Flyer Tutorial

  • How to make a blank tear-off flyer template and good flyer design, complete with stylish typography and colours.
  • How to create layers and colour swatches and then format text for your tear-off flyer in Affinity Publisher.
  • How to create a flyer template with tear-off tabs, set up to a standard US Letter format.
  • How to make a flyer template with an adaptable layout that can be customised with your own images and fonts.

Looking for more Affinity Publisher templates and blank tear-off flyer templates? Don’t miss the wide selection of flyer templates on Envato Elements

What You’ll Need to Create Your Tear-Off Flyer Template

Let’s get started with how to make a tear-off flyer in Affinity Publisher. In this tutorial, we’ll be using Affinity Publisher to create our tear-off flyer template, and we’ll dip into Affinity Photo to edit the photo to place into the Affinity Publisher template. If you’re an InDesign user, you can download the InDesign flyer template

As well as access to Publisher, you’ll also need to download the following fonts and images from Envato Elements to recreate the tear-off flyer design pictured here:

1. How to Set Up Your Blank Tear-Off Flyer Template in Affinity Publisher

Step 1

Open Publisher, and go to File > New. 

Select Print from the options along the top of the window. Set the Page width to 11 in and Page height to 8.5 in. Deselect Facing Pages under the Pages section.

new document

Step 2

From the Margins options, set a margin width of 0.5 in for all sides of the page except the Bottom, which you can set to 2.75 in. Add a Bleed width of 0.25 in. 

Then click Create

bleed and margins

Step 3

Double-click on Page 1 in the Pages panel to go to the main page of your document.

Go to the Layers panel (View > Studio > Layers), click on the Add Layer button at the bottom-right of the panel, and rename Layer 1 as Background

Click on the Add Layer button again. Name this second layer Text Behind. Repeat to create two more layers: Images and Text in Front. 

Select all the layers except Background and lock them by clicking the padlock icon at top-right. 

background layer

Step 4

Go to the Swatches panel (View > Studio > Swatches) and choose Add Global Colour from the drop-down menu at top-right. 

global colour

Name the swatch Off-White and set the levels below to C=3 M=1 Y=4 K=0. Then click Add

off white colour

Repeat to create five more swatches:

  • Dark Yellow: C=4 M=44 Y=90 K=0
  • Medium Yellow: C=0 M=35 Y=81 K=0
  • Pale Yellow: C=0 M=28 Y=72 K=0
  • Purple: C=76 M=78 Y=0 K=0
  • Dark Purple: C=92 M=100 Y=7 K=2
global colour

2. How to Add Colour and Text to Your Tear-Off Flyer Template

Step 1

Working on the Background layer, select the Rectangle Tool (M) from the Tools panel and drag across the whole of the page, extending the edges up to the bleed. 

From the Swatches panel, set the Fill Colour to Medium Yellow. 

medium yellow swatch

Step 2

Lock the Background layer and unlock the layer above, Text Behind. 

Select the Frame Text Tool (T) and drag across the left side of the page to create a small text frame.

Type in the description text (e.g. „Ellie’s Friendly / Dog Walking / Service”), and from the Character and Paragraph panels (View > Studio > Character), set the Font to Lumber, All Caps, and Align Center. 

Set the Font Colour to Off-White and Dark Purple. 

font colour purple

You can add more text below the heading (such as „30% Off / Your First Walk / With the Code Below”), set in Lumber, All Caps, Align Center, and an Off-White Font Colour. 

lumber text

Step 3

Switch to the Pen Tool (P) and, holding Shift, click twice to create a straight vertical line below the bottom text frame. 

From the Swatches panel, set the Stroke Colour to Off-White.

From the Stroke panel (View > Studio > Stroke), set the Width of the line to 2.5 pt. From the End drop-down menu, choose Simple to apply an arrowhead to the stroke. 

pen tool

To the right of the End arrow option, increase the percentage to 225% to enlarge the arrowhead. 

arrow head

Step 4

Open up the set of EPS animal icons in a vector program, such as Affinity Designer or Adobe Illustrator, and identify the paw icon. You can either use this as an outlined icon, or fill the paw with solid colour, as I’ve done here. In the vector program, Edit > Copy the paw icon. 

Back in Publisher, and still working on the Text Behind layer, Edit > Paste the icon onto the page. Adjust the colour to Pale Yellow, and position it towards the top right of the layout. 

large paw icon

Paste more paw icons, grouping them across the page to create a trail effect, setting the colour of some to Pale Yellow and others to Dark Yellow, to contrast against the background. 

paw icons
paws pasted

Step 5

Switch to the Pen Tool (P) and use this to draw a loose, wavy line across the top-left corner of the page. To create curves, hold the mouse down while you click. You can tidy up the curve afterwards by using the Node Tool (A) to select individual anchor points.

Make sure the line has no colour, from the Swatches panel. 

pen tool

Choose the Artistic Text Tool (T) from the Tools panel. Hover over the far left edge of the line and click to transform the line into a text path. 

Type in introductory text (e.g. „did someone say…”). Highlight the text and set the Font to Southern, with an Off-White Font Colour. 

off white swatch

Step 6

Select the Frame Text Tool (T) and create a larger text frame below the curved line, for a main title (e.g. „Walkies”). Rotate the frame slightly anti-clockwise. 

frame text tool

Set the Font to Southern and the Font Colour to Dark Purple. You can make the text appear jauntier by highlighting individual letters and adjusting the Baseline value from the Positioning and Transform options in the Character panel. 

baseline shift

For this design, I’ve also added a question mark in a separate text frame. 

text frame

3. How to Remove the Background From a Photo in Affinity Photo

Step 1

Before we can use the photo we’ve chosen for our tear-off flyer design, we’ll need to remove the background. 

Open the photo in Affinity Photo, before duplicating and switching off the visibility of the Background layer. 

Go to Select > Select Sampled Colour, and click on the white background.

select sampled colour

In the Select Sampled Colour window, adjust the Tolerance slider until all of the background colour is selected. Then click Apply

tolerance slider

Step 2

Delete the selection to remove the background, before saving the file as an afphoto file. 

save as file

Step 3

Back in Affinity Publisher, use the Picture Frame Rectangle Tool (F) to create an image frame on the Images layer, towards the right side of the page, above the bottom margin. 

image frame

File > Place, choosing the edited photo and opening it. Double-click inside the frame to select the image and scale it if needed. 

placed image

4. How to Add a Tear-Off Section to Your Flyer Template

Step 1

Working on the Images layer, use the Rectangle Tool (M) to create a shape across the bottom margin area. 

Set the Fill Colour to Dark Purple. 

dark purple

Step 2

Use guides pulled out from the left-hand ruler (View > Show Rulers) to divide the page into sections. You can divide the width of the page (8.5 in) into as many sections as you want—these will form the tear-off parts of your flyer. 

purple rectangle

Step 3

Use the Pen Tool (P) to create a vertical line over the first guide, setting the Stroke Colour to Medium Yellow. 

medium yellow

From the Stroke panel, set the Style to Dash Line Style and the Width to 2.5 pt, and adjust the Dash options at the bottom of the panel to adjust the look of the dashed line. 

dash line style

Copy and Paste the line, moving each over a guide, to create a row of tear-off tabs. 

pasted lines

Step 4

Use the Frame Text Tool (T) to create a text frame for the details on the tear-off tab, such as contact details. 

Set the Font to Lumber, and vary the Font Colour between Off-White and Pale Yellow. 

font lumber

On the text frame, Right-Click > Transform > Rotate Left, and position the text frame centrally on the first tab. 

rotate left
rotated text

Copy and Paste the text frame, positioning each pasted frame in its own tab. 

tear off tabs

5. How to Export Your Tear-Off Flyer for Print

Step 1

When you’ve finished working on your flyer, it’s time to export your artwork as a PDF, ready for sending to print. 

completed artwork

Make sure to File > Save your work, before going to File > Export. 

In the window that opens, choose PDF from the icon options at the top, and select PDF (press ready) from the Preset menu. 

Make sure the Raster DPI is set to 300 and that the Include Bleed box is checked.

Then click Export

export pdf

Step 2

Name your file, select a folder to save it into, and then hit Save

save file

You can now send the exported PDF straight off to the printers!

Conclusion: Your Finished Tear-Off Flyer Template

Your tear-off flyer template with tear-off tabs is finished—great job! 

finl tear off flyer

In this tutorial, you’ve picked up a wide range of skills and techniques for how to make a good flyer and how to create a tear-off flyer in Affinity Publisher, from setting up a blank tear-off flyer template to creating colour swatches, placing images, and formatting typography to create a stylish and contemporary tear-off flyer design. 

If you want to compare your tear-off flyer design with my own, make sure to download the completed Affinity Publisher template. The same tear-off flyer design is also available as an InDesign flyer template.

It’s quick and easy to customise your tear-off flyer design further by swapping in different colour swatches, fonts, and images, to create a completely unique tear-off flyer of your own. 

Looking for more Affinity Publisher templates and InDesign flyer templates? Discover more flyer templates for tri-fold brochures, tear-off flyers and more over on Envato Elements

Eager to develop your flyer design skills further? Don’t miss these Affinity Publisher and Affinity Photo flyer and print design tutorials:

What Is an SVG Font? All About SVG Fonts

Post pobrano z: What Is an SVG Font? All About SVG Fonts

The innovative SVG font format has come in with full force to shake up traditional font formats. Let’s take a look at what this is all about!

There hasn’t been much change in the font format world in a few years, so when SVG font files came in, they took the world of design by storm. SVG font glyphs contain so many more attributes than regular fonts, and we’ll talk about what an SVG font is in this article. We’ll also touch on how to make SVG fonts, how to install SVG fonts, and how to use an SVG font. Ready to jump in?

If you’re looking for some awesome SVG font examples, check out Envato Elements and GraphicRiver for some beautiful SVG fonts and SVG calligraphy fonts.

What Is an SVG Font?

An SVG font is a new version of the OpenType format, with SVG standing for Scalable Vector Graphics. The SVG glyph format allows the characters to be displayed in multiple colors and different transparencies, and some may even be animated. These attributes are not supported by regular OTF and TTF formats.

OpenType SVG fonts are also known as color fonts. One difference between regular fonts and SVG fonts is the file size. The SVG font files are embedded with so much information that instead of dealing with kilobytes, it’s megabytes. 

SVG fonts are particularly useful when designing with brush-inspired fonts. You’ll notice watercolor effects contain semi-transparent areas. Here are a couple of examples of fonts with multiple transparent sections.

Querins SVG Brush Font

A perfect example of multiple transparencies is a font inspired by brush strokes. This SVG font example is created from an authentic brush, so it has that hand-crafted feel. The font is perfectly suited for editorial design, signage, and even logos. 

Querins SVG Brush Font

Cardus Brush SVG Font

Another SVG font example that contains multiple transparencies and lots of texture is Cardus Brush. This thick style is achieved by using hands to paint each SVG font glyph. This SVG font is bold and perfect if you’re looking to create some striking designs. 

Cardus Brush SVG Font

The SVG font format also allows SVG font glyphs to contain multiple colors. This means that each character contains more than one color, for instance:

Futuristico SVG Color Font

This SVG font example contains gradients and multiple colors in a single SVG font glyph. Geometric and complex, this is suitable as a display font for any type of editorial design work. You can create a customized color by exploring Adobe Photoshop. 

Futuristico SVG Color Font

Corn Fruit Loops SVG Color Font

In need of a food-themed SVG font? The Corn Fruit Loops font is the perfect concept for typographic food. If you’re wondering how to change the color in Photoshop to create a sort of a custom font in SVG, keep reading below. You can change the color of the fruit loops to any palette you’d like. 

Corn Fruit Loops SVG Color Font

How to Install SVG Fonts

If you’re wondering how to install SVG fonts, you can do so as you would a normal font. Most download files will be contained in a .zip, so proceed to unzip the folder. OpenType-SVG fonts have the same file extensions as normal fonts, .ttf and .otf. For Mac, double-click on either of these, and the Font Book will pop up. Click on Install Font and it’s ready to be used!

If you’re wondering how to install SVG fonts on Windows 10, for instance, you can do so through the Control Panel or any font manager of your choice. The fonts will be displayed the same way as the rest of the fonts, in solid black. 

SVG fonts are currently supported by iOS 12, macOS Mojave, and Windows 10. Currently, you can use these fonts from the following versions and above: Illustrator CC 22.0.0, Photoshop CC 18.0, and InDesign CC 13.0.1. The only web browsers supporting SVG fonts are Safari and iOS Safari. 

How to install SVG fonts

How to Use SVG Fonts in Photoshop

The font I’ll be using to show you how to use SVG fonts in Photoshop is Bluesky SVG Font and comes in shades of blue. This SVG font script has an amazing 3D look because of the shadows included in each SVG font glyph.

Bluesky SVG Font
Bluesky SVG Font

In Photoshop, select the Text Tool (T), create a text box on the page, and add your content. On the toolbar, select the SVG font of your choice. You’ll notice that the logo on the right side of the dropdown menu displays the OTF logo with a small SVG logo. 

how to use SVG fonts in Photoshop select the text tool and choose your custom font in SVG

To change the color of this particular font, head over to the Layers panel. Right-click on the text layer and select Blending Options. In the pop-up window, check the Color Overlay option and click on it to open the settings. Set the Blend Mode to Color, click on the color swatch, and choose the color of your choice. I’ll change the color to orange to make the SVG font bolder. Click OK

how to use SVG fonts in Photoshop select the blending option and color

What about if you have a font with multiple colors? For this example of how to use SVG fonts in Photoshop, we’ll be using Color Paper Color Fonts. The designer wanted to make the SVG font appear as if it has multiple layers. The result is an amazing mix of multiple dimensions and colors. 

Color Paper Color Fonts

For fonts with multiple colors like Color Paper 3D, you have the option to use the method we described before. That method will allow you to coat the characters with shades of one color. 

If you’re looking to maintain the variety of colors that come with the font, head over to the Layers panel. Click on Create a New Fill or Adjustment Layer > Hue/Saturation. Press the Option key and click on the new layer to create a Clipping Mask. Head over to the Properties panel, where you can change the color by sliding the Hue, Saturation, and Lightness options. 

If you’re looking to get more specific, click on the Master dropdown menu and select each color. Tweak each one with the sliders underneath. 

SVG color font add an adjustment layer and change the huesaturation

How to Create Font Icons From SVG

Icon fonts are mainly used as web fonts because the icons are scalable CSS properties like different colors, and shadows can be applied. All of this can be done with a better speed performance as the icons load faster. The only disadvantage is due to the many different web browsers, meaning that smoothing of the icons is unreliable. There are plenty of free and paid tools online that can help you convert SVG files to font icons like IcoMoon and Fontello

To create the font icons, make sure you have the files saved as SVG from Photoshop or Illustrator. In IcoMoon, import the SVG files, select the icons you want to generate, and click on Generate Font

Select the individual SVG files from your computer and click Open

You’ll be able to rename each file, and you can proceed to download them. You’ll also be able to get the code to use on your website. You can also create a font file from SVG with this same method and have your own custom font in SVG.

After importing allt he SVG files for your font click on Generate Font

If you are wondering how to convert SVG files to fonts, the process is exactly the same. Draw each character in vector or bitmap format, using Adobe Illustrator or Adobe Photoshop. You can use the same applications as above or paid software like Glyphs, professional font editing software that lets you import SVG files to create each font character. Now you’re ready to make SVG fonts!

Envato Elements Assets: SVG Font Library

SVG fonts are mainly used as display SVG fonts rather than body text. That’s because they hold special information that will help your text stand out. These fonts are flashier and visually complex—that’s why they contain so many attributes. Use them in signage, logos, posters, headlines, book covers, etc. We’ve gathered some really awesome options from Envato Elements that we think you should check out: 

Hamilton SVG Font Collection

Looking for SVG monogram fonts? Search no more! This pack contains SVG font’s boldest options. You’ll receive a serif, sans serif, and script fonts. The fonts have a hand-crafted feel, and they’re suitable for classic and vintage brands.

Hamilton SVG Font Collection

Bouqet Flower & Watercolor SVG Font

Each SVG font glyph is perfectly unique in this set. The font has two versions, one with real flowers and one with a watercolor effect. If you don’t have the latest Photoshop version, you’ll receive the PSD file so you can use the individual characters. This SVG font is bold and will stand out anywhere you use it. 

Bouqet Flower  Watercolor SVG Font
Bouqet Flower & Watercolor SVG Font

Astute & Dude SVG Font & Solid

Looking for an awesome hand-painted brush font? Each SVG font glyph is high-resolution, and the strokes on the characters overlap, adding a nice texture and depth. This font is so authentic to the human hand that people won’t know it’s an SVG file. 

Astute  Dude SVG Font Solid
Astute & Dude SVG Font & Solid

Aston Vintage Color Font

If you’re branding a project and want to create an outstanding mark, Aston Vintage would make a great SVG monogram font. The decorative font has an old-fashioned and super ornamental look, suitable for a whiskey brand or a brand that prides itself in being trusted.

Aston Vintage Color Font

Light Shutter SVG Font

This modern SVG calligraphy font is beautifully designed. The SVG format allows it to have a watercolor effect, so it’s perfect for wedding invitations if you want something cost-effective. The pack comes with many glyphs that help your design look natural. 

Light Shutter SVG Font

Thinks OpenType SVG Font

To step away from watercolor, this SVG font is a bold move because it uses oil paint. The SVG glyphs have a thicker consistency, even in the texture. The high-resolution brush strokes make it look hyper-realistic. This experimental font is suitable for digital lettering, packaging, and much more!

Thinks OpenType SVG Font

Simbox Geometric Font

Simbox is an awesome example of how SVG font designs can be applied. This sans serif SVG font is a bold style with its geometric shapes. The color elements just make the whole thing pop, making the font out of the ordinary, eccentric, and perfect for display designs. 

Simbox Geometric Font

10 Color SVG Fonts Library

Need lots of options in your SVG font library? This is the ultimate pack to have in your arsenal. There are ten fonts included with different themes, from a sandy beach to coin-inspired forms and different fabric textures. 

10 Color SVG Fonts Library

Snowy Winter Floral SVG Color Font

Designers are taking full advantage of thematic SVG font formats. This SVG font is bold and delicate at the same time. The typeforms are bold but sit on the background and are adorned with beautiful winter flowers. Use this SVG font for your next Christmas card!

Snowy Winter Floral SVG Color Font

Monopixel Awesome

Check out this awesome font style! This reimagining of the classic monospace font is innovative and includes multiple colored pixels that make out each SVG font glyph. This colorful font is fun and cute—ready for the next gaming event? 

Monopixel Awesome
Monopixel Awesome

What Are Your Favorite SVG Fonts?

SVG fonts are the latest advance in the font format world, which had stayed pretty quiet for a while. This push forward for fonts resulted in more dynamic and interactive fonts that can create even more striking designs.

In this article, we covered what an SVG font is, how to create font files from SVG files, how to create font icons from SVG, and how to use an SVG font. Those are all the basics you need to dive in and get on the SVG bandwagon. They are a pretty great option if you want to take your design to the next level! Let us know in the comment section below: what are your favorite SVG fonts?

If you’re pressed for time and you’re looking for some high-quality SVG fonts, be sure to check out Envato Elements and GraphicRiver for some superb SVG glyphs and SVG color fonts. Looking for free SVG fonts? Check out FontSpace’s SVG font library—they’ve got great options there!

What Is an SVG Font? All About SVG Fonts

Post pobrano z: What Is an SVG Font? All About SVG Fonts

The innovative SVG font format has come in with full force to shake up traditional font formats. Let’s take a look at what this is all about!

There hasn’t been much change in the font format world in a few years, so when SVG font files came in, they took the world of design by storm. SVG font glyphs contain so many more attributes than regular fonts, and we’ll talk about what an SVG font is in this article. We’ll also touch on how to make SVG fonts, how to install SVG fonts, and how to use an SVG font. Ready to jump in?

If you’re looking for some awesome SVG font examples, check out Envato Elements and GraphicRiver for some beautiful SVG fonts and SVG calligraphy fonts.

What Is an SVG Font?

An SVG font is a new version of the OpenType format, with SVG standing for Scalable Vector Graphics. The SVG glyph format allows the characters to be displayed in multiple colors and different transparencies, and some may even be animated. These attributes are not supported by regular OTF and TTF formats.

OpenType SVG fonts are also known as color fonts. One difference between regular fonts and SVG fonts is the file size. The SVG font files are embedded with so much information that instead of dealing with kilobytes, it’s megabytes. 

SVG fonts are particularly useful when designing with brush-inspired fonts. You’ll notice watercolor effects contain semi-transparent areas. Here are a couple of examples of fonts with multiple transparent sections.

Querins SVG Brush Font

A perfect example of multiple transparencies is a font inspired by brush strokes. This SVG font example is created from an authentic brush, so it has that hand-crafted feel. The font is perfectly suited for editorial design, signage, and even logos. 

Querins SVG Brush Font

Cardus Brush SVG Font

Another SVG font example that contains multiple transparencies and lots of texture is Cardus Brush. This thick style is achieved by using hands to paint each SVG font glyph. This SVG font is bold and perfect if you’re looking to create some striking designs. 

Cardus Brush SVG Font

The SVG font format also allows SVG font glyphs to contain multiple colors. This means that each character contains more than one color, for instance:

Futuristico SVG Color Font

This SVG font example contains gradients and multiple colors in a single SVG font glyph. Geometric and complex, this is suitable as a display font for any type of editorial design work. You can create a customized color by exploring Adobe Photoshop. 

Futuristico SVG Color Font

Corn Fruit Loops SVG Color Font

In need of a food-themed SVG font? The Corn Fruit Loops font is the perfect concept for typographic food. If you’re wondering how to change the color in Photoshop to create a sort of a custom font in SVG, keep reading below. You can change the color of the fruit loops to any palette you’d like. 

Corn Fruit Loops SVG Color Font

How to Install SVG Fonts

If you’re wondering how to install SVG fonts, you can do so as you would a normal font. Most download files will be contained in a .zip, so proceed to unzip the folder. OpenType-SVG fonts have the same file extensions as normal fonts, .ttf and .otf. For Mac, double-click on either of these, and the Font Book will pop up. Click on Install Font and it’s ready to be used!

If you’re wondering how to install SVG fonts on Windows 10, for instance, you can do so through the Control Panel or any font manager of your choice. The fonts will be displayed the same way as the rest of the fonts, in solid black. 

SVG fonts are currently supported by iOS 12, macOS Mojave, and Windows 10. Currently, you can use these fonts from the following versions and above: Illustrator CC 22.0.0, Photoshop CC 18.0, and InDesign CC 13.0.1. The only web browsers supporting SVG fonts are Safari and iOS Safari. 

How to install SVG fonts

How to Use SVG Fonts in Photoshop

The font I’ll be using to show you how to use SVG fonts in Photoshop is Bluesky SVG Font and comes in shades of blue. This SVG font script has an amazing 3D look because of the shadows included in each SVG font glyph.

Bluesky SVG Font
Bluesky SVG Font

In Photoshop, select the Text Tool (T), create a text box on the page, and add your content. On the toolbar, select the SVG font of your choice. You’ll notice that the logo on the right side of the dropdown menu displays the OTF logo with a small SVG logo. 

how to use SVG fonts in Photoshop select the text tool and choose your custom font in SVG

To change the color of this particular font, head over to the Layers panel. Right-click on the text layer and select Blending Options. In the pop-up window, check the Color Overlay option and click on it to open the settings. Set the Blend Mode to Color, click on the color swatch, and choose the color of your choice. I’ll change the color to orange to make the SVG font bolder. Click OK

how to use SVG fonts in Photoshop select the blending option and color

What about if you have a font with multiple colors? For this example of how to use SVG fonts in Photoshop, we’ll be using Color Paper Color Fonts. The designer wanted to make the SVG font appear as if it has multiple layers. The result is an amazing mix of multiple dimensions and colors. 

Color Paper Color Fonts

For fonts with multiple colors like Color Paper 3D, you have the option to use the method we described before. That method will allow you to coat the characters with shades of one color. 

If you’re looking to maintain the variety of colors that come with the font, head over to the Layers panel. Click on Create a New Fill or Adjustment Layer > Hue/Saturation. Press the Option key and click on the new layer to create a Clipping Mask. Head over to the Properties panel, where you can change the color by sliding the Hue, Saturation, and Lightness options. 

If you’re looking to get more specific, click on the Master dropdown menu and select each color. Tweak each one with the sliders underneath. 

SVG color font add an adjustment layer and change the huesaturation

How to Create Font Icons From SVG

Icon fonts are mainly used as web fonts because the icons are scalable CSS properties like different colors, and shadows can be applied. All of this can be done with a better speed performance as the icons load faster. The only disadvantage is due to the many different web browsers, meaning that smoothing of the icons is unreliable. There are plenty of free and paid tools online that can help you convert SVG files to font icons like IcoMoon and Fontello

To create the font icons, make sure you have the files saved as SVG from Photoshop or Illustrator. In IcoMoon, import the SVG files, select the icons you want to generate, and click on Generate Font

Select the individual SVG files from your computer and click Open

You’ll be able to rename each file, and you can proceed to download them. You’ll also be able to get the code to use on your website. You can also create a font file from SVG with this same method and have your own custom font in SVG.

After importing allt he SVG files for your font click on Generate Font

If you are wondering how to convert SVG files to fonts, the process is exactly the same. Draw each character in vector or bitmap format, using Adobe Illustrator or Adobe Photoshop. You can use the same applications as above or paid software like Glyphs, professional font editing software that lets you import SVG files to create each font character. Now you’re ready to make SVG fonts!

Envato Elements Assets: SVG Font Library

SVG fonts are mainly used as display SVG fonts rather than body text. That’s because they hold special information that will help your text stand out. These fonts are flashier and visually complex—that’s why they contain so many attributes. Use them in signage, logos, posters, headlines, book covers, etc. We’ve gathered some really awesome options from Envato Elements that we think you should check out: 

Hamilton SVG Font Collection

Looking for SVG monogram fonts? Search no more! This pack contains SVG font’s boldest options. You’ll receive a serif, sans serif, and script fonts. The fonts have a hand-crafted feel, and they’re suitable for classic and vintage brands.

Hamilton SVG Font Collection

Bouqet Flower & Watercolor SVG Font

Each SVG font glyph is perfectly unique in this set. The font has two versions, one with real flowers and one with a watercolor effect. If you don’t have the latest Photoshop version, you’ll receive the PSD file so you can use the individual characters. This SVG font is bold and will stand out anywhere you use it. 

Bouqet Flower  Watercolor SVG Font
Bouqet Flower & Watercolor SVG Font

Astute & Dude SVG Font & Solid

Looking for an awesome hand-painted brush font? Each SVG font glyph is high-resolution, and the strokes on the characters overlap, adding a nice texture and depth. This font is so authentic to the human hand that people won’t know it’s an SVG file. 

Astute  Dude SVG Font Solid
Astute & Dude SVG Font & Solid

Aston Vintage Color Font

If you’re branding a project and want to create an outstanding mark, Aston Vintage would make a great SVG monogram font. The decorative font has an old-fashioned and super ornamental look, suitable for a whiskey brand or a brand that prides itself in being trusted.

Aston Vintage Color Font

Light Shutter SVG Font

This modern SVG calligraphy font is beautifully designed. The SVG format allows it to have a watercolor effect, so it’s perfect for wedding invitations if you want something cost-effective. The pack comes with many glyphs that help your design look natural. 

Light Shutter SVG Font

Thinks OpenType SVG Font

To step away from watercolor, this SVG font is a bold move because it uses oil paint. The SVG glyphs have a thicker consistency, even in the texture. The high-resolution brush strokes make it look hyper-realistic. This experimental font is suitable for digital lettering, packaging, and much more!

Thinks OpenType SVG Font

Simbox Geometric Font

Simbox is an awesome example of how SVG font designs can be applied. This sans serif SVG font is a bold style with its geometric shapes. The color elements just make the whole thing pop, making the font out of the ordinary, eccentric, and perfect for display designs. 

Simbox Geometric Font

10 Color SVG Fonts Library

Need lots of options in your SVG font library? This is the ultimate pack to have in your arsenal. There are ten fonts included with different themes, from a sandy beach to coin-inspired forms and different fabric textures. 

10 Color SVG Fonts Library

Snowy Winter Floral SVG Color Font

Designers are taking full advantage of thematic SVG font formats. This SVG font is bold and delicate at the same time. The typeforms are bold but sit on the background and are adorned with beautiful winter flowers. Use this SVG font for your next Christmas card!

Snowy Winter Floral SVG Color Font

Monopixel Awesome

Check out this awesome font style! This reimagining of the classic monospace font is innovative and includes multiple colored pixels that make out each SVG font glyph. This colorful font is fun and cute—ready for the next gaming event? 

Monopixel Awesome
Monopixel Awesome

What Are Your Favorite SVG Fonts?

SVG fonts are the latest advance in the font format world, which had stayed pretty quiet for a while. This push forward for fonts resulted in more dynamic and interactive fonts that can create even more striking designs.

In this article, we covered what an SVG font is, how to create font files from SVG files, how to create font icons from SVG, and how to use an SVG font. Those are all the basics you need to dive in and get on the SVG bandwagon. They are a pretty great option if you want to take your design to the next level! Let us know in the comment section below: what are your favorite SVG fonts?

If you’re pressed for time and you’re looking for some high-quality SVG fonts, be sure to check out Envato Elements and GraphicRiver for some superb SVG glyphs and SVG color fonts. Looking for free SVG fonts? Check out FontSpace’s SVG font library—they’ve got great options there!