Archiwum kategorii: Web Tools

What Is Art Nouveau?

Post pobrano z: What Is Art Nouveau?

The ornamental Art Nouveau design style emerged in France in the late 19th century and became widely popular across Europe, with the style applied to art, architecture, posters, jewelry, furniture, and textiles. 

mucha dance
Alphonse Mucha’s artwork for Dance, 1898.

Although Art Nouveau had fallen out of fashion by 1910, contemporary designers and illustrators are now revisiting and modernising the style to bring an emotive, romantic quality to their work.

Here, we’ll look at the defining characteristics of the Art Nouveau movement and how you can emulate the style in your own designs. 

Love the Art Nouveau style? Make a head start on creating your own decorative designs by picking up borders, patterns and fonts in the Art Nouveau style from GraphicRiver and Envato Elements.

What Is Art Nouveau?

Towards the end of the 19th century, some artists felt limited by the style of ‘academic art’ which had been popular for many decades. Initially in France, a few artists broke away from the rigours of the old academic style and started to create art that explored organic, highly decorative forms in a more stylized and sensual way.

In 1895, the art dealer Siegfried Bing opened the Maison de l’Art Nouveau, a new art gallery in Paris. Through the gallery, Bing sold fabrics designed by William Morris and glassware by Tiffany, and showcased paintings and furniture in the Art Nouveau style. 

gallery entrance
Photograph of the entrance to the Maison de l’Art Nouveau on 22 Rue de Provence in Paris.

The style became hugely popular, not only in France but across Europe and America too. Artists like Alphonse Mucha helped to popularise the style by creating advertisements and postcards in the Art Nouveau style, promoting cigarettes, alcohol, and confectionery. 

mucha champagne
Alphonse Mucha’s poster artwork for Moët & Chandon Crémant Impérial, 1899.

Art Nouveau was a total art form, meaning that its influence could be seen across a wide range of fine and decorative arts, including architecture, furniture, and illustration. Inspired by the curved, organic forms of plants and flowers, Art Nouveau is a highly decorative, romantic and ornate style which is undeniably very beautiful to look at.

tassel house
The Art Nouveau stairway of Tassel House in Brussels, designed by Victor Horta.

How You Can Create Your Own Art Nouveau Designs and Illustrations

While the minimal lines of modernism or the geometric symmetry of Art Deco hold a lot of appeal for designers today, many illustrators and designers are choosing to revisit the more organic style of Art Nouveau. Perhaps in line with the current trend for maximalism in design, Art Nouveau suddenly feels fresher and more relevant for now. 

Here we’ll look at some tips for creating your own Art Nouveau-inspired designs and illustrations.

1. Look to the Greats for Inspiration

If you’re new to working with an Art Nouveau style, it’s always a good idea to seek out some inspiration first. 

If you look at the work of some of the best-known Art Nouveau artists, you can start to spot common traits and identify some of the key defining characteristics of the style, which you can then apply to your own work. 

mucha poster
Vector illustration inspired by Mucha’s distinctive style. Learn how to create this illustration here.

The Czech painter Alphonse Mucha is probably the most widely known Art Nouveau artist, with his poster artwork being an elegant symbol of cafe culture the world over. Mucha’s paintings have a very distinctive style which remains a popular influence for illustrators and graphic artists today. 

The main hallmark of Mucha’s style is often a central female figure, pictured in a sensual, relaxed pose and dressed in classical costume. The hair is often a key element of the design, creating a long, curving point of focus around the figure and emphasising movement. For illustrators, a simple tip for emulating Mucha’s style is to create a thicker line around the silhouette of the figure and the edge of the hair, which pulls the central figure forward from the rest of the image. 

mucha dance
Alphonse Mucha’s artwork for Dance, 1898.

The figure is often surrounded by a highly decorative border, filled with nature-inspired elements like plants, flowers, seashells, or peacock feathers. Rounded, ornate typography is placed behind the figure, giving an almost three-dimensional quality to the design. 

The colors used in the design are also inspired by nature, with warm, earthy tones like terracotta, peach and orange being used alongside leafy greens and sky blues. 

This tutorial is a great introduction to how to emulate Mucha’s style in vector illustration. 

2. Borders and Dividers Should Be Ornate and Symmetrical

Art Nouveau is a maximalist design style, so aim to fill any white space on your layout with decorative elements like borders, frames, and dividers. 

Look for vector ornaments which use flowing lines, curved edges, and decorative corners. Organic and nature-inspired elements like vines, feathers and flowers will add to the overall Art Nouveau look. 

This ornament pack is really versatile, allowing you to combine different elements to create a nod to Nouveau style or build up an elaborate design with vine and leaf embellishments.

ornaments pack
Vitis ornaments vector pack.

This set of frames and banners features plenty of natural elements like flowers and leaves to help you create a vintage look.

frames
Set of vector frames and banners.

How can you ensure your design looks beautiful and not overly busy? Art Nouveau designs still use a high degree of symmetry to pull the design together, so make sure to flip your borders to create a pleasing mirrored effect. 

3. Look for Belle-Epoque-Inspired Fonts

Typography is a key part of any Art Nouveau-style layout. The original Art Nouveau type styles were developed and drawn by hand, giving them a curved, natural design. 

Typefaces which are inspired directly by the Art Nouveau movement retain this hand-drawn feel. De Arloy is an authentic replication of Art Nouveau script styles. Delicate serifs and curved ligatures make this a beautiful font choice for poster designs or branding. 

de arloy
De Arloy font.
de arloy
De Arloy font.

You can find other typefaces which make a nod to the Art Nouveau era, while retaining a contemporary feel. Naive Inline wouldn’t look out of place on a vintage postcard or in a Wes Anderson movie.

naive inline
Naive Inline font family.

4. Try the Style on Stationery and Invitations

The Art Nouveau style isn’t limited to illustrations. You can also emulate the style on simple, type-only layouts by selecting the right font, borders, and colors.

invite

Because Art Nouveau is romantic and emotive, it works particularly well for wedding stationery. Try creating an Art Nouveau design for an invitation or save-the-date card to play up the romantic sensibilities of the style. Touches of metallic foil on borders and typography can make the design feel luxurious and extra special. 

In this tutorial, you’ll learn how to create a wedding invitation in InDesign which uses a stripped-back Art Nouveau style.

Looking for a quick fix? This business card template demonstrates how the Art Nouveau style can really suit luxury branding. Why not try adapting the design to a wine, food or restaurant business?

business card
Art Nouveau business card template.

5. Use Highlights and Shadows to Create a Modern Effect

Art Nouveau can easily stray into stuffy or old-fashioned territory, particularly if you stick rigidly to an authentic Nouveau style. Some of the best examples of modern Art Nouveau design give the style a unique twist, which keeps the style looking fresh and exciting. 

Try switching a muted color palette for bright neons or pastels. Or incorporate an unexpected subject into your design, like the quirky robot in this vector tutorial.  
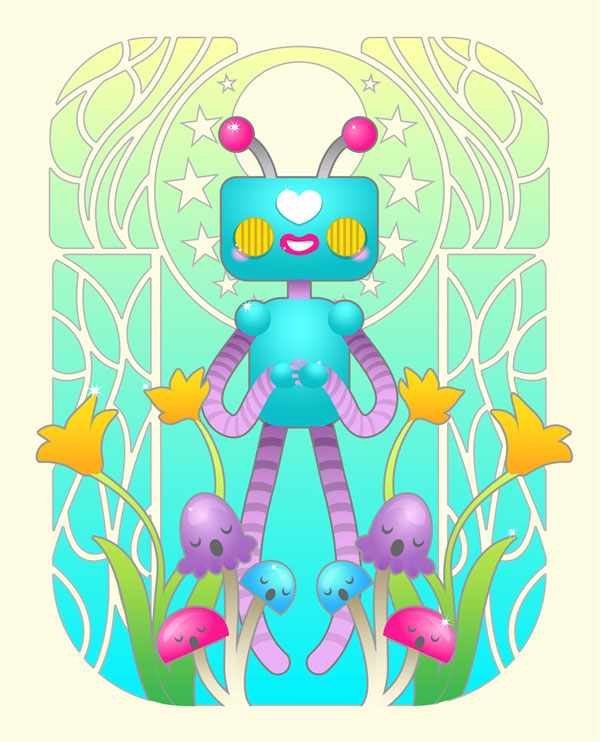
vector robot

Traditional Art Nouveau artwork uses flat design, which creates a collage-style effect. A 3D look was given to the designs through the creation of layers of flat artwork, overlapping elements, and thickly-drawn silhouettes.

Now that we have access to digital software, it’s much easier to break away from the flat style of authentic Art Nouveau and add textures, highlights and shadows to cultivate a more modern 3D look. This tutorial shows how blending a modern vector illustration style with Art Nouveau traits can give an illustration an immersive, pop-culture style. 

glinda

Conclusion: The 'New’ Art Nouveau Style

Art Nouveau fell out of fashion in Europe after 1910, with Art Deco and later Modernism becoming the defining design styles of the 20th century. However, although Art Nouveau’s heyday was short-lived (spanning about 20 years), its influence on graphic design and illustration since has been considerable, and many contemporary graphic artists are now revisiting the style for its beauty, ornamental qualities, and romance. 

Here, we’ve looked at a few tips for how you can emulate the Art Nouveau style in your own work, as well as suggesting some ideas for giving the style a modern twist.

To recap, authentic Art Nouveau graphic art and illustration is defined by:

  • organic, curved lines and graphics, inspired by natural forms like plants and flowers
  • symmetrical layouts and heavy embellishment
  • earthy, nature-inspired colors
  • romantic, often female, subjects, inspired by classical mythology
  • hand-drawn, rounded typography, which is often placed inside decorative banners or borders

You can bring a modern update to the Art Nouveau style by experimenting with a more unconventional color palette, incorporating unusual subjects into your designs, or stripping back your design to create a more minimal layout.

You can find plenty of Art Nouveau and Belle Epoque borders, patterns and fonts over on GraphicRiver and Envato Elements to use on your designs.

art nouveau
20 Art Nouveau vector ornaments.

How to Create a Stylish Magazine Layout in Affinity Publisher

Post pobrano z: How to Create a Stylish Magazine Layout in Affinity Publisher

Final product image
What You’ll Be Creating

In this tutorial, you’ll learn how to create a simple and stylish magazine spread using Affinity Publisher, the great-value and easy-to-use alternative to Adobe InDesign. 

You’ll pick up some versatile editorial design skills, as well as getting to know your way around the Publisher workspace. Although currently available only as a beta download, Affinity Publisher is slated for release later in the year, so watch this space. 

Need a quick solution for creating your own magazine designs? You can find a wide range of easy-to-edit magazine templates on Envato Elements and GraphicRiver.

What You’ll Need to Create Your Magazine Layout

You can download a free beta version of Affinity Publisher from the Serif website. You’ll also need to download the following fonts and photo from Envato Elements to create the design of the spread pictured: 

Install the fonts on your computer, and you’re ready to get started!

1. How to Set Up a Magazine Document in Affinity Publisher

Step 1

Open up Affinity Publisher, and go to File > New.

With the Type set to Print, choose Letter from the Page Preset menu.

letter page size

With Facing Pages checked, choose Left from the Start on menu. Normally, if you were creating a full magazine, you would choose to start the document on a right page, but for our purposes here of creating one spread, a left-hand page start will suit us. 

left page start

From the Color Format menu, choose CMYK/8.

cmyk color

Check the Include Margins box, and set the Inner and Bottom Margin to 1.25 in, and the Top and Outer Margin to 1 in. 

Then click OK

margins

Step 2

With your document created, you’ll need to add a bleed to the pages. 

Go to File > Document Setup, and click on Bleed from the trio of menu options in the middle of the window. Set the Bleed to 0.25 in, and then click OK

document bleed

Step 3

On the left side of the workspace, you can see the Pages panel. 

Click on the Add Pages button at the top of the panel, and add one more page to the document. 

add pages
extra page

Step 4

From the Master Pages panel above, click on the Add Master button. 

add master

Name the master Spread Master and select Facing. All of the remaining options should match the existing settings for the other pages in your document, so keep them as they are and click OK.

new master

Drag the Spread Master down onto Pages 1 and 2 in the Pages panel, to apply the master to both pages in your document. 

spread master

Step 5

To help you guide text and content into the right position, it’s a good idea to at least have the margins visible. 

Go to View > Show Margins. 

show margins

Step 6

We’re going to use a very simple color palette in our design—just yellow and black. 

In the Swatches panel (docked on the right side of the workspace), choose Add Global Color from the dropdown menu. 

add global color

In the window that opens, name the color Yellow and choose CMYK Sliders from the menu below this. 

cmyk sliders

Set the levels to C=2 M=24 Y=95 and K=0, before clicking Add

global color

2. How to Format Elements on Your Master Spread

Step 1

Double-click on the Spread Master icon in the Master Pages panel to bring it up on screen.

Choose the Frame Text Tool (T) from the Tools panel, and drag across the bottom-left corner of the left-hand master page to create a small text frame.

text frame

Type in two forward slashes (//), highlight the text, and from the Character panel (on the right side of the workspace), set the Font to Bw Modelica Bold, Size 10 pt. Set the Font Color to Yellow

yellow font color

Step 2

With your text tool cursor set in the text frame, after the slashes, go to Text > Insert > Page Number. 

insert page number

Adjust the Font Color of this page number to Black

black page number

Step 3

Select the whole text frame with the Move Tool (V) and Edit > Copy and Edit > Paste the frame, moving the copy over to the right corner of the right-hand master page. 

From the top Controls panel, adjust the text to Right Align.

page number pasted

Step 4

Use the Frame Text Tool (T) to create a frame across the top-left corner of the left-hand master page. 

Here you can type in a running header, such as the magazine title and issue number.

Mix up the fonts for interest, setting some text in a sans serif, like Bw Modelica, and some in a serif, like Addington CF

addington font

Highlight some of the words and change the Font Color to Yellow

font color yellow

Step 5

Switch to the Pen Tool and, while holding down Shift, click once on the pasteboard to the left of the running header, and once again where the header begins. 

From the top Controls panel, set the Stroke Color to Yellow and the Weight of the stroke to 0.9 pt. 

weight stroke

Step 6

Copy and Paste the yellow line, positioning the copy to the right of the header text. 

pasted line

Then extend the right edge of the line so that it extends across the remainder of the left page and right page, across the whole spread. 

line extended

Select the Transparency Tool and click once about a third of the way along the left side of the longer line. Click again at the far-right edge of the line, creating a gradual gradient effect across the line.

transparency tool
master spread

3. How to Build Up Typography on Your Magazine Spread

Step 1

Double-click on Page 1 in the Pages panel to bring it up on screen. 

Use the Frame Text Tool (T) to create a single tall text frame resting against the left and bottom margin. 

text frame

Step 2

Click on the small triangle shape on the bottom-right of the text frame to create a linked text frame. 

Click and drag to the right of the first text frame to create a second linked column. A ‘thread’ will appear between the two frames, showing that they are linked. 

linked frames

Step 3

You can either type in text directly, paste it over from a Word document, or go to Text > Insert Filler Text to create temporary text for your columns. 

Set the Font to Addington CF Regular, Size 10.5 pt, and set the Leading to 15 pt. 

text frames

You can add more interest to your column text by pulling out the first line in a Yellow Font Color, a Bold weight, and a larger 14 pt Font Size. 

yellow font color

Step 4

Create a very large text frame, matching the height of the columns, overlapping the right column and extending across the width of the right page. 

Type in ‘GO’, setting the Font to Bw Modelica Medium, Size 610 pt, and Font Color to Yellow. 

font modelica

Step 5

From the Layers panel (on the right side of the workspace) bring the Opacity of the text frame down to 95%.

layers panel

Use the Transparency Tool to create a gradient effect across the right side of the text frame. 

transparency tool

Step 6

With the text frame selected, click on the Move to Back button in the top Controls panel, to bring the column text forward and make it more legible. 

move to back
gradient effect

4. How to Add an Image to Your Magazine Spread

Step 1

Select the Picture Frame Tool and drag across the right-hand page, creating a frame just shy of the height of the columns. 

image frame

Go to File > Place. Navigate to the image of the racing greyhound you downloaded earlier, and click Open

Use Shift to scale the image inside the frame, before clicking Flip Horizontal in the top Controls panel to flip the image so that the dog is facing towards the center of the spread.

flip horizontal

Step 2

With the image frame selected, click on Move to Back at the top of the workspace.

image frame

5. How to Add a Pull Quote to Your Layout

Step 1

Use the Frame Text Tool (T) to create a text frame across the top-right of Page 2

frame text tool

Type in a pull quote, only typing an apostrophe at the end of the quote. Set the Font to Addington CF, Medium Italic, Size 45 pt.

medium italic

Switch the font weight of some of the text, such as pulling out certain phrases in Thin Italic, to create contrast and improve readability.

thin italic

Step 2

Highlight some of the text and switch the Font Color to Yellow.

yellow color

Create a separate small text frame at the top-left corner of the pull quote frame, and type in an opening apostrophe (“). Set the Font to Addington CF Thin Italic, Size 160 pt, and the Font Color to Yellow. 

apostrophe

6. How to Export Your Magazine Artwork

Whether you create a single spread or a whole magazine, the process of exporting your artwork in Affinity Publisher for printing is quick and simple.

Go to File > Export. 

Click on PDF from the options running along the top of the window.

Choose PDF (for print) from the Preset menu, before clicking Export

pdf export

Conclusion: Your Finished Magazine Layout

Your magazine spread is finished and exported, ready to be printed. Great job!

final magazine

In this tutorial, you’ve picked up a range of techniques and skills you can apply to editorial projects and other work using Affinity Publisher. 

Looking for a quick and easy way to get started with creating your own magazine? Discover a huge range of easy-to-edit magazine templates on Envato Elements and GraphicRiver.

If you’re on the hunt for more magazine design tips, don’t miss these other tutorials:

How to Create a Stylish Magazine Layout in Affinity Publisher

Post pobrano z: How to Create a Stylish Magazine Layout in Affinity Publisher

Final product image
What You’ll Be Creating

In this tutorial, you’ll learn how to create a simple and stylish magazine spread using Affinity Publisher, the great-value and easy-to-use alternative to Adobe InDesign. 

You’ll pick up some versatile editorial design skills, as well as getting to know your way around the Publisher workspace. Although currently available only as a beta download, Affinity Publisher is slated for release later in the year, so watch this space. 

Need a quick solution for creating your own magazine designs? You can find a wide range of easy-to-edit magazine templates on Envato Elements and GraphicRiver.

What You’ll Need to Create Your Magazine Layout

You can download a free beta version of Affinity Publisher from the Serif website. You’ll also need to download the following fonts and photo from Envato Elements to create the design of the spread pictured: 

Install the fonts on your computer, and you’re ready to get started!

1. How to Set Up a Magazine Document in Affinity Publisher

Step 1

Open up Affinity Publisher, and go to File > New.

With the Type set to Print, choose Letter from the Page Preset menu.

letter page size

With Facing Pages checked, choose Left from the Start on menu. Normally, if you were creating a full magazine, you would choose to start the document on a right page, but for our purposes here of creating one spread, a left-hand page start will suit us. 

left page start

From the Color Format menu, choose CMYK/8.

cmyk color

Check the Include Margins box, and set the Inner and Bottom Margin to 1.25 in, and the Top and Outer Margin to 1 in. 

Then click OK

margins

Step 2

With your document created, you’ll need to add a bleed to the pages. 

Go to File > Document Setup, and click on Bleed from the trio of menu options in the middle of the window. Set the Bleed to 0.25 in, and then click OK

document bleed

Step 3

On the left side of the workspace, you can see the Pages panel. 

Click on the Add Pages button at the top of the panel, and add one more page to the document. 

add pages
extra page

Step 4

From the Master Pages panel above, click on the Add Master button. 

add master

Name the master Spread Master and select Facing. All of the remaining options should match the existing settings for the other pages in your document, so keep them as they are and click OK.

new master

Drag the Spread Master down onto Pages 1 and 2 in the Pages panel, to apply the master to both pages in your document. 

spread master

Step 5

To help you guide text and content into the right position, it’s a good idea to at least have the margins visible. 

Go to View > Show Margins. 

show margins

Step 6

We’re going to use a very simple color palette in our design—just yellow and black. 

In the Swatches panel (docked on the right side of the workspace), choose Add Global Color from the dropdown menu. 

add global color

In the window that opens, name the color Yellow and choose CMYK Sliders from the menu below this. 

cmyk sliders

Set the levels to C=2 M=24 Y=95 and K=0, before clicking Add

global color

2. How to Format Elements on Your Master Spread

Step 1

Double-click on the Spread Master icon in the Master Pages panel to bring it up on screen.

Choose the Frame Text Tool (T) from the Tools panel, and drag across the bottom-left corner of the left-hand master page to create a small text frame.

text frame

Type in two forward slashes (//), highlight the text, and from the Character panel (on the right side of the workspace), set the Font to Bw Modelica Bold, Size 10 pt. Set the Font Color to Yellow

yellow font color

Step 2

With your text tool cursor set in the text frame, after the slashes, go to Text > Insert > Page Number. 

insert page number

Adjust the Font Color of this page number to Black

black page number

Step 3

Select the whole text frame with the Move Tool (V) and Edit > Copy and Edit > Paste the frame, moving the copy over to the right corner of the right-hand master page. 

From the top Controls panel, adjust the text to Right Align.

page number pasted

Step 4

Use the Frame Text Tool (T) to create a frame across the top-left corner of the left-hand master page. 

Here you can type in a running header, such as the magazine title and issue number.

Mix up the fonts for interest, setting some text in a sans serif, like Bw Modelica, and some in a serif, like Addington CF

addington font

Highlight some of the words and change the Font Color to Yellow

font color yellow

Step 5

Switch to the Pen Tool and, while holding down Shift, click once on the pasteboard to the left of the running header, and once again where the header begins. 

From the top Controls panel, set the Stroke Color to Yellow and the Weight of the stroke to 0.9 pt. 

weight stroke

Step 6

Copy and Paste the yellow line, positioning the copy to the right of the header text. 

pasted line

Then extend the right edge of the line so that it extends across the remainder of the left page and right page, across the whole spread. 

line extended

Select the Transparency Tool and click once about a third of the way along the left side of the longer line. Click again at the far-right edge of the line, creating a gradual gradient effect across the line.

transparency tool
master spread

3. How to Build Up Typography on Your Magazine Spread

Step 1

Double-click on Page 1 in the Pages panel to bring it up on screen. 

Use the Frame Text Tool (T) to create a single tall text frame resting against the left and bottom margin. 

text frame

Step 2

Click on the small triangle shape on the bottom-right of the text frame to create a linked text frame. 

Click and drag to the right of the first text frame to create a second linked column. A ‘thread’ will appear between the two frames, showing that they are linked. 

linked frames

Step 3

You can either type in text directly, paste it over from a Word document, or go to Text > Insert Filler Text to create temporary text for your columns. 

Set the Font to Addington CF Regular, Size 10.5 pt, and set the Leading to 15 pt. 

text frames

You can add more interest to your column text by pulling out the first line in a Yellow Font Color, a Bold weight, and a larger 14 pt Font Size. 

yellow font color

Step 4

Create a very large text frame, matching the height of the columns, overlapping the right column and extending across the width of the right page. 

Type in ‘GO’, setting the Font to Bw Modelica Medium, Size 610 pt, and Font Color to Yellow. 

font modelica

Step 5

From the Layers panel (on the right side of the workspace) bring the Opacity of the text frame down to 95%.

layers panel

Use the Transparency Tool to create a gradient effect across the right side of the text frame. 

transparency tool

Step 6

With the text frame selected, click on the Move to Back button in the top Controls panel, to bring the column text forward and make it more legible. 

move to back
gradient effect

4. How to Add an Image to Your Magazine Spread

Step 1

Select the Picture Frame Tool and drag across the right-hand page, creating a frame just shy of the height of the columns. 

image frame

Go to File > Place. Navigate to the image of the racing greyhound you downloaded earlier, and click Open

Use Shift to scale the image inside the frame, before clicking Flip Horizontal in the top Controls panel to flip the image so that the dog is facing towards the center of the spread.

flip horizontal

Step 2

With the image frame selected, click on Move to Back at the top of the workspace.

image frame

5. How to Add a Pull Quote to Your Layout

Step 1

Use the Frame Text Tool (T) to create a text frame across the top-right of Page 2

frame text tool

Type in a pull quote, only typing an apostrophe at the end of the quote. Set the Font to Addington CF, Medium Italic, Size 45 pt.

medium italic

Switch the font weight of some of the text, such as pulling out certain phrases in Thin Italic, to create contrast and improve readability.

thin italic

Step 2

Highlight some of the text and switch the Font Color to Yellow.

yellow color

Create a separate small text frame at the top-left corner of the pull quote frame, and type in an opening apostrophe (“). Set the Font to Addington CF Thin Italic, Size 160 pt, and the Font Color to Yellow. 

apostrophe

6. How to Export Your Magazine Artwork

Whether you create a single spread or a whole magazine, the process of exporting your artwork in Affinity Publisher for printing is quick and simple.

Go to File > Export. 

Click on PDF from the options running along the top of the window.

Choose PDF (for print) from the Preset menu, before clicking Export

pdf export

Conclusion: Your Finished Magazine Layout

Your magazine spread is finished and exported, ready to be printed. Great job!

final magazine

In this tutorial, you’ve picked up a range of techniques and skills you can apply to editorial projects and other work using Affinity Publisher. 

Looking for a quick and easy way to get started with creating your own magazine? Discover a huge range of easy-to-edit magazine templates on Envato Elements and GraphicRiver.

If you’re on the hunt for more magazine design tips, don’t miss these other tutorials:

How to Create a Stylish Magazine Layout in Affinity Publisher

Post pobrano z: How to Create a Stylish Magazine Layout in Affinity Publisher

Final product image
What You’ll Be Creating

In this tutorial, you’ll learn how to create a simple and stylish magazine spread using Affinity Publisher, the great-value and easy-to-use alternative to Adobe InDesign. 

You’ll pick up some versatile editorial design skills, as well as getting to know your way around the Publisher workspace. Although currently available only as a beta download, Affinity Publisher is slated for release later in the year, so watch this space. 

Need a quick solution for creating your own magazine designs? You can find a wide range of easy-to-edit magazine templates on Envato Elements and GraphicRiver.

What You’ll Need to Create Your Magazine Layout

You can download a free beta version of Affinity Publisher from the Serif website. You’ll also need to download the following fonts and photo from Envato Elements to create the design of the spread pictured: 

Install the fonts on your computer, and you’re ready to get started!

1. How to Set Up a Magazine Document in Affinity Publisher

Step 1

Open up Affinity Publisher, and go to File > New.

With the Type set to Print, choose Letter from the Page Preset menu.

letter page size

With Facing Pages checked, choose Left from the Start on menu. Normally, if you were creating a full magazine, you would choose to start the document on a right page, but for our purposes here of creating one spread, a left-hand page start will suit us. 

left page start

From the Color Format menu, choose CMYK/8.

cmyk color

Check the Include Margins box, and set the Inner and Bottom Margin to 1.25 in, and the Top and Outer Margin to 1 in. 

Then click OK

margins

Step 2

With your document created, you’ll need to add a bleed to the pages. 

Go to File > Document Setup, and click on Bleed from the trio of menu options in the middle of the window. Set the Bleed to 0.25 in, and then click OK

document bleed

Step 3

On the left side of the workspace, you can see the Pages panel. 

Click on the Add Pages button at the top of the panel, and add one more page to the document. 

add pages
extra page

Step 4

From the Master Pages panel above, click on the Add Master button. 

add master

Name the master Spread Master and select Facing. All of the remaining options should match the existing settings for the other pages in your document, so keep them as they are and click OK.

new master

Drag the Spread Master down onto Pages 1 and 2 in the Pages panel, to apply the master to both pages in your document. 

spread master

Step 5

To help you guide text and content into the right position, it’s a good idea to at least have the margins visible. 

Go to View > Show Margins. 

show margins

Step 6

We’re going to use a very simple color palette in our design—just yellow and black. 

In the Swatches panel (docked on the right side of the workspace), choose Add Global Color from the dropdown menu. 

add global color

In the window that opens, name the color Yellow and choose CMYK Sliders from the menu below this. 

cmyk sliders

Set the levels to C=2 M=24 Y=95 and K=0, before clicking Add

global color

2. How to Format Elements on Your Master Spread

Step 1

Double-click on the Spread Master icon in the Master Pages panel to bring it up on screen.

Choose the Frame Text Tool (T) from the Tools panel, and drag across the bottom-left corner of the left-hand master page to create a small text frame.

text frame

Type in two forward slashes (//), highlight the text, and from the Character panel (on the right side of the workspace), set the Font to Bw Modelica Bold, Size 10 pt. Set the Font Color to Yellow

yellow font color

Step 2

With your text tool cursor set in the text frame, after the slashes, go to Text > Insert > Page Number. 

insert page number

Adjust the Font Color of this page number to Black

black page number

Step 3

Select the whole text frame with the Move Tool (V) and Edit > Copy and Edit > Paste the frame, moving the copy over to the right corner of the right-hand master page. 

From the top Controls panel, adjust the text to Right Align.

page number pasted

Step 4

Use the Frame Text Tool (T) to create a frame across the top-left corner of the left-hand master page. 

Here you can type in a running header, such as the magazine title and issue number.

Mix up the fonts for interest, setting some text in a sans serif, like Bw Modelica, and some in a serif, like Addington CF

addington font

Highlight some of the words and change the Font Color to Yellow

font color yellow

Step 5

Switch to the Pen Tool and, while holding down Shift, click once on the pasteboard to the left of the running header, and once again where the header begins. 

From the top Controls panel, set the Stroke Color to Yellow and the Weight of the stroke to 0.9 pt. 

weight stroke

Step 6

Copy and Paste the yellow line, positioning the copy to the right of the header text. 

pasted line

Then extend the right edge of the line so that it extends across the remainder of the left page and right page, across the whole spread. 

line extended

Select the Transparency Tool and click once about a third of the way along the left side of the longer line. Click again at the far-right edge of the line, creating a gradual gradient effect across the line.

transparency tool
master spread

3. How to Build Up Typography on Your Magazine Spread

Step 1

Double-click on Page 1 in the Pages panel to bring it up on screen. 

Use the Frame Text Tool (T) to create a single tall text frame resting against the left and bottom margin. 

text frame

Step 2

Click on the small triangle shape on the bottom-right of the text frame to create a linked text frame. 

Click and drag to the right of the first text frame to create a second linked column. A ‘thread’ will appear between the two frames, showing that they are linked. 

linked frames

Step 3

You can either type in text directly, paste it over from a Word document, or go to Text > Insert Filler Text to create temporary text for your columns. 

Set the Font to Addington CF Regular, Size 10.5 pt, and set the Leading to 15 pt. 

text frames

You can add more interest to your column text by pulling out the first line in a Yellow Font Color, a Bold weight, and a larger 14 pt Font Size. 

yellow font color

Step 4

Create a very large text frame, matching the height of the columns, overlapping the right column and extending across the width of the right page. 

Type in ‘GO’, setting the Font to Bw Modelica Medium, Size 610 pt, and Font Color to Yellow. 

font modelica

Step 5

From the Layers panel (on the right side of the workspace) bring the Opacity of the text frame down to 95%.

layers panel

Use the Transparency Tool to create a gradient effect across the right side of the text frame. 

transparency tool

Step 6

With the text frame selected, click on the Move to Back button in the top Controls panel, to bring the column text forward and make it more legible. 

move to back
gradient effect

4. How to Add an Image to Your Magazine Spread

Step 1

Select the Picture Frame Tool and drag across the right-hand page, creating a frame just shy of the height of the columns. 

image frame

Go to File > Place. Navigate to the image of the racing greyhound you downloaded earlier, and click Open

Use Shift to scale the image inside the frame, before clicking Flip Horizontal in the top Controls panel to flip the image so that the dog is facing towards the center of the spread.

flip horizontal

Step 2

With the image frame selected, click on Move to Back at the top of the workspace.

image frame

5. How to Add a Pull Quote to Your Layout

Step 1

Use the Frame Text Tool (T) to create a text frame across the top-right of Page 2

frame text tool

Type in a pull quote, only typing an apostrophe at the end of the quote. Set the Font to Addington CF, Medium Italic, Size 45 pt.

medium italic

Switch the font weight of some of the text, such as pulling out certain phrases in Thin Italic, to create contrast and improve readability.

thin italic

Step 2

Highlight some of the text and switch the Font Color to Yellow.

yellow color

Create a separate small text frame at the top-left corner of the pull quote frame, and type in an opening apostrophe (“). Set the Font to Addington CF Thin Italic, Size 160 pt, and the Font Color to Yellow. 

apostrophe

6. How to Export Your Magazine Artwork

Whether you create a single spread or a whole magazine, the process of exporting your artwork in Affinity Publisher for printing is quick and simple.

Go to File > Export. 

Click on PDF from the options running along the top of the window.

Choose PDF (for print) from the Preset menu, before clicking Export

pdf export

Conclusion: Your Finished Magazine Layout

Your magazine spread is finished and exported, ready to be printed. Great job!

final magazine

In this tutorial, you’ve picked up a range of techniques and skills you can apply to editorial projects and other work using Affinity Publisher. 

Looking for a quick and easy way to get started with creating your own magazine? Discover a huge range of easy-to-edit magazine templates on Envato Elements and GraphicRiver.

If you’re on the hunt for more magazine design tips, don’t miss these other tutorials:

20 Different Fonts to Make Stylish Graphic Design Projects in 2018

Post pobrano z: 20 Different Fonts to Make Stylish Graphic Design Projects in 2018

Explore different letter fonts to complement your work. Get inspired with this awesome list of new resources for 2018.

Make Stylish Graphic Design Projects With These Fonts

Every designer should have a collection of different font styles in their arsenal. Because no matter the occasion, creative fonts are the best way to upgrade any project.

So today, we’re bringing you another amazing collection of helpful resources from Envato Elements and Envato Market.

Need a different type of font? Check out hundreds of extraordinary styles to pack a punch in your graphic design work.

From dramatic vintage styles to modern sans serif types, these fonts feature some of the hottest trends to hit the scene.

Stay Wildy Font

Embrace your natural side with this beautiful handwritten font. Stay Wildy is a new script style influenced by modern calligraphy. Although this download comes with one font, it allows you to capitalize the letters for a completely different look. Step up your typography game and try it out!

Stay Wildy Font

Knox Font Family

Decorative fonts like the incredible Knox font family simply command attention. And this set features a six-pack font download inspired by American Western culture and tattoos. Give your work that old Western feel you can instantly use for stationery and more.

Knox Font Family

Asans Layered Font

Using a creative font layering method to help make the result, the Asans font even supports multiple languages. Try out three different styles like regular, front and base to complete your text designs. Great for namecards and logos, this font is sure to make you stand out.

Asans Layered Font

La Pimienta Font

Sprinkle
some character into your work with the lovely La Pimienta font.
Designed to be a clean and sophisticated font style that you can apply
to modern designs, this font features an elegant, playful script. Enjoy
the monoline font style for letters, headlines, and logos.

La Pimienta

Sampestera Font

Create
extraordinary posters that highlight your typography skills with the
Sampestera font. A brush calligraphy font with wild script letters, this
font is stylish and versatile. Incorporate it into your wedding
stationery or turn it into a wonderful logo. There are so many options!

Sampestera Font

Madeleine Signature Font

One of the many benefits of an Envato Elements subscription is all the goodies you get within the font packs. The Madeleine Signature font, for instance, features a ton of additional ligatures to make your work look original. Check out the beautiful script style available for multiple languages.

Madeleine Signature Font

Lourena Font

Tackle your next typography project with Lourena, an exclusive elegant font perfect for editorial pieces. With two ornamental styles available, you’ll be able to mix and match letterforms with a minimalist or swirl-inspired combination. Great for logos and headlines!

Lourena Font

Venge Typeface

Next up is Venge, a fashionable display typeface with four different styles. Check out the original typeface graphic featuring tall, elegant letters. Or toggle the settings to get cool effects like this linear style below. You’ll definitely want to add this pack to your collection!

Venge Typeface

Mellony Brush Script 

Need a stunning brush script like the Mellony font? Creatives will love this gorgeous font family with its bouncy baseline and textural letters. Get the most out of your download by trying out the additional bonuses included, like swashes and end characters.

Mellony Brush Script

Dagon Typeface

Creative typefaces should get your audience to stop in their tracks. And the Dagon font is both bold and mysterious. This fun, groovy style features three unique versions with regular, bubbly, and diagonal decorations. Enjoy the retro-futuristic feel with this font pack!

Dagon Typeface

Felix Duo Font

Are you loving the glitch trend too? Designers inspired by the past are taking this creative effect and applying it to their photos, film, and now even fonts! Check out the cool Felix font duo packed with regular and clean styles. Give your work a little more edge with a nice glitch effect!

Felix Duo Font

Jester Display Font

Or get playful with the fun Jester font. A chunky display font with charismatic letters, this font is super approachable and great for animations. Try it out on posters, comics, or even as a new logo font for your next book title. Get a full set of letters, punctuation and more in this set.

Jester Display Font

3D Bulb Lamp Alphabet

Layered font systems work by taking common font styles and stacking them to create artistic text effects. The amazing 3D Bulb Lamp font features a full set of alphabet letters inspired by vintage neon lights. Add authentic grunge textures and more to blow your work out of the water! You’ll like this one!

3D Bulb Lamp Alphabet

eNeon Layered Typeface

Step into the future with the eNeon layered typeface. Featuring three unique styles you can stack together, this pack is inspired by neon signs and the tubes that brighten the streets of many cities. Get access to more than 500 glyphs and international characters in this incredible download.

eNeon Layered Typeface

Beettrot Font

If you’re not confident with your handwriting skills then you’ll definitely love the Beettrot font. This stylish typeface features fluid lines and gorgeous script letters inspired by old brush scripts. Launch your clothing apparel lines, make wedding plans, and so much more with this lovely font.

Beettrot Font

Simpson Font

Do you love the Simpsons? Now you can make funny typography designs with the awesome Simpson font. This classic design features a new upgrade which smooths out the letters for better visibility. Also included in this pack are extended features like European accents and Cyrillic characters.

Simpson Font

Sprint Font

Does design make you feel like you’re running a long marathon? Make the process go by faster with the epic Sprint font. A creative new font with lots of energy, this font dashes across your stationery with darting lines and capital letters. Also included in this pack is a second „Sprinter” version.

Sprint Font

Valenttina Font

Logo design gets a whole lot easier when you pair your company name with the right font style. The Valenttina logotype features a gorgeous, modern design with bold letters. Easily add it to your team logo or try it out with various symbols to see it in action!

Valenttina Font

Geist Typeface

Create your best work to date with the fascinating Geist typeface. A bold, all-caps typeface with eight different styles, this font set is a must-have for any creative. Check out the shadow, vintage, and inline versions on larger sizes for the best possible results.

Geist Typeface

Matilna Samuela Font Duo

Calligraphy brush fonts are popular because they do all the hard work of beautiful handwriting for you. Now you can make masterful script designs with the Matilna Samuela font duo. Perfect for logos, headlines, and blog posts, this font is certainly a stunner!

Matilna Samuela Font Duo

More Font Inspiration

Stay ahead of the trends with different font styles to match any project. Grab a few of your favorites from this selection for the ultimate pack of font goodies.

Want more amazing fonts? Check out these collections:

Tried any of these assets? Let us know! Tell us your favorites in the comments below.

This has been a selection of premium resources perfect for the avid designer. For more different font styles, check out Envato Market and Envato Elements, or enlist the help of our talented designers at Envato Studio. Happy creating!

20 Different Fonts to Make Stylish Graphic Design Projects in 2018

Post pobrano z: 20 Different Fonts to Make Stylish Graphic Design Projects in 2018

Explore different letter fonts to complement your work. Get inspired with this awesome list of new resources for 2018.

Make Stylish Graphic Design Projects With These Fonts

Every designer should have a collection of different font styles in their arsenal. Because no matter the occasion, creative fonts are the best way to upgrade any project.

So today, we’re bringing you another amazing collection of helpful resources from Envato Elements and Envato Market.

Need a different type of font? Check out hundreds of extraordinary styles to pack a punch in your graphic design work.

From dramatic vintage styles to modern sans serif types, these fonts feature some of the hottest trends to hit the scene.

Stay Wildy Font

Embrace your natural side with this beautiful handwritten font. Stay Wildy is a new script style influenced by modern calligraphy. Although this download comes with one font, it allows you to capitalize the letters for a completely different look. Step up your typography game and try it out!

Stay Wildy Font

Knox Font Family

Decorative fonts like the incredible Knox font family simply command attention. And this set features a six-pack font download inspired by American Western culture and tattoos. Give your work that old Western feel you can instantly use for stationery and more.

Knox Font Family

Asans Layered Font

Using a creative font layering method to help make the result, the Asans font even supports multiple languages. Try out three different styles like regular, front and base to complete your text designs. Great for namecards and logos, this font is sure to make you stand out.

Asans Layered Font

La Pimienta Font

Sprinkle
some character into your work with the lovely La Pimienta font.
Designed to be a clean and sophisticated font style that you can apply
to modern designs, this font features an elegant, playful script. Enjoy
the monoline font style for letters, headlines, and logos.

La Pimienta

Sampestera Font

Create
extraordinary posters that highlight your typography skills with the
Sampestera font. A brush calligraphy font with wild script letters, this
font is stylish and versatile. Incorporate it into your wedding
stationery or turn it into a wonderful logo. There are so many options!

Sampestera Font

Madeleine Signature Font

One of the many benefits of an Envato Elements subscription is all the goodies you get within the font packs. The Madeleine Signature font, for instance, features a ton of additional ligatures to make your work look original. Check out the beautiful script style available for multiple languages.

Madeleine Signature Font

Lourena Font

Tackle your next typography project with Lourena, an exclusive elegant font perfect for editorial pieces. With two ornamental styles available, you’ll be able to mix and match letterforms with a minimalist or swirl-inspired combination. Great for logos and headlines!

Lourena Font

Venge Typeface

Next up is Venge, a fashionable display typeface with four different styles. Check out the original typeface graphic featuring tall, elegant letters. Or toggle the settings to get cool effects like this linear style below. You’ll definitely want to add this pack to your collection!

Venge Typeface

Mellony Brush Script 

Need a stunning brush script like the Mellony font? Creatives will love this gorgeous font family with its bouncy baseline and textural letters. Get the most out of your download by trying out the additional bonuses included, like swashes and end characters.

Mellony Brush Script

Dagon Typeface

Creative typefaces should get your audience to stop in their tracks. And the Dagon font is both bold and mysterious. This fun, groovy style features three unique versions with regular, bubbly, and diagonal decorations. Enjoy the retro-futuristic feel with this font pack!

Dagon Typeface

Felix Duo Font

Are you loving the glitch trend too? Designers inspired by the past are taking this creative effect and applying it to their photos, film, and now even fonts! Check out the cool Felix font duo packed with regular and clean styles. Give your work a little more edge with a nice glitch effect!

Felix Duo Font

Jester Display Font

Or get playful with the fun Jester font. A chunky display font with charismatic letters, this font is super approachable and great for animations. Try it out on posters, comics, or even as a new logo font for your next book title. Get a full set of letters, punctuation and more in this set.

Jester Display Font

3D Bulb Lamp Alphabet

Layered font systems work by taking common font styles and stacking them to create artistic text effects. The amazing 3D Bulb Lamp font features a full set of alphabet letters inspired by vintage neon lights. Add authentic grunge textures and more to blow your work out of the water! You’ll like this one!

3D Bulb Lamp Alphabet

eNeon Layered Typeface

Step into the future with the eNeon layered typeface. Featuring three unique styles you can stack together, this pack is inspired by neon signs and the tubes that brighten the streets of many cities. Get access to more than 500 glyphs and international characters in this incredible download.

eNeon Layered Typeface

Beettrot Font

If you’re not confident with your handwriting skills then you’ll definitely love the Beettrot font. This stylish typeface features fluid lines and gorgeous script letters inspired by old brush scripts. Launch your clothing apparel lines, make wedding plans, and so much more with this lovely font.

Beettrot Font

Simpson Font

Do you love the Simpsons? Now you can make funny typography designs with the awesome Simpson font. This classic design features a new upgrade which smooths out the letters for better visibility. Also included in this pack are extended features like European accents and Cyrillic characters.

Simpson Font

Sprint Font

Does design make you feel like you’re running a long marathon? Make the process go by faster with the epic Sprint font. A creative new font with lots of energy, this font dashes across your stationery with darting lines and capital letters. Also included in this pack is a second „Sprinter” version.

Sprint Font

Valenttina Font

Logo design gets a whole lot easier when you pair your company name with the right font style. The Valenttina logotype features a gorgeous, modern design with bold letters. Easily add it to your team logo or try it out with various symbols to see it in action!

Valenttina Font

Geist Typeface

Create your best work to date with the fascinating Geist typeface. A bold, all-caps typeface with eight different styles, this font set is a must-have for any creative. Check out the shadow, vintage, and inline versions on larger sizes for the best possible results.

Geist Typeface

Matilna Samuela Font Duo

Calligraphy brush fonts are popular because they do all the hard work of beautiful handwriting for you. Now you can make masterful script designs with the Matilna Samuela font duo. Perfect for logos, headlines, and blog posts, this font is certainly a stunner!

Matilna Samuela Font Duo

More Font Inspiration

Stay ahead of the trends with different font styles to match any project. Grab a few of your favorites from this selection for the ultimate pack of font goodies.

Want more amazing fonts? Check out these collections:

Tried any of these assets? Let us know! Tell us your favorites in the comments below.

This has been a selection of premium resources perfect for the avid designer. For more different font styles, check out Envato Market and Envato Elements, or enlist the help of our talented designers at Envato Studio. Happy creating!

20 Different Fonts to Make Stylish Graphic Design Projects in 2018

Post pobrano z: 20 Different Fonts to Make Stylish Graphic Design Projects in 2018

Explore different letter fonts to complement your work. Get inspired with this awesome list of new resources for 2018.

Make Stylish Graphic Design Projects With These Fonts

Every designer should have a collection of different font styles in their arsenal. Because no matter the occasion, creative fonts are the best way to upgrade any project.

So today, we’re bringing you another amazing collection of helpful resources from Envato Elements and Envato Market.

Need a different type of font? Check out hundreds of extraordinary styles to pack a punch in your graphic design work.

From dramatic vintage styles to modern sans serif types, these fonts feature some of the hottest trends to hit the scene.

Stay Wildy Font

Embrace your natural side with this beautiful handwritten font. Stay Wildy is a new script style influenced by modern calligraphy. Although this download comes with one font, it allows you to capitalize the letters for a completely different look. Step up your typography game and try it out!

Stay Wildy Font

Knox Font Family

Decorative fonts like the incredible Knox font family simply command attention. And this set features a six-pack font download inspired by American Western culture and tattoos. Give your work that old Western feel you can instantly use for stationery and more.

Knox Font Family

Asans Layered Font

Using a creative font layering method to help make the result, the Asans font even supports multiple languages. Try out three different styles like regular, front and base to complete your text designs. Great for namecards and logos, this font is sure to make you stand out.

Asans Layered Font

La Pimienta Font

Sprinkle
some character into your work with the lovely La Pimienta font.
Designed to be a clean and sophisticated font style that you can apply
to modern designs, this font features an elegant, playful script. Enjoy
the monoline font style for letters, headlines, and logos.

La Pimienta

Sampestera Font

Create
extraordinary posters that highlight your typography skills with the
Sampestera font. A brush calligraphy font with wild script letters, this
font is stylish and versatile. Incorporate it into your wedding
stationery or turn it into a wonderful logo. There are so many options!

Sampestera Font

Madeleine Signature Font

One of the many benefits of an Envato Elements subscription is all the goodies you get within the font packs. The Madeleine Signature font, for instance, features a ton of additional ligatures to make your work look original. Check out the beautiful script style available for multiple languages.

Madeleine Signature Font

Lourena Font

Tackle your next typography project with Lourena, an exclusive elegant font perfect for editorial pieces. With two ornamental styles available, you’ll be able to mix and match letterforms with a minimalist or swirl-inspired combination. Great for logos and headlines!

Lourena Font

Venge Typeface

Next up is Venge, a fashionable display typeface with four different styles. Check out the original typeface graphic featuring tall, elegant letters. Or toggle the settings to get cool effects like this linear style below. You’ll definitely want to add this pack to your collection!

Venge Typeface

Mellony Brush Script 

Need a stunning brush script like the Mellony font? Creatives will love this gorgeous font family with its bouncy baseline and textural letters. Get the most out of your download by trying out the additional bonuses included, like swashes and end characters.

Mellony Brush Script

Dagon Typeface

Creative typefaces should get your audience to stop in their tracks. And the Dagon font is both bold and mysterious. This fun, groovy style features three unique versions with regular, bubbly, and diagonal decorations. Enjoy the retro-futuristic feel with this font pack!

Dagon Typeface

Felix Duo Font

Are you loving the glitch trend too? Designers inspired by the past are taking this creative effect and applying it to their photos, film, and now even fonts! Check out the cool Felix font duo packed with regular and clean styles. Give your work a little more edge with a nice glitch effect!

Felix Duo Font

Jester Display Font

Or get playful with the fun Jester font. A chunky display font with charismatic letters, this font is super approachable and great for animations. Try it out on posters, comics, or even as a new logo font for your next book title. Get a full set of letters, punctuation and more in this set.

Jester Display Font

3D Bulb Lamp Alphabet

Layered font systems work by taking common font styles and stacking them to create artistic text effects. The amazing 3D Bulb Lamp font features a full set of alphabet letters inspired by vintage neon lights. Add authentic grunge textures and more to blow your work out of the water! You’ll like this one!

3D Bulb Lamp Alphabet

eNeon Layered Typeface

Step into the future with the eNeon layered typeface. Featuring three unique styles you can stack together, this pack is inspired by neon signs and the tubes that brighten the streets of many cities. Get access to more than 500 glyphs and international characters in this incredible download.

eNeon Layered Typeface

Beettrot Font

If you’re not confident with your handwriting skills then you’ll definitely love the Beettrot font. This stylish typeface features fluid lines and gorgeous script letters inspired by old brush scripts. Launch your clothing apparel lines, make wedding plans, and so much more with this lovely font.

Beettrot Font

Simpson Font

Do you love the Simpsons? Now you can make funny typography designs with the awesome Simpson font. This classic design features a new upgrade which smooths out the letters for better visibility. Also included in this pack are extended features like European accents and Cyrillic characters.

Simpson Font

Sprint Font

Does design make you feel like you’re running a long marathon? Make the process go by faster with the epic Sprint font. A creative new font with lots of energy, this font dashes across your stationery with darting lines and capital letters. Also included in this pack is a second „Sprinter” version.

Sprint Font

Valenttina Font

Logo design gets a whole lot easier when you pair your company name with the right font style. The Valenttina logotype features a gorgeous, modern design with bold letters. Easily add it to your team logo or try it out with various symbols to see it in action!

Valenttina Font

Geist Typeface

Create your best work to date with the fascinating Geist typeface. A bold, all-caps typeface with eight different styles, this font set is a must-have for any creative. Check out the shadow, vintage, and inline versions on larger sizes for the best possible results.

Geist Typeface

Matilna Samuela Font Duo

Calligraphy brush fonts are popular because they do all the hard work of beautiful handwriting for you. Now you can make masterful script designs with the Matilna Samuela font duo. Perfect for logos, headlines, and blog posts, this font is certainly a stunner!

Matilna Samuela Font Duo

More Font Inspiration

Stay ahead of the trends with different font styles to match any project. Grab a few of your favorites from this selection for the ultimate pack of font goodies.

Want more amazing fonts? Check out these collections:

Tried any of these assets? Let us know! Tell us your favorites in the comments below.

This has been a selection of premium resources perfect for the avid designer. For more different font styles, check out Envato Market and Envato Elements, or enlist the help of our talented designers at Envato Studio. Happy creating!

20 Different Fonts to Make Stylish Graphic Design Projects in 2018

Post pobrano z: 20 Different Fonts to Make Stylish Graphic Design Projects in 2018

Explore different letter fonts to complement your work. Get inspired with this awesome list of new resources for 2018.

Make Stylish Graphic Design Projects With These Fonts

Every designer should have a collection of different font styles in their arsenal. Because no matter the occasion, creative fonts are the best way to upgrade any project.

So today, we’re bringing you another amazing collection of helpful resources from Envato Elements and Envato Market.

Need a different type of font? Check out hundreds of extraordinary styles to pack a punch in your graphic design work.

From dramatic vintage styles to modern sans serif types, these fonts feature some of the hottest trends to hit the scene.

Stay Wildy Font

Embrace your natural side with this beautiful handwritten font. Stay Wildy is a new script style influenced by modern calligraphy. Although this download comes with one font, it allows you to capitalize the letters for a completely different look. Step up your typography game and try it out!

Stay Wildy Font

Knox Font Family

Decorative fonts like the incredible Knox font family simply command attention. And this set features a six-pack font download inspired by American Western culture and tattoos. Give your work that old Western feel you can instantly use for stationery and more.

Knox Font Family

Asans Layered Font

Using a creative font layering method to help make the result, the Asans font even supports multiple languages. Try out three different styles like regular, front and base to complete your text designs. Great for namecards and logos, this font is sure to make you stand out.

Asans Layered Font

La Pimienta Font

Sprinkle
some character into your work with the lovely La Pimienta font.
Designed to be a clean and sophisticated font style that you can apply
to modern designs, this font features an elegant, playful script. Enjoy
the monoline font style for letters, headlines, and logos.

La Pimienta

Sampestera Font

Create
extraordinary posters that highlight your typography skills with the
Sampestera font. A brush calligraphy font with wild script letters, this
font is stylish and versatile. Incorporate it into your wedding
stationery or turn it into a wonderful logo. There are so many options!

Sampestera Font

Madeleine Signature Font

One of the many benefits of an Envato Elements subscription is all the goodies you get within the font packs. The Madeleine Signature font, for instance, features a ton of additional ligatures to make your work look original. Check out the beautiful script style available for multiple languages.

Madeleine Signature Font

Lourena Font

Tackle your next typography project with Lourena, an exclusive elegant font perfect for editorial pieces. With two ornamental styles available, you’ll be able to mix and match letterforms with a minimalist or swirl-inspired combination. Great for logos and headlines!

Lourena Font

Venge Typeface

Next up is Venge, a fashionable display typeface with four different styles. Check out the original typeface graphic featuring tall, elegant letters. Or toggle the settings to get cool effects like this linear style below. You’ll definitely want to add this pack to your collection!

Venge Typeface

Mellony Brush Script 

Need a stunning brush script like the Mellony font? Creatives will love this gorgeous font family with its bouncy baseline and textural letters. Get the most out of your download by trying out the additional bonuses included, like swashes and end characters.

Mellony Brush Script

Dagon Typeface

Creative typefaces should get your audience to stop in their tracks. And the Dagon font is both bold and mysterious. This fun, groovy style features three unique versions with regular, bubbly, and diagonal decorations. Enjoy the retro-futuristic feel with this font pack!

Dagon Typeface

Felix Duo Font

Are you loving the glitch trend too? Designers inspired by the past are taking this creative effect and applying it to their photos, film, and now even fonts! Check out the cool Felix font duo packed with regular and clean styles. Give your work a little more edge with a nice glitch effect!

Felix Duo Font

Jester Display Font

Or get playful with the fun Jester font. A chunky display font with charismatic letters, this font is super approachable and great for animations. Try it out on posters, comics, or even as a new logo font for your next book title. Get a full set of letters, punctuation and more in this set.

Jester Display Font

3D Bulb Lamp Alphabet

Layered font systems work by taking common font styles and stacking them to create artistic text effects. The amazing 3D Bulb Lamp font features a full set of alphabet letters inspired by vintage neon lights. Add authentic grunge textures and more to blow your work out of the water! You’ll like this one!

3D Bulb Lamp Alphabet

eNeon Layered Typeface

Step into the future with the eNeon layered typeface. Featuring three unique styles you can stack together, this pack is inspired by neon signs and the tubes that brighten the streets of many cities. Get access to more than 500 glyphs and international characters in this incredible download.

eNeon Layered Typeface

Beettrot Font

If you’re not confident with your handwriting skills then you’ll definitely love the Beettrot font. This stylish typeface features fluid lines and gorgeous script letters inspired by old brush scripts. Launch your clothing apparel lines, make wedding plans, and so much more with this lovely font.

Beettrot Font

Simpson Font

Do you love the Simpsons? Now you can make funny typography designs with the awesome Simpson font. This classic design features a new upgrade which smooths out the letters for better visibility. Also included in this pack are extended features like European accents and Cyrillic characters.

Simpson Font

Sprint Font

Does design make you feel like you’re running a long marathon? Make the process go by faster with the epic Sprint font. A creative new font with lots of energy, this font dashes across your stationery with darting lines and capital letters. Also included in this pack is a second „Sprinter” version.

Sprint Font

Valenttina Font

Logo design gets a whole lot easier when you pair your company name with the right font style. The Valenttina logotype features a gorgeous, modern design with bold letters. Easily add it to your team logo or try it out with various symbols to see it in action!

Valenttina Font

Geist Typeface

Create your best work to date with the fascinating Geist typeface. A bold, all-caps typeface with eight different styles, this font set is a must-have for any creative. Check out the shadow, vintage, and inline versions on larger sizes for the best possible results.

Geist Typeface

Matilna Samuela Font Duo

Calligraphy brush fonts are popular because they do all the hard work of beautiful handwriting for you. Now you can make masterful script designs with the Matilna Samuela font duo. Perfect for logos, headlines, and blog posts, this font is certainly a stunner!

Matilna Samuela Font Duo

More Font Inspiration

Stay ahead of the trends with different font styles to match any project. Grab a few of your favorites from this selection for the ultimate pack of font goodies.

Want more amazing fonts? Check out these collections:

Tried any of these assets? Let us know! Tell us your favorites in the comments below.

This has been a selection of premium resources perfect for the avid designer. For more different font styles, check out Envato Market and Envato Elements, or enlist the help of our talented designers at Envato Studio. Happy creating!

New Course: Adobe Illustrator for Beginners

Post pobrano z: New Course: Adobe Illustrator for Beginners

If you’ve never opened Illustrator before—or if you’ve opened it and struggled—our new course is for you! From the Top: Adobe Illustrator for Beginners will show you the easy way to make beautiful artwork in Adobe Illustrator.

What You’ll Learn

In this course, you’re going to learn everything you need to get up and running using Adobe Illustrator. Your instructor, Daniel Scott, will take you through all of the essential tools and features of the program while showing you how to create some simple illustrations.

Adobe Illustator for Beginners

This course is for beginners, so you don’t need any previous knowledge of Illustrator, and you don’t need design or illustration skills. You’ll start right at the beginning, and you can work your way through each topic step by step.

Here are some free lessons from this course, as a preview of what you can expect:

Drawing With Shapes and Lines

In this video, you’ll learn how to draw many common objects in Illustrator by creating and adjusting simple shapes and lines.


Drawing With the Shape Builder

In this video, you’ll take your drawing to the next level by learning how to transform simple overlapping shapes into complex images using the Shape Builder tool.


Drawing With the Pen Tool

In this lesson, you’ll learn how you can use the Pen Tool in addition to the Curvature Tool to draw more complex yet easily adjustable shapes.


Take the Course

This was just a small sample of videos from the course. There’s much more in the full course of 20 videos, which takes you through the full setup process and introduces you to a lot more Illustrator tools and techniques.

You can take our new course straight away with a subscription to Envato Elements. For a single low monthly fee, you get access not only to this course, but also to our growing library of over 1,000 video courses and industry-leading eBooks on Envato Tuts+. 

Plus you now get unlimited downloads from the huge Envato Elements library of 680,000+ creative assets. Create with unique fonts, photos, graphics and templates, and deliver better projects faster.

New Course: Adobe Illustrator for Beginners

Post pobrano z: New Course: Adobe Illustrator for Beginners

If you’ve never opened Illustrator before—or if you’ve opened it and struggled—our new course is for you! From the Top: Adobe Illustrator for Beginners will show you the easy way to make beautiful artwork in Adobe Illustrator.

What You’ll Learn

In this course, you’re going to learn everything you need to get up and running using Adobe Illustrator. Your instructor, Daniel Scott, will take you through all of the essential tools and features of the program while showing you how to create some simple illustrations.

Adobe Illustator for Beginners

This course is for beginners, so you don’t need any previous knowledge of Illustrator, and you don’t need design or illustration skills. You’ll start right at the beginning, and you can work your way through each topic step by step.

Here are some free lessons from this course, as a preview of what you can expect:

Drawing With Shapes and Lines

In this video, you’ll learn how to draw many common objects in Illustrator by creating and adjusting simple shapes and lines.


Drawing With the Shape Builder

In this video, you’ll take your drawing to the next level by learning how to transform simple overlapping shapes into complex images using the Shape Builder tool.


Drawing With the Pen Tool

In this lesson, you’ll learn how you can use the Pen Tool in addition to the Curvature Tool to draw more complex yet easily adjustable shapes.


Take the Course

This was just a small sample of videos from the course. There’s much more in the full course of 20 videos, which takes you through the full setup process and introduces you to a lot more Illustrator tools and techniques.

You can take our new course straight away with a subscription to Envato Elements. For a single low monthly fee, you get access not only to this course, but also to our growing library of over 1,000 video courses and industry-leading eBooks on Envato Tuts+. 

Plus you now get unlimited downloads from the huge Envato Elements library of 680,000+ creative assets. Create with unique fonts, photos, graphics and templates, and deliver better projects faster.