Archiwum kategorii: Web Tools

25+ Free Restaurant Menu Templates & PSD Mockups

Post pobrano z: 25+ Free Restaurant Menu Templates & PSD Mockups

A restaurant’s menu holds a lot of responsibility. A good one will ignite hunger cravings and give customers a rundown of what to expect. So make the design count!

Now you can create enticing restaurant scenes with high-quality menu mockups. Great for websites, profile banners, and more, these visuals help designers and restaurateurs make compelling imagery fast.

Restaurant Menu Mockup
This restaurant menu template will leave an impression only rivaled by your food.

Get a head start on your next project with these wonderful resources. Hand-picked from several free template sites around the web, this collection is packed with bonus goodies.

Discover inspiring designs made from high-quality textures and assets. 

Premium Menu Mockup Templates

Want more options?

Don’t
forget to check out these amazing premium assets from Envato Market and Envato Elements. Created by a community of creative designers, these templates are easy to edit and incredibly versatile.

Fast Food Menu Mockup Pack (PSD)

Add beautiful filters to your menu layout. This awesome food menu pack includes beautiful, high-quality mockups with grouped and labeled layers. Explore different layers to create the arrangement and color scheme you want. Make this clipboard menu mockup your own.
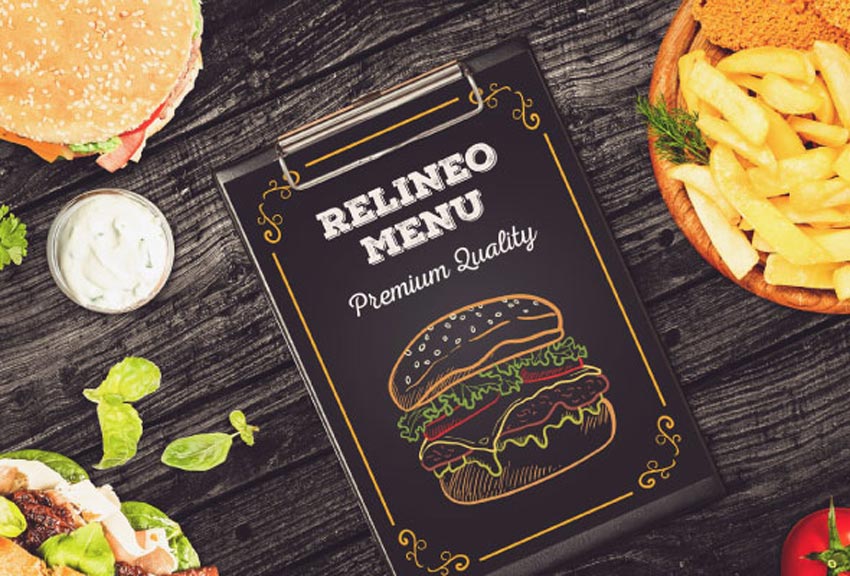
Fast Food Menu Mockup Pack

Food & Drink Menu Mockup Set (JPG, PSD)

Get three exciting views of your new menu with this mockup set. This download includes a minimal menu mockup PSD with versatile menu templates with photo-realistic effects. Edit each scene by selecting one of the smart objects and experimenting with different results. Try this restaurant menu PSD out!

Food  Drink Menu Mockup Set

Food Menu Mockups (PSD)

There is an artistry to food photography. But you don’t have to be an expert to get started with this art form. Check out this series of food menu PSD mockups based on actual photos. This download includes three Photoshop files perfect for creatives at any level!

Food Menu Mockups

Burger Restaurant Mockup (PSD)

Land new clients or customers with this delicious burger mockup! This menu template features a vintage-inspired vibe with fantastic food items. It’s also displayed against a rustic, wooden background. It’s a full promotion table mockup. Enjoy several amazing perspectives to choose from. Add this burger mockup to your collection!

Burger Restaurant Mockup

Kitchen Scene Generator (PSD)

Decorate your table with stunning spices and herbs. This helpful kitchen generator creates a high-quality scene with over 675 items. You can create the restaurant mockup that inspires you. Drag and drop each item to make the layout better. Then add your menu to one of the easy smart objects to complete your design. Try it out!

Kitchen Scene Generator

Coffee Branding Mockup (PSD)

Brand your coffee shop with a stunning header. This brilliant restaurant mockup features delightful coffee and baked goods set against a bright background. Edit the background to fit your style or change the overall selection with ease. Add your menu in minutes!

Coffee Branding Mockup

Burger Store Mockup Creator (PSD)

Showcase your restaurant or bar with a stylish header like this one. This burger store mockup creator is just what you need for fast results! Choose from nine Photoshop scenes that are ready to edit with simple smart objects. From A5 menu boards to beer, turn the scene into the burger mockup of your choosing. Suitable for users of Photoshop CS4 and above.

Burger Store Mockup Creator

Restaurant Food Mockup (PSD)

Customize this stationery mockup with your menu and business cards! This set offers ten Photoshop files with varying backgrounds and different perspectives. Make any presentation look perfect with this premium menu PSD and mockup set. Try it out!

Restaurant Food Mockup

Coffee Cafe Branding Identity Mockup (PSD)

Multipurpose and fully customizable, this branding identity template is packed with 28 mockup items! Coffee cups, A5 menu boards, paper bags, and more are all included. Adjust the lighting scenarios to fit your needs, and remove or add any item you want. Get photo-realistic menu results that are great for any project.
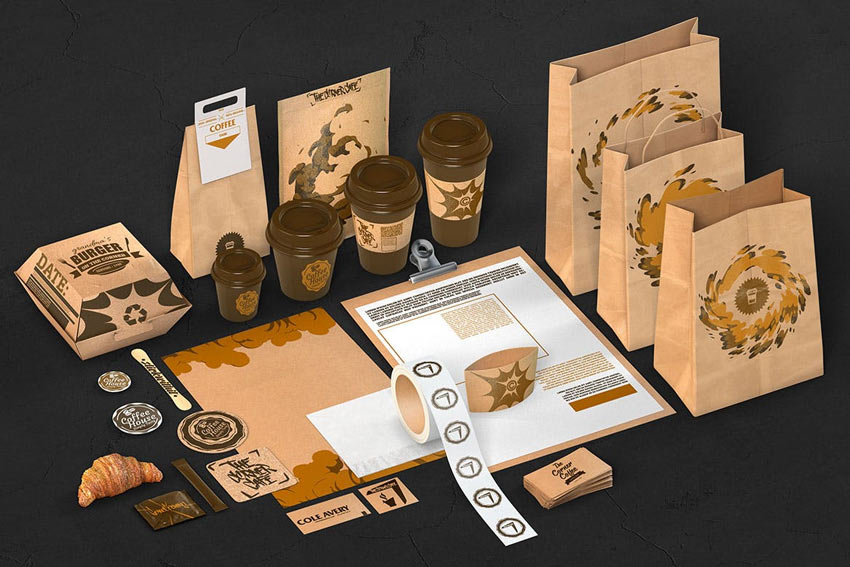
Coffee Cafe Branding Identity Mockup

Restaurant & Bar Stationery Branding Mockup (PSD)

Freshen up your restaurant’s website with a new branding mockup. This professional template features six well-organized files made for US and international page sizes. All the objects and shadows have been separated so you’ll be able to customize it fast. Add it today!
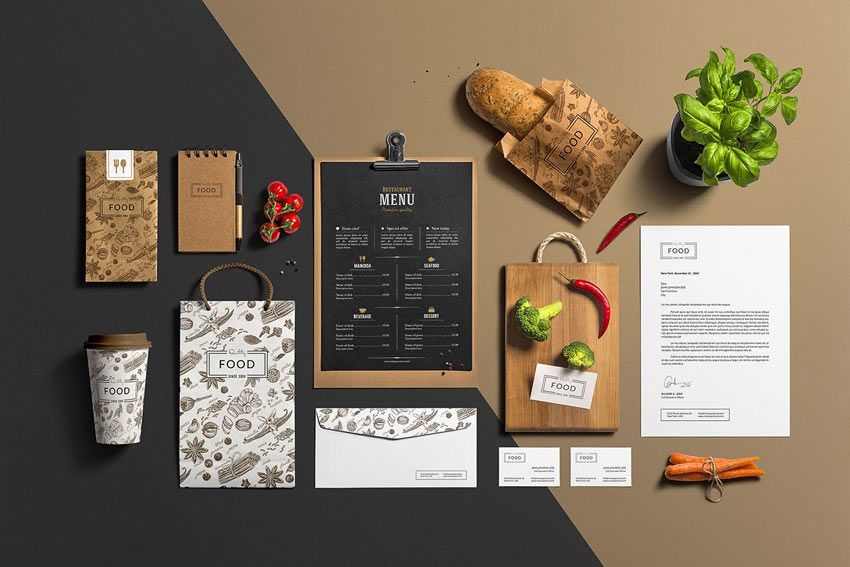
Restaurant  Bar Stationery Branding Mockup

25 Best Free Menu Mockup Templates

Now for the free resources!

Boost your customer base with enticing images. Enjoy this selection of high-quality assets that are 100% free! Great for Instagram, Facebook, and Twitter too!

Sidewalk Restaurant Signboard Sample

Make a nice menu mockup with this template. This restaurant menu PSD looks like a giant clipboard to allow you to bring poster quality to the outdoors. Easily edit the file to personalize the digital menu mockup with your business’s food and drink items. Not bad for a clipboard menu mockup that’s free.

Restaurant Menu Mockup PSD Free

Menu Card Mockup

Show off the clean elements of your menu design with this free template. This download includes a PSD file of a restaurant table mockup. It’s nice and minimal, allowing your audience to focus on your menu and what you have to offer. Try out this menu mockup template that’s free!  

Menu Card Mockups

Signboard Chalkboard Mockups

Make an impressive chalkboard sign with this simple and easy template! This menu mockup free download includes four different types of chalkboards you can customize to fit your needs. Add your official drink list, snack menu, or sandwich list using the editable smart object. It’s a nice template for a restaurant signboard sample!
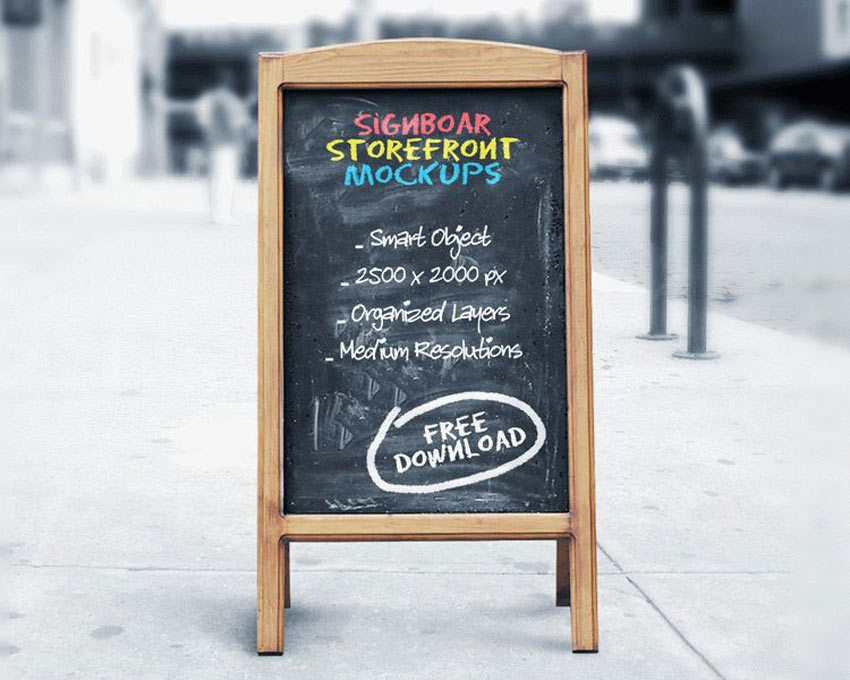
Signboard Chalkboard Mockups

Free Restaurant Stationery Mockup

Create a clear presentation of your restaurant with this stationery mockup. All the smart objects included are movable and fully editable to save you more time and energy. Just place your design and save the smart object to watch it transform. Explore the amazing options!

Free Restaurant Stationery Mockup

Menu Mockup PSD

Present your delicious food on a tri-folded menu with this template! This clever design features a photo-realistic result on a vibrant background that’s great for restaurants and cafes. Update it with your menu items and prices to see it in action. Check it out!

Menu Mockup Template Free

Yellow Restaurant Signboard Sample

There’s nothing like a classic sandwich board sign to display your tasty menu. This incredible template features a bright yellow background that keeps the look simple and modern. Easily make it the star of your website or use it for more promotional purposes. Try it now!

Yellow Restaurant Signboard Sample

Menu Card Mockup

Match the sophisticated style of your bistro restaurant with this menu card mockup. This nice template features editable smart objects you can update in seconds! The structured layers mean you can let your creativity loose while using this restaurant menu mockup PSD that’s free. 

Menu Mockup Template Free

Restaurant Menu Mockup

This next great design displays your menu as a tall vertical sign. Just download the free Photoshop menu template file to swap out the preview images for your own. Keep in mind the design is pretty tall, so you’ll have to adjust the menu dimensions accordingly. Check it out!

Restaurant Menu Mockup

Restaurant Menu Mockup

This elegant menu mockup is another great way to display your products. It features a simple blank background with a quick clipboard object you can easily change. Edit the free menu PSD mockup file with its smart object layer. Adjust the colors or add more photo effects using Photoshop’s adjustment layers. 

Clipboard Menu Mockup

Fresh Menu Mockup PSD

Check out this interesting composition. Featuring fresh food elements, this template is best suited for vegetarian, organic, and vegan food restaurants. Improve your ads with stunning graphics found in this menu mockup template that’s free.

Restaurant Menu PSD

Clip Board Mockup

Making impressive visuals for your content just got a whole lot easier. This free Photoshop menu template features a fun design with a clipboard menu and a plate of fruit to complete the minimal look. It’s set against a light background so your design will definitely stand out. Download it today!

Clip Board Menu Mockup

Restaurant Menu Mockup

In this brilliant mockup, a model holds your restaurant menu as she peruses each detail. Add your design to this setup with editable smart objects in Adobe Photoshop. This free PSD menu mockup also contains high-quality textures and incredible details. You’ll definitely want this one!

Restaurant Menu Mock-up

Restaurant Bar Table Menu

What are your drink specials for Friday nights? Present your specialties in a creative way with this bar or restaurant table mockup. This menu template features a simple restaurant scene against a blurred bokeh background. Just switch out the words for your best items.

Restaurant Table Mockup Menu

Red Restaurant Menu PSD

Want to display your fine dining menu in a new way? Try this straightforward classy menu mockup. This free PSD menu mockup features neat silverware next to a simple and sleek food menu you can easily adjust. Display nutritional information, wine selections, and more on your menu.

Restaurant Menu Mockup PSD Free

Promotion Table Mockup

Generate a savory food composition with this menu table template. It’s a perfect promotion table mockup for a Mexican food restaurant. Edit the included menu to match your business, and this food mockup PSD that’s free becomes all yours!

Promotion Table Mockup With Food

Menu Mockup PSD

This detailed mockup features a menu placed on a textured, wooden table. It’s a menu mockup template that’s free and easy to use. Adjust the size to fit your needs, or lower the resolution to save on file size. Download it now!

Menu Mockup Template Free

Restaurant Menu Frame on Table Mockup

Create a table-top menu for your restaurant or cafe! This free Photoshop menu template features a sleek white frame against a blurred bokeh background. Use it for just about any marketing project, from promotional materials to website banners and more.

Restaurant Menu Frame on Table Mockup

Fast Food Table Tent

Showcase your best-sellers on your restaurant’s tables, like in this amazing template. This table tent mockup is perfect for a fast food restaurant or diner. You can also put the latest special menu items, deals, and more on this food mockup PSD that’s free!

Table Tent Restaurant Menu Mockup PSD Free

Menu Card Mock Up

Marble isn’t going out of style any time soon. This menu mockup features a gorgeous wooden serving board set against a minimal, marble background. The menu card propped up by a classy plant ties the template together. Give this menu mockup a try!

Menu Mock Up Landscape Card

Foldable Menu Mockup

Add any menu to this menu mockup that’s free in a few easy steps! This Photoshop file includes a high-resolution template with adjustable layers. It’s a great option to showcase your foldable menu on a restaurant table.

Restaurant Table Mockup

Restaurant Wall Mockup

Minimal mockup templates like this are also a must-have for creatives. This free PSD menu mockup features a modern scene that showcases the restaurant wall mockup. Just add your menu design to see it applied to the template below. Make sure you check out this menu PSD!

Restaurant Wall Mockup

Cool Food Menu Flyer Mockup

Does your menu need some extra pop? Perhaps you need a mockup with a little more substance. Try this clean and cool flyer mockup created with photo-realistic textures. Just drag and drop your content into the editable layers to see it transform.

Food Mockup PSD Free

Clip Board Mockup

There’s no better way to sell food than with great imagery. This clipboard menu mockup has just that, with a stunning, high-quality image that stands out from other A5 menu boards. The minimal look is complemented well by the texture of the wood grain. It’s only outshone by what you plan on adding to the template. What will you include on the menu?

Clip Board Menu Mockup

Restaurant Menu Mockups: Using a Mockup Generator

Creating a menu mockup is easier and more fun than you think with Placeit. Design everything from a clipboard menu mockup to animated logos in seconds. The Placeit online platform is easy to use, and you don’t need to purchase any software to access it!

Young Woman Reading Restaurant Menu While Sitting Down

Here’s a great mockup template that works well with most restaurants. You can quickly place a menu into this cozy and modern scene. Use the editor to add text to draw attention to your restaurant and its welcoming decor.

Woman Reading Menu Mockup

Young Woman Holding a Menu at a Restaurant

This is a nice over-the-shoulder shot that frames the restaurant menu mockup well. Thanks to its sparse background, the focus of this template is put squarely on the menu. Upload your image and tweak the template to fit your needs.

Woman Holding Vertical Menu

Vertical Restaurant Menu Mockup

Coffee shops and small restaurants tend to have vertical two-sided menus like the one featured below. The image of looking over the menu while out for coffee with a friend is instantly relatable to your audience. Use this restaurant menu mockup for a natural look in your business’s marketing.

Vertical Menu Mockup

Booklet Menu Standing on a Small Dining Restaurant Table

This restaurant table mockup lets your menu stand out on its own. The table setting is minimal, and the sunlight coming through the blinds helps the scene make an impression. There is plenty of space to add a graphic of your choice, which you can do with the Placeit editor. 

Menu Standing On Table

Restaurant Menu Mockup Through the Window

To wrap up this section, we have a nice restaurant menu mockup. The full shot gives a unique perspective on looking at a menu through a window, while the restaurant in the background completes the scene. After seeing your menu on this template, anyone would want to walk through your doors.

Menu Mockup Through The Window

Conclusion

Make your audience’s mouth water with exciting menu mockups! Try out these free resources, and let us know your favorites in the comments!

Need more inspiration? Check out these articles to learn from our experts!

This has been a collection of resources perfect for the avid creative. For more options, check out Envato Market and Envato Elements or enlist the help of the amazing designers over on Envato Studio. Good luck!

25+ Free Restaurant Menu Templates & PSD Mockups

Post pobrano z: 25+ Free Restaurant Menu Templates & PSD Mockups

A restaurant’s menu holds a lot of responsibility. A good one will ignite hunger cravings and give customers a rundown of what to expect. So make the design count!

Now you can create enticing restaurant scenes with high-quality menu mockups. Great for websites, profile banners, and more, these visuals help designers and restaurateurs make compelling imagery fast.

Restaurant Menu Mockup
This restaurant menu template will leave an impression only rivaled by your food.

Get a head start on your next project with these wonderful resources. Hand-picked from several free template sites around the web, this collection is packed with bonus goodies.

Discover inspiring designs made from high-quality textures and assets. 

Premium Menu Mockup Templates

Want more options?

Don’t
forget to check out these amazing premium assets from Envato Market and Envato Elements. Created by a community of creative designers, these templates are easy to edit and incredibly versatile.

Fast Food Menu Mockup Pack (PSD)

Add beautiful filters to your menu layout. This awesome food menu pack includes beautiful, high-quality mockups with grouped and labeled layers. Explore different layers to create the arrangement and color scheme you want. Make this clipboard menu mockup your own.

Fast Food Menu Mockup Pack

Food & Drink Menu Mockup Set (JPG, PSD)

Get three exciting views of your new menu with this mockup set. This download includes a minimal menu mockup PSD with versatile menu templates with photo-realistic effects. Edit each scene by selecting one of the smart objects and experimenting with different results. Try this restaurant menu PSD out!

Food  Drink Menu Mockup Set

Food Menu Mockups (PSD)

There is an artistry to food photography. But you don’t have to be an expert to get started with this art form. Check out this series of food menu PSD mockups based on actual photos. This download includes three Photoshop files perfect for creatives at any level!

Food Menu Mockups

Burger Restaurant Mockup (PSD)

Land new clients or customers with this delicious burger mockup! This menu template features a vintage-inspired vibe with fantastic food items. It’s also displayed against a rustic, wooden background. It’s a full promotion table mockup. Enjoy several amazing perspectives to choose from. Add this burger mockup to your collection!

Burger Restaurant Mockup

Kitchen Scene Generator (PSD)

Decorate your table with stunning spices and herbs. This helpful kitchen generator creates a high-quality scene with over 675 items. You can create the restaurant mockup that inspires you. Drag and drop each item to make the layout better. Then add your menu to one of the easy smart objects to complete your design. Try it out!

Kitchen Scene Generator

Coffee Branding Mockup (PSD)

Brand your coffee shop with a stunning header. This brilliant restaurant mockup features delightful coffee and baked goods set against a bright background. Edit the background to fit your style or change the overall selection with ease. Add your menu in minutes!

Coffee Branding Mockup

Burger Store Mockup Creator (PSD)

Showcase your restaurant or bar with a stylish header like this one. This burger store mockup creator is just what you need for fast results! Choose from nine Photoshop scenes that are ready to edit with simple smart objects. From A5 menu boards to beer, turn the scene into the burger mockup of your choosing. Suitable for users of Photoshop CS4 and above.

Burger Store Mockup Creator

Restaurant Food Mockup (PSD)

Customize this stationery mockup with your menu and business cards! This set offers ten Photoshop files with varying backgrounds and different perspectives. Make any presentation look perfect with this premium menu PSD and mockup set. Try it out!

Restaurant Food Mockup

Coffee Cafe Branding Identity Mockup (PSD)

Multipurpose and fully customizable, this branding identity template is packed with 28 mockup items! Coffee cups, A5 menu boards, paper bags, and more are all included. Adjust the lighting scenarios to fit your needs, and remove or add any item you want. Get photo-realistic menu results that are great for any project.

Coffee Cafe Branding Identity Mockup

Restaurant & Bar Stationery Branding Mockup (PSD)

Freshen up your restaurant’s website with a new branding mockup. This professional template features six well-organized files made for US and international page sizes. All the objects and shadows have been separated so you’ll be able to customize it fast. Add it today!

Restaurant  Bar Stationery Branding Mockup

25 Best Free Menu Mockup Templates

Now for the free resources!

Boost your customer base with enticing images. Enjoy this selection of high-quality assets that are 100% free! Great for Instagram, Facebook, and Twitter too!

Sidewalk Restaurant Signboard Sample

Make a nice menu mockup with this template. This restaurant menu PSD looks like a giant clipboard to allow you to bring poster quality to the outdoors. Easily edit the file to personalize the digital menu mockup with your business’s food and drink items. Not bad for a clipboard menu mockup that’s free.

Restaurant Menu Mockup PSD Free

Menu Card Mockup

Show off the clean elements of your menu design with this free template. This download includes a PSD file of a restaurant table mockup. It’s nice and minimal, allowing your audience to focus on your menu and what you have to offer. Try out this menu mockup template that’s free!  

Menu Card Mockups

Signboard Chalkboard Mockups

Make an impressive chalkboard sign with this simple and easy template! This menu mockup free download includes four different types of chalkboards you can customize to fit your needs. Add your official drink list, snack menu, or sandwich list using the editable smart object. It’s a nice template for a restaurant signboard sample!

Signboard Chalkboard Mockups

Free Restaurant Stationery Mockup

Create a clear presentation of your restaurant with this stationery mockup. All the smart objects included are movable and fully editable to save you more time and energy. Just place your design and save the smart object to watch it transform. Explore the amazing options!

Free Restaurant Stationery Mockup

Menu Mockup PSD

Present your delicious food on a tri-folded menu with this template! This clever design features a photo-realistic result on a vibrant background that’s great for restaurants and cafes. Update it with your menu items and prices to see it in action. Check it out!

Menu Mockup Template Free

Yellow Restaurant Signboard Sample

There’s nothing like a classic sandwich board sign to display your tasty menu. This incredible template features a bright yellow background that keeps the look simple and modern. Easily make it the star of your website or use it for more promotional purposes. Try it now!

Yellow Restaurant Signboard Sample

Menu Card Mockup

Match the sophisticated style of your bistro restaurant with this menu card mockup. This nice template features editable smart objects you can update in seconds! The structured layers mean you can let your creativity loose while using this restaurant menu mockup PSD that’s free. 

Menu Mockup Template Free

Restaurant Menu Mockup

This next great design displays your menu as a tall vertical sign. Just download the free Photoshop menu template file to swap out the preview images for your own. Keep in mind the design is pretty tall, so you’ll have to adjust the menu dimensions accordingly. Check it out!

Restaurant Menu Mockup

Restaurant Menu Mockup

This elegant menu mockup is another great way to display your products. It features a simple blank background with a quick clipboard object you can easily change. Edit the free menu PSD mockup file with its smart object layer. Adjust the colors or add more photo effects using Photoshop’s adjustment layers. 

Clipboard Menu Mockup

Fresh Menu Mockup PSD

Check out this interesting composition. Featuring fresh food elements, this template is best suited for vegetarian, organic, and vegan food restaurants. Improve your ads with stunning graphics found in this menu mockup template that’s free.

Restaurant Menu PSD

Clip Board Mockup

Making impressive visuals for your content just got a whole lot easier. This free Photoshop menu template features a fun design with a clipboard menu and a plate of fruit to complete the minimal look. It’s set against a light background so your design will definitely stand out. Download it today!

Clip Board Menu Mockup

Restaurant Menu Mockup

In this brilliant mockup, a model holds your restaurant menu as she peruses each detail. Add your design to this setup with editable smart objects in Adobe Photoshop. This free PSD menu mockup also contains high-quality textures and incredible details. You’ll definitely want this one!

Restaurant Menu Mock-up

Restaurant Bar Table Menu

What are your drink specials for Friday nights? Present your specialties in a creative way with this bar or restaurant table mockup. This menu template features a simple restaurant scene against a blurred bokeh background. Just switch out the words for your best items.

Restaurant Table Mockup Menu

Red Restaurant Menu PSD

Want to display your fine dining menu in a new way? Try this straightforward classy menu mockup. This free PSD menu mockup features neat silverware next to a simple and sleek food menu you can easily adjust. Display nutritional information, wine selections, and more on your menu.

Restaurant Menu Mockup PSD Free

Promotion Table Mockup

Generate a savory food composition with this menu table template. It’s a perfect promotion table mockup for a Mexican food restaurant. Edit the included menu to match your business, and this food mockup PSD that’s free becomes all yours!

Promotion Table Mockup With Food

Menu Mockup PSD

This detailed mockup features a menu placed on a textured, wooden table. It’s a menu mockup template that’s free and easy to use. Adjust the size to fit your needs, or lower the resolution to save on file size. Download it now!

Menu Mockup Template Free

Restaurant Menu Frame on Table Mockup

Create a table-top menu for your restaurant or cafe! This free Photoshop menu template features a sleek white frame against a blurred bokeh background. Use it for just about any marketing project, from promotional materials to website banners and more.

Restaurant Menu Frame on Table Mockup

Fast Food Table Tent

Showcase your best-sellers on your restaurant’s tables, like in this amazing template. This table tent mockup is perfect for a fast food restaurant or diner. You can also put the latest special menu items, deals, and more on this food mockup PSD that’s free!

Table Tent Restaurant Menu Mockup PSD Free

Menu Card Mock Up

Marble isn’t going out of style any time soon. This menu mockup features a gorgeous wooden serving board set against a minimal, marble background. The menu card propped up by a classy plant ties the template together. Give this menu mockup a try!

Menu Mock Up Landscape Card

Foldable Menu Mockup

Add any menu to this menu mockup that’s free in a few easy steps! This Photoshop file includes a high-resolution template with adjustable layers. It’s a great option to showcase your foldable menu on a restaurant table.

Restaurant Table Mockup

Restaurant Wall Mockup

Minimal mockup templates like this are also a must-have for creatives. This free PSD menu mockup features a modern scene that showcases the restaurant wall mockup. Just add your menu design to see it applied to the template below. Make sure you check out this menu PSD!

Restaurant Wall Mockup

Cool Food Menu Flyer Mockup

Does your menu need some extra pop? Perhaps you need a mockup with a little more substance. Try this clean and cool flyer mockup created with photo-realistic textures. Just drag and drop your content into the editable layers to see it transform.

Food Mockup PSD Free

Clip Board Mockup

There’s no better way to sell food than with great imagery. This clipboard menu mockup has just that, with a stunning, high-quality image that stands out from other A5 menu boards. The minimal look is complemented well by the texture of the wood grain. It’s only outshone by what you plan on adding to the template. What will you include on the menu?

Clip Board Menu Mockup

Restaurant Menu Mockups: Using a Mockup Generator

Creating a menu mockup is easier and more fun than you think with Placeit. Design everything from a clipboard menu mockup to animated logos in seconds. The Placeit online platform is easy to use, and you don’t need to purchase any software to access it!

Young Woman Reading Restaurant Menu While Sitting Down

Here’s a great mockup template that works well with most restaurants. You can quickly place a menu into this cozy and modern scene. Use the editor to add text to draw attention to your restaurant and its welcoming decor.

Woman Reading Menu Mockup

Young Woman Holding a Menu at a Restaurant

This is a nice over-the-shoulder shot that frames the restaurant menu mockup well. Thanks to its sparse background, the focus of this template is put squarely on the menu. Upload your image and tweak the template to fit your needs.

Woman Holding Vertical Menu

Vertical Restaurant Menu Mockup

Coffee shops and small restaurants tend to have vertical two-sided menus like the one featured below. The image of looking over the menu while out for coffee with a friend is instantly relatable to your audience. Use this restaurant menu mockup for a natural look in your business’s marketing.

Vertical Menu Mockup

Booklet Menu Standing on a Small Dining Restaurant Table

This restaurant table mockup lets your menu stand out on its own. The table setting is minimal, and the sunlight coming through the blinds helps the scene make an impression. There is plenty of space to add a graphic of your choice, which you can do with the Placeit editor. 

Menu Standing On Table

Restaurant Menu Mockup Through the Window

To wrap up this section, we have a nice restaurant menu mockup. The full shot gives a unique perspective on looking at a menu through a window, while the restaurant in the background completes the scene. After seeing your menu on this template, anyone would want to walk through your doors.

Menu Mockup Through The Window

Conclusion

Make your audience’s mouth water with exciting menu mockups! Try out these free resources, and let us know your favorites in the comments!

Need more inspiration? Check out these articles to learn from our experts!

This has been a collection of resources perfect for the avid creative. For more options, check out Envato Market and Envato Elements or enlist the help of the amazing designers over on Envato Studio. Good luck!

How to Design Your Own Gaming Clan Logo

Post pobrano z: How to Design Your Own Gaming Clan Logo

Final product image
What You’ll Be Creating

Looking for a gaming clan logo maker? Need a gaming clan logo for your competitive group or guild? Well, in this tutorial, we’ll look at how to make a clan logo right from the comfort of your browser, no software required. It’s simple, easy, and you can get started right now.

clan logo maker

For this tutorial, we’re going to use Placeit—an awesome online tool where you can create and design all kinds of mockups, logos, and more within your browser. 

There’s a big collection of cool logos for clans, created with gaming in mind, but they’re all customizable too—change up the text, the font, the colors, and even the imagery. Create and customize the perfect logo for your clan, and then download it as a high-resolution image, perfect for any project—from T-shirts to video overlays.

Placeit has an entire section for gaming—gaming logos, Twitch banners, avatars, and a lot more! The best part is, it’s free to dig in and start customizing designs, right now.

Want to see for yourself? Follow along with this tutorial on our Envato Tuts+ YouTube channel:

1. How to Use a Gaming Clan Logo Maker

Step 1

Start by navigating to the Logo portion of Placeit. You can do this by either going to the Logos or Gaming sections of the site. 

If you think you might like to look at other genres or industries for your logo design, feel free to check out the general Logos section. Otherwise, let’s head right over to Gaming.

In these sections, make sure to select the appropriate category, such as Gaming Teams or Logos, depending on which starting point you choose.

PlaceIt

Step 2

Next, browse through the selection of premade clan logo template designs. If something catches your eye, jump right in—you can customize the content. Think of this as your starting point, rather than your final design.

In this tutorial, we’ll work with this one, so follow that link if you’d like to work along with me.

Gaming Clan Logo Maker

Step 3

And here we are, ready to jump right in and customize our logo. Before we do so, make sure to note the save and favorite buttons, on the right-hand side of your browser’s window.

It’s free to sign up for Placeit—and you’ll need an account to save your drafts.

Online Logo Maker

2. How to Create a Gaming Clan Logo Using a Gaming Clan Logo Maker

Step 1

Now, let’s dig right into how to make a clan logo!

On the left-hand side, we can make adjustments to our text. For example, we can change what the text says, the font itself, and the color of the text. 

Try out different fonts and colors! Your logo will update in the browser as you make changes. 

gaming clan logo

Step 2

Speaking of color, we can also change the colors within the logo itself. In this example design, we have three colors: a main color, an accent, and the background color. Experiment with the color scheme, and Placeit will update the colors in the logo, right in your browser. Cool, right?

Note that you can also choose a transparent background. This is really handy if you plan to make things like stickers or use the logo in your Twitch overlay.

Transparent Logo Maker

Step 3

Then, we can also change up the imagery—and this is more than changing the image itself. We can also tweak the image’s colors. 

Note that some images have a small play icon preview on them. This indicates that this image also has a unique animation. So, if you know you want an animated logo, you might want to keep an eye out for this option. The other images use a more standard animation.

However, if you prefer one of the static images, don’t worry—we can still use it in an animation too, right here in Placeit. You have plenty of options. 

Here’s our sample logo with a new image, adjusted color scheme, and some adjusted text. Remember, you can freely adjust all of these attributes as much as you want, until you come up with the perfect logo. 

Gaming Logo Design Maker

Step 4

Happy with your logo? Remember, you can save your draft, if you’re not sure yet.

However, if you’re ready to download, it’s as simple as clicking Download, at the top of the screen. You’ll be presented with your download options—a single low fee, or a subscription that allows you to create and download as much as you like. 

When creating logos, the subscription is super price effective (and often lower than a single purchase) especially if you know you’d like to download and create variants of your logo.

gaming clan logo maker

3. How to Create an Animated Gaming Clan Logo

Step 1

So, you can make some pretty cool clan logos on Placeit—but there’s even more to see. You can also make animated gaming clan logos, perfect for video introductions, highlight videos, and so much more. If you’re curious about how to create a gaming clan logo that animates, stay tuned.

Many of the static logos also have an animated variant, just like this one we’ve been working on.

gaming clan logo maker

Step 2

Just like when we were working with static imagery, it’s simple to start customizing our animated logo. For example, let’s change up the imagery. There’s plenty to choose from here, and it’s all available for commercial use. 

Again, just as we did earlier, simply browse and select any image you would like to preview.

gaming clan logo

Step 3

After you choose a new image, Placeit will automatically update your video preview for you. Be patient on this—it might need a moment’s wait. Then, go ahead and preview your animation.

make a clan logo

Step 4

But let’s say you made a static logo that you really fell in love with—or you already have a logo design you love. No problem, we can upload your logo—either the static one you made on Placeit or an image logo from elsewhere—and add it to our animation too!

How? Well, we can also add additional slides to our animations here. Let’s test this out.

Click where it says Add Slide to add more video content to your animated logo. 

cool clan logos

Step 5

Next, choose a video template to work with. For this example, let’s try out this animated introduction, highlighted below. It already has a place ready for us to upload our static image logo.

Online Video Maker

Step 6

Once you’ve selected it, click where it says Upload Image to go ahead and upload a static image. It’ll add your image to the animated template. It’s really that simple!

clan logo template

Step 7

I’m going to test this out with the original, static image logo concept we created and downloaded earlier. Placeit allows you to crop and adjust your image before it imports it into the animation.

When you’re happy with how your upload looks, just click Crop.

cool logos for clans

Step 8

And now the placeholder in the animation will be replaced with our upload. Simple, right? Just click on Preview Video to check out what your work looks like. 

clan logo maker

Step 9

We can continue to push this further with even more slides. For example, we could try out this animated background with animated text. We could use it to describe the match, list the players, and give other important information about the game at hand. 

Just like our logo, we can change the text, the colors, the fonts, and more!

how to make a clan logo

Step 10

You can preview your adjustments individually, in each slide, or you can watch them all together, as one finished video. 

To do so, mouse over the video preview and click on the triangle to display more options. Choose either Single Slide or All Slides, depending on the preview you’d like to see.

gaming clan logo maker

Step 11

You can also rearrange and delete your slides.

Click and drag on a slide to rearrange it in your timeline, shown at the bottom of your screen. So, for example, we could slide the first slide to the end, if we wanted to.

good clan logos

Step 12

To delete a slide, simply mouse over the slide and then select Delete. It’s that simple! 

You can also duplicate slides from the menu that appears here, if you’d like to.

gaming clan logo maker

Step 13

Remember, you can also save drafts of your work. This gets extra important to note when you’re working with video. Click the icon in the right-hand corner of the screen, or add the template you’re customizing to your favorites, so you can work with it again later, too.

You’ll need a free Placeit account to save your work.

 clan logo design

Step 14

Once you’re happy with your video, it’s as simple as clicking Download. Your video will need to process, and you’ll need to choose your purchase options. Then, your video creation is all yours—ready to use for personal, professional, and commercial use.

Not sure if your video is just right? Grab a free, watermarked low-res version of your video if you need to test it out first. 

Guild logo maker

And There You Have It!

We’ve created a gaming clan logo using a clan logo template. Of course, good clan logos are going to depend on what your guild or team is all about. What genre do you play? What kind of personality or aesthetic do you want to associate with your professional brand?

But, thankfully, it’s never been easier to make a clan logo! Whether you’re an experienced designer or brand new to design, Placeit makes it easy, fun, and free to start designing. 

Gaming Logo Template Design

Check Out These Gaming Clan Logo Designs on Placeit!

Remember, these are all starting points—you can totally customize these designs and take them in any direction you want! Change colors, move elements, and add entirely new ones! There’s so much you can do with Placeit’s animation templates too, and there are plenty of cool clan logos to see.

The choice is yours, and it’s easy to give it a shot in your browser, right now, with Placeit. Check out these other cool logos for clans, teams, streamers, and more.

1. Squid Gaming Clan Logo Template Design

Squid Gaming Clan Logo Template Design

Looking to splat some toons? I have an inkling that this logo design might just fit the bill. Video-game references side, there’s plenty you could do with this design. Give it a spin today, right in the comfort of your browser.

2. Funny Gaming Clan Logo Template Design

Funny Gaming Clan Logo Template Design

Whether you’re a grumpy cat or you’re just looking for a logo with a light-hearted mood, this design has a lot of potential. This imagery has a custom animation too—check it out! It could look awesome in front of your next highlight video.

3. Gaming Character Logo Clan Template Design

Gaming Character Logo Clan Template Design

Made of tougher stuff and looking to let your competition know it? Check out this logo design template. Not feeling this mascot? There are so many others to choose from! Just jump in and start testing them out today.

4. Competitive Fighting Game Logo Clan Template

Competitive Fighting Game Logo Clan Template

Whether you’re looking to do some street fighting or you’re more into smashing some brothers (please excuse the cheesy video-game references), this logo design template might be right up your alley. Give it a spin with your brand’s colors and customizations.

5. FPS Team Clan Logo Design Template

FPS Team Clan Logo Design Template

There’s plenty to see on Placeit—from gunslinging characters to creepy zombies, from cutesy avatars to ghosts and ghouls. Check out this logo design template and plenty of other ones today. There are loads of good clan logos to check out.

Want to Learn More?

Looking for even more design tools and tips to boost your professional gaming brand? Maybe you’re looking for something for your live stream, or your gaming clan is working on a YouTube channel. 

Check out these free tutorials from Envato Tuts+ for even more inspiration and walkthroughs. From tips and tricks that’ll help teach you how to create a gaming clan logo to other design insights, there’s plenty to learn in these tutorials.

How to Design Your Own Gaming Clan Logo

Post pobrano z: How to Design Your Own Gaming Clan Logo

Final product image
What You’ll Be Creating

Looking for a gaming clan logo maker? Need a gaming clan logo for your competitive group or guild? Well, in this tutorial, we’ll look at how to make a clan logo right from the comfort of your browser, no software required. It’s simple, easy, and you can get started right now.

clan logo maker

For this tutorial, we’re going to use Placeit—an awesome online tool where you can create and design all kinds of mockups, logos, and more within your browser. 

There’s a big collection of cool logos for clans, created with gaming in mind, but they’re all customizable too—change up the text, the font, the colors, and even the imagery. Create and customize the perfect logo for your clan, and then download it as a high-resolution image, perfect for any project—from T-shirts to video overlays.

Placeit has an entire section for gaming—gaming logos, Twitch banners, avatars, and a lot more! The best part is, it’s free to dig in and start customizing designs, right now.

Want to see for yourself? Follow along with this tutorial on our Envato Tuts+ YouTube channel:

1. How to Use a Gaming Clan Logo Maker

Step 1

Start by navigating to the Logo portion of Placeit. You can do this by either going to the Logos or Gaming sections of the site. 

If you think you might like to look at other genres or industries for your logo design, feel free to check out the general Logos section. Otherwise, let’s head right over to Gaming.

In these sections, make sure to select the appropriate category, such as Gaming Teams or Logos, depending on which starting point you choose.

PlaceIt

Step 2

Next, browse through the selection of premade clan logo template designs. If something catches your eye, jump right in—you can customize the content. Think of this as your starting point, rather than your final design.

In this tutorial, we’ll work with this one, so follow that link if you’d like to work along with me.

Gaming Clan Logo Maker

Step 3

And here we are, ready to jump right in and customize our logo. Before we do so, make sure to note the save and favorite buttons, on the right-hand side of your browser’s window.

It’s free to sign up for Placeit—and you’ll need an account to save your drafts.

Online Logo Maker

2. How to Create a Gaming Clan Logo Using a Gaming Clan Logo Maker

Step 1

Now, let’s dig right into how to make a clan logo!

On the left-hand side, we can make adjustments to our text. For example, we can change what the text says, the font itself, and the color of the text. 

Try out different fonts and colors! Your logo will update in the browser as you make changes. 

gaming clan logo

Step 2

Speaking of color, we can also change the colors within the logo itself. In this example design, we have three colors: a main color, an accent, and the background color. Experiment with the color scheme, and Placeit will update the colors in the logo, right in your browser. Cool, right?

Note that you can also choose a transparent background. This is really handy if you plan to make things like stickers or use the logo in your Twitch overlay.

Transparent Logo Maker

Step 3

Then, we can also change up the imagery—and this is more than changing the image itself. We can also tweak the image’s colors. 

Note that some images have a small play icon preview on them. This indicates that this image also has a unique animation. So, if you know you want an animated logo, you might want to keep an eye out for this option. The other images use a more standard animation.

However, if you prefer one of the static images, don’t worry—we can still use it in an animation too, right here in Placeit. You have plenty of options. 

Here’s our sample logo with a new image, adjusted color scheme, and some adjusted text. Remember, you can freely adjust all of these attributes as much as you want, until you come up with the perfect logo. 

Gaming Logo Design Maker

Step 4

Happy with your logo? Remember, you can save your draft, if you’re not sure yet.

However, if you’re ready to download, it’s as simple as clicking Download, at the top of the screen. You’ll be presented with your download options—a single low fee, or a subscription that allows you to create and download as much as you like. 

When creating logos, the subscription is super price effective (and often lower than a single purchase) especially if you know you’d like to download and create variants of your logo.

gaming clan logo maker

3. How to Create an Animated Gaming Clan Logo

Step 1

So, you can make some pretty cool clan logos on Placeit—but there’s even more to see. You can also make animated gaming clan logos, perfect for video introductions, highlight videos, and so much more. If you’re curious about how to create a gaming clan logo that animates, stay tuned.

Many of the static logos also have an animated variant, just like this one we’ve been working on.

gaming clan logo maker

Step 2

Just like when we were working with static imagery, it’s simple to start customizing our animated logo. For example, let’s change up the imagery. There’s plenty to choose from here, and it’s all available for commercial use. 

Again, just as we did earlier, simply browse and select any image you would like to preview.

gaming clan logo

Step 3

After you choose a new image, Placeit will automatically update your video preview for you. Be patient on this—it might need a moment’s wait. Then, go ahead and preview your animation.

make a clan logo

Step 4

But let’s say you made a static logo that you really fell in love with—or you already have a logo design you love. No problem, we can upload your logo—either the static one you made on Placeit or an image logo from elsewhere—and add it to our animation too!

How? Well, we can also add additional slides to our animations here. Let’s test this out.

Click where it says Add Slide to add more video content to your animated logo. 

cool clan logos

Step 5

Next, choose a video template to work with. For this example, let’s try out this animated introduction, highlighted below. It already has a place ready for us to upload our static image logo.

Online Video Maker

Step 6

Once you’ve selected it, click where it says Upload Image to go ahead and upload a static image. It’ll add your image to the animated template. It’s really that simple!

clan logo template

Step 7

I’m going to test this out with the original, static image logo concept we created and downloaded earlier. Placeit allows you to crop and adjust your image before it imports it into the animation.

When you’re happy with how your upload looks, just click Crop.

cool logos for clans

Step 8

And now the placeholder in the animation will be replaced with our upload. Simple, right? Just click on Preview Video to check out what your work looks like. 

clan logo maker

Step 9

We can continue to push this further with even more slides. For example, we could try out this animated background with animated text. We could use it to describe the match, list the players, and give other important information about the game at hand. 

Just like our logo, we can change the text, the colors, the fonts, and more!

how to make a clan logo

Step 10

You can preview your adjustments individually, in each slide, or you can watch them all together, as one finished video. 

To do so, mouse over the video preview and click on the triangle to display more options. Choose either Single Slide or All Slides, depending on the preview you’d like to see.

gaming clan logo maker

Step 11

You can also rearrange and delete your slides.

Click and drag on a slide to rearrange it in your timeline, shown at the bottom of your screen. So, for example, we could slide the first slide to the end, if we wanted to.

good clan logos

Step 12

To delete a slide, simply mouse over the slide and then select Delete. It’s that simple! 

You can also duplicate slides from the menu that appears here, if you’d like to.

gaming clan logo maker

Step 13

Remember, you can also save drafts of your work. This gets extra important to note when you’re working with video. Click the icon in the right-hand corner of the screen, or add the template you’re customizing to your favorites, so you can work with it again later, too.

You’ll need a free Placeit account to save your work.

 clan logo design

Step 14

Once you’re happy with your video, it’s as simple as clicking Download. Your video will need to process, and you’ll need to choose your purchase options. Then, your video creation is all yours—ready to use for personal, professional, and commercial use.

Not sure if your video is just right? Grab a free, watermarked low-res version of your video if you need to test it out first. 

Guild logo maker

And There You Have It!

We’ve created a gaming clan logo using a clan logo template. Of course, good clan logos are going to depend on what your guild or team is all about. What genre do you play? What kind of personality or aesthetic do you want to associate with your professional brand?

But, thankfully, it’s never been easier to make a clan logo! Whether you’re an experienced designer or brand new to design, Placeit makes it easy, fun, and free to start designing. 

Gaming Logo Template Design

Check Out These Gaming Clan Logo Designs on Placeit!

Remember, these are all starting points—you can totally customize these designs and take them in any direction you want! Change colors, move elements, and add entirely new ones! There’s so much you can do with Placeit’s animation templates too, and there are plenty of cool clan logos to see.

The choice is yours, and it’s easy to give it a shot in your browser, right now, with Placeit. Check out these other cool logos for clans, teams, streamers, and more.

1. Squid Gaming Clan Logo Template Design

Squid Gaming Clan Logo Template Design

Looking to splat some toons? I have an inkling that this logo design might just fit the bill. Video-game references side, there’s plenty you could do with this design. Give it a spin today, right in the comfort of your browser.

2. Funny Gaming Clan Logo Template Design

Funny Gaming Clan Logo Template Design

Whether you’re a grumpy cat or you’re just looking for a logo with a light-hearted mood, this design has a lot of potential. This imagery has a custom animation too—check it out! It could look awesome in front of your next highlight video.

3. Gaming Character Logo Clan Template Design

Gaming Character Logo Clan Template Design

Made of tougher stuff and looking to let your competition know it? Check out this logo design template. Not feeling this mascot? There are so many others to choose from! Just jump in and start testing them out today.

4. Competitive Fighting Game Logo Clan Template

Competitive Fighting Game Logo Clan Template

Whether you’re looking to do some street fighting or you’re more into smashing some brothers (please excuse the cheesy video-game references), this logo design template might be right up your alley. Give it a spin with your brand’s colors and customizations.

5. FPS Team Clan Logo Design Template

FPS Team Clan Logo Design Template

There’s plenty to see on Placeit—from gunslinging characters to creepy zombies, from cutesy avatars to ghosts and ghouls. Check out this logo design template and plenty of other ones today. There are loads of good clan logos to check out.

Want to Learn More?

Looking for even more design tools and tips to boost your professional gaming brand? Maybe you’re looking for something for your live stream, or your gaming clan is working on a YouTube channel. 

Check out these free tutorials from Envato Tuts+ for even more inspiration and walkthroughs. From tips and tricks that’ll help teach you how to create a gaming clan logo to other design insights, there’s plenty to learn in these tutorials.

How to Design Your Own Gaming Clan Logo

Post pobrano z: How to Design Your Own Gaming Clan Logo

Final product image
What You’ll Be Creating

Looking for a gaming clan logo maker? Need a gaming clan logo for your competitive group or guild? Well, in this tutorial, we’ll look at how to make a clan logo right from the comfort of your browser, no software required. It’s simple, easy, and you can get started right now.

clan logo maker

For this tutorial, we’re going to use Placeit—an awesome online tool where you can create and design all kinds of mockups, logos, and more within your browser. 

There’s a big collection of cool logos for clans, created with gaming in mind, but they’re all customizable too—change up the text, the font, the colors, and even the imagery. Create and customize the perfect logo for your clan, and then download it as a high-resolution image, perfect for any project—from T-shirts to video overlays.

Placeit has an entire section for gaming—gaming logos, Twitch banners, avatars, and a lot more! The best part is, it’s free to dig in and start customizing designs, right now.

Want to see for yourself? Follow along with this tutorial on our Envato Tuts+ YouTube channel:

1. How to Use a Gaming Clan Logo Maker

Step 1

Start by navigating to the Logo portion of Placeit. You can do this by either going to the Logos or Gaming sections of the site. 

If you think you might like to look at other genres or industries for your logo design, feel free to check out the general Logos section. Otherwise, let’s head right over to Gaming.

In these sections, make sure to select the appropriate category, such as Gaming Teams or Logos, depending on which starting point you choose.

PlaceIt

Step 2

Next, browse through the selection of premade clan logo template designs. If something catches your eye, jump right in—you can customize the content. Think of this as your starting point, rather than your final design.

In this tutorial, we’ll work with this one, so follow that link if you’d like to work along with me.

Gaming Clan Logo Maker

Step 3

And here we are, ready to jump right in and customize our logo. Before we do so, make sure to note the save and favorite buttons, on the right-hand side of your browser’s window.

It’s free to sign up for Placeit—and you’ll need an account to save your drafts.

Online Logo Maker

2. How to Create a Gaming Clan Logo Using a Gaming Clan Logo Maker

Step 1

Now, let’s dig right into how to make a clan logo!

On the left-hand side, we can make adjustments to our text. For example, we can change what the text says, the font itself, and the color of the text. 

Try out different fonts and colors! Your logo will update in the browser as you make changes. 

gaming clan logo

Step 2

Speaking of color, we can also change the colors within the logo itself. In this example design, we have three colors: a main color, an accent, and the background color. Experiment with the color scheme, and Placeit will update the colors in the logo, right in your browser. Cool, right?

Note that you can also choose a transparent background. This is really handy if you plan to make things like stickers or use the logo in your Twitch overlay.

Transparent Logo Maker

Step 3

Then, we can also change up the imagery—and this is more than changing the image itself. We can also tweak the image’s colors. 

Note that some images have a small play icon preview on them. This indicates that this image also has a unique animation. So, if you know you want an animated logo, you might want to keep an eye out for this option. The other images use a more standard animation.

However, if you prefer one of the static images, don’t worry—we can still use it in an animation too, right here in Placeit. You have plenty of options. 

Here’s our sample logo with a new image, adjusted color scheme, and some adjusted text. Remember, you can freely adjust all of these attributes as much as you want, until you come up with the perfect logo. 

Gaming Logo Design Maker

Step 4

Happy with your logo? Remember, you can save your draft, if you’re not sure yet.

However, if you’re ready to download, it’s as simple as clicking Download, at the top of the screen. You’ll be presented with your download options—a single low fee, or a subscription that allows you to create and download as much as you like. 

When creating logos, the subscription is super price effective (and often lower than a single purchase) especially if you know you’d like to download and create variants of your logo.

gaming clan logo maker

3. How to Create an Animated Gaming Clan Logo

Step 1

So, you can make some pretty cool clan logos on Placeit—but there’s even more to see. You can also make animated gaming clan logos, perfect for video introductions, highlight videos, and so much more. If you’re curious about how to create a gaming clan logo that animates, stay tuned.

Many of the static logos also have an animated variant, just like this one we’ve been working on.

gaming clan logo maker

Step 2

Just like when we were working with static imagery, it’s simple to start customizing our animated logo. For example, let’s change up the imagery. There’s plenty to choose from here, and it’s all available for commercial use. 

Again, just as we did earlier, simply browse and select any image you would like to preview.

gaming clan logo

Step 3

After you choose a new image, Placeit will automatically update your video preview for you. Be patient on this—it might need a moment’s wait. Then, go ahead and preview your animation.

make a clan logo

Step 4

But let’s say you made a static logo that you really fell in love with—or you already have a logo design you love. No problem, we can upload your logo—either the static one you made on Placeit or an image logo from elsewhere—and add it to our animation too!

How? Well, we can also add additional slides to our animations here. Let’s test this out.

Click where it says Add Slide to add more video content to your animated logo. 

cool clan logos

Step 5

Next, choose a video template to work with. For this example, let’s try out this animated introduction, highlighted below. It already has a place ready for us to upload our static image logo.

Online Video Maker

Step 6

Once you’ve selected it, click where it says Upload Image to go ahead and upload a static image. It’ll add your image to the animated template. It’s really that simple!

clan logo template

Step 7

I’m going to test this out with the original, static image logo concept we created and downloaded earlier. Placeit allows you to crop and adjust your image before it imports it into the animation.

When you’re happy with how your upload looks, just click Crop.

cool logos for clans

Step 8

And now the placeholder in the animation will be replaced with our upload. Simple, right? Just click on Preview Video to check out what your work looks like. 

clan logo maker

Step 9

We can continue to push this further with even more slides. For example, we could try out this animated background with animated text. We could use it to describe the match, list the players, and give other important information about the game at hand. 

Just like our logo, we can change the text, the colors, the fonts, and more!

how to make a clan logo

Step 10

You can preview your adjustments individually, in each slide, or you can watch them all together, as one finished video. 

To do so, mouse over the video preview and click on the triangle to display more options. Choose either Single Slide or All Slides, depending on the preview you’d like to see.

gaming clan logo maker

Step 11

You can also rearrange and delete your slides.

Click and drag on a slide to rearrange it in your timeline, shown at the bottom of your screen. So, for example, we could slide the first slide to the end, if we wanted to.

good clan logos

Step 12

To delete a slide, simply mouse over the slide and then select Delete. It’s that simple! 

You can also duplicate slides from the menu that appears here, if you’d like to.

gaming clan logo maker

Step 13

Remember, you can also save drafts of your work. This gets extra important to note when you’re working with video. Click the icon in the right-hand corner of the screen, or add the template you’re customizing to your favorites, so you can work with it again later, too.

You’ll need a free Placeit account to save your work.

 clan logo design

Step 14

Once you’re happy with your video, it’s as simple as clicking Download. Your video will need to process, and you’ll need to choose your purchase options. Then, your video creation is all yours—ready to use for personal, professional, and commercial use.

Not sure if your video is just right? Grab a free, watermarked low-res version of your video if you need to test it out first. 

Guild logo maker

And There You Have It!

We’ve created a gaming clan logo using a clan logo template. Of course, good clan logos are going to depend on what your guild or team is all about. What genre do you play? What kind of personality or aesthetic do you want to associate with your professional brand?

But, thankfully, it’s never been easier to make a clan logo! Whether you’re an experienced designer or brand new to design, Placeit makes it easy, fun, and free to start designing. 

Gaming Logo Template Design

Check Out These Gaming Clan Logo Designs on Placeit!

Remember, these are all starting points—you can totally customize these designs and take them in any direction you want! Change colors, move elements, and add entirely new ones! There’s so much you can do with Placeit’s animation templates too, and there are plenty of cool clan logos to see.

The choice is yours, and it’s easy to give it a shot in your browser, right now, with Placeit. Check out these other cool logos for clans, teams, streamers, and more.

1. Squid Gaming Clan Logo Template Design

Squid Gaming Clan Logo Template Design

Looking to splat some toons? I have an inkling that this logo design might just fit the bill. Video-game references side, there’s plenty you could do with this design. Give it a spin today, right in the comfort of your browser.

2. Funny Gaming Clan Logo Template Design

Funny Gaming Clan Logo Template Design

Whether you’re a grumpy cat or you’re just looking for a logo with a light-hearted mood, this design has a lot of potential. This imagery has a custom animation too—check it out! It could look awesome in front of your next highlight video.

3. Gaming Character Logo Clan Template Design

Gaming Character Logo Clan Template Design

Made of tougher stuff and looking to let your competition know it? Check out this logo design template. Not feeling this mascot? There are so many others to choose from! Just jump in and start testing them out today.

4. Competitive Fighting Game Logo Clan Template

Competitive Fighting Game Logo Clan Template

Whether you’re looking to do some street fighting or you’re more into smashing some brothers (please excuse the cheesy video-game references), this logo design template might be right up your alley. Give it a spin with your brand’s colors and customizations.

5. FPS Team Clan Logo Design Template

FPS Team Clan Logo Design Template

There’s plenty to see on Placeit—from gunslinging characters to creepy zombies, from cutesy avatars to ghosts and ghouls. Check out this logo design template and plenty of other ones today. There are loads of good clan logos to check out.

Want to Learn More?

Looking for even more design tools and tips to boost your professional gaming brand? Maybe you’re looking for something for your live stream, or your gaming clan is working on a YouTube channel. 

Check out these free tutorials from Envato Tuts+ for even more inspiration and walkthroughs. From tips and tricks that’ll help teach you how to create a gaming clan logo to other design insights, there’s plenty to learn in these tutorials.

How to Design Your Own Gaming Clan Logo

Post pobrano z: How to Design Your Own Gaming Clan Logo

Final product image
What You’ll Be Creating

Looking for a gaming clan logo maker? Need a gaming clan logo for your competitive group or guild? Well, in this tutorial, we’ll look at how to make a clan logo right from the comfort of your browser, no software required. It’s simple, easy, and you can get started right now.

clan logo maker

For this tutorial, we’re going to use Placeit—an awesome online tool where you can create and design all kinds of mockups, logos, and more within your browser. 

There’s a big collection of cool logos for clans, created with gaming in mind, but they’re all customizable too—change up the text, the font, the colors, and even the imagery. Create and customize the perfect logo for your clan, and then download it as a high-resolution image, perfect for any project—from T-shirts to video overlays.

Placeit has an entire section for gaming—gaming logos, Twitch banners, avatars, and a lot more! The best part is, it’s free to dig in and start customizing designs, right now.

Want to see for yourself? Follow along with this tutorial on our Envato Tuts+ YouTube channel:

1. How to Use a Gaming Clan Logo Maker

Step 1

Start by navigating to the Logo portion of Placeit. You can do this by either going to the Logos or Gaming sections of the site. 

If you think you might like to look at other genres or industries for your logo design, feel free to check out the general Logos section. Otherwise, let’s head right over to Gaming.

In these sections, make sure to select the appropriate category, such as Gaming Teams or Logos, depending on which starting point you choose.

PlaceIt

Step 2

Next, browse through the selection of premade clan logo template designs. If something catches your eye, jump right in—you can customize the content. Think of this as your starting point, rather than your final design.

In this tutorial, we’ll work with this one, so follow that link if you’d like to work along with me.

Gaming Clan Logo Maker

Step 3

And here we are, ready to jump right in and customize our logo. Before we do so, make sure to note the save and favorite buttons, on the right-hand side of your browser’s window.

It’s free to sign up for Placeit—and you’ll need an account to save your drafts.

Online Logo Maker

2. How to Create a Gaming Clan Logo Using a Gaming Clan Logo Maker

Step 1

Now, let’s dig right into how to make a clan logo!

On the left-hand side, we can make adjustments to our text. For example, we can change what the text says, the font itself, and the color of the text. 

Try out different fonts and colors! Your logo will update in the browser as you make changes. 

gaming clan logo

Step 2

Speaking of color, we can also change the colors within the logo itself. In this example design, we have three colors: a main color, an accent, and the background color. Experiment with the color scheme, and Placeit will update the colors in the logo, right in your browser. Cool, right?

Note that you can also choose a transparent background. This is really handy if you plan to make things like stickers or use the logo in your Twitch overlay.

Transparent Logo Maker

Step 3

Then, we can also change up the imagery—and this is more than changing the image itself. We can also tweak the image’s colors. 

Note that some images have a small play icon preview on them. This indicates that this image also has a unique animation. So, if you know you want an animated logo, you might want to keep an eye out for this option. The other images use a more standard animation.

However, if you prefer one of the static images, don’t worry—we can still use it in an animation too, right here in Placeit. You have plenty of options. 

Here’s our sample logo with a new image, adjusted color scheme, and some adjusted text. Remember, you can freely adjust all of these attributes as much as you want, until you come up with the perfect logo. 

Gaming Logo Design Maker

Step 4

Happy with your logo? Remember, you can save your draft, if you’re not sure yet.

However, if you’re ready to download, it’s as simple as clicking Download, at the top of the screen. You’ll be presented with your download options—a single low fee, or a subscription that allows you to create and download as much as you like. 

When creating logos, the subscription is super price effective (and often lower than a single purchase) especially if you know you’d like to download and create variants of your logo.

gaming clan logo maker

3. How to Create an Animated Gaming Clan Logo

Step 1

So, you can make some pretty cool clan logos on Placeit—but there’s even more to see. You can also make animated gaming clan logos, perfect for video introductions, highlight videos, and so much more. If you’re curious about how to create a gaming clan logo that animates, stay tuned.

Many of the static logos also have an animated variant, just like this one we’ve been working on.

gaming clan logo maker

Step 2

Just like when we were working with static imagery, it’s simple to start customizing our animated logo. For example, let’s change up the imagery. There’s plenty to choose from here, and it’s all available for commercial use. 

Again, just as we did earlier, simply browse and select any image you would like to preview.

gaming clan logo

Step 3

After you choose a new image, Placeit will automatically update your video preview for you. Be patient on this—it might need a moment’s wait. Then, go ahead and preview your animation.

make a clan logo

Step 4

But let’s say you made a static logo that you really fell in love with—or you already have a logo design you love. No problem, we can upload your logo—either the static one you made on Placeit or an image logo from elsewhere—and add it to our animation too!

How? Well, we can also add additional slides to our animations here. Let’s test this out.

Click where it says Add Slide to add more video content to your animated logo. 

cool clan logos

Step 5

Next, choose a video template to work with. For this example, let’s try out this animated introduction, highlighted below. It already has a place ready for us to upload our static image logo.

Online Video Maker

Step 6

Once you’ve selected it, click where it says Upload Image to go ahead and upload a static image. It’ll add your image to the animated template. It’s really that simple!

clan logo template

Step 7

I’m going to test this out with the original, static image logo concept we created and downloaded earlier. Placeit allows you to crop and adjust your image before it imports it into the animation.

When you’re happy with how your upload looks, just click Crop.

cool logos for clans

Step 8

And now the placeholder in the animation will be replaced with our upload. Simple, right? Just click on Preview Video to check out what your work looks like. 

clan logo maker

Step 9

We can continue to push this further with even more slides. For example, we could try out this animated background with animated text. We could use it to describe the match, list the players, and give other important information about the game at hand. 

Just like our logo, we can change the text, the colors, the fonts, and more!

how to make a clan logo

Step 10

You can preview your adjustments individually, in each slide, or you can watch them all together, as one finished video. 

To do so, mouse over the video preview and click on the triangle to display more options. Choose either Single Slide or All Slides, depending on the preview you’d like to see.

gaming clan logo maker

Step 11

You can also rearrange and delete your slides.

Click and drag on a slide to rearrange it in your timeline, shown at the bottom of your screen. So, for example, we could slide the first slide to the end, if we wanted to.

good clan logos

Step 12

To delete a slide, simply mouse over the slide and then select Delete. It’s that simple! 

You can also duplicate slides from the menu that appears here, if you’d like to.

gaming clan logo maker

Step 13

Remember, you can also save drafts of your work. This gets extra important to note when you’re working with video. Click the icon in the right-hand corner of the screen, or add the template you’re customizing to your favorites, so you can work with it again later, too.

You’ll need a free Placeit account to save your work.

 clan logo design

Step 14

Once you’re happy with your video, it’s as simple as clicking Download. Your video will need to process, and you’ll need to choose your purchase options. Then, your video creation is all yours—ready to use for personal, professional, and commercial use.

Not sure if your video is just right? Grab a free, watermarked low-res version of your video if you need to test it out first. 

Guild logo maker

And There You Have It!

We’ve created a gaming clan logo using a clan logo template. Of course, good clan logos are going to depend on what your guild or team is all about. What genre do you play? What kind of personality or aesthetic do you want to associate with your professional brand?

But, thankfully, it’s never been easier to make a clan logo! Whether you’re an experienced designer or brand new to design, Placeit makes it easy, fun, and free to start designing. 

Gaming Logo Template Design

Check Out These Gaming Clan Logo Designs on Placeit!

Remember, these are all starting points—you can totally customize these designs and take them in any direction you want! Change colors, move elements, and add entirely new ones! There’s so much you can do with Placeit’s animation templates too, and there are plenty of cool clan logos to see.

The choice is yours, and it’s easy to give it a shot in your browser, right now, with Placeit. Check out these other cool logos for clans, teams, streamers, and more.

1. Squid Gaming Clan Logo Template Design

Squid Gaming Clan Logo Template Design

Looking to splat some toons? I have an inkling that this logo design might just fit the bill. Video-game references side, there’s plenty you could do with this design. Give it a spin today, right in the comfort of your browser.

2. Funny Gaming Clan Logo Template Design

Funny Gaming Clan Logo Template Design

Whether you’re a grumpy cat or you’re just looking for a logo with a light-hearted mood, this design has a lot of potential. This imagery has a custom animation too—check it out! It could look awesome in front of your next highlight video.

3. Gaming Character Logo Clan Template Design

Gaming Character Logo Clan Template Design

Made of tougher stuff and looking to let your competition know it? Check out this logo design template. Not feeling this mascot? There are so many others to choose from! Just jump in and start testing them out today.

4. Competitive Fighting Game Logo Clan Template

Competitive Fighting Game Logo Clan Template

Whether you’re looking to do some street fighting or you’re more into smashing some brothers (please excuse the cheesy video-game references), this logo design template might be right up your alley. Give it a spin with your brand’s colors and customizations.

5. FPS Team Clan Logo Design Template

FPS Team Clan Logo Design Template

There’s plenty to see on Placeit—from gunslinging characters to creepy zombies, from cutesy avatars to ghosts and ghouls. Check out this logo design template and plenty of other ones today. There are loads of good clan logos to check out.

Want to Learn More?

Looking for even more design tools and tips to boost your professional gaming brand? Maybe you’re looking for something for your live stream, or your gaming clan is working on a YouTube channel. 

Check out these free tutorials from Envato Tuts+ for even more inspiration and walkthroughs. From tips and tricks that’ll help teach you how to create a gaming clan logo to other design insights, there’s plenty to learn in these tutorials.

How to Create a Dramatic Mermaid Photo Manipulation in Photoshop

Post pobrano z: How to Create a Dramatic Mermaid Photo Manipulation in Photoshop

Final product image
What You’ll Be Creating

Today, we will be putting together a vibrant and dynamic underwater dance scene between two mermaids! With this photo effect, we will take a close look at lighting and shadows, creating simple underwater backdrops and learning how to create a mermaid tail from scratch—no stock images needed. 

While we will be using digital painting techniques, I have specially formulated this process with the non-digital painter in mind! 

Why not try a similar photo manipulation project over on our Envato Tuts+ YouTube channel, if you wish to try out more mermaid Photoshop content!

What You’ll Need

To complete this project, we are using the following resources:

Find more resources on Envato Elements!

1. How to Create an Underwater Background

We’ll start by creating a simple underwater backdrop. Leaving the background clean and straightforward will help keep all of the focus on our two subjects. 

Step 1

Create a 3076 x 4359 px canvas.

Change it to a 300 Resolution if you intend to use this for prints. 

Step 2

Create a Color Fill layer filled with a dark blue #0f1219.

Step 3

Create a New Layer set to Overlay. 

Using a large, soft round Brush, paint blobs of white light towards the top of the canvas.

Set the brush to a low Flow Rate, 1-15%, to slowly build up the light to avoid any harsh edges. 

Use multiple layers, set to Overlay or Soft Light, to layer orbs of light over each other. Doing this will give you more control over the light’s opacity as well. 

Group all of the light layers together, naming the group „Light.”

light

Step 4

Repeat step three, adding even more light to the canvas. 

Focus on creating light all over the canvas, not just the upper portion. 

Group the layers, naming the group „Light Enhance.”

more light

Step 5

You might notice a lot of color banding; there’s a quick way to fix this using the Noise Filter! Even if you don’t have any notable banding, I suggest adding this as it adds to the foggy underwater feel of our background. 

Create a New Layer and fill it with Black.

Bring the layer below the two „Light” groups.

Go to Filter > Noise > Add Noise.

Noise Settings

  • Amount: 5
  • Distribution: Gaussian
  • Monochromatic: Checked

Bring the Noise layer’s Opacity to 53%.

Add a light 0.5px Filter > Blur > Gaussian Blur to the noise if it feels too harsh. 

noise

Step 6

Create a  New Layer setting it to Overlay.

Using the same techniques as in Step 3, paint more blobs of light.

Focus on creating smaller, more stringy light paths towards the upper portion of the canvas. 

more light

Step 7

Create a  New Layer setting it to Soft Light.

Create shadows using the color Black and the same techniques as in Step 3. 

Step 8

Create a Color Lookup layer.

Color Lookup Settings

  • 3DLUT File: TealOrangeContrast 
  • Opacity: 62%
color lookup layer

Step 9

Create a New Layer.

With a medium, soft, round Brush, paint light beams coming from the top of the water’s surface. 

Paint with a low Flow Rate to build up the light slowly. 

If you’re having a hard time getting the light rays to look smooth and slanted, try adding a Filter > Blur > Motion Blur. 

light rays

Step 10

Create a New Layer set to Screen.

Paint a pop of pale Orange #d8966e in the middle of the light ray. Bring down the opacity of the layer if needed. 

light rays

Step 11

Bring in an image of Underwater Coral.

Place it towards the bottom of the canvas, flipping it horizontally. 

Using the Patch Tool, remove the fish located towards the bottom of the coral. 

coral

Step 12

Add a Layer Mask to the coral. 

Mask out the top portion of the coral image with a large, soft, round Brush.

coral

Step 13

Go to Image > Adjustments > Hue/Saturation and set the settings as follows. 

Settings: 

  • Colorize: Checked
  • Hue: 193
  • Saturation: 29

Create a New Layer with a 4% Opacity.

With a large, soft, round Brush, paint a very light fog towards the top of the reef. 

coral

Step 14

Create Color Balance, Vibrance and Color Lookup adjustment layers, ordered from bottom to top. 

Color Balance Settings

  • Red: -17
  • Green: -35
  • Blue: -46

Vibrance Settings

  • Vibrance: +40
  • Saturation: +21

Color Lookup Settings

  • 3DLUT File: Crisp_Warm
  • Opacity: 17%

Group the three adjustment layers, naming the group „CC.”

Group all of the background layers together, naming the group „Water.”

final layers

2. How to Remove Clothing From a Subject

Next, we will be extracting and placing our subjects into their new environment. Our primary focus will be removing the unwanted clothes from our soon-to-be mermaids! 

Step 1

Extract the subjects using your preferred method. Find my favorite way in this tutorial!

Don’t worry about either of the subject’s legs—as you can see below, I didn’t even bother doing the male’s!

subjects

Step 2

Next, we are going to use the Clone Stamp Tool to remove the seam going down the side of our female mermaid. 

I like using a semi-hard brush when using the Clone Stamp Tool to keep as much of the original texture as possible!

remove seam

Step 3

Next, I am going to use the Mixer Brush Tool to remove some of the cloth and unwanted texture on the bodysuit and the armpit area. Do this by dragging the soft Mixer brush over the areas with the most amount of texture. You can also use this to smooth out shadows and highlights. 

The more you use the Mixer Brush, the better you’ll understand how it works! 

Mixer Brush Settings

mixer brush

Step 4

Create and clip a New Layer into the subject layer. On this layer, we are going to cover the seam of fabric located on the woman’s thigh. 

We will be covering the seam by painting skin over the area; the process is much easier to do than it is to explain, so bear with me! 

First, let’s set up our Brush settings. 

Brush Settings 

  • Size: Medium (Change as you go)
  • Hardness: 0%
  • Flow: 10%

Using the Eyedropper Tool, sample colors from the same area you are painting—in this case, the thigh area.

Slowly paint over the area of the seam, building up color gradually. Sample colors as you go, making sure everything is smooth and there is a natural transition. 

If you are having trouble hiding the seam completely, duplicate the layer you are painting on. Do this will increase the overall opacity of the colors. 

Use a soft Eraser brush to get rid of any harsh edges and additional color/paint. 

Step 5

Repeat Step 4 on the arm and chest seam.

remove seams

Step 6

Create a New Layer set to Overlay.

Using a soft, round Brush, paint White over the subject’s natural highlights to enhance them.

enhance highlights

Step 7

Create and clip a Brightness/Contrast layer into the subject layer. 

Brightness/Contrast Settings

  • Brightness: -12
  • Blend If:
blend if
brightnesscontrast

Step 8

Create and clip a Curves layer into the subject layer. 

Curve Settings

curves
results

Step 9

Create and clip a second Curves layer into the subject layer. 

Curve Settings

curves
blend if
results

Step 10

Duplicate the above Curves layer to enhance the effect.

Bring the layer down to 50% Opacity.

add shadows

Step 11

Clip a Water Reflection image into our subjects.

Set the layer mode to Screen with the Blend If settings seen below.

Blend If Settings

blend if
water texture

Step 12

Add an Image > Adjustments > Brightness/Contrast and Hue/Saturation to the „Water Surface” layer.

Brightness/Contrast Settings

  • Brightness: -6
  • Contrast: 21

Hue/Saturation Settings

  • Hue: +180
  • Saturation: -67
water texture

Step 13

Add a Layer Mask to the „Water Surface” layer.

Use a large, soft, round Brush to mask out the edges of the image.

Step 14

Duplicate the water surface so that it’s placed over the male subject as well. 

Group all of the current subject layers, naming the group „Subjects.”

final layers

3. How to Create a Dark and Vivid Color Grade 

When creating mermaids, I like to set up my colors and contrast levels early on! I set my „Color Grade” folder above all the other layers, where I can quickly turn it on or off and adjust it as I continue to paint.

These layers are ordered from bottom to top so that each layer will go above the previous one!

Step 1

Create a Color Lookup layer.

Color Lookup Settings 

  • 3DLUT File: FoggyNight
  • Opacity: 25%
  • Blend If:
blend if
results

Step 2

Create a Curves layer.

Curves Settings 

curves
curves results

Step 3

Create a Color Lookup layer.

Mask out the top half of the layer using a large, soft, round Brush. 

Color Lookup Settings 

  • 3DLUT File: FoggyNight
  • Opacity: 24%
  • Blend If:
blend if
blend if results

Step 4

Create a Color Lookup layer.

Copy the previous layer mask onto this layer. 

Color Lookup Settings 

  • 3DLUT File: EdgeyAmber
  • Opacity: 14%
color lookup

Step 5

Create a Curves layer.

Curves Settings 

curves

Step 6

Create a Curves layer.

Curves Settings 

curves

Step 7

Create a Curves layer.

Curves Settings 

curves
results

Step 8

Create a Color Lookup layer.

Color Lookup Settings 

  • 3DLUT File: DropBlues
  • Opacity: 51%

Group all of the adjustment layers together, naming the group „Color Grade.”

final layers

4. How to Create a Mermaid Tail in Photoshop 

Now to the star of the tutorial: the mermaid tail! As mentioned above, I specifically created this technique for non-digital painters, and as with everything, the more tails you create, the better you will get at them.

If it’s your first time, it’s best to start slow with simple shapes, colors, and textures. Then from there, you can continue to grow to more complex, photo-realistic shapes and textures, adding much more movement and detail!

Step 1

Create a New Layer. 

With a hard, round Brush set to a bright color like white, sketch out your tail. Just worry about the general shape—no need to make it perfect! 

The sketch is just a general guide for our tail; you will likely change it as you’ll see below.  

sketch tail

Step 2

Create a New Layer under your sketch.

Now, using the Pen Tool set to Shape, trace your sketch. 

Once you are generally happy with your path (don’t worry, you can adjust it later), create a Light Brown #685550 Color Fill layer.

The color fill layer will take the shape of your path, making it so you can change the base color of your tail at any time. 

Note!

While you won’t always need to do this, for this particular mermaid, I suggest splitting the tail in two. So you will have two shapes, the thigh portion and the bottom portion. Each piece will follow the same process! 

shape tail

Step 3 (Optional)

If you need to edit the shape of your tail, select the Pen Tool set to Path. 

On the upper Pen Tool Toolbar, to the left of the Shape button, you will find the Path Operations options. 

To Add to Your Tail

If you need to add to your tail, to make it longer for instance, then you will want to set the Path Operations to Combine Shapes. 

When set to Combine Shapes, paths will add to the shape of your tail. 

To Subtract From Your Tail 

If you’d like to subtract from your tail, to adjust the width or shape, for instance, set the Path Operations to Subtract From Shape. 

This option will make it so that the path will subtract from the shape, without creating new shapes. 

Use these options to adjust and shape your tail until you’re happy! 

Step 4

Using the layer mask on the thigh portion of the tail, mask out the top inner area of the tail, blending it into the thigh of the subject. 

remove edges

Step 5 

Next, we are going to shade and light the upper portion of our tail. 

Create two New Layers and clip them into the thigh layer. Name one „Light” and the other „Shadow.”

With a soft, round Brush set to a very low 1-10% Flow Rate, paint some highlights onto the „Light” layer and then shadows onto the „Shadow” layer.

Use the Eyedropper Tool to select colors, using the subject as the Eyedropper’s reference. 

Tips

  • If you don’t have a graphics tablet, use the Smudge and Mixer Brush Tool to smooth and taper out the edges.
  • Sample the colors from the subject’s high, mid, and lowlights; however, feel free to adjust the colors as needed.
  • Build up both the shadows and light slowly. Setting the brush to a low Flow Rate is essential for this.
  • Keeping the lights and darks helps you have more control and a higher room for error. 
  • Use the subject as a reference!
  • Use as many layers as you’d like so you can adjust opacities and play with layer modes!
  • For light and highlights, use Screen, Color Dodge, Overlay, and Softlight.
  • When painting shadows, set the layer modes to Multiply and Soft Light.
paint thigh

Step 6

Download and install these free Photoshop Brushes for Painting Fish Scales.

Create a New Group.

Hold Control and Click your thigh shape to create a selection of it. With the thigh-shaped selection, add a layer mask to the new group.

Rename the group „Scales” as this is the group we will be creating our thigh scales on. 

Step 7

Create a New Layer inside the „Scales” group, setting it to Overlay.

Using a mixture of a small, soft, round Brush and the „Pixelstains Fish Scale Brush 03” from the downloaded brush pack, paint a Soft Peach #fdc79b color all over the thigh.

Focus the scale texture towards the top of the thigh, keeping the texture small. 

color thigh

Step 8

Create a New Layer set to Darken.

Using the same „Pixelstains Fish Scale Brush 03” brush, paint Dark Brown #4a2618 scales onto your mermaid’s thigh. 

Tips

  • Focus on adding scales to areas where the light hits the most. Darker areas should have fewer scales.
  • Be aware of the direction of the scales.
  • Create multiple different layers to paint on, and make good use of Control-Z!
  • Find some fish or other mermaid illustrations for reference. 
  • Add a Filter > Shaper > Smart Sharp to the scales to increase details. 
add scales

Step 9

Create a New Layer set to Color Dodge, placing setting it above the „Scale” layers. 

Add color to the scales using the „Pixelstains Fish Scale Brush 03” Brush. I used a mixture of a Tan #9b8058 and Green #819058 color. 

Bring the Opacity of the layer down if needed. 

add light

Step 10

Create a New Layer set to Overlay. 

Continue to enhance the light and color of the tail by building up more of the Tan #9b8058 color on the thigh. 

Use a soft, round Brush set to a 1-15% Flow rate. 

add more light

Step 11

Repeat step 10 until you are happy! 

Looking at references is my biggest tip for this step, along with focusing on building and enhancing the highlights that already exist. 

Use a mixture of Overlay and Color layer modes to keep layering on the light.  

add color and light

Step 12

Finish off the scales by creating a New Layer set to Overlay.

Bring this layer below any „Scale” layers.

Using a small, hard, round Brush, paint white highlights on the edges of the most prominent scales, going down the middle portion of the side of the thigh.  

Group the  „Scales” group in with our „Thigh” layer, naming the new group „Thigh Tail.”

add highlights

Step 13

Remember how we split the tail into two shapes? Well, we are going to repeat the process above on the bottom portion of the tail!

The steps are the same, only you will be working in a looping motion this time. 

Once you are happy with the bottom portion of the tail, Group everything together, naming the group „Bottom Tail.”

Then Group both the bottom and thigh portion of the tail together, naming the group „Tail – Woman.”

bottom tail

Step 14

Create and clip a Selective Color adjustment layer into the „Tail – Woman” group. 

Selective Color Settings

Yellows 

  • Cyan: -56
  • Magenta: +64
  • Yellow: -22
selective color

Step 15

Create and clip a New Layer set to Overlay into the „Tail – Woman” group.

Using a soft, round Brush, further enhance the highlights of both the top and bottom portion of the tail.

As always, it’s a good idea to layer lighting using multiple layers!

Step 16

Create and clip a Color Balance adjustment layer into the „Tail – Woman” group.

Color Balance Settings 

  • Red: +70
  • Green: +53
  • Blue: +90
color balance

Step 17

Repeat the steps above with the male subject! 

final layers

5. How to Create Fish Fins 

To finish up our tails, we will be adding our fins. Soft, flowy fins are the easiest to work with, so that is what we will be adding, but incorporating hard fins like dorsal fins is a great way to create more visually appealing/edgy mermaids! 

Step 1

Drop the Betta Siamese Aquarium Fighting Fish 1 image onto the canvas. 

I suggest keeping all of the fish stock images as Smart Objects so that you can copy and resize them as needed, without having to worry about distortion or pixelation! 

Set the fish stock to Lighten, placing it over the female subject’s tail. 

add fish

Step 2

Using a soft, round brush, mask out the fish’s head and body. 

Step 3

Add an Image > Adjustments > Brightness/Contrast and Hue/Saturation to the fish stock.

Feel free to adjust these settings for all of the different fins we will create from this fin later on!

Brightness/Contrast Settings

  • Brightness: -80

Hue/Saturation Settings

  • Hue: -11
  • Saturation: -10
blend fish

Step 4

Repeat Step 3 until you are satisfied with the number of fins! 

Use both the Transform and Warp mode to differentiate the fins, along with Layer Masks. We don’t want the fins to look too repetitive! 

You can also experiment with using the Screen layer mode along with the Lighten layer mode. 

It’s also best to use at least two different stock images like Betta Siamese Aquarium Fighting Fish 2.

finish  fins

Step 5

Create a New Layer set to Multiply, placing it below all of the fin layers but above the subject layers. So if you placed fins below your mermaid layers, you would have to create a second layer for those fins.

Let’s finish up the fins by painting a dark blue base underneath them; this will make the fins feel more substantial. 

Use a semi-hard round Brush to achieve this effect. 

add fin shadows

Step 6

Repeat the above steps for the male subject as well! 

final layers

6. How to Create a Lens Flare Photo Effect 

Next, we will be adding a bright light coming from the surface of the water. Using lighting and lens flares is a great way to add contrasting yet complementing colors to your work!

Step 1

Create a New Layer set to Screen.

With a very large, soft, round Brush, paint a Light Orange #ff9259 blob of light towards the upper-middle portion of the canvas. 

add orange light

Step 2

Drop in image „8” from the Vintage Polygon Light Backgrounds texture pack. Set the layer to Screen.

Add a Filter > Blur > Shape Blur.

Shape Blur Settings 

  • Radius: 70 px
  • Shape: Hexagon 

Use a very large, soft, round Brush to mask out the bottom edge of the light texture. 

add texture

Step 3

Repeat Step 2 with the Suns and Rays lens flare pack. 

add texture

Step 4

Create a New Layer set to Screen. 

Using a soft, round Brush set to a very low 1-5% Flow, paint a glow coming from the bodies and tails of our two subjects. 

Sample colors from the areas you are painting over. For instance, paint light blue over the female mermaid’s tailfins, and a light peach or orange color over her body. 

Feel free to bring in other colors as well, like greens or golds! Bring the Opacity of the layer down if needed. 

final layers

7. How to Paint Dark Shadows 

Next up, we will be painting some dramatic shadows to match our rich light source. 

Step 1

Create a New Layer right above the „Water” group, setting the layer to Multiply. 

Using a medium, soft, round Brush, paint a Dark Green #0e1509 color behind your female subject. 

The shadows should be slanted, not too soft, and located logically. Creating defined shadows will often produce more dynamic lighting! 

Create a New Layer above the previous layer, setting it to Overlay. 

Paint a very subtle, soft, faint glow around the woman’s face and chest.  

add shadow

Step 2

Repeat Step 1 above, only this time place the layers above your subject’s. 

Whether you place them above or below the fins is up to you—you will likely have a mix. 

Paint shadows on multiple different Multiply layers, building the shadows as you go, and adjust the layer’s Opacity as needed. 

Use Filter > Blur > Motion Blur to add more slant to your shadows if needed as well!

Also, use the Blend If function to keep shadows out of highlights. 

add shadow

Step 3

Is there an area you want to catch more light? You can use a Brightness/Contrast layer.

Use a layer mask to keep it confined to the tail fin.

Brightness/Contrast Settings 

  • Brightness: 41
  • Contrast: 79
final layers

8. How to Create Underwater Bubbles and Hair

To finish everything off, we will be adding some underwater bubbles and adding some movement to our subject’s hair.

While you can paint your own bubbles, you can also use these premade Colorful soap bubbles!

Step 1

Open up the Colorful soap bubbles PSD, and drag and drop the whole „Wiggling Bubbles” group full of bubbles onto the canvas. 

Making sure the „Wiggling Bubbles” group is below the „Lens Flare” group, shrink the bubbles substantially!

Set the group to Screen. 

Step 2

Use the Move Tool to position each bubble around the canvas individually. 

You can copy, paste, flip, enlarge, and shrink the bubbles as needed. Variation is key, so try not to make any single bubble look the same! 

Step 3

Create and clip a Brightness/Contrast layer into the „Wiggling Bubbles” group. 

Brightness/Contrast Settings

  • Brightness: -150
  • Contrast: 100

Next, to get rid of 100% of the color of the bubbles, create and clip a Gradient Map layer above the „Brightness/Contrast” layer. 

Gradient Map Settings

  • Color: Black to White 

To add even more bubbles, without having to copy and paste each bubble individually, try the trick below! 

Step 4

Duplicate the „Wiggling Bubbles” group, along with its clipped adjustment layers. Bring the new group above the original group. We want to keep our two types of bubbles separate!

Merge the duplicate group and its adjustment layers together, making sure to reset the layer mode to Screen. 

Flip the merged bubbles both horizontally and vertically, as well as shrinking them down. Place the bubbles where desired—I placed them in the upper right-hand corner.  

If you find that your bubbles aren’t bright enough, duplicate their layers!

Step 5

Repeat step 4 until you’re satisfied! I added two new sets of bubbles, for a total of three. Again, try to avoid making the bubbles look repetitive! 

Use the Eraser Tool on any of the bubbles that look out of place. 

Step 6

Finally, add some depth by creating foreground bubbles. 

Start by repeating step 4. Significantly enlarge the new bubbles, positioning them on the right side and bottom portion of the canvas. 

Add a Filter > Blur > Shape Blur to the bubbles to remove any pixelation caused by enlarging the bubbles.

Shape Blur Settings 

  • Shape: Circle 
  • Radius: 25 px

Group all of the merged bubble layers together, naming the group „Merged Bubbles”. You should have a „Merged Bubbles” group and a „Wiggling Bubbles” group!

Step 7

Next, we will want to add some flow to the hair. I personally like to work with the existing hair of the subject, simply adding to it and giving it more motion. 

Create a New Layer. 

Using a hair-strand brush, like the one I teach you how to create in this fashion portrait tutorial, paint strands of wavy hair extending out of the subject’s current hair. 

Use the Eyedropper Tool to pick the colors as you go. 

Step 8

Create a New Layer, setting it to Overlay.

Using a soft, round Brush with a 1-10% Flow Rate, paint white highlights in and on the hair strands. 

Lower the layer’s Opacity if needed.

We’ve Done It!

These mermaids are just a jumping-off point, here to help you cover the basics; there are so many different directions you can go and so many more details you could add compared to what we did here today! And the best part is that the more you create, the better you’ll get, going from simple shapes to full-blown complex masterpieces. 

Take this opportunity to think of all the different kinds of underwater creatures you could create using these techniques as a starting point. Never be afraid to think outside of the tutorial!

So, as always, keep experimenting with different techniques and practicing, and don’t forget to post your version below, along with any questions, comments, or critiques!

Finished

Looking to learn more? Why not check out the following photo manipulation tutorials:

How to Create a Dramatic Mermaid Photo Manipulation in Photoshop

Post pobrano z: How to Create a Dramatic Mermaid Photo Manipulation in Photoshop

Final product image
What You’ll Be Creating

Today, we will be putting together a vibrant and dynamic underwater dance scene between two mermaids! With this photo effect, we will take a close look at lighting and shadows, creating simple underwater backdrops and learning how to create a mermaid tail from scratch—no stock images needed. 

While we will be using digital painting techniques, I have specially formulated this process with the non-digital painter in mind! 

Why not try a similar photo manipulation project over on our Envato Tuts+ YouTube channel, if you wish to try out more mermaid Photoshop content!

What You’ll Need

To complete this project, we are using the following resources:

Find more resources on Envato Elements!

1. How to Create an Underwater Background

We’ll start by creating a simple underwater backdrop. Leaving the background clean and straightforward will help keep all of the focus on our two subjects. 

Step 1

Create a 3076 x 4359 px canvas.

Change it to a 300 Resolution if you intend to use this for prints. 

Step 2

Create a Color Fill layer filled with a dark blue #0f1219.

Step 3

Create a New Layer set to Overlay. 

Using a large, soft round Brush, paint blobs of white light towards the top of the canvas.

Set the brush to a low Flow Rate, 1-15%, to slowly build up the light to avoid any harsh edges. 

Use multiple layers, set to Overlay or Soft Light, to layer orbs of light over each other. Doing this will give you more control over the light’s opacity as well. 

Group all of the light layers together, naming the group „Light.”

light

Step 4

Repeat step three, adding even more light to the canvas. 

Focus on creating light all over the canvas, not just the upper portion. 

Group the layers, naming the group „Light Enhance.”

more light

Step 5

You might notice a lot of color banding; there’s a quick way to fix this using the Noise Filter! Even if you don’t have any notable banding, I suggest adding this as it adds to the foggy underwater feel of our background. 

Create a New Layer and fill it with Black.

Bring the layer below the two „Light” groups.

Go to Filter > Noise > Add Noise.

Noise Settings

  • Amount: 5
  • Distribution: Gaussian
  • Monochromatic: Checked

Bring the Noise layer’s Opacity to 53%.

Add a light 0.5px Filter > Blur > Gaussian Blur to the noise if it feels too harsh. 

noise

Step 6

Create a  New Layer setting it to Overlay.

Using the same techniques as in Step 3, paint more blobs of light.

Focus on creating smaller, more stringy light paths towards the upper portion of the canvas. 

more light

Step 7

Create a  New Layer setting it to Soft Light.

Create shadows using the color Black and the same techniques as in Step 3. 

Step 8

Create a Color Lookup layer.

Color Lookup Settings

  • 3DLUT File: TealOrangeContrast 
  • Opacity: 62%
color lookup layer

Step 9

Create a New Layer.

With a medium, soft, round Brush, paint light beams coming from the top of the water’s surface. 

Paint with a low Flow Rate to build up the light slowly. 

If you’re having a hard time getting the light rays to look smooth and slanted, try adding a Filter > Blur > Motion Blur. 

light rays

Step 10

Create a New Layer set to Screen.

Paint a pop of pale Orange #d8966e in the middle of the light ray. Bring down the opacity of the layer if needed. 

light rays

Step 11

Bring in an image of Underwater Coral.

Place it towards the bottom of the canvas, flipping it horizontally. 

Using the Patch Tool, remove the fish located towards the bottom of the coral. 

coral

Step 12

Add a Layer Mask to the coral. 

Mask out the top portion of the coral image with a large, soft, round Brush.

coral

Step 13

Go to Image > Adjustments > Hue/Saturation and set the settings as follows. 

Settings: 

  • Colorize: Checked
  • Hue: 193
  • Saturation: 29

Create a New Layer with a 4% Opacity.

With a large, soft, round Brush, paint a very light fog towards the top of the reef. 

coral

Step 14

Create Color Balance, Vibrance and Color Lookup adjustment layers, ordered from bottom to top. 

Color Balance Settings

  • Red: -17
  • Green: -35
  • Blue: -46

Vibrance Settings

  • Vibrance: +40
  • Saturation: +21

Color Lookup Settings

  • 3DLUT File: Crisp_Warm
  • Opacity: 17%

Group the three adjustment layers, naming the group „CC.”

Group all of the background layers together, naming the group „Water.”

final layers

2. How to Remove Clothing From a Subject

Next, we will be extracting and placing our subjects into their new environment. Our primary focus will be removing the unwanted clothes from our soon-to-be mermaids! 

Step 1

Extract the subjects using your preferred method. Find my favorite way in this tutorial!

Don’t worry about either of the subject’s legs—as you can see below, I didn’t even bother doing the male’s!

subjects

Step 2

Next, we are going to use the Clone Stamp Tool to remove the seam going down the side of our female mermaid. 

I like using a semi-hard brush when using the Clone Stamp Tool to keep as much of the original texture as possible!

remove seam

Step 3

Next, I am going to use the Mixer Brush Tool to remove some of the cloth and unwanted texture on the bodysuit and the armpit area. Do this by dragging the soft Mixer brush over the areas with the most amount of texture. You can also use this to smooth out shadows and highlights. 

The more you use the Mixer Brush, the better you’ll understand how it works! 

Mixer Brush Settings

mixer brush

Step 4

Create and clip a New Layer into the subject layer. On this layer, we are going to cover the seam of fabric located on the woman’s thigh. 

We will be covering the seam by painting skin over the area; the process is much easier to do than it is to explain, so bear with me! 

First, let’s set up our Brush settings. 

Brush Settings 

  • Size: Medium (Change as you go)
  • Hardness: 0%
  • Flow: 10%

Using the Eyedropper Tool, sample colors from the same area you are painting—in this case, the thigh area.

Slowly paint over the area of the seam, building up color gradually. Sample colors as you go, making sure everything is smooth and there is a natural transition. 

If you are having trouble hiding the seam completely, duplicate the layer you are painting on. Do this will increase the overall opacity of the colors. 

Use a soft Eraser brush to get rid of any harsh edges and additional color/paint. 

Step 5

Repeat Step 4 on the arm and chest seam.

remove seams

Step 6

Create a New Layer set to Overlay.

Using a soft, round Brush, paint White over the subject’s natural highlights to enhance them.

enhance highlights

Step 7

Create and clip a Brightness/Contrast layer into the subject layer. 

Brightness/Contrast Settings

  • Brightness: -12
  • Blend If:
blend if
brightnesscontrast

Step 8

Create and clip a Curves layer into the subject layer. 

Curve Settings

curves
results

Step 9

Create and clip a second Curves layer into the subject layer. 

Curve Settings

curves
blend if
results

Step 10

Duplicate the above Curves layer to enhance the effect.

Bring the layer down to 50% Opacity.

add shadows

Step 11

Clip a Water Reflection image into our subjects.

Set the layer mode to Screen with the Blend If settings seen below.

Blend If Settings

blend if
water texture

Step 12

Add an Image > Adjustments > Brightness/Contrast and Hue/Saturation to the „Water Surface” layer.

Brightness/Contrast Settings

  • Brightness: -6
  • Contrast: 21

Hue/Saturation Settings

  • Hue: +180
  • Saturation: -67
water texture

Step 13

Add a Layer Mask to the „Water Surface” layer.

Use a large, soft, round Brush to mask out the edges of the image.

Step 14

Duplicate the water surface so that it’s placed over the male subject as well. 

Group all of the current subject layers, naming the group „Subjects.”

final layers

3. How to Create a Dark and Vivid Color Grade 

When creating mermaids, I like to set up my colors and contrast levels early on! I set my „Color Grade” folder above all the other layers, where I can quickly turn it on or off and adjust it as I continue to paint.

These layers are ordered from bottom to top so that each layer will go above the previous one!

Step 1

Create a Color Lookup layer.

Color Lookup Settings 

  • 3DLUT File: FoggyNight
  • Opacity: 25%
  • Blend If:
blend if
results

Step 2

Create a Curves layer.

Curves Settings 

curves
curves results

Step 3

Create a Color Lookup layer.

Mask out the top half of the layer using a large, soft, round Brush. 

Color Lookup Settings 

  • 3DLUT File: FoggyNight
  • Opacity: 24%
  • Blend If:
blend if
blend if results

Step 4

Create a Color Lookup layer.

Copy the previous layer mask onto this layer. 

Color Lookup Settings 

  • 3DLUT File: EdgeyAmber
  • Opacity: 14%
color lookup

Step 5

Create a Curves layer.

Curves Settings 

curves

Step 6

Create a Curves layer.

Curves Settings 

curves

Step 7

Create a Curves layer.

Curves Settings 

curves
results

Step 8

Create a Color Lookup layer.

Color Lookup Settings 

  • 3DLUT File: DropBlues
  • Opacity: 51%

Group all of the adjustment layers together, naming the group „Color Grade.”

final layers

4. How to Create a Mermaid Tail in Photoshop 

Now to the star of the tutorial: the mermaid tail! As mentioned above, I specifically created this technique for non-digital painters, and as with everything, the more tails you create, the better you will get at them.

If it’s your first time, it’s best to start slow with simple shapes, colors, and textures. Then from there, you can continue to grow to more complex, photo-realistic shapes and textures, adding much more movement and detail!

Step 1

Create a New Layer. 

With a hard, round Brush set to a bright color like white, sketch out your tail. Just worry about the general shape—no need to make it perfect! 

The sketch is just a general guide for our tail; you will likely change it as you’ll see below.  

sketch tail

Step 2

Create a New Layer under your sketch.

Now, using the Pen Tool set to Shape, trace your sketch. 

Once you are generally happy with your path (don’t worry, you can adjust it later), create a Light Brown #685550 Color Fill layer.

The color fill layer will take the shape of your path, making it so you can change the base color of your tail at any time. 

Note!

While you won’t always need to do this, for this particular mermaid, I suggest splitting the tail in two. So you will have two shapes, the thigh portion and the bottom portion. Each piece will follow the same process! 

shape tail

Step 3 (Optional)

If you need to edit the shape of your tail, select the Pen Tool set to Path. 

On the upper Pen Tool Toolbar, to the left of the Shape button, you will find the Path Operations options. 

To Add to Your Tail

If you need to add to your tail, to make it longer for instance, then you will want to set the Path Operations to Combine Shapes. 

When set to Combine Shapes, paths will add to the shape of your tail. 

To Subtract From Your Tail 

If you’d like to subtract from your tail, to adjust the width or shape, for instance, set the Path Operations to Subtract From Shape. 

This option will make it so that the path will subtract from the shape, without creating new shapes. 

Use these options to adjust and shape your tail until you’re happy! 

Step 4

Using the layer mask on the thigh portion of the tail, mask out the top inner area of the tail, blending it into the thigh of the subject. 

remove edges

Step 5 

Next, we are going to shade and light the upper portion of our tail. 

Create two New Layers and clip them into the thigh layer. Name one „Light” and the other „Shadow.”

With a soft, round Brush set to a very low 1-10% Flow Rate, paint some highlights onto the „Light” layer and then shadows onto the „Shadow” layer.

Use the Eyedropper Tool to select colors, using the subject as the Eyedropper’s reference. 

Tips

  • If you don’t have a graphics tablet, use the Smudge and Mixer Brush Tool to smooth and taper out the edges.
  • Sample the colors from the subject’s high, mid, and lowlights; however, feel free to adjust the colors as needed.
  • Build up both the shadows and light slowly. Setting the brush to a low Flow Rate is essential for this.
  • Keeping the lights and darks helps you have more control and a higher room for error. 
  • Use the subject as a reference!
  • Use as many layers as you’d like so you can adjust opacities and play with layer modes!
  • For light and highlights, use Screen, Color Dodge, Overlay, and Softlight.
  • When painting shadows, set the layer modes to Multiply and Soft Light.
paint thigh

Step 6

Download and install these free Photoshop Brushes for Painting Fish Scales.

Create a New Group.

Hold Control and Click your thigh shape to create a selection of it. With the thigh-shaped selection, add a layer mask to the new group.

Rename the group „Scales” as this is the group we will be creating our thigh scales on. 

Step 7

Create a New Layer inside the „Scales” group, setting it to Overlay.

Using a mixture of a small, soft, round Brush and the „Pixelstains Fish Scale Brush 03” from the downloaded brush pack, paint a Soft Peach #fdc79b color all over the thigh.

Focus the scale texture towards the top of the thigh, keeping the texture small. 

color thigh

Step 8

Create a New Layer set to Darken.

Using the same „Pixelstains Fish Scale Brush 03” brush, paint Dark Brown #4a2618 scales onto your mermaid’s thigh. 

Tips

  • Focus on adding scales to areas where the light hits the most. Darker areas should have fewer scales.
  • Be aware of the direction of the scales.
  • Create multiple different layers to paint on, and make good use of Control-Z!
  • Find some fish or other mermaid illustrations for reference. 
  • Add a Filter > Shaper > Smart Sharp to the scales to increase details. 
add scales

Step 9

Create a New Layer set to Color Dodge, placing setting it above the „Scale” layers. 

Add color to the scales using the „Pixelstains Fish Scale Brush 03” Brush. I used a mixture of a Tan #9b8058 and Green #819058 color. 

Bring the Opacity of the layer down if needed. 

add light

Step 10

Create a New Layer set to Overlay. 

Continue to enhance the light and color of the tail by building up more of the Tan #9b8058 color on the thigh. 

Use a soft, round Brush set to a 1-15% Flow rate. 

add more light

Step 11

Repeat step 10 until you are happy! 

Looking at references is my biggest tip for this step, along with focusing on building and enhancing the highlights that already exist. 

Use a mixture of Overlay and Color layer modes to keep layering on the light.  

add color and light

Step 12

Finish off the scales by creating a New Layer set to Overlay.

Bring this layer below any „Scale” layers.

Using a small, hard, round Brush, paint white highlights on the edges of the most prominent scales, going down the middle portion of the side of the thigh.  

Group the  „Scales” group in with our „Thigh” layer, naming the new group „Thigh Tail.”

add highlights

Step 13

Remember how we split the tail into two shapes? Well, we are going to repeat the process above on the bottom portion of the tail!

The steps are the same, only you will be working in a looping motion this time. 

Once you are happy with the bottom portion of the tail, Group everything together, naming the group „Bottom Tail.”

Then Group both the bottom and thigh portion of the tail together, naming the group „Tail – Woman.”

bottom tail

Step 14

Create and clip a Selective Color adjustment layer into the „Tail – Woman” group. 

Selective Color Settings

Yellows 

  • Cyan: -56
  • Magenta: +64
  • Yellow: -22
selective color

Step 15

Create and clip a New Layer set to Overlay into the „Tail – Woman” group.

Using a soft, round Brush, further enhance the highlights of both the top and bottom portion of the tail.

As always, it’s a good idea to layer lighting using multiple layers!

Step 16

Create and clip a Color Balance adjustment layer into the „Tail – Woman” group.

Color Balance Settings 

  • Red: +70
  • Green: +53
  • Blue: +90
color balance

Step 17

Repeat the steps above with the male subject! 

final layers

5. How to Create Fish Fins 

To finish up our tails, we will be adding our fins. Soft, flowy fins are the easiest to work with, so that is what we will be adding, but incorporating hard fins like dorsal fins is a great way to create more visually appealing/edgy mermaids! 

Step 1

Drop the Betta Siamese Aquarium Fighting Fish 1 image onto the canvas. 

I suggest keeping all of the fish stock images as Smart Objects so that you can copy and resize them as needed, without having to worry about distortion or pixelation! 

Set the fish stock to Lighten, placing it over the female subject’s tail. 

add fish

Step 2

Using a soft, round brush, mask out the fish’s head and body. 

Step 3

Add an Image > Adjustments > Brightness/Contrast and Hue/Saturation to the fish stock.

Feel free to adjust these settings for all of the different fins we will create from this fin later on!

Brightness/Contrast Settings

  • Brightness: -80

Hue/Saturation Settings

  • Hue: -11
  • Saturation: -10
blend fish

Step 4

Repeat Step 3 until you are satisfied with the number of fins! 

Use both the Transform and Warp mode to differentiate the fins, along with Layer Masks. We don’t want the fins to look too repetitive! 

You can also experiment with using the Screen layer mode along with the Lighten layer mode. 

It’s also best to use at least two different stock images like Betta Siamese Aquarium Fighting Fish 2.

finish  fins

Step 5

Create a New Layer set to Multiply, placing it below all of the fin layers but above the subject layers. So if you placed fins below your mermaid layers, you would have to create a second layer for those fins.

Let’s finish up the fins by painting a dark blue base underneath them; this will make the fins feel more substantial. 

Use a semi-hard round Brush to achieve this effect. 

add fin shadows

Step 6

Repeat the above steps for the male subject as well! 

final layers

6. How to Create a Lens Flare Photo Effect 

Next, we will be adding a bright light coming from the surface of the water. Using lighting and lens flares is a great way to add contrasting yet complementing colors to your work!

Step 1

Create a New Layer set to Screen.

With a very large, soft, round Brush, paint a Light Orange #ff9259 blob of light towards the upper-middle portion of the canvas. 

add orange light

Step 2

Drop in image „8” from the Vintage Polygon Light Backgrounds texture pack. Set the layer to Screen.

Add a Filter > Blur > Shape Blur.

Shape Blur Settings 

  • Radius: 70 px
  • Shape: Hexagon 

Use a very large, soft, round Brush to mask out the bottom edge of the light texture. 

add texture

Step 3

Repeat Step 2 with the Suns and Rays lens flare pack. 

add texture

Step 4

Create a New Layer set to Screen. 

Using a soft, round Brush set to a very low 1-5% Flow, paint a glow coming from the bodies and tails of our two subjects. 

Sample colors from the areas you are painting over. For instance, paint light blue over the female mermaid’s tailfins, and a light peach or orange color over her body. 

Feel free to bring in other colors as well, like greens or golds! Bring the Opacity of the layer down if needed. 

final layers

7. How to Paint Dark Shadows 

Next up, we will be painting some dramatic shadows to match our rich light source. 

Step 1

Create a New Layer right above the „Water” group, setting the layer to Multiply. 

Using a medium, soft, round Brush, paint a Dark Green #0e1509 color behind your female subject. 

The shadows should be slanted, not too soft, and located logically. Creating defined shadows will often produce more dynamic lighting! 

Create a New Layer above the previous layer, setting it to Overlay. 

Paint a very subtle, soft, faint glow around the woman’s face and chest.  

add shadow

Step 2

Repeat Step 1 above, only this time place the layers above your subject’s. 

Whether you place them above or below the fins is up to you—you will likely have a mix. 

Paint shadows on multiple different Multiply layers, building the shadows as you go, and adjust the layer’s Opacity as needed. 

Use Filter > Blur > Motion Blur to add more slant to your shadows if needed as well!

Also, use the Blend If function to keep shadows out of highlights. 

add shadow

Step 3

Is there an area you want to catch more light? You can use a Brightness/Contrast layer.

Use a layer mask to keep it confined to the tail fin.

Brightness/Contrast Settings 

  • Brightness: 41
  • Contrast: 79
final layers

8. How to Create Underwater Bubbles and Hair

To finish everything off, we will be adding some underwater bubbles and adding some movement to our subject’s hair.

While you can paint your own bubbles, you can also use these premade Colorful soap bubbles!

Step 1

Open up the Colorful soap bubbles PSD, and drag and drop the whole „Wiggling Bubbles” group full of bubbles onto the canvas. 

Making sure the „Wiggling Bubbles” group is below the „Lens Flare” group, shrink the bubbles substantially!

Set the group to Screen. 

Step 2

Use the Move Tool to position each bubble around the canvas individually. 

You can copy, paste, flip, enlarge, and shrink the bubbles as needed. Variation is key, so try not to make any single bubble look the same! 

Step 3

Create and clip a Brightness/Contrast layer into the „Wiggling Bubbles” group. 

Brightness/Contrast Settings

  • Brightness: -150
  • Contrast: 100

Next, to get rid of 100% of the color of the bubbles, create and clip a Gradient Map layer above the „Brightness/Contrast” layer. 

Gradient Map Settings

  • Color: Black to White 

To add even more bubbles, without having to copy and paste each bubble individually, try the trick below! 

Step 4

Duplicate the „Wiggling Bubbles” group, along with its clipped adjustment layers. Bring the new group above the original group. We want to keep our two types of bubbles separate!

Merge the duplicate group and its adjustment layers together, making sure to reset the layer mode to Screen. 

Flip the merged bubbles both horizontally and vertically, as well as shrinking them down. Place the bubbles where desired—I placed them in the upper right-hand corner.  

If you find that your bubbles aren’t bright enough, duplicate their layers!

Step 5

Repeat step 4 until you’re satisfied! I added two new sets of bubbles, for a total of three. Again, try to avoid making the bubbles look repetitive! 

Use the Eraser Tool on any of the bubbles that look out of place. 

Step 6

Finally, add some depth by creating foreground bubbles. 

Start by repeating step 4. Significantly enlarge the new bubbles, positioning them on the right side and bottom portion of the canvas. 

Add a Filter > Blur > Shape Blur to the bubbles to remove any pixelation caused by enlarging the bubbles.

Shape Blur Settings 

  • Shape: Circle 
  • Radius: 25 px

Group all of the merged bubble layers together, naming the group „Merged Bubbles”. You should have a „Merged Bubbles” group and a „Wiggling Bubbles” group!

Step 7

Next, we will want to add some flow to the hair. I personally like to work with the existing hair of the subject, simply adding to it and giving it more motion. 

Create a New Layer. 

Using a hair-strand brush, like the one I teach you how to create in this fashion portrait tutorial, paint strands of wavy hair extending out of the subject’s current hair. 

Use the Eyedropper Tool to pick the colors as you go. 

Step 8

Create a New Layer, setting it to Overlay.

Using a soft, round Brush with a 1-10% Flow Rate, paint white highlights in and on the hair strands. 

Lower the layer’s Opacity if needed.

We’ve Done It!

These mermaids are just a jumping-off point, here to help you cover the basics; there are so many different directions you can go and so many more details you could add compared to what we did here today! And the best part is that the more you create, the better you’ll get, going from simple shapes to full-blown complex masterpieces. 

Take this opportunity to think of all the different kinds of underwater creatures you could create using these techniques as a starting point. Never be afraid to think outside of the tutorial!

So, as always, keep experimenting with different techniques and practicing, and don’t forget to post your version below, along with any questions, comments, or critiques!

Finished

Looking to learn more? Why not check out the following photo manipulation tutorials:

How to Create a Dramatic Mermaid Photo Manipulation in Photoshop

Post pobrano z: How to Create a Dramatic Mermaid Photo Manipulation in Photoshop

Final product image
What You’ll Be Creating

Today, we will be putting together a vibrant and dynamic underwater dance scene between two mermaids! With this photo effect, we will take a close look at lighting and shadows, creating simple underwater backdrops and learning how to create a mermaid tail from scratch—no stock images needed. 

While we will be using digital painting techniques, I have specially formulated this process with the non-digital painter in mind! 

Why not try a similar photo manipulation project over on our Envato Tuts+ YouTube channel, if you wish to try out more mermaid Photoshop content!

What You’ll Need

To complete this project, we are using the following resources:

Find more resources on Envato Elements!

1. How to Create an Underwater Background

We’ll start by creating a simple underwater backdrop. Leaving the background clean and straightforward will help keep all of the focus on our two subjects. 

Step 1

Create a 3076 x 4359 px canvas.

Change it to a 300 Resolution if you intend to use this for prints. 

Step 2

Create a Color Fill layer filled with a dark blue #0f1219.

Step 3

Create a New Layer set to Overlay. 

Using a large, soft round Brush, paint blobs of white light towards the top of the canvas.

Set the brush to a low Flow Rate, 1-15%, to slowly build up the light to avoid any harsh edges. 

Use multiple layers, set to Overlay or Soft Light, to layer orbs of light over each other. Doing this will give you more control over the light’s opacity as well. 

Group all of the light layers together, naming the group „Light.”

light

Step 4

Repeat step three, adding even more light to the canvas. 

Focus on creating light all over the canvas, not just the upper portion. 

Group the layers, naming the group „Light Enhance.”

more light

Step 5

You might notice a lot of color banding; there’s a quick way to fix this using the Noise Filter! Even if you don’t have any notable banding, I suggest adding this as it adds to the foggy underwater feel of our background. 

Create a New Layer and fill it with Black.

Bring the layer below the two „Light” groups.

Go to Filter > Noise > Add Noise.

Noise Settings

  • Amount: 5
  • Distribution: Gaussian
  • Monochromatic: Checked

Bring the Noise layer’s Opacity to 53%.

Add a light 0.5px Filter > Blur > Gaussian Blur to the noise if it feels too harsh. 

noise

Step 6

Create a  New Layer setting it to Overlay.

Using the same techniques as in Step 3, paint more blobs of light.

Focus on creating smaller, more stringy light paths towards the upper portion of the canvas. 

more light

Step 7

Create a  New Layer setting it to Soft Light.

Create shadows using the color Black and the same techniques as in Step 3. 

Step 8

Create a Color Lookup layer.

Color Lookup Settings

  • 3DLUT File: TealOrangeContrast 
  • Opacity: 62%
color lookup layer

Step 9

Create a New Layer.

With a medium, soft, round Brush, paint light beams coming from the top of the water’s surface. 

Paint with a low Flow Rate to build up the light slowly. 

If you’re having a hard time getting the light rays to look smooth and slanted, try adding a Filter > Blur > Motion Blur. 

light rays

Step 10

Create a New Layer set to Screen.

Paint a pop of pale Orange #d8966e in the middle of the light ray. Bring down the opacity of the layer if needed. 

light rays

Step 11

Bring in an image of Underwater Coral.

Place it towards the bottom of the canvas, flipping it horizontally. 

Using the Patch Tool, remove the fish located towards the bottom of the coral. 

coral

Step 12

Add a Layer Mask to the coral. 

Mask out the top portion of the coral image with a large, soft, round Brush.

coral

Step 13

Go to Image > Adjustments > Hue/Saturation and set the settings as follows. 

Settings: 

  • Colorize: Checked
  • Hue: 193
  • Saturation: 29

Create a New Layer with a 4% Opacity.

With a large, soft, round Brush, paint a very light fog towards the top of the reef. 

coral

Step 14

Create Color Balance, Vibrance and Color Lookup adjustment layers, ordered from bottom to top. 

Color Balance Settings

  • Red: -17
  • Green: -35
  • Blue: -46

Vibrance Settings

  • Vibrance: +40
  • Saturation: +21

Color Lookup Settings

  • 3DLUT File: Crisp_Warm
  • Opacity: 17%

Group the three adjustment layers, naming the group „CC.”

Group all of the background layers together, naming the group „Water.”

final layers

2. How to Remove Clothing From a Subject

Next, we will be extracting and placing our subjects into their new environment. Our primary focus will be removing the unwanted clothes from our soon-to-be mermaids! 

Step 1

Extract the subjects using your preferred method. Find my favorite way in this tutorial!

Don’t worry about either of the subject’s legs—as you can see below, I didn’t even bother doing the male’s!

subjects

Step 2

Next, we are going to use the Clone Stamp Tool to remove the seam going down the side of our female mermaid. 

I like using a semi-hard brush when using the Clone Stamp Tool to keep as much of the original texture as possible!

remove seam

Step 3

Next, I am going to use the Mixer Brush Tool to remove some of the cloth and unwanted texture on the bodysuit and the armpit area. Do this by dragging the soft Mixer brush over the areas with the most amount of texture. You can also use this to smooth out shadows and highlights. 

The more you use the Mixer Brush, the better you’ll understand how it works! 

Mixer Brush Settings

mixer brush

Step 4

Create and clip a New Layer into the subject layer. On this layer, we are going to cover the seam of fabric located on the woman’s thigh. 

We will be covering the seam by painting skin over the area; the process is much easier to do than it is to explain, so bear with me! 

First, let’s set up our Brush settings. 

Brush Settings 

  • Size: Medium (Change as you go)
  • Hardness: 0%
  • Flow: 10%

Using the Eyedropper Tool, sample colors from the same area you are painting—in this case, the thigh area.

Slowly paint over the area of the seam, building up color gradually. Sample colors as you go, making sure everything is smooth and there is a natural transition. 

If you are having trouble hiding the seam completely, duplicate the layer you are painting on. Do this will increase the overall opacity of the colors. 

Use a soft Eraser brush to get rid of any harsh edges and additional color/paint. 

Step 5

Repeat Step 4 on the arm and chest seam.

remove seams

Step 6

Create a New Layer set to Overlay.

Using a soft, round Brush, paint White over the subject’s natural highlights to enhance them.

enhance highlights

Step 7

Create and clip a Brightness/Contrast layer into the subject layer. 

Brightness/Contrast Settings

  • Brightness: -12
  • Blend If:
blend if
brightnesscontrast

Step 8

Create and clip a Curves layer into the subject layer. 

Curve Settings

curves
results

Step 9

Create and clip a second Curves layer into the subject layer. 

Curve Settings

curves
blend if
results

Step 10

Duplicate the above Curves layer to enhance the effect.

Bring the layer down to 50% Opacity.

add shadows

Step 11

Clip a Water Reflection image into our subjects.

Set the layer mode to Screen with the Blend If settings seen below.

Blend If Settings

blend if
water texture

Step 12

Add an Image > Adjustments > Brightness/Contrast and Hue/Saturation to the „Water Surface” layer.

Brightness/Contrast Settings

  • Brightness: -6
  • Contrast: 21

Hue/Saturation Settings

  • Hue: +180
  • Saturation: -67
water texture

Step 13

Add a Layer Mask to the „Water Surface” layer.

Use a large, soft, round Brush to mask out the edges of the image.

Step 14

Duplicate the water surface so that it’s placed over the male subject as well. 

Group all of the current subject layers, naming the group „Subjects.”

final layers

3. How to Create a Dark and Vivid Color Grade 

When creating mermaids, I like to set up my colors and contrast levels early on! I set my „Color Grade” folder above all the other layers, where I can quickly turn it on or off and adjust it as I continue to paint.

These layers are ordered from bottom to top so that each layer will go above the previous one!

Step 1

Create a Color Lookup layer.

Color Lookup Settings 

  • 3DLUT File: FoggyNight
  • Opacity: 25%
  • Blend If:
blend if
results

Step 2

Create a Curves layer.

Curves Settings 

curves
curves results

Step 3

Create a Color Lookup layer.

Mask out the top half of the layer using a large, soft, round Brush. 

Color Lookup Settings 

  • 3DLUT File: FoggyNight
  • Opacity: 24%
  • Blend If:
blend if
blend if results

Step 4

Create a Color Lookup layer.

Copy the previous layer mask onto this layer. 

Color Lookup Settings 

  • 3DLUT File: EdgeyAmber
  • Opacity: 14%
color lookup

Step 5

Create a Curves layer.

Curves Settings 

curves

Step 6

Create a Curves layer.

Curves Settings 

curves

Step 7

Create a Curves layer.

Curves Settings 

curves
results

Step 8

Create a Color Lookup layer.

Color Lookup Settings 

  • 3DLUT File: DropBlues
  • Opacity: 51%

Group all of the adjustment layers together, naming the group „Color Grade.”

final layers

4. How to Create a Mermaid Tail in Photoshop 

Now to the star of the tutorial: the mermaid tail! As mentioned above, I specifically created this technique for non-digital painters, and as with everything, the more tails you create, the better you will get at them.

If it’s your first time, it’s best to start slow with simple shapes, colors, and textures. Then from there, you can continue to grow to more complex, photo-realistic shapes and textures, adding much more movement and detail!

Step 1

Create a New Layer. 

With a hard, round Brush set to a bright color like white, sketch out your tail. Just worry about the general shape—no need to make it perfect! 

The sketch is just a general guide for our tail; you will likely change it as you’ll see below.  

sketch tail

Step 2

Create a New Layer under your sketch.

Now, using the Pen Tool set to Shape, trace your sketch. 

Once you are generally happy with your path (don’t worry, you can adjust it later), create a Light Brown #685550 Color Fill layer.

The color fill layer will take the shape of your path, making it so you can change the base color of your tail at any time. 

Note!

While you won’t always need to do this, for this particular mermaid, I suggest splitting the tail in two. So you will have two shapes, the thigh portion and the bottom portion. Each piece will follow the same process! 

shape tail

Step 3 (Optional)

If you need to edit the shape of your tail, select the Pen Tool set to Path. 

On the upper Pen Tool Toolbar, to the left of the Shape button, you will find the Path Operations options. 

To Add to Your Tail

If you need to add to your tail, to make it longer for instance, then you will want to set the Path Operations to Combine Shapes. 

When set to Combine Shapes, paths will add to the shape of your tail. 

To Subtract From Your Tail 

If you’d like to subtract from your tail, to adjust the width or shape, for instance, set the Path Operations to Subtract From Shape. 

This option will make it so that the path will subtract from the shape, without creating new shapes. 

Use these options to adjust and shape your tail until you’re happy! 

Step 4

Using the layer mask on the thigh portion of the tail, mask out the top inner area of the tail, blending it into the thigh of the subject. 

remove edges

Step 5 

Next, we are going to shade and light the upper portion of our tail. 

Create two New Layers and clip them into the thigh layer. Name one „Light” and the other „Shadow.”

With a soft, round Brush set to a very low 1-10% Flow Rate, paint some highlights onto the „Light” layer and then shadows onto the „Shadow” layer.

Use the Eyedropper Tool to select colors, using the subject as the Eyedropper’s reference. 

Tips

  • If you don’t have a graphics tablet, use the Smudge and Mixer Brush Tool to smooth and taper out the edges.
  • Sample the colors from the subject’s high, mid, and lowlights; however, feel free to adjust the colors as needed.
  • Build up both the shadows and light slowly. Setting the brush to a low Flow Rate is essential for this.
  • Keeping the lights and darks helps you have more control and a higher room for error. 
  • Use the subject as a reference!
  • Use as many layers as you’d like so you can adjust opacities and play with layer modes!
  • For light and highlights, use Screen, Color Dodge, Overlay, and Softlight.
  • When painting shadows, set the layer modes to Multiply and Soft Light.
paint thigh

Step 6

Download and install these free Photoshop Brushes for Painting Fish Scales.

Create a New Group.

Hold Control and Click your thigh shape to create a selection of it. With the thigh-shaped selection, add a layer mask to the new group.

Rename the group „Scales” as this is the group we will be creating our thigh scales on. 

Step 7

Create a New Layer inside the „Scales” group, setting it to Overlay.

Using a mixture of a small, soft, round Brush and the „Pixelstains Fish Scale Brush 03” from the downloaded brush pack, paint a Soft Peach #fdc79b color all over the thigh.

Focus the scale texture towards the top of the thigh, keeping the texture small. 

color thigh

Step 8

Create a New Layer set to Darken.

Using the same „Pixelstains Fish Scale Brush 03” brush, paint Dark Brown #4a2618 scales onto your mermaid’s thigh. 

Tips

  • Focus on adding scales to areas where the light hits the most. Darker areas should have fewer scales.
  • Be aware of the direction of the scales.
  • Create multiple different layers to paint on, and make good use of Control-Z!
  • Find some fish or other mermaid illustrations for reference. 
  • Add a Filter > Shaper > Smart Sharp to the scales to increase details. 
add scales

Step 9

Create a New Layer set to Color Dodge, placing setting it above the „Scale” layers. 

Add color to the scales using the „Pixelstains Fish Scale Brush 03” Brush. I used a mixture of a Tan #9b8058 and Green #819058 color. 

Bring the Opacity of the layer down if needed. 

add light

Step 10

Create a New Layer set to Overlay. 

Continue to enhance the light and color of the tail by building up more of the Tan #9b8058 color on the thigh. 

Use a soft, round Brush set to a 1-15% Flow rate. 

add more light

Step 11

Repeat step 10 until you are happy! 

Looking at references is my biggest tip for this step, along with focusing on building and enhancing the highlights that already exist. 

Use a mixture of Overlay and Color layer modes to keep layering on the light.  

add color and light

Step 12

Finish off the scales by creating a New Layer set to Overlay.

Bring this layer below any „Scale” layers.

Using a small, hard, round Brush, paint white highlights on the edges of the most prominent scales, going down the middle portion of the side of the thigh.  

Group the  „Scales” group in with our „Thigh” layer, naming the new group „Thigh Tail.”

add highlights

Step 13

Remember how we split the tail into two shapes? Well, we are going to repeat the process above on the bottom portion of the tail!

The steps are the same, only you will be working in a looping motion this time. 

Once you are happy with the bottom portion of the tail, Group everything together, naming the group „Bottom Tail.”

Then Group both the bottom and thigh portion of the tail together, naming the group „Tail – Woman.”

bottom tail

Step 14

Create and clip a Selective Color adjustment layer into the „Tail – Woman” group. 

Selective Color Settings

Yellows 

  • Cyan: -56
  • Magenta: +64
  • Yellow: -22
selective color

Step 15

Create and clip a New Layer set to Overlay into the „Tail – Woman” group.

Using a soft, round Brush, further enhance the highlights of both the top and bottom portion of the tail.

As always, it’s a good idea to layer lighting using multiple layers!

Step 16

Create and clip a Color Balance adjustment layer into the „Tail – Woman” group.

Color Balance Settings 

  • Red: +70
  • Green: +53
  • Blue: +90
color balance

Step 17

Repeat the steps above with the male subject! 

final layers

5. How to Create Fish Fins 

To finish up our tails, we will be adding our fins. Soft, flowy fins are the easiest to work with, so that is what we will be adding, but incorporating hard fins like dorsal fins is a great way to create more visually appealing/edgy mermaids! 

Step 1

Drop the Betta Siamese Aquarium Fighting Fish 1 image onto the canvas. 

I suggest keeping all of the fish stock images as Smart Objects so that you can copy and resize them as needed, without having to worry about distortion or pixelation! 

Set the fish stock to Lighten, placing it over the female subject’s tail. 

add fish

Step 2

Using a soft, round brush, mask out the fish’s head and body. 

Step 3

Add an Image > Adjustments > Brightness/Contrast and Hue/Saturation to the fish stock.

Feel free to adjust these settings for all of the different fins we will create from this fin later on!

Brightness/Contrast Settings

  • Brightness: -80

Hue/Saturation Settings

  • Hue: -11
  • Saturation: -10
blend fish

Step 4

Repeat Step 3 until you are satisfied with the number of fins! 

Use both the Transform and Warp mode to differentiate the fins, along with Layer Masks. We don’t want the fins to look too repetitive! 

You can also experiment with using the Screen layer mode along with the Lighten layer mode. 

It’s also best to use at least two different stock images like Betta Siamese Aquarium Fighting Fish 2.

finish  fins

Step 5

Create a New Layer set to Multiply, placing it below all of the fin layers but above the subject layers. So if you placed fins below your mermaid layers, you would have to create a second layer for those fins.

Let’s finish up the fins by painting a dark blue base underneath them; this will make the fins feel more substantial. 

Use a semi-hard round Brush to achieve this effect. 

add fin shadows

Step 6

Repeat the above steps for the male subject as well! 

final layers

6. How to Create a Lens Flare Photo Effect 

Next, we will be adding a bright light coming from the surface of the water. Using lighting and lens flares is a great way to add contrasting yet complementing colors to your work!

Step 1

Create a New Layer set to Screen.

With a very large, soft, round Brush, paint a Light Orange #ff9259 blob of light towards the upper-middle portion of the canvas. 

add orange light

Step 2

Drop in image „8” from the Vintage Polygon Light Backgrounds texture pack. Set the layer to Screen.

Add a Filter > Blur > Shape Blur.

Shape Blur Settings 

  • Radius: 70 px
  • Shape: Hexagon 

Use a very large, soft, round Brush to mask out the bottom edge of the light texture. 

add texture

Step 3

Repeat Step 2 with the Suns and Rays lens flare pack. 

add texture

Step 4

Create a New Layer set to Screen. 

Using a soft, round Brush set to a very low 1-5% Flow, paint a glow coming from the bodies and tails of our two subjects. 

Sample colors from the areas you are painting over. For instance, paint light blue over the female mermaid’s tailfins, and a light peach or orange color over her body. 

Feel free to bring in other colors as well, like greens or golds! Bring the Opacity of the layer down if needed. 

final layers

7. How to Paint Dark Shadows 

Next up, we will be painting some dramatic shadows to match our rich light source. 

Step 1

Create a New Layer right above the „Water” group, setting the layer to Multiply. 

Using a medium, soft, round Brush, paint a Dark Green #0e1509 color behind your female subject. 

The shadows should be slanted, not too soft, and located logically. Creating defined shadows will often produce more dynamic lighting! 

Create a New Layer above the previous layer, setting it to Overlay. 

Paint a very subtle, soft, faint glow around the woman’s face and chest.  

add shadow

Step 2

Repeat Step 1 above, only this time place the layers above your subject’s. 

Whether you place them above or below the fins is up to you—you will likely have a mix. 

Paint shadows on multiple different Multiply layers, building the shadows as you go, and adjust the layer’s Opacity as needed. 

Use Filter > Blur > Motion Blur to add more slant to your shadows if needed as well!

Also, use the Blend If function to keep shadows out of highlights. 

add shadow

Step 3

Is there an area you want to catch more light? You can use a Brightness/Contrast layer.

Use a layer mask to keep it confined to the tail fin.

Brightness/Contrast Settings 

  • Brightness: 41
  • Contrast: 79
final layers

8. How to Create Underwater Bubbles and Hair

To finish everything off, we will be adding some underwater bubbles and adding some movement to our subject’s hair.

While you can paint your own bubbles, you can also use these premade Colorful soap bubbles!

Step 1

Open up the Colorful soap bubbles PSD, and drag and drop the whole „Wiggling Bubbles” group full of bubbles onto the canvas. 

Making sure the „Wiggling Bubbles” group is below the „Lens Flare” group, shrink the bubbles substantially!

Set the group to Screen. 

Step 2

Use the Move Tool to position each bubble around the canvas individually. 

You can copy, paste, flip, enlarge, and shrink the bubbles as needed. Variation is key, so try not to make any single bubble look the same! 

Step 3

Create and clip a Brightness/Contrast layer into the „Wiggling Bubbles” group. 

Brightness/Contrast Settings

  • Brightness: -150
  • Contrast: 100

Next, to get rid of 100% of the color of the bubbles, create and clip a Gradient Map layer above the „Brightness/Contrast” layer. 

Gradient Map Settings

  • Color: Black to White 

To add even more bubbles, without having to copy and paste each bubble individually, try the trick below! 

Step 4

Duplicate the „Wiggling Bubbles” group, along with its clipped adjustment layers. Bring the new group above the original group. We want to keep our two types of bubbles separate!

Merge the duplicate group and its adjustment layers together, making sure to reset the layer mode to Screen. 

Flip the merged bubbles both horizontally and vertically, as well as shrinking them down. Place the bubbles where desired—I placed them in the upper right-hand corner.  

If you find that your bubbles aren’t bright enough, duplicate their layers!

Step 5

Repeat step 4 until you’re satisfied! I added two new sets of bubbles, for a total of three. Again, try to avoid making the bubbles look repetitive! 

Use the Eraser Tool on any of the bubbles that look out of place. 

Step 6

Finally, add some depth by creating foreground bubbles. 

Start by repeating step 4. Significantly enlarge the new bubbles, positioning them on the right side and bottom portion of the canvas. 

Add a Filter > Blur > Shape Blur to the bubbles to remove any pixelation caused by enlarging the bubbles.

Shape Blur Settings 

  • Shape: Circle 
  • Radius: 25 px

Group all of the merged bubble layers together, naming the group „Merged Bubbles”. You should have a „Merged Bubbles” group and a „Wiggling Bubbles” group!

Step 7

Next, we will want to add some flow to the hair. I personally like to work with the existing hair of the subject, simply adding to it and giving it more motion. 

Create a New Layer. 

Using a hair-strand brush, like the one I teach you how to create in this fashion portrait tutorial, paint strands of wavy hair extending out of the subject’s current hair. 

Use the Eyedropper Tool to pick the colors as you go. 

Step 8

Create a New Layer, setting it to Overlay.

Using a soft, round Brush with a 1-10% Flow Rate, paint white highlights in and on the hair strands. 

Lower the layer’s Opacity if needed.

We’ve Done It!

These mermaids are just a jumping-off point, here to help you cover the basics; there are so many different directions you can go and so many more details you could add compared to what we did here today! And the best part is that the more you create, the better you’ll get, going from simple shapes to full-blown complex masterpieces. 

Take this opportunity to think of all the different kinds of underwater creatures you could create using these techniques as a starting point. Never be afraid to think outside of the tutorial!

So, as always, keep experimenting with different techniques and practicing, and don’t forget to post your version below, along with any questions, comments, or critiques!

Finished

Looking to learn more? Why not check out the following photo manipulation tutorials:

How to Create a Postcard Template in InDesign

Post pobrano z: How to Create a Postcard Template in InDesign

Final product image
What You’ll Be Creating

In this tutorial, you’ll learn how to design a postcard template in Adobe InDesign. Perfect for promoting a business or event, this versatile postcard design template can be adapted for a range of industries and sectors, including retail, lifestyle, food, and corporate brands.

What you will learn in this Adobe InDesign postcard template tutorial:

  • How to create a postcard template in InDesign
  • How to create a two-sided postcard design, including the postcard back template
  • How to add pattern, photos, color, and typography to your postcard template
  • How to design your own postcard so that it can be easily customised to suit any industry or purpose
  • How to export your postcard template in InDesign as a print-ready file

Here, we’ll walk through how to design your own postcard step by step, complete with two sides, a clean, simple layout, and stylish typography, background graphics, and photos.

Discover more awesome postcard design templates on Envato Elements.

What You’ll Need to Design Your Own Postcard Template

In this tutorial, we’ll create a versatile, easy-to-edit postcard design template that can be adapted with your own choice of background pattern, photos, and fonts. 

However, if you’d like to use the same graphics in your design, you can download the following images and font files from Envato Elements. We’ll walk through the steps of creating a postcard design suited for retail, but an example of how the design could be adapted for a corporate business is also pictured.

For the Retail Postcard Template:

retail fashion postcard

For the Corporate Postcard Template:

postcard corporate

Once you’ve downloaded the items and installed the fonts on your computer, you’re ready to get started with creating your postcard template. 

1. How to Set Up Your Postcard Template in InDesign

Step 1

Open InDesign and go to File > New > Document. 

Set the Width of the document to 105 mm and the Height to 148 mm*.

Deselect Facing Pages, and add Margins of 7 mm. Add a Bleed of 5 mm to all edges of the page. Then click Create.

* We’ll set up the template to a standard postcard A6 size, but you can always adjust this later using the Liquid Layout function in InDesign. 

new document
new document

Step 2

Expand the Layers panel (Window > Layers) and double-click on Layer 1, renaming it Background Color. 

Then create three more new layers in this order: Pattern, Images, and finally Text at the top. 

layers panel

Lock all layers except Background Color, which we’ll work on first. 

locked layers

Step 3

To create the earthy color palette we’ll be using for the retail postcard design, expand the Swatches panel (Window > Color > Swatches) and choose New Color Swatch from the panel’s main drop-down menu (at top right).

Set the Type to Process, Mode to CMYK, and the values below to C=31 M=75 Y=74 K=34, before clicking Add and OK

Repeat to create three more CMYK swatches:

  • C=9 M=10 Y=14 K=0
  • C=91 M=77 Y=42 K=41
  • C=63 M=26 Y=18 K=3
swatches panel

2. How to Add a Background Pattern to Your Postcard

Step 1

Working on the Background Color layer, use the Rectangle Tool (M) to create a shape across the whole page, setting the Fill Color to dark blue. 

background color

Step 2

Unlock the Pattern layer. 

Use the Rectangle Frame Tool (F) to create an image frame across the whole page. File > Place, choosing one of the PNG images from the artisan backgrounds pack (here I’ve used Background-14.png). 

Click Open, allowing the image to fill the frame. 

pattern

Step 3

Unlock the Images layer. 

Switch to the Rectangle Tool (M) and create a small rectangle across the bottom half of the page, not extending the edge past the margin line. 

Set the Fill Color to the pale cream swatch. 

rectangle tool

3. How to Add Photos and Text to Your Postcard Template

Step 1

Still working on the Images layer, use the Rectangle Frame Tool (F) to create an image frame across the top half of the page, again not extending across the margin.

File > Place, and choose a photo, such as this one, before clicking Open.  

image frame

Step 2

Select both the cream rectangle and image frame above, and head up to Object > Effects > Drop Shadow. 

Set the Mode to Multiply and Opacity to about 30%. Click on the colored square next to the Mode menu to switch the shadow color to the brown swatch in your palette. 

effects panel

Step 3

Lock all layers except the top layer, Text

Use the Type Tool (T) to create a text frame towards the top of the cream rectangle, typing in the title, e.g. ‘Store Launch’. 

From the Character panel (Window > Type & Tables > Character), set the Font to Marisa Bold, Size 25 pt, Align Center and, from the Swatches panel, to a brown Font Color. 

character panel

Step 4

Add another text frame below, setting the date, time, and location of the event in dark blue Marisa Bold, Size 10 pt, Align Center.

text frame

Add smaller body text below, set in Fiona Regular and a dark blue Font Color. 

fiona font

You can place the business logo at the bottom of the rectangle, or set the name of the business using the fonts you’ve already used. 

business logo

4. How to Create the Postcard Back Template

Step 1

To start creating your postcard back template, expand the Pages panel (Window > Pages). 

Click on the Create New Page (‘+’) button at the bottom of the panel.

pages panel

On the page, Right-Click > Page Attributes > Rotate Spread View > 90 Degrees CCW. 

rotate spread view

Step 2

Working on the Background Color layer, create a shape across the second page using the Rectangle Tool (M). Set the Fill to the cream swatch in your palette. 

rectangle tool

Step 3

On the Pattern layer, use the Rectangle Frame Tool (F) to create a tall, narrow image frame across the far left side of the page, and File > Place the same background image as before. 

pattern

Step 4

Working on the Images layer, create two image frames in a vertical row to the right of the pattern’s frame.

File > Place a different image into each frame. 

photos on reverse

Step 5

To the right of the images, create text frames set in Marisa Bold, Size 11 pt, and a dark blue Font Color. 

text frames

Use the Line Tool (\) to create a row of evenly spaced lines across the bottom of the cream section. From the Stroke panel (Window > Stroke), set the Weight to 0.25 pt.

Add a ‘TO’ text frame at the top-left corner of the lines to indicate space for writing an address. 

stroke panel

Step 6

You might also want to add a website or contact details to the reverse of your card, as well as the business logo. 

contact details

Allow room at the top right of the card for placing a postal stamp. Now your postcard back template is finished!

postal stamp

5. How to Export Your Postcard Template for Printing

Step 1

When you’ve finished working on your postcard, go to File > Export. 

Choose Adobe PDF (Print) from the Format menu at the bottom of the window, name the file, and then click Save

export postcard

Step 2

In the Export Adobe PDF window that opens, choose [Press Quality] from the Adobe PDF Preset menu at the top. 

press quality pdf

Click on Marks and Bleeds in the window’s left-hand menu. 

Check All Printer’s Marks and Use Document Bleed Settings

bleed settings

Then click Export

final postcard

Conclusion: Your Finished Postcard Template

With your postcard design finished and exported, you’re ready to send your PDF artwork straight off to the printers. Great job!

You can File > Save your InDesign document, ready to use it in the future as a postcard template that you can adapt into a different style of design simply by switching up the color palette, background pattern, fonts, and photos. 

corporate postcard

Looking for a different postcard template style? Discover more fantastic postcard templates on Envato Elements:

Minimal Postcard Template

A stylish, trend-led postcard template for Photoshop and InDesign, complete with striking typography and a simple, color-pop palette.

minimal postcard
Minimal postcard template

Contemporary Photographic Postcard Template

A versatile InDesign postcard template that could be adapted for a variety of industries and purposes, such as photography, architecture, lifestyle, and business.

postcard template
Photographic postcard template

Yoga Postcard Template

This clean and calm postcard template is ideally suited for yoga instructors or wellness brands. Available as a Photoshop postcard template with easy-to-edit fonts and graphics.

yoga postcard
Yoga postcard template

Traveler Postcard and Business Card Kit

Designed with art galleries, travelers and brand identities in mind, this adaptable postcard and business card kit is stylish, simple, and laid-back. Available as two easy-to-edit Photoshop files. 

photo template
Traveler Postcard and Business Card Template

Modern Marketing Postcard

Boost your company’s sales with this modern marketing postcard template for Photoshop. Customise the text and photos to create a marketing postcard to suit retail, business, or finance services. 

marketing postcard
Modern Marketing Postcard Template

Discover more tips, tutorials and recommendations for creating postcards and marketing flyers: