Standard paper sizes can be confusing. If your head’s in a whirl trying to pick the right size for your flyer or poster, we’ve got you covered.
Here you’ll find all the most commonly used standard sizes for flyers and posters in the US and Canada (known as the ANSI standard) and internationally(ISO 216).
Don’t start designing your flyer or poster before you’ve checked out the size guide below. Skip ahead to find links to poster and flyer design tutorials for Photoshop and InDesign, so you can start creating awesome layouts right away!
You can find out more about sizing with our free course on the Envato Tuts+ YouTube channel, with Flyer Design in Photoshop.
US and Canada Sizes (ANSI) for Flyers
These are the standard sizes for flyers used across the States and Canada.
Half Sheet
This is a small flyer size, at 5.5 by 8.5 inches (139.5 x 216 mm), usually used for non-folded promotional flyers. It’s also very cheap to print.
Standard Flyer
Equivalent to a US Letter page size, at 8.5 by 11 inches (216 x 279.5 mm), this flyer is widely used across the States and Canada and is considered the industry standard.
This versatile size can be folded in half (to create a half-fold flyer), twice (to create a tri-fold, z-fold or gate-fold flyer) or three times (to create a four-panel accordion fold).
Large Format Flyer (Tabloid)
The tabloid format can, as its name implies, be used for small-format newspapers, but it can also be folded to create a large format flyer. It measures in at 11 by 17 inches (279.5 x 432 mm).
Do you want to learn how to make a high-quality flyer in Photoshop, in under an hour? Then take our new short course, How to Make a Flyer.
US and Canada Sizes (ANSI) for Posters
These are the standard sizes for posters used in the USA and Canada.
Medium Posters
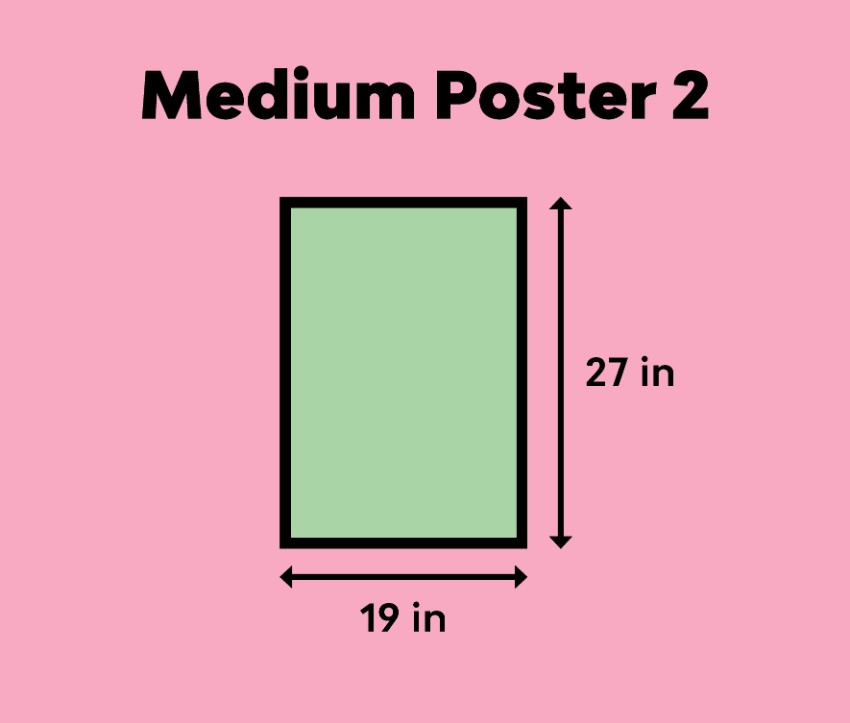
These two poster sizes, 18 by 24 inches (457 x 609.5 mm) and 19 by 27 inches (482.5 x 686 mm), are commonly used in colleges and schools and are the perfect size for showcasing charts or photographs.
Large Posters
These large poster sizes, 24 by 36 inches (609.5 x 914.5 mm) and 27 by 39 inches (686 x 990.5 mm), are used for marketing and outdoor advertising. They are also commonly used at trade shows and exhibitions, and in retail as well.
One Sheet
This is traditionally the standard movie poster size in the US. It’s used to promote new film releases—you’ll see the one sheet size, 27 by 40 inches (686 x 1016 mm), at theaters and posted up in retail areas.
Looking for an eye-catching poster style to promote a club night, festival, or music gig? This Memphis-inspired design is quick to create in InDesign and has…
International Sizes (ISO 216) for Flyers
These are the standard sizes for flyers used internationally (except Canada and the United States [see above], Mexico, Colombia, and the Dominican Republic).
DL
DL stands for ‘dimension lengthwise’. This compact flyer size is one-third of a sheet of A4 (99 x 210 mm). The DL term can be confusing, as this means that the flyer is designed to fit inside a DL envelope (which is a bit larger, at 110 by 120 mm).
This format is tall and slim, and it works well for pamphlets promoting a single offer.
A5
Slightly wider than a DL size, at 148 by 210 mm, this petite size is also often used for pamphlets and cheap-to-print flyers.
A4
Moving up the A-format scale, A4 (210 by 297 mm) is the European sister of the Letter size in the US. This size can be folded in various ways, and it can also be printed from most home and office printers.
This stylish flyer is the perfect way to promote club nights, music gigs or festivals this summer. Quick and easy to create using InDesign and Photoshop,…
International Sizes (ISO 216) for Posters
These are the standard sizes for posters used internationally.
A3
The sizes for posters move upwards through the A sizes. Because A3 (297 by 420 mm) can be printed from many home and office printers, you’ll see this size used for school, college, and community posters.
A2
Twice the size of an A3 sheet at 420 by 594 mm, A2 is used for marketing purposes and to promote music events.
A1
A large A-size at 594 by 841 mm, this can be used for a wide variety of purposes.
A0
A generous poster size at 841 by 1189 mm, again this is used widely for marketing and advertising purposes.
One Sheet
This standard US movie poster size, which measures up at 27 by 40 inches (686 x 1016 mm), is sometimes used to promote movies in some other countries, such as the UK and Australia.
Learn how to create an abstract but impactful poster in Adobe Photoshop by using compelling imagery and typography.
Conclusion
Choosing a suitable size for your flyer or poster doesn’t need to put your head in a spin. You’re sure to find a paper size to suit you from the options above.
Now that you’ve discovered the right size for your flyer, it’s time to start designing!
Standard paper sizes can be confusing. If your head’s in a whirl trying to pick the right size for your flyer or poster, we’ve got you covered.
Here you’ll find all the most commonly used standard sizes for flyers and posters in the US and Canada (known as the ANSI standard) and internationally(ISO 216).
Don’t start designing your flyer or poster before you’ve checked out the size guide below. Skip ahead to find links to poster and flyer design tutorials for Photoshop and InDesign, so you can start creating awesome layouts right away!
You can find out more about sizing with our free course on the Envato Tuts+ YouTube channel, with Flyer Design in Photoshop.
US and Canada Sizes (ANSI) for Flyers
These are the standard sizes for flyers used across the States and Canada.
Half Sheet
This is a small flyer size, at 5.5 by 8.5 inches (139.5 x 216 mm), usually used for non-folded promotional flyers. It’s also very cheap to print.
Standard Flyer
Equivalent to a US Letter page size, at 8.5 by 11 inches (216 x 279.5 mm), this flyer is widely used across the States and Canada and is considered the industry standard.
This versatile size can be folded in half (to create a half-fold flyer), twice (to create a tri-fold, z-fold or gate-fold flyer) or three times (to create a four-panel accordion fold).
Large Format Flyer (Tabloid)
The tabloid format can, as its name implies, be used for small-format newspapers, but it can also be folded to create a large format flyer. It measures in at 11 by 17 inches (279.5 x 432 mm).
Do you want to learn how to make a high-quality flyer in Photoshop, in under an hour? Then take our new short course, How to Make a Flyer.
US and Canada Sizes (ANSI) for Posters
These are the standard sizes for posters used in the USA and Canada.
Medium Posters
These two poster sizes, 18 by 24 inches (457 x 609.5 mm) and 19 by 27 inches (482.5 x 686 mm), are commonly used in colleges and schools and are the perfect size for showcasing charts or photographs.
Large Posters
These large poster sizes, 24 by 36 inches (609.5 x 914.5 mm) and 27 by 39 inches (686 x 990.5 mm), are used for marketing and outdoor advertising. They are also commonly used at trade shows and exhibitions, and in retail as well.
One Sheet
This is traditionally the standard movie poster size in the US. It’s used to promote new film releases—you’ll see the one sheet size, 27 by 40 inches (686 x 1016 mm), at theaters and posted up in retail areas.
Looking for an eye-catching poster style to promote a club night, festival, or music gig? This Memphis-inspired design is quick to create in InDesign and has…
International Sizes (ISO 216) for Flyers
These are the standard sizes for flyers used internationally (except Canada and the United States [see above], Mexico, Colombia, and the Dominican Republic).
DL
DL stands for ‘dimension lengthwise’. This compact flyer size is one-third of a sheet of A4 (99 x 210 mm). The DL term can be confusing, as this means that the flyer is designed to fit inside a DL envelope (which is a bit larger, at 110 by 120 mm).
This format is tall and slim, and it works well for pamphlets promoting a single offer.
A5
Slightly wider than a DL size, at 148 by 210 mm, this petite size is also often used for pamphlets and cheap-to-print flyers.
A4
Moving up the A-format scale, A4 (210 by 297 mm) is the European sister of the Letter size in the US. This size can be folded in various ways, and it can also be printed from most home and office printers.
This stylish flyer is the perfect way to promote club nights, music gigs or festivals this summer. Quick and easy to create using InDesign and Photoshop,…
International Sizes (ISO 216) for Posters
These are the standard sizes for posters used internationally.
A3
The sizes for posters move upwards through the A sizes. Because A3 (297 by 420 mm) can be printed from many home and office printers, you’ll see this size used for school, college, and community posters.
A2
Twice the size of an A3 sheet at 420 by 594 mm, A2 is used for marketing purposes and to promote music events.
A1
A large A-size at 594 by 841 mm, this can be used for a wide variety of purposes.
A0
A generous poster size at 841 by 1189 mm, again this is used widely for marketing and advertising purposes.
One Sheet
This standard US movie poster size, which measures up at 27 by 40 inches (686 x 1016 mm), is sometimes used to promote movies in some other countries, such as the UK and Australia.
Learn how to create an abstract but impactful poster in Adobe Photoshop by using compelling imagery and typography.
Conclusion
Choosing a suitable size for your flyer or poster doesn’t need to put your head in a spin. You’re sure to find a paper size to suit you from the options above.
Now that you’ve discovered the right size for your flyer, it’s time to start designing!
Standard paper sizes can be confusing. If your head’s in a whirl trying to pick the right size for your flyer or poster, we’ve got you covered.
Here you’ll find all the most commonly used standard sizes for flyers and posters in the US and Canada (known as the ANSI standard) and internationally(ISO 216).
Don’t start designing your flyer or poster before you’ve checked out the size guide below. Skip ahead to find links to poster and flyer design tutorials for Photoshop and InDesign, so you can start creating awesome layouts right away!
You can find out more about sizing with our free course on the Envato Tuts+ YouTube channel, with Flyer Design in Photoshop.
US and Canada Sizes (ANSI) for Flyers
These are the standard sizes for flyers used across the States and Canada.
Half Sheet
This is a small flyer size, at 5.5 by 8.5 inches (139.5 x 216 mm), usually used for non-folded promotional flyers. It’s also very cheap to print.
Standard Flyer
Equivalent to a US Letter page size, at 8.5 by 11 inches (216 x 279.5 mm), this flyer is widely used across the States and Canada and is considered the industry standard.
This versatile size can be folded in half (to create a half-fold flyer), twice (to create a tri-fold, z-fold or gate-fold flyer) or three times (to create a four-panel accordion fold).
Large Format Flyer (Tabloid)
The tabloid format can, as its name implies, be used for small-format newspapers, but it can also be folded to create a large format flyer. It measures in at 11 by 17 inches (279.5 x 432 mm).
Do you want to learn how to make a high-quality flyer in Photoshop, in under an hour? Then take our new short course, How to Make a Flyer.
US and Canada Sizes (ANSI) for Posters
These are the standard sizes for posters used in the USA and Canada.
Medium Posters
These two poster sizes, 18 by 24 inches (457 x 609.5 mm) and 19 by 27 inches (482.5 x 686 mm), are commonly used in colleges and schools and are the perfect size for showcasing charts or photographs.
Large Posters
These large poster sizes, 24 by 36 inches (609.5 x 914.5 mm) and 27 by 39 inches (686 x 990.5 mm), are used for marketing and outdoor advertising. They are also commonly used at trade shows and exhibitions, and in retail as well.
One Sheet
This is traditionally the standard movie poster size in the US. It’s used to promote new film releases—you’ll see the one sheet size, 27 by 40 inches (686 x 1016 mm), at theaters and posted up in retail areas.
Looking for an eye-catching poster style to promote a club night, festival, or music gig? This Memphis-inspired design is quick to create in InDesign and has…
International Sizes (ISO 216) for Flyers
These are the standard sizes for flyers used internationally (except Canada and the United States [see above], Mexico, Colombia, and the Dominican Republic).
DL
DL stands for ‘dimension lengthwise’. This compact flyer size is one-third of a sheet of A4 (99 x 210 mm). The DL term can be confusing, as this means that the flyer is designed to fit inside a DL envelope (which is a bit larger, at 110 by 120 mm).
This format is tall and slim, and it works well for pamphlets promoting a single offer.
A5
Slightly wider than a DL size, at 148 by 210 mm, this petite size is also often used for pamphlets and cheap-to-print flyers.
A4
Moving up the A-format scale, A4 (210 by 297 mm) is the European sister of the Letter size in the US. This size can be folded in various ways, and it can also be printed from most home and office printers.
This stylish flyer is the perfect way to promote club nights, music gigs or festivals this summer. Quick and easy to create using InDesign and Photoshop,…
International Sizes (ISO 216) for Posters
These are the standard sizes for posters used internationally.
A3
The sizes for posters move upwards through the A sizes. Because A3 (297 by 420 mm) can be printed from many home and office printers, you’ll see this size used for school, college, and community posters.
A2
Twice the size of an A3 sheet at 420 by 594 mm, A2 is used for marketing purposes and to promote music events.
A1
A large A-size at 594 by 841 mm, this can be used for a wide variety of purposes.
A0
A generous poster size at 841 by 1189 mm, again this is used widely for marketing and advertising purposes.
One Sheet
This standard US movie poster size, which measures up at 27 by 40 inches (686 x 1016 mm), is sometimes used to promote movies in some other countries, such as the UK and Australia.
Learn how to create an abstract but impactful poster in Adobe Photoshop by using compelling imagery and typography.
Conclusion
Choosing a suitable size for your flyer or poster doesn’t need to put your head in a spin. You’re sure to find a paper size to suit you from the options above.
Now that you’ve discovered the right size for your flyer, it’s time to start designing!
Standard paper sizes can be confusing. If your head’s in a whirl trying to pick the right size for your flyer or poster, we’ve got you covered.
Here you’ll find all the most commonly used standard sizes for flyers and posters in the US and Canada (known as the ANSI standard) and internationally(ISO 216).
Don’t start designing your flyer or poster before you’ve checked out the size guide below. Skip ahead to find links to poster and flyer design tutorials for Photoshop and InDesign, so you can start creating awesome layouts right away!
You can find out more about sizing with our free course on the Envato Tuts+ YouTube channel, with Flyer Design in Photoshop.
US and Canada Sizes (ANSI) for Flyers
These are the standard sizes for flyers used across the States and Canada.
Half Sheet
This is a small flyer size, at 5.5 by 8.5 inches (139.5 x 216 mm), usually used for non-folded promotional flyers. It’s also very cheap to print.
Standard Flyer
Equivalent to a US Letter page size, at 8.5 by 11 inches (216 x 279.5 mm), this flyer is widely used across the States and Canada and is considered the industry standard.
This versatile size can be folded in half (to create a half-fold flyer), twice (to create a tri-fold, z-fold or gate-fold flyer) or three times (to create a four-panel accordion fold).
Large Format Flyer (Tabloid)
The tabloid format can, as its name implies, be used for small-format newspapers, but it can also be folded to create a large format flyer. It measures in at 11 by 17 inches (279.5 x 432 mm).
Do you want to learn how to make a high-quality flyer in Photoshop, in under an hour? Then take our new short course, How to Make a Flyer.
US and Canada Sizes (ANSI) for Posters
These are the standard sizes for posters used in the USA and Canada.
Medium Posters
These two poster sizes, 18 by 24 inches (457 x 609.5 mm) and 19 by 27 inches (482.5 x 686 mm), are commonly used in colleges and schools and are the perfect size for showcasing charts or photographs.
Large Posters
These large poster sizes, 24 by 36 inches (609.5 x 914.5 mm) and 27 by 39 inches (686 x 990.5 mm), are used for marketing and outdoor advertising. They are also commonly used at trade shows and exhibitions, and in retail as well.
One Sheet
This is traditionally the standard movie poster size in the US. It’s used to promote new film releases—you’ll see the one sheet size, 27 by 40 inches (686 x 1016 mm), at theaters and posted up in retail areas.
Looking for an eye-catching poster style to promote a club night, festival, or music gig? This Memphis-inspired design is quick to create in InDesign and has…
International Sizes (ISO 216) for Flyers
These are the standard sizes for flyers used internationally (except Canada and the United States [see above], Mexico, Colombia, and the Dominican Republic).
DL
DL stands for ‘dimension lengthwise’. This compact flyer size is one-third of a sheet of A4 (99 x 210 mm). The DL term can be confusing, as this means that the flyer is designed to fit inside a DL envelope (which is a bit larger, at 110 by 120 mm).
This format is tall and slim, and it works well for pamphlets promoting a single offer.
A5
Slightly wider than a DL size, at 148 by 210 mm, this petite size is also often used for pamphlets and cheap-to-print flyers.
A4
Moving up the A-format scale, A4 (210 by 297 mm) is the European sister of the Letter size in the US. This size can be folded in various ways, and it can also be printed from most home and office printers.
This stylish flyer is the perfect way to promote club nights, music gigs or festivals this summer. Quick and easy to create using InDesign and Photoshop,…
International Sizes (ISO 216) for Posters
These are the standard sizes for posters used internationally.
A3
The sizes for posters move upwards through the A sizes. Because A3 (297 by 420 mm) can be printed from many home and office printers, you’ll see this size used for school, college, and community posters.
A2
Twice the size of an A3 sheet at 420 by 594 mm, A2 is used for marketing purposes and to promote music events.
A1
A large A-size at 594 by 841 mm, this can be used for a wide variety of purposes.
A0
A generous poster size at 841 by 1189 mm, again this is used widely for marketing and advertising purposes.
One Sheet
This standard US movie poster size, which measures up at 27 by 40 inches (686 x 1016 mm), is sometimes used to promote movies in some other countries, such as the UK and Australia.
Learn how to create an abstract but impactful poster in Adobe Photoshop by using compelling imagery and typography.
Conclusion
Choosing a suitable size for your flyer or poster doesn’t need to put your head in a spin. You’re sure to find a paper size to suit you from the options above.
Now that you’ve discovered the right size for your flyer, it’s time to start designing!
Photoshop actions are terrific tools for creatively transforming your images with a single click. That’s because they allow one artist to record all the steps needed to create an effect and another artist—you—to add all those actions to your own work with the press of a button. This means that they save you time and can also be a great learning tool to help you improve your own skills.
Today, we’ll take a look at over 50 of the best FREE Photoshop actions around, and for those looking for high-quality actions, we’ll first share a handful of premium Photoshop actions from Envato Elements that you shouldn’t miss.
Envato Elements: Best Source for Premium Photoshop Actions (Unlimited Downloads)
Envato Elements is the best source for professional, versatile, and easy-to-use Photoshop Actions. With unlimited downloads for one low monthly fee, you can choose as many Photoshop actions as you want or need.
One low monthly fee = unlimited access not just to the high-quality actions, but also to thousands of premium digital assets like logos, fonts, photos, business card templates, and much more. Elements saves you both the time and energy needed when creating from scratch.
Let’s look at the most creative Photoshop actions to be found at Envato Elements.
Turn your favourite portrait into a gorgeous pencil sketch with this Photoshop sketch effect action, which will make your portrait or other artwork look as if you spent hours drawing from scratch with a pencil and paper. It includes a terrific video tutorial to help you prepare your image for the action and show you how to customise your final artwork.
Double exposure is a cool photo effect that you can create yourself easily with this double exposure Photoshop action. The package contains a set of four Photoshop actions that simulate a double exposure effect and can be combined with any other actions. The final effect is fully editable.
If you’re looking for a great action to turn your colour photos into black and white, this is the action for you. The bundle contains 27 stunning black and white photo actions that will allow you to create everything from a dreamy vintage style to edgy, high-contrast black and white photos. The bundle comes with a 13-page PDF cheatsheet with a list of all the effects available and tips for best results.
For those times when you want to winterise your photos by adding both the colour and feel of winter as well as snow falling, you need to use this snow effect Photoshop action. You can run the action on your photo once or several times to vary the results. Either way, this is a great way to achieve a realistic feeling of snow floating down without spending hours trying to create the effect yourself.
Space, the final frontier. Add a touch of the magic of the universe with this cloud and particle effect Photoshop action, which includes explosions, lights, clouds, and terrific colour grading. A help file is included to help you get the most from the action.
This is the Photoshop edit action that photographers dream of. The bundle contains 50 matte actions that add tonal consistency and cohesion across a body of work to create a portfolio with a polished and professional look.
Portrait photographers will love this collection of Photoshop portrait actions designed specifically to make skin look flawless and gorgeous. This skin retouch action will let you retouch portraits in a fraction of the time it would take if you retouched each photo individually yourself. You can create a matte effect, airbrush, heal and improve skin and much more using this versatile tool.
This is a fun Photoshop text action that scrapbookers and collage artists need to check out. Grass Photoshop Action covers your text and logos with a grassy effect. What’s even better is that you have a choice of different kinds and colours of grass, so think spring grass, autumn grass, tropical grasses, etc. How cool is that?
Want to add some razzle-dazzle to your images? Wondering how to create particle effects in Photoshop or how to add a sparkle effect overlay? Wonder no more. This light particles Photoshop action allows you to add light particles, glitter, and shimmer just where you need the effects in any of your images.
You’ve seen edgy and eye-catching duotone images all over the internet, but perhaps you have no idea how to make your own duotone effects. Why, with a Photoshop effects action, of course. This duotone Photoshop action pack contains 25 duotone Photoshop effects that allow you to add your chosen effects to any image with just one click. Now how’s that for getting the job done quickly and easily?
Harness the beauty of a rainbow in this rainbow light leak overlay. Add it to any type of image at any resolution, and bring a touch of vintage iridescence to your images.
Whether you shoot landscapes, portraits, documentary, or something else entirely, this free action is a great way to lighten your photos in Photoshop while adding a gorgeous tonal smoothness. The actions work non-destructively to bring a high-quality look to your images.
Capture the look of light summer rain in your photos with this rain effect Photoshop action. Run the action once or several times to create different densities.
Turn any photo or graphic into pixel art with this awesome pixel art Photoshop action that resembles vintage video games. The free download gives you six Photoshop actions for colour and B&W results.
Create amazing black and white photos with this black and white Photoshop action that not only converts your images quickly but generates beautiful tones that enhance the overall mood of your images. The set contains 20 presets, which apply a range of stylish effects to your photos.
This set of 40 Photoshop actions will give your images amazing pastel tones. It’s ideal for portraits, but will work equally well on landscape or nature shots.
For those times when there’s just a bit too much haze in your photos and you need to get rid of it without taking the time to slowly work on each photo, there is this dehaze Photoshop action that promises to do a better job than Photoshop’s native tools.
The light leak aesthetic seems to be sticking around for a while longer, so if you’re keen to add this affect to your photos, this light leak Photoshop action, which offers eight different effects, is a great choice.
Weddings are among the most special of life’s moments, and you want your photos to reflect that. That’s why we’ve included this Photoshop dreamy glow effect action. Add it to your photos and create a fairytale quality that’s as magical as the day itself.
Want to add a bit of edginess to your images? Try this glitch effect Photoshop action. What’s great about this action is that it contains a looping animated glitch that you can save as an animated GIF within a few seconds.
If you need to create borders around your images, this action is for you. The bundle contains six collections with a total of 30 different borders. The created effect is always layered, so you can customise it as needed.
These matte Photoshop actions will work equally well on portraits, landscapes, and street shots. They will add a wonderful unifying tonality to your images and give them a professional quality.
Create the perfect high dynamic range effect with this free Photoshop action. The three unique filters in the set work with RAW and JPEG images and offer non-destructive editing.
Giving your photos a wonderful retro quality is easy with this vintage effect Photoshop action. The set contains seven vintage actions, and you can control the adjustment layer in each action to alter the intensity of the effects.
One of the best Photoshop actions for portraits, this action allows you to heal, mattify, and airbrush skin with one click. It also includes actions for brightening eyes and increasing contrast without clipping highlights/shadows.
Whether you are drawn to the cooler or warmer palettes of retro photos, this vintage effect Photoshop action contains nine beautiful coloured filters to suit every taste and need.
This grunge effect Photoshop action was designed specifically to bring a dystopic quality to night-time cityscape photos. Download it for free and add the effect to your photos with one click.
Want to bring a big of warmth to your photos? Then try this Photoshop colour effects action. It adds just a hint of yellow to your photos to create a very safe and comforting feeling.
This set of ten Photoshop actions for fashion photos has been designed to add an air of glamour to your photos. Use it to make your images truly eye-catching.
Bring a touch of the carefree, fun-filled days of summer to your photos with these free summer Photoshop actions. Each of the 50 different actions will bring out the detail and colour in your summer photography in different ways.
Double exposure is a photographic technique that combines two images into one, and this double exposure Photoshop action is designed to combine any two images you choose expertly.
Want to add some humour to your images? Why not turn your photo into a comic-like image quickly and easily with this Photoshop comic book effect? Give it a try.
For those times when you need to add snow to a wintry scene, there is this snow effect Photoshop action. Have fun running the action once or several times to layer the effect.
Want to convert your favourite photos to black and white? Try this silver effect Photoshop action. It offers eight film emulations, six film contrast effects, and two real film grain textures. All free to download and use.
Give your images a stylish and modern duotone look with these free duotone Photoshop actions. There are seven different actions which offer different colour variations to enhance your photos. Just select the action you want and play it.
Want to turn your photos of buildings into drawings? This sketch Photoshop action is for you. The free plugin, which offers a choice of three styles, also includes a watercolour effect Photoshop action.
If you’re looking to turn your text into 3D style, check out this 3D effect Photoshop action. Simply select the layer you want to transform, play any of the six actions offered, and Hey Presto! 3D text will be created for you.
This set of ten free light leak Photoshop actions will give your photos that vintage look that’s all the rage. Each effect gives a different variation, so experiment to see which you like the most.
More light leak fun with this light leaks Photoshop action that offers 12 ultra-faded film effects and 12 different kinds of light leaks. Fully editable and non-destructive.
Want to create the effect of a photo taken in the late evening or night? Try this Photoshop action, which allows you to bring the dusky tones of an evening sky to any photo.
Looking for a way to separate your traditional line drawing from the white background to create a transparent background? This is the action for you. Just download and press play after installing the addon.
Wedding Photoshop actions can really help your workflow. This free one offers 15 vintage Photoshop effects to give your images a beautiful 'shot with film’ look.
Winterise your photos with this collection of 50 free winter Photoshop actions that will bring the cool and quiet look of winter to any photograph with just a click.
Capture the glamour of the world of cinema with this glow effect Photoshop action. With just one click, you can change both the mood and style of your photos.
Use these Photoshop portrait actions to bring the level of retouching found in high fashion to your photos. The action will let you heal and airbrush skin with just one click. It also includes retouching actions for brightening eyes and increasing contrast.
Use these actions to give all your photos that soft, dreamlike effect that comes from pastel colours and tones. The actions work with RAW and JPEG files.
Turn your images black and white with this professional pack of 15 black and white effect Photoshop actions. Perfect for photographers and graphic designers, the action is calibrated to give your photos a range of looks along the grey scale.
Differentiate your photo from all the others with this colour pop Photoshop action. It offers 14 actions that will boost the colour in your photos and make them stand out in a pleasing way.
Give your photos that dreamy watercolour look with this watercolour effect Photoshop action. The free action is easy to install and run, and the files it creates are easy to customise.
Transform your photos into modern art with this gorgeous artist action, which uses the oil paint filter expertly without you having to do anything but press a button.
Get even more arty with this cool glass effect Photoshop action, which will transform any image with rectangular and circular glass-distortion effects. The action comes with a short how-to video to help you get the most from it.
Want to create shadow effects for your graphics? This Photoshop action is for you. It is specifically designed to add beautiful shadows to your 2D shapes like text or other graphics.
Bring depth and high drama to your images with these fabulous cinematic Photoshop actions. The set contains 12 effects based on the colour-grading aesthetics of popular movie genres.
There are many ways to add warmth to your photos, but none as easy as this orange tones Photoshop action. Just download the free action and run it on your photos with a click. It’s as easy as that.
We complete our whopping list of over 50 free Photoshop actions with this cool black and white set that offers six different effects, from vintage to high contrast to soft contrast. Use it to quickly create the black and white look you want in your images.
Choose Your Favourite Banner Template Today
To find premium Photoshop actions, Envato Elements is an excellent place to look. They offer a wide range of professional, high-quality actions, and if you regularly need fonts, icons, templates, and other design resources, Elements offers unlimited downloads for one low monthly fee.
On the other hand, if your budget is non-existent, you should check out the range of actions featured here, and if you’re interested in more premium and free Photoshop actions, check out these terrific articles:
Photoshop actions are terrific tools for creatively transforming your images with a single click. That’s because they allow one artist to record all the steps needed to create an effect and another artist—you—to add all those actions to your own work with the press of a button. This means that they save you time and can also be a great learning tool to help you improve your own skills.
Today, we’ll take a look at over 50 of the best FREE Photoshop actions around, and for those looking for high-quality actions, we’ll first share a handful of premium Photoshop actions from Envato Elements that you shouldn’t miss.
Envato Elements: Best Source for Premium Photoshop Actions (Unlimited Downloads)
Envato Elements is the best source for professional, versatile, and easy-to-use Photoshop Actions. With unlimited downloads for one low monthly fee, you can choose as many Photoshop actions as you want or need.
One low monthly fee = unlimited access not just to the high-quality actions, but also to thousands of premium digital assets like logos, fonts, photos, business card templates, and much more. Elements saves you both the time and energy needed when creating from scratch.
Let’s look at the most creative Photoshop actions to be found at Envato Elements.
Turn your favourite portrait into a gorgeous pencil sketch with this Photoshop sketch effect action, which will make your portrait or other artwork look as if you spent hours drawing from scratch with a pencil and paper. It includes a terrific video tutorial to help you prepare your image for the action and show you how to customise your final artwork.
Double exposure is a cool photo effect that you can create yourself easily with this double exposure Photoshop action. The package contains a set of four Photoshop actions that simulate a double exposure effect and can be combined with any other actions. The final effect is fully editable.
If you’re looking for a great action to turn your colour photos into black and white, this is the action for you. The bundle contains 27 stunning black and white photo actions that will allow you to create everything from a dreamy vintage style to edgy, high-contrast black and white photos. The bundle comes with a 13-page PDF cheatsheet with a list of all the effects available and tips for best results.
For those times when you want to winterise your photos by adding both the colour and feel of winter as well as snow falling, you need to use this snow effect Photoshop action. You can run the action on your photo once or several times to vary the results. Either way, this is a great way to achieve a realistic feeling of snow floating down without spending hours trying to create the effect yourself.
Space, the final frontier. Add a touch of the magic of the universe with this cloud and particle effect Photoshop action, which includes explosions, lights, clouds, and terrific colour grading. A help file is included to help you get the most from the action.
This is the Photoshop edit action that photographers dream of. The bundle contains 50 matte actions that add tonal consistency and cohesion across a body of work to create a portfolio with a polished and professional look.
Portrait photographers will love this collection of Photoshop portrait actions designed specifically to make skin look flawless and gorgeous. This skin retouch action will let you retouch portraits in a fraction of the time it would take if you retouched each photo individually yourself. You can create a matte effect, airbrush, heal and improve skin and much more using this versatile tool.
This is a fun Photoshop text action that scrapbookers and collage artists need to check out. Grass Photoshop Action covers your text and logos with a grassy effect. What’s even better is that you have a choice of different kinds and colours of grass, so think spring grass, autumn grass, tropical grasses, etc. How cool is that?
Want to add some razzle-dazzle to your images? Wondering how to create particle effects in Photoshop or how to add a sparkle effect overlay? Wonder no more. This light particles Photoshop action allows you to add light particles, glitter, and shimmer just where you need the effects in any of your images.
You’ve seen edgy and eye-catching duotone images all over the internet, but perhaps you have no idea how to make your own duotone effects. Why, with a Photoshop effects action, of course. This duotone Photoshop action pack contains 25 duotone Photoshop effects that allow you to add your chosen effects to any image with just one click. Now how’s that for getting the job done quickly and easily?
Harness the beauty of a rainbow in this rainbow light leak overlay. Add it to any type of image at any resolution, and bring a touch of vintage iridescence to your images.
Whether you shoot landscapes, portraits, documentary, or something else entirely, this free action is a great way to lighten your photos in Photoshop while adding a gorgeous tonal smoothness. The actions work non-destructively to bring a high-quality look to your images.
Capture the look of light summer rain in your photos with this rain effect Photoshop action. Run the action once or several times to create different densities.
Turn any photo or graphic into pixel art with this awesome pixel art Photoshop action that resembles vintage video games. The free download gives you six Photoshop actions for colour and B&W results.
Create amazing black and white photos with this black and white Photoshop action that not only converts your images quickly but generates beautiful tones that enhance the overall mood of your images. The set contains 20 presets, which apply a range of stylish effects to your photos.
This set of 40 Photoshop actions will give your images amazing pastel tones. It’s ideal for portraits, but will work equally well on landscape or nature shots.
For those times when there’s just a bit too much haze in your photos and you need to get rid of it without taking the time to slowly work on each photo, there is this dehaze Photoshop action that promises to do a better job than Photoshop’s native tools.
The light leak aesthetic seems to be sticking around for a while longer, so if you’re keen to add this affect to your photos, this light leak Photoshop action, which offers eight different effects, is a great choice.
Weddings are among the most special of life’s moments, and you want your photos to reflect that. That’s why we’ve included this Photoshop dreamy glow effect action. Add it to your photos and create a fairytale quality that’s as magical as the day itself.
Want to add a bit of edginess to your images? Try this glitch effect Photoshop action. What’s great about this action is that it contains a looping animated glitch that you can save as an animated GIF within a few seconds.
If you need to create borders around your images, this action is for you. The bundle contains six collections with a total of 30 different borders. The created effect is always layered, so you can customise it as needed.
These matte Photoshop actions will work equally well on portraits, landscapes, and street shots. They will add a wonderful unifying tonality to your images and give them a professional quality.
Create the perfect high dynamic range effect with this free Photoshop action. The three unique filters in the set work with RAW and JPEG images and offer non-destructive editing.
Giving your photos a wonderful retro quality is easy with this vintage effect Photoshop action. The set contains seven vintage actions, and you can control the adjustment layer in each action to alter the intensity of the effects.
One of the best Photoshop actions for portraits, this action allows you to heal, mattify, and airbrush skin with one click. It also includes actions for brightening eyes and increasing contrast without clipping highlights/shadows.
Whether you are drawn to the cooler or warmer palettes of retro photos, this vintage effect Photoshop action contains nine beautiful coloured filters to suit every taste and need.
This grunge effect Photoshop action was designed specifically to bring a dystopic quality to night-time cityscape photos. Download it for free and add the effect to your photos with one click.
Want to bring a big of warmth to your photos? Then try this Photoshop colour effects action. It adds just a hint of yellow to your photos to create a very safe and comforting feeling.
This set of ten Photoshop actions for fashion photos has been designed to add an air of glamour to your photos. Use it to make your images truly eye-catching.
Bring a touch of the carefree, fun-filled days of summer to your photos with these free summer Photoshop actions. Each of the 50 different actions will bring out the detail and colour in your summer photography in different ways.
Double exposure is a photographic technique that combines two images into one, and this double exposure Photoshop action is designed to combine any two images you choose expertly.
Want to add some humour to your images? Why not turn your photo into a comic-like image quickly and easily with this Photoshop comic book effect? Give it a try.
For those times when you need to add snow to a wintry scene, there is this snow effect Photoshop action. Have fun running the action once or several times to layer the effect.
Want to convert your favourite photos to black and white? Try this silver effect Photoshop action. It offers eight film emulations, six film contrast effects, and two real film grain textures. All free to download and use.
Give your images a stylish and modern duotone look with these free duotone Photoshop actions. There are seven different actions which offer different colour variations to enhance your photos. Just select the action you want and play it.
Want to turn your photos of buildings into drawings? This sketch Photoshop action is for you. The free plugin, which offers a choice of three styles, also includes a watercolour effect Photoshop action.
If you’re looking to turn your text into 3D style, check out this 3D effect Photoshop action. Simply select the layer you want to transform, play any of the six actions offered, and Hey Presto! 3D text will be created for you.
This set of ten free light leak Photoshop actions will give your photos that vintage look that’s all the rage. Each effect gives a different variation, so experiment to see which you like the most.
More light leak fun with this light leaks Photoshop action that offers 12 ultra-faded film effects and 12 different kinds of light leaks. Fully editable and non-destructive.
Want to create the effect of a photo taken in the late evening or night? Try this Photoshop action, which allows you to bring the dusky tones of an evening sky to any photo.
Looking for a way to separate your traditional line drawing from the white background to create a transparent background? This is the action for you. Just download and press play after installing the addon.
Wedding Photoshop actions can really help your workflow. This free one offers 15 vintage Photoshop effects to give your images a beautiful 'shot with film’ look.
Winterise your photos with this collection of 50 free winter Photoshop actions that will bring the cool and quiet look of winter to any photograph with just a click.
Capture the glamour of the world of cinema with this glow effect Photoshop action. With just one click, you can change both the mood and style of your photos.
Use these Photoshop portrait actions to bring the level of retouching found in high fashion to your photos. The action will let you heal and airbrush skin with just one click. It also includes retouching actions for brightening eyes and increasing contrast.
Use these actions to give all your photos that soft, dreamlike effect that comes from pastel colours and tones. The actions work with RAW and JPEG files.
Turn your images black and white with this professional pack of 15 black and white effect Photoshop actions. Perfect for photographers and graphic designers, the action is calibrated to give your photos a range of looks along the grey scale.
Differentiate your photo from all the others with this colour pop Photoshop action. It offers 14 actions that will boost the colour in your photos and make them stand out in a pleasing way.
Give your photos that dreamy watercolour look with this watercolour effect Photoshop action. The free action is easy to install and run, and the files it creates are easy to customise.
Transform your photos into modern art with this gorgeous artist action, which uses the oil paint filter expertly without you having to do anything but press a button.
Get even more arty with this cool glass effect Photoshop action, which will transform any image with rectangular and circular glass-distortion effects. The action comes with a short how-to video to help you get the most from it.
Want to create shadow effects for your graphics? This Photoshop action is for you. It is specifically designed to add beautiful shadows to your 2D shapes like text or other graphics.
Bring depth and high drama to your images with these fabulous cinematic Photoshop actions. The set contains 12 effects based on the colour-grading aesthetics of popular movie genres.
There are many ways to add warmth to your photos, but none as easy as this orange tones Photoshop action. Just download the free action and run it on your photos with a click. It’s as easy as that.
We complete our whopping list of over 50 free Photoshop actions with this cool black and white set that offers six different effects, from vintage to high contrast to soft contrast. Use it to quickly create the black and white look you want in your images.
Choose Your Favourite Banner Template Today
To find premium Photoshop actions, Envato Elements is an excellent place to look. They offer a wide range of professional, high-quality actions, and if you regularly need fonts, icons, templates, and other design resources, Elements offers unlimited downloads for one low monthly fee.
On the other hand, if your budget is non-existent, you should check out the range of actions featured here, and if you’re interested in more premium and free Photoshop actions, check out these terrific articles:
Photoshop actions are terrific tools for creatively transforming your images with a single click. That’s because they allow one artist to record all the steps needed to create an effect and another artist—you—to add all those actions to your own work with the press of a button. This means that they save you time and can also be a great learning tool to help you improve your own skills.
Today, we’ll take a look at over 50 of the best FREE Photoshop actions around, and for those looking for high-quality actions, we’ll first share a handful of premium Photoshop actions from Envato Elements that you shouldn’t miss.
Envato Elements: Best Source for Premium Photoshop Actions (Unlimited Downloads)
Envato Elements is the best source for professional, versatile, and easy-to-use Photoshop Actions. With unlimited downloads for one low monthly fee, you can choose as many Photoshop actions as you want or need.
One low monthly fee = unlimited access not just to the high-quality actions, but also to thousands of premium digital assets like logos, fonts, photos, business card templates, and much more. Elements saves you both the time and energy needed when creating from scratch.
Let’s look at the most creative Photoshop actions to be found at Envato Elements.
Turn your favourite portrait into a gorgeous pencil sketch with this Photoshop sketch effect action, which will make your portrait or other artwork look as if you spent hours drawing from scratch with a pencil and paper. It includes a terrific video tutorial to help you prepare your image for the action and show you how to customise your final artwork.
Double exposure is a cool photo effect that you can create yourself easily with this double exposure Photoshop action. The package contains a set of four Photoshop actions that simulate a double exposure effect and can be combined with any other actions. The final effect is fully editable.
If you’re looking for a great action to turn your colour photos into black and white, this is the action for you. The bundle contains 27 stunning black and white photo actions that will allow you to create everything from a dreamy vintage style to edgy, high-contrast black and white photos. The bundle comes with a 13-page PDF cheatsheet with a list of all the effects available and tips for best results.
For those times when you want to winterise your photos by adding both the colour and feel of winter as well as snow falling, you need to use this snow effect Photoshop action. You can run the action on your photo once or several times to vary the results. Either way, this is a great way to achieve a realistic feeling of snow floating down without spending hours trying to create the effect yourself.
Space, the final frontier. Add a touch of the magic of the universe with this cloud and particle effect Photoshop action, which includes explosions, lights, clouds, and terrific colour grading. A help file is included to help you get the most from the action.
This is the Photoshop edit action that photographers dream of. The bundle contains 50 matte actions that add tonal consistency and cohesion across a body of work to create a portfolio with a polished and professional look.
Portrait photographers will love this collection of Photoshop portrait actions designed specifically to make skin look flawless and gorgeous. This skin retouch action will let you retouch portraits in a fraction of the time it would take if you retouched each photo individually yourself. You can create a matte effect, airbrush, heal and improve skin and much more using this versatile tool.
This is a fun Photoshop text action that scrapbookers and collage artists need to check out. Grass Photoshop Action covers your text and logos with a grassy effect. What’s even better is that you have a choice of different kinds and colours of grass, so think spring grass, autumn grass, tropical grasses, etc. How cool is that?
Want to add some razzle-dazzle to your images? Wondering how to create particle effects in Photoshop or how to add a sparkle effect overlay? Wonder no more. This light particles Photoshop action allows you to add light particles, glitter, and shimmer just where you need the effects in any of your images.
You’ve seen edgy and eye-catching duotone images all over the internet, but perhaps you have no idea how to make your own duotone effects. Why, with a Photoshop effects action, of course. This duotone Photoshop action pack contains 25 duotone Photoshop effects that allow you to add your chosen effects to any image with just one click. Now how’s that for getting the job done quickly and easily?
Harness the beauty of a rainbow in this rainbow light leak overlay. Add it to any type of image at any resolution, and bring a touch of vintage iridescence to your images.
Whether you shoot landscapes, portraits, documentary, or something else entirely, this free action is a great way to lighten your photos in Photoshop while adding a gorgeous tonal smoothness. The actions work non-destructively to bring a high-quality look to your images.
Capture the look of light summer rain in your photos with this rain effect Photoshop action. Run the action once or several times to create different densities.
Turn any photo or graphic into pixel art with this awesome pixel art Photoshop action that resembles vintage video games. The free download gives you six Photoshop actions for colour and B&W results.
Create amazing black and white photos with this black and white Photoshop action that not only converts your images quickly but generates beautiful tones that enhance the overall mood of your images. The set contains 20 presets, which apply a range of stylish effects to your photos.
This set of 40 Photoshop actions will give your images amazing pastel tones. It’s ideal for portraits, but will work equally well on landscape or nature shots.
For those times when there’s just a bit too much haze in your photos and you need to get rid of it without taking the time to slowly work on each photo, there is this dehaze Photoshop action that promises to do a better job than Photoshop’s native tools.
The light leak aesthetic seems to be sticking around for a while longer, so if you’re keen to add this affect to your photos, this light leak Photoshop action, which offers eight different effects, is a great choice.
Weddings are among the most special of life’s moments, and you want your photos to reflect that. That’s why we’ve included this Photoshop dreamy glow effect action. Add it to your photos and create a fairytale quality that’s as magical as the day itself.
Want to add a bit of edginess to your images? Try this glitch effect Photoshop action. What’s great about this action is that it contains a looping animated glitch that you can save as an animated GIF within a few seconds.
If you need to create borders around your images, this action is for you. The bundle contains six collections with a total of 30 different borders. The created effect is always layered, so you can customise it as needed.
These matte Photoshop actions will work equally well on portraits, landscapes, and street shots. They will add a wonderful unifying tonality to your images and give them a professional quality.
Create the perfect high dynamic range effect with this free Photoshop action. The three unique filters in the set work with RAW and JPEG images and offer non-destructive editing.
Giving your photos a wonderful retro quality is easy with this vintage effect Photoshop action. The set contains seven vintage actions, and you can control the adjustment layer in each action to alter the intensity of the effects.
One of the best Photoshop actions for portraits, this action allows you to heal, mattify, and airbrush skin with one click. It also includes actions for brightening eyes and increasing contrast without clipping highlights/shadows.
Whether you are drawn to the cooler or warmer palettes of retro photos, this vintage effect Photoshop action contains nine beautiful coloured filters to suit every taste and need.
This grunge effect Photoshop action was designed specifically to bring a dystopic quality to night-time cityscape photos. Download it for free and add the effect to your photos with one click.
Want to bring a big of warmth to your photos? Then try this Photoshop colour effects action. It adds just a hint of yellow to your photos to create a very safe and comforting feeling.
This set of ten Photoshop actions for fashion photos has been designed to add an air of glamour to your photos. Use it to make your images truly eye-catching.
Bring a touch of the carefree, fun-filled days of summer to your photos with these free summer Photoshop actions. Each of the 50 different actions will bring out the detail and colour in your summer photography in different ways.
Double exposure is a photographic technique that combines two images into one, and this double exposure Photoshop action is designed to combine any two images you choose expertly.
Want to add some humour to your images? Why not turn your photo into a comic-like image quickly and easily with this Photoshop comic book effect? Give it a try.
For those times when you need to add snow to a wintry scene, there is this snow effect Photoshop action. Have fun running the action once or several times to layer the effect.
Want to convert your favourite photos to black and white? Try this silver effect Photoshop action. It offers eight film emulations, six film contrast effects, and two real film grain textures. All free to download and use.
Give your images a stylish and modern duotone look with these free duotone Photoshop actions. There are seven different actions which offer different colour variations to enhance your photos. Just select the action you want and play it.
Want to turn your photos of buildings into drawings? This sketch Photoshop action is for you. The free plugin, which offers a choice of three styles, also includes a watercolour effect Photoshop action.
If you’re looking to turn your text into 3D style, check out this 3D effect Photoshop action. Simply select the layer you want to transform, play any of the six actions offered, and Hey Presto! 3D text will be created for you.
This set of ten free light leak Photoshop actions will give your photos that vintage look that’s all the rage. Each effect gives a different variation, so experiment to see which you like the most.
More light leak fun with this light leaks Photoshop action that offers 12 ultra-faded film effects and 12 different kinds of light leaks. Fully editable and non-destructive.
Want to create the effect of a photo taken in the late evening or night? Try this Photoshop action, which allows you to bring the dusky tones of an evening sky to any photo.
Looking for a way to separate your traditional line drawing from the white background to create a transparent background? This is the action for you. Just download and press play after installing the addon.
Wedding Photoshop actions can really help your workflow. This free one offers 15 vintage Photoshop effects to give your images a beautiful 'shot with film’ look.
Winterise your photos with this collection of 50 free winter Photoshop actions that will bring the cool and quiet look of winter to any photograph with just a click.
Capture the glamour of the world of cinema with this glow effect Photoshop action. With just one click, you can change both the mood and style of your photos.
Use these Photoshop portrait actions to bring the level of retouching found in high fashion to your photos. The action will let you heal and airbrush skin with just one click. It also includes retouching actions for brightening eyes and increasing contrast.
Use these actions to give all your photos that soft, dreamlike effect that comes from pastel colours and tones. The actions work with RAW and JPEG files.
Turn your images black and white with this professional pack of 15 black and white effect Photoshop actions. Perfect for photographers and graphic designers, the action is calibrated to give your photos a range of looks along the grey scale.
Differentiate your photo from all the others with this colour pop Photoshop action. It offers 14 actions that will boost the colour in your photos and make them stand out in a pleasing way.
Give your photos that dreamy watercolour look with this watercolour effect Photoshop action. The free action is easy to install and run, and the files it creates are easy to customise.
Transform your photos into modern art with this gorgeous artist action, which uses the oil paint filter expertly without you having to do anything but press a button.
Get even more arty with this cool glass effect Photoshop action, which will transform any image with rectangular and circular glass-distortion effects. The action comes with a short how-to video to help you get the most from it.
Want to create shadow effects for your graphics? This Photoshop action is for you. It is specifically designed to add beautiful shadows to your 2D shapes like text or other graphics.
Bring depth and high drama to your images with these fabulous cinematic Photoshop actions. The set contains 12 effects based on the colour-grading aesthetics of popular movie genres.
There are many ways to add warmth to your photos, but none as easy as this orange tones Photoshop action. Just download the free action and run it on your photos with a click. It’s as easy as that.
We complete our whopping list of over 50 free Photoshop actions with this cool black and white set that offers six different effects, from vintage to high contrast to soft contrast. Use it to quickly create the black and white look you want in your images.
Choose Your Favourite Banner Template Today
To find premium Photoshop actions, Envato Elements is an excellent place to look. They offer a wide range of professional, high-quality actions, and if you regularly need fonts, icons, templates, and other design resources, Elements offers unlimited downloads for one low monthly fee.
On the other hand, if your budget is non-existent, you should check out the range of actions featured here, and if you’re interested in more premium and free Photoshop actions, check out these terrific articles:
Photoshop actions are terrific tools for creatively transforming your images with a single click. That’s because they allow one artist to record all the steps needed to create an effect and another artist—you—to add all those actions to your own work with the press of a button. This means that they save you time and can also be a great learning tool to help you improve your own skills.
Today, we’ll take a look at over 50 of the best FREE Photoshop actions around, and for those looking for high-quality actions, we’ll first share a handful of premium Photoshop actions from Envato Elements that you shouldn’t miss.
Envato Elements: Best Source for Premium Photoshop Actions (Unlimited Downloads)
Envato Elements is the best source for professional, versatile, and easy-to-use Photoshop Actions. With unlimited downloads for one low monthly fee, you can choose as many Photoshop actions as you want or need.
One low monthly fee = unlimited access not just to the high-quality actions, but also to thousands of premium digital assets like logos, fonts, photos, business card templates, and much more. Elements saves you both the time and energy needed when creating from scratch.
Let’s look at the most creative Photoshop actions to be found at Envato Elements.
Turn your favourite portrait into a gorgeous pencil sketch with this Photoshop sketch effect action, which will make your portrait or other artwork look as if you spent hours drawing from scratch with a pencil and paper. It includes a terrific video tutorial to help you prepare your image for the action and show you how to customise your final artwork.
Double exposure is a cool photo effect that you can create yourself easily with this double exposure Photoshop action. The package contains a set of four Photoshop actions that simulate a double exposure effect and can be combined with any other actions. The final effect is fully editable.
If you’re looking for a great action to turn your colour photos into black and white, this is the action for you. The bundle contains 27 stunning black and white photo actions that will allow you to create everything from a dreamy vintage style to edgy, high-contrast black and white photos. The bundle comes with a 13-page PDF cheatsheet with a list of all the effects available and tips for best results.
For those times when you want to winterise your photos by adding both the colour and feel of winter as well as snow falling, you need to use this snow effect Photoshop action. You can run the action on your photo once or several times to vary the results. Either way, this is a great way to achieve a realistic feeling of snow floating down without spending hours trying to create the effect yourself.
Space, the final frontier. Add a touch of the magic of the universe with this cloud and particle effect Photoshop action, which includes explosions, lights, clouds, and terrific colour grading. A help file is included to help you get the most from the action.
This is the Photoshop edit action that photographers dream of. The bundle contains 50 matte actions that add tonal consistency and cohesion across a body of work to create a portfolio with a polished and professional look.
Portrait photographers will love this collection of Photoshop portrait actions designed specifically to make skin look flawless and gorgeous. This skin retouch action will let you retouch portraits in a fraction of the time it would take if you retouched each photo individually yourself. You can create a matte effect, airbrush, heal and improve skin and much more using this versatile tool.
This is a fun Photoshop text action that scrapbookers and collage artists need to check out. Grass Photoshop Action covers your text and logos with a grassy effect. What’s even better is that you have a choice of different kinds and colours of grass, so think spring grass, autumn grass, tropical grasses, etc. How cool is that?
Want to add some razzle-dazzle to your images? Wondering how to create particle effects in Photoshop or how to add a sparkle effect overlay? Wonder no more. This light particles Photoshop action allows you to add light particles, glitter, and shimmer just where you need the effects in any of your images.
You’ve seen edgy and eye-catching duotone images all over the internet, but perhaps you have no idea how to make your own duotone effects. Why, with a Photoshop effects action, of course. This duotone Photoshop action pack contains 25 duotone Photoshop effects that allow you to add your chosen effects to any image with just one click. Now how’s that for getting the job done quickly and easily?
Harness the beauty of a rainbow in this rainbow light leak overlay. Add it to any type of image at any resolution, and bring a touch of vintage iridescence to your images.
Whether you shoot landscapes, portraits, documentary, or something else entirely, this free action is a great way to lighten your photos in Photoshop while adding a gorgeous tonal smoothness. The actions work non-destructively to bring a high-quality look to your images.
Capture the look of light summer rain in your photos with this rain effect Photoshop action. Run the action once or several times to create different densities.
Turn any photo or graphic into pixel art with this awesome pixel art Photoshop action that resembles vintage video games. The free download gives you six Photoshop actions for colour and B&W results.
Create amazing black and white photos with this black and white Photoshop action that not only converts your images quickly but generates beautiful tones that enhance the overall mood of your images. The set contains 20 presets, which apply a range of stylish effects to your photos.
This set of 40 Photoshop actions will give your images amazing pastel tones. It’s ideal for portraits, but will work equally well on landscape or nature shots.
For those times when there’s just a bit too much haze in your photos and you need to get rid of it without taking the time to slowly work on each photo, there is this dehaze Photoshop action that promises to do a better job than Photoshop’s native tools.
The light leak aesthetic seems to be sticking around for a while longer, so if you’re keen to add this affect to your photos, this light leak Photoshop action, which offers eight different effects, is a great choice.
Weddings are among the most special of life’s moments, and you want your photos to reflect that. That’s why we’ve included this Photoshop dreamy glow effect action. Add it to your photos and create a fairytale quality that’s as magical as the day itself.
Want to add a bit of edginess to your images? Try this glitch effect Photoshop action. What’s great about this action is that it contains a looping animated glitch that you can save as an animated GIF within a few seconds.
If you need to create borders around your images, this action is for you. The bundle contains six collections with a total of 30 different borders. The created effect is always layered, so you can customise it as needed.
These matte Photoshop actions will work equally well on portraits, landscapes, and street shots. They will add a wonderful unifying tonality to your images and give them a professional quality.
Create the perfect high dynamic range effect with this free Photoshop action. The three unique filters in the set work with RAW and JPEG images and offer non-destructive editing.
Giving your photos a wonderful retro quality is easy with this vintage effect Photoshop action. The set contains seven vintage actions, and you can control the adjustment layer in each action to alter the intensity of the effects.
One of the best Photoshop actions for portraits, this action allows you to heal, mattify, and airbrush skin with one click. It also includes actions for brightening eyes and increasing contrast without clipping highlights/shadows.
Whether you are drawn to the cooler or warmer palettes of retro photos, this vintage effect Photoshop action contains nine beautiful coloured filters to suit every taste and need.
This grunge effect Photoshop action was designed specifically to bring a dystopic quality to night-time cityscape photos. Download it for free and add the effect to your photos with one click.
Want to bring a big of warmth to your photos? Then try this Photoshop colour effects action. It adds just a hint of yellow to your photos to create a very safe and comforting feeling.
This set of ten Photoshop actions for fashion photos has been designed to add an air of glamour to your photos. Use it to make your images truly eye-catching.
Bring a touch of the carefree, fun-filled days of summer to your photos with these free summer Photoshop actions. Each of the 50 different actions will bring out the detail and colour in your summer photography in different ways.
Double exposure is a photographic technique that combines two images into one, and this double exposure Photoshop action is designed to combine any two images you choose expertly.
Want to add some humour to your images? Why not turn your photo into a comic-like image quickly and easily with this Photoshop comic book effect? Give it a try.
For those times when you need to add snow to a wintry scene, there is this snow effect Photoshop action. Have fun running the action once or several times to layer the effect.
Want to convert your favourite photos to black and white? Try this silver effect Photoshop action. It offers eight film emulations, six film contrast effects, and two real film grain textures. All free to download and use.
Give your images a stylish and modern duotone look with these free duotone Photoshop actions. There are seven different actions which offer different colour variations to enhance your photos. Just select the action you want and play it.
Want to turn your photos of buildings into drawings? This sketch Photoshop action is for you. The free plugin, which offers a choice of three styles, also includes a watercolour effect Photoshop action.
If you’re looking to turn your text into 3D style, check out this 3D effect Photoshop action. Simply select the layer you want to transform, play any of the six actions offered, and Hey Presto! 3D text will be created for you.
This set of ten free light leak Photoshop actions will give your photos that vintage look that’s all the rage. Each effect gives a different variation, so experiment to see which you like the most.
More light leak fun with this light leaks Photoshop action that offers 12 ultra-faded film effects and 12 different kinds of light leaks. Fully editable and non-destructive.
Want to create the effect of a photo taken in the late evening or night? Try this Photoshop action, which allows you to bring the dusky tones of an evening sky to any photo.
Looking for a way to separate your traditional line drawing from the white background to create a transparent background? This is the action for you. Just download and press play after installing the addon.
Wedding Photoshop actions can really help your workflow. This free one offers 15 vintage Photoshop effects to give your images a beautiful 'shot with film’ look.
Winterise your photos with this collection of 50 free winter Photoshop actions that will bring the cool and quiet look of winter to any photograph with just a click.
Capture the glamour of the world of cinema with this glow effect Photoshop action. With just one click, you can change both the mood and style of your photos.
Use these Photoshop portrait actions to bring the level of retouching found in high fashion to your photos. The action will let you heal and airbrush skin with just one click. It also includes retouching actions for brightening eyes and increasing contrast.
Use these actions to give all your photos that soft, dreamlike effect that comes from pastel colours and tones. The actions work with RAW and JPEG files.
Turn your images black and white with this professional pack of 15 black and white effect Photoshop actions. Perfect for photographers and graphic designers, the action is calibrated to give your photos a range of looks along the grey scale.
Differentiate your photo from all the others with this colour pop Photoshop action. It offers 14 actions that will boost the colour in your photos and make them stand out in a pleasing way.
Give your photos that dreamy watercolour look with this watercolour effect Photoshop action. The free action is easy to install and run, and the files it creates are easy to customise.
Transform your photos into modern art with this gorgeous artist action, which uses the oil paint filter expertly without you having to do anything but press a button.
Get even more arty with this cool glass effect Photoshop action, which will transform any image with rectangular and circular glass-distortion effects. The action comes with a short how-to video to help you get the most from it.
Want to create shadow effects for your graphics? This Photoshop action is for you. It is specifically designed to add beautiful shadows to your 2D shapes like text or other graphics.
Bring depth and high drama to your images with these fabulous cinematic Photoshop actions. The set contains 12 effects based on the colour-grading aesthetics of popular movie genres.
There are many ways to add warmth to your photos, but none as easy as this orange tones Photoshop action. Just download the free action and run it on your photos with a click. It’s as easy as that.
We complete our whopping list of over 50 free Photoshop actions with this cool black and white set that offers six different effects, from vintage to high contrast to soft contrast. Use it to quickly create the black and white look you want in your images.
Choose Your Favourite Banner Template Today
To find premium Photoshop actions, Envato Elements is an excellent place to look. They offer a wide range of professional, high-quality actions, and if you regularly need fonts, icons, templates, and other design resources, Elements offers unlimited downloads for one low monthly fee.
On the other hand, if your budget is non-existent, you should check out the range of actions featured here, and if you’re interested in more premium and free Photoshop actions, check out these terrific articles: