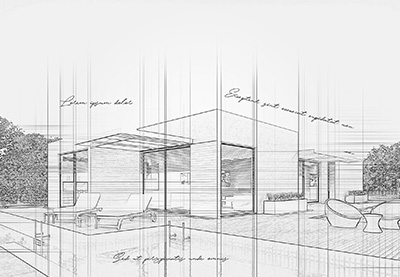
How to Create a Photo to Pencil Drawing Effect in Photoshop

Post pobrano z: How to Create a Photo to Pencil Drawing Effect in Photoshop

Final product image
What You’ll Be Creating

In this tutorial, you will learn how to create an amazing photo drawing effect in Adobe Photoshop. I will explain everything in so much detail that anyone can create it, even those who have just opened Photoshop for the first time. 

Follow along with us over on our Envato Tuts+ YouTube channel:

The effect shown above is the one I will show you how to create in this tutorial. If you would like to create the even more advanced drawing effects shown below, using just a single click and in only a few minutes, then check out my Construct Photoshop Action.

Action final results

You can also find more photo to pencil drawing Photoshop actions here:

What You’ll Need

To recreate the design above, you will need the following resources:

1. Let’s Get Started

First, open the photo that you want to work with. To open your photo, go to File > Open, choose your photo, and click Open. Now, before we get started, just check a couple of things:

  1. Your photo should be in RGB Color mode, 8 Bits/Channel. To check this, go to Image > Mode.
  2. For best results, your photo size should be 2000–3000 px wide/high. To check this, go to Image > Image Size.
  3. Your photo should be the Background layer. If it is not, go to Layer > New > Background from Layer.
Checking image size and mode

2. How to Create the Background

Step 1

In this section, we are going to create the background. Go to Layer > New Fill Layer > Solid Color to create a new solid color fill layer, name it Background color, and choose the color #e5e5e5 as shown below:

Creating new solid color fill layer

Step 2

Now go to File > Place Embedded, select the texture from the first texture link, and click Place. Then, set the Width and Height of the texture to 101.73% and name this layer Background Texture.

Placing texture

Step 3

Go to Layer > New Adjustment Layer > Black & White to create a new black & white adjustment layer and name it BT_Desaturate.

Creating new black and white adjustment layer

Step 4

Now press Control-Alt-G on your keyboard to create a clipping mask. Then, select the Background Texture layer and change the Opacity of this layer to 20%.

Changing opacity

3. How to Create the Sketch

Step 1

In this section, we are going to create the sketch. Select the Background layer and press Control-J on your keyboard to duplicate this layer. Then, go to Image > Adjustments > Shadows/Highlights and set the Shadows Amount to 10% and Highlights Amount to 10%.

Adjusting shadows and highlights

Step 2

Now name this layer Base and press Control-J on your keyboard to duplicate this layer. Then, drag this layer to the top of the layers in the Layers panel.

Duplicating layer

Step 3

Go to Filter > Filter Gallery > Artistic > Cutout and set the Number of Levels to 8, Edge Simplicity to 10 and Edge Fidelity to 1.

Adding cutout filter

Step 4

Now press Control-Shift-U on your keyboard to desaturate this layer. Then, go to Filter > Stylize > Find Edges.

Adding find edges filter

Step 5

Change the Blending Mode of this layer to Multiply and set the Opacity to 20%. Then, name this layer Rough_Sketch_1.

Changing blending mode and opacity

Step 6

Select the Base layer and press Control-J on your keyboard to duplicate this layer. Then, drag this layer just below the Rough_Sketch_1 layer in the Layers panel.

Duplicating layer

Step 7

Now go to Filter > Filter Gallery > Artistic > Cutout and set the Number of Levels to 8, Edge Simplicity to 2, and Edge Fidelity to 1.

Adding cutout filter

Step 8

Now press Control-Shift-U on your keyboard to desaturate this layer. Then, go to Filter > Stylize > Find Edges.

Adding find edges filter

Step 9

Change the Blending Mode of this layer to Multiply and set the Opacity to 10%. Then, name this layer Rough_Sketch_2.

Changing blending mode and opacity

Step 10

Now Control-click on the Rough_Sketch_1 layer to select both layers at the same time. Then, go to Layer > New > Group from Layers to create a new group from selected layers and name it Rough Sketch.

Creating new group from layers

Step 11

Change the Opacity of this layer group to 80%.

Changing opacity

Step 12

Select the Base layer and press Control-J on your keyboard to duplicate this layer. Then, drag this layer just above the Rough Sketch layer group in the Layers panel.

Duplicating layer

Step 13

Now go to Filter > Filter Gallery > Sketch > Graphic Pen and set the Stroke Length to 15, Light/Dark Balance to 10, and Stroke Direction to Right Diagonal.

Adding graphic pen filter

Step 14

Change the Blending Mode of this layer to Multiply and set the Opacity to 10%. Then, name this layer Shading_1.

Changing blending mode and opacity

Step 15

Now select the Base layer and press Control-J on your keyboard to duplicate this layer. Then, drag this layer just below the Shading_1 layer in the Layers panel.

Duplicating layer

Step 16

Now go to Filter > Filter Gallery > Sketch > Charcoal and set the Charcoal Thickness to 1, Detail to 5, and Light/Dark Balance to 10.

Adding charcoal filter

Step 17

Change the Blending Mode of this layer to Multiply and set the Opacity to 80%. Then, name this layer Shading_2.

Changing blending mode and opacity

Step 18

Now select the Base layer and press Control-J on your keyboard to duplicate this layer. Then, drag this layer just above the Shading_1 layer in the Layers panel.

Duplicating layer

Step 19

Now go to Filter > Filter Gallery > Sketch > Photocopy and set the Detail to 2 and Darkness to 5.

Adding photocopy filter

Step 20

Change the Blending Mode of this layer to Multiply and set the Opacity to 60%. Then, name this layer Main Sketch.

Changing blending mode and opacity

4. How to Create the Foreground Texture

Step 1

In this section, we are going to create the foreground texture. Go to File > Place Embedded, select the texture from the second texture link, and click Place. Then, set the Width and Height of the texture to 235% and name this layer Foreground Texture.

Placing texture

Step 2

Now Right-click on this layer and choose Edit Contents. In the new file that will show up, go to Image > Auto Tone. Then, press Control-Shift-U on your keyboard to desaturate this layer.

Adjusting tone

Step 3

Press Control-S on your keyboard to save the changes you have made and close this file.

Saving changes

Step 4

Now change the Blending Mode of this layer to Soft Light.

Changing blending mode

5. How to Make the Final Adjustments

Step 1

In this section, we are going to make the final adjustments to the design. Go to Layer > New Adjustment Layer > Photo Filter to create a new photo filter adjustment layer and name it Photo Tint.

Creating new photo filter adjustment layer

Step 2

Now Double-click on this layer thumbnail and, in the Properties panel, set the Filter to Cooling Filter (80) and Density to 11% as shown below:

Adjusting photo filter

Step 3

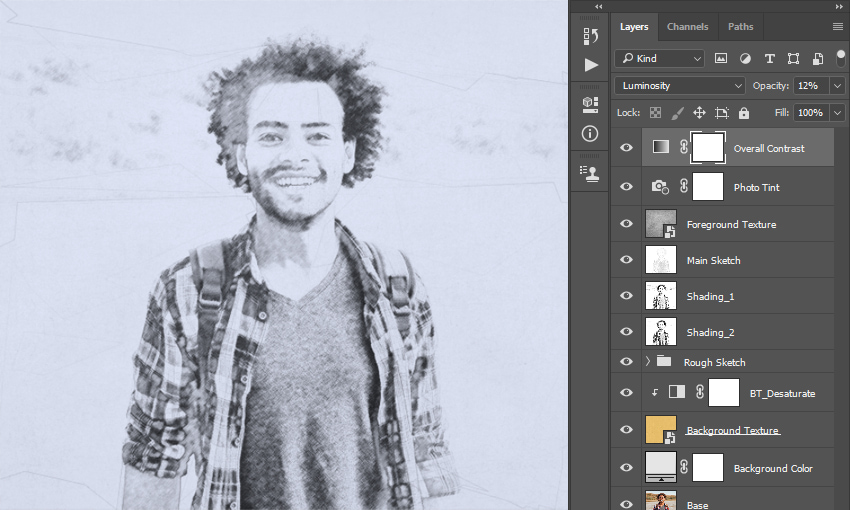
Press D on your keyboard to reset the swatches. Then, go to Layer > New Adjustment Layer > Gradient Map to create a new gradient map adjustment layer and name it Overall Contrast.

Creating new gradient map adjustment layer

Step 4

Now change the Blending Mode of this layer to Luminosity and set the Opacity to 12%.

Changing blending mode and opacity

Step 5

Now go to Layer > New Adjustment Layer > Vibrance to create a new vibrance adjustment layer and name it Overall Vibrance/Saturation.

Creating new vibrance and saturation adjustment layer

Step 6

Double-click on this layer thumbnail and, in the Properties panel, set the Vibrance to +40 and Saturation to +20.

Adjusting vibrance and saturation

Step 7

Press Control-Alt-Shift-E on your keyboard to make a screenshot, and then press Control-Shift-U to desaturate this layer. Then, go to Filter > Other > High Pass and set the Radius to 2 px.

Adding high pass filter

Step 8

Now change the Blending Mode of this layer to Overlay and name it Overall Sharpening.

Changing blending mode

You Made It!

Congratulations, you have succeeded! Here is our final result:

Final result

If you would like to create the even more advanced drawing effects shown
below, using just a single click and in only a few minutes, then check
out my Construct Photoshop Action.

The action will create professional and advanced sketch effects
from your photos with no work at all! You simply brush over your photo with a
color and just play the action. It’s really that simple! The action
will do all the work for you, leaving you fully layered and customizable results that you can further modify.

The action comes with a detailed video tutorial that demonstrates how to use the action and customize the results to get the most out of the effect.

Action final results

You may also like:

How to Create a Photo to Pencil Drawing Effect in Photoshop

Post pobrano z: How to Create a Photo to Pencil Drawing Effect in Photoshop

Final product image
What You’ll Be Creating

In this tutorial, you will learn how to create an amazing photo drawing effect in Adobe Photoshop. I will explain everything in so much detail that anyone can create it, even those who have just opened Photoshop for the first time. 

Follow along with us over on our Envato Tuts+ YouTube channel:

The effect shown above is the one I will show you how to create in this tutorial. If you would like to create the even more advanced drawing effects shown below, using just a single click and in only a few minutes, then check out my Construct Photoshop Action.

Action final results

You can also find more photo to pencil drawing Photoshop actions here:

What You’ll Need

To recreate the design above, you will need the following resources:

1. Let’s Get Started

First, open the photo that you want to work with. To open your photo, go to File > Open, choose your photo, and click Open. Now, before we get started, just check a couple of things:

  1. Your photo should be in RGB Color mode, 8 Bits/Channel. To check this, go to Image > Mode.
  2. For best results, your photo size should be 2000–3000 px wide/high. To check this, go to Image > Image Size.
  3. Your photo should be the Background layer. If it is not, go to Layer > New > Background from Layer.
Checking image size and mode

2. How to Create the Background

Step 1

In this section, we are going to create the background. Go to Layer > New Fill Layer > Solid Color to create a new solid color fill layer, name it Background color, and choose the color #e5e5e5 as shown below:

Creating new solid color fill layer

Step 2

Now go to File > Place Embedded, select the texture from the first texture link, and click Place. Then, set the Width and Height of the texture to 101.73% and name this layer Background Texture.

Placing texture

Step 3

Go to Layer > New Adjustment Layer > Black & White to create a new black & white adjustment layer and name it BT_Desaturate.

Creating new black and white adjustment layer

Step 4

Now press Control-Alt-G on your keyboard to create a clipping mask. Then, select the Background Texture layer and change the Opacity of this layer to 20%.

Changing opacity

3. How to Create the Sketch

Step 1

In this section, we are going to create the sketch. Select the Background layer and press Control-J on your keyboard to duplicate this layer. Then, go to Image > Adjustments > Shadows/Highlights and set the Shadows Amount to 10% and Highlights Amount to 10%.

Adjusting shadows and highlights

Step 2

Now name this layer Base and press Control-J on your keyboard to duplicate this layer. Then, drag this layer to the top of the layers in the Layers panel.

Duplicating layer

Step 3

Go to Filter > Filter Gallery > Artistic > Cutout and set the Number of Levels to 8, Edge Simplicity to 10 and Edge Fidelity to 1.

Adding cutout filter

Step 4

Now press Control-Shift-U on your keyboard to desaturate this layer. Then, go to Filter > Stylize > Find Edges.

Adding find edges filter

Step 5

Change the Blending Mode of this layer to Multiply and set the Opacity to 20%. Then, name this layer Rough_Sketch_1.

Changing blending mode and opacity

Step 6

Select the Base layer and press Control-J on your keyboard to duplicate this layer. Then, drag this layer just below the Rough_Sketch_1 layer in the Layers panel.

Duplicating layer

Step 7

Now go to Filter > Filter Gallery > Artistic > Cutout and set the Number of Levels to 8, Edge Simplicity to 2, and Edge Fidelity to 1.

Adding cutout filter

Step 8

Now press Control-Shift-U on your keyboard to desaturate this layer. Then, go to Filter > Stylize > Find Edges.

Adding find edges filter

Step 9

Change the Blending Mode of this layer to Multiply and set the Opacity to 10%. Then, name this layer Rough_Sketch_2.

Changing blending mode and opacity

Step 10

Now Control-click on the Rough_Sketch_1 layer to select both layers at the same time. Then, go to Layer > New > Group from Layers to create a new group from selected layers and name it Rough Sketch.

Creating new group from layers

Step 11

Change the Opacity of this layer group to 80%.

Changing opacity

Step 12

Select the Base layer and press Control-J on your keyboard to duplicate this layer. Then, drag this layer just above the Rough Sketch layer group in the Layers panel.

Duplicating layer

Step 13

Now go to Filter > Filter Gallery > Sketch > Graphic Pen and set the Stroke Length to 15, Light/Dark Balance to 10, and Stroke Direction to Right Diagonal.

Adding graphic pen filter

Step 14

Change the Blending Mode of this layer to Multiply and set the Opacity to 10%. Then, name this layer Shading_1.

Changing blending mode and opacity

Step 15

Now select the Base layer and press Control-J on your keyboard to duplicate this layer. Then, drag this layer just below the Shading_1 layer in the Layers panel.

Duplicating layer

Step 16

Now go to Filter > Filter Gallery > Sketch > Charcoal and set the Charcoal Thickness to 1, Detail to 5, and Light/Dark Balance to 10.

Adding charcoal filter

Step 17

Change the Blending Mode of this layer to Multiply and set the Opacity to 80%. Then, name this layer Shading_2.

Changing blending mode and opacity

Step 18

Now select the Base layer and press Control-J on your keyboard to duplicate this layer. Then, drag this layer just above the Shading_1 layer in the Layers panel.

Duplicating layer

Step 19

Now go to Filter > Filter Gallery > Sketch > Photocopy and set the Detail to 2 and Darkness to 5.

Adding photocopy filter

Step 20

Change the Blending Mode of this layer to Multiply and set the Opacity to 60%. Then, name this layer Main Sketch.

Changing blending mode and opacity

4. How to Create the Foreground Texture

Step 1

In this section, we are going to create the foreground texture. Go to File > Place Embedded, select the texture from the second texture link, and click Place. Then, set the Width and Height of the texture to 235% and name this layer Foreground Texture.

Placing texture

Step 2

Now Right-click on this layer and choose Edit Contents. In the new file that will show up, go to Image > Auto Tone. Then, press Control-Shift-U on your keyboard to desaturate this layer.

Adjusting tone

Step 3

Press Control-S on your keyboard to save the changes you have made and close this file.

Saving changes

Step 4

Now change the Blending Mode of this layer to Soft Light.

Changing blending mode

5. How to Make the Final Adjustments

Step 1

In this section, we are going to make the final adjustments to the design. Go to Layer > New Adjustment Layer > Photo Filter to create a new photo filter adjustment layer and name it Photo Tint.

Creating new photo filter adjustment layer

Step 2

Now Double-click on this layer thumbnail and, in the Properties panel, set the Filter to Cooling Filter (80) and Density to 11% as shown below:

Adjusting photo filter

Step 3

Press D on your keyboard to reset the swatches. Then, go to Layer > New Adjustment Layer > Gradient Map to create a new gradient map adjustment layer and name it Overall Contrast.

Creating new gradient map adjustment layer

Step 4

Now change the Blending Mode of this layer to Luminosity and set the Opacity to 12%.

Changing blending mode and opacity

Step 5

Now go to Layer > New Adjustment Layer > Vibrance to create a new vibrance adjustment layer and name it Overall Vibrance/Saturation.

Creating new vibrance and saturation adjustment layer

Step 6

Double-click on this layer thumbnail and, in the Properties panel, set the Vibrance to +40 and Saturation to +20.

Adjusting vibrance and saturation

Step 7

Press Control-Alt-Shift-E on your keyboard to make a screenshot, and then press Control-Shift-U to desaturate this layer. Then, go to Filter > Other > High Pass and set the Radius to 2 px.

Adding high pass filter

Step 8

Now change the Blending Mode of this layer to Overlay and name it Overall Sharpening.

Changing blending mode

You Made It!

Congratulations, you have succeeded! Here is our final result:

Final result

If you would like to create the even more advanced drawing effects shown
below, using just a single click and in only a few minutes, then check
out my Construct Photoshop Action.

The action will create professional and advanced sketch effects
from your photos with no work at all! You simply brush over your photo with a
color and just play the action. It’s really that simple! The action
will do all the work for you, leaving you fully layered and customizable results that you can further modify.

The action comes with a detailed video tutorial that demonstrates how to use the action and customize the results to get the most out of the effect.

Action final results

You may also like:

How to Replace the Sky in a Photo in Affinity Photo

Post pobrano z: How to Replace the Sky in a Photo in Affinity Photo

Final product image
What You’ll Be Creating

Mother Nature can create stunning environments, placed on the most ideal of backdrops. But let’s face it, a lot of the time we end up stuck with a gorgeous landscape right below a bland blue or gray sky. 

What do we say to the drab skies of nature? Not today! In this Affinity Photo tutorial, we are going to be learning all about how to replace skies, and we’ll look at just how much changing out a sky can affect the overall mood of a photo.

I will be covering all the basics of replacing a sky in Affinity Photo, whether you want to add some clouds, incorporate color, or do a full-blown background swap. 

Follow along with us over on the Envato Tuts+ YouTube Channel:

What You’ll Need

To complete this project, we are using the following resources:

Find more resources on Envato Elements!

1. How to Add Clouds to a Sky

First, let’s look at the quickest way to change out a sky, which is to add clouds! This method will work best for shots where the sky is just a little too flat and could use some detail. In this example, we will be adding a bit of a twist to our clouds. But the technique is the same, whether you want a cloudy blue sky photo effect or a straight-up twister. 

Step 1

Start by dragging and dropping the Strange Stormy Sky stock image onto the canvas, over our original beach image. Crop the image to add a bit more room for the cloudy sky. 

place base image

Step 2

Make sure the horizon line of each photo matches up reasonably closely. You can temporarily bring down the Opacity of the storm clouds if needed to line everything up. 

match horizon lines

Step 3

Next, add a Layer Mask to the storm clouds. Then, with a large, soft, round Brush, mask out the bottom half of the cloud image.

As both photos have a grey hue to them, they will blend beautifully with each other. With this method, I suggest choosing a sky that is similar in tone to the original image if you’d like to save some time on blending. 

mask sky

Step 4

Finish blending the two images by adjusting the color, brightness, and contrast of both the clouds and the original image if needed.

Here, I darkened and upped the contrast of both the base image and clouds using a Brightness/Contrast layer, while also desaturating the base image using a black and white gradient map adjustment layer. 

I then committed to the „storm of the century” vibe by adding both green and blue hues to the image with a Color Balance and S curve Curves layer. 

Brightness/Contrast Settings 

  • Brightness: -38%
  • Contrast: 19%

Gradient Map Settings 

  • Black to White 
  • Opacity: 47%

Color Balance Settings 

  • Red: -33%
  • Green: 51%
  • Blue: 59%

Curves Settings 

curves
final layers

2. How to Create a Sunset Photo Effect

Next, I am going to amp it up a notch by creating a substantially more dynamic sky mixed with a reflective surface.

Step 1

First, let’s crop our beach image to increase the sky, and I’ll opt for less land, so we have an equal mix of sky, water, and earth. 

place image

Step 2

Now, I am going to drop in my sky replacement. Once again, just like in the previous image, line up the horizons! 

match horizon lines

Step 3

Add a Layer Mask just as we did with the last sky, only this time we are going to be a bit more precise with our masking.

I am still going to use a soft brush, but it’s much smaller. I am blending the horizon line almost seamlessly with the new sky. 

mask out sky

Step 4

Duplicate the sky image, delete the layer mask, and set the layer to Overlay. Bring down the layer Opacity to 50%. 

Next, add a new Layer Mask to the sky, masking out all but the top quarter of the water. 

overlay sky

Step 5

Now, repeat that same step, only this time setting the layer to Soft Light.

Again, delete and then add a new Layer Mask to the duplicated sky. Mask out any area of the sky that is touching the land or the frothy white parts of the water. 

soft light sky

Step 6

Let’s finish this beautiful beach day off by bringing the stark blue of the sky into both the water and land using a Color Balance layer.  

Color Balance Settings

  • Red: -16%
  • Blue: 53%
color balance

3. How to Extract a Mountain Range 

When quick blending and layer mode magic won’t do the trick on their own, you may have to remove one sky altogether to place the other. Compositing is also the ideal solution if you are going for something more stylistic, surreal, or fantasy inspired! 

Step 1

As with the last image, we want there to be a bit more sky than before, so crop the canvas to give us more vertical space. 

place landscape

Step 2 

Now, let’s extract the sky of the original image. The best results would come from masking out the sky by hand using just a simple Brush and Layer Mask combo. However, use your preferred method for extraction! For a quick extract job, I like to rely on the Refine Mask tool.

Use the Flood Select Tool to create a quick selection and mask of the sky.

flood select and mask

Step 3

Then, clicking on the mask, Right Click > Refine Mask to refine and smooth the mask out. 

refine mask
refine mask results

Step 4

You can use the Select > Grow/Shrink function to get rid of any pesky unwanted edges as well, if needed. Set the Radius to -1 px and then mask out the selection. 

This is an excellent method to use when your image will be more of a backdrop, as opposed to the main focus, or you need to mock something up quickly. Otherwise, zoom in real close and mask that bad boy out by hand! 

Go ahead and place the new sky behind the mountain range for now as well. 

final layers

4. How to Create Sunrise Lighting Effects

Next up, let’s lay down our highlights. You will likely do the bulk of your highlights on layers set to Screen, but you can also play with other layer modes like color dodge, soft light, or overlay. The Curves layer is also a great tool to use for creating or enhancing highlights!

Step 1

Create a new layer, set to Screen, and paint some ambient light focused on the horizon line.

Keep the brush very large with a low Flow rate so you can build up the color slowly. Color pick a color from the new sky—in my case, pale yellow and orange colors.

add screen light

Step 2

Repeat this step on a layer clipped inside your landscape to help connect and blend the two images.

The lighting on this layer will be more focused if you have a rising sun or any bright light source as I do.

ad inner screen light

Step 3

Repeat the above step behind the mountainscape as well.

Every landscape will be different, and every sky a different time of day! If you are unsure how you should paint in your lighting, look up some references of a similar environment to get a better idea!

add backdrop screen light

5. How to Create Shadow Effects

For shadows, I recommend the use of layers set to Multiply, Soft Light, and the use of Brightness/Contrast and Curves adjustment layers. 

Step 1

Let’s start with a Brightness/Contrast adjustment layer clipped into the mountains to darken everything and lower their contrast, as shaded areas will usually have less contrast than lit areas.

Brightness/Contrast Settings

  • Brightness: -84%
  • Contrast: -42%
darken mountains

Step 2

Next, go in and mask out all the areas where the light source would be hitting.

Use the original lighting to guide you—and keep in mind that you may be able to skip this step if the light in your image is not as intense as it is in this particular image!

mask shadows

Step 3

You can also paint in shadows using just a brush on a layer set to Multiply. I like to set the layer Opacity to 50%, but it depends on how deep you want your shadows to be.

When painting shadows, avoid using black as shadows are hardly ever flat black. Instead, use a darker, desaturated version of the color you are painting on. For instance, I could use dark brown on these mountains.

Blue is also an excellent color to choose in this particular scene. Blue and orange are contrast colors, so they pair very well together. 

add deeper shadows

Step 4

Now, one of my best friends when it comes to compositing landscapes is the layer Blend Options.

blend options

Here you can tell a layer how much it should show up on light or dark areas. I don’t want these shadows to cover and darken the highlights of the image beneath, so I can drag the point on the right-hand curve to control the range of light.

bring down curve point

The further I pull, the less it will show on the lighter areas of the image beneath. You can further refine this by adding more points to the curve and adjusting them. 

add second curve point

You can also use this tool to pinpoint highlights or color. It’s a tool best learned by just playing with it and seeing what it can do!

final layers

6. How to Create a Sunset Color Grade

Finally, it always helps to add a few adjustment layers over top everything to tie it all together. 

Step 1

First, let’s add an S curve for some added contrast, along with bringing up the blues and reds in the shadows.

Curves Settings

curves
curves results

Step 2

Next, create a masked Color Balance adjustment layer adding blue to the outer edges of the image and one to bring more oranges into the innermost area of the image. 

Color Balance Settings

  • Red: -25%
  • Green: -20%
  • Blue: 22%
outer color balance

Step 3

Finally, create a second masked Color Balance adjustment layer, bringing more yellows and reds into the innermost area of the image. 

Color Balance Settings

  • Red: 23%
  • Green: -28%
  • Blue: -77%
inner color balance

And There You Have It!

While sometimes adding in a few fluffy white clouds will do just the trick, don’t be afraid to try changing up the whole mood of a photo by switching from a bright blue sky to a set of ominous clouds rolling in. Or create an entirely new alien atmosphere full of stars and planets. Every photo has a story to tell, and you can change the whole narrative just by choosing one sky over another! The sky is not the limit after all!

So, as always, keep experimenting with different techniques and practicing, and don’t forget to post your version below, along with any questions, comments, or critiques!

final result

Looking to learn more? Why not check out the following photo manipulation tutorials:

How to Replace the Sky in a Photo in Affinity Photo

Post pobrano z: How to Replace the Sky in a Photo in Affinity Photo

Final product image
What You’ll Be Creating

Mother Nature can create stunning environments, placed on the most ideal of backdrops. But let’s face it, a lot of the time we end up stuck with a gorgeous landscape right below a bland blue or gray sky. 

What do we say to the drab skies of nature? Not today! In this Affinity Photo tutorial, we are going to be learning all about how to replace skies, and we’ll look at just how much changing out a sky can affect the overall mood of a photo.

I will be covering all the basics of replacing a sky in Affinity Photo, whether you want to add some clouds, incorporate color, or do a full-blown background swap. 

Follow along with us over on the Envato Tuts+ YouTube Channel:

What You’ll Need

To complete this project, we are using the following resources:

Find more resources on Envato Elements!

1. How to Add Clouds to a Sky

First, let’s look at the quickest way to change out a sky, which is to add clouds! This method will work best for shots where the sky is just a little too flat and could use some detail. In this example, we will be adding a bit of a twist to our clouds. But the technique is the same, whether you want a cloudy blue sky photo effect or a straight-up twister. 

Step 1

Start by dragging and dropping the Strange Stormy Sky stock image onto the canvas, over our original beach image. Crop the image to add a bit more room for the cloudy sky. 

place base image

Step 2

Make sure the horizon line of each photo matches up reasonably closely. You can temporarily bring down the Opacity of the storm clouds if needed to line everything up. 

match horizon lines

Step 3

Next, add a Layer Mask to the storm clouds. Then, with a large, soft, round Brush, mask out the bottom half of the cloud image.

As both photos have a grey hue to them, they will blend beautifully with each other. With this method, I suggest choosing a sky that is similar in tone to the original image if you’d like to save some time on blending. 

mask sky

Step 4

Finish blending the two images by adjusting the color, brightness, and contrast of both the clouds and the original image if needed.

Here, I darkened and upped the contrast of both the base image and clouds using a Brightness/Contrast layer, while also desaturating the base image using a black and white gradient map adjustment layer. 

I then committed to the „storm of the century” vibe by adding both green and blue hues to the image with a Color Balance and S curve Curves layer. 

Brightness/Contrast Settings 

  • Brightness: -38%
  • Contrast: 19%

Gradient Map Settings 

  • Black to White 
  • Opacity: 47%

Color Balance Settings 

  • Red: -33%
  • Green: 51%
  • Blue: 59%

Curves Settings 

curves
final layers

2. How to Create a Sunset Photo Effect

Next, I am going to amp it up a notch by creating a substantially more dynamic sky mixed with a reflective surface.

Step 1

First, let’s crop our beach image to increase the sky, and I’ll opt for less land, so we have an equal mix of sky, water, and earth. 

place image

Step 2

Now, I am going to drop in my sky replacement. Once again, just like in the previous image, line up the horizons! 

match horizon lines

Step 3

Add a Layer Mask just as we did with the last sky, only this time we are going to be a bit more precise with our masking.

I am still going to use a soft brush, but it’s much smaller. I am blending the horizon line almost seamlessly with the new sky. 

mask out sky

Step 4

Duplicate the sky image, delete the layer mask, and set the layer to Overlay. Bring down the layer Opacity to 50%. 

Next, add a new Layer Mask to the sky, masking out all but the top quarter of the water. 

overlay sky

Step 5

Now, repeat that same step, only this time setting the layer to Soft Light.

Again, delete and then add a new Layer Mask to the duplicated sky. Mask out any area of the sky that is touching the land or the frothy white parts of the water. 

soft light sky

Step 6

Let’s finish this beautiful beach day off by bringing the stark blue of the sky into both the water and land using a Color Balance layer.  

Color Balance Settings

  • Red: -16%
  • Blue: 53%
color balance

3. How to Extract a Mountain Range 

When quick blending and layer mode magic won’t do the trick on their own, you may have to remove one sky altogether to place the other. Compositing is also the ideal solution if you are going for something more stylistic, surreal, or fantasy inspired! 

Step 1

As with the last image, we want there to be a bit more sky than before, so crop the canvas to give us more vertical space. 

place landscape

Step 2 

Now, let’s extract the sky of the original image. The best results would come from masking out the sky by hand using just a simple Brush and Layer Mask combo. However, use your preferred method for extraction! For a quick extract job, I like to rely on the Refine Mask tool.

Use the Flood Select Tool to create a quick selection and mask of the sky.

flood select and mask

Step 3

Then, clicking on the mask, Right Click > Refine Mask to refine and smooth the mask out. 

refine mask
refine mask results

Step 4

You can use the Select > Grow/Shrink function to get rid of any pesky unwanted edges as well, if needed. Set the Radius to -1 px and then mask out the selection. 

This is an excellent method to use when your image will be more of a backdrop, as opposed to the main focus, or you need to mock something up quickly. Otherwise, zoom in real close and mask that bad boy out by hand! 

Go ahead and place the new sky behind the mountain range for now as well. 

final layers

4. How to Create Sunrise Lighting Effects

Next up, let’s lay down our highlights. You will likely do the bulk of your highlights on layers set to Screen, but you can also play with other layer modes like color dodge, soft light, or overlay. The Curves layer is also a great tool to use for creating or enhancing highlights!

Step 1

Create a new layer, set to Screen, and paint some ambient light focused on the horizon line.

Keep the brush very large with a low Flow rate so you can build up the color slowly. Color pick a color from the new sky—in my case, pale yellow and orange colors.

add screen light

Step 2

Repeat this step on a layer clipped inside your landscape to help connect and blend the two images.

The lighting on this layer will be more focused if you have a rising sun or any bright light source as I do.

ad inner screen light

Step 3

Repeat the above step behind the mountainscape as well.

Every landscape will be different, and every sky a different time of day! If you are unsure how you should paint in your lighting, look up some references of a similar environment to get a better idea!

add backdrop screen light

5. How to Create Shadow Effects

For shadows, I recommend the use of layers set to Multiply, Soft Light, and the use of Brightness/Contrast and Curves adjustment layers. 

Step 1

Let’s start with a Brightness/Contrast adjustment layer clipped into the mountains to darken everything and lower their contrast, as shaded areas will usually have less contrast than lit areas.

Brightness/Contrast Settings

  • Brightness: -84%
  • Contrast: -42%
darken mountains

Step 2

Next, go in and mask out all the areas where the light source would be hitting.

Use the original lighting to guide you—and keep in mind that you may be able to skip this step if the light in your image is not as intense as it is in this particular image!

mask shadows

Step 3

You can also paint in shadows using just a brush on a layer set to Multiply. I like to set the layer Opacity to 50%, but it depends on how deep you want your shadows to be.

When painting shadows, avoid using black as shadows are hardly ever flat black. Instead, use a darker, desaturated version of the color you are painting on. For instance, I could use dark brown on these mountains.

Blue is also an excellent color to choose in this particular scene. Blue and orange are contrast colors, so they pair very well together. 

add deeper shadows

Step 4

Now, one of my best friends when it comes to compositing landscapes is the layer Blend Options.

blend options

Here you can tell a layer how much it should show up on light or dark areas. I don’t want these shadows to cover and darken the highlights of the image beneath, so I can drag the point on the right-hand curve to control the range of light.

bring down curve point

The further I pull, the less it will show on the lighter areas of the image beneath. You can further refine this by adding more points to the curve and adjusting them. 

add second curve point

You can also use this tool to pinpoint highlights or color. It’s a tool best learned by just playing with it and seeing what it can do!

final layers

6. How to Create a Sunset Color Grade

Finally, it always helps to add a few adjustment layers over top everything to tie it all together. 

Step 1

First, let’s add an S curve for some added contrast, along with bringing up the blues and reds in the shadows.

Curves Settings

curves
curves results

Step 2

Next, create a masked Color Balance adjustment layer adding blue to the outer edges of the image and one to bring more oranges into the innermost area of the image. 

Color Balance Settings

  • Red: -25%
  • Green: -20%
  • Blue: 22%
outer color balance

Step 3

Finally, create a second masked Color Balance adjustment layer, bringing more yellows and reds into the innermost area of the image. 

Color Balance Settings

  • Red: 23%
  • Green: -28%
  • Blue: -77%
inner color balance

And There You Have It!

While sometimes adding in a few fluffy white clouds will do just the trick, don’t be afraid to try changing up the whole mood of a photo by switching from a bright blue sky to a set of ominous clouds rolling in. Or create an entirely new alien atmosphere full of stars and planets. Every photo has a story to tell, and you can change the whole narrative just by choosing one sky over another! The sky is not the limit after all!

So, as always, keep experimenting with different techniques and practicing, and don’t forget to post your version below, along with any questions, comments, or critiques!

final result

Looking to learn more? Why not check out the following photo manipulation tutorials:

How to Replace the Sky in a Photo in Affinity Photo

Post pobrano z: How to Replace the Sky in a Photo in Affinity Photo

Final product image
What You’ll Be Creating

Mother Nature can create stunning environments, placed on the most ideal of backdrops. But let’s face it, a lot of the time we end up stuck with a gorgeous landscape right below a bland blue or gray sky. 

What do we say to the drab skies of nature? Not today! In this Affinity Photo tutorial, we are going to be learning all about how to replace skies, and we’ll look at just how much changing out a sky can affect the overall mood of a photo.

I will be covering all the basics of replacing a sky in Affinity Photo, whether you want to add some clouds, incorporate color, or do a full-blown background swap. 

Follow along with us over on the Envato Tuts+ YouTube Channel:

What You’ll Need

To complete this project, we are using the following resources:

Find more resources on Envato Elements!

1. How to Add Clouds to a Sky

First, let’s look at the quickest way to change out a sky, which is to add clouds! This method will work best for shots where the sky is just a little too flat and could use some detail. In this example, we will be adding a bit of a twist to our clouds. But the technique is the same, whether you want a cloudy blue sky photo effect or a straight-up twister. 

Step 1

Start by dragging and dropping the Strange Stormy Sky stock image onto the canvas, over our original beach image. Crop the image to add a bit more room for the cloudy sky. 

place base image

Step 2

Make sure the horizon line of each photo matches up reasonably closely. You can temporarily bring down the Opacity of the storm clouds if needed to line everything up. 

match horizon lines

Step 3

Next, add a Layer Mask to the storm clouds. Then, with a large, soft, round Brush, mask out the bottom half of the cloud image.

As both photos have a grey hue to them, they will blend beautifully with each other. With this method, I suggest choosing a sky that is similar in tone to the original image if you’d like to save some time on blending. 

mask sky

Step 4

Finish blending the two images by adjusting the color, brightness, and contrast of both the clouds and the original image if needed.

Here, I darkened and upped the contrast of both the base image and clouds using a Brightness/Contrast layer, while also desaturating the base image using a black and white gradient map adjustment layer. 

I then committed to the „storm of the century” vibe by adding both green and blue hues to the image with a Color Balance and S curve Curves layer. 

Brightness/Contrast Settings 

  • Brightness: -38%
  • Contrast: 19%

Gradient Map Settings 

  • Black to White 
  • Opacity: 47%

Color Balance Settings 

  • Red: -33%
  • Green: 51%
  • Blue: 59%

Curves Settings 

curves
final layers

2. How to Create a Sunset Photo Effect

Next, I am going to amp it up a notch by creating a substantially more dynamic sky mixed with a reflective surface.

Step 1

First, let’s crop our beach image to increase the sky, and I’ll opt for less land, so we have an equal mix of sky, water, and earth. 

place image

Step 2

Now, I am going to drop in my sky replacement. Once again, just like in the previous image, line up the horizons! 

match horizon lines

Step 3

Add a Layer Mask just as we did with the last sky, only this time we are going to be a bit more precise with our masking.

I am still going to use a soft brush, but it’s much smaller. I am blending the horizon line almost seamlessly with the new sky. 

mask out sky

Step 4

Duplicate the sky image, delete the layer mask, and set the layer to Overlay. Bring down the layer Opacity to 50%. 

Next, add a new Layer Mask to the sky, masking out all but the top quarter of the water. 

overlay sky

Step 5

Now, repeat that same step, only this time setting the layer to Soft Light.

Again, delete and then add a new Layer Mask to the duplicated sky. Mask out any area of the sky that is touching the land or the frothy white parts of the water. 

soft light sky

Step 6

Let’s finish this beautiful beach day off by bringing the stark blue of the sky into both the water and land using a Color Balance layer.  

Color Balance Settings

  • Red: -16%
  • Blue: 53%
color balance

3. How to Extract a Mountain Range 

When quick blending and layer mode magic won’t do the trick on their own, you may have to remove one sky altogether to place the other. Compositing is also the ideal solution if you are going for something more stylistic, surreal, or fantasy inspired! 

Step 1

As with the last image, we want there to be a bit more sky than before, so crop the canvas to give us more vertical space. 

place landscape

Step 2 

Now, let’s extract the sky of the original image. The best results would come from masking out the sky by hand using just a simple Brush and Layer Mask combo. However, use your preferred method for extraction! For a quick extract job, I like to rely on the Refine Mask tool.

Use the Flood Select Tool to create a quick selection and mask of the sky.

flood select and mask

Step 3

Then, clicking on the mask, Right Click > Refine Mask to refine and smooth the mask out. 

refine mask
refine mask results

Step 4

You can use the Select > Grow/Shrink function to get rid of any pesky unwanted edges as well, if needed. Set the Radius to -1 px and then mask out the selection. 

This is an excellent method to use when your image will be more of a backdrop, as opposed to the main focus, or you need to mock something up quickly. Otherwise, zoom in real close and mask that bad boy out by hand! 

Go ahead and place the new sky behind the mountain range for now as well. 

final layers

4. How to Create Sunrise Lighting Effects

Next up, let’s lay down our highlights. You will likely do the bulk of your highlights on layers set to Screen, but you can also play with other layer modes like color dodge, soft light, or overlay. The Curves layer is also a great tool to use for creating or enhancing highlights!

Step 1

Create a new layer, set to Screen, and paint some ambient light focused on the horizon line.

Keep the brush very large with a low Flow rate so you can build up the color slowly. Color pick a color from the new sky—in my case, pale yellow and orange colors.

add screen light

Step 2

Repeat this step on a layer clipped inside your landscape to help connect and blend the two images.

The lighting on this layer will be more focused if you have a rising sun or any bright light source as I do.

ad inner screen light

Step 3

Repeat the above step behind the mountainscape as well.

Every landscape will be different, and every sky a different time of day! If you are unsure how you should paint in your lighting, look up some references of a similar environment to get a better idea!

add backdrop screen light

5. How to Create Shadow Effects

For shadows, I recommend the use of layers set to Multiply, Soft Light, and the use of Brightness/Contrast and Curves adjustment layers. 

Step 1

Let’s start with a Brightness/Contrast adjustment layer clipped into the mountains to darken everything and lower their contrast, as shaded areas will usually have less contrast than lit areas.

Brightness/Contrast Settings

  • Brightness: -84%
  • Contrast: -42%
darken mountains

Step 2

Next, go in and mask out all the areas where the light source would be hitting.

Use the original lighting to guide you—and keep in mind that you may be able to skip this step if the light in your image is not as intense as it is in this particular image!

mask shadows

Step 3

You can also paint in shadows using just a brush on a layer set to Multiply. I like to set the layer Opacity to 50%, but it depends on how deep you want your shadows to be.

When painting shadows, avoid using black as shadows are hardly ever flat black. Instead, use a darker, desaturated version of the color you are painting on. For instance, I could use dark brown on these mountains.

Blue is also an excellent color to choose in this particular scene. Blue and orange are contrast colors, so they pair very well together. 

add deeper shadows

Step 4

Now, one of my best friends when it comes to compositing landscapes is the layer Blend Options.

blend options

Here you can tell a layer how much it should show up on light or dark areas. I don’t want these shadows to cover and darken the highlights of the image beneath, so I can drag the point on the right-hand curve to control the range of light.

bring down curve point

The further I pull, the less it will show on the lighter areas of the image beneath. You can further refine this by adding more points to the curve and adjusting them. 

add second curve point

You can also use this tool to pinpoint highlights or color. It’s a tool best learned by just playing with it and seeing what it can do!

final layers

6. How to Create a Sunset Color Grade

Finally, it always helps to add a few adjustment layers over top everything to tie it all together. 

Step 1

First, let’s add an S curve for some added contrast, along with bringing up the blues and reds in the shadows.

Curves Settings

curves
curves results

Step 2

Next, create a masked Color Balance adjustment layer adding blue to the outer edges of the image and one to bring more oranges into the innermost area of the image. 

Color Balance Settings

  • Red: -25%
  • Green: -20%
  • Blue: 22%
outer color balance

Step 3

Finally, create a second masked Color Balance adjustment layer, bringing more yellows and reds into the innermost area of the image. 

Color Balance Settings

  • Red: 23%
  • Green: -28%
  • Blue: -77%
inner color balance

And There You Have It!

While sometimes adding in a few fluffy white clouds will do just the trick, don’t be afraid to try changing up the whole mood of a photo by switching from a bright blue sky to a set of ominous clouds rolling in. Or create an entirely new alien atmosphere full of stars and planets. Every photo has a story to tell, and you can change the whole narrative just by choosing one sky over another! The sky is not the limit after all!

So, as always, keep experimenting with different techniques and practicing, and don’t forget to post your version below, along with any questions, comments, or critiques!

final result

Looking to learn more? Why not check out the following photo manipulation tutorials:

How to Replace the Sky in a Photo in Affinity Photo

Post pobrano z: How to Replace the Sky in a Photo in Affinity Photo

Final product image
What You’ll Be Creating

Mother Nature can create stunning environments, placed on the most ideal of backdrops. But let’s face it, a lot of the time we end up stuck with a gorgeous landscape right below a bland blue or gray sky. 

What do we say to the drab skies of nature? Not today! In this Affinity Photo tutorial, we are going to be learning all about how to replace skies, and we’ll look at just how much changing out a sky can affect the overall mood of a photo.

I will be covering all the basics of replacing a sky in Affinity Photo, whether you want to add some clouds, incorporate color, or do a full-blown background swap. 

Follow along with us over on the Envato Tuts+ YouTube Channel:

What You’ll Need

To complete this project, we are using the following resources:

Find more resources on Envato Elements!

1. How to Add Clouds to a Sky

First, let’s look at the quickest way to change out a sky, which is to add clouds! This method will work best for shots where the sky is just a little too flat and could use some detail. In this example, we will be adding a bit of a twist to our clouds. But the technique is the same, whether you want a cloudy blue sky photo effect or a straight-up twister. 

Step 1

Start by dragging and dropping the Strange Stormy Sky stock image onto the canvas, over our original beach image. Crop the image to add a bit more room for the cloudy sky. 

place base image

Step 2

Make sure the horizon line of each photo matches up reasonably closely. You can temporarily bring down the Opacity of the storm clouds if needed to line everything up. 

match horizon lines

Step 3

Next, add a Layer Mask to the storm clouds. Then, with a large, soft, round Brush, mask out the bottom half of the cloud image.

As both photos have a grey hue to them, they will blend beautifully with each other. With this method, I suggest choosing a sky that is similar in tone to the original image if you’d like to save some time on blending. 

mask sky

Step 4

Finish blending the two images by adjusting the color, brightness, and contrast of both the clouds and the original image if needed.

Here, I darkened and upped the contrast of both the base image and clouds using a Brightness/Contrast layer, while also desaturating the base image using a black and white gradient map adjustment layer. 

I then committed to the „storm of the century” vibe by adding both green and blue hues to the image with a Color Balance and S curve Curves layer. 

Brightness/Contrast Settings 

  • Brightness: -38%
  • Contrast: 19%

Gradient Map Settings 

  • Black to White 
  • Opacity: 47%

Color Balance Settings 

  • Red: -33%
  • Green: 51%
  • Blue: 59%

Curves Settings 

curves
final layers

2. How to Create a Sunset Photo Effect

Next, I am going to amp it up a notch by creating a substantially more dynamic sky mixed with a reflective surface.

Step 1

First, let’s crop our beach image to increase the sky, and I’ll opt for less land, so we have an equal mix of sky, water, and earth. 

place image

Step 2

Now, I am going to drop in my sky replacement. Once again, just like in the previous image, line up the horizons! 

match horizon lines

Step 3

Add a Layer Mask just as we did with the last sky, only this time we are going to be a bit more precise with our masking.

I am still going to use a soft brush, but it’s much smaller. I am blending the horizon line almost seamlessly with the new sky. 

mask out sky

Step 4

Duplicate the sky image, delete the layer mask, and set the layer to Overlay. Bring down the layer Opacity to 50%. 

Next, add a new Layer Mask to the sky, masking out all but the top quarter of the water. 

overlay sky

Step 5

Now, repeat that same step, only this time setting the layer to Soft Light.

Again, delete and then add a new Layer Mask to the duplicated sky. Mask out any area of the sky that is touching the land or the frothy white parts of the water. 

soft light sky

Step 6

Let’s finish this beautiful beach day off by bringing the stark blue of the sky into both the water and land using a Color Balance layer.  

Color Balance Settings

  • Red: -16%
  • Blue: 53%
color balance

3. How to Extract a Mountain Range 

When quick blending and layer mode magic won’t do the trick on their own, you may have to remove one sky altogether to place the other. Compositing is also the ideal solution if you are going for something more stylistic, surreal, or fantasy inspired! 

Step 1

As with the last image, we want there to be a bit more sky than before, so crop the canvas to give us more vertical space. 

place landscape

Step 2 

Now, let’s extract the sky of the original image. The best results would come from masking out the sky by hand using just a simple Brush and Layer Mask combo. However, use your preferred method for extraction! For a quick extract job, I like to rely on the Refine Mask tool.

Use the Flood Select Tool to create a quick selection and mask of the sky.

flood select and mask

Step 3

Then, clicking on the mask, Right Click > Refine Mask to refine and smooth the mask out. 

refine mask
refine mask results

Step 4

You can use the Select > Grow/Shrink function to get rid of any pesky unwanted edges as well, if needed. Set the Radius to -1 px and then mask out the selection. 

This is an excellent method to use when your image will be more of a backdrop, as opposed to the main focus, or you need to mock something up quickly. Otherwise, zoom in real close and mask that bad boy out by hand! 

Go ahead and place the new sky behind the mountain range for now as well. 

final layers

4. How to Create Sunrise Lighting Effects

Next up, let’s lay down our highlights. You will likely do the bulk of your highlights on layers set to Screen, but you can also play with other layer modes like color dodge, soft light, or overlay. The Curves layer is also a great tool to use for creating or enhancing highlights!

Step 1

Create a new layer, set to Screen, and paint some ambient light focused on the horizon line.

Keep the brush very large with a low Flow rate so you can build up the color slowly. Color pick a color from the new sky—in my case, pale yellow and orange colors.

add screen light

Step 2

Repeat this step on a layer clipped inside your landscape to help connect and blend the two images.

The lighting on this layer will be more focused if you have a rising sun or any bright light source as I do.

ad inner screen light

Step 3

Repeat the above step behind the mountainscape as well.

Every landscape will be different, and every sky a different time of day! If you are unsure how you should paint in your lighting, look up some references of a similar environment to get a better idea!

add backdrop screen light

5. How to Create Shadow Effects

For shadows, I recommend the use of layers set to Multiply, Soft Light, and the use of Brightness/Contrast and Curves adjustment layers. 

Step 1

Let’s start with a Brightness/Contrast adjustment layer clipped into the mountains to darken everything and lower their contrast, as shaded areas will usually have less contrast than lit areas.

Brightness/Contrast Settings

  • Brightness: -84%
  • Contrast: -42%
darken mountains

Step 2

Next, go in and mask out all the areas where the light source would be hitting.

Use the original lighting to guide you—and keep in mind that you may be able to skip this step if the light in your image is not as intense as it is in this particular image!

mask shadows

Step 3

You can also paint in shadows using just a brush on a layer set to Multiply. I like to set the layer Opacity to 50%, but it depends on how deep you want your shadows to be.

When painting shadows, avoid using black as shadows are hardly ever flat black. Instead, use a darker, desaturated version of the color you are painting on. For instance, I could use dark brown on these mountains.

Blue is also an excellent color to choose in this particular scene. Blue and orange are contrast colors, so they pair very well together. 

add deeper shadows

Step 4

Now, one of my best friends when it comes to compositing landscapes is the layer Blend Options.

blend options

Here you can tell a layer how much it should show up on light or dark areas. I don’t want these shadows to cover and darken the highlights of the image beneath, so I can drag the point on the right-hand curve to control the range of light.

bring down curve point

The further I pull, the less it will show on the lighter areas of the image beneath. You can further refine this by adding more points to the curve and adjusting them. 

add second curve point

You can also use this tool to pinpoint highlights or color. It’s a tool best learned by just playing with it and seeing what it can do!

final layers

6. How to Create a Sunset Color Grade

Finally, it always helps to add a few adjustment layers over top everything to tie it all together. 

Step 1

First, let’s add an S curve for some added contrast, along with bringing up the blues and reds in the shadows.

Curves Settings

curves
curves results

Step 2

Next, create a masked Color Balance adjustment layer adding blue to the outer edges of the image and one to bring more oranges into the innermost area of the image. 

Color Balance Settings

  • Red: -25%
  • Green: -20%
  • Blue: 22%
outer color balance

Step 3

Finally, create a second masked Color Balance adjustment layer, bringing more yellows and reds into the innermost area of the image. 

Color Balance Settings

  • Red: 23%
  • Green: -28%
  • Blue: -77%
inner color balance

And There You Have It!

While sometimes adding in a few fluffy white clouds will do just the trick, don’t be afraid to try changing up the whole mood of a photo by switching from a bright blue sky to a set of ominous clouds rolling in. Or create an entirely new alien atmosphere full of stars and planets. Every photo has a story to tell, and you can change the whole narrative just by choosing one sky over another! The sky is not the limit after all!

So, as always, keep experimenting with different techniques and practicing, and don’t forget to post your version below, along with any questions, comments, or critiques!

final result

Looking to learn more? Why not check out the following photo manipulation tutorials:

How to Replace the Sky in a Photo in Affinity Photo

Post pobrano z: How to Replace the Sky in a Photo in Affinity Photo

Final product image
What You’ll Be Creating

Mother Nature can create stunning environments, placed on the most ideal of backdrops. But let’s face it, a lot of the time we end up stuck with a gorgeous landscape right below a bland blue or gray sky. 

What do we say to the drab skies of nature? Not today! In this Affinity Photo tutorial, we are going to be learning all about how to replace skies, and we’ll look at just how much changing out a sky can affect the overall mood of a photo.

I will be covering all the basics of replacing a sky in Affinity Photo, whether you want to add some clouds, incorporate color, or do a full-blown background swap. 

Follow along with us over on the Envato Tuts+ YouTube Channel:

What You’ll Need

To complete this project, we are using the following resources:

Find more resources on Envato Elements!

1. How to Add Clouds to a Sky

First, let’s look at the quickest way to change out a sky, which is to add clouds! This method will work best for shots where the sky is just a little too flat and could use some detail. In this example, we will be adding a bit of a twist to our clouds. But the technique is the same, whether you want a cloudy blue sky photo effect or a straight-up twister. 

Step 1

Start by dragging and dropping the Strange Stormy Sky stock image onto the canvas, over our original beach image. Crop the image to add a bit more room for the cloudy sky. 

place base image

Step 2

Make sure the horizon line of each photo matches up reasonably closely. You can temporarily bring down the Opacity of the storm clouds if needed to line everything up. 

match horizon lines

Step 3

Next, add a Layer Mask to the storm clouds. Then, with a large, soft, round Brush, mask out the bottom half of the cloud image.

As both photos have a grey hue to them, they will blend beautifully with each other. With this method, I suggest choosing a sky that is similar in tone to the original image if you’d like to save some time on blending. 

mask sky

Step 4

Finish blending the two images by adjusting the color, brightness, and contrast of both the clouds and the original image if needed.

Here, I darkened and upped the contrast of both the base image and clouds using a Brightness/Contrast layer, while also desaturating the base image using a black and white gradient map adjustment layer. 

I then committed to the „storm of the century” vibe by adding both green and blue hues to the image with a Color Balance and S curve Curves layer. 

Brightness/Contrast Settings 

  • Brightness: -38%
  • Contrast: 19%

Gradient Map Settings 

  • Black to White 
  • Opacity: 47%

Color Balance Settings 

  • Red: -33%
  • Green: 51%
  • Blue: 59%

Curves Settings 

curves
final layers

2. How to Create a Sunset Photo Effect

Next, I am going to amp it up a notch by creating a substantially more dynamic sky mixed with a reflective surface.

Step 1

First, let’s crop our beach image to increase the sky, and I’ll opt for less land, so we have an equal mix of sky, water, and earth. 

place image

Step 2

Now, I am going to drop in my sky replacement. Once again, just like in the previous image, line up the horizons! 

match horizon lines

Step 3

Add a Layer Mask just as we did with the last sky, only this time we are going to be a bit more precise with our masking.

I am still going to use a soft brush, but it’s much smaller. I am blending the horizon line almost seamlessly with the new sky. 

mask out sky

Step 4

Duplicate the sky image, delete the layer mask, and set the layer to Overlay. Bring down the layer Opacity to 50%. 

Next, add a new Layer Mask to the sky, masking out all but the top quarter of the water. 

overlay sky

Step 5

Now, repeat that same step, only this time setting the layer to Soft Light.

Again, delete and then add a new Layer Mask to the duplicated sky. Mask out any area of the sky that is touching the land or the frothy white parts of the water. 

soft light sky

Step 6

Let’s finish this beautiful beach day off by bringing the stark blue of the sky into both the water and land using a Color Balance layer.  

Color Balance Settings

  • Red: -16%
  • Blue: 53%
color balance

3. How to Extract a Mountain Range 

When quick blending and layer mode magic won’t do the trick on their own, you may have to remove one sky altogether to place the other. Compositing is also the ideal solution if you are going for something more stylistic, surreal, or fantasy inspired! 

Step 1

As with the last image, we want there to be a bit more sky than before, so crop the canvas to give us more vertical space. 

place landscape

Step 2 

Now, let’s extract the sky of the original image. The best results would come from masking out the sky by hand using just a simple Brush and Layer Mask combo. However, use your preferred method for extraction! For a quick extract job, I like to rely on the Refine Mask tool.

Use the Flood Select Tool to create a quick selection and mask of the sky.

flood select and mask

Step 3

Then, clicking on the mask, Right Click > Refine Mask to refine and smooth the mask out. 

refine mask
refine mask results

Step 4

You can use the Select > Grow/Shrink function to get rid of any pesky unwanted edges as well, if needed. Set the Radius to -1 px and then mask out the selection. 

This is an excellent method to use when your image will be more of a backdrop, as opposed to the main focus, or you need to mock something up quickly. Otherwise, zoom in real close and mask that bad boy out by hand! 

Go ahead and place the new sky behind the mountain range for now as well. 

final layers

4. How to Create Sunrise Lighting Effects

Next up, let’s lay down our highlights. You will likely do the bulk of your highlights on layers set to Screen, but you can also play with other layer modes like color dodge, soft light, or overlay. The Curves layer is also a great tool to use for creating or enhancing highlights!

Step 1

Create a new layer, set to Screen, and paint some ambient light focused on the horizon line.

Keep the brush very large with a low Flow rate so you can build up the color slowly. Color pick a color from the new sky—in my case, pale yellow and orange colors.

add screen light

Step 2

Repeat this step on a layer clipped inside your landscape to help connect and blend the two images.

The lighting on this layer will be more focused if you have a rising sun or any bright light source as I do.

ad inner screen light

Step 3

Repeat the above step behind the mountainscape as well.

Every landscape will be different, and every sky a different time of day! If you are unsure how you should paint in your lighting, look up some references of a similar environment to get a better idea!

add backdrop screen light

5. How to Create Shadow Effects

For shadows, I recommend the use of layers set to Multiply, Soft Light, and the use of Brightness/Contrast and Curves adjustment layers. 

Step 1

Let’s start with a Brightness/Contrast adjustment layer clipped into the mountains to darken everything and lower their contrast, as shaded areas will usually have less contrast than lit areas.

Brightness/Contrast Settings

  • Brightness: -84%
  • Contrast: -42%
darken mountains

Step 2

Next, go in and mask out all the areas where the light source would be hitting.

Use the original lighting to guide you—and keep in mind that you may be able to skip this step if the light in your image is not as intense as it is in this particular image!

mask shadows

Step 3

You can also paint in shadows using just a brush on a layer set to Multiply. I like to set the layer Opacity to 50%, but it depends on how deep you want your shadows to be.

When painting shadows, avoid using black as shadows are hardly ever flat black. Instead, use a darker, desaturated version of the color you are painting on. For instance, I could use dark brown on these mountains.

Blue is also an excellent color to choose in this particular scene. Blue and orange are contrast colors, so they pair very well together. 

add deeper shadows

Step 4

Now, one of my best friends when it comes to compositing landscapes is the layer Blend Options.

blend options

Here you can tell a layer how much it should show up on light or dark areas. I don’t want these shadows to cover and darken the highlights of the image beneath, so I can drag the point on the right-hand curve to control the range of light.

bring down curve point

The further I pull, the less it will show on the lighter areas of the image beneath. You can further refine this by adding more points to the curve and adjusting them. 

add second curve point

You can also use this tool to pinpoint highlights or color. It’s a tool best learned by just playing with it and seeing what it can do!

final layers

6. How to Create a Sunset Color Grade

Finally, it always helps to add a few adjustment layers over top everything to tie it all together. 

Step 1

First, let’s add an S curve for some added contrast, along with bringing up the blues and reds in the shadows.

Curves Settings

curves
curves results

Step 2

Next, create a masked Color Balance adjustment layer adding blue to the outer edges of the image and one to bring more oranges into the innermost area of the image. 

Color Balance Settings

  • Red: -25%
  • Green: -20%
  • Blue: 22%
outer color balance

Step 3

Finally, create a second masked Color Balance adjustment layer, bringing more yellows and reds into the innermost area of the image. 

Color Balance Settings

  • Red: 23%
  • Green: -28%
  • Blue: -77%
inner color balance

And There You Have It!

While sometimes adding in a few fluffy white clouds will do just the trick, don’t be afraid to try changing up the whole mood of a photo by switching from a bright blue sky to a set of ominous clouds rolling in. Or create an entirely new alien atmosphere full of stars and planets. Every photo has a story to tell, and you can change the whole narrative just by choosing one sky over another! The sky is not the limit after all!

So, as always, keep experimenting with different techniques and practicing, and don’t forget to post your version below, along with any questions, comments, or critiques!

final result

Looking to learn more? Why not check out the following photo manipulation tutorials:

Agregator najlepszych postów o designie, webdesignie, cssie i Internecie