10 Fresh-Faced and Impressive Website Designs Inspired by King’s Masterpieces

Post pobrano z: 10 Fresh-Faced and Impressive Website Designs Inspired by King’s Masterpieces

Content outline:

  1. The King of Horror
  2. Main Features of Website Designs Inspired by King’s fictions
  3. Overview of 10 Website Templates for Different Purposes
  4. Bottoms up

“I’ll try to terrify you first, and if that doesn’t work , I’ll horrify you, and if I can’t make it there, I’ll try to gross you out. I’m not proud.”(Stephen King)

Who does know more about horror than the ‘King of Horror’? Mystery… Fantasy… Supernatural actions and heroes… Hair curling stories… Welcome to the world of King’s fictions. There are millions of people who have dug into that atmosphere just once in their life. There are loads of fans that can hardly wait for his new edition and reread his books. Tons of Horror’s fans are looking for different ways to become closer to their favorite writer and his depicted world. Those who try to create their own King-oriented world on the web can use ready-made website templates with a fascinating design.

Main Features of Website Designs Inspired by King’s fictions

Those who have ever read King’s stories or watched the movies based on his books know about his unrivalled style. You can hardly have got him mixed up with someone else. Building a website based on his screen adaptations requires from an owner creativity and fresh thinking. Experienced developers and designers created some extraordinary, stylish and responsive designs for websites dedicated to different needs and business niches. All of them feature:

  • a catchy, rich in contrast overall website appearance with mainly dark colors (black, grey, deep red, brown, navy blue, etc);
  • effective backgrounds with animation;
  • typography that makes much of an impression;
  • something extraordinary that grabs attention at a glance;
  • a barely visible barrier between the reality and fiction.

Take a closer look at the collection of 10 art wp themes which design reflects different Stephen King’s stories.

It
Details |  Demo

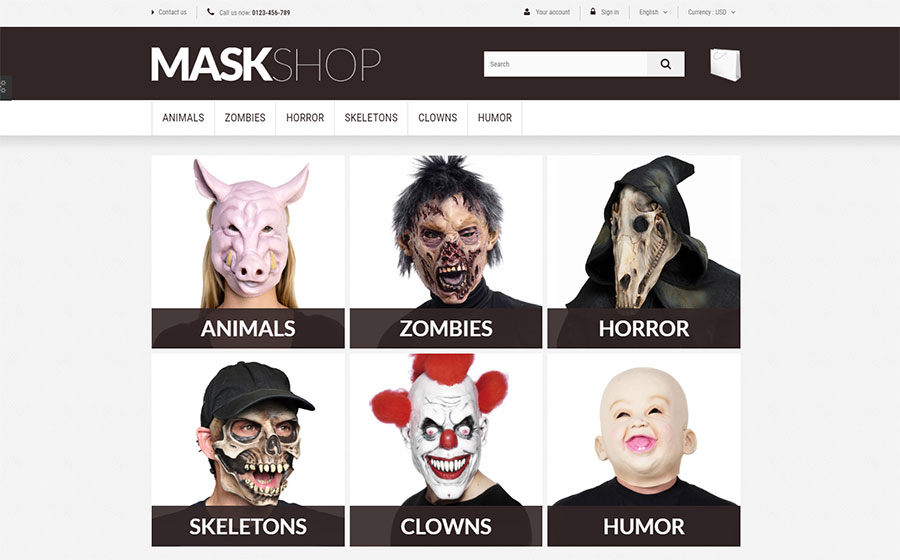
Pennywise the Clown invites you with this full of horror MaskShop. This theme suits any commercial purposes to sell masquerade masks and other horror-related items. Alongside formidable appearance, the website template boasts a number of usable features like:

  • the ability to alter color of the layout with a single click;
  • attention-grabbing slider on the homepage;
  • a responsive design that flows effortless on any device;
  • a feature-rich footer with social media integration.

Christine

Details |  Demo

Do you think this extravagant red car is possessed by the evil spirit? Of course, no it isn’t. However, looking at the design of Drivous WordPress theme, King’s Christine comes back. As for the website template, it has nothing connected with spirits. But it includes all the possible options and tools to provide a powerful website:

  • a variety of header/footer styles to choose from;
  • handy Cherry plugins to enhance your site’s functionality;
  • a clean and well-commented code;
  • 4 stunning blog layouts to keep your customers regularly updated.

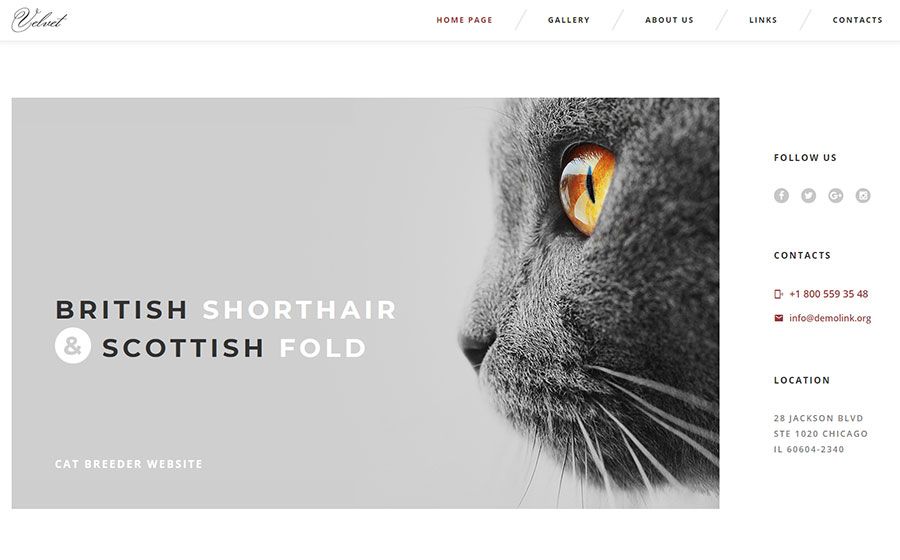
Cat’s Eye
Details |  Demo

Do you remember an excellent acting of Drew Barrymore in King’s Cat’s Eye? She even was nominated for the Young Artists Award for her fascinating performance. If you remember this anthology movie, you will find out absolute likeness with Velvet template design. This business niche comes with the multipurpose Intense package and boasts:

  • a clean and minimalistic design;
  • alluring gallery and other visual effects;
  • multiple custom widgets like Google maps, social media integration, etc;
  • e-commerce options for running a solid e-store.

The Running Man

Details |  Demo

Let’s start our own game with Fastek design, which resembles Stephen King’s runner from The Running Man. This WordPress theme will serve as a feature-rich platform for setting up a coaching online project. In addition to the affordable price, you get a comprehensive pack of necessary options:

  • the ability to build any page up to your needs effortless;
  • a simple and fast 5-mins installation;
  • the ability to modify page structures;
  • a useful Timetable plugin incorporated.

The Green Mile

Details |  Demo

The Green Mile

Do you remember unequalled performance of Tom Hanks in The Green Mile? That story fired imagination and made attentively watch the development of King’s plot. No doubt, the developers were inspired by this story when they were crafting Police Department template.

  • a comfortable drag-n-drop builder;
  • effective background options;
  • a user-friendly navigation in combination with the extensive menu possibilities;
  • Multilanguage support.

The Shawshank Redemption

Details |  Demo

One of the most inspirational and life-affirming Hollywood products, The Shawshank Redemption found inspired Zemez development team to produce Shieldon. This mobile-friendly theme with a reliable and up-to-date design completely meets all the requirements of modern web development.

  • a built-in library with your favorite layouts;
  • multiple content types: buttons, tables, sliders, etc;
  • various possibilities to display content and build a strong online presence;
  • easy-customizable components with the Live Customizer tool.

The Shining

Details |  Demo

This fact about The Shining you never knew: there was a really haunted hotel! The Stanley Hotel inspired The Shining, its prequel The Overlook Hotel, and even developers to craft a hotel-related theme – Modern. Don’t worry, your website based on this creative template will be without ghosts fortunately. Instead of King’s evil spirits, the template contains:

  • a charming, elegant, and trustworthy design;
  • rich user interface kit;
  • more than 40 ready-to-use HTML5 pages;
  • various header and footer variants up to your taste.

Firestarter

Details |  Demo

What do you think when you are sitting in front of fire and staring into the flames? Some people go back to 1984 when King’s Firestarter hit the screen. MotoCMS designers were also inspired by themovie’s special effects and surprisingly perfect Drew Barrymore’s performance. They created this stunning website template – React:

  • the ability to turn the Multilanguage option;
  • various gallery scripts;
  • multiple media integrations;
  • a feature-rich footer style with usable custom widgets.

Kingdom Hospital

Details |  Demo

Some like watching nerve-wracking King’s adaptations like Kingdom Hospital while others are looking for a powerful template for their medical website. BeClinic is a great all-in-one solution for any medical online project since the theme includes:

  • loads of live demos for any medical needs;
  • an elegant, trustworthy, and modern appearance with multiple custom widgets;
  • extra flexible Elementor Page builder to create dazzling layouts;
  • pre-made pages for all occasions.

The Langoliers

Details |  Demo

During a red-eye flight from the screened King’s novel The Langoliers most of the passengers and crew members mysteriously disappear. Cargo Express HTML5 template’s design greatly reminds of this horror movie but this is one and only similarity between them. The template is aimed to establish a feature-rich, effective and forward looking delivery service on the web.

  • multiple HTML5 pages;
  • user-friendly navigation with numerous handy options and extensive menu;
  • search engine optimized code;
  • complete crossbrowser compatibility.

Stephen King’s masterpieces can inspire even web design developers to create impressive and attention-grabbing products. This collection of templates completely proves this statement. Whichever purpose of your online project is, you can run it using one of this layouts effortless. Horror and mystery stay just in King’s novels and movies while the website templates promise flourishing online business projects.

Moving Backgrounds With Mouse Position

Post pobrano z: Moving Backgrounds With Mouse Position

Let’s say you wanted to move the background-position on an element as you mouse over it to give the design a little pizzazz. You have an element like this:

<div class="module" id="module"></div>

And you toss a background on it:

.module {
  background-image: url(big-image.jpg);
}

You can adjust the background-position in JavaScript like this:

const el = document.querySelector("#module");

el.addEventListener("mousemove", (e) => {
  el.style.backgroundPositionX = -e.offsetX + "px";
  el.style.backgroundPositionY = -e.offsetY + "px";
});

See the Pen Move a background with mouse by Chris Coyier (@chriscoyier) on CodePen.

Or, you could update CSS custom properties in the JavaScript instead:

const el = document.querySelector("#module");

el.addEventListener("mousemove", (e) => {
  el.style.setProperty('--x', -e.offsetX + "px");
  el.style.setProperty('--y', -e.offsetY + "px");
});
.module {
  --x: 0px;
  --y: 0px;
  background-image: url(large-image.jpg);
  background-position: var(--x) var(--y);
}

See the Pen Move a background with mouse by Chris Coyier (@chriscoyier) on CodePen.

Here’s an example that moves the background directly in JavaScript, but with a transition applied so it slides to the new position rather than jerking around the first time you enter:

See the Pen Movable Background Ad by Chris Coyier (@chriscoyier) on CodePen.

Or, you could move an actual element instead (rather than the background-position). You’d do this if there is some kind of content or interactivity on the sliding element. Here’s an example of that, which sets CSS custom properties again, but then actually moves the element via a CSS translate() and a calc() to temper the speed.

See the Pen Hotjar Moving Heatmap Ad by Chris Coyier (@chriscoyier) on CodePen.

I’m sure there are loads of other ways to do this — a moving SVG viewBox, scripts controlling a canvas, webGL… who knows! If you have some fancier ways to handle this, link ’em up in the comments.

The post Moving Backgrounds With Mouse Position appeared first on CSS-Tricks.

How to Paint Natural, Afro Textured Hair in Adobe Photoshop

Post pobrano z: How to Paint Natural, Afro Textured Hair in Adobe Photoshop

Final product image
What You’ll Be Creating

In this tutorial, we’re going to look at different ways of painting natural, afro textured hair in Adobe Photoshop. We’ll create a trio portrait, with each subject’s hair drawing inspiration from different hair types. 

Before diving into this lesson, check out the previous two tutorials in this series:

1. How to Set Up Your File

Step 1

First, create a New Document. I like to work at a print-appropriate resolution, but choose a size that is appropriate for your goals. In this case, I’m working at 17 inches by 11 inches, at 300 dpi.

Example of New Document window

Step 2

Before we begin to draw, I would recommend reviewing your Brush Settings. Photoshop’s default Brushes sometimes yield less than desirable results, if you’re looking for the kind of sensitivity you may be used to seeing when using a standard pencil or brush.

To open your Brush Settings, go to Window > Brush.

Under the Transfer tab, make sure that Opacity Jitter and Flow Jitter are set to Pen Pressure

Example of Brush Settings

Step 3

I would also recommend keeping an eye on your Opacity and Flow in your Options Panel. With the Brush Tool selected, you’ll see options that look like the screenshot below.

Adjust the Opacity and Flow to your liking as you draw and paint. Keep in mind that Opacity refers to the amount of transparency in your stroke. Flow is in reference to how much color „comes out” of your stroke.

Example of Options Panel

2. How to Create the Initial Artwork

Step 1

On a New Layer, begin to lay out your composition. I’m going to draw a portrait of three people, so we can experiment with rendering three different hair „types”: 4A, 4B, and 4C. They are the three coily hair types generally included in the Andre Walker Hair Typing System. While this system is not without its flaws (and valid criticisms), we’ll use it as a visual starting point.

Keep in mind that people, in general, do not usually fit into perfect categories. We’re all unique and beautiful in our own way—and that includes our hair! You may find that some people have combination hair or traits of more than one type. When in doubt, take a look at references! This is not a rigid rule book, but rather an example of how these qualities can be visually interpreted. 

Using a Hard Round Brush, begin to establish the basic facial structure and where you would like the hair to sit on the head. I’m going to work with hair generally inspired by 4A, 4B, and 4C curls, in that order. 

Initial sketch example

Step 2

Once I’m happy with my initial composition, I like to create a New Layer and refine my work. Notice how I kept my initial sketch visible, as a reference. Again, I largely utilize a Hard Round Brush with Pen Pressure sensitivity on for both my Opacity and Flow

One key tip—keep in mind that the hair here is not straight. Therefore, I generally like to avoid straight lines. Curved, varied lines will often make for a more organic aesthetic.

Want more insights on drawing this hair type? I would recommend taking a look at my How to Draw Natural, Textured Afro Hair (How to Draw Curly Hair) tutorial.

Example of refined lines over sketch

Step 3

When it comes to my initial colors, I like to place the colors on top, on a New Layer. Set this Layer’s Blending Mode to Multiply. Notice how the applied color affects the initial line art. I like to start with a single, flat color for each subject in this phase.

Example of initial flat color

Step 4

Then, on a New Layer acting as a Clipping Mask, apply color variation where applicable. Notice that because we defined a specific area for our color in the previous step, we can’t color outside of this area now.

Colors added with Clipping Masks

Step 5

I use a similar method to place my initial shadows. Create a New Layer, and set it as a Clipping Mask. Set this Layer’s Blending Mode to Multiply, and then experiment with where you would like your shadows to be in the composition. I decided to place my light source on the viewer’s left-hand side.

Values added with Clipping Mask

Step 6

At this point, I like to refine my work by painting on top of it. However, the focus of this tutorial is on the hair specifically, so we won’t spend too much time on rendering the other parts of the composition.

If you would, however, like to review this part of my process, you can check out some of my other tutorials, where I go through this in detail:

When painting on top of the base composition I’ve created, I largely use a Soft Round Brush and a Hard Round Brush. We’ll jump ahead to my rendered work and focus on the hair.

Example of rendered illustration without hair completed

3. How to Paint Type 4A Hair

Step 1

Let’s start with the subject on the viewer’s left. My intention is to give this subject’s hair qualities that are often associated with Type 4A. These coils can have a visible curl pattern, so we’ll work with that aesthetic here.

Note that I often do a lot of drawing on the same Layer—but if you are feeling less confident and/or want to preserve your work, you may want to use a New Layer for each step.

Using a Hard Round Brush, alter the Opacity so it is around 80%. Then, begin to add varied lines, starting from the hairline. They should be darker than the hair’s base color. 

Adding dark values at the hair line

Step 2

Lower the Opacity on your Hard Round Brush even more—around 70% will do. 

Begin to layer lighter colors in a spiral pattern. It doesn’t have to be perfect—we’re just establishing some texture and flow here. Note that while the pattern is a little abstract, the movement is not. The hair has a distinct direction on the head.

I also used this same, darker color, to add some variety to the hairline, so it looks more organic.

Establishing pattern

Step 3

As we continue to layer color on the hair, make your Brush Size smaller. I alternated between dark and light colors here, again using a Hard Round Brush.

Adding refinements

Step 4

Then, I created a New Layer and set it to Multiply, so I could bring back some of those dark values in the hairline area. 

Adding dark values to the hair line area

Step 5

Now, switch to a Soft Round Brush. Keep its size small, and add small variations and curls. If you notice a space that seems unnatural or out of place, you can also use this Brush for blending. 

Remember, you can alter your Opacity and Flow—in my opinion, this is often crucial in getting the line transparency and sensitivity you want.

Additional refinements with a Soft Round Brush

Step 6

Finally, I added some variation to the outermost contours of the hair. The edges looked a little too perfect—so stray hairs and extra curls can help make things look more natural. I achieved this with a Hard Round Brush.

Variation added to make things look more organic

4. How to Paint Type 4B Hair

Step 1

The center subject’s hair is going to draw inspiration from 4B hair qualities. 4Bs and 4Cs tend to have very dense curls with a lot of shrinkage. Many who have this hair type do not have a visible curl pattern, like 4As.

The difference is in the density; 4B coils are generally a little looser than 4Cs. 

I started with a Hard Round Brush. Similar to how we started with the previous subject, I added some darker values to begin to establish some depth.

Darker values added

Step 2

Then, layer on lighter colors. In this case, I like to use a Custom Brush, but you could use a Hard Round Brush and a Soft Round Brush with lowered Opacity

If you’d like more info on my Custom Brush, I created one, step by step, in my How to Draw & Paint a Galaxy Afro Portrait in Adobe Photoshop tutorial.

Remember to keep the light source in mind. I like to work in large, pillowy shapes. 

Lighter values added on top

Step 3

Then, I went in and added some additional definition to the darker areas in the hairline. My process is very much about layering colors and decreasing the size of the Brush each time I do so.

Further establishing the way the hair flows on the head

Step 4 

Note how the color placement follows the movement of the hair. It isn’t haphazard. In layering colors, darker values peek out from behind the lighter ones too, helping to further visually convey depth.

Light values layered on top

Step 5

To put the finishing touches on this, I made some edits to the outermost contours of the hair. I added variation here with a Hard Round Eraser, but the varied lines were inspired by the shapes I created within the hair. 

I also added some tiny tufts on the front because it looks cute! It’s as simple as using the Eyedropper Tool to grab the dark color and then the light color. Layer them just as we did the rest of the hair. 

Final refinements

5. How to Paint Type 4C Hair

Step 1

And now for the character on the viewer’s right, with hair inspired by 4C qualities. I want this afro to look thick and gorgeous, with minimal curl pattern. 

Similar to the center subject, I started with darker values to help define the dimensional qualities of the hair. 

Initial dark values added

Step 2

Layer on large clumps of lighter values. Again, the same Brushes apply from the previous subject. You can stick with a Hard Round Brush, or try using a custom one that has a little texture to it. 

Light values layered on top

Step 3

Again, when layering color like this, I recommend decreasing the Brush Size. Notice in this case, however, that there’s less of a pattern. I want an aesthetic that looks soft and unified.

Example of continuation of layered color

Step 4 

Continue to layer colors. I generally like to alternate between light and dark values; I like to use the Eyedropper Tool to „pick up” colors in the local area, where I’m painting. I find that it makes blending and choosing the right colors easier.

In addition, some variation in the hairline will make for a more natural look, similar to the previous two subjects.

Additional refinements

Step 5

Finally, I adjusted the outermost contours of the hair using a Hard Round Eraser. In this case, I wanted the shape of the hair to stay more unified and less divided, to help further visually illustrate the thickness and density of the hair.

Variation in outer contours

6. Add the Finishing Touches

Step 1

Now that I’ve rendered the hair on all three subjects, I decided I wanted to push the shadows further.

I created a New Layer and set its Blending Mode to Multiply. Make this Layer a Clipping Mask, and then apply these additional values. I used a light pinkish color.

Additional shadows added

Step 2

While the focus of this tutorial is not the background, I still wanted to do something visually interesting with it. I used a Hard Round Brush and drew some directional lines in various sizes. No need for perfectionism here—I just had fun drawing zigzags!

Lines added to background

Step 3

Then, to give the background some varied color, I locked this layer and used a Soft Round Brush to apply color. The colors were inspired by the subjects’ shirts, using the Eyedropper Tool.

Background color applied

And There You Have It!

We’ve explored three different ways one could potentially paint natural, afro textured hair—inspired by 4A, 4B, and 4C! Remember, regardless of the „type”, hair comes in all sorts of wonderful varieties. When in doubt, look at references!

Happy painting! 

The Finished Illustration

How to Paint Natural, Afro Textured Hair in Adobe Photoshop

Post pobrano z: How to Paint Natural, Afro Textured Hair in Adobe Photoshop

Final product image
What You’ll Be Creating

In this tutorial, we’re going to look at different ways of painting natural, afro textured hair in Adobe Photoshop. We’ll create a trio portrait, with each subject’s hair drawing inspiration from different hair types. 

Before diving into this lesson, check out the previous two tutorials in this series:

1. How to Set Up Your File

Step 1

First, create a New Document. I like to work at a print-appropriate resolution, but choose a size that is appropriate for your goals. In this case, I’m working at 17 inches by 11 inches, at 300 dpi.

Example of New Document window

Step 2

Before we begin to draw, I would recommend reviewing your Brush Settings. Photoshop’s default Brushes sometimes yield less than desirable results, if you’re looking for the kind of sensitivity you may be used to seeing when using a standard pencil or brush.

To open your Brush Settings, go to Window > Brush.

Under the Transfer tab, make sure that Opacity Jitter and Flow Jitter are set to Pen Pressure

Example of Brush Settings

Step 3

I would also recommend keeping an eye on your Opacity and Flow in your Options Panel. With the Brush Tool selected, you’ll see options that look like the screenshot below.

Adjust the Opacity and Flow to your liking as you draw and paint. Keep in mind that Opacity refers to the amount of transparency in your stroke. Flow is in reference to how much color „comes out” of your stroke.

Example of Options Panel

2. How to Create the Initial Artwork

Step 1

On a New Layer, begin to lay out your composition. I’m going to draw a portrait of three people, so we can experiment with rendering three different hair „types”: 4A, 4B, and 4C. They are the three coily hair types generally included in the Andre Walker Hair Typing System. While this system is not without its flaws (and valid criticisms), we’ll use it as a visual starting point.

Keep in mind that people, in general, do not usually fit into perfect categories. We’re all unique and beautiful in our own way—and that includes our hair! You may find that some people have combination hair or traits of more than one type. When in doubt, take a look at references! This is not a rigid rule book, but rather an example of how these qualities can be visually interpreted. 

Using a Hard Round Brush, begin to establish the basic facial structure and where you would like the hair to sit on the head. I’m going to work with hair generally inspired by 4A, 4B, and 4C curls, in that order. 

Initial sketch example

Step 2

Once I’m happy with my initial composition, I like to create a New Layer and refine my work. Notice how I kept my initial sketch visible, as a reference. Again, I largely utilize a Hard Round Brush with Pen Pressure sensitivity on for both my Opacity and Flow

One key tip—keep in mind that the hair here is not straight. Therefore, I generally like to avoid straight lines. Curved, varied lines will often make for a more organic aesthetic.

Want more insights on drawing this hair type? I would recommend taking a look at my How to Draw Natural, Textured Afro Hair (How to Draw Curly Hair) tutorial.

Example of refined lines over sketch

Step 3

When it comes to my initial colors, I like to place the colors on top, on a New Layer. Set this Layer’s Blending Mode to Multiply. Notice how the applied color affects the initial line art. I like to start with a single, flat color for each subject in this phase.

Example of initial flat color

Step 4

Then, on a New Layer acting as a Clipping Mask, apply color variation where applicable. Notice that because we defined a specific area for our color in the previous step, we can’t color outside of this area now.

Colors added with Clipping Masks

Step 5

I use a similar method to place my initial shadows. Create a New Layer, and set it as a Clipping Mask. Set this Layer’s Blending Mode to Multiply, and then experiment with where you would like your shadows to be in the composition. I decided to place my light source on the viewer’s left-hand side.

Values added with Clipping Mask

Step 6

At this point, I like to refine my work by painting on top of it. However, the focus of this tutorial is on the hair specifically, so we won’t spend too much time on rendering the other parts of the composition.

If you would, however, like to review this part of my process, you can check out some of my other tutorials, where I go through this in detail:

When painting on top of the base composition I’ve created, I largely use a Soft Round Brush and a Hard Round Brush. We’ll jump ahead to my rendered work and focus on the hair.

Example of rendered illustration without hair completed

3. How to Paint Type 4A Hair

Step 1

Let’s start with the subject on the viewer’s left. My intention is to give this subject’s hair qualities that are often associated with Type 4A. These coils can have a visible curl pattern, so we’ll work with that aesthetic here.

Note that I often do a lot of drawing on the same Layer—but if you are feeling less confident and/or want to preserve your work, you may want to use a New Layer for each step.

Using a Hard Round Brush, alter the Opacity so it is around 80%. Then, begin to add varied lines, starting from the hairline. They should be darker than the hair’s base color. 

Adding dark values at the hair line

Step 2

Lower the Opacity on your Hard Round Brush even more—around 70% will do. 

Begin to layer lighter colors in a spiral pattern. It doesn’t have to be perfect—we’re just establishing some texture and flow here. Note that while the pattern is a little abstract, the movement is not. The hair has a distinct direction on the head.

I also used this same, darker color, to add some variety to the hairline, so it looks more organic.

Establishing pattern

Step 3

As we continue to layer color on the hair, make your Brush Size smaller. I alternated between dark and light colors here, again using a Hard Round Brush.

Adding refinements

Step 4

Then, I created a New Layer and set it to Multiply, so I could bring back some of those dark values in the hairline area. 

Adding dark values to the hair line area

Step 5

Now, switch to a Soft Round Brush. Keep its size small, and add small variations and curls. If you notice a space that seems unnatural or out of place, you can also use this Brush for blending. 

Remember, you can alter your Opacity and Flow—in my opinion, this is often crucial in getting the line transparency and sensitivity you want.

Additional refinements with a Soft Round Brush

Step 6

Finally, I added some variation to the outermost contours of the hair. The edges looked a little too perfect—so stray hairs and extra curls can help make things look more natural. I achieved this with a Hard Round Brush.

Variation added to make things look more organic

4. How to Paint Type 4B Hair

Step 1

The center subject’s hair is going to draw inspiration from 4B hair qualities. 4Bs and 4Cs tend to have very dense curls with a lot of shrinkage. Many who have this hair type do not have a visible curl pattern, like 4As.

The difference is in the density; 4B coils are generally a little looser than 4Cs. 

I started with a Hard Round Brush. Similar to how we started with the previous subject, I added some darker values to begin to establish some depth.

Darker values added

Step 2

Then, layer on lighter colors. In this case, I like to use a Custom Brush, but you could use a Hard Round Brush and a Soft Round Brush with lowered Opacity

If you’d like more info on my Custom Brush, I created one, step by step, in my How to Draw & Paint a Galaxy Afro Portrait in Adobe Photoshop tutorial.

Remember to keep the light source in mind. I like to work in large, pillowy shapes. 

Lighter values added on top

Step 3

Then, I went in and added some additional definition to the darker areas in the hairline. My process is very much about layering colors and decreasing the size of the Brush each time I do so.

Further establishing the way the hair flows on the head

Step 4 

Note how the color placement follows the movement of the hair. It isn’t haphazard. In layering colors, darker values peek out from behind the lighter ones too, helping to further visually convey depth.

Light values layered on top

Step 5

To put the finishing touches on this, I made some edits to the outermost contours of the hair. I added variation here with a Hard Round Eraser, but the varied lines were inspired by the shapes I created within the hair. 

I also added some tiny tufts on the front because it looks cute! It’s as simple as using the Eyedropper Tool to grab the dark color and then the light color. Layer them just as we did the rest of the hair. 

Final refinements

5. How to Paint Type 4C Hair

Step 1

And now for the character on the viewer’s right, with hair inspired by 4C qualities. I want this afro to look thick and gorgeous, with minimal curl pattern. 

Similar to the center subject, I started with darker values to help define the dimensional qualities of the hair. 

Initial dark values added

Step 2

Layer on large clumps of lighter values. Again, the same Brushes apply from the previous subject. You can stick with a Hard Round Brush, or try using a custom one that has a little texture to it. 

Light values layered on top

Step 3

Again, when layering color like this, I recommend decreasing the Brush Size. Notice in this case, however, that there’s less of a pattern. I want an aesthetic that looks soft and unified.

Example of continuation of layered color

Step 4 

Continue to layer colors. I generally like to alternate between light and dark values; I like to use the Eyedropper Tool to „pick up” colors in the local area, where I’m painting. I find that it makes blending and choosing the right colors easier.

In addition, some variation in the hairline will make for a more natural look, similar to the previous two subjects.

Additional refinements

Step 5

Finally, I adjusted the outermost contours of the hair using a Hard Round Eraser. In this case, I wanted the shape of the hair to stay more unified and less divided, to help further visually illustrate the thickness and density of the hair.

Variation in outer contours

6. Add the Finishing Touches

Step 1

Now that I’ve rendered the hair on all three subjects, I decided I wanted to push the shadows further.

I created a New Layer and set its Blending Mode to Multiply. Make this Layer a Clipping Mask, and then apply these additional values. I used a light pinkish color.

Additional shadows added

Step 2

While the focus of this tutorial is not the background, I still wanted to do something visually interesting with it. I used a Hard Round Brush and drew some directional lines in various sizes. No need for perfectionism here—I just had fun drawing zigzags!

Lines added to background

Step 3

Then, to give the background some varied color, I locked this layer and used a Soft Round Brush to apply color. The colors were inspired by the subjects’ shirts, using the Eyedropper Tool.

Background color applied

And There You Have It!

We’ve explored three different ways one could potentially paint natural, afro textured hair—inspired by 4A, 4B, and 4C! Remember, regardless of the „type”, hair comes in all sorts of wonderful varieties. When in doubt, look at references!

Happy painting! 

The Finished Illustration

How to Paint Natural, Afro Textured Hair in Adobe Photoshop

Post pobrano z: How to Paint Natural, Afro Textured Hair in Adobe Photoshop

Final product image
What You’ll Be Creating

In this tutorial, we’re going to look at different ways of painting natural, afro textured hair in Adobe Photoshop. We’ll create a trio portrait, with each subject’s hair drawing inspiration from different hair types. 

Before diving into this lesson, check out the previous two tutorials in this series:

1. How to Set Up Your File

Step 1

First, create a New Document. I like to work at a print-appropriate resolution, but choose a size that is appropriate for your goals. In this case, I’m working at 17 inches by 11 inches, at 300 dpi.

Example of New Document window

Step 2

Before we begin to draw, I would recommend reviewing your Brush Settings. Photoshop’s default Brushes sometimes yield less than desirable results, if you’re looking for the kind of sensitivity you may be used to seeing when using a standard pencil or brush.

To open your Brush Settings, go to Window > Brush.

Under the Transfer tab, make sure that Opacity Jitter and Flow Jitter are set to Pen Pressure

Example of Brush Settings

Step 3

I would also recommend keeping an eye on your Opacity and Flow in your Options Panel. With the Brush Tool selected, you’ll see options that look like the screenshot below.

Adjust the Opacity and Flow to your liking as you draw and paint. Keep in mind that Opacity refers to the amount of transparency in your stroke. Flow is in reference to how much color „comes out” of your stroke.

Example of Options Panel

2. How to Create the Initial Artwork

Step 1

On a New Layer, begin to lay out your composition. I’m going to draw a portrait of three people, so we can experiment with rendering three different hair „types”: 4A, 4B, and 4C. They are the three coily hair types generally included in the Andre Walker Hair Typing System. While this system is not without its flaws (and valid criticisms), we’ll use it as a visual starting point.

Keep in mind that people, in general, do not usually fit into perfect categories. We’re all unique and beautiful in our own way—and that includes our hair! You may find that some people have combination hair or traits of more than one type. When in doubt, take a look at references! This is not a rigid rule book, but rather an example of how these qualities can be visually interpreted. 

Using a Hard Round Brush, begin to establish the basic facial structure and where you would like the hair to sit on the head. I’m going to work with hair generally inspired by 4A, 4B, and 4C curls, in that order. 

Initial sketch example

Step 2

Once I’m happy with my initial composition, I like to create a New Layer and refine my work. Notice how I kept my initial sketch visible, as a reference. Again, I largely utilize a Hard Round Brush with Pen Pressure sensitivity on for both my Opacity and Flow

One key tip—keep in mind that the hair here is not straight. Therefore, I generally like to avoid straight lines. Curved, varied lines will often make for a more organic aesthetic.

Want more insights on drawing this hair type? I would recommend taking a look at my How to Draw Natural, Textured Afro Hair (How to Draw Curly Hair) tutorial.

Example of refined lines over sketch

Step 3

When it comes to my initial colors, I like to place the colors on top, on a New Layer. Set this Layer’s Blending Mode to Multiply. Notice how the applied color affects the initial line art. I like to start with a single, flat color for each subject in this phase.

Example of initial flat color

Step 4

Then, on a New Layer acting as a Clipping Mask, apply color variation where applicable. Notice that because we defined a specific area for our color in the previous step, we can’t color outside of this area now.

Colors added with Clipping Masks

Step 5

I use a similar method to place my initial shadows. Create a New Layer, and set it as a Clipping Mask. Set this Layer’s Blending Mode to Multiply, and then experiment with where you would like your shadows to be in the composition. I decided to place my light source on the viewer’s left-hand side.

Values added with Clipping Mask

Step 6

At this point, I like to refine my work by painting on top of it. However, the focus of this tutorial is on the hair specifically, so we won’t spend too much time on rendering the other parts of the composition.

If you would, however, like to review this part of my process, you can check out some of my other tutorials, where I go through this in detail:

When painting on top of the base composition I’ve created, I largely use a Soft Round Brush and a Hard Round Brush. We’ll jump ahead to my rendered work and focus on the hair.

Example of rendered illustration without hair completed

3. How to Paint Type 4A Hair

Step 1

Let’s start with the subject on the viewer’s left. My intention is to give this subject’s hair qualities that are often associated with Type 4A. These coils can have a visible curl pattern, so we’ll work with that aesthetic here.

Note that I often do a lot of drawing on the same Layer—but if you are feeling less confident and/or want to preserve your work, you may want to use a New Layer for each step.

Using a Hard Round Brush, alter the Opacity so it is around 80%. Then, begin to add varied lines, starting from the hairline. They should be darker than the hair’s base color. 

Adding dark values at the hair line

Step 2

Lower the Opacity on your Hard Round Brush even more—around 70% will do. 

Begin to layer lighter colors in a spiral pattern. It doesn’t have to be perfect—we’re just establishing some texture and flow here. Note that while the pattern is a little abstract, the movement is not. The hair has a distinct direction on the head.

I also used this same, darker color, to add some variety to the hairline, so it looks more organic.

Establishing pattern

Step 3

As we continue to layer color on the hair, make your Brush Size smaller. I alternated between dark and light colors here, again using a Hard Round Brush.

Adding refinements

Step 4

Then, I created a New Layer and set it to Multiply, so I could bring back some of those dark values in the hairline area. 

Adding dark values to the hair line area

Step 5

Now, switch to a Soft Round Brush. Keep its size small, and add small variations and curls. If you notice a space that seems unnatural or out of place, you can also use this Brush for blending. 

Remember, you can alter your Opacity and Flow—in my opinion, this is often crucial in getting the line transparency and sensitivity you want.

Additional refinements with a Soft Round Brush

Step 6

Finally, I added some variation to the outermost contours of the hair. The edges looked a little too perfect—so stray hairs and extra curls can help make things look more natural. I achieved this with a Hard Round Brush.

Variation added to make things look more organic

4. How to Paint Type 4B Hair

Step 1

The center subject’s hair is going to draw inspiration from 4B hair qualities. 4Bs and 4Cs tend to have very dense curls with a lot of shrinkage. Many who have this hair type do not have a visible curl pattern, like 4As.

The difference is in the density; 4B coils are generally a little looser than 4Cs. 

I started with a Hard Round Brush. Similar to how we started with the previous subject, I added some darker values to begin to establish some depth.

Darker values added

Step 2

Then, layer on lighter colors. In this case, I like to use a Custom Brush, but you could use a Hard Round Brush and a Soft Round Brush with lowered Opacity

If you’d like more info on my Custom Brush, I created one, step by step, in my How to Draw & Paint a Galaxy Afro Portrait in Adobe Photoshop tutorial.

Remember to keep the light source in mind. I like to work in large, pillowy shapes. 

Lighter values added on top

Step 3

Then, I went in and added some additional definition to the darker areas in the hairline. My process is very much about layering colors and decreasing the size of the Brush each time I do so.

Further establishing the way the hair flows on the head

Step 4 

Note how the color placement follows the movement of the hair. It isn’t haphazard. In layering colors, darker values peek out from behind the lighter ones too, helping to further visually convey depth.

Light values layered on top

Step 5

To put the finishing touches on this, I made some edits to the outermost contours of the hair. I added variation here with a Hard Round Eraser, but the varied lines were inspired by the shapes I created within the hair. 

I also added some tiny tufts on the front because it looks cute! It’s as simple as using the Eyedropper Tool to grab the dark color and then the light color. Layer them just as we did the rest of the hair. 

Final refinements

5. How to Paint Type 4C Hair

Step 1

And now for the character on the viewer’s right, with hair inspired by 4C qualities. I want this afro to look thick and gorgeous, with minimal curl pattern. 

Similar to the center subject, I started with darker values to help define the dimensional qualities of the hair. 

Initial dark values added

Step 2

Layer on large clumps of lighter values. Again, the same Brushes apply from the previous subject. You can stick with a Hard Round Brush, or try using a custom one that has a little texture to it. 

Light values layered on top

Step 3

Again, when layering color like this, I recommend decreasing the Brush Size. Notice in this case, however, that there’s less of a pattern. I want an aesthetic that looks soft and unified.

Example of continuation of layered color

Step 4 

Continue to layer colors. I generally like to alternate between light and dark values; I like to use the Eyedropper Tool to „pick up” colors in the local area, where I’m painting. I find that it makes blending and choosing the right colors easier.

In addition, some variation in the hairline will make for a more natural look, similar to the previous two subjects.

Additional refinements

Step 5

Finally, I adjusted the outermost contours of the hair using a Hard Round Eraser. In this case, I wanted the shape of the hair to stay more unified and less divided, to help further visually illustrate the thickness and density of the hair.

Variation in outer contours

6. Add the Finishing Touches

Step 1

Now that I’ve rendered the hair on all three subjects, I decided I wanted to push the shadows further.

I created a New Layer and set its Blending Mode to Multiply. Make this Layer a Clipping Mask, and then apply these additional values. I used a light pinkish color.

Additional shadows added

Step 2

While the focus of this tutorial is not the background, I still wanted to do something visually interesting with it. I used a Hard Round Brush and drew some directional lines in various sizes. No need for perfectionism here—I just had fun drawing zigzags!

Lines added to background

Step 3

Then, to give the background some varied color, I locked this layer and used a Soft Round Brush to apply color. The colors were inspired by the subjects’ shirts, using the Eyedropper Tool.

Background color applied

And There You Have It!

We’ve explored three different ways one could potentially paint natural, afro textured hair—inspired by 4A, 4B, and 4C! Remember, regardless of the „type”, hair comes in all sorts of wonderful varieties. When in doubt, look at references!

Happy painting! 

The Finished Illustration

How to Paint Natural, Afro Textured Hair in Adobe Photoshop

Post pobrano z: How to Paint Natural, Afro Textured Hair in Adobe Photoshop

Final product image
What You’ll Be Creating

In this tutorial, we’re going to look at different ways of painting natural, afro textured hair in Adobe Photoshop. We’ll create a trio portrait, with each subject’s hair drawing inspiration from different hair types. 

Before diving into this lesson, check out the previous two tutorials in this series:

1. How to Set Up Your File

Step 1

First, create a New Document. I like to work at a print-appropriate resolution, but choose a size that is appropriate for your goals. In this case, I’m working at 17 inches by 11 inches, at 300 dpi.

Example of New Document window

Step 2

Before we begin to draw, I would recommend reviewing your Brush Settings. Photoshop’s default Brushes sometimes yield less than desirable results, if you’re looking for the kind of sensitivity you may be used to seeing when using a standard pencil or brush.

To open your Brush Settings, go to Window > Brush.

Under the Transfer tab, make sure that Opacity Jitter and Flow Jitter are set to Pen Pressure

Example of Brush Settings

Step 3

I would also recommend keeping an eye on your Opacity and Flow in your Options Panel. With the Brush Tool selected, you’ll see options that look like the screenshot below.

Adjust the Opacity and Flow to your liking as you draw and paint. Keep in mind that Opacity refers to the amount of transparency in your stroke. Flow is in reference to how much color „comes out” of your stroke.

Example of Options Panel

2. How to Create the Initial Artwork

Step 1

On a New Layer, begin to lay out your composition. I’m going to draw a portrait of three people, so we can experiment with rendering three different hair „types”: 4A, 4B, and 4C. They are the three coily hair types generally included in the Andre Walker Hair Typing System. While this system is not without its flaws (and valid criticisms), we’ll use it as a visual starting point.

Keep in mind that people, in general, do not usually fit into perfect categories. We’re all unique and beautiful in our own way—and that includes our hair! You may find that some people have combination hair or traits of more than one type. When in doubt, take a look at references! This is not a rigid rule book, but rather an example of how these qualities can be visually interpreted. 

Using a Hard Round Brush, begin to establish the basic facial structure and where you would like the hair to sit on the head. I’m going to work with hair generally inspired by 4A, 4B, and 4C curls, in that order. 

Initial sketch example

Step 2

Once I’m happy with my initial composition, I like to create a New Layer and refine my work. Notice how I kept my initial sketch visible, as a reference. Again, I largely utilize a Hard Round Brush with Pen Pressure sensitivity on for both my Opacity and Flow

One key tip—keep in mind that the hair here is not straight. Therefore, I generally like to avoid straight lines. Curved, varied lines will often make for a more organic aesthetic.

Want more insights on drawing this hair type? I would recommend taking a look at my How to Draw Natural, Textured Afro Hair (How to Draw Curly Hair) tutorial.

Example of refined lines over sketch

Step 3

When it comes to my initial colors, I like to place the colors on top, on a New Layer. Set this Layer’s Blending Mode to Multiply. Notice how the applied color affects the initial line art. I like to start with a single, flat color for each subject in this phase.

Example of initial flat color

Step 4

Then, on a New Layer acting as a Clipping Mask, apply color variation where applicable. Notice that because we defined a specific area for our color in the previous step, we can’t color outside of this area now.

Colors added with Clipping Masks

Step 5

I use a similar method to place my initial shadows. Create a New Layer, and set it as a Clipping Mask. Set this Layer’s Blending Mode to Multiply, and then experiment with where you would like your shadows to be in the composition. I decided to place my light source on the viewer’s left-hand side.

Values added with Clipping Mask

Step 6

At this point, I like to refine my work by painting on top of it. However, the focus of this tutorial is on the hair specifically, so we won’t spend too much time on rendering the other parts of the composition.

If you would, however, like to review this part of my process, you can check out some of my other tutorials, where I go through this in detail:

When painting on top of the base composition I’ve created, I largely use a Soft Round Brush and a Hard Round Brush. We’ll jump ahead to my rendered work and focus on the hair.

Example of rendered illustration without hair completed

3. How to Paint Type 4A Hair

Step 1

Let’s start with the subject on the viewer’s left. My intention is to give this subject’s hair qualities that are often associated with Type 4A. These coils can have a visible curl pattern, so we’ll work with that aesthetic here.

Note that I often do a lot of drawing on the same Layer—but if you are feeling less confident and/or want to preserve your work, you may want to use a New Layer for each step.

Using a Hard Round Brush, alter the Opacity so it is around 80%. Then, begin to add varied lines, starting from the hairline. They should be darker than the hair’s base color. 

Adding dark values at the hair line

Step 2

Lower the Opacity on your Hard Round Brush even more—around 70% will do. 

Begin to layer lighter colors in a spiral pattern. It doesn’t have to be perfect—we’re just establishing some texture and flow here. Note that while the pattern is a little abstract, the movement is not. The hair has a distinct direction on the head.

I also used this same, darker color, to add some variety to the hairline, so it looks more organic.

Establishing pattern

Step 3

As we continue to layer color on the hair, make your Brush Size smaller. I alternated between dark and light colors here, again using a Hard Round Brush.

Adding refinements

Step 4

Then, I created a New Layer and set it to Multiply, so I could bring back some of those dark values in the hairline area. 

Adding dark values to the hair line area

Step 5

Now, switch to a Soft Round Brush. Keep its size small, and add small variations and curls. If you notice a space that seems unnatural or out of place, you can also use this Brush for blending. 

Remember, you can alter your Opacity and Flow—in my opinion, this is often crucial in getting the line transparency and sensitivity you want.

Additional refinements with a Soft Round Brush

Step 6

Finally, I added some variation to the outermost contours of the hair. The edges looked a little too perfect—so stray hairs and extra curls can help make things look more natural. I achieved this with a Hard Round Brush.

Variation added to make things look more organic

4. How to Paint Type 4B Hair

Step 1

The center subject’s hair is going to draw inspiration from 4B hair qualities. 4Bs and 4Cs tend to have very dense curls with a lot of shrinkage. Many who have this hair type do not have a visible curl pattern, like 4As.

The difference is in the density; 4B coils are generally a little looser than 4Cs. 

I started with a Hard Round Brush. Similar to how we started with the previous subject, I added some darker values to begin to establish some depth.

Darker values added

Step 2

Then, layer on lighter colors. In this case, I like to use a Custom Brush, but you could use a Hard Round Brush and a Soft Round Brush with lowered Opacity

If you’d like more info on my Custom Brush, I created one, step by step, in my How to Draw & Paint a Galaxy Afro Portrait in Adobe Photoshop tutorial.

Remember to keep the light source in mind. I like to work in large, pillowy shapes. 

Lighter values added on top

Step 3

Then, I went in and added some additional definition to the darker areas in the hairline. My process is very much about layering colors and decreasing the size of the Brush each time I do so.

Further establishing the way the hair flows on the head

Step 4 

Note how the color placement follows the movement of the hair. It isn’t haphazard. In layering colors, darker values peek out from behind the lighter ones too, helping to further visually convey depth.

Light values layered on top

Step 5

To put the finishing touches on this, I made some edits to the outermost contours of the hair. I added variation here with a Hard Round Eraser, but the varied lines were inspired by the shapes I created within the hair. 

I also added some tiny tufts on the front because it looks cute! It’s as simple as using the Eyedropper Tool to grab the dark color and then the light color. Layer them just as we did the rest of the hair. 

Final refinements

5. How to Paint Type 4C Hair

Step 1

And now for the character on the viewer’s right, with hair inspired by 4C qualities. I want this afro to look thick and gorgeous, with minimal curl pattern. 

Similar to the center subject, I started with darker values to help define the dimensional qualities of the hair. 

Initial dark values added

Step 2

Layer on large clumps of lighter values. Again, the same Brushes apply from the previous subject. You can stick with a Hard Round Brush, or try using a custom one that has a little texture to it. 

Light values layered on top

Step 3

Again, when layering color like this, I recommend decreasing the Brush Size. Notice in this case, however, that there’s less of a pattern. I want an aesthetic that looks soft and unified.

Example of continuation of layered color

Step 4 

Continue to layer colors. I generally like to alternate between light and dark values; I like to use the Eyedropper Tool to „pick up” colors in the local area, where I’m painting. I find that it makes blending and choosing the right colors easier.

In addition, some variation in the hairline will make for a more natural look, similar to the previous two subjects.

Additional refinements

Step 5

Finally, I adjusted the outermost contours of the hair using a Hard Round Eraser. In this case, I wanted the shape of the hair to stay more unified and less divided, to help further visually illustrate the thickness and density of the hair.

Variation in outer contours

6. Add the Finishing Touches

Step 1

Now that I’ve rendered the hair on all three subjects, I decided I wanted to push the shadows further.

I created a New Layer and set its Blending Mode to Multiply. Make this Layer a Clipping Mask, and then apply these additional values. I used a light pinkish color.

Additional shadows added

Step 2

While the focus of this tutorial is not the background, I still wanted to do something visually interesting with it. I used a Hard Round Brush and drew some directional lines in various sizes. No need for perfectionism here—I just had fun drawing zigzags!

Lines added to background

Step 3

Then, to give the background some varied color, I locked this layer and used a Soft Round Brush to apply color. The colors were inspired by the subjects’ shirts, using the Eyedropper Tool.

Background color applied

And There You Have It!

We’ve explored three different ways one could potentially paint natural, afro textured hair—inspired by 4A, 4B, and 4C! Remember, regardless of the „type”, hair comes in all sorts of wonderful varieties. When in doubt, look at references!

Happy painting! 

The Finished Illustration

Agregator najlepszych postów o designie, webdesignie, cssie i Internecie