Observable launched a couple of weeks ago. As far as I understand, it’s sort of like a mix between CodePen and Medium where you create „notebooks” for exploring data, making nifty visualizations.
Check out this collection of visualizations using map integrations as an example. The entries are not only nice demos of the libraries or technology being used (i.e. D3, Google Maps, Leaflet, etc.), but also make for some interesting infographics in themselves.
In a note about this interesting new format, founder Mike Bostock describes a notebook as “an interactive, editable document defined by code. It’s a computer program, but one that’s designed to be easier to read and write by humans.”
All of this stuff riffs on a lot of Mike’s previous work which is definitely worth exploring further if you’re a fan of complex visualizations on the web.
The second iteration of CSS Grid is already in the works and the public editor’s draft was released last week! While it is by no means the final W3C recommendation, this draft is the start of discussions around big concepts many of us have been wanting to see since the first level was released, including subgrids:
In some cases it might be necessary for the contents of multiple grid items to align to each other. A grid container that is itself a grid item can defer the definition of its rows and columns to its parent grid container, making it a subgrid. In this case, the grid items of the subgrid participate in sizing the grid of the parent grid container, allowing the contents of both grids to align.
The currently defined characters of subgrid items are particularly interesting because they illustrate the differences between a subgrid and its parent grid. For example:
The subgrid is always stretched in both dimensions in its subgridded dimension(s): the align-self/justify-self properties on it are ignored, as are any specified width/height constraints.
In addition to subgrids, aspect-ratio-controlled gutters and conformance are also defined in the draft and worth a read. It’s great to see so much momentum around grids!
Can you imagine traveling the wilderness on the back of your faithful animal companion, going on a fantasy adventure together?
If you find such an image inspiring, I have something cool for you. In this tutorial I will show you how to place a rider on top of a huge animal with the power of Photoshop. You’ll learn all the basics of photo manipulation while working towards a beautiful end result.
1. How to Separate the Fluffy Dog From the Background
Step 1
Open the running husky image in Photoshop. It has a perfect pose, but the collar doesn’t really fit the concept. Let’s remove it!
Take the Patch Tool (J) and outline a part of the collar.
Step 2
Drag the selection towards the area that would fit nicely inside the selection.
Step 3
This method, though very powerful, is not flawless. Keep selecting smaller areas around until you achieve a convincing effect.
Step 4
Use this method to remove the whole collar.
Step 5
Use your favorite method to select the whole body of the husky. It doesn’t need to be a perfect selection with all the hairs outlined—we’ll take care of them in the next steps. You can learn about various methods of selection in our course Selections and Masking in Adobe Photoshop.
Step 6
Go to Select > Refine Edge. Change the View Mode to a black background to see the fur better, and then select Smart Radius and play with the Radius to make the edge of the selection smoother.
Step 7
Use the Refine Radius Tool to „paint” the fluff around the edges. It should do quite a good job at separating the hairs from the background.
Step 8
Finally, change the Output to New Layer and hit OK.
Step 9
A new layer with the isolated husky should appear—hide it. Go back to the original layer, duplicate it (Control-J), and hide it as well. Select the husky with the Rectangular Marquee Tool (M). We’re going to remove it from the background!
Step 10
Go to Edit > Fill and select Content-Aware. Press OK.
Step 11
Like all the automatic functions of Photoshop, the Content-Aware fill is not perfect. Use the Patch Tool to remove any „seams”.
Step 12
This trick has removed the shadow under the dog’s legs, but we need it to keep the scene consistent. Show the copied background and add a Layer Mask to it. Fill it with black to make the content transparent, and then use a soft brush and paint with white to reveal just the shadow.
If this instruction sounds confusing, you can learn about using Layer Masks here:
Open the wolf head image in Photoshop and separate it from the background the same way as you did with the dog.
Step 2
Copy and paste it into the file with the dog (you can flip the whole image of the dog, or just the head). Lower its Opacity to see the dog’s head beneath, and then use the Free Transform Tool (Control-T) to resize it properly.
Step 3
Switch the Opacity to 100% again and use a Layer Mask to blend the wolf’s head with the neck. Then use the Lasso Tool (L) to remove the dog’s head.
Step 4
Obviously, our husky is colored in a different way than the wolf. Let’s fix it! Select the layer with the head, go to Window > Adjustments, and select Curves.
Step 5
Drag the curve to make the head brighter. Don’t forget to clip the adjustment to affect the head only!
Step 6
Select the body now and add the Color Balance adjustment.
Step 7
Play with the sliders to make the whole body colder in its shade—more like the head. Clip the adjustment, too!
Step 8
Add the Hue/Saturation adjustment.
Step 9
Clip the adjustment and lower the Saturation to remove the warmer parts.
Step 10
When you’re ready, select the body’s and head’s layers along with their adjustments and merge them (Control-E). Fix any obvious seams by copying parts of the fur, blending it with a Layer Mask, and merging it with the rest.
Step 11
Curiously, the faces of big animals have slightly different proportions. To make our wolf look huge, make its eyes and ears smaller, and the muzzle shorter and thicker. Go to Filter > Liquify to add these changes.
Step 12
Dogs like to keep their tails high up, but for a wolf this is not a normal position. Let’s put it lower! Select the tail, for example with the Lasso Tool (L). Cut it and place it under the body layer.
Step 13
Use the Free Transform Tool (Control-T) to rotate the tail properly…
… and use the Warp Mode to reshape the tail. Merge the parts when you’re done.
Step 14
To make the wolf look even bigger, let’s modify its body even further. Use the Liquify filter to make the paws and torso thicker. You can also play with the facial features a little to give the wolf a more serious look.
Step 15
For me the whole wolf looks still a little bit too colorful, so let’s lower its Vibrance.
3. How to Put a Rider on the Wolf’s Back
Step 1
Our image with the wolf is not very big, so let’s resize it to have better access to details. Go to Image > Image Size and change the Width to 6000 pixels.
Step 2
Use the Crop Tool (C) to make more space.
Step 3
Open the image with the girl rider in Photoshop and cut it from its background as before. Include the saddle, too!
Step 4
Paste the girl into the main file and use the Free Transform Tool to adjust her size and position her on the back of our wolf.
Step 5
Crop the image for a better composition.
Step 6
The background is now bigger than the original one, so let’s use the Content-Aware Fill to fill the empty areas with snow.
Step 7
The girl on a horse had a different perspective, so let’s fix it subtly. Select the farther arm, cut it, and place it behind the body. Rotate it to better fit the perspective of the wolf.
Step 8
Use the Liquify filter to fix the torso, too. Merge the parts when you’re done.
Step 9
The Liquify filter will also help you adjust the saddle to the body of the wolf. Just make sure you use the backdrop with the wolf’s layer only.
Step 10
The girl has come from a differently lighted environment, so now we need to fix it. Add the Color Balance adjustment to make the girl colder in her hue…
… and the Hue/Saturation adjustment to make the colors less striking. When you’re done, merge the body layer with its adjustment layers.
Step 11
In the girl’s photo there was much more direct light, and our wolf is illuminated in a more ambient way. Brighten the dark shadows on the girl’s body with the Dodge Tool (O) in Shadows mode.
Step 12
The image with the girl had a high resolution, but the one with the husky didn’t—and we had to resize it. Because of that, the girl looks much sharper than the wolf, which breaks the illusion we want to achieve. Go to Filter > Blur > Gaussian Blur to fix it.
Step 13
To make the whole scene more interesting, let’s add a new background—a winter forest. Place the image behind the girl and the wolf, and resize it properly.
Step 14
Apply Gaussian Blur to the background to give an impression of depth.
4. How to Add the Accessories of a Fantasy Rider
Step 1
We have a girl riding a wolf, but it doesn’t look very convincing. Let’s give them both special fantasy outfits to make the whole illustration more interesting.
Open the chainmail image and place it inside the main file. Cut the part you need.
Step 2
Lower the Opacity of the chainmail to see the saddle beneath, and then adjust it to the shape of the blanket.
Step 3
Use a Layer Mask to reveal the saddle and the girl, keeping the chainmail over the blanket only.
Step 4
Open the image with the armor and cut its breast element the same way as before.
Step 5
Put this armor part over the neck of the wolf.
Step 6
Cut the parts that don’t fit the perspective.
Step 7
The lower part of the armor will be useful, too! Copy it…
… and put it over the back of the wolf.
Step 8
Copy it, put the copy beneath, and transform it to give more segments to this element.
Step 9
Open the image with the leather armor now. The armor looks nice, but there’s so much hair in front of it! Use the Patch Tool (J) to „clean” it.
Step 10
Cut the armor from its background the same way as before. Then copy the fur part as well, refining its edge carefully.
Step 11
Place the fur over the shoulder of the girl.
Step 12
Place the rest of the armor under the fur, transforming it to fit the girl’s torso.
Step 13
Use the Liquify filter to modify the armor even further. Pay attention to the perspective!
Step 14
Open the image with the sword and copy it to place it on the side of the girl.
Step 15
Our wolf needs a bridle, too! Open the image with the horse and copy parts of its head gear step by step, always refining the edge of selection first to make it softer. Place it in the main file and adjust the shape to the wolf’s head, trying to keep it all functional.
Here you may need to copy a part of the band to make it longer:
Step 16
The reins will be a bit tricky. Copy them as before…
… paste them and resize in the main file. To reshape them in a controlled way, use Edit > Puppet Warp. Uncheck Show Mesh to make the image clearer, and then place pins all along the length of the reins.
Step 17
Drag the pins to reshape the reins. Press Enter when you’re done.
Step 18
You can use the same method to decorate the reins with sapphires.
5. How to Make the Photo Manipulation Consistent
Step 1
All the elements are in place, but it doesn’t take a detective to tell that it doesn’t look realistic. We need to spend some time tweaking all the parts carefully using the same methods as before.
First, adjust the torso of the girl. Make sure the leather has a proper shape and that the sweater is beneath it.
Step 2
Adjust the color of the armor to make it as cool as the background and less contrasting.
Step 3
Add some Gaussian Blur to hide the sharp edges.
Step 4
Add another Hue/Saturation adjustment and brighten it strongly. Then fill the mask of the adjustment layer with black to hide the effect.
Step 5
Use a soft brush and paint with white on the mask to reveal the brightness around the sides of the armor—this will give it a proper ambient lighting.
Step 6
Add another Hue/Saturation adjustment to color the whole girl brown. Check Colorize for a better result.
Step 7
Fill the mask with black, and then paint on it with white to reveal the parts you want to color brown. This will give a more traditional look to the outfit.
Step 8
Use the same method (an adjustment layer with black mask, painting with white) to paint the shadows on the chainmail.
Step 9
Darken the saddle the same way, too.
Step 10
Use this method to give a more fitting shading to the armor. You can use the Hue/Saturation and Levels adjustments to create both shadow and light.
Step 11
Desaturate the whole bridle to fit its color to the whole scheme.
Step 12
Use the Levels adjustment to give more contrast to the bridle.
Step 13
Shade the bridle with the Hue/Saturation adjustment.
Step 14
There’s one more thing we need to add for more realism: the straps. Copy them from the image with the medieval armor.
Step 15
Use Puppet Warp to adjust the shape of the strap to the wolf’s neck.
Step 16
Remove the rest of the strap with a Layer Mask.
Step 17
Use the same method to attach the sword with a strap.
Step 18
I’ve also noticed that the girl has been copied with a soft edge from her previous background. If you have the same effect, remove it carefully with a Layer Mask.
Step 19
The bridle should sink a bit into the thick fur on our wolf’s face. To achieve this effect, copy a part of the fur from the wolf’s layer and place it over the bridle.
Step 20
Right click the fur layer and select Blending Options. Drag the upper black marker to remove the dark parts of the layer. Hold Alt to split it for a smoother effect. You can learn more about this great tool from the tutorial below:
Use the same technique to add covering fur wherever necessary.
Step 21
Time to add some shadows between the gear and the wolf’s body. Do it carefully and sparingly to avoid an airbrushing effect.
6. Final Tweaks and Adjustments
Step 1
Our photo manipulation is almost complete now, so let’s take a closer look at it as a whole to find any inconsistencies.
First, metal, even when it’s old, is reflective. That means it reflects both the brightness and colors of the objects around to a certain extent. To simulate this effect, create a New Layer over the metal parts, use the Eyedropper Tool (I) to pick the color of the surroundings, and carefully paint over a part of the metal. Clip the layer (Control-Alt-G) to keep the effect to the boundaries of the layer below.
Step 2
Use the Blending Options to remove the color from the dark crevices by dragging the lower slider.
Use this trick for all the metal parts.
Step 3
Take a good look at all the elements. Does everything cast a shadow as it’s supposed to? Make sure there are no missing shadows in your scene.
Step 4
To make the scene more dynamic, we can add some blur. Go into Quick Mask Mode (Q) and paint a part of the hair with a soft brush. Then go out of the mode (Q), Select > Inverse, and hide the selection (Control-H).
Step 5
Now you can use Filter > Blur > Motion Blur on the selection.
Step 6
Use the same trick in other places you want blurred. Just remember not to select too many at once, or they’ll seem flat.
Step 7
We’re going to add snow to the scene, so let’s give a snow-mist to the background by increasing the Lightness in the Hue/Saturation adjustment.
Step 8
If you are sure you don’t want to fix any more details separately, select all the layers and merge them (Control-E). Duplicate this merged layer (Control-J) and apply Filter > Blur > Motion Blur to the copy.
Step 9
Add a Layer Mask to the copy and reveal the most important parts of the scene. The ones you leave will stay blurred, giving the whole silhouette a sense of motion.
Step 10
Time for the snow! It will not only add a special atmosphere to the scene, but it will also unify all the elements. You can learn how to create realistic snow from the tutorial below. Just remember to add more blur than normally (especially motion blur), because our characters are moving fast.
One more look: is anything missing? At this point, you can add special details like snowflakes on the hair or reddened cheeks. It’s up to you how you decide to finish it!
Step 12
To unify the scene for the last time, change the Color Balance of the whole image to something cold.
Step 13
After you merge the layers again, you can add Filter > Noise > Add Noise to unify the level of noise across the picture.
Good Job!
This was a long tutorial, but I hope you enjoyed it and learned something about creating a fantasy photo manipulation in Photoshop today. If you want to learn more, you may be interested in these tutorials as well:
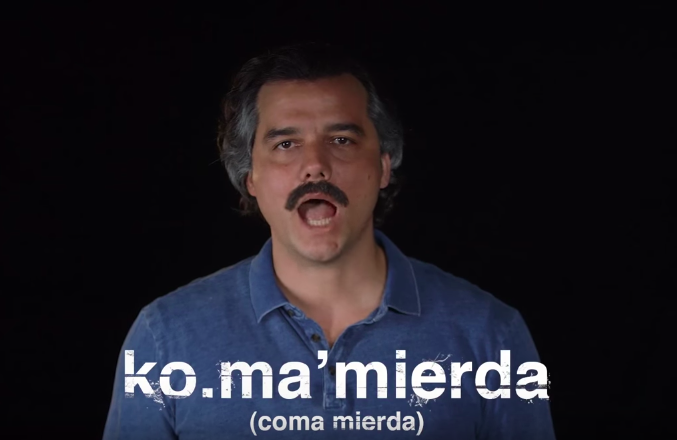
THE ORIGINAL?
Netflix & Babbel / Narcos TV Show – 2016
“Spanish lessons Tutorial”
Source : Coloribus, El Sol Festival GOLD
Agency : Alma DDB Miami (USA)
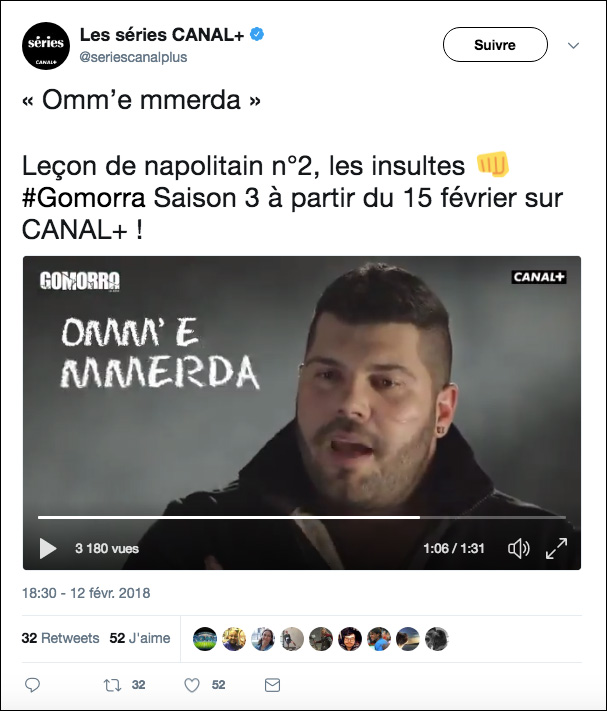
LESS ORIGINAL
Canal Plus / Gomorra –2018
“Neapolitan lessons tutorial”
Source : Twitter Agency : Unknown? (France)
Something you very much want to avoid in web design is unreadable text. That can happen when the background color of an element is too close or exactly the color of the text. For instance:
Which could lead to text that’s there, but invisible.
This is … very bad.
You’d never do that on purpose of course! The trouble is it can sneak up on you. For one thing, the default background-color is transparent, so without setting any background the background of an element is probably white.
More commonly, you’re using a background-image that makes the background a different color, and you’re setting white text on top of that.
But let’s take a look at what it looks like while the website is loading over a very common „Slow 3G” internet connection:
There’s no reason our dear visitor needs to wait to discover the incredible savings awaiting them this Sunday! Fortunately, a tiny bit of CSS solves this.
The black background color will ensure the white text will be visible while the image loads (or if it never loads at all!). Getting slightly fancier, we could use a color used in the image. I like a little app called Frank DeLoupe for helping me pluck a color from anywhere on my screen. Then I’ll use that color as the fallback color using the shorthand syntax for backgrounds:
This kind of thing takes very little effort, improves your design’s resiliency and UX, and I think you’ll find becomes are part of your CSS muscle memory the more you write CSS.
Another related topic here, since we’re working with a photograph, is the idea of a „Progressive JPG.” Photoshop has the ability to save a JPG in this format. This changes how the displays as it’s coming across the network. Here’s a comparison video:
A low-res version of the image loads into place first, and it becomes higher quality as more of the image loads.
Perhaps a more desirable loading experience, but not a replacement for a fallback color.
Leveling up!
Images are one of the heaviest parts of websites, and loading techniques for them are a big topic in web performance. Here are some more related to things to think about: