

Seahorse – Endangered Species Project

Alien Meet Walter by AMD & Weyland-Yutani
Post pobrano z: Alien Meet Walter by AMD & Weyland-Yutani
Twentieth Century Fox’s (FOX) action-thriller Alien: Covenant, hitting theaters May 19, marks visionary director Ridley Scott’s return to the universe he created. FOX has tapped Advanced Micro Devices (AMD) to be the official CPU/GPU partner for Alien: Covenant and has released this branded short, Meet Walter starring Michael Fassbender as his character Walter. As the centerpiece of the #MeetWalter campaign, this short introduces Walter, the latest synthetic android with intelligence powered by AMD (NASDAQ: AMD), RyzenTM and RadeonTM processors, and manufactured by the film’s fictional corporation Weyland-Yutani. Walter is presented as the world’s most advanced synthetic companion, created to serve and designed to help achieve a better human experience with intelligence. The Meet Walter campaign includes a limited-edition poster and a Twitter activation allowing users to tweet #MeetWalter to receive a personalized video autoreply from Walter.

Alien: Covenant follows the crew of a colony ship bound for a remote planet on the far side of the galaxy that discovers what they think is an uncharted paradise, but is actually a dark, dangerous world. When they uncover a threat beyond their imagination, they must attempt a harrowing escape. The ensemble cast includes Fassbender, Katherine Waterston, Billy Crudup and Danny McBride.
In addition to directing, Ridley Scott serves as producer along with Mark Huffman, Michael Schaefer, David Giler and Walter Hill. The screenplay is by John Logan and Dante Harper from a story by Jack Paglen and Michael Green.
“Partnering with AMD, one of the world’s leading technology companies, for our film’s ‘Meet Walter’ campaign aligned perfectly with our vision of the incredible potential of AI that Michael so wonderfully brings to life through Alien: Covenant’s Walter,” said Ridley Scott. “In AMD we have a partner at the forefront of developing and implementing artificially intelligent technologies, showcasing where the future of AI may well be heading. Bringing AMD into our longstanding collaboration with 20th Century Fox on the Alien films is inspiring and exciting.”

“AMD is at the forefront of advancements in AI, machine learning and at developing technologiUKes which are used every day,” said Zachary Eller, Senior Vice-President, Marketing Partnerships. “Given their amelioration in these technologies, we knew this was the perfect partnership for our film.”
“Once we saw the great connection between ‘Alien: Covenant’, the ‘Meet Walter’ short and AMD processor technologies, including AMD SenseMI technologies in our new Ryzen processors, and our Radeon Instinct accelerators, this technology collaboration with Twentieth Century Fox and Luke Scott was one we couldn’t resist,” said Jim Anderson, SVP & GM Computing & Graphics Business Group.

Meet Walter Credits
Meet Walter was commissioned by 20th Century Fox by worldwide marketing president Pamela Levine, SVP marketing partnerships Zachary Eller, VP marketing partnerships Chris Cerbo, director of marketing partnerships Brendan Murphy, VP digital marketing Noah Young, social media director Matt Creem, publicity SVP Heather Phillips, publicity VP Catherine Culbert, publicity director Nathan Marcy.
The Meet Walter trailer was developed at 3AM by concept leader Ridley Scott, managing partner Alison Temple, creative director Chris Eyerman, senior creatives Will Melton, Michelle Gilbert, Kelly Girth, social strategist David Sarkissian, executive director of integrated strategy Tiffany Duersch.
Strategy and marketing work for AMD was by 48 Communications president Karl Stewart.
Filming was shot by director Luke Scott via RSA Films with director of photography Ross Emery, producer Hannah Ireland.
Visual effects were produced at Atomic Arts by VFX supervisor Charley Henley.
Editor was Nick Temple at Wild Card.
Not Special Needs Just Human Needs
Post pobrano z: Not Special Needs Just Human Needs
CoorDown, Italy’s national organization for people with Down syndrome, has launched a conversation-changing initiative, #NotSpecialNeeds, with the goal of driving a cultural shift in the approach to Down syndrome awareness. The Not Special Needs campaign, introduced in time for World Down Syndrome Day on March 21, features a digital film entitled, Not Special Needs, spotlighting the paradox in the term, ‘special needs.’ The film stars Lauren Potter, the popular actress with Down syndrome who played the role of Becky Jackson in Glee, and John McGinley, best known for his role as Dr. Perry Cox on Scrubs, and whose 18-year old son Max has Down syndrome. The supporting cast includes, among others: Sam Suchmann and Mattie Zufelt, two friends with Down syndrome who created the movie Spring Break Zombie Massacre, and Jared Kozak, the recognized actor with Down syndrome known for Orson’s Last Dance, Leader of the Pack and Teens Wanna Know. The campaign is online www.NotSpecialNeeds.com, and is supported with social amplification on Facebook, Twitter and Instagram as #NotSpecialNeeds.

Sergio Silvestre, President of CoorDown Onlus, stated, “The World Down Syndrome day has great symbolic value for us, and we have been promoting it for some time. It is a day which allows us to reach out to everyone through our campaigns and address important issues. We are really proud to collaborate with Publicis North America in New York and, to once again count on the support of the many international organizations who participate in the project. The main objective of our work is to break down prejudices and stereotypes, and contribute to a profound change in attitude towards people with Down syndrome and more generally to the world of disability. We want to give our young people opportunities and tools that can ensure them a bright future.”
Andy Bird, chief creative officer, Publicis New York, stated, “The term ‘special needs’ is a euphemistic way to speak about persons with disabilities and their needs. The reality is people with Down syndrome do not have different or special needs, although they may sometimes meet those needs in different ways, they have the same needs as all of us… jobs, friends, love and simply the need to be seen and treated equally. We are so proud of this work for our incredible partner CoorDown who does so much great work courageously challenging preconceptions, and we hope our film maybe goes a little way to changing how people view those with Down syndrome.”

CoorDown and The World Down Syndrome Day aspire to give a voice to people with Down syndrome, to promote their full social inclusion and to promote change in the cultural approach to the world of disability. The #NotSpecialNeeds campaign amplifies that message by recognizing that people with Down syndrome may need extra assistance, sometimes significant assistance and adjustments to meet a particular need, yet that doesn’t make their common human need ‘special’. For example, a person who requires help speaking, writing or being understood, still has the same human needs we all share — the need to communicate. The only difference is the degree of assistance, or the way to satisfy that need, not the need itself. This is the message at the core of the campaign: every individual shares the same human needs, which bind us collectively together in mutual respect, empathy and understanding.
The Not Special Needs campaign will be presented to the World Down Syndrome Day Conference on March 21 at the UN HQ in New York, as part of the theme: “MyVoiceMyCommunity – Enabling people with Down syndrome to speak up, be heard and influence government policy and action, to be fully included in the community”.

No Special Needs Credits
The No Special Needs campaign was developed at Publicis New York by chief creative officer Andy Bird, executive creative directors Luca Pannese and Luca Lorenzini, copywriter David Green, art director Jen Wang, director of integrated production operations Tim Ayers, integrated producer Jakub Popadium, sr, lead AD technical developer Scott Jones, interactive developer Dara Mao, chief production officer Lisa Bifulco, producer Chris Muldoon, editor Marc Legana, music producer Rachel Rauch, working with CoorDown, Down Syndrome International, Down Syndrome Australia, Fondation Jérôme Lejeune and Down’s Syndrome Association.
Filming was shot by director Wayne McClammy via Hungry Man with executive producer Kevin Byrne.
Visual effects and puppeteering were by Legacy Effects.
Editor was Christjan Jordan at Rock Paper Scissors with assistant editor Pieter Vijoen, executive producers Rana Martin and Eve Kornblum, and producer Dani DuHadway.
VFX/Post were produced at Shed LA by colorist Billy Hobson, VFX artists Paul O’Shea, Miles Essmiller and Phil Man.
Music, sound design and mix were produced at Beacon Street by composers Andrew Feltenstein and John Nau, executive producer Leslie DiLullo, senior producer Kate Vadnais, mixer/sound designer Rommel Molina, and mix assistant Vivi Rojas.
KFC Irish Chicken on St Patrick’s Day
Post pobrano z: KFC Irish Chicken on St Patrick’s Day
KFC UK and Ireland is marking St Patrick’s Day with the promotion of their 100% Irish O’Sanders Feast bucket. The O’Sander’s Feast includes 14 pieces of 100% Irish chicken, four servings of mashed potato, two sides, eight onion rings and a 1.5 litre bottle of soft drink. The bucket is available in Ireland until 23 April. The KFC Irish chicken in the KFC O’Sanders Feast is 100% Irish. But 100% Irish just ain’t enough for American marketing man Randy O’Brien. To make the feast 200% more Irish he delves into as many Irish stereotypes as he can find.

KFC Irish Chicken Credits
The KFC Irish Chicken campaign was developed at BBH London by creative director Hamish Pinnell, creatives Alex King and Andrew Jordan, agency producer Sarah Cooper, working with KFC marketing executive Nahn Van Wyk and senior marketing manager Lucy Cousins and social media manager Josh Benge.
Filming was shot by director Giles Ripley via Partizan with producer Nicole Gray, production manager Jack Bristow, director of photography Sam Goldie, casting agent Maddy Hinton
Post production was done at Mini Mill.
Anchor “Inside Out” (4K)
Post pobrano z: Anchor “Inside Out” (4K)

The “jelly-man” sequence of “Inside Out” leaped out at me. I asked director Jonny Kofoed if it was inspired by Albert Omoss’ experimental artworks.
The character is actually the product of Assembly’s Alex McCleod, who has this to say:
The jelly-man came from our GPU-powered simulation testbed, which gets new features every time we use it. It’s usually a fluid simulator, and it’s generally real-time, so instead of trying to keyframe a plausible flopping animation, we just recorded an interactive session of pushing, pulling and swirling a man-shaped bundle of infrangible liquid, and we kept the highlights.
Another product of the same simulation system:

It’s also great for creating tentacle animations, like these:
Sherwin-Williams “Safari”
Post pobrano z: Sherwin-Williams “Safari”

Top of the Line Web Building Tools and Platforms for 2017
Post pobrano z: Top of the Line Web Building Tools and Platforms for 2017
It’s always exciting to see new or upgraded website building tools and platforms. Newer isn’t necessarily better of course, and upgrades do not always mean game-changing changes have taken place. The very best tools and platforms are out there of course, but it often takes some serious digging to locate them. It helps to know […]
The post Top of the Line Web Building Tools and Platforms for 2017 appeared first on Web Resources Depot.
How to Create a Decorative Spring Floral Lettering Card in Adobe Illustrator
Post pobrano z: How to Create a Decorative Spring Floral Lettering Card in Adobe Illustrator

Spring has arrived! Let’s greet this amazing season with a
beautiful lettering illustration. Of course, we’ll add some floral
decorations, love, passion, and creativity!
Today, you’ll learn
how to create digital writing in Adobe Illustrator to make some elegant
lettering with floral elements for our gentle, ornamental composition.
Ideally, it would be great to have a pen tablet for this tutorial for
your convenience. We will also use the Width Tool, the Pen Tool, and the
Arc and Line Segment Tool.
If you’re looking for some decorative vectors, you can find many different elements and designs on GraphicRiver.
OK, let’s get started!
1. How to Create Digital Hand Lettering
Step 1
After
opening your Adobe Illustrator, create a new document with 850 x 850 px
Width and Height. Our illustration will be placed on a dark grey
background. So let’s create a dark-grey rectangle with the Rectangle
Tool (M).

Step 2
Now, let’s start writing. Remember that
it doesn’t have to be perfect because we just need to mark where the
real letters will appear.
So that we can write legibly, let’s
get some help: the Rulers. To make them appear, go to View > Rulers > Show Rulers (Control-R). Take
the upper ruler and drag it down to the place where you want to write.
Repeat this action to make another ruler appear, so that you have two
lines between which you can place your letters.
Now that
you’ve prepared where you want to write, let’s begin writing using the
Pencil Tool (N) with no fill color. If you make a mistake, you can
always erase it using the Eraser Tool (Shift-E). It’s easier if you can
see the whole artboard (Control-0), because the smaller the letters you
write, the less your hand will shake.

Step 3
Lower the
Opacity on the Transparency panel of this layer, close it, and create a
new layer.
On the new layer, take the Pen Tool (P) and outline the word
„Hello”. I recommend the Pen Tool because you won’t have a lot of anchor
points which make your file heavier, as you would with the Brush Tool (B).
Write each letter separately, since it will be easier for you to manipulate the letters later. Begin by writing simple letters and then
add some curly decorations later.

Now you can add some curls by
manipulating the handles of the anchor points. If you want to connect
two letters, select the anchor points that you want to connect using the
Direct Selection Tool (A), right-click the mouse, and select Join.

Step 4
Now it’s time for the next word, “Spring”.
Close
the upper layer, where you wrote using the Pen Tool (P), and unlock the
bottom one, where you will write the new text. Make sure that you’re in
the bottom layer and create another couple of rulers below the first two
rulers that you made, where you want the second word to be placed.
Simply take the upper ruler and drag it down. Do this action twice to
get a pair of rulers as boundaries for your letters. Using the Pencil
Tool (N) with no fill color, write the word “Spring”.
For better visibility, you can increase the bottom layer Opacity.

Step 5
Similar
to what we did before with the word “Hello”, lock this layer, lower the Opacity, and go to
the upper layer. Next, select the light-cream or yellowish stroke color, and by using the Pen Tool (P), outline the word „Spring”. When you are
finished, add some curls to the letters by manipulating the handles of the
anchor points.

This is my result. Feel free to do something similar to this.

Step 6
Look
at the Layers panel, take the layer where we drafted the letters (the
non-decorative letter layer), and drag it to the trash icon (Delete Selection). Press
Control-R to hide the Rulers. Select the lines on your artboard (you placed letters between them) and press Delete on the keyboard.
This is what our lettering now looks like:

2. How to Create Floral Details
Step 1
Now we’ll add some spring floral details. Let’s make the first type of leaves.
Set
the stroke color to green with no fill color. Using the Arc Tool, draw
the stem of our leaf. Add a few lines from both sides of the stem by
using the Line Segment Tool (\) or the Arc Tool, if you prefer. Make sure to check Round Cap on the Stroke panel.
We’ll transform these
lines into leaves by using the Width Tool (Shift-W).
Hit the Width Tool (Shift-W) and place your mouse/pen tablet over the
“prospective” leaf. Stretch where the leaf should be thicker. Repeat
with the rest of the leaves.

Make a few of these leaf branches.
Finally, we need to expand the lines which were transformed. Select
them and go to Object > Expand Appearance, and then Object >
Expand. (The first time you expanded just the leaves, and then the second time the stem).

Step 2
For the second type of leaves, we’ll use
the Arc Tool again to draw lines in two colors: lighter green on the back
and darker green over it. Change the width of these lighter lines with
the Width Tool (Shift-W). Expand all lines (Object > Expand
Appearance, Object > Expand) and make the leaf edges sharper by
moving the handles of the anchor points (use the Direct Selection Tool (A)).

Step 3
Now
we will create a rose. Add a pink circle with no stroke color and pink
fill color (feel free to choose any shade of pink). To make an even
circle, draw an oval using the Ellipse Tool (L) while holding down the
Shift key.
Now add some outer petals. Remove the fill color and make the
same stroke color (Shift-X) as used for the circle. On the Stroke
panel, increase the Weight of the stroke and check Round Cap. Grab the
Pencil Tool (N) and start drawing curly petals, which will be the
outside of the circle.
To make the inner petals, decrease the
Weight of the stroke, and make the stroke color slightly darker. Using
the Pencil Tool (N), create inner petals as shown in the image below. Add
some lighter petals as well.

Step 4
In this step, we will
create a flower bud. Add a pink circle with no stroke color and pink
fill color. Make two copies of this circle with slightly darker
color and place them behind the first circle (Control-X, Control-B).
Add the fourth copy of the circle behind and make it darkest. Add a few
black lines with the Pencil Tool (N) (just grey stroke color), behind
the first circle as stamens. And finally, create a green oval behind all
petals of the bud as a receptacle.
Expand the stamens. You can select the whole bud, go to Object > Expand, and in the new dialogue window select Stroke and press OK.

Step 5
For the third type
of flowers, let’s use the Line Segment Tool (\) again and draw a few
petals as lines. Use the Width Tool (Shift-W) to change the width of
these lines and create petals. Add a tiny circle inside the flower.
Yellow fill color with no stroke. Isn’t it easy? Finally, expand these
lines. Go to Object > Expand.

Step 6
Create a similar but
smaller, white colored flower using the steps we just took. Use the
Line Segment Tool (\) for the white petals, deform the lines with the Width
Tool (Shift-W), add the yellow circle inside, and finally, expand these
lines (Object > Expand).

Step 7
Here are all the floral
elements that we just created. Before moving on to the next step, make
sure that you have expanded all of them (Object > Expand Appearance,
Object > Expand).

3. How to Arrange the Floral Elements
Step 1
Make a few copies of the dark green leaves and spread them over and under the letters.

Step 2
Select the other leaves that we created, make a few copies, and place them also around the text.

Step 3
Now it is time to place a few copies of our beautiful rose.

Step 4
Add some of the flower buds.

Step 5
Scatter a few small red flowers.

Awesome Work, You’re Done!
And last but not least, let’s not forget to place our tiny white flowers. With this, we will finish our illustration.
Congratulations! Our spring lettering card is ready! Great job! I hope you’ve enjoyed following this inspirational tutorial and discovered some new tips and tricks that will help you to design more lettering designs and floral compositions. Enjoy the spring, and have fun!


Such a pain / Une idée pub qui ne vaut plus un clou?
Post pobrano z: Such a pain / Une idée pub qui ne vaut plus un clou?
 |
 |
 |
| THE ORIGINAL? Geniol Anti-Headaches – 1927 “Cut the pain” / Point-of-sale ad Agency : unknown (Argentina) |
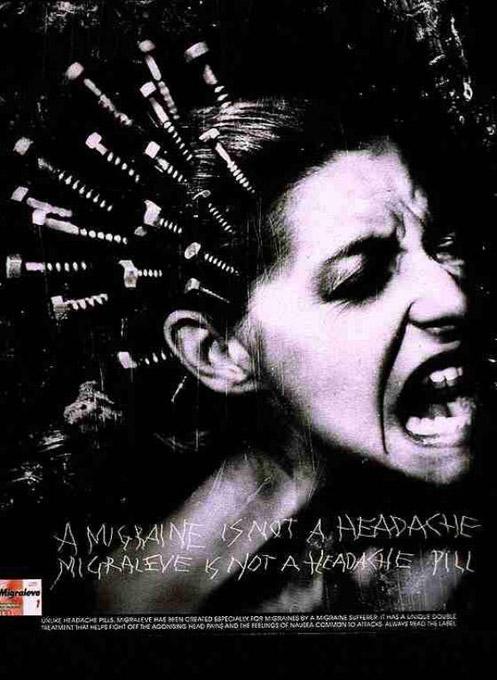
LESS ORIGINAL Migraleve Anti-Headache – 1998 Source : Coloribus Agency : M&C Saatchi (UK) |
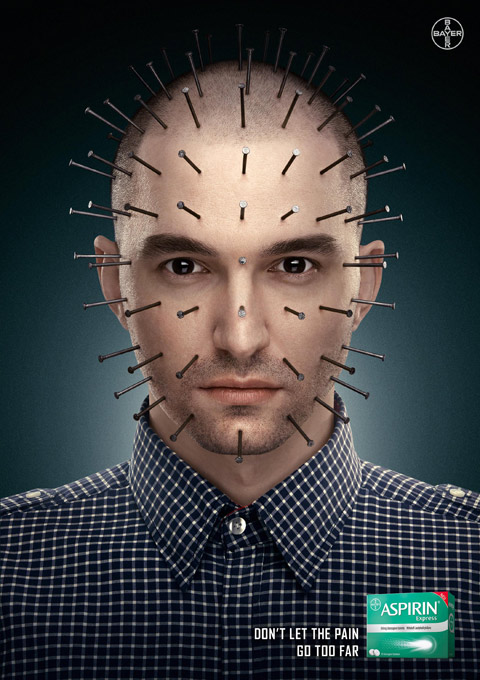
LESS ORIGINAL Bayer Aspirin – 2016 “Don’t let the pain go too far” Agency : Revision (Russia) |