10 WooCommerce Extensions to enhance your online shop

Post pobrano z: 10 WooCommerce Extensions to enhance your online shop

1. WooCommerce Product Reviews Pro

WooCommerce Product Reviews Pro allows you to supercharge your product reviews to add filtering, even more review capabilities, and provide additional discussion options. Meet the expectations of your customers by providing the same review capabilities as all large e-retailers in your own online shop.
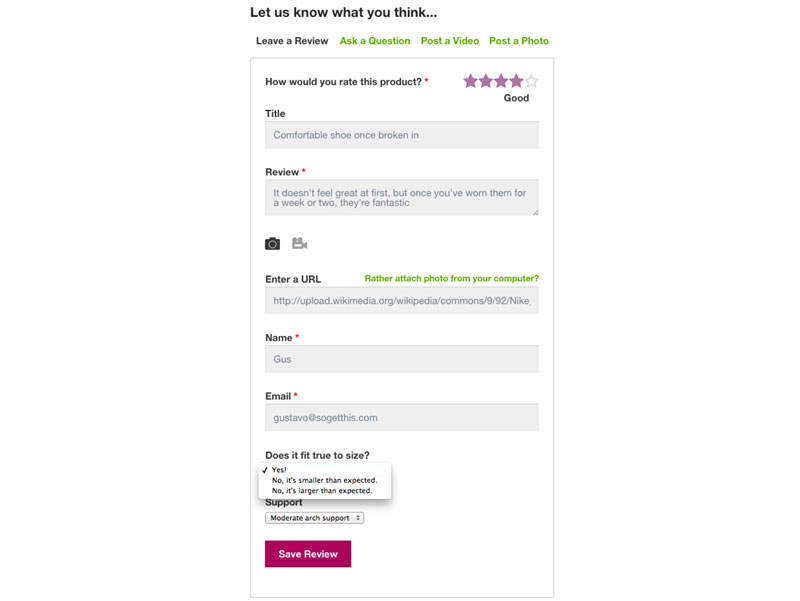
Product Reviews Pro lets you accept product reviews in the same way that you do now, but you can also accept user photos and videos as part of the review, as well as add “review qualifiers” so as to get a clearer and more vivid idea about the product.

2. WooCommerce Product Filters

Filtering products in the stores today is an absolute necessity that makes the search for goods more efficient. By Product Filters your users can conveniently search for a product in the store, what they are so used to. According to statistics, 75% of users leave the website if they can not find what they are looking for within 15 seconds.

Product Filters makes the process of searching for products faster and simpler. Product Filters is one of those WooCommerce Extensions, in the absence of which you will most certainly lose potential customers.

3. WooCommerce waitlist

The Waitlist extension makes your customers happy with back-in-stock notifications. It automatically notifies a customer when a product they were eyeing becomes available for purchase.
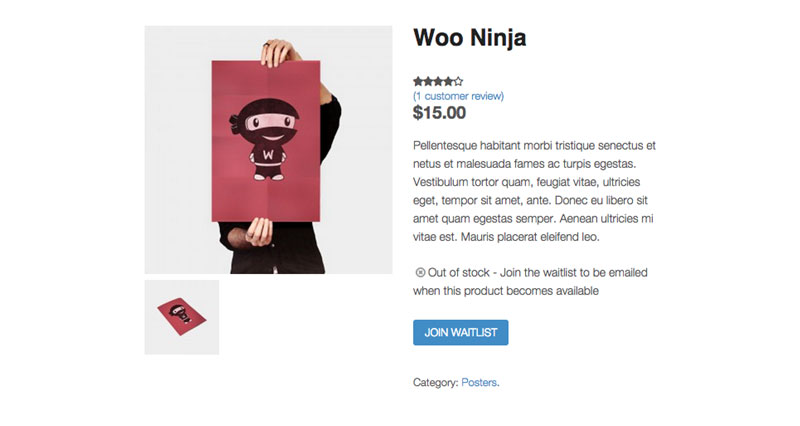
It lets you track demand for out-of-stock items, making sure your customers feel informed, and therefore more likely to buy. You can build up a waiting list of people wanting the unavailable item, then notify the shoppers automatically when products become available, using a simple plugin.

4. WooCommerce Additional Images extension

The Additional Variation Images extension enables you to add additional gallery images per variation on variable products within WooCommerce.

WooCommerce will only swap the main variation image when you select a product variation and not the gallery images below it.

This extension allows visitors to your online store to be able to check out different gallery images when they select a product variation and see the samples of different varieties.

5. PayFast

PayFast makes your customers feel more flexible including putting down deposits, ordering ahead of time or paying on a weekly, monthly or annual basis.

Customers can sign up with a PayFast account to manage their payments via a payment wallet to pay for your product or service quickly and easily.

A user who elects to pay for their order using PayFast is redirected to the merchant account on PayFast where they are requested to login and make the payment. PayFast handles the payments easily and redirects your visitors back to your website.

6. ShipStation

At ShipStation, your priorities come first, like finding new customers and growing your brand by sourcing the best products for them.

It is focused to reduce your shipping and fulfilment efforts, helping you ship faster with branding tools that will wow your shoppers. Believe it or not, no credit is needed.

7. WooCommerce Subscriptions

WooCommerce Subscriptions helps you create and manage products with recurring payments which will give you residual revenue you can track and count on.
WooCommerce Subscriptions allows you to introduce subscriptions for physical or virtual products and services. You can also create product-of-the-month clubs, weekly service subscriptions or even yearly software billing packages.

8. Multi-Currency

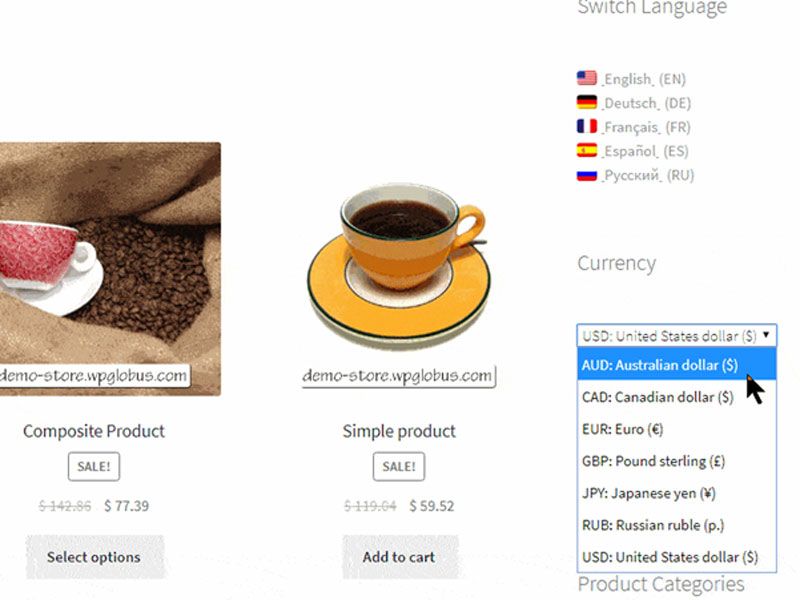
Multi-Currency is one of a kind among the WooCommerce extensions, that allows you to switch currencies and re-calculate rates on-the-go.

After selecting the currency using a sidebar widget, you would get to see the prices recalculated automatically, after which you can pay in the currency of your choice.

9. Amazon and eBay Integration

The WooCommerce Amazon & eBay Integration works to connect your online store with millions of customers on Amazon’s & eBay’s online platforms which are prominent global online marketplaces.

This is a marketplace listing tool, a fully-featured multi channel solution and inventory & pricing sync all in one powerful extension which at the same time successfully reaches the customers.

10. WooCommerce Product Compare

When there are many similar products online, shoppers want to compare prices and other features side-by-side to choose the product, there are many WooCommerce extensions to choose, Product Compare tops that list.
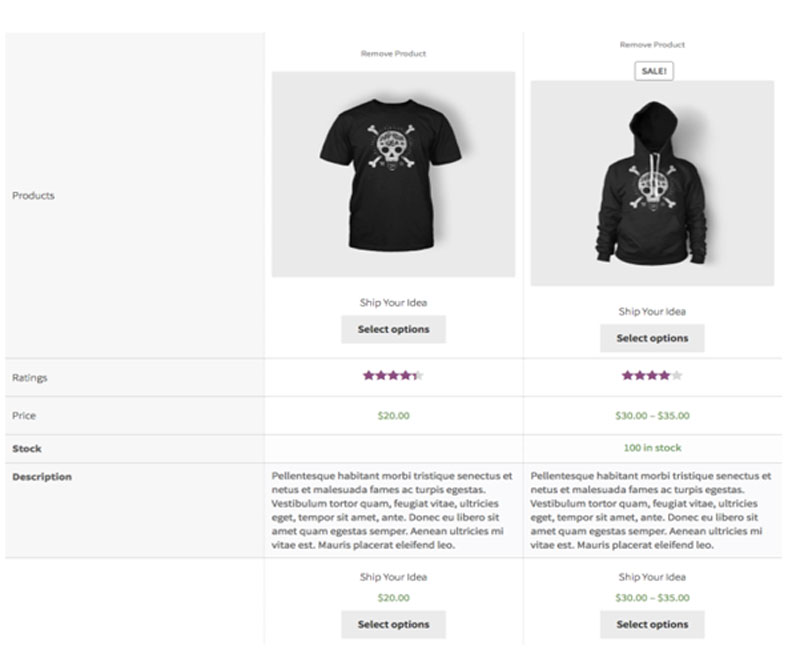
These functional and practical WooCommerce extensions which will make your WooCom really handy for both you and your users. By including a feature which lets them compare products, store owners can help customers make the right choice. If you are running a large store, with many similar products, giving customers the option to compare can make a big difference by making it prompt and convenient for them to arrive at a decision.

10 WooCommerce Extensions to enhance your online shop

Post pobrano z: 10 WooCommerce Extensions to enhance your online shop

1. WooCommerce Product Reviews Pro

WooCommerce Product Reviews Pro allows you to supercharge your product reviews to add filtering, even more review capabilities, and provide additional discussion options. Meet the expectations of your customers by providing the same review capabilities as all large e-retailers in your own online shop.

Product Reviews Pro lets you accept product reviews in the same way that you do now, but you can also accept user photos and videos as part of the review, as well as add “review qualifiers” so as to get a clearer and more vivid idea about the product.

2. WooCommerce Product Filters

Filtering products in the stores today is an absolute necessity that makes the search for goods more efficient. By Product Filters your users can conveniently search for a product in the store, what they are so used to. According to statistics, 75% of users leave the website if they can not find what they are looking for within 15 seconds.

Product Filters makes the process of searching for products faster and simpler. Product Filters is one of those WooCommerce Extensions, in the absence of which you will most certainly lose potential customers.

3. WooCommerce waitlist

The Waitlist extension makes your customers happy with back-in-stock notifications. It automatically notifies a customer when a product they were eyeing becomes available for purchase.

It lets you track demand for out-of-stock items, making sure your customers feel informed, and therefore more likely to buy. You can build up a waiting list of people wanting the unavailable item, then notify the shoppers automatically when products become available, using a simple plugin.

4. WooCommerce Additional Images extension

The Additional Variation Images extension enables you to add additional gallery images per variation on variable products within WooCommerce.

WooCommerce will only swap the main variation image when you select a product variation and not the gallery images below it.

This extension allows visitors to your online store to be able to check out different gallery images when they select a product variation and see the samples of different varieties.

5. PayFast

PayFast makes your customers feel more flexible including putting down deposits, ordering ahead of time or paying on a weekly, monthly or annual basis.

Customers can sign up with a PayFast account to manage their payments via a payment wallet to pay for your product or service quickly and easily.

A user who elects to pay for their order using PayFast is redirected to the merchant account on PayFast where they are requested to login and make the payment. PayFast handles the payments easily and redirects your visitors back to your website.

6. ShipStation

At ShipStation, your priorities come first, like finding new customers and growing your brand by sourcing the best products for them.

It is focused to reduce your shipping and fulfilment efforts, helping you ship faster with branding tools that will wow your shoppers. Believe it or not, no credit is needed.

7. WooCommerce Subscriptions

WooCommerce Subscriptions helps you create and manage products with recurring payments which will give you residual revenue you can track and count on.

WooCommerce Subscriptions allows you to introduce subscriptions for physical or virtual products and services. You can also create product-of-the-month clubs, weekly service subscriptions or even yearly software billing packages.

8. Multi-Currency

Multi-Currency is one of a kind among the WooCommerce extensions, that allows you to switch currencies and re-calculate rates on-the-go.

After selecting the currency using a sidebar widget, you would get to see the prices recalculated automatically, after which you can pay in the currency of your choice.

9. Amazon and eBay Integration

The WooCommerce Amazon & eBay Integration works to connect your online store with millions of customers on Amazon’s & eBay’s online platforms which are prominent global online marketplaces.

This is a marketplace listing tool, a fully-featured multi channel solution and inventory & pricing sync all in one powerful extension which at the same time successfully reaches the customers.

10. WooCommerce Product Compare

When there are many similar products online, shoppers want to compare prices and other features side-by-side to choose the product, there are many WooCommerce extensions to choose, Product Compare tops that list.

These functional and practical WooCommerce extensions which will make your WooCom really handy for both you and your users. By including a feature which lets them compare products, store owners can help customers make the right choice. If you are running a large store, with many similar products, giving customers the option to compare can make a big difference by making it prompt and convenient for them to arrive at a decision.

30 Blue Logo Designs

Post pobrano z: 30 Blue Logo Designs

Color can be very communicative in logo design, with every hue having a distinct meaning. Like the color blue, it means, in many cultures, symbolizes wisdom, trust, depth, intelligence, confidence, faith, and truth. Blue is also considered as the color of nature since it is in serene skies and bright blue sea. For this very reasons, the color blue was chosen carefully. You can bet the logo designer made his or her choice with regard to the emotion that the color invokes in the target audience. The following 30 logos use blue to their best advantage.


Dragos Alexandru

Qurat Ul Ain

Adolfo Teixeira

Md Sovho

Angling Prakoso

Eman Wageh

Super Beast

Sharee Neff

Lê B?o Anh

Sean Healey

Jordan Garrick

Giorgos Pehlivanidis

Ahmed Jamaan

Saif Al-Janabi

Shan Abeyrathne

Megan White

Daniel Estrada

Joe Aylor

Ntokozo Nzuza

Hanna R?czkowska

Baley Bodden

Craig Wolfe

Thomas MELKONIAN

Liubov Novikova

Connor Lin

Deedra Gannon

Jing Li

Adam Alalouf

Ronak Bhatt

Dmitry Umuarus

What do you name color variables?

Post pobrano z: What do you name color variables?

What naming scheme do you use for color variables?
Have you succeeded at writing CSS that uses color variables in a manner agnostic to the colors they represent?
I've tried all of the following, and I have yet to succeed at writing CSS that works well with any color scheme. ☹️

— Lea Verou (@LeaVerou) October 14, 2018

I remember the very first time I tried Sass on a project. The first thing I wanted to do was variablize my colors. From my naming-things-in-HTML skillz, I knew to avoid classes like .header-blue-left-bottom because the color and position of that element might change. It’s better for the to reflect it what it is than what it looks like.

So, I tried to make my colors semantic, in a sense — what they represent not what they literally are:

$mainBrandColor: #F060D6;
$secondaryFocus: #4C9FEB;
$fadedHighlight: #F1F3F4;

But I found that I absolutely never remembered them and had to constantly refer to where I defined them in order to use them. Later, in a „screw it” moment, I named colors more like…

$orange: #F060D6;
$red: #BB532E;
$blue: #4C9FEB;

$gray-1: #eee;
$gray-2: #ccc;
$gray-3: #555;

I found that to be much more intuitive with little if any negative side effects. After all, this isn’t crossing the HTML-CSS boundary here; this is all within CSS and developer-only-facing, which puts more of a narrow scope on the problem.

In a similar fashion, I’ve tried keeping colors within a Sass map, like:

$colors: (
  light: #ccc,
  dark: #333
);

But the only vague goal there was to clean up the global namespace, which probably isn’t worth the hassle of needing to map-get all the time. Namespacing like $-c-orange is probably an easier approach if you need to do anything at all.

I’ve largely stuck with that just-use-color-names approach today in Sass. As the shift toward CSS custom properties happens, I think having a --c-orange and --c-gray-5 is similarly appropriate.

:root {
  -c-orange: #F060D6;
  -c-red: #BB532E;
  -c-blue: #4C9FEB;

  -c-gray-1: #eee;
  -c-gray-2: #ccc;
  -c-gray-3: #555;
}

You could get a little more specific with those names with staying abstract, like Marcus Ortense says:

$color-primary:
$color-primary-dark:
$color-primary-light: 

And variations on each base like Mike Street says:

$primary:
$primaryLight: 
$primaryDark:

$secondary:
$secondaryLight:
$secondaryDark:

$neutralDarker:
$neutrayDark:
$neutral:
$neutralLight:
$neutralLighter: 
$neutralLightest: 

Silvestar Bistrović recently wrote about using abstract Greek numbering:

$color-alpha: #12e09f;
$color-beta: #e01258;
$color-gamma: #f5f5f5;
$color-psi: #1f1f1f;
$color-omega: #fff;

I’ve used that kind of thing for media query breakpoints before, as the numbering seems to make sense there (i.e. low numbers are smaller screens, big numbers are bigger screens). I could also see that being nice for tints or shades of the same color, but then why not regular numbers?

Another approach I’ve often seen is to combine named colors with abstracted names. Geoff does that and John Carroll lists that here:

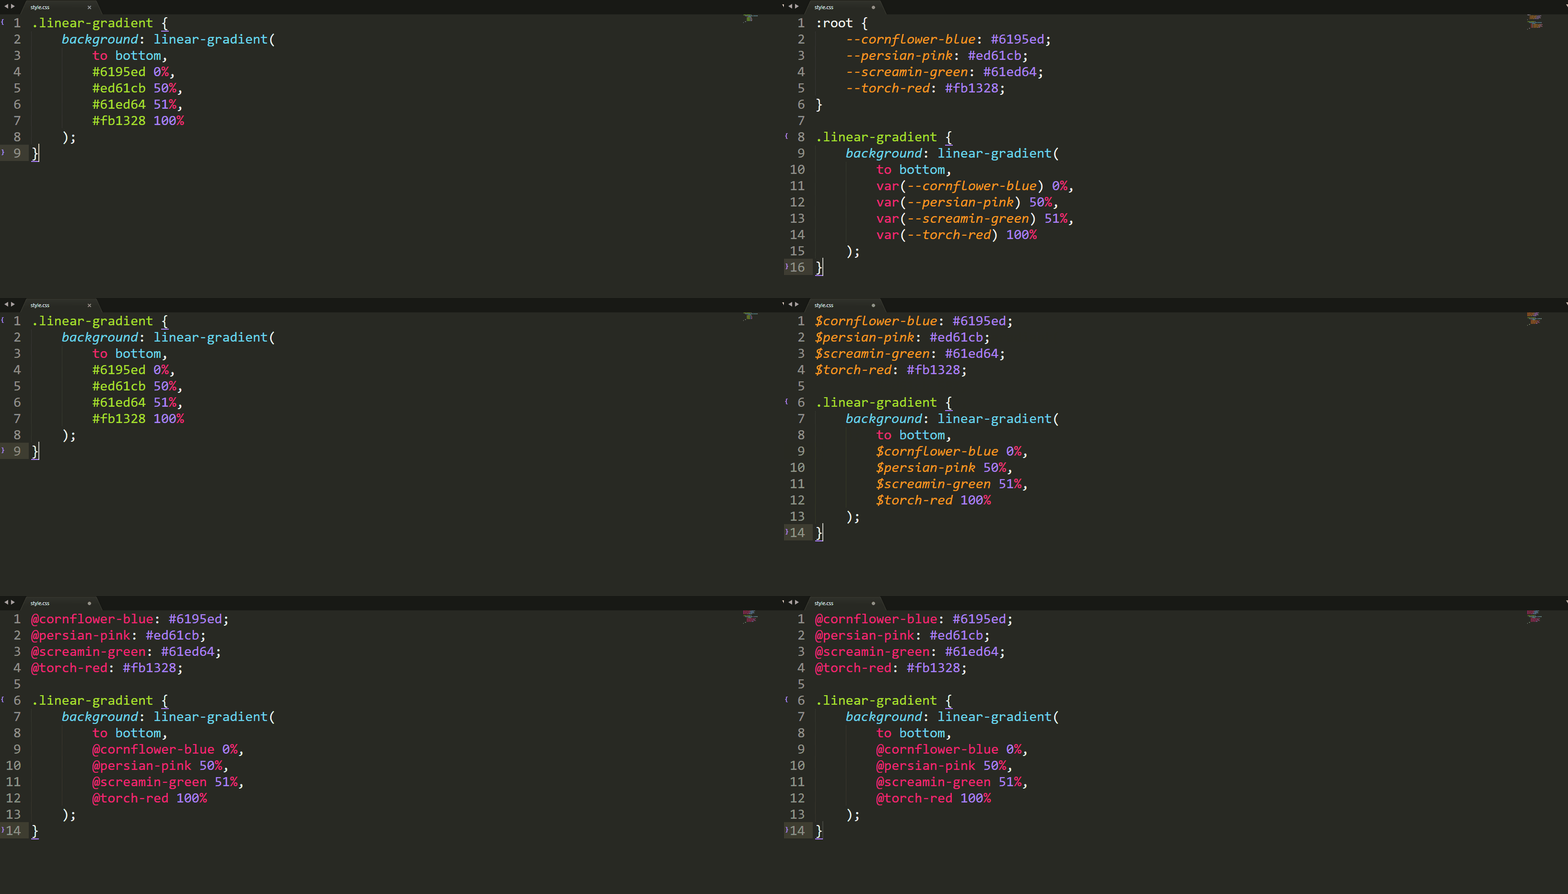
$color-danube: #668DD1;
$color-cornflower: $6195ED;
$color-east-bay: $3A4D6E;

// theme1.scss
$color-alpha: $color-danube;
$color-bravo: $color-cornflower;
$color-charlie: $color-east-bay;

// theme2.scss
$color-alpha: $color-cornflower;
$color-bravo: $color-danube;
$color-charlie: $color-east-bay;

That can get as verbose as you need it to, even adding variations as you call from the palette.

$table-row-background: lighten($color-background, 10%);

Stuart Robson even gets a bit BEM-y with the names, including the namespace:

$ns-color__blue—dark: rgb(25,25,112); 
$ns-brand__color—primary: $ns-color__blue—dark;

// component.scss
$ns-component__color—text: $ns-brand__color—primary;

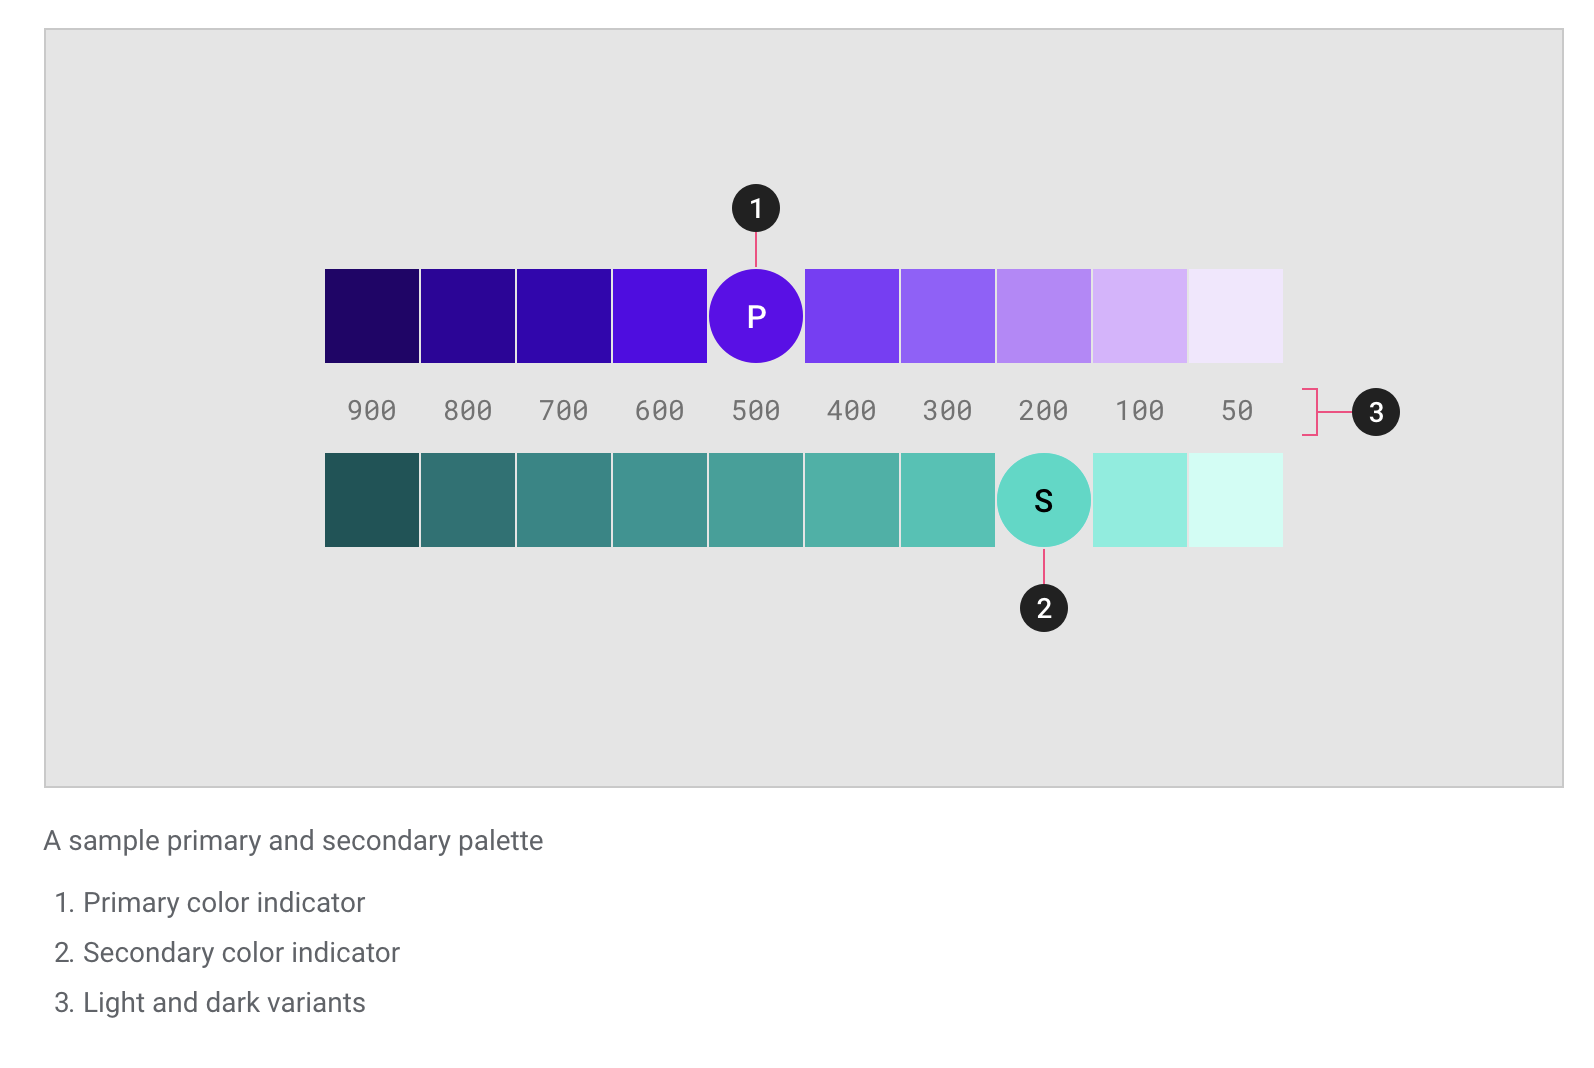
Material Design uses values that are similar to font-weight! That means you’d end up with something like a base range plus alternates:

$light-green-100:
$light-green-200:
$light-green-300:
// etc
$light-green-900:
$light-green-A200:
$light-green-A400:

$deep-purple-100:
$deep-purple-200:
$deep-purple-300:
// etc
$deep-purple-A900:

How might you pick names for colors? You might get a kick out of what to call a sunny yellow versus a sunflower yellow, or you might just want some help. Here’s one project for that, and here’s another:

See the Pen Color Namer by Maneesh (@maneeshc) on CodePen.

There is even a Sublime Text plugin for converting them (to whatever syntax you want):

And since we’re on the topic of naming:

The post What do you name color variables? appeared first on CSS-Tricks.

Accessible SVG Icons With Inline Sprites

Post pobrano z: Accessible SVG Icons With Inline Sprites

This is a great look at accessible SVG markup patterns by Marco Hengstenberg. Here’s the ideal example:

<button type="button">
  Menu
  <svg class="svg-icon"
     role="img"
     height="10"
     width="10"
     viewBox="0 0 10 10"
     aria-hidden="true"
     focusable="false">
     <path d="m1 7h8v2h-8zm0-3h8v2h-8zm0-3h8v2h-8z"/>
    </svg>
</button>

Notes:

  • It’s not the <svg> itself that is interactive — it’s wrapped in a <button> for that.
  • The .svg-icon class has some nice trickery, like em-based sizing to match the size of the text it’s next to, and currentColor to match the color.
  • Since real text is next to it, the icon can be safely ignored via aria-hidden="true". If you need an icon-only button, you can wrap that text in an accessibily-friendly .visually-hidden class.
  • The focusable="false" attribute solves an IE 11 bug.

Plus a handy Pen to reference all the patterns.

Direct Link to ArticlePermalink

The post Accessible SVG Icons With Inline Sprites appeared first on CSS-Tricks.

What’s the Best Program to Make a Flyer?

Post pobrano z: What’s the Best Program to Make a Flyer?

Flyers are the perfect way to promote an event, offer or business. And with the holiday season upon us, there’s never been a better time to work on your flyer design skills. 

party flyer

If you’re new to print design, it can be tricky to know where to get started. Here we look at the software options for creating flyers. Read on to find out which program is going to be best suited for creating your next flyer design. 

Word/Pages

microsoft word

If you’ve never created a flyer or other print item before, the software you’ll probably be most familiar with is a word processing program like Microsoft Word or Pages

While it’s tempting to dismiss Word out of hand, it’s actually a really versatile program for creating simple flyer designs. Particularly if you need to create something quickly and print from the office, Word can be a handy option. 

Although in many ways Word is much more limited than publishing software like InDesign, it still has many of the tools and features you need to create an effective flyer design, such as advanced text-formatting options and flexibility in page layout. 

Top Tip: To make the most of Word’s interface, try setting your text inside text boxes to give you maximum flexibility in how text can be placed on the page. 

Pros: Easy to access; cost-effective; easy to share files with colleagues

Cons: Very basic interface and functionality; not optimised for print design

Adobe Photoshop

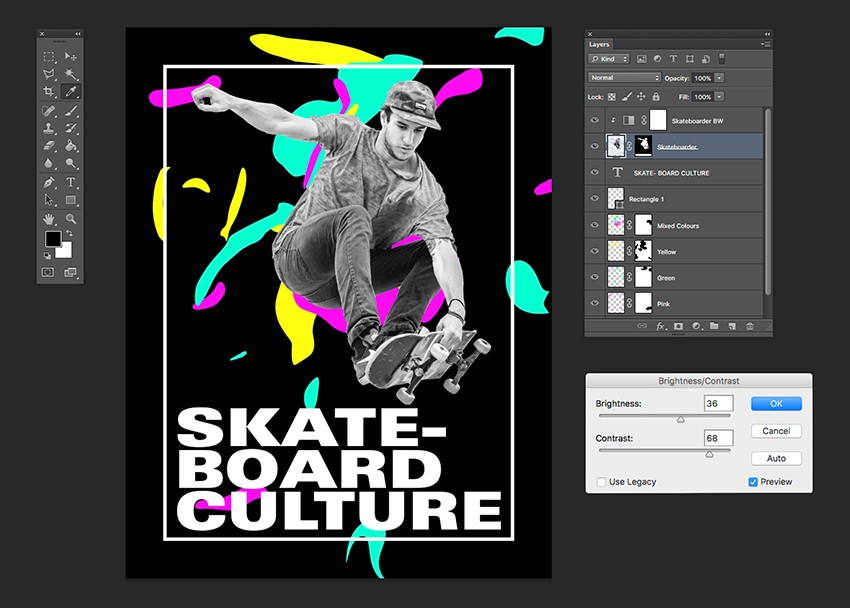
skateboard flyer

For many designers, Photoshop is their first introduction to Adobe applications. For good reason too—it’s arguably easier and quicker to get to grips with than other Adobe apps, and has a sophisticated collection of tools and options to help you achieve a wide range of effects.

acoustic flyer
Acoustic Photoshop flyer template

Photoshop isn’t limited to photo editing as it also works fantastically for creating print design layouts. Although multi-page documents like books are much trickier to put together in canvas-based software like Photoshop, single-page documents like flyers and posters are well suited to the program.

In most aspects, flyer designers won’t have any issues with creating their layouts using Photoshop. However, there are a couple of things to be aware of before you start designing. 

Firstly, you will have to manually add a bleed to your Photoshop canvas. To do this, go to Image > Canvas Size, and add the bleed width to the canvas. You will have to add twice the bleed width for the height, and twice for the width, to add an equal bleed around the whole edge. 

You should also ensure that you’re working within the correct color space in Photoshop. The default mode in Photoshop is RGB, which is better suited for digital work. Go to Image > Mode and choose CMYK to optimise your design for print. 

Pros: Arguably the most intuitive of the Adobe Creative Suite applications; can be adapted to create print design layouts

Cons: Bleed width needs to be taken into account; need to ensure you’re working within the correct colorspace

Adobe Illustrator

adobe illustrator

If you’re a vector artist, your go-to program for creating illustrations will be vector software, like Adobe Illustrator, Inkscape, Affinity Designer, or Sketch

While vector programs like Illustrator are perfect for creating scaleable vector designs, they can also be adapted for creating one-page layouts for print, including flyers. 

If your flyer includes mostly vector graphics, such as logos, and text, Illustrator will be a good choice. On export, your flyer will be crisp and clear, without any pixelation.

photo flyer
Photo flyer template for Illustrator

Compared to Photoshop, Illustrator also offers more sophisticated print design specs, including bleed setup options. To add a bleed to your Illustrator artboard, go to File > Print. Select Marks & Bleed on the left side of the Print window. From here, you can set the bleed width for the artboard.

Pros: Good for creating vector-based designs; works seamlessly with other Adobe applications

Cons: Not optimised for creating layouts for print; limited typography functionality

Affinity Publisher

affinity publisher

Designers have been waiting for a decent rival to market-leading publishing program InDesign (see below), and Affinity Publisher may just be the budget-friendly option that could finally offer some serious competition for Adobe. 

Publisher is ideally suited for creating print media, such as flyers and posters. With an advanced yet intuitive interface, you can create a wide range of effects and styles for your flyer, as well as format typography to a professional standard. It also matches InDesign for print specs, with the ability to add a bleed and printer’s marks and to work within a CMYK color space. 

Although currently only available in beta mode, the full version is slated for release later this year. 

Pros: Good-value alternative to InDesign (see below) with much of the same functionality

Cons: Arguably more limited than InDesign 

QuarkXPress

quark xpress

While many designers transitioned from the original publishing program, Quark, to InDesign some years ago, there still remains a devoted following for QuarkXPress.

Quark has a simple, intuitive interface which makes it great for print design beginners. It offers much of the same functionality as InDesign and Publisher. Only advanced users will miss some of the more sophisticated tools and functions on offer in InDesign. 

Pros: Easy-to-use interface which is great for print design beginners

Cons: More limited in functionality than Affinity Publisher and InDesign

Adobe InDesign

summer club flyer

Arguably, we’ve left the best program for creating flyers until last on our list. Adobe InDesign is the market leader in publishing software, and despite rivalry from Affinity, it still remains, for many designers, unbeatable.

Offering users advanced control over print design specs, typography, and images, as well as a comprehensive effects panel for adding gradients, transparencies, and other filters, InDesign is the designer’s choice for creating pro-standard flyers. The preflight function also ensures your exported artwork will be flawless.

The downside? InDesign doesn’t come cheap and is subscription-based, which may not suit everyone. 

Pros: Market-leading publishing software with sophisticated interface and functionality; fully optimised for print design; advanced export options for printing

Cons: Expensive; not immediately intuitive for complete beginners

And Don’t Forget… Templates

flyer template
Colorful marbled flyer template

Templates are a quick and handy way to get started with creating a flyer. It’s easy to switch up color, fonts, and images for a completely unique look too. 

While learning how to create flyers from scratch is a useful skill for any budding designer, sometimes you just need a good-looking flyer pronto. Templates have the hard work done for you—with layers, masters, and grids already established, you can spend more time getting creative.

Templates don’t have to be pricey. There are lots of free software apps, which allow you to adapt flyer templates online, such as Placeit.

placeit flyer templates
You can adapt a wide range of templates online for free using Placeit.

You can also find a wide range of flyer templates for Photoshop and InDesign on Envato Elements.

Conclusion: What’s the Best Program for Flyer Design?

As we’ve discussed, you can use many different programs to create flyer designs. While publishing software like Affinity Publisher or InDesign might be finely tuned for creating advanced print designs, Photoshop, Illustrator and template-based apps like Placeit can also offer designers a wide range of tools for designing pro-standard flyers.

Every designer has their preferred software of choice, so whether you prefer using Photoshop, InDesign, or even Word, you’ll always create your best design work in a software you feel most comfortable with using. 

If you want to polish up your flyer design skills, make sure to check out our new short course, How to Make a Flyer.

how to make a flyer

What’s the Best Program to Make a Flyer?

Post pobrano z: What’s the Best Program to Make a Flyer?

Flyers are the perfect way to promote an event, offer or business. And with the holiday season upon us, there’s never been a better time to work on your flyer design skills. 

party flyer

If you’re new to print design, it can be tricky to know where to get started. Here we look at the software options for creating flyers. Read on to find out which program is going to be best suited for creating your next flyer design. 

Word/Pages

microsoft word

If you’ve never created a flyer or other print item before, the software you’ll probably be most familiar with is a word processing program like Microsoft Word or Pages

While it’s tempting to dismiss Word out of hand, it’s actually a really versatile program for creating simple flyer designs. Particularly if you need to create something quickly and print from the office, Word can be a handy option. 

Although in many ways Word is much more limited than publishing software like InDesign, it still has many of the tools and features you need to create an effective flyer design, such as advanced text-formatting options and flexibility in page layout. 

Top Tip: To make the most of Word’s interface, try setting your text inside text boxes to give you maximum flexibility in how text can be placed on the page. 

Pros: Easy to access; cost-effective; easy to share files with colleagues

Cons: Very basic interface and functionality; not optimised for print design

Adobe Photoshop

skateboard flyer

For many designers, Photoshop is their first introduction to Adobe applications. For good reason too—it’s arguably easier and quicker to get to grips with than other Adobe apps, and has a sophisticated collection of tools and options to help you achieve a wide range of effects.

acoustic flyer
Acoustic Photoshop flyer template

Photoshop isn’t limited to photo editing as it also works fantastically for creating print design layouts. Although multi-page documents like books are much trickier to put together in canvas-based software like Photoshop, single-page documents like flyers and posters are well suited to the program.

In most aspects, flyer designers won’t have any issues with creating their layouts using Photoshop. However, there are a couple of things to be aware of before you start designing. 

Firstly, you will have to manually add a bleed to your Photoshop canvas. To do this, go to Image > Canvas Size, and add the bleed width to the canvas. You will have to add twice the bleed width for the height, and twice for the width, to add an equal bleed around the whole edge. 

You should also ensure that you’re working within the correct color space in Photoshop. The default mode in Photoshop is RGB, which is better suited for digital work. Go to Image > Mode and choose CMYK to optimise your design for print. 

Pros: Arguably the most intuitive of the Adobe Creative Suite applications; can be adapted to create print design layouts

Cons: Bleed width needs to be taken into account; need to ensure you’re working within the correct colorspace

Adobe Illustrator

adobe illustrator

If you’re a vector artist, your go-to program for creating illustrations will be vector software, like Adobe Illustrator, Inkscape, Affinity Designer, or Sketch

While vector programs like Illustrator are perfect for creating scaleable vector designs, they can also be adapted for creating one-page layouts for print, including flyers. 

If your flyer includes mostly vector graphics, such as logos, and text, Illustrator will be a good choice. On export, your flyer will be crisp and clear, without any pixelation.

photo flyer
Photo flyer template for Illustrator

Compared to Photoshop, Illustrator also offers more sophisticated print design specs, including bleed setup options. To add a bleed to your Illustrator artboard, go to File > Print. Select Marks & Bleed on the left side of the Print window. From here, you can set the bleed width for the artboard.

Pros: Good for creating vector-based designs; works seamlessly with other Adobe applications

Cons: Not optimised for creating layouts for print; limited typography functionality

Affinity Publisher

affinity publisher

Designers have been waiting for a decent rival to market-leading publishing program InDesign (see below), and Affinity Publisher may just be the budget-friendly option that could finally offer some serious competition for Adobe. 

Publisher is ideally suited for creating print media, such as flyers and posters. With an advanced yet intuitive interface, you can create a wide range of effects and styles for your flyer, as well as format typography to a professional standard. It also matches InDesign for print specs, with the ability to add a bleed and printer’s marks and to work within a CMYK color space. 

Although currently only available in beta mode, the full version is slated for release later this year. 

Pros: Good-value alternative to InDesign (see below) with much of the same functionality

Cons: Arguably more limited than InDesign 

QuarkXPress

quark xpress

While many designers transitioned from the original publishing program, Quark, to InDesign some years ago, there still remains a devoted following for QuarkXPress.

Quark has a simple, intuitive interface which makes it great for print design beginners. It offers much of the same functionality as InDesign and Publisher. Only advanced users will miss some of the more sophisticated tools and functions on offer in InDesign. 

Pros: Easy-to-use interface which is great for print design beginners

Cons: More limited in functionality than Affinity Publisher and InDesign

Adobe InDesign

summer club flyer

Arguably, we’ve left the best program for creating flyers until last on our list. Adobe InDesign is the market leader in publishing software, and despite rivalry from Affinity, it still remains, for many designers, unbeatable.

Offering users advanced control over print design specs, typography, and images, as well as a comprehensive effects panel for adding gradients, transparencies, and other filters, InDesign is the designer’s choice for creating pro-standard flyers. The preflight function also ensures your exported artwork will be flawless.

The downside? InDesign doesn’t come cheap and is subscription-based, which may not suit everyone. 

Pros: Market-leading publishing software with sophisticated interface and functionality; fully optimised for print design; advanced export options for printing

Cons: Expensive; not immediately intuitive for complete beginners

And Don’t Forget… Templates

flyer template
Colorful marbled flyer template

Templates are a quick and handy way to get started with creating a flyer. It’s easy to switch up color, fonts, and images for a completely unique look too. 

While learning how to create flyers from scratch is a useful skill for any budding designer, sometimes you just need a good-looking flyer pronto. Templates have the hard work done for you—with layers, masters, and grids already established, you can spend more time getting creative.

Templates don’t have to be pricey. There are lots of free software apps, which allow you to adapt flyer templates online, such as Placeit.

placeit flyer templates
You can adapt a wide range of templates online for free using Placeit.

You can also find a wide range of flyer templates for Photoshop and InDesign on Envato Elements.

Conclusion: What’s the Best Program for Flyer Design?

As we’ve discussed, you can use many different programs to create flyer designs. While publishing software like Affinity Publisher or InDesign might be finely tuned for creating advanced print designs, Photoshop, Illustrator and template-based apps like Placeit can also offer designers a wide range of tools for designing pro-standard flyers.

Every designer has their preferred software of choice, so whether you prefer using Photoshop, InDesign, or even Word, you’ll always create your best design work in a software you feel most comfortable with using. 

If you want to polish up your flyer design skills, make sure to check out our new short course, How to Make a Flyer.

how to make a flyer

What’s the Best Program to Make a Flyer?

Post pobrano z: What’s the Best Program to Make a Flyer?

Flyers are the perfect way to promote an event, offer or business. And with the holiday season upon us, there’s never been a better time to work on your flyer design skills. 

party flyer

If you’re new to print design, it can be tricky to know where to get started. Here we look at the software options for creating flyers. Read on to find out which program is going to be best suited for creating your next flyer design. 

Word/Pages

microsoft word

If you’ve never created a flyer or other print item before, the software you’ll probably be most familiar with is a word processing program like Microsoft Word or Pages

While it’s tempting to dismiss Word out of hand, it’s actually a really versatile program for creating simple flyer designs. Particularly if you need to create something quickly and print from the office, Word can be a handy option. 

Although in many ways Word is much more limited than publishing software like InDesign, it still has many of the tools and features you need to create an effective flyer design, such as advanced text-formatting options and flexibility in page layout. 

Top Tip: To make the most of Word’s interface, try setting your text inside text boxes to give you maximum flexibility in how text can be placed on the page. 

Pros: Easy to access; cost-effective; easy to share files with colleagues

Cons: Very basic interface and functionality; not optimised for print design

Adobe Photoshop

skateboard flyer

For many designers, Photoshop is their first introduction to Adobe applications. For good reason too—it’s arguably easier and quicker to get to grips with than other Adobe apps, and has a sophisticated collection of tools and options to help you achieve a wide range of effects.

acoustic flyer
Acoustic Photoshop flyer template

Photoshop isn’t limited to photo editing as it also works fantastically for creating print design layouts. Although multi-page documents like books are much trickier to put together in canvas-based software like Photoshop, single-page documents like flyers and posters are well suited to the program.

In most aspects, flyer designers won’t have any issues with creating their layouts using Photoshop. However, there are a couple of things to be aware of before you start designing. 

Firstly, you will have to manually add a bleed to your Photoshop canvas. To do this, go to Image > Canvas Size, and add the bleed width to the canvas. You will have to add twice the bleed width for the height, and twice for the width, to add an equal bleed around the whole edge. 

You should also ensure that you’re working within the correct color space in Photoshop. The default mode in Photoshop is RGB, which is better suited for digital work. Go to Image > Mode and choose CMYK to optimise your design for print. 

Pros: Arguably the most intuitive of the Adobe Creative Suite applications; can be adapted to create print design layouts

Cons: Bleed width needs to be taken into account; need to ensure you’re working within the correct colorspace

Adobe Illustrator

adobe illustrator

If you’re a vector artist, your go-to program for creating illustrations will be vector software, like Adobe Illustrator, Inkscape, Affinity Designer, or Sketch

While vector programs like Illustrator are perfect for creating scaleable vector designs, they can also be adapted for creating one-page layouts for print, including flyers. 

If your flyer includes mostly vector graphics, such as logos, and text, Illustrator will be a good choice. On export, your flyer will be crisp and clear, without any pixelation.

photo flyer
Photo flyer template for Illustrator

Compared to Photoshop, Illustrator also offers more sophisticated print design specs, including bleed setup options. To add a bleed to your Illustrator artboard, go to File > Print. Select Marks & Bleed on the left side of the Print window. From here, you can set the bleed width for the artboard.

Pros: Good for creating vector-based designs; works seamlessly with other Adobe applications

Cons: Not optimised for creating layouts for print; limited typography functionality

Affinity Publisher

affinity publisher

Designers have been waiting for a decent rival to market-leading publishing program InDesign (see below), and Affinity Publisher may just be the budget-friendly option that could finally offer some serious competition for Adobe. 

Publisher is ideally suited for creating print media, such as flyers and posters. With an advanced yet intuitive interface, you can create a wide range of effects and styles for your flyer, as well as format typography to a professional standard. It also matches InDesign for print specs, with the ability to add a bleed and printer’s marks and to work within a CMYK color space. 

Although currently only available in beta mode, the full version is slated for release later this year. 

Pros: Good-value alternative to InDesign (see below) with much of the same functionality

Cons: Arguably more limited than InDesign 

QuarkXPress

quark xpress

While many designers transitioned from the original publishing program, Quark, to InDesign some years ago, there still remains a devoted following for QuarkXPress.

Quark has a simple, intuitive interface which makes it great for print design beginners. It offers much of the same functionality as InDesign and Publisher. Only advanced users will miss some of the more sophisticated tools and functions on offer in InDesign. 

Pros: Easy-to-use interface which is great for print design beginners

Cons: More limited in functionality than Affinity Publisher and InDesign

Adobe InDesign

summer club flyer

Arguably, we’ve left the best program for creating flyers until last on our list. Adobe InDesign is the market leader in publishing software, and despite rivalry from Affinity, it still remains, for many designers, unbeatable.

Offering users advanced control over print design specs, typography, and images, as well as a comprehensive effects panel for adding gradients, transparencies, and other filters, InDesign is the designer’s choice for creating pro-standard flyers. The preflight function also ensures your exported artwork will be flawless.

The downside? InDesign doesn’t come cheap and is subscription-based, which may not suit everyone. 

Pros: Market-leading publishing software with sophisticated interface and functionality; fully optimised for print design; advanced export options for printing

Cons: Expensive; not immediately intuitive for complete beginners

And Don’t Forget… Templates

flyer template
Colorful marbled flyer template

Templates are a quick and handy way to get started with creating a flyer. It’s easy to switch up color, fonts, and images for a completely unique look too. 

While learning how to create flyers from scratch is a useful skill for any budding designer, sometimes you just need a good-looking flyer pronto. Templates have the hard work done for you—with layers, masters, and grids already established, you can spend more time getting creative.

Templates don’t have to be pricey. There are lots of free software apps, which allow you to adapt flyer templates online, such as Placeit.

placeit flyer templates
You can adapt a wide range of templates online for free using Placeit.

You can also find a wide range of flyer templates for Photoshop and InDesign on Envato Elements.

Conclusion: What’s the Best Program for Flyer Design?

As we’ve discussed, you can use many different programs to create flyer designs. While publishing software like Affinity Publisher or InDesign might be finely tuned for creating advanced print designs, Photoshop, Illustrator and template-based apps like Placeit can also offer designers a wide range of tools for designing pro-standard flyers.

Every designer has their preferred software of choice, so whether you prefer using Photoshop, InDesign, or even Word, you’ll always create your best design work in a software you feel most comfortable with using. 

If you want to polish up your flyer design skills, make sure to check out our new short course, How to Make a Flyer.

how to make a flyer

How to Create an Action in Photoshop

Post pobrano z: How to Create an Action in Photoshop

Final product image
What You’ll Be Creating

If you know how to make Photoshop actions, you have a powerful tool in your hands. Actions let you create magical Photoshop effects with a single click, saving you a lot of time and effort. In this tutorial, I will show you how to create an action in Photoshop so that you can design your own effects for pictures.

Follow along over on our Envato Tuts+ YouTube channel:

1. How to Create an Action in Photoshop

Step 1

First, you need to have a sample image that will help you see the effects of the action. Open it in Photoshop.

open your file
I used this image.

Step 2

Open the Actions panel. You can find it under Window > Actions.

open actions panel

Step 3

To create a new action, click the white card icon on the bottom of the panel.

create new action

Step 4

Give the action a name. If you want to be able to play this action with a press of a button, you can assign a Function Key to it.

name your action

Step 5

The action is being recorded now. But don’t worry, there’s no hurry. Photoshop only records your actions, and it doesn’t care how much time passes between them.

start recording an action

Let’s show Photoshop which actions we want it to save for later. First, create a New Layer.

create new layer

You’ll notice that your action has been automatically added to the list in the Actions panel.

new action added

Step 6

Let’s fill this layer with some color. When creating an action, it’s better to avoid tools that are based on clicking on the canvas, because if you play the action on an image with a different size, it may not work properly. Always try to use something as universal and fool-proof as possible—so instead of using the Paint Bucket Tool to fill the canvas, go to Edit > Fill.

fill canvas

Step 7

Let’s do something fun with this layer. Right click it and select Blending Options. This panel is often used in actions, because it’s full of switches and sliders that you can use to heavily modify the layer, without having to point at anything on the canvas.

First, drag Fill Opacity down to zero. This will make the fill color invisible.

open blending options

Step 8

Check Gradient Overlay and click it to see its settings.

check gradient overlay

Step 9

Change the gradient to a rainbow.

add rainbow gradient

Step 10

Change the Angle of the gradient to something more interesting.

rotate gradient

Step 11

Finally, change the Blend Mode to Color.

change blend mode of gradient

This method lets you apply the colors of the gradient to the image below without modifying it.

how to make rainbow photo in photoshop

Step 12

If you like the effect, press OK and stop recording by clicking the first button in the Actions panel.

stop recording an action

Step 13

And that’s it, our action has been recorded and saved! If you want to use it, just click the play button.

play an action

You can test it on many different images. A properly created action will give you the same results regardless of the photo you use!

rainbow action examples

To give you a better idea of how Photoshop actions can be used, here are a few examples from Envato Elements.

Painting Photoshop Action

If you want to turn a photo into a painting, it can be done with a single click, too! This action uses custom brushes and patterns to create a convincing effect of an oil painting. It also organizes the layer neatly, so that you can customize the effect afterwards.

painting photoshop action
Painting Photoshop Action

Geometric Portrait Photoshop Action

This action is a good example of a selective photo effect. Before you play the action, you must show the program which area you want to be affected. This is especially useful for portraits, to create a different effect for the person and the background.

portrait photoshop action
Geometric Portrait Photoshop Action

Cartoon Photoshop Action

Photoshop actions can also be used to create a comic book effect. You don’t have to be able to draw to create something that looks like a nicely stylized drawing! Just find a good photo, select the character, and click play!

cartoon photoshop action
Cartoon Photoshop Action

Vintage Photo Effect

If you want to give your photo a vintage feel, it can be easily done with many types of actions. This set has 20 of them, and each of these actions will give your photo a unique style that brings old cameras to mind.

vintage photo effect
Vintage Photo Effect Action

Retro Poster Photoshop Action

But photo effects don’t need to be all about photos. You can create a real poster from start to finish with a carefully prepared action. This action turns a photo into a neat illustration that can be used as a retro style poster.

restro photoshop action
Retro Poster Photoshop Action

Good Job!

Now you know how to create a Photoshop action step by step. If you want to learn more about Photoshop actions and photo effects in general, you can try these tutorials as well:

how to create action in photosop

How to Create an Action in Photoshop

Post pobrano z: How to Create an Action in Photoshop

Final product image
What You’ll Be Creating

If you know how to make Photoshop actions, you have a powerful tool in your hands. Actions let you create magical Photoshop effects with a single click, saving you a lot of time and effort. In this tutorial, I will show you how to create an action in Photoshop so that you can design your own effects for pictures.

Follow along over on our Envato Tuts+ YouTube channel:

1. How to Create an Action in Photoshop

Step 1

First, you need to have a sample image that will help you see the effects of the action. Open it in Photoshop.

open your file
I used this image.

Step 2

Open the Actions panel. You can find it under Window > Actions.

open actions panel

Step 3

To create a new action, click the white card icon on the bottom of the panel.

create new action

Step 4

Give the action a name. If you want to be able to play this action with a press of a button, you can assign a Function Key to it.

name your action

Step 5

The action is being recorded now. But don’t worry, there’s no hurry. Photoshop only records your actions, and it doesn’t care how much time passes between them.

start recording an action

Let’s show Photoshop which actions we want it to save for later. First, create a New Layer.

create new layer

You’ll notice that your action has been automatically added to the list in the Actions panel.

new action added

Step 6

Let’s fill this layer with some color. When creating an action, it’s better to avoid tools that are based on clicking on the canvas, because if you play the action on an image with a different size, it may not work properly. Always try to use something as universal and fool-proof as possible—so instead of using the Paint Bucket Tool to fill the canvas, go to Edit > Fill.

fill canvas

Step 7

Let’s do something fun with this layer. Right click it and select Blending Options. This panel is often used in actions, because it’s full of switches and sliders that you can use to heavily modify the layer, without having to point at anything on the canvas.

First, drag Fill Opacity down to zero. This will make the fill color invisible.

open blending options

Step 8

Check Gradient Overlay and click it to see its settings.

check gradient overlay

Step 9

Change the gradient to a rainbow.

add rainbow gradient

Step 10

Change the Angle of the gradient to something more interesting.

rotate gradient

Step 11

Finally, change the Blend Mode to Color.

change blend mode of gradient

This method lets you apply the colors of the gradient to the image below without modifying it.

how to make rainbow photo in photoshop

Step 12

If you like the effect, press OK and stop recording by clicking the first button in the Actions panel.

stop recording an action

Step 13

And that’s it, our action has been recorded and saved! If you want to use it, just click the play button.

play an action

You can test it on many different images. A properly created action will give you the same results regardless of the photo you use!

rainbow action examples

To give you a better idea of how Photoshop actions can be used, here are a few examples from Envato Elements.

Painting Photoshop Action

If you want to turn a photo into a painting, it can be done with a single click, too! This action uses custom brushes and patterns to create a convincing effect of an oil painting. It also organizes the layer neatly, so that you can customize the effect afterwards.

painting photoshop action
Painting Photoshop Action

Geometric Portrait Photoshop Action

This action is a good example of a selective photo effect. Before you play the action, you must show the program which area you want to be affected. This is especially useful for portraits, to create a different effect for the person and the background.

portrait photoshop action
Geometric Portrait Photoshop Action

Cartoon Photoshop Action

Photoshop actions can also be used to create a comic book effect. You don’t have to be able to draw to create something that looks like a nicely stylized drawing! Just find a good photo, select the character, and click play!

cartoon photoshop action
Cartoon Photoshop Action

Vintage Photo Effect

If you want to give your photo a vintage feel, it can be easily done with many types of actions. This set has 20 of them, and each of these actions will give your photo a unique style that brings old cameras to mind.

vintage photo effect
Vintage Photo Effect Action

Retro Poster Photoshop Action

But photo effects don’t need to be all about photos. You can create a real poster from start to finish with a carefully prepared action. This action turns a photo into a neat illustration that can be used as a retro style poster.

restro photoshop action
Retro Poster Photoshop Action

Good Job!

Now you know how to create a Photoshop action step by step. If you want to learn more about Photoshop actions and photo effects in general, you can try these tutorials as well:

how to create action in photosop