
Archiwum miesiąca: kwiecień 2019

HARNESS KING

NEXT TOUCH


30 Best Fonts for Making Monograms & Logo Designs in 2019
Post pobrano z: 30 Best Fonts for Making Monograms & Logo Designs in 2019
Create the best logos with monogram designs. Check out this list of premium logo fonts.
30 Best Fonts for Monograms & Logos
Having trouble designing a logo? A popular concept style that is easy and memorable is the classic monogram logo.
Simply put, a monogram is a symbol, usually made up of letters. Monograms have had a strong function in history, and many designers today use these simple motifs for symbolic professional and personal logos.
So today we’re bringing you another fantastic selection of premium resources from Envato Market and Envato Elements.
Featuring the best logo fonts with 30 amazing styles, this collection is unique and futuristic. Take advantage of cool monogram fonts created by our talented community.
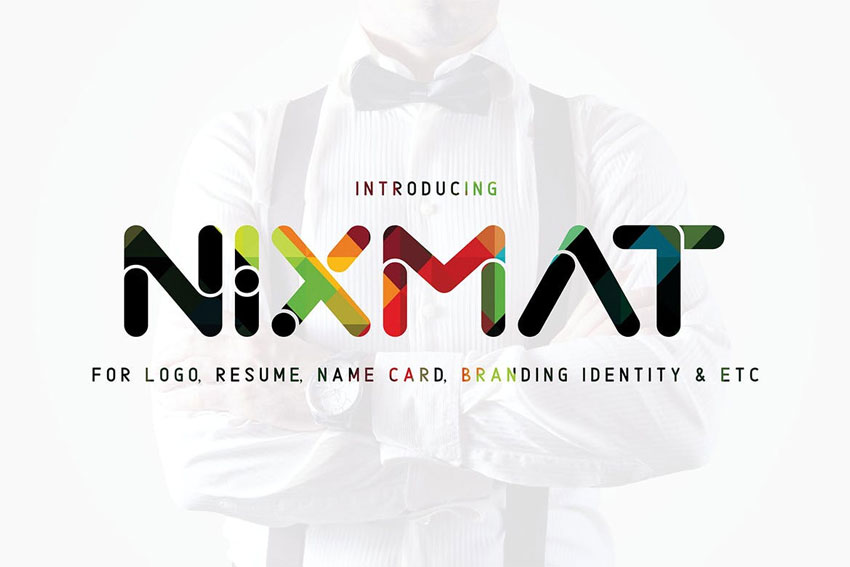
Nixmat Font
Design impressive logos with the cool Nixmat font. Featuring bold, rounded letters and creative linear details, this font is sure to make you shine. Pair it with effective brand materials for the all-around complete package. Download it today to add style to your work!
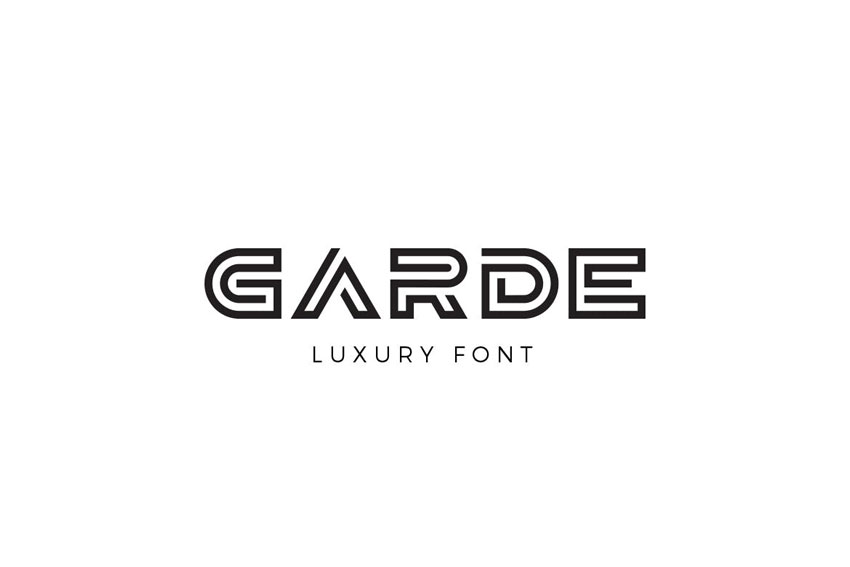
Garde Font
Create compelling campaigns with the luxurious Garde font. A clean monogram font with high-end features, this font is stylish and strong. It works perfectly with many creative industries including beauty, fashion, and so much more. So give your logos that bold edge over the competition with Garde!
Karma Font
Improve your karma with a creative font. The Karma font is unique and outstanding. Its geometric line style perfectly matches the recent trends in retro 90s design. And you’ll love its clean, block-style design. Test it out with your name or company for a new monogram logo.

WS Free Line
Make a bold impact with the WS Free Line typeface. This monogram font is the perfect companion to any design project. Create decorative logos with tall, elegant letters and interesting line details. Use it on posters, stationery, and more!

Hom Monogram
You don’t need extra characters or symbols with the Hom Monogram font. This extraordinary pack features a trendy monogram suitable for weddings or brands. Personalize it easily with the help of most design programs. Try it out!

Armor Font
Need a font for a strong brand? Try out this amazing armor font. Great for old world projects or athletic brands, this font conveys incredible strength with tall letters and a cool serif decoration. Enjoy this typeface for branding, headers, and even merchandise.

Robodron Font
How will robotic design affect the future of
fonts? The Robodron font family reflects the incredible look of clean,
futuristic curves and capital letters. This impressive download is
certainly a great find and perfect for any budding creative. Create
logos for posters, websites, and more!

Raisa Script Logo Font
Script font styles with sweeping curves are a popular treat for designers. And the Raisa Script font features a compelling design that is stunning yet casual. Create flowy monogram letters perfect for any wedding invite or stationery. A pretty and elegant look!

Bathey Calligraphy Font
Brighten your stationery with a classic, elegant script. This Bathey calligraphy font will do just the trick for a clean and modern appeal. This font package includes upper and lowercase letters as well as numbers and punctuation. How will you use it?

Rancho Font
Taking inspiration from an old Western film, this Rancho font is spicy and cool. It gives you that authentic-looking ranch vibe with nice serif details. Instantly make your work look more rustic and rugged with this Rancho font. Try it out!

Scripto Fonte Font Duo
Font duo packs are always a fantastic way to upgrade your logo! This handwritten font duo includes two well made typefaces. One is script and the other is sans serif for all your basic projects. Combine the two for a stellar result. Check it out!

Mustica Script Font
Celebrate your special day with the Mustica script font. A favorite among wedding planners and designers, this script font features wavy, calligraphic letters. Each line was created with incredible care for an all-around beautiful and soft look. Add it to your collection!

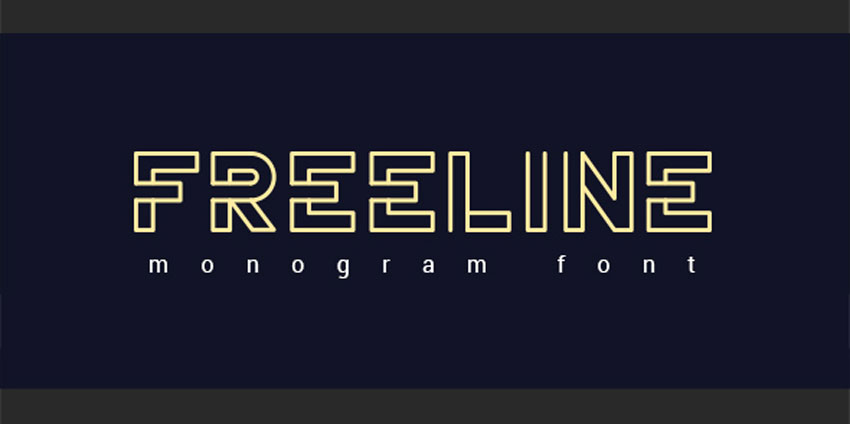
FreeLine Font
Innovate with a strong monogram font like the FreeLine typeface. This fashionable font features bold capital letters designed with creative, linear details. Wow any crowd with phenomenal headlines and impressive titles. And match it with any color to fit your style!
Giodasi Font
Need a font that looks as if it was made with a brush? Introducing this phenomenal handwritten typeface! The Giodasi font is different and fresh. It features long brush-styled letters that were individually made by hand. Use it for logos on apparel and more.

Sentaline Monogram Font
Sometimes you have to be a little unusual to stand out. The Sentaline Monogram font will help you break barriers with its futuristic monogram style. Great for headlines, logos, and titles, this font comes with a full set of letters, numbers, and characters. Enjoy!

Bowlist Logo Type
Show off your creative style with the Bowlist logo typeface. A bold calligraphic font, this typeface features a natural handwritten look. So update your recent projects with a modern logo font that is cool and impressive. Check it out on posters and more!

Sentagram Monogram Logo
This good-looking font could definitely work for luxury brands or fashionable personalities. Check out the creative Sentagram logo with sleek and sophisticated lines. Create an artistic brand that will shine the moment you place it on any stationery. Add it to your collection!

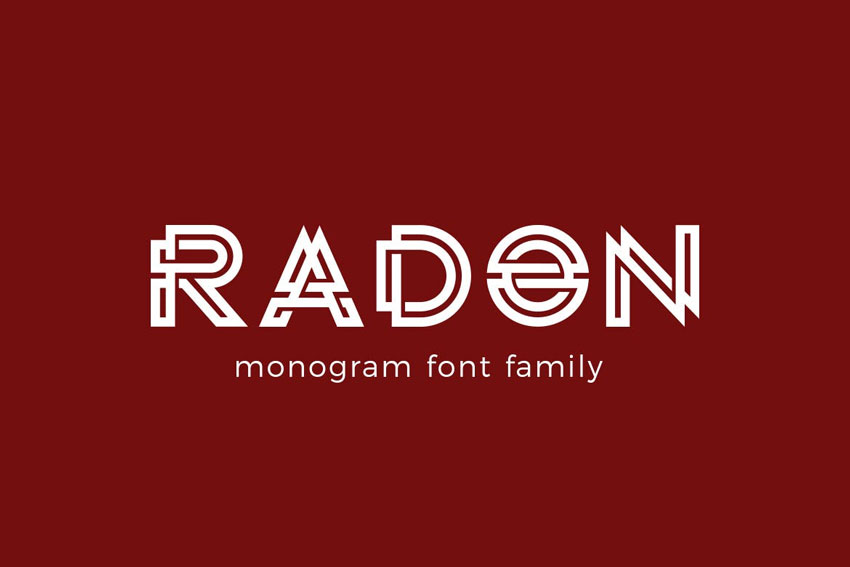
Radon Monogram Logo Font
Our next font family is definitely like no other. The letters for the Radon logo font interlock with exciting line designs. Perfect for minimalists, this font has just enough details to stand out from the crowd. Great for monogram logos, headlines, and posters too!
Goldiana Font Script
Perhaps you need something simple but elegant. Then check out the lovely Goldiana font script. Including lowercase and capital letters, this font pack is sweet and super pretty. It’s best suited for logos and invites, but I’m sure it’ll work for other creative projects too. Give it a try!

Forest Line Linear Font
Choose between light, regular and bold styles for this creative Forest Line Linear font. This typeface is bold and unique. It looks best at a size of 40 pt and includes all the files you need to get started. Add this one to your design arsenal!

Shintya Typeface
Craft an extraordinary look with the Shintya typeface. A curvy font full of feelings and allure, this typeface is soft and approachable. Fulfill the needs of your brand or wedding planning with this lovely design. And make sure to check out the preview images to see all the letters and characters!

Realita Color Font
It’s
easy to get caught up with standard, boring logos. Freshen up your look
with this daring and beautiful color font. This font is suitable for
many projects and is supported by applications that use color fonts.
Enjoy four different styles for more fabulous options.

Aline Font
How would you use the thrilling Aline font? A cool, linear style that resembles many Art Deco designs, this font is striking and classy. Update your concert posters, invite cards, and so much more with its fantastic characters. Works best in large font sizes.

Qindom Brush Fonts
Designers are now able to capture rich, authentic brush textures from calligraphy brushes. And this Qindom brush pack is a wonderful example of a beautiful brush script which retains its quality and texture. Enjoy an additional web font version for more versatility.

Cephalonia Font
It may take some time before your find the right font. Make sure to experiment with interesting and unique styles like this Cephalonia typeface. This handwritten font includes alternates, ligatures and an additional underline option. Use it on posters, merch and more!

Neue Stanley Font
We’re back with another great font and that’s this classic style Neue Stanley typeface. This font is inspired by the classic letter styling found in old posters and advertisements. Make authentic looking vintage projects with this stunning font.

Bernaillo Script Font
What kind of font are you looking for? Try out this brilliant Bernaillo script typeface. This handwritten font has an elegant and curvy baseline with tall, script letters you’ll certainly adore. Add this look to your stationery, invites and logos for a personal touch.

Academy House Font
Add a natural, rustic flair to your monogram logo. The Academy House font features striking textures and curvy loops. It’s made with a playful baseline to add a lot of character to your work. Perfect for prints, posters, and invites, this font will refresh your logos!

Austen Display Font
Design a classic monogram like your favorite vintage crests. The Austen display font is elegant and refined. Give your work that Victorian flavor with this beautiful font style that’s great for logos. Test it out on invites for weddings or any special occasion for stunning results.

Gramin Font
Your logo should reflect your unique spirit. So write out stunning letters and more with the Gramin font. A hand-painted display font with tall, serif letters, this font is casual and friendly. Download this official set of all capital letters, numbers, and punctuation today!

More Font Inspiration
You can make exquisite logos with minimalist monogram fonts. Which ones will you try to upgrade your designs and invites?
Love these logo collections? Check out these amazing articles for more:
 Fonts25 Stylish Vintage FontsMelody Nieves
 Fonts28 Best New Fonts for 2019Melody Nieves
 Graphic DesignThe Best Alternatives to the 10 Most Popular FontsLaura Keung
 Fonts30 Best Blackletter and Gothic Fonts for DesignersGrace Fussell
Tried any of these assets? Let us know! Tell us your favorite logo monogram fonts in the comments below.
This has been a selection of premium resources perfect for the avid designer. For more logo monogram fonts, make sure to check out Envato Market and Envato Elements, or enlist the help of our talented professionals at Envato Studio. Happy designing!

30 Best Fonts for Making Monograms & Logo Designs in 2019
Post pobrano z: 30 Best Fonts for Making Monograms & Logo Designs in 2019
Create the best logos with monogram designs. Check out this list of premium logo fonts.
30 Best Fonts for Monograms & Logos
Having trouble designing a logo? A popular concept style that is easy and memorable is the classic monogram logo.
Simply put, a monogram is a symbol, usually made up of letters. Monograms have had a strong function in history, and many designers today use these simple motifs for symbolic professional and personal logos.
So today we’re bringing you another fantastic selection of premium resources from Envato Market and Envato Elements.
Featuring the best logo fonts with 30 amazing styles, this collection is unique and futuristic. Take advantage of cool monogram fonts created by our talented community.
Nixmat Font
Design impressive logos with the cool Nixmat font. Featuring bold, rounded letters and creative linear details, this font is sure to make you shine. Pair it with effective brand materials for the all-around complete package. Download it today to add style to your work!
Garde Font
Create compelling campaigns with the luxurious Garde font. A clean monogram font with high-end features, this font is stylish and strong. It works perfectly with many creative industries including beauty, fashion, and so much more. So give your logos that bold edge over the competition with Garde!
Karma Font
Improve your karma with a creative font. The Karma font is unique and outstanding. Its geometric line style perfectly matches the recent trends in retro 90s design. And you’ll love its clean, block-style design. Test it out with your name or company for a new monogram logo.
WS Free Line
Make a bold impact with the WS Free Line typeface. This monogram font is the perfect companion to any design project. Create decorative logos with tall, elegant letters and interesting line details. Use it on posters, stationery, and more!
Hom Monogram
You don’t need extra characters or symbols with the Hom Monogram font. This extraordinary pack features a trendy monogram suitable for weddings or brands. Personalize it easily with the help of most design programs. Try it out!
Armor Font
Need a font for a strong brand? Try out this amazing armor font. Great for old world projects or athletic brands, this font conveys incredible strength with tall letters and a cool serif decoration. Enjoy this typeface for branding, headers, and even merchandise.
Robodron Font
How will robotic design affect the future of
fonts? The Robodron font family reflects the incredible look of clean,
futuristic curves and capital letters. This impressive download is
certainly a great find and perfect for any budding creative. Create
logos for posters, websites, and more!
Raisa Script Logo Font
Script font styles with sweeping curves are a popular treat for designers. And the Raisa Script font features a compelling design that is stunning yet casual. Create flowy monogram letters perfect for any wedding invite or stationery. A pretty and elegant look!
Bathey Calligraphy Font
Brighten your stationery with a classic, elegant script. This Bathey calligraphy font will do just the trick for a clean and modern appeal. This font package includes upper and lowercase letters as well as numbers and punctuation. How will you use it?
Rancho Font
Taking inspiration from an old Western film, this Rancho font is spicy and cool. It gives you that authentic-looking ranch vibe with nice serif details. Instantly make your work look more rustic and rugged with this Rancho font. Try it out!
Scripto Fonte Font Duo
Font duo packs are always a fantastic way to upgrade your logo! This handwritten font duo includes two well made typefaces. One is script and the other is sans serif for all your basic projects. Combine the two for a stellar result. Check it out!
Mustica Script Font
Celebrate your special day with the Mustica script font. A favorite among wedding planners and designers, this script font features wavy, calligraphic letters. Each line was created with incredible care for an all-around beautiful and soft look. Add it to your collection!
FreeLine Font
Innovate with a strong monogram font like the FreeLine typeface. This fashionable font features bold capital letters designed with creative, linear details. Wow any crowd with phenomenal headlines and impressive titles. And match it with any color to fit your style!
Giodasi Font
Need a font that looks as if it was made with a brush? Introducing this phenomenal handwritten typeface! The Giodasi font is different and fresh. It features long brush-styled letters that were individually made by hand. Use it for logos on apparel and more.
Sentaline Monogram Font
Sometimes you have to be a little unusual to stand out. The Sentaline Monogram font will help you break barriers with its futuristic monogram style. Great for headlines, logos, and titles, this font comes with a full set of letters, numbers, and characters. Enjoy!
Bowlist Logo Type
Show off your creative style with the Bowlist logo typeface. A bold calligraphic font, this typeface features a natural handwritten look. So update your recent projects with a modern logo font that is cool and impressive. Check it out on posters and more!
Sentagram Monogram Logo
This good-looking font could definitely work for luxury brands or fashionable personalities. Check out the creative Sentagram logo with sleek and sophisticated lines. Create an artistic brand that will shine the moment you place it on any stationery. Add it to your collection!
Radon Monogram Logo Font
Our next font family is definitely like no other. The letters for the Radon logo font interlock with exciting line designs. Perfect for minimalists, this font has just enough details to stand out from the crowd. Great for monogram logos, headlines, and posters too!
Goldiana Font Script
Perhaps you need something simple but elegant. Then check out the lovely Goldiana font script. Including lowercase and capital letters, this font pack is sweet and super pretty. It’s best suited for logos and invites, but I’m sure it’ll work for other creative projects too. Give it a try!
Forest Line Linear Font
Choose between light, regular and bold styles for this creative Forest Line Linear font. This typeface is bold and unique. It looks best at a size of 40 pt and includes all the files you need to get started. Add this one to your design arsenal!
Shintya Typeface
Craft an extraordinary look with the Shintya typeface. A curvy font full of feelings and allure, this typeface is soft and approachable. Fulfill the needs of your brand or wedding planning with this lovely design. And make sure to check out the preview images to see all the letters and characters!
Realita Color Font
It’s
easy to get caught up with standard, boring logos. Freshen up your look
with this daring and beautiful color font. This font is suitable for
many projects and is supported by applications that use color fonts.
Enjoy four different styles for more fabulous options.
Aline Font
How would you use the thrilling Aline font? A cool, linear style that resembles many Art Deco designs, this font is striking and classy. Update your concert posters, invite cards, and so much more with its fantastic characters. Works best in large font sizes.
Qindom Brush Fonts
Designers are now able to capture rich, authentic brush textures from calligraphy brushes. And this Qindom brush pack is a wonderful example of a beautiful brush script which retains its quality and texture. Enjoy an additional web font version for more versatility.
Cephalonia Font
It may take some time before your find the right font. Make sure to experiment with interesting and unique styles like this Cephalonia typeface. This handwritten font includes alternates, ligatures and an additional underline option. Use it on posters, merch and more!
Neue Stanley Font
We’re back with another great font and that’s this classic style Neue Stanley typeface. This font is inspired by the classic letter styling found in old posters and advertisements. Make authentic looking vintage projects with this stunning font.
Bernaillo Script Font
What kind of font are you looking for? Try out this brilliant Bernaillo script typeface. This handwritten font has an elegant and curvy baseline with tall, script letters you’ll certainly adore. Add this look to your stationery, invites and logos for a personal touch.
Academy House Font
Add a natural, rustic flair to your monogram logo. The Academy House font features striking textures and curvy loops. It’s made with a playful baseline to add a lot of character to your work. Perfect for prints, posters, and invites, this font will refresh your logos!
Austen Display Font
Design a classic monogram like your favorite vintage crests. The Austen display font is elegant and refined. Give your work that Victorian flavor with this beautiful font style that’s great for logos. Test it out on invites for weddings or any special occasion for stunning results.
Gramin Font
Your logo should reflect your unique spirit. So write out stunning letters and more with the Gramin font. A hand-painted display font with tall, serif letters, this font is casual and friendly. Download this official set of all capital letters, numbers, and punctuation today!
More Font Inspiration
You can make exquisite logos with minimalist monogram fonts. Which ones will you try to upgrade your designs and invites?
Love these logo collections? Check out these amazing articles for more:
-
Fonts25 Stylish Vintage FontsMelody Nieves
-
Fonts28 Best New Fonts for 2019Melody Nieves
-
Graphic DesignThe Best Alternatives to the 10 Most Popular FontsLaura Keung
-
Fonts30 Best Blackletter and Gothic Fonts for DesignersGrace Fussell
Tried any of these assets? Let us know! Tell us your favorite logo monogram fonts in the comments below.
This has been a selection of premium resources perfect for the avid designer. For more logo monogram fonts, make sure to check out Envato Market and Envato Elements, or enlist the help of our talented professionals at Envato Studio. Happy designing!
30 Best Fonts for Making Monograms & Logo Designs in 2019
Post pobrano z: 30 Best Fonts for Making Monograms & Logo Designs in 2019
Create the best logos with monogram designs. Check out this list of premium logo fonts.
30 Best Fonts for Monograms & Logos
Having trouble designing a logo? A popular concept style that is easy and memorable is the classic monogram logo.
Simply put, a monogram is a symbol, usually made up of letters. Monograms have had a strong function in history, and many designers today use these simple motifs for symbolic professional and personal logos.
So today we’re bringing you another fantastic selection of premium resources from Envato Market and Envato Elements.
Featuring the best logo fonts with 30 amazing styles, this collection is unique and futuristic. Take advantage of cool monogram fonts created by our talented community.
Nixmat Font
Design impressive logos with the cool Nixmat font. Featuring bold, rounded letters and creative linear details, this font is sure to make you shine. Pair it with effective brand materials for the all-around complete package. Download it today to add style to your work!
Garde Font
Create compelling campaigns with the luxurious Garde font. A clean monogram font with high-end features, this font is stylish and strong. It works perfectly with many creative industries including beauty, fashion, and so much more. So give your logos that bold edge over the competition with Garde!
Karma Font
Improve your karma with a creative font. The Karma font is unique and outstanding. Its geometric line style perfectly matches the recent trends in retro 90s design. And you’ll love its clean, block-style design. Test it out with your name or company for a new monogram logo.
WS Free Line
Make a bold impact with the WS Free Line typeface. This monogram font is the perfect companion to any design project. Create decorative logos with tall, elegant letters and interesting line details. Use it on posters, stationery, and more!
Hom Monogram
You don’t need extra characters or symbols with the Hom Monogram font. This extraordinary pack features a trendy monogram suitable for weddings or brands. Personalize it easily with the help of most design programs. Try it out!
Armor Font
Need a font for a strong brand? Try out this amazing armor font. Great for old world projects or athletic brands, this font conveys incredible strength with tall letters and a cool serif decoration. Enjoy this typeface for branding, headers, and even merchandise.
Robodron Font
How will robotic design affect the future of
fonts? The Robodron font family reflects the incredible look of clean,
futuristic curves and capital letters. This impressive download is
certainly a great find and perfect for any budding creative. Create
logos for posters, websites, and more!
Raisa Script Logo Font
Script font styles with sweeping curves are a popular treat for designers. And the Raisa Script font features a compelling design that is stunning yet casual. Create flowy monogram letters perfect for any wedding invite or stationery. A pretty and elegant look!
Bathey Calligraphy Font
Brighten your stationery with a classic, elegant script. This Bathey calligraphy font will do just the trick for a clean and modern appeal. This font package includes upper and lowercase letters as well as numbers and punctuation. How will you use it?
Rancho Font
Taking inspiration from an old Western film, this Rancho font is spicy and cool. It gives you that authentic-looking ranch vibe with nice serif details. Instantly make your work look more rustic and rugged with this Rancho font. Try it out!
Scripto Fonte Font Duo
Font duo packs are always a fantastic way to upgrade your logo! This handwritten font duo includes two well made typefaces. One is script and the other is sans serif for all your basic projects. Combine the two for a stellar result. Check it out!
Mustica Script Font
Celebrate your special day with the Mustica script font. A favorite among wedding planners and designers, this script font features wavy, calligraphic letters. Each line was created with incredible care for an all-around beautiful and soft look. Add it to your collection!
FreeLine Font
Innovate with a strong monogram font like the FreeLine typeface. This fashionable font features bold capital letters designed with creative, linear details. Wow any crowd with phenomenal headlines and impressive titles. And match it with any color to fit your style!
Giodasi Font
Need a font that looks as if it was made with a brush? Introducing this phenomenal handwritten typeface! The Giodasi font is different and fresh. It features long brush-styled letters that were individually made by hand. Use it for logos on apparel and more.
Sentaline Monogram Font
Sometimes you have to be a little unusual to stand out. The Sentaline Monogram font will help you break barriers with its futuristic monogram style. Great for headlines, logos, and titles, this font comes with a full set of letters, numbers, and characters. Enjoy!
Bowlist Logo Type
Show off your creative style with the Bowlist logo typeface. A bold calligraphic font, this typeface features a natural handwritten look. So update your recent projects with a modern logo font that is cool and impressive. Check it out on posters and more!
Sentagram Monogram Logo
This good-looking font could definitely work for luxury brands or fashionable personalities. Check out the creative Sentagram logo with sleek and sophisticated lines. Create an artistic brand that will shine the moment you place it on any stationery. Add it to your collection!
Radon Monogram Logo Font
Our next font family is definitely like no other. The letters for the Radon logo font interlock with exciting line designs. Perfect for minimalists, this font has just enough details to stand out from the crowd. Great for monogram logos, headlines, and posters too!
Goldiana Font Script
Perhaps you need something simple but elegant. Then check out the lovely Goldiana font script. Including lowercase and capital letters, this font pack is sweet and super pretty. It’s best suited for logos and invites, but I’m sure it’ll work for other creative projects too. Give it a try!
Forest Line Linear Font
Choose between light, regular and bold styles for this creative Forest Line Linear font. This typeface is bold and unique. It looks best at a size of 40 pt and includes all the files you need to get started. Add this one to your design arsenal!
Shintya Typeface
Craft an extraordinary look with the Shintya typeface. A curvy font full of feelings and allure, this typeface is soft and approachable. Fulfill the needs of your brand or wedding planning with this lovely design. And make sure to check out the preview images to see all the letters and characters!
Realita Color Font
It’s
easy to get caught up with standard, boring logos. Freshen up your look
with this daring and beautiful color font. This font is suitable for
many projects and is supported by applications that use color fonts.
Enjoy four different styles for more fabulous options.
Aline Font
How would you use the thrilling Aline font? A cool, linear style that resembles many Art Deco designs, this font is striking and classy. Update your concert posters, invite cards, and so much more with its fantastic characters. Works best in large font sizes.
Qindom Brush Fonts
Designers are now able to capture rich, authentic brush textures from calligraphy brushes. And this Qindom brush pack is a wonderful example of a beautiful brush script which retains its quality and texture. Enjoy an additional web font version for more versatility.
Cephalonia Font
It may take some time before your find the right font. Make sure to experiment with interesting and unique styles like this Cephalonia typeface. This handwritten font includes alternates, ligatures and an additional underline option. Use it on posters, merch and more!
Neue Stanley Font
We’re back with another great font and that’s this classic style Neue Stanley typeface. This font is inspired by the classic letter styling found in old posters and advertisements. Make authentic looking vintage projects with this stunning font.
Bernaillo Script Font
What kind of font are you looking for? Try out this brilliant Bernaillo script typeface. This handwritten font has an elegant and curvy baseline with tall, script letters you’ll certainly adore. Add this look to your stationery, invites and logos for a personal touch.
Academy House Font
Add a natural, rustic flair to your monogram logo. The Academy House font features striking textures and curvy loops. It’s made with a playful baseline to add a lot of character to your work. Perfect for prints, posters, and invites, this font will refresh your logos!
Austen Display Font
Design a classic monogram like your favorite vintage crests. The Austen display font is elegant and refined. Give your work that Victorian flavor with this beautiful font style that’s great for logos. Test it out on invites for weddings or any special occasion for stunning results.
Gramin Font
Your logo should reflect your unique spirit. So write out stunning letters and more with the Gramin font. A hand-painted display font with tall, serif letters, this font is casual and friendly. Download this official set of all capital letters, numbers, and punctuation today!
More Font Inspiration
You can make exquisite logos with minimalist monogram fonts. Which ones will you try to upgrade your designs and invites?
Love these logo collections? Check out these amazing articles for more:
-
Fonts25 Stylish Vintage FontsMelody Nieves
-
Fonts28 Best New Fonts for 2019Melody Nieves
-
Graphic DesignThe Best Alternatives to the 10 Most Popular FontsLaura Keung
-
Fonts30 Best Blackletter and Gothic Fonts for DesignersGrace Fussell
Tried any of these assets? Let us know! Tell us your favorite logo monogram fonts in the comments below.
This has been a selection of premium resources perfect for the avid designer. For more logo monogram fonts, make sure to check out Envato Market and Envato Elements, or enlist the help of our talented professionals at Envato Studio. Happy designing!
30 Best Fonts for Making Monograms & Logo Designs in 2019
Post pobrano z: 30 Best Fonts for Making Monograms & Logo Designs in 2019
Create the best logos with monogram designs. Check out this list of premium logo fonts.
30 Best Fonts for Monograms & Logos
Having trouble designing a logo? A popular concept style that is easy and memorable is the classic monogram logo.
Simply put, a monogram is a symbol, usually made up of letters. Monograms have had a strong function in history, and many designers today use these simple motifs for symbolic professional and personal logos.
So today we’re bringing you another fantastic selection of premium resources from Envato Market and Envato Elements.
Featuring the best logo fonts with 30 amazing styles, this collection is unique and futuristic. Take advantage of cool monogram fonts created by our talented community.
Nixmat Font
Design impressive logos with the cool Nixmat font. Featuring bold, rounded letters and creative linear details, this font is sure to make you shine. Pair it with effective brand materials for the all-around complete package. Download it today to add style to your work!
Garde Font
Create compelling campaigns with the luxurious Garde font. A clean monogram font with high-end features, this font is stylish and strong. It works perfectly with many creative industries including beauty, fashion, and so much more. So give your logos that bold edge over the competition with Garde!
Karma Font
Improve your karma with a creative font. The Karma font is unique and outstanding. Its geometric line style perfectly matches the recent trends in retro 90s design. And you’ll love its clean, block-style design. Test it out with your name or company for a new monogram logo.
WS Free Line
Make a bold impact with the WS Free Line typeface. This monogram font is the perfect companion to any design project. Create decorative logos with tall, elegant letters and interesting line details. Use it on posters, stationery, and more!
Hom Monogram
You don’t need extra characters or symbols with the Hom Monogram font. This extraordinary pack features a trendy monogram suitable for weddings or brands. Personalize it easily with the help of most design programs. Try it out!
Armor Font
Need a font for a strong brand? Try out this amazing armor font. Great for old world projects or athletic brands, this font conveys incredible strength with tall letters and a cool serif decoration. Enjoy this typeface for branding, headers, and even merchandise.
Robodron Font
How will robotic design affect the future of
fonts? The Robodron font family reflects the incredible look of clean,
futuristic curves and capital letters. This impressive download is
certainly a great find and perfect for any budding creative. Create
logos for posters, websites, and more!
Raisa Script Logo Font
Script font styles with sweeping curves are a popular treat for designers. And the Raisa Script font features a compelling design that is stunning yet casual. Create flowy monogram letters perfect for any wedding invite or stationery. A pretty and elegant look!
Bathey Calligraphy Font
Brighten your stationery with a classic, elegant script. This Bathey calligraphy font will do just the trick for a clean and modern appeal. This font package includes upper and lowercase letters as well as numbers and punctuation. How will you use it?
Rancho Font
Taking inspiration from an old Western film, this Rancho font is spicy and cool. It gives you that authentic-looking ranch vibe with nice serif details. Instantly make your work look more rustic and rugged with this Rancho font. Try it out!
Scripto Fonte Font Duo
Font duo packs are always a fantastic way to upgrade your logo! This handwritten font duo includes two well made typefaces. One is script and the other is sans serif for all your basic projects. Combine the two for a stellar result. Check it out!
Mustica Script Font
Celebrate your special day with the Mustica script font. A favorite among wedding planners and designers, this script font features wavy, calligraphic letters. Each line was created with incredible care for an all-around beautiful and soft look. Add it to your collection!
FreeLine Font
Innovate with a strong monogram font like the FreeLine typeface. This fashionable font features bold capital letters designed with creative, linear details. Wow any crowd with phenomenal headlines and impressive titles. And match it with any color to fit your style!
Giodasi Font
Need a font that looks as if it was made with a brush? Introducing this phenomenal handwritten typeface! The Giodasi font is different and fresh. It features long brush-styled letters that were individually made by hand. Use it for logos on apparel and more.
Sentaline Monogram Font
Sometimes you have to be a little unusual to stand out. The Sentaline Monogram font will help you break barriers with its futuristic monogram style. Great for headlines, logos, and titles, this font comes with a full set of letters, numbers, and characters. Enjoy!
Bowlist Logo Type
Show off your creative style with the Bowlist logo typeface. A bold calligraphic font, this typeface features a natural handwritten look. So update your recent projects with a modern logo font that is cool and impressive. Check it out on posters and more!
Sentagram Monogram Logo
This good-looking font could definitely work for luxury brands or fashionable personalities. Check out the creative Sentagram logo with sleek and sophisticated lines. Create an artistic brand that will shine the moment you place it on any stationery. Add it to your collection!
Radon Monogram Logo Font
Our next font family is definitely like no other. The letters for the Radon logo font interlock with exciting line designs. Perfect for minimalists, this font has just enough details to stand out from the crowd. Great for monogram logos, headlines, and posters too!
Goldiana Font Script
Perhaps you need something simple but elegant. Then check out the lovely Goldiana font script. Including lowercase and capital letters, this font pack is sweet and super pretty. It’s best suited for logos and invites, but I’m sure it’ll work for other creative projects too. Give it a try!
Forest Line Linear Font
Choose between light, regular and bold styles for this creative Forest Line Linear font. This typeface is bold and unique. It looks best at a size of 40 pt and includes all the files you need to get started. Add this one to your design arsenal!
Shintya Typeface
Craft an extraordinary look with the Shintya typeface. A curvy font full of feelings and allure, this typeface is soft and approachable. Fulfill the needs of your brand or wedding planning with this lovely design. And make sure to check out the preview images to see all the letters and characters!
Realita Color Font
It’s
easy to get caught up with standard, boring logos. Freshen up your look
with this daring and beautiful color font. This font is suitable for
many projects and is supported by applications that use color fonts.
Enjoy four different styles for more fabulous options.
Aline Font
How would you use the thrilling Aline font? A cool, linear style that resembles many Art Deco designs, this font is striking and classy. Update your concert posters, invite cards, and so much more with its fantastic characters. Works best in large font sizes.
Qindom Brush Fonts
Designers are now able to capture rich, authentic brush textures from calligraphy brushes. And this Qindom brush pack is a wonderful example of a beautiful brush script which retains its quality and texture. Enjoy an additional web font version for more versatility.
Cephalonia Font
It may take some time before your find the right font. Make sure to experiment with interesting and unique styles like this Cephalonia typeface. This handwritten font includes alternates, ligatures and an additional underline option. Use it on posters, merch and more!
Neue Stanley Font
We’re back with another great font and that’s this classic style Neue Stanley typeface. This font is inspired by the classic letter styling found in old posters and advertisements. Make authentic looking vintage projects with this stunning font.
Bernaillo Script Font
What kind of font are you looking for? Try out this brilliant Bernaillo script typeface. This handwritten font has an elegant and curvy baseline with tall, script letters you’ll certainly adore. Add this look to your stationery, invites and logos for a personal touch.
Academy House Font
Add a natural, rustic flair to your monogram logo. The Academy House font features striking textures and curvy loops. It’s made with a playful baseline to add a lot of character to your work. Perfect for prints, posters, and invites, this font will refresh your logos!
Austen Display Font
Design a classic monogram like your favorite vintage crests. The Austen display font is elegant and refined. Give your work that Victorian flavor with this beautiful font style that’s great for logos. Test it out on invites for weddings or any special occasion for stunning results.
Gramin Font
Your logo should reflect your unique spirit. So write out stunning letters and more with the Gramin font. A hand-painted display font with tall, serif letters, this font is casual and friendly. Download this official set of all capital letters, numbers, and punctuation today!
More Font Inspiration
You can make exquisite logos with minimalist monogram fonts. Which ones will you try to upgrade your designs and invites?
Love these logo collections? Check out these amazing articles for more:
-
Fonts25 Stylish Vintage FontsMelody Nieves
-
Fonts28 Best New Fonts for 2019Melody Nieves
-
Graphic DesignThe Best Alternatives to the 10 Most Popular FontsLaura Keung
-
Fonts30 Best Blackletter and Gothic Fonts for DesignersGrace Fussell
Tried any of these assets? Let us know! Tell us your favorite logo monogram fonts in the comments below.
This has been a selection of premium resources perfect for the avid designer. For more logo monogram fonts, make sure to check out Envato Market and Envato Elements, or enlist the help of our talented professionals at Envato Studio. Happy designing!
How to Create a Melting Portrait Photo Effect Manipulation in Photoshop
Post pobrano z: How to Create a Melting Portrait Photo Effect Manipulation in Photoshop

In this tutorial, I’ll show you how to create a portrait photo effect of a man melting. First, we’ll add a curtain background and retouch the model. After that, we’ll build a melting candle on top of the model’s head and some wax around his body. We’ll refine several details, paint the light effect, and use an adjustment layer to enhance the final effect.
Tutorial Assets
The following assets were used during the production of this tutorial:
1. How to Make the Base Background
Step 1
Create a new 2000 x 2000 px document in Photoshop with the following settings:

Step 2
Open the curtain background image and drag this image into the white canvas using the Move Tool (V). Place the upper half of the curtain onto the canvas and hide the floor.

Step 3
On the curtain layer, go to Filter > Blur > Gaussian Blur and set the Radius to 21 px. You can change these settings depending on the dimension of your document or when you feel it’s soft and blurry enough. This step is to separate the background from the main subject and make some depth for the whole scene.

Step 4
Go to Layer > New Adjustment Layer > Curves and decrease the lightness until it’s almost invisible. On this layer mask, activate the Brush Tool (B) and select a soft round one with black color. Lower the brush’s Opacity to about 10-15% to paint on the middle of the background to reveal some light on the wrinkles of the curtain in a subtle way.


Step 5
Create a Hue/Saturation adjustment layer to desaturate the blue of the curtain. Reduce the Saturation to –90.

2. How to Retouch the Model
Step 1
Cut out the model from the background and place him in the lower half of the dark canvas. Click the second icon at the bottom of the Layers panel to add a mask to this layer. Use a soft black brush to remove the top part of the head.


Step 2
Make a Hue/Saturation adjustment layer and change the Reds and Blues settings. This step is to adjust the tone of the model’s face and his shirt to match the background.


Step 3
Add a Color Balance adjustment layer and alter the Midtones and Highlights values. The aim is to give the model some golden light reflection as we’ll be adding the flame effect above his head in the next stages. On this layer mask, use a soft black brush to reduce the light effect on his skin and on the lower part of his shirt where it’s less affected by the light than the rest.


Step 4
Make a Curves adjustment layer and decrease the lightness. On the layer mask, paint on the front of the model to reveal the lightness there.

Step 5
Use another Curves adjustment layer to increase the contrast of the model. Paint on the front of the mouth, chin and shoulders and any details you feel are too dark or contrasting.

Step 6
Add another Hue/Saturation adjustment layer to reduce the golden light after increasing the contrast. Bring the Saturation values down to -32:

Step 7
Create a new layer and use a medium-soft brush with the color #0d0907 to paint more shadow below the model’s lips and nose. We’ve added more light and contrast, so the shadow should be more visible and a bit larger.

3. How to Build the Candle
Step 1
Cut out the candle 1 image and use the Lasso Tool (L) to select the top of this candle. Drag this part onto the front of the model using the Move Tool.

Add a mask to this layer and use a soft black brush to remove the bottom of the candle and the wick, and blend the top with his face. Lower the brush’s opacity when blending on the intersection between the face and the candle.

Step 2
Use the Lasso Tool to select another part from the original candle image and add it to the face of the model. Add a mask to this layer and use a soft black brush to remove the hard edges and blend this part with the face.


Step 3
Select a long, thin part from the side of the candle to add to the right of the model’s face (from the viewer). Add a mask to this layer and take a hard black brush to trim this part into several lines flowing from the top of the head. Lower the brush’s size to get a more natural result.


Step 4
Select all of the candle layers and hit Control-G to make a group for them. Change this group’s mode to Normal 100% and create a new layer within the group. Activate the Clone Tool (S) to reduce the light on the part above the nose.

Step 5
Make a Hue/Saturation adjustment layer and set it as a Clipping Mask. Adjust the
Saturation values to desaturate and change the color of the candle.

Step 6
Create a Curves adjustment layer to decrease the lightness. On this layer mask, paint on the middle area to reveal the lightness there, leaving the shadow visible on both sides and the space between the candle wax lines.

Step 7
Move the candle 2 image into the main document and place the candle’s flame on top of the middle of the existing candle. Add a mask to this layer and use a medium-soft black brush to erase most of the candle, leaving the candle’s flame and its glow visible.


Step 8
Create a Hue/Saturation adjustment layer above this candle layer and set it as a Clipping Mask. Change the Hue values a bit to +8:

Step 9
Make a new layer below the candle 2 layer. Use a soft brush with the color #e2b588 to paint around the candle’s flame. Change this layer mode to Color Dodge 80% and use a layer mask to erase the light around the head.


Step 10
Create another layer and use a soft brush with the color #9b6837 to paint above the candle’s flame to make a light reflection there. Alter this layer mode to Hard Light 40%.


4. How to Add the Candle Wax
Step 1
Open the candle wax 1 image. Use the Polygonal Lasso Tool to select a part on the right to place on the left of the model’s face. Flip it horizontally (Edit > Transform > Flip Horizontal) and add a mask to this layer. Use a soft black brush to blend this part with the existing candle’s surface.


Step 2
Select other parts from the candle’s wax to add around the shoulders and the left ear. Use Control-T to rotate these parts to different angles and sizes. Add a mask to several wax layers to blend them with the existing candle and shirt and remove the hard shadow of the wax on the left shoulder.


Step 3
Create a group for these wax layers and make a Hue/Saturation adjustment layer to change the color of the wax.

Step 4
Add a Curves adjustment layer to bring more light to this wax. On this layer mask, paint on the shadow areas of any details you feel are too bright.

Step 5
Open the candle wax 2 image. Use the Quick Selection Tool (W) to select different parts of wax to add to the head, face, and shirt. Add a mask to each of these layers, use a soft black brush to blend the top of the wax with the existing candle, and use a hard black brush to trim these pieces of wax in different lines flowing along the face.


Step 6
Make a group for these wax layers and make a Channel Mixer adjustment layer to alter the color of the wax.


Step 7
Create a Hue/Saturation adjustment layer to desaturate the color of the wax lines a bit to make them match the rest of the candle.

Step 8
Make a Curves adjustment layer to increase the contrast of the wax. Paint on any details you feel are too dark or contrasting.

Step 9
Create a new layer below the candle wax groups. Use a soft brush with the color #1c1b1b and Opacity about 30% to paint shadow below the wax on the shirt.

5. How to Make the Final Adjustments
Step 1
Make a new layer on top of the other layers and use a brush with the color #753c23 to paint on the lower lip, avoiding its highlight. Change this layer mode to Multiply 40% to reduce the light on this part.

Step 2
Create another layer and use a soft brush with the color #2a1503 to paint on the candle’s flame. Change this layer mode to Color Dodge 100%.

Step 3
Use another brush with the color #d5af5a to paint more glowing light on the bottom of the flame. Alter this layer mode to Hard Light 100%.

Step 4
Make a new layer and change the brush’s color to #0d0907. Use a medium-soft brush to paint the shadow of the head, including the top of the candle, on the shoulders and neck. Lower the Opacity of this layer to 80%.

Step 5
Create a new layer, change the mode to Overlay 100%, and fill with 50% gray.

Activate the Dodge and Burn Tool (O) with Midtones Range and Exposure about 15-25% to refine the light and shadow of the details of the candle, face, shoulders, and face, especially the space between the wax lines. You can see how I did it with Normal mode and the result with Overlay mode.


Step 6
Create a Color Balance adjustment layer to increase the light, color, contrast and vibrance of the whole scene.


Congratulations, You’re Done!
I hope that you’ve enjoyed the process of creating an interesting portrait photo effect and learned something new for
your own projects. Feel free to share your results or leave comments in
the box below. Enjoy Photoshopping!
Here are some more interesting portrait photo effects:
-

Manipulate a Portrait Photo to Create a Splatter Paint Effect
In this tutorial, I will show you how to manipulate a portrait photo to create a splatter paint and drip effect in Photoshop. This tutorial will cover many… -

How to Create a Strip Fractal Mirror Effect in Adobe Photoshop
Continuing with the Music Video Effects series, this tutorial demonstrates how to use Photoshop to create a Fractal Mirror effect inspired by the Pillow Talk…


How to Create a Melting Portrait Photo Effect Manipulation in Photoshop
Post pobrano z: How to Create a Melting Portrait Photo Effect Manipulation in Photoshop
In this tutorial, I’ll show you how to create a portrait photo effect of a man melting. First, we’ll add a curtain background and retouch the model. After that, we’ll build a melting candle on top of the model’s head and some wax around his body. We’ll refine several details, paint the light effect, and use an adjustment layer to enhance the final effect.
Tutorial Assets
The following assets were used during the production of this tutorial:
1. How to Make the Base Background
Step 1
Create a new 2000 x 2000 px document in Photoshop with the following settings:
Step 2
Open the curtain background image and drag this image into the white canvas using the Move Tool (V). Place the upper half of the curtain onto the canvas and hide the floor.
Step 3
On the curtain layer, go to Filter > Blur > Gaussian Blur and set the Radius to 21 px. You can change these settings depending on the dimension of your document or when you feel it’s soft and blurry enough. This step is to separate the background from the main subject and make some depth for the whole scene.
Step 4
Go to Layer > New Adjustment Layer > Curves and decrease the lightness until it’s almost invisible. On this layer mask, activate the Brush Tool (B) and select a soft round one with black color. Lower the brush’s Opacity to about 10-15% to paint on the middle of the background to reveal some light on the wrinkles of the curtain in a subtle way.
Step 5
Create a Hue/Saturation adjustment layer to desaturate the blue of the curtain. Reduce the Saturation to –90.
2. How to Retouch the Model
Step 1
Cut out the model from the background and place him in the lower half of the dark canvas. Click the second icon at the bottom of the Layers panel to add a mask to this layer. Use a soft black brush to remove the top part of the head.
Step 2
Make a Hue/Saturation adjustment layer and change the Reds and Blues settings. This step is to adjust the tone of the model’s face and his shirt to match the background.
Step 3
Add a Color Balance adjustment layer and alter the Midtones and Highlights values. The aim is to give the model some golden light reflection as we’ll be adding the flame effect above his head in the next stages. On this layer mask, use a soft black brush to reduce the light effect on his skin and on the lower part of his shirt where it’s less affected by the light than the rest.
Step 4
Make a Curves adjustment layer and decrease the lightness. On the layer mask, paint on the front of the model to reveal the lightness there.
Step 5
Use another Curves adjustment layer to increase the contrast of the model. Paint on the front of the mouth, chin and shoulders and any details you feel are too dark or contrasting.
Step 6
Add another Hue/Saturation adjustment layer to reduce the golden light after increasing the contrast. Bring the Saturation values down to -32:
Step 7
Create a new layer and use a medium-soft brush with the color #0d0907 to paint more shadow below the model’s lips and nose. We’ve added more light and contrast, so the shadow should be more visible and a bit larger.
3. How to Build the Candle
Step 1
Cut out the candle 1 image and use the Lasso Tool (L) to select the top of this candle. Drag this part onto the front of the model using the Move Tool.
Add a mask to this layer and use a soft black brush to remove the bottom of the candle and the wick, and blend the top with his face. Lower the brush’s opacity when blending on the intersection between the face and the candle.
Step 2
Use the Lasso Tool to select another part from the original candle image and add it to the face of the model. Add a mask to this layer and use a soft black brush to remove the hard edges and blend this part with the face.
Step 3
Select a long, thin part from the side of the candle to add to the right of the model’s face (from the viewer). Add a mask to this layer and take a hard black brush to trim this part into several lines flowing from the top of the head. Lower the brush’s size to get a more natural result.
Step 4
Select all of the candle layers and hit Control-G to make a group for them. Change this group’s mode to Normal 100% and create a new layer within the group. Activate the Clone Tool (S) to reduce the light on the part above the nose.
Step 5
Make a Hue/Saturation adjustment layer and set it as a Clipping Mask. Adjust the
Saturation values to desaturate and change the color of the candle.
Step 6
Create a Curves adjustment layer to decrease the lightness. On this layer mask, paint on the middle area to reveal the lightness there, leaving the shadow visible on both sides and the space between the candle wax lines.
Step 7
Move the candle 2 image into the main document and place the candle’s flame on top of the middle of the existing candle. Add a mask to this layer and use a medium-soft black brush to erase most of the candle, leaving the candle’s flame and its glow visible.
Step 8
Create a Hue/Saturation adjustment layer above this candle layer and set it as a Clipping Mask. Change the Hue values a bit to +8:
Step 9
Make a new layer below the candle 2 layer. Use a soft brush with the color #e2b588 to paint around the candle’s flame. Change this layer mode to Color Dodge 80% and use a layer mask to erase the light around the head.
Step 10
Create another layer and use a soft brush with the color #9b6837 to paint above the candle’s flame to make a light reflection there. Alter this layer mode to Hard Light 40%.
4. How to Add the Candle Wax
Step 1
Open the candle wax 1 image. Use the Polygonal Lasso Tool to select a part on the right to place on the left of the model’s face. Flip it horizontally (Edit > Transform > Flip Horizontal) and add a mask to this layer. Use a soft black brush to blend this part with the existing candle’s surface.
Step 2
Select other parts from the candle’s wax to add around the shoulders and the left ear. Use Control-T to rotate these parts to different angles and sizes. Add a mask to several wax layers to blend them with the existing candle and shirt and remove the hard shadow of the wax on the left shoulder.
Step 3
Create a group for these wax layers and make a Hue/Saturation adjustment layer to change the color of the wax.
Step 4
Add a Curves adjustment layer to bring more light to this wax. On this layer mask, paint on the shadow areas of any details you feel are too bright.
Step 5
Open the candle wax 2 image. Use the Quick Selection Tool (W) to select different parts of wax to add to the head, face, and shirt. Add a mask to each of these layers, use a soft black brush to blend the top of the wax with the existing candle, and use a hard black brush to trim these pieces of wax in different lines flowing along the face.
Step 6
Make a group for these wax layers and make a Channel Mixer adjustment layer to alter the color of the wax.
Step 7
Create a Hue/Saturation adjustment layer to desaturate the color of the wax lines a bit to make them match the rest of the candle.
Step 8
Make a Curves adjustment layer to increase the contrast of the wax. Paint on any details you feel are too dark or contrasting.
Step 9
Create a new layer below the candle wax groups. Use a soft brush with the color #1c1b1b and Opacity about 30% to paint shadow below the wax on the shirt.
5. How to Make the Final Adjustments
Step 1
Make a new layer on top of the other layers and use a brush with the color #753c23 to paint on the lower lip, avoiding its highlight. Change this layer mode to Multiply 40% to reduce the light on this part.
Step 2
Create another layer and use a soft brush with the color #2a1503 to paint on the candle’s flame. Change this layer mode to Color Dodge 100%.
Step 3
Use another brush with the color #d5af5a to paint more glowing light on the bottom of the flame. Alter this layer mode to Hard Light 100%.
Step 4
Make a new layer and change the brush’s color to #0d0907. Use a medium-soft brush to paint the shadow of the head, including the top of the candle, on the shoulders and neck. Lower the Opacity of this layer to 80%.
Step 5
Create a new layer, change the mode to Overlay 100%, and fill with 50% gray.
Activate the Dodge and Burn Tool (O) with Midtones Range and Exposure about 15-25% to refine the light and shadow of the details of the candle, face, shoulders, and face, especially the space between the wax lines. You can see how I did it with Normal mode and the result with Overlay mode.
Step 6
Create a Color Balance adjustment layer to increase the light, color, contrast and vibrance of the whole scene.
Congratulations, You’re Done!
I hope that you’ve enjoyed the process of creating an interesting portrait photo effect and learned something new for
your own projects. Feel free to share your results or leave comments in
the box below. Enjoy Photoshopping!
Here are some more interesting portrait photo effects:
-
Manipulate a Portrait Photo to Create a Splatter Paint Effect
In this tutorial, I will show you how to manipulate a portrait photo to create a splatter paint and drip effect in Photoshop. This tutorial will cover many… -
How to Create a Strip Fractal Mirror Effect in Adobe Photoshop
Continuing with the Music Video Effects series, this tutorial demonstrates how to use Photoshop to create a Fractal Mirror effect inspired by the Pillow Talk…
How to Create a Melting Portrait Photo Effect Manipulation in Photoshop
Post pobrano z: How to Create a Melting Portrait Photo Effect Manipulation in Photoshop
In this tutorial, I’ll show you how to create a portrait photo effect of a man melting. First, we’ll add a curtain background and retouch the model. After that, we’ll build a melting candle on top of the model’s head and some wax around his body. We’ll refine several details, paint the light effect, and use an adjustment layer to enhance the final effect.
Tutorial Assets
The following assets were used during the production of this tutorial:
1. How to Make the Base Background
Step 1
Create a new 2000 x 2000 px document in Photoshop with the following settings:
Step 2
Open the curtain background image and drag this image into the white canvas using the Move Tool (V). Place the upper half of the curtain onto the canvas and hide the floor.
Step 3
On the curtain layer, go to Filter > Blur > Gaussian Blur and set the Radius to 21 px. You can change these settings depending on the dimension of your document or when you feel it’s soft and blurry enough. This step is to separate the background from the main subject and make some depth for the whole scene.
Step 4
Go to Layer > New Adjustment Layer > Curves and decrease the lightness until it’s almost invisible. On this layer mask, activate the Brush Tool (B) and select a soft round one with black color. Lower the brush’s Opacity to about 10-15% to paint on the middle of the background to reveal some light on the wrinkles of the curtain in a subtle way.
Step 5
Create a Hue/Saturation adjustment layer to desaturate the blue of the curtain. Reduce the Saturation to –90.
2. How to Retouch the Model
Step 1
Cut out the model from the background and place him in the lower half of the dark canvas. Click the second icon at the bottom of the Layers panel to add a mask to this layer. Use a soft black brush to remove the top part of the head.
Step 2
Make a Hue/Saturation adjustment layer and change the Reds and Blues settings. This step is to adjust the tone of the model’s face and his shirt to match the background.
Step 3
Add a Color Balance adjustment layer and alter the Midtones and Highlights values. The aim is to give the model some golden light reflection as we’ll be adding the flame effect above his head in the next stages. On this layer mask, use a soft black brush to reduce the light effect on his skin and on the lower part of his shirt where it’s less affected by the light than the rest.
Step 4
Make a Curves adjustment layer and decrease the lightness. On the layer mask, paint on the front of the model to reveal the lightness there.
Step 5
Use another Curves adjustment layer to increase the contrast of the model. Paint on the front of the mouth, chin and shoulders and any details you feel are too dark or contrasting.
Step 6
Add another Hue/Saturation adjustment layer to reduce the golden light after increasing the contrast. Bring the Saturation values down to -32:
Step 7
Create a new layer and use a medium-soft brush with the color #0d0907 to paint more shadow below the model’s lips and nose. We’ve added more light and contrast, so the shadow should be more visible and a bit larger.
3. How to Build the Candle
Step 1
Cut out the candle 1 image and use the Lasso Tool (L) to select the top of this candle. Drag this part onto the front of the model using the Move Tool.
Add a mask to this layer and use a soft black brush to remove the bottom of the candle and the wick, and blend the top with his face. Lower the brush’s opacity when blending on the intersection between the face and the candle.
Step 2
Use the Lasso Tool to select another part from the original candle image and add it to the face of the model. Add a mask to this layer and use a soft black brush to remove the hard edges and blend this part with the face.
Step 3
Select a long, thin part from the side of the candle to add to the right of the model’s face (from the viewer). Add a mask to this layer and take a hard black brush to trim this part into several lines flowing from the top of the head. Lower the brush’s size to get a more natural result.
Step 4
Select all of the candle layers and hit Control-G to make a group for them. Change this group’s mode to Normal 100% and create a new layer within the group. Activate the Clone Tool (S) to reduce the light on the part above the nose.
Step 5
Make a Hue/Saturation adjustment layer and set it as a Clipping Mask. Adjust the
Saturation values to desaturate and change the color of the candle.
Step 6
Create a Curves adjustment layer to decrease the lightness. On this layer mask, paint on the middle area to reveal the lightness there, leaving the shadow visible on both sides and the space between the candle wax lines.
Step 7
Move the candle 2 image into the main document and place the candle’s flame on top of the middle of the existing candle. Add a mask to this layer and use a medium-soft black brush to erase most of the candle, leaving the candle’s flame and its glow visible.
Step 8
Create a Hue/Saturation adjustment layer above this candle layer and set it as a Clipping Mask. Change the Hue values a bit to +8:
Step 9
Make a new layer below the candle 2 layer. Use a soft brush with the color #e2b588 to paint around the candle’s flame. Change this layer mode to Color Dodge 80% and use a layer mask to erase the light around the head.
Step 10
Create another layer and use a soft brush with the color #9b6837 to paint above the candle’s flame to make a light reflection there. Alter this layer mode to Hard Light 40%.
4. How to Add the Candle Wax
Step 1
Open the candle wax 1 image. Use the Polygonal Lasso Tool to select a part on the right to place on the left of the model’s face. Flip it horizontally (Edit > Transform > Flip Horizontal) and add a mask to this layer. Use a soft black brush to blend this part with the existing candle’s surface.
Step 2
Select other parts from the candle’s wax to add around the shoulders and the left ear. Use Control-T to rotate these parts to different angles and sizes. Add a mask to several wax layers to blend them with the existing candle and shirt and remove the hard shadow of the wax on the left shoulder.
Step 3
Create a group for these wax layers and make a Hue/Saturation adjustment layer to change the color of the wax.
Step 4
Add a Curves adjustment layer to bring more light to this wax. On this layer mask, paint on the shadow areas of any details you feel are too bright.
Step 5
Open the candle wax 2 image. Use the Quick Selection Tool (W) to select different parts of wax to add to the head, face, and shirt. Add a mask to each of these layers, use a soft black brush to blend the top of the wax with the existing candle, and use a hard black brush to trim these pieces of wax in different lines flowing along the face.
Step 6
Make a group for these wax layers and make a Channel Mixer adjustment layer to alter the color of the wax.
Step 7
Create a Hue/Saturation adjustment layer to desaturate the color of the wax lines a bit to make them match the rest of the candle.
Step 8
Make a Curves adjustment layer to increase the contrast of the wax. Paint on any details you feel are too dark or contrasting.
Step 9
Create a new layer below the candle wax groups. Use a soft brush with the color #1c1b1b and Opacity about 30% to paint shadow below the wax on the shirt.
5. How to Make the Final Adjustments
Step 1
Make a new layer on top of the other layers and use a brush with the color #753c23 to paint on the lower lip, avoiding its highlight. Change this layer mode to Multiply 40% to reduce the light on this part.
Step 2
Create another layer and use a soft brush with the color #2a1503 to paint on the candle’s flame. Change this layer mode to Color Dodge 100%.
Step 3
Use another brush with the color #d5af5a to paint more glowing light on the bottom of the flame. Alter this layer mode to Hard Light 100%.
Step 4
Make a new layer and change the brush’s color to #0d0907. Use a medium-soft brush to paint the shadow of the head, including the top of the candle, on the shoulders and neck. Lower the Opacity of this layer to 80%.
Step 5
Create a new layer, change the mode to Overlay 100%, and fill with 50% gray.
Activate the Dodge and Burn Tool (O) with Midtones Range and Exposure about 15-25% to refine the light and shadow of the details of the candle, face, shoulders, and face, especially the space between the wax lines. You can see how I did it with Normal mode and the result with Overlay mode.
Step 6
Create a Color Balance adjustment layer to increase the light, color, contrast and vibrance of the whole scene.
Congratulations, You’re Done!
I hope that you’ve enjoyed the process of creating an interesting portrait photo effect and learned something new for
your own projects. Feel free to share your results or leave comments in
the box below. Enjoy Photoshopping!
Here are some more interesting portrait photo effects:
-
Manipulate a Portrait Photo to Create a Splatter Paint Effect
In this tutorial, I will show you how to manipulate a portrait photo to create a splatter paint and drip effect in Photoshop. This tutorial will cover many… -
How to Create a Strip Fractal Mirror Effect in Adobe Photoshop
Continuing with the Music Video Effects series, this tutorial demonstrates how to use Photoshop to create a Fractal Mirror effect inspired by the Pillow Talk…