If you believe
that paid social media ads will boost your sales and get you leads, you are
wrong. Email marketing is still the best companion for sales. It’s the ultimate
digital marketing tool that can get you qualified leads. Let’s resolve the
mystery by examining the well-known facts.
The reason why email marketing is so successful is that it is a preference of the target audience. The targeted group in this scenario are people between 38 – 53 years old or millennials, and they love to read emails. Let’s just say that 73% of millennials prefer communications from businesses to come via email. Yes, this fact testifies the lead generative power of email marketing.
New trends in
digital marketing are often a great way to try new things but also are the
cause of many clouded thoughts among entrepreneurs. Business owners forget that
the most effective way to capture leads and best website monetization sometimes is a
simple pop up on your website. You don’t need all the fuss with paid ads, even
though for some business models social media ads will work.
Let’s examine
how you can use email marketing wisely and increase your sales.
1. Lead scoring
It seems that
many business owners and marketing experts spend all of their time to get as
much leads as possible. With email marketing, quality is better than quantity.
Of course, capturing huge volumes of leads is not a bad thing but you need to
spend time scoring and grouping your captured email addresses.
Lead scoring is
a valuable process that will explain how your prospects moved from expressing
just an initial interest in revealing a purchasing intent. This process is a
way to track the prospect’s journey through the sales funnel and to analyze how
the conversion happened. The scoring can be explicit and implicit.
You can track
explicit data by analyzing the data left at the lead form, for instance, if the
lead left only the email address or there are more detail such as the telephone
number and the job title.
The implicit
data should be your assumptions about the behavior of the lead. However, these
assumptions can be made by analyzing Google Analytics data, such as website
visits, blog visits, registers for the webinars, etc.
With this data,
you can easily group your leads in your customized categories and create a
model that will fit your business perfectly. You will have a better overview
and make better decisions.
2. Lead nurturing
Lead nurturing
is simply the process of developing a relationship with your leads at every
stage of the sales funnel. Automated email sequences are not the only way to
nurture a lead, of course. The sequences are the crucial part but content is
also important.
This part will resolve any dilemmas you have about the importance of a quality social media presence and blogging. To nurture a lead you need to blog regularly, post thought leadership content and address the right pain points by offering value. It sounds complex of course but with the right effort and focus it can be achieved.
Keeping your
social media accounts updated and fresh is another important element. People
spend a lot of time on their mobile devices and social media. Keeping your
social media accounts active, professional and updated is another way to move
your leads down the sales funnel.
We did say that
doing solely social media ads is probably not a good tactic but for lead
nurturing, remarketing ads can do wonders.
3. Helpful tools
If you are just
at the beginning of the lead generation process and don’t know how to find your
leads, then social media channels might help. You can use the filters of
LinkedIn Sales Navigator to track down and analyze people or Facebook Audience
Insights to see where and how you can reach your target audience.
Adding lead
forms on your website is also a good idea and integrating everything with Mail
Chimp and Google Analytics.
By using these
two tools, you will get statistics, storage and many useful tools to track,
nurture and categorize your leads.
In advance of a recent podcast with the incredible technical writer and Smashing Magazine editor-in-chief Rachel Andrew, I gathered up a bunch of thoughts and references on the subject of technical writing. So many smart people have said a lot of smart things over the years that I thought I’d round up some of my favorite advice and sprinkle in my own experiences, as someone who has also done his fair share of technical writing and editing.
There is a much larger world of technical writing out there. My experience and interest is largely about web technology and blogging, so I’m coming at it from that angle and many of the people I quote throughout are in that same boat.
Picking something to write about
If you want to write for CSS-Tricks and you ask me what you should write about, I’m probably going to turn that question around on you. It’s likely I don’t know you well enough to pick the perfect topic for you. More importantly, what I really want you to write about is something that is personal and important to you. Articles rooted in recent excitement about a particular idea or technology always come out better than dictated assignments.
My best advice:
Write the article you wish you found when you googled something.
That said, I do maintain a list of ideas specifically for this site. Any writing can be done on assignment and sometimes that elicits the spark needed for something great and on-target for the audience of a site.
Write at the moment of learning
The moment you learn something is the best time to write. It’s fresh in your mind and you can remember what it was like before you understood it. You also understand what it takes to go from not knowing to knowing it. That’s the journey you need to take people on.
If you don’t have time, at least try to capture the vibe wherever you save your ideas. Don’t just write down „dataset.” Write down some quick notes like, „I didn’t realize DOM elements had a .dataset property for getting and setting data attributes. I wonder if it’s better to use that than getAttribute.” That way, you’ll be able to reload that realization in your brain when you revisit the idea.
Here’s some advice Rachel shared that I don’t see taken advantage of nearly enough:
There is a sweet spot for writing technical posts and tutorials. Write for the professional who hasn't had time to learn that thing yet, and link it back to things they already know. For example explaining a modern JS technique to someone who knows jQuery.
Tell me about how this new framework relates to Backbone. Tell me how this CMS relates to WordPress. Tell me how some technology connects to another technology that is safe to assume is more widely understood.
Technology changes a lot, but what technology does doesn’t change all that much.
Careful with that intro
The main comment I add on tutorials I review is to ask for an intro that describes what the tutorial is about. I'm 600 words in and still don't know what the tutorial is about and who it is for. #writing
Not getting to the point right at the top of technical articles is a dang epidemic. The start of a technical article is not the time to wax poetic or drop some cliché light philosophy like, „Web design sure has changed a lot.” You don’t have to be boring, but you do need to tell me what this article is going to get into and who it is for.
“Does the title make the article sound interesting?” If the title interests a reader, they’ll typically read the intro and decide, “Is it worth my time reading the whole thing?” A common mistake I see in a lot of technical posts is either too much introduction or, alternatively, far too little.
A single well-written paragraph can set the stage for a technical blog post.
Careful with the title, too
I remember a conversation from years ago with content strategist Erin Kissane where she strongly advised me to choose boring titles for everything. Not just the title of blog posts, but for everything, including the names of sections, tags, and even subheadings within posts.
Here’s the thing with boring: it works. Boring isn’t the right word either; it’s clarity. The world is full of clickbait, and maybe that’s effective in some genres, but technical blogging isn’t one of them.
A terrible version of the same: Build a web app with modern technologies in 30 minutes!
What’s a web app? What technologies? What’s modern about them? What’s with the weird time limit?
SEO matters and Margaret’s article is going to do a lot better in both the short and long term with that clear title.
The outro
Ben Halpern says that the next most important thing after the intro is:
[…] the last paragraph.
People don’t read top-to-bottom the moment when they arrive, so there is a good chance it’s the second paragraph people read. Personally, I find the beginning a lot more important than the ending, but there is a certain art to the ending as well.
A lot of people just <h2>Conclusion</h2> and write a few words about what was just went over. Honestly, I don’t hate that. It falls into this time tested pattern:
Tell ’em what you’re gonna tell ’em
Tell ’em
Tell ’em what you told ’em
That helps your message sink in and brings things full circle. Technical blogging isn’t terribly different from marketing in that sense. You’re trying to get people to understand something and you’re using whatever tricks you need to to get the job done. A little repetition is a classic trick.
[…] the wall of text can be easily be made less intimidating and appear much more visually appealing through the use of visual elements that break it up. The easiest is to simply place section subheadings throughout your post.
I agree: subheadings are probably the easiest and most powerful trick for scannability.
Other methods:
Lists: Like what I’m doing right now! I didn’t have to use a list. Paragraphs might have worked as well, but a list makes contextual sense here and is probably tricking some of you into reading this. Or at least scanning it and getting some key points in the process.
Images: Please make them relevant and contextual. Skip the funny GIF. Screenshots are often great in a technical context because they provide a visual to what might otherwise be a difficult concept to explain. I like Unsplash for thematic imagery, too, but you can do better than a random picture of trees, a woman drinking coffee, or a random rack of servers.
Illustrations: The abstract nature of an illustration is your friend. It tricks people into having a quick thought about what you are describing. They generally take a little work to pull off, but the pay-off for you and the reader can be huge.
Videos: You can’t simply drop a 42-minute video in the middle of a blog post, but if you can make it clear that you are demonstrating something visual and the video is less than a minute, it can be a powerful choice. You’ve always got <video autoplay muted loop controls> as well to make it GIF-like.
Blocks of code: Technical blog posts are often about code. Don’t avoid code, embrace it. I love how Dan Abramov sprinkles in code blocks in blog posts not so much to demonstrate syntax and setup, but to make points. I’m going to recommend Embedded Pens as well, because they’re fully interactive demoes in addition to serving as code blocks.
Tables: Don’t forget about tabular data! Presenting information (particularly data or definitions) in a table makes it more understandable than it would have been any other way.
Collapsing sections: The <details>/<summary> elements make quick work of collapsible content. If you’ve got a large section of content that is good to be there but doesn’t need to be read by everyone, collapse it! Our reference guide of media queries for devices is a decent example of this in action.
Whatever you pick here, you should pick things that help enhance the points you’re making even if in some ways it feels like trickery. It’s trickery to help readability, and that’s a good thing.
My favorite technique? A little bit of design. Use design principals like spacing, color, and alignment to help the readability of posts. We even go so far as to art direct some posts where design can enhance the central point being made.
The point here isn’t to do away with walls of text altogether. Sometimes that’s exactly what’s needed because you’re asking a reader to deeply read a passage that they otherwise wouldn’t get what’s needed from the content. However, more often than not, a post can strongly benefit from some healthy use of white space.
Use an active voice
I find this one a little tricky to wrap my head around, but Katy Decorah has a great presentation about technical writing that explains this point in great detail. It’s kinda like using present tense and stating a point directly rather than passively.
Passive: „After the file is downloaded…” Active: „After you download the file…”
Passive: „The request is processed by the server.” Active: „The server processes the request.”
“Just” makes me feel like an idiot. “Just” presumes I come from a specific background, studied certain courses in university, am fluent in certain technologies, and have read all the right books, articles, and resources. “Just” is a dangerous word.
There are plenty of others to avoid, which which I’ve written about before. Read the comments in that last link. Long story short: there are lots of words that do more harm than good in technical writing, not only because they can come across as preachy, but because they usually don’t help the sentences where they’re used. Try taking „just” out of any sentence. The sentence will still make sense without it.
SimplyClearlyJustOf courseEveryone knowsEasyHoweverSoBasicallyTurns outIn order toVery
Be mindful of your tone
Tone is concerned with how you say something in consideration of the context. For example, you wouldn’t deliver bad news to someone with a happy tone. The way you express yourself ought to be aligned with the situation.
This is our tone goal on this site:
Friendly. Authoritative. Welcoming. We’re all in this together. Flexible (nondogmatic about ideas). Thankful.
It’s worth pointing out that tone and voice are separate concepts. I like to think of voice as never changing (it’s your personality which is a part of who you are) while tone changes to suit the context. In other words, you can have a professional voice while communicating in a friendly tone.
I don’t think there is one true tone that is perfect for technical writing, but since the high-level goal of any technical writing is to help someone understand something complicated, you can use tone to help. A joke in the middle of a set of intricate steps is confusing. A bunch! of! excitement! about something might feel out of place or disingenuous, but being drab and lifeless is worse. I’d say if you’re writing under your own name, let’s feel a little bit of your personality as long as it’s not at the cost of clarity. If you’re writing under a brand, match what they have established whether it has been codified or not.
Careful about length
The general tendency in technical writing is to write too much rather than too little. Wade Christensen:
Whether trained by school assignments with word minimums or just uncritical, most of us write too much. Beyond approaching each draft with a ruthless cutting mentality, there are several ways to write short from draft one.
Word limits can help, even if they’re self-imposed.
I heard from a fledgling editor recently who struggled with his writers submitting posts with high word counts, so he suggested they keep it to 1000-1500 as a guideline and that seemed effective. This post is roughly double the high end there, for comparison.
The real solution, if the resources are there, is ruthless editing.
I personally don’t find that writing too long is the only issue. I’ve had just as many occurrences of writers going too short and not digging into the topic deep enough. I don’t like focusing on the length; I like focusing on the clarity of the delivery and usefulness of the content itself.
Side note: Breaking up a post into multiple parts (as separate posts in a series) is not a solution for posts that are too long. In fact, it can exacerbate the problem. Do that only if the different parts are thematically different and can stand alone without the other parts.
Don’t stop yourself from writing
There is an invisible force, built from fear, that keeps a lot of people away from technical blogging. „Meh, everybody already knows this,” you might think. (They don’t). „What if I’m wrong and someone calls me out?” (You aren’t wrong if what you’re doing is working for you.)
There can still be blockers even if you overcome those fears and start putting words to screen. Here’s Max Böck:
There is a thing that happens to me while writing. I start with a fresh idea, excited to shape it into words. But as time passes, I lose confidence.
The trick for Max is not to wait too long and to ignore feelings holding you back:
I’ll publish something as soon as I feel confident that all the important points I want to get across are there. I try to ignore the voice screaming “it’s not ready” just for long enough to push it online.
I think keeping drafts can be counterproductive. The problem is that, once something is a draft rather than a blog post, it’s likely to stay a draft and never become a blog post. And the longer something stays in draft, the less likely it is to ever see the light of day.
The chances that your writing helps someone is pretty high! Matthias Ott:
Even the smallest post can help someone else out there.
Think you’re too inexperienced? You’re probably not, but even if you were, a perspective from someone with less experience is still useful. Ali Spittel:
If you have a blog post that contains mostly correct information, or at least your interpretation of the topic, then you’re experienced enough. There are lots of excellent posts out there from the perspective of newbies, and they’re really important!
Fear is a real thing in writing and dealing with it can be debilitating. While it’s primarily geared toward creative writing, The War of Art by Stephen Pressfield is a good read to help break through the fear.
There is no one perfect style
We each have our own unique perspectives and writing styles. One writing style might be more approachable to some, and can therefore help and benefit a large (or even small) number of people in ways you might not expect.
Even if only one person learns something from your article, you’ll feel great, and that you’ve contributed — even if just a little bit — to this amazing community that we’re all constantly learning from.
Technical blog posts don’t have to be devoid of creativity. You could create a wonderful technical blog post that is an annotated chat room conversation between two developers learning from each other. Or a blog post that is a series of videos that build on each other.
The more introductory, the higher the bar
The web is saturated with beginner-rated and surface-level blog posts. There’s a sea of crash courses, 101s, and intros out there. You’ve gotta knock it out of the park if you want to stand out from the pack and be useful.
There is no particular change in tone necessarily for a beginner-focused post. You don’t need to do the equivalent of talking slowly or talking down. You only need to be clear, and clarity is valuable to readers at any skill level, not to mention appreciated by them as well. A very advanced programmer can and will appreciate the clarity in a technical blog post even if it’s something they already understand.
But the bar isn’t that high in general
You don’t need a decade of experience to write a blog post. I’d say it’s closer to a day of experience, a desire to write, and having something to say. I think you’d be surprised at how little you need to do to make a blog post stand out and be read. Put in some effort, make clear points, focus on readability, and you will do well.
I hope the advice in this post helps!
Abstraction is helpful, but real-world examples are sometimes better
It’s one thing to describe a high-level concept, and another to explain or illustrate how that concept applies to the real world. In technical writing, you’ll often be covering complex or hard-to-understand subjects, so it’s even more important to use a well-placed example or two to showcase why your topic matters, or how it relates to the real world.
I find myself pushing back on code that is too abstract more than I push back on code that is too focused on a real-world use case. I’d rather see ["Charles Adok", "Samantha Frederick"] than ["foo", "bar"] or [a, b] any day, but more importantly, what is then done with that data to make it feel like a relatable programming scenario.
But avoid real-world examples that come at the cost of clarity. If abstraction is useful to drive a complex point home without getting lost in the details, so be it.
Blogging opens doors
Everyone I’ve ever met who had ever actively blogged has said that blogging has had a positive impact on their career. Besides being a public demonstration of your ability to think and present ideas, it helps you understand things better. To teach is to learn.
I’d attribute my own blogging as the biggest contributor to any success I’ve had. Here’s Khoi Vinh, a designer ten times more successful than I’ll ever be:
It’s hard to overstate how important my blog has been, but if I were to try to distill it down into one word, it would be: “amplifier.”
You get better at what you do.
There is no way around it: practice makes you better. The expectations around practice are sometimes very clear and culturally ingrained. In order to get better at playing the piano, you take piano lessons and practice. We all know this. But people also say „Oh, I’m a terrible cook,” as if cooking as a skill is somehow fundamentally different than playing the piano and doesn’t require the same amount of learning and practice.
You get better at writing by writing more. That is, writing with stakes. Writing and then publicly publishing what you write such that people read it.
You can go to school for writing. You could get a writing coach. My thinking is nothing teaches better than writing often. Whatever it is you sink time into is what you end up getting good at. Is 10,000 hours a good framework for you? Go with it. Heck, I find even people that sit around watching a lot of TV end up being pretty damn good at watching TV.
Your voice alone < A story with context < Stories including others < Research and data along with stories including others
An article where you just say some stuff is OK. You’re allowed to say stuff.
But you can do better.
An article where you tell a true story about how something worked for you is better. Context! Now we can better understand where you are coming from when you say your stuff. Plus everybody likes a story.
An article where you combine that with quoting other people’s writing and stories is even better. Now you’re painting a larger picture and helping validate what you’re saying. Context and flavor!
An article where you combine all that with research and data is the best. Now you’re being personal, acknowledging a world outside yourself, layering in context, and avoiding being too anecdotal. Kapow! Now you’re writing!
Are you pitching?
Read what the site says about guest writing. Here’s ours.
Not to scare you off, but 90% of submissions are garbage. Maybe 75% is outright spam and another 15% are people that clearly didn’t read anything we had to say about guest posting and are way off base. I can usually tell from the quality of writing in the email itself if they’ll be a good guest blogger.
There probably is, but I don’t wanna link you off to tools I can’t vouch for. All I use is Dropbox Paper for collaborative writing because the sharing model is easy and allows for co-editing and commenting. Plus Grammarly because it catches a ton of mistakes as you go.
In advance of a recent podcast with the incredible technical writer and Smashing Magazine editor-in-chief Rachel Andrew, I gathered up a bunch of thoughts and references on the subject of technical writing. So many smart people have said a lot of smart things over the years that I thought I’d round up some of my favorite advice and sprinkle in my own experiences, as someone who has also done his fair share of technical writing and editing.
There is a much larger world of technical writing out there. My experience and interest is largely about web technology and blogging, so I’m coming at it from that angle and many of the people I quote throughout are in that same boat.
Picking something to write about
If you want to write for CSS-Tricks and you ask me what you should write about, I’m probably going to turn that question around on you. It’s likely I don’t know you well enough to pick the perfect topic for you. More importantly, what I really want you to write about is something that is personal and important to you. Articles rooted in recent excitement about a particular idea or technology always come out better than dictated assignments.
My best advice:
Write the article you wish you found when you googled something.
That said, I do maintain a list of ideas specifically for this site. Any writing can be done on assignment and sometimes that elicits the spark needed for something great and on-target for the audience of a site.
Write at the moment of learning
The moment you learn something is the best time to write. It’s fresh in your mind and you can remember what it was like before you understood it. You also understand what it takes to go from not knowing to knowing it. That’s the journey you need to take people on.
If you don’t have time, at least try to capture the vibe wherever you save your ideas. Don’t just write down „dataset.” Write down some quick notes like, „I didn’t realize DOM elements had a .dataset property for getting and setting data attributes. I wonder if it’s better to use that than getAttribute.” That way, you’ll be able to reload that realization in your brain when you revisit the idea.
Here’s some advice Rachel shared that I don’t see taken advantage of nearly enough:
There is a sweet spot for writing technical posts and tutorials. Write for the professional who hasn't had time to learn that thing yet, and link it back to things they already know. For example explaining a modern JS technique to someone who knows jQuery.
Tell me about how this new framework relates to Backbone. Tell me how this CMS relates to WordPress. Tell me how some technology connects to another technology that is safe to assume is more widely understood.
Technology changes a lot, but what technology does doesn’t change all that much.
Careful with that intro
The main comment I add on tutorials I review is to ask for an intro that describes what the tutorial is about. I'm 600 words in and still don't know what the tutorial is about and who it is for. #writing
Not getting to the point right at the top of technical articles is a dang epidemic. The start of a technical article is not the time to wax poetic or drop some cliché light philosophy like, „Web design sure has changed a lot.” You don’t have to be boring, but you do need to tell me what this article is going to get into and who it is for.
“Does the title make the article sound interesting?” If the title interests a reader, they’ll typically read the intro and decide, “Is it worth my time reading the whole thing?” A common mistake I see in a lot of technical posts is either too much introduction or, alternatively, far too little.
A single well-written paragraph can set the stage for a technical blog post.
Careful with the title, too
I remember a conversation from years ago with content strategist Erin Kissane where she strongly advised me to choose boring titles for everything. Not just the title of blog posts, but for everything, including the names of sections, tags, and even subheadings within posts.
Here’s the thing with boring: it works. Boring isn’t the right word either; it’s clarity. The world is full of clickbait, and maybe that’s effective in some genres, but technical blogging isn’t one of them.
A terrible version of the same: Build a web app with modern technologies in 30 minutes!
What’s a web app? What technologies? What’s modern about them? What’s with the weird time limit?
SEO matters and Margaret’s article is going to do a lot better in both the short and long term with that clear title.
The outro
Ben Halpern says that the next most important thing after the intro is:
[…] the last paragraph.
People don’t read top-to-bottom the moment when they arrive, so there is a good chance it’s the second paragraph people read. Personally, I find the beginning a lot more important than the ending, but there is a certain art to the ending as well.
A lot of people just <h2>Conclusion</h2> and write a few words about what was just went over. Honestly, I don’t hate that. It falls into this time tested pattern:
Tell ’em what you’re gonna tell ’em
Tell ’em
Tell ’em what you told ’em
That helps your message sink in and brings things full circle. Technical blogging isn’t terribly different from marketing in that sense. You’re trying to get people to understand something and you’re using whatever tricks you need to to get the job done. A little repetition is a classic trick.
[…] the wall of text can be easily be made less intimidating and appear much more visually appealing through the use of visual elements that break it up. The easiest is to simply place section subheadings throughout your post.
I agree: subheadings are probably the easiest and most powerful trick for scannability.
Other methods:
Lists: Like what I’m doing right now! I didn’t have to use a list. Paragraphs might have worked as well, but a list makes contextual sense here and is probably tricking some of you into reading this. Or at least scanning it and getting some key points in the process.
Images: Please make them relevant and contextual. Skip the funny GIF. Screenshots are often great in a technical context because they provide a visual to what might otherwise be a difficult concept to explain. I like Unsplash for thematic imagery, too, but you can do better than a random picture of trees, a woman drinking coffee, or a random rack of servers.
Illustrations: The abstract nature of an illustration is your friend. It tricks people into having a quick thought about what you are describing. They generally take a little work to pull off, but the pay-off for you and the reader can be huge.
Videos: You can’t simply drop a 42-minute video in the middle of a blog post, but if you can make it clear that you are demonstrating something visual and the video is less than a minute, it can be a powerful choice. You’ve always got <video autoplay muted loop controls> as well to make it GIF-like.
Blocks of code: Technical blog posts are often about code. Don’t avoid code, embrace it. I love how Dan Abramov sprinkles in code blocks in blog posts not so much to demonstrate syntax and setup, but to make points. I’m going to recommend Embedded Pens as well, because they’re fully interactive demoes in addition to serving as code blocks.
Tables: Don’t forget about tabular data! Presenting information (particularly data or definitions) in a table makes it more understandable than it would have been any other way.
Collapsing sections: The <details>/<summary> elements make quick work of collapsible content. If you’ve got a large section of content that is good to be there but doesn’t need to be read by everyone, collapse it! Our reference guide of media queries for devices is a decent example of this in action.
Whatever you pick here, you should pick things that help enhance the points you’re making even if in some ways it feels like trickery. It’s trickery to help readability, and that’s a good thing.
My favorite technique? A little bit of design. Use design principals like spacing, color, and alignment to help the readability of posts. We even go so far as to art direct some posts where design can enhance the central point being made.
The point here isn’t to do away with walls of text altogether. Sometimes that’s exactly what’s needed because you’re asking a reader to deeply read a passage that they otherwise wouldn’t get what’s needed from the content. However, more often than not, a post can strongly benefit from some healthy use of white space.
Use an active voice
I find this one a little tricky to wrap my head around, but Katy Decorah has a great presentation about technical writing that explains this point in great detail. It’s kinda like using present tense and stating a point directly rather than passively.
Passive: „After the file is downloaded…” Active: „After you download the file…”
Passive: „The request is processed by the server.” Active: „The server processes the request.”
“Just” makes me feel like an idiot. “Just” presumes I come from a specific background, studied certain courses in university, am fluent in certain technologies, and have read all the right books, articles, and resources. “Just” is a dangerous word.
There are plenty of others to avoid, which which I’ve written about before. Read the comments in that last link. Long story short: there are lots of words that do more harm than good in technical writing, not only because they can come across as preachy, but because they usually don’t help the sentences where they’re used. Try taking „just” out of any sentence. The sentence will still make sense without it.
SimplyClearlyJustOf courseEveryone knowsEasyHoweverSoBasicallyTurns outIn order toVery
Be mindful of your tone
Tone is concerned with how you say something in consideration of the context. For example, you wouldn’t deliver bad news to someone with a happy tone. The way you express yourself ought to be aligned with the situation.
This is our tone goal on this site:
Friendly. Authoritative. Welcoming. We’re all in this together. Flexible (nondogmatic about ideas). Thankful.
It’s worth pointing out that tone and voice are separate concepts. I like to think of voice as never changing (it’s your personality which is a part of who you are) while tone changes to suit the context. In other words, you can have a professional voice while communicating in a friendly tone.
I don’t think there is one true tone that is perfect for technical writing, but since the high-level goal of any technical writing is to help someone understand something complicated, you can use tone to help. A joke in the middle of a set of intricate steps is confusing. A bunch! of! excitement! about something might feel out of place or disingenuous, but being drab and lifeless is worse. I’d say if you’re writing under your own name, let’s feel a little bit of your personality as long as it’s not at the cost of clarity. If you’re writing under a brand, match what they have established whether it has been codified or not.
Careful about length
The general tendency in technical writing is to write too much rather than too little. Wade Christensen:
Whether trained by school assignments with word minimums or just uncritical, most of us write too much. Beyond approaching each draft with a ruthless cutting mentality, there are several ways to write short from draft one.
Word limits can help, even if they’re self-imposed.
I heard from a fledgling editor recently who struggled with his writers submitting posts with high word counts, so he suggested they keep it to 1000-1500 as a guideline and that seemed effective. This post is roughly double the high end there, for comparison.
The real solution, if the resources are there, is ruthless editing.
I personally don’t find that writing too long is the only issue. I’ve had just as many occurrences of writers going too short and not digging into the topic deep enough. I don’t like focusing on the length; I like focusing on the clarity of the delivery and usefulness of the content itself.
Side note: Breaking up a post into multiple parts (as separate posts in a series) is not a solution for posts that are too long. In fact, it can exacerbate the problem. Do that only if the different parts are thematically different and can stand alone without the other parts.
Don’t stop yourself from writing
There is an invisible force, built from fear, that keeps a lot of people away from technical blogging. „Meh, everybody already knows this,” you might think. (They don’t). „What if I’m wrong and someone calls me out?” (You aren’t wrong if what you’re doing is working for you.)
There can still be blockers even if you overcome those fears and start putting words to screen. Here’s Max Böck:
There is a thing that happens to me while writing. I start with a fresh idea, excited to shape it into words. But as time passes, I lose confidence.
The trick for Max is not to wait too long and to ignore feelings holding you back:
I’ll publish something as soon as I feel confident that all the important points I want to get across are there. I try to ignore the voice screaming “it’s not ready” just for long enough to push it online.
I think keeping drafts can be counterproductive. The problem is that, once something is a draft rather than a blog post, it’s likely to stay a draft and never become a blog post. And the longer something stays in draft, the less likely it is to ever see the light of day.
The chances that your writing helps someone is pretty high! Matthias Ott:
Even the smallest post can help someone else out there.
Think you’re too inexperienced? You’re probably not, but even if you were, a perspective from someone with less experience is still useful. Ali Spittel:
If you have a blog post that contains mostly correct information, or at least your interpretation of the topic, then you’re experienced enough. There are lots of excellent posts out there from the perspective of newbies, and they’re really important!
Fear is a real thing in writing and dealing with it can be debilitating. While it’s primarily geared toward creative writing, The War of Art by Stephen Pressfield is a good read to help break through the fear.
There is no one perfect style
We each have our own unique perspectives and writing styles. One writing style might be more approachable to some, and can therefore help and benefit a large (or even small) number of people in ways you might not expect.
Even if only one person learns something from your article, you’ll feel great, and that you’ve contributed — even if just a little bit — to this amazing community that we’re all constantly learning from.
Technical blog posts don’t have to be devoid of creativity. You could create a wonderful technical blog post that is an annotated chat room conversation between two developers learning from each other. Or a blog post that is a series of videos that build on each other.
The more introductory, the higher the bar
The web is saturated with beginner-rated and surface-level blog posts. There’s a sea of crash courses, 101s, and intros out there. You’ve gotta knock it out of the park if you want to stand out from the pack and be useful.
There is no particular change in tone necessarily for a beginner-focused post. You don’t need to do the equivalent of talking slowly or talking down. You only need to be clear, and clarity is valuable to readers at any skill level, not to mention appreciated by them as well. A very advanced programmer can and will appreciate the clarity in a technical blog post even if it’s something they already understand.
But the bar isn’t that high in general
You don’t need a decade of experience to write a blog post. I’d say it’s closer to a day of experience, a desire to write, and having something to say. I think you’d be surprised at how little you need to do to make a blog post stand out and be read. Put in some effort, make clear points, focus on readability, and you will do well.
I hope the advice in this post helps!
Abstraction is helpful, but real-world examples are sometimes better
It’s one thing to describe a high-level concept, and another to explain or illustrate how that concept applies to the real world. In technical writing, you’ll often be covering complex or hard-to-understand subjects, so it’s even more important to use a well-placed example or two to showcase why your topic matters, or how it relates to the real world.
I find myself pushing back on code that is too abstract more than I push back on code that is too focused on a real-world use case. I’d rather see ["Charles Adok", "Samantha Frederick"] than ["foo", "bar"] or [a, b] any day, but more importantly, what is then done with that data to make it feel like a relatable programming scenario.
But avoid real-world examples that come at the cost of clarity. If abstraction is useful to drive a complex point home without getting lost in the details, so be it.
Blogging opens doors
Everyone I’ve ever met who had ever actively blogged has said that blogging has had a positive impact on their career. Besides being a public demonstration of your ability to think and present ideas, it helps you understand things better. To teach is to learn.
I’d attribute my own blogging as the biggest contributor to any success I’ve had. Here’s Khoi Vinh, a designer ten times more successful than I’ll ever be:
It’s hard to overstate how important my blog has been, but if I were to try to distill it down into one word, it would be: “amplifier.”
You get better at what you do.
There is no way around it: practice makes you better. The expectations around practice are sometimes very clear and culturally ingrained. In order to get better at playing the piano, you take piano lessons and practice. We all know this. But people also say „Oh, I’m a terrible cook,” as if cooking as a skill is somehow fundamentally different than playing the piano and doesn’t require the same amount of learning and practice.
You get better at writing by writing more. That is, writing with stakes. Writing and then publicly publishing what you write such that people read it.
You can go to school for writing. You could get a writing coach. My thinking is nothing teaches better than writing often. Whatever it is you sink time into is what you end up getting good at. Is 10,000 hours a good framework for you? Go with it. Heck, I find even people that sit around watching a lot of TV end up being pretty damn good at watching TV.
Your voice alone < A story with context < Stories including others < Research and data along with stories including others
An article where you just say some stuff is OK. You’re allowed to say stuff.
But you can do better.
An article where you tell a true story about how something worked for you is better. Context! Now we can better understand where you are coming from when you say your stuff. Plus everybody likes a story.
An article where you combine that with quoting other people’s writing and stories is even better. Now you’re painting a larger picture and helping validate what you’re saying. Context and flavor!
An article where you combine all that with research and data is the best. Now you’re being personal, acknowledging a world outside yourself, layering in context, and avoiding being too anecdotal. Kapow! Now you’re writing!
Are you pitching?
Read what the site says about guest writing. Here’s ours.
Not to scare you off, but 90% of submissions are garbage. Maybe 75% is outright spam and another 15% are people that clearly didn’t read anything we had to say about guest posting and are way off base. I can usually tell from the quality of writing in the email itself if they’ll be a good guest blogger.
There probably is, but I don’t wanna link you off to tools I can’t vouch for. All I use is Dropbox Paper for collaborative writing because the sharing model is easy and allows for co-editing and commenting. Plus Grammarly because it catches a ton of mistakes as you go.
I really enjoyed this interview with Jeremy Keith on the state of the web, how things have changed in recent years and why he’s a mix of optimistic and nervous for the future.
One thing that caught my attention during the interview more than anything was where Jeremy started discussing how folks think that websites are pretty crummy in general. This reminded me that I cannot count the number of times when someone has said to me “ah, I can’t view this website on my phone.”
We have websites that aren’t responsive! We have websites that litter the UI with advertisements and modals! And we have websites that are slow as all heck just when we need them the most!
Of course folks are going to start complaining about the web and working around them if they find that this is the case. I’ll even catch myself sending an email to myself when I know that the mobile experience is going to be crummy. Or I’ll Instapaper something because the design of the website is particularly difficult to read. Remember, Reader Mode is the button to beat.
My quick thought on this is that we shouldn’t become sour and pessimistic. We should roll up our sleeves and get to work because clearly there’s much left to do.
I really enjoyed this interview with Jeremy Keith on the state of the web, how things have changed in recent years and why he’s a mix of optimistic and nervous for the future.
One thing that caught my attention during the interview more than anything was where Jeremy started discussing how folks think that websites are pretty crummy in general. This reminded me that I cannot count the number of times when someone has said to me “ah, I can’t view this website on my phone.”
We have websites that aren’t responsive! We have websites that litter the UI with advertisements and modals! And we have websites that are slow as all heck just when we need them the most!
Of course folks are going to start complaining about the web and working around them if they find that this is the case. I’ll even catch myself sending an email to myself when I know that the mobile experience is going to be crummy. Or I’ll Instapaper something because the design of the website is particularly difficult to read. Remember, Reader Mode is the button to beat.
My quick thought on this is that we shouldn’t become sour and pessimistic. We should roll up our sleeves and get to work because clearly there’s much left to do.
GraphQL is a query language for APIs that is very empowering for front-end developers. As the GraphQL site explains it, you describe your data, ask for what you want, and get predictable results.
If you haven’t worked with it before, GraphQL might be a little confusing to grok at first glance. So, let’s build a multiplayer tic-tac-toe game using it in order to demonstrate how it’s used and what we can do with it.
First thing we need is a backend for our APIs. We’re going to use Hasura GraphQL Engine along with a custom GraphQL server for this tutorial. We’ll look at the queries and mutations that the client-side needs to build the game. You can implement this kind of thing in whatever framework you wish, but we’re going with use React and Apollo for this tutorial.
GraphQL is a query language for APIs; a language with a syntax that defines a way to fetch data from the server. It works with any kind of API that is backed by a strong system that makes your codebase resilient. Some of the primary characteristics of GraphQL are:
The client can ask the server for what queries it supports (check out introspection for more).
The client must ask the server for exactly what it wants. It can’t ask for something like a wildcard (*) but rather exact fields. For example, to get a user’s ID and name, the GraphQL query would be something like:
query {
  user {
    id
    name
  }
}
Every query is made to a single endpoint and every request is a POST request.
Given a query, the structure of the response is enforced. For example, for the above query to get the id and name of a user object, a successful response would be something like:
This series of articles is a great place to start if you want to know more about GraphQL.
Why are we using GraphQL, anyway?
We just discussed how GraphQL demands that the client must ask the server for exactly what it wants. That means there is no unnecessary data retrieved from the server, like in case of REST where you would receive a huge response even when you need one field. Getting what new need and only what we need optimizes responses so that they’re speedy and predictable.
The client can ask the server for its schema via introspection. This schema can be used to build queries dynamically using an API explorer like GraphiQL. It also enables linting and auto-completing because every query can be built with and cross-checked against the GraphQL schema. As a front-end developer, this greatly enhances the DX as there is much less human error involved.
Since there is a single endpoint and every request is a POST request, GraphQL can avoid a lot of boilerplate since it doesn’t have to track endpoints, request payloads and response types. Response caching is much easier because every query response can be expected to be of a certain structure.
Furthermore, GraphQL has a well-defined spec for implementing real-time subscriptions. You do not have to come up with your own implementation details for building real-time servers. Build a server that complies with GraphQL’s real-time spec and any client can start consuming the real-time GraphQL APIs with ease.
GraphQL Terminology
I will be using some GraphQL terms in this post, so it’s worth covering a few of them here in advance.
Query: A GraphQL query is one that simply fetches data from the server.
Mutation: This is a GraphQL query that changes something on the server and fetches some data.
Subscription: This is a GraphQL query that subscribes the client to some changes on the server.
Query variables: These allow us to add parameters to a GraphQL query.
Getting back to the backend
Now that we have a cursory understanding of GraphQL, let’s start with modeling a backend. Our GraphQL backend would be a combination of Hasura GraphQL Engine and a custom GraphQL server. We will not go into the subtleties of code in this case.
Since Tic Tac Toe is a multiplayer game, there is a need to store state in the database. We will use Postgres as our database and Hasura GraphQL Engine as a GraphQL server that allows us to CRUD the data in Postgres over GraphQL.
Apart from CRUD on the database, we would also want to run some custom logic in the form of GraphQL mutations. We will use a custom GraphQL server for that.
Hasura describes itself quite nicely in its README file:
GraphQL Engine is a blazing-fast GraphQL server that gives you instant, realtime GraphQL APIs over Postgres, with webhook triggers on database events, and remote schemas for business logic.
Going a little deeper, Hasura GraphQL Engine is an open-source server that sits on top of a Postgres database and allows you to CRUD the data over real-time GraphQL. It works with both new and existing Postgres databases. It also has an access control layer that you can integrate with any auth provider. In this post though, we will not implement auth for the sake of brevity.
Let’s start by deploying an instance of Hasura GraphQL Engine to Heroku’s free tier that comes with a fresh Postgres database. Go ahead, do it; it is free and you do not need to enter your credit card details 🙂
Once you deploy, you will land up on the Hasura console which is the admin UI to manage your backend. Note that the URL you are at, is your GraphQL Engine URL. Lets start with creating our required tables.
user
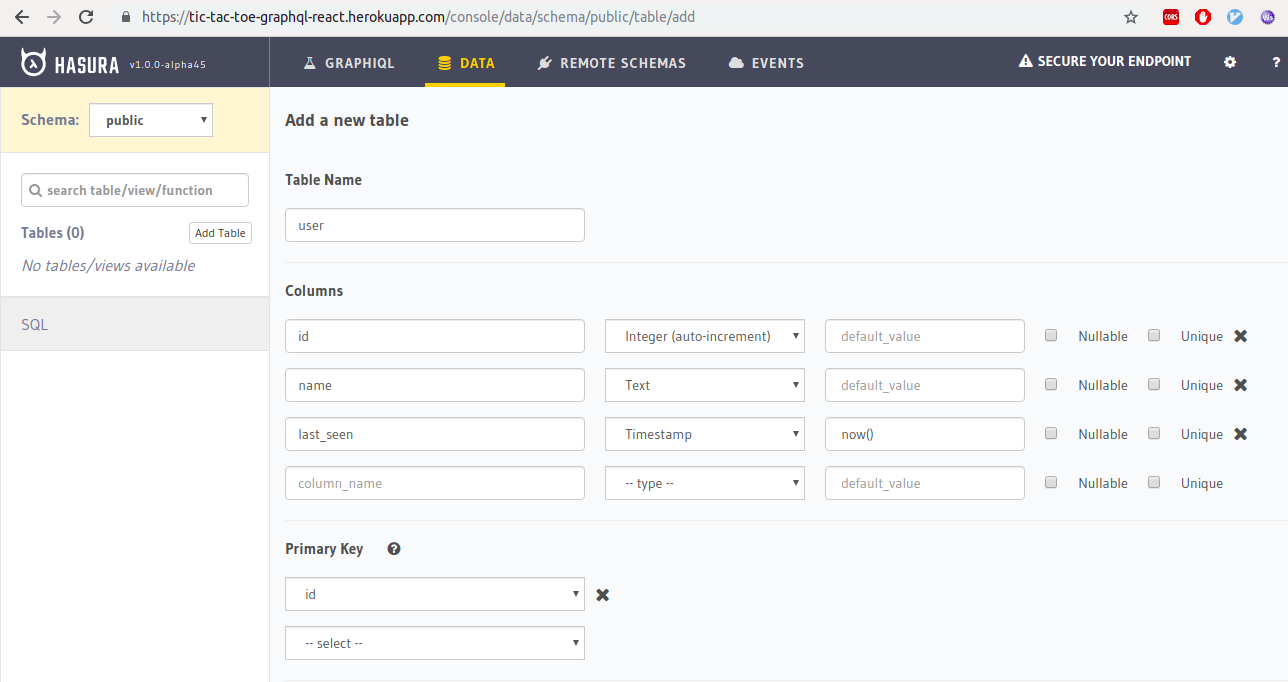
A user table will store our users. To create the table, go to the „Data” tab on top and click on the „Create Table” button.
This table has an id column which is the unique identifier of each user and a name column that stores the user’s name.
board
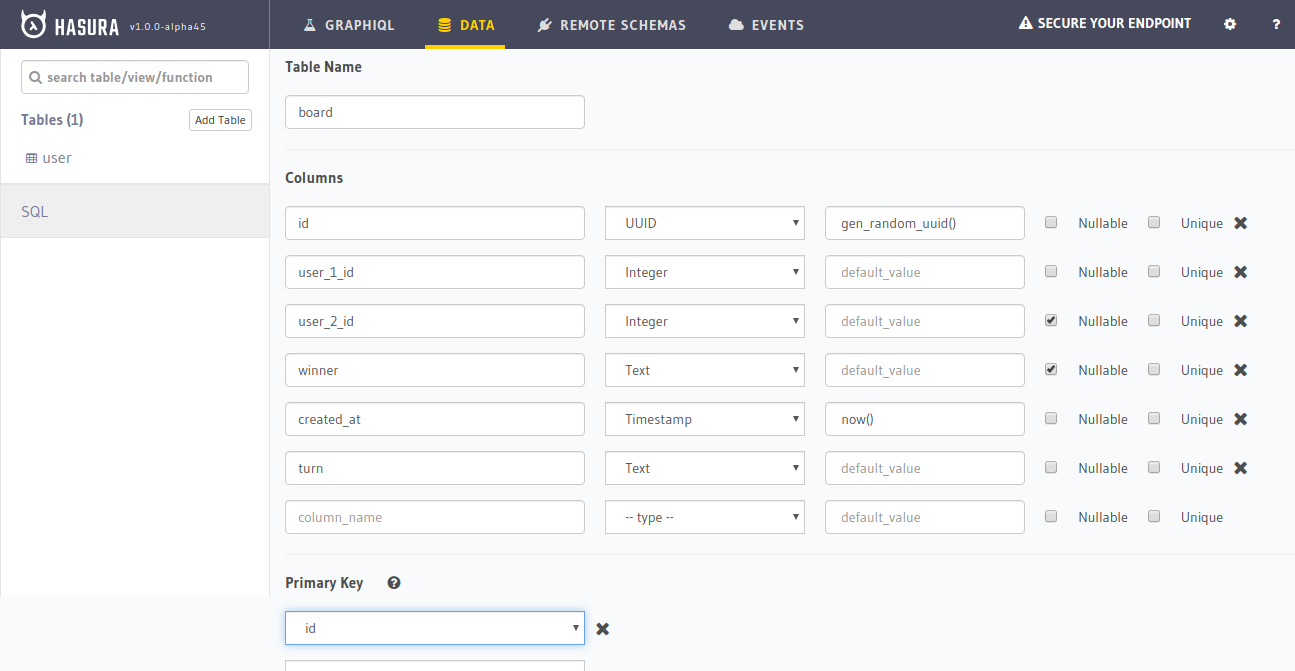
The board table will store the game boards where all the action happens. We’ll spin up a new board for each game that starts.
Lets look at the columns of this table:
id: A unique UUID for each board that is auto generated
user_1_id: The user_id of the first user. This user by default plays X in the game
user_2_id: The user_id of the second user. This user by default plays O.
winner: This is a text field that is set to X or O once the winner has been decided.
turn: This is a text field that can be X or O and it stores the current turn. It starts with X.
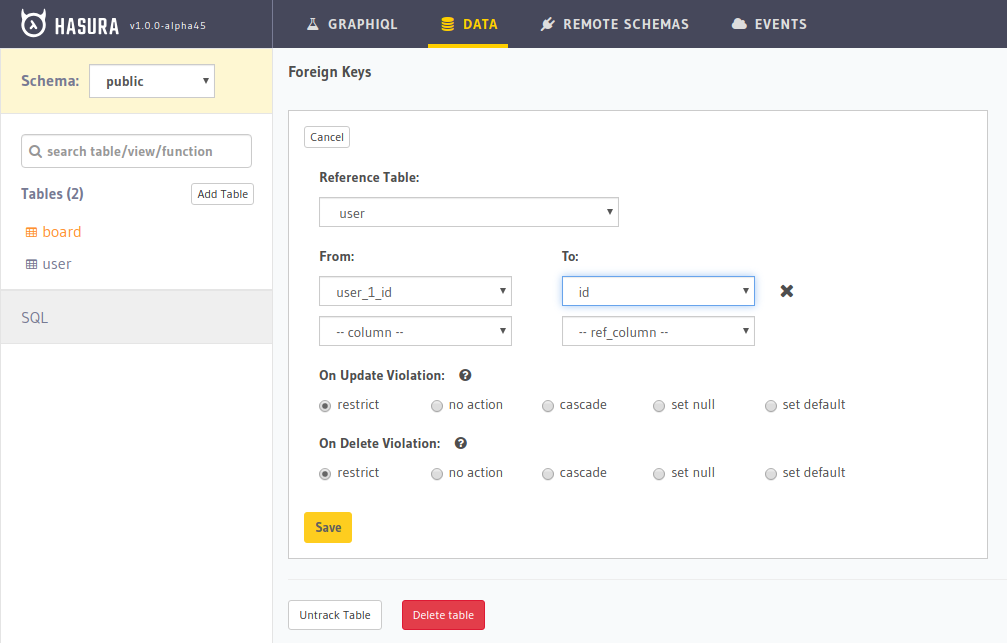
Since user_1_id and user_2_id store the user IDs, let’s add a constraint on the board table that ensures user_1_id and user_2_id to be present in table user.
Go to the „Modify” tab in the Hasura board table and add the foreign keys.
Adding the foreign key on user_1_id. We’ll need to add a new foreign key on user_2_id as well.
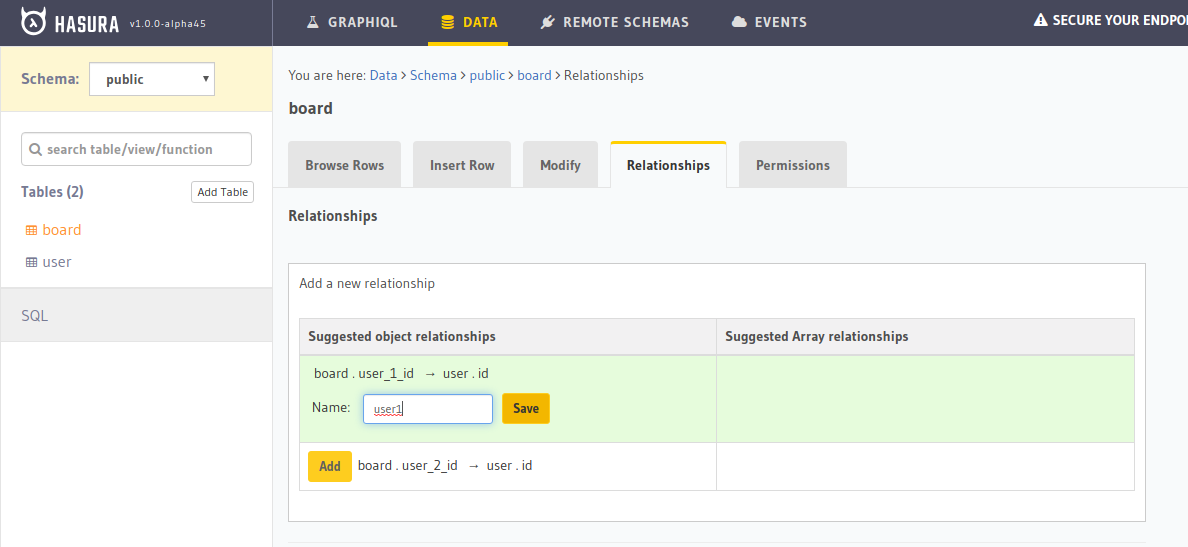
Now, based on these relationships, we need to create a connection between these tables so that we can query the user information while querying the board.
Go to the „Relationships” tab in Hasura and create relationships called user1 and user2 for user_1_id and user_2_id based suggested relations.
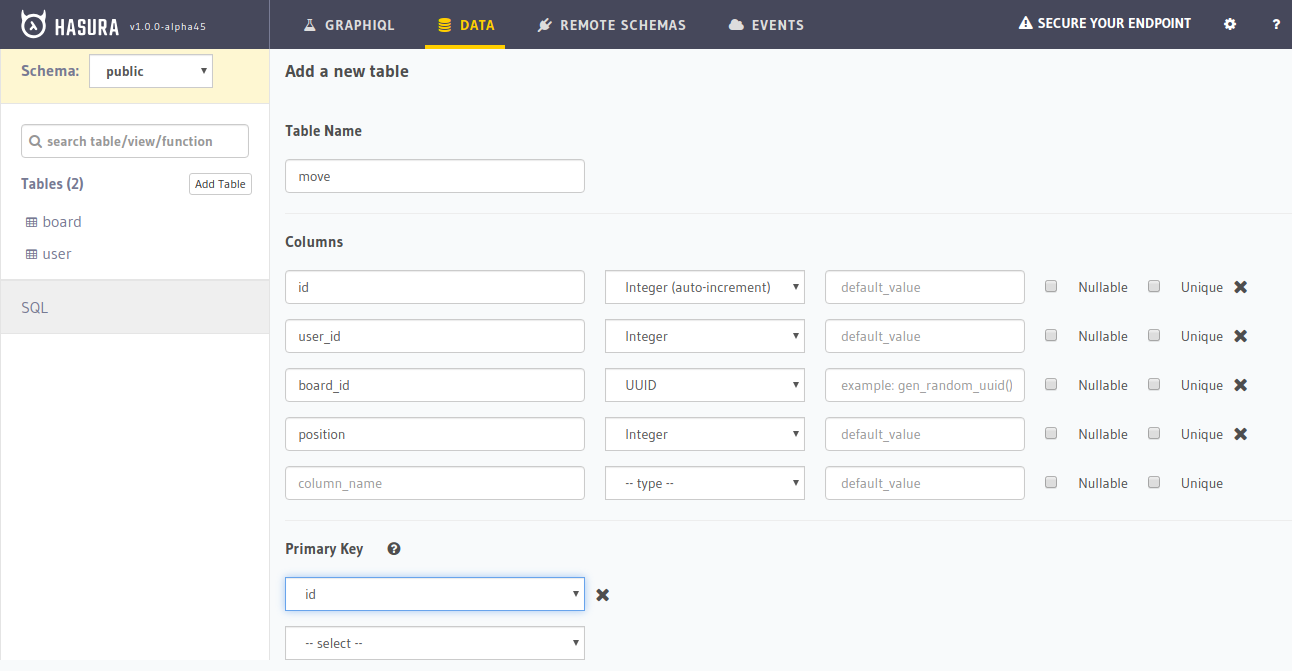
move
Finally, we need a move table that stores the moves made by users on a board.
Let’s look at the columns:
id: The unique identifier of each move that is auto generated
user_id: The ID of the user that made the move
board_id: The ID of the board that the move was made on
position: The position where the move was made (i.e. 1-9)
Since user_id and board_id are foreign keys to user and board table, respectively. We must create these foreign key constraints just like we did above. Next, create the relationships as user for the foreign key on user_id and board for the foreign key on board_id. Then, we’ll go back to the board table’s „Relationship” tab and create the suggested relationship to move table. Call it moves.
We need a custom server
Apart from storing data in the database, we also want to perform custom logic. The logic? Whenever a user makes a move, the move must be validated, made before the turn must is switched.
In order to do that, we must run an SQL transaction on the database. I have written a GraphQL server that does exactly that that I’ve deployed on Glitch.
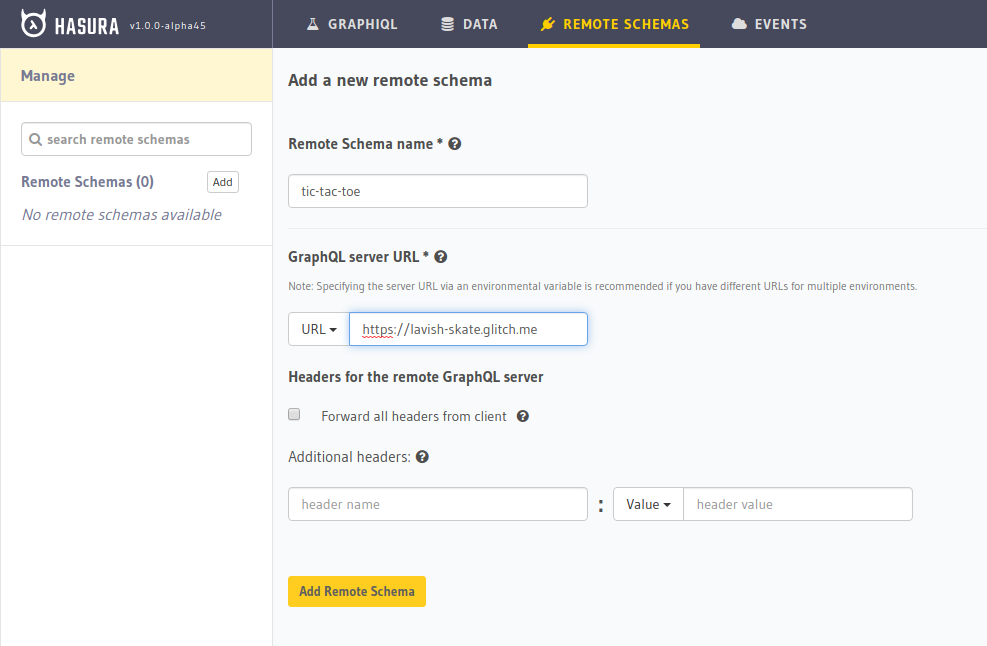
Now we have two GraphQL servers. But GraphQL spec enforces that there must be only one endpoint. For this purpose, Hasura supports remote schemas — i.e. you can provide an external GraphQL endpoint to Hasura and it will merge this GraphQL server with itself and serve the combined schema under a single endpoint. Let’s add this custom GraphQL server to our Hasura Engine instance:
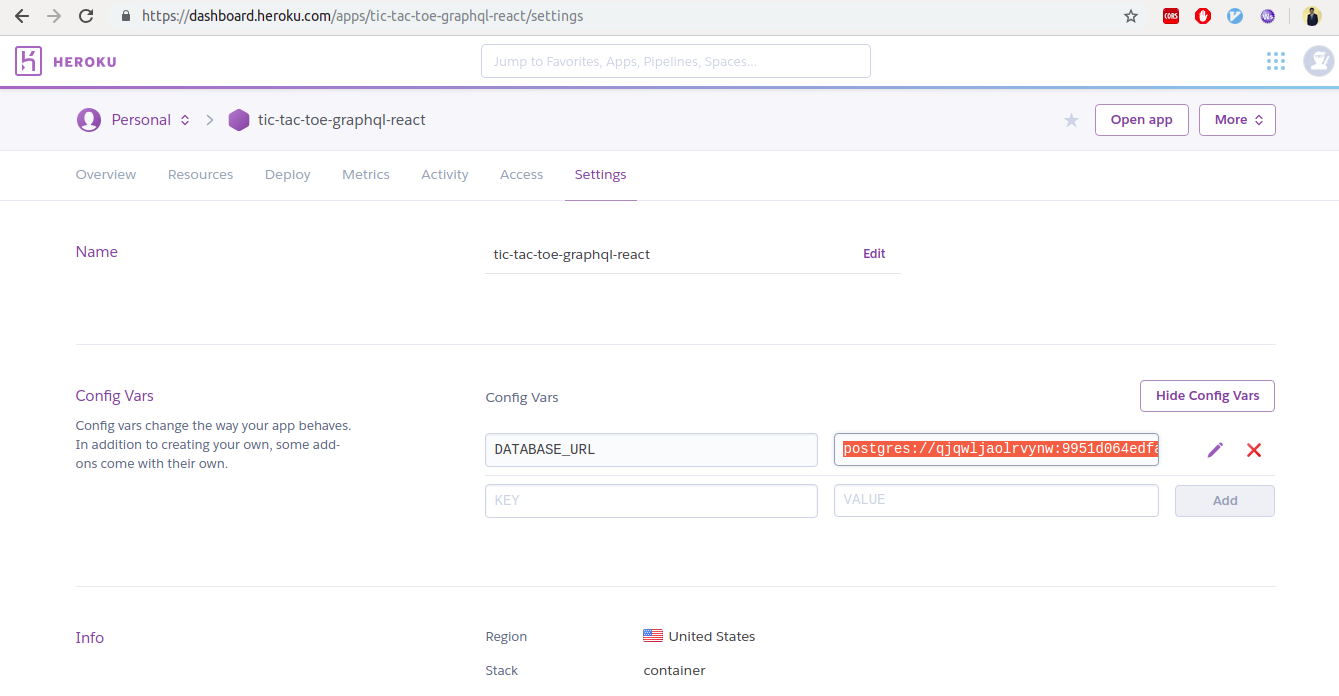
Add an environment variable that is the connection to your Postgres database. To do that, go to https://dashboard.heroku.com, choose your app, go to „Settings” and reveal config vars.
A few more steps from there:
Copy the value for the DATABASE_URL.
Go to the GraphQL server you forked and paste that value in the .env file (POSTGRES_CONNECTION_STRING=<value>).
Click on the „Show Live” button on top and copy the opened URL.
We’ll add this URL to GraphQL engine by adding it as a remote schema. Go to the „Remote Schemas” tab on top and click on the „Add” option.
We are done with setting up our backend!
Let’s work on the front end
I will not be going into the details of front-end implementation since y’all would choose to implement it in the framework of your choice. I’ll go ahead and provide all the required queries and mutations that you would need to build the game. Using these with the front-end framework of your choice will allow you to build a fully functional multiplayer Tic Tac Toe.
Setup
Apollo Client is the go-to library for client-side GraphQL. They have awesome abstractions for React, Vue, Angular, iOS, Android etc. It helps you save a lot of boilerplate and the DX is smooth. You might want to consider using Apollo client over doing everything from scratch.
Let’s discuss the queries and mutations that the client would need for this game.
Insert user
In the app that I built, I generated a random username for each user and inserted this name into the database whenever they open the app. I also stored the name and generated a user ID in local storage so that the same user does not have different usernames. The mutation I used is:
This mutation inserts an entry into the user table and returns the generated id. If you observe the mutation closely, it uses $name. This is called the query variable. When you send this mutation to the server along with the variables { "name": "bazooka"}, the GraphQL server would replace $name from the query variables, which in this case would be „bazooka.”
If you wish, you can implement auth and insert into this table with the username or the nickname.
Load all boards
To load all the boards, we run a GraphQL subscription:
This subscription is a live query that returns the id, user1 along with their id and name (from the relationship), user_2_id, winner and created_at. We have set a where filter which fetches us only the boards without a valid winner and where user_2_id is null which means the board is is open for a player to join. Finally, we order these boards by their created_at timestamp.
Creating a board
Users can create boards for other people to join. To do that, they have to insert an entry into the boards table.
In the above GraphQL mutation, we are setting the user_2_id of a board to a user_id. We have also added additional checks such that this action succeeds only if the joining player is not the creator and the board is not already full. After the mutation, we ask for the number of affected rows.
In my app, after joining a board, I would redirect users to /play?board_id=<board_id>.
Subscribing to the board
When both users are in game, we need real-time updates about the moves of each player. So we must subscribe to the given board that is being played on and also the moves (through the relationship).
subscription($board_id: uuid!) {
  board: board_by_pk (id: $board_id) {
    id
    moves (order_by: { id: desc}) {
      id
      position
      user {
        id
        name
      }
      user_id
    }
    user1 {
      id
      name
    }
    user2 {
      id
      name
    }
    turn
    winner
  }
}
The above query subscribes the client to the board that is being played. Whenever a new move is played, the client will be updated with it.
Making a move
To make a move, we will be using the make_move mutation from our custom GraphQL server.
This mutation takes a board_id, position and user_id from query variables. It validates the move, makes the move and also switches the turn. In the end, it returns whether this transaction was successful or not.
Tic Tac Whoa!
And now you have a working game of Tic Tac Toe! You can implement any real-time multiplayer game with GraphQL subscriptions using the concepts we covered. Let me know if you have any questions and I would be happy to answer.
GraphQL is a query language for APIs that is very empowering for front-end developers. As the GraphQL site explains it, you describe your data, ask for what you want, and get predictable results.
If you haven’t worked with it before, GraphQL might be a little confusing to grok at first glance. So, let’s build a multiplayer tic-tac-toe game using it in order to demonstrate how it’s used and what we can do with it.
First thing we need is a backend for our APIs. We’re going to use Hasura GraphQL Engine along with a custom GraphQL server for this tutorial. We’ll look at the queries and mutations that the client-side needs to build the game. You can implement this kind of thing in whatever framework you wish, but we’re going with use React and Apollo for this tutorial.
GraphQL is a query language for APIs; a language with a syntax that defines a way to fetch data from the server. It works with any kind of API that is backed by a strong system that makes your codebase resilient. Some of the primary characteristics of GraphQL are:
The client can ask the server for what queries it supports (check out introspection for more).
The client must ask the server for exactly what it wants. It can’t ask for something like a wildcard (*) but rather exact fields. For example, to get a user’s ID and name, the GraphQL query would be something like:
query {
  user {
    id
    name
  }
}
Every query is made to a single endpoint and every request is a POST request.
Given a query, the structure of the response is enforced. For example, for the above query to get the id and name of a user object, a successful response would be something like:
This series of articles is a great place to start if you want to know more about GraphQL.
Why are we using GraphQL, anyway?
We just discussed how GraphQL demands that the client must ask the server for exactly what it wants. That means there is no unnecessary data retrieved from the server, like in case of REST where you would receive a huge response even when you need one field. Getting what new need and only what we need optimizes responses so that they’re speedy and predictable.
The client can ask the server for its schema via introspection. This schema can be used to build queries dynamically using an API explorer like GraphiQL. It also enables linting and auto-completing because every query can be built with and cross-checked against the GraphQL schema. As a front-end developer, this greatly enhances the DX as there is much less human error involved.
Since there is a single endpoint and every request is a POST request, GraphQL can avoid a lot of boilerplate since it doesn’t have to track endpoints, request payloads and response types. Response caching is much easier because every query response can be expected to be of a certain structure.
Furthermore, GraphQL has a well-defined spec for implementing real-time subscriptions. You do not have to come up with your own implementation details for building real-time servers. Build a server that complies with GraphQL’s real-time spec and any client can start consuming the real-time GraphQL APIs with ease.
GraphQL Terminology
I will be using some GraphQL terms in this post, so it’s worth covering a few of them here in advance.
Query: A GraphQL query is one that simply fetches data from the server.
Mutation: This is a GraphQL query that changes something on the server and fetches some data.
Subscription: This is a GraphQL query that subscribes the client to some changes on the server.
Query variables: These allow us to add parameters to a GraphQL query.
Getting back to the backend
Now that we have a cursory understanding of GraphQL, let’s start with modeling a backend. Our GraphQL backend would be a combination of Hasura GraphQL Engine and a custom GraphQL server. We will not go into the subtleties of code in this case.
Since Tic Tac Toe is a multiplayer game, there is a need to store state in the database. We will use Postgres as our database and Hasura GraphQL Engine as a GraphQL server that allows us to CRUD the data in Postgres over GraphQL.
Apart from CRUD on the database, we would also want to run some custom logic in the form of GraphQL mutations. We will use a custom GraphQL server for that.
Hasura describes itself quite nicely in its README file:
GraphQL Engine is a blazing-fast GraphQL server that gives you instant, realtime GraphQL APIs over Postgres, with webhook triggers on database events, and remote schemas for business logic.
Going a little deeper, Hasura GraphQL Engine is an open-source server that sits on top of a Postgres database and allows you to CRUD the data over real-time GraphQL. It works with both new and existing Postgres databases. It also has an access control layer that you can integrate with any auth provider. In this post though, we will not implement auth for the sake of brevity.
Let’s start by deploying an instance of Hasura GraphQL Engine to Heroku’s free tier that comes with a fresh Postgres database. Go ahead, do it; it is free and you do not need to enter your credit card details 🙂
Once you deploy, you will land up on the Hasura console which is the admin UI to manage your backend. Note that the URL you are at, is your GraphQL Engine URL. Lets start with creating our required tables.
user
A user table will store our users. To create the table, go to the „Data” tab on top and click on the „Create Table” button.
This table has an id column which is the unique identifier of each user and a name column that stores the user’s name.
board
The board table will store the game boards where all the action happens. We’ll spin up a new board for each game that starts.
Lets look at the columns of this table:
id: A unique UUID for each board that is auto generated
user_1_id: The user_id of the first user. This user by default plays X in the game
user_2_id: The user_id of the second user. This user by default plays O.
winner: This is a text field that is set to X or O once the winner has been decided.
turn: This is a text field that can be X or O and it stores the current turn. It starts with X.
Since user_1_id and user_2_id store the user IDs, let’s add a constraint on the board table that ensures user_1_id and user_2_id to be present in table user.
Go to the „Modify” tab in the Hasura board table and add the foreign keys.
Adding the foreign key on user_1_id. We’ll need to add a new foreign key on user_2_id as well.
Now, based on these relationships, we need to create a connection between these tables so that we can query the user information while querying the board.
Go to the „Relationships” tab in Hasura and create relationships called user1 and user2 for user_1_id and user_2_id based suggested relations.
move
Finally, we need a move table that stores the moves made by users on a board.
Let’s look at the columns:
id: The unique identifier of each move that is auto generated
user_id: The ID of the user that made the move
board_id: The ID of the board that the move was made on
position: The position where the move was made (i.e. 1-9)
Since user_id and board_id are foreign keys to user and board table, respectively. We must create these foreign key constraints just like we did above. Next, create the relationships as user for the foreign key on user_id and board for the foreign key on board_id. Then, we’ll go back to the board table’s „Relationship” tab and create the suggested relationship to move table. Call it moves.
We need a custom server
Apart from storing data in the database, we also want to perform custom logic. The logic? Whenever a user makes a move, the move must be validated, made before the turn must is switched.
In order to do that, we must run an SQL transaction on the database. I have written a GraphQL server that does exactly that that I’ve deployed on Glitch.
Now we have two GraphQL servers. But GraphQL spec enforces that there must be only one endpoint. For this purpose, Hasura supports remote schemas — i.e. you can provide an external GraphQL endpoint to Hasura and it will merge this GraphQL server with itself and serve the combined schema under a single endpoint. Let’s add this custom GraphQL server to our Hasura Engine instance:
Add an environment variable that is the connection to your Postgres database. To do that, go to https://dashboard.heroku.com, choose your app, go to „Settings” and reveal config vars.
A few more steps from there:
Copy the value for the DATABASE_URL.
Go to the GraphQL server you forked and paste that value in the .env file (POSTGRES_CONNECTION_STRING=<value>).
Click on the „Show Live” button on top and copy the opened URL.
We’ll add this URL to GraphQL engine by adding it as a remote schema. Go to the „Remote Schemas” tab on top and click on the „Add” option.
We are done with setting up our backend!
Let’s work on the front end
I will not be going into the details of front-end implementation since y’all would choose to implement it in the framework of your choice. I’ll go ahead and provide all the required queries and mutations that you would need to build the game. Using these with the front-end framework of your choice will allow you to build a fully functional multiplayer Tic Tac Toe.
Setup
Apollo Client is the go-to library for client-side GraphQL. They have awesome abstractions for React, Vue, Angular, iOS, Android etc. It helps you save a lot of boilerplate and the DX is smooth. You might want to consider using Apollo client over doing everything from scratch.
Let’s discuss the queries and mutations that the client would need for this game.
Insert user
In the app that I built, I generated a random username for each user and inserted this name into the database whenever they open the app. I also stored the name and generated a user ID in local storage so that the same user does not have different usernames. The mutation I used is:
This mutation inserts an entry into the user table and returns the generated id. If you observe the mutation closely, it uses $name. This is called the query variable. When you send this mutation to the server along with the variables { "name": "bazooka"}, the GraphQL server would replace $name from the query variables, which in this case would be „bazooka.”
If you wish, you can implement auth and insert into this table with the username or the nickname.
Load all boards
To load all the boards, we run a GraphQL subscription:
This subscription is a live query that returns the id, user1 along with their id and name (from the relationship), user_2_id, winner and created_at. We have set a where filter which fetches us only the boards without a valid winner and where user_2_id is null which means the board is is open for a player to join. Finally, we order these boards by their created_at timestamp.
Creating a board
Users can create boards for other people to join. To do that, they have to insert an entry into the boards table.
In the above GraphQL mutation, we are setting the user_2_id of a board to a user_id. We have also added additional checks such that this action succeeds only if the joining player is not the creator and the board is not already full. After the mutation, we ask for the number of affected rows.
In my app, after joining a board, I would redirect users to /play?board_id=<board_id>.
Subscribing to the board
When both users are in game, we need real-time updates about the moves of each player. So we must subscribe to the given board that is being played on and also the moves (through the relationship).
subscription($board_id: uuid!) {
  board: board_by_pk (id: $board_id) {
    id
    moves (order_by: { id: desc}) {
      id
      position
      user {
        id
        name
      }
      user_id
    }
    user1 {
      id
      name
    }
    user2 {
      id
      name
    }
    turn
    winner
  }
}
The above query subscribes the client to the board that is being played. Whenever a new move is played, the client will be updated with it.
Making a move
To make a move, we will be using the make_move mutation from our custom GraphQL server.
This mutation takes a board_id, position and user_id from query variables. It validates the move, makes the move and also switches the turn. In the end, it returns whether this transaction was successful or not.
Tic Tac Whoa!
And now you have a working game of Tic Tac Toe! You can implement any real-time multiplayer game with GraphQL subscriptions using the concepts we covered. Let me know if you have any questions and I would be happy to answer.
Find the right Photoshop brushes for your projects. Explore this collection of tools and inspiration.
50+ Free Photoshop Brushes
Love a good freebie? Today, we’re bringing you an incredible selection of over 50 free Photoshop brushes from around the web.
Use these brushes to bring your digital paintings, photo manipulations and design ideas to life. From brilliant star brushes to realistic ink brushes, this list will ignite your creativity while saving your budget.
How to Install Photoshop Brushes
Not sure how to install Photoshop brushes? Tackle this essential tool with this quick tip video by Melody Nieves.
Follow your desire to make beautiful art digitally. This first selection features amazing Photoshop brushes which capture the look of traditional art mediums and techniques. Master realistic art textures with the help of these brushes.
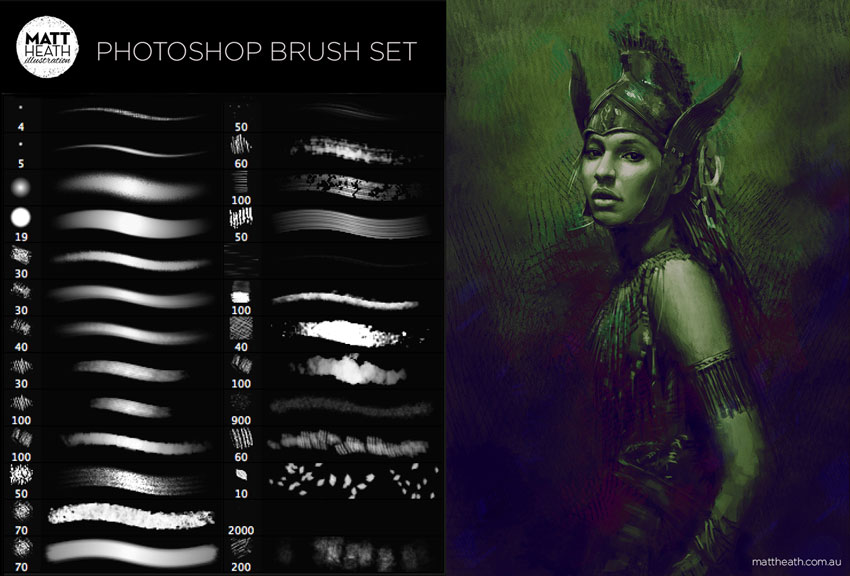
Artist Matt Heath completely overhauled this essential brush kit with over 110 Photoshop brushes inspired by natural and traditional art mediums. Enjoy high-quality textures you can layer on for more phenomenal effects.
Use these brushes for graphic design and various digital art projects.
Some of the best brush sets come from many acclaimed digital artists themselves. This set by digital painter Aaron Griffin features beautiful texture and art brushes to make your work look unbelievable.
Mimic realistic paint finishes with the very set he uses himself! Check it out.
Need that hand-drawn feel for your graphic or poster? Designer candies delivers with this helpful kit of hand-drawn arrow brushes. This set includes 80 Photoshop brushes drawn with an authentic, handmade look. Add a quirky flair to your projects with this free set.
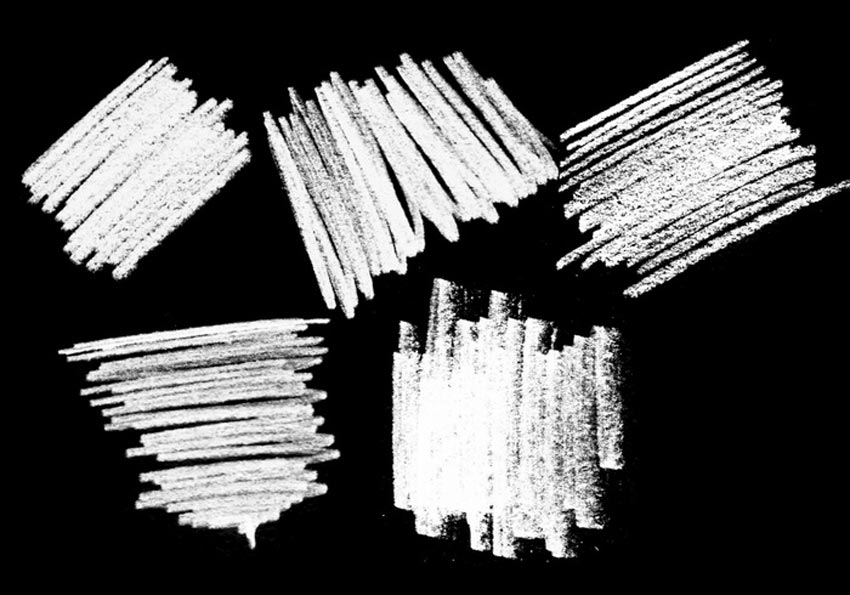
Need more grunge brushes? This Photoshop brush texture kit was handmade and digitized with care and consideration. All of the five Photoshop brushes included were individually edited for the best results. Try them for print and web designs.
Need a mixed brush pack to ignite your creativity? Try this lovely set of handmade Photoshop brushes from designer Danielle Lolley. This massive download includes over 200 hand-painted Photoshop brushes for personal use only. Give them a try for Instagram posts and more.
Want some solid ink brushes for Photoshop? Check out this excellent selection of various Photoshop brush textures. These free Photoshop grunge brushes will make it easy to add the right amount of grit and grime to any weathered project.
One of the ways to change up your paintings is to use textural brushes instead of a plain round one. This pretty set from XnBook helps you add just a touch of texture to any drawing or painting. Explore the possibilities with this neat set!
Halftones are uniquely dotted visual effects which date back to 19th-century print design. Now, designers use fantastic brush packs like this one to create retro halftone effects for illustrations, ads, and more. Try this set from Chris Letterle with several halftone textures to choose from.
Creative Martina Palazzese brings us our next Photoshop brush set, this remarkable take on traditional oil textures. Each brush was carefully handcrafted to include detailed textures and realistic oil-like marks. Visit the link to see the handy video tutorial also included.
Adobe Photoshop brushes reflect many of the changing trends in art. These free watercolor brushes for Photoshop might be just what you need for a slightly new look. Use them for illustrations, digital paintings, and more. Or pair them with a custom Photoshop action.
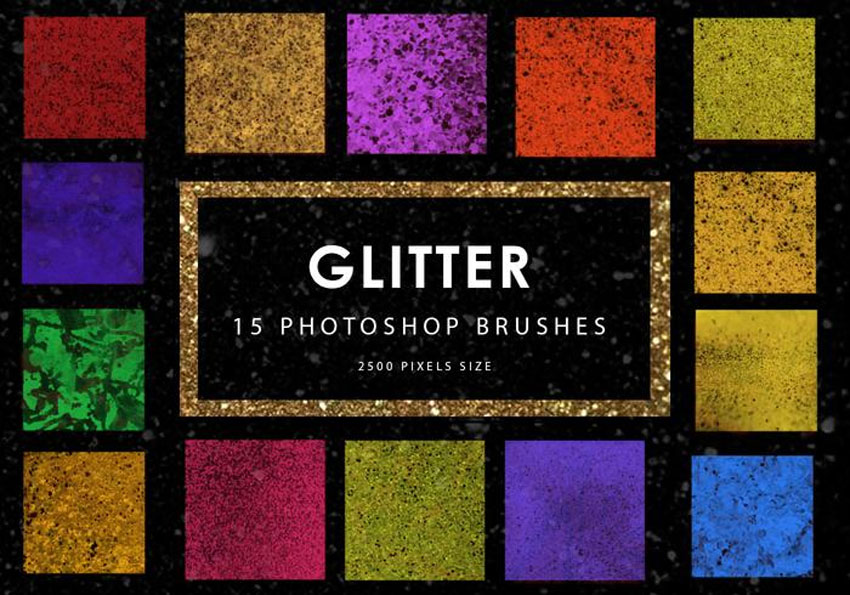
This next set of Photoshop brushes includes traditional art-inspired charcoal brushes that are free for both personal and commercial use. Explore 15 brushes that all come in at a large size of 2,500 pixels. The extra great resolution will help you add more texture or grunge to any piece.
You can make any day a little better with watercolor art. And this pack of 25 watercolor Photoshop brushes will help you achieve realistic effects quickly. Watercolor brushes always come in handy for their multipurpose textures and application.
Use these brushes for constructing amazing backgrounds, graphics, and more.
Doodle on just about anything with handmade Photoshop brushes. This inspiring pack of resources lets you make various heart, star and doodle shapes all with the click of a button. Try out these brushes on fun art projects and designs.
Forgot your pencil at home? Just grab a new brush pencil pack from this free download. Made for many versions of Adobe Photoshop, this set includes black and white HD pencil brushes and textures. Create masterful sketches and more.
Digital artist Wojtek Fus brings us into the world of charcoal art with this brilliant pack of realistic charcoal brushes. He created these highly detailed brushes using incredible references so that they look like the real thing.
Enjoy them for nearly any digital art project or in collaboration with a custom Photoshop action.
Create extraordinary ink effects with this next set of free ink brushes. This set is packed with 28 Photoshop brushes made from real watercolor swatches.
Capture the look of the real thing for your home or work projects.
Drip thick batches of liquid over any object or text effect with our next brushes. These Photoshop brushes were created by artist Lilith Demoness. The download contains 14 dripping liquids at various drips and angles for exciting results.
Ink brushes are usually inspired by the beautiful ink strokes found in traditional calligraphy styles. Grab this next incredible set from Brittney Murphy to get access to over 100 brilliant brushes made by hand. Great for painting, photo manips and more!
Carve out exceptional landscapes using just a few flat and dry Photoshop brushes. This next set from glassthroughskin helps you achieve wonderful scenes like the illustration below. No attribution is required but show the artist some love anyway!
Stay inspired with a fun watercolor painting. This set of Photoshop brushes will help you achieve lovely watercolor paint strokes and brush textures. Created by designer Vector Media, this set includes 20 brushes suitable for all your interests. Check it out.
Artist Sakimi Chan brings us our next free set of Photoshop brushes. Achieve wildly imaginative digital paintings and amazing effects with this Photoshop brush set. Made for Photoshop versions CS5 and above, you can grab 56 brushes for free!
Make sure you also grab up this essential set of realistic spray brushes for Adobe Photoshop. Take inspiration from classic street artists for a cool spray-paint effect. This pack includes 20 high-resolution brushes which are free for personal and commercial use.
Work with the very tools digital artist Dan Luvisi uses to create his mind-blowing graphic novel series. Included in this set are various basic, art and special effects brushes to add more realism and texture to your Photoshop drawings. Check them out.
Free Photoshop Brushes for Nature & Special Effects
This next selection of brushes will
certainly upgrade your design arsenal with quality resources. Try them out to add a fun twist to
your graphics and digital art designs.
What if you could pull off unbelievably real digital portraits? This first set of skin and hair textures might just give you the added boost your art needs. Use them along with a quality graphics tablet to enjoy pressure-sensitive brush textures for skin and hair.
Can’t quite figure out how to paint eyes in Photoshop? Keep yourself covered with this brilliant set of iris eye brushes. These Photoshop brushes will help you paint realistic eye textures to make your portraits pop. Enjoy this amazing collection from artist Feavre.
Having trouble painting skin? Let Photoshop brushes do all the work for you. This next brush set from pixelstains will help you achieve realistic skin textures as well as luminous shine. Visit the link to get additional tips about using them for color and shadows.
Create gorgeous, fluttery lashes with this beautiful set of brushes from absartwork. Enjoy several unique variations for eyelash brushes, eyebrows, lip shine and even freckles. Mix and match styles for a bold new look. Great for portraits!
Add a few elegant quill designs to your creative work. This simple Photoshop brush set comes from designer Waatt. Get over 10 amazing designs that work well on postcards, stationery and so much more.
Nature is sometimes hard to paint because it’s often made up of tiny clusters of details. This next pack of leaf brushes from artist Darkavey will leave you with fantastic leaf paint strokes and shapes. Use them with any color to paint trees and shrubs in different seasons.
Sculpt any landscape you desire! Photoshop brush packs like this grass texture set will leave you with well-crafted grass textures we’re sure you’ll love. Try out 20 different grass texture designs to achieve an authentic natural look.
Love reptiles? Achieve wildly realistic snake scales with this awesome brush set from pixelstains. You’ll get three free brushes you can quickly download through DeviantArt. Then just extract the brushes to enjoy them right away.
Water is actually quite hard to paint. That’s why it’s a good idea to have a handy pack of water Photoshop brushes like this one. This set includes 15 high-quality water surface textures that you can use for photo manipulations and so much more.
Sprinkle a few butterflies into a nature scene with this sweet pack of free Photoshop brushes. Created by designer Nikos Pountzas, these brushes can be used singularly or clustered together for a wild effect. Tap into your natural side with this set.
Make light flurries of snow fall down from the sky with a few Photoshop brushes like these. This pack includes 15 high-quality snow effects for free. Use them for various graphic projects like flyers, banners, and cards. Or make snowy illustrations too!
Digitally painting hair takes time and patience. Now you can lay in a strong foundation with this free hair brush set. These Photoshop brushes were made for versions CS and later. Enjoy this incredible free pack made by its creator, Falln-Stock.
Which phase of the moon do you connect to? Illustrate the cosmos with this fun moon brush pack. This set includes 15 space moon brushes that are all over 2,500 pixels in size. Use them for print designs or stunning illustrations.
Feel free to use this next set of Photoshop hair brushes for personal or commercial use. They come from artist para-vine, who made this set of five custom hair brushes for Photoshop CS3 and above. These work best with a pressure-sensitive graphics tablet too.
Create a scenic view with a few essential brushes. This extraordinary set of free Photoshop brushes includes 20 phenomenal waterfall effects. You’ll get each brush at 2,500 pixels in size, so you’ll be able to see all the waterfall details the brushes capture. Try them out!
Add wispy strands of hair to nearly any portrait with these amazing hair brushes from Ivadesign. This download includes seven high-resolution brushes made especially for Adobe Photoshop users. Try them out with any hair color or subject.
Some of the best smoke brushes feature authentic, billowing smoke made from real images. This set includes four awesome Photoshop brushes with phenomenal textures and details. Use them to add smoke and fog effects in seconds.
Drop a few staches onto any cute character with this nice glasses and staches brush kit. Designed by HGGraphicDesigns, this brush set includes various glasses and stache sizes and styles to choose from. Use them for any project that could use a cute design touch!
It’s never a bad idea to have a few Photoshop fog and smoke brushes on hand too. This amazing pack includes 15 Photoshop brushes made from real fog images. Create professional images with a hint of drama with these free brushes.
Next up is this great find for nature lovers. This Photoshop brush set includes 15 cloud brushes made from high-resolution images. Just imagine the kind of skies you’ll be able to paint with the help of these brushes from designer Mahmoud Ameara. Don’t limit your imagination with this one!
Make just about anything sparkle with this brilliant pack of star brushes. Create fun constellations and so much more with high-quality brushes made for Adobe Photoshop. This set includes 15 brushes with varying light and shine.
Save money on your next web project with this creative download of digital smoke brushes. Well designed and made for any color, these high-resolution Photoshop brushes come in different sizes and movements. Get 15 brushes to add to your collection.
You don’t have to play with fire to achieve fiery photo effects. This set of smoke and fire brushes lets you paint real fiery paint strokes with Adobe Photoshop. This simple method uses real pictures of smoke instead of fire to create interesting billowy forms.
Real glitter is messy. So try a glitter Photoshop brush instead. This pack of 15 Photoshop brushes includes high-resolution designs perfect for visual effects and more. Use them for just about any snazzy project, like unique invites and stationery. Check them out!
Get flirty with a few cute smooches! This fun Photoshop brush pack will keep you lip locked with a few sealed kisses. Created by artist Lileya Brogu, this set includes many well-designed lip shapes at varying texture levels. Try them on invites, posters, or cards.
You can achieve wonderfully realistic lip textures by focusing on the center shine. This great brush set is another great find from pixelstains. Just hover your brush over your subject’s lips and voila! Perfect lip shine. Check them out!
Okay, there’s always that one creepy brush pack. This is definitely it. Add insanely realistic blood splashes to your zombie and gory portraits with this epic blood Photoshop brush set.
Not for the faint of heart, this pack includes several blood splashes at varying… well, intensities.
Mimic the appearance of shattered glass with just a few clicks. This essential pack of shattered glass brushes includes 12 designs that are compatible with Adobe Photoshop. Play with their appearance even more by varying the opacity or blending modes.
Make your work shine with this fantastic star set from Romenig. Create a vibrant and colorful galaxy then fill the sky with brilliant, glittering stars. You’ll get various amazing shapes and shine levels with this free set!
A subtle lens flare can add beautiful shine and shimmer to your work. This lens flare Photoshop brush pack includes 15 high-resolution brushes that are suitable for many photo art scenarios. Create a fun cosmic layout, or add a bit of shine to any object.
Create glimmering designs with this lovely set of sunshine Photoshop brushes. Easily add shine and light effects with just a few clicks. Enjoy this pack of 15 high resolution brushes suitable for nearly any project. A must-have for your collection!
It’s always a good idea to keep floral brushes in your arsenal too! This lovely graphic set includes minimalist floral shapes you can add to many print or web projects. Mix and match the floral designs to create stunning patterns and compositions.
Craft a wintry scene with this incredible download of magical snowflake brushes. Created by designer Papercaptain, this set includes 15 custom brushes all in one package. Use them to add magical snowflake visuals to your graphics or animations.
Paint some spray paint onto backgrounds and other exciting visuals. This brush pack helps you produce excellent spray splatter effects for posters, flyers, and illustrations. Get 12 Photoshop grunge brushes with this quick and completely free download.
Designer JavierZhx gives us super-realistic results you won’t believe aren’t real. This set of cloud brushes makes painting nature in Photoshop a breeze. Create various cloud forms, from stormy ones to light and fluffy versions.
Need a few snowflakes perfectly placed into your projects? Check out this awesome snowy Photoshop brush set from pixelberrypie. Included in this download are high resolution snow brushes with intricate geometric designs. Use them on posters, print designs and websites.
Create elegant cloud shapes in the sky. This simple cloud brush set from sdavis75 helps you create realistic cloud textures with just a few clicks. No credit or attribution is necessary, just download the brushes and have fun!
In order to paint water, you’ll have to add a few splash particles to the scene. This set of splash Photoshop brushes will equip you with 15 high-quality splash effects at 2,500 pixels in size. Layer them up to show movement and activity in your underwater graphics.
Our next freebie comes in the form of brilliant night sky brushes you can use with Photoshop. Check out this selection of 13 brushes made in various large sizes. Each brush represents a different part of the night sky, from space dust to the stars and moon particles.
Enjoy seven high-resolution Photoshop cloud brushes with one smart download. Now you can make wondrous cloud illustrations and so much more with this Photoshop brush set. Use it for greeting cards, home projects, or personal work.
HGGraphicDesigns compiled this next creative Photoshop brush set for doodle art lovers! Free for personal use only, you can apply these doodle line brushes to frames and borders for your work. Mix and match styles for more options!
Natural hair and skin textures are easily the hardest details to achieve in digital art. So make it easier on yourself with this helpful and free Photoshop brush set from artist RaSen. Gradually build the textures for more details and realism.
We can’t complete this list without at least one set of brushes dedicated to rain effects. So once you learn how to install Photoshop brushes, make sure to grab this pack of 20 high-quality brushes. Get 20 varying storm types in one simple download.
Get lost in a creative maze! This cool set of Photoshop brushes is from designer sdwhaven. They’re free for both personal and commercial use, so you won’t have to worry! Keep your audience engaged with one of these awesome maze designs.
Love steam punk designs? Add a few gears and metal details to your work with this next Photoshop brush set from ValerianaSTOCK. Free for personal and commercial use, just make sure to credit the original author to spread the love.
Pixelstains brings us yet another wonderful set of Photoshop brushes, this time for painting elegant bird feathers. Achieve crazy realistic textures with brushes you can easily layer and adjust. Build an entire feathery creature with this awesome set!
Enjoy fabulous galaxy masterpieces with a Photoshop brush set that can help you achieve them quickly. This galactic brush set from Luminya creates exquisite star clusters that are dreamy and wonderful. Choose from 21 nebula and star designs.
Learn More About Photoshop Brushes
Nothing can get you more excited to create than Photoshop brushes. Free downloads like these are just one way to ensure you have everything you need to get started.
Find more lessons and tips on Photoshop brushes at these links:
Find the right Photoshop brushes for your projects. Explore this collection of tools and inspiration.
50+ Free Photoshop Brushes
Love a good freebie? Today, we’re bringing you an incredible selection of over 50 free Photoshop brushes from around the web.
Use these brushes to bring your digital paintings, photo manipulations and design ideas to life. From brilliant star brushes to realistic ink brushes, this list will ignite your creativity while saving your budget.
How to Install Photoshop Brushes
Not sure how to install Photoshop brushes? Tackle this essential tool with this quick tip video by Melody Nieves.
Follow your desire to make beautiful art digitally. This first selection features amazing Photoshop brushes which capture the look of traditional art mediums and techniques. Master realistic art textures with the help of these brushes.
Artist Matt Heath completely overhauled this essential brush kit with over 110 Photoshop brushes inspired by natural and traditional art mediums. Enjoy high-quality textures you can layer on for more phenomenal effects.
Use these brushes for graphic design and various digital art projects.
Some of the best brush sets come from many acclaimed digital artists themselves. This set by digital painter Aaron Griffin features beautiful texture and art brushes to make your work look unbelievable.
Mimic realistic paint finishes with the very set he uses himself! Check it out.
Need that hand-drawn feel for your graphic or poster? Designer candies delivers with this helpful kit of hand-drawn arrow brushes. This set includes 80 Photoshop brushes drawn with an authentic, handmade look. Add a quirky flair to your projects with this free set.
Need more grunge brushes? This Photoshop brush texture kit was handmade and digitized with care and consideration. All of the five Photoshop brushes included were individually edited for the best results. Try them for print and web designs.
Need a mixed brush pack to ignite your creativity? Try this lovely set of handmade Photoshop brushes from designer Danielle Lolley. This massive download includes over 200 hand-painted Photoshop brushes for personal use only. Give them a try for Instagram posts and more.
Want some solid ink brushes for Photoshop? Check out this excellent selection of various Photoshop brush textures. These free Photoshop grunge brushes will make it easy to add the right amount of grit and grime to any weathered project.
One of the ways to change up your paintings is to use textural brushes instead of a plain round one. This pretty set from XnBook helps you add just a touch of texture to any drawing or painting. Explore the possibilities with this neat set!
Halftones are uniquely dotted visual effects which date back to 19th-century print design. Now, designers use fantastic brush packs like this one to create retro halftone effects for illustrations, ads, and more. Try this set from Chris Letterle with several halftone textures to choose from.
Creative Martina Palazzese brings us our next Photoshop brush set, this remarkable take on traditional oil textures. Each brush was carefully handcrafted to include detailed textures and realistic oil-like marks. Visit the link to see the handy video tutorial also included.
Adobe Photoshop brushes reflect many of the changing trends in art. These free watercolor brushes for Photoshop might be just what you need for a slightly new look. Use them for illustrations, digital paintings, and more. Or pair them with a custom Photoshop action.
This next set of Photoshop brushes includes traditional art-inspired charcoal brushes that are free for both personal and commercial use. Explore 15 brushes that all come in at a large size of 2,500 pixels. The extra great resolution will help you add more texture or grunge to any piece.
You can make any day a little better with watercolor art. And this pack of 25 watercolor Photoshop brushes will help you achieve realistic effects quickly. Watercolor brushes always come in handy for their multipurpose textures and application.
Use these brushes for constructing amazing backgrounds, graphics, and more.
Doodle on just about anything with handmade Photoshop brushes. This inspiring pack of resources lets you make various heart, star and doodle shapes all with the click of a button. Try out these brushes on fun art projects and designs.
Forgot your pencil at home? Just grab a new brush pencil pack from this free download. Made for many versions of Adobe Photoshop, this set includes black and white HD pencil brushes and textures. Create masterful sketches and more.
Digital artist Wojtek Fus brings us into the world of charcoal art with this brilliant pack of realistic charcoal brushes. He created these highly detailed brushes using incredible references so that they look like the real thing.
Enjoy them for nearly any digital art project or in collaboration with a custom Photoshop action.
Create extraordinary ink effects with this next set of free ink brushes. This set is packed with 28 Photoshop brushes made from real watercolor swatches.
Capture the look of the real thing for your home or work projects.
Drip thick batches of liquid over any object or text effect with our next brushes. These Photoshop brushes were created by artist Lilith Demoness. The download contains 14 dripping liquids at various drips and angles for exciting results.
Ink brushes are usually inspired by the beautiful ink strokes found in traditional calligraphy styles. Grab this next incredible set from Brittney Murphy to get access to over 100 brilliant brushes made by hand. Great for painting, photo manips and more!
Carve out exceptional landscapes using just a few flat and dry Photoshop brushes. This next set from glassthroughskin helps you achieve wonderful scenes like the illustration below. No attribution is required but show the artist some love anyway!
Stay inspired with a fun watercolor painting. This set of Photoshop brushes will help you achieve lovely watercolor paint strokes and brush textures. Created by designer Vector Media, this set includes 20 brushes suitable for all your interests. Check it out.
Artist Sakimi Chan brings us our next free set of Photoshop brushes. Achieve wildly imaginative digital paintings and amazing effects with this Photoshop brush set. Made for Photoshop versions CS5 and above, you can grab 56 brushes for free!
Make sure you also grab up this essential set of realistic spray brushes for Adobe Photoshop. Take inspiration from classic street artists for a cool spray-paint effect. This pack includes 20 high-resolution brushes which are free for personal and commercial use.
Work with the very tools digital artist Dan Luvisi uses to create his mind-blowing graphic novel series. Included in this set are various basic, art and special effects brushes to add more realism and texture to your Photoshop drawings. Check them out.
Free Photoshop Brushes for Nature & Special Effects
This next selection of brushes will
certainly upgrade your design arsenal with quality resources. Try them out to add a fun twist to
your graphics and digital art designs.
What if you could pull off unbelievably real digital portraits? This first set of skin and hair textures might just give you the added boost your art needs. Use them along with a quality graphics tablet to enjoy pressure-sensitive brush textures for skin and hair.
Can’t quite figure out how to paint eyes in Photoshop? Keep yourself covered with this brilliant set of iris eye brushes. These Photoshop brushes will help you paint realistic eye textures to make your portraits pop. Enjoy this amazing collection from artist Feavre.
Having trouble painting skin? Let Photoshop brushes do all the work for you. This next brush set from pixelstains will help you achieve realistic skin textures as well as luminous shine. Visit the link to get additional tips about using them for color and shadows.
Create gorgeous, fluttery lashes with this beautiful set of brushes from absartwork. Enjoy several unique variations for eyelash brushes, eyebrows, lip shine and even freckles. Mix and match styles for a bold new look. Great for portraits!
Add a few elegant quill designs to your creative work. This simple Photoshop brush set comes from designer Waatt. Get over 10 amazing designs that work well on postcards, stationery and so much more.
Nature is sometimes hard to paint because it’s often made up of tiny clusters of details. This next pack of leaf brushes from artist Darkavey will leave you with fantastic leaf paint strokes and shapes. Use them with any color to paint trees and shrubs in different seasons.
Sculpt any landscape you desire! Photoshop brush packs like this grass texture set will leave you with well-crafted grass textures we’re sure you’ll love. Try out 20 different grass texture designs to achieve an authentic natural look.
Love reptiles? Achieve wildly realistic snake scales with this awesome brush set from pixelstains. You’ll get three free brushes you can quickly download through DeviantArt. Then just extract the brushes to enjoy them right away.
Water is actually quite hard to paint. That’s why it’s a good idea to have a handy pack of water Photoshop brushes like this one. This set includes 15 high-quality water surface textures that you can use for photo manipulations and so much more.
Sprinkle a few butterflies into a nature scene with this sweet pack of free Photoshop brushes. Created by designer Nikos Pountzas, these brushes can be used singularly or clustered together for a wild effect. Tap into your natural side with this set.
Make light flurries of snow fall down from the sky with a few Photoshop brushes like these. This pack includes 15 high-quality snow effects for free. Use them for various graphic projects like flyers, banners, and cards. Or make snowy illustrations too!
Digitally painting hair takes time and patience. Now you can lay in a strong foundation with this free hair brush set. These Photoshop brushes were made for versions CS and later. Enjoy this incredible free pack made by its creator, Falln-Stock.
Which phase of the moon do you connect to? Illustrate the cosmos with this fun moon brush pack. This set includes 15 space moon brushes that are all over 2,500 pixels in size. Use them for print designs or stunning illustrations.
Feel free to use this next set of Photoshop hair brushes for personal or commercial use. They come from artist para-vine, who made this set of five custom hair brushes for Photoshop CS3 and above. These work best with a pressure-sensitive graphics tablet too.
Create a scenic view with a few essential brushes. This extraordinary set of free Photoshop brushes includes 20 phenomenal waterfall effects. You’ll get each brush at 2,500 pixels in size, so you’ll be able to see all the waterfall details the brushes capture. Try them out!
Add wispy strands of hair to nearly any portrait with these amazing hair brushes from Ivadesign. This download includes seven high-resolution brushes made especially for Adobe Photoshop users. Try them out with any hair color or subject.
Some of the best smoke brushes feature authentic, billowing smoke made from real images. This set includes four awesome Photoshop brushes with phenomenal textures and details. Use them to add smoke and fog effects in seconds.
Drop a few staches onto any cute character with this nice glasses and staches brush kit. Designed by HGGraphicDesigns, this brush set includes various glasses and stache sizes and styles to choose from. Use them for any project that could use a cute design touch!
It’s never a bad idea to have a few Photoshop fog and smoke brushes on hand too. This amazing pack includes 15 Photoshop brushes made from real fog images. Create professional images with a hint of drama with these free brushes.
Next up is this great find for nature lovers. This Photoshop brush set includes 15 cloud brushes made from high-resolution images. Just imagine the kind of skies you’ll be able to paint with the help of these brushes from designer Mahmoud Ameara. Don’t limit your imagination with this one!
Make just about anything sparkle with this brilliant pack of star brushes. Create fun constellations and so much more with high-quality brushes made for Adobe Photoshop. This set includes 15 brushes with varying light and shine.
Save money on your next web project with this creative download of digital smoke brushes. Well designed and made for any color, these high-resolution Photoshop brushes come in different sizes and movements. Get 15 brushes to add to your collection.
You don’t have to play with fire to achieve fiery photo effects. This set of smoke and fire brushes lets you paint real fiery paint strokes with Adobe Photoshop. This simple method uses real pictures of smoke instead of fire to create interesting billowy forms.
Real glitter is messy. So try a glitter Photoshop brush instead. This pack of 15 Photoshop brushes includes high-resolution designs perfect for visual effects and more. Use them for just about any snazzy project, like unique invites and stationery. Check them out!
Get flirty with a few cute smooches! This fun Photoshop brush pack will keep you lip locked with a few sealed kisses. Created by artist Lileya Brogu, this set includes many well-designed lip shapes at varying texture levels. Try them on invites, posters, or cards.
You can achieve wonderfully realistic lip textures by focusing on the center shine. This great brush set is another great find from pixelstains. Just hover your brush over your subject’s lips and voila! Perfect lip shine. Check them out!
Okay, there’s always that one creepy brush pack. This is definitely it. Add insanely realistic blood splashes to your zombie and gory portraits with this epic blood Photoshop brush set.
Not for the faint of heart, this pack includes several blood splashes at varying… well, intensities.
Mimic the appearance of shattered glass with just a few clicks. This essential pack of shattered glass brushes includes 12 designs that are compatible with Adobe Photoshop. Play with their appearance even more by varying the opacity or blending modes.
Make your work shine with this fantastic star set from Romenig. Create a vibrant and colorful galaxy then fill the sky with brilliant, glittering stars. You’ll get various amazing shapes and shine levels with this free set!
A subtle lens flare can add beautiful shine and shimmer to your work. This lens flare Photoshop brush pack includes 15 high-resolution brushes that are suitable for many photo art scenarios. Create a fun cosmic layout, or add a bit of shine to any object.
Create glimmering designs with this lovely set of sunshine Photoshop brushes. Easily add shine and light effects with just a few clicks. Enjoy this pack of 15 high resolution brushes suitable for nearly any project. A must-have for your collection!
It’s always a good idea to keep floral brushes in your arsenal too! This lovely graphic set includes minimalist floral shapes you can add to many print or web projects. Mix and match the floral designs to create stunning patterns and compositions.
Craft a wintry scene with this incredible download of magical snowflake brushes. Created by designer Papercaptain, this set includes 15 custom brushes all in one package. Use them to add magical snowflake visuals to your graphics or animations.
Paint some spray paint onto backgrounds and other exciting visuals. This brush pack helps you produce excellent spray splatter effects for posters, flyers, and illustrations. Get 12 Photoshop grunge brushes with this quick and completely free download.
Designer JavierZhx gives us super-realistic results you won’t believe aren’t real. This set of cloud brushes makes painting nature in Photoshop a breeze. Create various cloud forms, from stormy ones to light and fluffy versions.
Need a few snowflakes perfectly placed into your projects? Check out this awesome snowy Photoshop brush set from pixelberrypie. Included in this download are high resolution snow brushes with intricate geometric designs. Use them on posters, print designs and websites.
Create elegant cloud shapes in the sky. This simple cloud brush set from sdavis75 helps you create realistic cloud textures with just a few clicks. No credit or attribution is necessary, just download the brushes and have fun!
In order to paint water, you’ll have to add a few splash particles to the scene. This set of splash Photoshop brushes will equip you with 15 high-quality splash effects at 2,500 pixels in size. Layer them up to show movement and activity in your underwater graphics.
Our next freebie comes in the form of brilliant night sky brushes you can use with Photoshop. Check out this selection of 13 brushes made in various large sizes. Each brush represents a different part of the night sky, from space dust to the stars and moon particles.
Enjoy seven high-resolution Photoshop cloud brushes with one smart download. Now you can make wondrous cloud illustrations and so much more with this Photoshop brush set. Use it for greeting cards, home projects, or personal work.
HGGraphicDesigns compiled this next creative Photoshop brush set for doodle art lovers! Free for personal use only, you can apply these doodle line brushes to frames and borders for your work. Mix and match styles for more options!
Natural hair and skin textures are easily the hardest details to achieve in digital art. So make it easier on yourself with this helpful and free Photoshop brush set from artist RaSen. Gradually build the textures for more details and realism.
We can’t complete this list without at least one set of brushes dedicated to rain effects. So once you learn how to install Photoshop brushes, make sure to grab this pack of 20 high-quality brushes. Get 20 varying storm types in one simple download.
Get lost in a creative maze! This cool set of Photoshop brushes is from designer sdwhaven. They’re free for both personal and commercial use, so you won’t have to worry! Keep your audience engaged with one of these awesome maze designs.
Love steam punk designs? Add a few gears and metal details to your work with this next Photoshop brush set from ValerianaSTOCK. Free for personal and commercial use, just make sure to credit the original author to spread the love.
Pixelstains brings us yet another wonderful set of Photoshop brushes, this time for painting elegant bird feathers. Achieve crazy realistic textures with brushes you can easily layer and adjust. Build an entire feathery creature with this awesome set!
Enjoy fabulous galaxy masterpieces with a Photoshop brush set that can help you achieve them quickly. This galactic brush set from Luminya creates exquisite star clusters that are dreamy and wonderful. Choose from 21 nebula and star designs.
Learn More About Photoshop Brushes
Nothing can get you more excited to create than Photoshop brushes. Free downloads like these are just one way to ensure you have everything you need to get started.
Find more lessons and tips on Photoshop brushes at these links:
Find the right Photoshop brushes for your projects. Explore this collection of tools and inspiration.
50+ Free Photoshop Brushes
Love a good freebie? Today, we’re bringing you an incredible selection of over 50 free Photoshop brushes from around the web.
Use these brushes to bring your digital paintings, photo manipulations and design ideas to life. From brilliant star brushes to realistic ink brushes, this list will ignite your creativity while saving your budget.
How to Install Photoshop Brushes
Not sure how to install Photoshop brushes? Tackle this essential tool with this quick tip video by Melody Nieves.
Follow your desire to make beautiful art digitally. This first selection features amazing Photoshop brushes which capture the look of traditional art mediums and techniques. Master realistic art textures with the help of these brushes.
Artist Matt Heath completely overhauled this essential brush kit with over 110 Photoshop brushes inspired by natural and traditional art mediums. Enjoy high-quality textures you can layer on for more phenomenal effects.
Use these brushes for graphic design and various digital art projects.
Some of the best brush sets come from many acclaimed digital artists themselves. This set by digital painter Aaron Griffin features beautiful texture and art brushes to make your work look unbelievable.
Mimic realistic paint finishes with the very set he uses himself! Check it out.
Need that hand-drawn feel for your graphic or poster? Designer candies delivers with this helpful kit of hand-drawn arrow brushes. This set includes 80 Photoshop brushes drawn with an authentic, handmade look. Add a quirky flair to your projects with this free set.
Need more grunge brushes? This Photoshop brush texture kit was handmade and digitized with care and consideration. All of the five Photoshop brushes included were individually edited for the best results. Try them for print and web designs.
Need a mixed brush pack to ignite your creativity? Try this lovely set of handmade Photoshop brushes from designer Danielle Lolley. This massive download includes over 200 hand-painted Photoshop brushes for personal use only. Give them a try for Instagram posts and more.
Want some solid ink brushes for Photoshop? Check out this excellent selection of various Photoshop brush textures. These free Photoshop grunge brushes will make it easy to add the right amount of grit and grime to any weathered project.
One of the ways to change up your paintings is to use textural brushes instead of a plain round one. This pretty set from XnBook helps you add just a touch of texture to any drawing or painting. Explore the possibilities with this neat set!
Halftones are uniquely dotted visual effects which date back to 19th-century print design. Now, designers use fantastic brush packs like this one to create retro halftone effects for illustrations, ads, and more. Try this set from Chris Letterle with several halftone textures to choose from.
Creative Martina Palazzese brings us our next Photoshop brush set, this remarkable take on traditional oil textures. Each brush was carefully handcrafted to include detailed textures and realistic oil-like marks. Visit the link to see the handy video tutorial also included.
Adobe Photoshop brushes reflect many of the changing trends in art. These free watercolor brushes for Photoshop might be just what you need for a slightly new look. Use them for illustrations, digital paintings, and more. Or pair them with a custom Photoshop action.
This next set of Photoshop brushes includes traditional art-inspired charcoal brushes that are free for both personal and commercial use. Explore 15 brushes that all come in at a large size of 2,500 pixels. The extra great resolution will help you add more texture or grunge to any piece.
You can make any day a little better with watercolor art. And this pack of 25 watercolor Photoshop brushes will help you achieve realistic effects quickly. Watercolor brushes always come in handy for their multipurpose textures and application.
Use these brushes for constructing amazing backgrounds, graphics, and more.
Doodle on just about anything with handmade Photoshop brushes. This inspiring pack of resources lets you make various heart, star and doodle shapes all with the click of a button. Try out these brushes on fun art projects and designs.
Forgot your pencil at home? Just grab a new brush pencil pack from this free download. Made for many versions of Adobe Photoshop, this set includes black and white HD pencil brushes and textures. Create masterful sketches and more.
Digital artist Wojtek Fus brings us into the world of charcoal art with this brilliant pack of realistic charcoal brushes. He created these highly detailed brushes using incredible references so that they look like the real thing.
Enjoy them for nearly any digital art project or in collaboration with a custom Photoshop action.
Create extraordinary ink effects with this next set of free ink brushes. This set is packed with 28 Photoshop brushes made from real watercolor swatches.
Capture the look of the real thing for your home or work projects.
Drip thick batches of liquid over any object or text effect with our next brushes. These Photoshop brushes were created by artist Lilith Demoness. The download contains 14 dripping liquids at various drips and angles for exciting results.
Ink brushes are usually inspired by the beautiful ink strokes found in traditional calligraphy styles. Grab this next incredible set from Brittney Murphy to get access to over 100 brilliant brushes made by hand. Great for painting, photo manips and more!
Carve out exceptional landscapes using just a few flat and dry Photoshop brushes. This next set from glassthroughskin helps you achieve wonderful scenes like the illustration below. No attribution is required but show the artist some love anyway!
Stay inspired with a fun watercolor painting. This set of Photoshop brushes will help you achieve lovely watercolor paint strokes and brush textures. Created by designer Vector Media, this set includes 20 brushes suitable for all your interests. Check it out.
Artist Sakimi Chan brings us our next free set of Photoshop brushes. Achieve wildly imaginative digital paintings and amazing effects with this Photoshop brush set. Made for Photoshop versions CS5 and above, you can grab 56 brushes for free!
Make sure you also grab up this essential set of realistic spray brushes for Adobe Photoshop. Take inspiration from classic street artists for a cool spray-paint effect. This pack includes 20 high-resolution brushes which are free for personal and commercial use.
Work with the very tools digital artist Dan Luvisi uses to create his mind-blowing graphic novel series. Included in this set are various basic, art and special effects brushes to add more realism and texture to your Photoshop drawings. Check them out.
Free Photoshop Brushes for Nature & Special Effects
This next selection of brushes will
certainly upgrade your design arsenal with quality resources. Try them out to add a fun twist to
your graphics and digital art designs.
What if you could pull off unbelievably real digital portraits? This first set of skin and hair textures might just give you the added boost your art needs. Use them along with a quality graphics tablet to enjoy pressure-sensitive brush textures for skin and hair.
Can’t quite figure out how to paint eyes in Photoshop? Keep yourself covered with this brilliant set of iris eye brushes. These Photoshop brushes will help you paint realistic eye textures to make your portraits pop. Enjoy this amazing collection from artist Feavre.
Having trouble painting skin? Let Photoshop brushes do all the work for you. This next brush set from pixelstains will help you achieve realistic skin textures as well as luminous shine. Visit the link to get additional tips about using them for color and shadows.
Create gorgeous, fluttery lashes with this beautiful set of brushes from absartwork. Enjoy several unique variations for eyelash brushes, eyebrows, lip shine and even freckles. Mix and match styles for a bold new look. Great for portraits!
Add a few elegant quill designs to your creative work. This simple Photoshop brush set comes from designer Waatt. Get over 10 amazing designs that work well on postcards, stationery and so much more.
Nature is sometimes hard to paint because it’s often made up of tiny clusters of details. This next pack of leaf brushes from artist Darkavey will leave you with fantastic leaf paint strokes and shapes. Use them with any color to paint trees and shrubs in different seasons.
Sculpt any landscape you desire! Photoshop brush packs like this grass texture set will leave you with well-crafted grass textures we’re sure you’ll love. Try out 20 different grass texture designs to achieve an authentic natural look.
Love reptiles? Achieve wildly realistic snake scales with this awesome brush set from pixelstains. You’ll get three free brushes you can quickly download through DeviantArt. Then just extract the brushes to enjoy them right away.
Water is actually quite hard to paint. That’s why it’s a good idea to have a handy pack of water Photoshop brushes like this one. This set includes 15 high-quality water surface textures that you can use for photo manipulations and so much more.
Sprinkle a few butterflies into a nature scene with this sweet pack of free Photoshop brushes. Created by designer Nikos Pountzas, these brushes can be used singularly or clustered together for a wild effect. Tap into your natural side with this set.
Make light flurries of snow fall down from the sky with a few Photoshop brushes like these. This pack includes 15 high-quality snow effects for free. Use them for various graphic projects like flyers, banners, and cards. Or make snowy illustrations too!
Digitally painting hair takes time and patience. Now you can lay in a strong foundation with this free hair brush set. These Photoshop brushes were made for versions CS and later. Enjoy this incredible free pack made by its creator, Falln-Stock.
Which phase of the moon do you connect to? Illustrate the cosmos with this fun moon brush pack. This set includes 15 space moon brushes that are all over 2,500 pixels in size. Use them for print designs or stunning illustrations.
Feel free to use this next set of Photoshop hair brushes for personal or commercial use. They come from artist para-vine, who made this set of five custom hair brushes for Photoshop CS3 and above. These work best with a pressure-sensitive graphics tablet too.
Create a scenic view with a few essential brushes. This extraordinary set of free Photoshop brushes includes 20 phenomenal waterfall effects. You’ll get each brush at 2,500 pixels in size, so you’ll be able to see all the waterfall details the brushes capture. Try them out!
Add wispy strands of hair to nearly any portrait with these amazing hair brushes from Ivadesign. This download includes seven high-resolution brushes made especially for Adobe Photoshop users. Try them out with any hair color or subject.
Some of the best smoke brushes feature authentic, billowing smoke made from real images. This set includes four awesome Photoshop brushes with phenomenal textures and details. Use them to add smoke and fog effects in seconds.
Drop a few staches onto any cute character with this nice glasses and staches brush kit. Designed by HGGraphicDesigns, this brush set includes various glasses and stache sizes and styles to choose from. Use them for any project that could use a cute design touch!
It’s never a bad idea to have a few Photoshop fog and smoke brushes on hand too. This amazing pack includes 15 Photoshop brushes made from real fog images. Create professional images with a hint of drama with these free brushes.
Next up is this great find for nature lovers. This Photoshop brush set includes 15 cloud brushes made from high-resolution images. Just imagine the kind of skies you’ll be able to paint with the help of these brushes from designer Mahmoud Ameara. Don’t limit your imagination with this one!
Make just about anything sparkle with this brilliant pack of star brushes. Create fun constellations and so much more with high-quality brushes made for Adobe Photoshop. This set includes 15 brushes with varying light and shine.
Save money on your next web project with this creative download of digital smoke brushes. Well designed and made for any color, these high-resolution Photoshop brushes come in different sizes and movements. Get 15 brushes to add to your collection.
You don’t have to play with fire to achieve fiery photo effects. This set of smoke and fire brushes lets you paint real fiery paint strokes with Adobe Photoshop. This simple method uses real pictures of smoke instead of fire to create interesting billowy forms.
Real glitter is messy. So try a glitter Photoshop brush instead. This pack of 15 Photoshop brushes includes high-resolution designs perfect for visual effects and more. Use them for just about any snazzy project, like unique invites and stationery. Check them out!
Get flirty with a few cute smooches! This fun Photoshop brush pack will keep you lip locked with a few sealed kisses. Created by artist Lileya Brogu, this set includes many well-designed lip shapes at varying texture levels. Try them on invites, posters, or cards.
You can achieve wonderfully realistic lip textures by focusing on the center shine. This great brush set is another great find from pixelstains. Just hover your brush over your subject’s lips and voila! Perfect lip shine. Check them out!
Okay, there’s always that one creepy brush pack. This is definitely it. Add insanely realistic blood splashes to your zombie and gory portraits with this epic blood Photoshop brush set.
Not for the faint of heart, this pack includes several blood splashes at varying… well, intensities.
Mimic the appearance of shattered glass with just a few clicks. This essential pack of shattered glass brushes includes 12 designs that are compatible with Adobe Photoshop. Play with their appearance even more by varying the opacity or blending modes.
Make your work shine with this fantastic star set from Romenig. Create a vibrant and colorful galaxy then fill the sky with brilliant, glittering stars. You’ll get various amazing shapes and shine levels with this free set!
A subtle lens flare can add beautiful shine and shimmer to your work. This lens flare Photoshop brush pack includes 15 high-resolution brushes that are suitable for many photo art scenarios. Create a fun cosmic layout, or add a bit of shine to any object.
Create glimmering designs with this lovely set of sunshine Photoshop brushes. Easily add shine and light effects with just a few clicks. Enjoy this pack of 15 high resolution brushes suitable for nearly any project. A must-have for your collection!
It’s always a good idea to keep floral brushes in your arsenal too! This lovely graphic set includes minimalist floral shapes you can add to many print or web projects. Mix and match the floral designs to create stunning patterns and compositions.
Craft a wintry scene with this incredible download of magical snowflake brushes. Created by designer Papercaptain, this set includes 15 custom brushes all in one package. Use them to add magical snowflake visuals to your graphics or animations.
Paint some spray paint onto backgrounds and other exciting visuals. This brush pack helps you produce excellent spray splatter effects for posters, flyers, and illustrations. Get 12 Photoshop grunge brushes with this quick and completely free download.
Designer JavierZhx gives us super-realistic results you won’t believe aren’t real. This set of cloud brushes makes painting nature in Photoshop a breeze. Create various cloud forms, from stormy ones to light and fluffy versions.
Need a few snowflakes perfectly placed into your projects? Check out this awesome snowy Photoshop brush set from pixelberrypie. Included in this download are high resolution snow brushes with intricate geometric designs. Use them on posters, print designs and websites.
Create elegant cloud shapes in the sky. This simple cloud brush set from sdavis75 helps you create realistic cloud textures with just a few clicks. No credit or attribution is necessary, just download the brushes and have fun!
In order to paint water, you’ll have to add a few splash particles to the scene. This set of splash Photoshop brushes will equip you with 15 high-quality splash effects at 2,500 pixels in size. Layer them up to show movement and activity in your underwater graphics.
Our next freebie comes in the form of brilliant night sky brushes you can use with Photoshop. Check out this selection of 13 brushes made in various large sizes. Each brush represents a different part of the night sky, from space dust to the stars and moon particles.
Enjoy seven high-resolution Photoshop cloud brushes with one smart download. Now you can make wondrous cloud illustrations and so much more with this Photoshop brush set. Use it for greeting cards, home projects, or personal work.
HGGraphicDesigns compiled this next creative Photoshop brush set for doodle art lovers! Free for personal use only, you can apply these doodle line brushes to frames and borders for your work. Mix and match styles for more options!
Natural hair and skin textures are easily the hardest details to achieve in digital art. So make it easier on yourself with this helpful and free Photoshop brush set from artist RaSen. Gradually build the textures for more details and realism.
We can’t complete this list without at least one set of brushes dedicated to rain effects. So once you learn how to install Photoshop brushes, make sure to grab this pack of 20 high-quality brushes. Get 20 varying storm types in one simple download.
Get lost in a creative maze! This cool set of Photoshop brushes is from designer sdwhaven. They’re free for both personal and commercial use, so you won’t have to worry! Keep your audience engaged with one of these awesome maze designs.
Love steam punk designs? Add a few gears and metal details to your work with this next Photoshop brush set from ValerianaSTOCK. Free for personal and commercial use, just make sure to credit the original author to spread the love.
Pixelstains brings us yet another wonderful set of Photoshop brushes, this time for painting elegant bird feathers. Achieve crazy realistic textures with brushes you can easily layer and adjust. Build an entire feathery creature with this awesome set!
Enjoy fabulous galaxy masterpieces with a Photoshop brush set that can help you achieve them quickly. This galactic brush set from Luminya creates exquisite star clusters that are dreamy and wonderful. Choose from 21 nebula and star designs.
Learn More About Photoshop Brushes
Nothing can get you more excited to create than Photoshop brushes. Free downloads like these are just one way to ensure you have everything you need to get started.
Find more lessons and tips on Photoshop brushes at these links: