26 Best InDesign Calendar Templates (New for 2020)

Post pobrano z: 26 Best InDesign Calendar Templates (New for 2020)

Final product image
What You’ll Be Creating

What do you have in store for 2020? Create a productive year with these InDesign calendar templates.

26 Best InDesign Calendar Templates (New for 2020)

Add a little creativity and efficiency to your life with a stunning InDesign calendar template. Not only are they great for decor overall, but they also help remind you of important dates and times.

And now you can display amazing calendars for your home or business using impressive InDesign calendar templates from Envato Elements and Envato Market.

Today, we’re bringing you another wonderful selection of premium resources handcrafted by a community of creative professionals. So check out these InDesign templates to help get you started on the right foot!

Not familiar with InDesign? Learn how to edit templates fast with this tutorial from Laura Keung.

2020 Calendar Poster

This versatile InDesign calendar poster template could be a great addition to anyone’s personal or professional space. It’s great for keeping an eye on the year at a glance and already has considerations for your branding and professional info. 

2020 Calendar Poster

Wall Calendar 2020 

This wall calendar includes 20 months and a cover. It’s easy to customize with your own content and custom colors, and it’s print ready. Making a calendar has never been quite so easy; it even comes with a help file, if you get stuck!

Wall Calendar 2020

InDesign Calendar 2020

This A3 calendar is stylish, clean, and ready for your favorite photos. It’s all fully editable, including the planner in each month! This could be a great fit for organizing projects for your new year and your new goals. 

InDesign Calendar 2020

2020 InDesign Wall Calendar

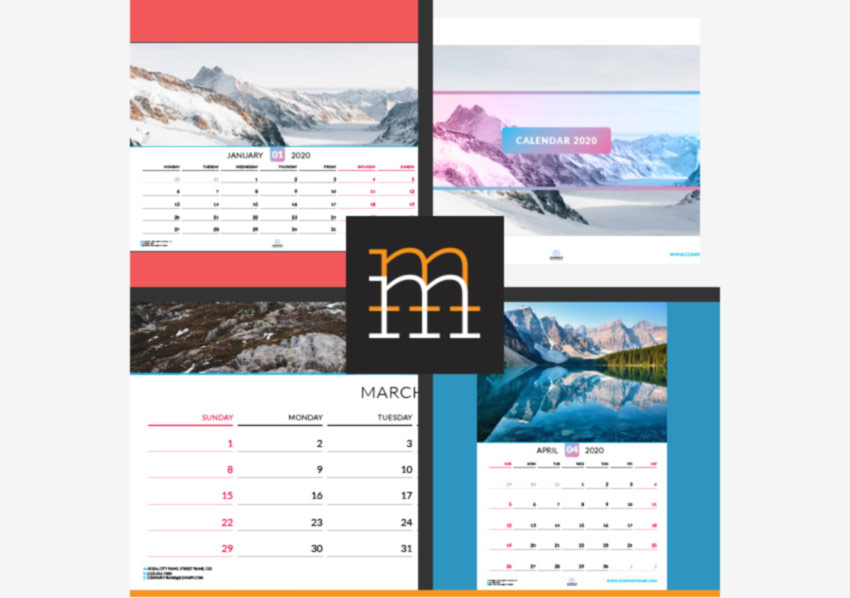
Check out these beautiful calendar designs! The previews look great, but wow, imagine your work on a beautiful 17″ x 11″ canvas. It’s a perfect fit for showing off artwork, photos, and other inspiring imagery. But if you prefer portrait, those dimensions are included too!
2020 InDesign Wall Calendar

Desk Calendar 2020

Check out this lovely desk calendar, perfect for keeping in your work space. Add your photos, your branding, for a professional calendar design, perfect for both personal and business projects. 

Desk Calendar 2020

Wall Tabloid Calendar Template

Showcase your stunning artwork with an InDesign calendar like this. This fantastic design is modern and minimal. It’s very easy to customize and includes 12 pages along with an additional cover. Check it out!

Wall Tabloid Calendar 2020

Wall Calendar Template 2020

Are the walls in your office looking a little bare? Add more color to the room with a beautiful wall calendar. This InDesign template is set up for 2020 and includes two months on each page. Edit the colors, swatches and more to fit your needs.

Wall Calendar Template 2020

Creative InDesign Calendar Template 2020

Or get creative with an abstract design! This InDesign calendar template is smart and simple. It includes an abstract photo effect that frames your photos with a cool paper cut-out effect. Just swap out the images for one of your own to get started!

Creative Calendar 2020

Minimal Calendar Template

Build a calendar around your business! This modern InDesign calendar template was specially made for entrepreneurs and business owners. It includes 14 pages with two cover options and details you can easily adjust. Add it to your collection!

Minimal Calendar InDesign Template

Landscape Calendar

This next InDesign template is great for beginners. Featuring an easy-to-use calendar made in landscape orientation, this template includes 13 pages along with the cover. It’s fully editable and ready to use, so you can print it right away!

Landscape Calendar InDesign

InDesign Desk Calendar 

Looking for a desk calendar instead? This next blue design is a great choice! This InDesign template features a creative popup design. The calendar sits comfortably on any desk, and you can easily update the files in minutes. Add your photos or art for an amazing result!

Desk Calendar InDesign

Floral Garden Calendar Template

Most InDesign calendar templates make it easy to use them, no matter the year! So don’t be afraid to use designs from other calendar years. This extraordinary template was designed with beautiful watercolor flowers. Add this colorful garden to your home or business.

Floral Garden Calendar Template

Desk Calendar 2020 Planner

Desk calendars can help you keep track of appointments and so much more. This next InDesign template is perfect for travel and nature photography. Just drag and drop your favorite mountain or seascapes for a beautiful calendar all year round.

Desk Calendar 2020 Planner

2020 Watercolor InDesign Calendar Template

Need a calendar that is fun and stylish? Check out this next template. Featuring 12 pages in standard sizes, this template is simple and easy to use. Edit the colors fast using the color palette, and then update it with new fonts. Check it out!

2020 Watercolor Calendar

A3 Wall Calendar Template

Many designers are also creating these stunning wall calendars to add to your home. Update your walls with this eclectic design. Inspired by the Kaleidoscope City Project, this lovely abstract design is one we’re sure you’ll love. 

A3 InDesign Wall Calendar

InDesign Desk Calendar

Turn your desk calendars into creative branding tools. This next InDesign template is corporate and professional. It allows you to update the year, logo, and contents, and even includes room for your company details. Add it to your design arsenal today!

InDesign Desk Calendar

InDesign Calendar Template

Want a simple calendar instead? This InDesign calendar pairs bold, vibrant colors with minimalist fonts for amazing results. It includes 12 unique pages with each month featured on one page. All the vectors and graphics are also included!

InDesign Calendar Template

Watercolor Floral Calendar

Show off your love of floral design with this pretty calendar template. This InDesign template uses gorgeous watercolor paintings as the backdrops for each month. The calendar starts from Sunday to Saturday, and there are more amazing options.

Watercolor Floral Calendar

Calendar Template 2020 Bundle

Need a wall calendar for your office or workspace? Here’s another fantastic design. This awesome bundle includes several InDesign calendar templates that are easy to update and customize. Enjoy fully editable pages and more for only $12. Check it out!

Calendar 2020 Bundle

Calendar InDesign Template

Made in Adobe InDesign, this next creative template can be updated to fit any year. It features an attractive and professional appearance along with fully editable elements in structured files. A handy documentation file is also included for more information.  

Calendar Template InDesign

InDesign Minimal Desk Calendar

Love black-and-white photography? Here’s another incredible color scheme for the ultimate impact! Boost your branding or interior decor with this next InDesign template. This download features 13 pages including a calendar cover you can easily adjust.

Minimal Desk Calendar InDesign

InDesign Wall Calendar

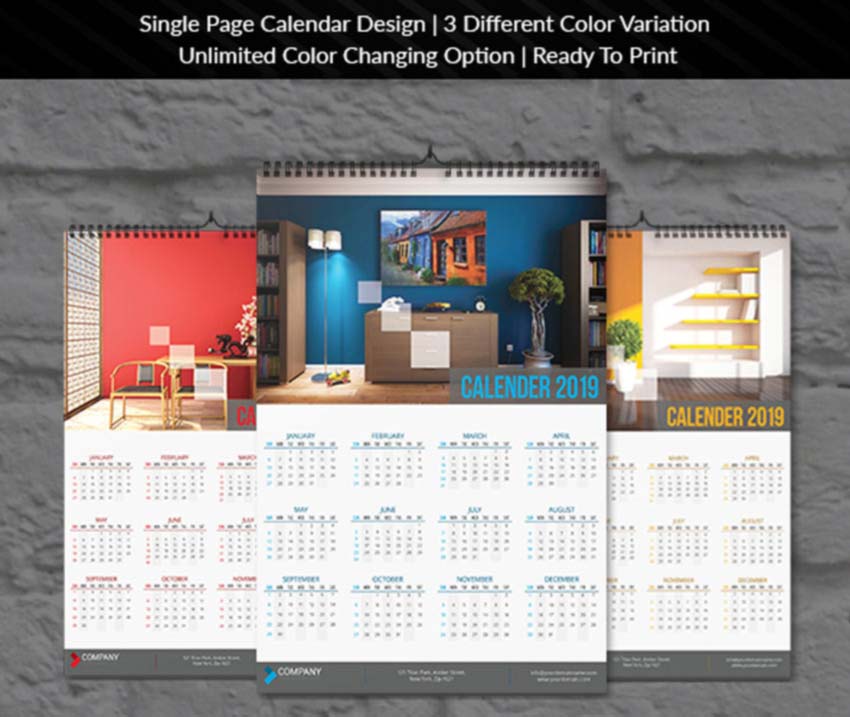
How will you decorate your walls this year? Aspire to incredible things, this year, with this InDesign calendar template. This download features three pre-made color variations along with helpful tools for unlimited color options. It’s ready to print and only $7!
Wall Calendar InDesign

Multi Platform Desk Calendar

Any high-resolution photography will look phenomenal in this next InDesign template. This desk calendar was made for 2019, but you can also keep it for future years. You’ll get three different industry formats along with many options for customization. Check it out!

Multi Platform Desk Calendar

Wall Calendar 2020

Begin your year with clear plans! This wall calendar will help you do the trick with a creative premium template. You can start the weeks on Sundays or Mondays and even include your company logo! Add more photos and details for more creative results.
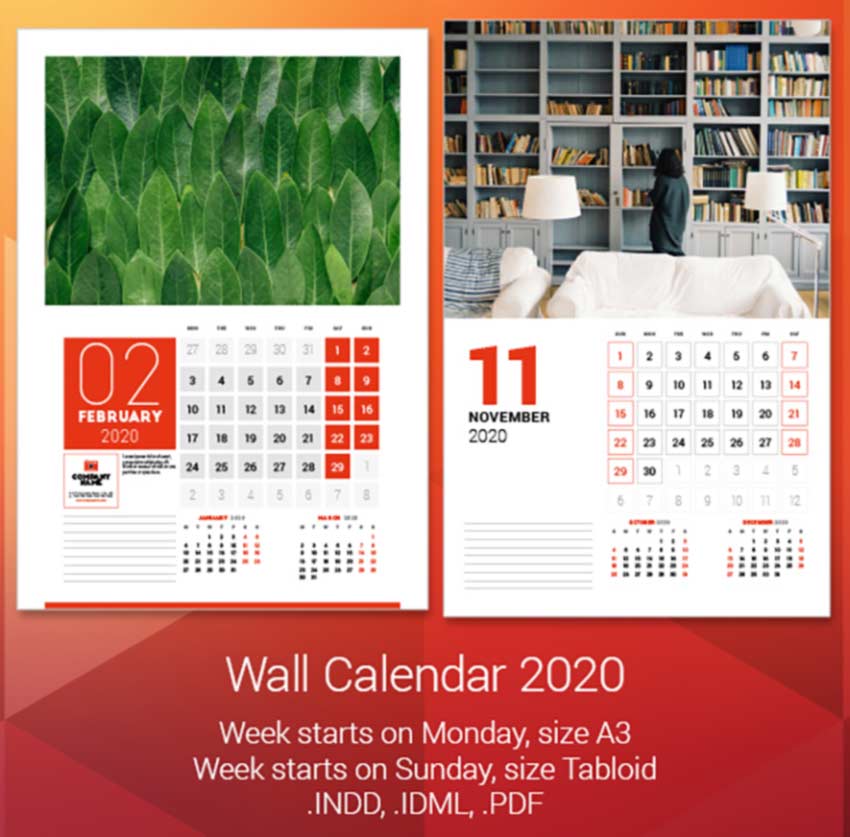
Wall Calendar 2020

Circular Calendar Design

Decorate your living space with an intriguing wall calendar! This cool template features an inspiring design made especially for lovers of beautiful use of geometry. Add it to your collection today!

Circular Calendar Design

Desk Calendar Template

One of the many great things about desk calendars is the use of exciting visuals to brighten up your space. Add mood, style and class to your surroundings with this InDesign template. Ready to print and so easy to edit, this template has options for Monday or Sunday starts! Check it out!

Desk Calendar Template

More InDesign Templates

Turn your calendar into an inspiring vision board or use it for more style. No matter which route you choose, these InDesign templates can help you achieve many amazing results.

Need more InDesign templates? Check out these articles for more inspiration:

Tried any of these assets? Let us know! Tell us your favorites in the comments below.

This
has been a selection of premium resources perfect for the avid creator.
For more creative InDesign calendar templates, check out Envato Market and Envato Elements, or enlist the help of our talented designers at Envato Studio. Happy creating!

26 Best InDesign Calendar Templates (New for 2020)

Post pobrano z: 26 Best InDesign Calendar Templates (New for 2020)

Final product image
What You’ll Be Creating

What do you have in store for 2020? Create a productive year with these InDesign calendar templates.

26 Best InDesign Calendar Templates (New for 2020)

Add a little creativity and efficiency to your life with a stunning InDesign calendar template. Not only are they great for decor overall, but they also help remind you of important dates and times.

And now you can display amazing calendars for your home or business using impressive InDesign calendar templates from Envato Elements and Envato Market.

Today, we’re bringing you another wonderful selection of premium resources handcrafted by a community of creative professionals. So check out these InDesign templates to help get you started on the right foot!

Not familiar with InDesign? Learn how to edit templates fast with this tutorial from Laura Keung.

2020 Calendar Poster

This versatile InDesign calendar poster template could be a great addition to anyone’s personal or professional space. It’s great for keeping an eye on the year at a glance and already has considerations for your branding and professional info. 

2020 Calendar Poster

Wall Calendar 2020 

This wall calendar includes 20 months and a cover. It’s easy to customize with your own content and custom colors, and it’s print ready. Making a calendar has never been quite so easy; it even comes with a help file, if you get stuck!

Wall Calendar 2020

InDesign Calendar 2020

This A3 calendar is stylish, clean, and ready for your favorite photos. It’s all fully editable, including the planner in each month! This could be a great fit for organizing projects for your new year and your new goals. 

InDesign Calendar 2020

2020 InDesign Wall Calendar

Check out these beautiful calendar designs! The previews look great, but wow, imagine your work on a beautiful 17″ x 11″ canvas. It’s a perfect fit for showing off artwork, photos, and other inspiring imagery. But if you prefer portrait, those dimensions are included too!

2020 InDesign Wall Calendar

Desk Calendar 2020

Check out this lovely desk calendar, perfect for keeping in your work space. Add your photos, your branding, for a professional calendar design, perfect for both personal and business projects. 

Desk Calendar 2020

Wall Tabloid Calendar Template

Showcase your stunning artwork with an InDesign calendar like this. This fantastic design is modern and minimal. It’s very easy to customize and includes 12 pages along with an additional cover. Check it out!

Wall Tabloid Calendar 2020

Wall Calendar Template 2020

Are the walls in your office looking a little bare? Add more color to the room with a beautiful wall calendar. This InDesign template is set up for 2020 and includes two months on each page. Edit the colors, swatches and more to fit your needs.

Wall Calendar Template 2020

Creative InDesign Calendar Template 2020

Or get creative with an abstract design! This InDesign calendar template is smart and simple. It includes an abstract photo effect that frames your photos with a cool paper cut-out effect. Just swap out the images for one of your own to get started!

Creative Calendar 2020

Minimal Calendar Template

Build a calendar around your business! This modern InDesign calendar template was specially made for entrepreneurs and business owners. It includes 14 pages with two cover options and details you can easily adjust. Add it to your collection!

Minimal Calendar InDesign Template

Landscape Calendar

This next InDesign template is great for beginners. Featuring an easy-to-use calendar made in landscape orientation, this template includes 13 pages along with the cover. It’s fully editable and ready to use, so you can print it right away!

Landscape Calendar InDesign

InDesign Desk Calendar 

Looking for a desk calendar instead? This next blue design is a great choice! This InDesign template features a creative popup design. The calendar sits comfortably on any desk, and you can easily update the files in minutes. Add your photos or art for an amazing result!

Desk Calendar InDesign

Floral Garden Calendar Template

Most InDesign calendar templates make it easy to use them, no matter the year! So don’t be afraid to use designs from other calendar years. This extraordinary template was designed with beautiful watercolor flowers. Add this colorful garden to your home or business.

Floral Garden Calendar Template

Desk Calendar 2020 Planner

Desk calendars can help you keep track of appointments and so much more. This next InDesign template is perfect for travel and nature photography. Just drag and drop your favorite mountain or seascapes for a beautiful calendar all year round.

Desk Calendar 2020 Planner

2020 Watercolor InDesign Calendar Template

Need a calendar that is fun and stylish? Check out this next template. Featuring 12 pages in standard sizes, this template is simple and easy to use. Edit the colors fast using the color palette, and then update it with new fonts. Check it out!

2020 Watercolor Calendar

A3 Wall Calendar Template

Many designers are also creating these stunning wall calendars to add to your home. Update your walls with this eclectic design. Inspired by the Kaleidoscope City Project, this lovely abstract design is one we’re sure you’ll love. 

A3 InDesign Wall Calendar

InDesign Desk Calendar

Turn your desk calendars into creative branding tools. This next InDesign template is corporate and professional. It allows you to update the year, logo, and contents, and even includes room for your company details. Add it to your design arsenal today!

InDesign Desk Calendar

InDesign Calendar Template

Want a simple calendar instead? This InDesign calendar pairs bold, vibrant colors with minimalist fonts for amazing results. It includes 12 unique pages with each month featured on one page. All the vectors and graphics are also included!

InDesign Calendar Template

Watercolor Floral Calendar

Show off your love of floral design with this pretty calendar template. This InDesign template uses gorgeous watercolor paintings as the backdrops for each month. The calendar starts from Sunday to Saturday, and there are more amazing options.

Watercolor Floral Calendar

Calendar Template 2020 Bundle

Need a wall calendar for your office or workspace? Here’s another fantastic design. This awesome bundle includes several InDesign calendar templates that are easy to update and customize. Enjoy fully editable pages and more for only $12. Check it out!

Calendar 2020 Bundle

Calendar InDesign Template

Made in Adobe InDesign, this next creative template can be updated to fit any year. It features an attractive and professional appearance along with fully editable elements in structured files. A handy documentation file is also included for more information.  

Calendar Template InDesign

InDesign Minimal Desk Calendar

Love black-and-white photography? Here’s another incredible color scheme for the ultimate impact! Boost your branding or interior decor with this next InDesign template. This download features 13 pages including a calendar cover you can easily adjust.

Minimal Desk Calendar InDesign

InDesign Wall Calendar

How will you decorate your walls this year? Aspire to incredible things, this year, with this InDesign calendar template. This download features three pre-made color variations along with helpful tools for unlimited color options. It’s ready to print and only $7!

Wall Calendar InDesign

Multi Platform Desk Calendar

Any high-resolution photography will look phenomenal in this next InDesign template. This desk calendar was made for 2019, but you can also keep it for future years. You’ll get three different industry formats along with many options for customization. Check it out!

Multi Platform Desk Calendar

Wall Calendar 2020

Begin your year with clear plans! This wall calendar will help you do the trick with a creative premium template. You can start the weeks on Sundays or Mondays and even include your company logo! Add more photos and details for more creative results.

Wall Calendar 2020

Circular Calendar Design

Decorate your living space with an intriguing wall calendar! This cool template features an inspiring design made especially for lovers of beautiful use of geometry. Add it to your collection today!

Circular Calendar Design

Desk Calendar Template

One of the many great things about desk calendars is the use of exciting visuals to brighten up your space. Add mood, style and class to your surroundings with this InDesign template. Ready to print and so easy to edit, this template has options for Monday or Sunday starts! Check it out!

Desk Calendar Template

More InDesign Templates

Turn your calendar into an inspiring vision board or use it for more style. No matter which route you choose, these InDesign templates can help you achieve many amazing results.

Need more InDesign templates? Check out these articles for more inspiration:

Tried any of these assets? Let us know! Tell us your favorites in the comments below.

This
has been a selection of premium resources perfect for the avid creator.
For more creative InDesign calendar templates, check out Envato Market and Envato Elements, or enlist the help of our talented designers at Envato Studio. Happy creating!

26 Best InDesign Calendar Templates (New for 2020)

Post pobrano z: 26 Best InDesign Calendar Templates (New for 2020)

Final product image
What You’ll Be Creating

What do you have in store for 2020? Create a productive year with these InDesign calendar templates.

26 Best InDesign Calendar Templates (New for 2020)

Add a little creativity and efficiency to your life with a stunning InDesign calendar template. Not only are they great for decor overall, but they also help remind you of important dates and times.

And now you can display amazing calendars for your home or business using impressive InDesign calendar templates from Envato Elements and Envato Market.

Today, we’re bringing you another wonderful selection of premium resources handcrafted by a community of creative professionals. So check out these InDesign templates to help get you started on the right foot!

Not familiar with InDesign? Learn how to edit templates fast with this tutorial from Laura Keung.

2020 Calendar Poster

This versatile InDesign calendar poster template could be a great addition to anyone’s personal or professional space. It’s great for keeping an eye on the year at a glance and already has considerations for your branding and professional info. 

2020 Calendar Poster

Wall Calendar 2020 

This wall calendar includes 20 months and a cover. It’s easy to customize with your own content and custom colors, and it’s print ready. Making a calendar has never been quite so easy; it even comes with a help file, if you get stuck!

Wall Calendar 2020

InDesign Calendar 2020

This A3 calendar is stylish, clean, and ready for your favorite photos. It’s all fully editable, including the planner in each month! This could be a great fit for organizing projects for your new year and your new goals. 

InDesign Calendar 2020

2020 InDesign Wall Calendar

Check out these beautiful calendar designs! The previews look great, but wow, imagine your work on a beautiful 17″ x 11″ canvas. It’s a perfect fit for showing off artwork, photos, and other inspiring imagery. But if you prefer portrait, those dimensions are included too!

2020 InDesign Wall Calendar

Desk Calendar 2020

Check out this lovely desk calendar, perfect for keeping in your work space. Add your photos, your branding, for a professional calendar design, perfect for both personal and business projects. 

Desk Calendar 2020

Wall Tabloid Calendar Template

Showcase your stunning artwork with an InDesign calendar like this. This fantastic design is modern and minimal. It’s very easy to customize and includes 12 pages along with an additional cover. Check it out!

Wall Tabloid Calendar 2020

Wall Calendar Template 2020

Are the walls in your office looking a little bare? Add more color to the room with a beautiful wall calendar. This InDesign template is set up for 2020 and includes two months on each page. Edit the colors, swatches and more to fit your needs.

Wall Calendar Template 2020

Creative InDesign Calendar Template 2020

Or get creative with an abstract design! This InDesign calendar template is smart and simple. It includes an abstract photo effect that frames your photos with a cool paper cut-out effect. Just swap out the images for one of your own to get started!

Creative Calendar 2020

Minimal Calendar Template

Build a calendar around your business! This modern InDesign calendar template was specially made for entrepreneurs and business owners. It includes 14 pages with two cover options and details you can easily adjust. Add it to your collection!

Minimal Calendar InDesign Template

Landscape Calendar

This next InDesign template is great for beginners. Featuring an easy-to-use calendar made in landscape orientation, this template includes 13 pages along with the cover. It’s fully editable and ready to use, so you can print it right away!

Landscape Calendar InDesign

InDesign Desk Calendar 

Looking for a desk calendar instead? This next blue design is a great choice! This InDesign template features a creative popup design. The calendar sits comfortably on any desk, and you can easily update the files in minutes. Add your photos or art for an amazing result!

Desk Calendar InDesign

Floral Garden Calendar Template

Most InDesign calendar templates make it easy to use them, no matter the year! So don’t be afraid to use designs from other calendar years. This extraordinary template was designed with beautiful watercolor flowers. Add this colorful garden to your home or business.

Floral Garden Calendar Template

Desk Calendar 2020 Planner

Desk calendars can help you keep track of appointments and so much more. This next InDesign template is perfect for travel and nature photography. Just drag and drop your favorite mountain or seascapes for a beautiful calendar all year round.

Desk Calendar 2020 Planner

2020 Watercolor InDesign Calendar Template

Need a calendar that is fun and stylish? Check out this next template. Featuring 12 pages in standard sizes, this template is simple and easy to use. Edit the colors fast using the color palette, and then update it with new fonts. Check it out!

2020 Watercolor Calendar

A3 Wall Calendar Template

Many designers are also creating these stunning wall calendars to add to your home. Update your walls with this eclectic design. Inspired by the Kaleidoscope City Project, this lovely abstract design is one we’re sure you’ll love. 

A3 InDesign Wall Calendar

InDesign Desk Calendar

Turn your desk calendars into creative branding tools. This next InDesign template is corporate and professional. It allows you to update the year, logo, and contents, and even includes room for your company details. Add it to your design arsenal today!

InDesign Desk Calendar

InDesign Calendar Template

Want a simple calendar instead? This InDesign calendar pairs bold, vibrant colors with minimalist fonts for amazing results. It includes 12 unique pages with each month featured on one page. All the vectors and graphics are also included!

InDesign Calendar Template

Watercolor Floral Calendar

Show off your love of floral design with this pretty calendar template. This InDesign template uses gorgeous watercolor paintings as the backdrops for each month. The calendar starts from Sunday to Saturday, and there are more amazing options.

Watercolor Floral Calendar

Calendar Template 2020 Bundle

Need a wall calendar for your office or workspace? Here’s another fantastic design. This awesome bundle includes several InDesign calendar templates that are easy to update and customize. Enjoy fully editable pages and more for only $12. Check it out!

Calendar 2020 Bundle

Calendar InDesign Template

Made in Adobe InDesign, this next creative template can be updated to fit any year. It features an attractive and professional appearance along with fully editable elements in structured files. A handy documentation file is also included for more information.  

Calendar Template InDesign

InDesign Minimal Desk Calendar

Love black-and-white photography? Here’s another incredible color scheme for the ultimate impact! Boost your branding or interior decor with this next InDesign template. This download features 13 pages including a calendar cover you can easily adjust.

Minimal Desk Calendar InDesign

InDesign Wall Calendar

How will you decorate your walls this year? Aspire to incredible things, this year, with this InDesign calendar template. This download features three pre-made color variations along with helpful tools for unlimited color options. It’s ready to print and only $7!

Wall Calendar InDesign

Multi Platform Desk Calendar

Any high-resolution photography will look phenomenal in this next InDesign template. This desk calendar was made for 2019, but you can also keep it for future years. You’ll get three different industry formats along with many options for customization. Check it out!

Multi Platform Desk Calendar

Wall Calendar 2020

Begin your year with clear plans! This wall calendar will help you do the trick with a creative premium template. You can start the weeks on Sundays or Mondays and even include your company logo! Add more photos and details for more creative results.

Wall Calendar 2020

Circular Calendar Design

Decorate your living space with an intriguing wall calendar! This cool template features an inspiring design made especially for lovers of beautiful use of geometry. Add it to your collection today!

Circular Calendar Design

Desk Calendar Template

One of the many great things about desk calendars is the use of exciting visuals to brighten up your space. Add mood, style and class to your surroundings with this InDesign template. Ready to print and so easy to edit, this template has options for Monday or Sunday starts! Check it out!

Desk Calendar Template

More InDesign Templates

Turn your calendar into an inspiring vision board or use it for more style. No matter which route you choose, these InDesign templates can help you achieve many amazing results.

Need more InDesign templates? Check out these articles for more inspiration:

Tried any of these assets? Let us know! Tell us your favorites in the comments below.

This
has been a selection of premium resources perfect for the avid creator.
For more creative InDesign calendar templates, check out Envato Market and Envato Elements, or enlist the help of our talented designers at Envato Studio. Happy creating!

26 Best InDesign Calendar Templates (New for 2020)

Post pobrano z: 26 Best InDesign Calendar Templates (New for 2020)

Final product image
What You’ll Be Creating

What do you have in store for 2020? Create a productive year with these InDesign calendar templates.

26 Best InDesign Calendar Templates (New for 2020)

Add a little creativity and efficiency to your life with a stunning InDesign calendar template. Not only are they great for decor overall, but they also help remind you of important dates and times.

And now you can display amazing calendars for your home or business using impressive InDesign calendar templates from Envato Elements and Envato Market.

Today, we’re bringing you another wonderful selection of premium resources handcrafted by a community of creative professionals. So check out these InDesign templates to help get you started on the right foot!

Not familiar with InDesign? Learn how to edit templates fast with this tutorial from Laura Keung.

2020 Calendar Poster

This versatile InDesign calendar poster template could be a great addition to anyone’s personal or professional space. It’s great for keeping an eye on the year at a glance and already has considerations for your branding and professional info. 

2020 Calendar Poster

Wall Calendar 2020 

This wall calendar includes 20 months and a cover. It’s easy to customize with your own content and custom colors, and it’s print ready. Making a calendar has never been quite so easy; it even comes with a help file, if you get stuck!

Wall Calendar 2020

InDesign Calendar 2020

This A3 calendar is stylish, clean, and ready for your favorite photos. It’s all fully editable, including the planner in each month! This could be a great fit for organizing projects for your new year and your new goals. 

InDesign Calendar 2020

2020 InDesign Wall Calendar

Check out these beautiful calendar designs! The previews look great, but wow, imagine your work on a beautiful 17″ x 11″ canvas. It’s a perfect fit for showing off artwork, photos, and other inspiring imagery. But if you prefer portrait, those dimensions are included too!

2020 InDesign Wall Calendar

Desk Calendar 2020

Check out this lovely desk calendar, perfect for keeping in your work space. Add your photos, your branding, for a professional calendar design, perfect for both personal and business projects. 

Desk Calendar 2020

Wall Tabloid Calendar Template

Showcase your stunning artwork with an InDesign calendar like this. This fantastic design is modern and minimal. It’s very easy to customize and includes 12 pages along with an additional cover. Check it out!

Wall Tabloid Calendar 2020

Wall Calendar Template 2020

Are the walls in your office looking a little bare? Add more color to the room with a beautiful wall calendar. This InDesign template is set up for 2020 and includes two months on each page. Edit the colors, swatches and more to fit your needs.

Wall Calendar Template 2020

Creative InDesign Calendar Template 2020

Or get creative with an abstract design! This InDesign calendar template is smart and simple. It includes an abstract photo effect that frames your photos with a cool paper cut-out effect. Just swap out the images for one of your own to get started!

Creative Calendar 2020

Minimal Calendar Template

Build a calendar around your business! This modern InDesign calendar template was specially made for entrepreneurs and business owners. It includes 14 pages with two cover options and details you can easily adjust. Add it to your collection!

Minimal Calendar InDesign Template

Landscape Calendar

This next InDesign template is great for beginners. Featuring an easy-to-use calendar made in landscape orientation, this template includes 13 pages along with the cover. It’s fully editable and ready to use, so you can print it right away!

Landscape Calendar InDesign

InDesign Desk Calendar 

Looking for a desk calendar instead? This next blue design is a great choice! This InDesign template features a creative popup design. The calendar sits comfortably on any desk, and you can easily update the files in minutes. Add your photos or art for an amazing result!

Desk Calendar InDesign

Floral Garden Calendar Template

Most InDesign calendar templates make it easy to use them, no matter the year! So don’t be afraid to use designs from other calendar years. This extraordinary template was designed with beautiful watercolor flowers. Add this colorful garden to your home or business.

Floral Garden Calendar Template

Desk Calendar 2020 Planner

Desk calendars can help you keep track of appointments and so much more. This next InDesign template is perfect for travel and nature photography. Just drag and drop your favorite mountain or seascapes for a beautiful calendar all year round.

Desk Calendar 2020 Planner

2020 Watercolor InDesign Calendar Template

Need a calendar that is fun and stylish? Check out this next template. Featuring 12 pages in standard sizes, this template is simple and easy to use. Edit the colors fast using the color palette, and then update it with new fonts. Check it out!

2020 Watercolor Calendar

A3 Wall Calendar Template

Many designers are also creating these stunning wall calendars to add to your home. Update your walls with this eclectic design. Inspired by the Kaleidoscope City Project, this lovely abstract design is one we’re sure you’ll love. 

A3 InDesign Wall Calendar

InDesign Desk Calendar

Turn your desk calendars into creative branding tools. This next InDesign template is corporate and professional. It allows you to update the year, logo, and contents, and even includes room for your company details. Add it to your design arsenal today!

InDesign Desk Calendar

InDesign Calendar Template

Want a simple calendar instead? This InDesign calendar pairs bold, vibrant colors with minimalist fonts for amazing results. It includes 12 unique pages with each month featured on one page. All the vectors and graphics are also included!

InDesign Calendar Template

Watercolor Floral Calendar

Show off your love of floral design with this pretty calendar template. This InDesign template uses gorgeous watercolor paintings as the backdrops for each month. The calendar starts from Sunday to Saturday, and there are more amazing options.

Watercolor Floral Calendar

Calendar Template 2020 Bundle

Need a wall calendar for your office or workspace? Here’s another fantastic design. This awesome bundle includes several InDesign calendar templates that are easy to update and customize. Enjoy fully editable pages and more for only $12. Check it out!

Calendar 2020 Bundle

Calendar InDesign Template

Made in Adobe InDesign, this next creative template can be updated to fit any year. It features an attractive and professional appearance along with fully editable elements in structured files. A handy documentation file is also included for more information.  

Calendar Template InDesign

InDesign Minimal Desk Calendar

Love black-and-white photography? Here’s another incredible color scheme for the ultimate impact! Boost your branding or interior decor with this next InDesign template. This download features 13 pages including a calendar cover you can easily adjust.

Minimal Desk Calendar InDesign

InDesign Wall Calendar

How will you decorate your walls this year? Aspire to incredible things, this year, with this InDesign calendar template. This download features three pre-made color variations along with helpful tools for unlimited color options. It’s ready to print and only $7!

Wall Calendar InDesign

Multi Platform Desk Calendar

Any high-resolution photography will look phenomenal in this next InDesign template. This desk calendar was made for 2019, but you can also keep it for future years. You’ll get three different industry formats along with many options for customization. Check it out!

Multi Platform Desk Calendar

Wall Calendar 2020

Begin your year with clear plans! This wall calendar will help you do the trick with a creative premium template. You can start the weeks on Sundays or Mondays and even include your company logo! Add more photos and details for more creative results.

Wall Calendar 2020

Circular Calendar Design

Decorate your living space with an intriguing wall calendar! This cool template features an inspiring design made especially for lovers of beautiful use of geometry. Add it to your collection today!

Circular Calendar Design

Desk Calendar Template

One of the many great things about desk calendars is the use of exciting visuals to brighten up your space. Add mood, style and class to your surroundings with this InDesign template. Ready to print and so easy to edit, this template has options for Monday or Sunday starts! Check it out!

Desk Calendar Template

More InDesign Templates

Turn your calendar into an inspiring vision board or use it for more style. No matter which route you choose, these InDesign templates can help you achieve many amazing results.

Need more InDesign templates? Check out these articles for more inspiration:

Tried any of these assets? Let us know! Tell us your favorites in the comments below.

This
has been a selection of premium resources perfect for the avid creator.
For more creative InDesign calendar templates, check out Envato Market and Envato Elements, or enlist the help of our talented designers at Envato Studio. Happy creating!

How to Create a Photo to Pencil Drawing Effect in Photoshop

Post pobrano z: How to Create a Photo to Pencil Drawing Effect in Photoshop

Final product image
What You’ll Be Creating

In this tutorial, you will learn how to create an amazing photo drawing effect in Adobe Photoshop. I will explain everything in so much detail that anyone can create it, even those who have just opened Photoshop for the first time. 

Follow along with us over on our Envato Tuts+ YouTube channel:

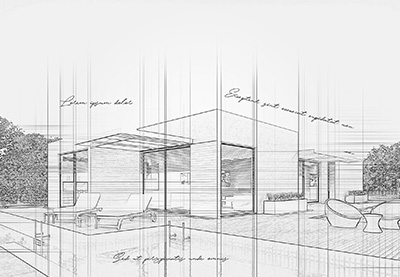
The effect shown above is the one I will show you how to create in this tutorial. If you would like to create the even more advanced drawing effects shown below, using just a single click and in only a few minutes, then check out my Construct Photoshop Action.

Action final results

You can also find more photo to pencil drawing Photoshop actions here:

What You’ll Need

To recreate the design above, you will need the following resources:

1. Let’s Get Started

First, open the photo that you want to work with. To open your photo, go to File > Open, choose your photo, and click Open. Now, before we get started, just check a couple of things:

  1. Your photo should be in RGB Color mode, 8 Bits/Channel. To check this, go to Image > Mode.
  2. For best results, your photo size should be 2000–3000 px wide/high. To check this, go to Image > Image Size.
  3. Your photo should be the Background layer. If it is not, go to Layer > New > Background from Layer.
Checking image size and mode

2. How to Create the Background

Step 1

In this section, we are going to create the background. Go to Layer > New Fill Layer > Solid Color to create a new solid color fill layer, name it Background color, and choose the color #e5e5e5 as shown below:

Creating new solid color fill layer

Step 2

Now go to File > Place Embedded, select the texture from the first texture link, and click Place. Then, set the Width and Height of the texture to 101.73% and name this layer Background Texture.

Placing texture

Step 3

Go to Layer > New Adjustment Layer > Black & White to create a new black & white adjustment layer and name it BT_Desaturate.

Creating new black and white adjustment layer

Step 4

Now press Control-Alt-G on your keyboard to create a clipping mask. Then, select the Background Texture layer and change the Opacity of this layer to 20%.

Changing opacity

3. How to Create the Sketch

Step 1

In this section, we are going to create the sketch. Select the Background layer and press Control-J on your keyboard to duplicate this layer. Then, go to Image > Adjustments > Shadows/Highlights and set the Shadows Amount to 10% and Highlights Amount to 10%.

Adjusting shadows and highlights

Step 2

Now name this layer Base and press Control-J on your keyboard to duplicate this layer. Then, drag this layer to the top of the layers in the Layers panel.

Duplicating layer

Step 3

Go to Filter > Filter Gallery > Artistic > Cutout and set the Number of Levels to 8, Edge Simplicity to 10 and Edge Fidelity to 1.

Adding cutout filter

Step 4

Now press Control-Shift-U on your keyboard to desaturate this layer. Then, go to Filter > Stylize > Find Edges.

Adding find edges filter

Step 5

Change the Blending Mode of this layer to Multiply and set the Opacity to 20%. Then, name this layer Rough_Sketch_1.

Changing blending mode and opacity

Step 6

Select the Base layer and press Control-J on your keyboard to duplicate this layer. Then, drag this layer just below the Rough_Sketch_1 layer in the Layers panel.

Duplicating layer

Step 7

Now go to Filter > Filter Gallery > Artistic > Cutout and set the Number of Levels to 8, Edge Simplicity to 2, and Edge Fidelity to 1.

Adding cutout filter

Step 8

Now press Control-Shift-U on your keyboard to desaturate this layer. Then, go to Filter > Stylize > Find Edges.

Adding find edges filter

Step 9

Change the Blending Mode of this layer to Multiply and set the Opacity to 10%. Then, name this layer Rough_Sketch_2.

Changing blending mode and opacity

Step 10

Now Control-click on the Rough_Sketch_1 layer to select both layers at the same time. Then, go to Layer > New > Group from Layers to create a new group from selected layers and name it Rough Sketch.

Creating new group from layers

Step 11

Change the Opacity of this layer group to 80%.

Changing opacity

Step 12

Select the Base layer and press Control-J on your keyboard to duplicate this layer. Then, drag this layer just above the Rough Sketch layer group in the Layers panel.

Duplicating layer

Step 13

Now go to Filter > Filter Gallery > Sketch > Graphic Pen and set the Stroke Length to 15, Light/Dark Balance to 10, and Stroke Direction to Right Diagonal.

Adding graphic pen filter

Step 14

Change the Blending Mode of this layer to Multiply and set the Opacity to 10%. Then, name this layer Shading_1.

Changing blending mode and opacity

Step 15

Now select the Base layer and press Control-J on your keyboard to duplicate this layer. Then, drag this layer just below the Shading_1 layer in the Layers panel.

Duplicating layer

Step 16

Now go to Filter > Filter Gallery > Sketch > Charcoal and set the Charcoal Thickness to 1, Detail to 5, and Light/Dark Balance to 10.

Adding charcoal filter

Step 17

Change the Blending Mode of this layer to Multiply and set the Opacity to 80%. Then, name this layer Shading_2.

Changing blending mode and opacity

Step 18

Now select the Base layer and press Control-J on your keyboard to duplicate this layer. Then, drag this layer just above the Shading_1 layer in the Layers panel.

Duplicating layer

Step 19

Now go to Filter > Filter Gallery > Sketch > Photocopy and set the Detail to 2 and Darkness to 5.

Adding photocopy filter

Step 20

Change the Blending Mode of this layer to Multiply and set the Opacity to 60%. Then, name this layer Main Sketch.

Changing blending mode and opacity

4. How to Create the Foreground Texture

Step 1

In this section, we are going to create the foreground texture. Go to File > Place Embedded, select the texture from the second texture link, and click Place. Then, set the Width and Height of the texture to 235% and name this layer Foreground Texture.

Placing texture

Step 2

Now Right-click on this layer and choose Edit Contents. In the new file that will show up, go to Image > Auto Tone. Then, press Control-Shift-U on your keyboard to desaturate this layer.

Adjusting tone

Step 3

Press Control-S on your keyboard to save the changes you have made and close this file.

Saving changes

Step 4

Now change the Blending Mode of this layer to Soft Light.

Changing blending mode

5. How to Make the Final Adjustments

Step 1

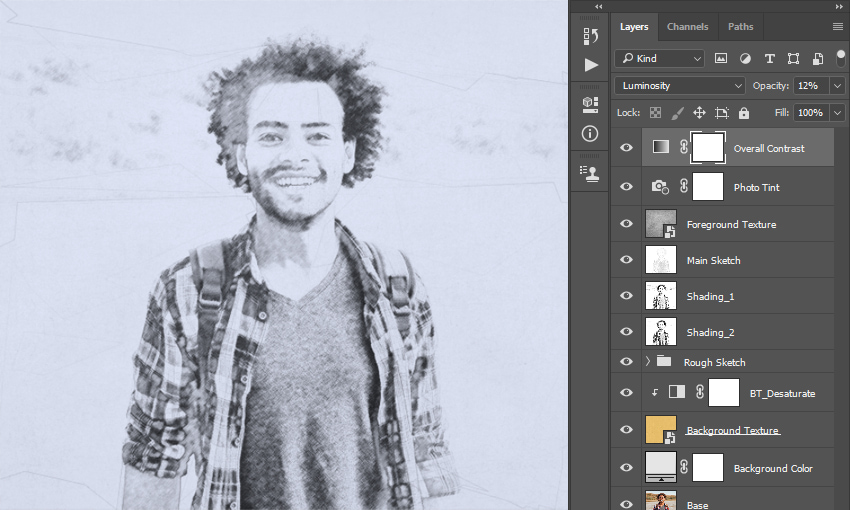
In this section, we are going to make the final adjustments to the design. Go to Layer > New Adjustment Layer > Photo Filter to create a new photo filter adjustment layer and name it Photo Tint.

Creating new photo filter adjustment layer

Step 2

Now Double-click on this layer thumbnail and, in the Properties panel, set the Filter to Cooling Filter (80) and Density to 11% as shown below:

Adjusting photo filter

Step 3

Press D on your keyboard to reset the swatches. Then, go to Layer > New Adjustment Layer > Gradient Map to create a new gradient map adjustment layer and name it Overall Contrast.

Creating new gradient map adjustment layer

Step 4

Now change the Blending Mode of this layer to Luminosity and set the Opacity to 12%.

Changing blending mode and opacity

Step 5

Now go to Layer > New Adjustment Layer > Vibrance to create a new vibrance adjustment layer and name it Overall Vibrance/Saturation.

Creating new vibrance and saturation adjustment layer

Step 6

Double-click on this layer thumbnail and, in the Properties panel, set the Vibrance to +40 and Saturation to +20.

Adjusting vibrance and saturation

Step 7

Press Control-Alt-Shift-E on your keyboard to make a screenshot, and then press Control-Shift-U to desaturate this layer. Then, go to Filter > Other > High Pass and set the Radius to 2 px.

Adding high pass filter

Step 8

Now change the Blending Mode of this layer to Overlay and name it Overall Sharpening.

Changing blending mode

You Made It!

Congratulations, you have succeeded! Here is our final result:

Final result

If you would like to create the even more advanced drawing effects shown
below, using just a single click and in only a few minutes, then check
out my Construct Photoshop Action.

The action will create professional and advanced sketch effects
from your photos with no work at all! You simply brush over your photo with a
color and just play the action. It’s really that simple! The action
will do all the work for you, leaving you fully layered and customizable results that you can further modify.

The action comes with a detailed video tutorial that demonstrates how to use the action and customize the results to get the most out of the effect.

Action final results

You may also like:

How to Create a Photo to Pencil Drawing Effect in Photoshop

Post pobrano z: How to Create a Photo to Pencil Drawing Effect in Photoshop

Final product image
What You’ll Be Creating

In this tutorial, you will learn how to create an amazing photo drawing effect in Adobe Photoshop. I will explain everything in so much detail that anyone can create it, even those who have just opened Photoshop for the first time. 

Follow along with us over on our Envato Tuts+ YouTube channel:

The effect shown above is the one I will show you how to create in this tutorial. If you would like to create the even more advanced drawing effects shown below, using just a single click and in only a few minutes, then check out my Construct Photoshop Action.

Action final results

You can also find more photo to pencil drawing Photoshop actions here:

What You’ll Need

To recreate the design above, you will need the following resources:

1. Let’s Get Started

First, open the photo that you want to work with. To open your photo, go to File > Open, choose your photo, and click Open. Now, before we get started, just check a couple of things:

  1. Your photo should be in RGB Color mode, 8 Bits/Channel. To check this, go to Image > Mode.
  2. For best results, your photo size should be 2000–3000 px wide/high. To check this, go to Image > Image Size.
  3. Your photo should be the Background layer. If it is not, go to Layer > New > Background from Layer.
Checking image size and mode

2. How to Create the Background

Step 1

In this section, we are going to create the background. Go to Layer > New Fill Layer > Solid Color to create a new solid color fill layer, name it Background color, and choose the color #e5e5e5 as shown below:

Creating new solid color fill layer

Step 2

Now go to File > Place Embedded, select the texture from the first texture link, and click Place. Then, set the Width and Height of the texture to 101.73% and name this layer Background Texture.

Placing texture

Step 3

Go to Layer > New Adjustment Layer > Black & White to create a new black & white adjustment layer and name it BT_Desaturate.

Creating new black and white adjustment layer

Step 4

Now press Control-Alt-G on your keyboard to create a clipping mask. Then, select the Background Texture layer and change the Opacity of this layer to 20%.

Changing opacity

3. How to Create the Sketch

Step 1

In this section, we are going to create the sketch. Select the Background layer and press Control-J on your keyboard to duplicate this layer. Then, go to Image > Adjustments > Shadows/Highlights and set the Shadows Amount to 10% and Highlights Amount to 10%.

Adjusting shadows and highlights

Step 2

Now name this layer Base and press Control-J on your keyboard to duplicate this layer. Then, drag this layer to the top of the layers in the Layers panel.

Duplicating layer

Step 3

Go to Filter > Filter Gallery > Artistic > Cutout and set the Number of Levels to 8, Edge Simplicity to 10 and Edge Fidelity to 1.

Adding cutout filter

Step 4

Now press Control-Shift-U on your keyboard to desaturate this layer. Then, go to Filter > Stylize > Find Edges.

Adding find edges filter

Step 5

Change the Blending Mode of this layer to Multiply and set the Opacity to 20%. Then, name this layer Rough_Sketch_1.

Changing blending mode and opacity

Step 6

Select the Base layer and press Control-J on your keyboard to duplicate this layer. Then, drag this layer just below the Rough_Sketch_1 layer in the Layers panel.

Duplicating layer

Step 7

Now go to Filter > Filter Gallery > Artistic > Cutout and set the Number of Levels to 8, Edge Simplicity to 2, and Edge Fidelity to 1.

Adding cutout filter

Step 8

Now press Control-Shift-U on your keyboard to desaturate this layer. Then, go to Filter > Stylize > Find Edges.

Adding find edges filter

Step 9

Change the Blending Mode of this layer to Multiply and set the Opacity to 10%. Then, name this layer Rough_Sketch_2.

Changing blending mode and opacity

Step 10

Now Control-click on the Rough_Sketch_1 layer to select both layers at the same time. Then, go to Layer > New > Group from Layers to create a new group from selected layers and name it Rough Sketch.

Creating new group from layers

Step 11

Change the Opacity of this layer group to 80%.

Changing opacity

Step 12

Select the Base layer and press Control-J on your keyboard to duplicate this layer. Then, drag this layer just above the Rough Sketch layer group in the Layers panel.

Duplicating layer

Step 13

Now go to Filter > Filter Gallery > Sketch > Graphic Pen and set the Stroke Length to 15, Light/Dark Balance to 10, and Stroke Direction to Right Diagonal.

Adding graphic pen filter

Step 14

Change the Blending Mode of this layer to Multiply and set the Opacity to 10%. Then, name this layer Shading_1.

Changing blending mode and opacity

Step 15

Now select the Base layer and press Control-J on your keyboard to duplicate this layer. Then, drag this layer just below the Shading_1 layer in the Layers panel.

Duplicating layer

Step 16

Now go to Filter > Filter Gallery > Sketch > Charcoal and set the Charcoal Thickness to 1, Detail to 5, and Light/Dark Balance to 10.

Adding charcoal filter

Step 17

Change the Blending Mode of this layer to Multiply and set the Opacity to 80%. Then, name this layer Shading_2.

Changing blending mode and opacity

Step 18

Now select the Base layer and press Control-J on your keyboard to duplicate this layer. Then, drag this layer just above the Shading_1 layer in the Layers panel.

Duplicating layer

Step 19

Now go to Filter > Filter Gallery > Sketch > Photocopy and set the Detail to 2 and Darkness to 5.

Adding photocopy filter

Step 20

Change the Blending Mode of this layer to Multiply and set the Opacity to 60%. Then, name this layer Main Sketch.

Changing blending mode and opacity

4. How to Create the Foreground Texture

Step 1

In this section, we are going to create the foreground texture. Go to File > Place Embedded, select the texture from the second texture link, and click Place. Then, set the Width and Height of the texture to 235% and name this layer Foreground Texture.

Placing texture

Step 2

Now Right-click on this layer and choose Edit Contents. In the new file that will show up, go to Image > Auto Tone. Then, press Control-Shift-U on your keyboard to desaturate this layer.

Adjusting tone

Step 3

Press Control-S on your keyboard to save the changes you have made and close this file.

Saving changes

Step 4

Now change the Blending Mode of this layer to Soft Light.

Changing blending mode

5. How to Make the Final Adjustments

Step 1

In this section, we are going to make the final adjustments to the design. Go to Layer > New Adjustment Layer > Photo Filter to create a new photo filter adjustment layer and name it Photo Tint.

Creating new photo filter adjustment layer

Step 2

Now Double-click on this layer thumbnail and, in the Properties panel, set the Filter to Cooling Filter (80) and Density to 11% as shown below:

Adjusting photo filter

Step 3

Press D on your keyboard to reset the swatches. Then, go to Layer > New Adjustment Layer > Gradient Map to create a new gradient map adjustment layer and name it Overall Contrast.

Creating new gradient map adjustment layer

Step 4

Now change the Blending Mode of this layer to Luminosity and set the Opacity to 12%.

Changing blending mode and opacity

Step 5

Now go to Layer > New Adjustment Layer > Vibrance to create a new vibrance adjustment layer and name it Overall Vibrance/Saturation.

Creating new vibrance and saturation adjustment layer

Step 6

Double-click on this layer thumbnail and, in the Properties panel, set the Vibrance to +40 and Saturation to +20.

Adjusting vibrance and saturation

Step 7

Press Control-Alt-Shift-E on your keyboard to make a screenshot, and then press Control-Shift-U to desaturate this layer. Then, go to Filter > Other > High Pass and set the Radius to 2 px.

Adding high pass filter

Step 8

Now change the Blending Mode of this layer to Overlay and name it Overall Sharpening.

Changing blending mode

You Made It!

Congratulations, you have succeeded! Here is our final result:

Final result

If you would like to create the even more advanced drawing effects shown
below, using just a single click and in only a few minutes, then check
out my Construct Photoshop Action.

The action will create professional and advanced sketch effects
from your photos with no work at all! You simply brush over your photo with a
color and just play the action. It’s really that simple! The action
will do all the work for you, leaving you fully layered and customizable results that you can further modify.

The action comes with a detailed video tutorial that demonstrates how to use the action and customize the results to get the most out of the effect.

Action final results

You may also like:

How to Create a Photo to Pencil Drawing Effect in Photoshop

Post pobrano z: How to Create a Photo to Pencil Drawing Effect in Photoshop

Final product image
What You’ll Be Creating

In this tutorial, you will learn how to create an amazing photo drawing effect in Adobe Photoshop. I will explain everything in so much detail that anyone can create it, even those who have just opened Photoshop for the first time. 

Follow along with us over on our Envato Tuts+ YouTube channel:

The effect shown above is the one I will show you how to create in this tutorial. If you would like to create the even more advanced drawing effects shown below, using just a single click and in only a few minutes, then check out my Construct Photoshop Action.

Action final results

You can also find more photo to pencil drawing Photoshop actions here:

What You’ll Need

To recreate the design above, you will need the following resources:

1. Let’s Get Started

First, open the photo that you want to work with. To open your photo, go to File > Open, choose your photo, and click Open. Now, before we get started, just check a couple of things:

  1. Your photo should be in RGB Color mode, 8 Bits/Channel. To check this, go to Image > Mode.
  2. For best results, your photo size should be 2000–3000 px wide/high. To check this, go to Image > Image Size.
  3. Your photo should be the Background layer. If it is not, go to Layer > New > Background from Layer.
Checking image size and mode

2. How to Create the Background

Step 1

In this section, we are going to create the background. Go to Layer > New Fill Layer > Solid Color to create a new solid color fill layer, name it Background color, and choose the color #e5e5e5 as shown below:

Creating new solid color fill layer

Step 2

Now go to File > Place Embedded, select the texture from the first texture link, and click Place. Then, set the Width and Height of the texture to 101.73% and name this layer Background Texture.

Placing texture

Step 3

Go to Layer > New Adjustment Layer > Black & White to create a new black & white adjustment layer and name it BT_Desaturate.

Creating new black and white adjustment layer

Step 4

Now press Control-Alt-G on your keyboard to create a clipping mask. Then, select the Background Texture layer and change the Opacity of this layer to 20%.

Changing opacity

3. How to Create the Sketch

Step 1

In this section, we are going to create the sketch. Select the Background layer and press Control-J on your keyboard to duplicate this layer. Then, go to Image > Adjustments > Shadows/Highlights and set the Shadows Amount to 10% and Highlights Amount to 10%.

Adjusting shadows and highlights

Step 2

Now name this layer Base and press Control-J on your keyboard to duplicate this layer. Then, drag this layer to the top of the layers in the Layers panel.

Duplicating layer

Step 3

Go to Filter > Filter Gallery > Artistic > Cutout and set the Number of Levels to 8, Edge Simplicity to 10 and Edge Fidelity to 1.

Adding cutout filter

Step 4

Now press Control-Shift-U on your keyboard to desaturate this layer. Then, go to Filter > Stylize > Find Edges.

Adding find edges filter

Step 5

Change the Blending Mode of this layer to Multiply and set the Opacity to 20%. Then, name this layer Rough_Sketch_1.

Changing blending mode and opacity

Step 6

Select the Base layer and press Control-J on your keyboard to duplicate this layer. Then, drag this layer just below the Rough_Sketch_1 layer in the Layers panel.

Duplicating layer

Step 7

Now go to Filter > Filter Gallery > Artistic > Cutout and set the Number of Levels to 8, Edge Simplicity to 2, and Edge Fidelity to 1.

Adding cutout filter

Step 8

Now press Control-Shift-U on your keyboard to desaturate this layer. Then, go to Filter > Stylize > Find Edges.

Adding find edges filter

Step 9

Change the Blending Mode of this layer to Multiply and set the Opacity to 10%. Then, name this layer Rough_Sketch_2.

Changing blending mode and opacity

Step 10

Now Control-click on the Rough_Sketch_1 layer to select both layers at the same time. Then, go to Layer > New > Group from Layers to create a new group from selected layers and name it Rough Sketch.

Creating new group from layers

Step 11

Change the Opacity of this layer group to 80%.

Changing opacity

Step 12

Select the Base layer and press Control-J on your keyboard to duplicate this layer. Then, drag this layer just above the Rough Sketch layer group in the Layers panel.

Duplicating layer

Step 13

Now go to Filter > Filter Gallery > Sketch > Graphic Pen and set the Stroke Length to 15, Light/Dark Balance to 10, and Stroke Direction to Right Diagonal.

Adding graphic pen filter

Step 14

Change the Blending Mode of this layer to Multiply and set the Opacity to 10%. Then, name this layer Shading_1.

Changing blending mode and opacity

Step 15

Now select the Base layer and press Control-J on your keyboard to duplicate this layer. Then, drag this layer just below the Shading_1 layer in the Layers panel.

Duplicating layer

Step 16

Now go to Filter > Filter Gallery > Sketch > Charcoal and set the Charcoal Thickness to 1, Detail to 5, and Light/Dark Balance to 10.

Adding charcoal filter

Step 17

Change the Blending Mode of this layer to Multiply and set the Opacity to 80%. Then, name this layer Shading_2.

Changing blending mode and opacity

Step 18

Now select the Base layer and press Control-J on your keyboard to duplicate this layer. Then, drag this layer just above the Shading_1 layer in the Layers panel.

Duplicating layer

Step 19

Now go to Filter > Filter Gallery > Sketch > Photocopy and set the Detail to 2 and Darkness to 5.

Adding photocopy filter

Step 20

Change the Blending Mode of this layer to Multiply and set the Opacity to 60%. Then, name this layer Main Sketch.

Changing blending mode and opacity

4. How to Create the Foreground Texture

Step 1

In this section, we are going to create the foreground texture. Go to File > Place Embedded, select the texture from the second texture link, and click Place. Then, set the Width and Height of the texture to 235% and name this layer Foreground Texture.

Placing texture

Step 2

Now Right-click on this layer and choose Edit Contents. In the new file that will show up, go to Image > Auto Tone. Then, press Control-Shift-U on your keyboard to desaturate this layer.

Adjusting tone

Step 3

Press Control-S on your keyboard to save the changes you have made and close this file.

Saving changes

Step 4

Now change the Blending Mode of this layer to Soft Light.

Changing blending mode

5. How to Make the Final Adjustments

Step 1

In this section, we are going to make the final adjustments to the design. Go to Layer > New Adjustment Layer > Photo Filter to create a new photo filter adjustment layer and name it Photo Tint.

Creating new photo filter adjustment layer

Step 2

Now Double-click on this layer thumbnail and, in the Properties panel, set the Filter to Cooling Filter (80) and Density to 11% as shown below:

Adjusting photo filter

Step 3

Press D on your keyboard to reset the swatches. Then, go to Layer > New Adjustment Layer > Gradient Map to create a new gradient map adjustment layer and name it Overall Contrast.

Creating new gradient map adjustment layer

Step 4

Now change the Blending Mode of this layer to Luminosity and set the Opacity to 12%.

Changing blending mode and opacity

Step 5

Now go to Layer > New Adjustment Layer > Vibrance to create a new vibrance adjustment layer and name it Overall Vibrance/Saturation.

Creating new vibrance and saturation adjustment layer

Step 6

Double-click on this layer thumbnail and, in the Properties panel, set the Vibrance to +40 and Saturation to +20.

Adjusting vibrance and saturation

Step 7

Press Control-Alt-Shift-E on your keyboard to make a screenshot, and then press Control-Shift-U to desaturate this layer. Then, go to Filter > Other > High Pass and set the Radius to 2 px.

Adding high pass filter

Step 8

Now change the Blending Mode of this layer to Overlay and name it Overall Sharpening.

Changing blending mode

You Made It!

Congratulations, you have succeeded! Here is our final result:

Final result

If you would like to create the even more advanced drawing effects shown
below, using just a single click and in only a few minutes, then check
out my Construct Photoshop Action.

The action will create professional and advanced sketch effects
from your photos with no work at all! You simply brush over your photo with a
color and just play the action. It’s really that simple! The action
will do all the work for you, leaving you fully layered and customizable results that you can further modify.

The action comes with a detailed video tutorial that demonstrates how to use the action and customize the results to get the most out of the effect.

Action final results

You may also like:

How to Create a Photo to Pencil Drawing Effect in Photoshop

Post pobrano z: How to Create a Photo to Pencil Drawing Effect in Photoshop

Final product image
What You’ll Be Creating

In this tutorial, you will learn how to create an amazing photo drawing effect in Adobe Photoshop. I will explain everything in so much detail that anyone can create it, even those who have just opened Photoshop for the first time. 

Follow along with us over on our Envato Tuts+ YouTube channel:

The effect shown above is the one I will show you how to create in this tutorial. If you would like to create the even more advanced drawing effects shown below, using just a single click and in only a few minutes, then check out my Construct Photoshop Action.

Action final results

You can also find more photo to pencil drawing Photoshop actions here:

What You’ll Need

To recreate the design above, you will need the following resources:

1. Let’s Get Started

First, open the photo that you want to work with. To open your photo, go to File > Open, choose your photo, and click Open. Now, before we get started, just check a couple of things:

  1. Your photo should be in RGB Color mode, 8 Bits/Channel. To check this, go to Image > Mode.
  2. For best results, your photo size should be 2000–3000 px wide/high. To check this, go to Image > Image Size.
  3. Your photo should be the Background layer. If it is not, go to Layer > New > Background from Layer.
Checking image size and mode

2. How to Create the Background

Step 1

In this section, we are going to create the background. Go to Layer > New Fill Layer > Solid Color to create a new solid color fill layer, name it Background color, and choose the color #e5e5e5 as shown below:

Creating new solid color fill layer

Step 2

Now go to File > Place Embedded, select the texture from the first texture link, and click Place. Then, set the Width and Height of the texture to 101.73% and name this layer Background Texture.

Placing texture

Step 3

Go to Layer > New Adjustment Layer > Black & White to create a new black & white adjustment layer and name it BT_Desaturate.

Creating new black and white adjustment layer

Step 4

Now press Control-Alt-G on your keyboard to create a clipping mask. Then, select the Background Texture layer and change the Opacity of this layer to 20%.

Changing opacity

3. How to Create the Sketch

Step 1

In this section, we are going to create the sketch. Select the Background layer and press Control-J on your keyboard to duplicate this layer. Then, go to Image > Adjustments > Shadows/Highlights and set the Shadows Amount to 10% and Highlights Amount to 10%.

Adjusting shadows and highlights

Step 2

Now name this layer Base and press Control-J on your keyboard to duplicate this layer. Then, drag this layer to the top of the layers in the Layers panel.

Duplicating layer

Step 3

Go to Filter > Filter Gallery > Artistic > Cutout and set the Number of Levels to 8, Edge Simplicity to 10 and Edge Fidelity to 1.

Adding cutout filter

Step 4

Now press Control-Shift-U on your keyboard to desaturate this layer. Then, go to Filter > Stylize > Find Edges.

Adding find edges filter

Step 5

Change the Blending Mode of this layer to Multiply and set the Opacity to 20%. Then, name this layer Rough_Sketch_1.

Changing blending mode and opacity

Step 6

Select the Base layer and press Control-J on your keyboard to duplicate this layer. Then, drag this layer just below the Rough_Sketch_1 layer in the Layers panel.

Duplicating layer

Step 7

Now go to Filter > Filter Gallery > Artistic > Cutout and set the Number of Levels to 8, Edge Simplicity to 2, and Edge Fidelity to 1.

Adding cutout filter

Step 8

Now press Control-Shift-U on your keyboard to desaturate this layer. Then, go to Filter > Stylize > Find Edges.

Adding find edges filter

Step 9

Change the Blending Mode of this layer to Multiply and set the Opacity to 10%. Then, name this layer Rough_Sketch_2.

Changing blending mode and opacity

Step 10

Now Control-click on the Rough_Sketch_1 layer to select both layers at the same time. Then, go to Layer > New > Group from Layers to create a new group from selected layers and name it Rough Sketch.

Creating new group from layers

Step 11

Change the Opacity of this layer group to 80%.

Changing opacity

Step 12

Select the Base layer and press Control-J on your keyboard to duplicate this layer. Then, drag this layer just above the Rough Sketch layer group in the Layers panel.

Duplicating layer

Step 13

Now go to Filter > Filter Gallery > Sketch > Graphic Pen and set the Stroke Length to 15, Light/Dark Balance to 10, and Stroke Direction to Right Diagonal.

Adding graphic pen filter

Step 14

Change the Blending Mode of this layer to Multiply and set the Opacity to 10%. Then, name this layer Shading_1.

Changing blending mode and opacity

Step 15

Now select the Base layer and press Control-J on your keyboard to duplicate this layer. Then, drag this layer just below the Shading_1 layer in the Layers panel.

Duplicating layer

Step 16

Now go to Filter > Filter Gallery > Sketch > Charcoal and set the Charcoal Thickness to 1, Detail to 5, and Light/Dark Balance to 10.

Adding charcoal filter

Step 17

Change the Blending Mode of this layer to Multiply and set the Opacity to 80%. Then, name this layer Shading_2.

Changing blending mode and opacity

Step 18

Now select the Base layer and press Control-J on your keyboard to duplicate this layer. Then, drag this layer just above the Shading_1 layer in the Layers panel.

Duplicating layer

Step 19

Now go to Filter > Filter Gallery > Sketch > Photocopy and set the Detail to 2 and Darkness to 5.

Adding photocopy filter

Step 20

Change the Blending Mode of this layer to Multiply and set the Opacity to 60%. Then, name this layer Main Sketch.

Changing blending mode and opacity

4. How to Create the Foreground Texture

Step 1

In this section, we are going to create the foreground texture. Go to File > Place Embedded, select the texture from the second texture link, and click Place. Then, set the Width and Height of the texture to 235% and name this layer Foreground Texture.

Placing texture

Step 2

Now Right-click on this layer and choose Edit Contents. In the new file that will show up, go to Image > Auto Tone. Then, press Control-Shift-U on your keyboard to desaturate this layer.

Adjusting tone

Step 3

Press Control-S on your keyboard to save the changes you have made and close this file.

Saving changes

Step 4

Now change the Blending Mode of this layer to Soft Light.

Changing blending mode

5. How to Make the Final Adjustments

Step 1

In this section, we are going to make the final adjustments to the design. Go to Layer > New Adjustment Layer > Photo Filter to create a new photo filter adjustment layer and name it Photo Tint.

Creating new photo filter adjustment layer

Step 2

Now Double-click on this layer thumbnail and, in the Properties panel, set the Filter to Cooling Filter (80) and Density to 11% as shown below:

Adjusting photo filter

Step 3

Press D on your keyboard to reset the swatches. Then, go to Layer > New Adjustment Layer > Gradient Map to create a new gradient map adjustment layer and name it Overall Contrast.

Creating new gradient map adjustment layer

Step 4

Now change the Blending Mode of this layer to Luminosity and set the Opacity to 12%.

Changing blending mode and opacity

Step 5

Now go to Layer > New Adjustment Layer > Vibrance to create a new vibrance adjustment layer and name it Overall Vibrance/Saturation.

Creating new vibrance and saturation adjustment layer

Step 6

Double-click on this layer thumbnail and, in the Properties panel, set the Vibrance to +40 and Saturation to +20.

Adjusting vibrance and saturation

Step 7

Press Control-Alt-Shift-E on your keyboard to make a screenshot, and then press Control-Shift-U to desaturate this layer. Then, go to Filter > Other > High Pass and set the Radius to 2 px.

Adding high pass filter

Step 8

Now change the Blending Mode of this layer to Overlay and name it Overall Sharpening.

Changing blending mode

You Made It!

Congratulations, you have succeeded! Here is our final result:

Final result

If you would like to create the even more advanced drawing effects shown
below, using just a single click and in only a few minutes, then check
out my Construct Photoshop Action.

The action will create professional and advanced sketch effects
from your photos with no work at all! You simply brush over your photo with a
color and just play the action. It’s really that simple! The action
will do all the work for you, leaving you fully layered and customizable results that you can further modify.

The action comes with a detailed video tutorial that demonstrates how to use the action and customize the results to get the most out of the effect.

Action final results

You may also like:

How to Create a Photo to Pencil Drawing Effect in Photoshop

Post pobrano z: How to Create a Photo to Pencil Drawing Effect in Photoshop

Final product image
What You’ll Be Creating

In this tutorial, you will learn how to create an amazing photo drawing effect in Adobe Photoshop. I will explain everything in so much detail that anyone can create it, even those who have just opened Photoshop for the first time. 

Follow along with us over on our Envato Tuts+ YouTube channel:

The effect shown above is the one I will show you how to create in this tutorial. If you would like to create the even more advanced drawing effects shown below, using just a single click and in only a few minutes, then check out my Construct Photoshop Action.

Action final results

You can also find more photo to pencil drawing Photoshop actions here:

What You’ll Need

To recreate the design above, you will need the following resources:

1. Let’s Get Started

First, open the photo that you want to work with. To open your photo, go to File > Open, choose your photo, and click Open. Now, before we get started, just check a couple of things:

  1. Your photo should be in RGB Color mode, 8 Bits/Channel. To check this, go to Image > Mode.
  2. For best results, your photo size should be 2000–3000 px wide/high. To check this, go to Image > Image Size.
  3. Your photo should be the Background layer. If it is not, go to Layer > New > Background from Layer.
Checking image size and mode

2. How to Create the Background

Step 1

In this section, we are going to create the background. Go to Layer > New Fill Layer > Solid Color to create a new solid color fill layer, name it Background color, and choose the color #e5e5e5 as shown below:

Creating new solid color fill layer

Step 2

Now go to File > Place Embedded, select the texture from the first texture link, and click Place. Then, set the Width and Height of the texture to 101.73% and name this layer Background Texture.

Placing texture

Step 3

Go to Layer > New Adjustment Layer > Black & White to create a new black & white adjustment layer and name it BT_Desaturate.

Creating new black and white adjustment layer

Step 4

Now press Control-Alt-G on your keyboard to create a clipping mask. Then, select the Background Texture layer and change the Opacity of this layer to 20%.

Changing opacity

3. How to Create the Sketch

Step 1

In this section, we are going to create the sketch. Select the Background layer and press Control-J on your keyboard to duplicate this layer. Then, go to Image > Adjustments > Shadows/Highlights and set the Shadows Amount to 10% and Highlights Amount to 10%.

Adjusting shadows and highlights

Step 2

Now name this layer Base and press Control-J on your keyboard to duplicate this layer. Then, drag this layer to the top of the layers in the Layers panel.

Duplicating layer

Step 3

Go to Filter > Filter Gallery > Artistic > Cutout and set the Number of Levels to 8, Edge Simplicity to 10 and Edge Fidelity to 1.

Adding cutout filter

Step 4

Now press Control-Shift-U on your keyboard to desaturate this layer. Then, go to Filter > Stylize > Find Edges.

Adding find edges filter

Step 5

Change the Blending Mode of this layer to Multiply and set the Opacity to 20%. Then, name this layer Rough_Sketch_1.

Changing blending mode and opacity

Step 6

Select the Base layer and press Control-J on your keyboard to duplicate this layer. Then, drag this layer just below the Rough_Sketch_1 layer in the Layers panel.

Duplicating layer

Step 7

Now go to Filter > Filter Gallery > Artistic > Cutout and set the Number of Levels to 8, Edge Simplicity to 2, and Edge Fidelity to 1.

Adding cutout filter

Step 8

Now press Control-Shift-U on your keyboard to desaturate this layer. Then, go to Filter > Stylize > Find Edges.

Adding find edges filter

Step 9

Change the Blending Mode of this layer to Multiply and set the Opacity to 10%. Then, name this layer Rough_Sketch_2.

Changing blending mode and opacity

Step 10

Now Control-click on the Rough_Sketch_1 layer to select both layers at the same time. Then, go to Layer > New > Group from Layers to create a new group from selected layers and name it Rough Sketch.

Creating new group from layers

Step 11

Change the Opacity of this layer group to 80%.

Changing opacity

Step 12

Select the Base layer and press Control-J on your keyboard to duplicate this layer. Then, drag this layer just above the Rough Sketch layer group in the Layers panel.

Duplicating layer

Step 13

Now go to Filter > Filter Gallery > Sketch > Graphic Pen and set the Stroke Length to 15, Light/Dark Balance to 10, and Stroke Direction to Right Diagonal.

Adding graphic pen filter

Step 14

Change the Blending Mode of this layer to Multiply and set the Opacity to 10%. Then, name this layer Shading_1.

Changing blending mode and opacity

Step 15

Now select the Base layer and press Control-J on your keyboard to duplicate this layer. Then, drag this layer just below the Shading_1 layer in the Layers panel.

Duplicating layer

Step 16

Now go to Filter > Filter Gallery > Sketch > Charcoal and set the Charcoal Thickness to 1, Detail to 5, and Light/Dark Balance to 10.

Adding charcoal filter

Step 17

Change the Blending Mode of this layer to Multiply and set the Opacity to 80%. Then, name this layer Shading_2.

Changing blending mode and opacity

Step 18

Now select the Base layer and press Control-J on your keyboard to duplicate this layer. Then, drag this layer just above the Shading_1 layer in the Layers panel.

Duplicating layer

Step 19

Now go to Filter > Filter Gallery > Sketch > Photocopy and set the Detail to 2 and Darkness to 5.

Adding photocopy filter

Step 20

Change the Blending Mode of this layer to Multiply and set the Opacity to 60%. Then, name this layer Main Sketch.

Changing blending mode and opacity

4. How to Create the Foreground Texture

Step 1

In this section, we are going to create the foreground texture. Go to File > Place Embedded, select the texture from the second texture link, and click Place. Then, set the Width and Height of the texture to 235% and name this layer Foreground Texture.

Placing texture

Step 2

Now Right-click on this layer and choose Edit Contents. In the new file that will show up, go to Image > Auto Tone. Then, press Control-Shift-U on your keyboard to desaturate this layer.

Adjusting tone

Step 3

Press Control-S on your keyboard to save the changes you have made and close this file.

Saving changes

Step 4

Now change the Blending Mode of this layer to Soft Light.

Changing blending mode

5. How to Make the Final Adjustments

Step 1

In this section, we are going to make the final adjustments to the design. Go to Layer > New Adjustment Layer > Photo Filter to create a new photo filter adjustment layer and name it Photo Tint.

Creating new photo filter adjustment layer

Step 2

Now Double-click on this layer thumbnail and, in the Properties panel, set the Filter to Cooling Filter (80) and Density to 11% as shown below:

Adjusting photo filter

Step 3

Press D on your keyboard to reset the swatches. Then, go to Layer > New Adjustment Layer > Gradient Map to create a new gradient map adjustment layer and name it Overall Contrast.

Creating new gradient map adjustment layer

Step 4

Now change the Blending Mode of this layer to Luminosity and set the Opacity to 12%.

Changing blending mode and opacity

Step 5

Now go to Layer > New Adjustment Layer > Vibrance to create a new vibrance adjustment layer and name it Overall Vibrance/Saturation.

Creating new vibrance and saturation adjustment layer

Step 6

Double-click on this layer thumbnail and, in the Properties panel, set the Vibrance to +40 and Saturation to +20.

Adjusting vibrance and saturation

Step 7

Press Control-Alt-Shift-E on your keyboard to make a screenshot, and then press Control-Shift-U to desaturate this layer. Then, go to Filter > Other > High Pass and set the Radius to 2 px.

Adding high pass filter

Step 8

Now change the Blending Mode of this layer to Overlay and name it Overall Sharpening.

Changing blending mode

You Made It!

Congratulations, you have succeeded! Here is our final result:

Final result

If you would like to create the even more advanced drawing effects shown
below, using just a single click and in only a few minutes, then check
out my Construct Photoshop Action.

The action will create professional and advanced sketch effects
from your photos with no work at all! You simply brush over your photo with a
color and just play the action. It’s really that simple! The action
will do all the work for you, leaving you fully layered and customizable results that you can further modify.

The action comes with a detailed video tutorial that demonstrates how to use the action and customize the results to get the most out of the effect.

Action final results

You may also like:

How to Create a Photo to Pencil Drawing Effect in Photoshop

Post pobrano z: How to Create a Photo to Pencil Drawing Effect in Photoshop

Final product image
What You’ll Be Creating

In this tutorial, you will learn how to create an amazing photo drawing effect in Adobe Photoshop. I will explain everything in so much detail that anyone can create it, even those who have just opened Photoshop for the first time. 

Follow along with us over on our Envato Tuts+ YouTube channel:

The effect shown above is the one I will show you how to create in this tutorial. If you would like to create the even more advanced drawing effects shown below, using just a single click and in only a few minutes, then check out my Construct Photoshop Action.

Action final results

You can also find more photo to pencil drawing Photoshop actions here:

What You’ll Need

To recreate the design above, you will need the following resources:

1. Let’s Get Started

First, open the photo that you want to work with. To open your photo, go to File > Open, choose your photo, and click Open. Now, before we get started, just check a couple of things:

  1. Your photo should be in RGB Color mode, 8 Bits/Channel. To check this, go to Image > Mode.
  2. For best results, your photo size should be 2000–3000 px wide/high. To check this, go to Image > Image Size.
  3. Your photo should be the Background layer. If it is not, go to Layer > New > Background from Layer.
Checking image size and mode

2. How to Create the Background

Step 1

In this section, we are going to create the background. Go to Layer > New Fill Layer > Solid Color to create a new solid color fill layer, name it Background color, and choose the color #e5e5e5 as shown below:

Creating new solid color fill layer

Step 2

Now go to File > Place Embedded, select the texture from the first texture link, and click Place. Then, set the Width and Height of the texture to 101.73% and name this layer Background Texture.

Placing texture

Step 3

Go to Layer > New Adjustment Layer > Black & White to create a new black & white adjustment layer and name it BT_Desaturate.

Creating new black and white adjustment layer

Step 4

Now press Control-Alt-G on your keyboard to create a clipping mask. Then, select the Background Texture layer and change the Opacity of this layer to 20%.

Changing opacity

3. How to Create the Sketch

Step 1

In this section, we are going to create the sketch. Select the Background layer and press Control-J on your keyboard to duplicate this layer. Then, go to Image > Adjustments > Shadows/Highlights and set the Shadows Amount to 10% and Highlights Amount to 10%.

Adjusting shadows and highlights

Step 2

Now name this layer Base and press Control-J on your keyboard to duplicate this layer. Then, drag this layer to the top of the layers in the Layers panel.

Duplicating layer

Step 3

Go to Filter > Filter Gallery > Artistic > Cutout and set the Number of Levels to 8, Edge Simplicity to 10 and Edge Fidelity to 1.

Adding cutout filter

Step 4

Now press Control-Shift-U on your keyboard to desaturate this layer. Then, go to Filter > Stylize > Find Edges.

Adding find edges filter

Step 5

Change the Blending Mode of this layer to Multiply and set the Opacity to 20%. Then, name this layer Rough_Sketch_1.

Changing blending mode and opacity

Step 6

Select the Base layer and press Control-J on your keyboard to duplicate this layer. Then, drag this layer just below the Rough_Sketch_1 layer in the Layers panel.

Duplicating layer

Step 7

Now go to Filter > Filter Gallery > Artistic > Cutout and set the Number of Levels to 8, Edge Simplicity to 2, and Edge Fidelity to 1.

Adding cutout filter

Step 8

Now press Control-Shift-U on your keyboard to desaturate this layer. Then, go to Filter > Stylize > Find Edges.

Adding find edges filter

Step 9

Change the Blending Mode of this layer to Multiply and set the Opacity to 10%. Then, name this layer Rough_Sketch_2.

Changing blending mode and opacity

Step 10

Now Control-click on the Rough_Sketch_1 layer to select both layers at the same time. Then, go to Layer > New > Group from Layers to create a new group from selected layers and name it Rough Sketch.

Creating new group from layers

Step 11

Change the Opacity of this layer group to 80%.

Changing opacity

Step 12

Select the Base layer and press Control-J on your keyboard to duplicate this layer. Then, drag this layer just above the Rough Sketch layer group in the Layers panel.

Duplicating layer

Step 13

Now go to Filter > Filter Gallery > Sketch > Graphic Pen and set the Stroke Length to 15, Light/Dark Balance to 10, and Stroke Direction to Right Diagonal.

Adding graphic pen filter

Step 14

Change the Blending Mode of this layer to Multiply and set the Opacity to 10%. Then, name this layer Shading_1.

Changing blending mode and opacity

Step 15

Now select the Base layer and press Control-J on your keyboard to duplicate this layer. Then, drag this layer just below the Shading_1 layer in the Layers panel.

Duplicating layer

Step 16

Now go to Filter > Filter Gallery > Sketch > Charcoal and set the Charcoal Thickness to 1, Detail to 5, and Light/Dark Balance to 10.

Adding charcoal filter

Step 17

Change the Blending Mode of this layer to Multiply and set the Opacity to 80%. Then, name this layer Shading_2.

Changing blending mode and opacity

Step 18

Now select the Base layer and press Control-J on your keyboard to duplicate this layer. Then, drag this layer just above the Shading_1 layer in the Layers panel.

Duplicating layer

Step 19

Now go to Filter > Filter Gallery > Sketch > Photocopy and set the Detail to 2 and Darkness to 5.

Adding photocopy filter

Step 20

Change the Blending Mode of this layer to Multiply and set the Opacity to 60%. Then, name this layer Main Sketch.

Changing blending mode and opacity

4. How to Create the Foreground Texture

Step 1

In this section, we are going to create the foreground texture. Go to File > Place Embedded, select the texture from the second texture link, and click Place. Then, set the Width and Height of the texture to 235% and name this layer Foreground Texture.

Placing texture

Step 2

Now Right-click on this layer and choose Edit Contents. In the new file that will show up, go to Image > Auto Tone. Then, press Control-Shift-U on your keyboard to desaturate this layer.

Adjusting tone

Step 3

Press Control-S on your keyboard to save the changes you have made and close this file.

Saving changes

Step 4

Now change the Blending Mode of this layer to Soft Light.

Changing blending mode

5. How to Make the Final Adjustments

Step 1

In this section, we are going to make the final adjustments to the design. Go to Layer > New Adjustment Layer > Photo Filter to create a new photo filter adjustment layer and name it Photo Tint.

Creating new photo filter adjustment layer

Step 2

Now Double-click on this layer thumbnail and, in the Properties panel, set the Filter to Cooling Filter (80) and Density to 11% as shown below:

Adjusting photo filter

Step 3

Press D on your keyboard to reset the swatches. Then, go to Layer > New Adjustment Layer > Gradient Map to create a new gradient map adjustment layer and name it Overall Contrast.

Creating new gradient map adjustment layer

Step 4

Now change the Blending Mode of this layer to Luminosity and set the Opacity to 12%.

Changing blending mode and opacity

Step 5

Now go to Layer > New Adjustment Layer > Vibrance to create a new vibrance adjustment layer and name it Overall Vibrance/Saturation.

Creating new vibrance and saturation adjustment layer

Step 6

Double-click on this layer thumbnail and, in the Properties panel, set the Vibrance to +40 and Saturation to +20.

Adjusting vibrance and saturation

Step 7

Press Control-Alt-Shift-E on your keyboard to make a screenshot, and then press Control-Shift-U to desaturate this layer. Then, go to Filter > Other > High Pass and set the Radius to 2 px.

Adding high pass filter

Step 8

Now change the Blending Mode of this layer to Overlay and name it Overall Sharpening.

Changing blending mode

You Made It!

Congratulations, you have succeeded! Here is our final result:

Final result

If you would like to create the even more advanced drawing effects shown
below, using just a single click and in only a few minutes, then check
out my Construct Photoshop Action.

The action will create professional and advanced sketch effects
from your photos with no work at all! You simply brush over your photo with a
color and just play the action. It’s really that simple! The action
will do all the work for you, leaving you fully layered and customizable results that you can further modify.

The action comes with a detailed video tutorial that demonstrates how to use the action and customize the results to get the most out of the effect.

Action final results

You may also like: