21 Awesome Funny T-Shirt Designs (And How to Make Your Own)

Post pobrano z: 21 Awesome Funny T-Shirt Designs (And How to Make Your Own)

Laughter is the best medicine, they say. If you think so too and are looking to create your own line of witty T-shirts but don’t know how to create T-shirt designs, let me introduce you to the Placeit T-shirt design maker. You’ll also discover 21 awesome T-shirt designs you can make with it that are guaranteed to tickle everyone’s funny bone. 

21 Awesome Funny T-Shirt Designs
Awesome Funny T-Shirt Designs from Placeit

Make Your Own T-Shirt Design

If you don’t know how to make T-shirt designs, here is a quick guide to get you started with the T-shirt design maker at Placeit. 

1. Navigate to Placeit’s T-Shirt Design Maker Page

Navigate to Placeits T-Shirt Design Maker Page

2. Select a Funny T-Shirt Design

Select a Family T-Shirt Design You Like

3. Start With the Controls on the Right 

When you find a design you like, click on it and the T-shirt design maker will open up. Starting on the right of the T-shirt design maker, add your text and/or change your font and its colour.

Starting With the Controls On The Right

4. Move to the Controls on the Left

Using the controls on the left of the T-shirt design maker, change the background of your T-shirt design to match the proposed colour of your T-shirt, and swap out the original for any other you prefer. 

Move to the Controls on the Left

If you get stuck or need new ideas, check out the set of presets found under every design, which offer you other options.

Check out the set of presets found under every design

5. Download Your Funny T-Shirt Design 

And just like that, you can easily make your own T-shirt design online, which you can download to send off to your T-shirt printer. 

Download Your Funny T Shirt Design

21 Awesome Funny T-Shirt Designs

1. Patriotic T-Shirt Design Template With a United Kingdom Map Illustration

Patriotic T-Shirt Design Template with a United Kingdom Map Illustration

If you’re British or just a lover of all things British, you’ll love this awesome T-shirt design, but get this, if you’re not British, but from India, Italy, Australia or somewhere else entirely, you can customise the map with your country’s shape and colours to reflect your patriotic zeal. 

2. T-Shirt Design Generator Featuring a Spaceship

T-Shirt Design Generator Featuring a Spaceship

If you’re a sci-fi buff, then this cool T-shirt design with a spaceship beaming up an old black and white TV might appeal to you. If you can think of a better caption, or like the design but not the colour, no worries. Just use the T-shirt design maker to design your shirt just the way you like it. 

3. Pride Tee Design Maker for Pride Parades

Pride Tee Design Maker for Pride Parades

If you’re looking for a funny T-shirt design with a pride angle, you’ll love this template with its lighthearted and playful graphics and fonts. Use as is or swap out the graphics, add your own text, and change the fonts and colours. 

4. Illustrated Dachshund Dog With Heart-Shape Glasses T-Shirt Design Maker

Illustrated Dachshund Dog with Heart-Shape Glasses T-Shirt Design Maker

This awesome T-shirt design is all about the cool dog, and there are plenty more equally funny and eye-catching pooches to choose from if this one doesn’t appeal. Just review the selection and click on the image that you prefer to see if it works for you. 

5. Pure Luck T-Shirt Design Creator for Cat Lovers

Pure Luck T-Shirt Design Creator for Cat Lovers

If cats are your thing then this template, the feline version of the canine one above, may just be your cup of tea. Again, there are many amazing versions to choose from, so take a look and try them all to see which appeals the most. 

6. T-Shirt Design Generator With a Serious-Looking Kitten Doodle

T-Shirt Design Generator with a Serious-Looking Kitten Doodle

More T-shirt design ideas for cat lovers. This template uses a looser, more casual drawing style and font, while the text plays with the reputation cats have of being aloof. Customise your design by using the T-shirt design maker to change the colours, fonts, and graphics.

7. T-Shirt Maker for Cute Designs

T-Shirt Maker for Cute Designs

This template is all about the text and the gorgeous, textured backgrounds. Use as is or come up with your own funny caption, changing the text and the font as you wish. Then add any of the luscious background textures on offer.

8. T-Shirt Design Template Featuring a Downward Facing Dog

T-Shirt Design Template Featuring a Downward Facing Dog

Yoga lovers, this one is for you. You can design your own tee shirt with an ever so cute and ever so funny, yoga-performing dog. Use one of the presets that come with the template and change up the colour and text if you like, or customise the design completely by selecting one of the dogs performing any number of yoga positions and adding your own text. 

9. Funny T-Shirt Design Template Featuring a Blanket Ghost Trick-or-Treating

Funny T-Shirt Design Template Featuring a Blanket Ghost Trick-or-Treating

This template offers a plethora of T-shirt design ideas for Halloween. The graphics available with the template couldn’t any spookier, with vampires, witches, Frankenstein and a bloodthirsty Elvis as just a few examples of the offerings.

10. T-Shirt Maker With a Sassy Cat Illustration

T-Shirt Maker with a Sassy Cat Illustration

Another play on the aloof nature of cats, this funny T-shirt design offers a number of gorgeous drawings of cats to which you can add your own twist.

11. T-Shirt Design Template With an Exotic Cat Illustration

T-Shirt Design Template with an Exotic Cat Illustration

Okay, so this cat does look a bit ferocious, but the drawing pairs really well with the caption, right? If you’re not convinced, don’t worry—there are plenty more drawings to choose from and lots of gorgeous presets with different text and animal pairings to keep you happy. 

12. T-Shirt Design Template Featuring a Zombie Executive

T-Shirt Design Template Featuring a Zombie Executive

A T-shirt design that’s great for Halloween—or any time of the year, for that matter. This template offers loads of customisation for the lovers of horror. 

13. Sci-Fi T-Shirt Design Template

Sci-Fi T-Shirt Design Template

More T-shirt design ideas for horror lovers. This one combines horror with sci-fi in a number of truly wonderful graphics that reference Hollywood classics like Alien, E.T., and The Matrix.

14. Negative Space Typography T-Shirt Template for Graphic Tees

Negative Space Typography T-shirt Template for Graphic Tees

Bold text and a grungy background make a powerful and eye-catching pairing. Use as is or use the T-shirt design maker to modify the font, change the backgrounds and colours, or create your own unique text. 

15. Valentine’s T-Shirt Design Generator With Bacon and Egg Graphic

Valentines T-Shirt Design Generator with Bacon and Egg Graphic

A fun and playful way to comment on love, this template offers graphics with as many clever pairings as you can stand: Netflix and pizza, milk and cookies, beer and nachos. Pick your poison. 

16. T-Shirt Design Generator for Valentine’s Day

T-Shirt Design Generator for Valentines Day

And just to show you how the previous design can be customised to lend your own spin to the same basic idea, here’s a clever variation. It uses a coffee and donut graphic, different colours, and a new font with slightly different text. The recombinations are endless. 

17. Illustrated T-Shirt Design Maker Featuring a Grumpy Cat by a Rainy Window

Illustrated T-Shirt Design Maker Featuring a Grumpy Cat by a Rainy Window

Okay, so we have a soft spot for cats, but don’t get as grumpy as the pink fella above—we have room in our hearts for dogs as well. That’s why we’re showing you this template. It has loads of sweet dog illustrations that you can use to replace oh grumpy one here.

18. T-Shirt Design Templates With Vintage Memes

 T-Shirt Design Templates with Vintage Memes

Vintage all the way here. Use the T-shirt design maker to design your T-shirt in vintage style. It takes no time at all, and you can change every aspect of this design to truly make it your own. 

19. Father’s Day T-Shirt Design Template With Dinosaur Clipart

Fathers Day T-Shirt Design Template with Dinosaur Clipart

Dinosaurs are cute, especially when they’re in 2D form. This kid-friendly template is the perfect choice for those who want to help their kids create a T-shirt for whatever occasion. As is the case with other templates here, customisation is easy peasy.

20. Alien Illustration T-Shirt Design Template

Alien Illustration T-Shirt Design Template

Another somewhat scary sci-fi horror combo template. This one suggests that behind every alien there’s really a cat. Could be a fair point. Use the template as is or modify it as much or as little as you like. 

21. Illustrated T-Shirt Design Maker Featuring a Dog Wearing a Raincoat

Illustrated T-Shirt Design Maker Featuring a Dog Wearing a Raincoat

We thought it only fair we should end our funny T-shirt designs with a dog, and a rather adorable drawing of one at that. The template offers a plethora of other great drawings, so take a look and choose the one that appeals most. Then customise the template as much as you like.

Create Your Own Funny T-Shirt Design Online Today

We hope you’ve found a bunch of T-shirt design ideas you can use and you are excited about using the T-shirt design maker to create your own T-shirt design online. Get to work creating your own unique design and share it with us in the comments below. 

And remember, these 21 funny T-shirt designs are only a fraction of the awesome designs available at Placeit, so if you haven’t found exactly what you need here, head on over to the site and browse the large collection of t-shirt designs to be found there. 

If you’re interested in other kinds of designs and mockups, here are some great suggestions for you:

How to Install and Use Procreate Brushes

Post pobrano z: How to Install and Use Procreate Brushes

Final product image
What You’ll Be Creating

Found some of the best Procreate brushes, but not sure how to install or use them? In this tutorial, we’ll look at installing and utilizing Procreate brushes, as well as some customization basics. We’ll wrap up with a demo of a newly installed brush set.

Please keep in mind that Procreate and an iPad Pro are required for this tutorial. For reference, I’m using an Apple Pencil. 
What You Will Need

You will need the following resource in order to complete this project:

Ready to get drawing? Let’s begin!

1. How to Install Procreate Brushes

Step 1

First, you’ll want to download your brush—let’s dig into how to download Procreate brushes, because it’s not always as straightforward as you might think. I know I found myself scratching my head a few times, the first time I did it. 

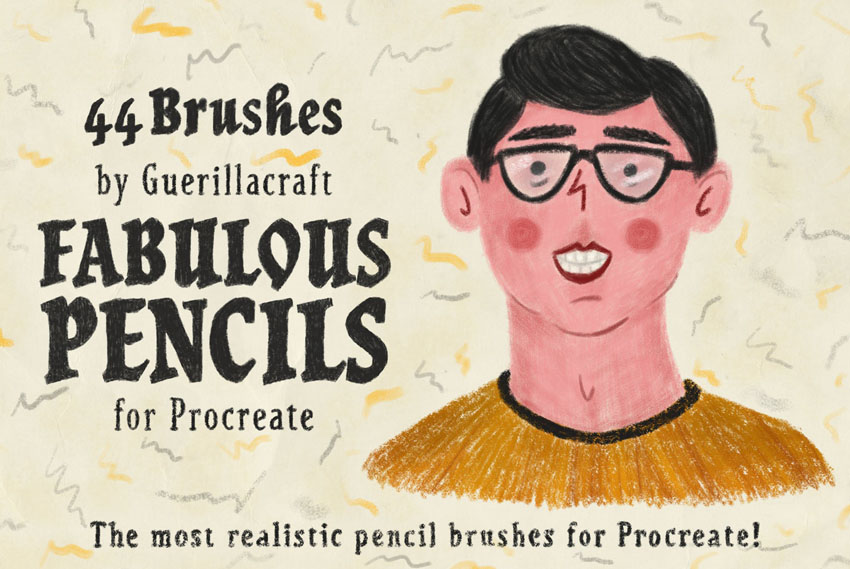
As an example for this tutorial, I’ll be using Fabulous Pencils for Procreate, a lovely, textured brush set by guerillacraft. You’re welcome to follow along with this brush set, or try another one!

Pencil Procreate Brushes

Step 2

Downloading things on an iPad is a little different from a desktop or laptop, so let’s start there—especially if your brush file is distributed in a zip file. 

In my example, below, I’m going to tap to download—this will vary, depending on the brush you want to install and where you’re installing it from. However, the process should be generally similar!

Downloading a brush

Step 3

Once you’ve accepted any download terms that may be applicable to your brush, your file will download.

This is what my browser gives me. Select Open in „Files”

Open in Files

Step 4

Now, I’m going to save the zip file, containing my brushes, somewhere on my iPad.

On a side note, I personally like to have some kind of cloud saving service handy, so that if I find a brush that I want to try out while I’m on my laptop, desktop computer, or smartphone, I can easily access it on my iPad, too!

In this case, I’m going to choose On My iPad.

Saving the file

Step 5

Now, locate the file on your iPad. 

Here’s an example of what mine looks like, on my device. I saved the zip file associated with this brush set to my Files, in a folder called Procreate. 

Locating files

Step 6

Since it’s likely that any brush you’ve downloaded has come in some kind of compressed zip file, let’s go through that process, too. 

You’ll know if it’s a zip file because the file itself has a big „ZIP” on it. If you see the Procreate logo instead, then it’s likely a Procreate Brush file. You can then jump ahead to Step 9.

Tap on the zip file. You’ll notice that it then gives you the option to „Preview Content”.

Tap on Preview Content.

Preview Content

Step 7

Then, you can swipe to preview the contents of the zip file, if you like. There’s nothing to visually preview with the brush file itself, so it just displays the file name. 

Tap on the Share Button.

Share Button

Step 8

This opens up a list of places where we can send our brush file. I chose Save to Files to unzip the Procreate brush set to my iPad’s storage.

You’ll be prompted to save the file wherever you like—this could, for example, be your favorite cloud service or your iPad’s storage. Your choice there—just make sure to note where you put it. 

Save to Files

Step 9

Now, here’s the Procreate brush file. Simply tap on it, and it will automatically load right up into Procreate! Easy, right? 

Procreate Brush file

Step 10

So, how do we find our newly installed Procreate brushes? 

Open up your Brush Library and look at the list—there it is, in its own new section. They’re all installed and ready to use.

Brush Library

2. How to Customize Procreate Brushes

Step 1

Using a brush is more than just installing it—we need to know how to work with it via the many Procreate brush settings. So here’s a brief overview of how to customize your newly installed brushes, so you can get the most out of them! 

First, keep the two sliders on the left-hand side of your screen in mind. The top slider is your Brush Size. The bottom slider is your Brush Opacity

These are two settings that I adjust frequently, while I’m drawing. 

Size and Opacity Sliders

Step 2

Looking at your brushes, you can customize a brush by tapping on it. 

Let’s try this out with our newly installed brush set, Fabulous Pencils for Procreate. I selected that group of brushes, and now I’m going to customize Velvet Text Shader.

Tap on the brush to customize its settings. 

Selecting a Brush

Step 3

Now, we’re „inside” the brush—this is where you can adjust and fine-tune the brush to your liking. While these brushes are wonderful just as they are, you might find little things that you’d like to tweak, like the brush’s maximum size, for example.

Brush Settings

Step 4

You’ll notice that there are a lot of options here to go through. Procreate lets you do some wonderful, in-depth customizations when it comes to brushes.

I could write a whole separate tutorial on this subject—and I did! If you’d like a more in-depth look at how to create and customize Procreate Brushes, I’ve written another tutorial on that! Feel free to check it out!

I’ve also written up a tutorial specifically about Procreate Layers, if you’d like a more in-depth look at that part of the software!

3. How to Use Procreate Brushes

Step 1

Now, let’s take a look at how to use the Procreate Brushes that we just installed!

In this demonstration, I’ll be using the Fabulous Pencils for Procreate brush set, from earlier in this tutorial. 

I’ll specify which brush from the set I tried out, by name, so if you’re interested, you can try out that brush too. Remember, you can find these brushes in a group, in your Brush Library

First, I started out with a rough sketch using Sussie B’s Pencil. It’s a really nice brush with an organic, graphite feel. I really like it!

Initial Sketch

Step 2

Then, I used the Big Chunky Lead brush to fill in the shapes I’d drawn on a New Layer. This way, I can save my sketch, but still use it as a guideline.  

I like to isolate different pieces of my colors on separate layers, for organization purposes.

Flat colors

Step 3

However, some features, like the general placement of the facial features, were covered up by my initial, flat colors. So I lowered the opacity on my flat colors so that I could, again, refer to my initial sketch. 

Lowering the opacity

Step 4

This allowed me to put down a more refined version of the facial features. I tried out Frankie & Bonnie’s Pencil from this Procreate brush set for this part!

Adding the facial features

Step 5

At this point, I started to refine my work. I created a New Layer and refined the shapes until I came up with something I was happy with—added some more hair, adjusted the shape of the face. 

I found these brushes to feel very organic and easy to work with. It felt very much like working with real media—but with the benefit of layers and undo!

Refining the face

Step 6

I added a rough background using Big 4B Lead, one of the larger brushes in this Procreate brush set. 

Adding a background

Step 7

Now, time to experiment with some lighting! I decided to add a shadow on the right-hand side, and I settled on a blue-ish color. I used the Big Chunky Lead brush!

I did this on a New Layer with the Blending Mode set to Multiply. This way, the blue affects my flat colors. 

If you’re curious about Procreate Layers and Blending Modes, check out this tutorial! 

Adding Shadows

Step 8

Then, I wanted some light on the opposite side. I decided on a yellowish color. 

Again, I did this on a New Layer. Sussie B’s Pencil was a great fit for this one, at a larger brush size. 

Adding lighting

Step 9

I added a little reflected light on the right-hand side, again using the Big Chunky Lead brush. 

I like to use the Eyedropper Tool to lift surrounding colors and paint on top of my work—as I did here with the fluffy, afro hair. I found Soft Pencil Lead to be a nice brush for blending, and Sussie B’s Brush works well, at larger sizes, for harder lines. 

Reflected light and refinements

Step 10

I decided to change up the background, to better work with the colors I was experimenting with—a cool blue on the right, yellow on the left. Big Flat Lead was a great choice for this. I really enjoyed how easily these brushes blend. 

I also added some subtle light to the facial area using Sussie B’s Pencil—can you tell I’m really fond of that one, in particular?

The background and face

Step 11

I added some stars in the background. They’re rough little pencil marks—just placed about for an extra touch of night sky. I tried out Trisha’s Pencil for this one!

Adding stars

Step 12

When I was happy with my work, I flattened the character art and cleaned it up with the eraser. I decided I wanted to keep things relatively relaxed and textured, but there were a few places I thought just needed a little tidying up!

Cleaning up the artwork

And There You Have It!

Thanks so much for exploring how to install and use Procreate brushes with me! I had a lot of fun with this demonstration—and honestly, I’m excited to use this brush set again! It was really user-friendly and fun to use. 

Good luck with your creative projects, and happy drawing!

If you’d like to follow the process of this illustration, it’s available on the Envato Tuts+ YouTube channel:

If you enjoyed working with this Procreate Brush, here are some others to check out and experiment with!

Oil Paint Brushes for Procreate

These Procreate Brushes are a lovely addition to any collection, especially if you’re a fan of texture! They’re by the same author as the artist who made the brushes we experimented with in this tutorial, too!

Shader Brushes for Procreate

I absolutely love the texture in these Procreate shader brushes. They could work for such a wide variety of styles and projects! 

Procreate Brushes

Auld Inks for Procreate

62 brushes—that is a lot of brushes to experiment with, right? And with such interesting texture, these ink Procreate brushes are so much fun to experiment with.

Procreate Brushes

Fabric and Paper Procreate Brushes

I love texture—it’s so fun to experiment with. This set is all about texturing with fabric and paper. There are plenty of versatile applications with this one, a great addition to anyone’s collection!

Procreate Brushes

Procreate Brush Calligraphy

I love hand-drawn type—and Procreate is an awesome tool for experimenting with it, too. This brush set is right up your alley, if calligraphy is your jam!

Procreate Brushes

If you enjoyed this tutorial, here are some others to check out!

How to Install and Use Procreate Brushes

Post pobrano z: How to Install and Use Procreate Brushes

Final product image
What You’ll Be Creating

Found some of the best Procreate brushes, but not sure how to install or use them? In this tutorial, we’ll look at installing and utilizing Procreate brushes, as well as some customization basics. We’ll wrap up with a demo of a newly installed brush set.

Please keep in mind that Procreate and an iPad Pro are required for this tutorial. For reference, I’m using an Apple Pencil. 

What You Will Need

You will need the following resource in order to complete this project:

Ready to get drawing? Let’s begin!

1. How to Install Procreate Brushes

Step 1

First, you’ll want to download your brush—let’s dig into how to download Procreate brushes, because it’s not always as straightforward as you might think. I know I found myself scratching my head a few times, the first time I did it. 

As an example for this tutorial, I’ll be using Fabulous Pencils for Procreate, a lovely, textured brush set by guerillacraft. You’re welcome to follow along with this brush set, or try another one!

Pencil Procreate Brushes

Step 2

Downloading things on an iPad is a little different from a desktop or laptop, so let’s start there—especially if your brush file is distributed in a zip file. 

In my example, below, I’m going to tap to download—this will vary, depending on the brush you want to install and where you’re installing it from. However, the process should be generally similar!

Downloading a brush

Step 3

Once you’ve accepted any download terms that may be applicable to your brush, your file will download.

This is what my browser gives me. Select Open in „Files”

Open in Files

Step 4

Now, I’m going to save the zip file, containing my brushes, somewhere on my iPad.

On a side note, I personally like to have some kind of cloud saving service handy, so that if I find a brush that I want to try out while I’m on my laptop, desktop computer, or smartphone, I can easily access it on my iPad, too!

In this case, I’m going to choose On My iPad.

Saving the file

Step 5

Now, locate the file on your iPad. 

Here’s an example of what mine looks like, on my device. I saved the zip file associated with this brush set to my Files, in a folder called Procreate. 

Locating files

Step 6

Since it’s likely that any brush you’ve downloaded has come in some kind of compressed zip file, let’s go through that process, too. 

You’ll know if it’s a zip file because the file itself has a big „ZIP” on it. If you see the Procreate logo instead, then it’s likely a Procreate Brush file. You can then jump ahead to Step 9.

Tap on the zip file. You’ll notice that it then gives you the option to „Preview Content”.

Tap on Preview Content.

Preview Content

Step 7

Then, you can swipe to preview the contents of the zip file, if you like. There’s nothing to visually preview with the brush file itself, so it just displays the file name. 

Tap on the Share Button.

Share Button

Step 8

This opens up a list of places where we can send our brush file. I chose Save to Files to unzip the Procreate brush set to my iPad’s storage.

You’ll be prompted to save the file wherever you like—this could, for example, be your favorite cloud service or your iPad’s storage. Your choice there—just make sure to note where you put it. 

Save to Files

Step 9

Now, here’s the Procreate brush file. Simply tap on it, and it will automatically load right up into Procreate! Easy, right? 

Procreate Brush file

Step 10

So, how do we find our newly installed Procreate brushes? 

Open up your Brush Library and look at the list—there it is, in its own new section. They’re all installed and ready to use.

Brush Library

2. How to Customize Procreate Brushes

Step 1

Using a brush is more than just installing it—we need to know how to work with it via the many Procreate brush settings. So here’s a brief overview of how to customize your newly installed brushes, so you can get the most out of them! 

First, keep the two sliders on the left-hand side of your screen in mind. The top slider is your Brush Size. The bottom slider is your Brush Opacity

These are two settings that I adjust frequently, while I’m drawing. 

Size and Opacity Sliders

Step 2

Looking at your brushes, you can customize a brush by tapping on it. 

Let’s try this out with our newly installed brush set, Fabulous Pencils for Procreate. I selected that group of brushes, and now I’m going to customize Velvet Text Shader.

Tap on the brush to customize its settings. 

Selecting a Brush

Step 3

Now, we’re „inside” the brush—this is where you can adjust and fine-tune the brush to your liking. While these brushes are wonderful just as they are, you might find little things that you’d like to tweak, like the brush’s maximum size, for example.

Brush Settings

Step 4

You’ll notice that there are a lot of options here to go through. Procreate lets you do some wonderful, in-depth customizations when it comes to brushes.

I could write a whole separate tutorial on this subject—and I did! If you’d like a more in-depth look at how to create and customize Procreate Brushes, I’ve written another tutorial on that! Feel free to check it out!

I’ve also written up a tutorial specifically about Procreate Layers, if you’d like a more in-depth look at that part of the software!

3. How to Use Procreate Brushes

Step 1

Now, let’s take a look at how to use the Procreate Brushes that we just installed!

In this demonstration, I’ll be using the Fabulous Pencils for Procreate brush set, from earlier in this tutorial. 

I’ll specify which brush from the set I tried out, by name, so if you’re interested, you can try out that brush too. Remember, you can find these brushes in a group, in your Brush Library

First, I started out with a rough sketch using Sussie B’s Pencil. It’s a really nice brush with an organic, graphite feel. I really like it!

Initial Sketch

Step 2

Then, I used the Big Chunky Lead brush to fill in the shapes I’d drawn on a New Layer. This way, I can save my sketch, but still use it as a guideline.  

I like to isolate different pieces of my colors on separate layers, for organization purposes.

Flat colors

Step 3

However, some features, like the general placement of the facial features, were covered up by my initial, flat colors. So I lowered the opacity on my flat colors so that I could, again, refer to my initial sketch. 

Lowering the opacity

Step 4

This allowed me to put down a more refined version of the facial features. I tried out Frankie & Bonnie’s Pencil from this Procreate brush set for this part!

Adding the facial features

Step 5

At this point, I started to refine my work. I created a New Layer and refined the shapes until I came up with something I was happy with—added some more hair, adjusted the shape of the face. 

I found these brushes to feel very organic and easy to work with. It felt very much like working with real media—but with the benefit of layers and undo!

Refining the face

Step 6

I added a rough background using Big 4B Lead, one of the larger brushes in this Procreate brush set. 

Adding a background

Step 7

Now, time to experiment with some lighting! I decided to add a shadow on the right-hand side, and I settled on a blue-ish color. I used the Big Chunky Lead brush!

I did this on a New Layer with the Blending Mode set to Multiply. This way, the blue affects my flat colors. 

If you’re curious about Procreate Layers and Blending Modes, check out this tutorial! 

Adding Shadows

Step 8

Then, I wanted some light on the opposite side. I decided on a yellowish color. 

Again, I did this on a New Layer. Sussie B’s Pencil was a great fit for this one, at a larger brush size. 

Adding lighting

Step 9

I added a little reflected light on the right-hand side, again using the Big Chunky Lead brush. 

I like to use the Eyedropper Tool to lift surrounding colors and paint on top of my work—as I did here with the fluffy, afro hair. I found Soft Pencil Lead to be a nice brush for blending, and Sussie B’s Brush works well, at larger sizes, for harder lines. 

Reflected light and refinements

Step 10

I decided to change up the background, to better work with the colors I was experimenting with—a cool blue on the right, yellow on the left. Big Flat Lead was a great choice for this. I really enjoyed how easily these brushes blend. 

I also added some subtle light to the facial area using Sussie B’s Pencil—can you tell I’m really fond of that one, in particular?

The background and face

Step 11

I added some stars in the background. They’re rough little pencil marks—just placed about for an extra touch of night sky. I tried out Trisha’s Pencil for this one!

Adding stars

Step 12

When I was happy with my work, I flattened the character art and cleaned it up with the eraser. I decided I wanted to keep things relatively relaxed and textured, but there were a few places I thought just needed a little tidying up!

Cleaning up the artwork

And There You Have It!

Thanks so much for exploring how to install and use Procreate brushes with me! I had a lot of fun with this demonstration—and honestly, I’m excited to use this brush set again! It was really user-friendly and fun to use. 

Good luck with your creative projects, and happy drawing!

If you’d like to follow the process of this illustration, it’s available on the Envato Tuts+ YouTube channel:

If you enjoyed working with this Procreate Brush, here are some others to check out and experiment with!

Oil Paint Brushes for Procreate

These Procreate Brushes are a lovely addition to any collection, especially if you’re a fan of texture! They’re by the same author as the artist who made the brushes we experimented with in this tutorial, too!

Shader Brushes for Procreate

I absolutely love the texture in these Procreate shader brushes. They could work for such a wide variety of styles and projects! 

Procreate Brushes

Auld Inks for Procreate

62 brushes—that is a lot of brushes to experiment with, right? And with such interesting texture, these ink Procreate brushes are so much fun to experiment with.

Procreate Brushes

Fabric and Paper Procreate Brushes

I love texture—it’s so fun to experiment with. This set is all about texturing with fabric and paper. There are plenty of versatile applications with this one, a great addition to anyone’s collection!

Procreate Brushes

Procreate Brush Calligraphy

I love hand-drawn type—and Procreate is an awesome tool for experimenting with it, too. This brush set is right up your alley, if calligraphy is your jam!

Procreate Brushes

If you enjoyed this tutorial, here are some others to check out!

How to Install and Use Procreate Brushes

Post pobrano z: How to Install and Use Procreate Brushes

Final product image
What You’ll Be Creating

Found some of the best Procreate brushes, but not sure how to install or use them? In this tutorial, we’ll look at installing and utilizing Procreate brushes, as well as some customization basics. We’ll wrap up with a demo of a newly installed brush set.

Please keep in mind that Procreate and an iPad Pro are required for this tutorial. For reference, I’m using an Apple Pencil. 

What You Will Need

You will need the following resource in order to complete this project:

Ready to get drawing? Let’s begin!

1. How to Install Procreate Brushes

Step 1

First, you’ll want to download your brush—let’s dig into how to download Procreate brushes, because it’s not always as straightforward as you might think. I know I found myself scratching my head a few times, the first time I did it. 

As an example for this tutorial, I’ll be using Fabulous Pencils for Procreate, a lovely, textured brush set by guerillacraft. You’re welcome to follow along with this brush set, or try another one!

Pencil Procreate Brushes

Step 2

Downloading things on an iPad is a little different from a desktop or laptop, so let’s start there—especially if your brush file is distributed in a zip file. 

In my example, below, I’m going to tap to download—this will vary, depending on the brush you want to install and where you’re installing it from. However, the process should be generally similar!

Downloading a brush

Step 3

Once you’ve accepted any download terms that may be applicable to your brush, your file will download.

This is what my browser gives me. Select Open in „Files”

Open in Files

Step 4

Now, I’m going to save the zip file, containing my brushes, somewhere on my iPad.

On a side note, I personally like to have some kind of cloud saving service handy, so that if I find a brush that I want to try out while I’m on my laptop, desktop computer, or smartphone, I can easily access it on my iPad, too!

In this case, I’m going to choose On My iPad.

Saving the file

Step 5

Now, locate the file on your iPad. 

Here’s an example of what mine looks like, on my device. I saved the zip file associated with this brush set to my Files, in a folder called Procreate. 

Locating files

Step 6

Since it’s likely that any brush you’ve downloaded has come in some kind of compressed zip file, let’s go through that process, too. 

You’ll know if it’s a zip file because the file itself has a big „ZIP” on it. If you see the Procreate logo instead, then it’s likely a Procreate Brush file. You can then jump ahead to Step 9.

Tap on the zip file. You’ll notice that it then gives you the option to „Preview Content”.

Tap on Preview Content.

Preview Content

Step 7

Then, you can swipe to preview the contents of the zip file, if you like. There’s nothing to visually preview with the brush file itself, so it just displays the file name. 

Tap on the Share Button.

Share Button

Step 8

This opens up a list of places where we can send our brush file. I chose Save to Files to unzip the Procreate brush set to my iPad’s storage.

You’ll be prompted to save the file wherever you like—this could, for example, be your favorite cloud service or your iPad’s storage. Your choice there—just make sure to note where you put it. 

Save to Files

Step 9

Now, here’s the Procreate brush file. Simply tap on it, and it will automatically load right up into Procreate! Easy, right? 

Procreate Brush file

Step 10

So, how do we find our newly installed Procreate brushes? 

Open up your Brush Library and look at the list—there it is, in its own new section. They’re all installed and ready to use.

Brush Library

2. How to Customize Procreate Brushes

Step 1

Using a brush is more than just installing it—we need to know how to work with it via the many Procreate brush settings. So here’s a brief overview of how to customize your newly installed brushes, so you can get the most out of them! 

First, keep the two sliders on the left-hand side of your screen in mind. The top slider is your Brush Size. The bottom slider is your Brush Opacity

These are two settings that I adjust frequently, while I’m drawing. 

Size and Opacity Sliders

Step 2

Looking at your brushes, you can customize a brush by tapping on it. 

Let’s try this out with our newly installed brush set, Fabulous Pencils for Procreate. I selected that group of brushes, and now I’m going to customize Velvet Text Shader.

Tap on the brush to customize its settings. 

Selecting a Brush

Step 3

Now, we’re „inside” the brush—this is where you can adjust and fine-tune the brush to your liking. While these brushes are wonderful just as they are, you might find little things that you’d like to tweak, like the brush’s maximum size, for example.

Brush Settings

Step 4

You’ll notice that there are a lot of options here to go through. Procreate lets you do some wonderful, in-depth customizations when it comes to brushes.

I could write a whole separate tutorial on this subject—and I did! If you’d like a more in-depth look at how to create and customize Procreate Brushes, I’ve written another tutorial on that! Feel free to check it out!

I’ve also written up a tutorial specifically about Procreate Layers, if you’d like a more in-depth look at that part of the software!

3. How to Use Procreate Brushes

Step 1

Now, let’s take a look at how to use the Procreate Brushes that we just installed!

In this demonstration, I’ll be using the Fabulous Pencils for Procreate brush set, from earlier in this tutorial. 

I’ll specify which brush from the set I tried out, by name, so if you’re interested, you can try out that brush too. Remember, you can find these brushes in a group, in your Brush Library

First, I started out with a rough sketch using Sussie B’s Pencil. It’s a really nice brush with an organic, graphite feel. I really like it!

Initial Sketch

Step 2

Then, I used the Big Chunky Lead brush to fill in the shapes I’d drawn on a New Layer. This way, I can save my sketch, but still use it as a guideline.  

I like to isolate different pieces of my colors on separate layers, for organization purposes.

Flat colors

Step 3

However, some features, like the general placement of the facial features, were covered up by my initial, flat colors. So I lowered the opacity on my flat colors so that I could, again, refer to my initial sketch. 

Lowering the opacity

Step 4

This allowed me to put down a more refined version of the facial features. I tried out Frankie & Bonnie’s Pencil from this Procreate brush set for this part!

Adding the facial features

Step 5

At this point, I started to refine my work. I created a New Layer and refined the shapes until I came up with something I was happy with—added some more hair, adjusted the shape of the face. 

I found these brushes to feel very organic and easy to work with. It felt very much like working with real media—but with the benefit of layers and undo!

Refining the face

Step 6

I added a rough background using Big 4B Lead, one of the larger brushes in this Procreate brush set. 

Adding a background

Step 7

Now, time to experiment with some lighting! I decided to add a shadow on the right-hand side, and I settled on a blue-ish color. I used the Big Chunky Lead brush!

I did this on a New Layer with the Blending Mode set to Multiply. This way, the blue affects my flat colors. 

If you’re curious about Procreate Layers and Blending Modes, check out this tutorial! 

Adding Shadows

Step 8

Then, I wanted some light on the opposite side. I decided on a yellowish color. 

Again, I did this on a New Layer. Sussie B’s Pencil was a great fit for this one, at a larger brush size. 

Adding lighting

Step 9

I added a little reflected light on the right-hand side, again using the Big Chunky Lead brush. 

I like to use the Eyedropper Tool to lift surrounding colors and paint on top of my work—as I did here with the fluffy, afro hair. I found Soft Pencil Lead to be a nice brush for blending, and Sussie B’s Brush works well, at larger sizes, for harder lines. 

Reflected light and refinements

Step 10

I decided to change up the background, to better work with the colors I was experimenting with—a cool blue on the right, yellow on the left. Big Flat Lead was a great choice for this. I really enjoyed how easily these brushes blend. 

I also added some subtle light to the facial area using Sussie B’s Pencil—can you tell I’m really fond of that one, in particular?

The background and face

Step 11

I added some stars in the background. They’re rough little pencil marks—just placed about for an extra touch of night sky. I tried out Trisha’s Pencil for this one!

Adding stars

Step 12

When I was happy with my work, I flattened the character art and cleaned it up with the eraser. I decided I wanted to keep things relatively relaxed and textured, but there were a few places I thought just needed a little tidying up!

Cleaning up the artwork

And There You Have It!

Thanks so much for exploring how to install and use Procreate brushes with me! I had a lot of fun with this demonstration—and honestly, I’m excited to use this brush set again! It was really user-friendly and fun to use. 

Good luck with your creative projects, and happy drawing!

If you’d like to follow the process of this illustration, it’s available on the Envato Tuts+ YouTube channel:

If you enjoyed working with this Procreate Brush, here are some others to check out and experiment with!

Oil Paint Brushes for Procreate

These Procreate Brushes are a lovely addition to any collection, especially if you’re a fan of texture! They’re by the same author as the artist who made the brushes we experimented with in this tutorial, too!

Shader Brushes for Procreate

I absolutely love the texture in these Procreate shader brushes. They could work for such a wide variety of styles and projects! 

Procreate Brushes

Auld Inks for Procreate

62 brushes—that is a lot of brushes to experiment with, right? And with such interesting texture, these ink Procreate brushes are so much fun to experiment with.

Procreate Brushes

Fabric and Paper Procreate Brushes

I love texture—it’s so fun to experiment with. This set is all about texturing with fabric and paper. There are plenty of versatile applications with this one, a great addition to anyone’s collection!

Procreate Brushes

Procreate Brush Calligraphy

I love hand-drawn type—and Procreate is an awesome tool for experimenting with it, too. This brush set is right up your alley, if calligraphy is your jam!

Procreate Brushes

If you enjoyed this tutorial, here are some others to check out!

How to Install and Use Procreate Brushes

Post pobrano z: How to Install and Use Procreate Brushes

Final product image
What You’ll Be Creating

Found some of the best Procreate brushes, but not sure how to install or use them? In this tutorial, we’ll look at installing and utilizing Procreate brushes, as well as some customization basics. We’ll wrap up with a demo of a newly installed brush set.

Please keep in mind that Procreate and an iPad Pro are required for this tutorial. For reference, I’m using an Apple Pencil. 

What You Will Need

You will need the following resource in order to complete this project:

Ready to get drawing? Let’s begin!

1. How to Install Procreate Brushes

Step 1

First, you’ll want to download your brush—let’s dig into how to download Procreate brushes, because it’s not always as straightforward as you might think. I know I found myself scratching my head a few times, the first time I did it. 

As an example for this tutorial, I’ll be using Fabulous Pencils for Procreate, a lovely, textured brush set by guerillacraft. You’re welcome to follow along with this brush set, or try another one!

Pencil Procreate Brushes

Step 2

Downloading things on an iPad is a little different from a desktop or laptop, so let’s start there—especially if your brush file is distributed in a zip file. 

In my example, below, I’m going to tap to download—this will vary, depending on the brush you want to install and where you’re installing it from. However, the process should be generally similar!

Downloading a brush

Step 3

Once you’ve accepted any download terms that may be applicable to your brush, your file will download.

This is what my browser gives me. Select Open in „Files”

Open in Files

Step 4

Now, I’m going to save the zip file, containing my brushes, somewhere on my iPad.

On a side note, I personally like to have some kind of cloud saving service handy, so that if I find a brush that I want to try out while I’m on my laptop, desktop computer, or smartphone, I can easily access it on my iPad, too!

In this case, I’m going to choose On My iPad.

Saving the file

Step 5

Now, locate the file on your iPad. 

Here’s an example of what mine looks like, on my device. I saved the zip file associated with this brush set to my Files, in a folder called Procreate. 

Locating files

Step 6

Since it’s likely that any brush you’ve downloaded has come in some kind of compressed zip file, let’s go through that process, too. 

You’ll know if it’s a zip file because the file itself has a big „ZIP” on it. If you see the Procreate logo instead, then it’s likely a Procreate Brush file. You can then jump ahead to Step 9.

Tap on the zip file. You’ll notice that it then gives you the option to „Preview Content”.

Tap on Preview Content.

Preview Content

Step 7

Then, you can swipe to preview the contents of the zip file, if you like. There’s nothing to visually preview with the brush file itself, so it just displays the file name. 

Tap on the Share Button.

Share Button

Step 8

This opens up a list of places where we can send our brush file. I chose Save to Files to unzip the Procreate brush set to my iPad’s storage.

You’ll be prompted to save the file wherever you like—this could, for example, be your favorite cloud service or your iPad’s storage. Your choice there—just make sure to note where you put it. 

Save to Files

Step 9

Now, here’s the Procreate brush file. Simply tap on it, and it will automatically load right up into Procreate! Easy, right? 

Procreate Brush file

Step 10

So, how do we find our newly installed Procreate brushes? 

Open up your Brush Library and look at the list—there it is, in its own new section. They’re all installed and ready to use.

Brush Library

2. How to Customize Procreate Brushes

Step 1

Using a brush is more than just installing it—we need to know how to work with it via the many Procreate brush settings. So here’s a brief overview of how to customize your newly installed brushes, so you can get the most out of them! 

First, keep the two sliders on the left-hand side of your screen in mind. The top slider is your Brush Size. The bottom slider is your Brush Opacity

These are two settings that I adjust frequently, while I’m drawing. 

Size and Opacity Sliders

Step 2

Looking at your brushes, you can customize a brush by tapping on it. 

Let’s try this out with our newly installed brush set, Fabulous Pencils for Procreate. I selected that group of brushes, and now I’m going to customize Velvet Text Shader.

Tap on the brush to customize its settings. 

Selecting a Brush

Step 3

Now, we’re „inside” the brush—this is where you can adjust and fine-tune the brush to your liking. While these brushes are wonderful just as they are, you might find little things that you’d like to tweak, like the brush’s maximum size, for example.

Brush Settings

Step 4

You’ll notice that there are a lot of options here to go through. Procreate lets you do some wonderful, in-depth customizations when it comes to brushes.

I could write a whole separate tutorial on this subject—and I did! If you’d like a more in-depth look at how to create and customize Procreate Brushes, I’ve written another tutorial on that! Feel free to check it out!

I’ve also written up a tutorial specifically about Procreate Layers, if you’d like a more in-depth look at that part of the software!

3. How to Use Procreate Brushes

Step 1

Now, let’s take a look at how to use the Procreate Brushes that we just installed!

In this demonstration, I’ll be using the Fabulous Pencils for Procreate brush set, from earlier in this tutorial. 

I’ll specify which brush from the set I tried out, by name, so if you’re interested, you can try out that brush too. Remember, you can find these brushes in a group, in your Brush Library

First, I started out with a rough sketch using Sussie B’s Pencil. It’s a really nice brush with an organic, graphite feel. I really like it!

Initial Sketch

Step 2

Then, I used the Big Chunky Lead brush to fill in the shapes I’d drawn on a New Layer. This way, I can save my sketch, but still use it as a guideline.  

I like to isolate different pieces of my colors on separate layers, for organization purposes.

Flat colors

Step 3

However, some features, like the general placement of the facial features, were covered up by my initial, flat colors. So I lowered the opacity on my flat colors so that I could, again, refer to my initial sketch. 

Lowering the opacity

Step 4

This allowed me to put down a more refined version of the facial features. I tried out Frankie & Bonnie’s Pencil from this Procreate brush set for this part!

Adding the facial features

Step 5

At this point, I started to refine my work. I created a New Layer and refined the shapes until I came up with something I was happy with—added some more hair, adjusted the shape of the face. 

I found these brushes to feel very organic and easy to work with. It felt very much like working with real media—but with the benefit of layers and undo!

Refining the face

Step 6

I added a rough background using Big 4B Lead, one of the larger brushes in this Procreate brush set. 

Adding a background

Step 7

Now, time to experiment with some lighting! I decided to add a shadow on the right-hand side, and I settled on a blue-ish color. I used the Big Chunky Lead brush!

I did this on a New Layer with the Blending Mode set to Multiply. This way, the blue affects my flat colors. 

If you’re curious about Procreate Layers and Blending Modes, check out this tutorial! 

Adding Shadows

Step 8

Then, I wanted some light on the opposite side. I decided on a yellowish color. 

Again, I did this on a New Layer. Sussie B’s Pencil was a great fit for this one, at a larger brush size. 

Adding lighting

Step 9

I added a little reflected light on the right-hand side, again using the Big Chunky Lead brush. 

I like to use the Eyedropper Tool to lift surrounding colors and paint on top of my work—as I did here with the fluffy, afro hair. I found Soft Pencil Lead to be a nice brush for blending, and Sussie B’s Brush works well, at larger sizes, for harder lines. 

Reflected light and refinements

Step 10

I decided to change up the background, to better work with the colors I was experimenting with—a cool blue on the right, yellow on the left. Big Flat Lead was a great choice for this. I really enjoyed how easily these brushes blend. 

I also added some subtle light to the facial area using Sussie B’s Pencil—can you tell I’m really fond of that one, in particular?

The background and face

Step 11

I added some stars in the background. They’re rough little pencil marks—just placed about for an extra touch of night sky. I tried out Trisha’s Pencil for this one!

Adding stars

Step 12

When I was happy with my work, I flattened the character art and cleaned it up with the eraser. I decided I wanted to keep things relatively relaxed and textured, but there were a few places I thought just needed a little tidying up!

Cleaning up the artwork

And There You Have It!

Thanks so much for exploring how to install and use Procreate brushes with me! I had a lot of fun with this demonstration—and honestly, I’m excited to use this brush set again! It was really user-friendly and fun to use. 

Good luck with your creative projects, and happy drawing!

If you’d like to follow the process of this illustration, it’s available on the Envato Tuts+ YouTube channel:

If you enjoyed working with this Procreate Brush, here are some others to check out and experiment with!

Oil Paint Brushes for Procreate

These Procreate Brushes are a lovely addition to any collection, especially if you’re a fan of texture! They’re by the same author as the artist who made the brushes we experimented with in this tutorial, too!

Shader Brushes for Procreate

I absolutely love the texture in these Procreate shader brushes. They could work for such a wide variety of styles and projects! 

Procreate Brushes

Auld Inks for Procreate

62 brushes—that is a lot of brushes to experiment with, right? And with such interesting texture, these ink Procreate brushes are so much fun to experiment with.

Procreate Brushes

Fabric and Paper Procreate Brushes

I love texture—it’s so fun to experiment with. This set is all about texturing with fabric and paper. There are plenty of versatile applications with this one, a great addition to anyone’s collection!

Procreate Brushes

Procreate Brush Calligraphy

I love hand-drawn type—and Procreate is an awesome tool for experimenting with it, too. This brush set is right up your alley, if calligraphy is your jam!

Procreate Brushes

If you enjoyed this tutorial, here are some others to check out!

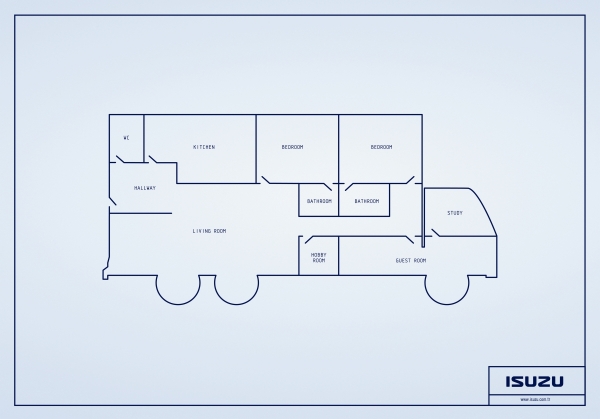
Truck apartment plan / Une idée un peu trop plan-plan?

Post pobrano z: Truck apartment plan / Une idée un peu trop plan-plan?

THE ORIGINAL?
Isuzu Trucks – 2007
Source : Adeevee
(Click on the image to enlarge)
Agency : Rafineri (Turkey)
LESS ORIGINAL
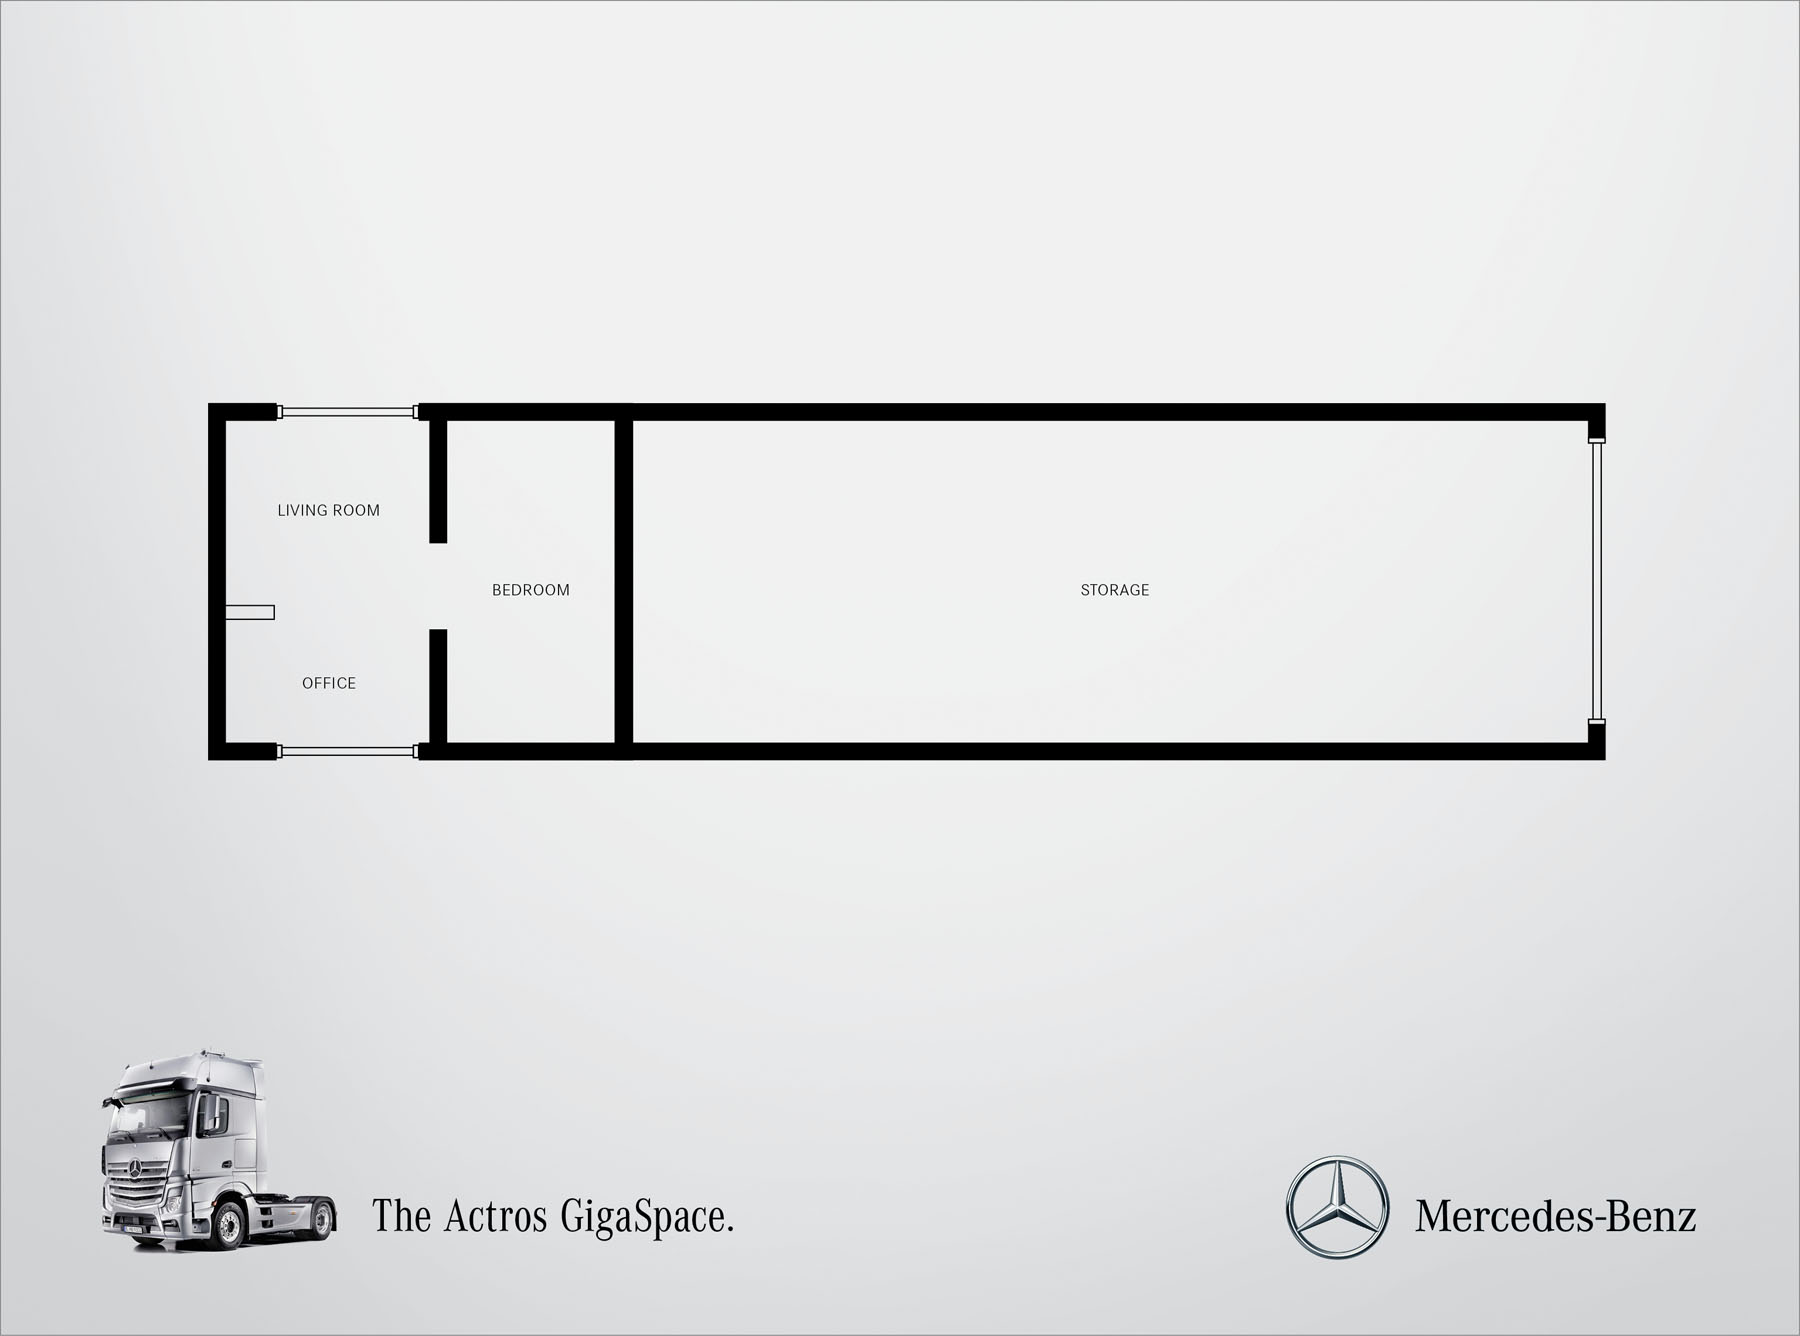
Mercedes Benz Actros – 2012
Source : Adeevee
(Click on the image to enlarge)
Agency : N5 (The Netherlands)
LESS ORIGINAL
Volkswagen Trucks – 2019
Source : Adsoftheworld
(Click on the image to enlarge)
School : Escola Cuca (Brazil)

Truck apartment plan / Une idée un peu trop plan-plan?

Post pobrano z: Truck apartment plan / Une idée un peu trop plan-plan?

THE ORIGINAL?
Isuzu Trucks – 2007
Source : Adeevee
(Click on the image to enlarge)
Agency : Rafineri (Turkey)
LESS ORIGINAL
Mercedes Benz Actros – 2012
Source : Adeevee
(Click on the image to enlarge)
Agency : N5 (The Netherlands)
LESS ORIGINAL
Volkswagen Trucks – 2019
Source : Adsoftheworld
(Click on the image to enlarge)
School : Escola Cuca (Brazil)

Getty Images: Coma

Post pobrano z: Getty Images: Coma

Film, Online
Getty Images

 The first original series made 100% out of image bank content.

Advertising Agency:AlmapBBDO, São Paulo, Brazil
Chief Creative Officer:Luiz Sanches
Ceo:Filipe Bartholomeu
Cso:Cintia Gonçalves
Executive Creative Director:Bruno Prosperi, Marcelo Nogueira, Keka Morelle, André Gola, Pernil
Copywriter:Thom Bregantin, Pedro Corbett, Gustavo Tasselli
Art Director:Israel Medeiros
Digital Creative Director:Luciana Haguiara
Digital Creative:Bruno Bizuti, Marco Leal
Ux Designer:Caroline Kayatt
Motion Designer:Francisco Andrade (Chicoh)
Account Executive:Maysa Lopes de Oliveira, Ana Clara Grana, Rogério Pereira
Producer:Vera Jacinto, Diego Villas Bôas, Aline Silva
Director:Squarehead, Cassiano Prado
Script Writer:Thom Bregantin, Israel Medeiros, Pedro Corbett, Gustavo Tasselli, Cassiano Prado, Rogério Corrêa, Eduardo Ribeiro, José Carvalho
Image Searcher:Guilherme Ifanger, Luis Michelazzo, Helena Chamon.
Executive Director:Ingrid Raszl
Executive Producer:Renata Dumont, Carolina Junqueira, Camila Martinez, Carol Duarte.
Production Coordination:Paula Macedo, Rogerio Maestro
PosProduction Coordination:Roberta Bruzadin
Editor:Fernanda Cardoso, Squarehead, Danilo Abraham, Victor Cohen
Opening Animator:Henrique Fernandes
Editing Assistant:Mariana Perin
Sound Production:Equipe Raw