Why Is This Work Relevant For Brand Experience & Activation ?
Although a lot of people think that IKEA sitting room furniture is in a very specific style (functional and minimalist),IKEA tells its clients that there is room for IKEA in any sitting room. This idea isn’t just expressed in words but also in actions, proposing a game based 100% on people’s prejudice that the brand wants to show.To participate, those taking part are accepting that the challenge is interesting. Just by participating our brand objectives are being met from the first premise: it’s not easy to identify a piece of IKEA furniture , even in an 18th Century sitting room.
Background
Aims: Break the quality and variety barrier in respect of IKEA living rooms. Reinforce the concept of the campaign „Disassembling the IKEA living room that’s in your head”.
Describe The Creative Idea
We placed a piece of IKEA furniture in a living room where nobody would ever imagine that it would go unnoticed which living room could theoretically be one where you would never expect to find a piece of IKEA furniture? A LIVING ROOM IN THE MUSEUM OF ROMANTICISM IN MADRID. We carried out an action, where on the weekend of 18th May, we placed pieces of IKEA furniture in one of the sitting rooms in the museum, with the aim of it going unnoticed by visitors. In addition we created an online as well as real life game that challenged both online and real life visitors to find the „hidden” pieces of furniture.
Describe The Strategy
Strategy: As part of the strategy of „Disassembling the IKEA living room that’s in your head” we wanted to go a step further and place IKEA furniture somewhere where people would never expect to blend in unnoticed, in the Museum of Romanticism in Madrid, a museum with furniture from the 19th Century.
Describe The Execution
We carried out an action, where on the weekend of 18th May, we placed pieces of IKEA furniture in one of the sitting rooms in the museum, with the aim of it going unnoticed by visitors. In addition we created an online as well as real life game that challenged both online and real life visitors to find the „hidden” pieces of furniture.
List The Results
9 Million impacts on Social Media. 25 Million media impressions in both audiovisual and print. Once again we disassembled the IKEA furniture that people had in their heads, showing them that in any style of living room there is space for IKEA furniture.
Major European cities like Stockholm are being invaded by electrical scooters. They have become immensely popular but are also creating debate and are currently a hot topic in the news. Some hate the scooters, but others love them. The main arguments for the scooters have been hard to argue against. Not only are they a fast and cheap alternative to cars, they are electric (sustainable) and contributes to less congestion on the roads. However fresh research in Sweden show that only 2 in 100 journeys actually replace cars. In almost all other cases the scooter replaces people walking. So, even though its still faster, is not cheaper or more sustainable. And, more importantly it contributes more people moving even less which in turn affects people’s health. And fresh statistics from the WHO shows that less and less people get enough exercise. Reebok – a brand that believes in the power of moving (that sports can change lives) – is now launching Reebok To Go, an alternative to the e-scooters, and the first rentable sneaker service ever. Why ride when you can use your feet? With Reebok-to-go there is no excuse. Reebok-To-Go works in a similar way to rental scooters. The shoes are equipped with a QR-Code you simply scan with your phone. Once you have entered your details, it’s just a case of putting them on and away you go. The soles of the shoes also have a GPS tag, so each pair can be tracked on a map. Reebok-To-Go is a reminder of the importance to get your daily exercise. If we can get more people to rediscover their feet through this initiative, that would be a step, well many steps, in the right direction.
JavaScript has a variety of built-in popup APIs that display special UI for user interaction. Famously:
alert("Hello, World!");
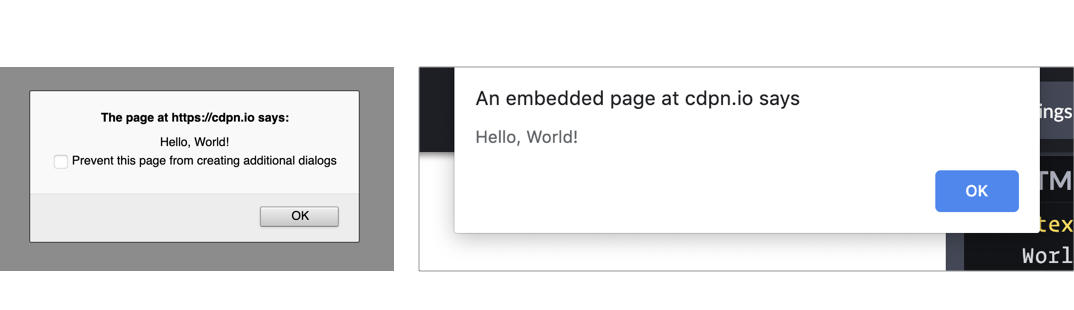
The UI for this varies from browser to browser, but generally you’ll see a little window pop up front and center in a very show-stopping way that contains the message you just passed. Here’s Firefox and Chrome:
Native popups in Firefox (left) and Chrome (right). Note the additional UI preventing additional dialogs in Firefox from triggering it more than once. You can also see how Chrome is pinned to the top of the window.
There is one big problem you should know about up front
JavaScript popups are blocking.
The entire page essentially stops when a popup is open. You can’t interact with anything on the page while one is open — that’s kind of the point of a “modal” but it’s still a UX consideration you should be keenly aware of. And crucially, no other main-thread JavaScript is running while the popup is open, which could (and probably is) unnecessarily preventing your site from doing things it needs to do.
Nine times out of ten, you’d be better off architecting things so that you don’t have to use such heavy-handed stop-everything behavior. Native JavaScript alerts are also implemented by browsers in such a way that you have zero design control. You can’t control *where* they appear on the page or what they look like when they get there. Unless you absolutely need the complete blocking nature of them, it’s almost always better to use a custom user interface that you can design to tailor the experience for the user.
With that out of the way, let’s look at each one of the native popups.
What it’s for: Displaying a simple message or debugging the value of a variable.
How it works: This function takes a string and presents it to the user in a popup with a button with an “OK” label. You can only change the message and not any other aspect, like what the button says.
The Alternative: Like the other alerts, if you have to present a message to the user, it’s probably better to do it in a way that’s tailor-made for what you’re trying to do.
If you’re trying to debug the value of a variable, consider console.log(<code>"`Value of variable:"`, variable); and looking in the console.
window.confirm();
window.confirm("Are you sure?");

<button onclick="confirm('Would you like to play a game?');">Ask Question</button>

let answer = window.confirm("Do you like cats?");
if (answer) {
  // User clicked OK
} else {
  // User clicked Cancel
}
What it’s for: “Are you sure?”-style messages to see if the user really wants to complete the action they’ve initiated.
How it works: You can provide a custom message and popup will give you the option of “OK” or “Cancel,” a value you can then use to see what was returned.
The Alternative: This is a very intrusive way to prompt the user. As Aza Raskin puts it:
…maybe you don’t want to use a warning at all.”
There are any number of ways to ask a user to confirm something. Probably a clear UI with a <button>Confirm</button> wired up to do what you need it to do.
window.prompt();
window.prompt("What’s your name?");

let answer = window.prompt("What is your favorite color?");
// answer is what the user typed in, if anything
What it’s for: Prompting the user for an input. You provide a string (probably formatted like a question) and the user sees a popup with that string, an input they can type into, and “OK” and “Cancel” buttons.
How it works: If the user clicks OK, you’ll get what they entered into the input. If they enter nothing and click OK, you’ll get an empty string. If they choose Cancel, the return value will be null.
The Alternative: Like all of the other native JavaScript alerts, this doesn’t allow you to style or position the alert box. It’s probably better to use a <form> to get information from the user. That way you can provide more context and purposeful design.
window.onbeforeunload();
window.addEventListener("beforeunload", () => {
  // Standard requires the default to be cancelled.
  event.preventDefault();
  // Chrome requires returnValue to be set (via MDN)
  event.returnValue = '';
});
What it’s for: Warn the user before they leave the page. That sounds like it could be very obnoxious, but it isn’t often used obnoxiously. It’s used on sites where you can be doing work and need to explicitly save it. If the user hasn’t saved their work and is about to navigate away, you can use this to warn them. If they *have* saved their work, you should remove it.
How it works: If you’ve attached the beforeunload event to the window (and done the extra things as shown in the snippet above), users will see a popup asking them to confirm if they would like to “Leave” or “Cancel” when attempting to leave the page. Leaving the site may be because the user clicked a link, but it could also be the result of clicking the browser’s refresh or back buttons. You cannot customize the message.
MDN warns that some browsers require the page to be interacted with for it to work at all:
To combat unwanted pop-ups, some browsers don’t display prompts created in beforeunload event handlers unless the page has been interacted with. Moreover, some don’t display them at all.
The Alternative: Nothing that comes to mind. If this is a matter of a user losing work or not, you kinda have to use this. And if they choose to stay, you should be clear about what they should to to make sure it’s safe to leave.
Accessibility
Native JavaScript alerts used to be frowned upon in the accessibility world, but it seems that screen readers have since become smarter in how they deal with them. According to Penn State Accessibility:
The use of an alert box was once discouraged, but they are actually accessible in modern screen readers.
It’s important to take accessibility into account when making your own modals, but there are some great resources like this post by Ire Aderinokun to point you in the right direction.
General alternatives
There are a number of alternatives to native JavaScript popups such as writing your own, using modal window libraries, and using alert libraries. Keep in mind that nothing we’ve covered can fully block JavaScript execution and user interaction, but some can come close by greying out the background and forcing the user to interact with the modal before moving forward.
You may want to look at HTML’s native <dialog> element. Chris recently took a hands-on look) at it. It’s compelling, but apparently suffers from some significant accessibility issues. I’m not entirely sure if building your own would end up better or worse, since handling modals is an extremely non-trivial interactive element to dabble in. Some UI libraries, like Bootstrap, offer modals but the accessibility is still largely in your hands. You might to peek at projects like a11y-dialog.
Wrapping up
Using built-in APIs of the web platform can seem like you’re doing the right thing — instead of shipping buckets of JavaScript to replicate things, you’re using what we already have built-in. But there are serious limitations, UX concerns, and performance considerations at play here, none of which land particularly in favor of using the native JavaScript popups. It’s important to know what they are and how they can be used, but you probably won’t need them a heck of a lot in production web sites.
Indie and enterprise web developers alike are pushing toward a serverless architecture for modern applications. Serverless architectures typically scale well, avoid the need for server provisioning and most importantly are easy and cheap to set up! And that’s why I believe the next evolution for cloud is serverless because it enables developers to focus on writing applications.
With that in mind, let’s build a REST API (because will we ever stop making these?) using 100% serverless technology.
We’re going to do that with Firebase Cloud Functions and FaunaDB, a globally distributed serverless database with native GraphQL.
Those familiar with Firebase know that Google’s serverless app-building tools also provide multiple data storage options: Firebase Realtime Database and Cloud Firestore. Both are valid alternatives to FaunaDB and are effectively serverless.
But why choose FaunaDB when Firestore offers a similar promise and is available with Google’s toolkit? Since our application is quite simple, it does not matter that much. The main difference is that once my application grows and I add multiple collections, then FaunaDB still offers consistency over multiple collections whereas Firestore does not. In this case, I made my choice based on a few other nifty benefits of FaunaDB, which you will discover as you read along — and FaunaDB’s generous free tier doesn’t hurt, either. 😉
In this post, we’ll cover:
Installing Firebase CLI tools
Creating a Firebase project with Hosting and Cloud Function capabilities
Routing URLs to Cloud Functions
Building three REST API calls with Express
Establishing a FaunaDB Collection to track your (my) favorite video games
Creating FaunaDB Documents, accessing them with FaunaDB’s JavaScript client API, and performing basic and intermediate-level queries
And more, of course!
Set Up A Local Firebase Functions Project
For this step, you’ll need Node v8 or higher. Install firebase-tools globally on your machine:
$ npm i -g firebase-tools
Then log into Firebase with this command:
$ firebase login
Make a new directory for your project, e.g. mkdir serverless-rest-api and navigate inside.
Create a Firebase project in your new directory by executing firebase login.
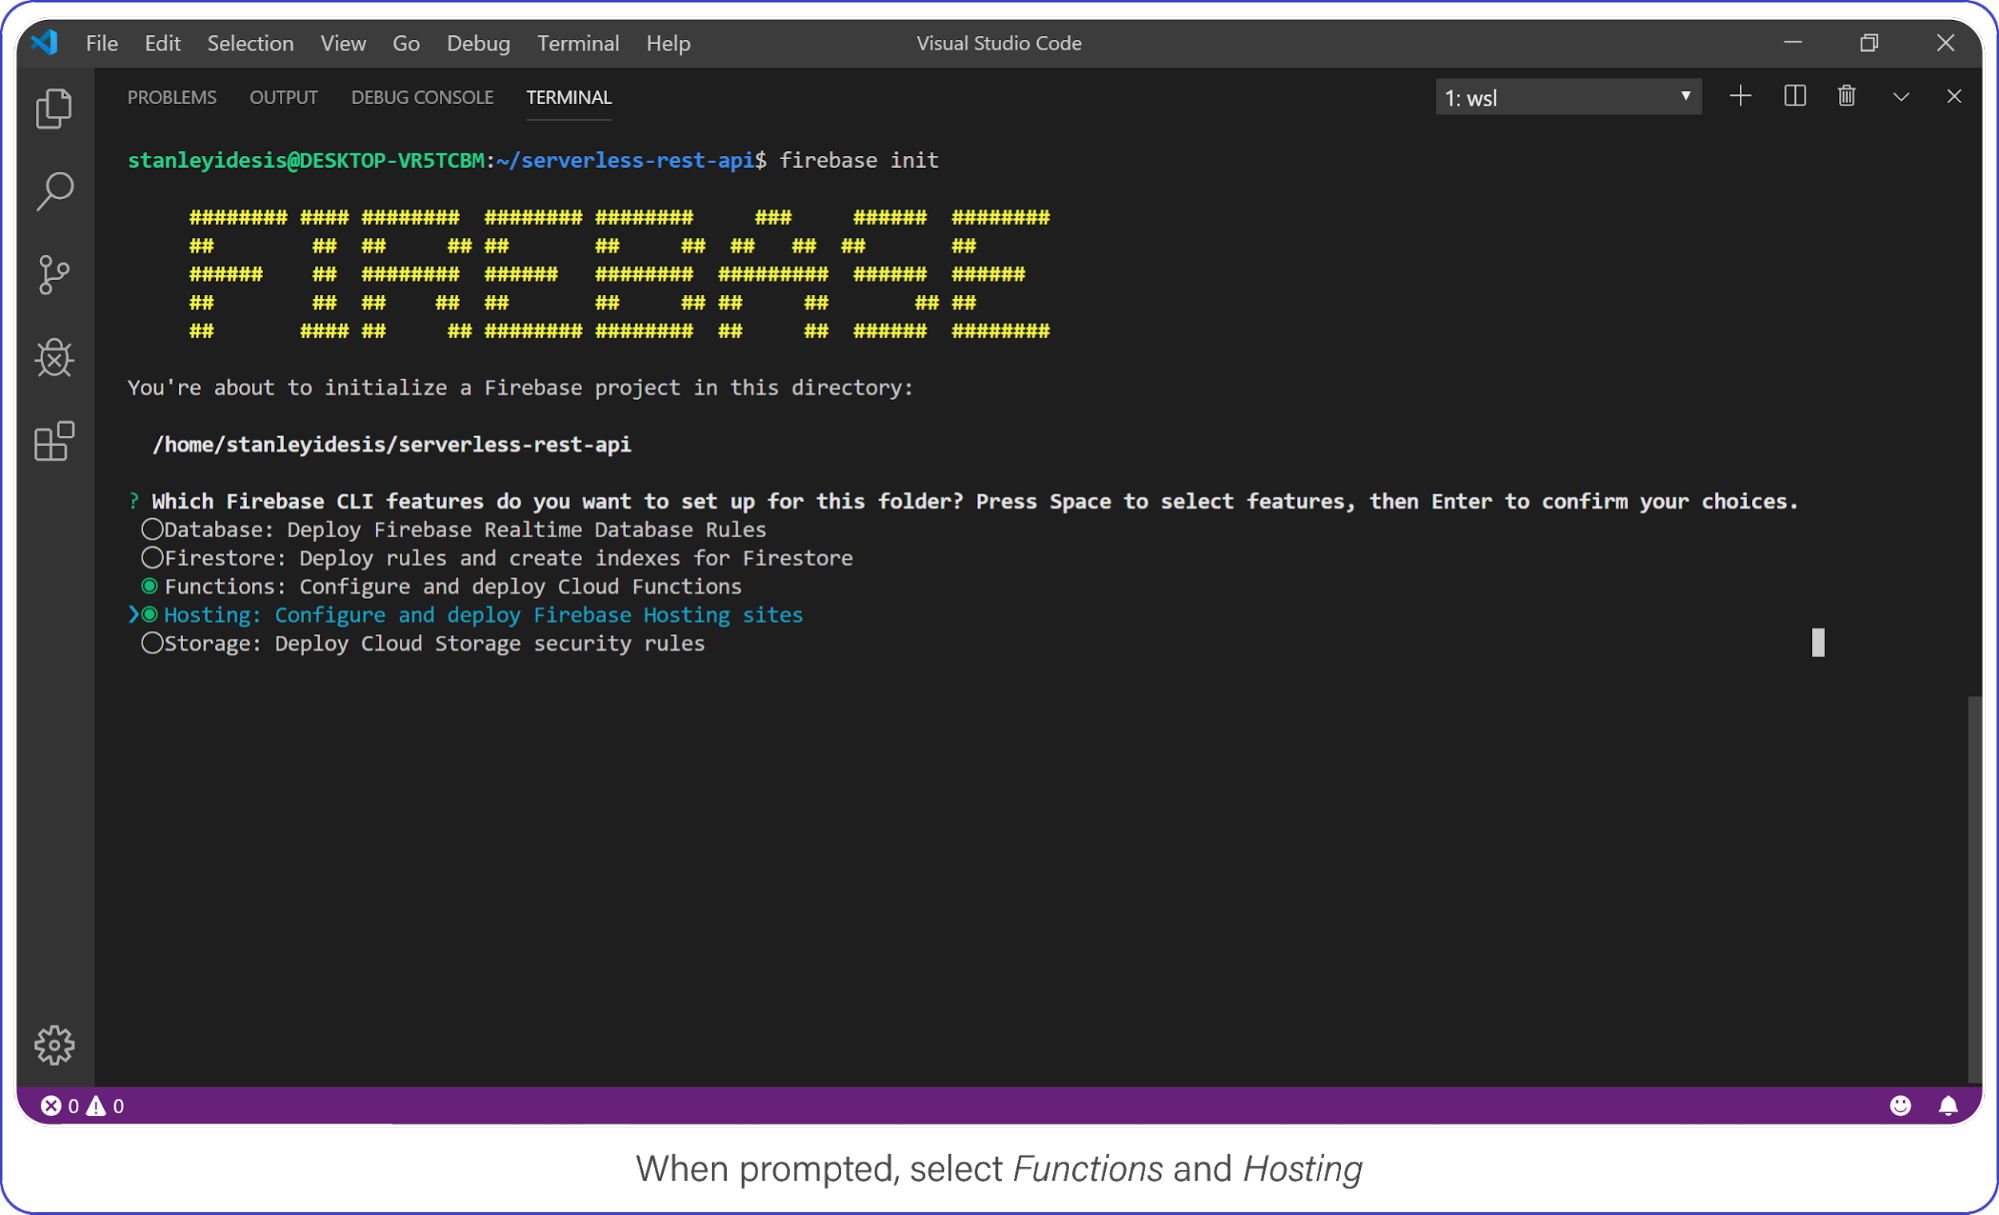
Select Functions and Hosting when prompted.
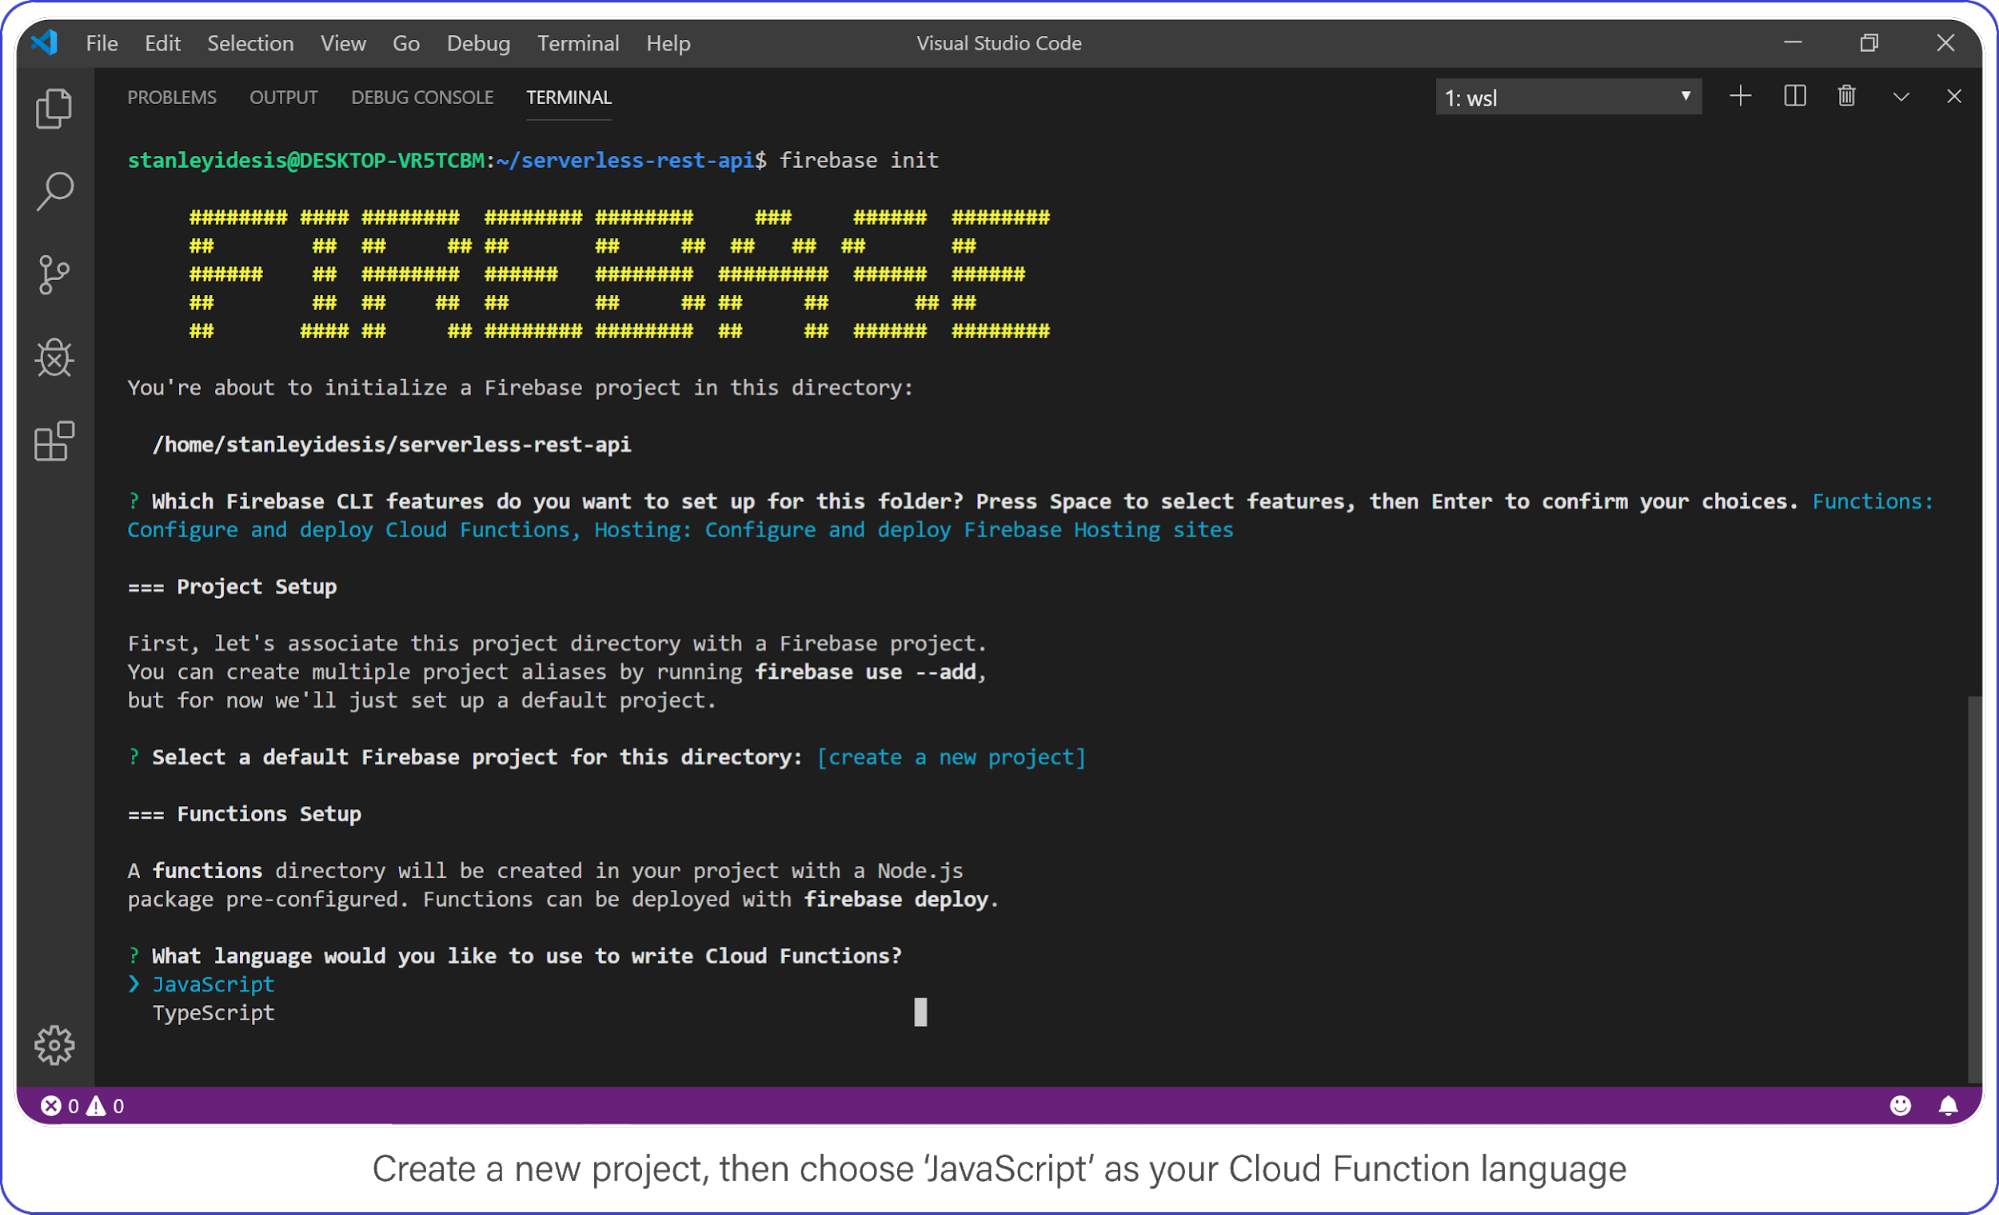
Choose „functions” and „hosting” when the bubbles appear, create a brand new firebase project, select JavaScript as your language, and choose yes (y) for the remaining options.
Create a new project, then choose JavaScript as your Cloud Function language.
Once complete, enter the functions directory, this is where your code lives and where you’ll add a few NPM packages.
Your API requires Express, CORS, and FaunaDB. Install it all with the following:
$ npm i cors express faunadb
Set Up FaunaDB with NodeJS and Firebase Cloud Functions
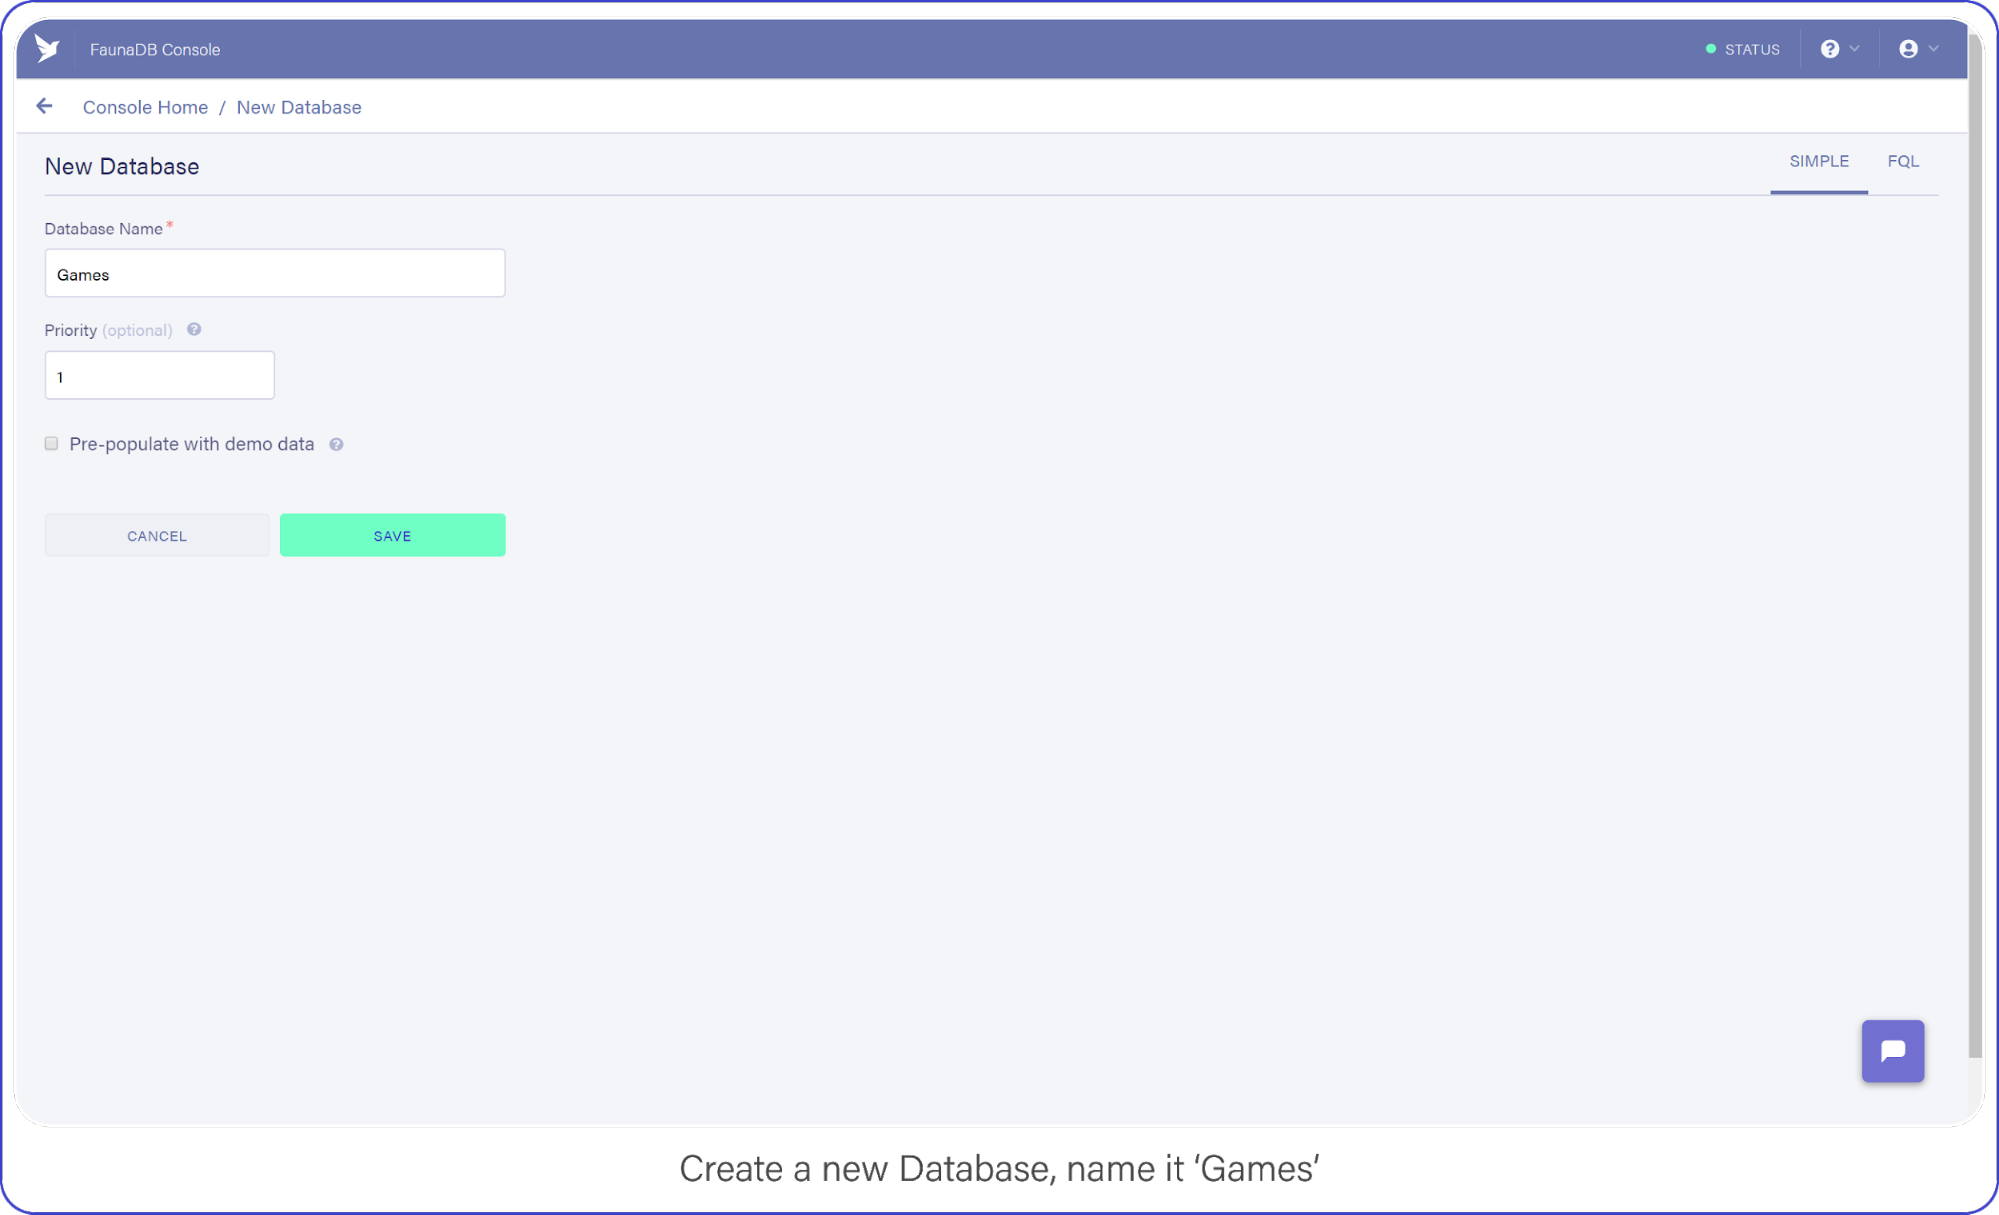
When you’re signed in, go to your FaunaDB console and create your first database, name it „Games.”
You’ll notice that you can create databases inside other databases . So you could make a database for development, one for production or even make one small database per unit test suite. For now we only need ‘Games’ though, so let’s continue.
Create a new database and name it „Games.”
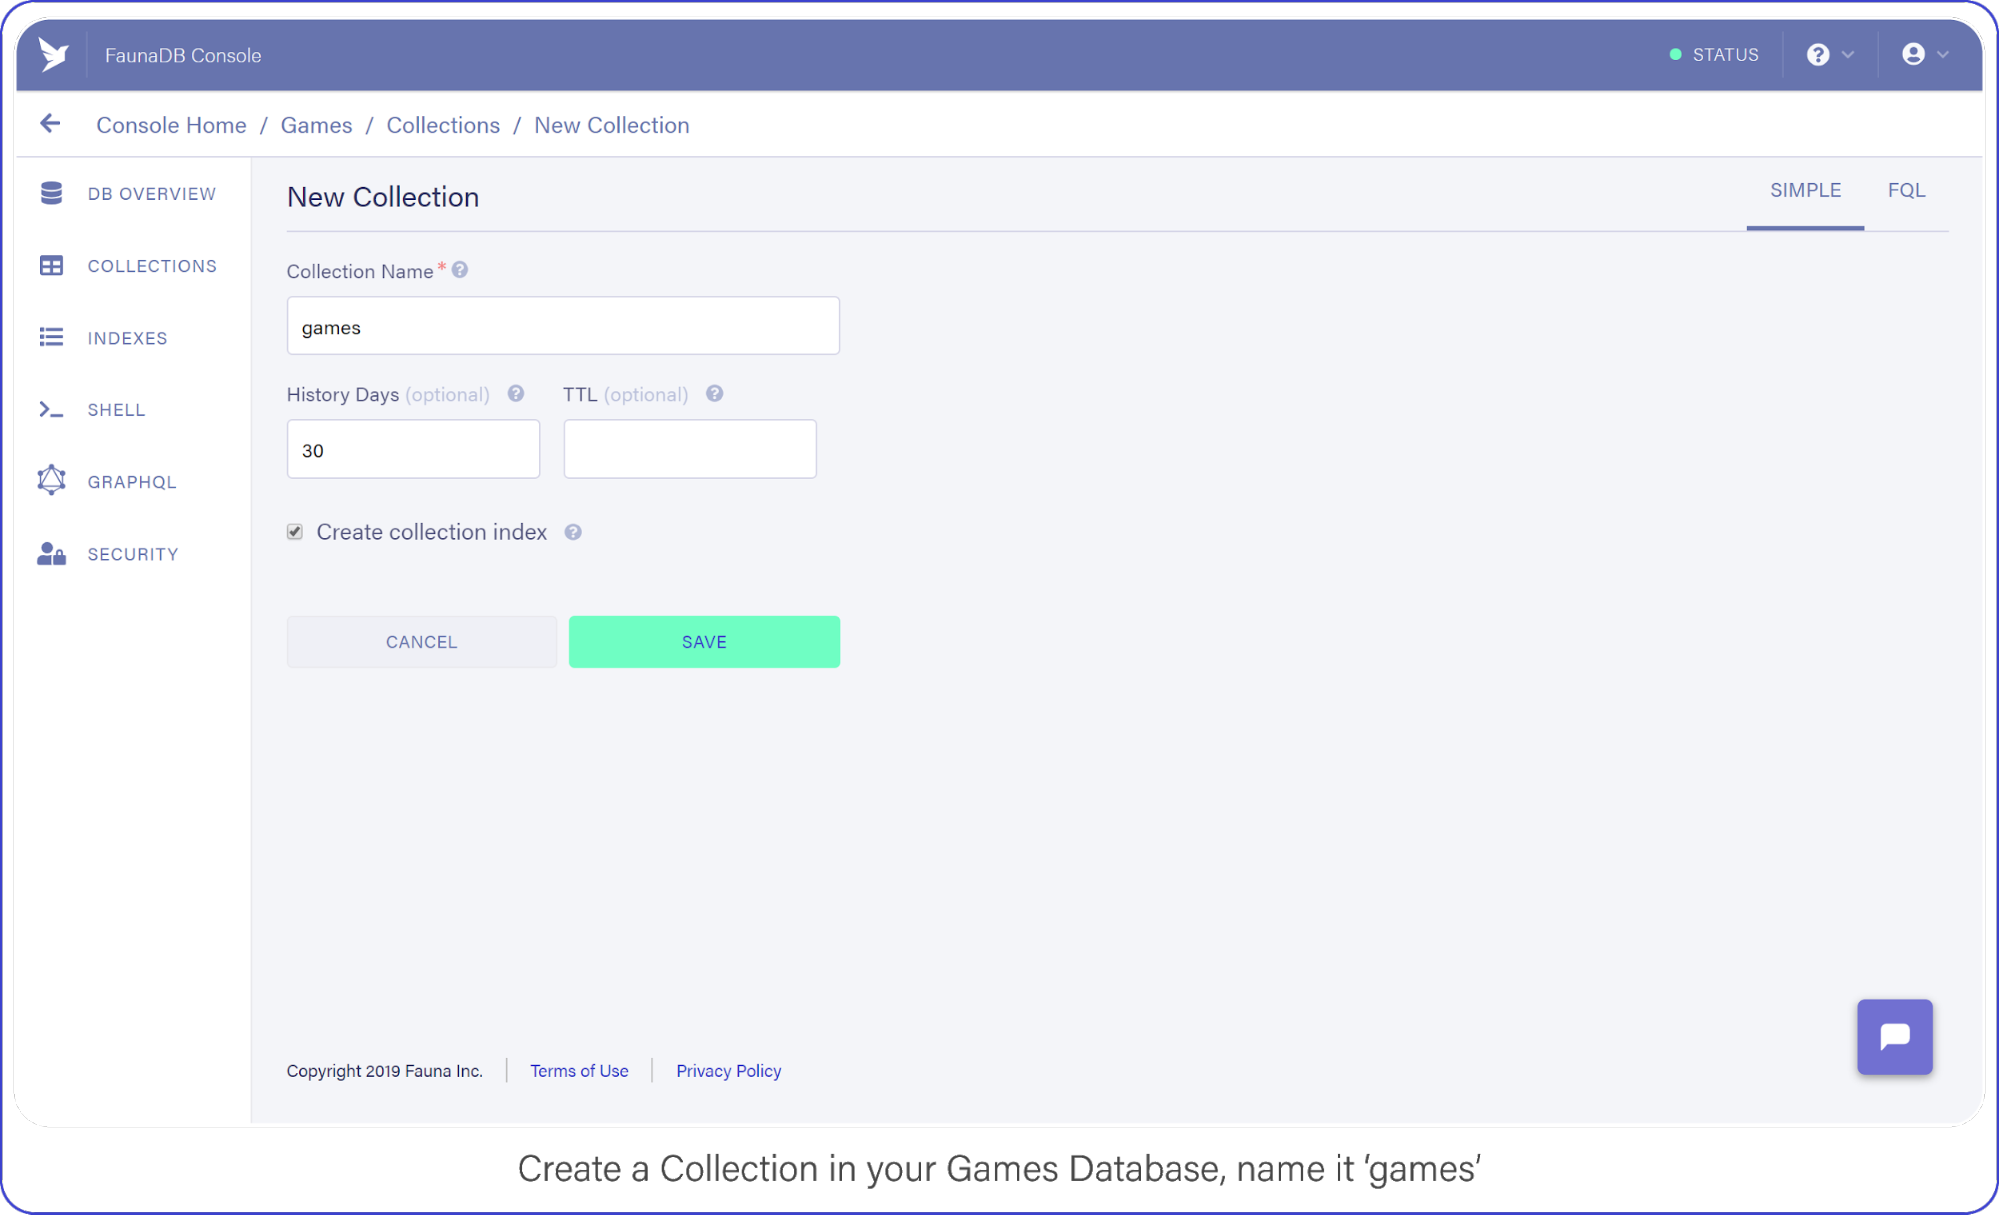
Then tab over to Collections and create your first Collection named ‘games’. Collections will contain your documents (games in this case) and are the equivalent of a table in other databases— don’t worry about payment details, Fauna has a generous free-tier, the reads and writes you perform in this tutorial will definitely not go over that free-tier. At all times you can monitor your usage in the FaunaDB console.
For the purpose of this API, make sure to name your collection ‘games’ because we’re going to be tracking your (my) favorite video games with this nerdy little API.
Create a Collection in your Games Database and name it „Games.”
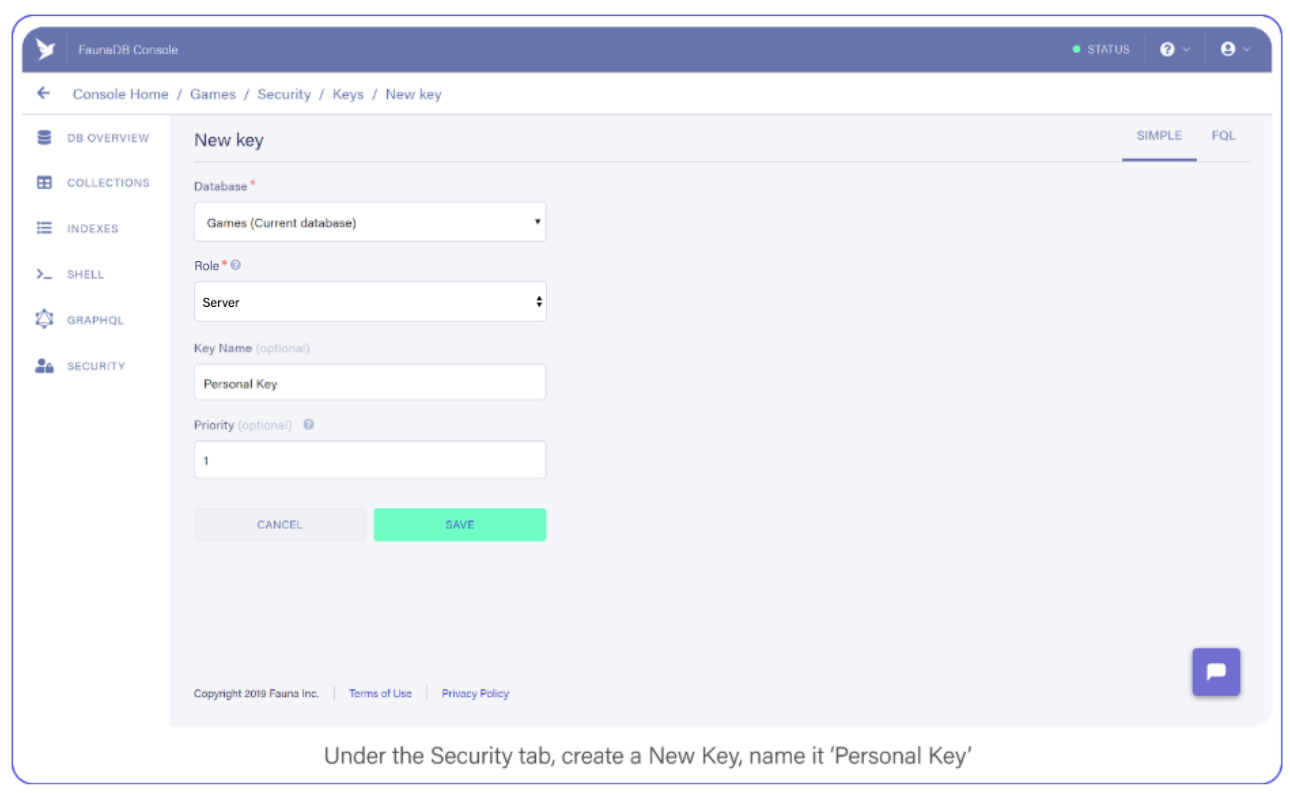
Tab over to Security, and create a new Key and name it „Personal Key.” There are 3 different types of keys, Admin/Server/Client. Admin key is meant to manage multiple databases, A Server key is typically what you use in a backend which allows you to manage one database. Finally a client key is meant for untrusted clients such as your browser. Since we’ll be using this key to access one FaunaDB database in a serverless backend environment, choose ‘Server key’.
Under the Security tab, create a new Key. Name it Personal Key.
Save the key somewhere, you’ll need it shortly.
Build an Express REST API with Firebase Functions
Firebase Functions can respond directly to external HTTPS requests, and the functions pass standard Node Request and Response objects to your code — sweet. This makes Google’s Cloud Function requests accessible to middleware such as Express.
Open index.js inside your functions directory, clear out the pre-filled code, and add the following to enable Firebase Functions:
This creates a cloud function named, “api” and passes all requests directly to your api express server.
Routing an API URL to a Firebase HTTPS Cloud Function
If you deployed right now, your function’s public URL would be something like this: https://project-name.firebaseapp.com/api. That’s a clunky name for an access point if I do say so myself (and I did because I wrote this… who came up with this useless phrase?)
To remedy this predicament, you will use Firebase’s Hosting options to re-route URL globs to your new function.
Open firebase.json and add the following section immediately below the „ignore” array:
This setting assigns all /api/v1/... requests to your brand new function, making it reachable from a domain that humans won’t mind typing into their text editors.
With that, you’re ready to test your API. Your API that does… nothing!
Respond to API Requests with Express and Firebase Functions
Before you run your function locally, let’s give your API something to do.
Add this simple route to your index.js file right above your export statement:
Save your index.js fil, open up your command line, and change into the functions directory.
If you installed Firebase globally, you can run your project by entering the following: firebase serve.
This command runs both the hosting and function environments from your machine.
If Firebase is installed locally in your project directory instead, open package.json and remove the --only functions parameter from your serve command, then run npm run serve from your command line.
Visit localhost:5000/api/v1/ in your browser. If everything was set up just right, you will be greeted by a gif from one of my favorite movies.
And if it’s not one of your favorite movies too, I won’t take it personally but I will say there are other tutorials you could be reading, Bethany.
Now you can leave the hosting and functions emulator running. They will automatically update as you edit your index.js file. Neat, huh?
FaunaDB Indexing
To query data in your games collection, FaunaDB requires an Index.
Indexes generally optimize query performance across all kinds of databases, but in FaunaDB, they are mandatory and you must create them ahead of time.
As a developer just starting out with FaunaDB, this requirement felt like a digital roadblock.
„Why can’t I just query data?” I grimaced as the right side of my mouth tried to meet my eyebrow.
I had to read the documentation and become familiar with how Indexes and the Fauna Query Language (FQL) actually work; whereas Cloud Firestore creates Indexes automatically and gives me stupid-simple ways to access my data. What gives?
Typical databases just let you do what you want and if you do not stop and think: : „is this performant?” or “how much reads will this cost me?” you might have a problem in the long run. Fauna prevents this by requiring an index whenever you query.
As I created complex queries with FQL, I began to appreciate the level of understanding I had when I executed them. Whereas Firestore just gives you free candy and hopes you never ask where it came from as it abstracts away all concerns (such as performance, and more importantly: costs).
Basically, FaunaDB has the flexibility of a NoSQL database coupled with the performance attenuation one expects from a relational SQL database.
We’ll see more examples of how and why in a moment.
As with other NoSQL databases, the documents are JSON-style text blocks with the exception of a few Fauna-specific objects (such as Date used in the "release_date" field).
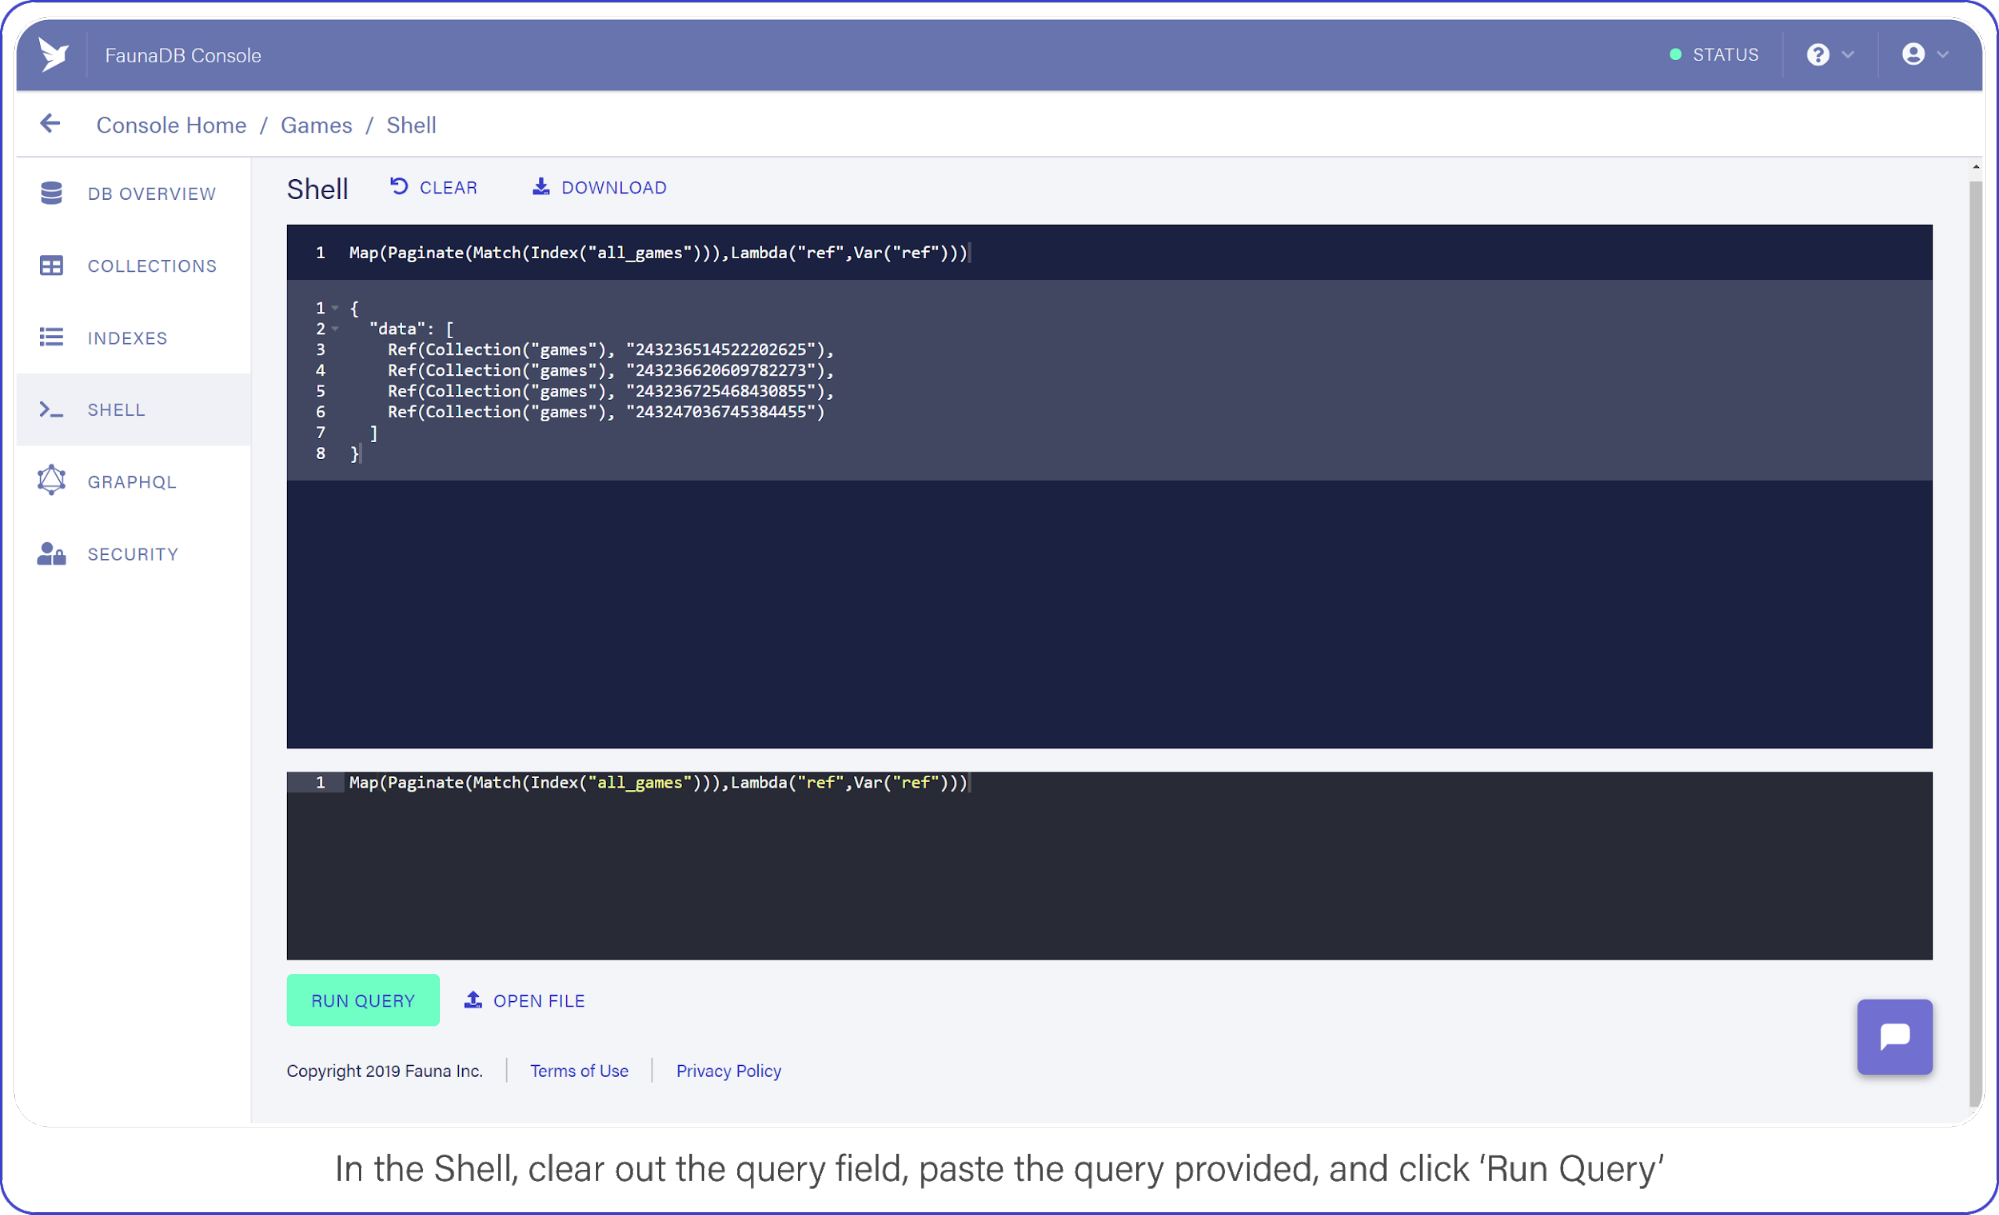
Now switch to the Shell area and clear your query. Paste the following:
And click the "Run Query" button. You should see a list of three items: references to the documents you created a moment ago.
In the Shell, clear out the query field, paste the query provided, and click "Run Query."
It’s a little long in the tooth, but here’s what the query is doing.
Index("all_games") creates a reference to the all_games index which Fauna generated automatically for you when you established your collection.These default indexes are organized by reference and return references as values. So in this case we use the Match function on the index to return a Set of references. Since we do not filter anywhere, we will receive every document in the ‘games’ collection.
The set that was returned from Match is then passed to Paginate. This function as you would expect adds pagination functionality (forward, backward, skip ahead). Lastly, you pass the result of Paginate to Map, which much like its software counterpart lets you perform an operation on each element in a Set and return an array, in this case it is simply returning ref (the reference id).
As we mentioned before, the default index only returns references. The Lambda operation that we fed to Map, pulls this ref field from each entry in the paginated set. The result is an array of references.
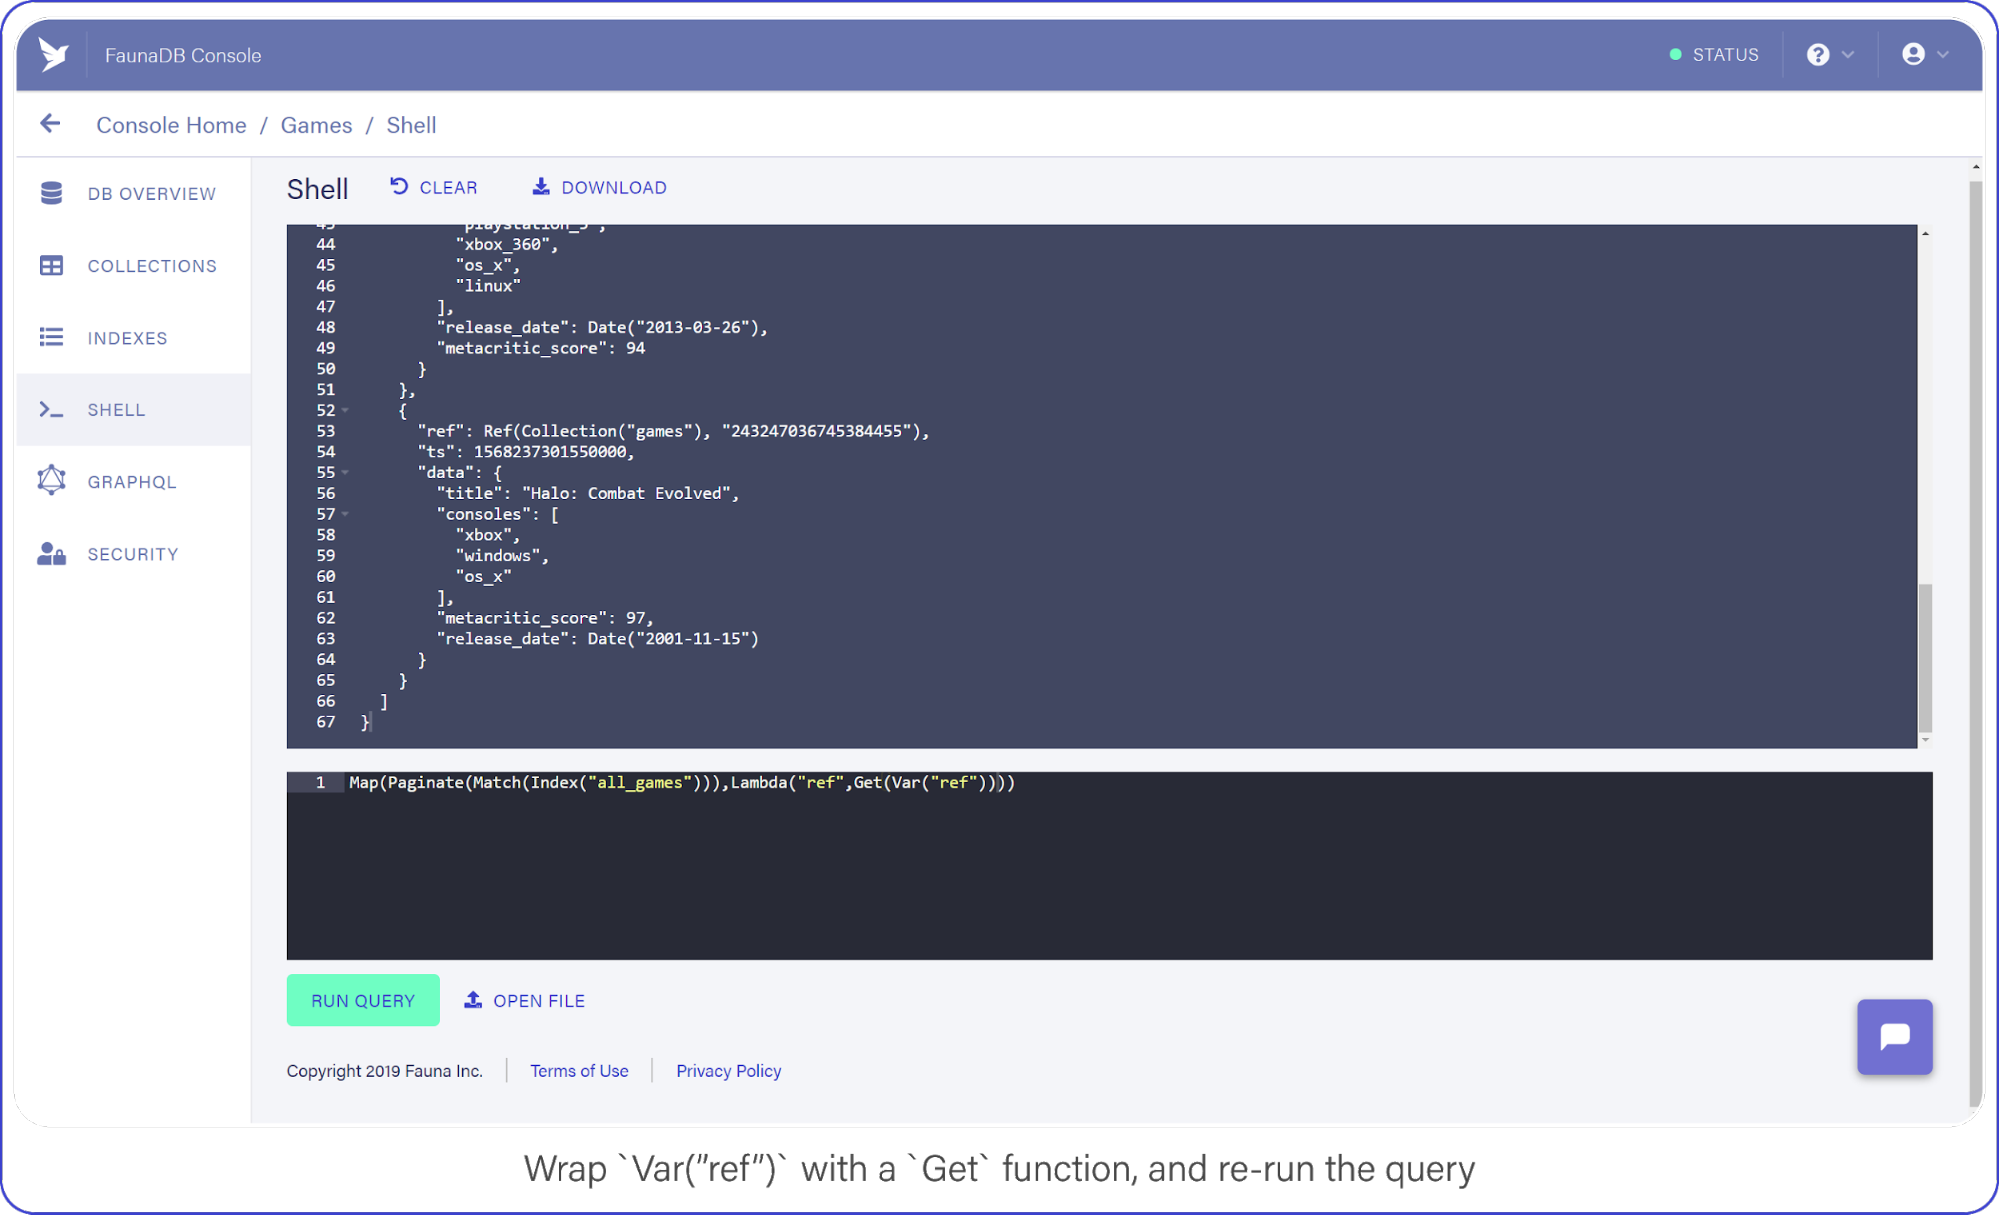
Now that you have a list of references, you can retrieve the data behind the reference by using another function: Get.
Wrap Var("ref") with a Get call and re-run your query, which should look like this:
You perform a Create, pass in your collection, and include data fields that come straight from the body of the request.
client.query returns a Promise, the success-state of which provides a reference to the newly-created document.
And to make sure it’s working, you return the reference to the caller. Let’s see it in action.
Test Firebase Functions Locally with Postman and cURL
Use Postman or cURL to make the following request against localhost:5000/api/v1/ to add Halo: Combat Evolved to your list of games (or whichever Halo is your favorite but absolutely not 4, 5, Reach, Wars, Wars 2, Spartan...)
If everything went right, you should see a reference coming back with your request and a new document show up in your FaunaDB console.
Now that you have some data in your games collection, let’s learn how to retrieve it.
Retrieve FaunaDB Records Using a REST API Request
Earlier, I mentioned that every FaunaDB query requires an Index and that Fauna prevents you from doing inefficient queries. Since our next query will return games filtered by a game console, we can’t simply use a traditional `where` clause since that might be inefficient without an index. In Fauna, we first need to define an index that allows us to filter.
To filter, we need to specify which terms we want to filter on. And by terms, I mean the fields of document you expect to search on.
Navigate to Indexes in your FaunaDB Console and create a new one.
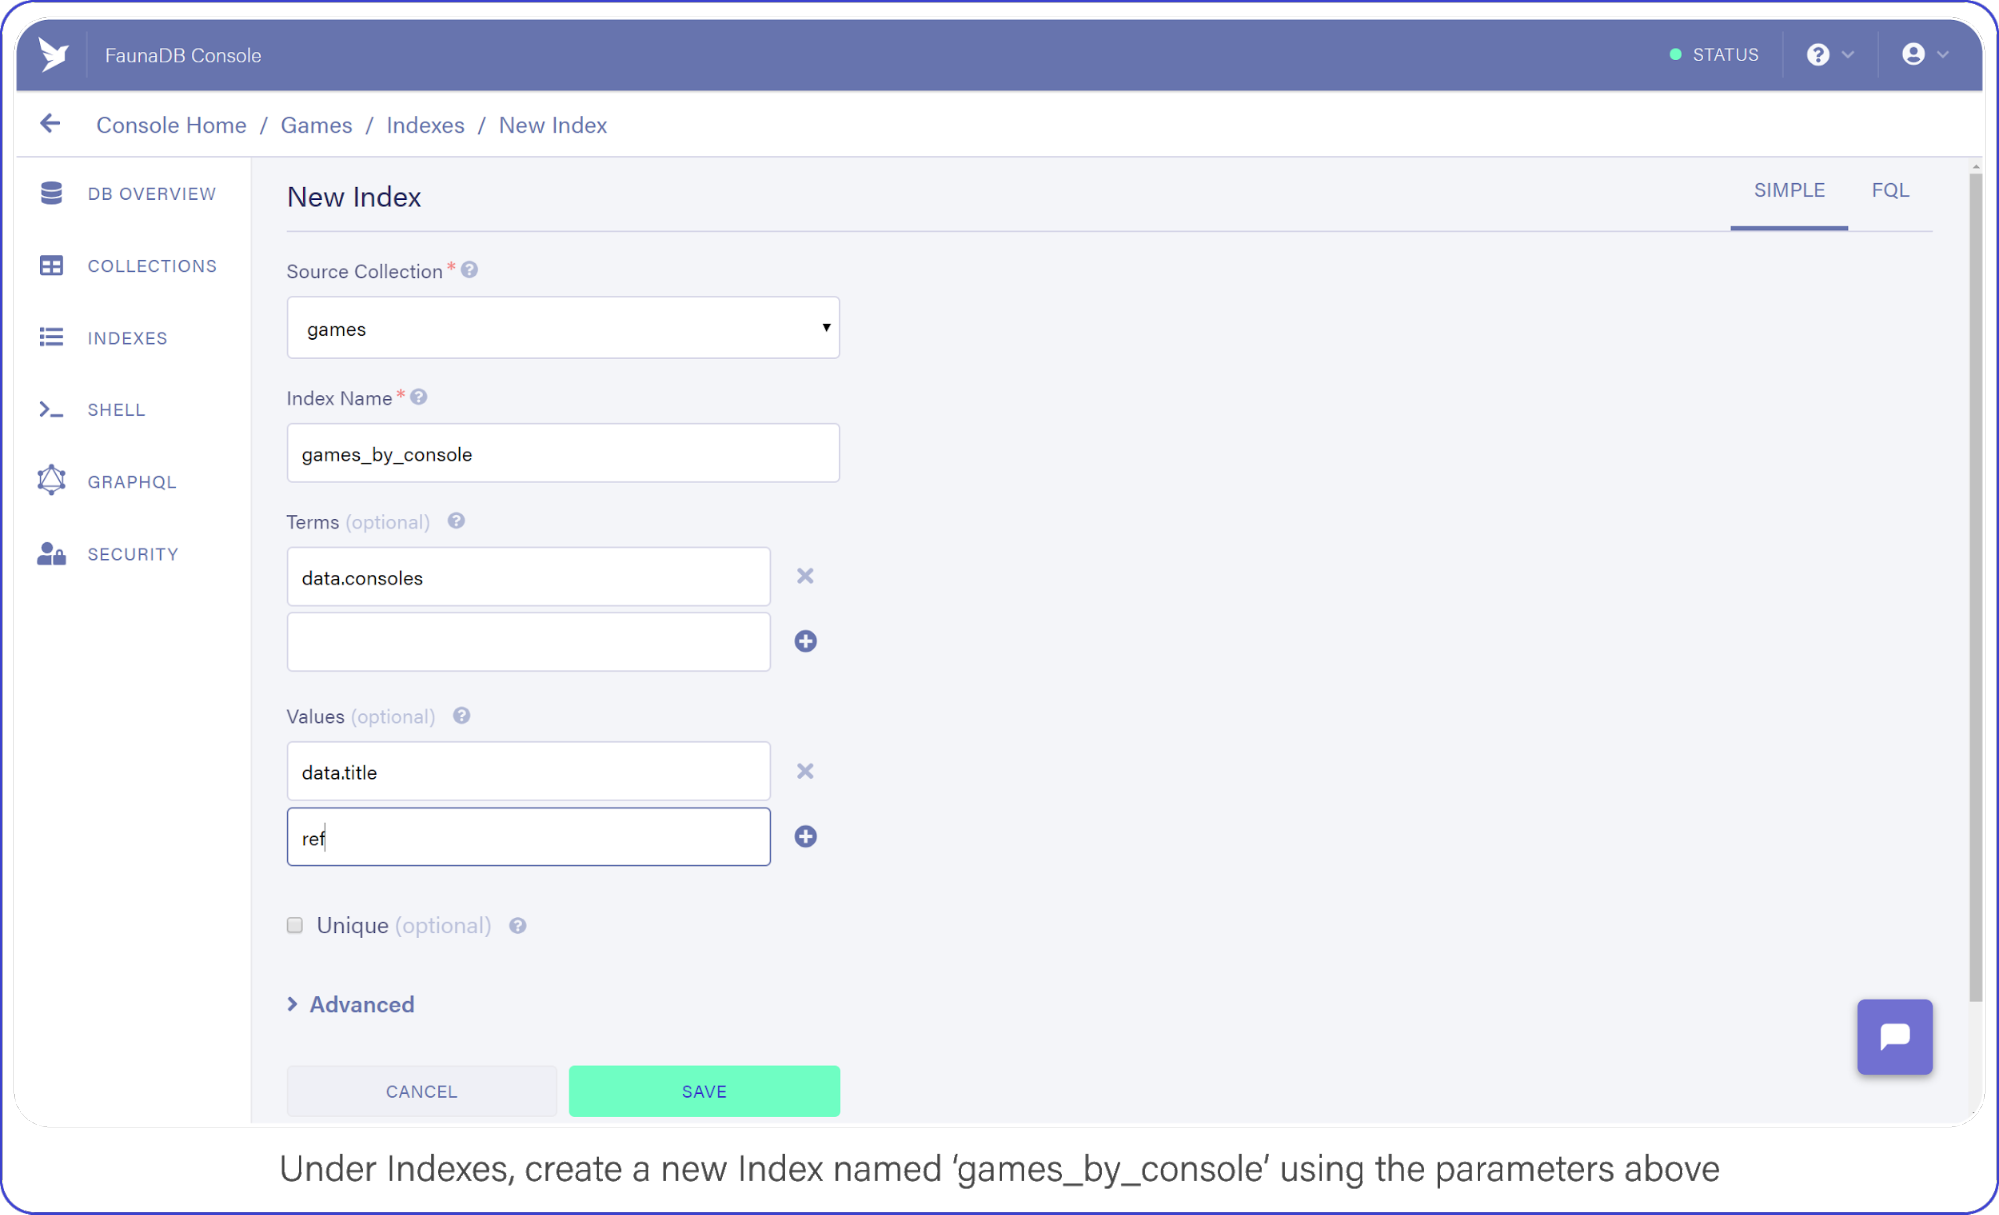
Name it games_by_console, set data.consoles as the only term since we will filter on the consoles. Then set data.title and ref as values. Values are indexed by range, but they are also just the values that will be returned by the query. Indexes are in that sense a bit like views, you can create an index that returns a different combination of fields and each index can have different security.
To minimize request overhead, we’ve limited the response data (e.g. values) to titles and the reference.
Your screen should resemble this one:
Under indexes, create a new index named games_by_console using the parameters above.
Click "Save" when you’re ready.
With your Index prepared, you can draft up your next API call.
I chose to represent consoles as a directory path where the console identifier is the sole parameter, e.g. /api/v1/console/playstation_3, not necessarily best practice, but not the worst either — come on now.
This query looks similar to the one you used in your SHELL to retrieve all games, but with a slight modification.This query looks similar to the one you used in your SHELL to retrieve all games, but with a slight modification. Note how your Match function now has a second parameter (req.params.name.toLowerCase()) which is the console identifier that was passed in through the URL.
The Index you made a moment ago, games_by_console, had one Term in it (the consoles array), this corresponds to the parameter we have provided to the match parameter. Basically, the Match function searches for the string you pass as its second argument in the index. The next interesting bit is the Lambda function. Your first encounter with Lamba featured a single string as Lambda’s first argument, “ref.”
However, the games_by_console Index returns two fields per result, the two values you specified earlier when you created the Index (data.title and ref). So basically we receive a paginated set containing tuples of titles and references, but we only need titles. In case your set contains multiple values, the parameter of your lambda will be an array. The array parameter above (`['title', 'ref']`) says that the first value is bound to the text variable title and the second is bound to the variable ref. text parameter. These variables can then be retrieved again further in the query by using Var(‘title’). In this case, both “title” and “ref,” were returned by the index and your Map with Lambda function maps over this list of results and simply returns only the list of titles for each game.
In fauna, the composition of queries happens before they are executed. When you write var q = q.Match(q.Index('games_by_console'))), the variable just contains a query but no query was executed yet. Only when you pass the query to client.query(q) to be executed, it will execute. You can even pass javascript variables in other Fauna FQL functions to start composing queries. his is a big benefit of querying in Fauna vs the chained asynchronous queries required of Firestore. If you ever have tried to generate very complex queries in SQL dynamically, then you will also appreciate the composition and less declarative nature of FQL.
Neat, huh? But Match only returns documents whose fields are exact matches, which doesn’t help the user looking for a game whose title they can barely recall.
Although Fauna does not offer fuzzy searching via indexes (yet), we can provide similar functionality by making an index on all words in the string. Or if we want really flexible fuzzy searching we can use the filter syntax. Note that its is not necessarily a good idea from a performance or cost point of view… but hey, we’ll do it because we can and because it is a great example of how flexible FQL is!
Filtering FaunaDB Documents by Search String
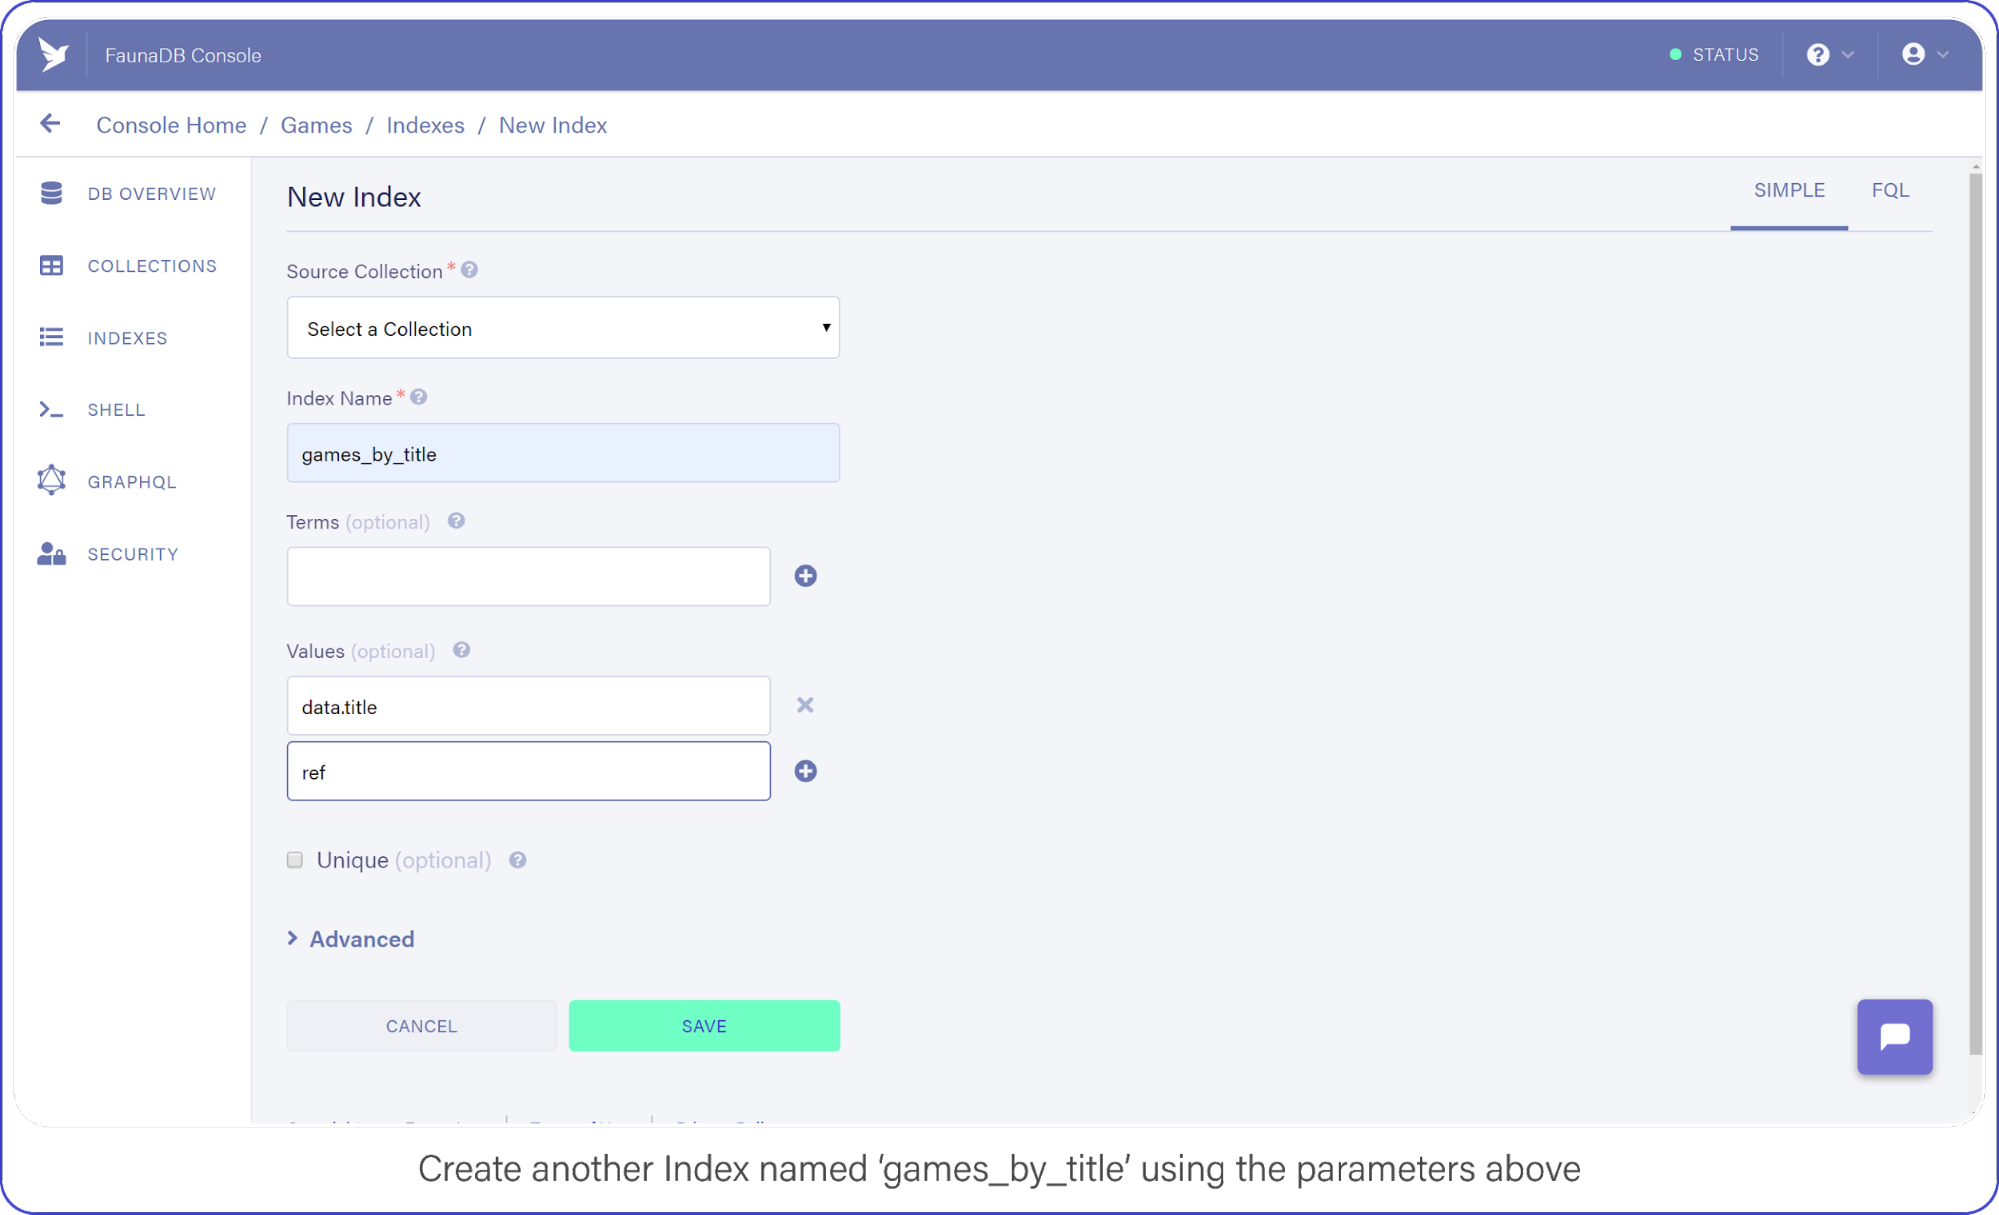
The last API call we are going to construct will let users find titles by name. Head back into your FaunaDB Console, select INDEXES and click NEW INDEX. Name the new Index, games_by_title and leave the Terms empty, you won’t be needing them.
Rather than rely on Match to compare the title to the search string, you will iterate over every game in your collection to find titles that contain the search query.
Remember how we mentioned that indexes are a bit like views. In order to filter on title , we need to include `data.title` as a value returned by the Index. Since we are using Filter on the results of Match, we have to make sure that Match returns the title so we can work with it.
Add data.title and ref as Values, compare your screen to mine:
Create another index called games_by_title using the parameters above.
Click "Save" when you’re ready.
Back in index.js, add your fourth and final API call:
Big breath because I know there are many brackets (Lisp programmers will love this) , but once you understand the components, the full query is quite easy to understand since it’s basically just like coding.
Beginning with the first new function you spot, Filter. Filter is again very similar to the filter you encounter in programming languages. It reduces an Array or Set to a subset based on the result of a Lambda function.
In this Filter, you exclude any game titles that do not contain the user’s search query.
You do that by comparing the result of FindStr (a string finding function similar to JavaScript’s indexOf) to -1, a non-negative value here means FindStr discovered the user’s query in a lowercase-version of the game’s title.
And the result of this Filter is passed to Map, where each document is retrieved and placed in the final result output.
Now you may have thought the obvious: performing a string comparison across four entries is cheap, 2 million…? Not so much.
This is an inefficient way to perform a text search, but it will get the job done for the purpose of this example. (Maybe we should have used ElasticSearch or Solr for this?) Well in that case, FaunaDB is quite perfect as central system to keep your data safe and feed this data into a search engine thanks to the temporal aspect which allows you to ask Fauna: “Hey, give me the last changes since timestamp X?”. So you could setup ElasticSearch next to it and use FaunaDB (soon they have push messages) to update it whenever there are changes. Whoever did this once knows how hard it is to keep such an external search up to date and correct, FaunaDB makes it quite easy.
Don’t You Dare Forget This One Firebase Optimization
A lot of Firebase Cloud Functions code snippets make one terribly wrong assumption: that each function invocation is independent of another.
In reality, Firebase Function instances can remain "hot" for a short period of time, prepared to execute subsequent requests.
This means you should lazy-load your variables and cache the results to help reduce computation time (and money!) during peak activity, here’s how:
let functions, admin, faunadb, q, client, express, cors, api
if (typeof api === 'undefined') {
... // dump the existing code here
}
exports.api = functions.https.onRequest(api)
Deploy Your REST API with Firebase Functions
Finally, deploy both your functions and hosting configuration to Firebase by running firebase deploy from your shell.
Without a custom domain name, refer to your Firebase subdomain when making API requests, e.g. https://{project-name}.firebaseapp.com/api/v1/.
What Next?
FaunaDB has made me a conscientious developer.
When using other schemaless databases, I start off with great intentions by treating documents as if I instantiated them with a DDL (strict types, version numbers, the whole shebang).
While that keeps me organized for a short while, soon after standards fall in favor of speed and my documents splinter: leaving outdated formatting and zombie data behind.
By forcing me to think about how I query my data, which Indexes I need, and how to best manipulate that data before it returns to my server, I remain conscious of my documents.
To aid me in remaining forever organized, my catalog (in FaunaDB Console) of Indexes helps me keep track of everything my documents offer.
And by incorporating this wide range of arithmetic and linguistic functions right into the query language, FaunaDB encourages me to maximize efficiency and keep a close eye on my data-storage policies. Considering the affordable pricing model, I’d sooner run 10k+ data manipulations on FaunaDB’s servers than on a single Cloud Function.
I love this post by Simon Holdorf. He’s got some ideas for how to level up your skills as a front-end developer next year. Here they are:
Build a movie search app using React
Build a chat app with Vue
Build a weather app with Angular
Build a to-do app with Svelte
… and 5 more like that.
All good ideas. All extremely focused on JavaScript frameworks.
I like thinking of being a front-end developer as being someone who is a browser person. You deal with people who use some kind of client to use the web on some kind of device. That’s the job.
Go find a Dribbble shot that appeals to you. Re-build it in HTML and CSS in the cleanest and most accessible way you can.
Find a component you can abstract in your codebase, and abstract it so you can re-use it efficiently. Consider accessibility as you do it. Could you make it more accessible in a way that benefits the entire site? How about your SVG icon component — how’s that looking these days?
Try out a static site generator (perhaps one that isn’t particularly JavaScript focused, just to experience it). What could the data source be? What could you make if you ran the build process on a timed schedule?
Install the Axe accessibility plugin for DevTools and run it on an important site you control. Make changes to improve the accessibility as it suggests.
Spin up a copy of Fractal. Check out how it can help you think about building front-ends as components, even at the HTML and CSS level.
Build a beautiful form in HTML/CSS that does something useful for you, like receive leads for freelance work. Learn all about form validation and see how much you can do in just HTML, then HTML plus some CSS, then with some vanilla JavaScript. Make the form work by using a small dedicated service.
Figure out how to implement an SVG icon system. So many sites these days need an icon set. Inlining SVG is a great simple solution, but how you can abstract that to easily implement it with your workflow? How can it work with the framework you use?
Let’s say you needed to put up a website where the entire thing was the name and address of the company, and a list of hours it is open. What’s the absolute minimum amount of work and technical debt you could incur to do it?
I love this post by Simon Holdorf. He’s got some ideas for how to level up your skills as a front-end developer next year. Here they are:
Build a movie search app using React
Build a chat app with Vue
Build a weather app with Angular
Build a to-do app with Svelte
… and 5 more like that.
All good ideas. All extremely focused on JavaScript frameworks.
I like thinking of being a front-end developer as being someone who is a browser person. You deal with people who use some kind of client to use the web on some kind of device. That’s the job.
Go find a Dribbble shot that appeals to you. Re-build it in HTML and CSS in the cleanest and most accessible way you can.
Find a component you can abstract in your codebase, and abstract it so you can re-use it efficiently. Consider accessibility as you do it. Could you make it more accessible in a way that benefits the entire site? How about your SVG icon component — how’s that looking these days?
Try out a static site generator (perhaps one that isn’t particularly JavaScript focused, just to experience it). What could the data source be? What could you make if you ran the build process on a timed schedule?
Install the Axe accessibility plugin for DevTools and run it on an important site you control. Make changes to improve the accessibility as it suggests.
Spin up a copy of Fractal. Check out how it can help you think about building front-ends as components, even at the HTML and CSS level.
Build a beautiful form in HTML/CSS that does something useful for you, like receive leads for freelance work. Learn all about form validation and see how much you can do in just HTML, then HTML plus some CSS, then with some vanilla JavaScript. Make the form work by using a small dedicated service.
Figure out how to implement an SVG icon system. So many sites these days need an icon set. Inlining SVG is a great simple solution, but how you can abstract that to easily implement it with your workflow? How can it work with the framework you use?
Let’s say you needed to put up a website where the entire thing was the name and address of the company, and a list of hours it is open. What’s the absolute minimum amount of work and technical debt you could incur to do it?
Has Procreate met its match? Fresco, Adobe’s new drawing program for iPad, is here—how does it compare to Procreate or Photoshop? Is it a worthwhile competitor, or something you should pass up? Here’s an overview, first impressions, and some comparisons for your consideration.
I’m an artist—art, design, game development and content creation are what I do professionally. I spend a lot of time in Adobe Photoshop, but I also really enjoy Procreate.
That said, I was pretty excited to get my hands on Fresco. When it comes to my iPad, Procreate is a really wonderful, enjoyable application. The price is right, and it’s very user friendly. So how does Adobe Fresco hold up, at launch?
My first impression of Adobe Fresco was generally optimistic. I really enjoy many of the „out the box” brushes. I spent some time just casually sketching, and it did feel really natural and comfortable.
I wanted Fresco to be an awesome application that I fell in love with.
So… how did my first date with Fresco go? Let’s take a look at the tools themselves. You can find the tools, by default, on the left-hand side of the visible work area.
Pixel Brushes
Pixel Brushes are your standard raster brushes, very much like those in Photoshop. I do a lot of drawing in Photoshop, so I was really excited at the prospect of having all of my usual Photoshop brushes on my iPad.
Below, I’ve tested out one of the ink brushes, and I’ve doodled an apple with some of the sketch brushes.
Importing Brushes
Your imported brushes are listed as „Library Brushes” at the bottom of your available Pixel Brushes. Doesn’t seem like there’s any sorting or reordering things, at this time.
I can’t remove any brushes I’ve imported within the app either—and it seems like I’m not the only one out there having that issue. That’s a bummer, but not a deal breaker.
Lovely, Right Out the Box
The Pixel Brushes that come with Fresco, however, are lovely. They have beautiful textures, and the sensitivity felt on point, without any adjustments—I didn’t have to tweak anything there to create really beautiful lines and textures. The Cezanne and Impressionist brushes were particularly fun and full of personality.
Live Brushes
Fresco also has Live Brushes—and they’re really cool. I had a lot of fun trying out the watercolor brushes, in particular. The way the colors bleed and run into each other really feels as if you’re working with paint.
This isn’t the way I usually draw, digitally, but it was a lot of fun to play with. I’d say that this, right here, is probably one of Fresco’s coolest features. You’ve got Watercolor and Oil brushes, 11 brushes total.
Vector Brushes
The Vector Brushes are rather nice too! It’s really simple to just dig in and create some really lovely, clean, vector lines. There are five different brushes to choose from, which did feel a little odd to me. Still, the five here are pretty versatile.
However, there’s no editing these vector lines with something like anchor points. Not a deal breaker, but it’s something that would have been nice.
The Eraser
The Eraser surprised me, because I expected to have the same Brush Options as the other brush tools. You can „Erase with Brush”, but I found this to be confusing—you don’t use the Eraser to erase like this.
For example, if I want to erase with a soft round brush, I have to, instead, go to the Pixel Brush Tool, select my soft round brush, and then tap and hold the Touch Shortcut while drawing—a circle on the screen that can be used to alter how some tools behave.
The line on the left is drawn with the Eraser tool, while the line on the right is drawn with the Pixel Brush Tool, using the Touch Shortcut.
The Other Tools
You can use the Move Tool to move your work, as well as flip content horizontally or vertically.
The Selection Tools are used to select a specific area. Simply tap and drag—this was quite straightforward and easy to use.
Then, you have a Paint Bucket Tool. Tap to add a fill color—the color currently active.
The Eyedropper is used to select color, but I found myself rarely using it. Instead, tap and hold on a color in your document to „pick up the color”. This is a standard action that will be familiar to those who have used Procreate.
There is also the ability to Import content, right from the tools.
One note there, however. I did really like that you can directly open your camera from Fresco, and then import. As a teacher, you could potentially photograph content, import, and directly draw on top of it, for example. That’s pretty cool.
Sharing Your Creations
Adobe Fresco has pretty straightforward export options. We can publish and export to a variety of formats, including PSD, PNG, JPG, and PDF. We can also export a time-lapse process video, which is genuinely fun to watch.
Fresco also allows the user to export as a Behance project, and there’s a Quick Export, which allows you to export a snapshot of your work. I found myself thinking it was kind of like a screenshot tool.
The Price Tag
I have a paid Creative Cloud plan already—I use Photoshop, InDesign, Dreamweaver, After Effects, and many other members of the Creative Cloud family on the regular. If you’re in the same boat as I am, it means you can download the fully featured version of Adobe Fresco without any additional fee. That’s appreciated.
However, if you don’t, Adobe Fresco’s price tag is $9.99 a month—after the first six months, which act as an initial, free trial.
If you don’t want to pay the subscription fee, Adobe Fresco is still available to use, but it’s generally a freemium app with limited features. For example, you’ll only be able to export flattened, low-res imagery, and not all brushes will be available.
2. Adobe Fresco vs. Photoshop
A Replacement? A Companion? Something Else?
In a dream world, I would love to see a completely mobile version of Photoshop—the same functionality as Photoshop, but I can take it with me on my iPad. Fresco has potential, and the Live Brushes are quite fun to experiment with, but that’s not what Fresco is.
Adobe Fresco brings together the world’s largest brush collection with revolutionary new technology to deliver a natural painting and drawing experience
That said, I found myself enjoying Fresco the most when I viewed it as an attempt to simulate real media—not as a Procreate competitor or as a companion/partner to Photoshop.
The Limitations
There are obvious limitations here, with Fresco—Photoshop is more than exclusively an illustration tool. We have a full range of tools for photo manipulation, adjustments, and more.
But as an illustration tool, Fresco isn’t as powerful as Photoshop. I expected that, honestly. However, the Brush Settings in Fresco have less than half of the Brush Settings available in Photoshop.
Importing Photoshop Brushes
This was one of the features I was most excited about: importing and using my Photoshop brushes in a mobile application. It sounds too good to be true!
It works, although it wasn’t without hiccups. Fresco has an Import from File feature, but I couldn’t get my brushes loaded up this way.
Instead, go to the brush file itself and choose Open In, then Fresco—so, if you have similar trouble, give this alternate method a try!
Photoshop Brush Settings
The Photoshop brush itself worked, once I had it imported. I had to go back in and tweak what settings are available in Fresco accordingly—like the Transfer and the Shape Dynamics. The Brush Settings are located at the bottom of the Tools panel.
You can test the brush out, in the preview above these settings—a setting that will be familiar for Procreate users, too.
The Compatibility
One of the appealing things about Fresco, for me, was the ability to easily jump back and forth from Photoshop to Fresco and back to Photoshop.
This is possible because you can save and export as a PSD in both programs. Fresco essentially saves your work as a cloud document, which you can then open up in Photoshop.
However, I need to note that this is also achievable with most cloud services—I regularly jump from Procreate to Photoshop and back this way.
3. Adobe Fresco vs. Procreate
The Functionality
Ultimately, Procreate and Adobe Fresco both do a lot of the same things. However, that’s the big deal here—this feels particularly jarring when you look at the price difference.
Let’s look at Procreate Bushes and Adobe Fresco Brushes, as an example (specifically, Pixel Brushes).
In Procreate, I can easily duplicate brushes and customize them to my liking. I can tap and drag to rearrange them—both the brushes themselves and the sets in my brush library.
In Fresco, however, I can’t seem to duplicate any of the default brushes. I’m left customizing the original, and then reverting to the original, if I want to go to back to the vanilla version. This is a huge bummer. You can favorite brushes, but there’s no rearranging them—the categories or the brushes themselves.
Customizing Brushes
That said, check out the difference between brush customization in Fresco and in Procreate.
In Fresco, the customization options seem to vary, based on the brush. When I looked at the 14px pencil, under Sketching, I was left with Pressure and Velocity Dynamics.
In Procreate, the brush options are relatively universal from brush to brush, and they are pretty robust.
The Interface
Procreate’s UI is quite minimal, and it’s nice—it keeps the emphasis on the artwork itself.
Fresco isn’t necessarily cluttered, but I did find myself feeling rather „boxed in”, especially on the right-hand side. Procreate puts its layers here too, but I appreciate that these menus are collapsible.
I did, however, appreciate that Fresco allows you to expand the canvas and hide almost all of your tools. It feels refreshing, clean, and very welcoming to draw this way—really reminiscent of a traditional sketchbook. This feels great; just doodling with the sketch brushes on an open surface like this is a very nice experience.
I love that Procreate has customizable color palettes. Saving colors and color schemes is a normal part of my workflow.
In Fresco, when looking at the color picker, we have the option to save recent colors, by tapping on the plus sign in the Recent expandable menu. This works, but it doesn’t necessarily work well. I can’t rearrange any of these colors, and I can’t seem to delete them either. These recently saved colors also seem to be document specific.
Exporting Artwork
Both Adobe Fresco and Procreate can export artwork to PSD files, which is important for me, as someone who works in Photoshop a lot. I often find myself drawing in Procreate, jumping over to Photoshop, and then going back to Procreate. I could easily do the same in Fresco, but it wasn’t necessarily a process that was vastly improved.
They can both export time-lapse video, as well.
Procreate, however, can export as additional file types, such as animated GIFs, TIFF files, and animated PNGs.
The Price
Let’s be real here—price matters, and it’s probably one of the first factors on everybody’s mind, when it comes to whether or not Fresco is for them.
Fresco comes with a $9.99 monthly fee, if you don’t already have a Creative Cloud subscription. Procreate, on the other hand, costs $9.99—and it’s a one-time fee.
And that’s a pretty big difference, especially if viewing Fresco as a possible Procreate competitor.
Honestly, I can’t say it has a world of content that Procreate doesn’t have. In fact, Fresco doesn’t have all of Procreate’s features, although some of them are listed as „coming soon” (such as perspective drawing and symmetry tools).
Ultimately, this means Procreate is $9.99 USD (and a one-time fee), while Adobe Fresco is potentially $119.98 USD per year. Wow! Of course, if you’re already a Creative Cloud subscriber, it’s included. Honestly, that’s the deal maker there, for me. Adobe has promised some updates here, so only time will tell on that.
But Those Live Brushes
I have to admit, however—Adobe Fresco’s Live Brushes are a genuinely fun experience. Sitting back and painting fluffy clouds and just watching the paint blend and smear was pretty neat. I know I presented plenty of things about Fresco that weren’t so hot, but I’d be lying if I said I didn’t genuinely have a good time sitting back in my favorite chair and painting some clouds. It was a really organic and relaxing experience.
I drew the following, below, using the Watercolor Live Brushes. Holding down the Touch Shortcut, when using this brush, gives you „Pure Water”, instead of an eraser—it’s just really fun to push paint around and experiment with layering.
I’m really curious to see where Adobe takes this feature in the future.
Who Wins the Battle Royale?
And the Winner Is…
Adobe Fresco isn’t a fundamentally bad application. It has a lot of potential, and some of the brushes are really very enjoyable to use. At launch, it’s just not everything it could be, just yet. I really hope this changes in the future, because the potential is there. Adobe has mentioned a bunch of additional features coming soon—I just wish „soon” was sooner!
In my opinion, there just isn’t enough here to dethrone Procreate, especially when Procreate has such a universally accessible price tag. As an „extra”, included with Creative Cloud, it’s fun to experiment with—but I wouldn’t call Fresco a significant addition to my normal workflow.
The Final Verdict
At the end of the day, Procreate has become a larger and larger part of my professional life. There have been times I’ve considered completely switching to Procreate as my preferred illustration tool—it’s genuinely awesome.
Fresco feels like an application that wants to compete, but just isn’t there yet. Adobe’s promised a bunch of updates, however—so we’ll see what happens! If nothing else, I’ve got myself a new set of watercolors without the mess… and that’s pretty neat.
Thanks for exploring Adobe Fresco and Procreate with me! If you enjoyed this article, here are some others that you might enjoy, too!