An Introduction to Adobe Fresco and How It Compares to Procreate

Post pobrano z: An Introduction to Adobe Fresco and How It Compares to Procreate
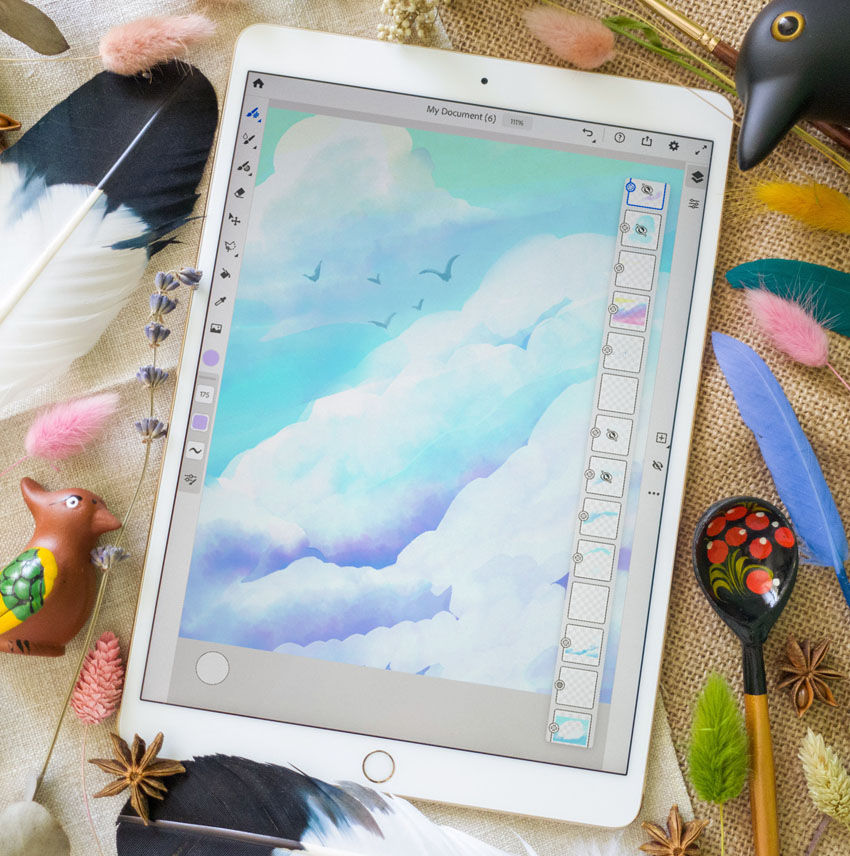
Final product image
What You’ll Be Creating

Has Procreate met its match? Fresco, Adobe’s new drawing program for iPad, is here—how does it compare to Procreate or Photoshop? Is it a worthwhile competitor, or something you should pass up? Here’s an overview, first impressions, and some comparisons for your consideration.

I’m an artist—art, design, game development and content creation are what I do professionally. I spend a lot of time in Adobe Photoshop, but I also really enjoy Procreate. 

That said, I was pretty excited to get my hands on Fresco. When it comes to my iPad, Procreate is a really wonderful, enjoyable application. The price is right, and it’s very user friendly. So how does Adobe Fresco hold up, at launch? 

Follow along with us over on our Envato Tuts+ YouTube channel:

1. A Tour of Adobe Fresco

First Impressions

My first impression of Adobe Fresco was generally optimistic. I really enjoy many of the „out the box” brushes. I spent some time just casually sketching, and it did feel really natural and comfortable. 

I wanted Fresco to be an awesome application that I fell in love with. 

So… how did my first date with Fresco go? Let’s take a look at the tools themselves. You can find the tools, by default, on the left-hand side of the visible work area.

Adobe Fresco Tools

Pixel Brushes

Pixel Brushes are your standard raster brushes, very much like those in Photoshop. I do a lot of drawing in Photoshop, so I was really excited at the prospect of having all of my usual Photoshop brushes on my iPad. 

Below, I’ve tested out one of the ink brushes, and I’ve doodled an apple with some of the sketch brushes. 

Pixel Brushes

Importing Brushes

Your imported brushes are listed as „Library Brushes” at the bottom of your available Pixel Brushes. Doesn’t seem like there’s any sorting or reordering things, at this time.

I can’t remove any brushes I’ve imported within the app either—and it seems like I’m not the only one out there having that issue. That’s a bummer, but not a deal breaker.

Importing Brushes

Lovely, Right Out the Box

The Pixel Brushes that come with Fresco, however, are lovely. They have beautiful textures, and the sensitivity felt on point, without any adjustments—I didn’t have to tweak anything there to create really beautiful lines and textures. The Cezanne and Impressionist brushes were particularly fun and full of personality.

Painting Brushes

Live Brushes

Fresco also has Live Brushes—and they’re really cool. I had a lot of fun trying out the watercolor brushes, in particular. The way the colors bleed and run into each other really feels as if you’re working with paint. 

This isn’t the way I usually draw, digitally, but it was a lot of fun to play with. I’d say that this, right here, is probably one of Fresco’s coolest features. You’ve got Watercolor and Oil brushes, 11 brushes total. 

Fresco Live Brushes

Vector Brushes

The Vector Brushes are rather nice too! It’s really simple to just dig in and create some really lovely, clean, vector lines. There are five different brushes to choose from, which did feel a little odd to me. Still, the five here are pretty versatile. 

However, there’s no editing these vector lines with something like anchor points. Not a deal breaker, but it’s something that would have been nice.

Vector Brushes

The Eraser

The Eraser surprised me, because I expected to have the same Brush Options as the other brush tools. You can „Erase with Brush”, but I found this to be confusing—you don’t use the Eraser to erase like this.

For example, if I want to erase with a soft round brush, I have to, instead, go to the Pixel Brush Tool, select my soft round brush, and then tap and hold the Touch Shortcut while drawing—a circle on the screen that can be used to alter how some tools behave. 

The line on the left is drawn with the Eraser tool, while the line on the right is drawn with the Pixel Brush Tool, using the Touch Shortcut. 

Eraser Tool

The Other Tools

You can use the Move Tool to move your work, as well as flip content horizontally or vertically.

The Selection Tools are used to select a specific area. Simply tap and drag—this was quite straightforward and easy to use. 

Then, you have a Paint Bucket Tool. Tap to add a fill color—the color currently active.

The Eyedropper is used to select color, but I found myself rarely using it. Instead, tap and hold on a color in your document to „pick up the color”. This is a standard action that will be familiar to those who have used Procreate. 

There is also the ability to Import content, right from the tools. 

One note there, however. I did really like that you can directly open your camera from Fresco, and then import. As a teacher, you could potentially photograph content, import, and directly draw on top of it, for example. That’s pretty cool. 

Additional Tools

Sharing Your Creations

Adobe Fresco has pretty straightforward export options. We can publish and export to a variety of formats, including PSD, PNG, JPG, and PDF. We can also export a time-lapse process video, which is genuinely fun to watch. 

Fresco also allows the user to export as a Behance project, and there’s a Quick Export, which allows you to export a snapshot of your work. I found myself thinking it was kind of like a screenshot tool. 

Export Options

The Price Tag

I have a paid Creative Cloud plan already—I use Photoshop, InDesign, Dreamweaver, After Effects, and many other members of the Creative Cloud family on the regular. If you’re in the same boat as I am, it means you can download the fully featured version of Adobe Fresco without any additional fee. That’s appreciated. 

However, if you don’t, Adobe Fresco’s price tag is $9.99 a month—after the first six months, which act as an initial, free trial. 

If you don’t want to pay the subscription fee, Adobe Fresco is still available to use, but it’s generally a freemium app with limited features. For example, you’ll only be able to export flattened, low-res imagery, and not all brushes will be available. 

Fresco Pricing

2. Adobe Fresco vs. Photoshop

A Replacement? A Companion? Something Else?

In a dream world, I would love to see a completely mobile version of Photoshop—the same functionality as Photoshop, but I can take it with me on my iPad. Fresco has potential, and the Live Brushes are quite fun to experiment with, but that’s not what Fresco is.

I think it’s important to note how Adobe describes Fresco:

Adobe Fresco brings together the world’s largest brush collection with revolutionary new technology to deliver a natural painting and drawing experience

That said, I found myself enjoying Fresco the most when I viewed it as an attempt to simulate real media—not as a Procreate competitor or as a companion/partner to Photoshop.

Adobe Fresco Painting

The Limitations

There are obvious limitations here, with Fresco—Photoshop is more than exclusively an illustration tool. We have a full range of tools for photo manipulation, adjustments, and more. 

But as an illustration tool, Fresco isn’t as powerful as Photoshop. I expected that, honestly. However, the Brush Settings in Fresco have less than half of the Brush Settings available in Photoshop.

Comparing Brush Settings

Importing Photoshop Brushes

This was one of the features I was most excited about: importing and using my Photoshop brushes in a mobile application. It sounds too good to be true!

It works, although it wasn’t without hiccups. Fresco has an Import from File feature, but I couldn’t get my brushes loaded up this way.

Instead, go to the brush file itself and choose Open In, then Fresco—so, if you have similar trouble, give this alternate method a try!

Loading Fresco Brushes

Photoshop Brush Settings

The Photoshop brush itself worked, once I had it imported. I had to go back in and tweak what settings are available in Fresco accordingly—like the Transfer and the Shape Dynamics. The Brush Settings are located at the bottom of the Tools panel. 

You can test the brush out, in the preview above these settings—a setting that will be familiar for Procreate users, too. 

Brush Settings

The Compatibility

One of the appealing things about Fresco, for me, was the ability to easily jump back and forth from Photoshop to Fresco and back to Photoshop. 

This is possible because you can save and export as a PSD in both programs. Fresco essentially saves your work as a cloud document, which you can then open up in Photoshop. 

However, I need to note that this is also achievable with most cloud services—I regularly jump from Procreate to Photoshop and back this way. 

Cloud Saving

3. Adobe Fresco vs. Procreate

The Functionality

Ultimately, Procreate and Adobe Fresco both do a lot of the same things. However, that’s the big deal here—this feels particularly jarring when you look at the price difference. 

Let’s look at Procreate Bushes and Adobe Fresco Brushes, as an example (specifically, Pixel Brushes). 

In Procreate, I can easily duplicate brushes and customize them to my liking. I can tap and drag to rearrange them—both the brushes themselves and the sets in my brush library.

In Fresco, however, I can’t seem to duplicate any of the default brushes. I’m left customizing the original, and then reverting to the original, if I want to go to back to the vanilla version. This is a huge bummer. You can favorite brushes, but there’s no rearranging them—the categories or the brushes themselves. 

Procreate Brushes versus Fresco Brushes

Customizing Brushes

That said, check out the difference between brush customization in Fresco and in Procreate. 

In Fresco, the customization options seem to vary, based on the brush. When I looked at the 14px pencil, under Sketching, I was left with Pressure and Velocity Dynamics.

In Procreate, the brush options are relatively universal from brush to brush, and they are pretty robust. 

Brush Customization

The Interface

Procreate’s UI is quite minimal, and it’s nice—it keeps the emphasis on the artwork itself.

Fresco isn’t necessarily cluttered, but I did find myself feeling rather „boxed in”, especially on the right-hand side. Procreate puts its layers here too, but I appreciate that these menus are collapsible. 

I did, however, appreciate that Fresco allows you to expand the canvas and hide almost all of your tools. It feels refreshing, clean, and very welcoming to draw this way—really reminiscent of a traditional sketchbook. This feels great; just doodling with the sketch brushes on an open surface like this is a very nice experience. 

Different Application Views
Procreate (Left), Adobe Fresco, Default View (Center), Adobe Fresco, Minimal View (Right)

Working With Color

I love that Procreate has customizable color palettes. Saving colors and color schemes is a normal part of my workflow.

In Fresco, when looking at the color picker, we have the option to save recent colors, by tapping on the plus sign in the Recent expandable menu. This works, but it doesn’t necessarily work well. I can’t rearrange any of these colors, and I can’t seem to delete them either. These recently saved colors also seem to be document specific. 

Color Palettes

Exporting Artwork

Both Adobe Fresco and Procreate can export artwork to PSD files, which is important for me, as someone who works in Photoshop a lot. I often find myself drawing in Procreate, jumping over to Photoshop, and then going back to Procreate. I could easily do the same in Fresco, but it wasn’t necessarily a process that was vastly improved.

They can both export time-lapse video, as well.

Procreate, however, can export as additional file types, such as animated GIFs, TIFF files, and animated PNGs. 

Exporting Work

The Price

Let’s be real here—price matters, and it’s probably one of the first factors on everybody’s mind, when it comes to whether or not Fresco is for them. 

Fresco comes with a $9.99 monthly fee, if you don’t already have a Creative Cloud subscription. Procreate, on the other hand, costs $9.99—and it’s a one-time fee. 

And that’s a pretty big difference, especially if viewing Fresco as a possible Procreate competitor. 

Honestly, I can’t say it has a world of content that Procreate doesn’t have. In fact, Fresco doesn’t have all of Procreate’s features, although some of them are listed as „coming soon” (such as perspective drawing and symmetry tools). 

Ultimately, this means Procreate is $9.99 USD (and a one-time fee), while Adobe Fresco is potentially $119.98 USD per year. Wow! Of course, if you’re already a Creative Cloud subscriber, it’s included. Honestly, that’s the deal maker there, for me. Adobe has promised some updates here, so only time will tell on that.  

Procreate vs Adobe Fresco

But Those Live Brushes

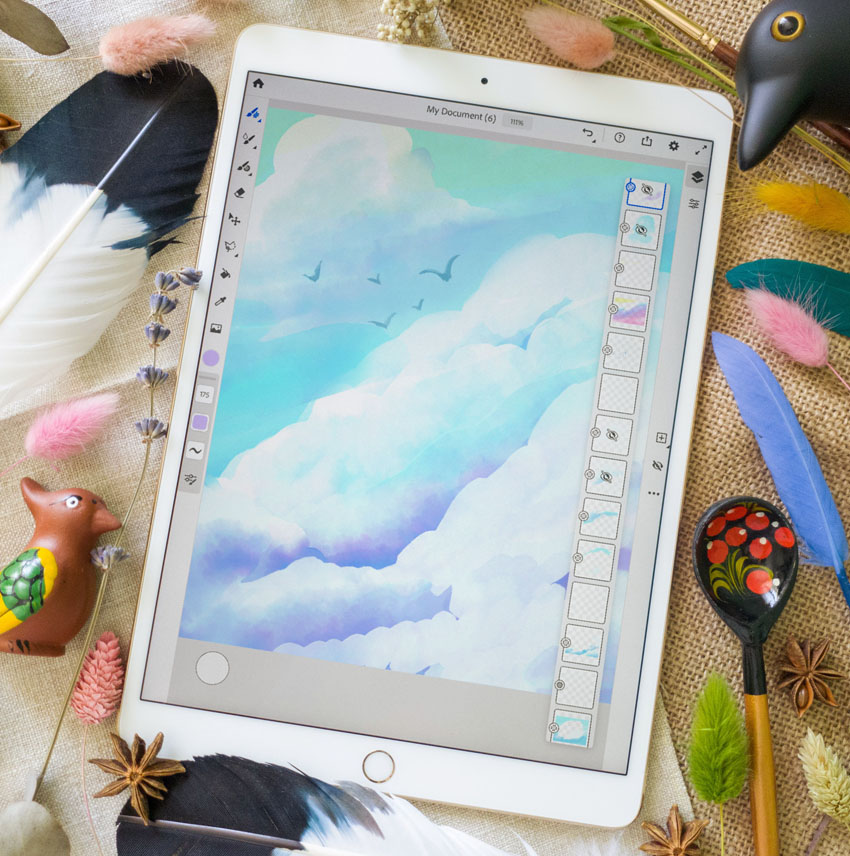
I have to admit, however—Adobe Fresco’s Live Brushes are a genuinely fun experience. Sitting back and painting fluffy clouds and just watching the paint blend and smear was pretty neat. I know I presented plenty of things about Fresco that weren’t so hot, but I’d be lying if I said I didn’t genuinely have a good time sitting back in my favorite chair and painting some clouds. It was a really organic and relaxing experience.

I drew the following, below, using the Watercolor Live Brushes. Holding down the Touch Shortcut, when using this brush, gives you „Pure Water”, instead of an eraser—it’s just really fun to push paint around and experiment with layering. 

I’m really curious to see where Adobe takes this feature in the future.

Adobe Fresco Painting

Who Wins the Battle Royale?

And the Winner Is…

Adobe Fresco isn’t a fundamentally bad application. It has a lot of potential, and some of the brushes are really very enjoyable to use. At launch, it’s just not everything it could be, just yet. I really hope this changes in the future, because the potential is there. Adobe has mentioned a bunch of additional features coming soon—I just wish „soon” was sooner!

In my opinion, there just isn’t enough here to dethrone Procreate, especially when Procreate has such a universally accessible price tag. As an „extra”, included with Creative Cloud, it’s fun to experiment with—but I wouldn’t call Fresco a significant addition to my normal workflow. 

Adobe Fresco vs Procreate

The Final Verdict

At the end of the day, Procreate has become a larger and larger part of my professional life. There have been times I’ve considered completely switching to Procreate as my preferred illustration tool—it’s genuinely awesome. 

Fresco feels like an application that wants to compete, but just isn’t there yet. Adobe’s promised a bunch of updates, however—so we’ll see what happens! If nothing else, I’ve got myself a new set of watercolors without the mess… and that’s pretty neat.
Adobe Fresco Painting

Thanks for exploring Adobe Fresco and Procreate with me! If you enjoyed this article, here are some others that you might enjoy, too!

An Introduction to Adobe Fresco and How It Compares to Procreate

Post pobrano z: An Introduction to Adobe Fresco and How It Compares to Procreate

Final product image
What You’ll Be Creating

Has Procreate met its match? Fresco, Adobe’s new drawing program for iPad, is here—how does it compare to Procreate or Photoshop? Is it a worthwhile competitor, or something you should pass up? Here’s an overview, first impressions, and some comparisons for your consideration.

I’m an artist—art, design, game development and content creation are what I do professionally. I spend a lot of time in Adobe Photoshop, but I also really enjoy Procreate. 

That said, I was pretty excited to get my hands on Fresco. When it comes to my iPad, Procreate is a really wonderful, enjoyable application. The price is right, and it’s very user friendly. So how does Adobe Fresco hold up, at launch? 

Follow along with us over on our Envato Tuts+ YouTube channel:

1. A Tour of Adobe Fresco

First Impressions

My first impression of Adobe Fresco was generally optimistic. I really enjoy many of the „out the box” brushes. I spent some time just casually sketching, and it did feel really natural and comfortable. 

I wanted Fresco to be an awesome application that I fell in love with. 

So… how did my first date with Fresco go? Let’s take a look at the tools themselves. You can find the tools, by default, on the left-hand side of the visible work area.

Adobe Fresco Tools

Pixel Brushes

Pixel Brushes are your standard raster brushes, very much like those in Photoshop. I do a lot of drawing in Photoshop, so I was really excited at the prospect of having all of my usual Photoshop brushes on my iPad. 

Below, I’ve tested out one of the ink brushes, and I’ve doodled an apple with some of the sketch brushes. 

Pixel Brushes

Importing Brushes

Your imported brushes are listed as „Library Brushes” at the bottom of your available Pixel Brushes. Doesn’t seem like there’s any sorting or reordering things, at this time.

I can’t remove any brushes I’ve imported within the app either—and it seems like I’m not the only one out there having that issue. That’s a bummer, but not a deal breaker.

Importing Brushes

Lovely, Right Out the Box

The Pixel Brushes that come with Fresco, however, are lovely. They have beautiful textures, and the sensitivity felt on point, without any adjustments—I didn’t have to tweak anything there to create really beautiful lines and textures. The Cezanne and Impressionist brushes were particularly fun and full of personality.

Painting Brushes

Live Brushes

Fresco also has Live Brushes—and they’re really cool. I had a lot of fun trying out the watercolor brushes, in particular. The way the colors bleed and run into each other really feels as if you’re working with paint. 

This isn’t the way I usually draw, digitally, but it was a lot of fun to play with. I’d say that this, right here, is probably one of Fresco’s coolest features. You’ve got Watercolor and Oil brushes, 11 brushes total. 

Fresco Live Brushes

Vector Brushes

The Vector Brushes are rather nice too! It’s really simple to just dig in and create some really lovely, clean, vector lines. There are five different brushes to choose from, which did feel a little odd to me. Still, the five here are pretty versatile. 

However, there’s no editing these vector lines with something like anchor points. Not a deal breaker, but it’s something that would have been nice.

Vector Brushes

The Eraser

The Eraser surprised me, because I expected to have the same Brush Options as the other brush tools. You can „Erase with Brush”, but I found this to be confusing—you don’t use the Eraser to erase like this.

For example, if I want to erase with a soft round brush, I have to, instead, go to the Pixel Brush Tool, select my soft round brush, and then tap and hold the Touch Shortcut while drawing—a circle on the screen that can be used to alter how some tools behave. 

The line on the left is drawn with the Eraser tool, while the line on the right is drawn with the Pixel Brush Tool, using the Touch Shortcut. 

Eraser Tool

The Other Tools

You can use the Move Tool to move your work, as well as flip content horizontally or vertically.

The Selection Tools are used to select a specific area. Simply tap and drag—this was quite straightforward and easy to use. 

Then, you have a Paint Bucket Tool. Tap to add a fill color—the color currently active.

The Eyedropper is used to select color, but I found myself rarely using it. Instead, tap and hold on a color in your document to „pick up the color”. This is a standard action that will be familiar to those who have used Procreate. 

There is also the ability to Import content, right from the tools. 

One note there, however. I did really like that you can directly open your camera from Fresco, and then import. As a teacher, you could potentially photograph content, import, and directly draw on top of it, for example. That’s pretty cool. 

Additional Tools

Sharing Your Creations

Adobe Fresco has pretty straightforward export options. We can publish and export to a variety of formats, including PSD, PNG, JPG, and PDF. We can also export a time-lapse process video, which is genuinely fun to watch. 

Fresco also allows the user to export as a Behance project, and there’s a Quick Export, which allows you to export a snapshot of your work. I found myself thinking it was kind of like a screenshot tool. 

Export Options

The Price Tag

I have a paid Creative Cloud plan already—I use Photoshop, InDesign, Dreamweaver, After Effects, and many other members of the Creative Cloud family on the regular. If you’re in the same boat as I am, it means you can download the fully featured version of Adobe Fresco without any additional fee. That’s appreciated. 

However, if you don’t, Adobe Fresco’s price tag is $9.99 a month—after the first six months, which act as an initial, free trial. 

If you don’t want to pay the subscription fee, Adobe Fresco is still available to use, but it’s generally a freemium app with limited features. For example, you’ll only be able to export flattened, low-res imagery, and not all brushes will be available. 

Fresco Pricing

2. Adobe Fresco vs. Photoshop

A Replacement? A Companion? Something Else?

In a dream world, I would love to see a completely mobile version of Photoshop—the same functionality as Photoshop, but I can take it with me on my iPad. Fresco has potential, and the Live Brushes are quite fun to experiment with, but that’s not what Fresco is.

I think it’s important to note how Adobe describes Fresco:

Adobe Fresco brings together the world’s largest brush collection with revolutionary new technology to deliver a natural painting and drawing experience

That said, I found myself enjoying Fresco the most when I viewed it as an attempt to simulate real media—not as a Procreate competitor or as a companion/partner to Photoshop.

Adobe Fresco Painting

The Limitations

There are obvious limitations here, with Fresco—Photoshop is more than exclusively an illustration tool. We have a full range of tools for photo manipulation, adjustments, and more. 

But as an illustration tool, Fresco isn’t as powerful as Photoshop. I expected that, honestly. However, the Brush Settings in Fresco have less than half of the Brush Settings available in Photoshop.

Comparing Brush Settings

Importing Photoshop Brushes

This was one of the features I was most excited about: importing and using my Photoshop brushes in a mobile application. It sounds too good to be true!

It works, although it wasn’t without hiccups. Fresco has an Import from File feature, but I couldn’t get my brushes loaded up this way.

Instead, go to the brush file itself and choose Open In, then Fresco—so, if you have similar trouble, give this alternate method a try!

Loading Fresco Brushes

Photoshop Brush Settings

The Photoshop brush itself worked, once I had it imported. I had to go back in and tweak what settings are available in Fresco accordingly—like the Transfer and the Shape Dynamics. The Brush Settings are located at the bottom of the Tools panel. 

You can test the brush out, in the preview above these settings—a setting that will be familiar for Procreate users, too. 

Brush Settings

The Compatibility

One of the appealing things about Fresco, for me, was the ability to easily jump back and forth from Photoshop to Fresco and back to Photoshop. 

This is possible because you can save and export as a PSD in both programs. Fresco essentially saves your work as a cloud document, which you can then open up in Photoshop. 

However, I need to note that this is also achievable with most cloud services—I regularly jump from Procreate to Photoshop and back this way. 

Cloud Saving

3. Adobe Fresco vs. Procreate

The Functionality

Ultimately, Procreate and Adobe Fresco both do a lot of the same things. However, that’s the big deal here—this feels particularly jarring when you look at the price difference. 

Let’s look at Procreate Bushes and Adobe Fresco Brushes, as an example (specifically, Pixel Brushes). 

In Procreate, I can easily duplicate brushes and customize them to my liking. I can tap and drag to rearrange them—both the brushes themselves and the sets in my brush library.

In Fresco, however, I can’t seem to duplicate any of the default brushes. I’m left customizing the original, and then reverting to the original, if I want to go to back to the vanilla version. This is a huge bummer. You can favorite brushes, but there’s no rearranging them—the categories or the brushes themselves. 

Procreate Brushes versus Fresco Brushes

Customizing Brushes

That said, check out the difference between brush customization in Fresco and in Procreate. 

In Fresco, the customization options seem to vary, based on the brush. When I looked at the 14px pencil, under Sketching, I was left with Pressure and Velocity Dynamics.

In Procreate, the brush options are relatively universal from brush to brush, and they are pretty robust. 

Brush Customization

The Interface

Procreate’s UI is quite minimal, and it’s nice—it keeps the emphasis on the artwork itself.

Fresco isn’t necessarily cluttered, but I did find myself feeling rather „boxed in”, especially on the right-hand side. Procreate puts its layers here too, but I appreciate that these menus are collapsible. 

I did, however, appreciate that Fresco allows you to expand the canvas and hide almost all of your tools. It feels refreshing, clean, and very welcoming to draw this way—really reminiscent of a traditional sketchbook. This feels great; just doodling with the sketch brushes on an open surface like this is a very nice experience. 

Different Application Views
Procreate (Left), Adobe Fresco, Default View (Center), Adobe Fresco, Minimal View (Right)

Working With Color

I love that Procreate has customizable color palettes. Saving colors and color schemes is a normal part of my workflow.

In Fresco, when looking at the color picker, we have the option to save recent colors, by tapping on the plus sign in the Recent expandable menu. This works, but it doesn’t necessarily work well. I can’t rearrange any of these colors, and I can’t seem to delete them either. These recently saved colors also seem to be document specific. 

Color Palettes

Exporting Artwork

Both Adobe Fresco and Procreate can export artwork to PSD files, which is important for me, as someone who works in Photoshop a lot. I often find myself drawing in Procreate, jumping over to Photoshop, and then going back to Procreate. I could easily do the same in Fresco, but it wasn’t necessarily a process that was vastly improved.

They can both export time-lapse video, as well.

Procreate, however, can export as additional file types, such as animated GIFs, TIFF files, and animated PNGs. 

Exporting Work

The Price

Let’s be real here—price matters, and it’s probably one of the first factors on everybody’s mind, when it comes to whether or not Fresco is for them. 

Fresco comes with a $9.99 monthly fee, if you don’t already have a Creative Cloud subscription. Procreate, on the other hand, costs $9.99—and it’s a one-time fee. 

And that’s a pretty big difference, especially if viewing Fresco as a possible Procreate competitor. 

Honestly, I can’t say it has a world of content that Procreate doesn’t have. In fact, Fresco doesn’t have all of Procreate’s features, although some of them are listed as „coming soon” (such as perspective drawing and symmetry tools). 

Ultimately, this means Procreate is $9.99 USD (and a one-time fee), while Adobe Fresco is potentially $119.98 USD per year. Wow! Of course, if you’re already a Creative Cloud subscriber, it’s included. Honestly, that’s the deal maker there, for me. Adobe has promised some updates here, so only time will tell on that.  

Procreate vs Adobe Fresco

But Those Live Brushes

I have to admit, however—Adobe Fresco’s Live Brushes are a genuinely fun experience. Sitting back and painting fluffy clouds and just watching the paint blend and smear was pretty neat. I know I presented plenty of things about Fresco that weren’t so hot, but I’d be lying if I said I didn’t genuinely have a good time sitting back in my favorite chair and painting some clouds. It was a really organic and relaxing experience.

I drew the following, below, using the Watercolor Live Brushes. Holding down the Touch Shortcut, when using this brush, gives you „Pure Water”, instead of an eraser—it’s just really fun to push paint around and experiment with layering. 

I’m really curious to see where Adobe takes this feature in the future.

Adobe Fresco Painting

Who Wins the Battle Royale?

And the Winner Is…

Adobe Fresco isn’t a fundamentally bad application. It has a lot of potential, and some of the brushes are really very enjoyable to use. At launch, it’s just not everything it could be, just yet. I really hope this changes in the future, because the potential is there. Adobe has mentioned a bunch of additional features coming soon—I just wish „soon” was sooner!

In my opinion, there just isn’t enough here to dethrone Procreate, especially when Procreate has such a universally accessible price tag. As an „extra”, included with Creative Cloud, it’s fun to experiment with—but I wouldn’t call Fresco a significant addition to my normal workflow. 

Adobe Fresco vs Procreate

The Final Verdict

At the end of the day, Procreate has become a larger and larger part of my professional life. There have been times I’ve considered completely switching to Procreate as my preferred illustration tool—it’s genuinely awesome. 

Fresco feels like an application that wants to compete, but just isn’t there yet. Adobe’s promised a bunch of updates, however—so we’ll see what happens! If nothing else, I’ve got myself a new set of watercolors without the mess… and that’s pretty neat.

Adobe Fresco Painting

Thanks for exploring Adobe Fresco and Procreate with me! If you enjoyed this article, here are some others that you might enjoy, too!

An Introduction to Adobe Fresco and How It Compares to Procreate

Post pobrano z: An Introduction to Adobe Fresco and How It Compares to Procreate

Final product image
What You’ll Be Creating

Has Procreate met its match? Fresco, Adobe’s new drawing program for iPad, is here—how does it compare to Procreate or Photoshop? Is it a worthwhile competitor, or something you should pass up? Here’s an overview, first impressions, and some comparisons for your consideration.

I’m an artist—art, design, game development and content creation are what I do professionally. I spend a lot of time in Adobe Photoshop, but I also really enjoy Procreate. 

That said, I was pretty excited to get my hands on Fresco. When it comes to my iPad, Procreate is a really wonderful, enjoyable application. The price is right, and it’s very user friendly. So how does Adobe Fresco hold up, at launch? 

Follow along with us over on our Envato Tuts+ YouTube channel:

1. A Tour of Adobe Fresco

First Impressions

My first impression of Adobe Fresco was generally optimistic. I really enjoy many of the „out the box” brushes. I spent some time just casually sketching, and it did feel really natural and comfortable. 

I wanted Fresco to be an awesome application that I fell in love with. 

So… how did my first date with Fresco go? Let’s take a look at the tools themselves. You can find the tools, by default, on the left-hand side of the visible work area.

Adobe Fresco Tools

Pixel Brushes

Pixel Brushes are your standard raster brushes, very much like those in Photoshop. I do a lot of drawing in Photoshop, so I was really excited at the prospect of having all of my usual Photoshop brushes on my iPad. 

Below, I’ve tested out one of the ink brushes, and I’ve doodled an apple with some of the sketch brushes. 

Pixel Brushes

Importing Brushes

Your imported brushes are listed as „Library Brushes” at the bottom of your available Pixel Brushes. Doesn’t seem like there’s any sorting or reordering things, at this time.

I can’t remove any brushes I’ve imported within the app either—and it seems like I’m not the only one out there having that issue. That’s a bummer, but not a deal breaker.

Importing Brushes

Lovely, Right Out the Box

The Pixel Brushes that come with Fresco, however, are lovely. They have beautiful textures, and the sensitivity felt on point, without any adjustments—I didn’t have to tweak anything there to create really beautiful lines and textures. The Cezanne and Impressionist brushes were particularly fun and full of personality.

Painting Brushes

Live Brushes

Fresco also has Live Brushes—and they’re really cool. I had a lot of fun trying out the watercolor brushes, in particular. The way the colors bleed and run into each other really feels as if you’re working with paint. 

This isn’t the way I usually draw, digitally, but it was a lot of fun to play with. I’d say that this, right here, is probably one of Fresco’s coolest features. You’ve got Watercolor and Oil brushes, 11 brushes total. 

Fresco Live Brushes

Vector Brushes

The Vector Brushes are rather nice too! It’s really simple to just dig in and create some really lovely, clean, vector lines. There are five different brushes to choose from, which did feel a little odd to me. Still, the five here are pretty versatile. 

However, there’s no editing these vector lines with something like anchor points. Not a deal breaker, but it’s something that would have been nice.

Vector Brushes

The Eraser

The Eraser surprised me, because I expected to have the same Brush Options as the other brush tools. You can „Erase with Brush”, but I found this to be confusing—you don’t use the Eraser to erase like this.

For example, if I want to erase with a soft round brush, I have to, instead, go to the Pixel Brush Tool, select my soft round brush, and then tap and hold the Touch Shortcut while drawing—a circle on the screen that can be used to alter how some tools behave. 

The line on the left is drawn with the Eraser tool, while the line on the right is drawn with the Pixel Brush Tool, using the Touch Shortcut. 

Eraser Tool

The Other Tools

You can use the Move Tool to move your work, as well as flip content horizontally or vertically.

The Selection Tools are used to select a specific area. Simply tap and drag—this was quite straightforward and easy to use. 

Then, you have a Paint Bucket Tool. Tap to add a fill color—the color currently active.

The Eyedropper is used to select color, but I found myself rarely using it. Instead, tap and hold on a color in your document to „pick up the color”. This is a standard action that will be familiar to those who have used Procreate. 

There is also the ability to Import content, right from the tools. 

One note there, however. I did really like that you can directly open your camera from Fresco, and then import. As a teacher, you could potentially photograph content, import, and directly draw on top of it, for example. That’s pretty cool. 

Additional Tools

Sharing Your Creations

Adobe Fresco has pretty straightforward export options. We can publish and export to a variety of formats, including PSD, PNG, JPG, and PDF. We can also export a time-lapse process video, which is genuinely fun to watch. 

Fresco also allows the user to export as a Behance project, and there’s a Quick Export, which allows you to export a snapshot of your work. I found myself thinking it was kind of like a screenshot tool. 

Export Options

The Price Tag

I have a paid Creative Cloud plan already—I use Photoshop, InDesign, Dreamweaver, After Effects, and many other members of the Creative Cloud family on the regular. If you’re in the same boat as I am, it means you can download the fully featured version of Adobe Fresco without any additional fee. That’s appreciated. 

However, if you don’t, Adobe Fresco’s price tag is $9.99 a month—after the first six months, which act as an initial, free trial. 

If you don’t want to pay the subscription fee, Adobe Fresco is still available to use, but it’s generally a freemium app with limited features. For example, you’ll only be able to export flattened, low-res imagery, and not all brushes will be available. 

Fresco Pricing

2. Adobe Fresco vs. Photoshop

A Replacement? A Companion? Something Else?

In a dream world, I would love to see a completely mobile version of Photoshop—the same functionality as Photoshop, but I can take it with me on my iPad. Fresco has potential, and the Live Brushes are quite fun to experiment with, but that’s not what Fresco is.

I think it’s important to note how Adobe describes Fresco:

Adobe Fresco brings together the world’s largest brush collection with revolutionary new technology to deliver a natural painting and drawing experience

That said, I found myself enjoying Fresco the most when I viewed it as an attempt to simulate real media—not as a Procreate competitor or as a companion/partner to Photoshop.

Adobe Fresco Painting

The Limitations

There are obvious limitations here, with Fresco—Photoshop is more than exclusively an illustration tool. We have a full range of tools for photo manipulation, adjustments, and more. 

But as an illustration tool, Fresco isn’t as powerful as Photoshop. I expected that, honestly. However, the Brush Settings in Fresco have less than half of the Brush Settings available in Photoshop.

Comparing Brush Settings

Importing Photoshop Brushes

This was one of the features I was most excited about: importing and using my Photoshop brushes in a mobile application. It sounds too good to be true!

It works, although it wasn’t without hiccups. Fresco has an Import from File feature, but I couldn’t get my brushes loaded up this way.

Instead, go to the brush file itself and choose Open In, then Fresco—so, if you have similar trouble, give this alternate method a try!

Loading Fresco Brushes

Photoshop Brush Settings

The Photoshop brush itself worked, once I had it imported. I had to go back in and tweak what settings are available in Fresco accordingly—like the Transfer and the Shape Dynamics. The Brush Settings are located at the bottom of the Tools panel. 

You can test the brush out, in the preview above these settings—a setting that will be familiar for Procreate users, too. 

Brush Settings

The Compatibility

One of the appealing things about Fresco, for me, was the ability to easily jump back and forth from Photoshop to Fresco and back to Photoshop. 

This is possible because you can save and export as a PSD in both programs. Fresco essentially saves your work as a cloud document, which you can then open up in Photoshop. 

However, I need to note that this is also achievable with most cloud services—I regularly jump from Procreate to Photoshop and back this way. 

Cloud Saving

3. Adobe Fresco vs. Procreate

The Functionality

Ultimately, Procreate and Adobe Fresco both do a lot of the same things. However, that’s the big deal here—this feels particularly jarring when you look at the price difference. 

Let’s look at Procreate Bushes and Adobe Fresco Brushes, as an example (specifically, Pixel Brushes). 

In Procreate, I can easily duplicate brushes and customize them to my liking. I can tap and drag to rearrange them—both the brushes themselves and the sets in my brush library.

In Fresco, however, I can’t seem to duplicate any of the default brushes. I’m left customizing the original, and then reverting to the original, if I want to go to back to the vanilla version. This is a huge bummer. You can favorite brushes, but there’s no rearranging them—the categories or the brushes themselves. 

Procreate Brushes versus Fresco Brushes

Customizing Brushes

That said, check out the difference between brush customization in Fresco and in Procreate. 

In Fresco, the customization options seem to vary, based on the brush. When I looked at the 14px pencil, under Sketching, I was left with Pressure and Velocity Dynamics.

In Procreate, the brush options are relatively universal from brush to brush, and they are pretty robust. 

Brush Customization

The Interface

Procreate’s UI is quite minimal, and it’s nice—it keeps the emphasis on the artwork itself.

Fresco isn’t necessarily cluttered, but I did find myself feeling rather „boxed in”, especially on the right-hand side. Procreate puts its layers here too, but I appreciate that these menus are collapsible. 

I did, however, appreciate that Fresco allows you to expand the canvas and hide almost all of your tools. It feels refreshing, clean, and very welcoming to draw this way—really reminiscent of a traditional sketchbook. This feels great; just doodling with the sketch brushes on an open surface like this is a very nice experience. 

Different Application Views
Procreate (Left), Adobe Fresco, Default View (Center), Adobe Fresco, Minimal View (Right)

Working With Color

I love that Procreate has customizable color palettes. Saving colors and color schemes is a normal part of my workflow.

In Fresco, when looking at the color picker, we have the option to save recent colors, by tapping on the plus sign in the Recent expandable menu. This works, but it doesn’t necessarily work well. I can’t rearrange any of these colors, and I can’t seem to delete them either. These recently saved colors also seem to be document specific. 

Color Palettes

Exporting Artwork

Both Adobe Fresco and Procreate can export artwork to PSD files, which is important for me, as someone who works in Photoshop a lot. I often find myself drawing in Procreate, jumping over to Photoshop, and then going back to Procreate. I could easily do the same in Fresco, but it wasn’t necessarily a process that was vastly improved.

They can both export time-lapse video, as well.

Procreate, however, can export as additional file types, such as animated GIFs, TIFF files, and animated PNGs. 

Exporting Work

The Price

Let’s be real here—price matters, and it’s probably one of the first factors on everybody’s mind, when it comes to whether or not Fresco is for them. 

Fresco comes with a $9.99 monthly fee, if you don’t already have a Creative Cloud subscription. Procreate, on the other hand, costs $9.99—and it’s a one-time fee. 

And that’s a pretty big difference, especially if viewing Fresco as a possible Procreate competitor. 

Honestly, I can’t say it has a world of content that Procreate doesn’t have. In fact, Fresco doesn’t have all of Procreate’s features, although some of them are listed as „coming soon” (such as perspective drawing and symmetry tools). 

Ultimately, this means Procreate is $9.99 USD (and a one-time fee), while Adobe Fresco is potentially $119.98 USD per year. Wow! Of course, if you’re already a Creative Cloud subscriber, it’s included. Honestly, that’s the deal maker there, for me. Adobe has promised some updates here, so only time will tell on that.  

Procreate vs Adobe Fresco

But Those Live Brushes

I have to admit, however—Adobe Fresco’s Live Brushes are a genuinely fun experience. Sitting back and painting fluffy clouds and just watching the paint blend and smear was pretty neat. I know I presented plenty of things about Fresco that weren’t so hot, but I’d be lying if I said I didn’t genuinely have a good time sitting back in my favorite chair and painting some clouds. It was a really organic and relaxing experience.

I drew the following, below, using the Watercolor Live Brushes. Holding down the Touch Shortcut, when using this brush, gives you „Pure Water”, instead of an eraser—it’s just really fun to push paint around and experiment with layering. 

I’m really curious to see where Adobe takes this feature in the future.

Adobe Fresco Painting

Who Wins the Battle Royale?

And the Winner Is…

Adobe Fresco isn’t a fundamentally bad application. It has a lot of potential, and some of the brushes are really very enjoyable to use. At launch, it’s just not everything it could be, just yet. I really hope this changes in the future, because the potential is there. Adobe has mentioned a bunch of additional features coming soon—I just wish „soon” was sooner!

In my opinion, there just isn’t enough here to dethrone Procreate, especially when Procreate has such a universally accessible price tag. As an „extra”, included with Creative Cloud, it’s fun to experiment with—but I wouldn’t call Fresco a significant addition to my normal workflow. 

Adobe Fresco vs Procreate

The Final Verdict

At the end of the day, Procreate has become a larger and larger part of my professional life. There have been times I’ve considered completely switching to Procreate as my preferred illustration tool—it’s genuinely awesome. 

Fresco feels like an application that wants to compete, but just isn’t there yet. Adobe’s promised a bunch of updates, however—so we’ll see what happens! If nothing else, I’ve got myself a new set of watercolors without the mess… and that’s pretty neat.

Adobe Fresco Painting

Thanks for exploring Adobe Fresco and Procreate with me! If you enjoyed this article, here are some others that you might enjoy, too!

An Introduction to Adobe Fresco and How It Compares to Procreate

Post pobrano z: An Introduction to Adobe Fresco and How It Compares to Procreate

Final product image
What You’ll Be Creating

Has Procreate met its match? Fresco, Adobe’s new drawing program for iPad, is here—how does it compare to Procreate or Photoshop? Is it a worthwhile competitor, or something you should pass up? Here’s an overview, first impressions, and some comparisons for your consideration.

I’m an artist—art, design, game development and content creation are what I do professionally. I spend a lot of time in Adobe Photoshop, but I also really enjoy Procreate. 

That said, I was pretty excited to get my hands on Fresco. When it comes to my iPad, Procreate is a really wonderful, enjoyable application. The price is right, and it’s very user friendly. So how does Adobe Fresco hold up, at launch? 

Follow along with us over on our Envato Tuts+ YouTube channel:

1. A Tour of Adobe Fresco

First Impressions

My first impression of Adobe Fresco was generally optimistic. I really enjoy many of the „out the box” brushes. I spent some time just casually sketching, and it did feel really natural and comfortable. 

I wanted Fresco to be an awesome application that I fell in love with. 

So… how did my first date with Fresco go? Let’s take a look at the tools themselves. You can find the tools, by default, on the left-hand side of the visible work area.

Adobe Fresco Tools

Pixel Brushes

Pixel Brushes are your standard raster brushes, very much like those in Photoshop. I do a lot of drawing in Photoshop, so I was really excited at the prospect of having all of my usual Photoshop brushes on my iPad. 

Below, I’ve tested out one of the ink brushes, and I’ve doodled an apple with some of the sketch brushes. 

Pixel Brushes

Importing Brushes

Your imported brushes are listed as „Library Brushes” at the bottom of your available Pixel Brushes. Doesn’t seem like there’s any sorting or reordering things, at this time.

I can’t remove any brushes I’ve imported within the app either—and it seems like I’m not the only one out there having that issue. That’s a bummer, but not a deal breaker.

Importing Brushes

Lovely, Right Out the Box

The Pixel Brushes that come with Fresco, however, are lovely. They have beautiful textures, and the sensitivity felt on point, without any adjustments—I didn’t have to tweak anything there to create really beautiful lines and textures. The Cezanne and Impressionist brushes were particularly fun and full of personality.

Painting Brushes

Live Brushes

Fresco also has Live Brushes—and they’re really cool. I had a lot of fun trying out the watercolor brushes, in particular. The way the colors bleed and run into each other really feels as if you’re working with paint. 

This isn’t the way I usually draw, digitally, but it was a lot of fun to play with. I’d say that this, right here, is probably one of Fresco’s coolest features. You’ve got Watercolor and Oil brushes, 11 brushes total. 

Fresco Live Brushes

Vector Brushes

The Vector Brushes are rather nice too! It’s really simple to just dig in and create some really lovely, clean, vector lines. There are five different brushes to choose from, which did feel a little odd to me. Still, the five here are pretty versatile. 

However, there’s no editing these vector lines with something like anchor points. Not a deal breaker, but it’s something that would have been nice.

Vector Brushes

The Eraser

The Eraser surprised me, because I expected to have the same Brush Options as the other brush tools. You can „Erase with Brush”, but I found this to be confusing—you don’t use the Eraser to erase like this.

For example, if I want to erase with a soft round brush, I have to, instead, go to the Pixel Brush Tool, select my soft round brush, and then tap and hold the Touch Shortcut while drawing—a circle on the screen that can be used to alter how some tools behave. 

The line on the left is drawn with the Eraser tool, while the line on the right is drawn with the Pixel Brush Tool, using the Touch Shortcut. 

Eraser Tool

The Other Tools

You can use the Move Tool to move your work, as well as flip content horizontally or vertically.

The Selection Tools are used to select a specific area. Simply tap and drag—this was quite straightforward and easy to use. 

Then, you have a Paint Bucket Tool. Tap to add a fill color—the color currently active.

The Eyedropper is used to select color, but I found myself rarely using it. Instead, tap and hold on a color in your document to „pick up the color”. This is a standard action that will be familiar to those who have used Procreate. 

There is also the ability to Import content, right from the tools. 

One note there, however. I did really like that you can directly open your camera from Fresco, and then import. As a teacher, you could potentially photograph content, import, and directly draw on top of it, for example. That’s pretty cool. 

Additional Tools

Sharing Your Creations

Adobe Fresco has pretty straightforward export options. We can publish and export to a variety of formats, including PSD, PNG, JPG, and PDF. We can also export a time-lapse process video, which is genuinely fun to watch. 

Fresco also allows the user to export as a Behance project, and there’s a Quick Export, which allows you to export a snapshot of your work. I found myself thinking it was kind of like a screenshot tool. 

Export Options

The Price Tag

I have a paid Creative Cloud plan already—I use Photoshop, InDesign, Dreamweaver, After Effects, and many other members of the Creative Cloud family on the regular. If you’re in the same boat as I am, it means you can download the fully featured version of Adobe Fresco without any additional fee. That’s appreciated. 

However, if you don’t, Adobe Fresco’s price tag is $9.99 a month—after the first six months, which act as an initial, free trial. 

If you don’t want to pay the subscription fee, Adobe Fresco is still available to use, but it’s generally a freemium app with limited features. For example, you’ll only be able to export flattened, low-res imagery, and not all brushes will be available. 

Fresco Pricing

2. Adobe Fresco vs. Photoshop

A Replacement? A Companion? Something Else?

In a dream world, I would love to see a completely mobile version of Photoshop—the same functionality as Photoshop, but I can take it with me on my iPad. Fresco has potential, and the Live Brushes are quite fun to experiment with, but that’s not what Fresco is.

I think it’s important to note how Adobe describes Fresco:

Adobe Fresco brings together the world’s largest brush collection with revolutionary new technology to deliver a natural painting and drawing experience

That said, I found myself enjoying Fresco the most when I viewed it as an attempt to simulate real media—not as a Procreate competitor or as a companion/partner to Photoshop.

Adobe Fresco Painting

The Limitations

There are obvious limitations here, with Fresco—Photoshop is more than exclusively an illustration tool. We have a full range of tools for photo manipulation, adjustments, and more. 

But as an illustration tool, Fresco isn’t as powerful as Photoshop. I expected that, honestly. However, the Brush Settings in Fresco have less than half of the Brush Settings available in Photoshop.

Comparing Brush Settings

Importing Photoshop Brushes

This was one of the features I was most excited about: importing and using my Photoshop brushes in a mobile application. It sounds too good to be true!

It works, although it wasn’t without hiccups. Fresco has an Import from File feature, but I couldn’t get my brushes loaded up this way.

Instead, go to the brush file itself and choose Open In, then Fresco—so, if you have similar trouble, give this alternate method a try!

Loading Fresco Brushes

Photoshop Brush Settings

The Photoshop brush itself worked, once I had it imported. I had to go back in and tweak what settings are available in Fresco accordingly—like the Transfer and the Shape Dynamics. The Brush Settings are located at the bottom of the Tools panel. 

You can test the brush out, in the preview above these settings—a setting that will be familiar for Procreate users, too. 

Brush Settings

The Compatibility

One of the appealing things about Fresco, for me, was the ability to easily jump back and forth from Photoshop to Fresco and back to Photoshop. 

This is possible because you can save and export as a PSD in both programs. Fresco essentially saves your work as a cloud document, which you can then open up in Photoshop. 

However, I need to note that this is also achievable with most cloud services—I regularly jump from Procreate to Photoshop and back this way. 

Cloud Saving

3. Adobe Fresco vs. Procreate

The Functionality

Ultimately, Procreate and Adobe Fresco both do a lot of the same things. However, that’s the big deal here—this feels particularly jarring when you look at the price difference. 

Let’s look at Procreate Bushes and Adobe Fresco Brushes, as an example (specifically, Pixel Brushes). 

In Procreate, I can easily duplicate brushes and customize them to my liking. I can tap and drag to rearrange them—both the brushes themselves and the sets in my brush library.

In Fresco, however, I can’t seem to duplicate any of the default brushes. I’m left customizing the original, and then reverting to the original, if I want to go to back to the vanilla version. This is a huge bummer. You can favorite brushes, but there’s no rearranging them—the categories or the brushes themselves. 

Procreate Brushes versus Fresco Brushes

Customizing Brushes

That said, check out the difference between brush customization in Fresco and in Procreate. 

In Fresco, the customization options seem to vary, based on the brush. When I looked at the 14px pencil, under Sketching, I was left with Pressure and Velocity Dynamics.

In Procreate, the brush options are relatively universal from brush to brush, and they are pretty robust. 

Brush Customization

The Interface

Procreate’s UI is quite minimal, and it’s nice—it keeps the emphasis on the artwork itself.

Fresco isn’t necessarily cluttered, but I did find myself feeling rather „boxed in”, especially on the right-hand side. Procreate puts its layers here too, but I appreciate that these menus are collapsible. 

I did, however, appreciate that Fresco allows you to expand the canvas and hide almost all of your tools. It feels refreshing, clean, and very welcoming to draw this way—really reminiscent of a traditional sketchbook. This feels great; just doodling with the sketch brushes on an open surface like this is a very nice experience. 

Different Application Views
Procreate (Left), Adobe Fresco, Default View (Center), Adobe Fresco, Minimal View (Right)

Working With Color

I love that Procreate has customizable color palettes. Saving colors and color schemes is a normal part of my workflow.

In Fresco, when looking at the color picker, we have the option to save recent colors, by tapping on the plus sign in the Recent expandable menu. This works, but it doesn’t necessarily work well. I can’t rearrange any of these colors, and I can’t seem to delete them either. These recently saved colors also seem to be document specific. 

Color Palettes

Exporting Artwork

Both Adobe Fresco and Procreate can export artwork to PSD files, which is important for me, as someone who works in Photoshop a lot. I often find myself drawing in Procreate, jumping over to Photoshop, and then going back to Procreate. I could easily do the same in Fresco, but it wasn’t necessarily a process that was vastly improved.

They can both export time-lapse video, as well.

Procreate, however, can export as additional file types, such as animated GIFs, TIFF files, and animated PNGs. 

Exporting Work

The Price

Let’s be real here—price matters, and it’s probably one of the first factors on everybody’s mind, when it comes to whether or not Fresco is for them. 

Fresco comes with a $9.99 monthly fee, if you don’t already have a Creative Cloud subscription. Procreate, on the other hand, costs $9.99—and it’s a one-time fee. 

And that’s a pretty big difference, especially if viewing Fresco as a possible Procreate competitor. 

Honestly, I can’t say it has a world of content that Procreate doesn’t have. In fact, Fresco doesn’t have all of Procreate’s features, although some of them are listed as „coming soon” (such as perspective drawing and symmetry tools). 

Ultimately, this means Procreate is $9.99 USD (and a one-time fee), while Adobe Fresco is potentially $119.98 USD per year. Wow! Of course, if you’re already a Creative Cloud subscriber, it’s included. Honestly, that’s the deal maker there, for me. Adobe has promised some updates here, so only time will tell on that.  

Procreate vs Adobe Fresco

But Those Live Brushes

I have to admit, however—Adobe Fresco’s Live Brushes are a genuinely fun experience. Sitting back and painting fluffy clouds and just watching the paint blend and smear was pretty neat. I know I presented plenty of things about Fresco that weren’t so hot, but I’d be lying if I said I didn’t genuinely have a good time sitting back in my favorite chair and painting some clouds. It was a really organic and relaxing experience.

I drew the following, below, using the Watercolor Live Brushes. Holding down the Touch Shortcut, when using this brush, gives you „Pure Water”, instead of an eraser—it’s just really fun to push paint around and experiment with layering. 

I’m really curious to see where Adobe takes this feature in the future.

Adobe Fresco Painting

Who Wins the Battle Royale?

And the Winner Is…

Adobe Fresco isn’t a fundamentally bad application. It has a lot of potential, and some of the brushes are really very enjoyable to use. At launch, it’s just not everything it could be, just yet. I really hope this changes in the future, because the potential is there. Adobe has mentioned a bunch of additional features coming soon—I just wish „soon” was sooner!

In my opinion, there just isn’t enough here to dethrone Procreate, especially when Procreate has such a universally accessible price tag. As an „extra”, included with Creative Cloud, it’s fun to experiment with—but I wouldn’t call Fresco a significant addition to my normal workflow. 

Adobe Fresco vs Procreate

The Final Verdict

At the end of the day, Procreate has become a larger and larger part of my professional life. There have been times I’ve considered completely switching to Procreate as my preferred illustration tool—it’s genuinely awesome. 

Fresco feels like an application that wants to compete, but just isn’t there yet. Adobe’s promised a bunch of updates, however—so we’ll see what happens! If nothing else, I’ve got myself a new set of watercolors without the mess… and that’s pretty neat.

Adobe Fresco Painting

Thanks for exploring Adobe Fresco and Procreate with me! If you enjoyed this article, here are some others that you might enjoy, too!

A Look at JAMstack’s Speed, By the Numbers

Post pobrano z: A Look at JAMstack’s Speed, By the Numbers

People say JAMstack sites are fast — let’s find out why by looking at real performance metrics! We’ll cover common metrics, like Time to First Byte (TTFB) among others, then compare data across a wide section of sites to see how different ways to slice those sites up compare.

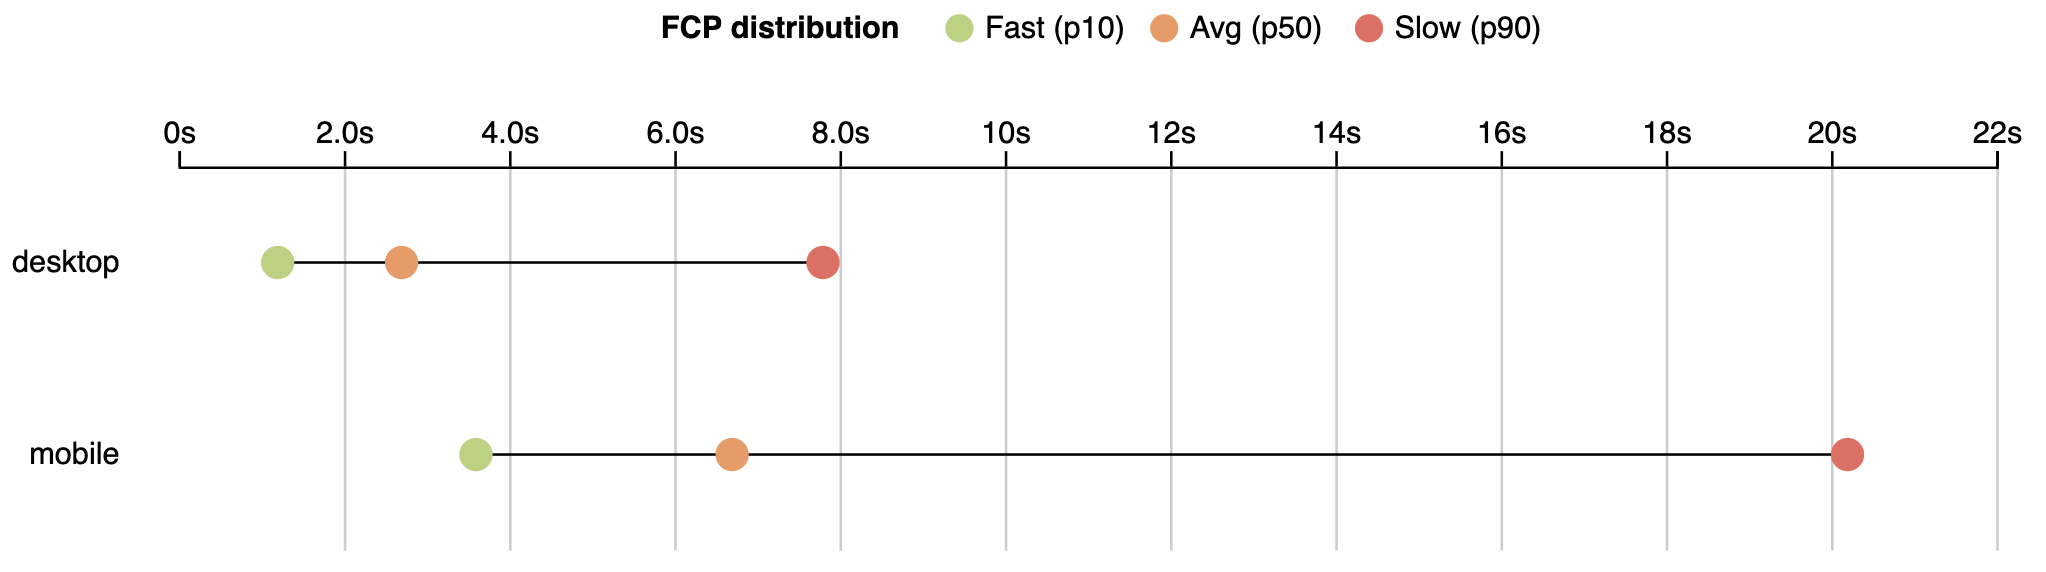
First, I’d like to present a small analysis to provide some background. According to the HTTPArchive metrics report on page loading, users wait an average of 6.7 seconds to see primary content.

First Contentful Paint (FCP) – measures the point at which text or graphics are first rendered to the screen.

The FCP distribution for the 10th, 50th and 90th percentile values as reported on August 1, 2019.

If we are talking about engagement with a page (Time to Interactive), users wait even longer. The average time to interactive is 9.3 seconds.

Time to Interactive (TTI) – a time when user can interact with a page without delay.

TTI distribution for the 10th, 50th and 90th percentile values as reported on August 1, 2019.

State of the real user web performance

The data above is from lab monitoring and doesn’t fully represent real user experience. Real users data based taken from the Chrome User Experience Report (CrUX) shows an even wider picture.

​​I’ll use data aggregated from users who use mobile devices. Specifically, we will use metrics like:


Time To First Byte

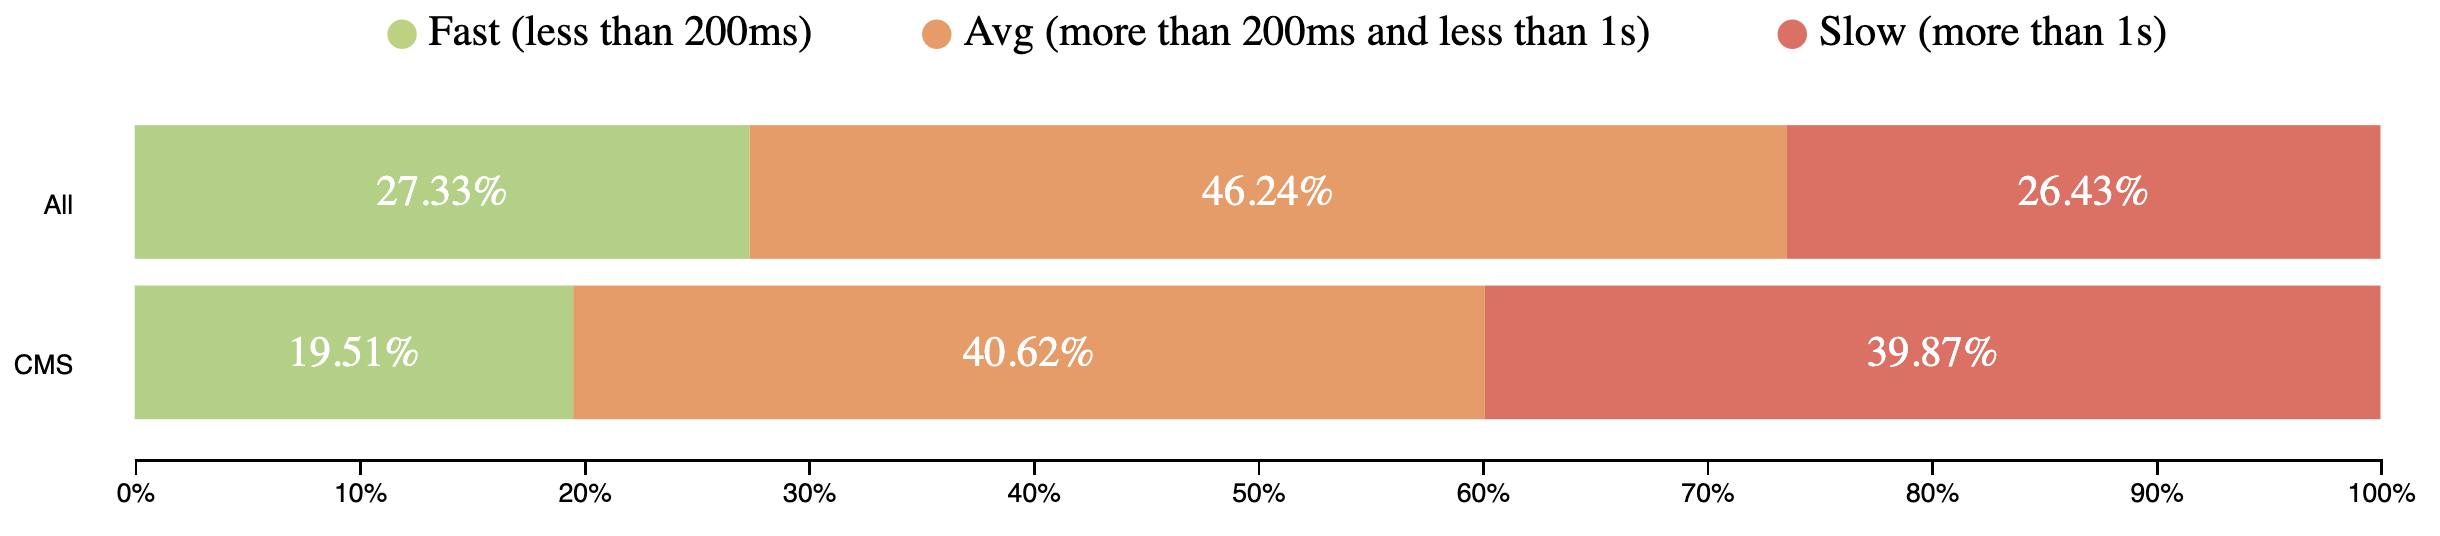
TTFB represents the time browser waits to receive first bytes of the response from server. TTFB takes from 200ms to 1 second for users around the world. It’s a pretty long time to receive the first chunks of the page.

TTFB mobile speed distribution (CrUX, July 2019)

First Contentful Paint

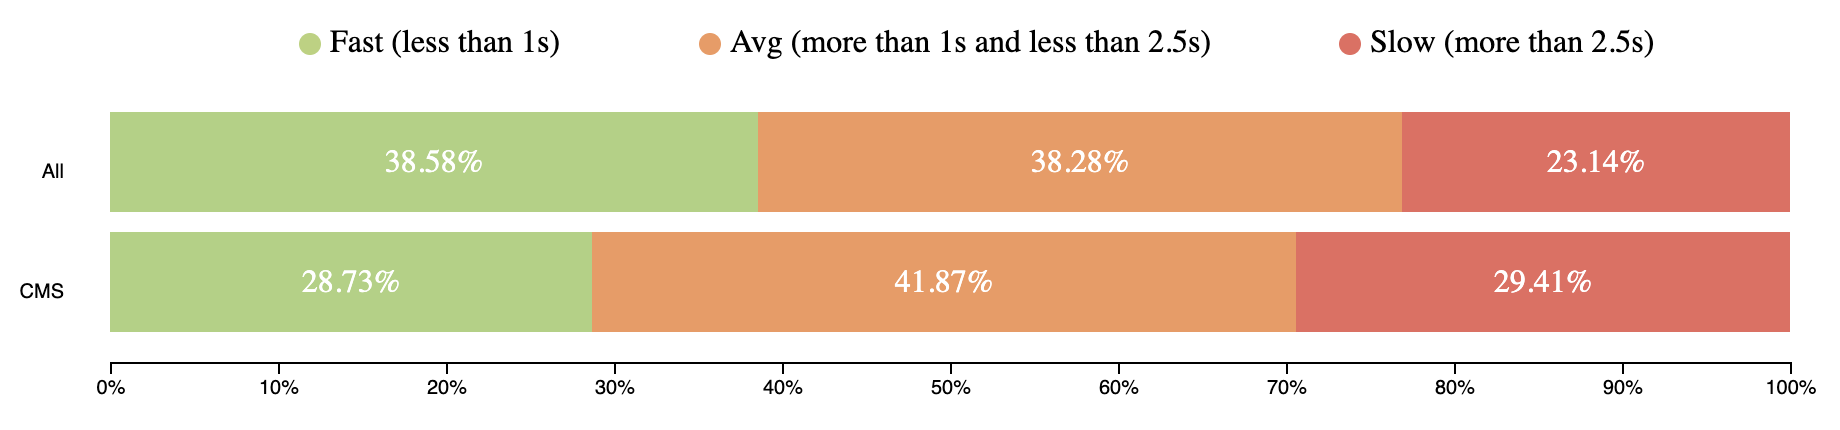
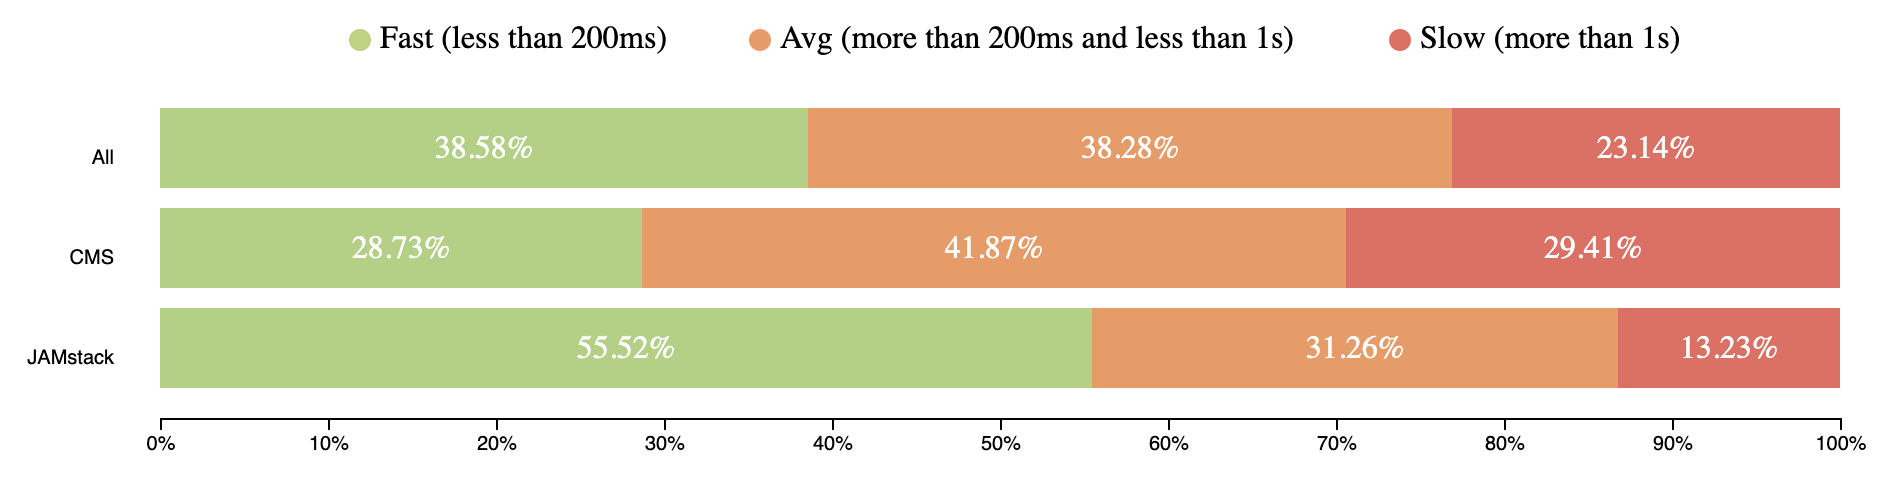
FCP happens after 2.5 seconds for 23% of page views around the world.

FCP mobile speed distribution (CrUX, July 2019)

First Input Delay

FID metrics show how fast web pages respond to user input (e.g. click, scroll, etc.).

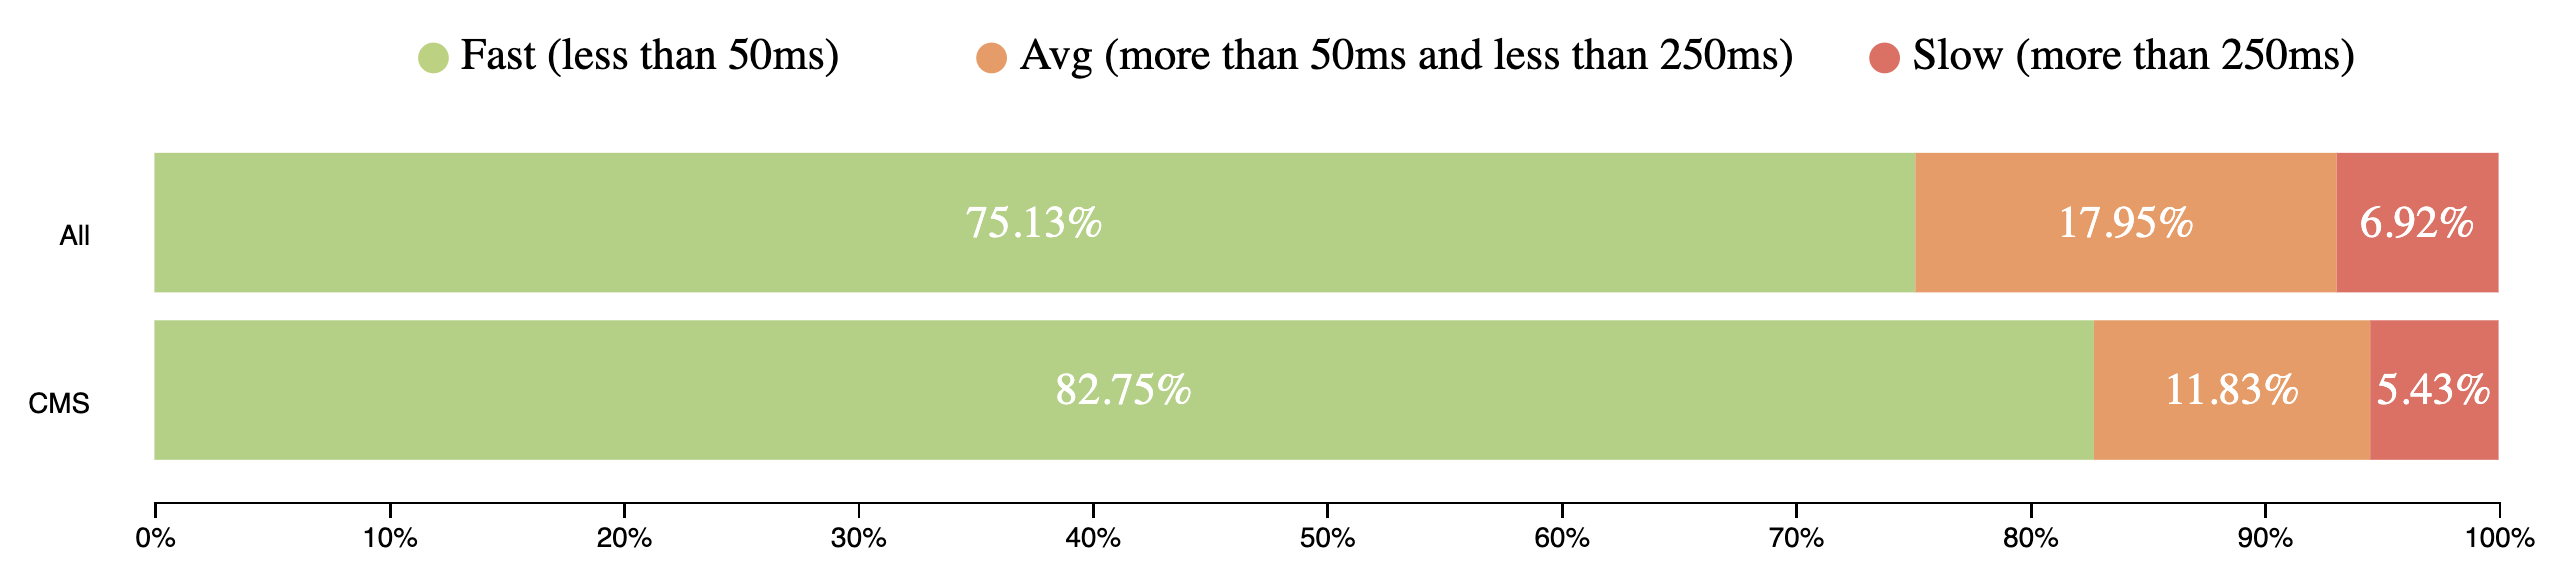
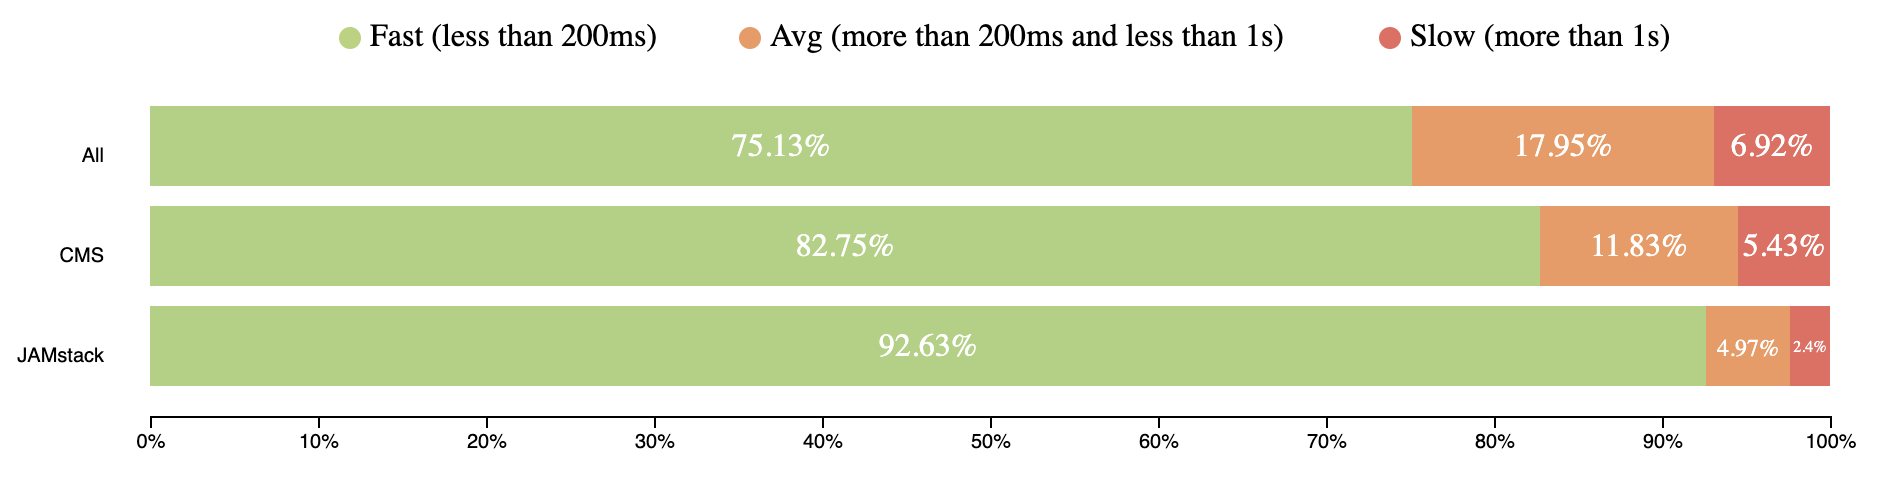
CrUX doesn’t have TTI data due to different restrictions, but has FID, which is even better can reflect page interactivity. Over 75% of mobile user experiences have input delay for 50ms and users didn’t experience any jank.

FID mobile speed distribution (CrUX, July 2019)

You can use the queries below and play with them on this site.

Data from July 2019
[
    {
      "date": "2019_07_01",
      "timestamp": "1561939200000",
      "client": "desktop",
      "fastTTFB": "27.33",
      "avgTTFB": "46.24",
      "slowTTFB": "26.43",
      "fastFCP": "48.99",
      "avgFCP": "33.17",
      "slowFCP": "17.84",
      "fastFID": "95.78",
      "avgFID": "2.79",
      "slowFID": "1.43"
    },
    {
      "date": "2019_07_01",
      "timestamp": "1561939200000",
      "client": "mobile",
      "fastTTFB": "23.61",
      "avgTTFB": "46.49",
      "slowTTFB": "29.89",
      "fastFCP": "38.58",
      "avgFCP": "38.28",
      "slowFCP": "23.14",
      "fastFID": "75.13",
      "avgFID": "17.95",
      "slowFID": "6.92"
    }
  ]
BigQuery
#standardSQL
  SELECT
    REGEXP_REPLACE(yyyymm, '(\\d{4})(\\d{2})', '\\1_\\2_01') AS date,
    UNIX_DATE(CAST(REGEXP_REPLACE(yyyymm, '(\\d{4})(\\d{2})', '\\1-\\2-01') AS DATE)) * 1000 * 60 * 60 * 24 AS timestamp,
    IF(device = 'desktop', 'desktop', 'mobile') AS client,
    ROUND(SUM(fast_fcp) * 100 / (SUM(fast_fcp) + SUM(avg_fcp) + SUM(slow_fcp)), 2) AS fastFCP,
    ROUND(SUM(avg_fcp) * 100 / (SUM(fast_fcp) + SUM(avg_fcp) + SUM(slow_fcp)), 2) AS avgFCP,
    ROUND(SUM(slow_fcp) * 100 / (SUM(fast_fcp) + SUM(avg_fcp) + SUM(slow_fcp)), 2) AS slowFCP,
    ROUND(SUM(fast_fid) * 100 / (SUM(fast_fid) + SUM(avg_fid) + SUM(slow_fid)), 2) AS fastFID,
    ROUND(SUM(avg_fid) * 100 / (SUM(fast_fid) + SUM(avg_fid) + SUM(slow_fid)), 2) AS avgFID,
    ROUND(SUM(slow_fid) * 100 / (SUM(fast_fid) + SUM(avg_fid) + SUM(slow_fid)), 2) AS slowFID
  FROM
    `chrome-ux-report.materialized.device_summary`
  WHERE
    yyyymm = '201907'
  GROUP BY
    date,
    timestamp,
    client
  ORDER BY
    date DESC,
    client

State of Content Management Systems (CMS) performance

CMSs should have become our saviors, helping us build faster sites. But looking at the data, that is not the case. The current state of CMS performance around the world is not so great.

TTFB mobile speed distribution comparison between all web and CMS (CrUX, July 2019)
Data from July 2019
[
    {
      "freq": "1548851",
      "fast": "0.1951",
      "avg": "0.4062",
      "slow": "0.3987"
    }
  ]
BigQuery
#standardSQL
  SELECT
    COUNT(DISTINCT origin) AS freq,
      
    ROUND(SUM(IF(ttfb.start < 200, ttfb.density, 0)) / SUM(ttfb.density), 4) AS fastTTFB,
    ROUND(SUM(IF(ttfb.start >= 200 AND ttfb.start < 1000, ttfb.density, 0)) / SUM(ttfb.density), 4) AS avgTTFB,
    ROUND(SUM(IF(ttfb.start >= 1000, ttfb.density, 0)) / SUM(ttfb.density), 4) AS slowTTFB
  
  FROM
    `chrome-ux-report.all.201907`,
    UNNEST(experimental.time_to_first_byte.histogram.bin) AS ttfb
  JOIN (
    SELECT
      url,
      app
    FROM
      `httparchive.technologies.2019_07_01_mobile`
    WHERE
      category = 'CMS'
    )
  ON CONCAT(origin, '/') = url
  ORDER BY
    freq DESC

And here are the FCP results:

FCP mobile speed distribution comparison between all web and CMS (CrUX, July 2019)

At least the FID results are a bit better:

FID mobile speed distribution comparison between all web and CMS (CrUX, July 2019)
Data from July 2019
[
    {
      "freq": "546415",
      "fastFCP": "0.2873",
      "avgFCP": "0.4187",
      "slowFCP": "0.2941",
      "fastFID": "0.8275",
      "avgFID": "0.1183",
      "slowFID": "0.0543"
    }
  ]
BigQuery
#standardSQL
  SELECT
    COUNT(DISTINCT origin) AS freq,
    ROUND(SUM(IF(fcp.start < 1000, fcp.density, 0)) / SUM(fcp.density), 4) AS fastFCP,
    ROUND(SUM(IF(fcp.start >= 1000 AND fcp.start < 2500, fcp.density, 0)) / SUM(fcp.density), 4) AS avgFCP,
    ROUND(SUM(IF(fcp.start >= 2500, fcp.density, 0)) / SUM(fcp.density), 4) AS slowFCP,
    ROUND(SUM(IF(fid.start < 50, fid.density, 0)) / SUM(fid.density), 4) AS fastFID,
    ROUND(SUM(IF(fid.start >= 50 AND fid.start < 250, fid.density, 0)) / SUM(fid.density), 4) AS avgFID,
    ROUND(SUM(IF(fid.start >= 250, fid.density, 0)) / SUM(fid.density), 4) AS slowFID
  FROM
    `chrome-ux-report.all.201907`,
    UNNEST(first_contentful_paint.histogram.bin) AS fcp,
    UNNEST(experimental.first_input_delay.histogram.bin) AS fid
  JOIN (
    SELECT
      url,
      app
    FROM
      `httparchive.technologies.2019_07_01_mobile`
    WHERE
      category = 'CMS'
    )
  ON CONCAT(origin, '/') = url
  ORDER BY
    freq DESC

As you can see, sites built with a CMS perform not much better than the overall performance of sites on web.

You can find performance distribution across different CMSs on this HTTPArchive forum discussion.

E-Commerce websites, a good example of sites that are typically built on a CMS, have really bad stats for page views:

  • ~40% – 1second for TTFB
  • ~30% – more than 1.5 second for FCP
  • ~12% – lag for page interaction.

I faced clients who requested support of IE10-IE11 because the traffic from those users represented 1%, which equalled millions of dollars in revenue. Please, calculate your losses in case 1% of users leave immediately and never came back because of bad performance. If users aren’t happy, business will be unhappy, too.

To get more details about how web performance correlates with revenue, check out WPO Stats. It’s a list of case studies from real companies and their success after improving performance.

JAMstack helps improve web performance

Credit: Snipcart

With JAMstack, developers do as little rendering on the client as possible, instead using server infrastructure for most things. Not to mention, most JAMstack workflows are great at handling deployments, and helping with scalability, among other benefits. Content is stored statically on a static file hosts and provided to the users via CDN.

Read Mathieu Dionne’s „New to JAMstack? Everything You Need to Know to Get Started” for a great place to become more familiar with JAMstack.

I had two years of experience working with one of the popular CMSs for e-commerce and we had a lot of problems with deployments, performance, scalability. The team would spend days and fixing them. It’s not what customers want. These are the sorts of big issues JAMstack solves.

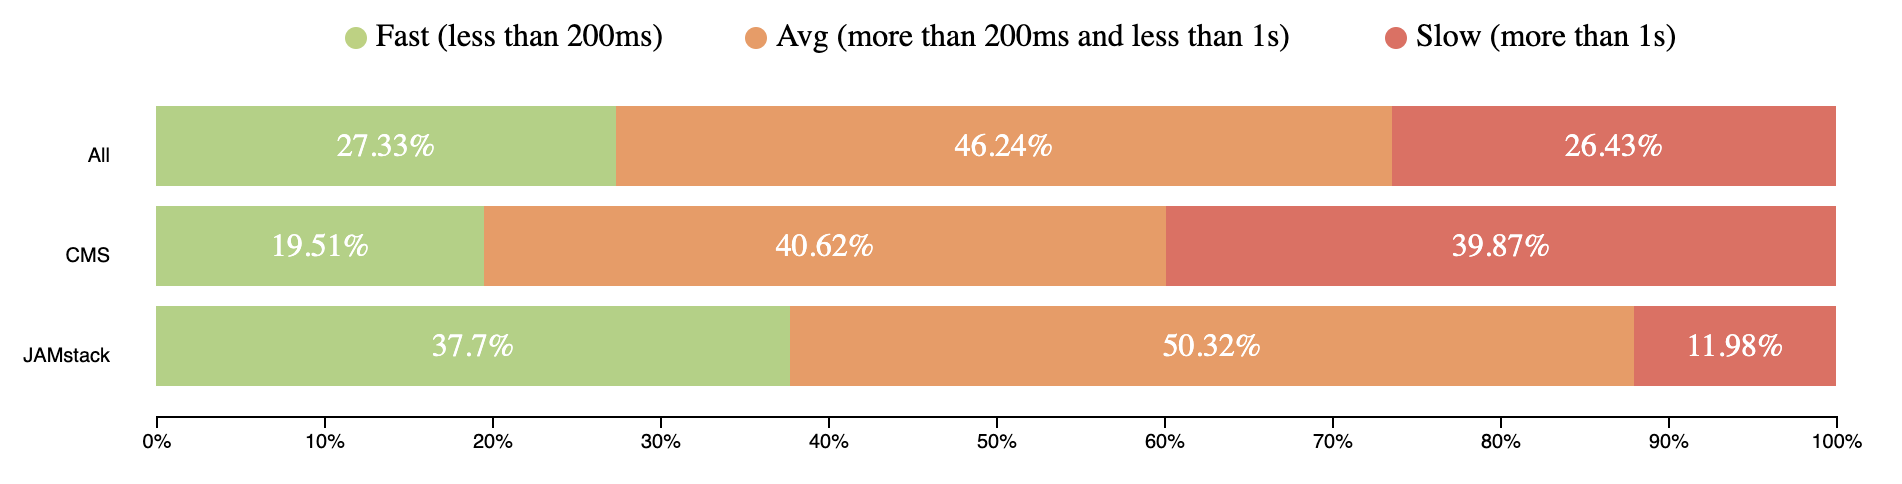
Looking at the CrUX data, JAMstack sites performance looks really solid. The following values are based on sites served by Netlify and GitHub. There is some discussion on the HTTPArchive forum where you can participate to make data more accurate.

Here are the results for TTFB:

TTFB mobile speed distribution comparison between all web, CMS and JAMstack sites (CrUX, July 2019)
Data from July 2019
[
  {
    "n": "7627",
    "fastTTFB": "0.377",
    "avgTTFB": "0.5032",
    "slowTTFB": "0.1198"
  }
]
BigQuery
#standardSQL
SELECT
  COUNT(DISTINCT origin) AS n,
  ROUND(SUM(IF(ttfb.start < 200, ttfb.density, 0)) / SUM(ttfb.density), 4) AS fastTTFB,
  ROUND(SUM(IF(ttfb.start >= 200 AND ttfb.start < 1000, ttfb.density, 0)) / SUM(ttfb.density), 4) AS avgTTFB,
  ROUND(SUM(IF(ttfb.start >= 1000, ttfb.density, 0)) / SUM(ttfb.density), 4) AS slowTTFB
FROM
  `chrome-ux-report.all.201907`,
  UNNEST(experimental.time_to_first_byte.histogram.bin) AS ttfb
JOIN
  (SELECT url, REGEXP_EXTRACT(LOWER(CONCAT(respOtherHeaders, resp_x_powered_by, resp_via, resp_server)),
      '(netlify|x-github-request)')
    AS platform
  FROM `httparchive.summary_requests.2019_07_01_mobile`)
ON
  CONCAT(origin, '/') = url
WHERE
  platform IS NOT NULL
ORDER BY
  n DESC

Here’s how FCP shook out:

FCP mobile speed distribution comparison between all web, CMS and JAMstack sites (CrUX, July 2019)

Now let’s look at FID:

FID mobile speed distribution comparison between all web, CMS and JAMstack sites (CrUX, July 2019)
Data from July 2019
[
    {
      "n": "4136",
      "fastFCP": "0.5552",
      "avgFCP": "0.3126",
      "slowFCP": "0.1323",
      "fastFID": "0.9263",
      "avgFID": "0.0497",
      "slowFID": "0.024"
    }
  ]
BigQuery
#standardSQL
  SELECT
    COUNT(DISTINCT origin) AS n,
    ROUND(SUM(IF(fcp.start < 1000, fcp.density, 0)) / SUM(fcp.density), 4) AS fastFCP,
    ROUND(SUM(IF(fcp.start >= 1000 AND fcp.start < 2500, fcp.density, 0)) / SUM(fcp.density), 4) AS avgFCP,
    ROUND(SUM(IF(fcp.start >= 2500, fcp.density, 0)) / SUM(fcp.density), 4) AS slowFCP,
    ROUND(SUM(IF(fid.start < 50, fid.density, 0)) / SUM(fid.density), 4) AS fastFID,
    ROUND(SUM(IF(fid.start >= 50 AND fid.start < 250, fid.density, 0)) / SUM(fid.density), 4) AS avgFID,
    ROUND(SUM(IF(fid.start >= 250, fid.density, 0)) / SUM(fid.density), 4) AS slowFID
  FROM
    `chrome-ux-report.all.201907`,
    UNNEST(first_contentful_paint.histogram.bin) AS fcp,
    UNNEST(experimental.first_input_delay.histogram.bin) AS fid
  JOIN
    (SELECT url, REGEXP_EXTRACT(LOWER(CONCAT(respOtherHeaders, resp_x_powered_by, resp_via, resp_server)),
        '(netlify|x-github-request)')
      AS platform
    FROM `httparchive.summary_requests.2019_07_01_mobile`)
  ON
    CONCAT(origin, '/') = url
  WHERE
    platform IS NOT NULL
  ORDER BY
    n DESC

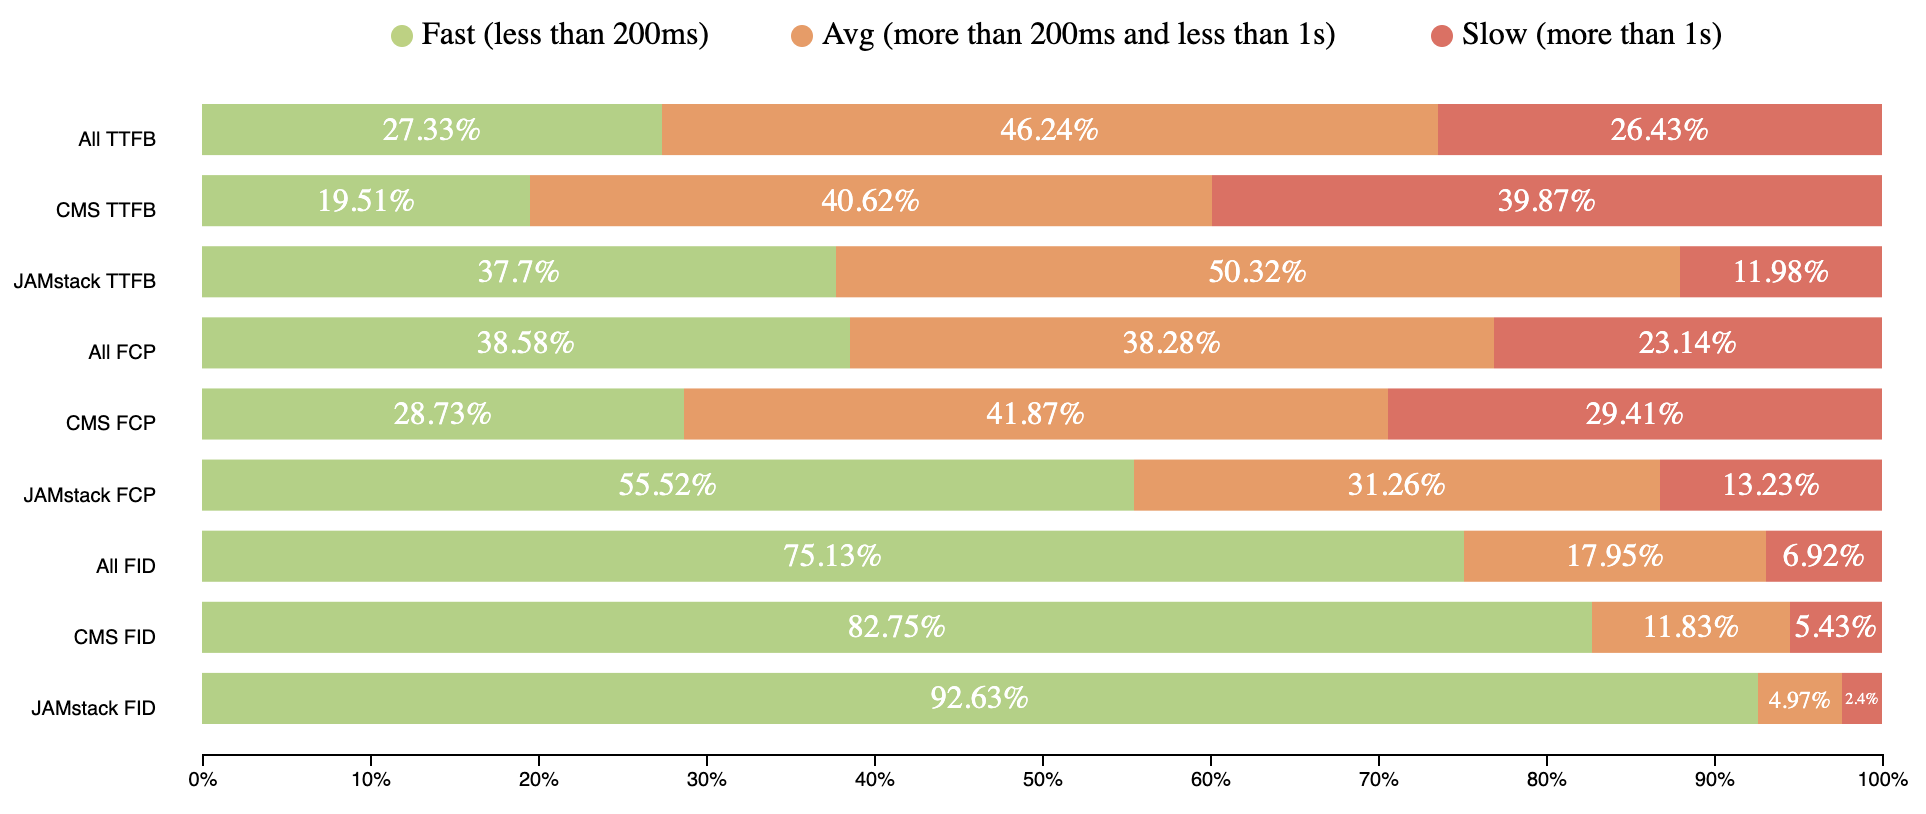
The numbers show the performance of JAMstack sites is the best. The numbers are pretty much the same for mobile and desktop which is even more amazing!

Some highlights from engineering leaders

Let me show you a couple of examples from some prominent folks in the industry:

Out of 468 million requests in the @HTTPArchive, 48% were not served from a CDN. I've visualized where they were served from below. Many of them were requests to 3rd parties. The client requesting them was in Redwood City, CA. Latency matters. #WebPerf pic.twitter.com/0F7nFa1QgM

— Paul Calvano (@paulcalvano) August 29, 2019

JAMstack sites are generally CDN-hosted and mitigate TTFB. Since the file hosting is handled by infrastructures like Amazon Web Services or similar, all sites performance can be improved in one fix.

One more real investigation says that it is better to deliver static HTML for better FCP.

Which has a better First Meaningful Paint time?

① a raw 8.5MB HTML file with the full text of every single one of my 27,506 tweets
② a client rendered React site with exactly one tweet on it

(Spoiler: @____lighthouse reports 8.5MB of HTML wins by about 200ms)

— Zach Leatherman (@zachleat) September 6, 2019

Here’s a comparison for all results shown above together:

Mobile speed distribution comparison between all web, CMS and JAMstack sites (CrUX, July 2019)

JAMstack brings better performance to the web by statically serving pages with CDNs. This is important because a fast back-end that takes a long time to reach users will be slow, and likewise, a slow back-end that is quick to reach users will also be slow.

JAMstack hasn’t won the perf race yet, because the number of sites built with it not so huge as for example for CMS, but the intention to win it is really great.

Adding these metrics to a performance budget can be one way make sure you are building good performance into your workflow. Something like:

  • TTFB: 200ms
  • FCP: 1s
  • FID: 50ms

Spend it wisely 🙂


Editor’s note: Artem Denysov is from Stackbit, which is a service that helps tremendously with spinning up JAMstack sites and more upcoming tooling to smooth out some of the workflow edges with JAMstack sites and content. Artem told me he’d like to thank Rick Viscomi, Rob Austin, and Aleksey Kulikov for their help in reviewing the article.

The post A Look at JAMstack’s Speed, By the Numbers appeared first on CSS-Tricks.

A Look at JAMstack’s Speed, By the Numbers

Post pobrano z: A Look at JAMstack’s Speed, By the Numbers

People say JAMstack sites are fast — let’s find out why by looking at real performance metrics! We’ll cover common metrics, like Time to First Byte (TTFB) among others, then compare data across a wide section of sites to see how different ways to slice those sites up compare.

First, I’d like to present a small analysis to provide some background. According to the HTTPArchive metrics report on page loading, users wait an average of 6.7 seconds to see primary content.

First Contentful Paint (FCP) – measures the point at which text or graphics are first rendered to the screen.

The FCP distribution for the 10th, 50th and 90th percentile values as reported on August 1, 2019.

If we are talking about engagement with a page (Time to Interactive), users wait even longer. The average time to interactive is 9.3 seconds.

Time to Interactive (TTI) – a time when user can interact with a page without delay.

TTI distribution for the 10th, 50th and 90th percentile values as reported on August 1, 2019.

State of the real user web performance

The data above is from lab monitoring and doesn’t fully represent real user experience. Real users data based taken from the Chrome User Experience Report (CrUX) shows an even wider picture.

​​I’ll use data aggregated from users who use mobile devices. Specifically, we will use metrics like:


Time To First Byte

TTFB represents the time browser waits to receive first bytes of the response from server. TTFB takes from 200ms to 1 second for users around the world. It’s a pretty long time to receive the first chunks of the page.

TTFB mobile speed distribution (CrUX, July 2019)

First Contentful Paint

FCP happens after 2.5 seconds for 23% of page views around the world.

FCP mobile speed distribution (CrUX, July 2019)

First Input Delay

FID metrics show how fast web pages respond to user input (e.g. click, scroll, etc.).

CrUX doesn’t have TTI data due to different restrictions, but has FID, which is even better can reflect page interactivity. Over 75% of mobile user experiences have input delay for 50ms and users didn’t experience any jank.

FID mobile speed distribution (CrUX, July 2019)

You can use the queries below and play with them on this site.

Data from July 2019
[
    {
      "date": "2019_07_01",
      "timestamp": "1561939200000",
      "client": "desktop",
      "fastTTFB": "27.33",
      "avgTTFB": "46.24",
      "slowTTFB": "26.43",
      "fastFCP": "48.99",
      "avgFCP": "33.17",
      "slowFCP": "17.84",
      "fastFID": "95.78",
      "avgFID": "2.79",
      "slowFID": "1.43"
    },
    {
      "date": "2019_07_01",
      "timestamp": "1561939200000",
      "client": "mobile",
      "fastTTFB": "23.61",
      "avgTTFB": "46.49",
      "slowTTFB": "29.89",
      "fastFCP": "38.58",
      "avgFCP": "38.28",
      "slowFCP": "23.14",
      "fastFID": "75.13",
      "avgFID": "17.95",
      "slowFID": "6.92"
    }
  ]
BigQuery
#standardSQL
  SELECT
    REGEXP_REPLACE(yyyymm, '(\\d{4})(\\d{2})', '\\1_\\2_01') AS date,
    UNIX_DATE(CAST(REGEXP_REPLACE(yyyymm, '(\\d{4})(\\d{2})', '\\1-\\2-01') AS DATE)) * 1000 * 60 * 60 * 24 AS timestamp,
    IF(device = 'desktop', 'desktop', 'mobile') AS client,
    ROUND(SUM(fast_fcp) * 100 / (SUM(fast_fcp) + SUM(avg_fcp) + SUM(slow_fcp)), 2) AS fastFCP,
    ROUND(SUM(avg_fcp) * 100 / (SUM(fast_fcp) + SUM(avg_fcp) + SUM(slow_fcp)), 2) AS avgFCP,
    ROUND(SUM(slow_fcp) * 100 / (SUM(fast_fcp) + SUM(avg_fcp) + SUM(slow_fcp)), 2) AS slowFCP,
    ROUND(SUM(fast_fid) * 100 / (SUM(fast_fid) + SUM(avg_fid) + SUM(slow_fid)), 2) AS fastFID,
    ROUND(SUM(avg_fid) * 100 / (SUM(fast_fid) + SUM(avg_fid) + SUM(slow_fid)), 2) AS avgFID,
    ROUND(SUM(slow_fid) * 100 / (SUM(fast_fid) + SUM(avg_fid) + SUM(slow_fid)), 2) AS slowFID
  FROM
    `chrome-ux-report.materialized.device_summary`
  WHERE
    yyyymm = '201907'
  GROUP BY
    date,
    timestamp,
    client
  ORDER BY
    date DESC,
    client

State of Content Management Systems (CMS) performance

CMSs should have become our saviors, helping us build faster sites. But looking at the data, that is not the case. The current state of CMS performance around the world is not so great.

TTFB mobile speed distribution comparison between all web and CMS (CrUX, July 2019)
Data from July 2019
[
    {
      "freq": "1548851",
      "fast": "0.1951",
      "avg": "0.4062",
      "slow": "0.3987"
    }
  ]
BigQuery
#standardSQL
  SELECT
    COUNT(DISTINCT origin) AS freq,
      
    ROUND(SUM(IF(ttfb.start < 200, ttfb.density, 0)) / SUM(ttfb.density), 4) AS fastTTFB,
    ROUND(SUM(IF(ttfb.start >= 200 AND ttfb.start < 1000, ttfb.density, 0)) / SUM(ttfb.density), 4) AS avgTTFB,
    ROUND(SUM(IF(ttfb.start >= 1000, ttfb.density, 0)) / SUM(ttfb.density), 4) AS slowTTFB
  
  FROM
    `chrome-ux-report.all.201907`,
    UNNEST(experimental.time_to_first_byte.histogram.bin) AS ttfb
  JOIN (
    SELECT
      url,
      app
    FROM
      `httparchive.technologies.2019_07_01_mobile`
    WHERE
      category = 'CMS'
    )
  ON CONCAT(origin, '/') = url
  ORDER BY
    freq DESC

And here are the FCP results:

FCP mobile speed distribution comparison between all web and CMS (CrUX, July 2019)

At least the FID results are a bit better:

FID mobile speed distribution comparison between all web and CMS (CrUX, July 2019)
Data from July 2019
[
    {
      "freq": "546415",
      "fastFCP": "0.2873",
      "avgFCP": "0.4187",
      "slowFCP": "0.2941",
      "fastFID": "0.8275",
      "avgFID": "0.1183",
      "slowFID": "0.0543"
    }
  ]
BigQuery
#standardSQL
  SELECT
    COUNT(DISTINCT origin) AS freq,
    ROUND(SUM(IF(fcp.start < 1000, fcp.density, 0)) / SUM(fcp.density), 4) AS fastFCP,
    ROUND(SUM(IF(fcp.start >= 1000 AND fcp.start < 2500, fcp.density, 0)) / SUM(fcp.density), 4) AS avgFCP,
    ROUND(SUM(IF(fcp.start >= 2500, fcp.density, 0)) / SUM(fcp.density), 4) AS slowFCP,
    ROUND(SUM(IF(fid.start < 50, fid.density, 0)) / SUM(fid.density), 4) AS fastFID,
    ROUND(SUM(IF(fid.start >= 50 AND fid.start < 250, fid.density, 0)) / SUM(fid.density), 4) AS avgFID,
    ROUND(SUM(IF(fid.start >= 250, fid.density, 0)) / SUM(fid.density), 4) AS slowFID
  FROM
    `chrome-ux-report.all.201907`,
    UNNEST(first_contentful_paint.histogram.bin) AS fcp,
    UNNEST(experimental.first_input_delay.histogram.bin) AS fid
  JOIN (
    SELECT
      url,
      app
    FROM
      `httparchive.technologies.2019_07_01_mobile`
    WHERE
      category = 'CMS'
    )
  ON CONCAT(origin, '/') = url
  ORDER BY
    freq DESC

As you can see, sites built with a CMS perform not much better than the overall performance of sites on web.

You can find performance distribution across different CMSs on this HTTPArchive forum discussion.

E-Commerce websites, a good example of sites that are typically built on a CMS, have really bad stats for page views:

  • ~40% – 1second for TTFB
  • ~30% – more than 1.5 second for FCP
  • ~12% – lag for page interaction.

I faced clients who requested support of IE10-IE11 because the traffic from those users represented 1%, which equalled millions of dollars in revenue. Please, calculate your losses in case 1% of users leave immediately and never came back because of bad performance. If users aren’t happy, business will be unhappy, too.

To get more details about how web performance correlates with revenue, check out WPO Stats. It’s a list of case studies from real companies and their success after improving performance.

JAMstack helps improve web performance

Credit: Snipcart

With JAMstack, developers do as little rendering on the client as possible, instead using server infrastructure for most things. Not to mention, most JAMstack workflows are great at handling deployments, and helping with scalability, among other benefits. Content is stored statically on a static file hosts and provided to the users via CDN.

Read Mathieu Dionne’s „New to JAMstack? Everything You Need to Know to Get Started” for a great place to become more familiar with JAMstack.

I had two years of experience working with one of the popular CMSs for e-commerce and we had a lot of problems with deployments, performance, scalability. The team would spend days and fixing them. It’s not what customers want. These are the sorts of big issues JAMstack solves.

Looking at the CrUX data, JAMstack sites performance looks really solid. The following values are based on sites served by Netlify and GitHub. There is some discussion on the HTTPArchive forum where you can participate to make data more accurate.

Here are the results for TTFB:

TTFB mobile speed distribution comparison between all web, CMS and JAMstack sites (CrUX, July 2019)
Data from July 2019
[
  {
    "n": "7627",
    "fastTTFB": "0.377",
    "avgTTFB": "0.5032",
    "slowTTFB": "0.1198"
  }
]
BigQuery
#standardSQL
SELECT
  COUNT(DISTINCT origin) AS n,
  ROUND(SUM(IF(ttfb.start < 200, ttfb.density, 0)) / SUM(ttfb.density), 4) AS fastTTFB,
  ROUND(SUM(IF(ttfb.start >= 200 AND ttfb.start < 1000, ttfb.density, 0)) / SUM(ttfb.density), 4) AS avgTTFB,
  ROUND(SUM(IF(ttfb.start >= 1000, ttfb.density, 0)) / SUM(ttfb.density), 4) AS slowTTFB
FROM
  `chrome-ux-report.all.201907`,
  UNNEST(experimental.time_to_first_byte.histogram.bin) AS ttfb
JOIN
  (SELECT url, REGEXP_EXTRACT(LOWER(CONCAT(respOtherHeaders, resp_x_powered_by, resp_via, resp_server)),
      '(netlify|x-github-request)')
    AS platform
  FROM `httparchive.summary_requests.2019_07_01_mobile`)
ON
  CONCAT(origin, '/') = url
WHERE
  platform IS NOT NULL
ORDER BY
  n DESC

Here’s how FCP shook out:

FCP mobile speed distribution comparison between all web, CMS and JAMstack sites (CrUX, July 2019)

Now let’s look at FID:

FID mobile speed distribution comparison between all web, CMS and JAMstack sites (CrUX, July 2019)
Data from July 2019
[
    {
      "n": "4136",
      "fastFCP": "0.5552",
      "avgFCP": "0.3126",
      "slowFCP": "0.1323",
      "fastFID": "0.9263",
      "avgFID": "0.0497",
      "slowFID": "0.024"
    }
  ]
BigQuery
#standardSQL
  SELECT
    COUNT(DISTINCT origin) AS n,
    ROUND(SUM(IF(fcp.start < 1000, fcp.density, 0)) / SUM(fcp.density), 4) AS fastFCP,
    ROUND(SUM(IF(fcp.start >= 1000 AND fcp.start < 2500, fcp.density, 0)) / SUM(fcp.density), 4) AS avgFCP,
    ROUND(SUM(IF(fcp.start >= 2500, fcp.density, 0)) / SUM(fcp.density), 4) AS slowFCP,
    ROUND(SUM(IF(fid.start < 50, fid.density, 0)) / SUM(fid.density), 4) AS fastFID,
    ROUND(SUM(IF(fid.start >= 50 AND fid.start < 250, fid.density, 0)) / SUM(fid.density), 4) AS avgFID,
    ROUND(SUM(IF(fid.start >= 250, fid.density, 0)) / SUM(fid.density), 4) AS slowFID
  FROM
    `chrome-ux-report.all.201907`,
    UNNEST(first_contentful_paint.histogram.bin) AS fcp,
    UNNEST(experimental.first_input_delay.histogram.bin) AS fid
  JOIN
    (SELECT url, REGEXP_EXTRACT(LOWER(CONCAT(respOtherHeaders, resp_x_powered_by, resp_via, resp_server)),
        '(netlify|x-github-request)')
      AS platform
    FROM `httparchive.summary_requests.2019_07_01_mobile`)
  ON
    CONCAT(origin, '/') = url
  WHERE
    platform IS NOT NULL
  ORDER BY
    n DESC

The numbers show the performance of JAMstack sites is the best. The numbers are pretty much the same for mobile and desktop which is even more amazing!

Some highlights from engineering leaders

Let me show you a couple of examples from some prominent folks in the industry:

Out of 468 million requests in the @HTTPArchive, 48% were not served from a CDN. I've visualized where they were served from below. Many of them were requests to 3rd parties. The client requesting them was in Redwood City, CA. Latency matters. #WebPerf pic.twitter.com/0F7nFa1QgM

— Paul Calvano (@paulcalvano) August 29, 2019

JAMstack sites are generally CDN-hosted and mitigate TTFB. Since the file hosting is handled by infrastructures like Amazon Web Services or similar, all sites performance can be improved in one fix.

One more real investigation says that it is better to deliver static HTML for better FCP.

Which has a better First Meaningful Paint time?

① a raw 8.5MB HTML file with the full text of every single one of my 27,506 tweets
② a client rendered React site with exactly one tweet on it

(Spoiler: @____lighthouse reports 8.5MB of HTML wins by about 200ms)

— Zach Leatherman (@zachleat) September 6, 2019

Here’s a comparison for all results shown above together:

Mobile speed distribution comparison between all web, CMS and JAMstack sites (CrUX, July 2019)

JAMstack brings better performance to the web by statically serving pages with CDNs. This is important because a fast back-end that takes a long time to reach users will be slow, and likewise, a slow back-end that is quick to reach users will also be slow.

JAMstack hasn’t won the perf race yet, because the number of sites built with it not so huge as for example for CMS, but the intention to win it is really great.

Adding these metrics to a performance budget can be one way make sure you are building good performance into your workflow. Something like:

  • TTFB: 200ms
  • FCP: 1s
  • FID: 50ms

Spend it wisely 🙂


Editor’s note: Artem Denysov is from Stackbit, which is a service that helps tremendously with spinning up JAMstack sites and more upcoming tooling to smooth out some of the workflow edges with JAMstack sites and content. Artem told me he’d like to thank Rick Viscomi, Rob Austin, and Aleksey Kulikov for their help in reviewing the article.

The post A Look at JAMstack’s Speed, By the Numbers appeared first on CSS-Tricks.

A Beginner’s Guide to Affinity Photo for iPad

Post pobrano z: A Beginner’s Guide to Affinity Photo for iPad

Final product image
What You’ll Be Creating

Today is all about Affinity Photo for the iPad. For a long time, photo editor apps for mobile devices were… less than stellar. And it made sense. Mobile meant phones, and no one was really looking to create full-blown composites on their phone.

But even now, with the iPad being so advanced that some people argue that it could be used as a stand-alone laptop, photo editing apps are still not much more than lightweight versions of their original counterparts, offering some filters and color. But Affinity Photo for the iPad is unique in that it offers the full power of Affinity Photo—not a wimpy, watered-down version. This even includes PSD importing and exporting! 

So let’s take a look at how you can get the full Affinity Photo experience, in a much smaller package and all on the go! 

Follow along with us over on the Envato Tuts+ YouTube channel:

What You’ll Need

You will need the following resources in order to complete this project:

Find more resources on Envato Elements!

1. Interface Settings and Left-Handed Mode

The first thing I always recommend when jumping into a new program is to set up your interface and settings. And while the interface is nowhere near as fluid as the desktop version, there are still a lot of personal preferences you can set by clicking on the Gear icon found in the upper right-hand corner of the Affinity Photo app.

splash screen

Step 1

First, in General, you have your Undo Limit, going up to an insane 2,000 undos. I recommend keeping it around 25-50 for the sake of performance. 

undo limit

Step 2

Next, how often you’d like things to Autosave, great for those like me who live that „10% or less battery life” life.

auto save

Step 3

Your Language and your Default Save Location. I highly recommend iCloud Drive for reasons I will cover a little later on!

language

Step 4

In Interface, you will find your Background Gray Level. I like to keep things nice and dark myself.

background color

Step 5

And finally, you will also find Left Handed Mode for all you lefties out there! 

So just take a quick look through, and get everything nice and set up to your liking. 

left handed mode

2. Creating a Document & Importing Resources

Next, we will want to set up our canvas by pressing the + icon found in the upper right-hand corner of the Affinity Photo app’s splash screen.

new document

Step 1

From here, you can choose from several options, including:

  • Create a whole New Document, which will bring up your typical options of Size, Color, and some document presets.
  • You can also import New From Clipboard or From Photos saved to your iPad.
  • You can Import From Cloud, which is what I personally find to be the easiest. To do this, you will have to have iCloud set up, which you likely already have or at the very least have it installed on one of your Apple products by default. But if not, it’s a straightforward process!
import from icloud

Step 2

Download and install iCloud on both the iPad and the computer you will be sharing the files with—in this case, my PC. Then you can drag and drop any resources you might need into the shared drive. 

How you go about importing depends not only on your personal workflow but on the image you will be creating. In this case, we will be creating a portrait photo effect, so I want to start by opening my portrait photo.

subject

3. Controlling the Canvas and Gestures

Affinity Photo for the iPad keeps it very simple with its gestures, keeping things fairly standard and intuitive. 

How to Zoom in Affinity Photo

You zoom in and out by placing two fingers on the screen and then pinching.

If you pinch outwards, you will zoom in, and if you pinch inward, you will zoom out.

You can also adjust the Zoom by going into the Navigator found on the right-hand side of the screen. You will see a few preset percentages as well as the Fit to screen option. 

zoom

How to Pan in Affinity Photo

To pan, simply take one finger, touch, and drag.

Make sure the View tool is selected. If you have another tool selected, like the Paintbrush tool, you will want to use two fingers instead of one, so that you won’t apply the tool.

How to Rotate in Affinity Photo

To rotate, you will first have to go into the Navigator, as Rotate is turned off by default. Once it’s turned on, you can rotate by using the rotation dial within the Navigator or by making a pinch and swivel motion.

To reset your canvas’s angle, click the rotation dial, input 0, and hit OK!

roate

How to Redo and Undo in Affinity Photo

Redo and Undo are also controlled using gestures. You can Undo by doing a two-finger tap on the canvas.

Redo by doing a three-finger tap on the canvas. 

How to Duplicate, Delete, Cut, and Copy in Affinity Photo

If you hold down on the canvas with one finger, a quick context menu will open up containing the Duplicate, Delete, Cut, and Copy options.

quick context

There are also tool-specific gestures as well, which we will cover when we cover the tool itself! But most come down to a simple drag, swipe, or tap. No magic fingers needed.

4. Moving, Rotating, and Resizing Layers

Let’s go into Options located in the File menu—that would be the three dots in the upper left-hand corner. We are going to go to Place From Cloud and bring in a glass texture.

place from icloud

With that placed, let’s look at how we rotate, resize, and move around different layers. First, you will want to make sure the Move tool is selected.  

move tool

How to Move Layers in Affinity Photo

To Move a layer around, hold your finger inside the image, and pan around.

Remember, if you want to Pan the canvas, and not move the layer around, you will use two fingers instead of one.  

How to Resize Layers in Affinity Photo

To resize layers, you will want to tap and drag the control nodes—the blue dots found around the image.

Some images and layers will by default constrain, keeping the original aspect ratio, whereas some layers won’t.

Whatever the case, you can use a one-finger modifier to toggle it on or off. While resizing the image with one finger, use your other finger to press down on the screen. 

resize

How to Rotate Layers in Affinity Photo

Rotate by holding the top control handle and swiveling to either the left or right.

If you want more precise control, you can open up the Transform panel found on the right-hand side.

Here you can adjust the order, Flip, and Rotate, and adjust the Dimensions by either tapping to change the numbers manually or by swiping up or down on the dimension dials. 

rotate

5. Layers, Blend Modes, and Filters 

Now, let’s take a closer look at layers. I’ll quickly run through the basics, and then we can jump into the good stuff.

How to Create a New Layer in Affinity Photo

Create a layer by opening up the Layers panel, found on the right-hand side.

Tap the + sign. From here, you can create a Pixel or Fill Layer. As well as layer masks and groups… let’s hold off on those.

I am going to create a Fill Layer set to a very dark purple #181320, along with an empty Pixel Layer.

create layer

How to Re-Order and Group Layers in Affinity Photo

Re-order a layer by tapping and dragging.

To re-order multiple layers at once, use a swipe gesture on any layers you’d like to move to select them. Do the same to deselect layers

To select multiple layers at once, select a layer, and then use two fingers to select another layer either above or below the initially selected layer. All layers between the two selected layers will become selected themselves.

You can group things together by selecting the layers you want to group, and then making a pinch-in gesture. You can then ungroup layers by selecting the group and pinching outwards.

Alternatively, you can hit the Group Layers icon found inside the Layers panel, to the left of the + icon. I much prefer the second method!

group layers

How to Duplicate in Affinity Photo

Duplicate a layer by selecting the Move Tool, double-tapping the layer on the canvas that you want to duplicate, holding down on the layer with two fingers, and then dragging with a finger on your other hand.

duplicate

How to Adjust Layer Settings in Affinity Photo

To get all of the fine-tuning layer options such as Opacity and Layer Modes, select the layer you want to adjust, and then click on the Layer Options icon in the Layers panel (shown as three dots in a circle).

layer settings

You can also choose to Lock and rename a layer in the layer options. 

lock and rename layers

How to Change Layer Modes in Affinity Photo

One of my favorite tools in both Affinity Photo and Photoshop is the Layer Modes. They are endlessly useful, so they are an absolute must-have. You can adjust the layer mode by clicking Normal and selecting from the list that appears. 

Alternatively, you can swipe through each layer mode individually by using a swiping gesture over the layer mode options.

layer modes

How to Add Adjustment Layers in Affinity Photo

To access the adjustment layers, click on the icon of the three-circle pyramid found in the right-hand toolbar. A list of all of your adjustments will come up. 

Let’s start with a Brightness/Contrast adjustment layer. When tapped, the options available to the adjustment layer you choose will come up towards the bottom of the screen.

To adjust the settings, either swipe on the various setting dials or you can tap them to input the amounts manually. Each adjustment layer will have its own options!   

adjustment layers

How to Add Filters in Affinity Photo

All of your Filters can be found directly below your adjustment layers.

Like with adjustment layers, all Filters will have their own filter specific options that will appear at the bottom of the screen.

filters

Along with the live preview you can also choose to have a split preview by hitting the Split icon giving you a before and after view of your photo.   

split preview

6. Selections and Layer Masks

Next, onto selections, extractions, and layer masks!

Step 1

First, we need to switch into the Selection Persona. This is where we will find all of our selection and extraction based tools.

selection persona

You have all the classic tools to choose from. 

  1. Smart selection Tool
  2. Freehand Selection Tool
  3. Marquee Tools
  4. Flood Selection Tool 
  5. Color Select Tool
selection tools

You can see all of the selection options towards the bottom of the screen. Including whether you want to add to Add or Subtract from a selection and the Brush Width. 

quick select

Step 2

Of course, you will likely want to refine your selection. Hit the Refine Selection tool found at the very bottom of the toolbar.

Your adjustment should be set to Matte by default.   

refine selection

Step 3

Next, adjust your brush, and drag across the edges of any hair, cloth or…anything really that needs to be selected.

This tool works exactly the same in the iPad version as it doe the desktop version! So, for instance, if too much gets selected, you can change from Matte to Foreground and fill in any part that should be in the foreground.

Once you are happy, you will want to choose your Output, in this case, New Layer with Mask and then hit Apply. 

output as new layer

Step 4

Now, if you want to add a Layer Mask without creating a selection all you have to do is choose the layer you want to add a mask too, hit the + icon found in the layers panel, and then select Mask Layer.

Use a black brush to mask out any areas as normal!

add a layer mask

7. The Liquify Persona 

Just like all the selection tools, all of the liquify tools and options have their very own persona. The Liquify Persona works the same as most, if not all, Liquify tools—which I like!  

liquify persona

Step 1

You push and pull on the grid, adjusting the Liquify Brush using the setting towards the bottom of the screen. 

liquify brush

Step 2

Adjust the mesh display by clicking the Mesh icon found on the right-hand side of the canvas. You can change the Color of the grid or hide it completely by bringing the Opacity down to 0%.

grid options

Step 3

All of your different liquify tools can be found to the left, allowing you to push, pull, and twist in every direction imaginable.

liquify tools

Step 4

Finally, there is also the Freeze and Thaw tools, which are your liquify masks.

Freeze makes it so the area marked in red, won’t be affected by any liquify tools.

Thaw erases the frozen mask, allowing that area to be liquefied again.  

thaw and freeze tools

8. The Brush Tool

Let’s take a quick look at the basics of the Paint Brush tool. 

Where to Find Brush Categories in Affinity Photo

First, we have the Brush Categories, which will hold all of Affinity Photo’s default brushes. 

You can switch through the brushes by going towards the top and hitting Basic, which is what your brushes are set to by default. 

brush categories

Where to Find Brush Settings in Affinity Photo

Again, once you have the Brush tool selected, all of its settings will pop up towards the bottom of the screen. Here you have your Width, Opacity, Flow, Hardness, and Color. 

From here you can paint using your finger, or the Apple Pencil if you need more precise details. 

brush settings

How to Import Brushes in Affinity Photo

And of course, you can import your own brushes by tapping the Three-Lined icon on the upper right of the Brushes panel and choosing Import Brushes.

From here you will choose wherever you have your brushes saved. You can drop them right into iCloud Drive, and then tap to import!

import brushes

More Brush Settings in Affinity Photo

To further adjust a brush, beyond just the typical size or flow, tap and hold on a brush, choose Edit and all of its possible settings will come up.

edit brushes
brush settings

If you want to reset the brush back to default you can tap, hold and then choose Reset.

reset brushes

And as a little trick, hit the Pin icon found towards the top of the Brushes panel to keep the Brushes panel open. This is handy if you switch your brushes around a lot, as the constant opening and closing can get incredibly annoying.

pin brush panel

9. Saving and Exporting 

Finally, at the end of every work session, you are probably going to do one of two things: save or export.

How to Auto-Save in Affinity Photo 

Affinity Photo for the iPad can save a document in one of two ways. It will first Auto-Save all on its own, saving the file internally within the app’s memory. This is great for maybe one or two projects, but things are going to start piling up real fast. 

auto save

How to Save in Affinity Photo

The second option is to save a copy of the file by tapping the Document menu and choosing to Save a Copy.

save a copy

From here, you can rename your file and decide where to save it to—in my case, iCloud Drive. You can also link things up with Dropbox and other file-sharing networks.

This will save as an Affinity Photo file, and it can be opened in the desktop version of Affinity Photo without having to convert or merge any layers!

save location

How to Export in Affinity Photo

But if your image is all finished, you might as well export it using your iPad! Go to the Document menu and choose Export to bring up all of the exporting options.

You have all of the exporting options the desktop version has, including Exporting to PSD. The settings will change depending on the format you choose. 

exsport

Once you have all of your settings set, you need hit OK to choose, once again, where you want the image to be saved. Once it’s exported, you are good to go!  

export settings

We’ve Done It!

And there you have it: a basic rundown of the Affinity Photo iPad App. If you are already experienced, or even just someone who knows their way around the desktop version of Affinity Photo „pretty OK”, you will have absolutely no problem diving headfirst into the iPad version of Affinity Photo. It’s the same program—but with touch! And carrying around an iPad is maybe a tad bit less cumbersome than a full-blown workstation desktop with a dual-screen setup. You won’t get as many weird looks at your local coffee shop, at the very least. 

So, as always, keep experimenting with different techniques and practicing, and don’t forget to post your version below, along with any questions, comments, or critiques!

final image

Looking to learn more? Why not check out the following photo manipulation tutorials: