This tutorial will show you a really quick and easy way to create a stylized chalk text effect, using some filters and drop shadow effects. Let’s get started!
Looking for a chalk effect in Photoshop? Head on over to Envato Elements and download this amazing chalk effect Photoshop Layer Styles set with 15 chalk and 15 charcoal style presets.
1. Create the Background
Step 1
Open the Black Board image, and then go to Image > Image Size, and set the Width to 1000 px.
Step 2
Click the Create new fill or adjustment layer icon at the bottom of the Layers panel and choose Levels.
Step 3
Set the Gamma value to 0.95. This will darken the texture a little bit.
2. Create the Text and Chalk Layers
Step 1
Create the text using the font Magnolia Script. Set the Size to 200 pt, and if you’re using multiple lines of text, set the Leading to a value around 185 pt.
Step 2
Set the Foreground and Background colors to Black and White.
Create a new layer below the text layer, call it Chalk, and fill it with Black.
Step 3
Go to Filter > Convert for Smart Filters, to convert the layer into a smart object.
3. Apply the Filters
Step 1
Go to Filter > Noise > Add Noise.
Change the Amount to 150 and the Distribution to Gaussian, and check the Monochromatic box.
Step 2
Go to Filter > Stylize > Diffuse, and choose the Lighten Only Mode.
4. Mask the Chalk Texture
Step 1
Command-click the text layer’s thumbnail to create a selection.
Step 2
Click the Add layer mask icon at the bottom of the Layers panel.
Step 3
Select the text layer, and change its Fill value to 0.
5. Style the Text Layer
Double-click the text layer to apply the following layer style:
Step 1
Add a Drop Shadow with these settings:
Color: #1e1c1e
Opacity: 100%
Distance: 6
Spread: 35
Size: 1
Noise: 100%
Step 2
Click the + icon to the right of the Drop Shadow tab to add another instance with these settings:
Color: #b57b88
Opacity: 100%
Distance: 7
Spread: 60
Size: 5
Noise: 50%
Step 3
Add another Drop Shadow instance with these settings:
Color: #000000
Opacity: 25%
Distance: 15
Spread: 0
Size: 15
Noise: 30%
This will create the colored chalk outline and finish off the text effect.
Text Effect Actions
If you need Photoshop actions that will do most of the work for you, check out our propositions:
This item comes with 14 extra actions to make your main
shape/text/raster have a chalk writing look. You can play with many
ready-made icons to give your chalkboard a unique look.
Ever tried to write text or make a logo or graphic using flour
or powder? It’s really hard.
With this set of Photoshop actions, you can achieve amazing results with
few clicks. Simply install the action, create your text or logo, and click play. Job
done!
Make your text or logo written in the sand! You can achieve a realistic effect of writing on the sand in just a couple of seconds.
Use this summer style for your projects!
Transform your text or logo into a realistic Salt and Sugar effect in few clicks. All the layers are well organized and packed in a Smart Object, so the starting layer is untouched.
Congratulations, You’re Done!
In this tutorial, we created a simple background using a blackboard texture, and then created text and a smart object layer to work on the effect.
After that, we applied some filters to create the main chalk effect and masked it to the text we created.
Finally, we styled the text using a couple of drop shadow effects with different settings to create the colored outline.
Please feel free to leave your comments, suggestions, and outcomes below.
This tutorial will show you a really quick and easy way to create a stylized chalk text effect, using some filters and drop shadow effects. Let’s get started!
Looking for a chalk effect in Photoshop? Head on over to Envato Elements and download this amazing chalk effect Photoshop Layer Styles set with 15 chalk and 15 charcoal style presets.
1. Create the Background
Step 1
Open the Black Board image, and then go to Image > Image Size, and set the Width to 1000 px.
Step 2
Click the Create new fill or adjustment layer icon at the bottom of the Layers panel and choose Levels.
Step 3
Set the Gamma value to 0.95. This will darken the texture a little bit.
2. Create the Text and Chalk Layers
Step 1
Create the text using the font Magnolia Script. Set the Size to 200 pt, and if you’re using multiple lines of text, set the Leading to a value around 185 pt.
Step 2
Set the Foreground and Background colors to Black and White.
Create a new layer below the text layer, call it Chalk, and fill it with Black.
Step 3
Go to Filter > Convert for Smart Filters, to convert the layer into a smart object.
3. Apply the Filters
Step 1
Go to Filter > Noise > Add Noise.
Change the Amount to 150 and the Distribution to Gaussian, and check the Monochromatic box.
Step 2
Go to Filter > Stylize > Diffuse, and choose the Lighten Only Mode.
4. Mask the Chalk Texture
Step 1
Command-click the text layer’s thumbnail to create a selection.
Step 2
Click the Add layer mask icon at the bottom of the Layers panel.
Step 3
Select the text layer, and change its Fill value to 0.
5. Style the Text Layer
Double-click the text layer to apply the following layer style:
Step 1
Add a Drop Shadow with these settings:
Color: #1e1c1e
Opacity: 100%
Distance: 6
Spread: 35
Size: 1
Noise: 100%
Step 2
Click the + icon to the right of the Drop Shadow tab to add another instance with these settings:
Color: #b57b88
Opacity: 100%
Distance: 7
Spread: 60
Size: 5
Noise: 50%
Step 3
Add another Drop Shadow instance with these settings:
Color: #000000
Opacity: 25%
Distance: 15
Spread: 0
Size: 15
Noise: 30%
This will create the colored chalk outline and finish off the text effect.
Text Effect Actions
If you need Photoshop actions that will do most of the work for you, check out our propositions:
This item comes with 14 extra actions to make your main
shape/text/raster have a chalk writing look. You can play with many
ready-made icons to give your chalkboard a unique look.
Ever tried to write text or make a logo or graphic using flour
or powder? It’s really hard.
With this set of Photoshop actions, you can achieve amazing results with
few clicks. Simply install the action, create your text or logo, and click play. Job
done!
Make your text or logo written in the sand! You can achieve a realistic effect of writing on the sand in just a couple of seconds.
Use this summer style for your projects!
Transform your text or logo into a realistic Salt and Sugar effect in few clicks. All the layers are well organized and packed in a Smart Object, so the starting layer is untouched.
Congratulations, You’re Done!
In this tutorial, we created a simple background using a blackboard texture, and then created text and a smart object layer to work on the effect.
After that, we applied some filters to create the main chalk effect and masked it to the text we created.
Finally, we styled the text using a couple of drop shadow effects with different settings to create the colored outline.
Please feel free to leave your comments, suggestions, and outcomes below.
This tutorial will show you a really quick and easy way to create a stylized chalk text effect, using some filters and drop shadow effects. Let’s get started!
Looking for a chalk effect in Photoshop? Head on over to Envato Elements and download this amazing chalk effect Photoshop Layer Styles set with 15 chalk and 15 charcoal style presets.
1. Create the Background
Step 1
Open the Black Board image, and then go to Image > Image Size, and set the Width to 1000 px.
Step 2
Click the Create new fill or adjustment layer icon at the bottom of the Layers panel and choose Levels.
Step 3
Set the Gamma value to 0.95. This will darken the texture a little bit.
2. Create the Text and Chalk Layers
Step 1
Create the text using the font Magnolia Script. Set the Size to 200 pt, and if you’re using multiple lines of text, set the Leading to a value around 185 pt.
Step 2
Set the Foreground and Background colors to Black and White.
Create a new layer below the text layer, call it Chalk, and fill it with Black.
Step 3
Go to Filter > Convert for Smart Filters, to convert the layer into a smart object.
3. Apply the Filters
Step 1
Go to Filter > Noise > Add Noise.
Change the Amount to 150 and the Distribution to Gaussian, and check the Monochromatic box.
Step 2
Go to Filter > Stylize > Diffuse, and choose the Lighten Only Mode.
4. Mask the Chalk Texture
Step 1
Command-click the text layer’s thumbnail to create a selection.
Step 2
Click the Add layer mask icon at the bottom of the Layers panel.
Step 3
Select the text layer, and change its Fill value to 0.
5. Style the Text Layer
Double-click the text layer to apply the following layer style:
Step 1
Add a Drop Shadow with these settings:
Color: #1e1c1e
Opacity: 100%
Distance: 6
Spread: 35
Size: 1
Noise: 100%
Step 2
Click the + icon to the right of the Drop Shadow tab to add another instance with these settings:
Color: #b57b88
Opacity: 100%
Distance: 7
Spread: 60
Size: 5
Noise: 50%
Step 3
Add another Drop Shadow instance with these settings:
Color: #000000
Opacity: 25%
Distance: 15
Spread: 0
Size: 15
Noise: 30%
This will create the colored chalk outline and finish off the text effect.
Text Effect Actions
If you need Photoshop actions that will do most of the work for you, check out our propositions:
This item comes with 14 extra actions to make your main
shape/text/raster have a chalk writing look. You can play with many
ready-made icons to give your chalkboard a unique look.
Ever tried to write text or make a logo or graphic using flour
or powder? It’s really hard.
With this set of Photoshop actions, you can achieve amazing results with
few clicks. Simply install the action, create your text or logo, and click play. Job
done!
Make your text or logo written in the sand! You can achieve a realistic effect of writing on the sand in just a couple of seconds.
Use this summer style for your projects!
Transform your text or logo into a realistic Salt and Sugar effect in few clicks. All the layers are well organized and packed in a Smart Object, so the starting layer is untouched.
Congratulations, You’re Done!
In this tutorial, we created a simple background using a blackboard texture, and then created text and a smart object layer to work on the effect.
After that, we applied some filters to create the main chalk effect and masked it to the text we created.
Finally, we styled the text using a couple of drop shadow effects with different settings to create the colored outline.
Please feel free to leave your comments, suggestions, and outcomes below.
This tutorial will show you a really quick and easy way to create a stylized chalk text effect, using some filters and drop shadow effects. Let’s get started!
Looking for a chalk effect in Photoshop? Head on over to Envato Elements and download this amazing chalk effect Photoshop Layer Styles set with 15 chalk and 15 charcoal style presets.
1. Create the Background
Step 1
Open the Black Board image, and then go to Image > Image Size, and set the Width to 1000 px.
Step 2
Click the Create new fill or adjustment layer icon at the bottom of the Layers panel and choose Levels.
Step 3
Set the Gamma value to 0.95. This will darken the texture a little bit.
2. Create the Text and Chalk Layers
Step 1
Create the text using the font Magnolia Script. Set the Size to 200 pt, and if you’re using multiple lines of text, set the Leading to a value around 185 pt.
Step 2
Set the Foreground and Background colors to Black and White.
Create a new layer below the text layer, call it Chalk, and fill it with Black.
Step 3
Go to Filter > Convert for Smart Filters, to convert the layer into a smart object.
3. Apply the Filters
Step 1
Go to Filter > Noise > Add Noise.
Change the Amount to 150 and the Distribution to Gaussian, and check the Monochromatic box.
Step 2
Go to Filter > Stylize > Diffuse, and choose the Lighten Only Mode.
4. Mask the Chalk Texture
Step 1
Command-click the text layer’s thumbnail to create a selection.
Step 2
Click the Add layer mask icon at the bottom of the Layers panel.
Step 3
Select the text layer, and change its Fill value to 0.
5. Style the Text Layer
Double-click the text layer to apply the following layer style:
Step 1
Add a Drop Shadow with these settings:
Color: #1e1c1e
Opacity: 100%
Distance: 6
Spread: 35
Size: 1
Noise: 100%
Step 2
Click the + icon to the right of the Drop Shadow tab to add another instance with these settings:
Color: #b57b88
Opacity: 100%
Distance: 7
Spread: 60
Size: 5
Noise: 50%
Step 3
Add another Drop Shadow instance with these settings:
Color: #000000
Opacity: 25%
Distance: 15
Spread: 0
Size: 15
Noise: 30%
This will create the colored chalk outline and finish off the text effect.
Text Effect Actions
If you need Photoshop actions that will do most of the work for you, check out our propositions:
This item comes with 14 extra actions to make your main
shape/text/raster have a chalk writing look. You can play with many
ready-made icons to give your chalkboard a unique look.
Ever tried to write text or make a logo or graphic using flour
or powder? It’s really hard.
With this set of Photoshop actions, you can achieve amazing results with
few clicks. Simply install the action, create your text or logo, and click play. Job
done!
Make your text or logo written in the sand! You can achieve a realistic effect of writing on the sand in just a couple of seconds.
Use this summer style for your projects!
Transform your text or logo into a realistic Salt and Sugar effect in few clicks. All the layers are well organized and packed in a Smart Object, so the starting layer is untouched.
Congratulations, You’re Done!
In this tutorial, we created a simple background using a blackboard texture, and then created text and a smart object layer to work on the effect.
After that, we applied some filters to create the main chalk effect and masked it to the text we created.
Finally, we styled the text using a couple of drop shadow effects with different settings to create the colored outline.
Please feel free to leave your comments, suggestions, and outcomes below.
Covid-19 is an equal opportunity global killer. It makes no difference between race or social standing. To keep virus from spreading, we all need to literally spread out and stay at least 2 meters away from anyone, but the best way to stifle the spread is to stay home.
Stay 2 meters away from everyone even better, please #StayHome.
I’ve been coding web animations and helping others do the same for years now. However, I have yet to see a concise list of tips focused on how to efficiently build animations, so here you go!
I will be using the GreenSock Animation Platform (GSAP). It provides a simple, readable API and solves cross-browser inconsistencies so that you can focus on animating. The code and concepts should be understandable even if you’ve never used GSAP. If you’d like to familiarize yourself with the basics of GSAP first so that you can get the most out of this article, the best place to begin is GSAP’s getting started page (includes a video).
Tip #1: Use an animation library
Some developers think that using an animation library is wasteful because they can just use native browser technologies like CSS transitions, CSS animations or the Web Animations API (WAAPI) to accomplish the same thing without loading a library. In some cases, that’s true. However, here are a few other factors to consider:
Browser bugs, inconsistencies, and compatibility: An animation library, like GSAP, solves these for you and is universally compatible. You can even use motion paths in IE9! There are many problematic areas when it comes to cross-browser issues, including handling transform-origin on SVG elements, path stroke measurements, 3D origins in Safari, and many more that we don’t have the space to list.
Animation workflow: Building even moderately complex animations is much faster and more fun with a tool like GSAP. You can modularize animations, nest them as deeply as you want, and have their timing adjusted automatically. This makes it so much easier to experiment. Trust me: once you try building an animation sequence in CSS and then in GSAP, you’ll see what I mean. Night and day! Future edits are faster too.
Animate beyond the DOM: Canvas, WebGL, generic objects, and complex strings can’t be animated with native technologies. Using one consistent tool for all your animations is much cleaner.
Runtime control: Using a good animation library can enable you to pause, resume, reverse, seek through, or even gradually change the speed of an entire animation sequence. You can control each transform component independently (rotation, scale, x, y, skew, etc.). You can also retrieve those values at any time as well. JavaScript animations give you ultimate flexibility.
Easing options (bounce, elastic, etc.): CSS only gives you two control points for eases. GSAP’s CustomEase lets you literally create any ease you can imagine.
Lag smoothing: GSAP can prioritize absolute timing or adjust things on the fly to avoid jumps if the CPU gets bogged down.
Advanced capabilities: Using GSAP, it’s easy to morph SVGs, add physics/inertia, edit motion paths directly in the browser, use position-aware staggers, and more.
Most of the top animators in the industry use a tool like GSAP because they’ve learned these same things over the years. Once you get beyond very basic animations, a JavaScript library will make your life much, much easier and open up entirely new possibilities.
Tip #2: Use timelines
A good animation library will provide some way of creating individual animations (called tweens) and a way to sequence animations in a timeline. Think of a timeline like a container for your tweens where you position them in relation to one another.
By default in GSAP, tweens added to a timeline will wait for the previous tweens to complete before running. The +=0.5 adds an additional offset or delay of a half-second as well, so the second tween will start 0.5 seconds after the first tween finishes no matter how long the first tween’s duration is.
To increase the amount of time between the tween to 1 second, all you need to do is change the +=0.5 to +=1! Super easy. With this approach, you can iterate on your animations quickly without worrying about doing the math to combine previous durations.
Tip #3: Use relative values
By “relative values” I mean three things:
Animate values relative to their current value. GSAP recognizes += and -= prefixes for this. So x: "+=200" will add 200 units (usually pixels) to the current x. And x: "-=200" will subtract 200 from the current value. This is also useful in GSAP’s position parameter when positioning tweens relative to one another.
Use relative units (like vw, vh and, in some cases, %) when values need to be responsive to viewport size changes.
Use methods like .to() and .from() (instead of .fromTo()) whenever possible so that the start or end values are dynamically populated from their current values. That way, you don’t need to declare start and end values in every tween. Yay, less typing! For example, if you had a bunch of differently-colored elements, you could animate them all to black like gsap.to(".class", {backgroundColor: "black" }).
Tip #4: Use keyframes
If you find yourself animating the same target over and over in a row, that’s a perfect time to use keyframes! You do so like this:
No timeline necessary! To space out the tweens we just use the delay property in each keyframe. (It can be negative to create overlaps.)
Tip #5: Use smart defaults
GSAP has default values for properties like ease ("power1.out") and duration (0.5 seconds). So, the following is a valid tween that will animate for half a second.
gsap.to(".box", { color: "black" })
To change GSAP’s global defaults, use gsap.defaults():
// Use a linear ease and a duration of 1 instead
gsap.defaults({ ease: "none", duration: 1 });
This can be handy, but it’s more common to set defaults for a particular timeline so that it affects only its children. For example, we can avoid typing duration: 1 for each of the sub-tweens by setting a default on the parent timeline:
We mentioned this briefly in the third tip, but it deserves its own tip.
If you have multiple elements that share the same class of .box, the code above will animate all of the elements at the same time!
You can also select multiple elements with different selectors by using a more complex selector string:
gsap.to(".box, .circle", { ... });
Or you can pass an array of variable references as long as the elements are of the same type (selector string, variable reference, generic object, etc.):
var box = document.querySelector(".box");
var circle = document.querySelector(".circle");

// some time later…
gsap.to([box, circle], { ... });
Tip #7: Use function-based values, staggers, and/or loops
Function-based values
Use a function instead of a number/string for almost any property, and GSAP will call that function once for each target when it first renders the tween. Plus, it’ll use whatever gets returned by the function as the property value! This can be really handy for creating a bunch of different animations using a single tween and for adding variance.
GSAP will pass the following parameters into the function:
The index
The specific element being affected
An array of all of the elements affected by the tween
For example, you could set the movement direction based on the index:
Or you could choose items from an array:
Staggers
Make your animations look more dynamic and interesting by offsetting the start times with a stagger. For simple staggered offsets in a single tween, just use stagger: 0.2 to add 0.2 seconds between the start time of each animation.
You can also pass in an object to get more complex stagger effects, including ones that emanate outward from the center of a grid or randomize the timings:
It can be helpful to loop through a list of elements to create or apply animations, particularly when they are based on some event, like a user’s interaction (which I’ll discuss later on).
To loop through a list of items, it’s easiest to use .forEach(). But since this isn’t supported on elements selected with .querySelectorAll() in IE, you can use GSAP’s utils.toArray() function instead.
In the example below, we are looping through each container to add animations to its children that are scoped to that container.
Tip #8: Modularize your animations
Modularization is one of the key principles of programming. It allows you to build small, easy-to-understand chunks that you can combine into larger creations while still keeping things clean, reusable, and easy to modify. It also lets you to use parameters and function scope, increasing the re-usability of your code.
Functions
Use functions to return tweens or timelines and then insert those into a master timeline:
function doAnimation() {
  // do something, like calculations, maybe using arguments passed into the function

  // return a tween, maybe using the calculations above
  return gsap.to(".myElem", { duration: 1, color: "red"});
}

tl.add( doAnimation() );
Nesting timelines can truly revolutionize the way you animate. It lets you sequence really complex animations with ease while keeping your code modular and readable.
function doAnimation() {
  const tl = gsap.timeline();
  tl.to(...);
  tl.to(...);
  // ...as many animations as you’d like!

  // When you’re all done, return the timeline
  return tl;
}

const master = gsap.timeline();
master.add( doAnimation() );
master.add( doAnotherAnimation() );
// Add even more timelines!
Here’s a more complex demo showing the same technique using a Star Wars theme by Craig Roblewsky:
CodePen Embed Fallback
Wrapping your animation-building routines inside functions also makes recreating animations (say, on resize) a breeze!
var tl; // keep an accessible reference to our timeline

function buildAnimation() {
  var time = tl ? tl.time() : 0; // save the old time if it exists

  // kill off the old timeline if it exists
  if (tl) {
    tl.kill();
  }

  // create a new timeline
  tl = gsap.timeline();
  tl.to(...)
    .to(...); // do your animation
  tl.time(time); // set the playhead to match where it was
}

buildAnimation(); //kick things off

window.addEventListener("resize", buildAnimation); // handle resize
Effects
With effects, you can turn a custom animation into a named effect that can be called anytime with new targets and configurations. This is especially helpful when you have standards for your animations or if you are going to be calling the same animation from different contexts.
Here’s a super-simple “fade” effect to show the concept:
// register the effect with GSAP:
gsap.registerEffect({
    name: "fade",
    defaults: {duration: 2}, //defaults get applied to the "config" object passed to the effect below
    effect: (targets, config) => {
        return gsap.to(targets, {duration: config.duration, opacity:0});
    }
});

// now we can use it like this:
gsap.effects.fade(".box");
// Or override the defaults:
gsap.effects.fade(".box", {duration: 1});
Tip #9: Use control methods
GSAP provides many methods to control the state of a tween or timeline. They include .play(), .pause(), .reverse(), .progress(), .seek(), .restart(), .timeScale(), and several others.
Using control methods can make transitions between animations more fluid (such as being able to reverse part way through) and more performant (by reusing the same tween/timeline instead of creating new instances each time). And by giving you finer control over the state of the animation, it can help with debugging as well.
Here’s a simple example:
One amazing use case is tweening the timeScale of a timeline!
CodePen Embed Fallback
Use case: interaction events that trigger animations
Inside of event listeners for user interaction events, we can use control methods to have fine control over our animation’s play state.
In the example below, we are creating a timeline for each element (so that it doesn’t fire the same animation on all instances), attaching a reference for that timeline to the element itself, and then playing the relevant timeline when the element is hovered, reversing it when the mouse leaves.
CodePen Embed Fallback
Use case: Animating between multiple states of a timeline
You may want a set of animations to affect the same properties of the same elements, but only in certain sequences (e.g. active/inactive states, each with mouseover/mouseout states). It may get tricky to manage. We can simplify it by using states of a timeline and control events.
Use case: Animating based on the scroll position
We can easily fire animations based on the scroll position by using control methods. For example, this demo plays a full animation once a scroll position has been reached:
You can also attach the progress of an animation to the scroll position for more fancy scroll effects!
But if you’re going to do this, it’s best to throttle the scroll listener for performance reasons:
Hot tip: GreenSock is working on a plugin to make scroll-based animations even easier! You’re in for quite a treat. Keep your eyes peeled for news.
Bonus tip: Use GSAP’s plugins, utility methods, and helper functions
GSAP plugins add extra capabilities to GSAP’s core. Some plugins make it easier to work with rendering libraries, like PixiJS or EaselJS, while other plugins add superpowers like morphing SVG, drag and drop functionality, etc. This keeps the GSAP core relatively small and lets you add features when you need them.
Plugins
MorphSVG morphs between any two SVG shapes, no matter the number of points, and gives you fine control over how the shapes are morphed.
CodePen Embed Fallback
DrawSVG progressively reveals (or hides) the stroke of an SVG element, making it look like it’s being drawn. It works around various browser bugs that affect typical stroke-dashoffset animations.
MotionPath animates anything (SVG, DOM, canvas, generic objects, whatever) along a motion path in any browser. You can even edit the path in-browser using MotionPathHelper!
CodePen Embed Fallback
GSDevTools gives you a visual UI for interacting with and debugging GSAP animations, complete with advanced playback controls, keyboard shortcuts, global synchronization and more.
CodePen Embed Fallback
Draggable provides a surprisingly simple way to make virtually any DOM element draggable, spinnable, tossable, or even flick-scrollable using mouse or touch events. Draggable integrates beautifully (and optionally) with InertiaPlugin so the user can flick and have the motion decelerate smoothly based on momentum.
CodePen Embed Fallback
CustomEase (along with CustomBounce and CustomWiggle) add to GSAP’s already extensive easing capabilities by enabling you to register any ease that you’d like.
SplitText is an easy to use JavaScript utility that allows you to split HTML text into characters, words and lines. It’s easy to use, extremely flexible, works all the way back to IE9, and handles special characters for you.
CodePen Embed Fallback
ScrambleText scrambles the text in a DOM element with randomized characters, refreshing new randomized characters at regular intervals, while gradually revealing your new text (or the original) over the course of the tween. Visually, it looks like a computer decoding a string of text.
CodePen Embed Fallback
Physics2D lets you tween the position of elements based on velocity and acceleration as opposed to going to specific values. PhysicsProps is similar but works with any property, not just 2D coordinates.
CodePen Embed Fallback
Utility methods
GSAP has built-in utility methods that can make some common tasks easier. Most are focused on manipulating values in a particular way, which can be especially helpful when generating or modifying animation values. The ones that I use most often are .wrap(), .random, .interpolate(), .distribute(), .pipe(), and .unitize(), but there are many others you might find helpful.
Helper functions
In a similar light, but not built into GSAP’s core, are some helper functions GreenSock has created over the years to deal with specific use cases. These functions make it easy to FLIP your animations, return a random number based on an ease curve, blend two ease curves, and much more. I highly recommend checking them out!
Conclusion
You’ve made it to the end! Hopefully, you’ve learned a thing or two along the way and this article will continue to be a resource for you in the years to come.
As always, if you have any questions about GSAP, feel free to drop by the GreenSock forums. They’re incredibly helpful and welcoming! As an employee of GreenSock, that’s where I hang out often; I love helping people with animation-related challenges!
I’ve been coding web animations and helping others do the same for years now. However, I have yet to see a concise list of tips focused on how to efficiently build animations, so here you go!
I will be using the GreenSock Animation Platform (GSAP). It provides a simple, readable API and solves cross-browser inconsistencies so that you can focus on animating. The code and concepts should be understandable even if you’ve never used GSAP. If you’d like to familiarize yourself with the basics of GSAP first so that you can get the most out of this article, the best place to begin is GSAP’s getting started page (includes a video).
Tip #1: Use an animation library
Some developers think that using an animation library is wasteful because they can just use native browser technologies like CSS transitions, CSS animations or the Web Animations API (WAAPI) to accomplish the same thing without loading a library. In some cases, that’s true. However, here are a few other factors to consider:
Browser bugs, inconsistencies, and compatibility: An animation library, like GSAP, solves these for you and is universally compatible. You can even use motion paths in IE9! There are many problematic areas when it comes to cross-browser issues, including handling transform-origin on SVG elements, path stroke measurements, 3D origins in Safari, and many more that we don’t have the space to list.
Animation workflow: Building even moderately complex animations is much faster and more fun with a tool like GSAP. You can modularize animations, nest them as deeply as you want, and have their timing adjusted automatically. This makes it so much easier to experiment. Trust me: once you try building an animation sequence in CSS and then in GSAP, you’ll see what I mean. Night and day! Future edits are faster too.
Animate beyond the DOM: Canvas, WebGL, generic objects, and complex strings can’t be animated with native technologies. Using one consistent tool for all your animations is much cleaner.
Runtime control: Using a good animation library can enable you to pause, resume, reverse, seek through, or even gradually change the speed of an entire animation sequence. You can control each transform component independently (rotation, scale, x, y, skew, etc.). You can also retrieve those values at any time as well. JavaScript animations give you ultimate flexibility.
Easing options (bounce, elastic, etc.): CSS only gives you two control points for eases. GSAP’s CustomEase lets you literally create any ease you can imagine.
Lag smoothing: GSAP can prioritize absolute timing or adjust things on the fly to avoid jumps if the CPU gets bogged down.
Advanced capabilities: Using GSAP, it’s easy to morph SVGs, add physics/inertia, edit motion paths directly in the browser, use position-aware staggers, and more.
Most of the top animators in the industry use a tool like GSAP because they’ve learned these same things over the years. Once you get beyond very basic animations, a JavaScript library will make your life much, much easier and open up entirely new possibilities.
Tip #2: Use timelines
A good animation library will provide some way of creating individual animations (called tweens) and a way to sequence animations in a timeline. Think of a timeline like a container for your tweens where you position them in relation to one another.
By default in GSAP, tweens added to a timeline will wait for the previous tweens to complete before running. The +=0.5 adds an additional offset or delay of a half-second as well, so the second tween will start 0.5 seconds after the first tween finishes no matter how long the first tween’s duration is.
To increase the amount of time between the tween to 1 second, all you need to do is change the +=0.5 to +=1! Super easy. With this approach, you can iterate on your animations quickly without worrying about doing the math to combine previous durations.
Tip #3: Use relative values
By “relative values” I mean three things:
Animate values relative to their current value. GSAP recognizes += and -= prefixes for this. So x: "+=200" will add 200 units (usually pixels) to the current x. And x: "-=200" will subtract 200 from the current value. This is also useful in GSAP’s position parameter when positioning tweens relative to one another.
Use relative units (like vw, vh and, in some cases, %) when values need to be responsive to viewport size changes.
Use methods like .to() and .from() (instead of .fromTo()) whenever possible so that the start or end values are dynamically populated from their current values. That way, you don’t need to declare start and end values in every tween. Yay, less typing! For example, if you had a bunch of differently-colored elements, you could animate them all to black like gsap.to(".class", {backgroundColor: "black" }).
Tip #4: Use keyframes
If you find yourself animating the same target over and over in a row, that’s a perfect time to use keyframes! You do so like this:
No timeline necessary! To space out the tweens we just use the delay property in each keyframe. (It can be negative to create overlaps.)
Tip #5: Use smart defaults
GSAP has default values for properties like ease ("power1.out") and duration (0.5 seconds). So, the following is a valid tween that will animate for half a second.
gsap.to(".box", { color: "black" })
To change GSAP’s global defaults, use gsap.defaults():
// Use a linear ease and a duration of 1 instead
gsap.defaults({ ease: "none", duration: 1 });
This can be handy, but it’s more common to set defaults for a particular timeline so that it affects only its children. For example, we can avoid typing duration: 1 for each of the sub-tweens by setting a default on the parent timeline:
We mentioned this briefly in the third tip, but it deserves its own tip.
If you have multiple elements that share the same class of .box, the code above will animate all of the elements at the same time!
You can also select multiple elements with different selectors by using a more complex selector string:
gsap.to(".box, .circle", { ... });
Or you can pass an array of variable references as long as the elements are of the same type (selector string, variable reference, generic object, etc.):
var box = document.querySelector(".box");
var circle = document.querySelector(".circle");

// some time later…
gsap.to([box, circle], { ... });
Tip #7: Use function-based values, staggers, and/or loops
Function-based values
Use a function instead of a number/string for almost any property, and GSAP will call that function once for each target when it first renders the tween. Plus, it’ll use whatever gets returned by the function as the property value! This can be really handy for creating a bunch of different animations using a single tween and for adding variance.
GSAP will pass the following parameters into the function:
The index
The specific element being affected
An array of all of the elements affected by the tween
For example, you could set the movement direction based on the index:
Or you could choose items from an array:
Staggers
Make your animations look more dynamic and interesting by offsetting the start times with a stagger. For simple staggered offsets in a single tween, just use stagger: 0.2 to add 0.2 seconds between the start time of each animation.
You can also pass in an object to get more complex stagger effects, including ones that emanate outward from the center of a grid or randomize the timings:
It can be helpful to loop through a list of elements to create or apply animations, particularly when they are based on some event, like a user’s interaction (which I’ll discuss later on).
To loop through a list of items, it’s easiest to use .forEach(). But since this isn’t supported on elements selected with .querySelectorAll() in IE, you can use GSAP’s utils.toArray() function instead.
In the example below, we are looping through each container to add animations to its children that are scoped to that container.
Tip #8: Modularize your animations
Modularization is one of the key principles of programming. It allows you to build small, easy-to-understand chunks that you can combine into larger creations while still keeping things clean, reusable, and easy to modify. It also lets you to use parameters and function scope, increasing the re-usability of your code.
Functions
Use functions to return tweens or timelines and then insert those into a master timeline:
function doAnimation() {
  // do something, like calculations, maybe using arguments passed into the function

  // return a tween, maybe using the calculations above
  return gsap.to(".myElem", { duration: 1, color: "red"});
}

tl.add( doAnimation() );
Nesting timelines can truly revolutionize the way you animate. It lets you sequence really complex animations with ease while keeping your code modular and readable.
function doAnimation() {
  const tl = gsap.timeline();
  tl.to(...);
  tl.to(...);
  // ...as many animations as you’d like!

  // When you’re all done, return the timeline
  return tl;
}

const master = gsap.timeline();
master.add( doAnimation() );
master.add( doAnotherAnimation() );
// Add even more timelines!
Here’s a more complex demo showing the same technique using a Star Wars theme by Craig Roblewsky:
CodePen Embed Fallback
Wrapping your animation-building routines inside functions also makes recreating animations (say, on resize) a breeze!
var tl; // keep an accessible reference to our timeline

function buildAnimation() {
  var time = tl ? tl.time() : 0; // save the old time if it exists

  // kill off the old timeline if it exists
  if (tl) {
    tl.kill();
  }

  // create a new timeline
  tl = gsap.timeline();
  tl.to(...)
    .to(...); // do your animation
  tl.time(time); // set the playhead to match where it was
}

buildAnimation(); //kick things off

window.addEventListener("resize", buildAnimation); // handle resize
Effects
With effects, you can turn a custom animation into a named effect that can be called anytime with new targets and configurations. This is especially helpful when you have standards for your animations or if you are going to be calling the same animation from different contexts.
Here’s a super-simple “fade” effect to show the concept:
// register the effect with GSAP:
gsap.registerEffect({
    name: "fade",
    defaults: {duration: 2}, //defaults get applied to the "config" object passed to the effect below
    effect: (targets, config) => {
        return gsap.to(targets, {duration: config.duration, opacity:0});
    }
});

// now we can use it like this:
gsap.effects.fade(".box");
// Or override the defaults:
gsap.effects.fade(".box", {duration: 1});
Tip #9: Use control methods
GSAP provides many methods to control the state of a tween or timeline. They include .play(), .pause(), .reverse(), .progress(), .seek(), .restart(), .timeScale(), and several others.
Using control methods can make transitions between animations more fluid (such as being able to reverse part way through) and more performant (by reusing the same tween/timeline instead of creating new instances each time). And by giving you finer control over the state of the animation, it can help with debugging as well.
Here’s a simple example:
One amazing use case is tweening the timeScale of a timeline!
CodePen Embed Fallback
Use case: interaction events that trigger animations
Inside of event listeners for user interaction events, we can use control methods to have fine control over our animation’s play state.
In the example below, we are creating a timeline for each element (so that it doesn’t fire the same animation on all instances), attaching a reference for that timeline to the element itself, and then playing the relevant timeline when the element is hovered, reversing it when the mouse leaves.
CodePen Embed Fallback
Use case: Animating between multiple states of a timeline
You may want a set of animations to affect the same properties of the same elements, but only in certain sequences (e.g. active/inactive states, each with mouseover/mouseout states). It may get tricky to manage. We can simplify it by using states of a timeline and control events.
Use case: Animating based on the scroll position
We can easily fire animations based on the scroll position by using control methods. For example, this demo plays a full animation once a scroll position has been reached:
You can also attach the progress of an animation to the scroll position for more fancy scroll effects!
But if you’re going to do this, it’s best to throttle the scroll listener for performance reasons:
Hot tip: GreenSock is working on a plugin to make scroll-based animations even easier! You’re in for quite a treat. Keep your eyes peeled for news.
Bonus tip: Use GSAP’s plugins, utility methods, and helper functions
GSAP plugins add extra capabilities to GSAP’s core. Some plugins make it easier to work with rendering libraries, like PixiJS or EaselJS, while other plugins add superpowers like morphing SVG, drag and drop functionality, etc. This keeps the GSAP core relatively small and lets you add features when you need them.
Plugins
MorphSVG morphs between any two SVG shapes, no matter the number of points, and gives you fine control over how the shapes are morphed.
CodePen Embed Fallback
DrawSVG progressively reveals (or hides) the stroke of an SVG element, making it look like it’s being drawn. It works around various browser bugs that affect typical stroke-dashoffset animations.
MotionPath animates anything (SVG, DOM, canvas, generic objects, whatever) along a motion path in any browser. You can even edit the path in-browser using MotionPathHelper!
CodePen Embed Fallback
GSDevTools gives you a visual UI for interacting with and debugging GSAP animations, complete with advanced playback controls, keyboard shortcuts, global synchronization and more.
CodePen Embed Fallback
Draggable provides a surprisingly simple way to make virtually any DOM element draggable, spinnable, tossable, or even flick-scrollable using mouse or touch events. Draggable integrates beautifully (and optionally) with InertiaPlugin so the user can flick and have the motion decelerate smoothly based on momentum.
CodePen Embed Fallback
CustomEase (along with CustomBounce and CustomWiggle) add to GSAP’s already extensive easing capabilities by enabling you to register any ease that you’d like.
SplitText is an easy to use JavaScript utility that allows you to split HTML text into characters, words and lines. It’s easy to use, extremely flexible, works all the way back to IE9, and handles special characters for you.
CodePen Embed Fallback
ScrambleText scrambles the text in a DOM element with randomized characters, refreshing new randomized characters at regular intervals, while gradually revealing your new text (or the original) over the course of the tween. Visually, it looks like a computer decoding a string of text.
CodePen Embed Fallback
Physics2D lets you tween the position of elements based on velocity and acceleration as opposed to going to specific values. PhysicsProps is similar but works with any property, not just 2D coordinates.
CodePen Embed Fallback
Utility methods
GSAP has built-in utility methods that can make some common tasks easier. Most are focused on manipulating values in a particular way, which can be especially helpful when generating or modifying animation values. The ones that I use most often are .wrap(), .random, .interpolate(), .distribute(), .pipe(), and .unitize(), but there are many others you might find helpful.
Helper functions
In a similar light, but not built into GSAP’s core, are some helper functions GreenSock has created over the years to deal with specific use cases. These functions make it easy to FLIP your animations, return a random number based on an ease curve, blend two ease curves, and much more. I highly recommend checking them out!
Conclusion
You’ve made it to the end! Hopefully, you’ve learned a thing or two along the way and this article will continue to be a resource for you in the years to come.
As always, if you have any questions about GSAP, feel free to drop by the GreenSock forums. They’re incredibly helpful and welcoming! As an employee of GreenSock, that’s where I hang out often; I love helping people with animation-related challenges!
Ever wanted to create stunning and explosive visuals in your photographs? One way to do this is with dispersion effects, which take the core subjects of your photos and spread them across the image canvas.
We have many stunning Photoshop actions for portraits in Envato Elements
Dispersion is commonly found in advertising and marketing promos, but you can use it in your own work too. The best part is that you don’t need to know how to dissolve in Photoshop from scratch, as we’ll see below in this collection of some of our best Photoshop actions from Envato Elements and outstanding image dispersion effects from GraphicRiver.
Envato Elements: Best Source for Photoshop Actions (With Unlimited Use)
Envato Elements has a single, compelling, all-inclusive offer:
Sign up for Envato Elements and you get access to thousands of creative graphics and templates (with unlimited use), from eye-catching Photoshop actions to professional, creative resume designs and more—all for one low price.
Download more than 1,500 Photoshop actions from our premium collection on Envato Elements
In addition, Envato Elements saves you both the time and energy needed when you’re designing from scratch.
To show you what I’m talking about, I’ve gathered 20 stunning dispersion Photoshop actions for you to download from Envato Elements.
20 Best Photoshop Dispersion Effects From Envato Elements
Dispersion effects are built for a variety of themes: portraits, action shots, landscapes, you name it. Each category has photo filters and effects built just for it. We’ve collected these from Envato Elements and GraphicRiver. You’ll find a well-rounded assortment of the 20 best dispersion Photoshop effects created for use in projects just like yours.
Elements offers unlimited access to Photoshop actions, while GraphicRiver offers inexpensive Photoshop effects on a pay-per-action model.
Also, if you prefer to hire a professional designer, check out the many services available at Envato Studio, where you can work with skilled designers to achieve all of your creative goals.
This disintegration photo effect will bring the stars and galaxies to your designs. Don’t worry if you don’t understand how to dissolve in Photoshop—this as easy as brushing over your photo, choosing an effect direction, and playing the action.
This picture disintegration effect will turn your images into magical designs. With our premium photo effects, you don’t need to worry about learning how to apply dispersion effects in Photoshop—they’re easy to use and have detailed instructions.
This Energy Animation Photoshop action is a stunning photo effect ready for you to use. This product is very useful for graphic designers and photography lovers. The main outstanding feature of this effect is its quality.
Look how cool this effect is! If you’re looking for Photoshop actions for portraits, this will bring out the best of your shots with a little sparkle. Also, all of our premium Photoshop actions are easy to use and come with detailed instructions.
Use this striking image dispersion effect to attract attention to your photographs and designs. It’s very easy to use—you simply brush over your photo where you want to start the firestorm, choose an effect direction, and play the action.
Ever wanted to have a cloud image dispersion effect in your designs? With our premium effect, you can have it now. This is one of our best Photoshop actions and is very easy to use.
A dispersion effect Photoshop action for those who love a fantasy touch in their designs. Don’t be stressed if you don’t know how to dissolve in Photoshop—this effect comes with detailed instructions, and it’s as easy as brushing over your photo where you want to create the magic dust and playing the action.
This dispersion photography action is especially useful if you like editing sports photography. Look at how the player stands out with this dispersion effect. It’s easy to use—you just need to fill in your subject with a color, and then play the action.
Use this striking dispersion Photoshop action to bring your designs to life and catch everyone’s attention. This photo filter allows you to create a storm effect in various colors around your subjects, and it’s easy and ready to use.
Create designs fit for superheroes with this cool image dispersion effect. Among our Photoshop actions for portraits, we recommend this because it will give your shot a nice effect. You know how easy our photo filters are to use. Simply fill in your subject with a color and play the action.
Help your photos take flight with this inspired dispersion effect Photoshop action. Best used in human photography, this picture disintegration effect will disperse subjects into vivid bursts of feathers. They’ll add a special look to fashion photographs and portraits alike. Ten color presets are included to help you tune and refine each image.
This image dispersion effect will grab the attention of the viewer. This action will give your subjects a liquid effect that is hard to miss. The focal points dissolve into water-like splashes for an edgy look. This Photoshop action is very easy to use—you just need to brush over the area where you want to apply the liquid effect and play it.
Capture the energy of a ticker-tape parade with this fun photo effect. Split images into wild flashes of confetti that lend a feeling of speed to any shot. The illusion of motion in this pixelated Photoshop action is complemented by an array of color and graphic options that can be applied with a single click.
Unlike flatter effects, this 3D Photoshop filter delivers an incredible sense of involvement in every image. The bold, multi-dimensional elements resemble gemstones flying towards the viewer. These dispersion photography effects are optimized for sports and action shots and really help amplify the action!
Dispersion 2 is an amazingly rich and robust effect to transform everyday action shots into works of art. Style your images in the tradition of movie posters and video-game covers with flashy, ethereal graphics. The color palette in this dispersion photography effect automatically optimizes to match the focal point of your photo.
Turn mundane grayscale images into red-hot wonders with Ashes n Embers, a volcanic dispersion photography effect. Fiery graphics dramatically offset binary black and white images and create unforgettable photographs. Boost the explosive style even more by trying out the included color presets.
True to its name, this pixelated Photoshop action breaks images down into individual pixels for a grainy, modern feel. Depending on the intensity of application, you can pixelate the full image or just the periphery of your subjects. The end result is abstract and captures the grunge style in every frame.
Blossoms is a picture disintegration effect that turns people into petals. Aimed at action photographs, this action creates explosive bursts of color. To alter the effect, adjust the color styling of your image in advance and then try applying the effect to bring out new and unforgettable looks.
Sand, dirt, and dust—these natural elements simulate stillness and the passage of time. But when stirred into motion by their human subjects, they bring about thoughts of power and speed, momentum and disruption. This dramatic contrast is boldly captured in this photo effect, best suited to images with strong contrast and fluid motion.
Made for quirky and eclectic snapshots, Bubblum is one of the best Photoshop filters for a moisture effect similar to water droplets. Abstract and yet vivid, this action strikes the perfect balance of documentary and art. Unlike many of the portrait examples we’ve explored, this effect is great for auto and fashion photography.
GraphicRiver: Best Source for Photoshop Effects (Buy One at a Time)
GraphicRiver is the leading digital marketplace for purchasing single-use graphics and visual assets. It’s part of the Envato Market suite of online marketplaces that cater to many creative digital asset needs.
These are some of our best Photoshop actions from GraphicRiver
While Envato Elements is a powerful option, if you prefer to buy just one disintegration photo effect (instead of getting unlimited access to hundreds of creative designs), check out the selection from our Envato Market below.
15 Awesome Photoshop Dispersion Effects From GraphicRiver
GraphicRiver offers a great variety of dispersion photography effects that can be purchased individually. If this is what you need, I’ve got you covered. Check some of the best Photoshop actions that I’ve gathered for you.
We offer you this effect from our collection of Photoshop actions for portraits. This effect will give them a unique and distinctive touch. Our premium GraphicRiver dispersion effect Photoshop actions come with instructions, so you don’t have to worry.
Have you ever wanted to learn how to dissolve in Photoshop? You can start by using a dispersion effect Photoshop action that’s ready for you to use. Simply brush over your high-quality photo where you want to create the smoke, and play the action. For more details, follow the instructions included.
This dispersion Photoshop action to download from GraphicRiver will definitely catch the attention of your audience. Our premium Photoshop effects aren’t complicated—you only need to follow the instructions included to create stunning dispersion images.
Whirlwinds create stunning visuals that grab the attention of even the most distracted viewers. Fire, dust, and particles explode across any image this effect is applied to. The result is a gritty, intimate shot with a vortex of dispersion color effects for pictures. Again, color changes are all-important to instantly alter the mood of your photo.
Quick and dynamic, Geometric Dispersion is a top choice for sports photo filters and effects. The download is a pack of several unique effects in the geometric style, creating motion mosaics from each image you apply them to. Even though the result is static, the feeling of speed is captured forever.
Ashen Decay brings an apocalyptic burning style to your collection of Photoshop filters. Subjects dissolve into fire, smoke, and particles. Use this one for music or movie projects, or apply it as a Photoshop action for portraits for a spectacularly unconventional look.
Dust is one of the finest techniques to bring dispersion to your photos. No finer example exists than this professional disintegration photo effect offering four unique dust dispersions. Easily customize colors and directions to craft new grit and glamor in each and every photo. And best of all, you won’t even have to clean dust off your lens!
Cortisol recreates the spectacular chaos of our natural environment. Subjects will burst from clouds of swirling smoke and dust to make an unforgettable entrance. Every layer is fully editable to make minute adjustments to the general scene. Combine it with your own title overlays to create posters, promos, and more.
Color effects for pictures often rely on introducing new palettes to existing images. Not so with this simple and dynamic Photoshop filter. Color Splatter takes the unique colors of your image and splatters them across the canvas, complementing instead of contrasting with the original. Aimed at creating a fun new dimension in portraits, this action is adaptable to branding and fashion uses as well.
When purchasing Photoshop actions, it pays to seek offerings that offer extra value. That’s definitely the case with the After Actions Bundle, which features five diverse and distinct effects in a single download. Dispersion, fantasy, lines, galaxy, and bi-exposure; each of the five caters to different types of images, and working together they form a powerful tool in any photographer’s toolbox.
Falling rain adds an intimate dimension to any photograph, but it can be difficult or impossible to capture naturally. Not to worry; with this rainy Photoshop filter, you can instantly apply downpours to every one of your images. In just a few clicks, foggy rain will disperse and overlay your subjects. The stormy fog of the falling rain is often the difference between good and great images. Take advantage of that here.
Help the shifting sands of time evolve from mental images to your own images with this dramatic pixelated Photoshop action. Sand particles add sharp focus to photos and help draw attention to the center of the frame. Be sure to adjust the dispersion and grain for maximum benefit.
Watercolors are perhaps the most popular form of abstract art. If you want to capture a scene as if on canvas, but don’t have the gift of painting abilities, don’t worry. With quick dispersion effect Photoshop actions like these, you can transform any photograph into a beautiful watercolor. Edges are softened, and even hidden contrasts stand out.
Give your photos the gift of timeless style with this powerful Photoshop effect. Vintageo is a retro, artistic filter that converts everyday snaps into classical portraits. An assortment of color options and fully editable graphic elements make the action a mere starting point on your artistic journey. All the tools you need to build incredible artwork are at your fingertips.
Disperse photos in the style of pen sketches with these photo effects. Distill complex photos into their fundamental elements in the transformation from photo to paper. Try Pen Sketch to break down technical photos into clean lines, or to create stunning, intimate portraits.
Top Dispersion Tutorials
If you want to learn how to create dispersion effects of your own and how to dissolve in Photoshop, look no further than the tutorials below. Try these out to totally customize how you apply dispersion to your images and text.
Dispersion, though it applies to a rather narrow concept, offers virtually unlimited artistic flexibility. As you can see, Envato offers a remarkable collection of the best Photoshop dispersion effects through Envato Elements and GraphicRiver.
Be sure to explore both sites on your creative journey. And once you’ve found the dispersion effect of your choice, spend some quality time experimenting with it in Photoshop. The most amazing images aren’t built instantly, and practice makes perfect! Also, don’t forget to check out Envato Studio to enlist professional help with your projects.
Ever wanted to create stunning and explosive visuals in your photographs? One way to do this is with dispersion effects, which take the core subjects of your photos and spread them across the image canvas.
We have many stunning Photoshop actions for portraits in Envato Elements
Dispersion is commonly found in advertising and marketing promos, but you can use it in your own work too. The best part is that you don’t need to know how to dissolve in Photoshop from scratch, as we’ll see below in this collection of some of our best Photoshop actions from Envato Elements and outstanding image dispersion effects from GraphicRiver.
Envato Elements: Best Source for Photoshop Actions (With Unlimited Use)
Envato Elements has a single, compelling, all-inclusive offer:
Sign up for Envato Elements and you get access to thousands of creative graphics and templates (with unlimited use), from eye-catching Photoshop actions to professional, creative resume designs and more—all for one low price.
Download more than 1,500 Photoshop actions from our premium collection on Envato Elements
In addition, Envato Elements saves you both the time and energy needed when you’re designing from scratch.
To show you what I’m talking about, I’ve gathered 20 stunning dispersion Photoshop actions for you to download from Envato Elements.
20 Best Photoshop Dispersion Effects From Envato Elements
Dispersion effects are built for a variety of themes: portraits, action shots, landscapes, you name it. Each category has photo filters and effects built just for it. We’ve collected these from Envato Elements and GraphicRiver. You’ll find a well-rounded assortment of the 20 best dispersion Photoshop effects created for use in projects just like yours.
Elements offers unlimited access to Photoshop actions, while GraphicRiver offers inexpensive Photoshop effects on a pay-per-action model.
Also, if you prefer to hire a professional designer, check out the many services available at Envato Studio, where you can work with skilled designers to achieve all of your creative goals.
This disintegration photo effect will bring the stars and galaxies to your designs. Don’t worry if you don’t understand how to dissolve in Photoshop—this as easy as brushing over your photo, choosing an effect direction, and playing the action.
This picture disintegration effect will turn your images into magical designs. With our premium photo effects, you don’t need to worry about learning how to apply dispersion effects in Photoshop—they’re easy to use and have detailed instructions.
This Energy Animation Photoshop action is a stunning photo effect ready for you to use. This product is very useful for graphic designers and photography lovers. The main outstanding feature of this effect is its quality.
Look how cool this effect is! If you’re looking for Photoshop actions for portraits, this will bring out the best of your shots with a little sparkle. Also, all of our premium Photoshop actions are easy to use and come with detailed instructions.
Use this striking image dispersion effect to attract attention to your photographs and designs. It’s very easy to use—you simply brush over your photo where you want to start the firestorm, choose an effect direction, and play the action.
Ever wanted to have a cloud image dispersion effect in your designs? With our premium effect, you can have it now. This is one of our best Photoshop actions and is very easy to use.
A dispersion effect Photoshop action for those who love a fantasy touch in their designs. Don’t be stressed if you don’t know how to dissolve in Photoshop—this effect comes with detailed instructions, and it’s as easy as brushing over your photo where you want to create the magic dust and playing the action.
This dispersion photography action is especially useful if you like editing sports photography. Look at how the player stands out with this dispersion effect. It’s easy to use—you just need to fill in your subject with a color, and then play the action.
Use this striking dispersion Photoshop action to bring your designs to life and catch everyone’s attention. This photo filter allows you to create a storm effect in various colors around your subjects, and it’s easy and ready to use.
Create designs fit for superheroes with this cool image dispersion effect. Among our Photoshop actions for portraits, we recommend this because it will give your shot a nice effect. You know how easy our photo filters are to use. Simply fill in your subject with a color and play the action.
Help your photos take flight with this inspired dispersion effect Photoshop action. Best used in human photography, this picture disintegration effect will disperse subjects into vivid bursts of feathers. They’ll add a special look to fashion photographs and portraits alike. Ten color presets are included to help you tune and refine each image.
This image dispersion effect will grab the attention of the viewer. This action will give your subjects a liquid effect that is hard to miss. The focal points dissolve into water-like splashes for an edgy look. This Photoshop action is very easy to use—you just need to brush over the area where you want to apply the liquid effect and play it.
Capture the energy of a ticker-tape parade with this fun photo effect. Split images into wild flashes of confetti that lend a feeling of speed to any shot. The illusion of motion in this pixelated Photoshop action is complemented by an array of color and graphic options that can be applied with a single click.
Unlike flatter effects, this 3D Photoshop filter delivers an incredible sense of involvement in every image. The bold, multi-dimensional elements resemble gemstones flying towards the viewer. These dispersion photography effects are optimized for sports and action shots and really help amplify the action!
Dispersion 2 is an amazingly rich and robust effect to transform everyday action shots into works of art. Style your images in the tradition of movie posters and video-game covers with flashy, ethereal graphics. The color palette in this dispersion photography effect automatically optimizes to match the focal point of your photo.
Turn mundane grayscale images into red-hot wonders with Ashes n Embers, a volcanic dispersion photography effect. Fiery graphics dramatically offset binary black and white images and create unforgettable photographs. Boost the explosive style even more by trying out the included color presets.
True to its name, this pixelated Photoshop action breaks images down into individual pixels for a grainy, modern feel. Depending on the intensity of application, you can pixelate the full image or just the periphery of your subjects. The end result is abstract and captures the grunge style in every frame.
Blossoms is a picture disintegration effect that turns people into petals. Aimed at action photographs, this action creates explosive bursts of color. To alter the effect, adjust the color styling of your image in advance and then try applying the effect to bring out new and unforgettable looks.
Sand, dirt, and dust—these natural elements simulate stillness and the passage of time. But when stirred into motion by their human subjects, they bring about thoughts of power and speed, momentum and disruption. This dramatic contrast is boldly captured in this photo effect, best suited to images with strong contrast and fluid motion.
Made for quirky and eclectic snapshots, Bubblum is one of the best Photoshop filters for a moisture effect similar to water droplets. Abstract and yet vivid, this action strikes the perfect balance of documentary and art. Unlike many of the portrait examples we’ve explored, this effect is great for auto and fashion photography.
GraphicRiver: Best Source for Photoshop Effects (Buy One at a Time)
GraphicRiver is the leading digital marketplace for purchasing single-use graphics and visual assets. It’s part of the Envato Market suite of online marketplaces that cater to many creative digital asset needs.
These are some of our best Photoshop actions from GraphicRiver
While Envato Elements is a powerful option, if you prefer to buy just one disintegration photo effect (instead of getting unlimited access to hundreds of creative designs), check out the selection from our Envato Market below.
15 Awesome Photoshop Dispersion Effects From GraphicRiver
GraphicRiver offers a great variety of dispersion photography effects that can be purchased individually. If this is what you need, I’ve got you covered. Check some of the best Photoshop actions that I’ve gathered for you.
We offer you this effect from our collection of Photoshop actions for portraits. This effect will give them a unique and distinctive touch. Our premium GraphicRiver dispersion effect Photoshop actions come with instructions, so you don’t have to worry.
Have you ever wanted to learn how to dissolve in Photoshop? You can start by using a dispersion effect Photoshop action that’s ready for you to use. Simply brush over your high-quality photo where you want to create the smoke, and play the action. For more details, follow the instructions included.
This dispersion Photoshop action to download from GraphicRiver will definitely catch the attention of your audience. Our premium Photoshop effects aren’t complicated—you only need to follow the instructions included to create stunning dispersion images.
Whirlwinds create stunning visuals that grab the attention of even the most distracted viewers. Fire, dust, and particles explode across any image this effect is applied to. The result is a gritty, intimate shot with a vortex of dispersion color effects for pictures. Again, color changes are all-important to instantly alter the mood of your photo.
Quick and dynamic, Geometric Dispersion is a top choice for sports photo filters and effects. The download is a pack of several unique effects in the geometric style, creating motion mosaics from each image you apply them to. Even though the result is static, the feeling of speed is captured forever.
Ashen Decay brings an apocalyptic burning style to your collection of Photoshop filters. Subjects dissolve into fire, smoke, and particles. Use this one for music or movie projects, or apply it as a Photoshop action for portraits for a spectacularly unconventional look.
Dust is one of the finest techniques to bring dispersion to your photos. No finer example exists than this professional disintegration photo effect offering four unique dust dispersions. Easily customize colors and directions to craft new grit and glamor in each and every photo. And best of all, you won’t even have to clean dust off your lens!
Cortisol recreates the spectacular chaos of our natural environment. Subjects will burst from clouds of swirling smoke and dust to make an unforgettable entrance. Every layer is fully editable to make minute adjustments to the general scene. Combine it with your own title overlays to create posters, promos, and more.
Color effects for pictures often rely on introducing new palettes to existing images. Not so with this simple and dynamic Photoshop filter. Color Splatter takes the unique colors of your image and splatters them across the canvas, complementing instead of contrasting with the original. Aimed at creating a fun new dimension in portraits, this action is adaptable to branding and fashion uses as well.
When purchasing Photoshop actions, it pays to seek offerings that offer extra value. That’s definitely the case with the After Actions Bundle, which features five diverse and distinct effects in a single download. Dispersion, fantasy, lines, galaxy, and bi-exposure; each of the five caters to different types of images, and working together they form a powerful tool in any photographer’s toolbox.
Falling rain adds an intimate dimension to any photograph, but it can be difficult or impossible to capture naturally. Not to worry; with this rainy Photoshop filter, you can instantly apply downpours to every one of your images. In just a few clicks, foggy rain will disperse and overlay your subjects. The stormy fog of the falling rain is often the difference between good and great images. Take advantage of that here.
Help the shifting sands of time evolve from mental images to your own images with this dramatic pixelated Photoshop action. Sand particles add sharp focus to photos and help draw attention to the center of the frame. Be sure to adjust the dispersion and grain for maximum benefit.
Watercolors are perhaps the most popular form of abstract art. If you want to capture a scene as if on canvas, but don’t have the gift of painting abilities, don’t worry. With quick dispersion effect Photoshop actions like these, you can transform any photograph into a beautiful watercolor. Edges are softened, and even hidden contrasts stand out.
Give your photos the gift of timeless style with this powerful Photoshop effect. Vintageo is a retro, artistic filter that converts everyday snaps into classical portraits. An assortment of color options and fully editable graphic elements make the action a mere starting point on your artistic journey. All the tools you need to build incredible artwork are at your fingertips.
Disperse photos in the style of pen sketches with these photo effects. Distill complex photos into their fundamental elements in the transformation from photo to paper. Try Pen Sketch to break down technical photos into clean lines, or to create stunning, intimate portraits.
Top Dispersion Tutorials
If you want to learn how to create dispersion effects of your own and how to dissolve in Photoshop, look no further than the tutorials below. Try these out to totally customize how you apply dispersion to your images and text.
Dispersion, though it applies to a rather narrow concept, offers virtually unlimited artistic flexibility. As you can see, Envato offers a remarkable collection of the best Photoshop dispersion effects through Envato Elements and GraphicRiver.
Be sure to explore both sites on your creative journey. And once you’ve found the dispersion effect of your choice, spend some quality time experimenting with it in Photoshop. The most amazing images aren’t built instantly, and practice makes perfect! Also, don’t forget to check out Envato Studio to enlist professional help with your projects.
Ever wanted to create stunning and explosive visuals in your photographs? One way to do this is with dispersion effects, which take the core subjects of your photos and spread them across the image canvas.
We have many stunning Photoshop actions for portraits in Envato Elements
Dispersion is commonly found in advertising and marketing promos, but you can use it in your own work too. The best part is that you don’t need to know how to dissolve in Photoshop from scratch, as we’ll see below in this collection of some of our best Photoshop actions from Envato Elements and outstanding image dispersion effects from GraphicRiver.
Envato Elements: Best Source for Photoshop Actions (With Unlimited Use)
Envato Elements has a single, compelling, all-inclusive offer:
Sign up for Envato Elements and you get access to thousands of creative graphics and templates (with unlimited use), from eye-catching Photoshop actions to professional, creative resume designs and more—all for one low price.
Download more than 1,500 Photoshop actions from our premium collection on Envato Elements
In addition, Envato Elements saves you both the time and energy needed when you’re designing from scratch.
To show you what I’m talking about, I’ve gathered 20 stunning dispersion Photoshop actions for you to download from Envato Elements.
20 Best Photoshop Dispersion Effects From Envato Elements
Dispersion effects are built for a variety of themes: portraits, action shots, landscapes, you name it. Each category has photo filters and effects built just for it. We’ve collected these from Envato Elements and GraphicRiver. You’ll find a well-rounded assortment of the 20 best dispersion Photoshop effects created for use in projects just like yours.
Elements offers unlimited access to Photoshop actions, while GraphicRiver offers inexpensive Photoshop effects on a pay-per-action model.
Also, if you prefer to hire a professional designer, check out the many services available at Envato Studio, where you can work with skilled designers to achieve all of your creative goals.
This disintegration photo effect will bring the stars and galaxies to your designs. Don’t worry if you don’t understand how to dissolve in Photoshop—this as easy as brushing over your photo, choosing an effect direction, and playing the action.
This picture disintegration effect will turn your images into magical designs. With our premium photo effects, you don’t need to worry about learning how to apply dispersion effects in Photoshop—they’re easy to use and have detailed instructions.
This Energy Animation Photoshop action is a stunning photo effect ready for you to use. This product is very useful for graphic designers and photography lovers. The main outstanding feature of this effect is its quality.
Look how cool this effect is! If you’re looking for Photoshop actions for portraits, this will bring out the best of your shots with a little sparkle. Also, all of our premium Photoshop actions are easy to use and come with detailed instructions.
Use this striking image dispersion effect to attract attention to your photographs and designs. It’s very easy to use—you simply brush over your photo where you want to start the firestorm, choose an effect direction, and play the action.
Ever wanted to have a cloud image dispersion effect in your designs? With our premium effect, you can have it now. This is one of our best Photoshop actions and is very easy to use.
A dispersion effect Photoshop action for those who love a fantasy touch in their designs. Don’t be stressed if you don’t know how to dissolve in Photoshop—this effect comes with detailed instructions, and it’s as easy as brushing over your photo where you want to create the magic dust and playing the action.
This dispersion photography action is especially useful if you like editing sports photography. Look at how the player stands out with this dispersion effect. It’s easy to use—you just need to fill in your subject with a color, and then play the action.
Use this striking dispersion Photoshop action to bring your designs to life and catch everyone’s attention. This photo filter allows you to create a storm effect in various colors around your subjects, and it’s easy and ready to use.
Create designs fit for superheroes with this cool image dispersion effect. Among our Photoshop actions for portraits, we recommend this because it will give your shot a nice effect. You know how easy our photo filters are to use. Simply fill in your subject with a color and play the action.
Help your photos take flight with this inspired dispersion effect Photoshop action. Best used in human photography, this picture disintegration effect will disperse subjects into vivid bursts of feathers. They’ll add a special look to fashion photographs and portraits alike. Ten color presets are included to help you tune and refine each image.
This image dispersion effect will grab the attention of the viewer. This action will give your subjects a liquid effect that is hard to miss. The focal points dissolve into water-like splashes for an edgy look. This Photoshop action is very easy to use—you just need to brush over the area where you want to apply the liquid effect and play it.
Capture the energy of a ticker-tape parade with this fun photo effect. Split images into wild flashes of confetti that lend a feeling of speed to any shot. The illusion of motion in this pixelated Photoshop action is complemented by an array of color and graphic options that can be applied with a single click.
Unlike flatter effects, this 3D Photoshop filter delivers an incredible sense of involvement in every image. The bold, multi-dimensional elements resemble gemstones flying towards the viewer. These dispersion photography effects are optimized for sports and action shots and really help amplify the action!
Dispersion 2 is an amazingly rich and robust effect to transform everyday action shots into works of art. Style your images in the tradition of movie posters and video-game covers with flashy, ethereal graphics. The color palette in this dispersion photography effect automatically optimizes to match the focal point of your photo.
Turn mundane grayscale images into red-hot wonders with Ashes n Embers, a volcanic dispersion photography effect. Fiery graphics dramatically offset binary black and white images and create unforgettable photographs. Boost the explosive style even more by trying out the included color presets.
True to its name, this pixelated Photoshop action breaks images down into individual pixels for a grainy, modern feel. Depending on the intensity of application, you can pixelate the full image or just the periphery of your subjects. The end result is abstract and captures the grunge style in every frame.
Blossoms is a picture disintegration effect that turns people into petals. Aimed at action photographs, this action creates explosive bursts of color. To alter the effect, adjust the color styling of your image in advance and then try applying the effect to bring out new and unforgettable looks.
Sand, dirt, and dust—these natural elements simulate stillness and the passage of time. But when stirred into motion by their human subjects, they bring about thoughts of power and speed, momentum and disruption. This dramatic contrast is boldly captured in this photo effect, best suited to images with strong contrast and fluid motion.
Made for quirky and eclectic snapshots, Bubblum is one of the best Photoshop filters for a moisture effect similar to water droplets. Abstract and yet vivid, this action strikes the perfect balance of documentary and art. Unlike many of the portrait examples we’ve explored, this effect is great for auto and fashion photography.
GraphicRiver: Best Source for Photoshop Effects (Buy One at a Time)
GraphicRiver is the leading digital marketplace for purchasing single-use graphics and visual assets. It’s part of the Envato Market suite of online marketplaces that cater to many creative digital asset needs.
These are some of our best Photoshop actions from GraphicRiver
While Envato Elements is a powerful option, if you prefer to buy just one disintegration photo effect (instead of getting unlimited access to hundreds of creative designs), check out the selection from our Envato Market below.
15 Awesome Photoshop Dispersion Effects From GraphicRiver
GraphicRiver offers a great variety of dispersion photography effects that can be purchased individually. If this is what you need, I’ve got you covered. Check some of the best Photoshop actions that I’ve gathered for you.
We offer you this effect from our collection of Photoshop actions for portraits. This effect will give them a unique and distinctive touch. Our premium GraphicRiver dispersion effect Photoshop actions come with instructions, so you don’t have to worry.
Have you ever wanted to learn how to dissolve in Photoshop? You can start by using a dispersion effect Photoshop action that’s ready for you to use. Simply brush over your high-quality photo where you want to create the smoke, and play the action. For more details, follow the instructions included.
This dispersion Photoshop action to download from GraphicRiver will definitely catch the attention of your audience. Our premium Photoshop effects aren’t complicated—you only need to follow the instructions included to create stunning dispersion images.
Whirlwinds create stunning visuals that grab the attention of even the most distracted viewers. Fire, dust, and particles explode across any image this effect is applied to. The result is a gritty, intimate shot with a vortex of dispersion color effects for pictures. Again, color changes are all-important to instantly alter the mood of your photo.
Quick and dynamic, Geometric Dispersion is a top choice for sports photo filters and effects. The download is a pack of several unique effects in the geometric style, creating motion mosaics from each image you apply them to. Even though the result is static, the feeling of speed is captured forever.
Ashen Decay brings an apocalyptic burning style to your collection of Photoshop filters. Subjects dissolve into fire, smoke, and particles. Use this one for music or movie projects, or apply it as a Photoshop action for portraits for a spectacularly unconventional look.
Dust is one of the finest techniques to bring dispersion to your photos. No finer example exists than this professional disintegration photo effect offering four unique dust dispersions. Easily customize colors and directions to craft new grit and glamor in each and every photo. And best of all, you won’t even have to clean dust off your lens!
Cortisol recreates the spectacular chaos of our natural environment. Subjects will burst from clouds of swirling smoke and dust to make an unforgettable entrance. Every layer is fully editable to make minute adjustments to the general scene. Combine it with your own title overlays to create posters, promos, and more.
Color effects for pictures often rely on introducing new palettes to existing images. Not so with this simple and dynamic Photoshop filter. Color Splatter takes the unique colors of your image and splatters them across the canvas, complementing instead of contrasting with the original. Aimed at creating a fun new dimension in portraits, this action is adaptable to branding and fashion uses as well.
When purchasing Photoshop actions, it pays to seek offerings that offer extra value. That’s definitely the case with the After Actions Bundle, which features five diverse and distinct effects in a single download. Dispersion, fantasy, lines, galaxy, and bi-exposure; each of the five caters to different types of images, and working together they form a powerful tool in any photographer’s toolbox.
Falling rain adds an intimate dimension to any photograph, but it can be difficult or impossible to capture naturally. Not to worry; with this rainy Photoshop filter, you can instantly apply downpours to every one of your images. In just a few clicks, foggy rain will disperse and overlay your subjects. The stormy fog of the falling rain is often the difference between good and great images. Take advantage of that here.
Help the shifting sands of time evolve from mental images to your own images with this dramatic pixelated Photoshop action. Sand particles add sharp focus to photos and help draw attention to the center of the frame. Be sure to adjust the dispersion and grain for maximum benefit.
Watercolors are perhaps the most popular form of abstract art. If you want to capture a scene as if on canvas, but don’t have the gift of painting abilities, don’t worry. With quick dispersion effect Photoshop actions like these, you can transform any photograph into a beautiful watercolor. Edges are softened, and even hidden contrasts stand out.
Give your photos the gift of timeless style with this powerful Photoshop effect. Vintageo is a retro, artistic filter that converts everyday snaps into classical portraits. An assortment of color options and fully editable graphic elements make the action a mere starting point on your artistic journey. All the tools you need to build incredible artwork are at your fingertips.
Disperse photos in the style of pen sketches with these photo effects. Distill complex photos into their fundamental elements in the transformation from photo to paper. Try Pen Sketch to break down technical photos into clean lines, or to create stunning, intimate portraits.
Top Dispersion Tutorials
If you want to learn how to create dispersion effects of your own and how to dissolve in Photoshop, look no further than the tutorials below. Try these out to totally customize how you apply dispersion to your images and text.
Dispersion, though it applies to a rather narrow concept, offers virtually unlimited artistic flexibility. As you can see, Envato offers a remarkable collection of the best Photoshop dispersion effects through Envato Elements and GraphicRiver.
Be sure to explore both sites on your creative journey. And once you’ve found the dispersion effect of your choice, spend some quality time experimenting with it in Photoshop. The most amazing images aren’t built instantly, and practice makes perfect! Also, don’t forget to check out Envato Studio to enlist professional help with your projects.
Agregator najlepszych postów o designie, webdesignie, cssie i Internecie


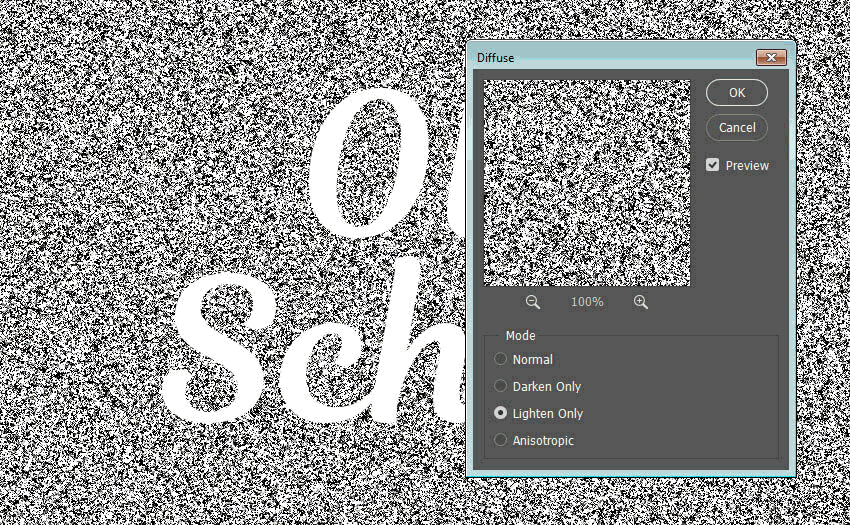


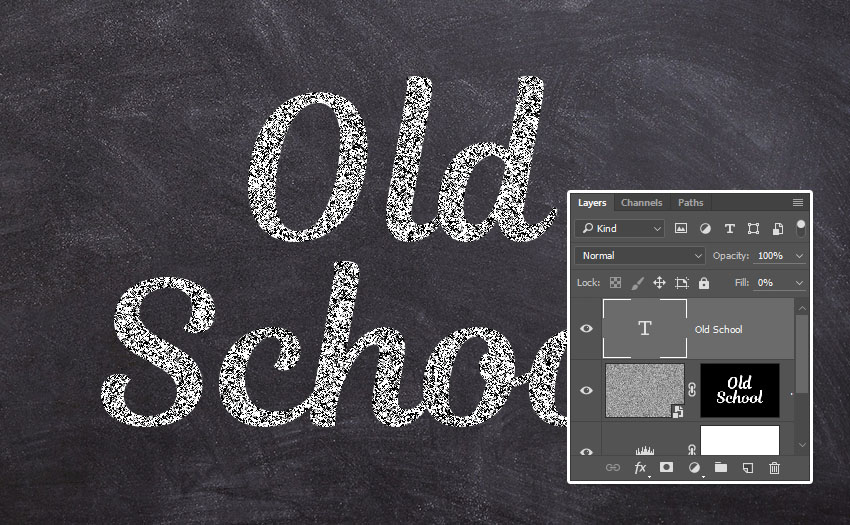


 VectorCreate a Chalkboard Effect with the New Pen Tool in IllustratorMary Winkler
 Photoshop ActionsHow to Create a Chalkboard Sign With Chalk Text in Adobe PhotoshopJohn Negoita
 Text EffectsHow to Create a Blueprint Text Effect in Adobe IllustratorAndrei Marius
 Text EffectsHow to Create a Sketch Text Effect Action in Adobe PhotoshopAnderson Luiz
 Text EffectsHow to Create a Grunge Text Effect Using a Displacement Map in Adobe PhotoshopIvan Gromov


