WordPress Multi-Multisite: A Case Study

Post pobrano z: WordPress Multi-Multisite: A Case Study

The mission: Provide a dashboard within the WordPress admin area for browsing Google Analytics data for all your blogs.

The catch? You’ve got about 900 live blogs, spread across about 25 WordPress multisite instances. Some instances have just one blog, others have as many as 250. In other words, what you need is to compress a data set that normally takes a very long time to compile into a single user-friendly screen.

The implementation details are entirely up to you, but the final result should look like this Figma comp:

Design courtesy of the incomparable Brian Biddle.

I want to walk you through my approach and some of the interesting challenges I faced coming up with it, as well as the occasional nitty-gritty detail in between. I’ll cover topics like the WordPress REST API, choosing between a JavaScript or PHP approach, rate/time limits in production web environments, security, custom database design — and even a touch of AI. But first, a little orientation.

Let’s define some terms

We’re about to cover a lot of ground, so it’s worth spending a couple of moments reviewing some key terms we’ll be using throughout this post.

What is WordPress multisite?

WordPress Multisite is a feature of WordPress core — no plugins required — whereby you can run multiple blogs (or websites, or stores, or what have you) from a single WordPress installation. All the blogs share the same WordPress core files, wp-content folder, and MySQL database. However, each blog gets its own folder within wp-content/uploads for its uploaded media, and its own set of database tables for its posts, categories, options, etc. Users can be members of some or all blogs within the multisite installation.

What is WordPress multi-multisite?

It’s just a nickname for managing multiple instances of WordPress multisite. It can get messy to have different customers share one multisite instance, so I prefer to break it up so that each customer has their own multisite, but they can have many blogs within their multisite.

So that’s different from a “Network of Networks”?

It’s apparently possible to run multiple instances of WordPress multisite against the same WordPress core installation. I’ve never looked into this, but I recall hearing about it over the years. I’ve heard the term “Network of Networks” and I like it, but that is not the scenario I’m covering in this article.

Why do you keep saying “blogs”? Do people still blog?

You betcha! And people read them, too. You’re reading one right now. Hence, the need for a robust analytics solution. But this article could just as easily be about any sort of WordPress site. I happen to be dealing with blogs, and the word “blog” is a concise way to express “a subsite within a WordPress multisite instance”.

One more thing: In this article, I’ll use the term dashboard site to refer to the site from which I observe the compiled analytics data. I’ll use the term client sites to refer to the 25 multisites I pull data from.

My implementation

My strategy was to write one WordPress plugin that is installed on all 25 client sites, as well as on the dashboard site. The plugin serves two purposes:

  • Expose data at API endpoints of the client sites
  • Scrape the data from the client sites from the dashboard site, cache it in the database, and display it in a dashboard.

The WordPress REST API is the Backbone

The WordPress REST API is my favorite part of WordPress. Out of the box, WordPress exposes default WordPress stuff like posts, authors, comments, media files, etc., via the WordPress REST API. You can see an example of this by navigating to /wp-json from any WordPress site, including CSS-Tricks. Here’s the REST API root for the WordPress Developer Resources site:

The root URL for the WordPress REST API exposes structured JSON data, such as this example from the WordPress Developer Resources website.

What’s so great about this? WordPress ships with everything developers need to extend the WordPress REST API and publish custom endpoints. Exposing data via an API endpoint is a fantastic way to share it with other websites that need to consume it, and that’s exactly what I did:

Open the code

<?php

[...]

function register(\WP_REST_Server $server) {
  $endpoints = $this->get();

  foreach ($endpoints as $endpoint_slug => $endpoint) {
    register_rest_route(
      $endpoint['namespace'],
      $endpoint['route'],
      $endpoint['args']
    );
  }
}

function get() {

  $version = 'v1';

  return array(
      
    'empty_db' => array(
      'namespace' => 'LXB_DBA/' . $version,
      'route'     => '/empty_db',
      'args'      => array(
        'methods' => array( 'DELETE' ),
        'callback' => array($this, 'empty_db_cb'),
        'permission_callback' => array( $this, 'is_admin' ),
      ),
    ),

    'get_blogs' => array(
      'namespace' => 'LXB_DBA/' . $version,
      'route'     => '/get_blogs',
      'args'      => array(
        'methods' => array('GET', 'OPTIONS'),
        'callback' => array($this, 'get_blogs_cb'),
        'permission_callback' => array($this, 'is_dba'),
      ),
    ),

    'insert_blogs' => array(
      'namespace' => 'LXB_DBA/' . $version,
      'route'     => '/insert_blogs',
      'args'      => array(
        'methods' => array( 'POST' ),
        'callback' => array($this, 'insert_blogs_cb'),
        'permission_callback' => array( $this, 'is_admin' ),
      ),
    ),

    'get_blogs_from_db' => array(
      'namespace' => 'LXB_DBA/' . $version,
      'route'     => '/get_blogs_from_db',
      'args'      => array(
        'methods' => array( 'GET' ),
        'callback' => array($this, 'get_blogs_from_db_cb'),
        'permission_callback' => array($this, 'is_admin'),
      ),
    ),  

    'get_blog_details' => array(
      'namespace' => 'LXB_DBA/' . $version,
      'route'     => '/get_blog_details',
      'args'      => array(
        'methods' => array( 'GET' ),
        'callback' => array($this, 'get_blog_details_cb'),
        'permission_callback' => array($this, 'is_dba'),
      ),
    ),   

    'update_blogs' => array(
      'namespace' => 'LXB_DBA/' . $version,
      'route'     => '/update_blogs',
      'args'      => array(
        'methods' => array( 'PATCH' ),
        'callback' => array($this, 'update_blogs_cb'),
        'permission_callback' => array($this, 'is_admin'),
      ),
    ),     

  );
}

We don’t need to get into every endpoint’s details, but I want to highlight one thing. First, I provided a function that returns all my endpoints in an array. Next, I wrote a function to loop through the array and register each array member as a WordPress REST API endpoint. Rather than doing both steps in one function, this decoupling allows me to easily retrieve the array of endpoints in other parts of my plugin to do other interesting things with them, such as exposing them to JavaScript. More on that shortly.

Once registered, the custom API endpoints are observable in an ordinary web browser like in the example above, or via purpose-built tools for API work, such as Postman:

JSON output.

PHP vs. JavaScript

I tend to prefer writing applications in PHP whenever possible, as opposed to JavaScript, and executing logic on the server, as nature intended, rather than in the browser. So, what would that look like on this project?

  • On the dashboard site, upon some event, such as the user clicking a “refresh data” button or perhaps a cron job, the server would make an HTTP request to each of the 25 multisite installs.
  • Each multisite install would query all of its blogs and consolidate its analytics data into one response per multisite.

Unfortunately, this strategy falls apart for a couple of reasons:

  • PHP operates synchronously, meaning you wait for one line of code to execute before moving to the next. This means that we’d be waiting for all 25 multisites to respond in series. That’s sub-optimal.
  • My production environment has a max execution limit of 60 seconds, and some of my multisites contain hundreds of blogs. Querying their analytics data takes a second or two per blog.

Damn. I had no choice but to swallow hard and commit to writing the application logic in JavaScript. Not my favorite, but an eerily elegant solution for this case:

  • Due to the asynchronous nature of JavaScript, it pings all 25 Multisites at once.
  • The endpoint on each Multisite returns a list of all the blogs on that Multisite.
  • The JavaScript compiles that list of blogs and (sort of) pings all 900 at once.
  • All 900 blogs take about one-to-two seconds to respond concurrently.

Holy cow, it just went from this:

( 1 second per Multisite * 25 installs ) + ( 1 second per blog * 900 blogs ) = roughly 925 seconds to scrape all the data.

To this:

1 second for all the Multisites at once + 1 second for all 900 blogs at once = roughly 2 seconds to scrape all the data.

That is, in theory. In practice, two factors enforce a delay:

  1. Browsers have a limit as to how many concurrent HTTP requests they will allow, both per domain and regardless of domain. I’m having trouble finding documentation on what those limits are. Based on observing the network panel in Chrome while working on this, I’d say it’s about 50-100.
  2. Web hosts have a limit on how many requests they can handle within a given period, both per IP address and overall. I was frequently getting a “429; Too Many Requests” response from my production environment, so I introduced a delay of 150 milliseconds between requests. They still operate concurrently, it’s just that they’re forced to wait 150ms per blog. Maybe “stagger” is a better word than “wait” in this context:
Open the code
async function getBlogsDetails(blogs) {
  let promises = [];

  // Iterate and set timeouts to stagger requests by 100ms each
  blogs.forEach((blog, index) => {
    if (typeof blog.url === 'undefined') {
      return;
    }

    let id = blog.id;
    const url = blog.url + '/' + blogDetailsEnpointPath + '?uncache=' + getRandomInt();

    // Create a promise that resolves after 150ms delay per blog index
    const delayedPromise = new Promise(resolve => {
      setTimeout(async () => {
        try {
          const blogResult = await fetchBlogDetails(url, id);
                
          if( typeof blogResult.urls == 'undefined' ) {
            console.error( url, id, blogResult );

          } else if( ! blogResult.urls ) {
            console.error( blogResult );
                
                
          } else if( blogResult.urls.length == 0 ) {
            console.error( blogResult );
                
          } else {
            console.log( blogResult );
          }
                
          resolve(blogResult);
        } catch (error) {
          console.error(`Error fetching details for blog ID ${id}:`, error);
          resolve(null); // Resolve with null to handle errors gracefully
      }
    }, index * 150); // Offset each request by 100ms
  });

  promises.push(delayedPromise);
});

  // Wait for all requests to complete
  const blogsResults = await Promise.all(promises);

  // Filter out any null results in case of caught errors
  return blogsResults.filter(result => result !== null);
}

With these limitations factored in, I found that it takes about 170 seconds to scrape all 900 blogs. This is acceptable because I cache the results, meaning the user only has to wait once at the start of each work session.

The result of all this madness — this incredible barrage of Ajax calls, is just plain fun to watch:

PHP and JavaScript: Connecting the dots

I registered my endpoints in PHP and called them in JavaScript. Merging these two worlds is often an annoying and bug-prone part of any project. To make it as easy as possible, I use wp_localize_script():

<?php

[...]

class Enqueue {

  function __construct() {
    add_action( 'admin_enqueue_scripts', array( $this, 'lexblog_network_analytics_script' ), 10 );
    add_action( 'admin_enqueue_scripts', array( $this, 'lexblog_network_analytics_localize' ), 11 );
  }

  function lexblog_network_analytics_script() {
    wp_register_script( 'lexblog_network_analytics_script', LXB_DBA_URL . '/js/lexblog_network_analytics.js', array( 'jquery', 'jquery-ui-autocomplete' ), false, false );
  }

  function lexblog_network_analytics_localize() {
    $a = new LexblogNetworkAnalytics;
    $data = $a -> get_localization_data();
    $slug = $a -> get_slug();

    wp_localize_script( 'lexblog_network_analytics_script', $slug, $data );

  }

  // etc.              
}

In that script, I’m telling WordPress two things:

  1. Load my JavaScript file.
  2. When you do, take my endpoint URLs, bundle them up as JSON, and inject them into the HTML document as a global variable for my JavaScript to read. This is leveraging the point I noted earlier where I took care to provide a convenient function for defining the endpoint URLs, which other functions can then invoke without fear of causing any side effects.

Here’s how that ended up looking:

The JSON and its associated JavaScript file, where I pass information from PHP to JavaScript using wp_localize_script().

Auth: Fort Knox or Sandbox?

We need to talk about authentication. To what degree do these endpoints need to be protected by server-side logic? Although exposing analytics data is not nearly as sensitive as, say, user passwords, I’d prefer to keep things reasonably locked up. Also, since some of these endpoints perform a lot of database queries and Google Analytics API calls, it’d be weird to sit here and be vulnerable to weirdos who might want to overload my database or Google Analytics rate limits.

That’s why I registered an application password on each of the 25 client sites. Using an app password in php is quite simple. You can authenticate the HTTP requests just like any basic authentication scheme.

I’m using JavaScript, so I had to localize them first, as described in the previous section. With that in place, I was able to append these credentials when making an Ajax call:

async function fetchBlogsOfInstall(url, id) {
  let install = lexblog_network_analytics.installs[id];
  let pw = install.pw;
  let user = install.user;

  // Create a Basic Auth token
  let token = btoa(`${user}:${pw}`);
  let auth = {
      'Authorization': `Basic ${token}`
  };

  try {
    let data = await $.ajax({
        url: url,
        method: 'GET',
        dataType: 'json',
        headers: auth
    });

    return data;

  } catch (error) {
    console.error('Request failed:', error);
    return [];
  }
}

That file uses this cool function called btoa() for turning the raw username and password combo into basic authentication.

The part where we say, “Oh Right, CORS.”

Whenever I have a project where Ajax calls are flying around all over the place, working reasonably well in my local environment, I always have a brief moment of panic when I try it on a real website, only to get errors like this:

CORS console error.

Oh. Right. CORS. Most reasonably secure websites do not allow other websites to make arbitrary Ajax requests. In this project, I absolutely do need the Dashboard Site to make many Ajax calls to the 25 client sites, so I have to tell the client sites to allow CORS:

<?php

  // ...

  function __construct() {
  add_action( 'rest_api_init', array( $this, 'maybe_add_cors_headers' ), 10 );
}

function maybe_add_cors_headers() {   
  // Only allow CORS for the endpoints that pertain to this plugin.
  if( $this->is_dba() ) {
      add_filter( 'rest_pre_serve_request', array( $this, 'send_cors_headers' ), 10, 2 );
  }
}

function is_dba() {
  $url = $this->get_current_url();
  $ep_urls = $this->get_endpoint_urls();
  $out = in_array( $url, $ep_urls );
          
  return $out;
          
}

function send_cors_headers( $served, $result ) {

          // Only allow CORS from the dashboard site.
  $dashboard_site_url = $this->get_dashboard_site_url();

  header( "Access-Control-Allow-Origin: $dashboard_site_url" );
  header( 'Access-Control-Allow-Headers: Origin, X-Requested-With, Content-Type, Accept, Authorization' );
  header( 'Access-Control-Allow-Methods: GET, OPTIONS' );
  return $served;
  
}

  [...]

}

You’ll note that I’m following the principle of least privilege by taking steps to only allow CORS where it’s necessary.

Auth, Part 2: I’ve been known to auth myself

I authenticated an Ajax call from the dashboard site to the client sites. I registered some logic on all the client sites to allow the request to pass CORS. But then, back on the dashboard site, I had to get that response from the browser to the server.

The answer, again, was to make an Ajax call to the WordPress REST API endpoint for storing the data. But since this was an actual database write, not merely a read, it was more important than ever to authenticate. I did this by requiring that the current user be logged into WordPress and possess sufficient privileges. But how would the browser know about this?

In PHP, when registering our endpoints, we provide a permissions callback to make sure the current user is an admin:

<?php

// ...

function get() {
  $version = 'v1';
  return array(

    'update_blogs' => array(
      'namespace' => 'LXB_DBA/' . $version,
      'route'     => '/update_blogs',
      'args'      => array(
        'methods' => array( 'PATCH' ),
        'callback' => array( $this, 'update_blogs_cb' ),
        'permission_callback' => array( $this, 'is_admin' ),
        ),
      ),
      // ...
    );           
  }
                      
function is_admin() {
    $out = current_user_can( 'update_core' );
    return $out;
}

JavaScript can use this — it’s able to identify the current user — because, once again, that data is localized. The current user is represented by their nonce:

async function insertBlog( data ) {
    
  let url = lexblog_network_analytics.endpoint_urls.insert_blog;

  try {
    await $.ajax({
      url: url,
      method: 'POST',
      dataType: 'json',
      data: data,
      headers: {
        'X-WP-Nonce': getNonce()
      }
    });
  } catch (error) {
    console.error('Failed to store blogs:', error);
  }
}

function getNonce() {
  if( typeof wpApiSettings.nonce == 'undefined' ) { return false; }
  return wpApiSettings.nonce;
}

The wpApiSettings.nonce global variable is automatically present in all WordPress admin screens. I didn’t have to localize that. WordPress core did it for me.

Cache is King

Compressing the Google Analytics data from 900 domains into a three-minute loading .gif is decent, but it would be totally unacceptable to have to wait for that long multiple times per work session. Therefore I cache the results of all 25 client sites in the database of the dashboard site.

I’ve written before about using the WordPress Transients API for caching data, and I could have used it on this project. However, something about the tremendous volume of data and the complexity implied within the Figma design made me consider a different approach. I like the saying, “The wider the base, the higher the peak,” and it applies here. Given that the user needs to query and sort the data by date, author, and metadata, I think stashing everything into a single database cell — which is what a transient is — would feel a little claustrophobic. Instead, I dialed up E.F. Codd and used a relational database model via custom tables:

In the Dashboard Site, I created seven custom database tables, including one relational table, to cache the data from the 25 client sites, as shown in the image.

It’s been years since I’ve paged through Larry Ullman’s career-defining (as in, my career) books on database design, but I came into this project with a general idea of what a good architecture would look like. As for the specific details — things like column types — I foresaw a lot of Stack Overflow time in my future. Fortunately, LLMs love MySQL and I was able to scaffold out my requirements using DocBlocks and let Sam Altman fill in the blanks:

Open the code
<?php 

/**
* Provides the SQL code for creating the Blogs table.  It has columns for:
* - ID: The ID for the blog.  This should just autoincrement and is the primary key.
* - name: The name of the blog.  Required.
* - slug: A machine-friendly version of the blog name.  Required.
* - url:  The url of the blog.  Required.
* - mapped_domain: The vanity domain name of the blog.  Optional.
* - install: The name of the Multisite install where this blog was scraped from.  Required.
* - registered:  The date on which this blog began publishing posts.  Optional.
* - firm_id:  The ID of the firm that publishes this blog.  This will be used as a foreign key to relate to the Firms table.  Optional.
* - practice_area_id:  The ID of the firm that publishes this blog.  This will be used as a foreign key to relate to the PracticeAreas table.  Optional.
* - amlaw:  Either a 0 or a 1, to indicate if the blog comes from an AmLaw firm.  Required.
* - subscriber_count:  The number of email subscribers for this blog.  Optional.
* - day_view_count:  The number of views for this blog today.  Optional.
* - week_view_count:  The number of views for this blog this week.  Optional.
* - month_view_count:  The number of views for this blog this month.  Optional.
* - year_view_count:  The number of views for this blog this year.  Optional.
* 
* @return string The SQL for generating the blogs table.
*/
function get_blogs_table_sql() {
  $slug = 'blogs';
  $out = "CREATE TABLE {$this->get_prefix()}_$slug (
      id BIGINT NOT NULL AUTO_INCREMENT,
      slug VARCHAR(255) NOT NULL,
      name VARCHAR(255) NOT NULL,
      url VARCHAR(255) NOT NULL UNIQUE, /* adding unique constraint */
      mapped_domain VARCHAR(255) UNIQUE,
      install VARCHAR(255) NOT NULL,
      registered DATE DEFAULT NULL,
      firm_id BIGINT,
      practice_area_id BIGINT,
      amlaw TINYINT NOT NULL,
      subscriber_count BIGINT,
      day_view_count BIGINT,
      week_view_count BIGINT,
      month_view_count BIGINT,
      year_view_count BIGINT,
      PRIMARY KEY (id),
      FOREIGN KEY (firm_id) REFERENCES {$this->get_prefix()}_firms(id),
      FOREIGN KEY (practice_area_id) REFERENCES {$this->get_prefix()}_practice_areas(id)
  ) DEFAULT CHARSET=utf8mb4;";
  return $out;
}

In that file, I quickly wrote a DocBlock for each function, and let the OpenAI playground spit out the SQL. I tested the result and suggested some rigorous type-checking for values that should always be formatted as numbers or dates, but that was the only adjustment I had to make. I think that’s the correct use of AI at this moment: You come in with a strong idea of what the result should be, AI fills in the details, and you debate with it until the details reflect what you mostly already knew.

How it’s going

I’ve implemented most of the user stories now. Certainly enough to release an MVP and begin gathering whatever insights this data might have for us:

Screenshot of the final dashboard which looks similar to the Figma mockups from earlier.
It’s working!

One interesting data point thus far: Although all the blogs are on the topic of legal matters (they are lawyer blogs, after all), blogs that cover topics with a more general appeal seem to drive more traffic. Blogs about the law as it pertains to food, cruise ships, germs, and cannabis, for example. Furthermore, the largest law firms on our network don’t seem to have much of a foothold there. Smaller firms are doing a better job of connecting with a wider audience. I’m positive that other insights will emerge as we work more deeply with this.

Regrets? I’ve had a few.

This project probably would have been a nice opportunity to apply a modern JavaScript framework, or just no framework at all. I like React and I can imagine how cool it would be to have this application be driven by the various changes in state rather than… drumrolla couple thousand lines of jQuery!

I like jQuery’s ajax() method, and I like the jQueryUI autocomplete component. Also, there’s less of a performance concern here than on a public-facing front-end. Since this screen is in the WordPress admin area, I’m not concerned about Google admonishing me for using an extra library. And I’m just faster with jQuery. Use whatever you want.

I also think it would be interesting to put AWS to work here and see what could be done through Lambda functions. Maybe I could get Lambda to make all 25 plus 900 requests concurrently with no worries about browser limitations. Heck, maybe I could get it to cycle through IP addresses and sidestep the 429 rate limit as well.

And what about cron? Cron could do a lot of work for us here. It could compile the data on each of the 25 client sites ahead of time, meaning that the initial three-minute refresh time goes away. Writing an application in cron, initially, I think is fine. Coming back six months later to debug something is another matter. Not my favorite. I might revisit this later on, but for now, the cron-free implementation meets the MVP goal.

I have not provided a line-by-line tutorial here, or even a working repo for you to download, and that level of detail was never my intention. I wanted to share high-level strategy decisions that might be of interest to fellow Multi-Multisite people. Have you faced a similar challenge? I’d love to hear about it in the comments!


WordPress Multi-Multisite: A Case Study originally published on CSS-Tricks, which is part of the DigitalOcean family. You should get the newsletter.

WordPress Multi-Multisite: A Case Study

Post pobrano z: WordPress Multi-Multisite: A Case Study

The mission: Provide a dashboard within the WordPress admin area for browsing Google Analytics data for all your blogs.

The catch? You’ve got about 900 live blogs, spread across about 25 WordPress multisite instances. Some instances have just one blog, others have as many as 250. In other words, what you need is to compress a data set that normally takes a very long time to compile into a single user-friendly screen.

The implementation details are entirely up to you, but the final result should look like this Figma comp:

Design courtesy of the incomparable Brian Biddle.

I want to walk you through my approach and some of the interesting challenges I faced coming up with it, as well as the occasional nitty-gritty detail in between. I’ll cover topics like the WordPress REST API, choosing between a JavaScript or PHP approach, rate/time limits in production web environments, security, custom database design — and even a touch of AI. But first, a little orientation.

Let’s define some terms

We’re about to cover a lot of ground, so it’s worth spending a couple of moments reviewing some key terms we’ll be using throughout this post.

What is WordPress multisite?

WordPress Multisite is a feature of WordPress core — no plugins required — whereby you can run multiple blogs (or websites, or stores, or what have you) from a single WordPress installation. All the blogs share the same WordPress core files, wp-content folder, and MySQL database. However, each blog gets its own folder within wp-content/uploads for its uploaded media, and its own set of database tables for its posts, categories, options, etc. Users can be members of some or all blogs within the multisite installation.

What is WordPress multi-multisite?

It’s just a nickname for managing multiple instances of WordPress multisite. It can get messy to have different customers share one multisite instance, so I prefer to break it up so that each customer has their own multisite, but they can have many blogs within their multisite.

So that’s different from a “Network of Networks”?

It’s apparently possible to run multiple instances of WordPress multisite against the same WordPress core installation. I’ve never looked into this, but I recall hearing about it over the years. I’ve heard the term “Network of Networks” and I like it, but that is not the scenario I’m covering in this article.

Why do you keep saying “blogs”? Do people still blog?

You betcha! And people read them, too. You’re reading one right now. Hence, the need for a robust analytics solution. But this article could just as easily be about any sort of WordPress site. I happen to be dealing with blogs, and the word “blog” is a concise way to express “a subsite within a WordPress multisite instance”.

One more thing: In this article, I’ll use the term dashboard site to refer to the site from which I observe the compiled analytics data. I’ll use the term client sites to refer to the 25 multisites I pull data from.

My implementation

My strategy was to write one WordPress plugin that is installed on all 25 client sites, as well as on the dashboard site. The plugin serves two purposes:

  • Expose data at API endpoints of the client sites
  • Scrape the data from the client sites from the dashboard site, cache it in the database, and display it in a dashboard.

The WordPress REST API is the Backbone

The WordPress REST API is my favorite part of WordPress. Out of the box, WordPress exposes default WordPress stuff like posts, authors, comments, media files, etc., via the WordPress REST API. You can see an example of this by navigating to /wp-json from any WordPress site, including CSS-Tricks. Here’s the REST API root for the WordPress Developer Resources site:

The root URL for the WordPress REST API exposes structured JSON data, such as this example from the WordPress Developer Resources website.

What’s so great about this? WordPress ships with everything developers need to extend the WordPress REST API and publish custom endpoints. Exposing data via an API endpoint is a fantastic way to share it with other websites that need to consume it, and that’s exactly what I did:

Open the code

<?php

[...]

function register(\WP_REST_Server $server) {
  $endpoints = $this->get();

  foreach ($endpoints as $endpoint_slug => $endpoint) {
    register_rest_route(
      $endpoint['namespace'],
      $endpoint['route'],
      $endpoint['args']
    );
  }
}

function get() {

  $version = 'v1';

  return array(
      
    'empty_db' => array(
      'namespace' => 'LXB_DBA/' . $version,
      'route'     => '/empty_db',
      'args'      => array(
        'methods' => array( 'DELETE' ),
        'callback' => array($this, 'empty_db_cb'),
        'permission_callback' => array( $this, 'is_admin' ),
      ),
    ),

    'get_blogs' => array(
      'namespace' => 'LXB_DBA/' . $version,
      'route'     => '/get_blogs',
      'args'      => array(
        'methods' => array('GET', 'OPTIONS'),
        'callback' => array($this, 'get_blogs_cb'),
        'permission_callback' => array($this, 'is_dba'),
      ),
    ),

    'insert_blogs' => array(
      'namespace' => 'LXB_DBA/' . $version,
      'route'     => '/insert_blogs',
      'args'      => array(
        'methods' => array( 'POST' ),
        'callback' => array($this, 'insert_blogs_cb'),
        'permission_callback' => array( $this, 'is_admin' ),
      ),
    ),

    'get_blogs_from_db' => array(
      'namespace' => 'LXB_DBA/' . $version,
      'route'     => '/get_blogs_from_db',
      'args'      => array(
        'methods' => array( 'GET' ),
        'callback' => array($this, 'get_blogs_from_db_cb'),
        'permission_callback' => array($this, 'is_admin'),
      ),
    ),  

    'get_blog_details' => array(
      'namespace' => 'LXB_DBA/' . $version,
      'route'     => '/get_blog_details',
      'args'      => array(
        'methods' => array( 'GET' ),
        'callback' => array($this, 'get_blog_details_cb'),
        'permission_callback' => array($this, 'is_dba'),
      ),
    ),   

    'update_blogs' => array(
      'namespace' => 'LXB_DBA/' . $version,
      'route'     => '/update_blogs',
      'args'      => array(
        'methods' => array( 'PATCH' ),
        'callback' => array($this, 'update_blogs_cb'),
        'permission_callback' => array($this, 'is_admin'),
      ),
    ),     

  );
}

We don’t need to get into every endpoint’s details, but I want to highlight one thing. First, I provided a function that returns all my endpoints in an array. Next, I wrote a function to loop through the array and register each array member as a WordPress REST API endpoint. Rather than doing both steps in one function, this decoupling allows me to easily retrieve the array of endpoints in other parts of my plugin to do other interesting things with them, such as exposing them to JavaScript. More on that shortly.

Once registered, the custom API endpoints are observable in an ordinary web browser like in the example above, or via purpose-built tools for API work, such as Postman:

JSON output.

PHP vs. JavaScript

I tend to prefer writing applications in PHP whenever possible, as opposed to JavaScript, and executing logic on the server, as nature intended, rather than in the browser. So, what would that look like on this project?

  • On the dashboard site, upon some event, such as the user clicking a “refresh data” button or perhaps a cron job, the server would make an HTTP request to each of the 25 multisite installs.
  • Each multisite install would query all of its blogs and consolidate its analytics data into one response per multisite.

Unfortunately, this strategy falls apart for a couple of reasons:

  • PHP operates synchronously, meaning you wait for one line of code to execute before moving to the next. This means that we’d be waiting for all 25 multisites to respond in series. That’s sub-optimal.
  • My production environment has a max execution limit of 60 seconds, and some of my multisites contain hundreds of blogs. Querying their analytics data takes a second or two per blog.

Damn. I had no choice but to swallow hard and commit to writing the application logic in JavaScript. Not my favorite, but an eerily elegant solution for this case:

  • Due to the asynchronous nature of JavaScript, it pings all 25 Multisites at once.
  • The endpoint on each Multisite returns a list of all the blogs on that Multisite.
  • The JavaScript compiles that list of blogs and (sort of) pings all 900 at once.
  • All 900 blogs take about one-to-two seconds to respond concurrently.

Holy cow, it just went from this:

( 1 second per Multisite * 25 installs ) + ( 1 second per blog * 900 blogs ) = roughly 925 seconds to scrape all the data.

To this:

1 second for all the Multisites at once + 1 second for all 900 blogs at once = roughly 2 seconds to scrape all the data.

That is, in theory. In practice, two factors enforce a delay:

  1. Browsers have a limit as to how many concurrent HTTP requests they will allow, both per domain and regardless of domain. I’m having trouble finding documentation on what those limits are. Based on observing the network panel in Chrome while working on this, I’d say it’s about 50-100.
  2. Web hosts have a limit on how many requests they can handle within a given period, both per IP address and overall. I was frequently getting a “429; Too Many Requests” response from my production environment, so I introduced a delay of 150 milliseconds between requests. They still operate concurrently, it’s just that they’re forced to wait 150ms per blog. Maybe “stagger” is a better word than “wait” in this context:
Open the code
async function getBlogsDetails(blogs) {
  let promises = [];

  // Iterate and set timeouts to stagger requests by 100ms each
  blogs.forEach((blog, index) => {
    if (typeof blog.url === 'undefined') {
      return;
    }

    let id = blog.id;
    const url = blog.url + '/' + blogDetailsEnpointPath + '?uncache=' + getRandomInt();

    // Create a promise that resolves after 150ms delay per blog index
    const delayedPromise = new Promise(resolve => {
      setTimeout(async () => {
        try {
          const blogResult = await fetchBlogDetails(url, id);
                
          if( typeof blogResult.urls == 'undefined' ) {
            console.error( url, id, blogResult );

          } else if( ! blogResult.urls ) {
            console.error( blogResult );
                
                
          } else if( blogResult.urls.length == 0 ) {
            console.error( blogResult );
                
          } else {
            console.log( blogResult );
          }
                
          resolve(blogResult);
        } catch (error) {
          console.error(`Error fetching details for blog ID ${id}:`, error);
          resolve(null); // Resolve with null to handle errors gracefully
      }
    }, index * 150); // Offset each request by 100ms
  });

  promises.push(delayedPromise);
});

  // Wait for all requests to complete
  const blogsResults = await Promise.all(promises);

  // Filter out any null results in case of caught errors
  return blogsResults.filter(result => result !== null);
}

With these limitations factored in, I found that it takes about 170 seconds to scrape all 900 blogs. This is acceptable because I cache the results, meaning the user only has to wait once at the start of each work session.

The result of all this madness — this incredible barrage of Ajax calls, is just plain fun to watch:

PHP and JavaScript: Connecting the dots

I registered my endpoints in PHP and called them in JavaScript. Merging these two worlds is often an annoying and bug-prone part of any project. To make it as easy as possible, I use wp_localize_script():

<?php

[...]

class Enqueue {

  function __construct() {
    add_action( 'admin_enqueue_scripts', array( $this, 'lexblog_network_analytics_script' ), 10 );
    add_action( 'admin_enqueue_scripts', array( $this, 'lexblog_network_analytics_localize' ), 11 );
  }

  function lexblog_network_analytics_script() {
    wp_register_script( 'lexblog_network_analytics_script', LXB_DBA_URL . '/js/lexblog_network_analytics.js', array( 'jquery', 'jquery-ui-autocomplete' ), false, false );
  }

  function lexblog_network_analytics_localize() {
    $a = new LexblogNetworkAnalytics;
    $data = $a -> get_localization_data();
    $slug = $a -> get_slug();

    wp_localize_script( 'lexblog_network_analytics_script', $slug, $data );

  }

  // etc.              
}

In that script, I’m telling WordPress two things:

  1. Load my JavaScript file.
  2. When you do, take my endpoint URLs, bundle them up as JSON, and inject them into the HTML document as a global variable for my JavaScript to read. This is leveraging the point I noted earlier where I took care to provide a convenient function for defining the endpoint URLs, which other functions can then invoke without fear of causing any side effects.

Here’s how that ended up looking:

The JSON and its associated JavaScript file, where I pass information from PHP to JavaScript using wp_localize_script().

Auth: Fort Knox or Sandbox?

We need to talk about authentication. To what degree do these endpoints need to be protected by server-side logic? Although exposing analytics data is not nearly as sensitive as, say, user passwords, I’d prefer to keep things reasonably locked up. Also, since some of these endpoints perform a lot of database queries and Google Analytics API calls, it’d be weird to sit here and be vulnerable to weirdos who might want to overload my database or Google Analytics rate limits.

That’s why I registered an application password on each of the 25 client sites. Using an app password in php is quite simple. You can authenticate the HTTP requests just like any basic authentication scheme.

I’m using JavaScript, so I had to localize them first, as described in the previous section. With that in place, I was able to append these credentials when making an Ajax call:

async function fetchBlogsOfInstall(url, id) {
  let install = lexblog_network_analytics.installs[id];
  let pw = install.pw;
  let user = install.user;

  // Create a Basic Auth token
  let token = btoa(`${user}:${pw}`);
  let auth = {
      'Authorization': `Basic ${token}`
  };

  try {
    let data = await $.ajax({
        url: url,
        method: 'GET',
        dataType: 'json',
        headers: auth
    });

    return data;

  } catch (error) {
    console.error('Request failed:', error);
    return [];
  }
}

That file uses this cool function called btoa() for turning the raw username and password combo into basic authentication.

The part where we say, “Oh Right, CORS.”

Whenever I have a project where Ajax calls are flying around all over the place, working reasonably well in my local environment, I always have a brief moment of panic when I try it on a real website, only to get errors like this:

CORS console error.

Oh. Right. CORS. Most reasonably secure websites do not allow other websites to make arbitrary Ajax requests. In this project, I absolutely do need the Dashboard Site to make many Ajax calls to the 25 client sites, so I have to tell the client sites to allow CORS:

<?php

  // ...

  function __construct() {
  add_action( 'rest_api_init', array( $this, 'maybe_add_cors_headers' ), 10 );
}

function maybe_add_cors_headers() {   
  // Only allow CORS for the endpoints that pertain to this plugin.
  if( $this->is_dba() ) {
      add_filter( 'rest_pre_serve_request', array( $this, 'send_cors_headers' ), 10, 2 );
  }
}

function is_dba() {
  $url = $this->get_current_url();
  $ep_urls = $this->get_endpoint_urls();
  $out = in_array( $url, $ep_urls );
          
  return $out;
          
}

function send_cors_headers( $served, $result ) {

          // Only allow CORS from the dashboard site.
  $dashboard_site_url = $this->get_dashboard_site_url();

  header( "Access-Control-Allow-Origin: $dashboard_site_url" );
  header( 'Access-Control-Allow-Headers: Origin, X-Requested-With, Content-Type, Accept, Authorization' );
  header( 'Access-Control-Allow-Methods: GET, OPTIONS' );
  return $served;
  
}

  [...]

}

You’ll note that I’m following the principle of least privilege by taking steps to only allow CORS where it’s necessary.

Auth, Part 2: I’ve been known to auth myself

I authenticated an Ajax call from the dashboard site to the client sites. I registered some logic on all the client sites to allow the request to pass CORS. But then, back on the dashboard site, I had to get that response from the browser to the server.

The answer, again, was to make an Ajax call to the WordPress REST API endpoint for storing the data. But since this was an actual database write, not merely a read, it was more important than ever to authenticate. I did this by requiring that the current user be logged into WordPress and possess sufficient privileges. But how would the browser know about this?

In PHP, when registering our endpoints, we provide a permissions callback to make sure the current user is an admin:

<?php

// ...

function get() {
  $version = 'v1';
  return array(

    'update_blogs' => array(
      'namespace' => 'LXB_DBA/' . $version,
      'route'     => '/update_blogs',
      'args'      => array(
        'methods' => array( 'PATCH' ),
        'callback' => array( $this, 'update_blogs_cb' ),
        'permission_callback' => array( $this, 'is_admin' ),
        ),
      ),
      // ...
    );           
  }
                      
function is_admin() {
    $out = current_user_can( 'update_core' );
    return $out;
}

JavaScript can use this — it’s able to identify the current user — because, once again, that data is localized. The current user is represented by their nonce:

async function insertBlog( data ) {
    
  let url = lexblog_network_analytics.endpoint_urls.insert_blog;

  try {
    await $.ajax({
      url: url,
      method: 'POST',
      dataType: 'json',
      data: data,
      headers: {
        'X-WP-Nonce': getNonce()
      }
    });
  } catch (error) {
    console.error('Failed to store blogs:', error);
  }
}

function getNonce() {
  if( typeof wpApiSettings.nonce == 'undefined' ) { return false; }
  return wpApiSettings.nonce;
}

The wpApiSettings.nonce global variable is automatically present in all WordPress admin screens. I didn’t have to localize that. WordPress core did it for me.

Cache is King

Compressing the Google Analytics data from 900 domains into a three-minute loading .gif is decent, but it would be totally unacceptable to have to wait for that long multiple times per work session. Therefore I cache the results of all 25 client sites in the database of the dashboard site.

I’ve written before about using the WordPress Transients API for caching data, and I could have used it on this project. However, something about the tremendous volume of data and the complexity implied within the Figma design made me consider a different approach. I like the saying, “The wider the base, the higher the peak,” and it applies here. Given that the user needs to query and sort the data by date, author, and metadata, I think stashing everything into a single database cell — which is what a transient is — would feel a little claustrophobic. Instead, I dialed up E.F. Codd and used a relational database model via custom tables:

In the Dashboard Site, I created seven custom database tables, including one relational table, to cache the data from the 25 client sites, as shown in the image.

It’s been years since I’ve paged through Larry Ullman’s career-defining (as in, my career) books on database design, but I came into this project with a general idea of what a good architecture would look like. As for the specific details — things like column types — I foresaw a lot of Stack Overflow time in my future. Fortunately, LLMs love MySQL and I was able to scaffold out my requirements using DocBlocks and let Sam Altman fill in the blanks:

Open the code
<?php 

/**
* Provides the SQL code for creating the Blogs table.  It has columns for:
* - ID: The ID for the blog.  This should just autoincrement and is the primary key.
* - name: The name of the blog.  Required.
* - slug: A machine-friendly version of the blog name.  Required.
* - url:  The url of the blog.  Required.
* - mapped_domain: The vanity domain name of the blog.  Optional.
* - install: The name of the Multisite install where this blog was scraped from.  Required.
* - registered:  The date on which this blog began publishing posts.  Optional.
* - firm_id:  The ID of the firm that publishes this blog.  This will be used as a foreign key to relate to the Firms table.  Optional.
* - practice_area_id:  The ID of the firm that publishes this blog.  This will be used as a foreign key to relate to the PracticeAreas table.  Optional.
* - amlaw:  Either a 0 or a 1, to indicate if the blog comes from an AmLaw firm.  Required.
* - subscriber_count:  The number of email subscribers for this blog.  Optional.
* - day_view_count:  The number of views for this blog today.  Optional.
* - week_view_count:  The number of views for this blog this week.  Optional.
* - month_view_count:  The number of views for this blog this month.  Optional.
* - year_view_count:  The number of views for this blog this year.  Optional.
* 
* @return string The SQL for generating the blogs table.
*/
function get_blogs_table_sql() {
  $slug = 'blogs';
  $out = "CREATE TABLE {$this->get_prefix()}_$slug (
      id BIGINT NOT NULL AUTO_INCREMENT,
      slug VARCHAR(255) NOT NULL,
      name VARCHAR(255) NOT NULL,
      url VARCHAR(255) NOT NULL UNIQUE, /* adding unique constraint */
      mapped_domain VARCHAR(255) UNIQUE,
      install VARCHAR(255) NOT NULL,
      registered DATE DEFAULT NULL,
      firm_id BIGINT,
      practice_area_id BIGINT,
      amlaw TINYINT NOT NULL,
      subscriber_count BIGINT,
      day_view_count BIGINT,
      week_view_count BIGINT,
      month_view_count BIGINT,
      year_view_count BIGINT,
      PRIMARY KEY (id),
      FOREIGN KEY (firm_id) REFERENCES {$this->get_prefix()}_firms(id),
      FOREIGN KEY (practice_area_id) REFERENCES {$this->get_prefix()}_practice_areas(id)
  ) DEFAULT CHARSET=utf8mb4;";
  return $out;
}

In that file, I quickly wrote a DocBlock for each function, and let the OpenAI playground spit out the SQL. I tested the result and suggested some rigorous type-checking for values that should always be formatted as numbers or dates, but that was the only adjustment I had to make. I think that’s the correct use of AI at this moment: You come in with a strong idea of what the result should be, AI fills in the details, and you debate with it until the details reflect what you mostly already knew.

How it’s going

I’ve implemented most of the user stories now. Certainly enough to release an MVP and begin gathering whatever insights this data might have for us:

Screenshot of the final dashboard which looks similar to the Figma mockups from earlier.
It’s working!

One interesting data point thus far: Although all the blogs are on the topic of legal matters (they are lawyer blogs, after all), blogs that cover topics with a more general appeal seem to drive more traffic. Blogs about the law as it pertains to food, cruise ships, germs, and cannabis, for example. Furthermore, the largest law firms on our network don’t seem to have much of a foothold there. Smaller firms are doing a better job of connecting with a wider audience. I’m positive that other insights will emerge as we work more deeply with this.

Regrets? I’ve had a few.

This project probably would have been a nice opportunity to apply a modern JavaScript framework, or just no framework at all. I like React and I can imagine how cool it would be to have this application be driven by the various changes in state rather than… drumrolla couple thousand lines of jQuery!

I like jQuery’s ajax() method, and I like the jQueryUI autocomplete component. Also, there’s less of a performance concern here than on a public-facing front-end. Since this screen is in the WordPress admin area, I’m not concerned about Google admonishing me for using an extra library. And I’m just faster with jQuery. Use whatever you want.

I also think it would be interesting to put AWS to work here and see what could be done through Lambda functions. Maybe I could get Lambda to make all 25 plus 900 requests concurrently with no worries about browser limitations. Heck, maybe I could get it to cycle through IP addresses and sidestep the 429 rate limit as well.

And what about cron? Cron could do a lot of work for us here. It could compile the data on each of the 25 client sites ahead of time, meaning that the initial three-minute refresh time goes away. Writing an application in cron, initially, I think is fine. Coming back six months later to debug something is another matter. Not my favorite. I might revisit this later on, but for now, the cron-free implementation meets the MVP goal.

I have not provided a line-by-line tutorial here, or even a working repo for you to download, and that level of detail was never my intention. I wanted to share high-level strategy decisions that might be of interest to fellow Multi-Multisite people. Have you faced a similar challenge? I’d love to hear about it in the comments!


WordPress Multi-Multisite: A Case Study originally published on CSS-Tricks, which is part of the DigitalOcean family. You should get the newsletter.

Why the Jaguar rebrand is a total disaster

Post pobrano z: Why the Jaguar rebrand is a total disaster

Copy nothing. #Jaguar pic.twitter.com/BfVhc3l09B

— Jaguar (@Jaguar) November 19, 2024

At this point, you must all have seen the Jaguar latest video, as it went viral on almost every social media platform. The car brand went for something totally different from their usual ads, as you can see in the embedded video above. If success is determined by the virality of a video, this was a huge success. If it’s defined by the positive/negative ratio of the reactions, it was a total failure.

Social media reactions to the Jaguar re-branding

The first to complain were the conservative accounts, who were shocked by the fabulous characters and colors of the video, putting all the blame on the LGBT community right away. On X, Jaguar’s post was met with a lot of irony, to which the community manager replied with tweets that seemed to be copy-pasted.

The second point that brought everybody’s attention, even beyond conservative, is the lack of car in the video. If you check the brand’s replies on social media, it was intentional and the video was more of a marketing stunt promising big changes.

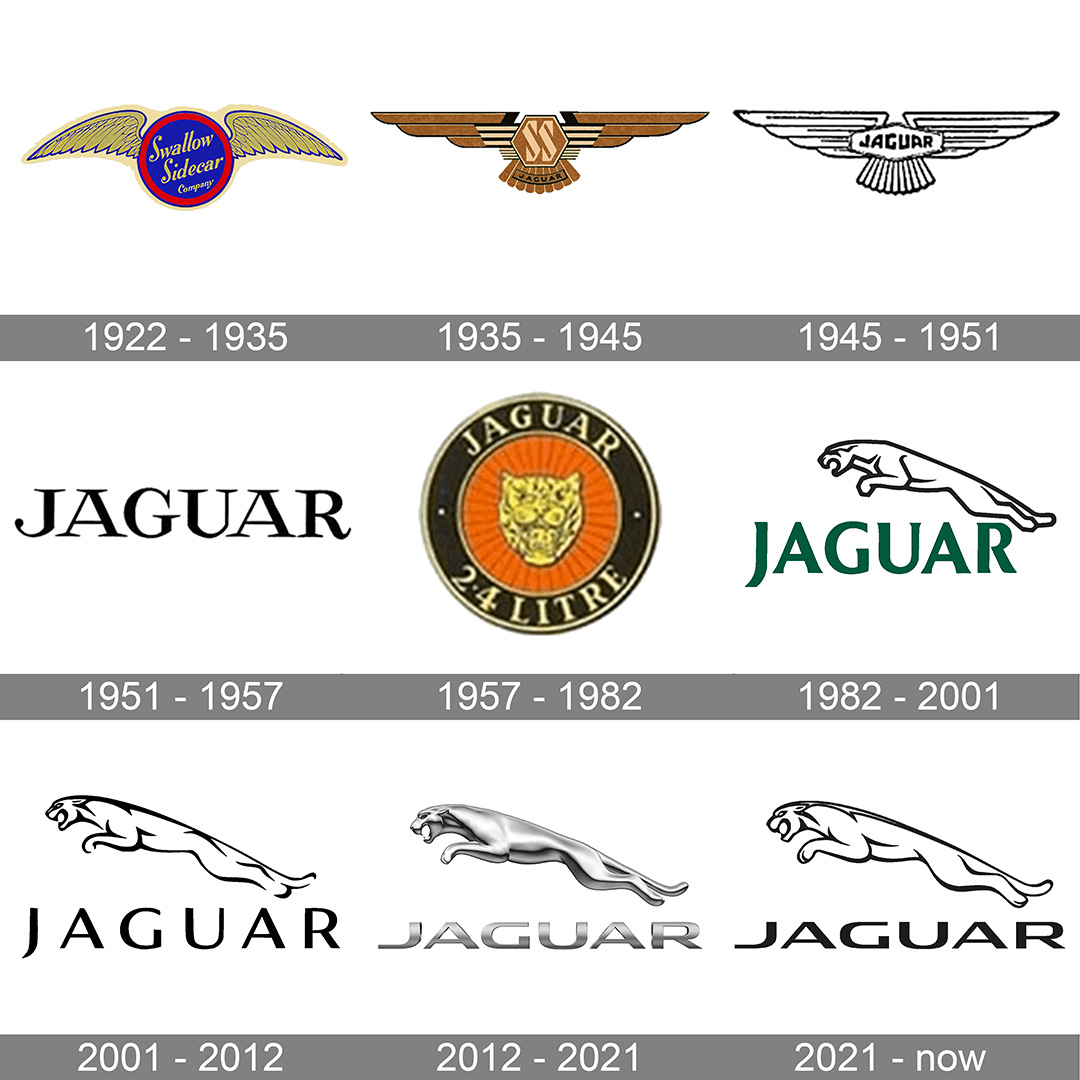
For graphic designers, although the video was the main center of attention, the logo redesign didn’t go unnoticed. Following a global trend, it takes a much more minimalist approach, going as far as removing the jaguar drawing. The typography is less “agressive”, with rounded lower-case letters and much bigger letter-spacing.

At first sight, removing the stylized jaguar drawing from the logo is surprising, but we could have only seen a part of it, as the drawing might be reserved for other uses. After all, the former logo was also occasionally used without the jaguar drawing in the past. On top of that, this isn’t the first time Jaguar underwent a radical redesign. In fact, it happened several times, as you can see it in the image below. As a sidenote, it’s worth taking a look at the 1935-1945 logo, which was surprising for a British brand considering the politics of the time.

So, what’s the problem with the new branding?

The first issue is that the re-design was totally off-brand. In itself, this is only a problem if the off-brand re-design is unpopular with its targetted audience. In this case, the usual target audience reacted very negatively.

The other major issue comes from the root causes of the re-branding. Although inclusivity is a noble cause, it should not take over the main product in the company’s ads. The radical change in style is also very politically connoted, which is always dangerous when doing business. In the video below, which dates from a few months ago, you can see Jaguar’s head of branding explaining his intentions.

A message from @jaguar’s Santino Pietrosanti, one of our #AttitudeAwards sponsors ❤️

“We are here to celebrate you, the ones who, despite everything, keep that vital flame alive.” pic.twitter.com/aDIJi6hYJf

— Attitude Magazine (@AttitudeMag) October 9, 2024

He clearly explains that a radical change is coming, but the change we have been seeing doesn’t have anything to do, but everything to do with the agenda of the head of branding. This type of behavior, not caring about customers, but caring about your own opinions only, reveals a level of narcissism that isn’t very good for the brand.

So, will there be a massive backlash about this ad? It seems so when seeing the first reactions, but we’ll see that in the longer term.

The post Why the Jaguar rebrand is a total disaster appeared first on Designer Daily: graphic and web design blog.

How to Select Promotional Items That Resonate with Your Audience

Post pobrano z: How to Select Promotional Items That Resonate with Your Audience

Promotional products are a powerful tool for enhancing brand recognition and building relationships with clients and prospects. However, the success of a promotional campaign largely depends on choosing promotional items for your audience that resonate with your target group. Whether it’s a branded pen, reusable tote bag, or a custom tech gadget, choosing promotional items that align with your audience’s preferences can make a lasting impact. When carefully selected, these items not only increase brand visibility but also strengthen customer loyalty over time.

1. Know Your Target Audience

Understanding your target audience is the first step to selecting promotional items that will resonate with them. Analyze demographic data like age, gender, occupation, and interests to gain insights into their preferences. For instance, tech-savvy customers might prefer gadgets like USB drives, while an environmentally conscious audience would appreciate eco-friendly products like reusable water bottles. By tailoring your promotional items to your audience’s specific needs and interests, you increase the likelihood of creating a positive and memorable experience.

2. Align the Product with Your Brand Message

The promotional items you choose should reflect your brand’s identity and core message. If your brand emphasizes innovation, selecting high-tech products like Bluetooth speakers or smart accessories can help reinforce this image. On the other hand, if your company values sustainability, opt for eco-friendly items such as recycled notebooks or bamboo utensils. Aligning your promotional products with your brand message not only enhances your brand’s image but also ensures that your audience associates the items with your company’s values and vision.

3. Focus on Practicality and Usability

Choosing practical and useful promotional items increases the chances that your audience will use them frequently, which in turn boosts brand visibility. Products like pens, notepads, and tote bags are popular because they serve a daily purpose. Consider the context in which the item will be used. For example, travel accessories like portable chargers or luggage tags can appeal to a frequently traveling audience. Practical items that fit seamlessly into your audience’s daily routine are more likely to be kept and appreciated.

4. Consider Trends and Seasonal Relevance

Keeping up with current trends and considering seasonal factors can help you choose promotional items that are timely and relevant. For example, the rising demand for sustainable products means that items like reusable bags or stainless steel straws may resonate well with an eco-conscious audience. Additionally, think about the season: sunglasses and sunscreen make great summer giveaways, while cozy beanies and insulated mugs are perfect for winter. Seasonal and trendy products show that your brand is in tune with your audience’s preferences and needs at specific times of the year.

5. Prioritize Quality Over Quantity

Investing in high-quality promotional items can have a lasting impact on how your brand is perceived. While it may be tempting to choose cheaper products to distribute widely, low-quality items may be discarded quickly and could reflect poorly on your brand. Instead, opt for fewer, high-quality items that recipients are more likely to keep and use. A durable, well-made product not only enhances the user experience but also signals that your company values quality, which can help build trust and credibility with your audience.

6. Choose Items That Encourage Brand Interaction

Interactive promotional items can create memorable experiences and engage your audience in a unique way. Products that require user engagement, like branded puzzles or tech gadgets, can increase the time spent with your brand. Items that offer customization options, such as choosing a preferred color or design, can also enhance the appeal by making the product feel more personal. When recipients interact with your promotional items, it reinforces your brand message and creates a stronger connection with your audience.

7. Set a Clear Budget and Evaluate ROI

Before selecting promotional products, it’s essential to set a clear budget that aligns with your marketing goals. Consider the potential return on investment (ROI) of each item, focusing on products that offer high visibility and usage. Items like tote bags and travel mugs, which are used frequently, can provide ongoing brand exposure and better ROI compared to novelty items that might be used once and forgotten. Maximizing your budget by choosing effective products will help ensure that your promotional campaign delivers strong results.

8. Test and Gather Feedback

Testing a small batch of promotional items before placing a large order can help you assess their quality and appeal. Gathering feedback from a sample of your target audience allows you to make adjustments and ensure the items are well-received. Pay attention to the feedback and look for patterns that indicate what your audience likes or dislikes about the products. This proactive approach helps you refine your selection process and increases the chances of success in your promotional campaigns by choosing items that truly resonate with your audience.

The post How to Select Promotional Items That Resonate with Your Audience appeared first on Designer Daily: graphic and web design blog.

Martha Olivia’s Illustrations About India For Highlife Magazine

Post pobrano z: Martha Olivia’s Illustrations About India For Highlife Magazine

Martha Olivia is not just any illustrator; she’s a creative powerhouse known for her colorful, patterned artwork that brings places to life. When approached by British Airways to illustrate six key sights of India for their High Life magazine, she was thrilled. “British Airways is such an iconic name,” she said. “It’s inspiring to collaborate with a brand that connects people and destinations worldwide.”Her mission? To capture the essence of India’s diverse culture through her unique artistic lens while highlighting its rich food, architecture, nature, and bustling cities.

A Colorful Journey Through India

Olivia’s illustrations are a feast for the eyes! Each piece is infused with vibrant colors and intricate patterns that reflect India’s rich heritage. For this project, she selected six favorite sights from a list of 25 must-see attractions. Her illustrations are not just images; they are invitations to explore the heart and soul of India.Imagine wandering through the lively streets of Jaipur, where every corner bursts with color, or savoring the spices of a bustling market in Delhi—all beautifully depicted in Olivia’s work. She describes her style as one that often features “repeats, symmetry, or flowing designs,” which perfectly aligns with India’s stunning crafts and intricate patterns.

The Art of Research: A Dream Project

What makes this collaboration even more special is Olivia’s passion for travel. Although she had never visited India before taking on this project, she embraced the opportunity to dive deep into its culture during her research phase. “It wasn’t a challenge; it was an opportunity to discover great new places,” she explained.Her research allowed her to draw inspiration from various elements—food, markets, clothing, nature, and architecture—ensuring that her illustrations resonate with authenticity and vibrancy. Each illustration tells a story, inviting viewers to experience the sights and sounds of India.

A Palette Inspired by Tradition

When it comes to color, Olivia went all out! She started with the colors of the Indian flag—saffron, white, and green—and then expanded her palette to reflect the diversity and energy of India. “I wanted it to feel bright, colorful, and warm,” she said. This thoughtful approach ensures that each piece not only captures the visual beauty of India but also evokes its spirit.From the rich reds of traditional textiles to the lush greens of its landscapes, Olivia’s illustrations are a celebration of India’s vibrant culture. They serve as a reminder that art can transport us to different places and inspire wanderlust in our hearts.

The Future Looks Bright

As Olivia looks ahead, she dreams of continuing her journey through travel-related projects. “I’ve always loved traveling and capturing places through film photography,” she shares. Illustrating different towns and countries allows her to blend her passions for art and exploration into one delightful package.

Conclusion: An Invitation to Explore

Through Martha Olivia’s stunning illustrations for British Airways, we are invited on an enchanting journey through India—a land where every color tells a story and every pattern holds a memory. As travelers seek authentic experiences beyond traditional tourist traps, these vibrant artworks remind us that there’s always more to discover in this incredible country.So grab your passport and your camera! With Olivia’s illustrations as your guide, let your imagination take flight as you explore the wonders of India—where every corner is Instagram-worthy and every moment is filled with magic!

The post Martha Olivia’s Illustrations About India For Highlife Magazine appeared first on Designer Daily: graphic and web design blog.

11 Upcoming UX Design Trends

Post pobrano z: 11 Upcoming UX Design Trends

Analyzing UI and UX trends is essential to anticipate user needs and optimize the experience you offer. By adopting trendy features and designs, your business can improve its efficiency and offer innovative experiences.

1. Minimalism, still a big UI UX trend

In UX and UI, minimalism is a quality. On the one hand because it allows for faster page loading (and therefore more efficient for the user), on the other hand because it allows only the most important elements to be shown.

In design, this will involve white spaces, of course, but also a more than moderate use of notifications and pop-ups. You will also avoid an excess of innovative tools: a few will be welcome, but you will rely primarily on techniques already known (and validated) by Internet users.

2. Artificial intelligence to the rescue of UX

By simplifying the way we interact with digital systems, AI significantly improves the user experience. From intelligent voice assistants to chatbots, AI offers a more natural and intuitive interaction, reducing the need for a complex user interface.

In addition, machine learning, a subset of AI, allows for more adaptive and personalized design, by anticipating user needs based on their past behaviors. A good solution to save time for the many UX/UI designers.

Artificial intelligence can also open up new opportunities for sites, such as new interactions available thanks to AI, or making your site dynamic by reacting to the visitor’s actions.

3. Even more micro-interactions

Micro-interactions are today an effective way to captivate your audience, and remain one of the main trends in UX and UI design. You’ll see:

  • Tactile reviews in mobile apps.
  • Color changes according to the program states.
  • Visualization of page loading.
  • Animations during transitions.

These small details make navigation more pleasant and warmer, and prolong visitor engagement.

4. Less conventional navigation

Attracting the attention of users is a constant struggle for designers who must constantly renew themselves. A truly unique design allows you to stand out in the eyes of Internet users, who are accustomed to ever more technological prowess.

It’s up to you to bet on new arrangements to attract users:

  • Combined horizontal and vertical scrolling.
  • Exploration by sliding.

However, be sure to preserve intuitive navigation! User comfort must always be at the heart of your concerns.

5. Ever more personalization

Personalization is a key lever for engaging users, and has been for several years now. Use big data to offer tailored experiences in real time (according to time, location, etc.). You have to go beyond integrating first names or birthday wishes, your users are already used to all that.

Your web design then plays a role in personalization, and this can include:

  • Dynamic content.
  • Themes based on user preferences.
  • Personalized browsing experiences.

6. Abstract data visualization

Classic tables and lists are outdated, they tend to spoil the design of your home pages. Opt for a more creative visualization:

  • Reinforced visual communication.
  • Originality.
  • More attractive and functional user interfaces.
  • Reduction of the familiarization time between the user and the service or product.
  • Depth of the site.

7. Dare to use bold typography

Large fonts and strong contrasts dominate in 2025, bringing a modern and striking touch to designs.

Texts, important words and impactful numbers will be highlighted with contrasting colors to create a strong visual hierarchy and encourage Internet users to engage with the website. Also, consider revisiting serif typography for a timeless look.

8. Ethical design

In 2025, designers are, as they have been for several years now, called upon to adopt practices ethical, respecting a hierarchy of human needs:

  • Respect for human rights: Privacy, diversity, accessibility.
  • Effort: Reliability and performance.
  • Overall experience: Pleasure and added value.

Ethical design therefore aims to support all these layers simultaneously, and it is necessary to balance business objectives with human needs for a more respectful experience.

9. Interactive storytelling

Interactive storytelling has become an essential pillar for capturing users’ attention. By combining classic narration with interactive elements, it transforms a simple visit into a memorable experience.

  • Interactive stories: Use animations and scrolling effects to tell a story as the user explores the page. Brands like Apple and Nike use interactive storytelling to present products by telling their design story.
  • Personalized choices: Give the user the opportunity to influence the story
  • Immersive experiences: Integrate full-screen videos, sound effects and animations to completely immerse the user in a story.

By focusing on captivating storytelling, you can transform complex information into engaging content, improving user retention and loyalty.

10. Developing the voice user interface (VUI)

With the growing popularity of voice assistants like Siri, Alexa, and Google Assistant, the Voice User Interface (VUI) has become essential for smoother and more natural navigation.

Users expect to be able to interact with applications via voice commands, especially on mobile and on devices without a screen like smart speakers. By integrating voice UX, you can simplify access to information and services for a hands-free experience.

Also think about accessibility: voice interfaces are particularly useful for people with visual or motor disabilities. They offer them increased autonomy by facilitating interaction with technologies.

11. Inclusive and accessible design

Digital accessibility is no longer a simple addition, but a must. Inclusive design aims to create interfaces that adapt to all users, regardless of their abilities.

  • Text and contrast: Use easily readable fonts and ensure sufficient contrast between text and background. Increase the size of your fonts and line spacing. Use text effects (italics, bold, or underline) to highlight important information.
  • Universal navigation: Provide clear navigation. Optimize your site for keyboard commands for users who cannot use a mouse.
  • Accessible components: Make sure your buttons, forms, and other interactive elements are easily usable for people with motor limitations. For example, areas of

The post 11 Upcoming UX Design Trends appeared first on Designer Daily: graphic and web design blog.

Solved by CSS: Donuts Scopes

Post pobrano z: Solved by CSS: Donuts Scopes

Imagine you have a web component that can show lots of different content. It will likely have a slot somewhere where other components can be injected. The parent component also has its own styles unrelated to the styles of the content components it may hold.

This makes a challenging situation: how can we prevent the parent component styles from leaking inwards?

This isn’t a new problem — Nicole Sullivan described it way back in 2011! The main problem is writing CSS so that it doesn’t affect the content, and she accurately coined it as donut scoping.

“We need a way of saying, not only where scope starts, but where it ends. Thus, the scope donut”.

Diagram showing a rectangle colored salmon inside another rectangle colored dark red. The larger rectangle is the donut and the smaller rectangle is the hole.

Even if donut scoping is an ancient issue in web years, if you do a quick search on “CSS Donut Scope” in your search engine of choice, you may notice two things:

  1. Most of them talk about the still recent @scope at-rule.
  2. Almost every result is from 2021 onwards.

We get similar results even with a clever “CSS Donut Scope –@scope” query, and going year by year doesn’t seem to bring anything new to the donut scope table. It seems like donut scopes stayed at the back of our minds as just another headache of the ol’ CSS global scope until @scope.

And (spoiler!), while the @scope at-rule brings an easier path for donut scoping, I feel there must have been more attempted solutions over the years. We will venture through each of them, making a final stop at today’s solution, @scope. It’s a nice exercise in CSS history!

Take, for example, the following game screen. We have a .parent element with a tab set and a .content slot, in which an .inventory component is injected. If we change the .parent color, then so does the color inside .content.

CodePen Embed Fallback

How can we stop this from happening? I want to prevent the text inside of .content from inheriting the .parent‘s color.

Just ignore it!

The first solution is no solution at all! This may be the most-used approach since most developers can live their lives without the joys of donut scoping (crazy, right?). Let’s be more tangible here, it isn’t just blatantly ignoring it, but rather accepting CSS’s global scope and writing styles with that in mind. Back to our first example, we assume we can’t stop the parent’s styles from leaking inwards to the content component, so we write our parent’s styles with less specificity, so they can be overridden by the content styles.

body {
  color: blue;
}

.parent {
  color: orange; /* Initial background */
}

.content {
  color: blue; /* Overrides parent's background */
}
CodePen Embed Fallback

While this approach is sufficient for now, managing styles just by their specificity as a project grows larger becomes tedious, at best, and chaotic at worst. Components may behave differently depending on where they are slotted and changing our CSS or HTML can break other styles in unexpected ways.

Two CSS properties walk into a bar. A barstool in a completely different bar falls over.

Thomas Fuchs

You can see how in this small example we have to override the styles twice:

Dev Tools showing the body styles getting overridden twice

Shallow donuts scopes with :not()

Our goal then it’s to only scope the .parent, leaving out whatever may be inserted into the .content slot. So, not the .content but the rest of .parent… not the .content:not()! We can use the :not() selector to scope only the direct descendants of .parent that aren’t .content.

body {
  color: blue;
}

.parent > :not(.content) {
  color: orange;
}

This way the .content styles won’t be bothered by the styles defined in their .parent:

CodePen Embed Fallback

You can see an immense difference when we open the DevTools for each example:

Dev Tools Comparison between specificity overrides and donut scopes

As good as an improvement, the last example has a shallow reach. So, if there were another slot nested deeper in, we wouldn’t be able to reach it unless we know beforehand where it is going to be slotted.

CodePen Embed Fallback

This is because we are using the direct descendant selector (>), but I couldn’t find a way to make it work without it. Even using a combination of complex selectors inside :not() doesn’t seem to lead anywhere useful. For example, back in 2021, Dr. Lea Verou mentioned donut scoping with :not() using the following selector cocktail:

.container:not(.content *) {
  /* Donut Scoped styles (?) */
}

However, this snippet appears to match the .container/.parent class instead of its descendants, and it’s noted that it still would be shallow donut scoping:

TIL that all modern browsers now support complex selectors in :not()! 😍

Test: https://t.co/rHSJARDvSW

So you can do things like:
– .foo :not(.foo .foo *) to match things inside one .foo wrapper but not two
– .container :not(.content *) to get simple (shallow) “donut scope”

— Dr Lea Verou (@LeaVerou) January 28, 2021

Donut scoping with @scope

So our last step for donut scoping completion is being able to go beyond one DOM layer. Luckily, last year we were gifted the @scope at-rule (you can read more about it in its Almanac entry). In a nutshell, it lets us select a subtree in the DOM where our styles will be scoped, so no more global scope!

@scope (.parent) {
 /* Styles written here will only affect .parent */
}

What’s better, we can leave slots inside the subtree we selected (usually called the scope root). In this case, we would want to style the .parent element without scoping .content:

@scope (.parent) to (.content) {
  /* Styles written here will only affect .parent but skip .content*/
}

And what’s better, it detects every .content element inside .parent, no matter how nested it may be. So we don’t need to worry about where we are writing our slots. In the last example, we could instead write the following style to change the text color of the element in .parent without touching .content:

body {
  color: blue;
}

@scope (.parent) to (.content) {
  h2,
  p,
  span,
  a {
    color: orange;
  }
}

While it may seem inconvenient to list all the elements we are going to change, we can’t use something like the universal selector (*) since it would mess up the scoping of nested slots. In this example, it would leave the nested .content out of scope, but not its container. Since the color property inherits, the nested .content would change colors regardless!

And voilà! Both .content slots are inside our scoped donut holes:

CodePen Embed Fallback

Shallow scoping is still possible with this method, we would just have to rewrite our slot selector so that only direct .content descendants of .parent are left out of the scope. However, we have to use the :scope selector, which refers back to the scoping root, or .parent in this case:

@scope (.parent) to (:scope > .content) {
  * {
    color: orange;
  }
}

We can use the universal selector in this instance since it’s shallow scoping.

CodePen Embed Fallback

Conclusion

Donut scoping, a wannabe feature coined back in 2011 has finally been brought to life in the year 2024. It’s still baffling how it appeared to sit in the back of our minds until recently, as just another consequence of CSS Global Scope, while it had so many quirks by itself. It would be unfair, however, to say that it went under everyone’s radars since the CSSWG (the people behind writing the spec for new CSS features) clearly had the intention to address it when writing the spec for the @scope at-rule.

Whatever it may be, I am grateful we can have true donut scoping in our CSS. To some degree, we still have to wait for Firefox to support it. 😉

This browser support data is from Caniuse, which has more detail. A number indicates that browser supports the feature at that version and up.

Desktop

Chrome Firefox IE Edge Safari
118 No No 118 17.4

Mobile / Tablet

Android Chrome Android Firefox Android iOS Safari
131 No 131 17.4

Solved by CSS: Donuts Scopes originally published on CSS-Tricks, which is part of the DigitalOcean family. You should get the newsletter.

Invoker Commands: Additional Ways to Work With Dialog, Popover… and More?

Post pobrano z: Invoker Commands: Additional Ways to Work With Dialog, Popover… and More?

The Popover API and <dialog> element are two of my favorite new platform features. In fact, I recently [wrote a detailed overview of their use cases] and the sorts of things you can do with them, even learning a few tricks in the process that I couldn’t find documented anywhere else.

I’ll admit that one thing that I really dislike about popovers and dialogs is that they could’ve easily been combined into a single API. They cover different use cases (notably, dialogs are typically modal) but are quite similar in practice, and yet their implementations are different.

Well, web browsers are now experimenting with two HTML attributes — technically, they’re called “invoker commands” — that are designed to invoke popovers, dialogs, and further down the line, all kinds of actions without writing JavaScript. Although, if you do reach for JavaScript, the new attributes — command and commandfor — come with some new events that we can listen for.

Invoker commands? I’m sure you have questions, so let’s dive in.

We’re in experimental territory

Before we get into the weeds, we’re dealing with experimental features. To use invoker commands today in November 2024 you’ll need Chrome Canary 134+ with the enable-experimental-web-platform-features flag set to Enabled, Firefox Nightly 135+ with the dom.element.invokers.enabled flag set to true, or Safari Technology Preview with the InvokerAttributesEnabled flag set to true.

I’m optimistic we’ll get baseline coverage for command and commandfor in due time considering how nicely they abstract the kind of work that currently takes a hefty amount of scripting.

Basic command and commandfor usage

First, you’ll need a <button> or a button-esque <input> along the lines of <input type="button"> or <input type="reset">. Next, tack on the command attribute. The command value should be the command name that you want the button to invoke (e.g., show-modal). After that, drop the commandfor attribute in there referencing the dialog or popover you’re targeting by its id.

<button command="show-modal" commandfor="dialogA">Show dialogA</button>

<dialog id="dialogA">...</dialog>

In this example, I have a <button> element with a command attribute set to show-modal and a commandfor attribute set to dialogA, which matches the id of a <dialog> element we’re targeting:

Let’s get into the possible values for these invoker commands and dissect what they’re doing.

Looking closer at the attribute values

CodePen Embed Fallback

The show-modal value is the command that I just showed you in that last example. Specifically, it’s the HTML-invoked equivalent of JavaScript’s showModal() method.

The main benefit is that show-modal enables us to, well… show a modal without reaching directly for JavaScript. Yes, this is almost identical to how HTML-invoked popovers already work with thepopovertarget and popovertargetaction attributes, so it’s cool that the “balance is being redressed” as the Open UI explainer describes it, even more so because you can use the command and commandfor invoker commands for popovers too.

There isn’t a show command to invoke show() for creating non-modal dialogs. I’ve mentioned before that non-modal dialogs are redundant now that we have the Popover API, especially since popovers have ::backdrops and other dialog-like features. My bold prediction is that non-modal dialogs will be quietly phased out over time.

The close command is the HTML-invoked equivalent of JavaScript’s close() method used for closing the dialog. You probably could have guessed that based on the name alone!

<dialog id="dialogA">
  <!-- Close #dialogA -->
  <button command="close" commandfor="dialogA">Close dialogA</button>
</dialog>

The show-popover, hide-popover, and toggle-popover values

<button command="show-popover" commandfor="id">

…invokes showPopover(), and is the same thing as:

<button popovertargetaction="show" popovertarget="id">

Similarly:

<button command="hide-popover" commandfor="id">

…invokes hidePopover(), and is the same thing as:

<button popovertargetaction="hide" popovertarget="id">

Finally:

<button command="toggle-popover" commandfor="id">

…invokes togglePopover(), and is the same thing as:

<button popovertargetaction="toggle" popovertarget="id">
<!--  or <button popovertarget="id">, since ‘toggle’ is the default action anyway. -->

I know all of this can be tough to organize in your mind’s eye, so perhaps a table will help tie things together:

command Invokes popovertargetaction equivalent
show-popover showPopover() show
hide-popover hidePopover() hide
toggle-popover togglePopover() toggle

So… yeah, popovers can already be invoked using HTML attributes, making command and commandfor not all that useful in this context. But like I said, invoker commands also come with some useful JavaScript stuff, so let’s dive into all of that.

Listening to commands with JavaScript

Invoker commands dispatch a command event to the target whenever their source button is clicked on, which we can listen for and work with in JavaScript. This isn’t required for a <dialog> element’s close event, or a popover attribute’s toggle or beforetoggle event, because we can already listen for those, right?

For example, the Dialog API doesn’t dispatch an event when a <dialog> is shown. So, let’s use invoker commands to listen for the command event instead, and then read event.command to take the appropriate action.

// Select all dialogs
const dialogs = document.querySelectorAll("dialog");

// Loop all dialogs
dialogs.forEach(dialog => {

  // Listen for close (as normal)
  dialog.addEventListener("close", () => {
    // Dialog was closed
  });

  // Listen for command
  dialog.addEventListener("command", event => {

    // If command is show-modal
    if (event.command == "show-modal") {
      // Dialog was shown (modally)
    }

    // Another way to listen for close
    else if (event.command == "close") {
      // Dialog was closed
    }

  });
});

So invoker commands give us additional ways to work with dialogs and popovers, and in some scenarios, they’ll be less verbose. In other scenarios though, they’ll be more verbose. Your approach should depend on what you need your dialogs and popovers to do.

For the sake of completeness, here’s an example for popovers, even though it’s largely the same:

// Select all popovers
const popovers = document.querySelectorAll("[popover]");

// Loop all popovers
popovers.forEach(popover => {

  // Listen for command
  popover.addEventListener("command", event => {

    // If command is show-popover
    if (event.command == "show-popover") {
      // Popover was shown
    }

    // If command is hide-popover
    else if (event.command == "hide-popover") {
      // Popover was hidden
    }

    // If command is toggle-popover
    else if (event.command == "toggle-popover") {
      // Popover was toggled
    }

  });
});

Being able to listen for show-popover and hide-popover is useful as we otherwise have to write a sort of “if opened, do this, else do that” logic from within a toggle or beforetoggle event listener or toggle-popover conditional. But <dialog> elements? Yeah, those benefit more from the command and commandfor attributes than they do from this command JavaScript event.

Another thing that’s available to us via JavaScript is event.source, which is the button that invokes the popover or <dialog>:

if (event.command == "toggle-popover") {
  // Toggle the invoker’s class
  event.source.classList.toggle("active");
}

You can also set the command and commandfor attributes using JavaScript:

const button = document.querySelector("button");
const dialog = document.querySelector("dialog");

button.command = "show-modal";
button.commandForElement = dialog; /* Not dialog.id */

…which is only slightly less verbose than:

button.command = "show-modal";
button.setAttribute("commandfor", dialog.id);

Creating custom commands

The command attribute also accepts custom commands prefixed with two dashes (--). I suppose this makes them like CSS custom properties but for JavaScript events and event handler HTML attributes. The latter observation is maybe a bit (or definitely a lot) controversial since using event handler HTML attributes is considered bad practice. But let’s take a look at that anyway, shall we?

Custom commands look like this:

<button command="--spin-me-a-bit" commandfor="record">Spin me a bit</button>
<button command="--spin-me-a-lot" commandfor="record">Spin me a lot</button>
<button command="--spin-me-right-round" commandfor="record">Spin me right round</button>
const record = document.querySelector("#record");

record.addEventListener("command", event => {
  if (event.command == "--spin-me-a-bit") {
    record.style.rotate = "90deg";
  } else if (event.command == "--spin-me-a-lot") {
    record.style.rotate = "180deg";
  } else if (event.command == "--spin-me-right-round") {
    record.style.rotate = "360deg";
  }
});

event.command must match the string with the dashed (--) prefix.

Are popover and <dialog> the only features that support invoker commands?

According to Open UI, invokers targeting additional elements such as <details> were deferred from the initial release. I think this is because HTML-invoked dialogs and an API that unifies dialogs and popovers is a must-have, whereas other commands (even custom commands) feel more like a nice-to-have deal.

However, based on experimentation (I couldn’t help myself!) web browsers have actually implemented additional invokers to varying degrees. For example, <details> commands work as expected whereas <select> commands match event.command (e.g., show-picker) but fail to actually invoke the method (showPicker()). I missed all of this at first because MDN only mentions dialog and popover.

Open UI also alludes to commands for <input type="file">, <input type="number">, <video>, <audio>, and fullscreen-related methods, but I don’t think that anything is certain at this point.

So, what would be the benefits of invoker commands?

Well, a whole lot less JavaScript for one, especially if more invoker commands are implemented over time. Additionally, we can listen for these commands almost as if they were JavaScript events. But if nothing else, invoker commands simply provide more ways to interact with APIs such as the Dialog and Popover APIs. In a nutshell, it seems like a lot of “dotting i’s” and “crossing-t’s” which is never a bad thing.


Invoker Commands: Additional Ways to Work With Dialog, Popover… and More? originally published on CSS-Tricks, which is part of the DigitalOcean family. You should get the newsletter.

Complete CSS Course

Post pobrano z: Complete CSS Course

Do you subscribe to Piccalilli? You should. If you’re reading that name for the first time, that would be none other than Andy Bell running the ship and he’s reimagined the site from the ground-up after coming out of hibernation this year. You’re likely familiar with Andy’s great writing here on CSS-Tricks.

Andy is more than a great writer — he’s a teacher, too. And you’ll see that in spades next week when his brand-new course Complete CSS is released one week from today on November 26.

As someone who also runs a front-end course, I can tell you it takes a non-trivial amount of time and effort to put something like Complete CSS together. I’ve been able to sneak peek at the course and like love how it’s made for many CSS-Tricks readers — you know CSS and use it regularly but need to ratchet it up from good to great. If my course is for those just getting into CSS, Andy will graduate you from hobbyist to practitioner in Complete CSS. It’s the perfect next step for narrowing the ever-growing learning gaps in this industry.

Early bird price is £189 (~$240) which is a steep cut from the full £249 (~$325) price tag.


Complete CSS Course originally published on CSS-Tricks, which is part of the DigitalOcean family. You should get the newsletter.

Anchoreum: A New Game for Learning Anchor Positioning

Post pobrano z: Anchoreum: A New Game for Learning Anchor Positioning

You’ve played Flexbox Froggy before, right? Or maybe Grid Garden? They’re both absolute musts for learning the basics of modern CSS layout using Flexbox and CSS Grid. I use both games in all of the classes I teach and I never get anything but high-fives from my students because they love them so much.

As widely known as those games are, you may be less familiar with the name of the developer who made them. That would be Thomas Park, and he has a couple of CSS-Tricks articles notched in his belt. He also has a horde of other games in his CodePip collection of free and premium games for learning front-end techniques.

Thomas wrote in to share his latest game with us: Anchoreum.

Showing level three of 40 in the Anchoreum game. Code is on the left and a live preview of the result is on the right,

I’ll bet the two nickels in my pocket that you know this game’s all about CSS Anchor Positioning. I love that Thomas has jumped on this so quickly because the feature is still fresh, and indeed is currently only supported in a couple of browsers at the moment.

This is the perfect time to learn about anchor positioning. It’s still relatively early days, but things are baked enough to be supported in Chrome and Edge so you can access the games. If you haven’t seen Juan’s big ol’ guide on anchor positioning, that’s another dandy way to get up to speed.

The objective is less on-the-nose than Flexbox Froggy and Grid Garden, which both lean heavily into positioning elements to complete game tasks. For example, Flexbox Froggy is about positioning frogs safely on lilypads. Grid Garden wants you to water specific garden areas to feed your carrots. Anchoreum? You’re in a museum and need to anchor labels to museum artifacts. I know, attaching target elements to the same anchor over and again could get boring. But thankfully the game goes beyond simple positioning by getting into multiple anchors, spanning, and position fallbacks.

Whatever the objective, the repetition is good for developing muscle memory and the overall outcome is still the same: learn CSS Anchor Positioning. I’m already planning how and where I’m going to use Anchoreum in my curriculum. It’s not often we get a fun interactive learning resource like this for such a new web feature and I think it’s worth jumping on it sooner rather than later.

Thomas prepped a video trailer for the game so I thought I’d drop that for reference.


Anchoreum: A New Game for Learning Anchor Positioning originally published on CSS-Tricks, which is part of the DigitalOcean family. You should get the newsletter.