Our new campaign for “Nestor” Psychogeriatric Association. Founded in 2001, “Nestor” is the largest provider of free services for the elderly in Greece specialized mostly in Alzheimer and dementia. Patients with advanced dementia and Alzheimer’s cannot survive without help. They are no longer able to perform basic functions such as washing, dressing, eating or using the toilet. They show a complete inability to recognize surroundings, time, season, name of objects, or familiar faces. They are again like little, helpless children who are constantly in need of a caregiver. This is exactly what we are depicting in our new campaign: The adult patient, presented as a lost or troubled toddler that struggles with speech. Only when one reads the entire title does understand the drama of the case.
Welcome to How to Create Light Particles Photoshop Brush! In this tutorial, you will learn the step-by-step process of how to create a particle effect using Photoshop brushes.
Adding light particles to an illustration or photo is a great way to enhance your image and make it more eye-catching. One of the best things about using a light particle Photoshop brush is that it has such a wide range of uses, such as adding a bokeh effect, a sparkle effect, dust particles, and even snow effects!
To get started with this tutorial, we’ll need a photograph or image to use as a background for our light particles. You can find a wide range of professional photos on Envato Elements. Whether you’re looking for a spooky forest or a glitzy wedding image, you’ll be able to find all sorts of inspirational topics to help you get started. For a single monthly rate, you can unlock access to all of these and countless others.
Open the background image in Photoshop (File > Open and then navigate to the file location on your hard drive). Select the whole image by using the Marquee Tool (M) or by pressing Control-A on the keyboard to select all. Press Control-C to copy the image.
Step 4
Now return to the original document and press Control-V to paste it.
Alternatively, you can change the size of the image by going to Image > Image Size and changing the values to something close to 1920 x 1080.
Then use Edit > Free Transform (Control-T) to resize the image or layer to fit the 1920×1080 sized document.
2. How to Create Small Dust Particles in Photoshop
Step 1
In this section of the tutorial, we will first learn how to add dust particles in Photoshop. Create a new layer (Shift-Control-N) and rename it Small Dust Particles. This is the layer where we will paint our dust particles Photoshop brush.
Step 2
Select the Brush Tool (B).
Step 3
Now go to the brush library and select a standard round brush.
Step 4
Go to the Brush Settings panel (Window > Brush Settings) where you will find many options to adjust the brush that you have selected.
Step 5
Under Brush Tip Shape, set the size of the brush to approximately the size of the dust particles that you would like (e.g. 10 or 20). Set the Hardness to 20%.
Activate the Spacing option and set it to its maximum value (1000%). This will make the brush appear as dots instead of a line.
Step 6
Select Shape Dynamics and activate it using the tick box on the left. Set the Size Jitter to 100%. If you are using a tablet, you can also activate the pen pressure and use the settings below:
Control: Pen Pressure
Minimum Diameter: 5%
Angle Jitter: 0%
Roundness Jitter: 0%
Step 7
Select Scattering and activate it using the tick box on the left. Make sure that the option for Both Axes has been selected. Then follow the settings below:
Scatter: Both Axes 1000%
Count: 2
Step 8
Select Transfer and activate it using the tick box on the left. Set the Opacity Jitter to 100%.
Step 9
Activate Wet Edges and Smoothing.
Step 10
Once you are happy with the settings, you can save the brush as a preset by clicking on the Create New Brush button on the bottom right.
Step 11
Use a new layer to add the dust particles Photoshop brush to see what the brush looks like on your image. You can also set the Opacity of the layer down to around 20% to make it lighter. The end result here can also be used as a sparkle effect Photoshop brush.
3. How to Create Particle Effects in Photoshop Using Custom Brushes
Step 1
In this section of the tutorial, you will learn how to create particle effects in Photoshop using a custom brush. To create a new brush, we need to create a New Document in Adobe Photoshop (File > New or Control-N). For this tutorial, we will use the settings below:
Width: 1000 px
Height: 1000 px
Resolution: 300
Color Mode: RGB Color
Step 2
Create a new layer (Shift-Control-N) by clicking on the New Layer button in the Layers panel. This is the layer where we will create the light particle brush. You can also rename the layer 'Light Particles’.
Step 3
Select the Brush Tool (B).
Step 4
Go to the Brush Settings panel (Window > Brush Settings) where you will find many options to adjust the brush that you have selected.
Step 5
Now go to the brush library and select the standard round brush. This will be the base for our light particle effect Photoshop brush.
Step 6
Under Brush Tip Shape, set the Hardness to 40%.
Step 7
Make sure that your background and foreground colors are set to Black and White. Select the black color so that your light particle brush color is black.
Step 8
Using the square bracket keys on your keyboard (they look like [ or ] on the keyboard), you can increase or decrease the size of your brush. Use this to create some light particle spots within the square.
Depending on how dense you want your light particle brush to be, you can increase or decrease the number of light particle dots within the square. Try to randomize the size and the location of each light particle dot to create the best results (see below for a few different examples). For a bokeh effect Photoshop brush, you may want to use a wider brush with fewer particles.
Step 9
Remove the background layer.
Step 10
Now go to Edit > Define Brush Preset and give the brush a name such as 'particle effect Photoshop brush’. Feel free to create a few different versions of this.
4. How to Adjust and Customize the Light Particles Photoshop Brush
Step 1
After clicking on the OK button, you’ll find that your new light particles Photoshop brush has been automatically selected and is ready to be used.
You can now also select the brush in the Brush Settings panelor the Brushes panel.
Step 2
Now switch back to the original photograph document by clicking on the tab at the top.
Go to the Brush Settings panel (Window > Brush Settings) where you will find many options to adjust the light particle brush that you have selected.
Step 3
Select Scattering and activate it using the tick box on the left. Make sure that the option for Both Axes has been selected. Then follow the settings below:
Scatter: Both Axes 1000%
5. How to Adjust the Color of the Background Photo Image
Step 1
In order to give our background layer a cold atmosphere, we will apply a blue hue. Create a new layer above the background layer (our photograph) and use the Fill Tool to color it in blue.
Set the layer to Overlay in order to see what kind of effect it will have on the photo.
Step 2
Keep adjusting the color of the overlay layer until you are happy with the result. Below is an example of a dark blue (#0e2640) overlay layer on top of the photograph.
Step 3
Create another new layer and set the layer mode to Overlay with an Opacity setting of 75%. Use the soft round brush to color the top of the photograph using a light blue (#b3dbe4).
This will add a bright light glow to the top or wherever your light source is in the photograph.
Step 4
Now use a slightly warmer color (#d1aea6)and use the soft round brush to warm up the darker areas of the photograph—for example, the top left of the example photograph shown below.
Step 5
Next, we’ll adjust the photo further by going to Image > Adjustments > Curves.
Step 6
In the curve properties, we can adjust the graph for the red, green and blue channel. The example below shows how each has been adjusted slightly by clicking a point on the line and then moving it either up or down.
Step 7
Use the graph settings to come up with a look that you like.
6. How to Use the Light Particles Photoshop Brush
Step 1
Now, with the particle effect Photoshop brush all set up, we can choose a color for it. For this tutorial, we will select white for the light particles.
Create a new layer and call it 'Back Light Particles’. Make the size of the brush small using the square bracket keys or the brush settings. Use the particle effect Photoshop brush and create some light particles for the photographic image. Set the Opacity to 20%.
Step 2
Create a new layer and call it 'Mid Light Particles’. Make the size of the brush slightly larger using the square bracket keys or the brush settings. Use the particle effect Photoshop brush and create some light particles for the photographic image. Set the Opacity to 90%.
Step 3
Create a new layer and call it 'Front Light Particles’. Increase the size of the particle effect Photoshop brush and create some light particles for the foreground using the brush. Set the Opacity to 30%.
Step 4
Select the 'Front Light Particles’ layer, and then go to Filter > Blur > Gaussian Blur and set the percentage value to 15%.
7. How to Add a Vignette
Step 1
Create a new layer and use the Fill Tool (G) to fill it with black.Then use the Ellipse Tool (U) to draw a white oval in the middle. Merge both of these layers.
Step 2
In the top menu, go to Filter > Blur > Gaussian Blur and adjust the settings until the layer looks similar to the image shown below.
Step 3
Set the layer to Multiply.
Step 4
Adjust the opacity of the layer to your liking. In this example, we have set the Opacity to 25%.
Awesome! You’re Finished!
Congratulations! You have successfully completed this tutorial. Feel free to share your own creations below! I hope you found this tutorial helpful and that you’ve learned many new tips and tricks that you can use for your future illustrations. See you next time!
Learn More Particles Art Skills!
If you liked this and are looking to learn some more light particle effects or anything similar, check out the tutorials below! Expand your expertise by going through these in-depth guides. Happy designing!
In this tutorial, you will learn how to create a sandstorm Photoshop action to add amazing special effects to your photos. Want more sandstorm Photoshop…
In this tutorial, I’ll show you how to create an ashes and embers style dispersion effect from any photo in Adobe Photoshop and automate everything in a…
In this tutorial you will learn how to create an amazing lens dust effect, with such detailed explanations that everyone can create it, even those who have…
Add beautiful lighting effects to your photos. Today we bring you an awesome collection of colorful and sparkly photo effects from Envato Market and Envato…
Welcome to How to Create Light Particles Photoshop Brush! In this tutorial, you will learn the step-by-step process of how to create a particle effect using Photoshop brushes.
Adding light particles to an illustration or photo is a great way to enhance your image and make it more eye-catching. One of the best things about using a light particle Photoshop brush is that it has such a wide range of uses, such as adding a bokeh effect, a sparkle effect, dust particles, and even snow effects!
To get started with this tutorial, we’ll need a photograph or image to use as a background for our light particles. You can find a wide range of professional photos on Envato Elements. Whether you’re looking for a spooky forest or a glitzy wedding image, you’ll be able to find all sorts of inspirational topics to help you get started. For a single monthly rate, you can unlock access to all of these and countless others.
Open the background image in Photoshop (File > Open and then navigate to the file location on your hard drive). Select the whole image by using the Marquee Tool (M) or by pressing Control-A on the keyboard to select all. Press Control-C to copy the image.
Step 4
Now return to the original document and press Control-V to paste it.
Alternatively, you can change the size of the image by going to Image > Image Size and changing the values to something close to 1920 x 1080.
Then use Edit > Free Transform (Control-T) to resize the image or layer to fit the 1920×1080 sized document.
2. How to Create Small Dust Particles in Photoshop
Step 1
In this section of the tutorial, we will first learn how to add dust particles in Photoshop. Create a new layer (Shift-Control-N) and rename it Small Dust Particles. This is the layer where we will paint our dust particles Photoshop brush.
Step 2
Select the Brush Tool (B).
Step 3
Now go to the brush library and select a standard round brush.
Step 4
Go to the Brush Settings panel (Window > Brush Settings) where you will find many options to adjust the brush that you have selected.
Step 5
Under Brush Tip Shape, set the size of the brush to approximately the size of the dust particles that you would like (e.g. 10 or 20). Set the Hardness to 20%.
Activate the Spacing option and set it to its maximum value (1000%). This will make the brush appear as dots instead of a line.
Step 6
Select Shape Dynamics and activate it using the tick box on the left. Set the Size Jitter to 100%. If you are using a tablet, you can also activate the pen pressure and use the settings below:
Control: Pen Pressure
Minimum Diameter: 5%
Angle Jitter: 0%
Roundness Jitter: 0%
Step 7
Select Scattering and activate it using the tick box on the left. Make sure that the option for Both Axes has been selected. Then follow the settings below:
Scatter: Both Axes 1000%
Count: 2
Step 8
Select Transfer and activate it using the tick box on the left. Set the Opacity Jitter to 100%.
Step 9
Activate Wet Edges and Smoothing.
Step 10
Once you are happy with the settings, you can save the brush as a preset by clicking on the Create New Brush button on the bottom right.
Step 11
Use a new layer to add the dust particles Photoshop brush to see what the brush looks like on your image. You can also set the Opacity of the layer down to around 20% to make it lighter. The end result here can also be used as a sparkle effect Photoshop brush.
3. How to Create Particle Effects in Photoshop Using Custom Brushes
Step 1
In this section of the tutorial, you will learn how to create particle effects in Photoshop using a custom brush. To create a new brush, we need to create a New Document in Adobe Photoshop (File > New or Control-N). For this tutorial, we will use the settings below:
Width: 1000 px
Height: 1000 px
Resolution: 300
Color Mode: RGB Color
Step 2
Create a new layer (Shift-Control-N) by clicking on the New Layer button in the Layers panel. This is the layer where we will create the light particle brush. You can also rename the layer 'Light Particles’.
Step 3
Select the Brush Tool (B).
Step 4
Go to the Brush Settings panel (Window > Brush Settings) where you will find many options to adjust the brush that you have selected.
Step 5
Now go to the brush library and select the standard round brush. This will be the base for our light particle effect Photoshop brush.
Step 6
Under Brush Tip Shape, set the Hardness to 40%.
Step 7
Make sure that your background and foreground colors are set to Black and White. Select the black color so that your light particle brush color is black.
Step 8
Using the square bracket keys on your keyboard (they look like [ or ] on the keyboard), you can increase or decrease the size of your brush. Use this to create some light particle spots within the square.
Depending on how dense you want your light particle brush to be, you can increase or decrease the number of light particle dots within the square. Try to randomize the size and the location of each light particle dot to create the best results (see below for a few different examples). For a bokeh effect Photoshop brush, you may want to use a wider brush with fewer particles.
Step 9
Remove the background layer.
Step 10
Now go to Edit > Define Brush Preset and give the brush a name such as 'particle effect Photoshop brush’. Feel free to create a few different versions of this.
4. How to Adjust and Customize the Light Particles Photoshop Brush
Step 1
After clicking on the OK button, you’ll find that your new light particles Photoshop brush has been automatically selected and is ready to be used.
You can now also select the brush in the Brush Settings panelor the Brushes panel.
Step 2
Now switch back to the original photograph document by clicking on the tab at the top.
Go to the Brush Settings panel (Window > Brush Settings) where you will find many options to adjust the light particle brush that you have selected.
Step 3
Select Scattering and activate it using the tick box on the left. Make sure that the option for Both Axes has been selected. Then follow the settings below:
Scatter: Both Axes 1000%
5. How to Adjust the Color of the Background Photo Image
Step 1
In order to give our background layer a cold atmosphere, we will apply a blue hue. Create a new layer above the background layer (our photograph) and use the Fill Tool to color it in blue.
Set the layer to Overlay in order to see what kind of effect it will have on the photo.
Step 2
Keep adjusting the color of the overlay layer until you are happy with the result. Below is an example of a dark blue (#0e2640) overlay layer on top of the photograph.
Step 3
Create another new layer and set the layer mode to Overlay with an Opacity setting of 75%. Use the soft round brush to color the top of the photograph using a light blue (#b3dbe4).
This will add a bright light glow to the top or wherever your light source is in the photograph.
Step 4
Now use a slightly warmer color (#d1aea6)and use the soft round brush to warm up the darker areas of the photograph—for example, the top left of the example photograph shown below.
Step 5
Next, we’ll adjust the photo further by going to Image > Adjustments > Curves.
Step 6
In the curve properties, we can adjust the graph for the red, green and blue channel. The example below shows how each has been adjusted slightly by clicking a point on the line and then moving it either up or down.
Step 7
Use the graph settings to come up with a look that you like.
6. How to Use the Light Particles Photoshop Brush
Step 1
Now, with the particle effect Photoshop brush all set up, we can choose a color for it. For this tutorial, we will select white for the light particles.
Create a new layer and call it 'Back Light Particles’. Make the size of the brush small using the square bracket keys or the brush settings. Use the particle effect Photoshop brush and create some light particles for the photographic image. Set the Opacity to 20%.
Step 2
Create a new layer and call it 'Mid Light Particles’. Make the size of the brush slightly larger using the square bracket keys or the brush settings. Use the particle effect Photoshop brush and create some light particles for the photographic image. Set the Opacity to 90%.
Step 3
Create a new layer and call it 'Front Light Particles’. Increase the size of the particle effect Photoshop brush and create some light particles for the foreground using the brush. Set the Opacity to 30%.
Step 4
Select the 'Front Light Particles’ layer, and then go to Filter > Blur > Gaussian Blur and set the percentage value to 15%.
7. How to Add a Vignette
Step 1
Create a new layer and use the Fill Tool (G) to fill it with black.Then use the Ellipse Tool (U) to draw a white oval in the middle. Merge both of these layers.
Step 2
In the top menu, go to Filter > Blur > Gaussian Blur and adjust the settings until the layer looks similar to the image shown below.
Step 3
Set the layer to Multiply.
Step 4
Adjust the opacity of the layer to your liking. In this example, we have set the Opacity to 25%.
Awesome! You’re Finished!
Congratulations! You have successfully completed this tutorial. Feel free to share your own creations below! I hope you found this tutorial helpful and that you’ve learned many new tips and tricks that you can use for your future illustrations. See you next time!
Learn More Particles Art Skills!
If you liked this and are looking to learn some more light particle effects or anything similar, check out the tutorials below! Expand your expertise by going through these in-depth guides. Happy designing!
In this tutorial, you will learn how to create a sandstorm Photoshop action to add amazing special effects to your photos. Want more sandstorm Photoshop…
In this tutorial, I’ll show you how to create an ashes and embers style dispersion effect from any photo in Adobe Photoshop and automate everything in a…
In this tutorial you will learn how to create an amazing lens dust effect, with such detailed explanations that everyone can create it, even those who have…
Add beautiful lighting effects to your photos. Today we bring you an awesome collection of colorful and sparkly photo effects from Envato Market and Envato…
Welcome to How to Create Light Particles Photoshop Brush! In this tutorial, you will learn the step-by-step process of how to create a particle effect using Photoshop brushes.
Adding light particles to an illustration or photo is a great way to enhance your image and make it more eye-catching. One of the best things about using a light particle Photoshop brush is that it has such a wide range of uses, such as adding a bokeh effect, a sparkle effect, dust particles, and even snow effects!
To get started with this tutorial, we’ll need a photograph or image to use as a background for our light particles. You can find a wide range of professional photos on Envato Elements. Whether you’re looking for a spooky forest or a glitzy wedding image, you’ll be able to find all sorts of inspirational topics to help you get started. For a single monthly rate, you can unlock access to all of these and countless others.
Open the background image in Photoshop (File > Open and then navigate to the file location on your hard drive). Select the whole image by using the Marquee Tool (M) or by pressing Control-A on the keyboard to select all. Press Control-C to copy the image.
Step 4
Now return to the original document and press Control-V to paste it.
Alternatively, you can change the size of the image by going to Image > Image Size and changing the values to something close to 1920 x 1080.
Then use Edit > Free Transform (Control-T) to resize the image or layer to fit the 1920×1080 sized document.
2. How to Create Small Dust Particles in Photoshop
Step 1
In this section of the tutorial, we will first learn how to add dust particles in Photoshop. Create a new layer (Shift-Control-N) and rename it Small Dust Particles. This is the layer where we will paint our dust particles Photoshop brush.
Step 2
Select the Brush Tool (B).
Step 3
Now go to the brush library and select a standard round brush.
Step 4
Go to the Brush Settings panel (Window > Brush Settings) where you will find many options to adjust the brush that you have selected.
Step 5
Under Brush Tip Shape, set the size of the brush to approximately the size of the dust particles that you would like (e.g. 10 or 20). Set the Hardness to 20%.
Activate the Spacing option and set it to its maximum value (1000%). This will make the brush appear as dots instead of a line.
Step 6
Select Shape Dynamics and activate it using the tick box on the left. Set the Size Jitter to 100%. If you are using a tablet, you can also activate the pen pressure and use the settings below:
Control: Pen Pressure
Minimum Diameter: 5%
Angle Jitter: 0%
Roundness Jitter: 0%
Step 7
Select Scattering and activate it using the tick box on the left. Make sure that the option for Both Axes has been selected. Then follow the settings below:
Scatter: Both Axes 1000%
Count: 2
Step 8
Select Transfer and activate it using the tick box on the left. Set the Opacity Jitter to 100%.
Step 9
Activate Wet Edges and Smoothing.
Step 10
Once you are happy with the settings, you can save the brush as a preset by clicking on the Create New Brush button on the bottom right.
Step 11
Use a new layer to add the dust particles Photoshop brush to see what the brush looks like on your image. You can also set the Opacity of the layer down to around 20% to make it lighter. The end result here can also be used as a sparkle effect Photoshop brush.
3. How to Create Particle Effects in Photoshop Using Custom Brushes
Step 1
In this section of the tutorial, you will learn how to create particle effects in Photoshop using a custom brush. To create a new brush, we need to create a New Document in Adobe Photoshop (File > New or Control-N). For this tutorial, we will use the settings below:
Width: 1000 px
Height: 1000 px
Resolution: 300
Color Mode: RGB Color
Step 2
Create a new layer (Shift-Control-N) by clicking on the New Layer button in the Layers panel. This is the layer where we will create the light particle brush. You can also rename the layer 'Light Particles’.
Step 3
Select the Brush Tool (B).
Step 4
Go to the Brush Settings panel (Window > Brush Settings) where you will find many options to adjust the brush that you have selected.
Step 5
Now go to the brush library and select the standard round brush. This will be the base for our light particle effect Photoshop brush.
Step 6
Under Brush Tip Shape, set the Hardness to 40%.
Step 7
Make sure that your background and foreground colors are set to Black and White. Select the black color so that your light particle brush color is black.
Step 8
Using the square bracket keys on your keyboard (they look like [ or ] on the keyboard), you can increase or decrease the size of your brush. Use this to create some light particle spots within the square.
Depending on how dense you want your light particle brush to be, you can increase or decrease the number of light particle dots within the square. Try to randomize the size and the location of each light particle dot to create the best results (see below for a few different examples). For a bokeh effect Photoshop brush, you may want to use a wider brush with fewer particles.
Step 9
Remove the background layer.
Step 10
Now go to Edit > Define Brush Preset and give the brush a name such as 'particle effect Photoshop brush’. Feel free to create a few different versions of this.
4. How to Adjust and Customize the Light Particles Photoshop Brush
Step 1
After clicking on the OK button, you’ll find that your new light particles Photoshop brush has been automatically selected and is ready to be used.
You can now also select the brush in the Brush Settings panelor the Brushes panel.
Step 2
Now switch back to the original photograph document by clicking on the tab at the top.
Go to the Brush Settings panel (Window > Brush Settings) where you will find many options to adjust the light particle brush that you have selected.
Step 3
Select Scattering and activate it using the tick box on the left. Make sure that the option for Both Axes has been selected. Then follow the settings below:
Scatter: Both Axes 1000%
5. How to Adjust the Color of the Background Photo Image
Step 1
In order to give our background layer a cold atmosphere, we will apply a blue hue. Create a new layer above the background layer (our photograph) and use the Fill Tool to color it in blue.
Set the layer to Overlay in order to see what kind of effect it will have on the photo.
Step 2
Keep adjusting the color of the overlay layer until you are happy with the result. Below is an example of a dark blue (#0e2640) overlay layer on top of the photograph.
Step 3
Create another new layer and set the layer mode to Overlay with an Opacity setting of 75%. Use the soft round brush to color the top of the photograph using a light blue (#b3dbe4).
This will add a bright light glow to the top or wherever your light source is in the photograph.
Step 4
Now use a slightly warmer color (#d1aea6)and use the soft round brush to warm up the darker areas of the photograph—for example, the top left of the example photograph shown below.
Step 5
Next, we’ll adjust the photo further by going to Image > Adjustments > Curves.
Step 6
In the curve properties, we can adjust the graph for the red, green and blue channel. The example below shows how each has been adjusted slightly by clicking a point on the line and then moving it either up or down.
Step 7
Use the graph settings to come up with a look that you like.
6. How to Use the Light Particles Photoshop Brush
Step 1
Now, with the particle effect Photoshop brush all set up, we can choose a color for it. For this tutorial, we will select white for the light particles.
Create a new layer and call it 'Back Light Particles’. Make the size of the brush small using the square bracket keys or the brush settings. Use the particle effect Photoshop brush and create some light particles for the photographic image. Set the Opacity to 20%.
Step 2
Create a new layer and call it 'Mid Light Particles’. Make the size of the brush slightly larger using the square bracket keys or the brush settings. Use the particle effect Photoshop brush and create some light particles for the photographic image. Set the Opacity to 90%.
Step 3
Create a new layer and call it 'Front Light Particles’. Increase the size of the particle effect Photoshop brush and create some light particles for the foreground using the brush. Set the Opacity to 30%.
Step 4
Select the 'Front Light Particles’ layer, and then go to Filter > Blur > Gaussian Blur and set the percentage value to 15%.
7. How to Add a Vignette
Step 1
Create a new layer and use the Fill Tool (G) to fill it with black.Then use the Ellipse Tool (U) to draw a white oval in the middle. Merge both of these layers.
Step 2
In the top menu, go to Filter > Blur > Gaussian Blur and adjust the settings until the layer looks similar to the image shown below.
Step 3
Set the layer to Multiply.
Step 4
Adjust the opacity of the layer to your liking. In this example, we have set the Opacity to 25%.
Awesome! You’re Finished!
Congratulations! You have successfully completed this tutorial. Feel free to share your own creations below! I hope you found this tutorial helpful and that you’ve learned many new tips and tricks that you can use for your future illustrations. See you next time!
Learn More Particles Art Skills!
If you liked this and are looking to learn some more light particle effects or anything similar, check out the tutorials below! Expand your expertise by going through these in-depth guides. Happy designing!
In this tutorial, you will learn how to create a sandstorm Photoshop action to add amazing special effects to your photos. Want more sandstorm Photoshop…
In this tutorial, I’ll show you how to create an ashes and embers style dispersion effect from any photo in Adobe Photoshop and automate everything in a…
In this tutorial you will learn how to create an amazing lens dust effect, with such detailed explanations that everyone can create it, even those who have…
Add beautiful lighting effects to your photos. Today we bring you an awesome collection of colorful and sparkly photo effects from Envato Market and Envato…
Welcome to How to Create Light Particles Photoshop Brush! In this tutorial, you will learn the step-by-step process of how to create a particle effect using Photoshop brushes.
Adding light particles to an illustration or photo is a great way to enhance your image and make it more eye-catching. One of the best things about using a light particle Photoshop brush is that it has such a wide range of uses, such as adding a bokeh effect, a sparkle effect, dust particles, and even snow effects!
To get started with this tutorial, we’ll need a photograph or image to use as a background for our light particles. You can find a wide range of professional photos on Envato Elements. Whether you’re looking for a spooky forest or a glitzy wedding image, you’ll be able to find all sorts of inspirational topics to help you get started. For a single monthly rate, you can unlock access to all of these and countless others.
Open the background image in Photoshop (File > Open and then navigate to the file location on your hard drive). Select the whole image by using the Marquee Tool (M) or by pressing Control-A on the keyboard to select all. Press Control-C to copy the image.
Step 4
Now return to the original document and press Control-V to paste it.
Alternatively, you can change the size of the image by going to Image > Image Size and changing the values to something close to 1920 x 1080.
Then use Edit > Free Transform (Control-T) to resize the image or layer to fit the 1920×1080 sized document.
2. How to Create Small Dust Particles in Photoshop
Step 1
In this section of the tutorial, we will first learn how to add dust particles in Photoshop. Create a new layer (Shift-Control-N) and rename it Small Dust Particles. This is the layer where we will paint our dust particles Photoshop brush.
Step 2
Select the Brush Tool (B).
Step 3
Now go to the brush library and select a standard round brush.
Step 4
Go to the Brush Settings panel (Window > Brush Settings) where you will find many options to adjust the brush that you have selected.
Step 5
Under Brush Tip Shape, set the size of the brush to approximately the size of the dust particles that you would like (e.g. 10 or 20). Set the Hardness to 20%.
Activate the Spacing option and set it to its maximum value (1000%). This will make the brush appear as dots instead of a line.
Step 6
Select Shape Dynamics and activate it using the tick box on the left. Set the Size Jitter to 100%. If you are using a tablet, you can also activate the pen pressure and use the settings below:
Control: Pen Pressure
Minimum Diameter: 5%
Angle Jitter: 0%
Roundness Jitter: 0%
Step 7
Select Scattering and activate it using the tick box on the left. Make sure that the option for Both Axes has been selected. Then follow the settings below:
Scatter: Both Axes 1000%
Count: 2
Step 8
Select Transfer and activate it using the tick box on the left. Set the Opacity Jitter to 100%.
Step 9
Activate Wet Edges and Smoothing.
Step 10
Once you are happy with the settings, you can save the brush as a preset by clicking on the Create New Brush button on the bottom right.
Step 11
Use a new layer to add the dust particles Photoshop brush to see what the brush looks like on your image. You can also set the Opacity of the layer down to around 20% to make it lighter. The end result here can also be used as a sparkle effect Photoshop brush.
3. How to Create Particle Effects in Photoshop Using Custom Brushes
Step 1
In this section of the tutorial, you will learn how to create particle effects in Photoshop using a custom brush. To create a new brush, we need to create a New Document in Adobe Photoshop (File > New or Control-N). For this tutorial, we will use the settings below:
Width: 1000 px
Height: 1000 px
Resolution: 300
Color Mode: RGB Color
Step 2
Create a new layer (Shift-Control-N) by clicking on the New Layer button in the Layers panel. This is the layer where we will create the light particle brush. You can also rename the layer 'Light Particles’.
Step 3
Select the Brush Tool (B).
Step 4
Go to the Brush Settings panel (Window > Brush Settings) where you will find many options to adjust the brush that you have selected.
Step 5
Now go to the brush library and select the standard round brush. This will be the base for our light particle effect Photoshop brush.
Step 6
Under Brush Tip Shape, set the Hardness to 40%.
Step 7
Make sure that your background and foreground colors are set to Black and White. Select the black color so that your light particle brush color is black.
Step 8
Using the square bracket keys on your keyboard (they look like [ or ] on the keyboard), you can increase or decrease the size of your brush. Use this to create some light particle spots within the square.
Depending on how dense you want your light particle brush to be, you can increase or decrease the number of light particle dots within the square. Try to randomize the size and the location of each light particle dot to create the best results (see below for a few different examples). For a bokeh effect Photoshop brush, you may want to use a wider brush with fewer particles.
Step 9
Remove the background layer.
Step 10
Now go to Edit > Define Brush Preset and give the brush a name such as 'particle effect Photoshop brush’. Feel free to create a few different versions of this.
4. How to Adjust and Customize the Light Particles Photoshop Brush
Step 1
After clicking on the OK button, you’ll find that your new light particles Photoshop brush has been automatically selected and is ready to be used.
You can now also select the brush in the Brush Settings panelor the Brushes panel.
Step 2
Now switch back to the original photograph document by clicking on the tab at the top.
Go to the Brush Settings panel (Window > Brush Settings) where you will find many options to adjust the light particle brush that you have selected.
Step 3
Select Scattering and activate it using the tick box on the left. Make sure that the option for Both Axes has been selected. Then follow the settings below:
Scatter: Both Axes 1000%
5. How to Adjust the Color of the Background Photo Image
Step 1
In order to give our background layer a cold atmosphere, we will apply a blue hue. Create a new layer above the background layer (our photograph) and use the Fill Tool to color it in blue.
Set the layer to Overlay in order to see what kind of effect it will have on the photo.
Step 2
Keep adjusting the color of the overlay layer until you are happy with the result. Below is an example of a dark blue (#0e2640) overlay layer on top of the photograph.
Step 3
Create another new layer and set the layer mode to Overlay with an Opacity setting of 75%. Use the soft round brush to color the top of the photograph using a light blue (#b3dbe4).
This will add a bright light glow to the top or wherever your light source is in the photograph.
Step 4
Now use a slightly warmer color (#d1aea6)and use the soft round brush to warm up the darker areas of the photograph—for example, the top left of the example photograph shown below.
Step 5
Next, we’ll adjust the photo further by going to Image > Adjustments > Curves.
Step 6
In the curve properties, we can adjust the graph for the red, green and blue channel. The example below shows how each has been adjusted slightly by clicking a point on the line and then moving it either up or down.
Step 7
Use the graph settings to come up with a look that you like.
6. How to Use the Light Particles Photoshop Brush
Step 1
Now, with the particle effect Photoshop brush all set up, we can choose a color for it. For this tutorial, we will select white for the light particles.
Create a new layer and call it 'Back Light Particles’. Make the size of the brush small using the square bracket keys or the brush settings. Use the particle effect Photoshop brush and create some light particles for the photographic image. Set the Opacity to 20%.
Step 2
Create a new layer and call it 'Mid Light Particles’. Make the size of the brush slightly larger using the square bracket keys or the brush settings. Use the particle effect Photoshop brush and create some light particles for the photographic image. Set the Opacity to 90%.
Step 3
Create a new layer and call it 'Front Light Particles’. Increase the size of the particle effect Photoshop brush and create some light particles for the foreground using the brush. Set the Opacity to 30%.
Step 4
Select the 'Front Light Particles’ layer, and then go to Filter > Blur > Gaussian Blur and set the percentage value to 15%.
7. How to Add a Vignette
Step 1
Create a new layer and use the Fill Tool (G) to fill it with black.Then use the Ellipse Tool (U) to draw a white oval in the middle. Merge both of these layers.
Step 2
In the top menu, go to Filter > Blur > Gaussian Blur and adjust the settings until the layer looks similar to the image shown below.
Step 3
Set the layer to Multiply.
Step 4
Adjust the opacity of the layer to your liking. In this example, we have set the Opacity to 25%.
Awesome! You’re Finished!
Congratulations! You have successfully completed this tutorial. Feel free to share your own creations below! I hope you found this tutorial helpful and that you’ve learned many new tips and tricks that you can use for your future illustrations. See you next time!
Learn More Particles Art Skills!
If you liked this and are looking to learn some more light particle effects or anything similar, check out the tutorials below! Expand your expertise by going through these in-depth guides. Happy designing!
In this tutorial, you will learn how to create a sandstorm Photoshop action to add amazing special effects to your photos. Want more sandstorm Photoshop…
In this tutorial, I’ll show you how to create an ashes and embers style dispersion effect from any photo in Adobe Photoshop and automate everything in a…
In this tutorial you will learn how to create an amazing lens dust effect, with such detailed explanations that everyone can create it, even those who have…
Add beautiful lighting effects to your photos. Today we bring you an awesome collection of colorful and sparkly photo effects from Envato Market and Envato…
Pringles has unveiled a gaming headset that does double-duty as an automatic chip dispenser. Hungry gamers can stay on their controllers and be fed chips hands-free by the Pringles “Hunger Hammer” as they play on.
The new invention prototype promotes the brand’s partnership with new “Gears 5” first-person shooter game and connects gamers and their followers on Twitch. Pringles has been growing its presence in the gaming world and more than doubled its investment in eSports in 2019. For its promotion with “Gears 5,” each Pringles can has a code that can be used to unlock a three-day boost in the game.
Pringles has hired Twitch gaming influencers Criken, DexBonus, and Strippin to beta-test the Hunger Hammer playing “Gears 5” during live streams over the next few weeks and is running ads on Twitch to promote its “Gears 5” partnership.
Every week, we’ll give you an overview of the best deals for designers, make sure you don’t miss any by subscribing to our deals feed. You can also follow the recently launched website Type Deals if you are looking for free fonts or font deals.
100+ Christmas and New Year’s Vector Designs
It’s that time of year again! The holidays are upon us, so break out the Christmas cheer with this premium bundle of high-quality Christmas and New Year vectors! You’ll get 100+ professional illustrations, all helping to usher in a very Merry Christmas and Happy New Year! Great for everything from holiday cards to posters, ads, T-shirts and more.
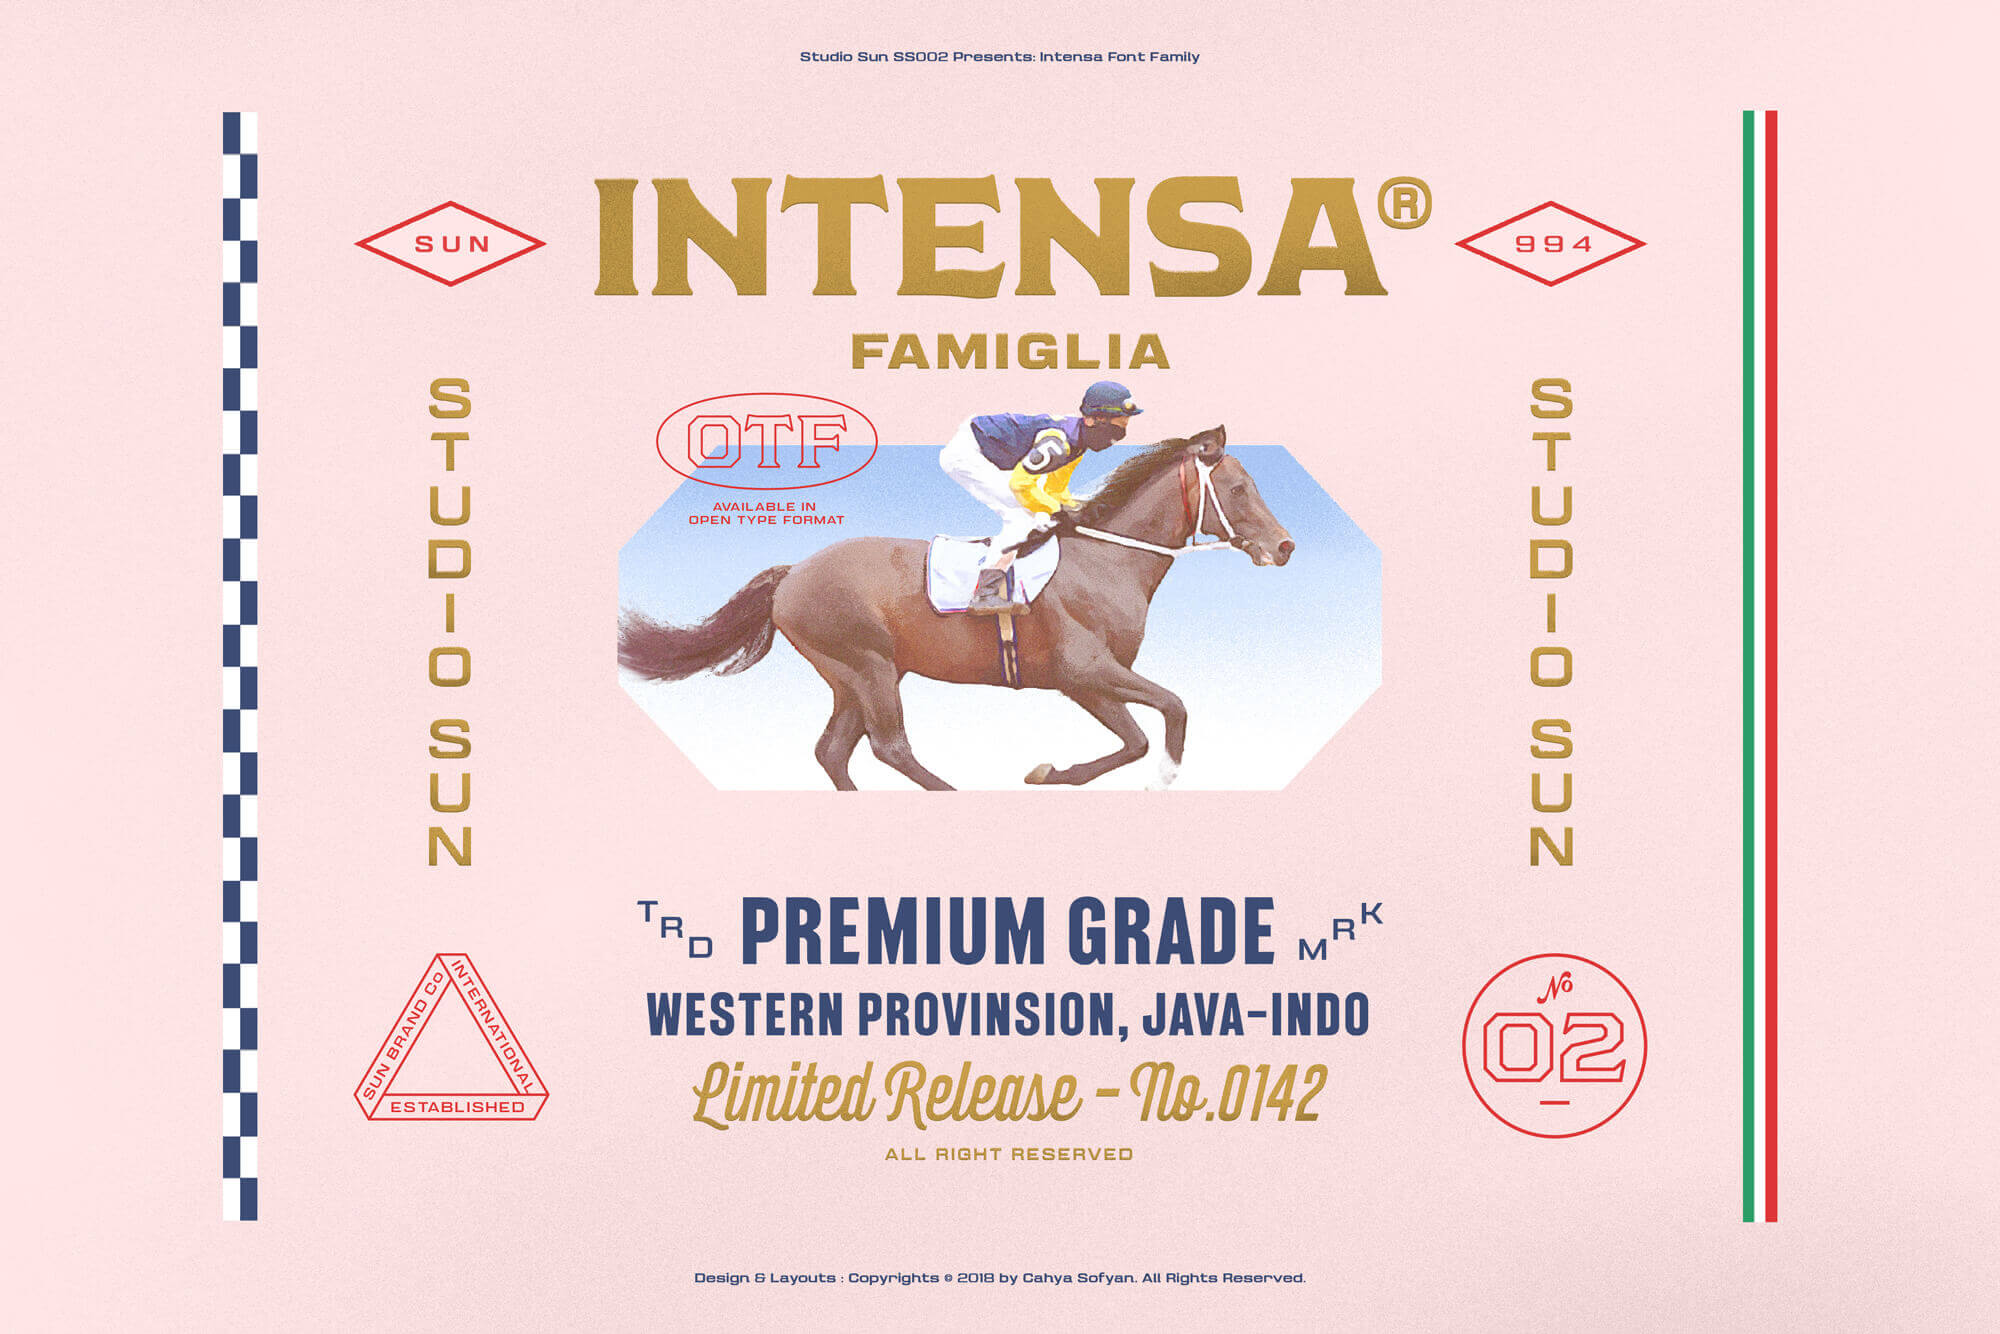
Revolutionary Auto Racing Inspired Intensa Font Family
Inspired by the auto racing revolution in the 1960s, Intensa is a fabulous font family comprised of 15 display fonts in a wide range for styles and weights. It also supports more than 45 different languages. Mix and match styles to create the perfect store sign, T-shirt, advertisement or any other printed project currently in your hands.
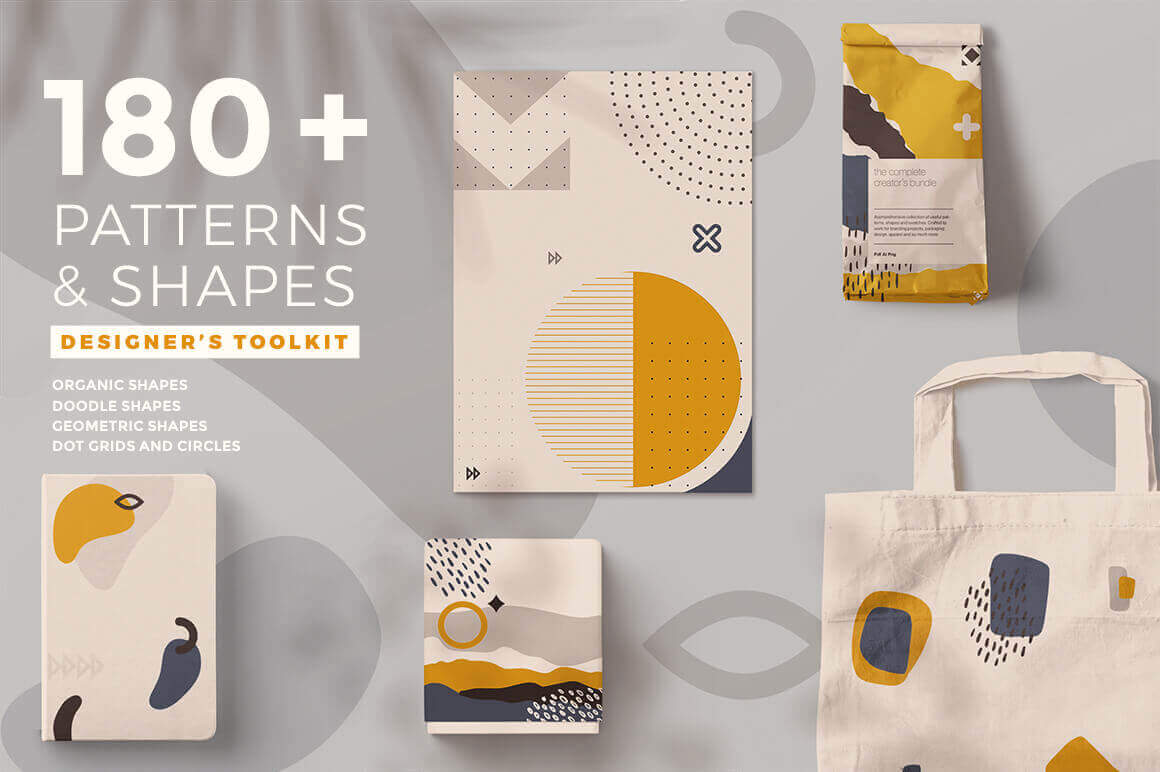
This Awesome Shapes and Patterns collection will give a wonderfully modern look to your latest project. Jam packed with more than 180 individual elements, you’ll find organic, doodle and geometric shapes, as well as a slew of dot grids and circles. They’re all perfect for everything from invitations to web design to apparel.
Is the season for ugly Christmas sweaters and has Mighty Deals got you covered! This collection of 100+ Ugly Christmas Sweater Designs and Templates is all you need to create unlimited uglywear. With multiple file formats and knitted fonts, these bad boys are fully customizable to suit your every need.
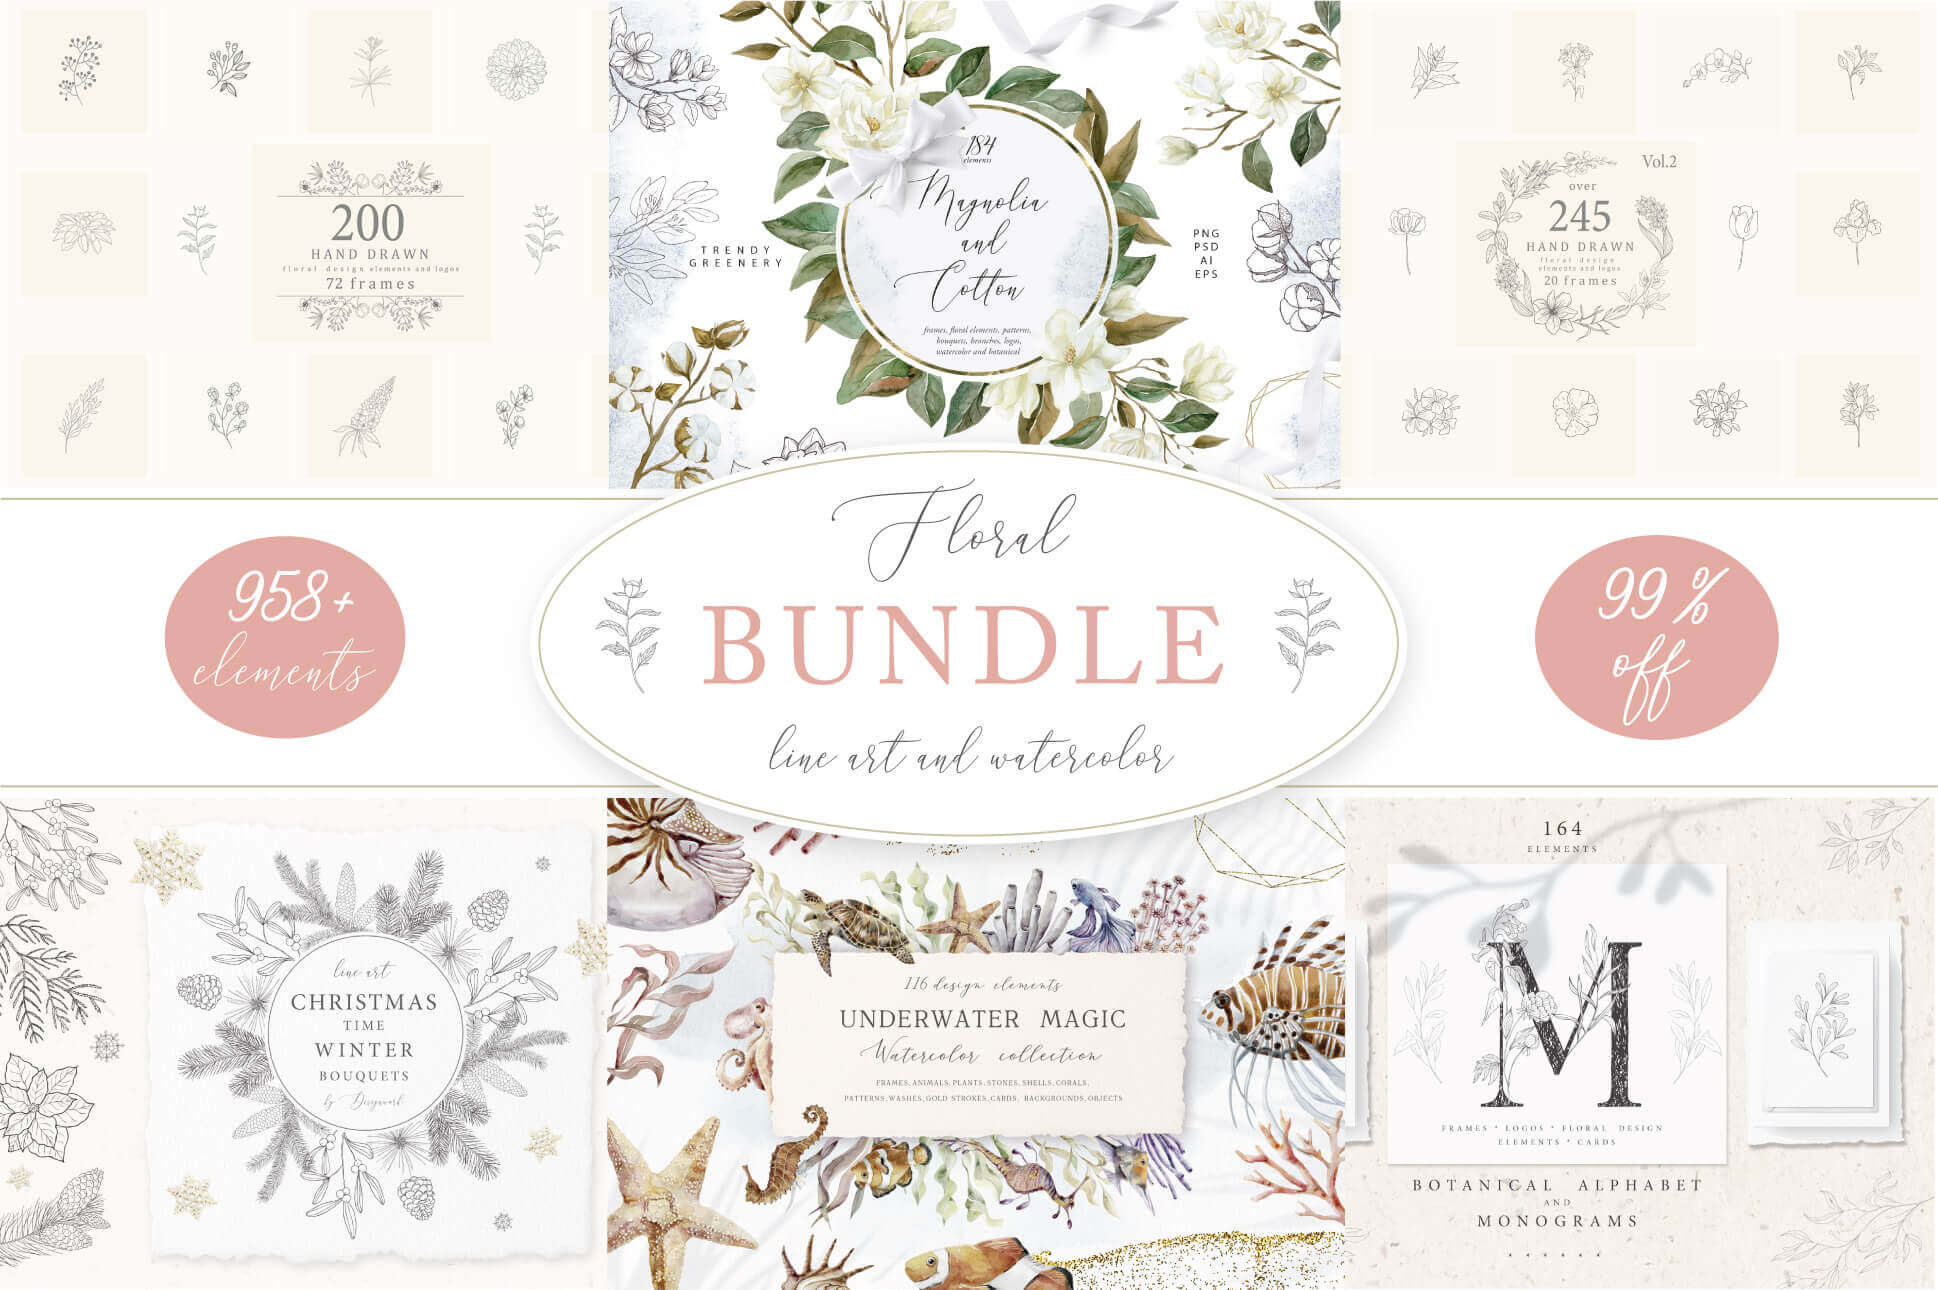
This beautiful Flower Bundle of line art and watercolors is comprised of 6 different floral sets from Christmas Time to Underwater Magic. That’s over 950 elegant floral designs delivered as borders, frames, logos, patterns and more. With an extended license, you can create limitless commercial projects from apparel to wedding invitations.
Every week, we’ll give you an overview of the best deals for designers, make sure you don’t miss any by subscribing to our deals feed. You can also follow the recently launched website Type Deals if you are looking for free fonts or font deals.
100+ Christmas and New Year’s Vector Designs
It’s that time of year again! The holidays are upon us, so break out the Christmas cheer with this premium bundle of high-quality Christmas and New Year vectors! You’ll get 100+ professional illustrations, all helping to usher in a very Merry Christmas and Happy New Year! Great for everything from holiday cards to posters, ads, T-shirts and more.
Revolutionary Auto Racing Inspired Intensa Font Family
Inspired by the auto racing revolution in the 1960s, Intensa is a fabulous font family comprised of 15 display fonts in a wide range for styles and weights. It also supports more than 45 different languages. Mix and match styles to create the perfect store sign, T-shirt, advertisement or any other printed project currently in your hands.
This Awesome Shapes and Patterns collection will give a wonderfully modern look to your latest project. Jam packed with more than 180 individual elements, you’ll find organic, doodle and geometric shapes, as well as a slew of dot grids and circles. They’re all perfect for everything from invitations to web design to apparel.
Is the season for ugly Christmas sweaters and has Mighty Deals got you covered! This collection of 100+ Ugly Christmas Sweater Designs and Templates is all you need to create unlimited uglywear. With multiple file formats and knitted fonts, these bad boys are fully customizable to suit your every need.
This beautiful Flower Bundle of line art and watercolors is comprised of 6 different floral sets from Christmas Time to Underwater Magic. That’s over 950 elegant floral designs delivered as borders, frames, logos, patterns and more. With an extended license, you can create limitless commercial projects from apparel to wedding invitations.