Post pobrano z: Create an FAQ Slack app with Netlify functions and FaunaDB
Sometimes, when you’re looking for a quick answer, it’s really useful to have an FAQ system in place, rather than waiting for someone to respond to a question. Wouldn’t it be great if Slack could just answer these FAQs for us? In this tutorial, we’re going to be making just that: a slash command for Slack that will answer user FAQs. We’ll be storing our answers in FaunaDB, using FQL to search the database, and utilising a Netlify function to provide a serverless endpoint to connect Slack and FaunaDB.
Prerequisites
This tutorial assumes you have the following requirements:
- Github account, used to log in to Netlify and Fauna, as well as storing our code
- Slack workspace with permission to create and install new apps
- Node.js v12
Create npm package
To get started, create a new folder and initialise a npm package by using your package manager of choice and run npm init -y from inside the folder. After the package has been created, we have a few npm packages to install.
Run this to install all the packages we will need for this tutorial:
npm install express body-parser faunadb encoding serverless-http netlify-lambdaThese packages are explained below, but if you are already familiar with them, feel free to skip ahead.
Encoding has been installed due to a plugin error occurring in @netlify/plugin-functions-core at the time of writing and may not be needed when you follow this tutorial.
Packages
Express is a web application framework that will allow us to simplify writing multiple endpoints for our function. Netlify functions require handlers for each endpoint, but express combined with serverless-http will allow us to write the endpoints all in one place.
Body-parser is an express middleware which will take care of the application/x-www-form-urlencoded data Slack will be sending to our function.
Faunadb is an npm module that allows us to interact with the database through the FaunaDB Javascript driver. It allows us to pass queries from our function to the database, in order to get the answers
Serverless-http is a module that wraps Express applications to the format expected by Netlify functions, meaning we won’t have to rewrite our code when we shift from local development to Netlify.
Netlify-lambda is a tool which will allow us to build and serve our functions locally, in the same way they will be built and deployed on Netlify. This means we can develop locally before pushing our code to Netlify, increasing the speed of our workflow.
Create a function
With our npm packages installed, it’s time to begin work on the function. We’ll be using serverless to wrap an express app, which will allow us to deploy it to Netlify later. To get started, create a file called netlify.toml, and add the following into it:
[build]
  functions = "functions"
We will use a .gitignore file, to prevent our node_modules and functions folders from being added to git later. Create a file called .gitignore, and add the following:
functions/
node_modules/
We will also need a folder called src, and a file inside it called server.js. Your final file structure should look like:

With this in place, create a basic express app by inserting the code below into server.js:
const express = require("express");
const bodyParser = require("body-parser");
const fauna = require("faunadb");
const serverless = require("serverless-http");

const app = express();

module.exports.handler = serverless(app);
Check out the final line; it looks a little different to a regular express app. Rather than listening on a port, we’re passing our app into serverless and using this as our handler, so that Netlify can invoke our function.
Let’s set up our body parser to use application/x-www-form-urlencoded data, as well as putting a router in place. Add the following to server.js after defining app:
const router = express.Router();
app.use(bodyParser.json());
app.use(bodyParser.urlencoded({ extended: true }));
app.use("/.netlify/functions/server", router);
Notice that the router is using /.netlify/functions/server as an endpoint. This is so that Netlify will be able to correctly deploy the function later in the tutorial. This means we will need to add this to any base URLs, in order to invoke the function.
Create a test route
With a basic app in place, let’s create a test route to check everything is working. Insert the following code to create a simple GET route, that returns a simple json object:
router.get("/test", (req, res) => {
 res.json({ hello: "world" });
});
With this route in place, let’s spin up our function on localhost, and check that we get a response. We’ll be using netlify-lambda to serve our app, so that we can imitate a Netlify function locally on port 9000. In our package.json, add the following lines into the scripts section:
"start": "./node_modules/.bin/netlify-lambda serve src",
   "build": "./node_modules/.bin/netlify-lambda build src"
With this in place, after saving the file, we can run npm start to begin netlify-lambda on port 9000.
The build command will be used when we deploy to Netlify later.
Once it is up and running, we can visit http://localhost:9000/.netlify/functions/server/test to check our function is working as expected.

The great thing about netlify-lambda is it will listen for changes to our code, and automatically recompile whenever we update something, so we can leave it running for the duration of this tutorial.
Start ngrok URL
Now we have a test route working on our local machine, let’s make it available online. To do this, we’ll be using ngrok, a npm package that provides a public URL for our function. If you don’t have ngrok installed already, first run npm install -g ngrok to globally install it on your machine. Then run ngrok http 9000 which will automatically direct traffic to our function running on port 9000.

After starting ngrok, you should see a forwarding URL in the terminal, which we can visit to confirm our server is available online. Copy this base URL to your browser, and follow it with /.netlify/functions/server/test. You should see the same result as when we made our calls on localhost, which means we can now use this URL as an endpoint for Slack!
Each time you restart ngrok, it creates a new URL, so if you need to stop it at any point, you will need to update your URL endpoint in Slack.
Setting up Slack
Now that we have a function in place, it’s time to move to Slack to create the app and slash command. We will have to deploy this app to our workspace, as well as making a few updates to our code to connect our function. For a more in depth set of instructions on how to create a new slash command, you can follow the official Slack documentation. For a streamlined set of instructions, follow along below:
Create a new Slack app
First off, let’s create our new Slack app for these FAQs. Visit https://api.slack.com/apps and select Create New App to begin. Give your app a name (I used Fauna FAQ), and select a development workspace for the app.
Create a slash command
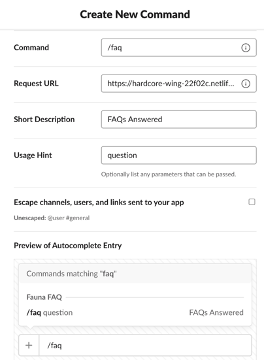
After creating the app, we need to add a slash command to it, so that we can interact with the app. Select slash commands from the menu after the app has been created, then create a new command. Fill in the following form with the name of your command (I used /faq) as well as providing the URL from ngrok. Don’t forget to add /.netlify/functions/server/ to the end!
Install app to workspace
Once you have created your slash command, click on basic information in the sidebar on the left to return to the app’s main page. From here, select the dropdown “Install app to your workspace” and click the button to install it.

Once you have allowed access, the app will be installed, and you’ll be able to start using the slash command in your workspace.
Update the function
With our new app in place, we’ll need to create a new endpoint for Slack to send the requests to. For this, we’ll use the root endpoint for simplicity. The endpoint will need to be able to take a post request with application/x-www-form-urlencoded data, then return a 200 status response with a message. To do this, let’s create a new post route at the root by adding the following code to server.js:
router.post("/", async (req, res) => {

});
Now that we have our endpoint, we can also extract and view the text that has been sent by slack by adding the following line before we set the status:
const text = req.body.text;
console.log(`Input text: ${text}`);
For now, we’ll just pass this text into the response and send it back instantly, to ensure the slack app and function are communicating.
res.status(200);
res.send(text);
Now, when you type /faq <somequestion> on a slack channel, you should get back the same message from the slack slash command.
Formatting the response
Rather than just sending back plaintext, we can make use of Slack’s Block Kit to use specialised UI elements to improve the look of our answers. If you want to create a more complex layout, Slack provides a Block Kit builder to visually design your layout.
For now, we’re going to keep things simple, and just provide a response where each answer is separated by a divider. Add the following function to your server.js file after the post route:
const format = (answers) => {
 if (answers.length == 0) {
   answers = ["No answers found"];
 }

 let formatted = {
   blocks: [],
 };

 for (answer of answers) {
   formatted["blocks"].push({
     type: "divider",
   });
   formatted["blocks"].push({
     type: "section",
     text: {
       type: "mrkdwn",
       text: answer,
     },
   });
 }

 return formatted;
};
With this in place, we now need to pass our answers into this function, to format the answers before returning them to Slack. Update the following in the root post route:
let answers = text;
const formattedAnswers = format(answers);
Now when we enter the same command to the slash app, we should get back the same message, but this time in a formatted version!
Setting up Fauna
With our slack app in place, and a function to connect to it, we now need to start working on the database to store our answers. If you’ve never set up a database with FaunaDB before, there is some great documentation on how to quickly get started. A brief step-by-step overview for the database and collection is included below:
Create database
First, we’ll need to create a new database. After logging into the Fauna dashboard online, click New Database. Give your new database a name you’ll remember (I used “slack-faq”) and save the database.
Create collection
With this database in place, we now need a collection. Click the “New Collection” button that should appear on your dashboard, and give your collection a name (I used “faq”). The history days and TTL values can be left as their defaults, but you should ensure you don’t add a value to the TTL field, as we don’t want our documents to be removed automatically after a certain time.
Add question / answer documents
Now we have a database and collection in place, we can start adding some documents to it. Each document should follow the structure:
{
   question: "a question string",
   answer: "an answer string",
   qTokens: [
       "first token",
       "second token",
       "third token"
   ]
}
The qToken values should be key terms in the question, as we will use them for a tokenized search when we can’t match a question exactly. You can add as many qTokens as you like for each question. The more relevant the tokens are, the more accurate results will be. For example, if our question is “where are the bathrooms”, we should include the qTokens “bathroom”, “bathrooms”, “toilet”, “toilets” and any other terms you may think people will search for when trying to find information about a bathroom.
The questions I used to develop a proof of concept are as follows:
{
  question: "where is the lobby",
  answer: "On the third floor",
  qTokens: ["lobby", "reception"],
},
{
  question: "when is payday",
  answer: "On the first Monday of each month",
  qTokens: ["payday", "pay", "paid"],
},
{
  question: "when is lunch",
  answer: "Lunch break is *12 - 1pm*",
  qTokens: ["lunch", "break", "eat"],
},
{
  question: "where are the bathrooms",
  answer: "Next to the elevators on each floor",
  qTokens: ["toilet", "bathroom", "toilets", "bathrooms"],
},
{
  question: "when are my breaks",
  answer: "You can take a break whenever you want",
  qTokens: ["break", "breaks"],
}
Feel free to take this time to add as many documents as you like, and as many qTokens as you think each question needs, then we’ll move on to the next step.
Creating Indexes
With these questions in place, we will create two indexes to allow us to search the database. First, create an index called “answers_by_question”, selecting question as the term and answer as the value. This will allow us to search all answers by their associated question.
Then, create an index called “answers_by_qTokens”, selecting qTokens as the term and answer as the value. We will use this index to allow us to search through the qTokens of all items in the database.
Searching the database
To run a search in our database, we will do two things. First, we’ll run a search for an exact match to the question, so we can provide a single answer to the user. Second, if this search doesn’t find a result, we’ll do a search on the qTokens each answer has, returning any results that provide a match. We’ll use Fauna’s online shell to demonstrate and explain these queries, before using them in our function.
Exact Match
Before searching the tokens, we’ll test whether we can match the input question exactly, as this will allow for the best answer to what the user has asked. To search our questions, we will match against the “answers_by_question” index, then paginate our answers. Copy the following code into the online Fauna shell to see this in action:
q.Paginate(q.Match(q.Index("answers_by_question"), "where is the lobby"))If you have a question matching the “where is the lobby” example above, you should see the expected answer of “On the third floor” as a result.
Searching the tokens
For cases where there is no exact match on the database, we will have to use our qTokens to find any relevant answers. For this, we will match against the “answers_by_qTokens” index we created and again paginate our answers. Copy the following into the online shell to see how this works:
q.Paginate(q.Match(q.Index("answers_by_qTokens"), "break"))If you have any questions with the qToken “break” from the example questions, you should see all answers returned as a result.
Connect function to Fauna
We have our searches figured out, but currently we can only run them from the online shell. To use these in our function, there is some configuration required, as well as an update to our function’s code.
Function configuration
To connect to Fauna from our function, we will need to create a server key. From your database’s dashboard, select security in the left hand sidebar, and create a new key. Give your new key a name you will recognise, and ensure that the dropdown has Server selected, not Admin. Finally, once the key has been created, add the following code to server.js before the test route, replacing the <secretKey> value with the secret provided by Fauna.
const q = fauna.query;
const client = new fauna.Client({
 secret: "<secretKey>",
});
It would be preferred to store this key in an environment variable in Netlify, rather than directly in the code, but that is beyond the scope of this tutorial. If you would like to use environment variables, this Netlify post explains how to do so.
Update function code
To include our new search queries in the function, copy the following code into server.js after the post route:
const searchText = async (text) => {
 console.log("Beginning searchText");
 const answer = await client.query(
   q.Paginate(q.Match(q.Index("answers_by_question"), text))
 );
 console.log(`searchText response: ${answer.data}`);
 return answer.data;
};

const getTokenResponse = async (text) => {
 console.log("Beginning getTokenResponse");
 let answers = [];
 const questionTokens = text.split(/[ ]+/);
 console.log(`Tokens: ${questionTokens}`);
 for (token of questionTokens) {
   const tokenResponse = await client.query(
     q.Paginate(q.Match(q.Index("answers_by_qTokens"), text))
   );
   answers = [...answers, ...tokenResponse.data];
 }
 console.log(`Token answers: ${answers}`);
 return answers;
};
These functions replicate the same functionality as the queries we previously ran in the online Fauna shell, but now we can utilise them from our function.
Deploy to Netlify
Now the function is searching the database, the only thing left to do is put it on the cloud, rather than a local machine. To do this, we’ll be making use of a Netlify function deployed from a GitHub repository.
First things first, add a new repo on Github, and push your code to it. Once the code is there, go to Netlify and either sign up or log in using your Github profile. From the home page of Netlify, select “New site from git” to deploy a new site, using the repo you’ve just created in Github.
If you have never deployed a site in Netlify before, this post explains the process to deploy from git.
Ensure while you are creating the new site, that your build command is set to npm run build, to have Netlify build the function before deployment. The publish directory can be left blank, as we are only deploying a function, rather than any pages.
Netlify will now build and deploy your repo, generating a unique URL for the site deployment. We can use this base URL to access the test endpoint of our function from earlier, to ensure things are working.
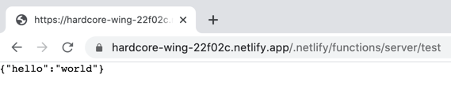
The last thing to do is update the Slack endpoint to our new URL! Navigate to your app, then select ‘slash commands’ in the left sidebar. Click on the pencil icon to edit the slash command and paste in the new URL for the function. Finally, you can use your new slash command in any authorised Slack channels!
Conclusion
There you have it, an entirely serverless, functional slack slash command. We have used FaunaDB to store our answers and connected to it through a Netlify function. Also, by using Express, we have the flexibility to add further endpoints to the function for adding new questions, or anything else you can think up to further extend this project! Hopefully now, instead of waiting around for someone to answer your questions, you can just use /faq and get the answer instantly!
Matthew Williams is a software engineer from Melbourne, Australia who believes the future of technology is serverless. If you’re interested in more from him, check out his Medium articles, or his GitHub repos.
The post Create an FAQ Slack app with Netlify functions and FaunaDB appeared first on CSS-Tricks.
You can support CSS-Tricks by being an MVP Supporter.