Wszystkie wpisy, których autorem jest admin

How to Create a Golden Autumn-Inspired Text Effect in Adobe Photoshop

Post pobrano z: How to Create a Golden Autumn-Inspired Text Effect in Adobe Photoshop

Final product image
What You’ll Be Creating

Autumn is all about the beautiful reds and golds and what’s in between. This tutorial will show you how to use Photoshop’s layer styles, filters, and adjustment layers, along with a couple of stock images, to create a glittering, gold, autumn-inspired text effect. Let’s get started!

This text effect was inspired by the many Layer Styles available on GraphicRiver.

Tutorial Assets

The following assets were used during the production of this tutorial:

1. How to Create a Background Layer

Step 1

Create a new 1500 x 950 px document, and go to File > Place Linked to place the Wood Background image as a Smart Object on top of the Background layer.

Resize the Wood Background image as needed and hit the Return key to commit the changes.

Add the Background Image

Step 2

Go to Image > Adjustments > Vibrance, and change the Vibrance value to -20.

Vibrance

Step 3

Double-click the Wood Background layer to apply a Color Overlay effect with these settings:

  • Color: #d2d0cb
  • Blend Mode: Multiply
Color Overlay

This will adjust the coloring.

Adjusted Background

2. How to Create Text Layers

Step 1

Create the text in All Caps using the font Big Bottom Cartoon. Change the Size to 300 pt and the Tracking to 75.

Create the Text

Step 2

Duplicate the text layer to create a copy.

Duplicate the Text Layer

3. How to Create a Drop Shadow Effect

Double-click the original text layer to apply the following layer style:

Step 1

Add a Drop Shadow with these settings:

  • Opacity: 32%
  • Distance: 11
  • Size: 9
Drop Shadow

Step 2

Add another Drop Shadow effect instance with these settings:

  • Color: #121212
  • Opacity: 50%
  • Distance: 36
  • Size: 50
Drop Shadow

Step 3

Right-click the original text layer, choose Copy Layer Style, click the copy text layer, and choose Paste Layer Style.

Change the original text layer’s Fill value to 0.

Copy and Paste Layer Style

4. How to Create a Glittering Effect

Double-click the copy text layer to add the following layer style:

Step 1

Add a Bevel and Emboss with these settings:

  • Size: 3
  • Check the Anti-aliased box
  • Highlight Mode: Linear Light
  • Shadow Mode: Color Burn
    • Opacity: 15%
Bevel and Emboss

Step 2

Add a Contour with these settings:

  • Contour: Half Round
  • Check the Anti-aliased box.
Contour

Step 3

Add an Inner Shadow with these settings:

  • Blend Mode: Linear Burn
  • Opacity: 13%
  • Distance: 0
  • Size: 10
Inner Shadow

Step 4

Add a Pattern Overlay with these settings:

  • Pattern: FDR Glitter Pattern 02
  • Scale: 50%
Pattern Overlay

Step 5

Place both text layers in a group and name it Text Layers.

Text Layers Group

Step 6

Add a Vibrance adjustment layer on top of the Text Layers group, clip it to the group, and change the Vibrance value to -70%.

Vibrance

5. How to Apply Color to an Image

Step 1

Open the Leaves0020 – Image 3 image, right-click the layer, choose Convert to Smart Object, and duplicate it.

Hide the copy layer and make sure that the original is selected.

Convert to Smart Object

Step 2

Go to Filter > Noise > Median, and change the Radius to 3.

Median Filter

Step 3

Double-click the layer to apply a Color Overlay effect with these settings:

Add a Color Overlay with these settings:

  • Color: #9c752a
  • Blend Mode: Color
Color Overlay

This will color the original leaf.

Colored Leaf

Step 4

Show the copy layer, and expand the original’s Filters list.

Press-hold the Option key and click-drag the original leaf layer’s Smart Filters tab to the copy layer.

Duplicate the Smart Filters

6. How to Create a Gold Effect Using Filters

Step 1

Select the copy leaf layer, press Command-U, and change the Saturation value to -100.

Change the Saturation

Step 2

Go to Filter > Filter Gallery > Artistic > Plastic Wrap, and use these settings:

  • Highlight Strength: 20
  • Detail: 10
  • Smoothness: 7
Plastic Wrap Filter

Step 3

Change the copy leaf layer’s Blend Mode to Linear Light.

Change the Blend Mode

Step 4

Double-click the copy leaf layer to adjust its Blending Options.

We are going to adjust the Underlying Layer sliders under the Blend If section.

Press-hold the Option key, and click-drag the right slider to split it. As you move the slider’s ends, you’ll notice how the copy leaf will not affect the lighter areas below it.

Press-hold the Option key, and click-drag the left slider to exclude some of the darker areas as well.

Blending Options

Step 5

This will create a golden leaf. Because we’re going to significantly downsize this when we use it, the effect will look even more refined and realistic. So don’t worry about the details for now.

Save this file and keep it open as we’ll get back to it again.

Save the File

7. How to Use Highlights and Shadows to Increase Contrast

Step 1

Open the Leaves0153 – Image 1 image, convert the layer to a Smart Object, and duplicate it.

Convert to a Smart Object

Step 2

Go to Select > Color Range, and choose Highlights from the Select drop-down menu. Adjust the Fuzziness and Range sliders to select the highlights.

Select the Highlights

Step 3

Create a new layer on top of all layers and name it Highlights.

Highlights Layer

Step 4

Fill the layer with White and press Command-D to deselect.

Fill with White

Step 5

Hide the Highlights layer so that it doesn’t affect the Shadows selection we’re going to create next.

Hide the Layer

Step 6

Go to Select > Color Range, and this time choose Shadows from the Select menu. Adjust the Fuzziness and Range sliders to select the shadows.

Select the Shadows

Step 7

Create a new layer on top of all layers, name it Shadows, fill it with Black and deselect, and show the Highlights layer.

Fill with Black

Step 8

Change both the Highlights and Shadows layers’ Blend Mode to Soft Light, and their Opacity value to 50%.

This will help create more contrast.

Change Layer Settings

8. How to Duplicate and Adjust Effects and Filters

Step 1

What you need to do next is repeat the same steps to turn the leaves gold.

You can duplicate the original leaf layers into this document to copy and paste the layer styles and duplicate the filters, but remember to delete the duplicated layers when you’re done.

Apply the Layer Styles and Filters

Step 2

Double-click the original Leaves0153 – Image 1 layer to adjust its Color Overlay effect by changing the Color to #a27412.

Color Overlay

Step 3

Double-click the copy Leaves0153 – Image 1 layer to adjust its Blending Options if needed.

Blending Options

You can adjust any settings needed to get a result you like.

Gold Leaves

9. How to Create Final Smart Objects for the Leaf Layers

Step 1

Go back to the first leaf layer document, duplicate the layers you have, hide the original ones, merge the copy layers, and rename the merged layer to Leaf 01.

Merge Layers

Step 2

Add a Vibrance adjustment layer, clip it to the Leaf 01 layer, and change the Vibrance value to -35.

Vibrance

Step 3

Select both the Leaf 01 and the Vibrance layers and convert them to a Smart Object.

Placing the adjustment layer inside the Smart Object will help make it easily editable if you want to change its values anytime later on.

Final Smart Object

Step 4

Go back to the second leaf image document, group the layers, duplicate the group and hide it, and merge the copy.

Merge the Layers

Step 5

Pick the Lasso Tool and select one of the leaves.

Select a Leaf

Step 6

Press Shift-Command-J to cut and paste the selected leaf into a new layer

Select and cut and paste the second leaf into a new layer, and delete the original empty layer. Rename the first leaf layer to Leaf 02 and the second to Leaf 03.

Separate the Leaf Images

Step 7

Add a clipped Vibrance layer using the same -35 Vibrance value to each of the leaf layers.

Vibrance

Step 8

Convert each leaf layer and its Vibrance layer to Smart Objects.

Convert to Smart Object

10. How to Add the Leaves to the Text

Step 1

Duplicate the Leaf 01 layer to the original document that has the text layers. Place the leaf on top of the first letter and scale it down as you like.

Add the First Leaf Layer

Step 2

Double-click the Leaf 01 layer to apply a Drop Shadow effect with these settings:

  • Opacity: 32%
  • Distance: 11
  • Size: 9
Drop Shadow

This will add a subtle drop shadow effect.

Shadow Effect

Step 3

Press-hold the Option key, and click-drag to duplicate the Leaf 01 layer. Then, you can transform the copy to build a dynamic effect.

Duplicate the Leaf Layer

Step 4

Follow the same steps to add more Leaf 01 copies, as well as adding and duplicating the Leaf 02 and Leaf 03 layers, over a part of the first letter.

Place all the leaf layers in a group with the letter’s name.

Add and Group the Leaf Layers

Step 5

Keep duplicating and transforming the leaf layers to place them over all the remaining letters.

Add More Leaves Over the Rest of the Text

11. How to Add More Leaves

Step 1

Open the autumn leaves image, and use the Lasso Tool to select any of the leaves you want to add to your text, and copy them to the original text document.

Select and Copy the Red Leaves

Step 2

Rename the copied leaf layer to Red Leaf 01, convert it to a Smart Object, and place it anywhere you like.

Add a Red Leaf Layer

Double-click the Red Leaf 01 layer to apply the following layer style:

Step 3

Add a Pattern Overlay with these settings:

  • Blend Mode: Linear Dodge (Add)
  • Opacity: 35
  • Pattern: FDR Glitter Pattern 02
  • Scale: 25%
Pattern Overlay

Step 4

Add a Drop Shadow with these settings:

  • Blend Mode: Darker Color
  • Opacity: 50%
  • Uncheck the Use Global Light box
  • Angle: 99
  • Distance: 6
  • Size: 9
Drop Shadow

Step 5

Add another Drop Shadow effect instance with these settings:

  • Blend Mode: Multiply
  • Opacity: 50%
  • Distance: 36
  • Size: 50
Drop Shadow

Step 6

This will style the leaf layer. Make sure to copy and paste this layer style to any red leaf layers you add next.

Copy the Layer Style

Step 7

Continue adding different red leaves until you get a result you like.

Add More Red Leaves

12. How to Add Pins

Step 1

Open the Mirror ball png image, and go to Image > Trim. Set Based On to Transparent Pixels, and check all the Trim Away boxes.

Trim

Step 2

Double-click the layer to apply a Color Overlay with these settings:

  • Color: #998051
  • Blend Mode: Color
Color Overlay

Step 3

Convert the mirror ball layer to a Smart Object.

Convert to a Smart Object

Step 4

Duplicate the mirror ball’s smart object into the original document, rename its layer to Pin, place it on top of all layers, and resize it to fit inside the center of some of the leaves you have.

Duplicate the Pin Layer

Double-click the Pin layer to apply the following layer style:

Step 5

Add a Pattern Overlay with these settings:

  • Blend Mode: Lighten
  • Pattern: FDR Glitter Pattern 02
  • Scale: 50%
Pattern Overlay

Step 6

Add an Outer Glow with these settings:

  • Blend Mode: Soft Light
  • Opacity: 35%
  • Color: #ffffff
  • Size: 50
Outer Glow

Step 7

Add a Drop Shadow effect with these settings:

  • Opacity: 32%
  • Distance: 11
  • Size: 9
Drop Shadow

This will style the pin.

Styled Pin

Step 8

Duplicate the pin to add it over more parts of the text, and place all the pin layers in a group with the name Pins.

Duplicate More Pins

13. How to Apply Global Adjustments

Step 1

Add a Color Lookup adjustment layer and choose the 3Strip.look table from the 3DLUT File menu, and change the layer’s Opacity to 50%.

Color Lookup

Step 2

Press the Shift-Option-Command-E keys to create a stamp layer on top of all layers. Rename the stamp layer to Lighting Effects and convert it to a Smart Object.

Lighting Effects Layer

Step 3

Go to Filter > Render > Lighting Effects. Choose Spot Light and adjust the rest of the settings as below:

Lighting Effects Filter

Step 4

Create another stamp layer on top of all layers, name it High Pass, convert it to a Smart Object, and change its Blend Mode to Soft Light.

High Pass Layer

Step 5

Go to Filter > Other > High Pass, and set the Radius to 1.

High Pass Filter

Step 6

Change the Lighting Effects layer’s Opacity to 50%.

Lighting Effects Layer Opacity

14. How to Add a Vignette

Step 1

Save the final result as an image, and open it.

Save as an Image

Step 2

Go to Image > Image Size, and change the Width to 1000 px.

Image Size

Step 3

Use the Elliptical Marquee Tool to create an elliptical selection around the text.

Create an Elliptical Selection

Step 4

Add a new Solid Color fill layer and set the Color to Black. The selection will be applied to the mask.

Solid Color

Step 5

Select the mask’s thumbnail and press Command-I to invert it.

Invert the Mask

Step 6

Change the Solid Color layer’s Blend Mode to Soft Light and its Opacity to 35%.

Layer Settings

Step 7

Select the mask’s thumbnail again and open the Properties panel to increase the Feather value until you get a smooth vignette effect.

Mask Feather

Congratulations! You’re Done!

In this tutorial, we used layer styles to create some glittering text. Then, we used layer styles and filters to create gold leaves, and added them along with more red leaves over the text to create the main effect.

Finally, we added some pins, and applied a bunch of adjustment layers and filters to blend everything together.

Please feel free to leave your comments, suggestions, and outcomes below.

Final Result

ASDA Best Christmas Ever

Post pobrano z: ASDA Best Christmas Ever

Asda has launched its 2017 festive campaign, “Best. Christmas. Ever.”. “Imaginarium”, the commercial at the heart of the Asda Best Christmas Ever campaign, gives viewers a behind-the-scenes glance into the magical world where Asda Christmas treats are created. Set to the iconic track ‘Don’t Stop’ by Fleetwood Mac, the 60” TVC follows a young girl and her grandfather, who sneak into the Christmas Asda headquarters, the Imaginarium, revealing the secrets behind the iconic seasonal ranges and products available in store this festive season. As we follow their journey through weird and wonderful rooms, we discover magical machines, enchanting experiments and the imaginative ways in which Asda will ensure the Best. Christmas. Ever.: from reindeers powering a ginormous food mixer to make Christmas puddings, to canapés and mince pies being assembled by tiny Asda Imaginarium workers, and Christmas Smash Igloo cakes being tested by strapping weightlifters – the ranges offer creativity, innovation and quality. A captivating place with a surprise in every corner – a giant pop-up Christmas cookbook snaps opens to reveal two real life Asda chefs preparing the iconic Christmas meal of roast turkey with all the trimmings, including this year’s special Wagyu dripping roast potatoes. We also catch a glimpse into a futuristic gin room where truffles are being infused with gin by a giant ‘gin laser’. Their expedition comes to its fruition when Walter, the factory’s security guard shows them what other adventures lie in store for them, revealing the whole of the Imaginarium in all its glory.

Asda Best Christmas Ever commercial

Four further 30” adverts will be rolled out over the festive period, which will reveal more mysteries of the Asda Imaginarium. These spots will focus on four key festive shopping moments: Gifting, Home Decorations, Parties & Gatherings and ‘the Big Shop’. The Gifting film will also feature a panel of children selecting toys either as ‘fun’ or ‘boring’, highlighting the ‘Chosen by Kids’ range at Asda, where only the little ones have a say in what makes the cut. Each of the 30” spots will be supported on TV with 10” ads that focus on the essential Christmas staples such as turkey and vegetables and party food. These ads will highlight Asda’s amazing prices and deals, echoed in 6” YouTube bumpers.

Asda Best Christmas Ever commercial

Asda will engage dynamic technology to create tailored Trueview videos, taking audience search terms and linking them thematically with relevant Asda messaging. These will bring contextual relevance to the 6” YouTube Christmas bumpers, and will be supplemented with short-form 2” content and carousel ads on Facebook. The campaign will also feature an innovative, gamified Snapchat filter, where people can become the striped weightlifters from the ad.

Asda Best Christmas Ever commercial

Behind the campaign

Andy Murray, Chief Marketing Officer at Asda, said: “Earlier in the year we held sessions with our customers to get feedback on our Christmas range. As we talked to them about Christmas we could see how much joy and happiness planning their Christmas brought them – we knew we wanted to reflect that in our ad. When we saw their reactions to our food – the way it surprised them and made them smile – as well as the incredible pride and attention to detail our product developers had put into creating it, the inspiration for the Imaginarium was born.”

Eilidh Macaskill, Asda’s Vice President Creative and Media, explains: “By Combining CGI animation and some spectacular real life venues, the ad and the wider campaign is a love letter to our customers and products.”

Sara Rose, Group Creative Director at Saatchi & Saatchi London added: “Although the campaign has a fantastical element to it, our stories are firmly rooted in what Asda has to offer shoppers this Christmas, from old favourites to inventive new treats like gin infused chocolates and massive Christmas puddings. Our first thought was “how do they come up with these things?” And the campaign just grew from there.”

Asda Best Christmas Ever Credits

The Asda Best. Christmas. Ever campaign was developed at Saatchi & Saatchi London by chief creative officer Kate Stanners, group creative director Sara Rose, art director Cece Chu, copywriter Ryan Price, designer Teresa Goncalves, planning director Paul Hackett, account team Danny Josephs, Andy Chisholm, Jennie Gundill, Natasha Griffiths, Patrick Boyce and Walter Bayliss, agency producers Maja McIntosh and Georgie Ford.

Media was handled at Blue 449.

Filming was shot by duo Los Perez via Blink with producer Ewen Brown.

Editor was Joce Hockings at TenThree with producer Zoe Hockings.

Post production was done at MPC by VFX supervisor Bevis Jones and producer Annabel Bennett.

Audio post production was done at 750mph.

Music, “Don’t Stop”, performed by Fleetwood Mac, was licensed at One More Music Company.

Pet Art and How to Make It

Post pobrano z: Pet Art and How to Make It

If you are an animal lover, most likely you are also a pet owner. For pet parents, our furry companions are part of the family, not just a pet. As such, pet parents are always looking for creative ways to memorialize the love they have for their pets.

Pet Paintings

One of the most endearing ways people love to create art around their critters is through portrait painting. Whether your cat is posed amidst a black background or your dog is posed in a pumpkin patch waiting for the Great Pumpkin, or your guinea pig is a popcorning Red Baron pilot, portrait paintings are permanent illustrations of your pet’s unique personality. Just be mindful of the strain an awkward pose can put on an animal if made to be in it for a long length of time. Learn to recognize the symptoms of arthritis in dogs and other pets, especially older ones, before proceeding with your masterpiece.

Coffee Cups & Mugs

Creativity is contagious when it comes to our pets. Today, there are many sites that offer the ability to produce merchandise with your pet’s photos and artwork. Coffee cups and coffee mugs can carry a print of your critter’s image so you can carry your kitty, puppy, rabbit, guinea pig or fish with you at work.

Pet Sculptures

Sculptures can come in many forms. If you lack the artistic touch but want to create a sculpture in honor of your pet, polymer clay is one way to go. You can mold your cat, dog, rabbit or even fish from little pieces of clay. And if you make a mistake, you can start over without damage to the clay.

For a more permanent fixture, oven bake clay allows you to create your pet, cook it and color it as you wish. There are many videos online that teach how to bake/cure polymer clay. It’s tricky at first because the cooking time is what determines the success of your piece. However, by following the instructions, you should have no problem.

Mixed Media Pet Art

Mixed media is one of the most creative and fun ways to honor your critter. Usually, mixed media includes a variety of materials such as quality photography, paintings, clue, cut outs, paper, and paper mache, or anything that can be used creatively. Examples of mixed media projects are picture frames, pillows, or decor for your work office or home. Holiday pet cards are among the most popular pet creations. We love cards of our animals on Valentine’s Day, Labor Day or any holiday.

Charcoal & Graphite Drawings of Your Pet

If you know how to draw, then drawing your pooch, cat, bird or mouse is a fun and relaxing way to celebrate your pet. Charcoal and graphite sets come in inexpensive beginner sets. Some sets include a drawing pad. When you draw your pet, you can let your imagination get wild. Your pet is no longer bound by the three-dimensional world. He/she is memorialized in the setting you devise. Petsmart has Youtube videos that show you how to draw your dog. Similarly, you can find may other tutorials online that teach you how to draw your specific pet.

Pet Jewelry

Just like people parents, some dog and cat parents love to imprint the paws of their kittens, puppies and other creatures. The imprints on soft non-toxic animal clay are easy and safe to use. Once you capture your pet’s paw onto the soft-air drying clay, allow the impression to dry. Once the clay has dried, you can glue a metal jewelry necklace holder and metal chain to make a necklace.
 
Step stones also make nice gifts or decorations for the garden. Milestone sells pet photo stone kits you can decorate with a photo of your pet and stunning color glass gems, number stamps and a reusable mold.

Abstract Pet Art

Abstract creativity is a visually stimulating way to pay tribute to your pet. Abstract lines, drawings, paintings or sculptures can be illustrated in any form. Yarn can be used to create a modernized, colorful design of your pet. There are many DIY sites online and videos that show you how to produce beautiful items you can hang on your wall or decorate your bed with.
 
Pet parents will always cherish their pets and pay tribute to the unconditional love their furry little-loved gives them.

Featured Image by Matthew Henry on Unsplash

How to Create an Illustration of a Retro Kitchen in Adobe Illustrator

Post pobrano z: How to Create an Illustration of a Retro Kitchen in Adobe Illustrator

Final product image
What You’ll Be Creating

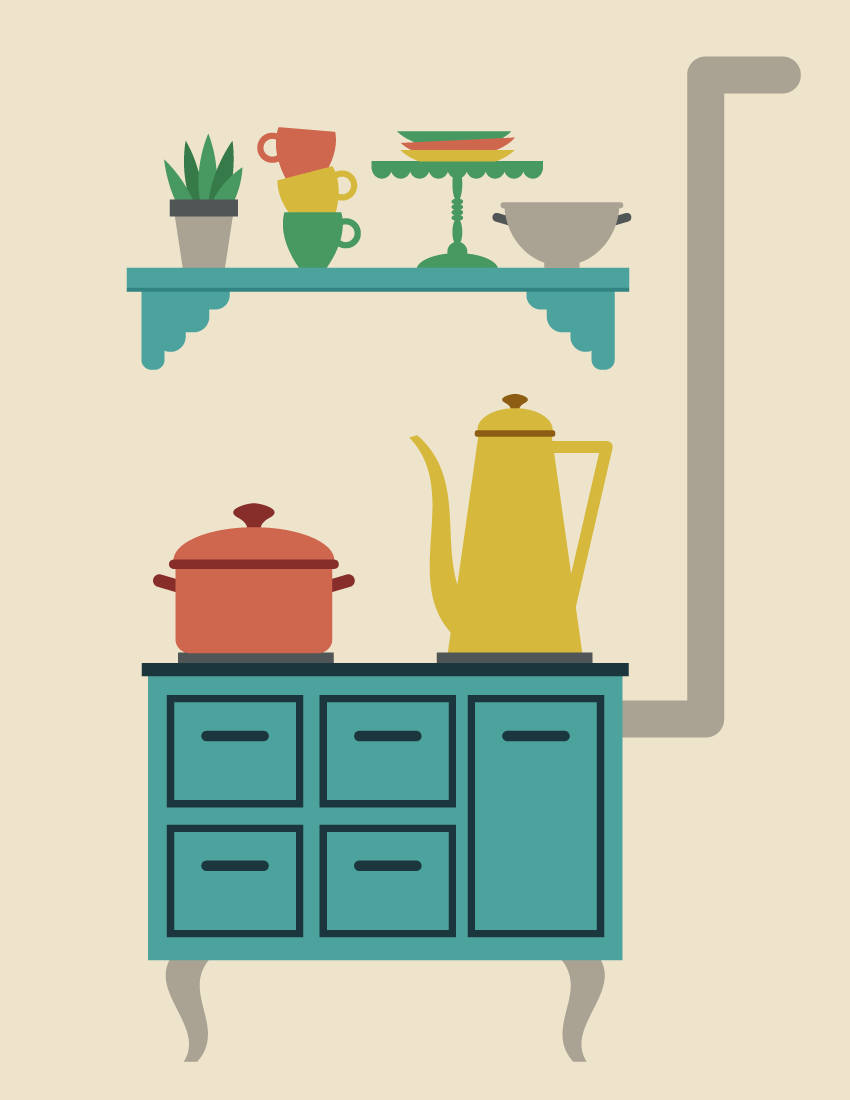
I really love retro style, and it so happens that it’s become very popular. So I decided to draw a retro kitchen. And of course, I will show you how it’s done! 

Don’t worry, you do not have to be a professional to do this. We will be using simple shapes and some effects that will make this tutorial a breeze. You will be surprised by just how many things we can create using mostly rectangles and ellipses.

For more inspiration for retro illustrations, check GraphicRiver. They have a great selection of different images.

So, let’s get into a retro mood, and begin!

1. How to Create a Retro Stove 

Step 1

Start by creating a new document (File > New) with 850 px Width and 1100 px Height. First, we will create a retro stove with some drawers, where the coffee and the soup will be made.

Take the Rectangle Tool (M) and create a blue rectangle with no stroke color. To get the same color, type in the numbers shown below in the Color panel (Window > Color). Be sure that you have checked RGB on the options of the panel. 

Next, create a second, darker rectangle, which should be much thinner. Now, place the darker rectangle on top of the lighter one. When doing this, make sure you are using the selection tool. Other tools can deform the shape, which is not needed in this case.

how to create the stove top

Step 2

Let’s give our retro stove a few drawers. Draw a dark blue rectangle using the Rectangle Tool (M). The stroke color of this rectangle should be the same as the top of our stove, and the fill color should be left as it is. On the Stroke panel, make the stroke Weight around 3 pt for this rectangle. After you draw the drawer, add a handle. Just create a dark blue rounded rectangle. This is the first drawer.

Select all parts of the drawer and group them (right-click > Group). Holding the Shift and Alt keys, move the drawer down to get another copy of it. Now select two drawers and, while holding the Shift and Alt keys, move both drawers to the right side to get two more drawers. 

Finally, to get a large drawer, make a copy of the small drawer, drag the bottom part down, and align its position and size with all the other drawers to get a result similar to the one presented below.

how to create the drawers

Step 3

Let’s create the legs for the stove. First, using the Rectangle Tool (M), create a grey vertical rectangle. Next, we will apply the Flag effect to this rectangle. Go to Effect > Warp > Flag and use the options shown. Don’t forget to expand the final shape: while keeping it selected, go to Object > Expand Appearance.

how to create the legs of the stove top

Step 4

Now let’s attach the leg behind our stove. Make a vertical copy of this leg: select it and go to Transform > Reflect, enter Axis Vertical, Angle 90 degrees, and press Copy. Move the copy of the leg to the right. 

Finally, in this step, add two thin grey rectangles on top of the stove.

placing the legs

Step 5

Using the Rounded Rectangle Tool, create a grey rounded rectangle, horizontally aligned, and place it behind the right side of the stove as shown in the image below. 

To get a rounded rectangle with very rounded corners, create a small rounded rectangle first, and then stretch it. Or you can go to View > Show Corner Widget and modify the corners by dragging them inside. 

Next, attach a long vertical rounded rectangle and finally a shorter horizontal one. Our retro stove is ready!

2. How to Create the Soup Pot

Step 1

Using the Rounded Rectangle Tool, create a red rounded rectangle. Be sure you have checked View > Show Corner Widget. Take the Direct Selection Tool (A) and select the two upper anchor points of the rectangle. Drag them outside. You will notice that those corners become sharp.

Next, add a thin, dark red rounded rectangle on top. After that, create another dark red rounded rectangle, slightly rotate it to the right, and place it behind the pot. This is the left handle. 

To make the right handle, make a reflected copy of the left one. For this, select the left handle, right-click your mouse, and select Transform > Reflect. In the dialogue box, select Axis Vertical, Angle 90 degrees, and press Copy. Move the newly created handle to the right.

how to create the pot

Step 2

To make the pot lid, take the Ellipse Tool (L), and draw a light brown ellipse and place it behind the pot. To finish the lid, add a dark red circle. To create an even circle, use the Ellipse Tool (L) while holding down the Shift key. Now let’s modify this. We’ll use the Fish effect: select the circle, go to Effect > Warp > Fish and enter the options below. Expand this shape: select it and go to Object > Expand Appearance. Our soup pot is ready!

how to create the pot 2

3. How to Create the Coffee Pot

Step 1

To create the coffee pot, we will start with a copy of the lid of the soup pot. Now, decrease its size and change its color as shown in the image below. Add a vertical rectangle for the body of our coffee pot. After this, apply the Arc effect to this rectangle: go to Effect > Warp > Arc and enter the presented options. Expand the shape (Object > Expand Appearance).

Finally, in this step, we will add the coffee pot handle. For this, we need to draw a triangle: take the Polygon Tool and click on your artboard. In the new dialogue window, type 3 Sides with any Radius. Then click OK. Set the necessary stroke color and remove the fill color (Shift-X). Finally, resize this triangle, turn it upside down, and place it behind the coffee pot body.

how to create the coffee pot

Step 2

To create the spout of our coffee pot, we will start with a yellow rectangle. Next, we will apply the Flag effect: go to Effect > Warp > Flag and use the shown options. Expand the final shape. And finally, place it to the left of the coffee pot’s body.

how to create the nose of the coffee pot

Step 3

Place the created pots on the stove.

placing pots on the stove top

4. How to Create the Shelf

To create the shelf, we will start with a blue rectangle. Make a copy of it behind: Control-C, Control-B. Then move this back rectangle down a bit and change its color so it is darker.

Behind these rectangles on the left side, create a set of different sized rounded rectangles as shown below. Of course, you can place them however you want. Just remember that the black stroke color is not needed; it is only there for better visibility. 

After that, while keeping all the rounded rectangles selected, unite them by pressing the Unite button on the Pathfinder panel (Window > Pathfinder). You will end up with a single shape. To add another piece on the right, select this shape and create a vertical reflection of it (Transform > Reflect, Copy). Move the vertical copy to the right.

how to create the kitchen shelf

5. How to Create the House Plant

Step 1

Now, we will create the plant pot. First, create a grey rectangle. To deform the shape, go to Effect > Warp > Arc. In the new dialogue window, adjust the options as you see in the image below. Create a new dark grey rectangle on top of the previous one.

how to create the flower pot

Step 2

Let’s create the leaves for our plant. 

Draw a green ellipse. Select this ellipse and, using the Convert Anchor Point Tool (Shift-C), make the top and bottom anchor points sharp by clicking on them. Make a few more copies of the created leaf, and slightly rotate them in different directions and place them behind the flower pot. To add a three-dimensional effect, change the color of half of them to the dark green as shown below.
how to create the house plant

6. How to Create the Cups

Step 1

Using the Rectangle Tool (M), make a green rectangle and go to Effect > Warp > Bulge. In the new window, enter the options shown. Expand the object: Object > Expand Appearance. For the handle, create a circle with green stroke color and no fill color (press Shift-X). Place this circle on the right of the modified rectangle.

how to create the cup

Step 2

Create two more copies of the cup and change their colors. You can use the Eyedropper Tool (I) to take the colors from the coffee and soup pots. Place them on top of each other. Be sure that the image of each cup on top is placed behind the bottom one.

changing colors of the cups

7. How to Create the Plates

For the plate, we will use a green rectangle. Now, go to Effect > Warp > Bulge. In the new window, enter the options shown in the image below. Don’t forget to expand this shape. 

Create another two copies of the plate, change their colors, and place them on top of each other, in a similar way to the cups in the previous step.

how to create the tea plates

8. How to Create the Cake Stand

Step 1

Let’s start with the scallops. Using the Ellipse Tool (L), create a green ellipse. Now, we will cut the top half of the ellipse: using the Rectangle Tool (M), create a rectangle and cover the top part of the ellipse. The rectangle will be used as a cutter; therefore its color is not important. 

Select both shapes and press the Minus Front button on the Pathfinder panel. This action leaves us with half of the ellipse.

how to create the cake stand

Step 2

While holding down the Shift and Alt buttons, move the half ellipse to the right. Make sure the copies are attached to each other. Then, by pressing Control-D a few more times, create some scallops. 

Finally, add a long rectangle on top of the scallops to get the top part of the cake stand.

how to create the cake stand 2

Step 3

For the cake stand’s leg, create a vertical ellipse and attach it to the cake stand’s top. Next, add four horizontal ellipses, followed by another vertical ellipse and a circle. On the bottom, attach one of the scallops, which should be stretched out. Our cake stand is ready!

how to create the cake stand 3

Finally, place all the plates on this cake stand.

placing the tea plates on the cake stand

9. How to Create the Bowl

To start, make a copy of a scallop and change the color to grey. This will be the body of the bowl. On top of this bowl body, add a rounded rectangle for the rim. 

For the handle, create a dark grey rounded rectangle, rotate it slightly to the right, and place it as shown below—on the left side of the bowl behind the body (Control-X, Control-B). To make the right handle, create a vertical reflection of the left one and move it to the right. 

Add a rectangle on the bottom. The bowl is ready!

how to create the colander

10. How to Place All the Objects Together

Step 1

Place the kitchenware and plant on the shelf.

placing all the kitchenware on the shelf

Step 2

Hang the shelf with all the elements above the stove.

combining all the objects together

11. How to Create the Background

Add a light tan rectangle behind the objects. Hit the Rectangle Tool (M) and click on your artboard. Enter the Width as 850 px and Height as 1100 px. Place the background behind everything. Your entire scene is ready!

how to create the background

Conclusion

Awesome work, you’re done! I can even smell the coffee from the coffee pot. This kitchen will warm up those cold November days. I hope you’ve enjoyed following this tutorial. Have fun creating your own illustrations, and please share your creations in the comments below. See you again in my next tutorial!

final image

Uber Boxes campaign to unlock cities

Post pobrano z: Uber Boxes campaign to unlock cities

Uber is highlighting the absurdity of the traffic situation in Asia’s biggest cities as part of its first ever brand purpose campaign. Using cardboard boxes to represent cars, the film humorously shows the reality of how people get around currently and ends with images of a city being overrun by boxes. The film was shot on the streets of Bangkok with around 200 extras. The Uber boxes commercial was filmed in Bangkok with 200 extras, set to the track “Bare Necessities” from the 1967 Disney film The Jungle Book. The film is a reminder of just how serious the traffic crisis enveloping our cities is becoming. Uber-commissioned research show that people in Asia are stuck in congestion for 52 minutes every day, in addition to the 26 minutes they spend trying to find parking spots. Forty three percent of millennials are considering getting rid of their cars all together.

Uber Boxes commercial

Ridesharing companies like Uber are part of the solution to traffic congestion because they can create a viable alternative to private car ownership by giving people access to an affordable, reliable and safe ride. Together with good public transit, they make it easier for cities to move to a car-lite future.

“We use boxes as a way to dramatise the traffic situation and highlight some of the funny, absurd and occasionally annoying situations that we face on daily basis in traffic,” says Esh Ponnadurai, Marketing Director, Uber, Asia Pacific. “We also hint at the need for solution, of which ride-sharing plays an important role.”

Uber Manila stats

Uber used two sources for the statistics underpinning this campaign. Firstly, a consumer survey of 9,000 people in nine Asian cities on attitudes towards traffic and parking. Secondly, Uber commissioned the Boston Consulting Group (BCG) to assess the potential benefits that greater ridesharing adoption may bring to Asian cities. The results are online at unlockingcities.com

Uber Boxes Credits

The Uber Boxes commercial was developed at Forsman & Bodenfors by copywriters Jacob Nelson, Rikke Jacobsen, art director John Bergdahl, designers Emelie Lindquist, Johan Fredriksson, planners Tobias Nordström, Leo Bovaller, music supervisor Jenny Ring, producer Alexander Blidner, account supervisor Sanna Fagring, account manager Helen Johansson, account director Alison Arnold, and PR director Bjarne Darwall, working with Uber Asia Pacific marketing director Esh Ponnadurai and rider marketing lead Kunal Gupta.

Activation strategy and orchestration were by Mano Copenhagen. Distribution was through Oath.

Filming was shot by director Adam Berg via Indio with director of photography Mattias Rudh, executive producer Johan Lindström, producer Ben Croker, 1st AD Tony Fernandez and production manager Kate Wynborne.

Editor was Paul Hardcastle at Trim.

Visual effects were produced at Swiss by VFX supervisor Leo Wilk, executive producer Emma Rosas Host, producer John Thorstensson, VFX coordinator Jonas From, VFX artists Peter Marin, Jon Wesström, Nicklas Bühlman, John Svensson, Markus Bergqvist, Marcus Krupa, Mattias Josefsson, Benjamin Kraft, Mattias Lind, and Anne Isaksson.

Colourist was Mark Gethin at MPC Los Angeles.

Sound was designed at Redpipe by sound engineer Joakim Kristensen.

Building Flexible Design Systems

Post pobrano z: Building Flexible Design Systems

Yesenia Perez-Cruz talks about design systems that aren’t just, as she puts it, Lego bricks for piecing layouts together. Yesenia is Design Director at Vox, which is a parent to many very visually different brands, so you can see how a single inflexible design system might fall over.

Successful design patterns don’t exist in a vacuum.

Direct Link to Article — Permalink


Building Flexible Design Systems is a post from CSS-Tricks