Wszystkie wpisy, których autorem jest admin

How to Create a Transport-Themed Icon Pack in Adobe Illustrator

Post pobrano z: How to Create a Transport-Themed Icon Pack in Adobe Illustrator

Final product image
What You’ll Be Creating

In today’s tutorial we’re going to take an in-depth look at the
process of creating a transportation-themed icon pack, using some geometric
shapes and tools that you probably already work with on a daily basis.

Don’t forget, you can always expand the pack
by heading over to GraphicRiver where you’ll find a great selection of
transportation icons just waiting to be snatched.

That being said, grab
a fresh cup of that yummy mocha latte and let’s get started!

1. How to Set Up a New Project File

Since I’m sure that you already
have Illustrator up and running in the background, bring it up and let’s set up
a New Document (File > New or Control-N)
using the following settings:

  • Number
    of Artboards:
    1
  • Width:
    800
    px
  • Height:
    600
    px
  • Units:
    Pixels

And from the Advanced tab:

  • Color
    Mode:
    RGB
  • Raster
    Effects:
    Screen (72ppi)
  • Preview Mode: Default
setting up a new document

2. How to Set Up a Custom Grid

Since we’re going to be creating the icons
using a pixel-perfect workflow, we’ll want to set up a nice little Grid so that we can have full control
over our shapes.

Step 1

Go to the Edit > Preferences > Guides & Grid submenu, and adjust
the following settings:

  • Gridline
    every:
    1 px
  • Subdivisions: 1
setting up a custom grid

Quick
tip:
you can learn more about grids by reading this
in-depth piece on How Illustrator’s Grid System Works.

Step 2

Once we’ve set up our custom grid, all we
need to do in order to make sure our shapes look crisp is enable the Snap to Grid and Snap to Pixel options found under the View menu.

Now, if you’re new to
the whole “pixel-perfect workflow”, I strongly recommend you go through my How
to Create Pixel-Perfect Artwork
tutorial, which will help you widen your
technical skills in no time.

3. How to Set Up the Layers

With the new document created, it would be
a good idea to structure our project using a couple of layers, since this way
we can maintain a steady workflow by focusing on one icon at a time.

That being said, bring up the Layers panel, and create a total of
four layers, which we will rename as follows:

  • layer
    1:
    reference grids
  • layer
    2:
    train
  • layer
    3:
    bus
  • layer 4: tram
setting up the layers

4. How to Create the Reference Grids

The
reference grids (or base grids)
are a set of precisely delimited reference surfaces, which allow us to build
our icons by focusing on size and consistency.

Usually, the size of the grids determines
the size of the actual icons, and they should always be the first decision you
make once you start a new project, since you’ll always want to start from the
smallest possible size and build on that.

Now, in our case, we’re going to be
creating the icon pack using just one size, more exactly 128 x 128 px, which is a fairly large one.

Step 1

Start by locking all
but the “reference grids” layer, and then grab the Rectangle Tool (M) and create a 128 x 128 px orange (#F15A24) square, which will help define the
overall size of our icons.

creating the reference grids main shape

Step 2

Add a smaller 120 x 120 px one (#FFFFFF) which we
will position on top of the previous shape, since it will act as our active
drawing area, thus giving us an all-around 4
px
padding to work with.

creating the active drawing areas main shape

Step 3

Select and group the
two squares together using the Control-G
keyboard shortcut, center aligning them to the underlying Artboard
afterwards. Create the remaining grids using two copies (Control-C > Control-F) at a horizontal distance of 40 px from the original, locking
the current layer before moving on to the next section.

adding the remaining reference grids

5. How to Create the Train Icon

Assuming you’ve successfully managed to
create the little reference grids, move on to the next layer (that would be the
second one), and let’s kick off the project by creating our first icon.

Step 1

Start by creating the
circular background using a 120 x 120 px
circle, which we will color using #FF8D60 and then center align to the
first active drawing area.

creating and positioning the main shape for the train icons background

Step 2

Create the upper section of the train using a 60 x 60 px square, which we will color using #CBF7EC and then
center align to the larger circle, positioning it 20 px from its top edge.

creating and positioning the main shape for the trains upper body

Step 3

Adjust the shape that we’ve just created by setting the Radius of its top corners to 20 px from within the Transform panel’s Rectangle Properties.

adjusting the shape of the trains upper body

Step 4

Give the resulting shape an outline using the Stroke method, by creating a copy of it (Control-C), which we will paste in front (Control-F) and then adjust by first changing its color to #3F3330 and
then flipping its Fill with its Stroke (Shift-X). Set the resulting outline’s Weight to 4 px,
selecting and grouping the two shapes together afterwards using the Control-G keyboard shortcut.

adding the outline to the trains upper body

Step 5

Create the little roof section using a 12 x 4 px rectangle (#3F3330) which we will position on top of the
larger outline, as seen in the reference image.

adding the little roof section to the trains upper body

Step 6

Start working on the door using a 20
x 42 px
rectangle (#55AA9A) which we will adjust by setting the Radius of its top corners to 4 px from within the Transform panel’s Rectangle Properties. Give the resulting shape a 4 px thick outline (#3F3330), grouping
(Control-G) and then aligning the
two to the center of the larger body’s bottom edge.

creating and positioning the main shapes for the trains door

Step 7

Add the little window using an 8 x 10 px rounded rectangle (#3F3330)
with a 2 px Corner Radius, which we
will center align to the door, positioning it at a distance of 4 px from its top edge.

adding the window to the trains door

Step 8

Add the rectangular side insertions using two 4 x 8 px rectangles (#3F3330), which we will position at a distance
of 6 px from the door’s top edge.

adding the rectangular side insertions to the trains door

Step 9

Create the little handle using a 4 x 4 px square (#3F3330), which we will position onto the left side of the door, right
underneath the window itself. Once you’re done, select and group (Control-G) all of the current section’s
composing shapes together before moving on to the next step.

adding the handle to the trains door

Step 10

Start working on the protective string sections using three 2 x 4 px rectangles (#3F3330), which we
will vertically stack at a distance of 2
px
from one another, grouping (Control-G)
and then positioning them at a distance of 2
px
from the center of the door’s bottom edge.

adding the three rope insertion points to the trains door

Step 11

Turn on Pixel Preview
mode (Alt-Control-Y), and then use a 2 px thick Stroke with the color set to #3F3330 to draw the three rope sections.
Once you’re done, switch back to the Default
Preview
mode (Alt-Control-Y),
selecting and grouping (Control-G)
them to the smaller insertion rectangles, doing the same for the entire door
afterwards.

adding the safety ropes to the trains door

Step 12

Create the left window using an 8
x 14 px
rounded rectangle (#3F3330) with a 2 px Corner Radius, which we will position on the left side of
the door, making sure to bottom align it to the smaller center window.

adding the left window to the trains body

Step 13

Add the small rectangular insertion using a 4 x 2 px rectangle (#3F3330), which we will position above the
window, at a distance of just 6 px.

adding the small rectangular insertion to the trains left upper body

Step 14

Create the circular lights using two 4 x 4 px circles (#3F3330) vertically stacked 2 px from one another, which we will
group (Control-G) and then position
below the left window, at a distance of 4
px
.

adding the left circular lights to the trains upper body

Step 15

Start working on the left bumper by creating a 4 x 24 px rounded rectangle (#3F3330)
with a 2 px Corner Radius, which we
will align to the bottom of the larger body, positioning it at a
distance of just 2 px from its left
edge.

creating and positioning the main shape for the trains left bumper

Step 16

Create two 6 x 4 px rectangles
(#3F3330), which we will vertically stack at a distance of 6 px, grouping (Control-G)
and then positioning them on top of the bumper, at a distance of 4 px from its top edge. Once you’re
done, select and group (Control-G)
all of the bumper’s composing shapes before moving on to the next step.

adding the two rectangles to the trains left bumper

Step 17

Add the bottom rectangular insertion using a 6 x 4 px rectangle (#3F3330), which we will bottom align to the
train’s larger body. Once you’re done, select and group (Control-G) all of the details that we’ve added so far, since we
will use them to fill up the larger body’s right side.

adding the bottom rectangular insertion to the trains main body

Step 18

Create a copy (Control-C > Control-F) of the details that we’ve just finished working on, which we will vertically reflect (right click > Transform > Reflect
> Vertical
) and then position onto the train’s opposite side. Once
you’re done, select and group (Control-G)
all of the train’s composing sections before moving on to the next step.

adding the details to the trains right side

Step 19

Start working on the train’s bottom section by creating a 64 x 6 px rectangle (#55AA9A) with a 4 px thick outline (#3F3330), which we
will group (Control-G) and then
position below the train’s larger body.

creating and positioning the main shapes for the trains bottom section

Step 20

Next, create an 8 x 6 px rectangle
(#3F3330), which we will center align to the two shapes that we’ve just
grouped.

adding the center rectangle to the trains bottom section

Step 21

Add the side pieces using two 4 x
6 px
rectangles (#3F3330), which we will position onto the outer edges of
the wider section.

adding the side pieces to the trains bottom section

Step 22

Finish off the train’s bottom section by adding a 60 x 6 px rectangle (#3F3330) followed by a slightly smaller 24 x 4 px one (#3F3330), to the center
of its bottom edge. Once you’re done, select and group (Control-G) all of the current section’s composing shapes together,
doing the same for the entire train afterwards.

adding the horizontal detail rectangles to the trains bottom section

Step 23

Finish off the train, and with it the icon
itself, by drawing the small railroad section from underneath using a 4 px thick Stroke (#3F3330). Take your time and, once you’re done,
select and group (Control-G) all of
its composing sections together.

finishing off the train icon

6. How to Create the Bus Icon

Assuming you’ve finished working on the
first icon, lock its layer and then move on up to the next one (that would be
the third one) where we’ll start working on the iconic New York bus.

Step 1

As we did with the
previous icon, start by creating the circular background using a 120 x 120 px circle, which we will
color using #FF8D60 and then center align to the second active drawing area.

creating and positioning the main shape for the bus icons background

Step 2

Create the vehicle’s roof section using a 70 x 12 px rounded rectangle (#55AA9A)
with a 6 px Corner Radius and a 4 px thick outline (#3F3330), which we
will group (Control-G) and then
center align to the larger circle, positioning them at a distance of 20 px from its top edge.

creating and positioning the main shapes for the buss roof

Step 3

Add the center detail piece using a 42 x 4 px rounded rectangle (#3F3330)
with a 2 px Corner Radius, which we
will center align to the shapes that we’ve just grouped.

adding the center detail piece to the buss roof

Step 4

Create the circular front lights using two 4 x 4 px circles (#3F3330), which we will
position onto the sides of the larger center piece, at a distance of just 4 px from it.

adding the circular lights to the buss roof

Step 5

Add the bottom insertion using a 12
x 3 px
rectangle (#3F3330), which we will center align to its bottom edge.

adding the bottom center insertion to the buss roof

Step 6

Create the smaller insertions using two 4 x 3 px rectangles (#3F3330), which we
will position at a distance of 2 px from
the larger insertion’s side edges.

adding the smaller bottom insertions to the buss roof

Step 7

Finish off the roof by creating a 50 x 6 px rectangle (#3F3330), which we
will adjust by individually selecting and pushing its top anchor points to the
inside by a distance of 4 px (right click > Transform > Move >
Horizontal > + / – 4 px
depending on which side you start with). Once
you’re done, position the resulting shape on top of the larger shapes,
selecting and grouping (Control-G)
all of them together afterwards.

adding the top section to the buss roof

Step 8

Create the bus’s main body using a 66 x 44 px rectangle (#CBF7EC) with a 4 px thick outline (#3F3330), which we
will group (Control-G) and then
position below the roof that we’ve just finished working on.

creating and positioning the main shapes for the buss body

Step 9

Create the windows using two 28 x 20 px rounded rectangles (#3F3330)
with a 4 px Corner Radius, which we
will horizontally distance at 2 px from
one another, which we will group (Control-G)
and then center align at a distance of 2
px
from the larger body’s top edge.

adding the two windows to the buss main body

Step 10

Add the horizontal divider line using a 74 x 2 px rectangle (#3F3330), which we
will position at a distance of just 2 px
from the bus’s windows, making sure to center align it to
them before moving on to the next step.

adding the horizontal detail line to the buss main body

Step 11

Create the smaller detail segments using fourteen 2 x 1 px rectangles (#3F3330), which we will place at a horizontal distance of 2 px from
one another, grouping (Control-G)
and then positioning them below the shape from the previous step.

adding the smaller horizontal detail lines to the buss main body

Step 12

Add the smaller rectangular light using a 2 x 4 px rectangle (#3F3330), which we will position at a distance
of 2 px from the larger body’s
bottom-left corner.

adding the smaller rectangle light to the left side of the buss body

Step 13

Create the larger light using a 12
x 4 px
rectangle (#3F3330), which we will position at a distance of 2 px from the smaller one’s right edge.

adding the larger rectangular light to the left side of the buss body

Step 14

Add the circular light using a 2
x 2 px
circle (#3F3330), which we will position above the gap created by
the two rectangular lights, at a distance of just 2 px.

adding the circular light to the left side of the buss body

Step 15

Star working on the left windshield wiper by creating the base using a 6 x 2 px rectangle (#3F3330), which we
will position above the larger rectangular light, at a distance of just 2 px from its top and right edges.

adding the windshield wipers base to the left side of the buss main body

Step 16

Create the wiper’s end section using a 2 x 12 px rectangle (#3F3330), which we will position onto the
right side of the bus, at a distance of 8
px
from its base.

adding the windshield wipers end piece to the left side of the buss main body

Step 17

Finish off the wiper by drawing the diagonal body using a 2 px thick Stroke (#3F3330) starting from the center of the base all the way
up to the top of the end piece. Once you’re done, select and group all of the
current section’s composing shapes together using the Control-G keyboard shortcut.

drawing the windshield wipers body to the left side of the buss main body

Step 18

Select and group (Control-G)
all the left-sided details, and then use a copy (Control-C > Control-F) of them to add the right-sided ones, making sure to vertically reflect them once you have them in place (right click > Transform > Reflect
> Vertical
).

adding the right sided details to the buss main body

Step 19

Add the side lights using two 4 x 4 px squares (#3F3330), which we
will position onto the outside of the bus’s larger body, so that they’re in line with the inner rectangular lights.

adding the side lights to the buss main body

Step 20

Start working on the left side mirror by
creating its main body using a 6 x 12 px
rectangle (#3F3330), which we will position at a distance of 2 px from the vehicle’s main body and 4 px from its roof.

creating and positioning the main shape for the buss left side mirror

Step 21

Finish off the mirror by adding an 8 x 2 px rectangle (#3F3330) on top of
it, followed by a smaller 4 x 2 px one
(#3F3330) towards its bottom. Once you’re done, select and group all three
shapes together using the Control-G
keyboard shortcut.

adding the support arms to the buss left side mirror

Step 22

Create the right mirror’s main body using a 6 x 8 px rectangle (#3F3330), which we
will position at a distance of 2 px from
the larger body and 10 px from its
roof.

creating and positioning the main shape for the buss right side mirror

Step 23

Add the support arms by positioning an 8 x 2 px rectangle (#3F3330) underneath
the mirror’s main body, followed by a smaller 4 x 2 px one (#3F3330) towards its top. Once you’re done, select
and group (Control-G) all of the
mirror’s composing shapes together, doing the same for the larger body
afterwards.

adding the support arms to the buss right side mirror

Step 24

Create the main shapes for the vehicle’s front
bumper using a 70 x 8 px rectangle
(#55AA9A) with a 4 px thick outline
(#3F3330), which we will group (Control-G)
and then position below its larger body so that their outlines end up
overlapping.

creating and positioning the main shapes for the buss front bumper

Step 25

Start adding details to the bumper by creating a
26 x 2 px rectangle (#3F3330), which
we will center align to its larger composing shapes.

adding the center detail rectangle to the buss front bumper

Step 26

Add the vertical delimiters using two 4 x 8 px rectangles (#3F3330), which we
will position at a distance of 4 px from
the center piece’s side edges.

adding the vertical delimiters to the buss front bumper

Step 27

Create the side insertions using two 8 x 2 px rectangles (#3F3330), which we will position in the center
of the space created by the bumper and the vertical delimiters.

adding the side insertions to the buss front bumper

Step 28

Add the bumper’s side sections using two 4 x 8 px rectangles (#3F3330), which we will position on the
outside of its main body.

adding the side sections to the buss front bumper

Step 29

Create another larger 66 x 6 px rectangle,
which we will color using #3F3330 and then position below the bumper’s main
body.

adding the larger rectangle to the bottom of the buss front bumper

Step 30

Add the wheels using two 12 x 8
px
rounded rectangles (#3F3330) with a 2
px Corner Radius
, which we will position as seen in the reference image, at
a distance of 4 px from its sides.

adding the wheels to the buss front bumper

Step 31

Finish off the current section by adding an 18 x 2 px rectangle, which we will color using #3F3330 and then
position below the bumper’s bottom detail rectangle. Once you’re done, select
and group (Control-G) all of the
current section’s composing shapes together, doing the same for the entire bus
afterwards.

adding the bottom detail rectangle to the buss front bumper

Step 32

Finish off the icon by adding the little road strip, using an 8 x 12 px rectangle (#3F3330), which we
will adjust by individually selecting and pushing its top anchor points to the
inside by a distance of 2 px (right click > Transform > Move >
Horizontal > + / – 2 px
depending on which side you start with). Once
you’re done, position the resulting shape at a distance of 2 px from the bus’s bottom, selecting and grouping (Control-G) all its composing sections
together before moving on to the next icon.

finishing off the bus icon

7. How to Create the Tram Icon

We are now down to
our third and last icon, so without wasting any more time, make sure you’re on
the right layer (that would be the fourth one) and let’s finish this.

Step 1

Kick things off by creating the circular background using a 120 x 120 px circle, which we will
color using #FF8D60 and then center align to the third active drawing area.

creating and positioning the main shape for the tram icons background

Step 2

Start working on the vehicle’s pantograph by creating an 18 x 6 px rectangle (#55AA9A) with a 4 px thick outline (#3F3330), which we
will group (Control-G) and then
center align to the circular background, positioning them at a distance of 20 px from its top edge.

creating and positioning the main shapes for the trams roof

Step 3

Add the little rectangular insertion using a 6 x 3 px rectangle (#3F3330), which we will center align to the two
shapes’ bottom edge.

adding the rectangular insertion to the bottom of the trams roof

Step 4

Create another slightly larger 14
x 4 px
rectangle, which we will color using #3F3330 and then position on
top of the roof section, making sure to center align it to the larger shapes.

adding the rectangular detail shape to the trams roof

Step 5

Take a couple of moments and draw the pantograph’s rail using a 2 px thick Stroke line (#3F3330), using the reference image as your main guide.
Once you’re done, select and group (Control-G)
all of the current section’s composing shapes together before moving on to the
next step.

adding the rail to the trams pantograph

Step 6

Create the tram’s roof using a 50 x 6 px rectangle (#CBF7EC) with a 4 px thick outline (#3F3330), and a 30 x 3 px rectangle (#3F3330) aligned
to their top edge, grouping and positioning all three shapes right underneath
the pantograph.

creating and positioning the main shapes for the trams upper body

Step 7

Add the body’s upper section using a 42 x 26 px rectangle (#55AA9A) with a 4 px thick outline (#3F3330), which we will group (Control-G) and then position below its roof.

creating and positioning the main shapes for the trams window section

Step 8

Add the front windows using three 10
x 18 px
rectangles (#3F3330) with a 4
px
top Corner Radius and a 2 px bottom one, which we will horizontally stack 2 px from one another, grouping (Control-G) and then positioning them in the center of the larger rectangles. Once you’re done, select and group (Control-G) all of the current section’s
shapes as well before moving on to the next step.

adding the three windows to the trams window section

Step 9

Create the tram’s bottom section using a 42 x 20 px rectangle (#CBF7EC) with a 4 px thick outline (#3F3330), which we will group (Control-G)
and then position below the previously grouped shapes.

creating and positioning the main shapes for the trams bottom section

Step 10

Add the smaller center section using a 12 x 20 px rectangle with a 4 px thick Stroke (#3F3330), which we will center align to the
shapes from the previous step.

adding the smaller center section to the trams bottom section

Step 11

Add the center lights using two 4 x 4 px circles (#3F3330), vertically
stacked 2 px from one another,
which we will group (Control-G) and
then position at a distance of 2 px from
the center section’s top edge.

adding the center circular lights to the trams bottom section

Step 12

Create the bottom rectangular insertion using a 4 x 4 px square (#3F3330), which we
will center align to the center section’s bottom edge.

adding the bottom rectangular insertion to the trams bottom section

Step 13

Add the side insertions using two 4 x 4 px squares (#3F3330), which we
will position on the outer edges of the center section, at a distance of just
2 px from its bottom edge.

adding the rectangular side insertions to the trams bottom section

Step 14

Create the left and right horizontal detail
lines using two sets of two 15 x 2 px rectangles
(#3F3330) vertically stacked 2 px from
one another, which we will group (Control-G)
and then position onto the sides, at a distance of just 2 px of the larger section’s top edge.

adding the horizontal detail lines to the trams bottom section

Step 15

Finish off the current section by adding the
smaller circular lights using two 2 x 2
px
circles (#3F3330), which we will individually position at a distance of 2 px from the larger outline’s bottom
corners. Once you’re done, select and group (Control-G) all its composing shapes before moving on to the next
step.

adding the smaller circular lights to the trams bottom section

Step 16

Start working on the bumper by creating a 50 x 8 px rectangle (#55AA9A) with a 4 px thick outline (#3F3330), which we
will group (Control-G) and then
position below the previous section.

creating and positioning the main shapes for the trams front bumper

Step 17

Add the center detail using an 18 x 2 px rectangle, which we will
color using #3F3330 and then center align to the shapes that we’ve just
grouped.

adding the center detail rectangle to the trams front bumper

Step 18

Create the bumper’s bottom insertions using two 6 x 4 px rectangles (#3F3330), which we
will position at a distance of 2 px from
its outer edges.

adding the bottom rectangular insertions to the trams front bumper

Step 19

Add the bumper’s side pieces using two 4 x 8 px rectangles (#3F3330), which we
will position onto the outer edges of the larger rectangles, as seen in the
reference image.

adding the side pieces to the trams front bumper

Step 20

Move a few pixels towards the bottom and create
a 46 x 4 px rectangle (#3F3330),
which we will position below the bumper itself.

adding the bottom detail rectangle to the trams front bumper

Step 21

Create another smaller 54 x 2 px rectangle, which we will color using #3F3330 and then
position below the one from the previous step.

adding the smaller bottom detail rectangle to the trams front bumper

Step 22

Finish off the current section by creating a 38 x 4 px rectangle (#3F3330) with a 2 px bottom corner Radius, which we will position below the tram’s bottom section.
Once you’re done, select and group (Control-G)
all its composing shapes before moving on to the next step.

adding the bottom detail to the trams front bumper

Step 23

Create the left handrail using a 2 x 46 px rectangle (#3F3330), which we
will position onto the side of the tram, between its roof and front bumper.

creating and positioning the main shape for the trams left handrail

Step 24

Add the handrail’s support arms using two 4 x 2 px rectangles (#3F3330), which we
will position onto its right side, at a distance of 6 px from its top and bottom edges. Once you’re done, select and
group all three shapes together using the Control-G
keyboard shortcut.

adding the support arms to the trams left handrail

Step 25

Create the right handrail using a copy (Control-C > Control-F) of the one
that we’ve just finished working on, which we will vertically reflect (right click > Transform > Reflect
> Vertical
) and then position on the opposite side of the tram’s body.
Once you’re done, select and group (Control-G)
all of the tram’s composing sections before moving on to the next step.

adding the trams right handrail

Step 26

Finish off the tram, and with it the icon itself,
by taking a couple of moments and drawing the three rail segments using a 4 px thick Stroke with the color set to #3F3330. Once you’re done, select and
group (Control-G) all of the icon’s
composing sections before saving the finished project.

finishing off the tram icon

It’s a Wrap!

There you have it, fellow icon lovers—a nice little pack created using
the most basic geometric shapes and tools that one can find within Illustrator.
As always, I hope you’ve enjoyed the tutorial and managed to learn something new
and useful along the way.

finished project preview

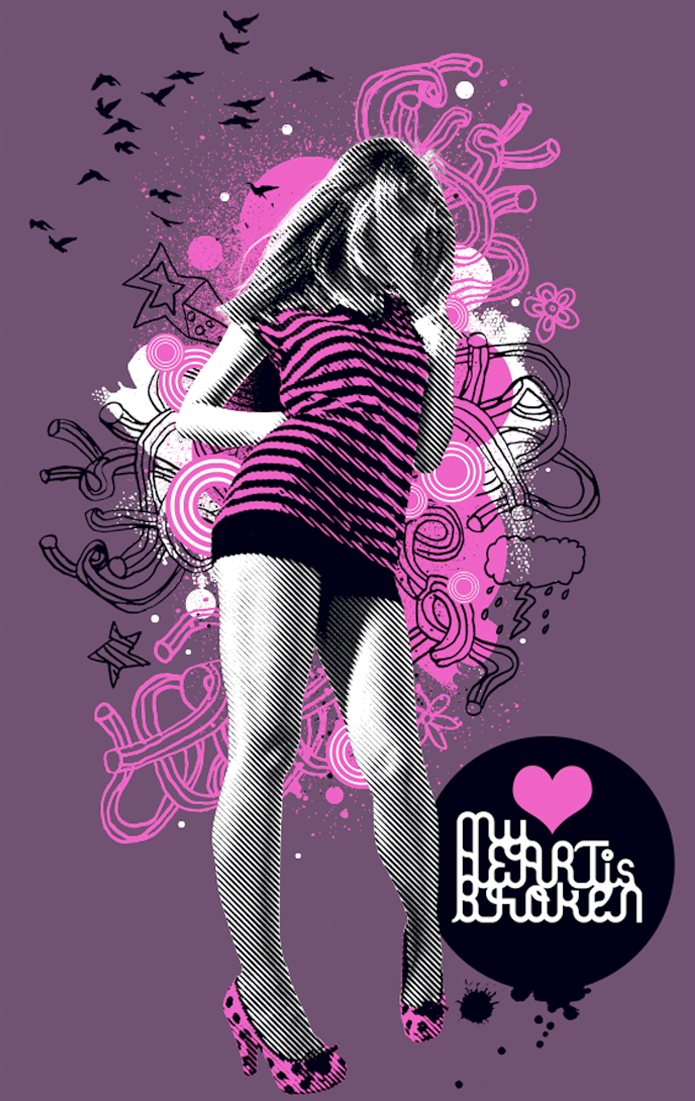
Create a Three-Color Illustration for Screen Printing

Post pobrano z: Create a Three-Color Illustration for Screen Printing

Final product image
What You’ll Be Creating

This tutorial was originally published in February 2009 as a Tuts+ Premium
tutorial. It is now available free to view. Although this tutorial does
not use the latest version of Adobe Photoshop, its techniques and
process are still relevant.

This tutorial shows step by step how to create separated artwork for a screen-printed T-shirt. Screen printing is regarded as the best method of printing onto apparel because of the quality it produces. It should not be confused with the inferior four-color heat transfer printing, which does not look as good or last as long.

The tutorial also demystifies how to manage special or spot colors using Photoshop’s channels.

To start off, you’ll assemble a CMYK illustration, and then create a convincing mockup on a T-shirt. You’ll then make full use of Photoshop’s selection tools to create the necessary channels for screen printing, and you’ll discover how certain colors will maintain their vivacity by under-printing with white. Finally, you’ll apply the often misunderstood concept of trapping to your artwork to counteract any slight misalignment that may occur on press.

Want to add cool effects to your images? Browse our incredible selection of Photoshop Actions from GraphicRiver and Envato Elements to add artistic effects like the ones below.


1. How to Edit the Initial Image

Step 1

Note: The images included with this tutorial are no longer available, so feel free to use your own stocks.

Open a girl image. You’ll be isolating the figure next, so trim the excess background with the Crop Tool (C) as shown.

Edit the Initial Image

Step 2

Choose the Pen Tool (P) with it set to the Paths option to carefully plot your paths around the girl—don’t sweat over the hair because you’ll fix that later. I’ve stroked the path with red for clarity in the screengrab. Now select the Subtract From Path Area option to create the inner path on her right arm.

Remember to use the Alt, Command and Shift modifier keys as you work. You can also fine-tune your path by holding the Command key to access the Direct Selection Tool to adjust the direction/anchor points.

Edit the Initial Image

Step 3

Now we’ll make a density mask for the hair. Switch to the Channels palette and cycle through each one in turn to determine which holds the most contrast for the hair—in this instance it’s the „Blue” one. Duplicate it by dragging its thumbnail onto the Create New Channel icon, and then hit Command-L to access the Levels dialogue box. Increase the contrast by setting the Midpoint to 0.25 and the Whitepoint to 235.

Edit the Initial Image

Step 4

Switch to the Paths palette and Command-click your path thumbnail to generate a selection. Now, back in your Channels palette, target the „Blue copy.” Ensure white is set as your Foreground Color, and hit Delete to fill the selection with black. Don’t deselect just yet.

It’s worth remembering that you can fill channel selections with white by switching the foreground color to black (press X) and hitting Delete.

Edit the Initial Image

Step 5

The mask is looking good apart from the right-hand shadow. Hit Shift-Command-I to Inverse the selection, and then enable the visibility of the top composite channel (you can also Double-click the channel thumbnail to adjust its opacity to suit). Use a large, white Hard Brush to Erase the right-hand shadow and hair.

Edit the Initial Image

Step 6

Zoom in and continue Erasing the hair using a smaller brush to create a clean edge. Remember to toggle the visibility of the composite channel as you work.

Edit the Initial Image

Step 7

Now go to Image > Adjustments > Black and White and use the drop-down menu to select the High Contrast Red Filter preset.

Edit the Initial Image

2. How to Create the Background

Switch to the Channels palette and Command-click the „Blue copy” thumbnail to generate a selection. Inverse, and then target the top composite channel and Copy it to the clipboard. Now use the Color Picker to select 63C, 76M, 38Y, and 22K as your background color. Create a New Document 7.5″ wide x 12″ high, with a Resolution of 300 dpi (print resolution). Set the Color Mode to CMYK and the Background Contents to Background Color.

Now Paste your selection as a New Layer, and go to Layer > Matting > Defringe by 2 px to erase the white halo and Transform as shown. This purple background is only a visual representation of the T-shirt color.

Create the Background

3. How to Create the Halftone Effect

Step 1

Generate a Selection from the layer by Command-clicking its thumbnail, and then switch to the Channels palette. Click on the Create New Channel icon and then Fill the selection with white, labeling it „Girl Alpha.” It’s always a good idea to store commonly used selections as alpha channels, as you’ll see later.

Create the Halftone Effect

Step 2

Screen inks tend to spread a little—this is one of the reasons why screen printing doesn’t do a very good job of printing fine halftones, at least compared to other printing methods. When dots increase in size, they cause the tints in the image to grow darker, which is technically known as dot gain.

To combat this, we’ll integrate a coarse line halftone to the girl as part of the design, but first we need to bump the contrast by adding a Levels Adjustment, setting the Blackpoint to 64, the Midpoint to 0.88, and the Whitepoint to 216.

Create the Halftone Effect

Step 3

Add a white filled New Layer below the girl, highlight both layers, and hit Command-E to Merge them. We now need to make a bitmap halftone of the girl—the best way to achieve this is in a new document, so Select All and Copy to the clipboard.

Create the Halftone Effect

Step 4

Create the New Document using the clipboard as the preset and setting the Color Mode to Greyscale. Paste your selection and Merge Down. Now go to Image > Mode > Bitmap, and under Method choose Halftone Screen. In the next dialogue box, use the following settings: Frequency: 22, Angle: 45, and Shape: Line.

Create the Halftone Effect

4. How to Create the Line Art

Step 1

Select All and Copy > Paste into your working document and label it „Girl lineart.” Next, set the Blending Mode to Multiply and Delete the original girl layer.

Create the Lineart

Step 2

Make a Selection from the „Girl Alpha” channel, add a New Layer beneath the girl, and Fill the selection with white. Label the layer „White fill.” Now place the „Girl lineart” and „White fill” layers into a Group folder labelled „GIRL.”

Create the Lineart

Step 3

We’re now going to Fill the girl’s shirt and shoes with pink; first draw some closed paths (indicated in red on the screengrab) that extend outside the figure as shown—you’ll be using the extra channel to fix these areas next.

Create the Lineart

5. How to Add Color

Click on your Foreground Color to access the Color Picker, and select Color Libraries. In the next dialogue box, select PANTONE solid uncoated, then PANTONE 238—rather than using the slider, you can access it by typing 238 swiftly. We’ll be using this four-color equivalent to create the CMYK illustration before using the spot color channels in the final steps.

Generate a path-based Selection, add a New Layer above the „White fill”, and label it „Pink clothes.” Now Fill the selection with the Foreground Color. Next, make a Selection from the „Girl Alpha” channel, ensure the new layer is targeted, Inverse and hit Delete to trim away the excess.

 Add Color

6. How to Add Graphics

Step 1

Note: The images included with this tutorial are no longer available, so feel free to use your own stocks.

Open a brushstroke image and choose the Magic Wand Tool (W), setting the Tolerance to 44 and Unchecking the Contiguous option. Now click within the black area to generate a Selection, fill with white, and Copy to the clipboard. Close, but don’t save the file as you’ll be needing it later.

Add Graphics

Add a New Group folder within your working document below the Girl and label it „WHITE GRAPHICS.” Paste the selection within the folder, label it „Paint 1”, and Transform as shown. Follow the same procedure using another brushstroke image, and then feel free to Duplicate/Transform and label accordingly.

You’ll be Pasting a lot of elements throughout this tutorial, so remember to use the Defringe command. A setting of 1-2 pixels is usually enough to remove any white halo.

Add Graphics

Step 2

Add a New Group folder below the Girl and label it „PINK GRAPHICS.” Open a line-based graphic and convert to CMYK mode, and then use the same selection techniques to Fill with PANTONE 238.

Now Copy > Paste into the new group folder, Transform as shown and label it „Squiggle 1.”

Add Graphics

Step 3

Paste the same graphic using the same method. Feel free to Duplicate and Transform as required. Next, open a spray image and use the same technique again, positioning it behind the figure. Remember to name your layers—this will make things much easier later.

Add Graphics

Step 4

With PANTONE 238 as your Foreground Color, use the Custom Shape Tool (U) with the Ellipse and Fill Pixels options selected to add some circles behind the girl. When using the Fill Pixels option, you need to add a New Layer beforehand, so the shapes will be drawn on independent layers. This way they can be positioned and resized as required.

Add Graphics

Step 5

Create a new 600 px by 600 px sized CMYK Document, with a Resolution of 300 dpi and the Background Contents set to Transparent. We now need to add some central guides; a quick way to do this is to work in Full Screen Mode, and then snap the Crop Tool (C) to the document bounds. Now drag in your guides, which will snap to the crop tool’s centre points, and then cancel the crop prompt.

Next, make sure PANTONE 238 is set as the Foreground Color. Select the Custom Shape Tool using the same Ellipse and Fill Pixels options as before. Use the drop-down menu to select Fixed Size and type 550 px in the Width and Height fields, and then check the From Center option. Now click in the centre of your canvas to create the shape.

Add Graphics

Step 6

Switch your Foreground Color to white and add another circle set to 500 px by 500 px on the same layer. Continue adding alternating color circles, each one Decreasing in size by 50 px. When you’ve completed the last white circle, use the Magic Wand Tool (set to Contiguous) to select it and hit Delete.

Add Graphics

Step 7

Drag and Drop the graphic at the top of the layer stack within the „PINK GRAPHICS” folder. Next, Duplicate, Resize and Position as required. Feel free to add variations of the circles (I created a version with a pink fill). When you’re happy, highlight their layer thumbnails and Merge. You can now label the resulting layer „Bullseyes.”

Add Graphics

Step 8

Open the second brushstroke image again and Convert it to CMYK mode. Fill with PANTONE 238 and Copy > Paste at the top of the layer stack within the „PINK GRAPHICS” folder.

Add Graphics

Step 9

Follow the same techniques with flower images and position as shown.

Add Graphics

Step 10

Now open the line files again and use the same selection techniques to Copy > Paste into a New Group folder labelled „BLACK GRAPHICS.” Ensure this folder is positioned above the „PINK GRAPHICS” folder.

Add Graphics

Step 11

Open the spray file again, make a Selection and Copy > Paste at the top of the stack within the „BLACK GRAPHICS” folder, and position it behind the girl as shown.

Add Graphics

Step 12

Use the same method to add the remaining hand-drawn elements; they’ll include additional clouds and stars.

Add Graphics

Step 13

Download and open the birds image, select the birds with the Magic Wand Tool (with Contiguous Unchecked), and Copy > Paste at the top of the layer stack within the „BLACK GRAPHICS” folder. Now resize and position to the left—also feel free to delete individual birds with the Eraser Tool (E).

Next, generate a Selection from the „Bullseyes” layer and, with the „BLACK GRAPHICS” folder targeted, go to Layer > Layer Mask > Hide Selection.

Add Graphics

Step 14

Add a New Layer at the top in the „BLACK GRAPHICS” folder, and draw a black circle as shown with the Elliptical Custom Shape Tool (using Fill Pixels). Next, open a splash image and use the Magic Wand Tool (with Contiguous Unchecked) to select, Copy > Paste above the circle later, and then Transform and Merge Down.

Add Graphics

7. How to Add Lettering

Create your own lettering and Drag/Drop above the circle. Then add a PANTONE 238 heart on a New Layer using the Custom Shape Tool (set to Fill pixels). Now’s the time to scrutinize your image and carry out any amendments: I added some small white circles on a new layer within the „WHITE GRAPHICS” folder. Once you’re happy, Save but don’t close it.

Add Lettering

8. How to Create a T-Shirt Mockup

Step 1

Now we’ll mock the finished design onto a T-shirt. I drew inspiration from this Go Media tutorial.

Download and open the wood image, and then go to Image > Rotate Canvas > 90 Degrees CW. Next, create a new 300 dpi, RGB document 10 cm by 10 cm, and then Drag/Drop the wood as a New Layer, Transform and Merge Down.

Create a T-shirt Mockup

Step 2

Download and open the T-shirt image, and Crop it. Make a Selection and Copy > Paste as a new layer in your working document. Give it some depth by adding a Drop Shadow. I used the following settings: Blending Mode: Multiply, Opacity: 75, Angle: 50, Distance 6, and Size: 21.

Create a T-shirt Mockup

Step 3

To alter the T-shirt color; click Create New Fill or Adjustment Layer and use the drop-down menu to select Color Fill, and then pick the same purple used in your CMYK illustration (63C, 76M, 38Y and 22K). Don’t worry about this altering the color of the wood—we’ll fix that later.

Create a T-shirt Mockup

Step 4

Back in your CMYK illustration, access the History palette (Window > History) and use the pull-out menu to create a New Snapshot. Delete the purple background layer and target the „Girl lineart” layer.

Next, use the Magic Wand Tool (set to Contiguous) to select the white background (it’s there, just not visible because the layer’s Blending Mode is set to Multiply) and hit Delete. Finally, press Shift-Command-E to Merge Visible.

Create a T-shirt Mockup

Step 5

Drag/Drop the resulting layer into your T-shirt document above the Color Fill, and label it „Illustration.” Resize to fit the T-shirt—this is best done in stages, adding small amounts of Smart Blur each time to retain the sharpness. Now switch to your CMYK illustration and click on the Snapshot you created in the previous step to restore its saved state.

Create a T-shirt Mockup

Step 6

To make the print look realistic, Duplicate the T-shirt layer and position it at the top of the layer stack, and label it „T-shirt multiply.” Now set the Blending Mode to Multiply and drop the Opacity to 70%.

Create a T-shirt Mockup

Step 7

Target the T-shirt multiply layer and Alt-click between the Illustration, Color fill and the original T-shirt layer icons to create a clipping group. This has now made the non-transparent areas of the uppermost layer serve as a Mask for the clipped layers. Because clipping groups use one mask, there is no edge interference from underlying layers.

Create a T-shirt Mockup

Step 8

As a finishing touch, drop in the original illustration at full size above the „Wood” layer. Duplicate and position either edge of the canvas. Now set both layers’ Blending Mode to Soft Light so as not to overpower the illustration.

Create a T-shirt Mockup

Step 9

That’s the T-shirt mockup complete. Remember it’s also very quick to visualize how your design will look on different colored material by simply adding Color Fill Adjustment Layers and toggling their Visibility. Your screen printer will also be able to supply various material swatches, so it’s just a case of matching them on-screen.

Create a T-shirt Mockup

9. How to Set Up Your Art for Screen Printing

Step 1

In the final part of this tutorial you’ll be creating the artwork for screen printing. Revisit your CMYK illustration and hit Shift-Command-S to Save As, giving it a memorable name such as „Spot_col_artwork.”

The white ink will be printed first, followed by the pink and then the black. To optimize the pink ink, it’s best to add white beneath it. Sometimes your printer will add a double pass of white ink, depending on the darkness of the material being printed. 

The thing to bear in mind is that you need to build in a certain amount of trapping to these white areas. This means contracting (choking) or expanding (spreading) areas to compensate for any slight shift which may occur when the T-shirt is printed. The diagram bottom left shows what may happen with no trapping—as you can see, the T-shirt material is showing through. You’ll learn more about this later.

Setup Your Art for Screen Printing

Step 2

Disable the Visibility of all folders except for the „WHITE GRAPHICS” folder and the colored „Background” layer. With the „WHITE GRAPHICS” folder targeted, hit Command-E to Merge Group.

Setup Your Art for Screen Printing

Step 3

Generate a Selection from the resulting layer and switch to the Channels palette. Use the fly-out menu to select New Spot Channel, label it „White”, and then click the Color Swatch to access the Color Picker. Now set the CMYK values to 0 and click OK—the active selection will now appear as black on the new channel.

You’ll notice that by toggling the visibility of the „CMYK” composite channel, the „White” channel appears either black or white, which is correct—all artwork on spot channels is represented in black, regardless of its actual printing color.

Setup Your Art for Screen Printing

Step 4

Move the „Bullseyes” layer out of the „PINK GRAPHICS” folder so it sits beneath the „BLACK GRAPHICS” folder, and then Merge the „PINK GRAPHICS” folder. We now need to add this layer content to the „White” channel, but first we need to choke or shrink it. Most printers work in points, and I was given a trap value of half a point (0.5 pt), but different printers’ trap requirements will vary, so it’s vital to check beforehand.

Here’s a little equation to convert points into pixels: There are 72 points to an inch, so to find out how many half points there are to the inch, divide 72 by 0.5, which equals 144. Now divide the document resolution, (which is 300) by 144, which makes a trap value of 2.

Generate a Selection from the merged pink layer and go to Select > Modify > Contract by 2 px. Now target the „White” channel and Fill the selection with black.

Setup Your Art for Screen Printing

Step 5

Generate a Selection from the „Bullseyes” layer, Contract by 2 px, and then Fill the active selection with black on the „White” channel. Next, generate a Selection from the „Girl Alpha” channel and Fill with black on the „White” channel also.

Setup Your Art for Screen Printing

Step 6

Make a Selection from the „Pink clothes” layer, Contract by 2 px, and then Inverse. Now pick a small, white Hard Brush and carefully paint out the outer shoe edges on the „White” channel.

Setup Your Art for Screen Printing

Step 7

Generate a Selection from the „Lettering” layer and Expand by 2 px. Now fill this with black on the „White” channel. Do the same using an Expanded selection from the „Heart” layer. These areas are now spread, to run fractionally behind the black circle.

Setup Your Art for Screen Printing

Step 8

Make a Selection from the merged „Pink graphics” layer, and then add another spot channel. Select PANTONE 238 as you did before and label it „PANTONE 238.” The active selection will now appear as black on the new channel—you can check this by disabling the visibility of the „White” channel.

Setup Your Art for Screen Printing

Step 9

Generate a Selection from the „Bullseyes” layer and Fill with white on the „PANTONE 238” channel.

Setup Your Art for Screen Printing

Step 10

Zoom in and use the Magic Wand Tool (with Contiguous Unchecked) to select just the pink areas from the „Bullseyes” layer. You’ll need to have the Visibility of the „Bullseyes” layer as well as the composite „CMYK” channel targeted to do this. Now Fill this selection with black on the „PANTONE 238” channel.

Setup Your Art for Screen Printing

Step 11

Fill a Selection from the „Girl Alpha” channel with white on the „PANTONE 238” channel.

Setup Your Art for Screen Printing

Step 12

Now Fill a Selection from the „Pink clothes” layer with black on the „PANTONE 238” channel.

Setup Your Art for Screen Printing

Step 13

Generate a Selection from the „Heart” layer. This area needs spreading behind the black circle, so Expand by 2 px and Fill with black on the „PANTONE 238” channel.

Setup Your Art for Screen Printing

Step 14

Merge the „BLACK GRAPHICS” folder and generate a Selection. Add another Spot Channel, label it „Black,” and click the Color Swatch to access the Color Picker. Set the CMYK values to 70c, 70m, 100k. Using a CMYK setting for spot black ink will not affect the ink color—it’s only an on-screen representation. As long as your channels are clearly labelled, that’s all that matters.

The active selection should now be filled with black on the new channel. Next, Fill the „Black” channel with white using a selection from the „Bullseyes” layer.

Setup Your Art for Screen Printing

Step 15

Now Fill the „Black” channel with white using a selection from the „Girl Alpha” channel. As the black ink overprints print last, there’s no need to apply any trapping.

Setup Your Art for Screen Printing

Step 16

Fill a Selection from the „Circle” layer with black on the „Black” channel. Now make a selection from the „Lettering” layer and fill with white. Repeat using a Selection from the „Heart” layer.

Setup Your Art for Screen Printing

Step 17

Generate a Selection from the „Girl Alpha” channel, and then target the „Black” channel. Now use a white Hard Brush and paint within the selection to reveal her left leg.

Setup Your Art for Screen Printing

Step 18

Now use the Magic Wand Tool (with Contiguous Unchecked) to make a Selection of the black areas on the „Girl lineart” layer. Now Fill with black on your „Black” channel.

Setup Your Art for Screen Printing

Step 19

You can check the trapping by Enabling the Visibility of the three spot channels, and then Zooming in to 200%. Now generate Selections from your „White” and „PANTONE 238” channels in turn. The screengrab below shows a selection from the „White” channel—the white lettering and the base white (under the pink heart) have both been spread under the black.

Setup Your Art for Screen Printing

Step 20

All you need to do now is Enable the „CMYK” composite channel and Delete all your layers apart from the background, which you can rename „T-shirt color.” Finally, Save, ensuring that you check the Spot Color option. That’s it—your PSD file is good to go.

Setup Your Art for Screen Printing

Conclusion

I hope this tutorial has cleared up some common misconceptions a lot of designers have about using spot colors for screen printing, as well as how and when to apply trapping to your artwork. I would like to credit my daughter Chloe for drawing the doodles, as well as a big thanks to Steve at Advertees who always offers great technical support, and for casting his expert eye over my final artwork to ensure it was error-free!

If this has inspired you to make your own T-shirt designs, remember it’s good practice to involve your printer at the initial design stage to see what’s achievable. Have fun!

The final image is below. Or you can view the large version.

Three Color Illustration for Screen Printing Photoshop Tutorial

Halftone Effects From GraphicRiver

Want to create a cool halftone effect for your photo? Then download one of the amazing Halftone Photoshop Actions from GraphicRiver to jazz up your photos today. Check out one of our favorites below!

Halftone Photo Effect Photoshop Action

Create an awesome halftone effect in only a few seconds with this awesome Photoshop action. This action is fully editable and allows you to play with additional effects to add dots, lines, or swirls to your photo. Transform your photos with this super fun Photoshop action!

Halftone Photo Effect Photoshop Action

Popular Design Trends of 2017

Post pobrano z: Popular Design Trends of 2017

Vibrant patterns and gorgeous colors are in full bloom for 2017. Check out a few of our favorite design trends below.

Popular Design Trends of 2017

2017 looks to be the year of bold color! It all began with Pantone announcing its Color of the Year as:

„Greenery, a symbol of new beginning.”

Cool Green Business Stationery

The zesty, green-yellow shade is fun and inviting, and has been received well by many designers. With a shift in focus towards healthier foods, and growing concerns over the environment, the vibrant green lends itself as a refreshing symbol of rebirth and new beginnings.

So what else is in store for this year? Let’s dive into some of the hottest trends currently hitting the industry.

Looking for more trendy resources? Browse Envato Market and Envato Elements for more high-quality templates.

1. Rose Gold With Marble

Who knew there could be a more winning combination of color and texture than rose gold and marble? The simplicity of this light stone texture against the elegance of rose gold makes for one sublime team.

Back in its day, marble was the quintessential material used by sculptors during the Age of Enlightenment. Greco-Roman artists continued to use this luxurious stone as a cultural symbol of refined taste.

And of course, you can’t have luxury without a little gold! Going back several centuries, the value of gold remains a distinct reflection of extraordinary taste and style.

Not sure how to work with texture? Instructor Grace Fussell shows you how to apply lovely gold foiling to your print designs in the tutorial below.

One way to utilize this trend is for a modern set of business cards. This template, for example, showcases a stunning combination of marble and gold elements for a chic, minimalist vibe.

Gold Marble Business Card Template

You can also create classy designs for your restaurant menu. The clean aesthetic of marble provides a great background accent for any project. Sprinkle in a few rose gold titles as a lovely accessory like this delightful menu design.

Classy Food Menu 7 Template

Or elevate your logos with a stunning rose gold text effect instead. With layer styles, you can achieve professional quality graphics in only a fraction of the time. This package, for instance, includes eight fully layered Photoshop files to transform any text or smart object.

3D Gold Text Styles
3D Gold Text Styles

Pair the rose gold text above with this set of marble textures for a brilliant result! Featuring six high-resolution images at 3000 x 2000 pixels, this pack contains several common marble textures for more variety.

Marble Textures Pack 1

Or why not just combine the two together? Go for bold design with this jaw-dropping texture pack featuring 12 gold marble textures. Perfect for labels, packaging, and brand identities, this awesome pack is one we’re sure you’ll love.

Gold marble texture patterns
Gold Marble Texture Patterns

2. Tropical Leaves

Kick off your summer design essentials by incorporating some tropical leaves into your work. This trend has recently popped up in many unique poster designs, highlighting the beauty of tropical plants.

The types of plant most commonly seen are birds of paradise, areca palms, or lovely philodendrons. These healthy plants provide exceptional, inspiring colors that add life to your creative projects.

Our very own Grace Fussell took this challenge on by creating a stunning Wedding Invitation using a few leafy stocks.

Nature-based design always has a refreshing quality to it, and this tropical pattern is no different! Just imagine the lovely breeze as it shuffles through the vibrant green leaves. Need some project inspiration? This pattern works great for posters, websites, and more.

Tropical Leaves PattTropical Leaves Pattern
Tropical Leaves Pattern

If you’d prefer to have the leaves as separate design elements instead, then check out this awesome pack! This pack includes a mix of watercolor tropical leaves to beautify any design. Designed in Adobe Illustrator, this file is already print ready for fast results.

Learn how to create a tropical pattern yourself in this tutorial by Yulia Sokolova.

Vector Watercolor Tropical Leaves

Make a bold statement by mixing stunning typography with tropical elements. This exotic poster design features a tropical aesthetic that is definitely on trend, with two high-resolution Photoshop files for easy editing.

Exotic Summer Flyer
Exotic Summer Flyer

In this awesome bundle, you’ll get access to 30 seamless tropical patterns. Ideal for stationery and design projects, these patterns will help bring paradise to you!

Tropical Romance Patterns Bundle

Become the hero of summer! Throw a luau party your guests won’t forget! This sweet party invitation features a few tropical leaves alongside colorful fruit. Just switch out the text by clicking on the fully editable text holders.

Luau Party Invitation

3. Unicorns & Mermaids

Some of your favorite mythical creatures are also in full effect for 2017. Unicorns and mermaids are legendary creatures commonly known from ancient folklore. Even today, they captivate the imagination of designers around the world.

Unicorns symbolize purity and innocence. Try pairing them with a rainbow to show off their whimsical humor and overall bright energy.

Mermaids are seductive and charming. They help you create enticing designs with the help of allure and mystery.

Love mermaids too? Monika Zagrobelna shows you how to magically change any vacation selfie into a beautiful mermaid in this detailed Photoshop tutorial.

Launch your brand with an adorable mermaid character reminiscent of a delightful Disney movie. This design features a fully editable vector mermaid with several flat ocean elements in the background. It’s super trendy and insanely pretty!

Sea Mermaid Character

Or add realistic scale textures to your work. With 100% vector files, you can resize these scales without any loss of quality. Use them as a great accessory to a mermaid-inspired design or feature them alone for a fantastic piece.

Scales Vector Pattern

Show the strength of the unicorn symbol with a powerful logo. This exemplary design features bold lines and solid details. It’s great for any service-based business or official organization.

Unicorn Logo
Unicorn Logo

Unicorns plus rainbows equals awesome design, always. And you can satisfy all your whimsical needs with this delightful pack of seamless patterns. Follow this trend to create pretty designs that please your followers.

Or learn how to create a unicorn illustration in this tutorial by Nataliya Dolotko.

Unicorns  Rainbows Patterns
Unicorns & Rainbows Patterns

Make 2017 a memorable year with a fabulous unicorn celebration! This party invitation is great for many ages and features a fantastical rainbow design.

Unicorn Birthday Party Invitation

4. 90s Revival

It was a time of funky colors and loud patterns, but the 90s will never die. Twenty years later, designers still find ways to honor this fun time with nostalgic designs.

So what are a few of the key characteristics of 90s revival design?

  • Chunky Text
  • Neon Colors
  • Abstract Shapes
  • Seamless Patterns

Minimalists love this style for its simple, clean lines and pleasing abstract shapes. Beginners to design can learn a lot by studying the simplicity of retro poster templates.

Feeling a little nostalgic? Test out your Photoshop skills with a 90s-inspired text effect!

Throw a rocking music festival this summer with an epic 90s poster template. This design features bold black and white lines with early MTV-esque colors. Create a real throwback Thursday with this awesome and fun design.

90s Music Festival
90’s Music Festival

Make a bold statement. Download a funky 3D neon text effect for logos, headlines, and more.

Retro Funky 3D Text Effects

Another huge trend is this retro but chic 90s poster design. This template features lively pastel colors and a bold 3D text effect.

90s DJ Flyer
90’s DJ Flyer

Creating individual abstract shapes can take a long time. Cut the time in half by opting for this abstract shape generator. This generator creates an infinite number of random shapes to apply to your designs. Try it out today!

Abstract Vector Shape Generator

Nothing says the 90s more than an awesome retro font. This Thunderstorm Typeface screams the style of an epic 1990s sitcom everyone loves. Throw back to a truly epic era with this wonderful typeface.

Thunderstorm Typeface

5. Galaxy

From beautiful posters to elegant digital paintings, everyone is obsessed with the galaxy lately.

Space is represented by many symbols in design. And there’s no wonder that it’s super inspirational with its beautiful cosmos and mystifying galaxies.

Love space elements too? Instructor Rose shows you how to create an awesome galaxy text effect with this detailed tutorial.

Keep in mind that some space graphics are often more conceptual than literal. This space flyer, for instance, has bursting 3D abstract shapes with stunning deep colors.

Space Flyer
Space Flyer

Add a few stars to your sky manipulations with this awesome star brush pack. This pack features 45 star brushes with varying shapes and flares.

45 Star  Starfield Brushes
45 Star & Starfield Brushes

Or set a beautiful nebula background as your website or social media banner. This nebula bundle includes three HD backgrounds available in two sizes.

Love spacey designs? Create a cool Sci-Fi outer space scene in this tutorial from Jenny Le.

Nebula Backgrounds Bundle

Need an effect fast? Try a Photoshop action to add a beautiful space effect to your photos.

Space Effect - Photoshop Action
Space Effect – Photoshop Action

Create a compelling design with a galaxy background. This extraordinary bundle features beautiful bokeh effects and light flares. Use it to elevate any website or poster design.

Galaxy Backgrounds V1

6. Gradients

Whenever a large brand makes a major change, the design industry usually follows suit. And with the boom of gradient colors across major platforms like Instagram and more, designers have fallen back in love with this vibrant transition.

When designing with gradients, consider the symbolic qualities of the colors you choose. Mix and match color arrangements and even experiment with different types of gradient styles (radial, linear, etc.).

Want to create a gradient icon similar to Instagram’s official logo? Then check out this awesome tutorial by Mary Winkler.

Match your social media across several networks with a set of flat gradient icons. Flat graphics are hugely popular because of their clean aesthetics and simplistic design.

Modern Gradient Flat Icons

Also on trend is the duotone look for Instagram filter-like aesthetics.

Gorgeous gradients are applied to your photos with the help of an amazing Photoshop action. This duotone action includes 50 total gradients with amazing combinations.

Love this effect? Learn how to create a pride rainbow overlay in this tutorial by Sharon Milne.

Gradient Duotone Photoshop Action

Sometimes you only need a little color to pack a punch. So try out a gradient magazine template to launch your new brand. Know when to incorporate bold colors for an elegant layout.

Gradient Magazine Indesign Template

For the ultimate modern logo, consider adding a bold gradient. This diamond template, for example, features lovely purple hues that transition well into text. Create a smart logo that will stand out from the crowd.

Diamond Logo
Diamond Logo

This last resource includes 500 colorful gradients for your desktop backgrounds, websites, and more. Inspire yourself with the gorgeous color schemes that translate to inspiring, happy colors.

500 Gradient Backgrounds

Share Your Favorite Trends!

From gold textures to vibrant tropical leaves, 2017 has a lot to offer in the realm of design.

So which of the following trends are your favorite?

  1. Rose Gold With Marble
  2. Tropical Leaves
  3. Unicorns and Mermaids
  4. 90s Revival
  5. Galaxy
  6. Gradients

Let us know in the comments and share your trendy designs with us!

Let’s Talk About Speech CSS

Post pobrano z: Let’s Talk About Speech CSS

Boston, like many large cities, has a subway system. Commuters on it are accustomed to hearing regular public address announcements.

Riders simply tune out some announcements, such as the pre-recorded station stop names repeated over and over. Or public service announcements from local politicians and celebrities—again, kind of repetitive and not worth paying attention to after the first time. Most important are service alerts, which typically deliver direct and immediate information riders need to take action on.

An informal priority

A regular rider’s ear gets trained to listen for important announcements, passively, while fiddling around on a phone or zoning out after a hard day of work. It’s not a perfect system—occasionally I’ll find myself trapped on a train that’s been pressed into express service.

But we shouldn’t remove lower priority announcements. It’s unclear what kind of information will be important to whom: tourists, new residents, or visiting friends and family, to name a few.

A little thought experiment: Could this priority be more formalized via sound design? The idea would be to use different voices consistently or to prefix certain announcements with specific tones. I’ve noticed an emergent behavior from the train operators that kind of mimics this: Sometimes they’ll use a short blast of radio static to get riders’ attention before an announcement.

Opportunities

I’ve been wondering if this kind of thinking can be extended to craft better web experiences for everyone. After all, sound is enjoying a renaissance on the web: the Web Audio API has great support, and most major operating systems now ship with built-in narration tools. Digital assistants such as Siri are near-ubiquitous, and podcasts and audiobooks are a normal part of people’s media diet.

Deep in CSS’—ahem—labyrinthine documentation, are references to two Media Types that speak to the problem: aural and speech. The core idea is pretty simple: audio-oriented CSS tells a digitized voice how it should read content, the same as how regular CSS tells the browser how to visually display content. Of the two, aural has been deprecated. speech Media Type detection is also tricky, as a screen reader potentially may not communicate its presence to the browser.

The CSS 3 Speech Module, the evolved version of the aural Media Type, looks the most promising. Like display: none;, it is part of the small subset of CSS that has an impact on screen reader behavior. It uses traditional CSS property/value pairings alongside existing declarations to create an audio experience that has parity with the visual box model.

code {
  background-color: #292a2b;
  color: #e6e6e6;
  font-family: monospace;
  speak: literal-punctuation; /* Reads all punctuation out loud in iOS VoiceOver */
}

Just because you can, doesn’t mean you should

In his book Building Accessible Websites, published in 2003, author/journalist/accessibility researcher Joe Clark outlines some solid reasons for never altering the way spoken audio is generated. Of note:

Support

Many browsers don’t honor the technology, so writing the code would be a waste of effort. Simple and direct.

Proficiency

Clark argues that developers shouldn’t mess with the way spoken content is read because they lack training to „craft computer voices, position them in three-dimensional space, and specify background music and tones for special components.”

This may be the case for some, but ours is an industry of polymaths. I’ve known plenty of engineers who develop enterprise-scale technical architecture by day and compose music by night. There’s also the fact that we’ve kind of already done it.

The point he’s driving at—crafting an all-consuming audio experience is an impossible task—is true. But the situation has changed. An entire audio universe doesn’t need to be created from whole cloth any more. Digitized voices are now supplied by most operating systems, and the number of inexpensive/free stock sound and sound editing resources is near-overwhelming.

Appropriateness

For users of screen readers, the reader’s voice is their interface for the web. As a result, users can be very passionate about their screen reader’s voice. In this light, Clark argues for not changing how a screen reader sounds out content that is not in its dictionary.

Screen readers have highly considered defaults for handling digital interfaces, and probably tackle content types many developers would not even think to consider. For example, certain screen readers use specialized sound cues to signal behaviors. NVDA uses a series of tones to communicate an active progress bar:

Altering screen reader behavior effectively alters the user’s expected experience. Sudden, unannounced changes can be highly disorienting and can be met with fear, anger, and confusion.

A good parallel would be if developers were to change how a mouse scrolls and clicks on a per-website basis. This type of unpredictability is not a case of annoying someone, it’s a case of inadvertently rendering content more difficult to understand or changing default operation to something unfamiliar.

My voice is not your voice

A screen reader’s voice is typically tied to the region and language preference set in the operating system.

For example, iOS contains a setting for not just for English, but for variations that include United Kingdom, Ireland, Singapore, New Zealand and five others. A user picking UK English will, among other things, find their Invert Colors feature renamed to „Invert Colours.”

However, a user’s language preference setting may not be their primary language, the language of their country of origin, or the language of the country they’re currently living in. My favorite example is my American friend who set the voice on his iPhone to UK English to make Siri sound more like a butler.

UK English is also an excellent reminder that regional differences are a point of consideration, y’all.

Another consideration is biological and environmental hearing loss. It can manifest with a spectrum of severity, so the voice-balance property may have the potential to „move” the voice outside of someone’s audible range.

Also, the speed the voice reads out content may be too fast for some or too slow for others. Experienced screen reader operators may speed up the rate of speech, much as some users quickly scroll a page to locate information they need. A user new to screen readers, or a user reading about an unfamiliar topic may desire a slower speaking rate to keep from getting overwhelmed.

And yet

Clark admits that some of his objections exist only in the realm of the academic. He cites the case of a technologically savvy blind user who uses the power of CSS’ interoperability to make his reading experience pleasant.

According to my (passable) research skills, not much work has been done in asking screen reader users their preferences for this sort of technology in the fourteen years since the book was published. It’s also important to remember that screen reader users aren’t necessarily blind, nor are they necessarily technologically illiterate.

The idea here would be to treat CSS audio manipulation as something a user can opt into, either globally or on a per-site basis. Think web extensions like Greasemonkey/Tampermonkey, or when websites ask permission to send notifications. It could be as simple as the kinds of preference toggles users are already used to interacting with:

A fake NVDA screenshot
A fake screenshot simulating a preference in NVDA that would allow the user to enable or disable CSS audio manipulation.

There is already a precedent for this. Accessibility Engineer Léonie Watson notes that JAWS—another popular screen reader—“has a built in sound scheme that enables different voices for different parts of web pages. This suggests that perhaps there is some interest in enlivening the audio experience for screen reader users.”

Opt-in also supposes features such as whitelists to prevent potential abuses of CSS-manipulated speech. For example, a user could only allow certain sites with CSS-manipulated content to be read, or block things like unsavory ad networks who use less-than-scrupulous practices to get attention.

Opinions: I have a few

In certain situations a screen reader can’t know the context of content but can accept a human-authored suggestion on how to correctly parse it. For example, James Craig’s 2011 WWDC video outlines using speak-as values to make street names and code read accurately (starts at the 15:36 mark, requires Safari to view).

In programming, every symbol counts. Being able to confidently state the relationship between things in code is a foundational aspect of programming. The case of thisOne != thisOtherOne being read as „this one is equal to this other one” when the intent was „this one is not equal to this other one” is an especially compelling concern.

Off the top of my head, other examples where this kind of audio manipulation would be desirable are:

  • Ensuring names are pronounced properly.
  • Muting pronunciation of icons (especially icons made with web fonts) in situations where the developer can’t edit the HTML.
  • Using sound effect cues for interactive components that the screen reader lacks built-in behaviors for.
  • Creating a cloud-synced service that stores a user’s personal collection of voice preferences and pronunciation substitutions.
  • Ability to set a companion voice to read specialized content such as transcribed interviews or code examples.
  • Emoting. Until we get something approaching EmotionML support, this could be a good way to approximate the emotive intent of the author (No, emoji don’t count).
  • Spicing things up. If a user can’t view a website’s art direction, their experience relies on the skill of the writer or sound editor—on the internet this can sometimes leave a lot to be desired.

The reality of the situation

The CSS Speech Module document was last modified in March 2012. VoiceOver on iOS implements support using the following speak-as values for the speak property, as shown in this demo by accessibility consultant Paul J. Adam:

  • normal
  • digits
  • literal-punctuation
  • spell-out

Apparently, the iOS accessibility features Speak Selection and Speak Screen currently do not honor these properties.

Despite the fact that CSS 3 Speech Module has to be ratified (and therefore is still subject to change), VoiceOver support signals that a de facto standard has been established. The popularity of iOS—millions of devices, 76% of which run the latest version of iOS—makes implementation worth considering. For those who would benefit from the clarity provided by these declarations, it could potentially make a big difference.

Be inclusive, be explicit

Play to CSS’ strengths and make small, surgical tweaks to website content to enhance the overall user experience, regardless of device or usage context. Start with semantic markup and a Progressive Enhancement mindset. Don’t override pre-existing audio cues for the sake of vanity. Use iOS-supported speak-as values to provide clarity where VoiceOver’s defaults need an informed suggestion.

Writing small utility classes and applying them to semantically neutral span tags wrapped around troublesome content would be a good approach. Here’s a recording of VoiceOver reading this CodePen to demonstrate:

Take care to extensively test to make sure these tweaks don’t impair other screen reading software. If you’re not already testing with screen readers, there’s no time like the present to get started!

Unfortunately, current support for CSS speech is limited. But learning what it can and can’t do, and the situations in which it could be used is still vital for developers. Thoughtful and well-considered application of CSS is a key part of creating robust interfaces for all users, regardless of their ability or circumstance.


Let’s Talk About Speech CSS is a post from CSS-Tricks

How to Create an Aquaman-Inspired Text Effect in Adobe Photoshop

Post pobrano z: How to Create an Aquaman-Inspired Text Effect in Adobe Photoshop

Final product image
What You’ll Be Creating

This tutorial will show you how to use layer styles, textures, brushes, with a bunch of tools and adjustments to create a text effect inspired by the Aquaman movie poster. Let’s get started!

This text effect was inspired by the many Layer Styles available on GraphicRiver.

Tutorial Assets

The following assets were used during the production of this tutorial:

1. How to Create a Background

Step 1

Create a new 3000 x 2071 px document, click the Create new fill or adjustment layer icon at the bottom of the Layers panel, and choose Gradient.

Create the gradient fill using the Colors #297f82 to the left, #1a3344 in the middle, and #0d1018 to the right.

Change the Style to Radial, and click-drag the center of the gradient to place it at the top of the document.

Increase the Scale value to 200, and check the Dither box.

Gradient Fill Layer

Step 2

Go to File > Place Linked, open the Under water texture image, and go to Image > Adjustments > Hue/Saturation to change the Saturation value to -100.

HueSaturation

Step 3

Change the texture layer’s Blend Mode to Color Dodge.

Change the Blend Mode

Step 4

Go to Edit > Transform > Warp, choose Arc from the Warp menu in the Options bar, and click-drag the control point to get a result you like.

Warp Mode

Step 5

Hit the Return key to commit the changes, and click the Add layer mask icon at the bottom of the Layers panel.

Add a Layer Mask

Step 6

Pick the Gradient Tool, set the Foreground and Background Colors to White and Black, choose the Foreground to Background gradient fill, and click the Radial Gradient icon in the Options bar.

Select the mask’s thumbnail, and click-drag from the document’s top to its bottom to create a gradient mask.

Create a Gradient Mask

2. How to Add a Light Rays Brush

Step 1

Pick the Brush Tool, and create a new layer and name it Light Rays.

Change the layer’s Blend Mode to Overlay and its Opacity to 50%.

Create the Light Rays Layer

Step 2

Hold the Option key, and click-drag the texture layer mask’s thumbnail to the Light Rays layer to duplicate it.

Duplicate the Layer Mask

Step 3

Unlink the mask by clicking the link icon between the layer and mask thumbnails.

Select the layer’s thumbnail, and add a light rays brush from the Light Rays pack. You can then press Command-T to enter Free Transform Mode and rotate, resize, and warp the rays.

Free Transform Mode

3. How to Add a Fizz Texture

Step 1

Open the Phineas F. Texture Stock image, and go to Image > Calculations.

Change both Channel values to Red, the Blending to Overlay, and the Result to Selection. Click OK, and go to Edit > Copy.

Calculations Settings

Step 2

Back to the original document, go to Edit > Paste, rename the layer to Top Fizz, and change its Fill value to 0%.

Place the texture at the top of the document and resize it as needed.

Add the Top Fizz Texture

Double-click the Top Fizz layer to apply the following layer style:

Step 3

Add a Bevel and Emboss with these settings:

  • Size: 2
  • Uncheck the Use Global Light box
  • Angle: 122
  • Altitude: 42
  • Gloss Contour: Ring
  • Check the Anti-aliased box
  • Highlight Mode: Linear Light
  • Shadow Mode:
    • Opacity: 35%
Bevel and Emboss

Step 4

Add a Contour with these settings:

  • Contour: Ring – Double
  • Check the Anti-aliased box.
Contour

Step 5

Lower the Opacity to 50%.

Opacity Value

Step 6

Put all the layers except for the Background layer in a group and name it Background.

Background Group

4. How to Create a Smart Object Text Layer

Step 1

Create the text in All Caps using the font Lato Heavy. Set the Size to 250 pt and the Tracking to 645.

Create the Text

Step 2

Rename the text layer to Text, right-click it, and choose Convert to Smart Object.

Convert to Smart Object

5. How to Record a Simple Extrusion Action

Step 1

Open the Actions panel, click the Create new set icon at the bottom of the panel, type Extrusion in the Name field, and click OK.

New Action Set

Step 2

Click the Create new action icon at the bottom of the panel, type Action in the Name field, and click Record.

Create New Action

Step 3

Press Command-J to duplicate the Text layer.

Duplicate the Layer

Step 4

Press Command-T to enter Free Transform Mode.

In the Options bar, click the Maintain aspect ratio icon between the W and H fields, and set their values to 99.9%.

Hit the Return key to commit the changes. You should see all the steps recorded and added to the action you’ve created.

Scale Down

Step 5

Click the Stop recording icon at the bottom of the Actions panel.

Stop Recording

6. How to Create an Extrusion

Step 1

Click the Play selection icon at the bottom of the Actions panel ten times to create ten more copies with the transformation.

Create the Extrusion

Step 2

Select all the Text layers, and go to Layer > Arrange > Reverse. This will place the last copy layer at the bottom and bring the original to the top.

Reverse Layer Order

Step 3

Deselect the first and last Text layers, and place the rest in a group and name it Center.

Center Group

Step 4

Rename the top Text layer to Front and the last to Back.

Front and Back Layers

Step 5

Duplicate the Front layer twice.

Duplicate Layers

Step 6

Drag the Front layer on top of all layers inside the Center group.

Move Layer

7. How to Style the Front Text Layers

Double-click the Front copy 2 layer to apply the following layer style:

Step 1

Add a Bevel and Emboss with these settings:

  • Style: Stroke Emboss
  • Depth: 300
  • Size: 5
  • Uncheck the Use Global Light box
  • Angle: -176
  • Altitude: 21
  • Gloss Contour: Gaussian
  • Check the Anti-aliased box
Bevel and Emboss

Step 2

Add a Contour with these settings:

  • Contour: Cone – Asymmetrical
  • Check the Anti-aliased box.
Contour

Step 3

Add a Stroke with these settings:

  • Size: 3
  • Position: Inside
  • Fill Type: Gradient
  • Style: Reflected
  • Create the Gradient using the Colors #7e662e to the left, and #cfb765 with a Location value around 86%.
Stroke

Step 4

Change the Fill value to 0%.

Change the Fill Value

Step 5

Convert the layer to a Smart Object.

Convert to a Smart Object

Step 6

Double-click the Front copy layer to apply a Pattern Overlay effect with these settings:

  • Pattern: 1.jpg (Open the image from the Metal seamless textures pack, and go to Edit > Define Pattern to add it to the preset)
  • Scale: 50%
Pattern Overlay

This will style the front part of the text.

Styled Front

8. How to Style the Extrusion

Double-click the Front layer to apply the following layer style:

Step 1

Add a Bevel and Emboss with these settings:

  • Style: Stroke Emboss
  • Depth: 230
  • Size: 5
  • Uncheck the Use Global Light box
  • Angle: -90
  • Altitude: 50
  • Gloss Contour: Cove – Deep
  • Check the Anti-aliased box
Bevel and Emboss

Step 2

Add a Contour with these settings:

  • Contour: Rolling Slope – Descending
  • Check the Anti-aliased box.
Contour

Step 3

Add a Stroke with these settings:

  • Size: 3
  • Position: Center
  • Fill Type: Gradient
  • Style: Linear
  • Create the Gradient using the Colors #7e662e to the left and right, and #d4c591 in the middle.
Stroke

Step 4

Change the Front layer’s Fill value to 0%, right-click it, and choose Copy Layer Style.

Copy Layer Style

Step 5

Select the other layers inside the Center group, right-click any of them, and choose Paste Layer Style.

Paste Layer Style

9. How to Style the Back Text Layer

Double-click the Back text layer to apply the following layer style:

Step 1

Add a Bevel and Emboss with these settings:

  • Style: Stroke Emboss
  • Size: 4
  • Uncheck the Use Global Light box
  • Angle: -164
  • Altitude: 53
  • Gloss Contour: Gaussian
  • Check the Anti-aliased box
Bevel and Emboss

Step 2

Add a Contour with these settings:

  • Contour: Cone – Asymmetrical
  • Check the Anti-aliased box.
Contour

Step 3

Add a Stroke with these settings:

  • Size: 2
  • Position: Outside
  • Fill Type: Gradient
  • Style: Reflected
  • Create the Gradient using the Colors #7e662e to the left and right, and #fdcb1c in the middle.
Stroke

Step 4

Change the Back layer’s Fill value to 0%.

Change the Fill Value

Step 5

Double-click the Center group to apply a Gradient Overlay effect with these settings:

  • Check the Dither box
  • Blend Mode: Color Burn
  • Style: Reflected
  • Use the Silver 30 gradient fill
Gradient Overlay

This will finish styling the text.

Styled Text

10. How to Create a Simple Texture Using Filters

Step 1

Create a new layer on top of all layers, fill it with Black, name it Extrusion Texture, and convert it to a Smart Object.

Extrusion Texture

Step 2

Set the Foreground and Background Colors to Black and White, and go to Filter > Render > Fibers.

Change the Vibrance to 20 and the Strength to 5.

Render Fibers

Step 3

Go to Filter > Blur > Motion Blur, and change the Angle to 90 and the Distance to 25.

Motion Blur

Step 4

Use the Rectangular Marquee Tool to select a random small area of the texture.

Create Selection

Step 5

Press Command-J to duplicate the selected area in a new layer, and hide the Extrusion Texture layer.

Duplicate the Layer

11. How to Add the Extrusion Texture

Step 1

Move the duplicated texture layer on top of the Center group, right-click it, and choose Create Clipping Mask.

Create Clipping Mask

Step 2

Place the clipped texture on top of the letter you want to apply it to, and press the Command-T keys to transform the texture so that it matches the part you want it to cover.

Transform the Texture

Step 3

You can add a mask and use a round brush tip to remove any areas you don’t like.

Erase Unwanted Areas

Step 4

Once you’re done, change the texture layer’s Blend Mode to Soft Light.

Blend Mode

Step 5

For rounded letter parts, you can use the Warp mode to adjust the texture.

Warp the Texture

Step 6

Show the Extrusion Texture layer, select a new area, and repeat the steps to add the texture to all the letters you have.

Once you’re done, put the Center group and its texture layers in another group with the name Center + Textures.

Add and Group the Textures

12. How to Add Highlights and a Color Texture

Step 1

Create a new layer on top of all the layers inside the Center + Textures group, name it Highlights, and clip it to the Center group.

Change the Highlights layer’s Blend Mode to Linear Light, and its Opacity to 30%.

Set the Foreground Color to #b5aa98, and use a soft round brush tip to paint some highlights over the bright areas of the extrusion.

Add Highlights

Step 2

Create a new layer on top of the Front copy 2 layer, name it Stroke Highlights, and change its Blend Mode to Vivid Light.

Clip the Stroke Highlights layer to the Front copy 2 layer, and add some highlights to the stroke.

Stroke Highlights

Step 3

Place the out of the blue image on top of the Front copy layer, resize it as needed, rename its layer to Color Texture, and change its Blend Mode to Color.

Command-click the Front copy layer to create a selection.

Add the Color Texture

Step 4

Click the Add layer mask icon.

Add Layer Mask

Step 5

Put all the front layers in a group and name it Front.

Front Group

13. How to Add Texture Overlays

Step 1

Place the grunge-background8 image from the Grunge-Backgrounds pack on top of the Front group, clip it to it, change its layer’s Blend Mode to Soft Light, and resize it as needed.

Add a Grunge Texture

Step 2

Go to Image > Adjustments > Hue/Saturation, and change the Saturation value to -100.

HueSaturation

Step 3

If you like a smaller texture overlay, you can create copies to cover the whole text instead of scaling the texture up.

Scale Down

Step 4

Add the Ur gravel texture on top of the grunge-background8 layers, and go to Image > Adjustments > Levels.

Change the Input Levels Shadows’ value to 50 and the Output Levels Highlights’ value to 150.

Levels

Step 5

Clip the layer to the Front group, change its Blend Mode to Soft Light, and resize the texture to cover the first letter.

Grunge Texture Overlays

Step 6

Duplicate to add the texture to each of the remaining letters, and then put the Front group and its texture layers in another group and name it Front + Texture.

Duplicate and Group the Textures

14. How to Add a Lens Flare

Step 1

Place the Lens Flare 02 image from the 30 Awsome Lens Flare pack on top of all layers, and go to Edit > Transform > Rotate 90° Clockwise.

Add the Lens Flare

Step 2

Double-click the lens flare layer’s thumbnail to open its original file. Create a new layer under the flare’s layer and fill it with Black.

Add a Black Background

Step 3

Select both layers and press Command-E to merge them, and save and close the file.

Merge Layers

Step 4

Change the flare layer’s Blend Mode to Screen and its Opacity to 70%. Place the flare on top of one of the letters in the center of the text, and resize it as needed.

Flare Layers Settings

Step 5

Go to Image > Adjustments > Hue/Saturation, check the Colorize box, and change the Hue to 180 and the Saturation to 50.

HueSaturation

Step 6

Go to Image > Adjustments > Levels, and change the Gamma value to 0.61.

Levels

15. How to Add Water Splashes

Step 1

Create a new layer on top of the flare layer and name it Water Splash 01, and change its Fill value to 0%.

Water Splash Layer

Double-click the Water Splash 01 layer to apply the following layer style:

Step 2

Add a Bevel and Emboss with these settings:

  • Size: 3
  • Uncheck the Use Global Light box
  • Angle: -48
  • Altitude: 21
  • Gloss Contour: Ring
  • Check the Anti-aliased box
  • Highlight Mode: Linear Light
    • Opacity: 35%
  • Shadow Mode:
    • Opacity: 20%
Bevel and Emboss

Step 3

Add a Contour with these settings:

  • Contour: Ring – Double
  • Check the Anti-aliased box.
Contour

Step 4

Use the Free Water Splash Photoshop Brushes and Water Splash Brushes packs’ brush tips to add water splashes to the letter with the flare.

For better results, add each splash in a separate layer, and copy and paste the layer style to each copy.

Add Water Splash Brushes

Step 5

You can also add some splashes to the background behind the text.

Add Water Splashes to the Background

16. How to Make Global Adjustments

Step 1

Place the Concrete Rough 5 texture on top of all layers, rename its layer to Texture Overlay, and change its Blend Mode to Soft Light and its Opacity to 10%.

Add a Texture Overlay

Step 2

Add a Photo Filter adjustment layer on top of all layers, and use the default values.

Photo Filter

Step 3

Save the file as an image, open the image, and go to Image > Image Size to change the size to 1500 x 1063 px.

Image Size

Step 4

You can also use the Crop Tool to control the final size even more.

Crop the Image

Congratulations! You’re Done!

In this tutorial, we created a simple background and a text smart object layer. After that, we recorded an action to create the extrusion, and styled all parts of the text.

Then, we created and added a bunch of different texture overlays, flare, and adjustment layers to the text. Finally, we added some water splash brushes to finish off the effect.

Please feel free to leave your comments, suggestions, and outcomes below.

Final Result

Jekyll Includes are Cool

Post pobrano z: Jekyll Includes are Cool

Dave Rupert:

When cruising through the Includes documentation I noticed a relatively new feature where you can pass data into a component.

I was similarly excited learning about Macros in Nunjucks. Then:

After a couple days of writing includes like this I thought to myself „Why am I not just writing Web Components?”

Direct Link to Article — Permalink


Jekyll Includes are Cool is a post from CSS-Tricks

Designed Lines

Post pobrano z: Designed Lines

Ethan Marcotte on digital disenfranchisement and why we should design lightning fast, accessible websites:

We’re building on a web littered with too-heavy sites, on an internet that’s unevenly, unequally distributed. That’s why designing a lightweight, inexpensive digital experience is a form of kindness. And while that kindness might seem like a small thing these days, it’s a critical one. A device-agnostic, data-friendly interface helps ensure your work can reach as many people as possible, regardless of their location, income level, network quality, or device.

Direct Link to Article — Permalink


Designed Lines is a post from CSS-Tricks