The effect shown above is the one I will show you how to create in this tutorial. If you would like to create the even more advanced grand theft auto photo effects shown below and using just a single click, then check out my Grandiose Photoshop Action.
First, open the photo that you want to work with. To open your photo, go to File > Open, choose your photo, and click Open. Now, before we get started, just check a couple of things:
Your photo should be in RGB Color mode, 8 Bits/Channel. To check this, go to Image > Mode.
For best results, your photo size should be 1500–3500 px wide/high. To check this, go to Image > Image Size.
Your photo should be the Background layer. If it is not, go to Layer > New > Background from Layer.
Step 2
Now we are going to crop the image to remove some of the space above the subject. Choose the Crop Tool (C), and transform the Crop Box as shown below:
2. How to Create the GTA Art Style
Step 1
In this section, we are going to create a GTA art style from our photo. Go to Layer > New > Layer to create a new layer and name it Temp 1.
Step 2
Now press Control-Alt-Shift-E on your keyboard to make a screenshot, and then go to Image > Adjustments > Shadows/Highlights, and set Shadows to 10% and Highlights to 2% as shown below:
Step 3
Go to Layer > New > Layer to create a new layer and name it Temp 2.
Step 4
Now press Control-Alt-Shift-E on your keyboard to make a screenshot, and go to Filter > Sharpen > Sharpen. Then press Control-F on your keyboard to repeat this filter.
Step 5
Change the Blending Mode of this layer to Soft Light, and then go to Filter > Other > High Pass and set the Radius to 1.5 px as shown below:
Step 6
Now Control-click on the Temp 1 layer to get both layers selected at the same time and press Control-E on your keyboard to merge these two layers into one layer.
Step 7
Go to Filter > Stylize > Diffuse and set the Mode to Anisotropic.
Step 8
Now go to Edit > Transform > Rotate 90° Clockwise to rotate this layer 90° clockwise, and then press Control-F on your keyboard to repeat the previous filter.
Step 9
Go to Edit > Transform > Rotate 90° Clockwise to rotate this layer another 90° clockwise, and then press Control-F on your keyboard to repeat the previous filter again.
Step 10
Now go to Edit > Transform > Rotate 180° to rotate this layer 180° clockwise, and then go to Filter > Sharpen > Smart Sharpen and set the Amount to 250%, Radius to 1.5 px and Remove to Gaussian Blur as shown below:
Step 11
Go to Filter > Noise > Reduce Noise, and set the Strength to 5, Preserve Details to 0%, Reduce Color Noise to 54% and Sharpen Details to 0% as shown below:
Step 12
Now go to Layer > New > Layer to create a new layer and name it Temp 3.
Step 13
Press Control-Alt-Shift-E on your keyboard to make a screenshot, and then go to Filter > Filter Gallery > Artistic > Cutout, and set the Number of Levels to 4, Edge Simplicity to 0 and Edge Fidelity to 3 as shown below:
Step 14
Now set the Blending Mode of this layer to Soft Light and set the Opacity to 56%.
Step 15
Control-click on the Temp 2 layer to get both layers selected at the same time and press Control-E on your keyboard to merge them. Then name this new layer GTA Art Style.
3. How to Create a Stroke Around the Subject
Step 1
In this section, we are going to create a stroke around the subject. Select the Background layer, hide the GTA Art Style layer, choose the Quick Selection Tool (W), and select the background. Feel free to use the Shift and Alt buttons to add or remove some areas from the selection. Then press Control-Shift-I on your keyboard to invert the selection and get the selection around the subject.
Step 2
Now go to Select > Modify > Smooth and set the SampleRadius to 5 px. Then select and show the GTA Art Style layer, go to Layer > New > Layer to create a new layer, and name it Subject Stroke.
Step 3
Choose the Rectangular Marquee Tool (M), set the foreground color to #000000, Right-click anywhere inside the canvas, and choose Stroke. Set the Width to 5 px, Location to Outside, Mode to Normal and Opacity to 100% as shown below:
4. How to Make the Final Adjustments
Step 1
In this section, we are going to make final adjustments to the design. Press D on your keyboard to reset the swatches, go to Layer > New Adjustment Layer > Gradient Map to create a new gradient map adjustment layer, and name it Overall Contrast.
Step 2
Now change the Blending Mode of this layer to Soft Light and set the Opacity to 26%.
Step 3
Go to Layer > New Adjustment Layer > Levels to create a new levels adjustment layer and name it Overall Brightness.
Step 4
Now Double-click on this layer thumbnail and in the Properties panel use the settings below:
Step 5
Go to Layer > New Adjustment Layer > Hue/Saturation to create a new hue/saturation adjustment layer and name it Overall Saturation.
Step 6
Now Double-click on this layer thumbnail and in the Properties panel use the settings below:
Step 7
Go to Layer > New Adjustment Layer > Curves to create a new curves adjustment layer and name it Color Look.
Step 8
Now Double-click on this layer thumbnail and in the Properties panel use the settings below:
Step 9
Go to Layer > New Adjustment Layer > Brightness/Contrast to create a new brightness/contrast adjustment layer and name it Background Brightness.
Step 10
Now, while the layer mask of the Background Brightness layer is selected, choose the Brush Tool (B), set the foreground color to #000000, and brush over the subject.
Step 11
Double-click on this layer thumbnail and in the Properties panel enter the settings below:
You Made It!
Congratulations, you have succeeded! Here is our final result:
If you would like to create the even more advanced grand theft auto photo effects shown below and using just a single click, then check out my Grandiose Photoshop Action.
The action works so you just
fill in your subject with a color and play the action. Yes, it’s really
that simple! The action will do all the work for you, leaving you fully
layered results that you can further customize.
It comes with a detailed video tutorialthat demonstrates how to use the action and also how to customize the results to get the most out of the effect.
Ever wondered how to make stars in Adobe Photoshop? Well, wonder no more! In this quick tip tutorial, you will learn how to make stars in Photoshop quickly and easily.
In your document, go to the Polygon Menu, right-click on it, and select the Polygon Tool (U), which is a pentagon.
Step 2
Go to the Settings in the top toolbar. This will be shaped like a cog. Click on this and select the Star checkbox with the Radius set to 25%.
Step 3
Next, drag out your shape. This will give us a chunky star.
Step 4
Change the percentage to create a range of different star shapes. Simple!
2. How to Create a Star Effect in Adobe Photoshop
Step 1
Create a New Layer (Control-N) in your document and fill the layer with black.
Step 2
Next, go to Filter> Add Noise and set the Amount to 50%, select Gaussian, and check the Monochromatic box. Click OK.
Step 3
Go to Filter >Blur>Gaussian Blur and set the blur Radius to 1.5%, and click OK.
Step 4
Next, we go to Levels (Control-L) and move the arrows to the base of the curve in the Input Levels, similar to how this is below. Play with these sliders until you get a pleasing star field intensity.
Step 5
Next, set the Layer Blend Mode to Screen. To add extra intensity to your stars, simply duplicate the layer. I think this makes a really impressive star effect with not much effort.
3. How to Make Star Trails With a Brush
Step 1
Create a star of your choosing as in „Part 1. How to Make a Star in Adobe Photoshop”, and make sure that it’s set to black.
Here are the settings I used to create a star trail.
Brush Tip Shape
Spacing to 102%
Shape Dynamics
Size Jitter to 27% with Control set to Pen Pressure
Angle Jitter at 70% with the Control set to Pen Pressure
Roundness Jitter to 20%; Control: Off
Minimum Roundness to 25%
Scattering
Scatter is set to 196% on Both Axes; Control: Pen Pressure
Count Jitter to 14%; Control: Pen Pressure
Transfer
Opacity Jitter is set to 0%; Pen Pressure is set to Minimum 0%
Flow Jitter at 0% set to Pen Pressure with Minimum at 76%
Smoothing
On
Step 2
Now you can save your brush by clicking the square with the + sign at the bottom of the Brush Settings panel.
Step 3
Here’s how our star trail brush looks with our settings.
4. How to Create a Shining Star
Step 1
Draw out your stars using the Star Trail Brush we just created and duplicate the layer.
Step 2
On the lower layer, go to Filter > Blur > Gaussian Blur and set the Radius to 8.6 Pixels. Click OK.
5. How to Create a Shooting Star
Step 1
In the Brush Settings, select the default Hard Round Pressure Opacity brush and squeeze the tip shape to a narrow oval.
Step 2
On a New Layer (Control-N), draw out a shooting star with the tip being more intense than the trail.
Step 3
Select the Eraser (E) and use a Soft Brush to gently paint out some of the tail.
Step 4
To create a meteor shower effect, hold Alt and use the Move Tool (V) to duplicate each layer. Scale, move, and repeat as necessary. Optionally, to add depth, you can lower the opacity of some of the shooting stars.
Conclusion
Now you have learned how to make stars in Photoshop! I hope you found this quick tip useful and can use these techniques to jazz up your artwork.
If you’d like to learn more from Envato Tuts+, here are some excellent tutorials on how to get started with Adobe Photoshop, working with brushes and light effects!
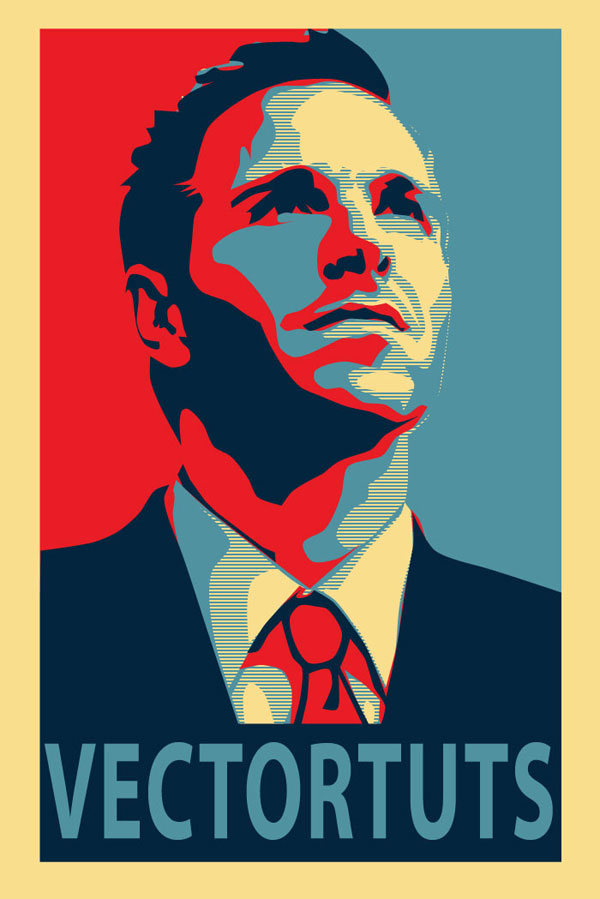
We’ll be showing you how to create this style of design. We’ll start with basic image editing techniques in Adobe Photoshop to get our guide layers setup, and then we’ll jump into Adobe Illustrator. You don’t need any fancy equipment to do this. I used an older mouse that still has the rubber ball.
Note: This tutorial has been recently updated, however the stock image and pattern are no longer available for download. Please find the appropriate items to replace them to complete the exact end result. Envato Tuts+ does not endorse any political party in the publishing of this tutorial. Rather, this tutorial is focused on demonstrating a workflow for recreating this iconic poster.
For this effect it is best to have a portrait style picture, preferably of a subject that appears to be thinking, or looking off into the distance.
Step 2
Once you have your image, you need to Open it in Photoshop and Crop it appropriately. The top of the image should be cropped to the top of your subject’s head, and the bottom should be a bit higher than chest height. The crop should have about a 2:1 ratio.
Step 3
Now we need to Posterize the image. Go to Image > Adjustments > Posterize. An appropriate posterization level for the look we are going for is 5.
Step 4
Now we’re going to create our guide layers for use in Illustrator. Start by duplicating your posterized layer, and name this new layer „Pattern Guide.” Then go to Image > Adjustments > Threshold. We’re going to slide our Point until we get something similar to below. We want it fairly dark, but still with a small amount of detail. Also, when using Threshold, it is best to use the Peaks that you see.
Step 5
Save this newly created layer as „patternguide.psd,” or something similar, as you’ll need it for Illustrator.
Step 6
We need to repeat Step 4 and Step 5 three more times. Each time apply a lower threshold, and save each new layer. Below are the settings I used, again notice the peaks.
2. Setup Your Document and Palettes
Step 1
Before we start to outline our layers, we need to create the horizontal blue line pattern. To do this create a new Illustrator document. Give it a Height and Width of 4px. Then create a rectangle filled with our light blue color (#4F919F), and cover the top half of the canvas.
Step 2
Cover the bottom half with a rectangle filled with beige. Then Select All (Control + A), and drag this over to our Swatches panel. Congratulations you’ve made a pattern!
Step 3
Now we have to save this Swatch set so we can use it in our poster we’re about to make. In the bottom left corner of our Swatches panel we’ll select Save Swatches from the Swatches Library Menu. Name it anything you want, I used „pattern.” You can now close this document, as we won’t need it anymore.
Step 4
Here is the color palette we’ll be using for this tutorial. There are four colors and a pattern. We’ll be using a mix of beige and light blue colors.
3. Create Your Portrait
Step 1
Now that we have our reference images and pattern created, it is time to create a New document in Illustrator. I used a canvas size of 700 x 850px.
Step 2
We’re going to start with our darkest guide layer, this will be our pattern layer. We’re going to outline the layer using the Pen Tool (P). So to start we’re going to go to File > Place and select our first reference layer into Illustrator. If you’ve been following verbatim, this file to place is called „patternguide.psd”.
Step 3
Let’s stop for a moment and discuss the proper use of the Pen Tool (P) in Illustrator. This is one area where Illustrator handedly trumps Photoshop, but only if you use it correctly.
For any curve you basically have three clicks; two are anchor points, and the other is your curve point. You place your curve point at the highest point of your curve. You place the anchors at where the curve starts and ends.
One click is all that is needed when you are creating a curve. You can then change the curve points to curves after you have done the entire shape. To convert them use the Direct Selection Tool (A) and click on the Convert Selected Anchor Points to Smooth icon.
Step 4
Before we can outline our first layer, we need to load our pattern into the Swatches Library. To do this select Other Library from the Swatches Library menu in the Swatches panel.
Step 5
Okay, so back to outlining our first layer. Create New Layer below the file you just placed into Illustrator. This layer will hold our outline. We place it below because it is easier to see what we’re outlining that way.
Now we grab our Pen Tool (P), give it a stroke of null, and a fill of our pattern. Then start outlining all the black areas with the Pen Tool (P). The key is to average it out, don’t follow too closely to the guide layer. Just roughly outline, and don’t worry about our curves, as we’ll fix that after we create our outline.
Note: This is the most tedious part of the process.
Step 6
You might have noticed that there are portions in the middle that are lighter that we just went right over with outlines. Well we’re going to fix that by outlining those using the same process. Fill those with our beige color, as shown below. We’ll do this on a new layer just above the pattern layer. After you’ve done that, you should have something similar to the following.
Step 7
Now we smooth out the shapes we just created. We want most of our points to be smooth, but I find it looks better if you leave a few the way they are. View the effect below from smoothing both the pattern and beige layer.
Note: I made this image out of order and the pattern was wrong, don’t worry about the color difference.
Step 8
Now we just do this same thing for each layer. Roughly outlining it, then outlining the highlights with the color immediately below it, and then smoothing out our outlines. The next layer should have solid light blue, followed by red, and then finally our dark blue.
Step 9
Okay, you should have something like the following. The tedious part is over. Now to make it look like a poster. First we’ll put a beige filled rectangle below all these layers, this will serve as our background.
Step 10
Now we’ll need to put our red and light blue halves in. We’re going to do this just above the beige rectangle layer. Use the Rectangle Tool (M) to place the two rectangles.
Step 11
Our poster is looking pretty good. Let’s create the space needed to add the inspiring text at the bottom. You’ll probably have to enlarge your canvas area. To do this go to File > Document Setup. I added 300px onto mine.
Step 12
Now extend you beige rectangle so that it covers the new length of your canvas. Then create a new rectangle filled with our dark blue color. It should be a quarter the size of main subject.
Step 13
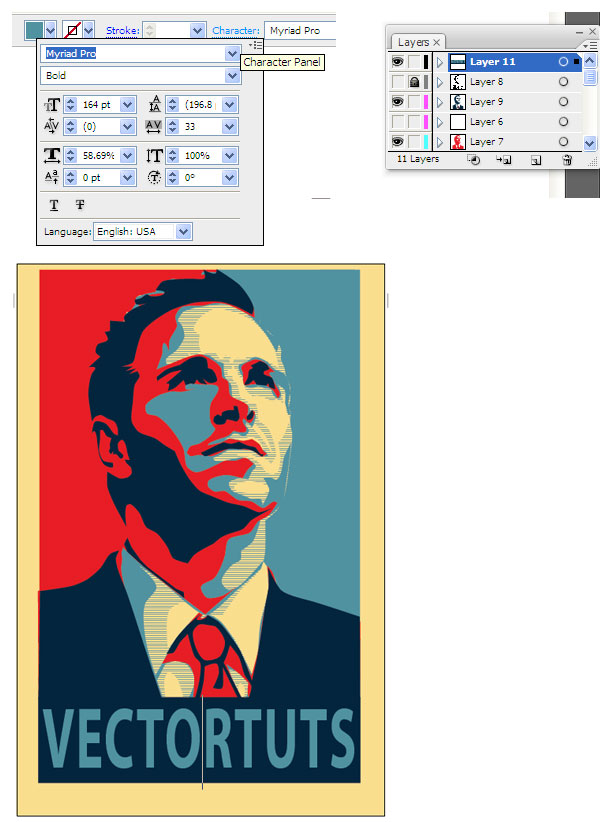
Time to add our inspiring word. We’ll use light blue for the font color, and we want to change the text settings so that the word fills most of the dark blue rectangle. To change the spacing between the characters, use the Character panel. This is available to us when we are using the Text Tool (T). I used the font „Myriad Pro”.
Step 14
Almost finished, we need to clean up our borders a little bit. First, select every layer, but your beige layer. Then create a Group (Control + G). Then Vertically and Horizontally Align them to the artboard.
Step 15
Now we’re going to clean up the edges of our poster. Cover the layers that we grouped in a rectangle of any color. Then use the Pathfinder panel, and select Subtract Shape From Area.
Awesome Work! You’re Now Finished!
Way to go, we’re done! We managed to create a really awesome effect without needing a whole lot of artistic ability. We also learned how to efficiently use the Pen Tool, and a nice way to use Photoshop and Illustrator in tandem. This is my first tutorial, so I’m sure there will be questions. Feel free to ask in the comments, and I’ll try and answer as quickly as I can. Thanks!
Want to Learn More?
Check out the following great poster design tutorials to learn more:
We’ve all heard them before. The 101 reasons why art will never be a sustainable career. But it’s time to throw away all that negativity and pick up some real hope, because the digital age is changing the game for artists.
In today’s world, there are more opportunities than ever which allow artists to do what they love while creating a sustainable income. And if you’re willing to put in the time and work, you too can reap the incredible rewards of this new age in being a creative.
Today we’ll dive into one avenue that artists turn to when they want to figure out how illustrators make money online. We’ll take a look at what Patreon is, how to use Patreon as an artist, how to set up an account, look at sites like Patreon, and consider the alternatives to building these types of businesses online.
Creator Jack Conte was looking for a way to support himself and his YouTube channel when he decided to found Patreon. Patreon is a crowdfunding platform that allows creators to fund their projects by fans, or patrons, who donate money on a recurring basis.
How Illustrators Make Money on Patreon
Similar to crowdfunding sites like Kickstarter, Patreon allows users to create their own profiles where fans can support their work, either through pledges of monthly Patreon donations or donations per project.
You can help your favorite Patreon artists hit their goals and be one step closer to supporting their dreams of making a living doing what they love.
Patreon is reinventing the way artists are supported by their community. Pledges are separated into several different tiers, with amazing rewards at each level. And with fans able to pledge as little as $1 per cycle, there’s a real sense that you’re able to support artists without needing to break the bank.
Paid to Do „Nothing?”
So how do you convince people to give you Patreon donations? And are they really okay with it?
Don’t be fooled by the naysayers who don’t understand what it takes to build a business online. The number one misconception you’ll run into is people thinking that you’re getting paid to do nothing.
But let’s be real. Patreon artists by no means are accepting handouts.
And it’s not just a platform for visual artists. Writers, musicians, podcasters, photographers, and creatives of all different shapes and sizes use Patreon to fund their projects. Each of these projects takes from dozens to hundreds of hours to complete, on top of the years of experience put into mastering their craft.
So think of all those years you spent creating for others without ever receiving a single penny. Allow Patreon to buy back those years by supplying you with a way to support yourself reliably.
How Do I Start a Patreon?
Learning how to start a Patreon takes a few simple steps. Let’s walk through them together.
1. Head to the Patreon Website
The first step in learning how to start a Patreon is to head to their website. In the upper right-hand corner, click the red button that says Create on Patreon.
2. Choose a Sign-Up Option
You’ll find three sign-up options: Sign up with Google, Sign up with Facebook, and the choice to create an account without linking.
What’s the difference? Choosing either of the first two sign-up options will link your Patreon account to Google or Facebook, meaning you won’t need to make new login information. However, that does mean that if you lose your Google or Facebook account, you lose your Patreon account too.
3. Complete the Account Creation Steps
Once you’ve signed up, you’ll be greeted with five steps to get your account ready.
Choose Content Categories
On Patreon, you can promote anime, podcasts, films, and other creative arts. You can choose up to two categories from the list to describe the content you’ll show on your Patreon.
18+ Age Filter
This is an important step for Patreon artists. Patrons on Patreon come from many different age groups. If you have content that’s appropriate for older audiences and not for younger ones, this will add an 18+ pop up to visitors of your page.
Currency Options
Patreon offers three payout currency options to creators: US Dollars, Euro, or British Pounds.
Don’t worry. Even if you don’t see your local currency, you can still create on Patreon! This article from the Patreon Help Center addresses how you can receive payouts if you’re not based in the United States, United Kingdom, or Europe.
Offer Exclusive Merch
Part of the appeal of making Patreon art is connecting with patrons, and you can build that relationship with merch. If you choose this option, you design the merch and Patreon will handle production and shipping for an added fee to your membership plan.
Pro tip: tying merch to different tiers is a great incentive for patrons. Learn about the relationship between tier pricing and merch from the Patreon Help Center.
Merch through Patreon isn’t mandatory. There are plenty of other Patreon reward ideas for artists that you can find to show your patrons love.
Reserve Custom URL
If you want to set up a custom URL for your Patreon page, you can do so here. You’ll need to connect at least one social media account on this page to be able to use this option.
Take this opportunity to connect all your social accounts to your Patreon. This is how to use Patreon as an artist with an interconnected presence.
4. Set Up Account Details and Launch
We’re almost done learning how to start a Patreon! Your last and most important step will be filling out the important account details. This is where you share information about you and what you create, customize tiers, choose merch, edit payment information, and other account information. Note: you won’t be able to launch your Patreon until you finish the required items in the checklist (shown below).
Once you’re finished with this step, click Launch in the upper right-hand corner.
And you’re done! If you’ve been wondering „how do I start a Patreon”, now you know how quick the process is.
How to Be Successful With Patreon
Want a look at a day in the life of a creator? Illustrator Andreas Rocha shares the reality of what it takes to become one of the successful Patreon artists. Their insights are useful if you need some Patreon help.
„Posting my work on Patreon is different from posting paintings on my online portfolio. There is not so much freedom as I have to prepare the files and paint following certain guidelines so people can more or less follow what is going on when they watch the videos. I also have to try and find themes that people appreciate and find interesting.
It’s challenging, because ultimately you have to keep motivated to post but that can only work if people support you. If you set pledge levels too high people won’t support you, but if the income is too low it ends up not being rewarding. You must have patience as the number of followers rises, very slowly. My goal with Patreon is to share my workflow with people interested in knowing how I work and, of course, to provide another source of income.”
I asked even more artists about their insight into what it takes to be successful on Patreon. Let’s take a look at what they all have to say.
Set Realistic Goals
As with any project, goals help not only with motivation but establishing what your end game is. And for Patreon donations, goals also allow your fans to help you by understanding what your needs are. Need new equipment? Say it. Looking to make this your full-time job? Be honest. Don’t be afraid to post your real goals while asking for pledges. It’s how illustrators make money from Patreon.
Digital artist DanteWontDie knows all about goal-setting on Patreon. Here is what he had to say:
„I
think Patreon is a place that you need to prove yourself. You have to let people
willingly pledge to see your art. My
page was set up at the beginning of 2015 and I think I’m pretty satisfied with
my monthly income on that, but I’m still far from my ultimate goal ($2000
per month).
I know there’s still a lot of space for me
to improve and I really appreciate those who have already pledged on my page now. Accumulating
Patreon pledges is like setting up your own business. Do you want to be a full-time artist, or just do it for fun? The good thing is you
have almost zero costs, so you can manage your time accordingly.”
This is one of the most important pieces of Patreon help you’ll get. If you showed up to your work only a few times a week, you wouldn’t have the greatest reputation. So just like any other profession, make sure you’re able to post regularly in order to keep your patrons interested and Patreon donations coming in.
Icarus, artist and creator of the analog scifi comic Inhuman, offer his advice on the best way to approach posting regularly:
„Engage,
engage, engage! Build your brand before launching as much as possible, and then
encourage people to check out your Patreon whenever possible.
Rewards are a
must, if that’s WIPs or access to zips of unreleased art or whatever. People
just like to get „something” for their money besides just the knowledge they’re
helping you. Patreon
is half of our household income, so it helps a lot. More than anything, being friendly in whatever you do also pays!”
Though it’s not uncommon that people will support you just for the heck of it, one of the best ways you can keep your patrons happy while garnering new ones is to offer them valuable rewards. This could be Patreon anime commissions, shoutouts, or other rewards.
Freelance Digital Artist Didi Esmeralda offers tutorials and commissions for her patrons depending on the reward tier they select. She reminds us why it’s important to have Patreon reward ideas for artists and to keep in communication with your fans for support:
„Each
artist must divulge their own work on social networks to be appreciated by
followers and fans, and then communicate to their followers that they can
support the work in patreon, and get exclusive content that can be found there.”
But remember, Patreon is not your only option here. While there are other sites like Patreon, taking advantage of social media and online business goes way beyond just crowdfunding sites. Here are just a few other areas that are some great alternatives to sites like Patreon:
Though artist Racheal Scotland is new to building her presence on Patreon, she’s a talented artist with years in the industry. Take it from her on what other sites like Patreon and alternatives you can look to:
If
you’re looking to live off your art, you can open shops on DeviantArt, INPRNT, and Etsy. If
you’re confident in your work, open commissions. There’s always
someone who’s bound to help support your work.
As long as you make sure people know where to find your work, market all
your avenues. Create a portfolio. And use all the platforms available to you.
Graphic Designer Roberto Blake is not a Patreon artist but definitely knows the online grind. From his popular YouTube channel to his offline speaking engagements, he’s found a way to not only build a community but one that supports his creative endeavors. Here’s his advice:
„A service based business
is not sustainable long term. My variations of diversifying income (advertising/affiliate marketing/public speaking/paid
writing/consulting/webinars) may not be a fit for everyone.
However, creating a product that can generate a combination
of passive and active income can make you more secure.
Envato, for instance,
is a great marketplace and I buy assets to modify to save my time pretty
regularly. Align
your passions to a purpose and the work in between is figuring out a practical
application of it. Making
your moves with intention and clarity makes all the difference in where you end
up.”
Thank you to all the artists who gave their wonderful advice. If you want to learn more about them, feel free to follow their work on social media and support their pages below:
Whether you make Patreon anime or abstract illustrations, there’s an audience out there. If you point them in the right direction, your fans will support you more than you could ever imagine. So take a risk and put yourself out there to build an incredible community that will back your dreams.
Who knows, maybe with the help of Patreon or other online avenues, you’ll be able to make a living doing what you love. Now that you know how to use Patreon as an artist, it’s time to get started. So how will you put yourself out there today?
If you’re an artist starting out online, you can find more helpful articles and social media graphics from Envato Tuts+ below. Have any experience with Patreon? Let us know how you like it in the comments below.
Coupons are a great way to reward loyal customers and clients, so they should look as attractive as the discounts they’re offering.
Placeit has many gorgeous Coupon Templates for you to choose from
If you are a small business looking for a cost-effective way to create a professional quality coupon, then you have to check out Placeit. Not only does Placeit offer hundreds of gorgeous coupon templates, but it also provides an easy to use coupon maker so you can make your own coupon quickly and easily in a few simple steps.
Let me show you how.
How to Make Coupons With a Digital Coupon Creator
Step 1
Go to Placeit.net and enter ’Sales Coupons’ in the search bar.
Browse the coupon design ideas available.
Select a coupon maker template you like.
Click on it to open up the coupon creator.
Step 2
Now you will create your custom coupon template, starting with the controls on the right.
Select a background image for your coupon template. If you want to upload your own photo, this is where you can do so by clicking on Upload Image.
Alternatively, you can elect not to use a photo by selecting No Image and choosing a beautiful colour for your background instead.
If your business has an icon that you wish to use, you can upload it next or choose an icon you like from those on offer.
Now select a top and bottom banner colour for your coupon.
Step 3
When you are done, go to the left of the template.
Here you will enter the text for your coupon and change the font style and colour if you like.
You can also add additional text fields if you need them.
Step 4
You can move and resize your text or top and bottom banners if you like, and use the Reset Layout button to return to the default setting if you don’t like what you’ve done.
Step 5
When you’re happy with your design, hit the Download button.
This will take you to the download page, where you have two options for purchasing your custom coupon design.
You can either pay a small fee for your single design or sign up for a monthly or yearly subscription that offers you unlimited downloads of all of Placeit’s designs, mockups, logos, videos, and gaming templates.
Now that you know how to design a coupon, let’s look at some of the best coupon design ideas available at Placeit.
Who can resist a 2 for 1 offer, especially when it’s paired with a mouth-watering image like this one? Of course, you can easily use your own image and change the text to advertise a completely different kind of offer too.
Why not learn how to design a coupon by playing with a template like this one? Switch out the background image, change the text, and see how easy it is to make your own coupon.
Boom! The offer is hard to miss here, with super-sized text and that bright red background. If it’s too much, you can easily pull back a little by tweaking the template online.
Learning how to make coupons can be time-consuming and tedious, but a coupon maker template like this one means you can get it done in no time and get back to focusing on the more important aspects of your business.
Did someone say „smoothie bowls”? That one looks particularly delicious, but of course you’ll have your own enticing image to use to promote your offer.
This business coupon template is so flexible. The example is for a photography studio, but you can easily change the text and use it to promote pretty much any type of company.
With this bakery or restaurant coupon template, you can give most of the space to your imagery, but there’s still enough space to give people a nice discount in the bottom half.
You know the drill by now. This is billed as a gym coupon template, but by changing the image and text using the digital coupon creator, you can promote any business you want!
Try a touch of mystery with this coupon, which gives viewers a glimpse of the clothes on the left but leaves the rest of them partially hidden behind the text and colour overlay.
Why not tie your offer in with a particular holiday to make this an Easter coupon template or other holiday coupon template? The sky’s the limit with Placeit’s digital coupon creator.
Out of coupon design ideas? No problem. You can use a template like this one as inspiration to make your own coupon. You’ll never run out of ideas again!
Creative typography can be surprisingly persuasive. This coupon makes great use of different typefaces to communicate its message. Offering free coffee always helps too!
Here’s a simple gift coupon template that you can use to help spread the word. The elegant design and abstract graphics make it easy to use it for a range of different businesses with minimal changes required.
Anyone who can do that pose definitely deserves their 50% off! The rest of us, though, can still use the template to make a coupon that’s visually appealing and that customers will want to keep and use.
Some of the templates here are generic, but others cater to a specific niche. This car wash coupon template is definitely in the „niche” category. If you happen to run a car wash and need to make a coupon, it’s your lucky day!
You don’t need to be a designer or even know how to make coupons. All you need to do is use a referral coupon template like this one and edit it right in your browser. So simple!
Whether you’re vegan or carnivore, you can get your customers salivating by uploading your best imagery to this restaurant coupon template (and by giving your best discount, of course).
Check out the elegant simplicity of this referral coupon template. The white text on a black background has a wonderful minimalism, and the percentage line extending to slice through the number is a lovely touch.
Need some fresh coupon design ideas? Check out an online coupon maker template like this one, which includes some cool design elements while keeping the attention focused on your all-important discount offer.
When you’re learning how to design coupons, one popular principle is the dotted line at the edge to encourage people to „clip” them. Another is to make your offer super clear. This business coupon template makes great use of both those principles.
You’ve got to admire the optimism of someone who would create a coupon template with a $1,000 discount offer. If you’re not feeling so generous, no problem—you can change the amount, as well as all the other details, with the online coupon maker.
Sometimes, bigger is better. If you want to grab your customers’ attention by screaming „SALE” in big, bold letters against a bright red background, this is the business coupon template for you.
Want to offer a special discount to students? Use this student coupon template to get the job done. Of course, you could also use the same template to offer a range of different discounts.
Offer your customers a great deal on the holiday of their dreams! This holiday coupon template gives plenty of space for an enticing image to inspire wanderlust, as well as text to specify the details of the deal.
Let your customers print off a coupon giving them a discount on a meal. This restaurant coupon template is the perfect solution for making people’s mouths water and getting them to come back to your restaurant. Try offering an extra discount to boost reservations on slow nights of the week.
Here’s a printable gift coupon template that’s suitable for a variety of different businesses. Give it out to reward your loyal customers, or let people buy the certificates to give to their friends.
Coupons can be either physical or digital these days, and this digital coupon creator is perfect for creating a web-based coupon. If the background graphic is not for you, don’t worry—there are plenty more to choose from.
Want to generate more referrals for your business? A coupon is a great tactic to use. With this simple referral coupon template, you can drum up business for your spa, salon, or other type of company.
Let your customers give a gift that also spreads the word about your business! With this gift coupon template, you can make a stylish gift certificate that people will want to give away.
This last one won’t be to everyone’s taste, but if you like bright colours, bold text, and trippy designs, you’ll love it. If not, you can always use the online coupon maker to tone things down a bit.
Make Your Own Coupon Today
Placeit is an excellent source for premium coupon designs. You can create your own with the online coupon maker in minutes and download it for a small fee.
Alternatively, if you regularly need mockups, logos, banners, and other design resources, Placeit offers unlimited downloads for one low monthly fee.
Check out the following articles to see what other terrific resources are available from Placeit.
If you are searching for a theme to install on a new WordPress website, then one provider you will certainly come across is Elegant Themes. Founded by Nick Roach in his college apartment, Elegant Themes is one of the most popular WordPress theme stores around. What started as a repository of 80+ themes and a […]
If you are searching for a theme to install on a new WordPress website, then one provider you will certainly come across is Elegant Themes. Founded by Nick Roach in his college apartment, Elegant Themes is one of the most popular WordPress theme stores around. What started as a repository of 80+ themes and a […]
Logos are meant to make you stand out from the crowd, so if you’re looking for a YouTube gaming logo that’ll make you stand out, then why not try designing your own.
Don’t worry—that’s not as hard as it sounds, especially when you use the best gamer logo maker around, the Placeit.net Logo Maker. In this article, we’ll show you how to make a gaming logo for YouTube and share a few examples of cool YouTube logos for gaming available at Placeit.
You can type your channel name in the top bar to see how your name would look on all the available YouTube gaming logos and select one that you like, or you can browse the Logo Templates first to find one you like and add your channel name during customisation.
When you find a YouTube gaming logo you like, click on it to open the YouTube gaming logo maker.
Step 3
To start customising your YouTube gaming logo, move to the controls on the right of the template and choose a gaming logo maker avatar.
If you don’t like the images on offer, enter a search term in the search bar to find more appropriate images.
Once you’ve chosen a gaming logo maker avatar, chose a background colour for your logo and a main colour and accent colour for your avatar.
Step 4
Now move to the left side of the YouTube gaming logo and enter the channel name for your logo.
You can also change the font and font colours in this area.
Step 5
When you have finished and are satisfied with your gaming channel logo design, you can hit the Download button at the top of the YouTube profile logo maker.
This will take you to the download page, where you have two options for purchasing your cool logo gaming template.
You can either pay a small fee for your logo or sign up for a monthly or yearly subscription that offers you unlimited downloads of all Placeit’s designs, mockups, logos, videos, and gaming templates.
Now that you know how to make a gaming logo for YouTube, let’s look at some of the best gaming logo templates available at Placeit.
Bees are great collaborators, so this gaming logo design would be especially useful for a YouTube channel focusing on team games or eSports. It’s easy to customise it with the YouTube gaming logo maker at Placeit.
Draw on the mythical allure of dragons to create your gaming channel logo. You can play with different fonts and graphics to create a really cool logo for gaming.
If you’re not sure how to make a professional gaming logo for your YouTube channel, then forget about struggling with Photoshop and use one of the templates offered by the Placeit.net logo maker. This one’s ideal for war gamers and fans of classic shoot-em-ups.
Create the best gaming logo for your YouTube channel by using this cool Spartan graphic as a starting point and building around it. In just a few minutes, you’ll have an impressive gaming channel logo, ready to upload.
What better way to make a gaming logo design than by choosing this wacky image of a mutant carnivorous plant? Logos should be memorable, and this one will certainly make your channel stand out from the crowd!
What makes Placeit the best gamer logo maker out there is the sheer range of designs on offer, like this striking image of an aggressive, charging rhino. You don’t need to know how to make your own gamer logo when there are so many options for you to choose from and tweak right in your browser.
Here’s a cool logo maker for gaming channels on YouTube. Draw on the mystique of old-time Mafia bosses from the era of the Godfather films, with the wide-brimmed hat, the cigarette, and of course the gun ready to fire.
If you’re searching for cool YouTube logos for gaming, you can stop looking now. This is the ideal option to give your channel a professional look and impress your viewers and subscribers. It’s inspired by classic war and fantasy games, but it could work for other gaming genres too.
Want to know how to make your own gamer logo? It’s simple: just start with a template like this one, and start customising it by clicking on buttons in your browser. It really is that easy! It’s free to experiment, so why not click through and give it a try?
A mythical creature is a great choice when you’re making a cool logo for a gaming channel. Either stick with this griffin as it is, or use the YouTube gaming logo maker to recolour it, reposition it, or even choose a different graphic altogether.
Let’s finish our roundup of the best gamer logo makers with this stylish image of a ninja about to draw his sword. Put your own channel name in there and see how it would look. The result could be a really cool logo for a gaming channel.
Make Your Own Cool YouTube Logo for Gaming Today
If you want to know how to make a professional gaming logo, check out the Placeit YouTube gaming logo maker. It will help you create your own cool logo gaming template in a matter of minutes and download it for a small fee.
Alternatively, if you regularly need mockups, logos, banners, and other design resources, you can choose to sign up for a monthly or yearly Placeit membership for one low monthly fee.
And if you’re interested in the other digital assets Placeit has to offer, check out these informative articles:
Logos are meant to make you stand out from the crowd, so if you’re looking for a YouTube gaming logo that’ll make you stand out, then why not try designing your own.
Don’t worry—that’s not as hard as it sounds, especially when you use the best gamer logo maker around, the Placeit.net Logo Maker. In this article, we’ll show you how to make a gaming logo for YouTube and share a few examples of cool YouTube logos for gaming available at Placeit.
You can type your channel name in the top bar to see how your name would look on all the available YouTube gaming logos and select one that you like, or you can browse the Logo Templates first to find one you like and add your channel name during customisation.
When you find a YouTube gaming logo you like, click on it to open the YouTube gaming logo maker.
Step 3
To start customising your YouTube gaming logo, move to the controls on the right of the template and choose a gaming logo maker avatar.
If you don’t like the images on offer, enter a search term in the search bar to find more appropriate images.
Once you’ve chosen a gaming logo maker avatar, chose a background colour for your logo and a main colour and accent colour for your avatar.
Step 4
Now move to the left side of the YouTube gaming logo and enter the channel name for your logo.
You can also change the font and font colours in this area.
Step 5
When you have finished and are satisfied with your gaming channel logo design, you can hit the Download button at the top of the YouTube profile logo maker.
This will take you to the download page, where you have two options for purchasing your cool logo gaming template.
You can either pay a small fee for your logo or sign up for a monthly or yearly subscription that offers you unlimited downloads of all Placeit’s designs, mockups, logos, videos, and gaming templates.
Now that you know how to make a gaming logo for YouTube, let’s look at some of the best gaming logo templates available at Placeit.
Bees are great collaborators, so this gaming logo design would be especially useful for a YouTube channel focusing on team games or eSports. It’s easy to customise it with the YouTube gaming logo maker at Placeit.
Draw on the mythical allure of dragons to create your gaming channel logo. You can play with different fonts and graphics to create a really cool logo for gaming.
If you’re not sure how to make a professional gaming logo for your YouTube channel, then forget about struggling with Photoshop and use one of the templates offered by the Placeit.net logo maker. This one’s ideal for war gamers and fans of classic shoot-em-ups.
Create the best gaming logo for your YouTube channel by using this cool Spartan graphic as a starting point and building around it. In just a few minutes, you’ll have an impressive gaming channel logo, ready to upload.
What better way to make a gaming logo design than by choosing this wacky image of a mutant carnivorous plant? Logos should be memorable, and this one will certainly make your channel stand out from the crowd!
What makes Placeit the best gamer logo maker out there is the sheer range of designs on offer, like this striking image of an aggressive, charging rhino. You don’t need to know how to make your own gamer logo when there are so many options for you to choose from and tweak right in your browser.
Here’s a cool logo maker for gaming channels on YouTube. Draw on the mystique of old-time Mafia bosses from the era of the Godfather films, with the wide-brimmed hat, the cigarette, and of course the gun ready to fire.
If you’re searching for cool YouTube logos for gaming, you can stop looking now. This is the ideal option to give your channel a professional look and impress your viewers and subscribers. It’s inspired by classic war and fantasy games, but it could work for other gaming genres too.
Want to know how to make your own gamer logo? It’s simple: just start with a template like this one, and start customising it by clicking on buttons in your browser. It really is that easy! It’s free to experiment, so why not click through and give it a try?
A mythical creature is a great choice when you’re making a cool logo for a gaming channel. Either stick with this griffin as it is, or use the YouTube gaming logo maker to recolour it, reposition it, or even choose a different graphic altogether.
Let’s finish our roundup of the best gamer logo makers with this stylish image of a ninja about to draw his sword. Put your own channel name in there and see how it would look. The result could be a really cool logo for a gaming channel.
Make Your Own Cool YouTube Logo for Gaming Today
If you want to know how to make a professional gaming logo, check out the Placeit YouTube gaming logo maker. It will help you create your own cool logo gaming template in a matter of minutes and download it for a small fee.
Alternatively, if you regularly need mockups, logos, banners, and other design resources, you can choose to sign up for a monthly or yearly Placeit membership for one low monthly fee.
And if you’re interested in the other digital assets Placeit has to offer, check out these informative articles:
When you want to create stunning monograms and logos, you’ll need to work with an impressive monogram font.
RADON is just one of the many fabulous monogram font styles you’ll find at Envato Elements
We’ve created a list of the 25+ best free fonts for monograms and logos as well as a selection of premium monogram font styles you can find at Envato Elements.
Unlimited Monogram Font Downloads at Envato Elements
When you just don’t have the money to spend on expensive fonts for your project, free fonts are a great option. But free fonts can impose cumbersome attribution commitments or licensing and use restrictions, and they can carry the possibility of downloading hidden malware from random online sites.
Bearing this in mind, there is an alternative resource that allows you to access hundreds of premium monogram fonts while sticking to a budget. It’s called Envato Elements, and it’s an incredibly inexpensive resource for unlimited monogram fonts.
In fact, you can download as many monogram font styles as you want, as frequently as you want to, for one flat monthly fee. That monthly fee also gives you unlimited access to thousands of quality digital assets like graphic templates, photos, business card templates, and much more. Let’s take a look at some of the best monogram fonts you can find at Elements.
First up is the very stylish and totally impressive Raisa Script Monogram Font. This fancy monogram font is perfect for creating a personalised monogram logo or for creating a two-letter monogram with an authentic hand-crafted feel.
Make your own monogram with this bold and unique font, BLACK – Monogram Font Download. This uppercase font comes in five different weights, from light to heavy, so that you can mix and match to create your own distinct look. A perfect monogram initials font for those who like to make their own mark.
Check out this gorgeous script monogram font. A great choice when you want to bring a personal touch to your monogram initials. This gorgeous, free-spirited font will definitely impart an air of adventure and whimsy on your monogram design.
This curly monogram font is for the romantic in you. The font includes unique flourishes and swirl letters in the form of hearts, perfect for reinforcing the theme of love when used on your Valentine’s, wedding, or anniversary cards. Use it to create monogram initials with a bit of flair.
This block monogram font with its clean, solid lines creates a strong, bold feel. Use it as a monogram initials font or an embroidery monogram font for a modern approach to apparel branding.
Need to create a monogram logo with a contemporary feel? This is the monogram font for you. The font includes uppercase characters, numbers, and punctuation in three styles: regular, bold, and deco. A great font for creating unique monogram styles, this one would also work well as an embroidery monogram font.
Matilna Samuela is a stylish cursive monogram font that’s an excellent choice when you want to bring a more personal style to your monogram initials or monogram logo. The font offers two styles: one with clean brush strokes and one with slightly roughened brush strokes. Use them together or separately according to your preference.
Monogram letters need to be distinct and eye-catching, and when you use this modern font, you’ll certainly create a monogram logo that’s both. This strong and stylish font includes uppercase characters, numbers, and punctuation.
This fancy monogram font is something to behold. The Japanese/Art Deco influenced font offers uppercase letters in four weights that can be combined in various ways to generate any number of stunning monogram ideas.
When you want to make a bold statement, this block monogram font is the right choice. The font comes in five weights: thin, light, regular, bold, and black. Mix them to come up with unique monogram ideas. A great font for two- or three-letter monograms and logos.
Use this lovely cursive monogram font to create an elegant and feminine monogram logo. This might even work if you’re looking for an embroidery monogram font with a delicate touch. The handwritten font contains upper and lowercase characters, numbers, and punctuation.
This monogram font download perfectly combines artistic symbols with typography. The font offers finely crafted uppercase characters that are beautiful and distinct in their own right. Use this fancy monogram font in your branding or logo creation projects.
Looking for cute monogram ideas? This curly monogram font gives you no end of beautiful monogram letter combinations that you can use to create your own distinct brand. Get to work creating your gorgeous logo today.
The Best Free Monogram Fonts to Download
Now that you know the kind of monogram fonts available at Envato Elements, let’s take a look at the best free fonts for monograms available to you on the internet.
This free monogram font features a lyrical baseline and beautiful, expressive lines. If you love script monogram fonts as much as we do, you’ll love this delightful free font.
Download this wonderful font for free and create a two-letter monogram you can be proud of. The font includes uppercase characters, numbers, and punctuation.
AMAX is a free font download that will take your monogram logo to the next level. This wonderfully futuristic display font uses an engaging strikethrough design which is sure to make your monogram logo stand out.
Looking for a superb free monogram font for download? Check out this distinctive font that features uppercase characters designed to stand out. The font offers many alternative options and weights that you can experiment with to get just the right look for you.
Make your own monogram logo with this awesome free font download. The modern sans-serif font consists of bold, geometric uppercase letters, numbers, and punctuation. A strong font for making a bold statement.
Electro is a monogram initials font that will bring a stylish twist to your logo. This free monogram font for download plays with think lines and sharp edges to create a futuristic style that is hard to forget.
How awesome is this monogram font that’s totally free to download? The font includes lower and uppercase characters in three different weights. Get this free font and get to work creating the monogram design of your dreams.
How about this fancy monogram font to create a stunning logo? Hard to believe you can download this font for free, right? The font includes 351 glyphs, so you can do loads of experimenting to get the exact look you want.
Create a feel of the hand-drawn when you use this free font download to make your own monogram. The font includes upper and lowercase characters, numbers, and punctuation.
Anurati is one of those free fonts for personal use only, so please be aware of that when you download it. You will agree, though, that this futuristic font would certainly make a lovely monogram design.
How’s this for a fancy monogram font? This free monogram font for download definitely deserves its place on our best free fonts list. It’s chic, innovative, and eye-catching, and with the included ligatures and alternate characters, it’s a great font for logos and monograms.
How about this free font download for a three-letter monogram? Its clean lines with rounded curves give it a delicacy that would suit those with understated and minimalist tastes.
If you’re looking for something a bit different, then you’ve got to try this cool and edgy monogram font that’s free to download. Maybe it won’t suit every project, but in the right context, this is a font that would shine.
Cursive monogram fonts make great monogram logos when you’re after a more personal touch. Download this font for free and use it to make your own monogram.
Go bold with this free monogram font. The bold and modern style would make a great monogram logo, but it’s only available for personal use, so bear that in mind when you download it.
This elegant font, with its interesting use of line and wonderful rounded curves, will make a great addition to your toolbox. Make your own monogram today with this delicate font that’s totally free to download.
Looking for cute monogram ideas? Well, how about this free font download that features charming paper cutout letter shapes? Use it for monogram designs that have a craft or art theme.
Nordic would make terrific monogram initials. It offers two styles in three weights, giving you plenty of options to experiment with when you make your own monogram. Download this monogram font for free and get to work.
Looking for elegant monogram ideas? Why not do some experimentation with this ever so lovely free font download? A great minimalist choice for two-letter monograms.
Just look at this amazing and innovative font. Wouldn’t it make wonderfully unique monogram initials? Download this monogram font for free and apply it to contemporary projects that call for a bit of edge.
Looking for a three-letter monogram? Try this free monogram font for download. The bold font composed of thin lines manages to look strong while communicating a certain delicacy.
Download this beautiful cursive monogram free font and create beautiful monogram logos for fashion, design, or wedding themes. The font includes upper and lowercase characters, numbers, and punctuation.
Wouldn’t this free monogram font make an awesome logo? Admittedly it won’t be everyone’s cup of tea, but in the right hands and for the right projects, it would make a powerful and iconic monogram design.
This cool decorative font is another awesome free download that would make a stunning monogram logo. The font offers uppercase characters in unique shapes and is available in two weights: light and bold.
Download this script monogram font for free and make your own distinct monogram. The font has a wonderful hand-drawn feel that makes it ideal for creating logos with a personal touch.
Choose Your Favourite Monogram Font Today
As you can see, there are many terrific free monogram fonts to choose from, but of course if you’re looking for the very best monogram fonts for an important project, we highly recommend Envato Elements.
Elements is an excellent resource for premium fonts and if you often need mockups, icons, and other design resources, Elements offers unlimited downloads for one low monthly fee.
Check out these really helpful articles below for more ideas on excellent fonts: