Archiwum kategorii: Web Tools

How to Make a Book Cover

Post pobrano z: How to Make a Book Cover

In this article, you’ll learn how to make a book cover. Here, you’ll pick up tips on how to make a book in InDesign and create your own InDesign book template, from using InDesign templates to putting together your cover artwork. 

If you’re looking to self-publish your own books and sell them online, or you are making your first steps into professional cover design for clients, this guide will introduce you to the essentials of creating book cover templates. 

Looking for a quick start? InDesign templates are great value and easy to adapt. You can find a huge range of customizable InDesign book cover templates and book layout templates on Envato Elements and GraphicRiver.

book cover mockup
Book cover mockup template

Read on to discover eight key steps for helping you create a book cover design that’s guaranteed to draw in readers. 

1. Pick Your Software Wisely

If you’re dipping a toe into the publishing design world, it can be tricky to know which software you should use to create your book cover. 

You can use almost any design software to create a cover, but some programs are more specialised for creating professional-quality covers. 

Adobe Photoshop isn’t suited for creating inside layouts, but it works perfectly well for creating covers, which are drafted as one page (with the back cover, spine and front cover as one image).

Professional cover designers tend to opt for publishing software as standard, as these tend to give you more control over print specs and typography. Adobe InDesign is the most popular choice, with QuarkXPress a good, if more simplified, alternative. 

With Affinity Publisher’s full launch just around the corner as well, this is likely to be a good-value alternative for cover designers in the future. 

2. Make a Confident Start With a Book Cover Template

If you don’t know how to make a book in InDesign, starting with a downloadable InDesign template can be a sensible and reassuring place to begin designing your cover. Ready-made InDesign book templates can be downloaded from sites like GraphicRiver and can be updated with your own content.

By adapting an existing template, you can learn more about cover design by observing the work a designer has put into a template. Look at how the document has been set up in InDesign to pick up tips for designing your own covers in the future. 

Go to File > Document Setup to view the page size and bleed specs, and Layout > Margins and Columns will show you more details about how the cover has been structured. Has the designer included a flexible spine? Noting these key details will help you understand how professional cover designers work and give you pointers for your own custom book covers. 

Maker apps like Placeit can also provide a helpful solution for new cover designers wanting to build confidence. In these apps, you can choose an existing cover design and adapt it quickly, tailoring the size for multiple print formats or adapting it as an eBook cover.

This Simple Graphic and Text cover template can be adapted quickly using a range of fonts, graphics, and photos.

placeit
Simple Graphic and Text Template on Placeit

Ready to take the next step and create a cover in InDesign? Check out these book cover templates which are quick and easy to customize with your own text and images:

book cover template
book template
Book cover and book layout template
book cover
Book cover template

3. Discover Creative Inspiration

Book cover design is one of the most creative areas of print design. Why? Compared to more commercial print media, like flyers and business cards, book covers are intrinsically linked to art—the connection between a book and a potential reader is emotionally charged. 

Although we are told not to judge a book by its cover, we can’t help doing just that when we browse a bookshelf. By making your cover as creative and striking as possible, you can hope to win the hearts and minds of your readership and convert browsing to sales. 

Professional cover designers know the power of treating a cover like an art canvas. So look to inspirational sources like the fantastic Book Cover Archive and Pinterest to really get your creative juices flowing.

book cover archive
Book Cover Archive
pinterest
By clicking on cover designs which catch your eye on Pinterest, you can browse hundreds of related images, which might spark your next cover idea.

It’s also important to not allow your creativity to outpace your judgement about making the cover genre- and audience-appropriate. 

So crime thrillers have a certain design language (large sans serif fonts in punchy colors like red and blue), as do historical romance novels (which tend towards script fonts and pastel colors). 

If you’re self-publishing an eBook, it pays to be aware of the sorts of design styles which are trending on eBook stores, like the Kindle Store and Google Play

kindle store
Do your research by browsing trending cover designs on the Kindle Store.

Check out these tutorials and courses which show you how to design covers tailored to specific audiences, from young adults to thriller fans:

4. Get the Essentials Right

When you start to design your book cover, you should take a bit of time to carefully prepare your artwork before you begin designing. 

working on a cover in indesign
Carefully consider page size, bleed and guides before you put together your cover artwork in InDesign.

Consider the format and size of the cover—will you print the book as a paperback (softcover) or hardback, or create a digital eBook? Do you have a standard size in mind such as Pocket Book, Demy, or Royal? Look up industry-recommended book sizes, and don’t be tempted to stray from the norm. 

Top tip: If you want to adjust the size of your cover artwork without starting over in a new document, you can use the Free Transform Tool (E) in InDesign to scale the artwork.

You’ll also need to add a bleed to your cover artwork, which allows background elements and color to extend past the page (trim) edge, making for a more seamless printed result. In InDesign, go to File > Document Setup to add a bleed width to your artwork. 

Consider also the expected spine width of your cover, which will have a knock-on effect on the overall width of the cover artwork (which includes the back cover, spine and front cover, from left to right). You can work out the width of the spine once you know the final page count of your book and the paper stock the inside pages will be printed on (which will affect how bulky the book is, and therefore how wide the spine is). 

Use an online spine width calculator to find the final width, or ask for a width spec from your printer. 

Looking for a more in-depth walk-through on how to create a book cover? This book cover design course shows you how to comprehensively design a cover for a paperback book, from setting up the artwork all the way through to exporting the design for professional printing. 

5. For the Front Cover, Focus on Balance, Impact, and Legibility

When designing your front cover, it’s a good tip to let yourself be creative and experiment with different layouts, styles, and themes. The more eye-catching and imaginative you can make your book cover, the better!

long shadow
Book cover mockup template

However, you do tend to find that covers still follow some rules of layout. After all, you will always need to include some essential information, including the book title and author name. The publisher might also want to include a review or short blurb on the front of the book. 

Some cover designers choose to make a feature of the title, creating covers which prioritise typographic design. Alternatively, a single strong photo or graphic can be the dominant feature, with type taking a secondary role. 

Above all, you want to foster balance on your cover, and because covers tend to be relatively small it usually looks best if either type or graphic are highlighted more than the other. This also contributes to the improved legibility of the cover, which is also incredibly important when a cover is viewed from a distance away.

This tutorial shows you how to create a cover design which balances an absorbing image with legible text:

6. Use the Back Cover to Seal the Deal

While the front cover should be designed to advertise the book and provoke an immediate reaction from a reader, the back cover should be used to ‘seal the deal’, providing more enticing information about the book.

Here is the place to include a blurb (a short, interesting summary of the narrative), and possibly reviews (it goes without saying to only include positive ones!).

You will also need to place a barcode (use a barcode generator once you have an ISBN to hand) and optional pricing information on the back cover too. The publisher may also want to include their logo and website, which is usually placed at the bottom of the back cover. 

book cover
Book cover template

7. Don’t Neglect the Spine

Readers won’t always come into contact with your book through looking at the front cover. The sheer volume of books in stores can mean retailers can choose to stack your book alongside thousands of other competing titles, with only the spine visible. So this small area of spine can spell the difference between someone picking up your book or dismissing it in an instant. 

Take the time to consider the design of your spine. You can lift elements from the front cover, such as the title and author name, but you can also add extra quirky details. 

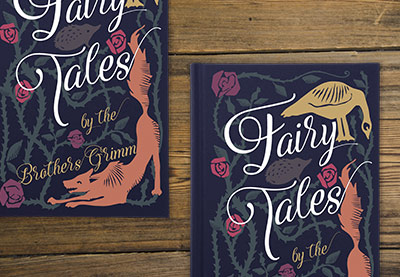
In this example, I designed a vintage-inspired cover for a book of fairy tales. The artwork on the front cover is intricate and fantastical, and I wanted to translate this mood to the spine of the book.

vintage cover

The spine has trailing vines and a rose detail, which frame the script type and make the spine just as romantic and ethereal as the front cover. 

spine design

8. Export Your Cover for Printing

When you’ve finished the artwork for your cover, you’ll need to export your design as a press-ready PDF file to be printed. 

To do this, head up to File > Export in InDesign, and choose Adobe PDF (Print) from the Format menu. Choose Press Quality from the Preset options to ensure your artwork is exported at very high quality. 

Top tip: The cover should be exported as one whole image (including back cover, front cover, and spine).

book cover

Find out more about the essentials of preparing your book artwork for print with this must-read tutorial:

Take Your Publishing Design Skills to the Next Level…

Still unsure about how to start creating your own book templates? A downloadable InDesign template is a sensible place to get started, and can be great for boosting your confidence when you’re dipping a toe into book design.

You can find a wide range of customizable InDesign book templates for book covers and book layouts on Envato Elements and GraphicRiver.

Discover our pick of the best book design tutorials for beginners below:

How to Make a Book Cover

Post pobrano z: How to Make a Book Cover

In this article, you’ll learn how to make a book cover. Here, you’ll pick up tips on how to make a book in InDesign and create your own InDesign book template, from using InDesign templates to putting together your cover artwork. 

If you’re looking to self-publish your own books and sell them online, or you are making your first steps into professional cover design for clients, this guide will introduce you to the essentials of creating book cover templates. 

Looking for a quick start? InDesign templates are great value and easy to adapt. You can find a huge range of customizable InDesign book cover templates and book layout templates on Envato Elements and GraphicRiver.

book cover mockup
Book cover mockup template

Read on to discover eight key steps for helping you create a book cover design that’s guaranteed to draw in readers. 

1. Pick Your Software Wisely

If you’re dipping a toe into the publishing design world, it can be tricky to know which software you should use to create your book cover. 

You can use almost any design software to create a cover, but some programs are more specialised for creating professional-quality covers. 

Adobe Photoshop isn’t suited for creating inside layouts, but it works perfectly well for creating covers, which are drafted as one page (with the back cover, spine and front cover as one image).

Professional cover designers tend to opt for publishing software as standard, as these tend to give you more control over print specs and typography. Adobe InDesign is the most popular choice, with QuarkXPress a good, if more simplified, alternative. 

With Affinity Publisher’s full launch just around the corner as well, this is likely to be a good-value alternative for cover designers in the future. 

2. Make a Confident Start With a Book Cover Template

If you don’t know how to make a book in InDesign, starting with a downloadable InDesign template can be a sensible and reassuring place to begin designing your cover. Ready-made InDesign book templates can be downloaded from sites like GraphicRiver and can be updated with your own content.

By adapting an existing template, you can learn more about cover design by observing the work a designer has put into a template. Look at how the document has been set up in InDesign to pick up tips for designing your own covers in the future. 

Go to File > Document Setup to view the page size and bleed specs, and Layout > Margins and Columns will show you more details about how the cover has been structured. Has the designer included a flexible spine? Noting these key details will help you understand how professional cover designers work and give you pointers for your own custom book covers. 

Maker apps like Placeit can also provide a helpful solution for new cover designers wanting to build confidence. In these apps, you can choose an existing cover design and adapt it quickly, tailoring the size for multiple print formats or adapting it as an eBook cover.

This Simple Graphic and Text cover template can be adapted quickly using a range of fonts, graphics, and photos.

placeit
Simple Graphic and Text Template on Placeit

Ready to take the next step and create a cover in InDesign? Check out these book cover templates which are quick and easy to customize with your own text and images:

book cover template
book template
Book cover and book layout template
book cover
Book cover template

3. Discover Creative Inspiration

Book cover design is one of the most creative areas of print design. Why? Compared to more commercial print media, like flyers and business cards, book covers are intrinsically linked to art—the connection between a book and a potential reader is emotionally charged. 

Although we are told not to judge a book by its cover, we can’t help doing just that when we browse a bookshelf. By making your cover as creative and striking as possible, you can hope to win the hearts and minds of your readership and convert browsing to sales. 

Professional cover designers know the power of treating a cover like an art canvas. So look to inspirational sources like the fantastic Book Cover Archive and Pinterest to really get your creative juices flowing.

book cover archive
Book Cover Archive
pinterest
By clicking on cover designs which catch your eye on Pinterest, you can browse hundreds of related images, which might spark your next cover idea.

It’s also important to not allow your creativity to outpace your judgement about making the cover genre- and audience-appropriate. 

So crime thrillers have a certain design language (large sans serif fonts in punchy colors like red and blue), as do historical romance novels (which tend towards script fonts and pastel colors). 

If you’re self-publishing an eBook, it pays to be aware of the sorts of design styles which are trending on eBook stores, like the Kindle Store and Google Play

kindle store
Do your research by browsing trending cover designs on the Kindle Store.

Check out these tutorials and courses which show you how to design covers tailored to specific audiences, from young adults to thriller fans:

4. Get the Essentials Right

When you start to design your book cover, you should take a bit of time to carefully prepare your artwork before you begin designing. 

working on a cover in indesign
Carefully consider page size, bleed and guides before you put together your cover artwork in InDesign.

Consider the format and size of the cover—will you print the book as a paperback (softcover) or hardback, or create a digital eBook? Do you have a standard size in mind such as Pocket Book, Demy, or Royal? Look up industry-recommended book sizes, and don’t be tempted to stray from the norm. 

Top tip: If you want to adjust the size of your cover artwork without starting over in a new document, you can use the Free Transform Tool (E) in InDesign to scale the artwork.

You’ll also need to add a bleed to your cover artwork, which allows background elements and color to extend past the page (trim) edge, making for a more seamless printed result. In InDesign, go to File > Document Setup to add a bleed width to your artwork. 

Consider also the expected spine width of your cover, which will have a knock-on effect on the overall width of the cover artwork (which includes the back cover, spine and front cover, from left to right). You can work out the width of the spine once you know the final page count of your book and the paper stock the inside pages will be printed on (which will affect how bulky the book is, and therefore how wide the spine is). 

Use an online spine width calculator to find the final width, or ask for a width spec from your printer. 

Looking for a more in-depth walk-through on how to create a book cover? This book cover design course shows you how to comprehensively design a cover for a paperback book, from setting up the artwork all the way through to exporting the design for professional printing. 

5. For the Front Cover, Focus on Balance, Impact, and Legibility

When designing your front cover, it’s a good tip to let yourself be creative and experiment with different layouts, styles, and themes. The more eye-catching and imaginative you can make your book cover, the better!

long shadow
Book cover mockup template

However, you do tend to find that covers still follow some rules of layout. After all, you will always need to include some essential information, including the book title and author name. The publisher might also want to include a review or short blurb on the front of the book. 

Some cover designers choose to make a feature of the title, creating covers which prioritise typographic design. Alternatively, a single strong photo or graphic can be the dominant feature, with type taking a secondary role. 

Above all, you want to foster balance on your cover, and because covers tend to be relatively small it usually looks best if either type or graphic are highlighted more than the other. This also contributes to the improved legibility of the cover, which is also incredibly important when a cover is viewed from a distance away.

This tutorial shows you how to create a cover design which balances an absorbing image with legible text:

6. Use the Back Cover to Seal the Deal

While the front cover should be designed to advertise the book and provoke an immediate reaction from a reader, the back cover should be used to ‘seal the deal’, providing more enticing information about the book.

Here is the place to include a blurb (a short, interesting summary of the narrative), and possibly reviews (it goes without saying to only include positive ones!).

You will also need to place a barcode (use a barcode generator once you have an ISBN to hand) and optional pricing information on the back cover too. The publisher may also want to include their logo and website, which is usually placed at the bottom of the back cover. 

book cover
Book cover template

7. Don’t Neglect the Spine

Readers won’t always come into contact with your book through looking at the front cover. The sheer volume of books in stores can mean retailers can choose to stack your book alongside thousands of other competing titles, with only the spine visible. So this small area of spine can spell the difference between someone picking up your book or dismissing it in an instant. 

Take the time to consider the design of your spine. You can lift elements from the front cover, such as the title and author name, but you can also add extra quirky details. 

In this example, I designed a vintage-inspired cover for a book of fairy tales. The artwork on the front cover is intricate and fantastical, and I wanted to translate this mood to the spine of the book.

vintage cover

The spine has trailing vines and a rose detail, which frame the script type and make the spine just as romantic and ethereal as the front cover. 

spine design

8. Export Your Cover for Printing

When you’ve finished the artwork for your cover, you’ll need to export your design as a press-ready PDF file to be printed. 

To do this, head up to File > Export in InDesign, and choose Adobe PDF (Print) from the Format menu. Choose Press Quality from the Preset options to ensure your artwork is exported at very high quality. 

Top tip: The cover should be exported as one whole image (including back cover, front cover, and spine).

book cover

Find out more about the essentials of preparing your book artwork for print with this must-read tutorial:

Take Your Publishing Design Skills to the Next Level…

Still unsure about how to start creating your own book templates? A downloadable InDesign template is a sensible place to get started, and can be great for boosting your confidence when you’re dipping a toe into book design.

You can find a wide range of customizable InDesign book templates for book covers and book layouts on Envato Elements and GraphicRiver.

Discover our pick of the best book design tutorials for beginners below:

How to Make a Book Cover

Post pobrano z: How to Make a Book Cover

In this article, you’ll learn how to make a book cover. Here, you’ll pick up tips on how to make a book in InDesign and create your own InDesign book template, from using InDesign templates to putting together your cover artwork. 

If you’re looking to self-publish your own books and sell them online, or you are making your first steps into professional cover design for clients, this guide will introduce you to the essentials of creating book cover templates. 

Looking for a quick start? InDesign templates are great value and easy to adapt. You can find a huge range of customizable InDesign book cover templates and book layout templates on Envato Elements and GraphicRiver.

book cover mockup
Book cover mockup template

Read on to discover eight key steps for helping you create a book cover design that’s guaranteed to draw in readers. 

1. Pick Your Software Wisely

If you’re dipping a toe into the publishing design world, it can be tricky to know which software you should use to create your book cover. 

You can use almost any design software to create a cover, but some programs are more specialised for creating professional-quality covers. 

Adobe Photoshop isn’t suited for creating inside layouts, but it works perfectly well for creating covers, which are drafted as one page (with the back cover, spine and front cover as one image).

Professional cover designers tend to opt for publishing software as standard, as these tend to give you more control over print specs and typography. Adobe InDesign is the most popular choice, with QuarkXPress a good, if more simplified, alternative. 

With Affinity Publisher’s full launch just around the corner as well, this is likely to be a good-value alternative for cover designers in the future. 

2. Make a Confident Start With a Book Cover Template

If you don’t know how to make a book in InDesign, starting with a downloadable InDesign template can be a sensible and reassuring place to begin designing your cover. Ready-made InDesign book templates can be downloaded from sites like GraphicRiver and can be updated with your own content.

By adapting an existing template, you can learn more about cover design by observing the work a designer has put into a template. Look at how the document has been set up in InDesign to pick up tips for designing your own covers in the future. 

Go to File > Document Setup to view the page size and bleed specs, and Layout > Margins and Columns will show you more details about how the cover has been structured. Has the designer included a flexible spine? Noting these key details will help you understand how professional cover designers work and give you pointers for your own custom book covers. 

Maker apps like Placeit can also provide a helpful solution for new cover designers wanting to build confidence. In these apps, you can choose an existing cover design and adapt it quickly, tailoring the size for multiple print formats or adapting it as an eBook cover.

This Simple Graphic and Text cover template can be adapted quickly using a range of fonts, graphics, and photos.

placeit
Simple Graphic and Text Template on Placeit

Ready to take the next step and create a cover in InDesign? Check out these book cover templates which are quick and easy to customize with your own text and images:

book cover template
book template
Book cover and book layout template
book cover
Book cover template

3. Discover Creative Inspiration

Book cover design is one of the most creative areas of print design. Why? Compared to more commercial print media, like flyers and business cards, book covers are intrinsically linked to art—the connection between a book and a potential reader is emotionally charged. 

Although we are told not to judge a book by its cover, we can’t help doing just that when we browse a bookshelf. By making your cover as creative and striking as possible, you can hope to win the hearts and minds of your readership and convert browsing to sales. 

Professional cover designers know the power of treating a cover like an art canvas. So look to inspirational sources like the fantastic Book Cover Archive and Pinterest to really get your creative juices flowing.

book cover archive
Book Cover Archive
pinterest
By clicking on cover designs which catch your eye on Pinterest, you can browse hundreds of related images, which might spark your next cover idea.

It’s also important to not allow your creativity to outpace your judgement about making the cover genre- and audience-appropriate. 

So crime thrillers have a certain design language (large sans serif fonts in punchy colors like red and blue), as do historical romance novels (which tend towards script fonts and pastel colors). 

If you’re self-publishing an eBook, it pays to be aware of the sorts of design styles which are trending on eBook stores, like the Kindle Store and Google Play

kindle store
Do your research by browsing trending cover designs on the Kindle Store.

Check out these tutorials and courses which show you how to design covers tailored to specific audiences, from young adults to thriller fans:

4. Get the Essentials Right

When you start to design your book cover, you should take a bit of time to carefully prepare your artwork before you begin designing. 

working on a cover in indesign
Carefully consider page size, bleed and guides before you put together your cover artwork in InDesign.

Consider the format and size of the cover—will you print the book as a paperback (softcover) or hardback, or create a digital eBook? Do you have a standard size in mind such as Pocket Book, Demy, or Royal? Look up industry-recommended book sizes, and don’t be tempted to stray from the norm. 

Top tip: If you want to adjust the size of your cover artwork without starting over in a new document, you can use the Free Transform Tool (E) in InDesign to scale the artwork.

You’ll also need to add a bleed to your cover artwork, which allows background elements and color to extend past the page (trim) edge, making for a more seamless printed result. In InDesign, go to File > Document Setup to add a bleed width to your artwork. 

Consider also the expected spine width of your cover, which will have a knock-on effect on the overall width of the cover artwork (which includes the back cover, spine and front cover, from left to right). You can work out the width of the spine once you know the final page count of your book and the paper stock the inside pages will be printed on (which will affect how bulky the book is, and therefore how wide the spine is). 

Use an online spine width calculator to find the final width, or ask for a width spec from your printer. 

Looking for a more in-depth walk-through on how to create a book cover? This book cover design course shows you how to comprehensively design a cover for a paperback book, from setting up the artwork all the way through to exporting the design for professional printing. 

5. For the Front Cover, Focus on Balance, Impact, and Legibility

When designing your front cover, it’s a good tip to let yourself be creative and experiment with different layouts, styles, and themes. The more eye-catching and imaginative you can make your book cover, the better!

long shadow
Book cover mockup template

However, you do tend to find that covers still follow some rules of layout. After all, you will always need to include some essential information, including the book title and author name. The publisher might also want to include a review or short blurb on the front of the book. 

Some cover designers choose to make a feature of the title, creating covers which prioritise typographic design. Alternatively, a single strong photo or graphic can be the dominant feature, with type taking a secondary role. 

Above all, you want to foster balance on your cover, and because covers tend to be relatively small it usually looks best if either type or graphic are highlighted more than the other. This also contributes to the improved legibility of the cover, which is also incredibly important when a cover is viewed from a distance away.

This tutorial shows you how to create a cover design which balances an absorbing image with legible text:

6. Use the Back Cover to Seal the Deal

While the front cover should be designed to advertise the book and provoke an immediate reaction from a reader, the back cover should be used to ‘seal the deal’, providing more enticing information about the book.

Here is the place to include a blurb (a short, interesting summary of the narrative), and possibly reviews (it goes without saying to only include positive ones!).

You will also need to place a barcode (use a barcode generator once you have an ISBN to hand) and optional pricing information on the back cover too. The publisher may also want to include their logo and website, which is usually placed at the bottom of the back cover. 

book cover
Book cover template

7. Don’t Neglect the Spine

Readers won’t always come into contact with your book through looking at the front cover. The sheer volume of books in stores can mean retailers can choose to stack your book alongside thousands of other competing titles, with only the spine visible. So this small area of spine can spell the difference between someone picking up your book or dismissing it in an instant. 

Take the time to consider the design of your spine. You can lift elements from the front cover, such as the title and author name, but you can also add extra quirky details. 

In this example, I designed a vintage-inspired cover for a book of fairy tales. The artwork on the front cover is intricate and fantastical, and I wanted to translate this mood to the spine of the book.

vintage cover

The spine has trailing vines and a rose detail, which frame the script type and make the spine just as romantic and ethereal as the front cover. 

spine design

8. Export Your Cover for Printing

When you’ve finished the artwork for your cover, you’ll need to export your design as a press-ready PDF file to be printed. 

To do this, head up to File > Export in InDesign, and choose Adobe PDF (Print) from the Format menu. Choose Press Quality from the Preset options to ensure your artwork is exported at very high quality. 

Top tip: The cover should be exported as one whole image (including back cover, front cover, and spine).

book cover

Find out more about the essentials of preparing your book artwork for print with this must-read tutorial:

Take Your Publishing Design Skills to the Next Level…

Still unsure about how to start creating your own book templates? A downloadable InDesign template is a sensible place to get started, and can be great for boosting your confidence when you’re dipping a toe into book design.

You can find a wide range of customizable InDesign book templates for book covers and book layouts on Envato Elements and GraphicRiver.

Discover our pick of the best book design tutorials for beginners below:

How to Make a Book Cover

Post pobrano z: How to Make a Book Cover

In this article, you’ll learn how to make a book cover. Here, you’ll pick up tips on how to make a book in InDesign and create your own InDesign book template, from using InDesign templates to putting together your cover artwork. 

If you’re looking to self-publish your own books and sell them online, or you are making your first steps into professional cover design for clients, this guide will introduce you to the essentials of creating book cover templates. 

Looking for a quick start? InDesign templates are great value and easy to adapt. You can find a huge range of customizable InDesign book cover templates and book layout templates on Envato Elements and GraphicRiver.

book cover mockup
Book cover mockup template

Read on to discover eight key steps for helping you create a book cover design that’s guaranteed to draw in readers. 

1. Pick Your Software Wisely

If you’re dipping a toe into the publishing design world, it can be tricky to know which software you should use to create your book cover. 

You can use almost any design software to create a cover, but some programs are more specialised for creating professional-quality covers. 

Adobe Photoshop isn’t suited for creating inside layouts, but it works perfectly well for creating covers, which are drafted as one page (with the back cover, spine and front cover as one image).

Professional cover designers tend to opt for publishing software as standard, as these tend to give you more control over print specs and typography. Adobe InDesign is the most popular choice, with QuarkXPress a good, if more simplified, alternative. 

With Affinity Publisher’s full launch just around the corner as well, this is likely to be a good-value alternative for cover designers in the future. 

2. Make a Confident Start With a Book Cover Template

If you don’t know how to make a book in InDesign, starting with a downloadable InDesign template can be a sensible and reassuring place to begin designing your cover. Ready-made InDesign book templates can be downloaded from sites like GraphicRiver and can be updated with your own content.

By adapting an existing template, you can learn more about cover design by observing the work a designer has put into a template. Look at how the document has been set up in InDesign to pick up tips for designing your own covers in the future. 

Go to File > Document Setup to view the page size and bleed specs, and Layout > Margins and Columns will show you more details about how the cover has been structured. Has the designer included a flexible spine? Noting these key details will help you understand how professional cover designers work and give you pointers for your own custom book covers. 

Maker apps like Placeit can also provide a helpful solution for new cover designers wanting to build confidence. In these apps, you can choose an existing cover design and adapt it quickly, tailoring the size for multiple print formats or adapting it as an eBook cover.

This Simple Graphic and Text cover template can be adapted quickly using a range of fonts, graphics, and photos.

placeit
Simple Graphic and Text Template on Placeit

Ready to take the next step and create a cover in InDesign? Check out these book cover templates which are quick and easy to customize with your own text and images:

book cover template
book template
Book cover and book layout template
book cover
Book cover template

3. Discover Creative Inspiration

Book cover design is one of the most creative areas of print design. Why? Compared to more commercial print media, like flyers and business cards, book covers are intrinsically linked to art—the connection between a book and a potential reader is emotionally charged. 

Although we are told not to judge a book by its cover, we can’t help doing just that when we browse a bookshelf. By making your cover as creative and striking as possible, you can hope to win the hearts and minds of your readership and convert browsing to sales. 

Professional cover designers know the power of treating a cover like an art canvas. So look to inspirational sources like the fantastic Book Cover Archive and Pinterest to really get your creative juices flowing.

book cover archive
Book Cover Archive
pinterest
By clicking on cover designs which catch your eye on Pinterest, you can browse hundreds of related images, which might spark your next cover idea.

It’s also important to not allow your creativity to outpace your judgement about making the cover genre- and audience-appropriate. 

So crime thrillers have a certain design language (large sans serif fonts in punchy colors like red and blue), as do historical romance novels (which tend towards script fonts and pastel colors). 

If you’re self-publishing an eBook, it pays to be aware of the sorts of design styles which are trending on eBook stores, like the Kindle Store and Google Play

kindle store
Do your research by browsing trending cover designs on the Kindle Store.

Check out these tutorials and courses which show you how to design covers tailored to specific audiences, from young adults to thriller fans:

4. Get the Essentials Right

When you start to design your book cover, you should take a bit of time to carefully prepare your artwork before you begin designing. 

working on a cover in indesign
Carefully consider page size, bleed and guides before you put together your cover artwork in InDesign.

Consider the format and size of the cover—will you print the book as a paperback (softcover) or hardback, or create a digital eBook? Do you have a standard size in mind such as Pocket Book, Demy, or Royal? Look up industry-recommended book sizes, and don’t be tempted to stray from the norm. 

Top tip: If you want to adjust the size of your cover artwork without starting over in a new document, you can use the Free Transform Tool (E) in InDesign to scale the artwork.

You’ll also need to add a bleed to your cover artwork, which allows background elements and color to extend past the page (trim) edge, making for a more seamless printed result. In InDesign, go to File > Document Setup to add a bleed width to your artwork. 

Consider also the expected spine width of your cover, which will have a knock-on effect on the overall width of the cover artwork (which includes the back cover, spine and front cover, from left to right). You can work out the width of the spine once you know the final page count of your book and the paper stock the inside pages will be printed on (which will affect how bulky the book is, and therefore how wide the spine is). 

Use an online spine width calculator to find the final width, or ask for a width spec from your printer. 

Looking for a more in-depth walk-through on how to create a book cover? This book cover design course shows you how to comprehensively design a cover for a paperback book, from setting up the artwork all the way through to exporting the design for professional printing. 

5. For the Front Cover, Focus on Balance, Impact, and Legibility

When designing your front cover, it’s a good tip to let yourself be creative and experiment with different layouts, styles, and themes. The more eye-catching and imaginative you can make your book cover, the better!

long shadow
Book cover mockup template

However, you do tend to find that covers still follow some rules of layout. After all, you will always need to include some essential information, including the book title and author name. The publisher might also want to include a review or short blurb on the front of the book. 

Some cover designers choose to make a feature of the title, creating covers which prioritise typographic design. Alternatively, a single strong photo or graphic can be the dominant feature, with type taking a secondary role. 

Above all, you want to foster balance on your cover, and because covers tend to be relatively small it usually looks best if either type or graphic are highlighted more than the other. This also contributes to the improved legibility of the cover, which is also incredibly important when a cover is viewed from a distance away.

This tutorial shows you how to create a cover design which balances an absorbing image with legible text:

6. Use the Back Cover to Seal the Deal

While the front cover should be designed to advertise the book and provoke an immediate reaction from a reader, the back cover should be used to ‘seal the deal’, providing more enticing information about the book.

Here is the place to include a blurb (a short, interesting summary of the narrative), and possibly reviews (it goes without saying to only include positive ones!).

You will also need to place a barcode (use a barcode generator once you have an ISBN to hand) and optional pricing information on the back cover too. The publisher may also want to include their logo and website, which is usually placed at the bottom of the back cover. 

book cover
Book cover template

7. Don’t Neglect the Spine

Readers won’t always come into contact with your book through looking at the front cover. The sheer volume of books in stores can mean retailers can choose to stack your book alongside thousands of other competing titles, with only the spine visible. So this small area of spine can spell the difference between someone picking up your book or dismissing it in an instant. 

Take the time to consider the design of your spine. You can lift elements from the front cover, such as the title and author name, but you can also add extra quirky details. 

In this example, I designed a vintage-inspired cover for a book of fairy tales. The artwork on the front cover is intricate and fantastical, and I wanted to translate this mood to the spine of the book.

vintage cover

The spine has trailing vines and a rose detail, which frame the script type and make the spine just as romantic and ethereal as the front cover. 

spine design

8. Export Your Cover for Printing

When you’ve finished the artwork for your cover, you’ll need to export your design as a press-ready PDF file to be printed. 

To do this, head up to File > Export in InDesign, and choose Adobe PDF (Print) from the Format menu. Choose Press Quality from the Preset options to ensure your artwork is exported at very high quality. 

Top tip: The cover should be exported as one whole image (including back cover, front cover, and spine).

book cover

Find out more about the essentials of preparing your book artwork for print with this must-read tutorial:

Take Your Publishing Design Skills to the Next Level…

Still unsure about how to start creating your own book templates? A downloadable InDesign template is a sensible place to get started, and can be great for boosting your confidence when you’re dipping a toe into book design.

You can find a wide range of customizable InDesign book templates for book covers and book layouts on Envato Elements and GraphicRiver.

Discover our pick of the best book design tutorials for beginners below:

How to Create a 3D Jewel Text Effect Action in Photoshop

Post pobrano z: How to Create a 3D Jewel Text Effect Action in Photoshop

Final product image
What You’ll Be Creating

Today I’m back to show you how to create fake 3D Photoshop actions. This text effect action was inspired by one of the text effects of the 10 Glossy Photoshop Text Effects, and it looks as if it’s made of a faceted ruby. 

You will learn that it is possible to save the information of Photoshop layer styles in Photoshop actions, making the process of saving the text effect easier since you don’t need to save any layer style. The fake 3D effect will come from a Bevel & Emboss style and a reflection layer below the text. 

At the end of this tutorial, I will link to more tutorials about how to create an action in Photoshop and Photoshop type effects. So don’t forget to check those if you’re interested in learning more 3D text effect Photoshop actions.

Check the original text effect on GraphicRiver—you might like the whole pack.

10 Glossy photoshop text effects promo image
10 Glossy Photoshop Text Effects

Tutorial Assets

The following assets were used during this tutorial:

1. How to Record the Action

Step 1

In my other tutorials, I teach how to create the layer styles first and then how to create the action using the styles. Today it will be faster, since this text effect doesn’t require any assets, to save all its settings in the action itself. So let’s begin.

Extract the zip file attached to this tutorial and then open the Background-image.jpg with Photoshop.  

Jewel Background

Step 2

Pick the Horizontal Type Tool (T) and set the font to Darktech LDR and font size to 121 pt. After that, write „JEWEL” in the center of the document.

Jewel text layer

Step 3

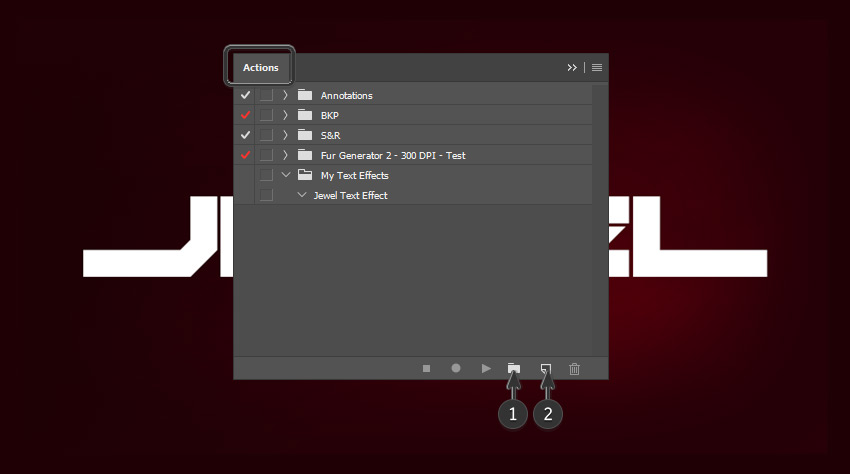
Make sure the text layer is selected on the Layers panel. After that, go to Window > Actions to open the Actions panel. Then, click on the Create new set icon and name it My Text Effects. After that, click on the Create new Action icon and name it Jewel Text Effect.

Now Photoshop will record the next steps. Keep an eye on the Actions panel. Delete any wrong step you make by dragging it to the trash bin icon.

Creating a Photoshop Action

Step 4

Rename the text layer to Jewel A. Then double-click on it to open the Layer Style panel. After that, add a Gradient Overlay with these settings:

  • Blend Mode: Normal
  • Dither: Off
  • Opacity: 100%
  • Reverse: Off
  • Style: Linear
  • Align with Layer: On
  • Angle: 90º
  • Scale: 100%

Click on the gradient bar to open the Gradient Editor

You can move the stops on the gradient bar and create new ones by clicking below it. Create a gradient with these settings:

  • First stop color: #1a1a1a Location: 19%
  • Second stop color: #404040 Location: 42%
  • Third stop color: #1c1c1c Location: 80%
Creating a new gradient overlay

Step 5

Add a Drop Shadow with these settings:

  • Blend Mode: Normal
  • Color: #090909
  • Opacity: 100%
  • Use Global Light: Off
  • Angle: 180º
  • Distance: 2 px
  • Spread: 100%
  • Size: 3 px
  • Contour: Linear
  • Anti-aliased: On
  • Noise: 0%
  • Layer Knocks Out Drop Shadow: On
Drop shadow settings

Step 6

Now add an Outer Glow with these settings:

  • Blend Mode: Normal
  • Opacity: 100%
  • Noise: 0%
  • Color: #181818
  • Technique: Softer
  • Spread: 0%
  • Size: 18%
  • Contour: Linear
  • Anti-aliased: Off
  • Range: 100%
  • Jitter: 0%
Outer Glow Settings

Step 7

Add an Inner Glow with these settings:

  • Blend Mode: Screen
  • Opacity: 100%
  • Noise: 0%
  • Color: #828282
  • Technique: Softer
  • Source: Edge
  • Choke: 100%
  • Size: 2 px
  • Contour: Linear
  • Anti-aliased: On
  • Range: 100%
  • Jitter: 0%
Inner Glow settings

Step 8

Now add an Inner Shadow with these settings:

  • Blend Mode: Multiply
  • Color: #383838
  • Opacity: 100%
  • Use Global Light: Off
  • Angle: -61º
  • Distance: 2 px
  • Choke: 40%
  • Size: 1 px
  • Contour: Linear
  • Anti-aliased: On
  • Noise: 0%
Inner Shadow settings

Step 9

Add a Bevel & Emboss with these settings:

  • Style: Inner Bevel
  • Technique: Smooth
  • Depth: 355%
  • Direction: Up
  • Size: 32 px
  • Soften: 0 px
  • Use Global Light: Off
  • Angle: -56º
  • Altitude: 74º
  • Anti-aliased: On
  • Highlight Mode: Screen Color: #ffffff Opacity: 45%
  • Shadow Mode: Multiply Color: #242424 Opacity: 55%

Then click on the Gloss Contour box and edit the curve with these settings:

  • First Point Input: 0% Output: 100% Corner: Off
  • Second Point Input: 24% Output: 99% Corner: Off
  • Third Point Input: 44% Output: 45% Corner: Off
  • Fourth Point Input: 100% Output: 0% Corner: Off

Now click OK to close the Layer Style panel.

Bevel and Emboss settings

This is how the text effect should look by now:

How the text effect shoul look

Step 10

Press Control-J to duplicate the layer. Then rename the copy to Jewel B. After that, right-click on the Jewel B layer and choose Clear Layer Style.

Creating another text layer

Step 11

Double-click the Jewel B layer to open the Layer Style panel. Then add a Bevel & Emboss with these settings:

  • Style: Inner Bevel
  • Technique: Chisel Hard
  • Depth: 157%
  • Direction: Down
  • Size: 250 px
  • Soften: 0 px
  • Use Global Light: Off
  • Angle: 81º
  • Altitude: 32º
  • Anti-aliased: On
  • Highlight Mode: Color Dodge Color: #ececec Opacity: 69%
  • Shadow Mode: Hard Light Color: #474747 Opacity: 9%

Then click on the Gloss Contour box and edit the curve with these settings:

  • First Point Input: 0% Output: 0% Corner: Off
  • Second Point Input: 7% Output: 100% Corner: On
  • Third Point Input: 37% Output: 55% Corner: Off
  • Fourth Point Input: 46% Output: 1% Corner: On
  • Fifth Point Input: 73% Output: 100% Corner: On
  • Sixth Point Input: 100% Output: 100% Corner: Off
Second Bevel and Emboss settings

Step 12

Add a Stroke with these settings:

  • Size: 2 px
  • Position: Outside
  • Blend Mode: Normal
  • Opacity: 100%
  • Overprint: Off
  • Fill Type: Gradient
  • Reverse: Off
  • Align with Layer: On
  • Style: Linear
  • Angle: 83º
  • Scale: 100%
  • Dither: Off

Then click on the gradient bar and edit it with these settings:

  • First stop color: #121212 Location: 0%
  • Second stop color: #5b5b5b Location: 48%
  • Third stop color: #121212 Location: 100%
Stroke settings

Step 13

Now add a Color Overlay with these settings:

  • Blend Mode: Color Dodge
  • Color: #404040
  • Opacity: 100%
Color Overlay settings

Step 14

Add an Outer Glow with these settings:

  • Blend Mode: Normal
  • Opacity: 68%
  • Noise: 0%
  • Color: #272727
  • Technique: Softer
  • Spread: 15%
  • Size: 16 px
  • Contour: Linear
  • Anti-aliased: On
  • Range: 100%
  • Jitter: 0%

After that, click OK to close the Layer Style window.

Outer Glow settings

This is how the text effect should look:

How the text effect should look

Step 15

Press Control and select both text layers. Then right-click on one of them and choose Convert to Smart Object. After that, rename the new smart object to Jewel Text Effect.

Converting the layers to a smart object

Step 16

Now go to Window > Adjustments and click on the Gradient Map icon. After that, right-click on the Gradient Map layer and choose Create Clipping Mask.

Creating a gradient map layer

Step 17

Select the Gradient Map layer and go to Window > Properties. Then click on the gradient bar to open the Gradient Editor. After that, edit the gradient with these settings:

  • First stop color: #240003 Location: 0%
  • Second stop color: #4e0009 Location: 16%
  • Third stop color: #ff0012 Location: 59%
  • Fourth stop color: #ffbe8f Location: 86%
  • Fifth stop color: #ffffff Location: 100%
Creating a new gradient

Step 18

Select both the text layer and the gradient map and convert them into a smart object. Then rename the new smart object to Jewel Text Effect. After that, go to the Actions panel and click on the Stop Recording icon to finish the action.

Converting the layers into one smart object

This is how the text effect should look:

How the text effect should look

2. How to Create the Shadow and the Reflection 

Step 1

Create a new layer below the text effect and name it Shadow. Then pick the Rectangle Tool (U) and create a thin black shape below the text.

Shadow layer

Step 2

Go to Filter > Blur > Gaussian blur and set it to 6.0 pixels. After that, change the Opacity of the Shadow layer to 35%.

Shadow layer with gaussian blur

Step 3

Select the text layer and press Control-J to duplicate it. Then rename the copy to Reflex and move it below the Shadow layer. After that, press Control-T and right-click on the Transform box and choose Flip Vertical. Then, move the layer down to make it look like a perfect reflection.

Reflex layer below the shadow layer

Step 4

Select the Reflex layer and click on the Add layer mask icon. Then pick the Gradient Tool (G) and select the Black, White gradient. After that, draw a gradient vertically from the bottom of the Reflex layer to the top of the Jewel Text Effect Layer.

Drawing the gradient mask

And We’re Done!

Jewel Text Effect Final result

In this tutorial, you learned how to record a Photoshop action and save Photoshop layer styles in it. We created two layer styles and merged them. After that, we added some colors with a gradient map, and then we added a simple shadow and a reflection below the text.

The text effect is saved in the Actions panel. Now you can apply the same effect to any word or font by selecting the action and clicking on Play. Then you just need to create the shadow and the reflection.

Don’t forget to check the original text effect.

10 Glossy photoshop text effects promo image
10 Glossy Photoshop Text Effects

If you want to keep learning, here are some tutorials that you may also like:

How to Create a 3D Jewel Text Effect Action in Photoshop

Post pobrano z: How to Create a 3D Jewel Text Effect Action in Photoshop

Final product image
What You’ll Be Creating

Today I’m back to show you how to create fake 3D Photoshop actions. This text effect action was inspired by one of the text effects of the 10 Glossy Photoshop Text Effects, and it looks as if it’s made of a faceted ruby. 

You will learn that it is possible to save the information of Photoshop layer styles in Photoshop actions, making the process of saving the text effect easier since you don’t need to save any layer style. The fake 3D effect will come from a Bevel & Emboss style and a reflection layer below the text. 

At the end of this tutorial, I will link to more tutorials about how to create an action in Photoshop and Photoshop type effects. So don’t forget to check those if you’re interested in learning more 3D text effect Photoshop actions.

Check the original text effect on GraphicRiver—you might like the whole pack.

10 Glossy photoshop text effects promo image
10 Glossy Photoshop Text Effects

Tutorial Assets

The following assets were used during this tutorial:

1. How to Record the Action

Step 1

In my other tutorials, I teach how to create the layer styles first and then how to create the action using the styles. Today it will be faster, since this text effect doesn’t require any assets, to save all its settings in the action itself. So let’s begin.

Extract the zip file attached to this tutorial and then open the Background-image.jpg with Photoshop.  

Jewel Background

Step 2

Pick the Horizontal Type Tool (T) and set the font to Darktech LDR and font size to 121 pt. After that, write „JEWEL” in the center of the document.

Jewel text layer

Step 3

Make sure the text layer is selected on the Layers panel. After that, go to Window > Actions to open the Actions panel. Then, click on the Create new set icon and name it My Text Effects. After that, click on the Create new Action icon and name it Jewel Text Effect.

Now Photoshop will record the next steps. Keep an eye on the Actions panel. Delete any wrong step you make by dragging it to the trash bin icon.

Creating a Photoshop Action

Step 4

Rename the text layer to Jewel A. Then double-click on it to open the Layer Style panel. After that, add a Gradient Overlay with these settings:

  • Blend Mode: Normal
  • Dither: Off
  • Opacity: 100%
  • Reverse: Off
  • Style: Linear
  • Align with Layer: On
  • Angle: 90º
  • Scale: 100%

Click on the gradient bar to open the Gradient Editor

You can move the stops on the gradient bar and create new ones by clicking below it. Create a gradient with these settings:

  • First stop color: #1a1a1a Location: 19%
  • Second stop color: #404040 Location: 42%
  • Third stop color: #1c1c1c Location: 80%
Creating a new gradient overlay

Step 5

Add a Drop Shadow with these settings:

  • Blend Mode: Normal
  • Color: #090909
  • Opacity: 100%
  • Use Global Light: Off
  • Angle: 180º
  • Distance: 2 px
  • Spread: 100%
  • Size: 3 px
  • Contour: Linear
  • Anti-aliased: On
  • Noise: 0%
  • Layer Knocks Out Drop Shadow: On
Drop shadow settings

Step 6

Now add an Outer Glow with these settings:

  • Blend Mode: Normal
  • Opacity: 100%
  • Noise: 0%
  • Color: #181818
  • Technique: Softer
  • Spread: 0%
  • Size: 18%
  • Contour: Linear
  • Anti-aliased: Off
  • Range: 100%
  • Jitter: 0%
Outer Glow Settings

Step 7

Add an Inner Glow with these settings:

  • Blend Mode: Screen
  • Opacity: 100%
  • Noise: 0%
  • Color: #828282
  • Technique: Softer
  • Source: Edge
  • Choke: 100%
  • Size: 2 px
  • Contour: Linear
  • Anti-aliased: On
  • Range: 100%
  • Jitter: 0%
Inner Glow settings

Step 8

Now add an Inner Shadow with these settings:

  • Blend Mode: Multiply
  • Color: #383838
  • Opacity: 100%
  • Use Global Light: Off
  • Angle: -61º
  • Distance: 2 px
  • Choke: 40%
  • Size: 1 px
  • Contour: Linear
  • Anti-aliased: On
  • Noise: 0%
Inner Shadow settings

Step 9

Add a Bevel & Emboss with these settings:

  • Style: Inner Bevel
  • Technique: Smooth
  • Depth: 355%
  • Direction: Up
  • Size: 32 px
  • Soften: 0 px
  • Use Global Light: Off
  • Angle: -56º
  • Altitude: 74º
  • Anti-aliased: On
  • Highlight Mode: Screen Color: #ffffff Opacity: 45%
  • Shadow Mode: Multiply Color: #242424 Opacity: 55%

Then click on the Gloss Contour box and edit the curve with these settings:

  • First Point Input: 0% Output: 100% Corner: Off
  • Second Point Input: 24% Output: 99% Corner: Off
  • Third Point Input: 44% Output: 45% Corner: Off
  • Fourth Point Input: 100% Output: 0% Corner: Off

Now click OK to close the Layer Style panel.

Bevel and Emboss settings

This is how the text effect should look by now:

How the text effect shoul look

Step 10

Press Control-J to duplicate the layer. Then rename the copy to Jewel B. After that, right-click on the Jewel B layer and choose Clear Layer Style.

Creating another text layer

Step 11

Double-click the Jewel B layer to open the Layer Style panel. Then add a Bevel & Emboss with these settings:

  • Style: Inner Bevel
  • Technique: Chisel Hard
  • Depth: 157%
  • Direction: Down
  • Size: 250 px
  • Soften: 0 px
  • Use Global Light: Off
  • Angle: 81º
  • Altitude: 32º
  • Anti-aliased: On
  • Highlight Mode: Color Dodge Color: #ececec Opacity: 69%
  • Shadow Mode: Hard Light Color: #474747 Opacity: 9%

Then click on the Gloss Contour box and edit the curve with these settings:

  • First Point Input: 0% Output: 0% Corner: Off
  • Second Point Input: 7% Output: 100% Corner: On
  • Third Point Input: 37% Output: 55% Corner: Off
  • Fourth Point Input: 46% Output: 1% Corner: On
  • Fifth Point Input: 73% Output: 100% Corner: On
  • Sixth Point Input: 100% Output: 100% Corner: Off
Second Bevel and Emboss settings

Step 12

Add a Stroke with these settings:

  • Size: 2 px
  • Position: Outside
  • Blend Mode: Normal
  • Opacity: 100%
  • Overprint: Off
  • Fill Type: Gradient
  • Reverse: Off
  • Align with Layer: On
  • Style: Linear
  • Angle: 83º
  • Scale: 100%
  • Dither: Off

Then click on the gradient bar and edit it with these settings:

  • First stop color: #121212 Location: 0%
  • Second stop color: #5b5b5b Location: 48%
  • Third stop color: #121212 Location: 100%
Stroke settings

Step 13

Now add a Color Overlay with these settings:

  • Blend Mode: Color Dodge
  • Color: #404040
  • Opacity: 100%
Color Overlay settings

Step 14

Add an Outer Glow with these settings:

  • Blend Mode: Normal
  • Opacity: 68%
  • Noise: 0%
  • Color: #272727
  • Technique: Softer
  • Spread: 15%
  • Size: 16 px
  • Contour: Linear
  • Anti-aliased: On
  • Range: 100%
  • Jitter: 0%

After that, click OK to close the Layer Style window.

Outer Glow settings

This is how the text effect should look:

How the text effect should look

Step 15

Press Control and select both text layers. Then right-click on one of them and choose Convert to Smart Object. After that, rename the new smart object to Jewel Text Effect.

Converting the layers to a smart object

Step 16

Now go to Window > Adjustments and click on the Gradient Map icon. After that, right-click on the Gradient Map layer and choose Create Clipping Mask.

Creating a gradient map layer

Step 17

Select the Gradient Map layer and go to Window > Properties. Then click on the gradient bar to open the Gradient Editor. After that, edit the gradient with these settings:

  • First stop color: #240003 Location: 0%
  • Second stop color: #4e0009 Location: 16%
  • Third stop color: #ff0012 Location: 59%
  • Fourth stop color: #ffbe8f Location: 86%
  • Fifth stop color: #ffffff Location: 100%
Creating a new gradient

Step 18

Select both the text layer and the gradient map and convert them into a smart object. Then rename the new smart object to Jewel Text Effect. After that, go to the Actions panel and click on the Stop Recording icon to finish the action.

Converting the layers into one smart object

This is how the text effect should look:

How the text effect should look

2. How to Create the Shadow and the Reflection 

Step 1

Create a new layer below the text effect and name it Shadow. Then pick the Rectangle Tool (U) and create a thin black shape below the text.

Shadow layer

Step 2

Go to Filter > Blur > Gaussian blur and set it to 6.0 pixels. After that, change the Opacity of the Shadow layer to 35%.

Shadow layer with gaussian blur

Step 3

Select the text layer and press Control-J to duplicate it. Then rename the copy to Reflex and move it below the Shadow layer. After that, press Control-T and right-click on the Transform box and choose Flip Vertical. Then, move the layer down to make it look like a perfect reflection.

Reflex layer below the shadow layer

Step 4

Select the Reflex layer and click on the Add layer mask icon. Then pick the Gradient Tool (G) and select the Black, White gradient. After that, draw a gradient vertically from the bottom of the Reflex layer to the top of the Jewel Text Effect Layer.

Drawing the gradient mask

And We’re Done!

Jewel Text Effect Final result

In this tutorial, you learned how to record a Photoshop action and save Photoshop layer styles in it. We created two layer styles and merged them. After that, we added some colors with a gradient map, and then we added a simple shadow and a reflection below the text.

The text effect is saved in the Actions panel. Now you can apply the same effect to any word or font by selecting the action and clicking on Play. Then you just need to create the shadow and the reflection.

Don’t forget to check the original text effect.

10 Glossy photoshop text effects promo image
10 Glossy Photoshop Text Effects

If you want to keep learning, here are some tutorials that you may also like:

How to Create a 3D Jewel Text Effect Action in Photoshop

Post pobrano z: How to Create a 3D Jewel Text Effect Action in Photoshop

Final product image
What You’ll Be Creating

Today I’m back to show you how to create fake 3D Photoshop actions. This text effect action was inspired by one of the text effects of the 10 Glossy Photoshop Text Effects, and it looks as if it’s made of a faceted ruby. 

You will learn that it is possible to save the information of Photoshop layer styles in Photoshop actions, making the process of saving the text effect easier since you don’t need to save any layer style. The fake 3D effect will come from a Bevel & Emboss style and a reflection layer below the text. 

At the end of this tutorial, I will link to more tutorials about how to create an action in Photoshop and Photoshop type effects. So don’t forget to check those if you’re interested in learning more 3D text effect Photoshop actions.

Check the original text effect on GraphicRiver—you might like the whole pack.

10 Glossy photoshop text effects promo image
10 Glossy Photoshop Text Effects

Tutorial Assets

The following assets were used during this tutorial:

1. How to Record the Action

Step 1

In my other tutorials, I teach how to create the layer styles first and then how to create the action using the styles. Today it will be faster, since this text effect doesn’t require any assets, to save all its settings in the action itself. So let’s begin.

Extract the zip file attached to this tutorial and then open the Background-image.jpg with Photoshop.  

Jewel Background

Step 2

Pick the Horizontal Type Tool (T) and set the font to Darktech LDR and font size to 121 pt. After that, write „JEWEL” in the center of the document.

Jewel text layer

Step 3

Make sure the text layer is selected on the Layers panel. After that, go to Window > Actions to open the Actions panel. Then, click on the Create new set icon and name it My Text Effects. After that, click on the Create new Action icon and name it Jewel Text Effect.

Now Photoshop will record the next steps. Keep an eye on the Actions panel. Delete any wrong step you make by dragging it to the trash bin icon.

Creating a Photoshop Action

Step 4

Rename the text layer to Jewel A. Then double-click on it to open the Layer Style panel. After that, add a Gradient Overlay with these settings:

  • Blend Mode: Normal
  • Dither: Off
  • Opacity: 100%
  • Reverse: Off
  • Style: Linear
  • Align with Layer: On
  • Angle: 90º
  • Scale: 100%

Click on the gradient bar to open the Gradient Editor

You can move the stops on the gradient bar and create new ones by clicking below it. Create a gradient with these settings:

  • First stop color: #1a1a1a Location: 19%
  • Second stop color: #404040 Location: 42%
  • Third stop color: #1c1c1c Location: 80%
Creating a new gradient overlay

Step 5

Add a Drop Shadow with these settings:

  • Blend Mode: Normal
  • Color: #090909
  • Opacity: 100%
  • Use Global Light: Off
  • Angle: 180º
  • Distance: 2 px
  • Spread: 100%
  • Size: 3 px
  • Contour: Linear
  • Anti-aliased: On
  • Noise: 0%
  • Layer Knocks Out Drop Shadow: On
Drop shadow settings

Step 6

Now add an Outer Glow with these settings:

  • Blend Mode: Normal
  • Opacity: 100%
  • Noise: 0%
  • Color: #181818
  • Technique: Softer
  • Spread: 0%
  • Size: 18%
  • Contour: Linear
  • Anti-aliased: Off
  • Range: 100%
  • Jitter: 0%
Outer Glow Settings

Step 7

Add an Inner Glow with these settings:

  • Blend Mode: Screen
  • Opacity: 100%
  • Noise: 0%
  • Color: #828282
  • Technique: Softer
  • Source: Edge
  • Choke: 100%
  • Size: 2 px
  • Contour: Linear
  • Anti-aliased: On
  • Range: 100%
  • Jitter: 0%
Inner Glow settings

Step 8

Now add an Inner Shadow with these settings:

  • Blend Mode: Multiply
  • Color: #383838
  • Opacity: 100%
  • Use Global Light: Off
  • Angle: -61º
  • Distance: 2 px
  • Choke: 40%
  • Size: 1 px
  • Contour: Linear
  • Anti-aliased: On
  • Noise: 0%
Inner Shadow settings

Step 9

Add a Bevel & Emboss with these settings:

  • Style: Inner Bevel
  • Technique: Smooth
  • Depth: 355%
  • Direction: Up
  • Size: 32 px
  • Soften: 0 px
  • Use Global Light: Off
  • Angle: -56º
  • Altitude: 74º
  • Anti-aliased: On
  • Highlight Mode: Screen Color: #ffffff Opacity: 45%
  • Shadow Mode: Multiply Color: #242424 Opacity: 55%

Then click on the Gloss Contour box and edit the curve with these settings:

  • First Point Input: 0% Output: 100% Corner: Off
  • Second Point Input: 24% Output: 99% Corner: Off
  • Third Point Input: 44% Output: 45% Corner: Off
  • Fourth Point Input: 100% Output: 0% Corner: Off

Now click OK to close the Layer Style panel.

Bevel and Emboss settings

This is how the text effect should look by now:

How the text effect shoul look

Step 10

Press Control-J to duplicate the layer. Then rename the copy to Jewel B. After that, right-click on the Jewel B layer and choose Clear Layer Style.

Creating another text layer

Step 11

Double-click the Jewel B layer to open the Layer Style panel. Then add a Bevel & Emboss with these settings:

  • Style: Inner Bevel
  • Technique: Chisel Hard
  • Depth: 157%
  • Direction: Down
  • Size: 250 px
  • Soften: 0 px
  • Use Global Light: Off
  • Angle: 81º
  • Altitude: 32º
  • Anti-aliased: On
  • Highlight Mode: Color Dodge Color: #ececec Opacity: 69%
  • Shadow Mode: Hard Light Color: #474747 Opacity: 9%

Then click on the Gloss Contour box and edit the curve with these settings:

  • First Point Input: 0% Output: 0% Corner: Off
  • Second Point Input: 7% Output: 100% Corner: On
  • Third Point Input: 37% Output: 55% Corner: Off
  • Fourth Point Input: 46% Output: 1% Corner: On
  • Fifth Point Input: 73% Output: 100% Corner: On
  • Sixth Point Input: 100% Output: 100% Corner: Off
Second Bevel and Emboss settings

Step 12

Add a Stroke with these settings:

  • Size: 2 px
  • Position: Outside
  • Blend Mode: Normal
  • Opacity: 100%
  • Overprint: Off
  • Fill Type: Gradient
  • Reverse: Off
  • Align with Layer: On
  • Style: Linear
  • Angle: 83º
  • Scale: 100%
  • Dither: Off

Then click on the gradient bar and edit it with these settings:

  • First stop color: #121212 Location: 0%
  • Second stop color: #5b5b5b Location: 48%
  • Third stop color: #121212 Location: 100%
Stroke settings

Step 13

Now add a Color Overlay with these settings:

  • Blend Mode: Color Dodge
  • Color: #404040
  • Opacity: 100%
Color Overlay settings

Step 14

Add an Outer Glow with these settings:

  • Blend Mode: Normal
  • Opacity: 68%
  • Noise: 0%
  • Color: #272727
  • Technique: Softer
  • Spread: 15%
  • Size: 16 px
  • Contour: Linear
  • Anti-aliased: On
  • Range: 100%
  • Jitter: 0%

After that, click OK to close the Layer Style window.

Outer Glow settings

This is how the text effect should look:

How the text effect should look

Step 15

Press Control and select both text layers. Then right-click on one of them and choose Convert to Smart Object. After that, rename the new smart object to Jewel Text Effect.

Converting the layers to a smart object

Step 16

Now go to Window > Adjustments and click on the Gradient Map icon. After that, right-click on the Gradient Map layer and choose Create Clipping Mask.

Creating a gradient map layer

Step 17

Select the Gradient Map layer and go to Window > Properties. Then click on the gradient bar to open the Gradient Editor. After that, edit the gradient with these settings:

  • First stop color: #240003 Location: 0%
  • Second stop color: #4e0009 Location: 16%
  • Third stop color: #ff0012 Location: 59%
  • Fourth stop color: #ffbe8f Location: 86%
  • Fifth stop color: #ffffff Location: 100%
Creating a new gradient

Step 18

Select both the text layer and the gradient map and convert them into a smart object. Then rename the new smart object to Jewel Text Effect. After that, go to the Actions panel and click on the Stop Recording icon to finish the action.

Converting the layers into one smart object

This is how the text effect should look:

How the text effect should look

2. How to Create the Shadow and the Reflection 

Step 1

Create a new layer below the text effect and name it Shadow. Then pick the Rectangle Tool (U) and create a thin black shape below the text.

Shadow layer

Step 2

Go to Filter > Blur > Gaussian blur and set it to 6.0 pixels. After that, change the Opacity of the Shadow layer to 35%.

Shadow layer with gaussian blur

Step 3

Select the text layer and press Control-J to duplicate it. Then rename the copy to Reflex and move it below the Shadow layer. After that, press Control-T and right-click on the Transform box and choose Flip Vertical. Then, move the layer down to make it look like a perfect reflection.

Reflex layer below the shadow layer

Step 4

Select the Reflex layer and click on the Add layer mask icon. Then pick the Gradient Tool (G) and select the Black, White gradient. After that, draw a gradient vertically from the bottom of the Reflex layer to the top of the Jewel Text Effect Layer.

Drawing the gradient mask

And We’re Done!

Jewel Text Effect Final result

In this tutorial, you learned how to record a Photoshop action and save Photoshop layer styles in it. We created two layer styles and merged them. After that, we added some colors with a gradient map, and then we added a simple shadow and a reflection below the text.

The text effect is saved in the Actions panel. Now you can apply the same effect to any word or font by selecting the action and clicking on Play. Then you just need to create the shadow and the reflection.

Don’t forget to check the original text effect.

10 Glossy photoshop text effects promo image
10 Glossy Photoshop Text Effects

If you want to keep learning, here are some tutorials that you may also like:

How to Create a 3D Jewel Text Effect Action in Photoshop

Post pobrano z: How to Create a 3D Jewel Text Effect Action in Photoshop

Final product image
What You’ll Be Creating

Today I’m back to show you how to create fake 3D Photoshop actions. This text effect action was inspired by one of the text effects of the 10 Glossy Photoshop Text Effects, and it looks as if it’s made of a faceted ruby. 

You will learn that it is possible to save the information of Photoshop layer styles in Photoshop actions, making the process of saving the text effect easier since you don’t need to save any layer style. The fake 3D effect will come from a Bevel & Emboss style and a reflection layer below the text. 

At the end of this tutorial, I will link to more tutorials about how to create an action in Photoshop and Photoshop type effects. So don’t forget to check those if you’re interested in learning more 3D text effect Photoshop actions.

Check the original text effect on GraphicRiver—you might like the whole pack.

10 Glossy photoshop text effects promo image
10 Glossy Photoshop Text Effects

Tutorial Assets

The following assets were used during this tutorial:

1. How to Record the Action

Step 1

In my other tutorials, I teach how to create the layer styles first and then how to create the action using the styles. Today it will be faster, since this text effect doesn’t require any assets, to save all its settings in the action itself. So let’s begin.

Extract the zip file attached to this tutorial and then open the Background-image.jpg with Photoshop.  

Jewel Background

Step 2

Pick the Horizontal Type Tool (T) and set the font to Darktech LDR and font size to 121 pt. After that, write „JEWEL” in the center of the document.

Jewel text layer

Step 3

Make sure the text layer is selected on the Layers panel. After that, go to Window > Actions to open the Actions panel. Then, click on the Create new set icon and name it My Text Effects. After that, click on the Create new Action icon and name it Jewel Text Effect.

Now Photoshop will record the next steps. Keep an eye on the Actions panel. Delete any wrong step you make by dragging it to the trash bin icon.

Creating a Photoshop Action

Step 4

Rename the text layer to Jewel A. Then double-click on it to open the Layer Style panel. After that, add a Gradient Overlay with these settings:

  • Blend Mode: Normal
  • Dither: Off
  • Opacity: 100%
  • Reverse: Off
  • Style: Linear
  • Align with Layer: On
  • Angle: 90º
  • Scale: 100%

Click on the gradient bar to open the Gradient Editor

You can move the stops on the gradient bar and create new ones by clicking below it. Create a gradient with these settings:

  • First stop color: #1a1a1a Location: 19%
  • Second stop color: #404040 Location: 42%
  • Third stop color: #1c1c1c Location: 80%
Creating a new gradient overlay

Step 5

Add a Drop Shadow with these settings:

  • Blend Mode: Normal
  • Color: #090909
  • Opacity: 100%
  • Use Global Light: Off
  • Angle: 180º
  • Distance: 2 px
  • Spread: 100%
  • Size: 3 px
  • Contour: Linear
  • Anti-aliased: On
  • Noise: 0%
  • Layer Knocks Out Drop Shadow: On
Drop shadow settings

Step 6

Now add an Outer Glow with these settings:

  • Blend Mode: Normal
  • Opacity: 100%
  • Noise: 0%
  • Color: #181818
  • Technique: Softer
  • Spread: 0%
  • Size: 18%
  • Contour: Linear
  • Anti-aliased: Off
  • Range: 100%
  • Jitter: 0%
Outer Glow Settings

Step 7

Add an Inner Glow with these settings:

  • Blend Mode: Screen
  • Opacity: 100%
  • Noise: 0%
  • Color: #828282
  • Technique: Softer
  • Source: Edge
  • Choke: 100%
  • Size: 2 px
  • Contour: Linear
  • Anti-aliased: On
  • Range: 100%
  • Jitter: 0%
Inner Glow settings

Step 8

Now add an Inner Shadow with these settings:

  • Blend Mode: Multiply
  • Color: #383838
  • Opacity: 100%
  • Use Global Light: Off
  • Angle: -61º
  • Distance: 2 px
  • Choke: 40%
  • Size: 1 px
  • Contour: Linear
  • Anti-aliased: On
  • Noise: 0%
Inner Shadow settings

Step 9

Add a Bevel & Emboss with these settings:

  • Style: Inner Bevel
  • Technique: Smooth
  • Depth: 355%
  • Direction: Up
  • Size: 32 px
  • Soften: 0 px
  • Use Global Light: Off
  • Angle: -56º
  • Altitude: 74º
  • Anti-aliased: On
  • Highlight Mode: Screen Color: #ffffff Opacity: 45%
  • Shadow Mode: Multiply Color: #242424 Opacity: 55%

Then click on the Gloss Contour box and edit the curve with these settings:

  • First Point Input: 0% Output: 100% Corner: Off
  • Second Point Input: 24% Output: 99% Corner: Off
  • Third Point Input: 44% Output: 45% Corner: Off
  • Fourth Point Input: 100% Output: 0% Corner: Off

Now click OK to close the Layer Style panel.

Bevel and Emboss settings

This is how the text effect should look by now:

How the text effect shoul look

Step 10

Press Control-J to duplicate the layer. Then rename the copy to Jewel B. After that, right-click on the Jewel B layer and choose Clear Layer Style.

Creating another text layer

Step 11

Double-click the Jewel B layer to open the Layer Style panel. Then add a Bevel & Emboss with these settings:

  • Style: Inner Bevel
  • Technique: Chisel Hard
  • Depth: 157%
  • Direction: Down
  • Size: 250 px
  • Soften: 0 px
  • Use Global Light: Off
  • Angle: 81º
  • Altitude: 32º
  • Anti-aliased: On
  • Highlight Mode: Color Dodge Color: #ececec Opacity: 69%
  • Shadow Mode: Hard Light Color: #474747 Opacity: 9%

Then click on the Gloss Contour box and edit the curve with these settings:

  • First Point Input: 0% Output: 0% Corner: Off
  • Second Point Input: 7% Output: 100% Corner: On
  • Third Point Input: 37% Output: 55% Corner: Off
  • Fourth Point Input: 46% Output: 1% Corner: On
  • Fifth Point Input: 73% Output: 100% Corner: On
  • Sixth Point Input: 100% Output: 100% Corner: Off
Second Bevel and Emboss settings

Step 12

Add a Stroke with these settings:

  • Size: 2 px
  • Position: Outside
  • Blend Mode: Normal
  • Opacity: 100%
  • Overprint: Off
  • Fill Type: Gradient
  • Reverse: Off
  • Align with Layer: On
  • Style: Linear
  • Angle: 83º
  • Scale: 100%
  • Dither: Off

Then click on the gradient bar and edit it with these settings:

  • First stop color: #121212 Location: 0%
  • Second stop color: #5b5b5b Location: 48%
  • Third stop color: #121212 Location: 100%
Stroke settings

Step 13

Now add a Color Overlay with these settings:

  • Blend Mode: Color Dodge
  • Color: #404040
  • Opacity: 100%
Color Overlay settings

Step 14

Add an Outer Glow with these settings:

  • Blend Mode: Normal
  • Opacity: 68%
  • Noise: 0%
  • Color: #272727
  • Technique: Softer
  • Spread: 15%
  • Size: 16 px
  • Contour: Linear
  • Anti-aliased: On
  • Range: 100%
  • Jitter: 0%

After that, click OK to close the Layer Style window.

Outer Glow settings

This is how the text effect should look:

How the text effect should look

Step 15

Press Control and select both text layers. Then right-click on one of them and choose Convert to Smart Object. After that, rename the new smart object to Jewel Text Effect.

Converting the layers to a smart object

Step 16

Now go to Window > Adjustments and click on the Gradient Map icon. After that, right-click on the Gradient Map layer and choose Create Clipping Mask.

Creating a gradient map layer

Step 17

Select the Gradient Map layer and go to Window > Properties. Then click on the gradient bar to open the Gradient Editor. After that, edit the gradient with these settings:

  • First stop color: #240003 Location: 0%
  • Second stop color: #4e0009 Location: 16%
  • Third stop color: #ff0012 Location: 59%
  • Fourth stop color: #ffbe8f Location: 86%
  • Fifth stop color: #ffffff Location: 100%
Creating a new gradient

Step 18

Select both the text layer and the gradient map and convert them into a smart object. Then rename the new smart object to Jewel Text Effect. After that, go to the Actions panel and click on the Stop Recording icon to finish the action.

Converting the layers into one smart object

This is how the text effect should look:

How the text effect should look

2. How to Create the Shadow and the Reflection 

Step 1

Create a new layer below the text effect and name it Shadow. Then pick the Rectangle Tool (U) and create a thin black shape below the text.

Shadow layer

Step 2

Go to Filter > Blur > Gaussian blur and set it to 6.0 pixels. After that, change the Opacity of the Shadow layer to 35%.

Shadow layer with gaussian blur

Step 3

Select the text layer and press Control-J to duplicate it. Then rename the copy to Reflex and move it below the Shadow layer. After that, press Control-T and right-click on the Transform box and choose Flip Vertical. Then, move the layer down to make it look like a perfect reflection.

Reflex layer below the shadow layer

Step 4

Select the Reflex layer and click on the Add layer mask icon. Then pick the Gradient Tool (G) and select the Black, White gradient. After that, draw a gradient vertically from the bottom of the Reflex layer to the top of the Jewel Text Effect Layer.

Drawing the gradient mask

And We’re Done!

Jewel Text Effect Final result

In this tutorial, you learned how to record a Photoshop action and save Photoshop layer styles in it. We created two layer styles and merged them. After that, we added some colors with a gradient map, and then we added a simple shadow and a reflection below the text.

The text effect is saved in the Actions panel. Now you can apply the same effect to any word or font by selecting the action and clicking on Play. Then you just need to create the shadow and the reflection.

Don’t forget to check the original text effect.

10 Glossy photoshop text effects promo image
10 Glossy Photoshop Text Effects

If you want to keep learning, here are some tutorials that you may also like:

28 New Tasty Restaurant & Cafe Menu Templates for 2019

Post pobrano z: 28 New Tasty Restaurant & Cafe Menu Templates for 2019

Become the next hottest spot to grab a bite! Check out these amazing menu templates below!

28 New Restaurant and Cafe Menus for 2019

The restaurant of your dreams is missing just one special element: the perfect menu. So entice your customers with mouth-watering items and tasty aesthetics.

Today we bring you another amazing set of premium templates from Envato Market and Envato Elements. Featuring incredible designs from professional designers, these templates will give you high-quality results in less time!

Not sure where to begin? Try a minimalist vibe with clean colors and simplistic elements. Or for the more traditional route, download trendy menu designs any customer is sure to love!

Get more help! For custom professional designs, ask our experts at Envato Studio.

Learn More About Menu Design

New to menu design? Follow along with our instructors with these helpful lessons:

Restaurant Menu

Many restaurants incorporate certain colors into their menus that are as vibrant as their meals. Take this spectacular design, for example. With clean, professional elements and plenty of room for your menu items, this design is highly effective. Use it today for a noticeable difference!

Restaurant Menu

Cafe Restaurant Menu

Modern cafe menus effortlessly blend a mixture of elegance and style. So does that sound like your restaurant? Celebrate your delectable treats with a lovely design like this one. It features a standard A4 sized template that is completely customizable, so you’ll be able to update this design in minutes! Enjoy!

Cafe Restaurant Menu

Cafe Menu

Your menu is the biggest selling point for every customer. Make sure you win them over with stunning modern visuals like fresh, premium ingredients. This gorgeous template features a seafood-inspired design with plenty of premium extras for drink menus and more.

Cafe Menu

Vegan Food Menu

Invite your customers to enjoy a delicious healthy meal with this vegan food menu. Inspired by a classic chalkboard style, this template features an A4 sized design that has been pieced together with bold, editable details. The best part? Only free fonts were used!

Vegan Food Menu

Rustic Restaurant Menu

Could this be the template for your next
award-winning meals? We hope so! Created with stylish rustic elements in
mind, this menu template is a beauty! Enjoy six Photoshop files with
alternative styles for the main menu and drinks page.

Rustic Menu

Restaurant Menu

For just under $10, you can enjoy stunning luxury restaurant menus. This menu template features five alternate versions where you can mix and match your favorite elements for the photos, colors and graphics. Update it fast with Adobe Photoshop.

Restaurant Menu

Cafe Menu

Large menus are overwhelming. So keep it simple with an elegant cafe menu like this casual style below. It offers two unique color schemes with beautiful arrangements, so you’ll love the way your items appear on this menu! All the images you see are included, and you’ll get access to free fonts!

Cafe Menu

Coffee Shop Template

Refresh your coffee shop menu with a contemporary flyer template! Although the sample graphics are not included in this one, you can easily drag and drop your favorite photos into the editable placeholders for more customization. Try it out for a fresh new look!

Coffee Shop Template

Bi-Fold Food Menu Template

The best meals in town should have the best menu too! This mouth-watering design features a classic flip out style with room for food items and pictures. Just switch out the images for some of your own or utilize your subscription to download these great finds!

Bi-Fold Food Menu Template

Fakous Restaurant Menu Flyer

Got a burger joint with the best fresh patties around?
Check out this delicious-looking Fakous menu with incredible colors and
details. This design features a clean and modern layout with adjustable
smart objects. And it’s ready to print for a super quick turnaround!

Fakous Restaurant Menu Flyer

Simple Restaurant Menu

This simple and elegant design might be just what you need for a restaurant menu. The perfect style for steak house or fast food restaurants, this design features six pages and more. Get access to this print-ready template for an easy menu alternative.

Simple Restaurant Menu

Clean & Simple Menu

Or
highlight your exquisite palette with this clean and simple menu
template. A ready-to-print design created in standard A4 size, this
template is ideal for any cafe or restaurant looking to stay away from
busy visuals. Enjoy a minimalist style with text elements you can easily
update today!

Clean  Simple Menu

Vintage Restaurant Menu

Add that old school charm to your cafe or restaurant with this vintage menu. Inspired by classic designs from the 50s and 60s, this restaurant menu can be used with both Illustrator and Photoshop. It’s 100% vector and fully editable. Check it out!

Vintage Restaurant Menu

Colorful Tropical Menu

Create
a happy atmosphere in your establishment with this delightful tropical
menu. Inspired by the vibrant colors seen in many exotic locations, this
menu can be customized to any tropical cuisine. Perfect for beginners,
this template requires at least Photoshop CS3 to access the files.

Colorful Tropical Menu

Retro Diner Food Menu

Show off your love for nostalgic diner design with this vibrant food menu. Inspired by the retro aesthetics of 1950s drive-in diners, this menu comes in Photoshop and Illustrator formats. Included are well-organized layers with vector elements you can modify.

Retro Diner Food Menu

Restaurant Menu

How will you present your menu to customers? Consider this next lovely restaurant menu template available in two design formats. Perfect for small restaurants or cafes, this template features white and turquoise versions for a standout menu.

Restaurant Menu

Restaurant Menu

Looking for a table mat menu instead? Try this incredible restaurant menu specifically designed for beach themed bars and grills. Display your favorite bar drinks and hot appetizers on one sunny menu. Save it to your design arsenal today!

Restaurant Menu

Rectangle Restaurant Menu

Ready to open the best seafood restaurant in your area? Kick things off with this elegant rectangular restaurant menu. This menu template features four Photoshop files along with four alternative Illustrator formats. Modern and classy, this one is a winner!

Rectangle Restaurant Menu

Restaurant Menu

A stunning design with golden geometric details, this menu is an elegant choice for any restaurateur. Included in this package is a duo restaurant and beverage menu set with ten total files available. Simply edit them with the help of Adobe Photoshop for easy customization.

Restaurant Menu

Elegant Food Menu

Would you prefer tri-fold templates for your restaurant menu? Then check out this awesome design suitable for pizza restaurants and many small businesses. This download features several unique folds along with everything you need to get started. Check it out!

Elegant Food Menu

Sketch Trifold Food Menu

Chalkboard menus are currently popular for their clean designs and retro charm. Check out this sketch trifold menu, for instance. It comes with A4 and US letter sizes perfect for an easy transition to a new menu. You’ll love the realistic chalkboard design!

Sketch Trifold Food Menu

Coffee Shop Trifold Brochure

Brew heartwarming cups of delicious coffee accompanied by this delightful menu! An affordable design for any cafe owner on a budget, this trifold makes it easy to update the pictures and coffee names fast. Experience no quality loss with fully editable smart objects!

Coffee Shop Trifold Brochure

Cafe Menu

Make your cafe stand out with delectable items presented on this vintage-inspired chalkboard menu. It’s created with realistic chalkboard details like handmade typography and more, so you’ll be able to update it quickly and easily. Just drag and drop your specials into the super convenient placeholders. Get started today!

Cafe Menu

Restaurant Menu

Ready to become the hottest restaurant in town? Show off your appetizers, entrees and desserts with this fantastic restaurant menu. This template features an exquisite black and white design with plenty of room for your delicious photos. Add it to your collection!

Restaurant Menu

Cocktail Drinks Menu

Everyone loves happy hour! So make sure your best weekly deals shine with a fun cocktail drinks menu. This design features a cool, modern style with realistic bar elements for the perfect mixer! Get access to one fully editable Photoshop file with built-in bleed lines and more!

Cocktail Drinks Menu

Restaurant Menu

Your bakery menu should stand out with all the delectable treats you have. So make your graphics count with this easily editable menu template. This template features print-ready Illustrator files along with helpful instructions for easier customization. Add it today!

Restaurant Menu

Cafe Restaurant Menu

Set your restaurant apart from the others in town. This cafe menu template features a sleek and elegant style you’ll definitely love. Enjoy eight Photoshop files you can customize at any time at all. Add new icons, prices, or text for a brand new look.

Cafe Restaurant Menu

Restaurant Menu

Sometimes, less is more. Succeed with a professional menu template that is easy to read and manage. Easily update this ready-to-use template with new items when they’re available! Included are four Photoshop files with clear instructions.

Restaurant Menu

Conclusion

This list features exciting
resources for the avid designer
familiar with Adobe Photoshop, Illustrator, and InDesign. For
additional help with your menu needs, enlist the skills of a talented
professional by choosing one of the amazing designers from Envato Studio.

And
with loads of menu templates available at your fingertips, chances are we’ve
missed a few to add to your personal collection. Be sure to browse Envato Market and Envato Elements for more resources, and let us know your favorites in the comments below!

28 New Tasty Restaurant & Cafe Menu Templates for 2019

Post pobrano z: 28 New Tasty Restaurant & Cafe Menu Templates for 2019

Become the next hottest spot to grab a bite! Check out these amazing menu templates below!

28 New Restaurant and Cafe Menus for 2019

The restaurant of your dreams is missing just one special element: the perfect menu. So entice your customers with mouth-watering items and tasty aesthetics.

Today we bring you another amazing set of premium templates from Envato Market and Envato Elements. Featuring incredible designs from professional designers, these templates will give you high-quality results in less time!

Not sure where to begin? Try a minimalist vibe with clean colors and simplistic elements. Or for the more traditional route, download trendy menu designs any customer is sure to love!

Get more help! For custom professional designs, ask our experts at Envato Studio.

Learn More About Menu Design

New to menu design? Follow along with our instructors with these helpful lessons:

Restaurant Menu

Many restaurants incorporate certain colors into their menus that are as vibrant as their meals. Take this spectacular design, for example. With clean, professional elements and plenty of room for your menu items, this design is highly effective. Use it today for a noticeable difference!

Restaurant Menu

Cafe Restaurant Menu

Modern cafe menus effortlessly blend a mixture of elegance and style. So does that sound like your restaurant? Celebrate your delectable treats with a lovely design like this one. It features a standard A4 sized template that is completely customizable, so you’ll be able to update this design in minutes! Enjoy!

Cafe Restaurant Menu

Cafe Menu

Your menu is the biggest selling point for every customer. Make sure you win them over with stunning modern visuals like fresh, premium ingredients. This gorgeous template features a seafood-inspired design with plenty of premium extras for drink menus and more.

Cafe Menu

Vegan Food Menu

Invite your customers to enjoy a delicious healthy meal with this vegan food menu. Inspired by a classic chalkboard style, this template features an A4 sized design that has been pieced together with bold, editable details. The best part? Only free fonts were used!

Vegan Food Menu

Rustic Restaurant Menu

Could this be the template for your next
award-winning meals? We hope so! Created with stylish rustic elements in
mind, this menu template is a beauty! Enjoy six Photoshop files with
alternative styles for the main menu and drinks page.

Rustic Menu

Restaurant Menu

For just under $10, you can enjoy stunning luxury restaurant menus. This menu template features five alternate versions where you can mix and match your favorite elements for the photos, colors and graphics. Update it fast with Adobe Photoshop.

Restaurant Menu

Cafe Menu

Large menus are overwhelming. So keep it simple with an elegant cafe menu like this casual style below. It offers two unique color schemes with beautiful arrangements, so you’ll love the way your items appear on this menu! All the images you see are included, and you’ll get access to free fonts!

Cafe Menu

Coffee Shop Template

Refresh your coffee shop menu with a contemporary flyer template! Although the sample graphics are not included in this one, you can easily drag and drop your favorite photos into the editable placeholders for more customization. Try it out for a fresh new look!

Coffee Shop Template

Bi-Fold Food Menu Template

The best meals in town should have the best menu too! This mouth-watering design features a classic flip out style with room for food items and pictures. Just switch out the images for some of your own or utilize your subscription to download these great finds!

Bi-Fold Food Menu Template

Fakous Restaurant Menu Flyer

Got a burger joint with the best fresh patties around?
Check out this delicious-looking Fakous menu with incredible colors and
details. This design features a clean and modern layout with adjustable
smart objects. And it’s ready to print for a super quick turnaround!

Fakous Restaurant Menu Flyer

Simple Restaurant Menu

This simple and elegant design might be just what you need for a restaurant menu. The perfect style for steak house or fast food restaurants, this design features six pages and more. Get access to this print-ready template for an easy menu alternative.

Simple Restaurant Menu

Clean & Simple Menu

Or
highlight your exquisite palette with this clean and simple menu
template. A ready-to-print design created in standard A4 size, this
template is ideal for any cafe or restaurant looking to stay away from
busy visuals. Enjoy a minimalist style with text elements you can easily
update today!

Clean  Simple Menu

Vintage Restaurant Menu

Add that old school charm to your cafe or restaurant with this vintage menu. Inspired by classic designs from the 50s and 60s, this restaurant menu can be used with both Illustrator and Photoshop. It’s 100% vector and fully editable. Check it out!

Vintage Restaurant Menu

Colorful Tropical Menu

Create
a happy atmosphere in your establishment with this delightful tropical
menu. Inspired by the vibrant colors seen in many exotic locations, this
menu can be customized to any tropical cuisine. Perfect for beginners,
this template requires at least Photoshop CS3 to access the files.

Colorful Tropical Menu

Retro Diner Food Menu

Show off your love for nostalgic diner design with this vibrant food menu. Inspired by the retro aesthetics of 1950s drive-in diners, this menu comes in Photoshop and Illustrator formats. Included are well-organized layers with vector elements you can modify.

Retro Diner Food Menu

Restaurant Menu

How will you present your menu to customers? Consider this next lovely restaurant menu template available in two design formats. Perfect for small restaurants or cafes, this template features white and turquoise versions for a standout menu.

Restaurant Menu

Restaurant Menu

Looking for a table mat menu instead? Try this incredible restaurant menu specifically designed for beach themed bars and grills. Display your favorite bar drinks and hot appetizers on one sunny menu. Save it to your design arsenal today!

Restaurant Menu

Rectangle Restaurant Menu

Ready to open the best seafood restaurant in your area? Kick things off with this elegant rectangular restaurant menu. This menu template features four Photoshop files along with four alternative Illustrator formats. Modern and classy, this one is a winner!

Rectangle Restaurant Menu

Restaurant Menu

A stunning design with golden geometric details, this menu is an elegant choice for any restaurateur. Included in this package is a duo restaurant and beverage menu set with ten total files available. Simply edit them with the help of Adobe Photoshop for easy customization.

Restaurant Menu

Elegant Food Menu

Would you prefer tri-fold templates for your restaurant menu? Then check out this awesome design suitable for pizza restaurants and many small businesses. This download features several unique folds along with everything you need to get started. Check it out!

Elegant Food Menu

Sketch Trifold Food Menu

Chalkboard menus are currently popular for their clean designs and retro charm. Check out this sketch trifold menu, for instance. It comes with A4 and US letter sizes perfect for an easy transition to a new menu. You’ll love the realistic chalkboard design!

Sketch Trifold Food Menu

Coffee Shop Trifold Brochure

Brew heartwarming cups of delicious coffee accompanied by this delightful menu! An affordable design for any cafe owner on a budget, this trifold makes it easy to update the pictures and coffee names fast. Experience no quality loss with fully editable smart objects!

Coffee Shop Trifold Brochure

Cafe Menu

Make your cafe stand out with delectable items presented on this vintage-inspired chalkboard menu. It’s created with realistic chalkboard details like handmade typography and more, so you’ll be able to update it quickly and easily. Just drag and drop your specials into the super convenient placeholders. Get started today!

Cafe Menu

Restaurant Menu

Ready to become the hottest restaurant in town? Show off your appetizers, entrees and desserts with this fantastic restaurant menu. This template features an exquisite black and white design with plenty of room for your delicious photos. Add it to your collection!

Restaurant Menu

Cocktail Drinks Menu

Everyone loves happy hour! So make sure your best weekly deals shine with a fun cocktail drinks menu. This design features a cool, modern style with realistic bar elements for the perfect mixer! Get access to one fully editable Photoshop file with built-in bleed lines and more!

Cocktail Drinks Menu

Restaurant Menu

Your bakery menu should stand out with all the delectable treats you have. So make your graphics count with this easily editable menu template. This template features print-ready Illustrator files along with helpful instructions for easier customization. Add it today!

Restaurant Menu

Cafe Restaurant Menu

Set your restaurant apart from the others in town. This cafe menu template features a sleek and elegant style you’ll definitely love. Enjoy eight Photoshop files you can customize at any time at all. Add new icons, prices, or text for a brand new look.

Cafe Restaurant Menu

Restaurant Menu

Sometimes, less is more. Succeed with a professional menu template that is easy to read and manage. Easily update this ready-to-use template with new items when they’re available! Included are four Photoshop files with clear instructions.

Restaurant Menu

Conclusion

This list features exciting
resources for the avid designer
familiar with Adobe Photoshop, Illustrator, and InDesign. For
additional help with your menu needs, enlist the skills of a talented
professional by choosing one of the amazing designers from Envato Studio.

And
with loads of menu templates available at your fingertips, chances are we’ve
missed a few to add to your personal collection. Be sure to browse Envato Market and Envato Elements for more resources, and let us know your favorites in the comments below!